rvtech july aug 2013 final
DESCRIPTION
RVDA's online magazine for professional RV techniciansTRANSCRIPT

JJJuuulllyyy///AAAuuuggguuusssttt 222000111333
TTTaaakkkiiinnnggg ttthhheee CCChhhiiillllll OOOffffff
AAAiiirrr CCCooonnndddiiitttiiiooonnneeerrr FFFrrrooosssttt BBBuuuiiilllddd---UUUppp PPPaaagggeee 555
Troubleshooting
Gasoline Gensets Page 11
OSHA Cracks Down On Heat Stress Page 17 New Products
Page 23
RRReeepppaaaiiirrriiinnnggg RRRVVV FFFllloooooorrrsss
PPPaaagggeee 111444

11 Troubleshooting Gasoline Gensets
DEPARTMENTS
3 Board of Directors
4 From the Editor
23 New Products
25 Recalls
July/August 2013
Interior Repairs
Generators
14 Repairing RV Floors
Safety
17 OSHA Cracks Down on Heat Stress
5 Air Conditioner Frost Build-Up
Certification Page 22
555 AAAiiirrr CCCooonnndddiii ttt iiiooonnneeerrr RRReeepppaaaiiirrr
Air Conditioners
Vents
18 How to Clean a Fan Vent
999 RRReeepppaaaiiirrr iiinnnggg RRRVVV FFFllloooooorrrsss
111777 OOOSSSHHHAAA CCCrrraaaccckkksss DDDooowwwnnn ooonnn HHHeeeaaattt SSStttrrreeessssss
111111 GGGaaasssooolll iiinnneee GGGeeennnssseeetttsss
111444 RRReeepppaaaiiirrr iiinnnggg RRRVVV FFFllloooooorrrsss
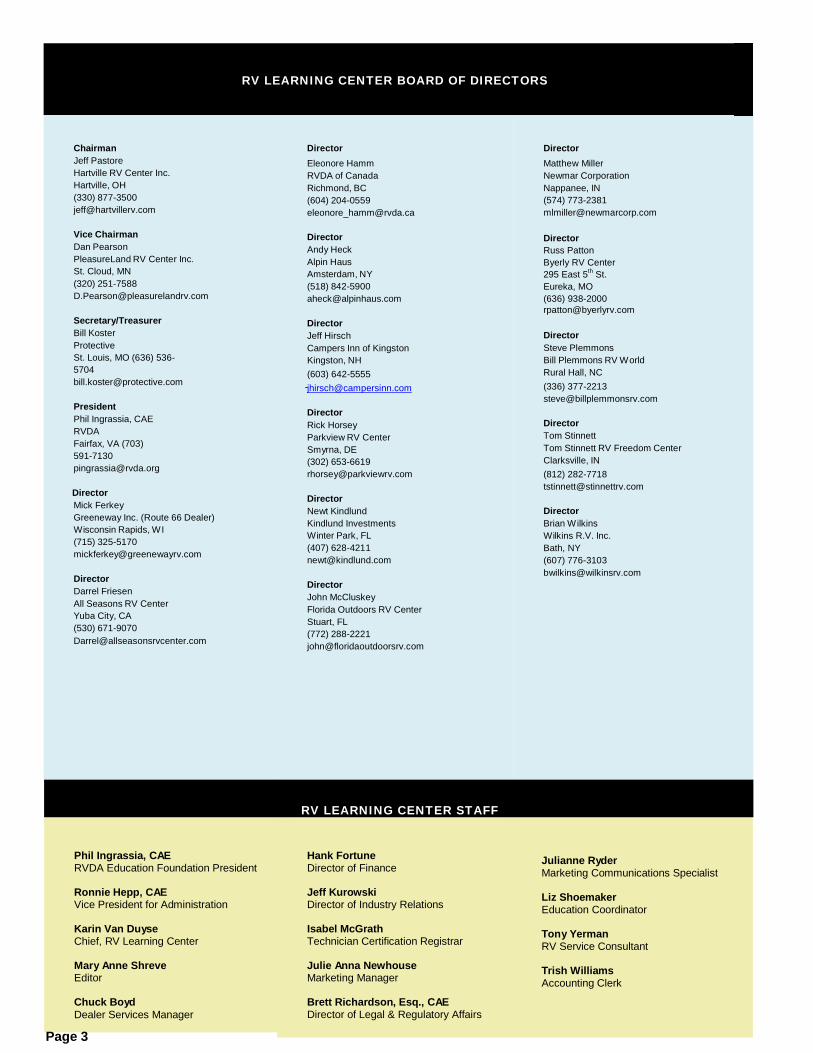
RV LEARNING CENTER BOARD OF DIRECTORS
Chairman Jeff Pastore Hartville RV Center Inc. Hartville, OH (330) 877-3500 [email protected]
Vice Chairman Dan Pearson PleasureLand RV Center Inc. St. Cloud, MN (320) 251-7588 [email protected]
Secretary/Treasurer Bill Koster Protective St. Louis, MO (636) 536-5704 [email protected]
President Phil Ingrassia, CAE RVDA Fairfax, VA (703) 591-7130 [email protected]
Director
Mick Ferkey Greeneway Inc. (Route 66 Dealer) Wisconsin Rapids, WI (715) 325-5170 [email protected]
Director Darrel Friesen All Seasons RV Center Yuba City, CA (530) 671-9070 [email protected]
Director Eleonore Hamm RVDA of Canada Richmond, BC (604) 204-0559 [email protected] Director Andy Heck Alpin Haus Amsterdam, NY (518) 842-5900 [email protected] Director Jeff Hirsch Campers Inn of Kingston Kingston, NH (603) 642-5555 [email protected] Director Rick Horsey Parkview RV Center Smyrna, DE (302) 653-6619 [email protected] Director Newt Kindlund Kindlund Investments Winter Park, FL (407) 628-4211 [email protected] Director John McCluskey Florida Outdoors RV Center Stuart, FL (772) 288-2221 [email protected]
Director Matthew Miller Newmar Corporation Nappanee, IN (574) 773-2381 [email protected] Director Russ Patton Byerly RV Center 295 East 5th St. Eureka, MO (636) 938-2000 [email protected]
Director Steve Plemmons Bill Plemmons RV World Rural Hall, NC (336) 377-2213 [email protected] Director Tom Stinnett Tom Stinnett RV Freedom Center Clarksville, IN (812) 282-7718 [email protected] Director Brian Wilkins Wilkins R.V. Inc. Bath, NY (607) 776-3103 [email protected]
RV LEARNING CENTER STAFF
Phil Ingrassia, CAE RVDA Education Foundation President
Ronnie Hepp, CAE Vice President for Administration
Karin Van Duyse Chief, RV Learning Center
Mary Anne Shreve Editor
Chuck Boyd Dealer Services Manager
Page 3
Hank Fortune Director of Finance Jeff Kurowski Director of Industry Relations Isabel McGrath Technician Certification Registrar Julie Anna Newhouse Marketing Manager Brett Richardson, Esq., CAE Director of Legal & Regulatory Affairs
Julianne Ryder Marketing Communications Specialist Liz Shoemaker Education Coordinator Tony Yerman RV Service Consultant Trish Williams Accounting Clerk

Randy Biles, Pikes Peak Traveland Inc. Tom Fribley, Fribley Technical Services Inc.
Ellen Kietzmann, Blue Ox Gary Motley, Motley RV Repair
Steve Savage, Mobility RV Service Tony Yerman, RV Service Consultant
FROM THE EDITOR Welcome to this issue of RV Technician.
It seems a little odd to be writing the words
“frost build-up” when the temperatures
outside are hovering near triple digits, but
the frost in question here is the kind that
forms when an air conditioner is installed
improperly or has a mechanical problem.
With hot weather still firmly entrenched,
you’re no doubt getting calls about
malfunctioning AC units; take a look at “Air
Conditioner Frost Build-Up” on page 5 for
tips on troubleshooting and repairs.
Speaking of hot weather, did you know that
OSHA has started getting aggressive about
inspecting workplaces for heat-related
issues? Check it out in “OSHA Cracks
Down on Heat Stress” on page 17.
While we’re on the subject of staying cool
and keeping things light and airy, you’ll find
a detailed demo of how to clean and service
fan vents from Atwood Mobile Products on
page 18.
The generator has been called the heart of
an RV—if it doesn’t function, neither do
other things. Master Certified Technician
Gary Motley details how to diagnose basic
problems with gasoline gensets in his story
on page 11.
Finally, RV Technician has run a number of
stories recently on maintaining and repairing
roofs; now it’s time to take a look at an
equally important surface. In “Repairing RV
Floors,” page 14, RVDA Service Consultant
Tony Yerman discusses how they’re
constructed and how to repair and recover
them.
Mary Anne Shreve Editor 3930 University Drive Fairfax, VA 22030 [email protected] (703) 591-7130 x117
Frost? In August?
July/August 2013
Page 4
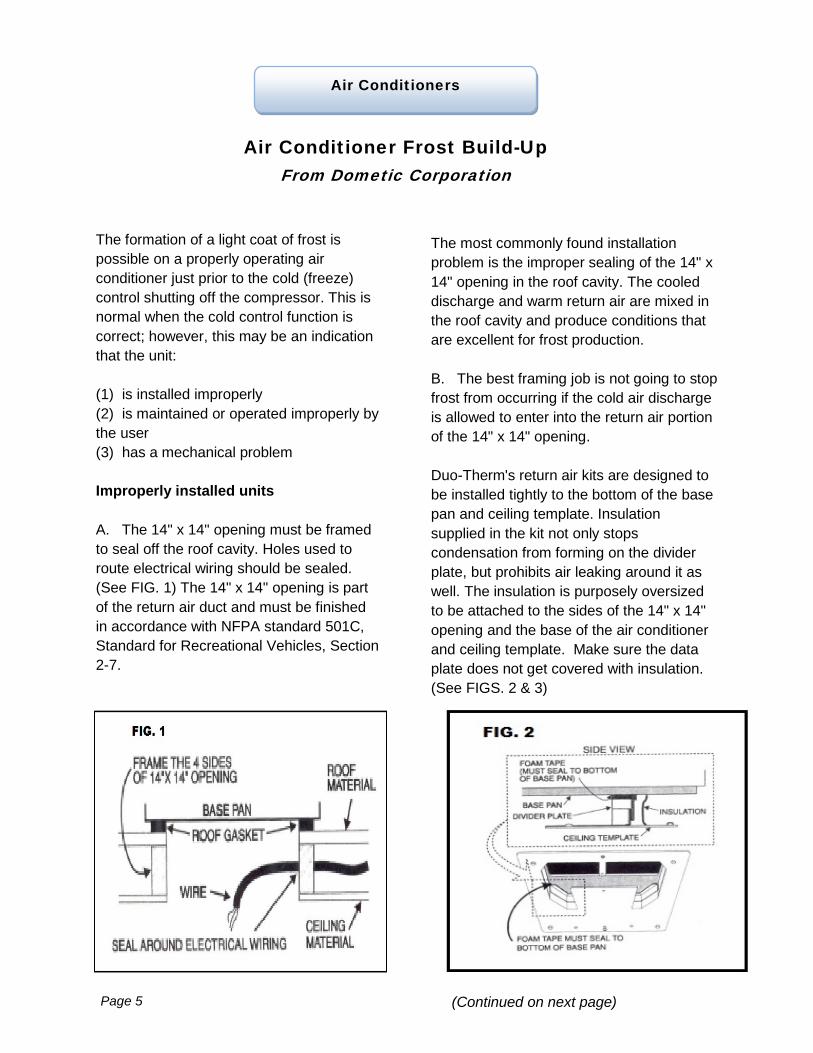
The formation of a light coat of frost is possible on a properly operating air conditioner just prior to the cold (freeze) control shutting off the compressor. This is normal when the cold control function is correct; however, this may be an indication that the unit: (1) is installed improperly (2) is maintained or operated improperly by the user (3) has a mechanical problem Improperly installed units A. The 14" x 14" opening must be framed to seal off the roof cavity. Holes used to route electrical wiring should be sealed. (See FIG. 1) The 14" x 14" opening is part of the return air duct and must be finished in accordance with NFPA standard 501C, Standard for Recreational Vehicles, Section 2-7.
The most commonly found installation problem is the improper sealing of the 14" x 14" opening in the roof cavity. The cooled discharge and warm return air are mixed in the roof cavity and produce conditions that are excellent for frost production. B. The best framing job is not going to stop frost from occurring if the cold air discharge is allowed to enter into the return air portion of the 14" x 14" opening. Duo-Therm's return air kits are designed to be installed tightly to the bottom of the base pan and ceiling template. Insulation supplied in the kit not only stops condensation from forming on the divider plate, but prohibits air leaking around it as well. The insulation is purposely oversized to be attached to the sides of the 14" x 14" opening and the base of the air conditioner and ceiling template. Make sure the data plate does not get covered with insulation. (See FIGS. 2 & 3)
Air Conditioners
Air Conditioner Frost Build-Up From Dometic Corporation
Page 5 (Continued on next page)

C. In some installations, the OEM supplies its own return air kits. Sometimes both the return and the discharge air are ducted to and from the 14" x 14" opening. In some cases, the bottom of the 14" x 14" opening is covered with ceiling material. In this type of installation the 14" x 14" opening is divided. If the divider only fills to the thickness of the ceiling cavity, an air gap may be created both on the top and bottom of the thickness of the roof gasket, roof or ceiling material. A gasket, etc., must be used to fill up the open space to reduce recirculation. (See FIG. 4)
D. Another method of connecting the discharge air to the coach's main duct uses Duo-Therm's return air kit. It uses half of the 14" x 14" opening as a discharge plenum. If the duct opening is not clean, restriction of air can cause the coil to freeze. The opening of the duct should be as large as possible to make the air distribution better in the coach and reduce freeze-up. (See FIG. 5)
E. The final method of installation dumps the discharge air directly into the RV's main duct. The duct is routed through the 14" x 14" opening. A duct adapter is used to connect the air conditioner to the main duct. If this connection is not made properly, cold air can migrate back into the return air path and make conditions right for freeze-up. Be sure the duct adapter is sealed to the main duct and air conditioner. (See FIG. 6)
Page 6 (Continued on next page)

F. Restrictions at the connection to the air conditioner are the most common, but blockage in the main duct runs can also cause freeze-up. Blockages commonly occur in the areas where the duct changes direction. Other obstacles that can cause a change in the duct (air) path include rafters, vent pipes, wire bundles, etc. (See FIG.7)
A good way to check for duct blockage is with a flashlight and a mirror. Remove ceiling register cover to allow a flashlight to be put in the duct and use a mirror to view the flashlight from the next register opening. A blockage will be visible in the mirror. (See FIG. 7) Duo-Therm has available a quick cool return air kit that will allow the cooled air to come directly out of the air conditioner. This will bypass any restrictions in the coach duct system. G . If the main duct in the vehicle is undersized, the volume of air flowing through the ducts will decrease. The coil temperature will also drop because not enough air is moving through it. The requirements for proper duct size are shown in FIG. 8 below.
Page 7 (Continued on next page)

H. This article has mainly covered the discharge side; however, restrictions of the return air can result in frost build-up. The Duo-Therm air conditioner requires a minimum of 40 square inches of FREE AREA, that is, the opening that remains in a grill or louvered panel after the restrictions are taken away. For example, an opening of 10 x 20 inches has 200 square inches. When this opening is covered with a grill that is 56 percent open, the FREE AREA is (200 x 56), 112 square inches. Dometic return air kits are designed to have the correct free area; however, some manufacturers use their own grills. If a manufacturer's grill is used, it must use the above formula to make sure the return air is sufficient to reduce the chances for freeze-up. The filter material must also be considered as a restriction and subtracted from the free area. (See FIG. 9)
Main ducts running through the 14" x 14" opening must leave space between the duct and return air grill or duct and bottom of the air conditioner. (See FIGS. 10-12 in the column to the right.)
(Continued on next page) Page 8
FIG. 9

The gap between the top of the main duct to the bottom of the air conditioner should be a minimum of 1-112". (See FIGS.12 & 13)
If the return air is ducted into the 14"x 14" opening, the duct must be equal to the 40 sq. inches that are needed by the air conditioner. Grill or registers used in this duct must be equal to or greater than the duct in square inches. (See FIG.14 below)
Page 9 (Continued on next page)

I. The control system used by Duo-Therm Air Conditioner is designed with a low temperature switch that will shut off the compressor and allow air to flow through the coil to melt the frost. A properly operating cold control may allow a slight coating of frost to form on the evaporator coil before it turns off the compressor. If the cold control is not installed in its intended mounting location, frost buildup can block all air flow through the evaporator coil and stop cooling inside the RV The cold control has clips that allow it to be snapped onto the turn/bends of the evaporator coil. See FIGS. 15 & 16 for correct location.
(Continued on next page)
Page 10

The first thing to do when trouble shooting a genset is to determine if it will run. If it doesn’t, it has one of the following problems: • No spark • Bad or no air/fuel mixture • Bad compression • Out-of-time The two most common no-start problems with a genset are difficulties with fuel or spark. Let’s examine both of these in more depth. A quick way to determine if you’re getting a spark is to prime the engine. If you prime it and the engine doesn’t fire, you should use a spark checker to be certain you are getting a spark. Other items to check if none of these work: 1) Be certain the magnet on the flywheel is not in excess of .010” from the pick-up. I
have seen a remote switch stuck in the kill position. You have to unhook the remote to check this. 2) Be sure all your connections are tight. This goes for the ground side as well as the hot side. Many technicians spend a lot of time making certain the hot side is ok, while ignoring the ground. This can be true in general RV repair as well as genset repair. 3) Make sure you have a fully-charged battery that’s cranking the genset at full speed. Some gensets require a certain RPM to spark properly. 4) On older models, you should be sure you’re getting voltage to the coil. This can easily be done with a jump wire from the 12 volt side of the battery. If this gets you a spark, you will know to check for an open in the control system to the coil. As always, the correct manual and schematics can be a real benefit when working on any genset. If you’re getting spark, the engine will run ever so briefly. If this occurs, you have just eliminated the spark problem and most likely isolated your problem to the other no-start problem—bad or no air/fuel mixture into the cylinders. Here are the five main reasons for improper air/fuel ratio into the cylinders:
Generators
Troubleshooting Basic Gasoline Generator Problems By Gary Motley
Page 11

1) Fuel in the carburetor has gone bad or varnished so that it is clogging the ports, etc. Sometimes a carburetor cleaner will help this. Most of the time a new carburetor or carburetor kit is in order. 2) The fuel in the tank is old, or the line from the tank pickup to the carburetor is full of old gas. 3) There’s a blockage, either in the fuel pickup, the fuel lines, or the fuel filter(s). 4) A faulty fuel pump or no electric to the fuel pump. A voltmeter will easily check the voltage to the fuel pump. A reading of zero voltage would indicate a fault in the control system. Refer to the appropriate manual for correction. 5) The fuel pump is sucking air. You can determine if your problems are numbers two through five by testing with a fuel system which you’re certain is good. Completely bypass the genset fuel and electrical system for the fuel pump with your own fuel set-up. A boat fuel tank with a separate 12 volt fuel pump going directly to the carburetor inlet is a good way to ensure you have good fuel to the carburetor. Be aware the fuel pump you use should be regulated not to exceed 5 psi, with 3.5 psi being ideal. The fuel pump on the genset should put out at least 3.5 psi. If after testing you find that it puts out less, replace it, providing there are no blockages in the fuel system. After determining you have a problem in the fuel supply, you must locate the blockage. First, check that it’s not a blocked fuel filter between the fuel pump
and the carburetor. If this isn’t the problem, then hook up your known good gas supply without using your auxiliary fuel pump directly to the genset fuel pump. Check the pressure as mentioned before and replace the fuel pump if it’s not putting out 3.5 psi. If these tests go ok, it’s obvious the problem is in the portion of the fuel system from the tank to the fuel pump. Your potential problems and their fixes include: 1) Sucking air—find the open and repair as appropriate 2) Low gas tank—add fuel to tank 3) Blocked fuel filter—replace with proper fuel filter 4) Crimped fuel line—repair as appropriate Often when you get the genset running and it still runs rough, you may still have ignition or spark problems. Refer to the appropriate manual. You may also have a bad carburetor problem as mentioned above in item number one. Two Other Less Common No-Start Problems Compression and timing problems are very seldom seen in gensets. But here are a couple of quick checks to determine if either of these is the problem: 1) When cranking the genset with the spark plugs in, does the engine continue to spin quite freely after you release the start button? This probably indicates that there’s no compression. A no-compression problem can be caused by such things as
Page 12

the exhaust intake valve being stuck open, a hole in a piston, a burst head gasket, or a broken rod. To get an idea of what this looks like, you can remove the spark plug(s) and crank the engine. The free-wheeling you see after releasing the start switch is a no-compressing free-spinning cylinder. 2) Another way to check compression is with a compression gauge. This is sometimes hard to do because of the placement of the spark plugs. The actual desired compression varies with model and make. You should consult the appropriate manual for specifics. Spark timing is hard to diagnose. An
indicator of bad timing would be backfiring through the carburetor or exhaust. This would occur only in a really bad situation. Reasons for bad timing include:
• The flywheel is not aligned perfectly on the shaft and has slipped so the flywheel magnets cross the pick-up of the magneto or ignition modules at the wrong time. This would be caused by someone putting the wrong size square key in or the square key being worn.
• The point gap is one of the
determining factors in spark timing. You will need to consult the appropriate manual for proper point gap.
Gary Motley is a Master Certified Technician and owner of Motley’s RV Repair in Oklahoma City.
Page 13
Repairing RV Floors By Tony Yerman
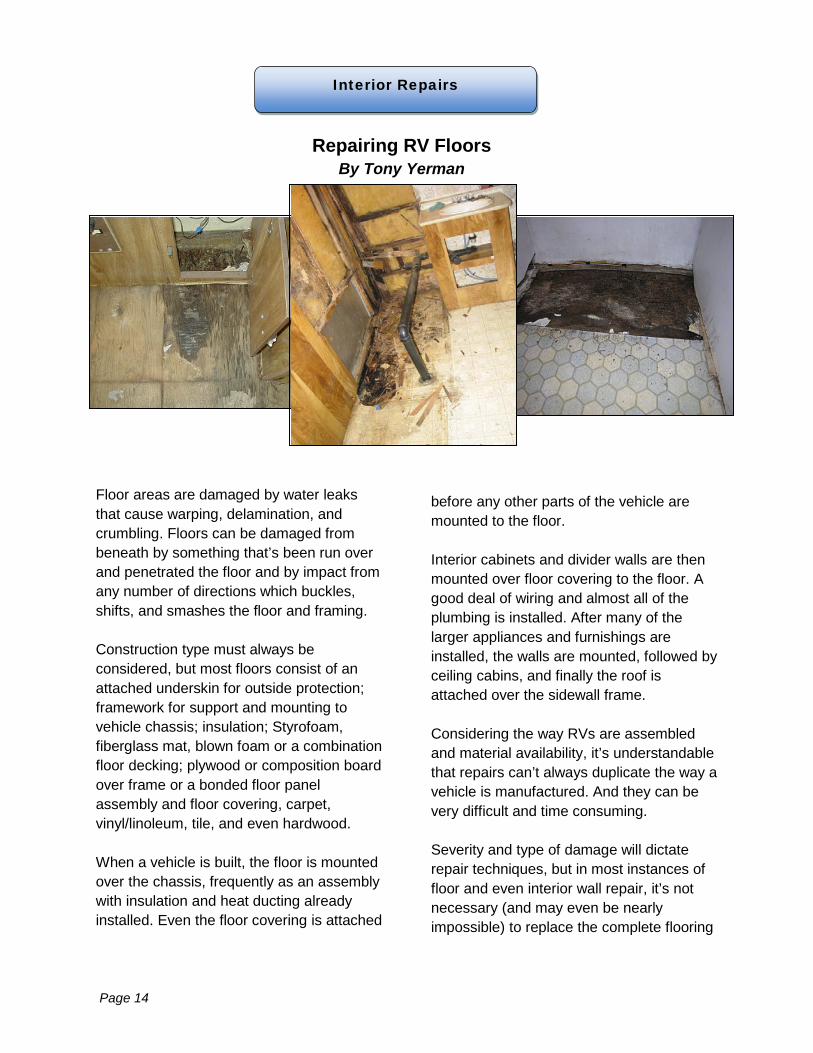
Floor areas are damaged by water leaks that cause warping, delamination, and crumbling. Floors can be damaged from beneath by something that’s been run over and penetrated the floor and by impact from any number of directions which buckles, shifts, and smashes the floor and framing. Construction type must always be considered, but most floors consist of an attached underskin for outside protection; framework for support and mounting to vehicle chassis; insulation; Styrofoam, fiberglass mat, blown foam or a combination floor decking; plywood or composition board over frame or a bonded floor panel assembly and floor covering, carpet, vinyl/linoleum, tile, and even hardwood. When a vehicle is built, the floor is mounted over the chassis, frequently as an assembly with insulation and heat ducting already installed. Even the floor covering is attached
before any other parts of the vehicle are mounted to the floor. Interior cabinets and divider walls are then mounted over floor covering to the floor. A good deal of wiring and almost all of the plumbing is installed. After many of the larger appliances and furnishings are installed, the walls are mounted, followed by ceiling cabins, and finally the roof is attached over the sidewall frame. Considering the way RVs are assembled and material availability, it’s understandable that repairs can’t always duplicate the way a vehicle is manufactured. And they can be very difficult and time consuming. Severity and type of damage will dictate repair techniques, but in most instances of floor and even interior wall repair, it’s not necessary (and may even be nearly impossible) to replace the complete flooring
Interior Repairs
Page 14

and paneling to make effective, good-looking area repairs. Water and even collision damage to the flooring may extend underneath cabinets. Some cabinets, like dinette seat boxes and galley cabinets, are removed easily, while divider walls and other cabinets are not. Walkways are the main concern with any floor damage. Cabinets, where mounted through the floor to frame members, literally clamp flooring down and hold it in place at these points, making it safe to leave cabinets installed and replace the flooring in sections in and around them. Damaged areas in aisles and walkways can be cut out along cabinet edges and should be cut at floor frame cross members. Once damaged decking and covering are removed, any damage to floor framing can be repaired, using techniques such as those with wall framing. It’s sometimes necessary to add framework around, or to box in, the opening caused by the removal of damaged floor decking in order to give the new section the proper support. Some companies use composition board for flooring, and this should be replaced with a good quality plywood sheet to make repairs solid and lasting. It’s possible in some instances, especially inside cabinets, to overlay repair damage or to repair damage much the way repairs are made in residential housing. Inside cabinets generally don’t carry the same weight or have the traffic that aisles and walkways do, making floor deck strength less critical. In these cases, providing there’s no frame damage,
damaged flooring can be cut out, leveled, and/or dried and pieces of plywood laid over the existing material. Joints around edges of repaired or replaced floor sections should be filled with a joint compound or even fiberglass auto body filler for strength and then sanded smooth. Floor covering and wall covering are much like ceiling materials and usually can’t be matched when finishing repaired areas. It’s often necessary to replace more of an area than the damaged section, and in some instances the complete floor or a complete wall or room must be recovered for an acceptable finished look. Floors can be broken down into rooms to enable use of different materials, styles, or colors. Walls can be done in halves, using moldings or chair rails. They can be papered or painted to match or contrast with the existing surroundings. Interior panels (like floors) can’t always—and don’t always have to be—replaced entirely. The key is to make sure, structurally, that the vehicle is sound. Cosmetics are secondary, and with today’s materials and trims, it’s not hard to make a repair look good without a lot of additional work. Floor framing, which supports the floor deck and attaches to the vehicle chassis or foundation, can be formed so that frame members run either by width or length to the chassis, depending on mounting requirements; heat and air conditioning systems; and other manufacturer requirements.
Page 15

Underbelly or exterior floor skin can be made from several different materials and can be applied several ways. On most travel trailers, conventional Class A motorhomes, Class C motorhomes, and pop-up campers, the floor assembly, with exterior skin attached, is mounted over the vehicle chassis, making complete removal and replacement impractical. Exterior floor skin must be replaced or overlaid in sections. Materials that can be used include aluminum or galvanized steel, heavy plastic sheet, or a thin basket-weave type of plastic. Basement model vehicles usually have compartment or basement floors that act as belly skin and compartment floor all in one. When repairing the flooring in a curved-body vehicle, the procedures are the same
as a more conventional or standard vehicle type construction. The difference is the use of a belly skin over the complete underside of the trailer, creating a subfloor that houses tanks and wiring. Many late-model mid to upper grade conventional travel trailers use a thick plastic sheet, held to the chassis by mounting rails to enclose the undercarriage, between the chassis rails. This information is from “The RV Damage Repair Estimator” by Tony Yerman, who is RVDA’s service consultant. Yerman is a Master Certified Technician, an Ohio repair specialist, and an RV Technician advisory group member. Contact him at [email protected].
Page 16

Although workplace heat stress has no specific standard in most states, OSHA has begun to aggressively inspect for heat-related issues. This is especially true in states like California, where specific regulations exist. Employers need to plan how to protect their employees from heat stress as well as protect themselves from costly citations and litigation. Too much heat can compromise a body’s cooling system, resulting in dehydration, cramps, exhaustion, and in some cases, fatal heat stroke. The risk of heat stress varies from person to person, which makes the challenge of a safe work place even more challenging. Factors can include physical condition, temperature, humidity, clothing, pace of work, and environmental conditions. Heat stress is particularly prevalent in auto shops that do not have air conditioning. OSHA is urging employers to create a heat stress program. Utilizing its General Duty Clause, Section 5(a)(1), the agency is attempting to regulate activities surrounding the risk of heat stress. A violation of the General Duty Clause may occur when employees have been working in hot environments and employers are aware of the risks but have not taken adequate steps to protect their workers from the heat.
To protect your employees, implement the following:
• Provide adequate water, rest, and shade.
• Acclimate new employees and current employees who are returning from an extended time away.
• Implement a work-and-rest schedule.
• Provide a climate controlled area for cool down.
• Train temporary employees on the risk of heat stress and acclimate them to the environment.
If heat stress does occur, OSHA may cite an employer if prompt remedial action is not taken when an employee falls ill. To protect your employees and yourself, establish specific responses and procedures for heat-related emergencies. Training on the signs and symptoms are also encouraged. KPA provides environment and safety services for dealers. If you have additional questions, contact KPA at [email protected] or (800) 853-9659.
Safety
OSHA Cracks Down on Heat Stress By Peter Zaidel, KPA Environmental and Safety Product Director
Page 17

The following instructions for cleaning a Fan-Tastic Fan are provided from Atwood Mobile Products. Step one: Open the dome all the way, then remove the fuse by pushing up and turning the black fuse cap 1/4 of a turn counter-clockwise and pulling:
Step two: Remove 8 painted flat head Phillips screws from around the perimeter of the
ring insert. Option: Once screen and blade are clean and dry, you may wipe or spray 303 protectant (not a petroleum-based protectant) on the screen and blade. Then buff to a high gloss. This minimizes dust and dirt build up and eases cleaning. Step 3: After cleaning the screen and fan blade, reverse steps one and two to put fan back together. OR…to remove the fan blade for thorough cleaning, continue to step four. Step 4: Remove two screws from the lift motor and unplug, using two pairs of pliers. (If the fan is manual, remove the center screw from the black lift knob.)
(Continued on next page)
Fan Vents
How to Clean a Fan Vent From Atwood Mobile Products
Page 18
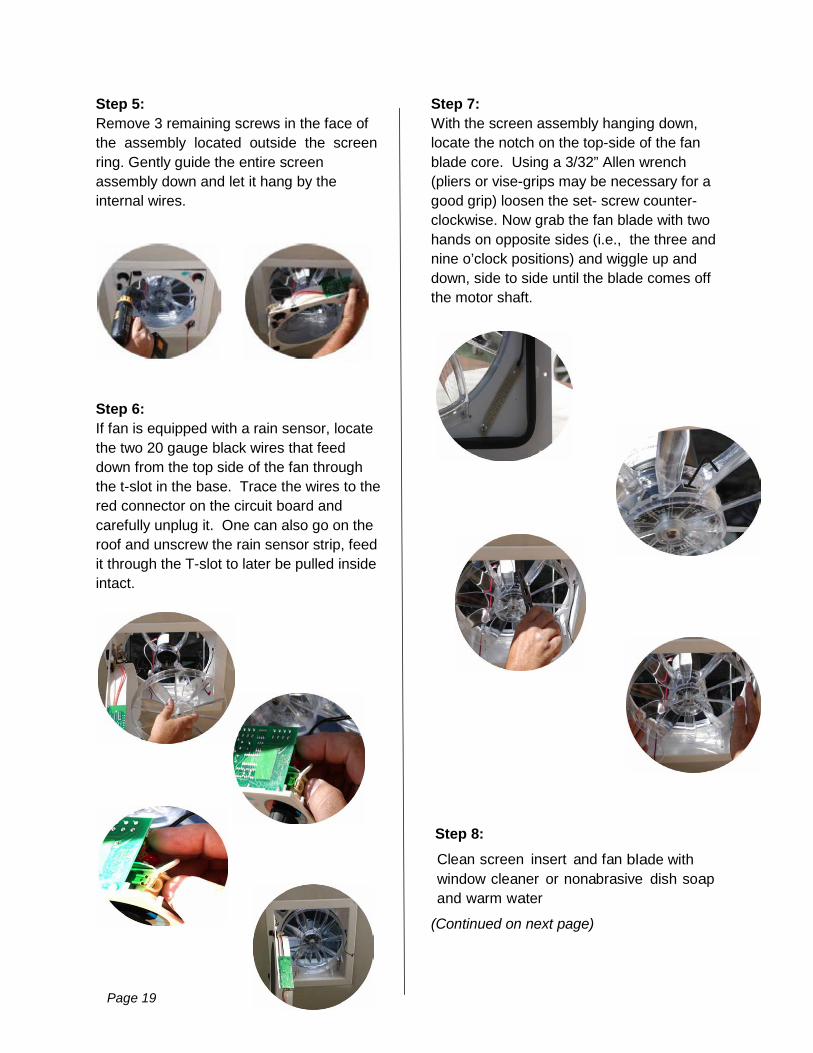
Step 5: Remove 3 remaining screws in the face of the assembly located outside the screen ring. Gently guide the entire screen assembly down and let it hang by the internal wires.
Step 6: If fan is equipped with a rain sensor, locate the two 20 gauge black wires that feed down from the top side of the fan through the t-slot in the base. Trace the wires to the red connector on the circuit board and carefully unplug it. One can also go on the roof and unscrew the rain sensor strip, feed it through the T-slot to later be pulled inside intact.
Step 7: With the screen assembly hanging down, locate the notch on the top-side of the fan blade core. Using a 3/32” Allen wrench (pliers or vise-grips may be necessary for a good grip) loosen the set- screw counter-clockwise. Now grab the fan blade with two hands on opposite sides (i.e., the three and nine o’clock positions) and wiggle up and down, side to side until the blade comes off the motor shaft.
Step 8: Clean screen insert and fan blade with window cleaner or nonabrasive dish soap and warm water
(Continued on next page)
Page 19

Step 9: Put the fan back together by reversing steps one through seven. Cleaning the fan from primarily outside the unit. Step 1: Open the dome (lid) all the way. Remove one screw from the back of the dome slide (located on the inside of the dome) to further open dome.
Step 2: Remove the four screws that hold the motor mount (bowtie) to the base of fan. Lift entire motor assembly (motor, bowtie and fan blade) up and tip the assembly to a 45° angle (approximate).
Step 3: Locate the notch on the top-side of the fan blade core and identify the set screw that secures the fan blade to the motor shaft.
Step 4: Using a 9” x 3/32” Allen T-handle wrench (shown in step 3), loosen the Allen screw counter-clockwise. Grab the fan blade and wiggle up and down, side to side until the blade comes off the motor shaft.
(Continued on next page)
Page 20

Step 5: FROM THE INSIDE, remove eight painted flat-head Phillips screws from around the perimeter of the ring.
Step 6: Clean screen insert and fan blade with window cleaner or nonabrasive dish soap and warm water. The top rack of a dishwasher may also be used to clean the screen and fan blade.
Step 7: Put your fan back together by reversing steps one through five. Option: Once screen and blade are clean and dry, you may wipe or spray 303 protectant (not a petroleum-based protectant) on the screen and blade and buff to a high gloss. This minimizes dust and dirt build up and eases cleaning.
Page 21

It’s time to take the first step toward certification! The RV technician certification process is just a click away. Visit
www.rvtechnician.com to learn more.
Step 1
Technician Certification Candidate: The candidate test is a basic orientation to the RV service technician career. The training and test is available at no cost and is located at: http://www.rvst.org/Candidate/.
Step 2
Registered Technician: This test establishes that the technician is proficient in core knowledge areas such as propane, basic electrical, fire & life safety, weight knowledge, and other technical skills.
Step 3
Select a Career Path
Traditional Certification: This test is designed to evaluate both the general and specific knowledge in 12 different areas--propane, electrical, plumbing, brakes, suspension, towing, appliances, generators, hydraulics, interior, exterior, slide out systems and other technical skills.
Specialty Certifications: There are five certified specialist areas that make up the right path on the RV Service Technician Career Ladder: body, chassis, electrical systems, appliances, and plumbing. Each test focuses on the subject related to the specialty.
Page 22
Certification How-to

Suburban Ranges Feature Stylish Burners
To help create RV galleys that are as elegant as they are functional, Suburban conventional burner cooking appliances now feature sophisticated residential-style burners. Suburban gas RV ranges offer sizes, features and options to meet any need. The high-efficiency, well-insulated 17" and 22" ovens heat to 500°F and feature a large broiler area. These ranges feature a high-output, 9,000-BTUh front burner and two 6,500 BTUh rear burners with linear valves. The company's compact, slide-in three-burner cooktop is ideal for installation with a convection oven. The cooktop also features a 9,000-BTUh front burner and two 6,500-BTUh rear burners. Smooth, infinitely variable flame adjusts from a gentle simmer to high heat for faster cooking. Designed for use in most motorhomes, fifth wheels, travel trailers, vans and larger campers, Suburban ranges and cooktops are designed to match the requirements of
RV OEMs and aftermarket installers. Suburban cooking appliance tops are available in black porcelain and stainless porcelain finishes to complement the décor of any RV. Contact Suburban at [email protected] or www.airxcel.com.
RV Ventilation Fan Delivers a Breath of Fresh Air Musty odors can accumulate when RVs are closed up. The MaxxFan Standard model ventilation fan from MaxxAir Ventilation Solutions, with reversible fan
option, efficiently draws in fresh air and removes hot, stale air. MaxxFan Standard fans
are available in remote control or manual lid-opening models. Sturdy lid-lifting arms ensure smooth operation with no lid fluttering in high winds. A powerful, fuse-protected 12V DC ball-bearing motor with built-in thermal protection operates a 12", 10-blade fan to circulate over 900 cu. ft. of air per minute. A ceiling keypad lets users choose between 10 fan speeds, as well as control thermostat, air intake and exhaust functions.
New Products
Page 23

The flush-mounted fan fits any standard 14" x 14" roof opening and closes securely for a low-profile appearance. When the lid is closed, the MaxxFan also operates as a ceiling fan, a MaxxFan exclusive. The interior insect screen removes by rotating the four retaining knobs, so no tools are required for cleaning. All MaxxFan remote control models also include backup keypad controls at the ceiling, another MaxxFan exclusive. The 4500K model comes equipped with a handy rain sensor that automatically closes the lid within seconds of detecting rain. The rain sensor's sloped mounting prevents false triggers and helps water wick away faster. Each MaxxFan Standard model comes with all necessary mounting hardware. Waterproof molded mounting holes facilitate installation of compatible MaxxAir fan covers. Contact MaxxAir at. 316-832-3400 or visit www.maxxair.com.
Cover Keeps Trailer Ball Greased
Fastway Trailer Products introduces a tethered ball cover that keeps grease on the ball and off clothes. Unlike other ball covers, the Fastway tethered ball cover stays with the hitch ball while towing and is
ready to use when it’s time to store the trailer. The Fastway tethered ball cover makes storing a trailer faster and easier. Two different models are available: one for a 2" ball, and one for a 2-5/16" ball. The new tethered ball cover is currently available through dealerships serving the towing industry throughout the United States and Canada. For more information about Fastway trailer products, visit www.FastwayTrailer.com.
Ergo Grip Cords Ease Hand Discomfort
Difficult-to-remove cords can make RV life frustrating for those with arthritis. Ergo Grip adapter and extension cords from Conntek give users greater leverage with an ergonomic handle that reduces hand fatigue and simplifies grasping and unplugging cords. Handle and prongs are arranged at a 90° angle, reducing cord stress for added safety and long life.
Conntek offers Ergo Grip RV adapter cords with a 30A, 125V rating in 25' and 30' lengths, plus 25' and 50' Ergo Grip RV 30A, 125V extension cords, and 15' and 30' Ergo Grip 50A, 125/250V extension cords. All feature built-in LED power indicators and Ergo Grip handles on both the plug and the connector. Visit www.conntek.com for more information.
Page 24

Dutchmen Propane Hose Recall Dutchmen Manufacturing Inc. is recalling 543 model year 2013-2014 Aspen 1400RB, 1500BH, 1600RB, 2110RBS, 2470BHS and 3010BHDS travel trailers; certain model year 2013-2014 Coleman CTS14FD, CTS15BH, CTS16BH and CTS16QB travel trailers; and certain model year 2013-2014 Dutchmen 190QB, 282RBS, 286BHGS, 318RKDS and 816QB travel trailers. Heat from the range burner may melt the propane supply hose.
If the hose melts it may leak propane, increasing the risk of a fire. Dutchmen will notify owners and dealers will install a copper line to the propane connection in the burner, free of charge. Owners may contact Dutchmen at 1-574-537-0600 or the National Highway Traffic Safety Administration's Vehicle Safety Hotline at 1-888-327-4236 or go to www.safercar.gov.
Recalls
More Awning Recalls
The National Highway Transportation Safety Administration has recalled thousands of RVs that are equipped with a potentially defective power awning manufactured by Dometic Corporation. If the awning installation sequence wasn’t followed completely, the awning motor may become damaged, and the awning could unfurl unexpectedly while the RV is on the road or at rest. The affected products include certain 9100 Power Awnings, Weatherpro Awnings, and Motor Service Kits made between February 13 and April 9 of this year. Dometic has advised OEMs and aftermarket dealers to call 1/888/943-4905 for instructions on replacing the units. NHTSA and Dometic are advising owners not to take their RVs on the road until they’ve been repaired. Owners can call the above number for instructions on how to determine if their RV is affected and how to get it repaired. Two more RV manufacturers have issued product recalls: * Evergreen Recreational Vehicles is recalling 34 model year 2013 Bay Hill fifth wheel travel trailers manufactured from March 13, 2013, through April 25, 2013. * Augusta RV is recalling 36 model year 2013-2014 FLEX recreational trailers manufactured from February 13, 2013, through April 9, 2013.
Page 25

Monaco Water Tank Recall Monaco RV is recalling 2,250 model year 2011 Holiday Rambler Campmaster and R-Vision Trail Cruiser; model year 2011-2012 R-Vision Onyx; model year 2011-2013 R-Vision Trail Light; model year 2012-2014 Holiday Rambler Aluma-Lite, Aluma-Lite Ultra and R-Vision Trail Sport and Trail-Lite Crossovers; and model year 2013-2014 McKenzie Rainier Ascent and R-Vision Trail Lite Trek recreational vehicles. These vehicles were manufactured from October 12, 2009, through March 15, 2013 and have water tanks mounted under the floor within enclosed underbellies. The water tank mounting system may fail. If that happens, the water tank may separate from the vehicle and become a road hazard, increasing the risk of a crash. Monaco will notify owners and dealers will install a cross brace between the water tank and the mounting brackets, free of charge. Monaco's recall number is 13001MRV. Owners may contact Monaco at 1-877-466-6226 or contact NHTSA at 1-888-327-4236. Evergreen Propane Recall EverGreen Recreational Vehicles is recalling 185 model year 2010-2012 Ever-Lite and Element travel trailers. The trailers are equipped with propane cylinders that may leak gas or rupture, potentially resulting in a fire. EverGreen will notify owners, and dealers will replace the propane cylinder free of charge. Owners may contact Evergreen 1-574-825-4298 or contact NHTSA at 1-888-327-4236.
Thor Battery Control Center Failure Thor Motor Coach is recalling 7,593 model year 2006-2013 Windsport, model year 2006-2010 Magellan, model year 2007-2013 Hurricane, model year 2009-2013 Serrano and model year 2011-2013 A.C.E motorhomes that are equipped with an RV Custom Products Battery Control Center (BCC) which may experience a failure while the motorhome is in motion. If the BCC fails, all power may be lost to the motorhome chassis, including all lighting, making the vehicle very difficult to operate and increasing the risk of a crash. Thor will notify owners, and dealers will rewire the BCC free of charge. Customers may contact Thor at 1-877-855-2867 or contact NHTSA at 1-888-327-4236. Forest River Battery Isolation Manager Short Circuit Forest River is recalling 289 model year 2014 Sunseeker, Forester, Lexington, and Solera motorhomes manufactured between April 1, 2013, through May 21, 2013. The battery isolation manager (BIM) can develop a short circuit, resulting in smoke, melting, or a fire. Forest River will notify owners and will replace the BIM. Owners may contact Forest River Customer Service at 1-574-206-7600 or contact NHTSA at 1-888-327-4236. Jayco Converter Improperly Grounded Jayco is recalling 17 model year 2014 White Hawk travel trailers manufactured from May 17, 2013, through May 21, 2013. The A/C to D/C converter may not be properly grounded to the frame, resulting in an
Page 26

excessive heat buildup and melting of the wiring, possibly resulting in a fire. Jayco will notify owners and dealers will inspect the wiring for the converter. If needed, they will add the provided ground wire free of charge. Owners may contact Jayco at 1-800-283-8267 or contact NHTSA at 1-888-327-4236. Keystone Battery Box Recall Keystone RV is recalling 239 model year 2013-2014 Laredo Fifth Wheel vehicles, models 270SRL, 280SBH, 290SRE and
293SBH, manufactured from March 6, 2013, through June 27, 2013. The battery box has inadequate support for the battery, and the box may fall out of position during travel, resulting in electrical shorts that may lead to a fire. Also, the battery box may fall from the vehicle, creating a road hazard. Keystone RV will notify owners and install a battery box mounting reinforcement kit. Owners may contact Keystone Customer Service by calling 1-866-425-4369.
Page 27
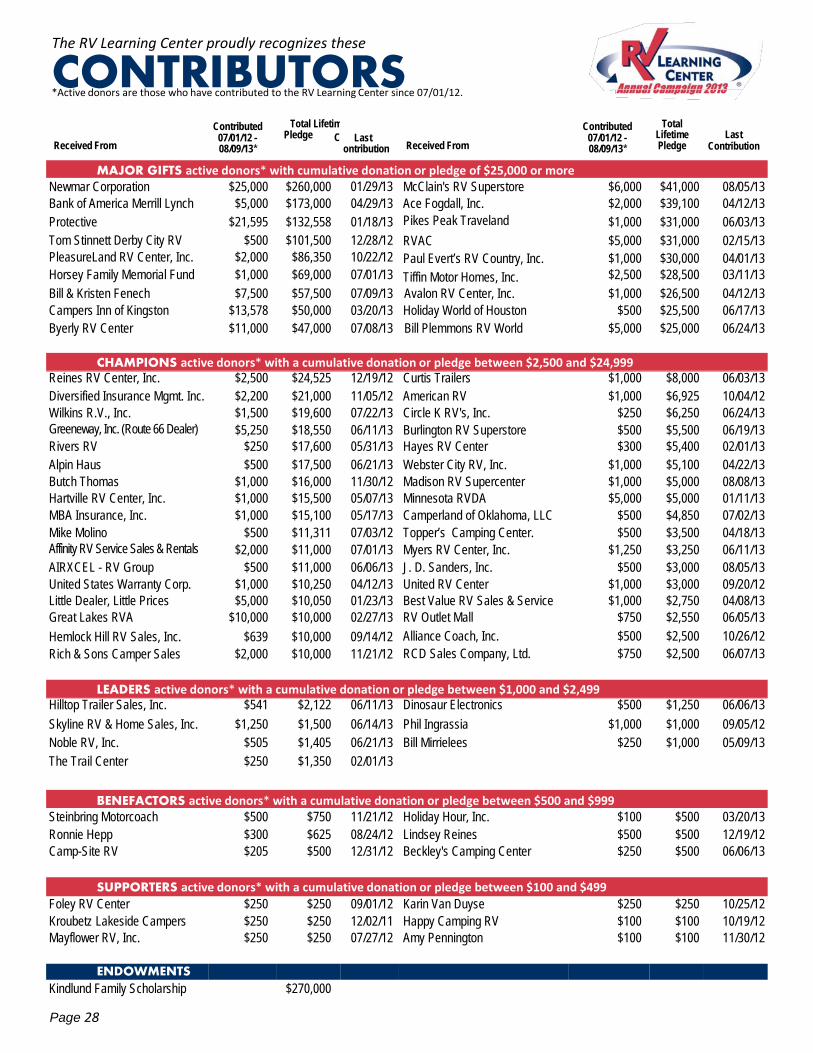
The RV Learning Center proudly recognizes these
C*Activ
Oe donors
Nare thos
Te whRo have
IcoBntribut
Ued to th
Te RVO
LearninRg Cent
Ser since 07/01/12.
Received From
Contributed
07/01/12 - 08/09/13*
Total Lifetim Pledge C
Last
ontribution
Received From
Contributed
07/01/12 - 08/09/13*
Total Lifetime Pledge
Last
Contribution MAJOR GIFTS active donors* with cumulative donation or pledge of $25,000 or more
Newmar Corporation $25,000 $260,000 01/29/13 McClain's RV Superstore $6,000 $41,000 08/05/13 Bank of America Merrill Lynch $5,000 $173,000 04/29/13 Ace Fogdall, Inc. $2,000 $39,100 04/12/13 Protective $21,595 $132,558 01/18/13 Pikes Peak Traveland $1,000 $31,000 06/03/13 Tom Stinnett Derby City RV $500 $101,500 12/28/12 RVAC $5,000 $31,000 02/15/13 PleasureLand RV Center, Inc. $2,000 $86,350 10/22/12 Paul Evert’s RV Country, Inc. $1,000 $30,000 04/01/13 Horsey Family Memorial Fund $1,000 $69,000 07/01/13 Tiffin Motor Homes, Inc. $2,500 $28,500 03/11/13 Bill & Kristen Fenech $7,500 $57,500 07/09/13 Avalon RV Center, Inc. $1,000 $26,500 04/12/13 Campers Inn of Kingston $13,578 $50,000 03/20/13 Holiday World of Houston $500 $25,500 06/17/13 Byerly RV Center $11,000 $47,000 07/08/13 Bill Plemmons RV World $5,000 $25,000 06/24/13
CHAMPIONS active donors* with a cumulative donation or pledge between $2,500 and $24,999 Reines RV Center, Inc. $2,500 $24,525 12/19/12 Curtis Trailers $1,000 $8,000 06/03/13 Diversified Insurance Mgmt. Inc. $2,200 $21,000 11/05/12 American RV $1,000 $6,925 10/04/12 Wilkins R.V., Inc. $1,500 $19,600 07/22/13 Circle K RV's, Inc. $250 $6,250 06/24/13 Greeneway, Inc. (Route 66 Dealer) $5,250 $18,550 06/11/13 Burlington RV Superstore $500 $5,500 06/19/13 Rivers RV $250 $17,600 05/31/13 Hayes RV Center $300 $5,400 02/01/13 Alpin Haus $500 $17,500 06/21/13 Webster City RV, Inc. $1,000 $5,100 04/22/13 Butch Thomas $1,000 $16,000 11/30/12 Madison RV Supercenter $1,000 $5,000 08/08/13 Hartville RV Center, Inc. $1,000 $15,500 05/07/13 Minnesota RVDA $5,000 $5,000 01/11/13 MBA Insurance, Inc. $1,000 $15,100 05/17/13 Camperland of Oklahoma, LLC $500 $4,850 07/02/13 Mike Molino $500 $11,311 07/03/12 Topper’s Camping Center. $500 $3,500 04/18/13 Affinity RV Service Sales & Rentals $2,000 $11,000 07/01/13 Myers RV Center, Inc. $1,250 $3,250 06/11/13 AIRXCEL - RV Group $500 $11,000 06/06/13 J. D. Sanders, Inc. $500 $3,000 08/05/13 United States Warranty Corp. $1,000 $10,250 04/12/13 United RV Center $1,000 $3,000 09/20/12 Little Dealer, Little Prices $5,000 $10,050 01/23/13 Best Value RV Sales & Service $1,000 $2,750 04/08/13 Great Lakes RVA $10,000 $10,000 02/27/13 RV Outlet Mall $750 $2,550 06/05/13 Hemlock Hill RV Sales, Inc. $639 $10,000 09/14/12 Alliance Coach, Inc. $500 $2,500 10/26/12 Rich & Sons Camper Sales $2,000 $10,000 11/21/12 RCD Sales Company, Ltd. $750 $2,500 06/07/13
LEADERS active donors* with a cumulative donation or pledge between $1,000 and $2,499 Hilltop Trailer Sales, Inc. $541 $2,122 06/11/13 Dinosaur Electronics $500 $1,250 06/06/13 Skyline RV & Home Sales, Inc. $1,250 $1,500 06/14/13 Phil Ingrassia $1,000 $1,000 09/05/12 Noble RV, Inc. $505 $1,405 06/21/13 Bill Mirrielees $250 $1,000 05/09/13 The Trail Center $250 $1,350 02/01/13
BENEFACTORS active donors* with a cumulative donation or pledge between $500 and $999 Steinbring Motorcoach $500 $750 11/21/12 Holiday Hour, Inc. $100 $500 03/20/13 Ronnie Hepp $300 $625 08/24/12 Lindsey Reines $500 $500 12/19/12 Camp-Site RV $205 $500 12/31/12 Beckley's Camping Center $250 $500 06/06/13
SUPPORTERS active donors* with a cumulative donation or pledge between $100 and $499 Foley RV Center $250 $250 09/01/12 Karin Van Duyse $250 $250 10/25/12 Kroubetz Lakeside Campers $250 $250 12/02/11 Happy Camping RV $100 $100 10/19/12 Mayflower RV, Inc. $250 $250 07/27/12 Amy Pennington $100 $100 11/30/12
ENDOWMENTS Kindlund Family Scholarship $270,000
Page 28
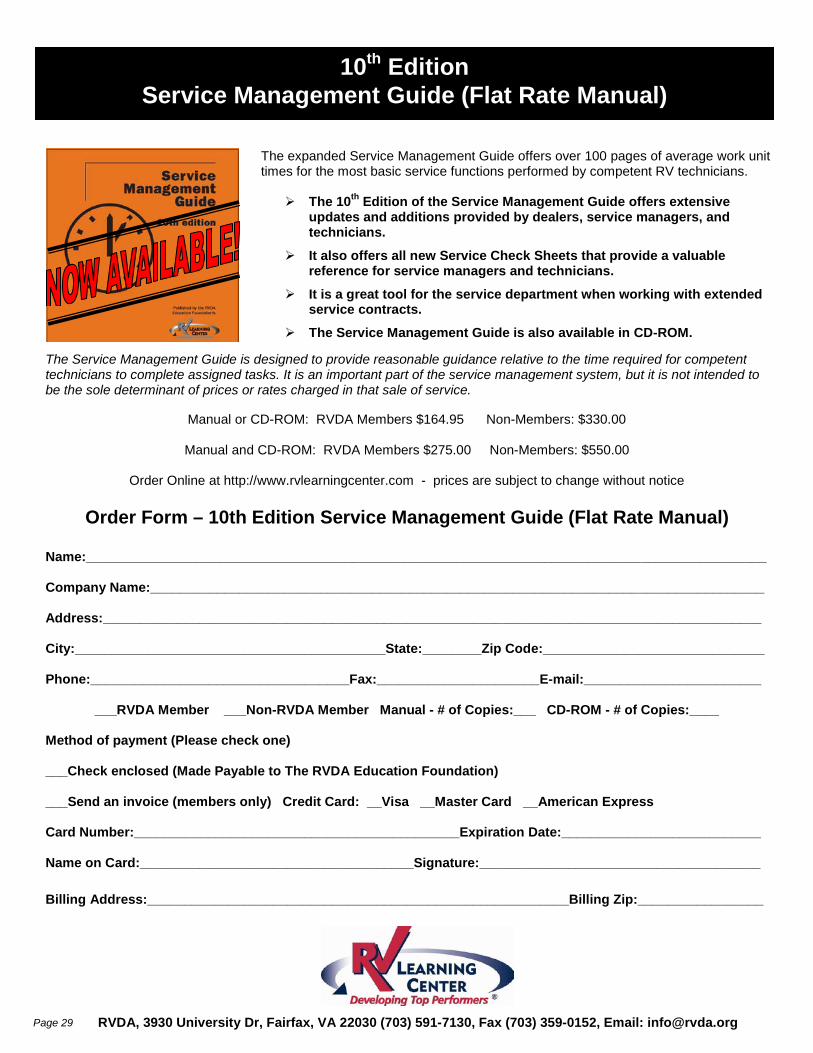
10th Edition Service Management Guide (Flat Rate Manual)
The expanded Service Management Guide offers over 100 pages of average work unit times for the most basic service functions performed by competent RV technicians.
The 10th Edition of the Service Management Guide offers extensive updates and additions provided by dealers, service managers, and technicians.
It also offers all new Service Check Sheets that provide a valuable reference for service managers and technicians.
It is a great tool for the service department when working with extended service contracts.
The Service Management Guide is also available in CD-ROM.
Manual or CD-ROM: RVDA Members $164.95 Non-Members: $330.00
Manual and CD-ROM: RVDA Members $275.00 Non-Members: $550.00
Order Online at http://www.rvlearningcenter.com - prices are subject to change without notice
Order Form – 10th Edition Service Management Guide (Flat Rate Manual)
Name:____________________________________________________________________________________________ Company Name:___________________________________________________________________________________ Address:_________________________________________________________________________________________ City:__________________________________________State:________Zip Code:______________________________ Phone:___________________________________Fax:______________________E-mail:________________________
___RVDA Member ___Non-RVDA Member Manual - # of Copies:___ CD-ROM - # of Copies:____ Method of payment (Please check one) ___Check enclosed (Made Payable to The RVDA Education Foundation) ___Send an invoice (members only) Credit Card: __Visa __Master Card __American Express Card Number:____________________________________________Expiration Date:___________________________ Name on Card:_____________________________________Signature:______________________________________ Billing Address:_________________________________________________________Billing Zip:_________________
RVDA, 3930 University Dr, Fairfax, VA 22030 (703) 591-7130, Fax (703) 359-0152, Email: [email protected]
The Service Management Guide is designed to provide reasonable guidance relative to the time required for competent technicians to complete assigned tasks. It is an important part of the service management system, but it is not intended to be the sole determinant of prices or rates charged in that sale of service.
Page 29

38 RV EXECUTIVE TODAY
FRVTA–RV Learning Center Partnership$995 per year for each dealership location.Over 50 sessions available, 24 hours a day,seven days a week, with full access totraining through July 31, 2014.
The DLN offers your dealership:• Onsite training• Group training• No travel time or expenses • Self-determined pace• One fixed price of $995 for the subscription term
The DLN offers online training for:• RV Technicians – The certification prep coursehelps technicians get ready for the certification exam.Your subscription includes unlimited access to morethan 50 training sessions, reviews, and test prepara-tion sections. Also included are manufacturer- and
supplier-specific advanced repair and troubleshootingclasses designed to upgrade technicians’ skills.
Completion of these classes qualifies forrecertification hours. Classes are available24/7 throughout the program year,providing maximum flexibility.
• Service Writers/Advisors – Thisthree-hour program is valuable for both new
staff and experienced personnel preparing forthe RV Learning Center’s Service Writer/Advisor
certification.
• Greeters/Receptionists – This 50-minute sessionis suitable for all employees who need customerservice skills. It includes a final exam and certificateof completion.
• Dealers/GMs – This program features importanttopics for management, including lemon laws, LP gaslicensing issues, and the federal Red Flags Rule.
Company Name:____________________________________________________________________________________________
Address: ____________________________________________ City:________________________ State: ____ Zip: __________
Phone:______________________________________________ Fax: __________________________________________________
Mentor Name: ________________________________________________________ Phone: ______________________________
E-mail (at dealership) : __________________________________________________ Fax: ________________________________
**High speed Internet access required. RVIA service textbooks not included**_____ location(s) at $995 each = payment due: $__________________ (select payment method below)
PAYMENT METHOD Note: prices are subject to change without notice. Complete lower section and mail or fax to:
Florida RV Trade Association, 10510 Gibsonton Drive, Riverview, FL 33578, (813) 741-0488, Fax: (813) 741-0688
q PAY BY CHECK OR MONEY ORDER q PAY BY VISA OR MASTERCARD
Name on Credit Card: ______________________________________________________________________________________
Card Number:__________________________________________________ Security Code: _________ Expires: ____________
Card Billing Address: ________________________________ City:________________________ State: ____ Zip: __________
Card Holder Signature: ______________________________________________________________________________________
For more information, call (386) 754-4285 or go to www.fgc.edu/rv-institute.aspx
Online Training with FRVTA’s
DISTANCE LEARNING NETWORK
DEALERSHIP REGISTRATION
08/2013

Textbook Title
Price
# books
Total $
Introduction to RV Service – Provides an introduction to the RV industry, the various types of RVs and their structural characteristics and systems, the basic tools utilized by RV technicians, and safety in the RV workplace. Summaries of industry codes and standards and RV technician job classifications are also included as well as basic information on using RV service manuals. Developing and demonstrating solid customer relations and record keeping skills are also addressed.
$19.95
Electricity Demystified – Written in a step-by-step format, this practical guide begins by covering direct current (DC), voltage, resistance, circuits, cells, and batteries. The book goes on to discuss alternating current (AC), power supplies, wire, and cable. Magnetism and electromagnetic effects are also addressed. Detailed examples and concise explanations make it easy to understand the material.
$14.95
RV Electrical Systems – Provides instruction on performing AC and DC voltage systems inspections and tests; servicing AC and DC power sources; servicing wiring/distribution systems; and maintaining, repairing and inspect-ing AC and DC devices.
$49.95
RV Propane Systems – Provides instruction on inspecting and maintaining propane containers and fittings; in-specting and maintaining the piping system; performing propane system tests; purging and filling containers; transferring propane from container to container; and burning off propane in a container.
$49.95
RV Generators – Covers the installation, maintenance and repair of RV generators, the generator section and control system. This includes inspecting, maintaining and repairing generator components and verifying battery voltage, fuel source and pressures, engine operation, output voltage and frequency, and governor operation.
$39.95
RV Ranges & Cooktops – Provides instruction on the installation, repair and replacement of ranges and ovens. This includes verifying gas pressure; verifying grate clips installation; checking lines and fittings; repairing and replacing components; verifying range burners are not affected by operation of force air furnace or other applianc-es; and performing function test.
$39.95
RV Water Heaters – Covers the installation, repair and replacement of RV water heaters — Pilot, DSI (direct spark ignition) and Electric. Topics addressed include inspecting ignition systems, verifying gas pressure; trouble-shooting the sequence of operation, repair and replacement of various components; draining and flushing the water heater and inspecting fittings for calcium deposits; checking fittings on the tank; inspecting and replacing the water tank; and checking lines and valves for motor aide.
$39.95
RV Plumbing Systems – Provides instruction on performing fresh water systems tests; inspecting and repairing fresh water storage tanks, distribution systems, and fixtures and devices; performing waste water systems tests; and inspecting, repairing and replacing waste holding tanks and drainage piping systems.
$39.95
RV Heating Appliances – Covers installation, repair and replacement of RV heating systems, including gravity, pilot and DSI (direct spark ignition furnaces). Topics examined include verifying pressure and electrical voltage; inspecting and cleaning burner, pilot, exhaust tube and air intake; troubleshooting the sequence of operation; repairing and replacing various furnace components; inspecting and correcting ducting and return air.
$39.95
RV Service Textbooks
SUMMARIES & ORDER FORM Published by RVIA and available through the RV Learning Center
These texts help technicians increase their knowledge and understanding of the components and operating systems found in today’s RVs and prepare them for the new testing requirements of the RV Service Techni-cian Career Ladder. The complete set consists of 14 volumes--written by RV service experts--and the “Electricity Demystified” text.
Save 30%when you order a complete hard copy or CD-ROM set! See next page for details.
Page 31
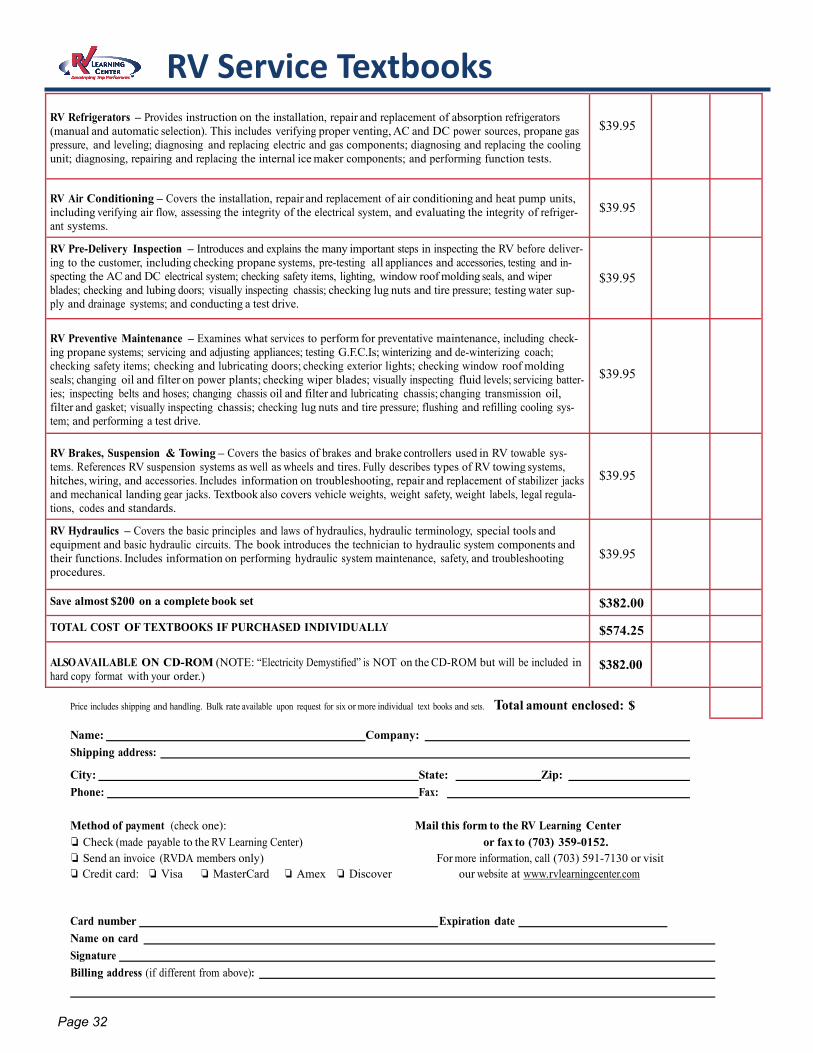
RV Refrigerators – Provides instruction on the installation, repair and replacement of absorption refrigerators (manual and automatic selection). This includes verifying proper venting, AC and DC power sources, propane gas pressure, and leveling; diagnosing and replacing electric and gas components; diagnosing and replacing the cooling unit; diagnosing, repairing and replacing the internal ice maker components; and performing function tests.
$39.95
RV Air Conditioning – Covers the installation, repair and replacement of air conditioning and heat pump units, including verifying air flow, assessing the integrity of the electrical system, and evaluating the integrity of refriger-ant systems.
$39.95
RV Pre-Delivery Inspection – Introduces and explains the many important steps in inspecting the RV before deliver-ing to the customer, including checking propane systems, pre-testing all appliances and accessories, testing and in-specting the AC and DC electrical system; checking safety items, lighting, window roof molding seals, and wiper blades; checking and lubing doors; visually inspecting chassis; checking lug nuts and tire pressure; testing water sup-ply and drainage systems; and conducting a test drive.
$39.95
RV Preventive Maintenance – Examines what services to perform for preventative maintenance, including check-ing propane systems; servicing and adjusting appliances; testing G.F.C.Is; winterizing and de-winterizing coach; checking safety items; checking and lubricating doors; checking exterior lights; checking window roof molding seals; changing oil and filter on power plants; checking wiper blades; visually inspecting fluid levels; servicing batter-ies; inspecting belts and hoses; changing chassis oil and filter and lubricating chassis; changing transmission oil, filter and gasket; visually inspecting chassis; checking lug nuts and tire pressure; flushing and refilling cooling sys-tem; and performing a test drive.
$39.95
RV Brakes, Suspension & Towing – Covers the basics of brakes and brake controllers used in RV towable sys-tems. References RV suspension systems as well as wheels and tires. Fully describes types of RV towing systems, hitches, wiring, and accessories. Includes information on troubleshooting, repair and replacement of stabilizer jacks and mechanical landing gear jacks. Textbook also covers vehicle weights, weight safety, weight labels, legal regula-tions, codes and standards.
$39.95
RV Hydraulics – Covers the basic principles and laws of hydraulics, hydraulic terminology, special tools and equipment and basic hydraulic circuits. The book introduces the technician to hydraulic system components and their functions. Includes information on performing hydraulic system maintenance, safety, and troubleshooting procedures.
$39.95
Save almost $200 on a complete book set $382.00
TOTAL COST OF TEXTBOOKS IF PURCHASED INDIVIDUALLY $574.25
ALSO AVAILABLE ON CD-ROM (NOTE: “Electricity Demystified” is NOT on the CD-ROM but will be included in hard copy format with your order.)
$382.00
Price includes shipping and handling. Bulk rate available upon request for six or more individual text books and sets. Total amount enclosed: $
Name: Company:
Shipping address:
City: State: Zip:
Phone: Fax:
Method of payment (check one): Mail this form to the RV Learning Center ❏ Check (made payable to the RV Learning Center) or fax to (703) 359-0152. ❏ Send an invoice (RVDA members only) For more information, call (703) 591-7130 or visit
❏ Credit card: ❏ Visa ❏ MasterCard ❏ Amex ❏ Discover our website at www.rvlearningcenter.com
Card number Expiration date
Name on card
Signature
Billing address (if different from above):
RV Service Textbooks
Page 32

We offer more than products. We offer solutions.
RVDA
SINCEI99l'
When you work with Protective you offer customers more than
products; you offer solutions - solutions that allow people to
embrace all today has to offer by protecting their tomorrow.
Protective provides F&l solutions that simplify the selling process
with easy to understand products, advanced training and reliable
customer care and claims service. We are committed to your
profitability by serving the increasing number of RV buyers that
are unprotected from the costs of future mechanical expenses.
Like you, we believe in doing the right thing for the customer.
Help your customers protect tomorrow and embrace today with
F&l solutions from Protective Asset Protection.
Learn more at protectiveassetprotection.com/brand
Protect Tomorrow.Embrace Today™.
XtraRide Service Agreements I Post-Sale Programs Dealer Experience Refund & Reinsurance Programs I Rental Programs F&lTraining I On-Line Rating, Reporting & Agreements
=== 888 274 5104
Protective0 Asset Protection
The XtraRideService Apeement Programbacked by Lyn-don Property ln:svrance Company, a Protcompany.in all statt>s except New York In New Yothi5 product ls !)a(.by Old R >pubbc Insurance Companv.·An RVOA endorsed procft•« 01 !ot!r'VIte rs (J(Uth! .Jt h.l!. bct!n 1:!1.lei1Stvcly C\•i.111JJlt:d by Ihe kVDA 10 J UfqUJi rlj', <.kopt.mdJbiJI!y ,ltld twetJII Viifuc RVDA tmd tlufNDA Wucat.Jotl f ow1dJ-llon 11;:( 1\lt' cOtnpcnsatlotl hom 4 PIOf<Xl!'ro (OOll)c}ny fur busu1<3.!. geueroJit.1f by HV di!Jit>r!.