roho dry floatation wheelchair cushions - … roho dry floatation wheelchair cushions operation...
TRANSCRIPT
s h a p e f i t t i n g t e c h n o l o g y ®
Supplier: This manual must be given to the user of this product.Operator (Individual or Caregiver): Before using this product, read the instructions and save for future reference.
ROHO® DRY FLOATATION® Wheelchair Cushions
Operation Manual


ROHO, Inc., 100 North Florida Avenue, Belleville, Illinois 62221-5429 U.S.A.U.S.A.: 800-851-3449 • Fax: 888-551-3449 • Customer Care: [email protected]
Outside the U.S.A.: 618-277-9150 • Fax: 618-277-6518 • [email protected]
© 2007, 2017 ROHO, Inc.
The following are trademarks and registered trademarks of ROHO, Inc.: ROHO®, DRY FLOATATION®, ISOFLO®, Yellow Rope®, shape fitting technology®, CONTOUR SELECT®, ENHANCER®, QUADTRO SELECT®, HIGH PROFILE®, MID PROFILE™, and LOW PROFILE®.
Products in this manual may be covered by one or more U.S. and foreign patents and trademarks. For further details, please refer to permobilus.com.
ROHO, Inc. has a policy of continual product improvement and reserves the right to amend this document. A current version of this document is available at permobilus.com.
Table of ContentsIntended Use 2
Important Safety Information 3
Parts Detail 4
Product Specifications 4-5
Cushion Adjustment 6-8
Cover Removal and Replacement 9
Troubleshooting 9
Cleaning and Disinfecting 10
Disposal 10
Limited Warranty 10
Español 11
Français 21
Deutsch 31
Italiano 41
Nederlands 51
Dansk 61
Svenska 71
Norsk 81
Suomi 91
Português 101

2
ROHO DRY FLOATATION Wheelchair Cushions Operation Manual
Intended UseEach ROHO® DRY FLOATATION® product in this manual is an adjustable, air-filled, cellular-design wheelchair support surface. There is no weight limit, yet the cushion must be properly sized to the individual.
ROHO, Inc. recommends evaluation by a clinician who is experienced in seating, positioning and mobility: 1) to determine whether the cushion is appropriate for the individual; and 2) to determine whether a solid seat platform is recommended if using the cushion on a sling-seat wheelchair.
Each of the following products utilizes DRY FLOATATION® Technology and is intended to conform to an individual's seated shape to provide skin/soft tissue protection, positioning, and an environment to facilitate wound healing.
- ROHO® LOW PROFILE® Dual Compartment Cushion (LOW PROFILE Dual Compartment Cushion)
- ROHO® MID PROFILE™ Dual Compartment Cushion (MID PROFILE Dual Compartment Cushion)
- ROHO® HIGH PROFILE® Dual Compartment Cushion (HIGH PROFILE Dual Compartment Cushion)
- ROHO® QUADTRO SELECT® LOW PROFILE® Cushion (QUADTRO SELECT LOW PROFILE)
- ROHO® QUADTRO SELECT MID PROFILE™ Cushion (QUADTRO SELECT MID PROFILE)
- ROHO® QUADTRO SELECT HIGH PROFILE® Cushion (QUADTRO SELECT HIGH PROFILE)
- ROHO® CONTOUR SELECT® Cushion (CONTOUR SELECT)
- ROHO® ENHANCER® Cushion (ENHANCER)
Each of the following products utilizes DRY FLOATATION® Technology and is intended to conform to an individual's seated shape to provide skin/soft tissue protection and an environment to facilitate wound healing.
- ROHO® LOW PROFILE® Single Compartment Cushion (LOW PROFILE Single Compartment Cushion)
- ROHO® MID PROFILE™ Single Compartment Cushion (MID PROFILE Single Compartment Cushion)
- ROHO® HIGH PROFILE® Single Compartment Cushion (HIGH PROFILE Single Compartment Cushion)

3
ROHO DRY FLOATATION Wheelchair Cushions Operation Manual
Important Safety InformationROHO medical products are intended to be part of an overall care regimen. ROHO, Inc. recommends that a clinician make product recommendations based upon an evaluation of the individual’s medical and therapeutic needs and overall condition.
Warnings
• Skin/soft tissue breakdown can occur due to a number of factors, which vary by individual. Check skin frequently, at least once a day. Redness, bruising, or darker areas (when compared to normal skin) may indicate the beginning of soft tissue breakdown and may need to be addressed. If there is any discoloration to skin/soft tissue, STOP USE immediately. If the discoloration does not disappear within 30 minutes after disuse, immediately consult a healthcare professional.
• The cushion and the cover MUST be compatible sizes and MUST be used as directed in this manual. IF THEY ARE NOT: 1) The benefits provided by the cushion may be reduced or eliminated, increasing the risk to skin or to other soft tissue, and 2) the individual may become unstable and vulnerable to falling.
• DO NOT use your cushion on top of, or in conjunction with, any other products or materials, except as indicated in this manual. Doing so may cause the individual to become unstable and vulnerable to falling.
• DO NOT use your cushion as a water flotation device (e.g., a Life Preserver). It will NOT support you in water.
• If you are unable to perform any tasks described in this manual, seek assistance.
Cautions
• DO NOT use a pump, cover, or repair kit other than those provided by ROHO, Inc. Doing so may void your product's warranty.
• DO NOT modify the cushion or any components. Doing so may result in damage to the product and will void the warranty.
• DO NOT allow your cushion to come into contact with oil-based lotions or lanolin. They may degrade the material.
• Prolonged exposure to ozone may degrade materials used in the cushion, affect the performance of the cushion, and void the product warranty.
• Changes in altitude may require adjustment to your cushion.
• Keep your cushion away from sharp objects.
• DO NOT expose your cushion to high heat, open flames or hot ashes.
• If the cushion has been in temperatures lower than 32° F (0° C) and exhibits unusual stiffness, allow the cushion to warm to room temperature.
• DO NOT use an inflation valve as a handle for carrying or pulling your DRY FLOATATION cushioning device. Carry your cushioning device by the cushion base or by the carrying handle on the cover.
4
ROHO DRY FLOATATION Wheelchair Cushions Operation Manual
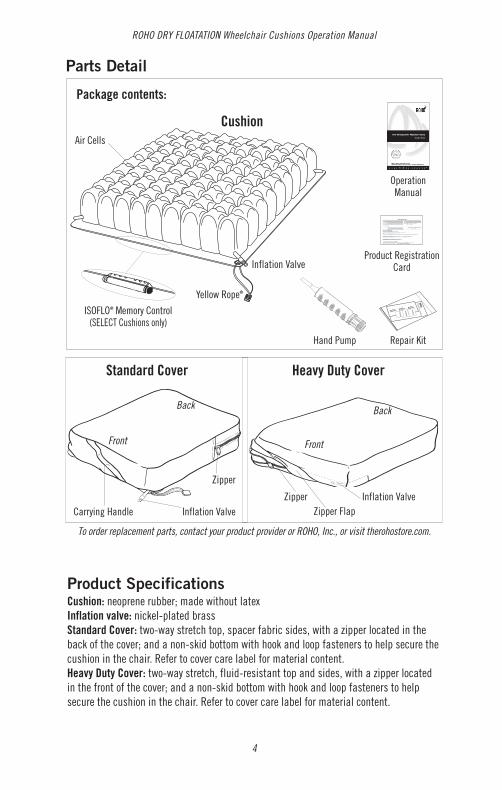
To order replacement parts, contact your product provider or ROHO, Inc., or visit therohostore.com.
Product SpecificationsCushion: neoprene rubber; made without latexInflation valve: nickel-plated brass Standard Cover: two-way stretch top, spacer fabric sides, with a zipper located in the back of the cover; and a non-skid bottom with hook and loop fasteners to help secure the cushion in the chair. Refer to cover care label for material content. Heavy Duty Cover: two-way stretch, fluid-resistant top and sides, with a zipper located in the front of the cover; and a non-skid bottom with hook and loop fasteners to help secure the cushion in the chair. Refer to cover care label for material content.
Air Cells
Hand Pump Repair Kit
Product Registration Card
OperationManual
Inflation Valve
Yellow Rope®
Standard Cover
Back
Front
Zipper
Heavy Duty Cover
Zipper FlapZipper Inflation Valve
Back
Front
Inflation Valve
Cushion
Parts Detail
Package contents:
Carrying Handle
ISOFLO® Memory Control (SELECT Cushions only)

5
ROHO DRY FLOATATION Wheelchair Cushions Operation Manual
Cushion Smallest Width Smallest Depth Largest Width Largest Depth
# cells in. cm
# cells in. cm
# cells in. cm
# cells in. cm
LOW PROFILE Single Compartment Cushion
6 111/2 29.0 6 111/2 29.0 13 231/2 59.5 11 20 50.5
LOW PROFILE Dual Compartment Cushion
6 111/2 29.0 6 111/2 29.0 11 20 50.5 11 20 50.5
QUADTRO SELECT LOW PROFILE 5 11 28.0 6 113/4 30.0 13 241/2 62.5 12 22 56.0
MID PROFILE Single Compartment Cushion
7 131/4 33.5 7 131/4 33.5 11 20 50.5 11 20 50.5
MID PROFILE Dual Compartment Cushion
8 143/4 37.5 9 161/2 42.0 8 143/4 37.5 9 161/2 42.0
QUADTRO SELECT MID PROFILE 8 16 41.0 8 151/4 38.5 10 191/2 49.5 10 181/2 47.0
HIGH PROFILE Single Compartment Cushion
6 111/2 29.0 6 111/2 29.0 15 263/4 68.0 14 231/2 59.5
HIGH PROFILE Dual Compartment Cushion
6 111/2 29.0 6 111/2 29.0 11 20 50.5 12 213/4 55.0
QUADTRO SELECT HIGH PROFILE 6 123/4 32.5 6 113/4 30.0 14 261/4 67.0 14 233/4 60.0
CONTOUR SELECT 7 141/2 36.5 8 151/4 38.5 13 241/2 62.5 12 22 56.0
ENHANCER 8 143/4 37.5 8 143/4 37.5 11 20 50.5 11 20 50.5
Product Specifications, continuedSTANDARD CUSHION DIMENSIONS AND WEIGHTS:
Cushion Height Average Weight*
LOW PROFILE Single Compartment Cushion 21/4 in. (5.5 cm) 2.5 lbs. (1.1 kg)
LOW PROFILE Dual Compartment Cushion 21/4 in. (5.5 cm) 2.5 lbs. (1.1 kg)
QUADTRO SELECT LOW PROFILE 21/4 in. (5.5 cm) 2.5 lbs. (1.1 kg)
MID PROFILE SINGLE Compartment Cushion 31/4 in. (8.5 cm) 3.0 lbs. (1.4 kg)
MID PROFILE Dual Compartment Cushion 31/4 in. (8.5 cm) 3.0 lbs. (1.4 kg)
QUADTRO SELECT MID PROFILE 31/4 in. (8.5 cm) 3.0 lbs. (1.4 kg)
HIGH PROFILE Single Compartment Cushion 41/4 in. (10.5 cm) 3.25 lbs. (1.5 kg)
HIGH PROFILE Dual Compartment Cushion 41/4 in. (10.5 cm) 3.25 lbs. (1.5 kg)
QUADTRO SELECT HIGH PROFILE 41/4 in. (10.5 cm) 3.25 lbs. (1.5 kg)
CONTOUR SELECT 21/4 to 41/4 in. (5.5 to 10.5 cm) 3.5 lbs. (1.6 kg)
ENHANCER 21/4 to 41/4 in. (5.5 to 10.5 cm) 3.5 lbs. (1.6 kg)
*Note: The average weights are based on 9 x 9 cell (161/2 in. x 161/2 in., 42.0 cm x 42.0 cm) cushions.
Note: Refer to Customer Care for specific cushion sizes.

6
ROHO DRY FLOATATION Wheelchair Cushions Operation Manual
Cushion Adjustment
1. Inflate the cushion:a. Place the cushion in
the wheelchair with the air cells facing up and the non-skid surface of the cover facing down. Consult your prescriber about alternate positions of inflation valves.
b. For SELECT Cushions: Before inflating, you must open the ISOFLO Memory Control so that all of the air cells will inflate. Push the ISOFLO green knob toward the unlocked position.
c. Slide the rubber nozzle of the hand pump over the inflation valve. Pinch the nozzle, turn to open the inflation valve, and inflate the air cells.
d. When all of the air cells are inflated and the cushion begins to arch slightly, pinch the rubber nozzle of the hand pump and turn to close the inflation valve completely.
e. Remove the hand pump. f. Repeat cushion inflation for all valves.
Important Safety Information:• Check inflation frequently, at least once a day!• DO NOT use an under-inflated cushion or an over-inflated cushion because the
product benefits will be reduced or eliminated, resulting in an increased risk to skin and other soft tissue. If the cushion does not appear to be holding air, or if you are not able to inflate or deflate the cushion, see TROUBLESHOOTING. Immediately contact your clinical caregiver, distributor, or ROHO, Inc. if the problem persists.
• When possible, use the hook or loop fasteners to further secure the cushion to the seating surface.
Open Close
Cushion Cover
InflationValve
Unlocked

7
ROHO DRY FLOATATION Wheelchair Cushions Operation Manual
Cushion Adjustment, continued2. Adjust the cushion:
a. The individual should sit in the chair in their usual position. The cushion should be centered beneath the individual.
b. Slide your hand between the cushion and the individual. Lift the leg slightly and feel for the lowest bony prominence, and then lower the leg to a sitting position.
c. Open the valve to remove air, keeping your hand beneath the individual’s lowest bony prominence.
d. Release air until you are barely able to move your fingertips.
e. Close the valve.
f. Repeat cushion adjustment for all valves.
g. To adjust the QUADTRO SELECT Cushion or the CONTOUR SELECT Cushion to accommodate a fixed pelvic obliquity or a fixed posterior pelvic tilt:
The individual should sit in their normal position while the air transfers through the ISOFLO Memory Control. When the air transfer is complete, push the red knob toward the locked position. Check each compartment of the cushion to ensure a Proper Cushion Inflation Setting.
Note: See the next page for instructions on adjusting the QUADTRO SELECT Cushion to correct a flexible pelvic obliquity or a flexible posterior pelvic tilt.
The seated figure shows product orientation.
A
B
Proper Cushion Inflation Setting: A) sink down into the cushion and B) “float”
above the cushion base.
1/2" - 1" (1.5 cm - 2.5 cm) recommended distance between the individual and the seating surface.
=
Note for Dual Compartment Cushions: For individuals with a pelvic obliquity, first adjust the side with the deepest bony prominence. For front-to-back positioning, adjust the rear section first. Always re-check adjustment for each section.
Locked

8
ROHO DRY FLOATATION Wheelchair Cushions Operation Manual
Cushion Adjustment, continuedh. To adjust the QUADTRO SELECT Cushion to correct a flexible pelvic
obliquity or a flexible posterior pelvic tilt:
- Follow all Cushion Adjustment instructions in this operation manual to make sure the cushion is adjusted to a Proper Cushion Inflation Setting.
- Make sure the ISOFLO Memory Control is in the unlocked position
- Follow the instructions below.
Flexible pelvic obliquity: 1) Manually correct to the desired pelvic position. (For example, if the left
side of the pelvis is lower than the right side, either have the individual lean toward the right, or place downward pressure on the right hip until the desired position is achieved.)
2) Push the red knob toward the locked position.
3) Re-check each compartment of the cushion to ensure a Proper Cushion Inflation Setting.
Flexible posterior pelvic tilt:1) Check to make sure there is approximately 1" (2.5 cm) of space between
the individual's bony prominences and the seating surface. Add more air if needed.
2) Lift both of the individual's knees to put more downward pressure on the pelvis and to force air to the front of the cushion. This will create a "well" (a lower, concave area) for the pelvis and will help prevent the pelvis from sliding forward.
3) Push the red knob toward the locked position.
4) Re-check each compartment of the cushion to ensure a Proper Cushion Inflation Setting.
Unlocked
Locked

9
ROHO DRY FLOATATION Wheelchair Cushions Operation Manual
Cover Removal and Replacement
Inspect the cover for damage and replace if necessary.
Keeping a cover on your cushion will help to protect the cushion components. A cover will also help to keep the air cells together, which may aid in slide board transfers.
Cover Removal: Unzip and remove the cover from the cushion.
Cover Replacement: 1. Turn the cover and the cushion upside down: The non-skid
material should face up and the zipped opening should face you. The air cells should face down.
2. Insert the cushion into the cover, following the instructions below.
Standard Cover Instructions Heavy Duty Cover Instructions
The back of the cushion should face the zipper. The front of the cushion (the inflation valve) should face the zipper.
Make sure all four corners of the cushion extend through the corner openings in the cover. Carefully pull the inflation valve and the Yellow Rope through the openings.
Tuck the inflation valve and the Yellow Rope inside the cover.
Close the zipper completely. Turn the cushion over so the air cells face up. The cushion should lie flat inside the cover with the non-skid material on the bottom and all cells covered.
TroubleshootingFor additional assistance, contact your clinical caregiver, distributor, or ROHO, Inc.Not Holding Air Inflate the cushion. Inspect the inflation valve(s) and hose(s) for
damage. Confirm that the inflation valve is completely closed. Look for holes in the cushion. If very small holes or no holes are visible, follow the instructions in the Repair Kit provided with your product. For inflation valve or hose damage, or for large holes or leaks in the cushion, see the ROHO Limited Warranty supplement, or contact Customer Care.
Not Able To Inflate or Deflate the Cushion
Confirm that the inflation valve is open. Inspect the inflation valve(s) and hose(s) for damage. When inflating SELECT Cushions: Confirm that the green knob of the ISOFLO Memory Control is pushed toward the center of the ISOFLO in the UNLOCKED position so that all chambers will inflate.
Uncomfortable or Unstable
Confirm that:- the cushion is not over-inflated (See Cushion Adjustment.) - the cushion cells and the top of the cover are facing up. - the cushion is centered beneath the individual. - the cushion is properly sized to the individual and the wheelchair.
Allow the individual at least one hour to adjust to the cushion.The Cushion Slides on the Wheelchair
Make sure the non-skid bottom of the cushion cover is facing away from the individual. Use directional labels on the cushion and on the cover to orient the cushion. Use hook and loop fasteners to further secure the cushion to the wheelchair.
Refer to the label on the bottom of the cushion and to the image on the cover to correctly orient your cushion and cover.

1110
ROHO DRY FLOATATION Wheelchair Cushions Operation Manual
Cleaning and DisinfectingCleaning and disinfecting are separate processes. Cleaning must precede disinfection. Before use by a different individual: clean, disinfect, and check product for proper functioning.
Cover Care: Remove hook fastener pieces from bottom of cover prior to cleaning and disinfecting. Wash with like colors.
To Clean the Cover: Remove the cover. Machine wash in cold water (30°C) with mild detergent, gentle cycle, or wipe clean with neutral detergent and warm water. Tumble dry low.
To Disinfect the Cover: Hand wash in cold water (30°C) using 1 part household liquid bleach per 9 parts water. Keep the product wet with the bleach solution for 10 minutes, then rinse thoroughly. Or machine wash in hot water (60°C). Tumble dry low.
Follow the safety guidelines on the bleach container.
Cushion Care Cautions: Valve(s) must be closed. DO NOT allow water or cleaning solution to enter the cushion. DO NOT machine wash or sanitize the cushion or machine dry the cushion. Use of the following may cause damage to the cushion: abrasives (steel wool, scouring pads); caustic, automatic dishwasher detergents; cleaning products that contain petroleum or organic solvents, including acetone, toluene, Methyl Ethyl Ketone (MEK), naphtha, dry cleaning fluid, adhesive remover; oil-based lotions, lanolin, or phenolic-based disinfectants; ozone gas; ultraviolet light cleaning methods.
To Clean the Cushion: Remove the cover, close valve(s) and place in a large sink. Hand wash, using mild liquid hand soap, hand dishwashing liquid, laundry detergent, or a multipurpose detergent (Follow product label instructions.) Gently scrub all cushion surfaces, using a soft plastic bristle brush, a sponge or a cloth. Rinse with clean water. Air dry. DO NOT expose to direct sunlight.
To Disinfect the Cushion: Repeat cleaning instructions, using 1 part household liquid bleach per 9 parts water. Keep the product wet with the bleach solution for 10 minutes. Rinse thoroughly with clean water. Air dry. Note: Most germicidal disinfectants are safe if used following the disinfectant manufacturer’s dilution directions.
Follow the safety guidelines on the bleach container.
Note About Sterilization: High temperatures accelerate aging and will damage the product assembly. ROHO products are not packaged in a sterile condition, nor are they intended or required to be sterilized prior to use. If institution protocol demands sterilization: First, follow the cleaning and disinfecting instructions; then, open the inflation valve and use the lowest possible sterilizing temperature, but not to exceed 60°C (158°F), for the shortest time possible. DO NOT autoclave.
DisposalThe components of the products in this manual are associated with no known environmental hazards when properly used and when disposed of in accordance with all local/regional regulations. Incineration must be performed by a qualified, licensed waste management facility.
Limited WarrantyLimited Warranty Term from the date the product was originally purchased: SELECT Cushions: 36 months; All other DRY FLOATATION Products: 24 months. The warranty does not apply to punctures, tears, burns, or misuse, nor does it apply to the removable cover. See also the ROHO Limited Warranty supplement provided with your product, or contact Customer Care.
30C
30C1:9
+ or


T20200 Revision: 3/28/17 Print Date: Qty:
Mailing/Shipping Address:1501 South 74th Street, Belleville, IL 62223-5900 USA
Administrative Offices:100 N. Florida Avenue, Belleville, IL 62221-5429 USA
U.S.: 800-851-3449 • Fax 888-551-3449Outside the U.S.: 618-277-9150 • Fax 618-277-6518
permobilus.com