rifle / pistol skill builder drill book updated february ... · nra b8 bullseye. 100 yards, prone,...
TRANSCRIPT
Rifle / Pistol Skill Builder Drill Book Updated February 2014
I did not invent these drills. This book is a compilation of drills I have found useful over the years for firearms
training. It is not all inclusive, as there are thousands of drills and standards that one can use to work on various
techniques and fundamental gun handling and marksmanship skills.
I attempted to give credit to whomever I got the drill from. If there is a drill listed that is incorrectly listed or
credited, please let me know. These are the drills and standards I have found to be useful in building specific
skills and for measuring progress in these areas. I have more compiled, including various qualifications and
standards if you are looking for something else.
The pages are designed to fit into ½ sized page protectors in a ½ sized binder.
FIREARMS TRAINING IS INHERENTLY DANGEROUS. DO NOT ATTEMPT TO SHOOT ANY OF THESE DRILLS
WITHOUT FIRST SEEKING PROFESSIONAL INSTRUCTION. I TAKE NO RESPONSIBILITY FOR ANYTHING YOU
DO WHILE ATTEMPTING TO PERFORM THESE DRILLS. IF YOU SHOOT YOURSELF OR SOMEONE ELSE, IT’S
YOUR FAULT.
www.progunfighter.com www.facebook.com/progunfighter
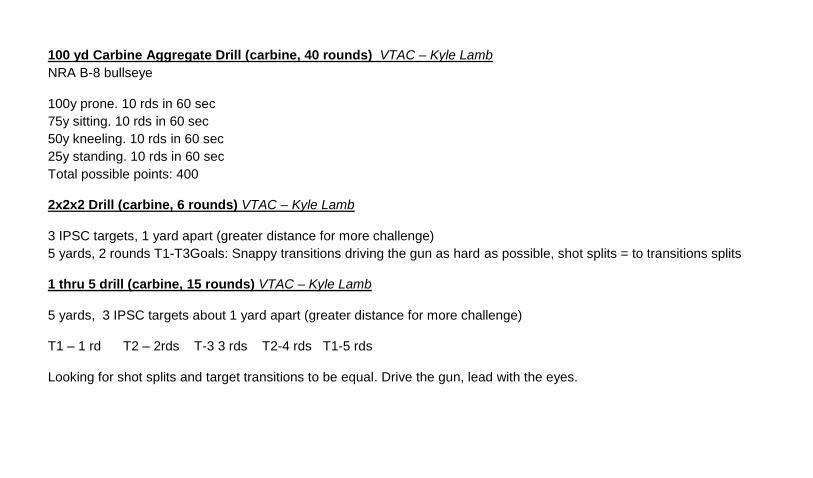
100 yd Carbine Aggregate Drill (carbine, 40 rounds) VTAC – Kyle Lamb
NRA B-8 bullseye
100y prone. 10 rds in 60 sec
75y sitting. 10 rds in 60 sec
50y kneeling. 10 rds in 60 sec
25y standing. 10 rds in 60 sec
Total possible points: 400
2x2x2 Drill (carbine, 6 rounds) VTAC – Kyle Lamb
3 IPSC targets, 1 yard apart (greater distance for more challenge)
5 yards, 2 rounds T1-T3Goals: Snappy transitions driving the gun as hard as possible, shot splits = to transitions splits
1 thru 5 drill (carbine, 15 rounds) VTAC – Kyle Lamb
5 yards, 3 IPSC targets about 1 yard apart (greater distance for more challenge)
T1 – 1 rd T2 – 2rds T-3 3 rds T2-4 rds T1-5 rds
Looking for shot splits and target transitions to be equal. Drive the gun, lead with the eyes.
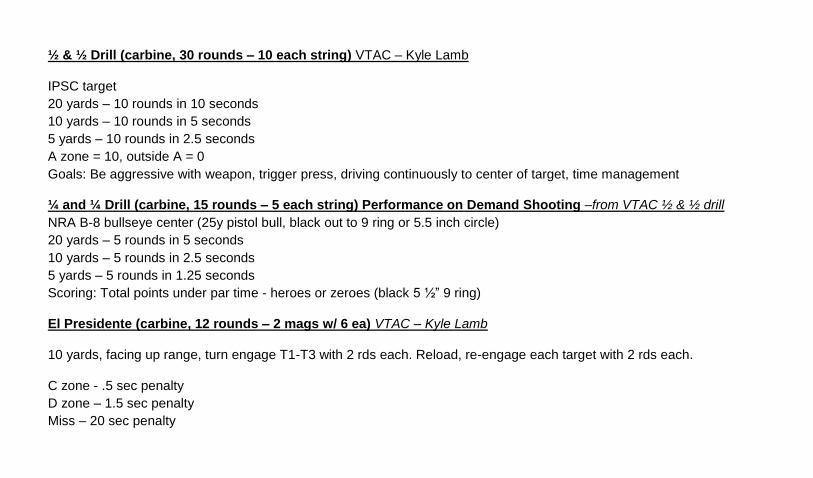
½ & ½ Drill (carbine, 30 rounds – 10 each string) VTAC – Kyle Lamb
IPSC target
20 yards – 10 rounds in 10 seconds
10 yards – 10 rounds in 5 seconds
5 yards – 10 rounds in 2.5 seconds
A zone = 10, outside A = 0
Goals: Be aggressive with weapon, trigger press, driving continuously to center of target, time management
¼ and ¼ Drill (carbine, 15 rounds – 5 each string) Performance on Demand Shooting –from VTAC ½ & ½ drill
NRA B-8 bullseye center (25y pistol bull, black out to 9 ring or 5.5 inch circle)
20 yards – 5 rounds in 5 seconds
10 yards – 5 rounds in 2.5 seconds
5 yards – 5 rounds in 1.25 seconds
Scoring: Total points under par time - heroes or zeroes (black 5 ½” 9 ring)
El Presidente (carbine, 12 rounds – 2 mags w/ 6 ea) VTAC – Kyle Lamb
10 yards, facing up range, turn engage T1-T3 with 2 rds each. Reload, re-engage each target with 2 rds each.
C zone - .5 sec penalty
D zone – 1.5 sec penalty
Miss – 20 sec penalty

9 hole drill (carbine, 9+ rounds) VTAC – Kyle Lamb
Target: BC steel (or similar). Range 50-100 yards
On command, fire one hit through each port of VTAC barricade.
Scoring: total time.
Zig-Zag Drill (carbine, 9+ rounds) VTAC – Kyle Lamb
Start at position A.
While moving:
A B 3 rds @ T1
BC 2 rds @ T2,T3,T4
move around cone D
DC 3 rds @ T5
CB 2 rds @ T4,T3,T2
Scoring total time and penalties:
A 0 sec
B/C +0.5 sec
D + 1.5 sec
miss + 20 sec
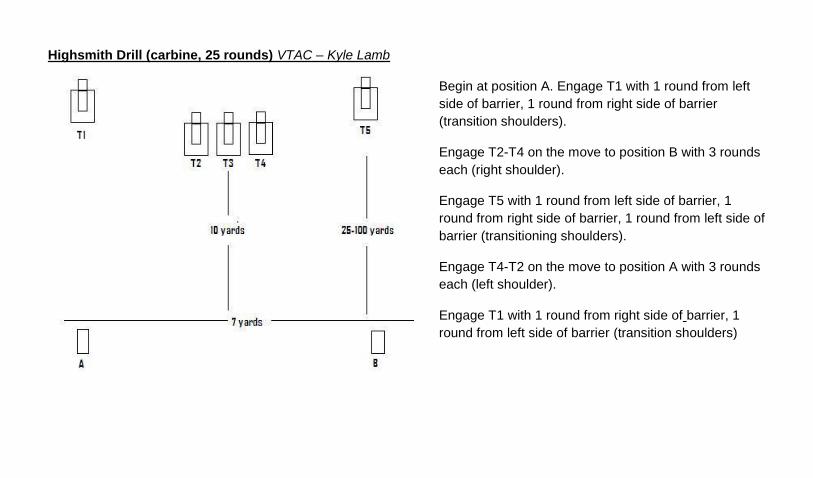
Highsmith Drill (carbine, 25 rounds) VTAC – Kyle Lamb
Begin at position A. Engage T1 with 1 round from left
side of barrier, 1 round from right side of barrier
(transition shoulders).
Engage T2-T4 on the move to position B with 3 rounds
each (right shoulder).
Engage T5 with 1 round from left side of barrier, 1
round from right side of barrier, 1 round from left side of
barrier (transitioning shoulders).
Engage T4-T2 on the move to position A with 3 rounds
each (left shoulder).
Engage T1 with 1 round from right side of barrier, 1
round from left side of barrier (transition shoulders)
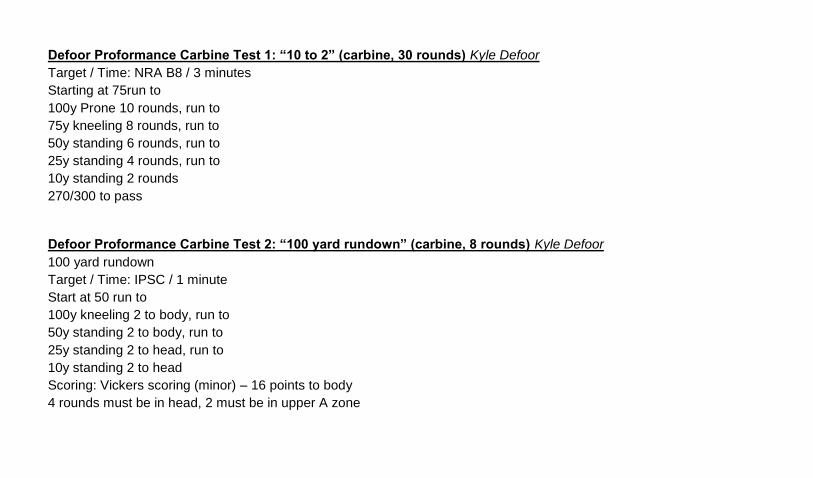
Defoor Proformance Carbine Test 1: “10 to 2” (carbine, 30 rounds) Kyle Defoor
Target / Time: NRA B8 / 3 minutes
Starting at 75run to
100y Prone 10 rounds, run to
75y kneeling 8 rounds, run to
50y standing 6 rounds, run to
25y standing 4 rounds, run to
10y standing 2 rounds
270/300 to pass
Defoor Proformance Carbine Test 2: “100 yard rundown” (carbine, 8 rounds) Kyle Defoor
100 yard rundown
Target / Time: IPSC / 1 minute
Start at 50 run to
100y kneeling 2 to body, run to
50y standing 2 to body, run to
25y standing 2 to head, run to
10y standing 2 to head
Scoring: Vickers scoring (minor) – 16 points to body
4 rounds must be in head, 2 must be in upper A zone

Defoor Proformance Carbine Test 3: “200 yard rundown” (carbine, 10 rounds) Kyle Defoor
Target / Time: SR42 / 2 minutes
Start at 100y, run to 200y. Prone 2 rounds
Run to 100y, kneeling 2 rounds
Run to 50y, standing 2 rounds
Run to 25y, standing 2 rounds
Run to 10y, standing 2 rounds
80/100 to pass
BRM - Basic Rifle Marksmanship (carbine, 10 rounds)
NRA B8 bullseye. 100 yards, prone, slowfire for score
Four Position Shoot (carbine, 20 rounds) Pat McNamara
Shot on IPSC target from 100 or 50 yard line
On signal, engage target with 5 rounds from each position: Standing, Kneeling (or modified kneel such as rice paddy
prone), sitting, and prone
A +0, B/C+1, D+2, miss +5

BASIC DRILL (carbine 15 rounds – 1 mag 5 rounds loaded in gun, 1 reload with 10 rounds) unknown
Target 8” circle.50y – fire 5 standing, reloading, 5 kneeling, 5 prone.
Par – 20 sec, 100% to pass Navy Qual scoring
ADVANCED DRILL (carbine, 20 rounds. 10 rounds loaded in gun, 1 reload with 10 rounds) unknown
Target 8” circle.
100y – Fire 1 shot, 4 second par time. Repeat for 10 rounds.
100y – Fire 2 shots, 5 second par time. Repeat for a total of 10 rounds.
80% A zone (16 hits) to pass
MODIFIED NAVY QUAL (carbine, 3 mags of 5 rounds) Jeff Gonzales, Trident Concepts
50 yards, target 8” circle - 5 rounds standing, reload, 5 rounds kneeling, reload, 5 rounds prone
Scoring: Par 25 seconds. Every miss = +5 points. Every second over par = +2 points. Every second under par = -1
Start with 0 points, tally up penalties, under 40 points to pass. Marksman: 26-40, Sharpshooter:10-25, Expert: 10 or under
**Accuracy is more critical than speed.

The Scrambler (carbine, 9 rounds) Pat McNamara, T.A.P.S.
One Iron Maiden (large) steel @ 125y (black)
One B/C steel @ 100 y (black)
Two B/C steel @ 75y (white)
Two barricades a yard apart
Shooter loads 3 magazines with 2 rounds,
3 rounds and 4 rounds (9 total)
Begin 10 yards behind barricade
-Shooter must engage all B/C steel with one
round, and Iron Maiden with four rounds.
-Shooter must engage all black steel from one barricade, all white steel from the other barricade (any order).
-Shooter must apply sound tactics (communicate mag change and movement, finger off trigger, weapon on safe, etc)
Scoring: “Go” or “No Go” timed event.

Light the Fuse – (carbine, 40 rounds) Pat McNamara
IPSC target @ 100 yards, 20 magazines loaded with 20 rounds each
On signal, shooter will engage target with 5 rounds from any position at 100, 75, 50, 25 (reload) 25, 50, 75 and 100
yards, running between each position.
Scoring: Total time plus penalties:
A +0, C (and head) +1 sec, D+2 sec, miss + 5 seconds
(Run backwards for easier scoring / reset)
Set it Off – (carbine, 9 rounds) Pat McNamara
BC steel at 50 yards. Two barricades 25 yards apart. Shooter has three
magazines loaded with three rounds each.
Starting position: facing up range behind one barricade.
On signal, turn and engage steel target with one round. Move to next
barricade, repeat. Continue until five hits are made on target. Shooter must
hit target from current barricade before moving to next one. Shooter must
use proper tactics (communicate reloads, moving, safe weapon, etc) or will receive NO GO.
Scoring: Time minus bonus points. Each un-fired round subtracts five seconds from total time (20 possible bonus
seconds).
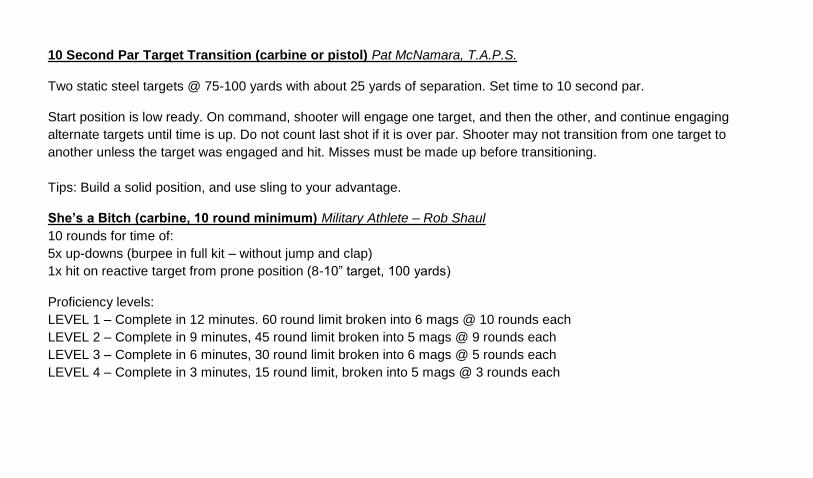
10 Second Par Target Transition (carbine or pistol) Pat McNamara, T.A.P.S.
Two static steel targets @ 75-100 yards with about 25 yards of separation. Set time to 10 second par.
Start position is low ready. On command, shooter will engage one target, and then the other, and continue engaging
alternate targets until time is up. Do not count last shot if it is over par. Shooter may not transition from one target to
another unless the target was engaged and hit. Misses must be made up before transitioning.
Tips: Build a solid position, and use sling to your advantage.
She’s a Bitch (carbine, 10 round minimum) Military Athlete – Rob Shaul
10 rounds for time of:
5x up-downs (burpee in full kit – without jump and clap)
1x hit on reactive target from prone position (8-10” target, 100 yards)
Proficiency levels:
LEVEL 1 – Complete in 12 minutes. 60 round limit broken into 6 mags @ 10 rounds each
LEVEL 2 – Complete in 9 minutes, 45 round limit broken into 5 mags @ 9 rounds each
LEVEL 3 – Complete in 6 minutes, 30 round limit broken into 6 mags @ 5 rounds each
LEVEL 4 – Complete in 3 minutes, 15 round limit, broken into 5 mags @ 3 rounds each

Transition Drill 3 – 3 – 1 (carbine and pistol, 6 / 1 rounds) Pat McNamara
IPSC target at 10 yards. Two rifle mags with three rounds, loaded pistol holstered. On signal:
-3 rounds from carbine
-Reload
-3 rounds from carbine
-Transition to pistol and fire 1 round
Keep all rounds in A zone for “GO” and use rifle safety during reloads.
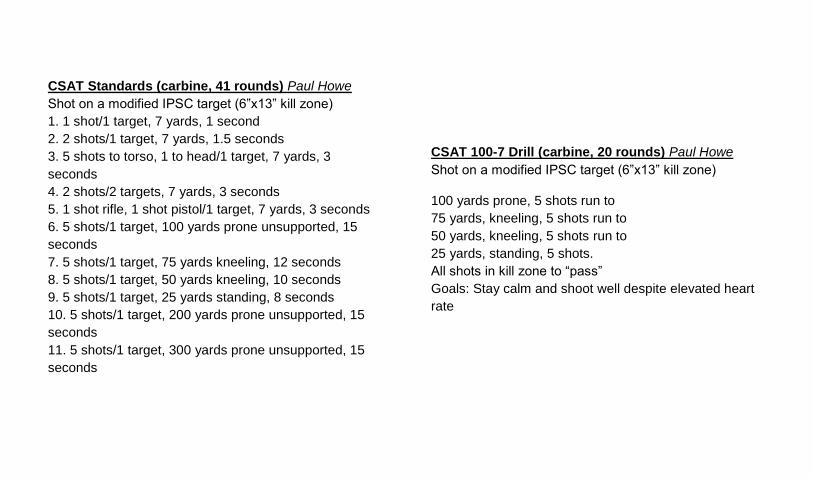
CSAT Standards (carbine, 41 rounds) Paul Howe
Shot on a modified IPSC target (6”x13” kill zone)
1. 1 shot/1 target, 7 yards, 1 second
2. 2 shots/1 target, 7 yards, 1.5 seconds
3. 5 shots to torso, 1 to head/1 target, 7 yards, 3
seconds
4. 2 shots/2 targets, 7 yards, 3 seconds
5. 1 shot rifle, 1 shot pistol/1 target, 7 yards, 3 seconds
6. 5 shots/1 target, 100 yards prone unsupported, 15
seconds
7. 5 shots/1 target, 75 yards kneeling, 12 seconds
8. 5 shots/1 target, 50 yards kneeling, 10 seconds
9. 5 shots/1 target, 25 yards standing, 8 seconds
10. 5 shots/1 target, 200 yards prone unsupported, 15
seconds
11. 5 shots/1 target, 300 yards prone unsupported, 15
seconds
CSAT 100-7 Drill (carbine, 20 rounds) Paul Howe
Shot on a modified IPSC target (6”x13” kill zone)
100 yards prone, 5 shots run to
75 yards, kneeling, 5 shots run to
50 yards, kneeling, 5 shots run to
25 yards, standing, 5 shots.
All shots in kill zone to “pass”
Goals: Stay calm and shoot well despite elevated heart
rate

MEU (SOC) M4A1 QUALIFICATION COURSE
Phase 1 For this evolution, each shooter has one target assigned.
Distance in yards Procedure
Shots fired
Time allotment in seconds
Cumulative round count
50 Pair Standing/Kneeling/Prone to body 6 10 6
25 Run from 50-25 yard line. Pair Standing/Kneeling to body 4 11 10
25 Brain Shot 1 2 11
25-15 Shooting on the move. Pair to body 2 5 13
15 Standing. Pair to body 2 1.5 15
15-10 Shooting on the move. Failure Drill 3 4 18
10-5 Shooting on the move. Failure Drill 3 3.5 21
7-3 Shooting on the move. Failure Drill 3 24
At this point, the targets are scored. There shold be twenty shots to body, and four shots to the brain. There are forty-eight points possible, with shots scored accordingly: In the desired area - 2 points. Outside the desired area, 1 point. A miss is zero points. Tally the score to this point and write it on the target. Tape the target.
Phase 2 For this evolution, each shooter has two targets assigned.
Distance in yards Procedure
Shots fired
Time allotment in seconds
Cumulative round count
50 Pair standing to body of target one, reload, pair kneeling on target two 4 11 28
25-15 Shooting on the move. Pair to each body 4 6 32
15 Pair to bodies of each target 4 3.5 36
15-10 Shooting on the move. Pair to bodies of each target 4 4 40
10 Pair to bodies of each target 4 3 44
10-3
Shooting on the move. Hammer to body of each target, single shot to brain of each target (Box Drill). 6 5 50
At this point, the targets are scored. There should be twelve shots to each of two bodies, and one shot to each brain (24 body shots, 2 brain shots). There are fifty-two points possible, with shots scored accordingly: In the desired area - 2 points. Outside the desired area, 1 point. A miss is zero points. Tally the score for this phase, add it to the score for the previous phase and write it on the target. The maximum score possible for both phases is 100 points (an aggregate of Phases 1 and 2). To qualify, each shooter must score at least 80 points.
Copyright 2001 Patrick A. Rogers E.A.G. Tactical Training
40 Acadia Place - Staten Island, NY 10310-2207
718-273-0953 [email protected]
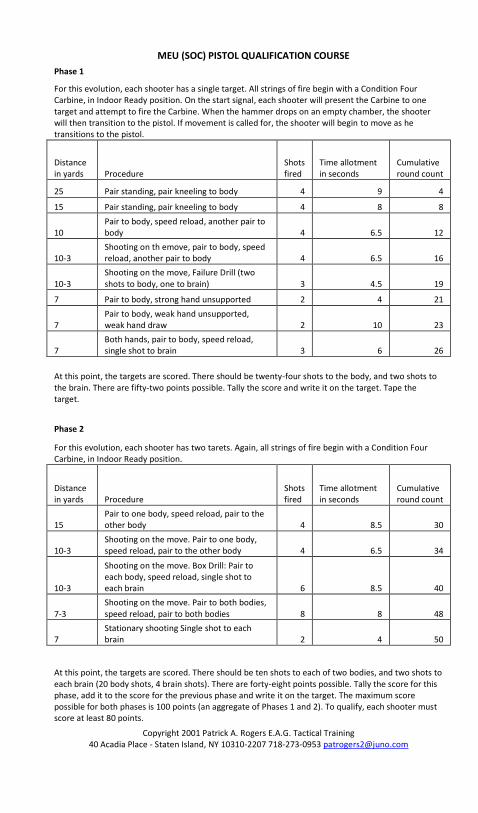
MEU (SOC) PISTOL QUALIFICATION COURSE
Phase 1
For this evolution, each shooter has a single target. All strings of fire begin with a Condition Four Carbine, in Indoor Ready position. On the start signal, each shooter will present the Carbine to one target and attempt to fire the Carbine. When the hammer drops on an empty chamber, the shooter will then transition to the pistol. If movement is called for, the shooter will begin to move as he transitions to the pistol.
Distance in yards Procedure
Shots fired
Time allotment in seconds
Cumulative round count
25 Pair standing, pair kneeling to body 4 9 4
15 Pair standing, pair kneeling to body 4 8 8
10 Pair to body, speed reload, another pair to body 4 6.5 12
10-3 Shooting on th emove, pair to body, speed reload, another pair to body 4 6.5 16
10-3 Shooting on the move, Failure Drill (two shots to body, one to brain) 3 4.5 19
7 Pair to body, strong hand unsupported 2 4 21
7 Pair to body, weak hand unsupported, weak hand draw 2 10 23
7 Both hands, pair to body, speed reload, single shot to brain 3 6 26
At this point, the targets are scored. There should be twenty-four shots to the body, and two shots to the brain. There are fifty-two points possible. Tally the score and write it on the target. Tape the target.
Phase 2
For this evolution, each shooter has two tarets. Again, all strings of fire begin with a Condition Four Carbine, in Indoor Ready position.
Distance in yards Procedure
Shots fired
Time allotment in seconds
Cumulative round count
15 Pair to one body, speed reload, pair to the other body 4 8.5 30
10-3 Shooting on the move. Pair to one body, speed reload, pair to the other body 4 6.5 34
10-3
Shooting on the move. Box Drill: Pair to each body, speed reload, single shot to each brain 6 8.5 40
7-3 Shooting on the move. Pair to both bodies, speed reload, pair to both bodies 8 8 48
7 Stationary shooting Single shot to each brain 2 4 50
At this point, the targets are scored. There should be ten shots to each of two bodies, and two shots to each brain (20 body shots, 4 brain shots). There are forty-eight points possible. Tally the score for this phase, add it to the score for the previous phase and write it on the target. The maximum score possible for both phases is 100 points (an aggregate of Phases 1 and 2). To qualify, each shooter must score at least 80 points.
Copyright 2001 Patrick A. Rogers E.A.G. Tactical Training 40 Acadia Place - Staten Island, NY 10310-2207 718-273-0953 [email protected]
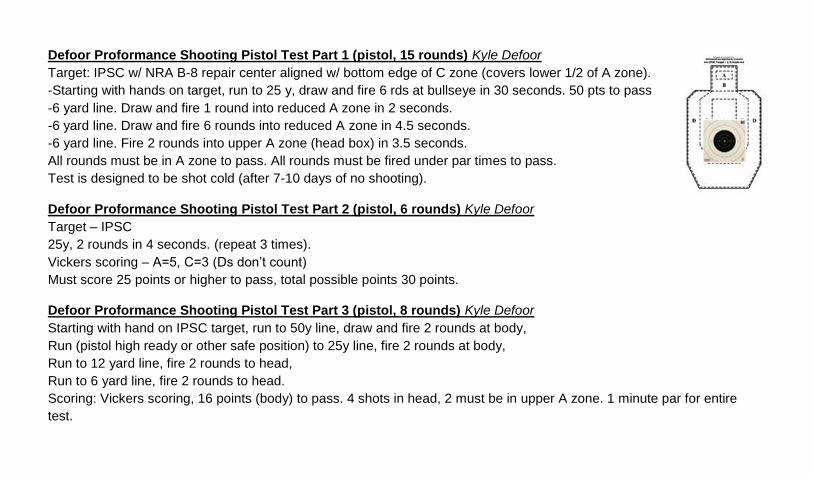
Defoor Proformance Shooting Pistol Test Part 1 (pistol, 15 rounds) Kyle Defoor
Target: IPSC w/ NRA B-8 repair center aligned w/ bottom edge of C zone (covers lower 1/2 of A zone).
-Starting with hands on target, run to 25 y, draw and fire 6 rds at bullseye in 30 seconds. 50 pts to pass
-6 yard line. Draw and fire 1 round into reduced A zone in 2 seconds.
-6 yard line. Draw and fire 6 rounds into reduced A zone in 4.5 seconds.
-6 yard line. Fire 2 rounds into upper A zone (head box) in 3.5 seconds.
All rounds must be in A zone to pass. All rounds must be fired under par times to pass.
Test is designed to be shot cold (after 7-10 days of no shooting).
Defoor Proformance Shooting Pistol Test Part 2 (pistol, 6 rounds) Kyle Defoor
Target – IPSC
25y, 2 rounds in 4 seconds. (repeat 3 times).
Vickers scoring – A=5, C=3 (Ds don’t count)
Must score 25 points or higher to pass, total possible points 30 points.
Defoor Proformance Shooting Pistol Test Part 3 (pistol, 8 rounds) Kyle Defoor
Starting with hand on IPSC target, run to 50y line, draw and fire 2 rounds at body,
Run (pistol high ready or other safe position) to 25y line, fire 2 rounds at body,
Run to 12 yard line, fire 2 rounds to head,
Run to 6 yard line, fire 2 rounds to head.
Scoring: Vickers scoring, 16 points (body) to pass. 4 shots in head, 2 must be in upper A zone. 1 minute par for entire
test.
50 Round Time Crunch Pistol Training (pistol, 50 rounds) Kyle Defoor
Target: 6-8 inch circle
1. 25 yards, 10 rounds slowfire
2. 7 yards, draw and fire 1 round (repeat 10x)
3. 7 yards, fire 1 round, reload fire 1 round (repeat 5x)
4. 7 yards, 5 round Bill Drills (repeat 4x)
Last Man Standing (pistol, 6 rounds each string) Pat McNamara, T.A.P.S.
Group competition. Use IPSC targets, loaded and holstered.
On command (vocal, targets turn, timer) shooters will draw and engage their target. They must show six shots in the A
zone of the target. Shooters may fire more than six rounds each time, but must show six A zone hits or they are out.
Anyone who does not show six rounds in the A zone is out. The last person to fire is out.
Repair everything in A zone. Repeat until there is only one standing. Have a couple instructors monitoring to monitor for
last person shooting.

Grid of Fire (pistol,8 rounds minimum) Pat McNamara
Single BC steel target. Cones are 5 yards apart, at 10, 15 and
25 yards. Start at cone 1. On signal, engage target with one
round from each cone, moving in order of diagram (figure 8
pattern). Shooter must hit target prior to moving to next
position.
“Mod” – Alternate between strong hand only and support hand
only at each shooting position
Rifle – Cones at 75, 50 and 25 yards. Use Iron Maiden or BC
steel.
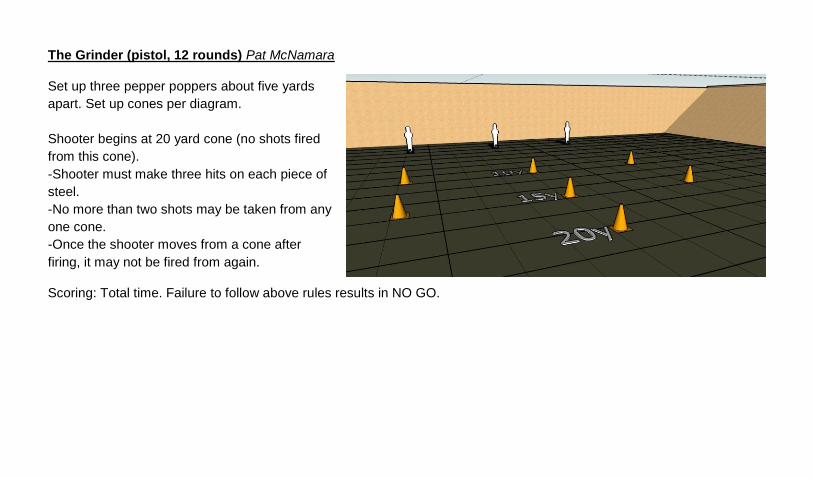
The Grinder (pistol, 12 rounds) Pat McNamara
Set up three pepper poppers about five yards
apart. Set up cones per diagram.
Shooter begins at 20 yard cone (no shots fired
from this cone).
-Shooter must make three hits on each piece of
steel.
-No more than two shots may be taken from any
one cone.
-Once the shooter moves from a cone after
firing, it may not be fired from again.
Scoring: Total time. Failure to follow above rules results in NO GO.
Pick Your Poison (pistol, 30 rounds) Pat McNamara
This is a great accuracy drill that allows shooters of different skill levels to compete with one another.
Three firing lines: 25, 15 and 10. Shot on IPSC target.
Prior to shooting, shooter will determine if his target is worth 150, 140 or 130 points and write it on target. Shooter may
outline his target area with marker.
If the shooter chooses 150 points – only A zone hits will count (anything outside A zone is -10)
If the shooter chooses 140 points – only A and C zone hits will count (anything outside A or C zone is -5)
If the shooter chooses 130 points – anything on target will count (misses are only -1)
From the 25 yard line, shooters will slowfire 10 rounds free style
From the 15 yard line, shooters will slowfire 10 rounds strong hand
From the 10 yard line, shooters will slowfire 10 rounds support hand
Tie break: most shots closest to “A” on target (use target paster circle or something)
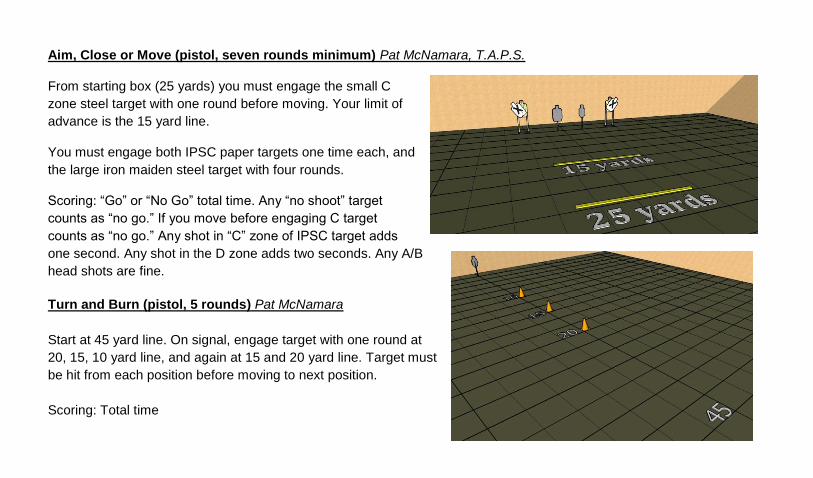
Aim, Close or Move (pistol, seven rounds minimum) Pat McNamara, T.A.P.S.
From starting box (25 yards) you must engage the small C
zone steel target with one round before moving. Your limit of
advance is the 15 yard line.
You must engage both IPSC paper targets one time each, and
the large iron maiden steel target with four rounds.
Scoring: “Go” or “No Go” total time. Any “no shoot” target
counts as “no go.” If you move before engaging C target
counts as “no go.” Any shot in “C” zone of IPSC target adds
one second. Any shot in the D zone adds two seconds. Any A/B
head shots are fine.
Turn and Burn (pistol, 5 rounds) Pat McNamara
Start at 45 yard line. On signal, engage target with one round at
20, 15, 10 yard line, and again at 15 and 20 yard line. Target must
be hit from each position before moving to next position.
Scoring: Total time
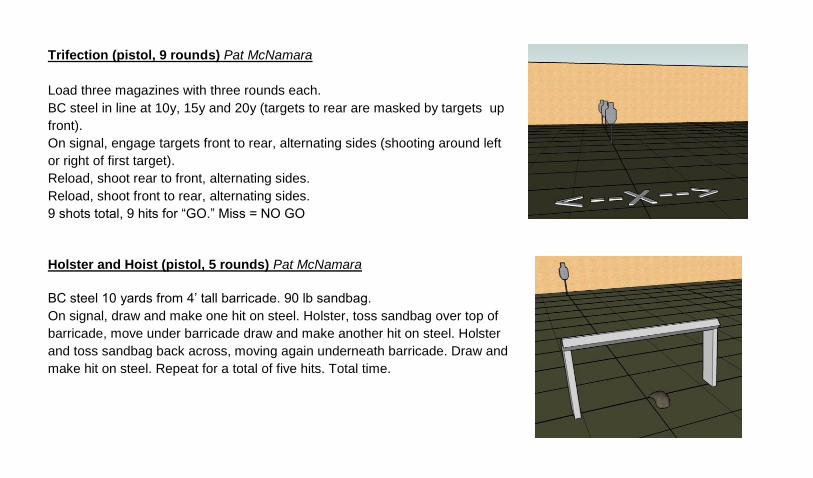
Trifection (pistol, 9 rounds) Pat McNamara
Load three magazines with three rounds each.
BC steel in line at 10y, 15y and 20y (targets to rear are masked by targets up
front).
On signal, engage targets front to rear, alternating sides (shooting around left
or right of first target).
Reload, shoot rear to front, alternating sides.
Reload, shoot front to rear, alternating sides.
9 shots total, 9 hits for “GO.” Miss = NO GO
Holster and Hoist (pistol, 5 rounds) Pat McNamara
BC steel 10 yards from 4’ tall barricade. 90 lb sandbag.
On signal, draw and make one hit on steel. Holster, toss sandbag over top of
barricade, move under barricade draw and make another hit on steel. Holster
and toss sandbag back across, moving again underneath barricade. Draw and
make hit on steel. Repeat for a total of five hits. Total time.

Bianchi Plates (pistol, 48 rounds) modified version from TAPS - Pat McNamara
Shot on Bianchi plate rack (6, 8” plates)
10y – 6 seconds (modified/duty gear 8 seconds) x2
15y – 7 seconds (modified/duty gear 9 seconds) x2
20y – 8 seconds (modified/duty gear 10 seconds) x2
25y – 9 seconds (modified/duty gear 12 seconds) x2
10 points per plate, total possible score: 480 points (48 plates)
150 point, 5,5&5 (pistol, 15 rounds) TAPS - Pat McNamara
25y, slowfire, NRA-B8 25yd pistol bull
5 rounds freestyle, 5 rounds strong hand only, 5 rounds support hand only. Total score. 150 points possible.
500 point aggregate (pistol, 50 rounds) TAPS – Pat McNamara
15y, NRA-B8 25yd pistol bull. Score and repair after each stage.
20y – Slowfire 10 rounds
15y – Slowfire 10 rounds, strong hand only
15y – Slowfire 10 rounds, support hand only
10y – 10 rounds from holster in 20 seconds
7y – 10 rounds from holster in 10 seconds
500 points possible.
Triple Threat (pistol, 15 rounds, 1 mag) VTAC – Kyle Lamb
5y @ 3 VTAC targets, 1m apart.
Draw – at center target fire 3 to chest, 1 to head, 1 to pelvis. Transition to either outside target, repeat. Transition to last
target, repeat. Must begin each target with 3 to chest. Head or pelvis can be shot first.
Scoring: 0 MISSES ALLOWED – total time
Driving the Gun (pistol, 15+ rounds) VTAC – Kyle Lamb
5 static steel targets
10 y – Draw and fire down the line: T1,T2,T1,T3,T1,T4,T1,T5 continue back down the line T1,T4,T1,T3,T1,T2,T1.
Scoring: Total time - make up any misses
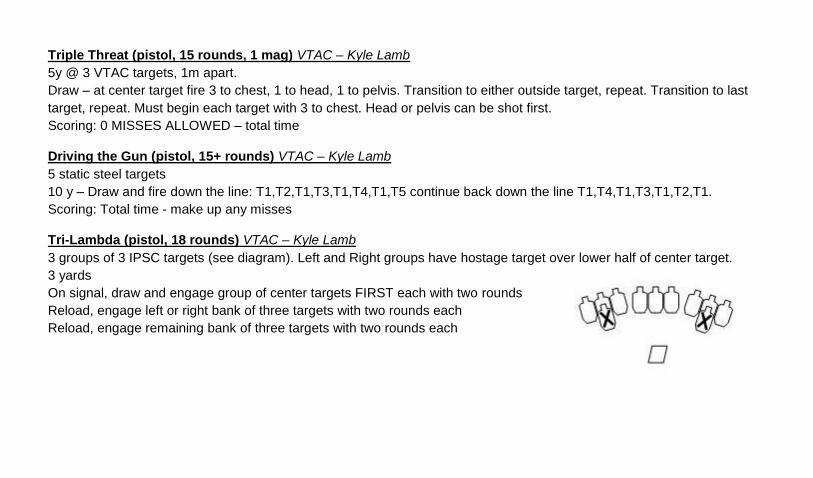
Tri-Lambda (pistol, 18 rounds) VTAC – Kyle Lamb
3 groups of 3 IPSC targets (see diagram). Left and Right groups have hostage target over lower half of center target.
3 yards
On signal, draw and engage group of center targets FIRST each with two rounds
Reload, engage left or right bank of three targets with two rounds each
Reload, engage remaining bank of three targets with two rounds each
Bill Drill (pistol, 18 rounds – 6 each string) VTAC – Kyle Lamb
20y – draw and fire 6 rounds – 5 second par
15y – draw and fire 6 rounds – 4 second par
10y – draw and fire 6 rounds – 3 second par
Scoring: Total A zone hits (IPSC)
½ & ½ (pistol, 30 rounds – 10 each string) VTAC – Kyle Lamb
20y – from position 3, fire 10 rounds – 12 second par
15y – from position 3, fire 10 rounds – 6 second par
10y – from position 3, fire 10 rounds – 3 second par
Reload Drill (pistol, 9+ rounds, 3 magazines) VTAC – Kyle Lamb
Target: BC Steel
10y – Draw and fire 3 hits, reload fire 3 hits, reload fire 3 hits for total time.
Vary from slide lock, to speed reload, etc. Work through as many magazine pouches as you want.

700 point Aggregate Drill AKA “The Humbler” (pistol, 70 rounds) All fired from 25 yds at NRA B-8, 700 possible points Stage 1- 10 rds slow fire in 10 min Stage 2- 5 rds in 20 sec from the draw X 2 Stage 3- 5 rds in 10 sec from the draw X 2 Stage 4- 5 rds strong hand in 5 min Stage 5- 5 rds in 20 sec strong hand from the draw Stage 6- 5 rds in 10 sec strong hand from the draw Stage 7- 5 rds weak hand in 5 min Stage 8- 5 rds kneeling in 5 min Stage 9- 5 rds in 20 sec standing to kneel with the draw Stage 10-5 rds prone in 5 min Stage 11-5 rds in 20 sec standing to prone with the draw
Hackathorn Standards (pistol, 60 rounds) Tigerswan - Ken Hackathorn 3 IPSC targets 1 meter apart and staggered heights. 5 yards - 1 round to each head freestyle. 3 secs 5 yards - 1 round to each head strong hand only. 4 secs 5 yards - 1 round to each body strong hand only. 3 secs twice 8 yards - 2 rounds to the body left target. 2 secs 8 yards - 2 rounds to the body middle target. 2 secs 8 yards - 2 rounds to the body right target. 2 secs 10 yards - El presidente (facing up range, turn and fire 2-2-2, reload, 2-2-2) 10 secs 10 yards - Weak hand pick up (pistol on ground, butt strong side. Flip pistol with weak hand and fire 1 round per target to each body.) 5 secs 12 to 8 yards - Shoot on the move, 2 to each body 5 secs 15 yards - transition drill, 1 to each body 4 secs 20 yards - standing to prone, 2 to each body 10 secs 25 yards - using vertical cover and tactical order, 2 to each body tactical/retention reload, kneeling, 2 to each body. 24 secs 5 points for an A, 3 points for a C and 2 points for a D. 300 total possible points. (275 is instructor score at Tiger Swan).

F.A.S.T. Test (pistol, 6 rounds) Todd Green
Target: 3x5 card (head), 8” plate/circle (body)
Start position: Weapon concealed or in duty condition with all holster retention devices active. Facing downrange in
relaxed state with arms down at sides.
Course of fire: Shooter loads gun with two rounds. On signal, draw and fire two rounds at head target, perform slidelock
reload, fire four rounds at body target.
Scoring: -Open top retention (ALS, SERPA) without concealment, + 0.50 sec to final score
-Flap/retention mag pouch, - 0.50 sec to final score
-Misses to 3x5 box, + 2.00 sec per miss
-Misses to 8” circle, + 1.00 sec per miss
Ranking: -10+ seconds: Novice
- Under 10 seconds: Intermediate
- Under 7 seconds: Advanced
- Under 5 seconds: Expert
10-8 Pistol Test (pistol, 65 rounds) 10-8 Performance
All drills performed at 7y. Target IDPA 8” circle.
All reloads are slide-lock.
Par time for all strings: 8 seconds (basic), 6.5 seconds (advanced), 5 seconds (expert)
Scoring: A zone – 1 pt. Outside A zone – 0 pts. 65 rounds fired, possible score of 65.
1. From holster, 4 to body, 1 to head strong hand only
2. From high ready, transfer gun to support hand. 4 to body, 1 to head
3. From high ready w/ empty chamber. Rack slide strong hand only, 4 to head.
4. From high ready w/ empty chamber. Rack slide with support hand only, 4 to body, 1 to head.
5. With empty mag, slide locked back, aimed in, reload strong hand only, 1 to body.
6. From holster, 7 to body, 1 to head.
7. From holster, 7 rounds loaded in gun, 7 to body, reload 1 to body.
8. From holster, 8 to head.
9. From high ready, 3 rounds loaded in gun. Failure drill (2 to body, 1 to head), reload failure drill.
10. From holster, 2 rounds loaded in gun. 1 to body, 1 to head, reload, 1 to body, 1 to head.
11. From high ready, 4 to body, reload, 4 to body.
12. From holster 1 round loaded in gun, 1 to body, reload, 1 to body, reload, 1 to body.
Figure Eights IPSC (pistol, 8 rounds) adapted Barnhart Drill
From at least 7 yards at two, IPSC targets.
Draw and fire 2 rounds to body of T1, 2 to head of T2, 2 to head of T1, 2 to body of T2 (making a figure 8).
Goals: Lead with your eyes. Recognize speed vs accuracy requirements (head shots / vs torso shots)
Hardball’s Headache IPSC (pistol, 12 rounds) Brian Enos
3 IPSC targets at 12 yds, 1yd apart edge to edge
Draw and fire 2 shots in each body, reload, 2 shots in each upper B zone. Scored time/plus 0.2 seconds for each point
dropped.
El Presidente and Variations (pistol, 12 rounds) Jeff Cooper
3 IPSC targets at 10 yds, spaced 1 yd apart edge to edge
Facing up range, (surrender position) turn, draw and fire 2 rds at T1-T3. Reload, fire 2 rds at T1-T3.
Par times: (for a clean run)
D Class: 15 seconds
C Class: 11.25 seconds
B Class: 7.5 seconds
A Class: 6.0 seconds
Master Class: 5.3 seconds
Grand Master Class: 4.75 seconds
Original API (American Pistol Institute) par time was 10 seconds
Variations: Vice Pres (shot at 7 yards). Demi-Presidente (10 yards, 2rds T1-T3, reload, 1rd to head of T1-T3. Same par)

Plaxco Academy Drill IPSC reloads (pistol, 36 rounds)
3 IPSC targets at 10 yards, 1 yd apart edge to edge
T1 – Draw and fire 1 shot, reload, fire 1 shot. Repeat six times (12 rounds)
T2 – Draw and fire 2 shots, reload, fire 2 shots. Repeat three times (12 rounds)
T3 – Draw and fire 6 shots, reload, fire 6 shots. (12 rounds).
Goal: 100% A zone hits and smooth reloads.
2 target draw drill IPSC (pistol) Matt Burkett
2 IPSC targets, T1 – 3 yards, T3 – 7 yards
Stage 1) Draw and fire 2 rounds at T1. Record draw times. Repeat.
Stage 2) Draw and fire 2 rounds at T1, transition to T2, 2 rounds. Record draw times.
Stage 2 draw times should be the same as stage 1. Psychologically, there is a tendency to slow down. Presentation form
holster should be the same from 1 yard or 100 yards. SPEND MORE TIME ON THE SIGHTS.
Farnham Drill (pistol) John Farnham
7 yards. Mag w/ 6 rounds +1 dummy round (not first nor last in magazine)
-Fire first mag, clear malfunction, fire remainder, emergency reload, fire 2 shots to head.
Beginner Intermediate Expert Master
Draw 2.5 2.0 1.5 1.25
Split 1 .5 .35 .25
Headsplit add .25 to split Malf subtract .5 from draw Reload add .75 to draw
MAPD “Glock Handling Drill” academy standards Draw 2.5, Cadence 1.0, Tap Rack 3.0, Reload 6.0
Target Transitions no. 43 (adapted) IPSC (pistol) Saul Kirsch
3-4 IPSC targets at varying distances down range (5y, 10y, 15y, 25y, etc.)
Draw and fire 2 rounds at each target, near to far. Repeat. Then draw and fire 2 rounds at each target, far to near. Adjust
speed as necessary to obtain two hits at all distances.
El Platezente #37(pistol) Steve Anderson
10 yards, Bianchi plate rack (6, 8” plates). Facing up range with holstered gun. On signal, turn, draw and engage three
plates. Perform mandatory reload and engage remaining three plates.
Scoring: Total time.
Shoot Off #38 (pistol) Steve Anderson
10 yards, Bianchi plate rack. Facing plates. On signal, draw and engage plates 1-5 or 6-2. Perform mandatory reload and
engage remaining plates.
Scoring: Total time.
Plate transitions #30 (pistol) Steve Anderson
10 yards, Bianchi plate rack. Facing plates. On signal, draw and engage plates 1,6,2,5,3,4 in that exact order.
Scoring: Total time.
Ball and dummy aggregate (30 rounds) Performance on Demand Shooting
Target: NRA B-8 @ 25 yards.
Randomly load 3 pistol magazines, each with 10 live rounds, 8-10 dummy rounds. Do not load the magazines the same
way. Without looking, load one magazine into your gun, the other two into mag pouches.
String 1: Slowfire10 rounds. Score and paste target.
String 2: From holster. Draw and fire one round. Par time 5 seconds per shot. Repeat. Score and paste target.
String 3: (credit to Larry Vickers) Sights on target. Finger on trigger, slack out of trigger. Use delay start on timer. Set par
so start beep and end beep make one, nearly continuous sound (under .5 seconds). Shot should break before buzzer
tone ends. No need to keep gun on target longer than necessary. When sights are aligned, break the shot. Watch for
flinch and follow through!
Scoring: Tally total points from all three strings. 300 possible.
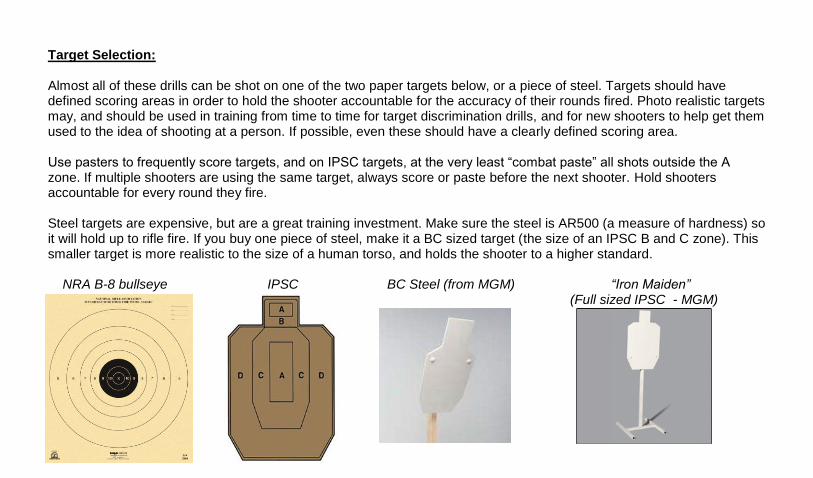
Target Selection: Almost all of these drills can be shot on one of the two paper targets below, or a piece of steel. Targets should have defined scoring areas in order to hold the shooter accountable for the accuracy of their rounds fired. Photo realistic targets may, and should be used in training from time to time for target discrimination drills, and for new shooters to help get them used to the idea of shooting at a person. If possible, even these should have a clearly defined scoring area. Use pasters to frequently score targets, and on IPSC targets, at the very least “combat paste” all shots outside the A zone. If multiple shooters are using the same target, always score or paste before the next shooter. Hold shooters accountable for every round they fire. Steel targets are expensive, but are a great training investment. Make sure the steel is AR500 (a measure of hardness) so it will hold up to rifle fire. If you buy one piece of steel, make it a BC sized target (the size of an IPSC B and C zone). This smaller target is more realistic to the size of a human torso, and holds the shooter to a higher standard. NRA B-8 bullseye IPSC BC Steel (from MGM) “Iron Maiden”
(Full sized IPSC - MGM)

Shooting Timer: Almost all of these drills have a time standard or are timed. Shooting on a timer accomplishes two things: it provides another method for keeping the shooter accountable and tracking their progress as they train, but more importantly it adds an element of stress while shooting the drill. We will never be able to completely replicate the stress of a real gunfight on the range, but for many shooters, putting them on the clock, in front of their peers, in a competitive situation can get that stress level up a bit. A timer is hands down the best investment in a piece of equipment you can make in your firearms training. They run about $120 and are worth every penny. I prefer a simple timer so easy to operate, a caveman could do it. A good timer will have a delay option, so while training by yourself when you press start, you will have a couple seconds to standby before the timer goes off. Shot timers record the time after each consecutive shot you fire. A good timer will allow you to set a “par time,” review all your shot times, show your splits (time between shots) and your first round on target. This is your first round on target (with a rifle) or your draw time (with a pistol). It is the most important round you fire. On the street, it sets the tone for the gunfight – on the range, it sets the tone for the drill. The only thing worse than a miss, is a slow miss – or another miss. Even when shooting on a timer – get your hits then pick up the speed. Most of the drills in a book penalize a shooter for an off center shot – and complete air balls get hammered. There are some smart phone shooting timer apps too. I have found they work in a pinch, but aren’t as nice or reliable as a stand-alone timer. They are nice for dry fire practice – where you can set a par time and turn down the volume of the buzzer so you don’t scare the dog. CED, Competition Electronics and PACT are all brands that all have a good reputation and various models to choose from. Again, I prefer fast and simple opposed to the models with more features but that’s me.

Fundamentals There is no such thing as an advanced skill. The best shooters are the ones who can apply the same fundamentals consistently and quickly. I know many will cringe at the comparison, but shooting is a lot like golf, both physically and mentally. Physically, the mechanics of the golf swing remains the same from shot to shot. What makes a PGA pro so good is he can consistently perform those mechanics 60 to 70 times during a round, where your average golfer is happy if he can put three to four good shots together to par a hole. Mentally, shooting and golf are the same sport. If you make a bad shot in either – there is nothing you can do about it anymore. Pat MacNamara explained “you have to learn to fail quickly.” In other words, when you inevitably miss, or the wheels come off during a drill or even a gunfight, you need to get over it fast, and bounce back. There is a difference between analyzing your failure and dwelling on it. Figure out what went wrong, correct it and then focus on doing it right. Don’t dwell on failure, and NEVER think about missing. When you have to make a hostage shot – don’t think about missing the hostage – you are telling yourself you’re going to miss. Focus on drilling the bad guy. Stance Many trainers gloss over stance because “in a gunfight you won’t have a good stance.” True, you may be moving and in strange positions while you are fighting with your pistol or rifle, but you won’t be flying through the air while shooting Keaneau Reeves style. Some part of my body is still going to be in contact with the ground – and therefore, my platform will affect how I shoot. Whether I am standing, prone, kneeling, moving, hanging out of a window – I want to be as stable as I can so I can put accurate rounds on target. More importantly, while training, your stance affects all of the other fundamentals. If you don’t build a good platform, you will struggle with sight alignment, trigger control and everything else. With a pistol, stand up! I see so many people scrunching behind their pistols, burying their heads between their shoulders like they are a hunched back, bell-ringing
Quasimodo. I call this “vulture necking.” It’s a tense and rigid position to fight from. It creates fatigue, reduces mobility and reduces visual acuity. Bring your gun up to your eyes, keep your head up and look through the center of your eyes – they way they were intended to be used. You’ll be able to focus better, you’ll have better peripheral vision, your muscles will be more relaxed. “But I need to get behind the gun and control the recoil!” How much the gun recoils matters far less than how consistently you can bring it back on target using a good grip and natural point of aim. Natural point of aim is where your gun returns with minimal muscular input after being fired. In other words, it’s where your sights settle after you shoot. One way to check it is to build a good solid platform, grip, cheek weld (with the rifle) and line up your sights on target. Close your eyes, and give you’re a body a little wiggle. With your eyes still closed, solidify your position and open your eyes. If your sights moved off target – rebuild your platform moving your entire body to get things lined up again. If you begin shooting while not utilizing your natural point of aim, to get your sights back on target, you are going to have to “steer” the gun using muscular input. This is going to affect your accuracy and consistency. When you see someone shooting groups with their rifle, and they have a group stretched laterally across the target, it’s usually because they are neglecting NPA and are having to steer the rifle back into place for each shot. With your rifle, get your stock all the way out, blade your body slightly and reach as far forward on the rifle as you comfortably can with your support hand. By having more rifle between your hands, you’ll have better control and leverage for tracking a moving target or driving it between targets. Put a little blade in your body. The collapsed stock, totally square to target, forward hand on magwell was not designed for rifle shooting. It’s the rifle equivalent of vulture-necking. Likewise, you don’t want a full, 90 degree blade in your stance either. The full 90 degree blade does provide good skeletal support when shooting offhand, slowfire, at targets that don’t shoot back – but your mobility, speed getting into this position, recoil control and ability to drive the gun suffer.
When shooting prone with the rifle, get your body in line behind the gun and “monopod” the mag on the deck for better stability. This will NOT cause a malfunction with the AR-15. If it does, you have a bad mag. Grip Grip is another neglected fundamental. A good grip directly affects the most important fundamental – trigger control. Your hand should be as high as possible on the grip. On a pistol, there should be no space between the webbing of your hand and the beavertail / grip tang. Your support hand should then fill in as much of the remaining exposed grip as possible, your support index finger up tight under the trigger guard, and your thumbs should point forward along the frame of the pistol towards your target. It may help you lock down your support hand by rotating it forward and down a little. Thumb over thumb creates a space where there is no hand to grip contact. The more surface of the grip in contact with your hand, the better you will be able to control recoil. Take a moment to ensure you have a good grip on your weapon. If you don’t quite have it solid on your draw stroke – make the adjustment! Adjusting your grip may take a couple tenths of a second, but if you don’t, you’re going to be fighting your gun on every shot – and it will cost you more in time and accuracy. How hard do I hold the weapon? As hard as you need to. You don’t need to choke it to death, but if it’s coming loose in your hands as you fire, you probably need to hold it harder. I find most shooters could hold their pistols harder, especially with their support hand. Having good grip strength will improve your pistol shooting, so get some Captains of Crush of a tennis ball and start squeezing. A lot of weapons these days have interchangeable grip sizes. If your weapon doesn’t fit you because you have small or large hands, modify it or find one that does. Some grips are not very “grippy” – especially when your hand gets wet, they can feel like a bar of soap. They can be modified or stippled, but often the easiest way to remedy this is good old
fashioned grip tape. There are custom grip tapes designed to fit specific guns, or for a lot less money, you can but a roll of skateboard tape, 3M stair tape, etc – and do it yourself. The nice thing with tape is when it wears, or you decide you don’t like it, you strip it off, and start over. Sight Alignment In my opinion, the most important fundamental next to trigger control. The final thing that determines whether you hit your target or not is: were your sights properly aligned, and did you keep them aligned when you pressed the trigger? Pat McNamara told me: sight picture is a thing, sight alignment is something you can do. When shooting iron sights, your front sight should be in focus, the top of the front sight even with the top of the rear notch (or centered of the rear peep on an AR-15 rifle), and the front sight equidistant between the sides of rear notch. Your rear sight is going to be a little blurry and your target is going to be a little blurry. With a red dot or optic, your dot or reticle should be centered in the middle of your optic. Red dots have parallax, despite what anyone says. Some have it worse than others, but the farther your target, and the more accurate you are trying to shoot, the more this will affect your shot placement. Just like the pro golfer we talked about, consistency is key. Why is sight alignment more important than sight picture? Because when we are shooting, we have a natural “wobble zone” – or the tracking of your sights back and forth across your target. When you’re shooting a red dot, prone with a rifle from 100 yards, you may not notice it, but if you put a high magnification scope on your rifle, you will see it moving a little bit as long as you are attached to the rifle. Your heartbeat and the blood moving through your body will cause very small movements even in the most stable positions. Of course with the pistol, it is much more noticeable, especially when shooting one handed. By relaxing and building a stable position you can minimize your “wobble zone,” but at the end of the day, we cannot completely eliminate it. You have to accept it and learn to ignore it. As you wobble, your sights are still aligned, even if it doesn’t always appear that way to your eye. Take your unloaded

gun, and pick a spot on the wall. Line up your sights. Now keep your gun where it is, but shift your head to the side. You still going to hit your target? Yes, because your sights are still pointing at where you aimed, even though your head moved. Wobble is the opposite – your head is staying still, but your gun is moving a little. The sights are still lined up – at least good enough to hit your target, even though the entire gun has moved. It’s kind of an optical illusion. A TACTICAL OPTICAL ILLUSION! Everyone’s hands shake a little. I have extremely shaky hands – it’s a genetic thing called a familial tremor. My wobble zone is bigger than most people’s, but when I use good trigger control and my head is in the game, I can drill shot after shot into the black on a pistol bull at 25 yards. If you try to time your shots so you break the trigger when your wobble zone moves across your target, you will most likely jerk the trigger and misalign your sights. A misalignment of the sights by a fraction of an inch will translate to a much greater error the farther downrange your target is. Learn to accept the wobble zone for what it is. Sight Picture
We pretty much covered this under sight alignment, but essentially, sight picture is aligning your sights on top of the target. Sight picture is always changing because of your wobble zone, which we discussed you need to ignore. Now if you bring your gun completely off target, obviously that can be a problem - but generally, once you get the gun up on target, and are ready to fire, your focus, attention, thoughts, Zen, The Force, The Schwartz – should shift to trigger control and maintaining sight alignment. Trigger Control The trigger is the heart of the beast. Most people think “break the shot while the sights are on target.” I like to think, which I heard from Brian Enos, “keep your sights aligned as the shot breaks.” They mean the same thing, but the latter suggests a more passive role on the trigger which I believe puts you in a better frame of mind to ignore the wobble zone and make a good trigger press – versus “jumping” on the trigger when the sights are aligned. One drill I use for shooters who are
struggling with trigger control is to have them align the sights, then I press the trigger for them. All they have to do is keep the sights aligned. Most of their shots go right down the middle. The next step is to have them put their finger on the trigger, my finger on top of theirs, and again, I press the trigger. Usually the result is the same. This teaches them they aren’t missing because their sights aren’t aligned, they are missing because they aren’t controlling the trigger. Ball and dummy is another great drill to expose trigger control problems. You’ll often hear inexperienced firearms instructors yelling at a new shooter who is shooting low left (right handed shoter) “you’re jerking the trigger!” For one, most new shooters don’t know what that means. Two, while often this is the case, it can also be a symptom of improper trigger finger placement. Get plenty of finger on the trigger. Somewhere, someone invented this idea that Glocks are supposed to be shot with the pad of your finger. The further towards the tip of your finger you get, the less leverage you have. It’s simple physics. When you have to pick up or carry a heavy object, do you lift if far away from your body with your hands outstretched? Of course not, you get it as close to your center as possible. I find most shooters would be much better off getting more finger on the trigger and using that first joint instead of the pad, especially on guns with 5, 8 or (God forbid) a 12 lb DA trigger. I suggest the same for the rifle. This also means if a shooter, especially someone with smaller hands, can’t get that much finger on the trigger, they are using too large of a gun, and should get a smaller one or have a grip reduction done. I have found most women have the innate, natural, hard-wired, biological ability to be more accurate shooters than their male counter parts. This is primarily due to their lack of the pig-headedness gene and male ego. Women shooters often struggle because their equipment doesn’t fit their bodies. We have body armor, shoes and uniforms specially designed for women cops – but today’s gun manufacturers design firearms for average sized male hands. Most police recruits all get the same gun when they start, even though they likely have very different hand sizes. One area where some women may have a biological disadvantage is grip strength – but that can be improved with strength training.
Follow Through This is a critical fundamental, though it is one that is often not even taught. Follow thorough is important in the golf swing, baseball swing, jump shot, even shooting pool or throwing darts. When throwing a ball, you don’t jerk your arm to a halt as soon as you let go - your arm naturally continues through an arc of movement well after the ball has been released. We have the same thing in shooting. After you break your shot, your eyes should stay focused on your front sight. Experienced shooters won’t even blink when the gun is fired, and will see the front sight lifting out of the rear notch. The gun recoils and cycles, and then begins to settle down back on target. The shooter should still be focused on the front sight, not looking down range to see where their shot went, in case another shot needs to be made. As the sights settle back on target, the trigger is released – CLICK!- and reset. The shooter now has another sight picture and is ready to fire again. When one shot is fired, there should be two sight pictures. Two shots – three sight pictures, three shots – four sight pictures, and so forth. The most commonly missed shots are the first shot, and the last shot in a string of fire. The first shots because the shooter is trying to get on target fast and burn it down before their sights are settled, and the last one because they give up on the fight and drop the gun. You’ll see amateurs do this at competitions. They are shooting steel – ding, ding, ding, miss – and they have already dropped their gun below their line of sight, and have to bring it back up to make up the hit. Check your work through your sights. By looking at your sights and where they were when your shot went off, you should be able to tell if you hit your target without looking for holes, or hearing the steel ding. On the street, you won’t be able to see holes and your target sure won’t “ding.” There is no reason you need to be fast getting out of the fight. After your last shot, keep your sights aligned, get another sight picture, reset the trigger, check your work through the sights, keep your mind in the game and make sure the fight/drill/course of fire really is OVER before you drop your gun and break for lunch.

Resources and places with more shooting drills: www.vikingtactics.com www.pistol-training.com www.uspsa.org (see the classifier section) www.brianenos.com/forums www.benstoeger/myonlineplace.org www.kyledefoor.com www.modernserviceweapons.com www.panteaoproductions.com Tactical Application of Practical Shooting by Patrick McNamara The Shooter’s Approach to Practice by Sam Conway Refinement and Repetition: Dry Fire Drills for Dramatic Improvement by Steve Anderson Perfect Practice by Saul Kirsch Green Eyes, Black Rifles by Kyle Lamb Stay in the Fight by Kyle Lamb