real time electrocardiogram web application implemented by
TRANSCRIPT

Real Time Electrocardiogram Web Application Implemented by Angular2
by
YUEJIAO HUI Master of Engineering, Northwestern Polytechnical University, 2013
A Report Submitted in Partial Fulfillment of the Requirements for the Degree of
MASTER OF ENGINEERING
in the Department of Electrical and Computer Engineering
© YUEJIAO HUI, 2017 University of Victoria
All rights reserved. This thesis may not be reproduced in whole or in part, by photocopy or other
means, without the permission of the author.

ii
Supervisory Committee
Real Time Electrocardiogram Web Application Implemented by Angular2 by
YUEJIAO HUI Master of Engineering, Northwestern Polytechnical University, 2013
SupervisoryCommittee
Dr.XiaodaiDong,DepartmentofElectricalandComputerEngineering
Supervisor
[EnterNameandDepartment]
DepartmentalMember
iii
Abstract
Heart disease is one of the leading causes of death and there is one died of heart disease in every
four deaths [1]. One of the reasons is that there are no obvious warning signs or symptoms before
any sudden cardiac events. There is no doubt that precaution and recognition of the signs of heart
disease are extremely important for people who have cardiovascular concerns, or have a family
history of this kind of disease. Therefore, we design and develop a comprehensive ECG web
application using Angular2 framework that can be accessed by browsers, for real-time reviewing
and analysis of ECG data collected by an in-house ECG system. Thus not only patients can
access their personal ECG records, but also doctors can review patients’ ECG data, anywhere,
anytime. Our ECG Web application is categorized by different level of user groups which means
we use access levels to define what a user can do or can not do. The whole project explores
several core features of Angular2, such as Ahead-of-Time (AoT) compilation, caching and tree
shaking, to improve web page loading performance. Furthermore, unit test and end-to-end test
are implemented to ensure application quality and robustness.
iv
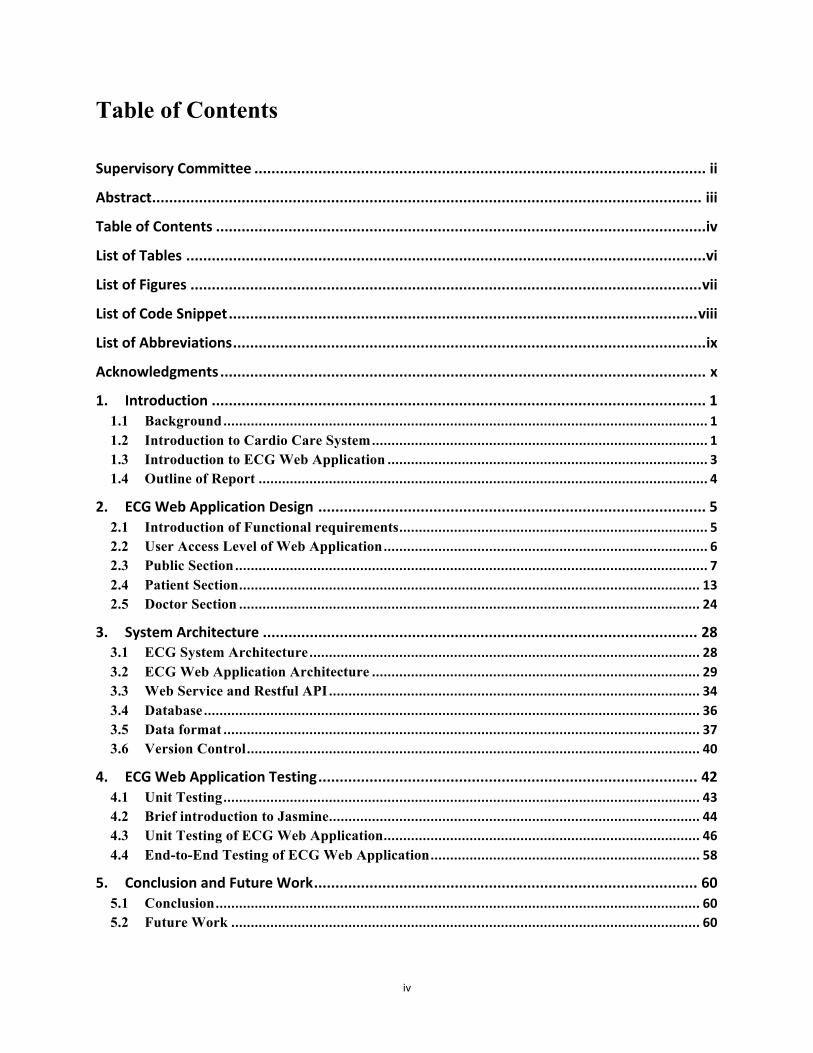
Table of Contents
SupervisoryCommittee..........................................................................................................ii
Abstract.................................................................................................................................iii
TableofContents...................................................................................................................iv
ListofTables..........................................................................................................................vi
ListofFigures........................................................................................................................vii
ListofCodeSnippet..............................................................................................................viii
ListofAbbreviations...............................................................................................................ix
Acknowledgments..................................................................................................................x
1. Introduction....................................................................................................................11.1 Background............................................................................................................................11.2 Introduction to Cardio Care System......................................................................................11.3 Introduction to ECG Web Application..................................................................................31.4 Outline of Report...................................................................................................................4
2. ECGWebApplicationDesign...........................................................................................52.1 Introduction of Functional requirements...............................................................................52.2 User Access Level of Web Application...................................................................................62.3 Public Section.........................................................................................................................72.4 Patient Section......................................................................................................................132.5 Doctor Section......................................................................................................................24
3. SystemArchitecture......................................................................................................283.1 ECG System Architecture....................................................................................................283.2 ECG Web Application Architecture....................................................................................293.3 Web Service and Restful API...............................................................................................343.4 Database...............................................................................................................................363.5 Data format..........................................................................................................................373.6 Version Control....................................................................................................................40
4. ECGWebApplicationTesting.........................................................................................424.1 Unit Testing..........................................................................................................................434.2 Brief introduction to Jasmine...............................................................................................444.3 Unit Testing of ECG Web Application.................................................................................464.4 End-to-End Testing of ECG Web Application.....................................................................58
5. ConclusionandFutureWork..........................................................................................605.1 Conclusion............................................................................................................................605.2 Future Work........................................................................................................................60

v
Bibliography.........................................................................................................................62
AppendixASourceCode.......................................................................................................63
AppendixBRestfulAPIs........................................................................................................64

vi
List of Tables
Table2-1.AccesstoDifferentWebpage............................................................................................6
Table3-1.ComparisonofJiTandAoT..............................................................................................33

vii
List of Figures
Figure1-1.CardioCareSystemArchitecture......................................................................................3
Figure2-1.ECGWebApplicationHomepage.....................................................................................8
Figure2-2.AboutCardiocarepage.....................................................................................................9
Figure2-3.ContactPage...................................................................................................................10
Figure2-4.LoginPage.......................................................................................................................11
Figure2-5.SignupPage.....................................................................................................................12
Figure2-6.Footer..............................................................................................................................13
Figure2-7.DashboardPageofPatient.............................................................................................14
Figure2-8.TestsPageofPatient......................................................................................................15
Figure2-9.DoctorsListPageofPatient............................................................................................16
Figure2-10.FilteredDoctorListofPatient.......................................................................................16
Figure2-11.CommentsListofPatient..............................................................................................17
Figure2-12.ECGDetailofPatient.....................................................................................................18
Figure2-13.LeaveANoteModalofPatient....................................................................................20
Figure2-14.NotesandCommentsofTest.......................................................................................20
Figure2-15.NoteListofPatient.......................................................................................................21
Figure2-16.LeaveANotePageofPatient.......................................................................................22
Figure2-17.AssociateNotetoTestModalofPatient.....................................................................23
Figure2-18.ProfilepageofPatient..................................................................................................23
Figure2-19.DashboardpageofDoctor............................................................................................24
Figure2-20.NewPatientpageofDoctor.........................................................................................25
Figure2-21.NoteListpageofDoctor...............................................................................................26
Figure2-22.CreateNewCommentPageofDoctor.........................................................................27
Figure3-1.ECGSystemArchitecture................................................................................................29
Figure3-2.ECGTestandRecordRelationship..................................................................................37

viii
List of Code Snippet
CodeSnippet4-1.TypicalStructureofUnitTestinJasmine...........................................................45
CodeSnippet4-2.UnitTestforComponent....................................................................................47
CodeSnippet4-3.FakeServiceforComponentUnitTest...............................................................48
CodeSnippet4-4.UnitTestforService............................................................................................50
CodeSnippet4-5.MockUpHTTPService........................................................................................51
CodeSnippet4-6.UnitTestForPipe................................................................................................53
CodeSnippet4-7.UnitTestForRoutes............................................................................................55
CodeSnippet4-8.UnitTestForRouteswithParameter................................................................56
CodeSnippet4-9.SearchBoxComponent........................................................................................57
CodeSnippet4-10.UnitTestForEventEmitter................................................................................58

ix
List of Abbreviations
BLE - Bluetooth Low Energy
ECG - Electrocardiogram
WiFi - Wireless Fidelity
AoT - Ahead of Time
JiT – Just in Time
Json - JavaScript Object Notation
REST – Representational State Transfer
HTTP – Hypertext Transfer Protocol
Ajax - Asynchronous JavaScript and XML
SEO – Search Engine Optimization

x
Acknowledgments
I would like to thank: Dr. Xiaodai Dong for supporting me and providing me with valuable learning suggestions during
Master programme study.
Weizheng Li, Lan Xu, He Ma and other team members who contributed to ECG project, for your
generous help.
Yuejiao Hui June 5, 2017

1
1. Introduction
1.1 Background Heart disease is one of the leading causes of death and there is one died of heart disease in every
four deaths [1]. This kind of disease happens for not only women but also men worldwide. On
average, there is one person dies every 11 minutes because of a cardiovascular disease. There is
no doubt that precaution and recognition of the signs of heart disease is extremely important for
the person who may have cardiac concerns, or have a family history of this kind disease.
Therefore, we designed a wireless and wearable ECG sensor that allows patients to capture
ECGs anywhere, anytime. Thus patients, who are at risk for heart disease, can get a timely
treatment. Besides, a series of ECG applications, such as ECG mobile app that can be installed
on any mobile phone, tablet and Apple Watch later, ECG web application that can be accessed
by a browser, is developed for real-time review and analysis of ECG data.
1.2 Introduction to Cardio Care System
Actually, there already exists one type of portable device named Holter monitor, which can be
used to record patients’ ECGs. The most distinct difference between our Cardio Care system and
traditional Holter monitor is real-time data measure and analysis. For the traditional monitor,
after patients testing ECG and Holter collecting data, it will be sent to hospitals for ECGs
analysis. This will no doubt affect and delay the diagnosis of heart disease. In addition, the
average size of today’s Holter monitor is almost same as a camera and it operates with two AA
batteries,so it’s not that convenient and comfortable for people who needs to ware this device
for 24 hours or even longer.

2
In recent years, with the development of wireless communication, wearable wireless ECG
monitor system has become smarter and more lightweight. For example, QardioCore - one of
today’s world’s smart wearable ECG monitors, no more wires and patches. It adopts wireless
Bluetooth for data transmission and is only 130g including a Lithium-ion polymer battery [2].
Our wireless wearable ECG monitor mainly includes an ECG sensor and a BLE chip, is very
small and pretty lightweight. With the BLE technology and collaboration with both mobile and
web application, our ECG monitor addresses the need for more convenient and long-time heart
activity detecting for both patients and doctors. In general, our complete Cardio Care system, as
demonstrated in Figure1-1, is a comprehensive cardiovascular health system that consists of five
different and distinct types of parts: ECG hardware sensor, web application client, mobile
application client, backend server, and database. Functionalities of each part explained as bellow:
• Testing data package is acquired from the ECG sensor and transmitted to Mobile
application by Bluetooth Low Energy that enables the device to work at very low
power consumption.
• Mobile application not only receives these data package, processes, and displays data
on the mobile phone but also uploads all data package to backend server by WIFI.
• Backend that is considered as the functional logic component is usually responsible for
HTTP response and database interactivity. For example, it receives login requests from
website application or mobile application, compares username, password retrieved
from database and responses with corresponding authentication result.
• The management of data, its storage, insertion and retrieval, its deletion, and alteration,
which is core for a comprehensive application system, is taken cared by Database. For
example usernames, passwords and ECG data is stored in MySQL;

3
• Web application client serves as the presentation layer. Generally, it is the front end for
information, content and data display and user interaction. For example, it displays
ECG data in forms of chart format and provides login functionality by using an HTML
form that collects username and password information.
Figure1-1.CardioCareSystemArchitecture
First of all, ECG monitor with Bluetooth Low Energy sensor collecting ECG data from patients
and sends these data package to the mobile application. Mobile application processes these
collected data, displays real-time ECG data also sends data to backend server. Backend server
stores received data to database or hard drive. Web application client requests ECG data from
backend server and display retrieved data to users. This report is concerned with the web
application development, while the rest parts of the system have been designed by other team
members.
1.3 Introduction to ECG Web Application
As we can see from Figure1-1, ECG web client plays an important role that displays ECG data to
users. Our web client application is implemented by popular front end framework-Angular2. Its
features are summarized as follows:

4
1. Displays HTML web pages hosted on a web server to browsers when users type
website URL into address bar of browsers.
2. Presents ECG data to users and allows some more convenient manipulations on data
charts.
3. Sends HTTP requests to RESTful APIs of the backend server.
4. Provides authentication and authorization mechanism to enhance the security of
application.
5. Implements caching mechanism to improve user experience.
6. It is single page application that updates the view automatically with the goal of
reducing the loading time of files.
7. User-friendly interface and support for a variety of web browsers.
The details about ECG web application implementation and functionalities will be covered in
Chapter 2.
1.4 Outline of Report
The entire report is organized as follows:
Chapter 2 introduces the detailed functionalities of the ECG Web Application based on the
content of each webpage.
Chapter 3 describes the architecture of the ECG web application, including details how
application is implemented and what mechanisms are used to improve web performance.
Chapter 4 details how the ECG web application is tested, as testing can improve and ensure
software quality.
Chapter 5 draws conclusions for the whole report and suggests future work.

5
2. ECG Web Application Design
The fundamental jobs of ECG web application are presenting information and data to web users
and allow interaction between user and webs such as submitting question forms, registering new
users, logging into system and reviewing private data. In general, content of ECG web
application can be divided into two types in terms of access level: public and private. For public
content, for example, homepage, web pages about ECG product and contact information, any
user can review it, whereas this is not true for private content. Patient records, comment or notes
on any record and profile information about any user are considered as private data, which is
protected by authority strategy of application, so that user need to login to access these protected
content.
In this chapter, we are going to explore functionalities of ECG web application and how we
implement authority strategy.
2.1 Introduction of Functional requirements
From a technical viewpoint, the essential functionality of web applications is allowing website
visitors to submit and retrieve data to/from a database using their preferred web browser and then
displaying this information to the visitors. In our ECG web application, the core contents are the
ECGs data and related contents. Besides presenting ECGs data, the application is designed to
include several other useful segments such as user profile – gender, phone, address and so on,
ECG test data – detailed ECG data within different time periods, comments – messages created
by specific doctor to explain or illustrate some information associated with ECG record and
notes – note created by specific patient to record feeling when test ECG data. Users trigger
actions on web pages to manipulate data containing these contents.
Later we will discuss the details of each function of ECG web application.
6
2.2 User Access Level of Web Application
The contents and functionalities of the ECG web application can be categorized by different
level of user groups which means we use access levels to define what a user can do or can not do.
Each user account has a different access level that is associated with it. This access level is used
to restrict access to resources of website as well as all actions that user use to interact with
content located on web pages within a website. Users with lower access level will not have
access to resource and actions of a higher level.
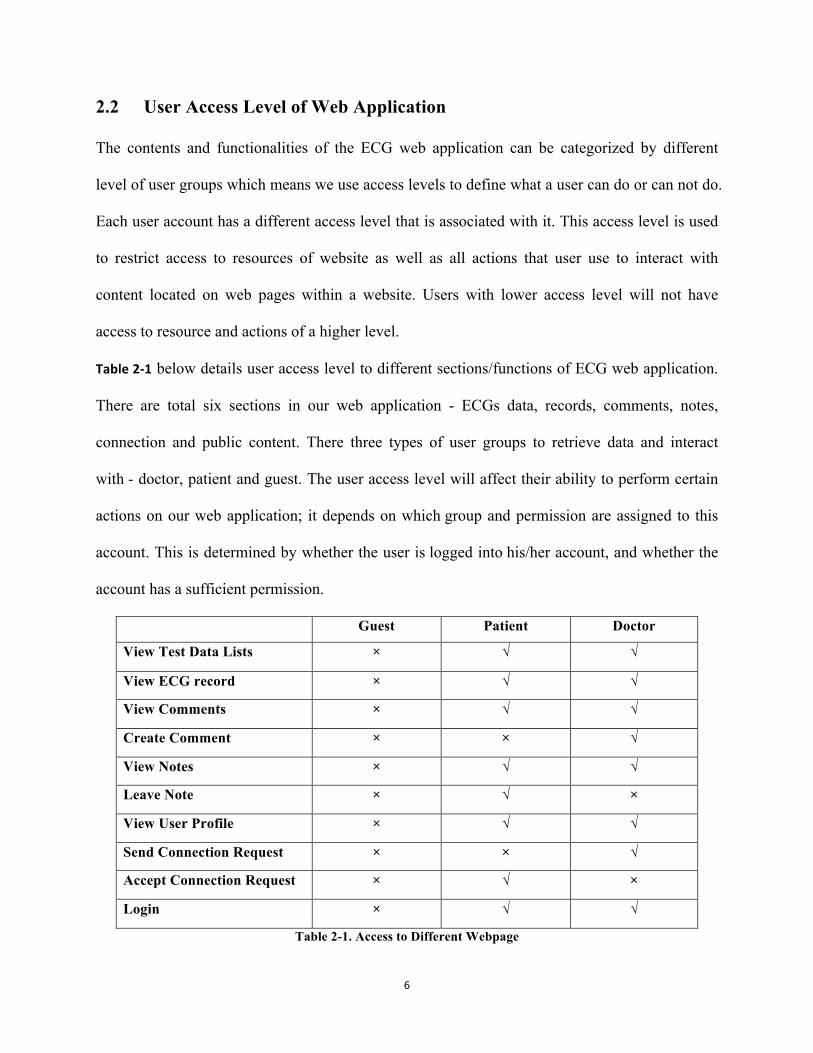
Table2-1 below details user access level to different sections/functions of ECG web application.
There are total six sections in our web application - ECGs data, records, comments, notes,
connection and public content. There three types of user groups to retrieve data and interact
with - doctor, patient and guest. The user access level will affect their ability to perform certain
actions on our web application; it depends on which group and permission are assigned to this
account. This is determined by whether the user is logged into his/her account, and whether the
account has a sufficient permission.
Guest Patient Doctor
View Test Data Lists × √ √
View ECG record × √ √
View Comments × √ √
Create Comment × × √
View Notes × √ √
Leave Note × √ ×
View User Profile × √ √
Send Connection Request × × √
Accept Connection Request × √ ×
Login × √ √
Table 2-1. Access to Different Webpage
7
Note that the guest user has the lowest level of permission. That is to say, this user group, which
does not require a login, can only see the public section. For example, product introduction, login
and registration section, other non-private content, etc. However, the patient and doctor users
group, as logged-in registered users, possess higher access level to do certain actions. Such as,
viewing an ECG data, creating a comment, adding a note and reviewing user own profile. It is
worth mentioning that, individual rights can be assigned to a particular user group. All members
of this user group will have access to these rights. Such features as leaving a note and associate it
with some ECG record; sending connection request belongs to Doctor user group. However, in
the case of creating a comment and accept connection requests from doctors, the user must
belong to the Patient user group.
ECG web application, therefore, realizes user access level and customizes user permission by
implementing three user groups. In general, guest user group have least rights assigned to them,
as they are unregistered users, however, patient /doctor user groups have the highest access to all
sections after login.
2.3 Public Section
The ECG web application provides fundamental information about the ECG system and
hardware devices to the visitors. User does not need to login to application to request information
on products. Such features as product information, login pages, support and product request
forms, shopping carts and content management systems, shape public part of ECG application.
The paragraphs below detail every page of the public section.
2.3.1 Homepage
The homepage is one of the most important pages for a website, which is usually the
introductory page of a website. It is the first web page that is displayed and generally contains

8
links to the other part of the site and serves as navigator of the website. According to surveys,
most of the web visitors expect a site to be displayed within 3 seconds or less, so the loading
time of the first page is particularly important. Figure 2-1 shows the homepage of the ECG
website. When the web users enter the ECG website address (http://ecg.ece.uvic.ca), the
homepages will be presented.
Figure 2-1. ECG Web Application Homepage
As we can see, on the left top of the page, there is a navigation bar that includes links to About
Cardiacare and Contact pages; also there are two links -login/signup, on the right top of the page.
For the convenience of web users, there is also a direct login form included on the homepage.
Below the login form, there are some introduction texts to Cardio Care system. The homepage
gives detailed information on ECG system and provides links to its other parts.
2.3.2 About Cardiocare
If the website visitors are interested in the ECG and want to know more about our system, he/she
can click About Cardiocare link or button of the home page, it will navigate to About Cardiocare

9
page. About us page is a place where we can display more details about our products and allow
web visitors to know us better. Figure2-2 shows the About Cardiocare page of the ECG website.
Figure 2-2. About Cardiocare page
As we can see, this page contains general information about ECG system and also guideline to
start with ECG applications that helps users to start explores our products, application and
websites. Our About page has an important task of providing the web visitors practical
information and gives our website viewers a better idea about the ECG systems.
2.3.3 Contact
Contact us page is as same import as About Cardiocare page and Home page. The essential task
of the contact page is providing the best ways to build communication between you and web
users. Contact page has the ability to let the web visitors who may have questions about our
products or services get in touch with us. Figure2-3 shows the Contact page of the ECG website.

10
Figure 2-3. Contact Page
As shown in Figure2-3, on the left top side of contact page, there is a list of information includes
location address, telephone number and email address that is convenient for users who would
like to call us or email us, also a Google map to our physical research location on the right top
side in case users want to stop by our office. Bellow basic contact information section, there is a
contact form, with which the user can send messages on any questions about the web application
or the ECG system.
2.3.4 Login/Signup
In case a user in order to access ECG data, he/she needs to log in the system. There are two
forms on the Login in page; one for patient users and the other is for doctor users. By clicking
the tab above the form, web users can switch form and choose right form to login to the system.
The login page’s responsibility is to determine whether the user’s credentials are valid. In our
case, users need to input username and password, which is hidden under asterisk for security
purpose. After user click login button, browser sends an HTTP request to the application server

11
to identify the user, if it’s valid, browser will navigate to specific user data page according to
which group user belongs to; while it’s not valid, browser will show wrong username or
password tips and redirect the user to the login page instead. Figure2-4 shows the login page of
the ECG website.
Figure 2-4. Login Page
As shown, there is linkable text at the bottom of login form that will navigate a user to a sign up
page for the user who have not registered at all.
The Signup page is shown in Figure2-5. Sign up form makes it possible for web visitors to fill it
out and begin to explore and experience more functional sections of ECG website. On the right
part of signup page, there is a workflow shows process of registering for ECG account. The first
step is to fill in profile form. Same as the login form, web users can switch form and choose right
form to register to the system by clicking the tab above the form. Also, we can see sign up for the
ECG application requires more personal information than just signing in; it requires the user’
gender, medical plan number, birth date, email, telephone number and address. After user click
‘get start’ button, browser sends an HTTP request to the application server to register the user, if
it’s successful, browser will navigate to login page for user to login; while it’s not, browser will

12
show wrong info tips and redirect the user to the signup page instead. If user already has an
existing account, he/she can click linkable login text at the bottom of signup form.
Figure 2-5. Signup Page
The Signup page is mainly designed and used for doctors at this stage of ECG system
development. As patient needs to sign up for the application when they start to test and record
their ECG data by using ECG hardware device and upload these data to their user data account
by mobile apps. This account information and relevant ECG data are saved on database and can
be retrieved when user login in by ECG website. In a word, users don’t need to register a
duplicated account in order to log in to ECG website to review their test data. While, this does
not apply to doctors’ scenario, which doesn’t use ECG hardware device to test data. That is to
say, doctor user need sign up for an ECG account by Website.
2.3.5 Footer
Footer usually is the last part of website page for most web visitors. At this point, visitors may
decide to register for the service, may require contact information or simply want to get to know

13
more about product and service. There is no doubt that footer of a website is as important as the
header and homepage. Figure2-6 shows the footer section of the ECG website.
Figure 2-6. Footer
As we can see, there are links to the other pages such as signup page, about us page and contact
us page within the footer which serves like second navigation bar that makes it easy for visitors
to navigate their way around. Besides this, there are some prominent social media buttons that
can drive users to their various social networks once they are done browsing the website.
2.4 Patient Section
The public pages of ECG web application provide fundamental information about the ECG
system and hardware devices to the visitors, which visitors don’t need to login to the system.
While for some sensitive and private information such as test data, comments on test records,
notes and connected doctors of patients that need visitors to login in order to get access,
contribute to patient pages of ECG application.
The paragraphs below detail every page of patient related section.
2.4.1 Dashboard
Dashboard page is first page displayed automatically after patient user successfully login to the
ECG website. It serves as a control panel for patient users that a well-designed dashboard can
save amounts of time and efforts, helping our website visitors to quickly identify the resources
they need. Figure2-7 shows the dashboard page after patient login. As shown in Fig.2, there is a
navigation menu on the left of page that is used to facilitate navigation to other corresponding

14
page of patient related section such as ECG tests, doctors, comments and notes the use has. For
example, clicking the tests link will redirect user to the tests list page. Besides navigation menu
on the left side, there are also recent tests and recent comments tables that just include such
simple and basic information as test data length, created time, comment content and comment
owner. These tables are sorted by created date of the data for the convenience of users and
implemented by CSS collapsible div, which means user can click top header of each table to
show or hide content of each table. User an also see details information of each test data and
comment from doctor by clicking correspond row of test or comments table.
Figure 2-7. Dashboard Page of Patient
It should be noted that cache mechanism doesn’t apply to this page as recent tests and recent
comments keep changing all the time. For the sake of reducing HTTP response time, we set
‘limit’ parameter when sending HTTP request to get latest tests or comments, which means
server will only return limited number of data, 6 for recent tests and 8 for recent comments in our
case, instead of whole list tests or comments belong to the user.
2.4.2 Tests List

15
The patient test page displayed when user clicks ‘my tests’ link of navigation menu. Figure2-8
shows the patient test page.
Figure 2-8. Tests Page of Patient
This page mainly contains two parts. On top of main area is a search table used for searching
specific tests data. For instance, use can search tests data within particular time range by clicking
‘From’ and ‘To’ fields and date picker will show up below the input field. Moreover, retrieved
tests data can be limited whether there is associated comments or notes by checking two
checkboxes on bottom of searching table. Below the searching table, there is a tests table used
for display all tests data belongs to that patient user. Each row of the able represent a particular
ECG test entity and with some basic information about it such as number of records, comments,
notes, test length and time this test was created. One thing to be noted is that the table is
particular user friendlily by being with some wonderful features, which are sorting and
pagination. For example, user can sort the whole table by number of record, comments, notes or
created date and paginate table by clicking number located at bottom-right corner.

16
2.4.3 Doctors List
The patient’ doctors page is displayed when user clicks ‘my doctors’ link of navigation menu.
Figure2-9 shows the patient’ doctors page.
Figure 2-9. Doctors List Page of Patient
There is a doctor table located on the page. The main purpose of this table is to show connected
doctors as well as doctors who send a connection request to the patient user. More specifically,
doctor, who sends a building connection request in order to get access to patient user’s private
ECG data, will show up on this table. Later patient who receives this request have options to
accept or decline the request by clicking one of those two buttons located on rightmost column.
User can also filter specific doctor by inputting doctor name, telephone number, hospitable and
so on. As showed in Figure2-10, there is only one doctor returned by inputting ‘to’ on top input
filed as his username contains ‘to’.
Figure 2-10. Filtered Doctor List of Patient

17
2.4.4 Comments List
The patient’ comments page is displayed when user clicks ‘my comments’ link of navigation
menu. Figure2-11 shows the patient’ comments page.
Figure 2-11. Comments List of Patient
Same as patient’ tests page, this page mainly contains two parts. On top of main area is a search
table used for searching specific comment data. For example, use can search comment data
within particular time range by clicking ‘From’ and ‘To’ fields and date picker will show up
below the input field. Moreover, returned comments data can be limited to containing some
particular keyword by inputting keyword on bottom of searching table. Below the searching table,
here is a comments table used for display all comments from doctors. Each row of the able
represent a particular comment entity including some basic information about it such as doctor
name, comment content, associated record, associated note, and time this comment was created.
There three types of comments in ECG system. First type is a simple message comment not
associated with any record or note; second type is comment associated with a specific ECG

18
record and last type is comment associated with particular note. User will be navigated to
corresponding ECG record by clicking associated record time.
2.4.5 Test Detail
The patient’ test detail page is displayed when user clicks any data entry of tests table or
associated test entry of comments or notes tables. Figure2-12 shows the patient’ ECG test detail
page.
Figure2-12.ECGDetailofPatient
ECG test detail page is most essential part of ECG website as it includes all basic and core
elements related to each ECG test data. This page mainly contains two parts. On right side of
main area is simple table with basic information about each test record such as record length and
time this record was created. For the reason that ECG test can last a long time more than 10

19
minutes, our design mechanism is to split this long time and big test into several small records
data that is about 10 minutes long. By clicking one of these record data entity, the application
will send HTTP request asynchronously to server side to retrieve the ECG data related to that
record and then display the data in chart format on the left side of main area. Because our ECG
data have two channels, our website application also supports two channel data display, that is
why there are two charts used for data display.
To display ECG signal on a website, we need to use the chart plugins or library for visualizing
data. There are many such kinds of JavaScript library for Angular2. In our case, we choose to use
D3, which is an open source JavaScript library for producing dynamic, interactive data
visualization and allows great control on the visual result by creating objects, adding dynamic
effects or styling them. The chart supports and allows following behaviors:
• Drag on the canvas to translate/pan the chart;
• Double clicking on canvas to zoom in;
• Shift double clicking on canvas to zoom out;
• Use the mouse wheel or click ‘+’ or ’-’ button to zoom.
• Choose a certain interval for X-axis by clicking the corresponding buttons on top of chart.
• Reset chats to initial status by clicking ‘Reset’ button.
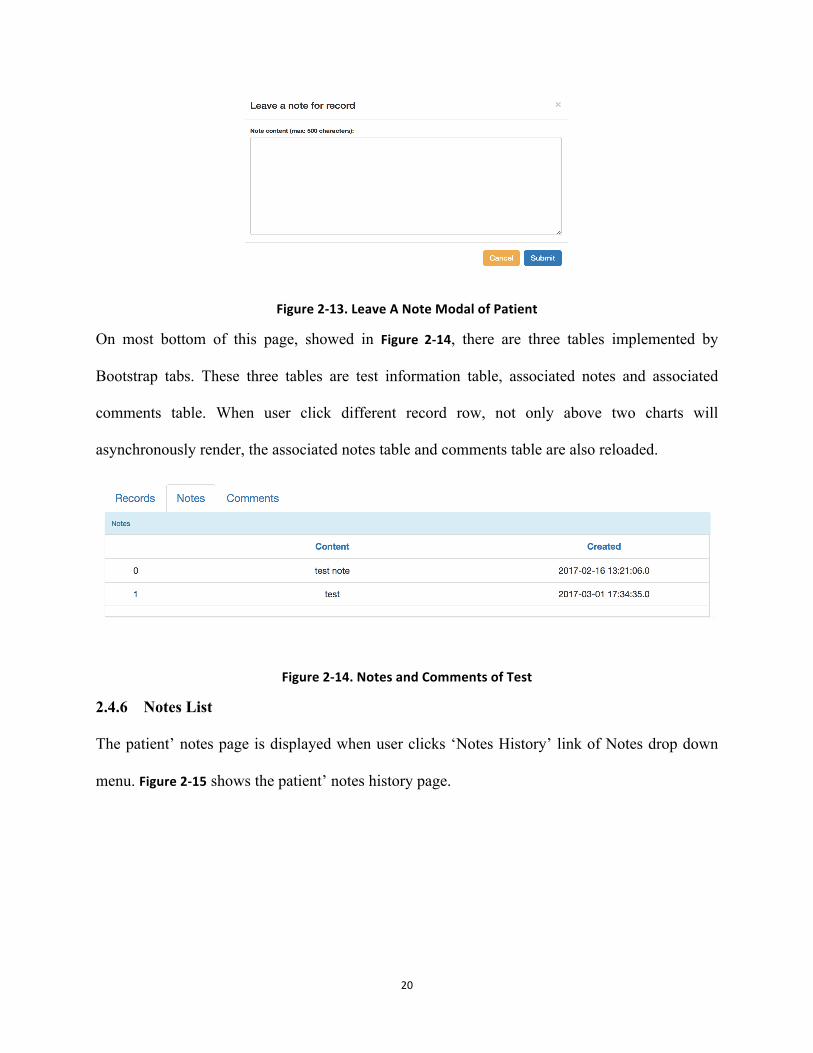
Besides displaying ECG data, this page also allows user to leave a note associated with the
specific record by clicking ‘Leave a Note’ button on bottom-right corner of chart. A modal
dialog showed in Figure2-13 prompts for user to leave a note.
20
Figure2-13.LeaveANoteModalofPatient
On most bottom of this page, showed in Figure 2-14, there are three tables implemented by
Bootstrap tabs. These three tables are test information table, associated notes and associated
comments table. When user click different record row, not only above two charts will
asynchronously render, the associated notes table and comments table are also reloaded.
Figure2-14.NotesandCommentsofTest
2.4.6 Notes List
The patient’ notes page is displayed when user clicks ‘Notes History’ link of Notes drop down
menu. Figure2-15 shows the patient’ notes history page.

21
Figure2-15.NoteListofPatient
The note history page is similar to the comment page. The patient’ notes table includes all notes
entities with content, created time, associated test and associated record on each column. There
are also two types of notes in the ECG system. First type is a simple message note not associated
with any record or test; the other type is note associated with a specific ECG record. If note
entity is the second type, the associated test time and record time will show up. User will be
navigated to the corresponding ECG record by clicking the associated record time.
2.4.7 Create New Note
The patient’ creating note page is displayed when user clicks ‘Create New Note’ link of
navigation menu. Figure2-16 shows the patient’ creating note page.

22
Figure2-16.LeaveANotePageofPatient
This page is designed for patient to leave a note for some reason. As we mentioned before, there
are two kinds of notes in ECG systems. One is simple message note written down for some sorts
of events such as abnormal ECG tests or unpleasant symptom. For this kind of note, besides
basic text area, there are date and time pickers help patients to take a record of time for the event.
The other type of note is associated with the particular ECG test. For this type of note, user can
select specific test entity from a list of tests loaded by application. To be more specific, by
inputting ‘From’ and ‘To’ fields, patient is able to retrieve tests data created within this time slot,
and associate this note to any test from this test table showed in Figure2-17.

23
Figure2-17.AssociateNotetoTestModalofPatient
2.4.8 Patient Profile
The patient’ profile page is displayed when user clicks ‘User Profile’ link of user drop down
menu. Figure2-18 shows the patient’ profile page.
Figure2-18.ProfilepageofPatient
User profile displays user’s basic information such as first name, last name, gender, birthday,
telephone number, address and so on.

24
2.5 Doctor Section
The ECG system is designed not only for patient but also for doctor to build connection with
patient, to leave comment to patient’s ECG test data and so on.
The paragraphs below detail every page of doctor related section.
2.5.1 Dashboard
The doctor user has a similar user interface as the patient user. The doctor user also has a
dashboard page serves as navigation page after login. On doctor’s dashboard page, user can get
general information about latest tests and notes of all connected patients.
Figure2-19.DashboardpageofDoctor
2.5.2 Patients List
The Patient List page shows doctor user’s all connected patients.
2.5.3 New Patient
The new patient page shows all currently available patients exist in ECG database. Basic
information about patients is displayed in table and last column shows relationship status
between this specific patient and doctor. ‘Connect’ button located in last column enables doctor

25
to send a build connection request to selected patient, which will change relationship status from
‘new’ to ‘request sent’. Once patient confirm this request, connection between doctor and patient
is build successfully thus doctor can review patient private data.
Figure2-20.NewPatientpageofDoctor
2.5.4 Tests List
The doctor test list page is also same as the patient test list page. On doctor’s test list page, there
is a table including all tests data with same related information such as number of records,
number of comments, number of notes and test length. What need to be pay attention is only
tests belongs to connected patients are displayed. Namely doctors don’t have access to any other
unauthorized resources.
2.5.5 Test Detail
The doctor test detail page is same as patient test detail. The only difference is that doctor users
leave a comment to test data rather than create a note to test data.
2.5.6 Note List
26
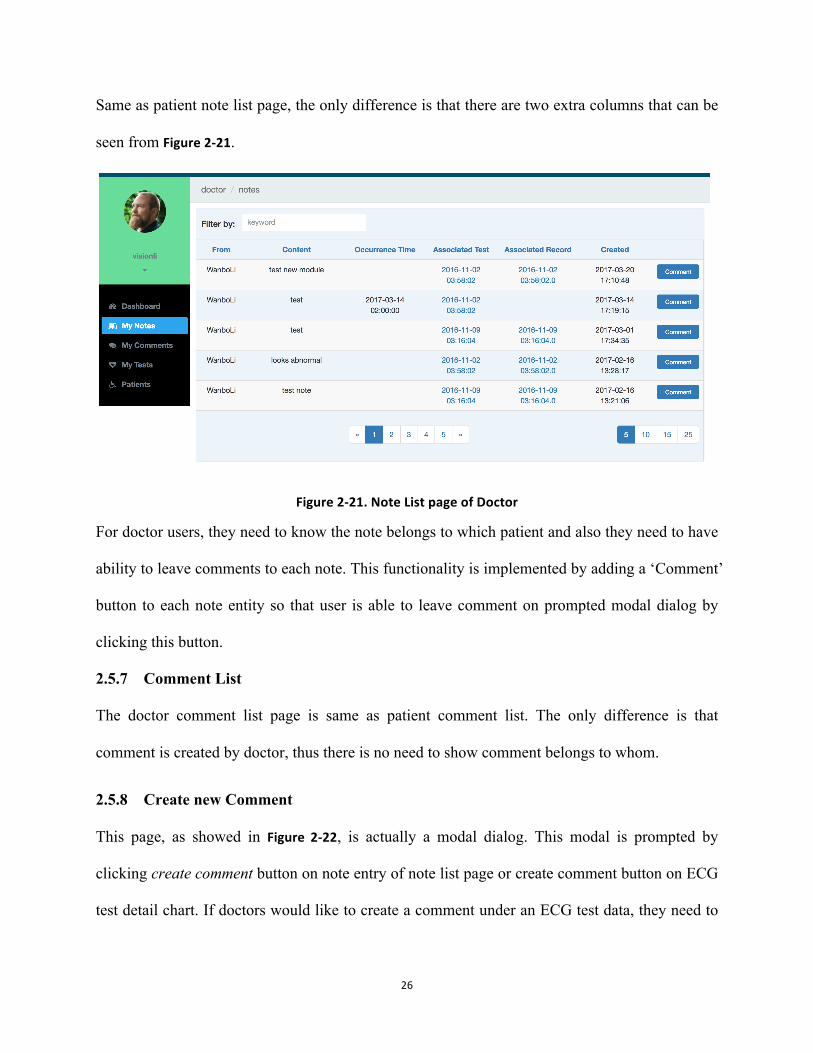
Same as patient note list page, the only difference is that there are two extra columns that can be
seen from Figure2-21.
Figure2-21.NoteListpageofDoctor
For doctor users, they need to know the note belongs to which patient and also they need to have
ability to leave comments to each note. This functionality is implemented by adding a ‘Comment’
button to each note entity so that user is able to leave comment on prompted modal dialog by
clicking this button.
2.5.7 Comment List
The doctor comment list page is same as patient comment list. The only difference is that
comment is created by doctor, thus there is no need to show comment belongs to whom.
2.5.8 Create new Comment
This page, as showed in Figure 2-22, is actually a modal dialog. This modal is prompted by
clicking create comment button on note entry of note list page or create comment button on ECG
test detail chart. If doctors would like to create a comment under an ECG test data, they need to

27
navigate to ECG detail page. Otherwise, they can create comment in note list page and
associated this comment to the specific note entry.
Figure2-22.CreateNewCommentPageofDoctor

28
3. System Architecture
ECG web application is implemented by the popular Angular2 framework and it utilizes
RESTful APIs to exchange data between client and server, which communicate with the SQL
database.
In this chapter, we are going to cover the details about the architecture of the whole ECG
application.
3.1 ECG System Architecture
Actually, our whole ECG system is a comprehensive system that consists of five different and
distinct types of parts: ECG hardware sensor, web application client, mobile application client,
backend server, and database. As we can see, ECG web application is part of this full-featured
ECG system. Figure3-1 below demonstrates the functionality of each component and relationship
between these different components.
• Testing data package is acquired from the ECG sensor and transmitted to Mobile
application by Bluetooth Low Energy.
• Mobile application not only receives these data package, processes, and displays data
on the mobile phone but also uploads all data package to the backend server by WIFI.
• Backend that is considered as the functional logic component is usually responsible for
HTTP response and database interactivity. For example, it receives login request from
website application or mobile application, compares username, password retrieved
from database and responses with corresponding authentication results.
• The management of data, its storage, insertion, and retrieval, its deletion and alteration,
which is core for a comprehensive application system, is taken cared by Database. For
example usernames, passwords and ECG data is stored in MySQL;

29
• Web application client serves as the presentation layer. Generally, it is the front end for
information display and user interaction. For example, it displays ECG data in forms of
chart and provides login functionality by using an HTML form that collects username
and password information.
Figure3-1.ECGSystemArchitecture
The workflow of how the whole system is connected and how each component works can be
summarized as follows:
1. First of all, ECG monitor with Bluetooth Low Energy sensor acquires testing data from
the patient and sends data packages to the mobile phone.
2. Mobile application processes all these collected data, displays ECG data and send data
to backend server.
3. Backend server stores received data to database or hard drive.
4. Web application client requests ECG data from backend server and present data to user.
3.2 ECG Web Application Architecture
Our ECG web application includes and provides the following functionalities based on the
features described above.

30
1. Display HTML web pages hosted on web server to browsers when user types website
URL into address bar of bowsers.
2. Present ECG data to user and allows some more convenient manipulations on data
chart.
3. Send HTTP requests to RESTful API of backend server.
4. Provide authentication and authorization mechanism to enhance security of application.
5. Implement caching mechanism to improve user experience.
6. Be single page application that updates the view automatically with the goal of
reducing the amount of files loading time.
7. Users friendly interface and support for a variety of web browsers.
3.2.1 Classification of General Web Application Architectures
Before building any website, we need to know basic and fundamental knowledge about web
architecture so that we can get a conclusion which web architecture and framework is the most
suitable for the development of ECG web application.
There are mainly two types of today’s web application architectures.
1. Server-side rendered
Server-side rendering, in a nutshell, is converting .html files into readable documents for
browsers in the server side. Basically, whenever a user enters the URL of any website, there will
be requests sent to the server side that include files of the website and produce the full HTML
containing the requested content and send that back to the browser which simply renders it out.
When the user interacts with the website, for example, visiting a different page or filling in the
login forms, bowser will send a request again to the server, which in turn generates a new HTML

31
page no matter if there are only a few changes different from the previous page. The entire new
HTML page generated and rendered in server-side rendering, but not just the new difference.
Server-side rendering will generate entire new files for the subsequent requests. This means the
user has to wait for each and every page to parse when navigating to the new page. The benefit is
all website content is visible to search engines and initial page load is faster. Usually, server-side
rendering is more suitable for the static site that doesn’t involve rich interactions.
2. Client-side rendered
When talking about client- side rendering, it actually refers to generating and rendering HTML
in the browser by JavaScript. With client-side rendering, the initial request is loading a bare
bones page of HTML with CSS and JavaScript files but some of the content isn’t included. That
is to say, another request will be made by JavaScript running in the browser to render the rest of
the content and generate full HTML with data in the HTTP response. For the subsequent updates
to the content, client-side rendering method basically gets JSON format data from HTTP
response and render only new content by some JavaScript code and client-side JavaScript library
such as Angular2 framework.
The advantage is we can update the web pages content dynamically and instantly when the user
interacts with web pages. There is no doubt that client-side rendering after the initial load is
much faster since we only load part of the web page rather than rendering the entire page. The
disadvantage is the initial loading with client-side rendering approach might require more time
than server-side rendering. Which make sense, as client-side rendering requires more JavaScript
files to generate the template.
As ECG application is mainly designed for ECG hardware device users and authorized doctors,
we will pay more attention to user experience and website performance rather than SEO (search
32
engine optimization). Taking the features described in the ECG application architecture part into
account, we adopt client-side rendering approach and take Angular2 as framework to speed up
the development of front end, build clean and tidy code, and makes maintenance easier.
3.2.2 Introduction to Angular2
Most websites share a very similar structure but not completely same. Framework, which is
defined as a package of files and standards, can be used as a cornerstone to help developers to
build websites. With the help of framework, developers don’t need to build everything from
scratch and thus save a lot of time and efforts. In this way, framework speed up the development
of an application and allows the maintenance to be easier.
Angular 2 that is launched by Google and supported by a big community, provides us a great
deal of flexibility and features when building our single page application. Below are some
highlight concepts behind Angular2.
1. AoT Compilation
AoT (ahead of time) compilation is one of key features Angular2 brings to web developers.
When taking about Ahead-of-Time (AoT) and Just-in-Time (JiT), it refers to when compilation
happens. Most JavaScript frontend frameworks require some kind of compiling engine to
compile code at runtime, which is called JiT (Just in Time) compilation. That is to say, JiT
compiles code when it is running. While the essence of AoT is moving compiling process from
runtime to building process thus reduce the payload size. AoT compiler compiles the code
before it is running. That means Angular2 application does not require compiling process at run
time anymore as it is already compiled. As a result, application build size gets quite smaller.
Moreover, the browser can render the application much faster by skipping compilation in the
browser.

33
JiT AoT
Compilation context Runtime Build
Bundle Size Big (~1.2MB) Smaller (~400KB)
Execution Performance ~ Better
Startup Time ~ Shorter
Table 3-1. Comparison of JiT and AoT
Table3-1 shows the comparison between JiT and AoT. In a nutshell, JiT compiles code when it is
running, while AoT compiler moves the compilation from runtime to building process thus
reduce the payload size and decrease application startup time.
2. Lazy loading
When developers build a comprehensive application, code files might get pretty big as features
added. Angular2 adopts lazy loading mechanism to help to decrease application startup time by
splitting code into multiple modules, loading what application needs when it firstly bootstrap and
rendering each module on demand when needed. That is to say, application does not need to load
all files when it firstly starts up, which will increase application load time with no doubt.
Modules that are lazily loaded are only rendered when a user navigates throughout the app. As a
result, the initially loaded files size is small thus speeds up application load time.
3. Smaller Bundler
By introducing compiling in the building process and dropping lots of stuff when deploying app
in production, application bundle size gets dramatically reduced. Furthermore, implementing
lazy loading makes the final compiled JS bundlers much smaller thus reduce the size of
application. With the help of Webpack, it packages all of small modules and their dependencies
34
into a bunch of files often a single file, which optimizes module loading in the browser by
minimizing the number of requests.
3.3 Web Service and Restful API
Web Services refers to the approaches that allow connections and communication. It is the
endpoint of each connection. REST, which stands for Representational State Transfer, is one of
architectural styles of the web communication. It serves as the language that allows web client
(browser) to connect and interact with web services. A RESTful web service, also called as
RESTful web API, is a set of functions which developers can send requests or receive responses
by using HTTP methods explicitly such as GET and POST, and this set of functions is
implemented by using the principles of REST [3].
Our ECG web application client sends requests and receive response to/from Restful API of
ECG cloud web services via HTTP protocol such as GET, PUT, POST and DELETE.
The following are four main characteristics define Restful API:
• Client-Server – the client and server are independent of each other;
• URI – resource that represents the targets of the requests are identified by persistent
and unique URIs;
• Uniform interface – resources are manipulated by a common set of operations: GET,
PUT, POST and DELETE. Get is to retrieve resource; Put is to update existing
resource; POST is to create new resource and DELETE is to remove resource.
• Format type – resources can be accessed by various formats, such as XML, JSON or
plain text.
• Stateless – every interaction with a resource is stateless. That means no client state is
stored on server side, but transferred around from client to other place that needs it.

35
The RESTful API should specify query parameters, supported format, request method
(GET/POST/PUT/DELETE), and API keys and so on. Following is the example of RESTful
APIs for get basic information about a patient account:
Request:
GET http://ecg.ece.uvic.ca/rest/patient/id
Accept: application/json
Response:
200 OK
Content-Type: application/json
Body:
{
"result": "success",
"username": "[email protected]",
"firstname": "he",
"lastname": "ma",
"userid": "133",
"total_tests": 33,
"total_doctors": 13,
"total_comments": 112,
"total_notes": 242,
"birthday": "1985-07-15",
"medical_plan_number": "512526346346",
"phone": "604-445-6645",
"address": "8717 cook crescent, Richmond"
}
36
All the APIs provided by the web service in ECG system is implemented by Jersey framework.
ECG client only interacts with APIs and has no knowledge about details how backend server
communicates with database. A complete API documentation is provided in the appendix B.
3.4 Database The ECG system chose a MySQL database which is compatible with Tomcat for the storage of
persistent data. ‘MySQL is an open-source relational database management system
(RDBMS)’[4]. It runs on a server, free to install and is ideal for our ECG data models.
There are a number of data models in our ECG system, varying from the user information to
ECG testing data, and there is relationship between these data. For example, every each test data
consists of several test records, and each test record includes some notes from patient and
comments from doctor. MySQL meets the requirement of this relationship feature.
In database, we usually store data in separate tables and build relationships between each table
by using indexes. By breaking data into tables, make it much easier to manage and understand
data relationship. Typically, there are three types of relationships: one-to-one, one-to-
many and many-to-many. The first step to create database for a system is building a database
schema, which helps developer understand data structure.
There is bunch of data models in ECG application, such as patient profile, doctor profile,
relations between patients and doctors, doctors’ comments, patients’ notes, ECG tests and ECG
records. We divide these data models into 9 tables in the database of the server such tables as
patient_info, doctor_info, relation, access_request, doctor_comment, comment_relation,
ecgdatainfo, ecgtestinfo, mynote and note_relation. These tables have relationships with each
other. For example, ecgtestinfo table includes records of each ECG test, and each ECG test
record includes ecgdatainfo record, and each ecgdatainfo record has doctor_comment record and
mynote record.
37
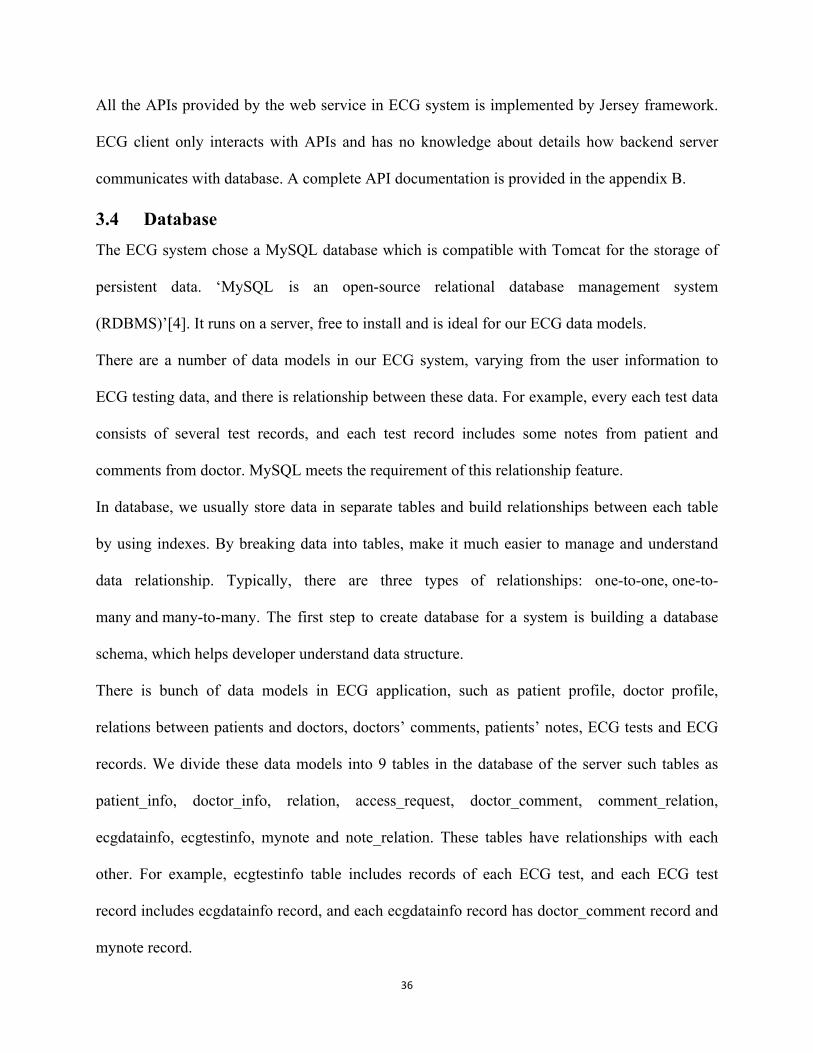
The main purpose of ECG web application is displaying ECG data for user to review. However,
with the increase of the length of ECG data, the size of the ECG data would become very large.
A one-hour ECG data can be more than 500KB that will result in data retrieving and reloading
unacceptably slow, which affects user experience with no doubt. Thus, in our ECG system, we
introduce the concept of test and record. To be more specific, each entire ECG recording is
called one test and every test can be separated into several records that are up to 10 minutes long.
Relationship between ECG test and record showed in Figure3-2.
Figure3-2.ECGTestandRecordRelationship
3.5 Data format
To implement the communication and data transformation between client and remote server, a
data format and exchange protocol for client and server to share data must be selected. There are
a variety of options according to the applications functionality, requirements and architecture.
Such as SOAP-based web services adopt XML as data format which works well for many

38
application scenarios. While as our ECG application is Ajax-styled and API is RESTful, we use
JSON as data exchange format that is better suited for Ajax – style web application.
“JSON, shorts for JavaScript Object Notation”[5], is a method to store information or data in an
organized way thus developer can access this information more logically and easily. Like XML,
it is lightweight, human-readable, language independent, and easy to transmit between web
server and client or browser. JSON, in a nutshell, as a data exchange format is not just suited for
Ajax web application, but can be used in any scenarios where application needs to share data. As
its name suggests, JSON is derived from the JavaScript programming language, but it also enjoys
a wide availability of implementations by many languages including Python, Ruby, PHP, and
Java. JSON is text only, it can easily be sent to and from server by any programming language.
The basic structures of JSON are:
• A set of name/value pairs
• An ordered list of values
Below snippet illustrates a patient’s doctors list by JSON:

39
{ "result": "success",
"total_results": 2,
"results": [
{
"doctor_id": "1",
"userid": "1",
"connected_date": "1992-08-18",
"firstname": "vision",
"lastname": "li",
"hospital": "General Hospital",
"username": "vision",
"phone": "123456",
"patients": 1,
"viewed": true,
"status": "connected"
},
{
"doctor_id": "2",
"userid": "1",
"connected_date": "1992-08-18",
"firstname": "Joe",
"lastname": "Smith",
"hospital": "General Hospital",
"username": "Tom",
"phone": "123456",
"patients": 1,
"viewed": true,
"status": "connected"
}
]

40
As you can see, JSON has a very simple structure and format; it is self-describing and easy to
understand. Let’s break that down a bit:
In ECG client side, we can convert any data stored in JavaScript object into JSON, and send this
JSON data to our server.
let body = JSON.stringify(note);
let path: string = 'note/?session_id='+session_id;
return this.post(body, path)
.map(response => {
let json = response.json();
return json;
}).catch(this.handleError);
We can also convert any JSON data received from the server into JavaScript objects. Bellow is
tests list of patient, which contains a JSON array.
{
"result": "success",
"total_results": 2,
"results":
[{
"id": 314,
"total_notes": 13,
"total_records": 9,
"created": "2015-06-07 13:30:00"}]
}
3.6 Version Control
Version control is an indispensable component for the development of any software. Version
control, also known as source control, is management and record of any changes to source code
41
over time so that developer can get back to any of the previous version during development.
Typically, a version control system does following:
• Backup and Restore – files can be saved at any time, and developers can get back to
previous version at any time.
• Synchronization – allows multiple developers share files and work on the same project.
• Record changes – track all changed during development and allows developers leave
messages about new changes made to code files, which makes it easy to see what is
changed in code and why.
We use Git as version control system in our ECG web application. It allows me to track my code
files changes along time so that I can easily roll back to a previous working version when our
current code files do not work. Project GitHub URL is listed in Appendix A.

42
4. ECG Web Application Testing
Testing is an important part of any software development ranging from small mobile application
to complex desktop software, and web application is no exception. Testing makes sure our
software is working as we intend. If we are maintaining a project without any tests, to make even
a small change to the working code will be a nightmare. As we have no idea if the new change
will mess up the whole project. Automation testing is the most effective and efficient way, which
can also increase the coverage of our application testing. Automation testing, usually
accompanied with the use of special, powerful and effective testing tools, is scheduled automated
script to be executed and compare the execution results to what we expected. For example, we
are testing ECG web application where we intend to emulate patient user register and login
interacting behaviors with our application. It will be difficult and time-consuming if we create
new user every time manually. With automated testing, we can create virtual users and emulate
login behavior. Once the automated tests are executed, testers can get the result of success or
failure of these tests. Whenever developers add some new features or fix bugs, they can run those
automated scripts again to check if the new codes change have introduced any new bug or not.
As we can see, these automated scripts can be executed repeatedly when code is modified
frequently and they are much faster than manual tests. When our tests are weak, we may ship
software with bugs. So the better the tests are, the more we can rely on them to ensure quality
and robustness of application.
When we are writing our testing, we need to keep the future maintainability of the tests in mind.
Our application will change over time and thus so will our tests. Ideally, our tests only have to
change corresponding to the change we are making in our software. For example, if we change
our ECG web UI a little bit, we don’t want to add or rewrite a lot of tests.
43
There are myriad types of tests, but for our application here, l will cover about two types of tests:
end-to-end testing and unit testing. Developers or testers need to keep the balance between these
two types of tests.
Angular 2 was designed with testability as its predecessor – AngularJS, and it provides multiple
options to support testing [7]. In this chapter, I am going to cover how to set up testing
environment with Jasmine to support unit testing and write some common unit tests for our
Angular2 ECG web Applications. We are going to take a look at unit tests firstly so that we can
make sure every single part of whole systems works perfectly OK and understanding benefit of
unit testing. Finally, we will explore End-to-End testing as well to validate the application as a
whole.
4.1 Unit Testing
Essentially, unit testing is a method that ensures single function of a system works well itself
without being taken into consideration of other parts. That is to say, unit testing is verifying
small pieces of code, usually individual unit, independently and separately from other parts. The
purpose of unit test is to check that each single part of the system behaviors as expected and
ensure that every small part works correctly. Test that uses external resource or dependencies,
such as database and services, is not unit test.
In test-driven development project, developers code unit tests before they write a specific
functionality module, which means the developers will be more likely to write code that is easy
to test. As unit tests require our code be easily tested, which mean we are more likely to have a
bunch of smaller, but functional and testable code snippets rather than a bigger and more
complicated code. Unit test makes our development and maintenance of software more efficient.
As we write unit test for every single functionality and create new unit test as we introduce new

44
feature, this helps developers find out and focus on the particular part that fails tests.
Furthermore, unit tests give developers confidence the remainders of system are working, but
just that single unit of code is broken.
A common unit test includes 4 phases:
1. Setup – initialize the instance of object to be tested. It should setup and initialize
everything needed prior particular test methods and help to avoid code duplication;
2. Exercise – apply some input to system under test to stimulate tests and invoke those
methods of tests;
3. Verify - observes the testing outcome to determine if it is consistent with expectation;
4. Teardown – clean up some persistent factors that might survive the end of test and
affect results of other subsequent tests.
This typical 4 phases pattern make it easy to understand the whole process of testing. Setup
provides precondition, exercise actually invokes the methods of tests, verify checks the expected
result and teardown cleans up test make it ready for its successor.
4.2 Brief introduction to Jasmine
We have created and built many features and functionality into our Angular2 ECG web
application. We feel very necessarily that our application needs to come with a set of tests to
make sure its quality and robustness. Jasmine is an open-source testing framework that uses
behavior-driven notation for testing JavaScript code. It is the most popular option for testing
Angular2 application and provides features to help with making testing our Augular2 application
easy. With help of functions and matchers supported by Jasmine, it let us keep our tests well
structured and make assertions.
Bellow are main concepts in Jasmine help developer write and run tests:

45
• Suites - a suite of test specs, usually begin with a describe function, which takes a string
and a function as parameters. String is the title for this test suite.
• Specs - a test contains one or more expectations, usually begin with it function, which
also takes a string and a function as parameters. String is the title of the spec.
• Expectations - assertions that evaluate to true or false. If all expectations of a spec are
true, it is a passing spec, otherwise, it is a failing spec.
• Matchers - predefined helpers for common assertions.
Besides this, Jasmine also offers four functions to help setup and teardown
test: beforeEach, afterEach functions will be executed before and after each spec, while
beforeAll, afterAll will be executed only once before and after each suite. Bellow CodeSnippet
4-1 shows a typical and complete structure of unit test in Jasmine.
// Suite of specs
describe('Pipe: SearchNotePipe with TestBed', () => {
//Setup
beforeEach(() => TestBed.configureTestingModule({
providers: [ SearchNotePipe ]
}));
//Specs
it('should capitalise', () => {
let notes = [{content:"abc",for_records:[],for_test:[]}];
let keyword = "A";
// Expectations
expect(pipe.transform(notes,keyword).length).toBe(notes.length);
});
}) Code Snippet 4-1. Typical Structure of Unit Test in Jasmine
46
4.3 Unit Testing of ECG Web Application
In this part, I am going to explore how to set up unit testing environment and write unit testing
with Jasmine for different parts of our Angular2 ECG web Applications such as component,
services, data, and pipe. With these unit tests, we can make sure every component works well.
Besides, we will integrate our tests with a test runner named Karma, which can run against a
number of browsers and execute our tests.
1. Testing a Component
Component is core and fundamental building block of Angular2 web application. In Angular2,
we can consider almost everything as a component, and actually our software system is a set of
components. In web applications, we can create a very little and simple component, for example,
a date component that just displays date and time, or a web header component. We can combine
these components together to make up the whole web application. As software gets larger, it
becomes more complex and difficult to manage. With the help of components mechanism, it is
easier to manage small code snippet and unit test that our small component is doing what we
intended them to do.
In ECG application testing, we test each component by injecting collaborators via dependency
injection, and mocking other external resources. That is to say, we will mock service rather than
using actual service or real resource. For example, services injected in each component
constructor function or HTTP request to backend will be mocked. Below CodeSnippet4-2 is unit
test for a specific component in ECG web application.

47
describe('PatientCommentsComponent', () => {
beforeEach(() => {
TestBed.configureTestingModule({
declarations: [ PatientCommentsComponent ],
schemas: [NO_ERRORS_SCHEMA]
});
});
compileAndCreate();
it('should NOT have comments before ngOnInit', () => {
expect(comp.comments.length).toBe(0,
'should not have comments before ngOnInit');
});
it('should display loader before ngOnInit', () => {
expect(comp.loadCommentData).toBeTruthy();
});
it('should not display loader after ngOnInit', () => {
fixture.detectChanges();
expect(comp.loadCommentData).toBeFalsy();
});
})
Code Snippet 4-2. Unit Test for Component
We begin with Jasmine’s describe and beforeEach methods. Next, describe function tells
Jasmine that we are going to run a suite of tests and beforeEach tells Jasmine to run the passed
function before each test. Since we are going to need both instances in every test, we put the
initialization on a beforeEach so we will have a new instance every time. We create and inject
fake Service instead of real service. The purpose of this unit test is to verify component works
well, therefore we make use of fake service to decouple component from service. Basically,
TestBed is the main entry to most of Angular test cases, which is used to configure the testing
48
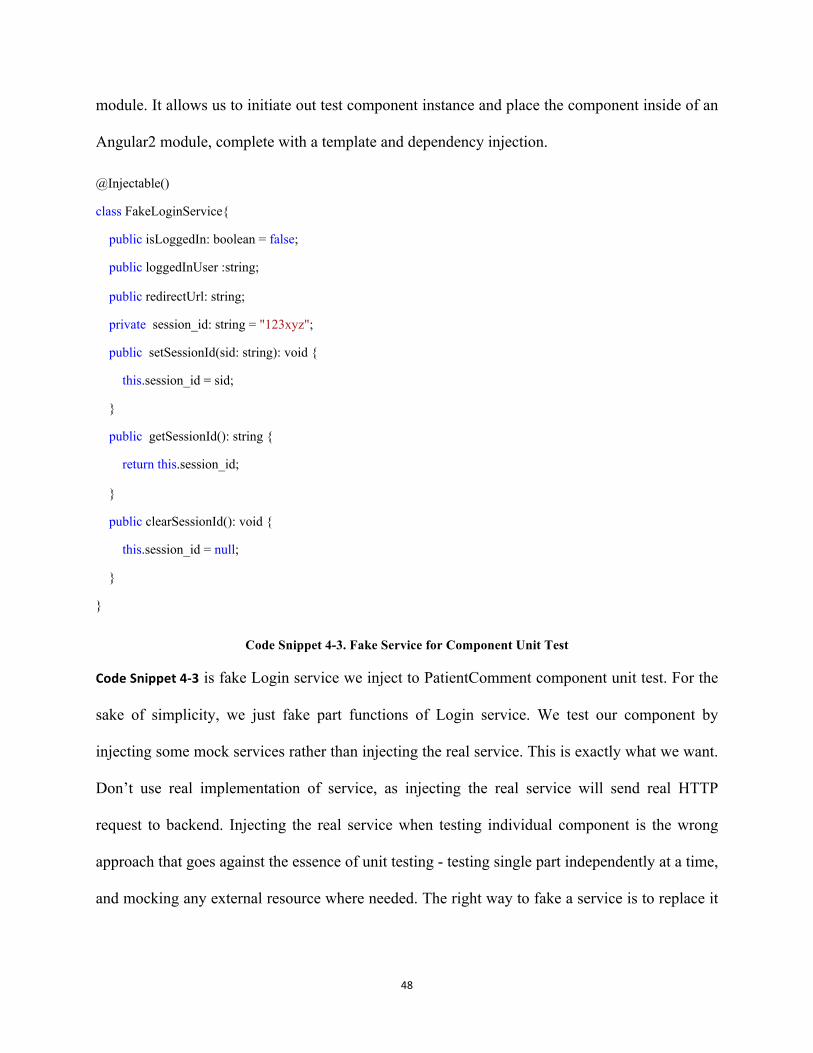
module. It allows us to initiate out test component instance and place the component inside of an
Angular2 module, complete with a template and dependency injection.
@Injectable()
class FakeLoginService{
public isLoggedIn: boolean = false;
public loggedInUser :string;
public redirectUrl: string;
private session_id: string = "123xyz";
public setSessionId(sid: string): void {
this.session_id = sid;
}
public getSessionId(): string {
return this.session_id;
}
public clearSessionId(): void {
this.session_id = null;
}
}
Code Snippet 4-3. Fake Service for Component Unit Test
CodeSnippet4-3 is fake Login service we inject to PatientComment component unit test. For the
sake of simplicity, we just fake part functions of Login service. We test our component by
injecting some mock services rather than injecting the real service. This is exactly what we want.
Don’t use real implementation of service, as injecting the real service will send real HTTP
request to backend. Injecting the real service when testing individual component is the wrong
approach that goes against the essence of unit testing - testing single part independently at a time,
and mocking any external resource where needed. The right way to fake a service is to replace it
49
with a simple test double and inject this test double rather than real service that might send
HTTP request to server.
2. Testing a Service with HTTP
Services are important in any Angular web application. They allow our code to share common
functionality across our application. For example, we could have a user data retrieving
functionality service that can be provided and included in various components. Service provides
developers with the ability to develop code that can be reused later. Most services include HTTP
network request calls and here I will show how to unit test an Angular2 service with HTTP
requests. The HTTP service as a dependency is required by many services. If we use real
implementation of service to the dependencies when we are unit testing particular service, the
test will send real HTTP calls to backend server, which is not what we want. This should not
happen in a unit test. Injecting real services would make unit tests depend on external resources,
and wouldn't run independently. All this goes against the concept of unit test.
Instead of using the real one that may send HTTP request, we can provide a fake backend HTTP
service implementation. We don't need to implement this fake HTTP service manually, as
Angular 2 already provides one for us. Below is unit test for one of service in ECG web
application. The service is basically retrieving user data, such as comments, notes, and tests,
from server, which means it needs to send HTTP request to backend in order to retrieve these
data. For the sake of simplicity, we just show the small part of test.
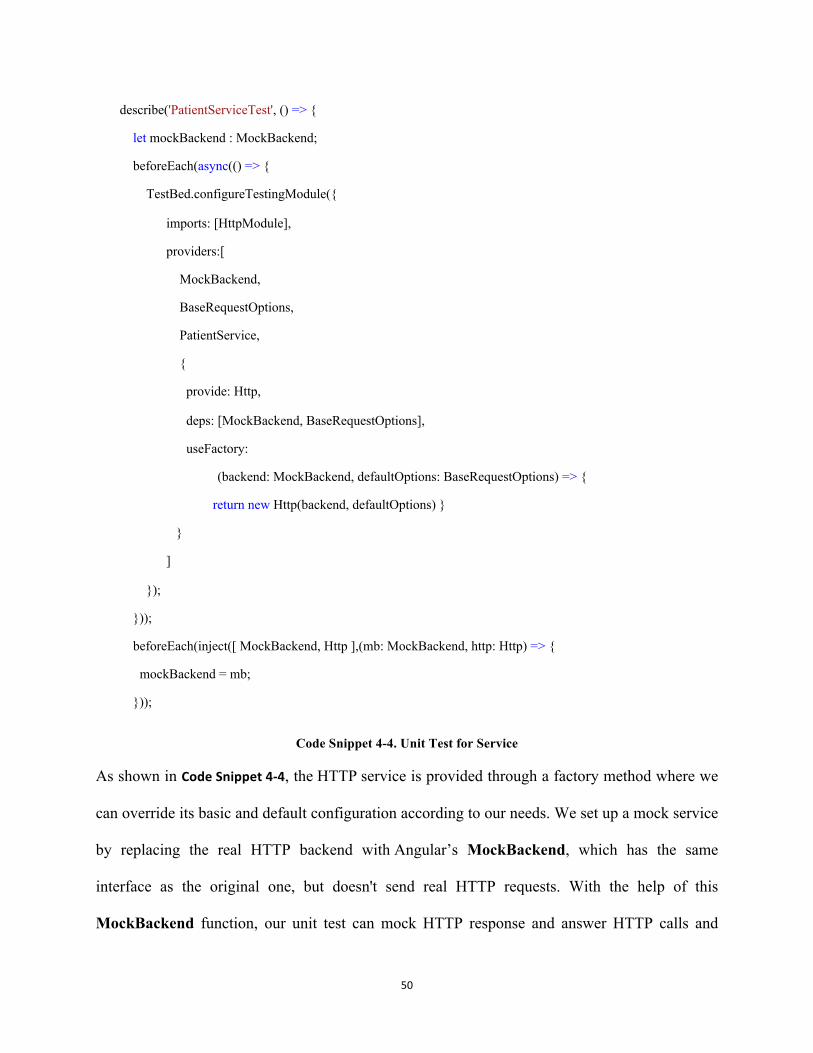
50
describe('PatientServiceTest', () => {
let mockBackend : MockBackend;
beforeEach(async(() => {
TestBed.configureTestingModule({
imports: [HttpModule],
providers:[
MockBackend,
BaseRequestOptions,
PatientService,
{
provide: Http,
deps: [MockBackend, BaseRequestOptions],
useFactory:
(backend: MockBackend, defaultOptions: BaseRequestOptions) => {
return new Http(backend, defaultOptions) }
}
]
});
}));
beforeEach(inject([ MockBackend, Http ],(mb: MockBackend, http: Http) => {
mockBackend = mb;
}));
Code Snippet 4-4. Unit Test for Service
As shown in CodeSnippet4-4, the HTTP service is provided through a factory method where we
can override its basic and default configuration according to our needs. We set up a mock service
by replacing the real HTTP backend with Angular’s MockBackend, which has the same
interface as the original one, but doesn't send real HTTP requests. With the help of this
MockBackend function, our unit test can mock HTTP response and answer HTTP calls and
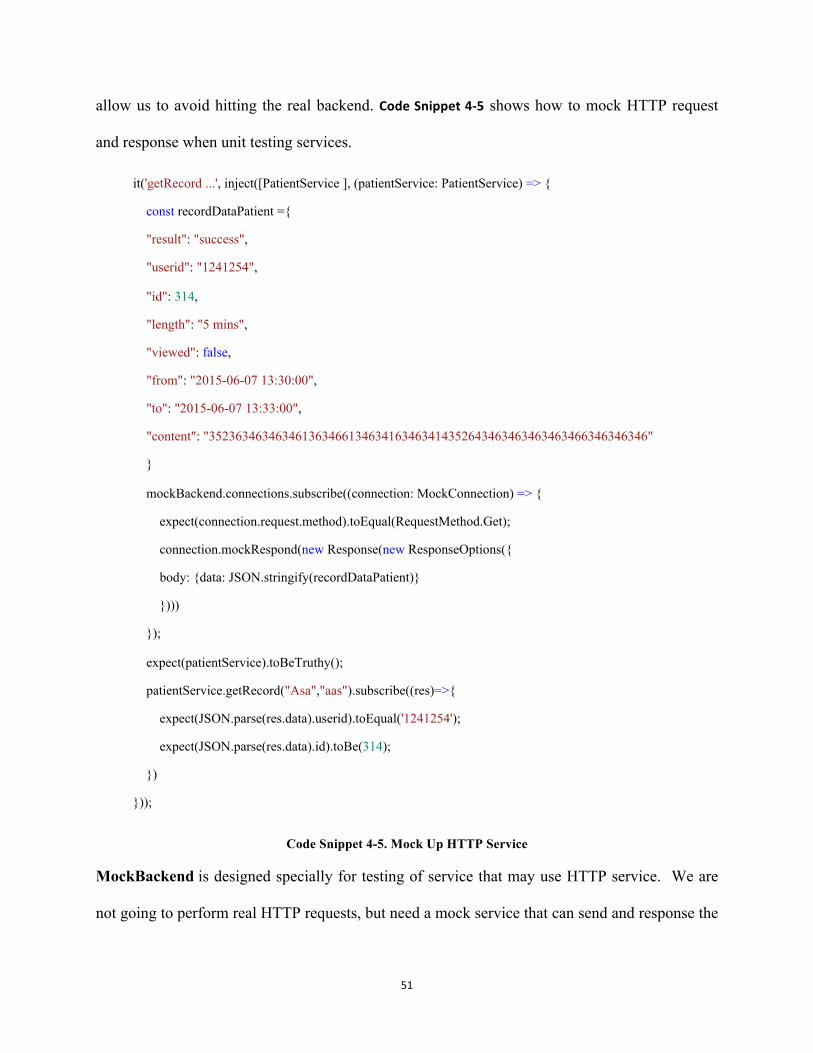
51
allow us to avoid hitting the real backend. CodeSnippet4-5 shows how to mock HTTP request
and response when unit testing services.
it('getRecord ...', inject([PatientService ], (patientService: PatientService) => {
const recordDataPatient ={
"result": "success",
"userid": "1241254",
"id": 314,
"length": "5 mins",
"viewed": false,
"from": "2015-06-07 13:30:00",
"to": "2015-06-07 13:33:00",
"content": "352363463463461363466134634163463414352643463463463463466346346346"
}
mockBackend.connections.subscribe((connection: MockConnection) => {
expect(connection.request.method).toEqual(RequestMethod.Get);
connection.mockRespond(new Response(new ResponseOptions({
body: {data: JSON.stringify(recordDataPatient)}
})))
});
expect(patientService).toBeTruthy();
patientService.getRecord("Asa","aas").subscribe((res)=>{
expect(JSON.parse(res.data).userid).toEqual('1241254');
expect(JSON.parse(res.data).id).toBe(314);
})
}));
Code Snippet 4-5. Mock Up HTTP Service
MockBackend is designed specially for testing of service that may use HTTP service. We are
not going to perform real HTTP requests, but need a mock service that can send and response the
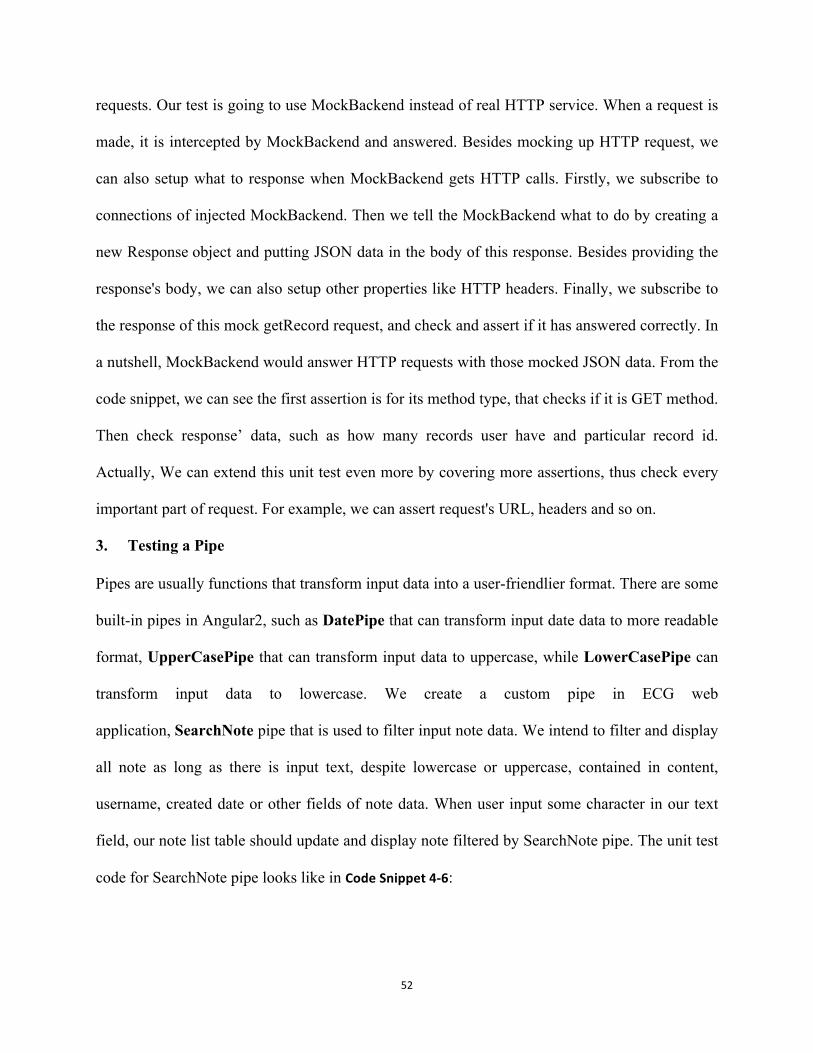
52
requests. Our test is going to use MockBackend instead of real HTTP service. When a request is
made, it is intercepted by MockBackend and answered. Besides mocking up HTTP request, we
can also setup what to response when MockBackend gets HTTP calls. Firstly, we subscribe to
connections of injected MockBackend. Then we tell the MockBackend what to do by creating a
new Response object and putting JSON data in the body of this response. Besides providing the
response's body, we can also setup other properties like HTTP headers. Finally, we subscribe to
the response of this mock getRecord request, and check and assert if it has answered correctly. In
a nutshell, MockBackend would answer HTTP requests with those mocked JSON data. From the
code snippet, we can see the first assertion is for its method type, that checks if it is GET method.
Then check response’ data, such as how many records user have and particular record id.
Actually, We can extend this unit test even more by covering more assertions, thus check every
important part of request. For example, we can assert request's URL, headers and so on.
3. Testing a Pipe
Pipes are usually functions that transform input data into a user-friendlier format. There are some
built-in pipes in Angular2, such as DatePipe that can transform input date data to more readable
format, UpperCasePipe that can transform input data to uppercase, while LowerCasePipe can
transform input data to lowercase. We create a custom pipe in ECG web
application, SearchNote pipe that is used to filter input note data. We intend to filter and display
all note as long as there is input text, despite lowercase or uppercase, contained in content,
username, created date or other fields of note data. When user input some character in our text
field, our note list table should update and display note filtered by SearchNote pipe. The unit test
code for SearchNote pipe looks like in CodeSnippet4-6:
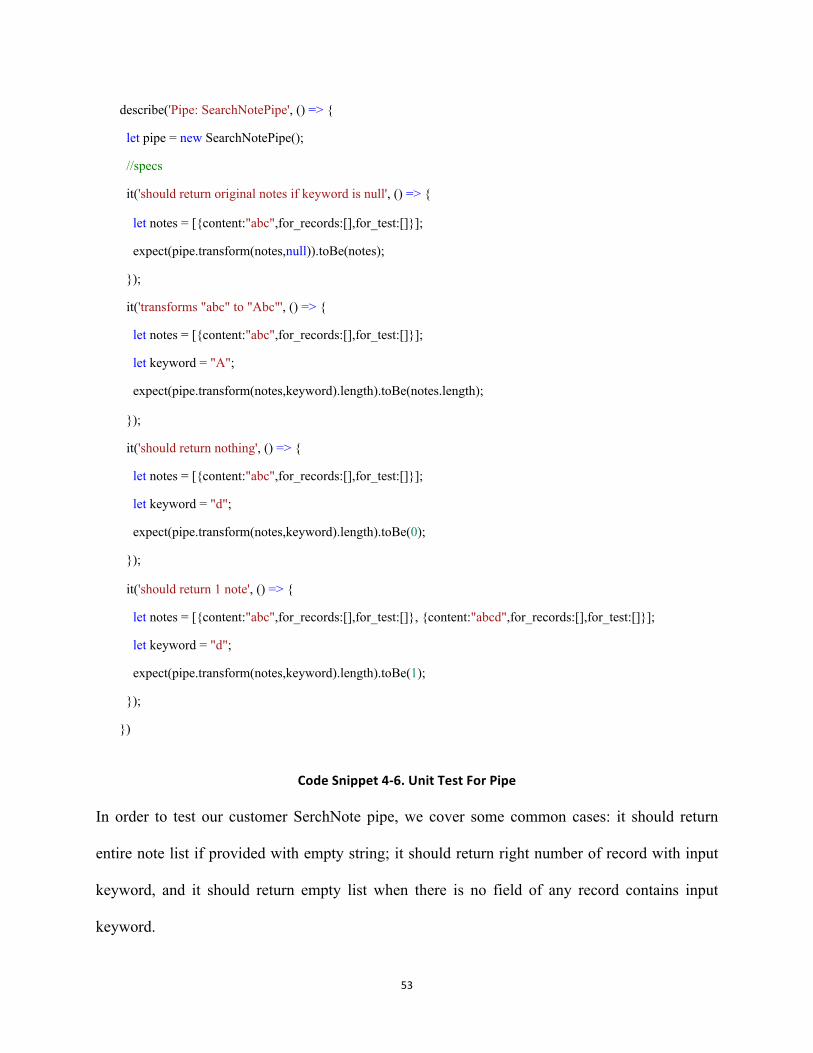
53
describe('Pipe: SearchNotePipe', () => {
let pipe = new SearchNotePipe();
//specs
it('should return original notes if keyword is null', () => {
let notes = [{content:"abc",for_records:[],for_test:[]}];
expect(pipe.transform(notes,null)).toBe(notes);
});
it('transforms "abc" to "Abc"', () => {
let notes = [{content:"abc",for_records:[],for_test:[]}];
let keyword = "A";
expect(pipe.transform(notes,keyword).length).toBe(notes.length);
});
it('should return nothing', () => {
let notes = [{content:"abc",for_records:[],for_test:[]}];
let keyword = "d";
expect(pipe.transform(notes,keyword).length).toBe(0);
});
it('should return 1 note', () => {
let notes = [{content:"abc",for_records:[],for_test:[]}, {content:"abcd",for_records:[],for_test:[]}];
let keyword = "d";
expect(pipe.transform(notes,keyword).length).toBe(1);
});
})
CodeSnippet4-6.UnitTestForPipe
In order to test our customer SerchNote pipe, we cover some common cases: it should return
entire note list if provided with empty string; it should return right number of record with input
keyword, and it should return empty list when there is no field of any record contains input
keyword.

54
4. Testing Routes
Routes provide users with the ability to navigate throughout the application and return to a
particular URL. For example, ECG website user can jump to different web pages to review
user’s data, such as record list page and comment list page by clicking specific URL. Having
routes gives ECG application ability that redirects users to dashboard page after successfully
logging as well.
As our ECG application simply make use of two features of the Angular routing library, we are
going to verify that those features are used correctly and at the right time. The first important
feature we'll be testing is the router’s navigate method, which should be called when the user
tries to click any ‘a’ tag from the navigation list. Clicking one of those anchor tags will result in
the navigation from one view to the other one. For example, web should jump to ‘contact us’
page when user clicking ‘Contact us’ tag. The other feature is application can navigate to specific
URL with parameter passed in. When user is reviewing the ECG test data list, he or she might
want to see details of specific test data. In this case, page should navigate to corresponding test
data information page when user clicking one of the ECG data.
CodeSnippet4-7 bellow covering two specs verifies the first feature: first, it asserts application
will point to default URL - home page, as we already setup in routes module; then it verify that
application’ navigate method does what it is told: it tries to navigate to exactly expected URL
when clicking ‘aboutus’ tag. Note we are using the ‘fakeAsync’ function that allows tests to be
executed only after the component has already been created, which is an asynchronous activity.

55
describe('AppComponent & RouterTestingModule', () => {
beforeEach( async(() => {
TestBed.configureTestingModule({
imports: [ AppModule, RouterTestingModule ]
})
.compileComponents();
}));
it('should navigate to "home" immediately', fakeAsync(() => {
createComponent();
expect(location.path()).toEqual('/home', 'after initialNavigation()');
expectElementOf(HomeComponent);
}));
it('should navigate to "aboutus" on click', fakeAsync(() => {
createComponent();
click(page.aboutLinkDe);
// page.aboutLinkDe.nativeElement.click(); // ok but fails in phantom
advance();
expectPathToBe('/aboutus');
expectElementOf(AboutUsComponent);
page.expectEvents([
[r.NavigationStart, '/aboutus'], [r.RoutesRecognized, '/aboutus'],
[r.NavigationEnd, '/aboutus']
]);
}));
CodeSnippet4-7.UnitTestForRoutes
Within our PatientComments component, it also contains a method, testOnclick, which handles
user click event when clicking any row of test data table. To be more specific, router needs to
navigate to specific URL with the test ID as parameter to display all detailed information about
the test data. We will utilize the router's params method to get the ID of the test data that we

56
want to view. This means that we'll need to test if the page displays view utilizing the
router's params method properly.
it('should navigate to selected test detail on click', fakeAsync(() => {
const li = page.profileRows[2];
// li.dispatchEvent(new Event('click'));
li.click()
tick();
// should have navigated
console.log(page.navSpy.calls.count());
expect(page.navSpy.calls.count()).toBe(1, 'navigate called first time')
expect(page.navSpy.calls.any()).toBe(true, 'navigate called');
// composed hero detail will be URL like 'heroes/42'
// expect link array with the route path and hero id
// first argument to router.navigate is link array
const navArgs = page.navSpy.calls.first().args[0];
expect(navArgs[0]).toContain('patient/tests', 'nav to test detail URL');
expect(navArgs[1]).toBe('79', 'expected test_id');
expect(navArgs[2]).toBe('12512521', 'expected record_id')
}));
CodeSnippet4-8.UnitTestForRouteswithParameter
Note that in CodeSnippet4-8, we spy on the navigate method of the Router instance. Mocking a
fake service instance and spying on a real service are both great strategies used to test component
or service. Spy is the feature provided by Jasmine that gives us the ability to take more control of
real service instance. Such as when spy method is called, we can see how many times it as
called and even what parameter it is called with. In the above test, we call click method and pass
in data ID firstly. Then we retrieve the URL from the spy we used and assert that navigate event
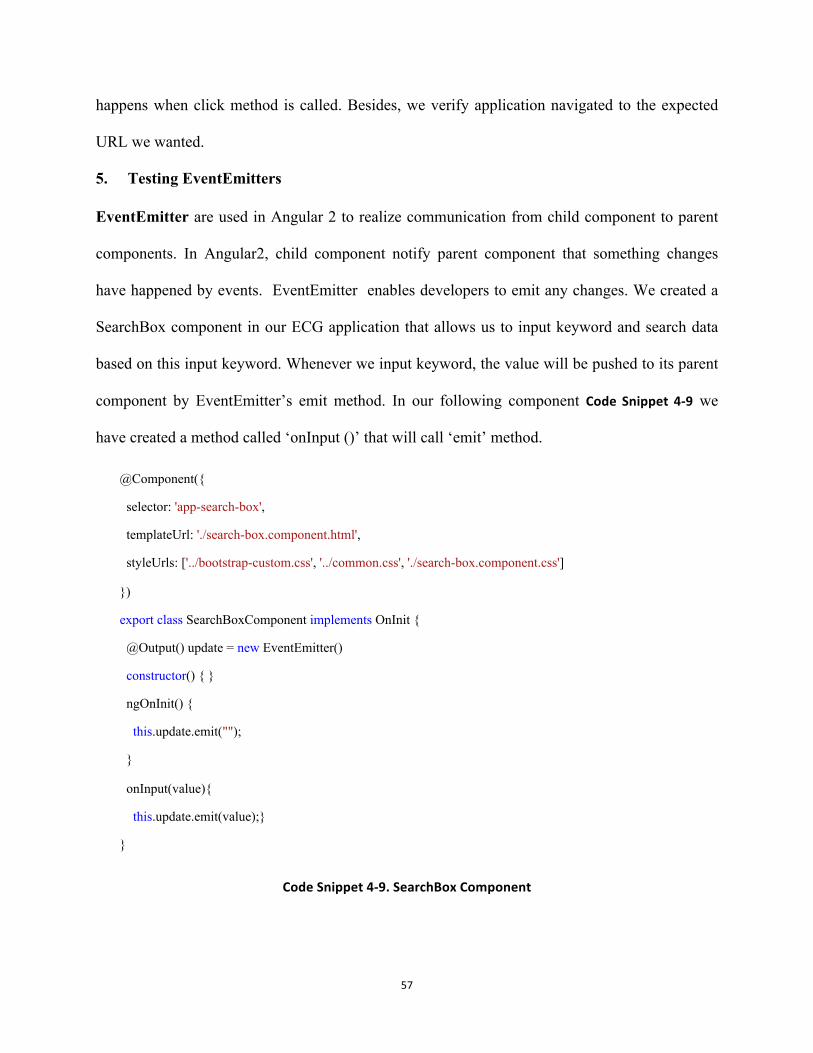
57
happens when click method is called. Besides, we verify application navigated to the expected
URL we wanted.
5. Testing EventEmitters
EventEmitter are used in Angular 2 to realize communication from child component to parent
components. In Angular2, child component notify parent component that something changes
have happened by events. EventEmitter enables developers to emit any changes. We created a
SearchBox component in our ECG application that allows us to input keyword and search data
based on this input keyword. Whenever we input keyword, the value will be pushed to its parent
component by EventEmitter’s emit method. In our following component Code Snippet 4-9 we
have created a method called ‘onInput ()’ that will call ‘emit’ method.
@Component({
selector: 'app-search-box',
templateUrl: './search-box.component.html',
styleUrls: ['../bootstrap-custom.css', '../common.css', './search-box.component.css']
})
export class SearchBoxComponent implements OnInit {
@Output() update = new EventEmitter()
constructor() { }
ngOnInit() {
this.update.emit("");
}
onInput(value){
this.update.emit(value);}
}
CodeSnippet4-9.SearchBoxComponent

58
In this case, we check that we can update value by using subscribe on the EventEmitter as it
exposes an Observable. Every time input event is triggered, the update method is called and
input value is emitted. We trigger the update method by inputting different values and calling
input event and check our expectations.
// synchronous beforeEach
beforeEach(() => {
fixture = TestBed.createComponent(SearchBoxComponent);
comp = fixture.componentInstance;
heroEl = fixture.debugElement.query(By.css('.form-control')); // find input element
fixture.detectChanges(); // trigger initial data binding
});
it('should display input', () => {
expect(heroEl).toBeDefined();
});
it('should raise selected event when clicked', () => {
comp.update.subscribe((value) => {
expect(value).toBe('keyword')
});
comp.onInput('keyword')
});
CodeSnippet4-10.UnitTestForEventEmitter
4.4 End-to-End Testing of ECG Web Application
There are many kinds of testing, while the most common two are unit test and end-to-end test.
Unit test covers single part of the application independently so that they can help developer or
tester find out the exact direction of bug. Usually, it tests code itself. While it does not test how
the application would behavior and perform with user’s iteration but verify the code do exactly
what they supposed to do [6]. This is why we also need to introduce end-to-end test. End to end,

59
shorts for E2E, is another direction to test Angular2 web application. E2E is types of testing that
test if application responds as what is expected when users experience it, namely, from web
user’s perspective. We need to set up the entire application, while we can mock other external
resources in unit tests.
In ECG web application E2E testing, we utilize Protractor to interact with our Angular
application. Protractor, which allows running tests against Angular application on a variety of
browsers, also supports Jasmine as default. Protractor can mimic user behaviors and verify that
the application performs as expected.
In this chapter, we explore two important testing directions: unit tests and E2E tests for ECG
web application. They are designed and used for different purpose. Unit tests are fast, better at
catching bugs in particular unit of application, but not everything can be verified in unit tests.
E2E tests are slow, costly and more difficult to debug because of the added complexity, but
provide us the ability to emulate real user behaviors and test complicated scenarios of users
interaction with an Angular application.
60
5. Conclusion and Future Work
5.1 Conclusion
This report focuses on the development and testing of ECG web application. It details
functionalities, practical implementation, architecture, web performance, user experience and
testing.
The ECG web application is implemented by popular framework – Angular2. Its fundamental
and core functionality is to display ECG data. Web pages are categorized by different level of
user groups which means we use access levels to define what a user can do or can not do. It
makes use of lazy loading, AoT and caching to decrease files size and shorten application startup
time. We also include unit tests and E2E tests for ECG web application to ensure our application
quality. Unit tests are fast, better at catching bugs in particular unit of application. E2E tests
provide us the ability to emulate real user behaviors and test complicated scenarios of users
interaction with Angular application.
5.2 Future Work
There are still some works can be done further to improve ECG web application.
1. The whole ECG web application, implemented by Angular2, is a single page
application. This means that, with the help of Ajax technique, our web application
dynamically update the HTML page as users interacted with websites. One
noticeable disadvantage of single page application is – search engine optimization
(SEO) is difficult. As there is only one single HTML page, all the routing is done
on the client side. All this makes it is difficult and impossible for search engines
crawlers – program that search for hundreds of thousands of webpages to provide
data to browsers. Because when an HTML page is loaded, only part of the content

61
is rendered, thus a search engine crawler can only see little HTML content. Further
research and work need to be done to overcome this drawback.
2. Currently, the ECG web application uses only one database to store all data, such
as ECG data, patient information, and doctor information. In the future, as data
increases, data may need to be spilt and stored in several different databases.
3. We did not cover every detail of End-to-End testing of ECG web application in
terms of user interaction with web site, which can be included in future work.

62
Bibliography
[1] “Heart Disease Statistics and Maps”, Available online:https://www.cdc.gov/heartdisease/facts.htm
[2] “Qardio”, Available online: https://www.getqardio.com/qardiocore-wearable-ecg-ekg-monitor-iphone/?gclid=CjwKCAjw-qbLBRB7EiwAftBCI2-p7j30dpbreURMjQzFh1KOpovcAmRIyEH7fjq_ezndYD902-fLGRoCR-0QAvD_BwE [3] “Do you know what a REST API is? ”, Available online: https://www.sitepoint.com/developers-rest-api/ [4] Wikipedia – the free encyclopedia, “MySQL”, Available online: https://en.wikipedia.org/wiki/MySQL [5] “JSON: What It Is, How It Works, & How to Use It”, Available online: https://www.copterlabs.com/json-what-it-is-how-it-works-how-to-use-it/
[6] “Angular- Unit Testing recipes (v2+)”, Available online: https://medium.com/google-developer-experts/angular-2-unit-testing-with-jasmine-defe20421584
[7] “Unit Tests, How to Write Testable Code and Why it Matters”, Available online: https://www.toptal.com/qa/how-to-write-testable-code-and-why-it-matters

63
Appendix A Source Code
The source code of ECG web application can be downloaded at https://github.com/huiyuejiao/ECG-Angular2-TypeScript. Source code should work on an apache server on windows, Linux or mac.
64
Appendix B Restful APIs
The complete APIs of ECG web application can be found at http://docs.ecg.apiary.io/#reference