cim. cersa instruments manager. user's manual. quick start.pdfsee "connexion manager"...
TRANSCRIPT

CERSA-MCIM2 rue de lisbonne
Centre d'Affaires Expobat13480 Cabries - France
tel: +33 (0)4 42 02 60 44fax: +33 (0)4 42 02 79 79
web: http://www.cersa-mci.comemail: [email protected], [email protected]
CIM. Cersa Instruments Manager.
Lab quick start manual.
Manual version : 5.3.0© 2017 CERSA-MCI
CIM. Cersa Instruments Manager. User's manual.2
© 2017 CERSA-MCI
Manual version : 5.3.0
Table of Contents
Part I Quick Start 3
................................................................................................................................... 41 Install Instruments
................................................................................................................................... 52 CIM startup
................................................................................................................................... 63 Add connexions
................................................................................................................................... 84 CIM Lab
......................................................................................................................................................... 9Automatic group 4.1
......................................................................................................................................................... 11Configure instrument accessory 4.2
......................................................................................................................................................... 12Acquire a "Wire" sample 4.3
3
Manual version : 5.3.0
Part I: Quick Start
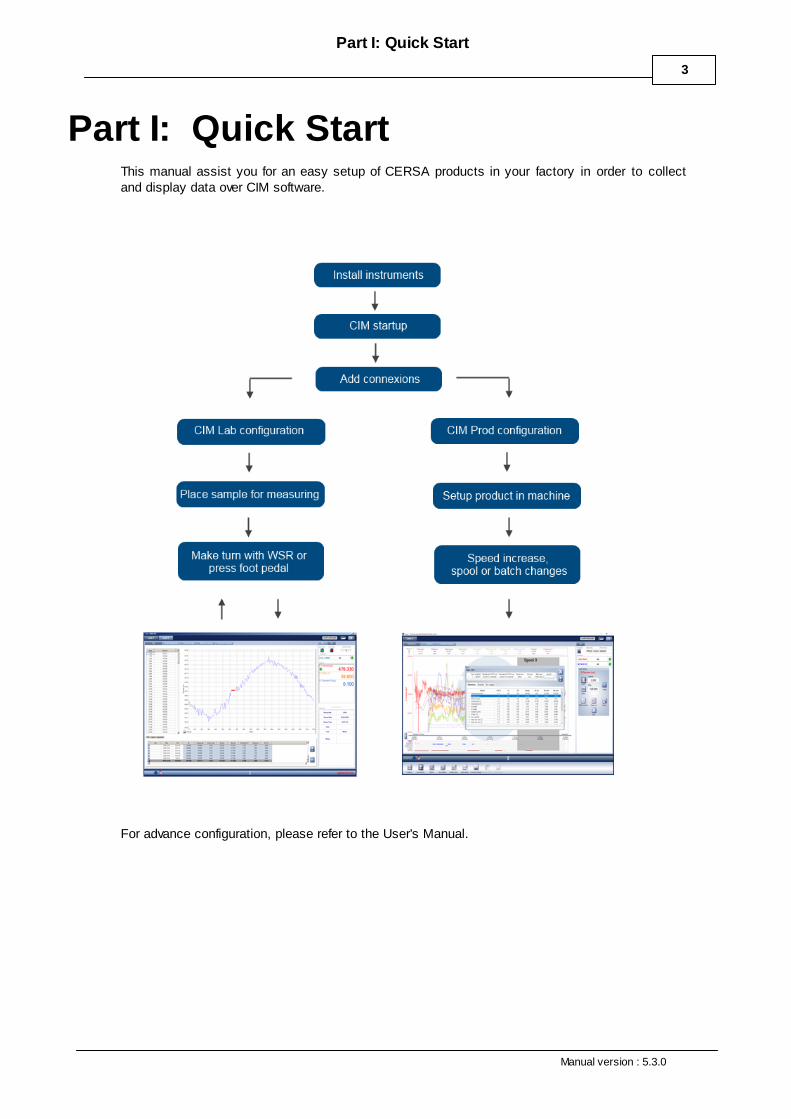
Part I: Quick StartThis manual assist you for an easy setup of CERSA products in your factory in order to collectand display data over CIM software.
For advance configuration, please refer to the User's Manual.
4
CIM. Cersa Instruments Manager. User's manual.© 2017 CERSA-MCI
Manual version : 5.3.0
Part I: Quick StartInstall Instruments
Install Instruments1Mount the instruments in production line or place it in laboratory desk.Install accessories like wire sample rotation (WSR) or foot pedal if required.Plug in air supply for the instrument if necessary.Connects digital input output instrument interface with your process control system.Connects BNC analog outputs with your process control system.Connects RS232 instrument interface with the PC.Keep in mind the PC COM port used for each instrument.Plug in power supply for the instrument.
For more details please refer to specific device manual.

5
Manual version : 5.3.0
Part I: Quick StartCIM startup
CIM startup2Install CIM
Your instrument has been delivered with CERSA-MCI CD-ROM including the CIM Setup file. Whenyou insert your CD-ROM in your drive, an automatic setup is launched.
Remark:
If the setup is not launched automatically you need to launch the setup manually from you driveat the following location: DVD drive:\CIM\setup.exe
Follow step by step the setup procedure displayed on the screen.
Protection key
Plug in the USB protection dongle to benefit the full production and laboratory features. Refer tokey protection in CIM manual.
Configure CIM
Launch CIM software.Enter the "supervisor" password.

6
CIM. Cersa Instruments Manager. User's manual.© 2017 CERSA-MCI
Manual version : 5.3.0
Part I: Quick StartAdd connexions
Add connexions3Add your connexions (CERSA instruments) in the connexions manager interface.
1
1- Click on the "Connexions manager" in main panel.
2- Click on Add instrument

7
Manual version : 5.3.0
Part I: Quick StartAdd connexions
3- Choose your instrument type (LDS 1 axis in this example).
4- Choose the communication port where your instrument is connected (COM1 in this
example).
5- Choose the type of connexion:
Production
Laboratory
6- Add the instrument.
7- The instrument is added in the connexions table. The status can be either ok or warning:
Ok: The instrument is measuring without any problem.
Warning: for example if the temperature is not stable or the user don't put any product to
measure.
See "Connexion Manager" in CIM manual for more information about additional configuration.

8
CIM. Cersa Instruments Manager. User's manual.© 2017 CERSA-MCI
Manual version : 5.3.0
Part I: Quick StartCIM Lab
CIM Lab4Once the connexions setup is finish the software runs in easy mode.The easy mode will automatic create groups for WSR or Footpedal tools with metric or imperialunits in the working database.In this way the user can start wire measurement immediately without any additional action.
To have more information to configure working database, please see "Lab configuration" in CIMLaboratory manual.

9
Manual version : 5.3.0
Part I: Quick StartCIM Lab
Automatic group4.1
1
1- Click on the Main button to display the Lab interface.
Click on the Group manager tab.
1- The following icon indicates when the group is already created and open:
2- You can close the group. Then the state of the group can be either:
WSR: Wire sample rotation tool.
10
CIM. Cersa Instruments Manager. User's manual.© 2017 CERSA-MCI
Manual version : 5.3.0
Part I: Quick StartCIM Lab
FP: Foot pedal.
3- You can open the group.
Note : If instrument accessory has been changed, and the group is incompatible, a newgroup is created or, if compatible group exists, it is open.

11
Manual version : 5.3.0
Part I: Quick StartCIM Lab
Configure instrument accessory4.2To configure the instrument accessory ( WSR or FOOTPEDAL), you must be logged in Supervisormode to access to the "Parameters manager" tab.
Parameters manager => Instrument tab => Digital Interface => Digital IO.
the interface looks like this :
Change the accessory
Note : Group must be close to change trigger mode.

12
CIM. Cersa Instruments Manager. User's manual.© 2017 CERSA-MCI
Manual version : 5.3.0
Part I: Quick StartCIM Lab
Acquire a "Wire" sample4.3
2
3 4
5
1
1- Make a turn with the wire sample rotation tool or press the foot pedal to make an
acquisition.
2- A line with the statistics for the sample is added at the end of the table.
3- The points acquisition are displayed into the table. You can select and copy the values in
table, and you can paste into a text editor or a spreadsheet software (Microsoft Excel for example).
4- The acquisition graph is displayed (measure errors appear in red).
5- You can click on previous sample's acquisition to display graph and acquisition points.

13
Manual version : 5.3.0
Part I: Quick StartCIM Lab
7 8 9
7- In the tab "Graph", you can display the evolution of the acquisition.
8- In the tree, you can display or hide the statistics show in table "Tab Stats".
9- The graph displays the evolution of acquisitions statistics.
The error code can be found in the instrument documentation (see LDS documentation forexample).