cim user manual - umpqua health · 10/2017 4 introduction community integration manager community...
TRANSCRIPT

PERFORMANCE HEALTH TECHNOLOGY
CIM User Manual
YEAR
2017

10/2017 2
CIM Provider User Manual
10/2017 3
Table of Contents
Introduction to Clinical Integration Manager (CIM) …………………………………….…..4
Accessing the System ……….………………………………………………………………......4 Eligibility ……………………………………………………………………………………….…..5 Entering Authorizations in CIM…………………………………………………………………..8 Using Referral Manager for Checking Authorizations in CIM...………………………….…..17 Referral Reports…………………………………………………………………….…………...19 Exporting to an Excel File ………...…………………………………………………………....21 Checking Claim Status Online ….….…….……………………………………….…………...23 Review of Claim Statuses………..……………………………………………………………..26 Using CIM Online DMAP Line Search…………………………………………………………27
10/2017 4
Introduction
Community Integration Manager
Community Integration Manager (CIM) is available to check eligibility status, authorization status, and claims status. A plan’s medical management team uses CIM to authorize, monitor, and manage authorizations submitted by provider agencies, as well as, document important actions (example: clinical notes). CIM eliminates much of the paperwork and faxing associated with the authorization process.
Accessing the system
You will use the Internet Browser to reach our website at https://cim1.phtech.com. Logging onto CIM requires a unique username and password for each employee with access to the system. As a new user, you will register and choose a unique username and password. CIM will prompt you to change your password once a year. The following rules apply when creating a unique username:
In the box labeled "Username," you will need to type a name without spaces which will be unique to you. Common usernames make use of a person's last name and the first letter of the first name, such as 'doej' (John Doe). Persons who have common last names such as 'Smith' might try something like 'smithjo' or 'josmith' (Joe Smith). Always use lower case. Minimum password length is six characters and must contain at least 3 of the following types of characters:
Uppercase letters (A-Z)
Lowercase Letters (a-z)
Number(s) (0-9)
Non-alpha character (!, #, $, %, etc.)
Examples: Splurt1 or Cazart!
C O M M U N I T Y I N T E G R A T I O N M A N A G E R
10/2017 5
Eligibility
Below you will find the steps to find various plans’ eligible members. CIM allows users to search for members in many different ways. You can use a Social Security number, date of birth, or the member’s policy/Member ID number. CIM is searchable by a specific date to verify eligibility for a particular date of service as of today or in the past.
Eligibility is the first step in the authorization process
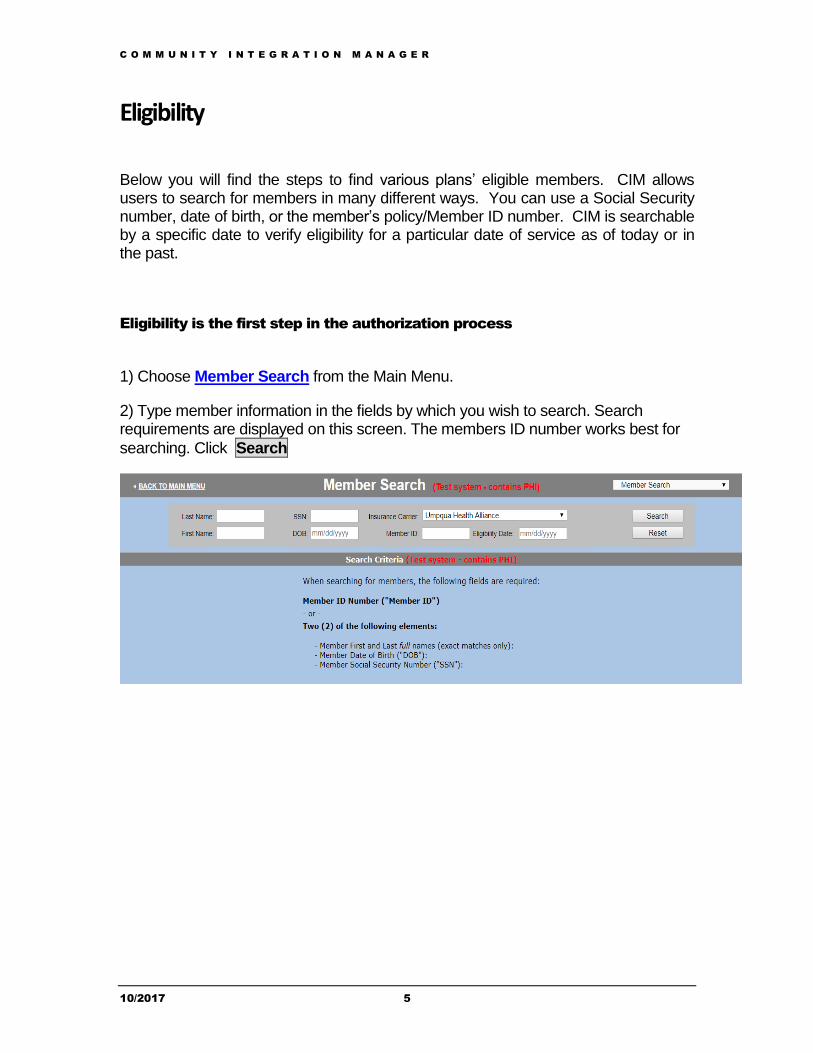
1) Choose Member Search from the Main Menu.
2) Type member information in the fields by which you wish to search. Search requirements are displayed on this screen. The members ID number works best for
searching. Click Search

C O M M U N I T Y I N T E G R A T I O N M A N A G E R
10/2017 6
CIM will search the database and return the specific member or a list of members that fit the information entered. Next is an example of a record display in Member Search. You will want to select the line that is open with no term date.
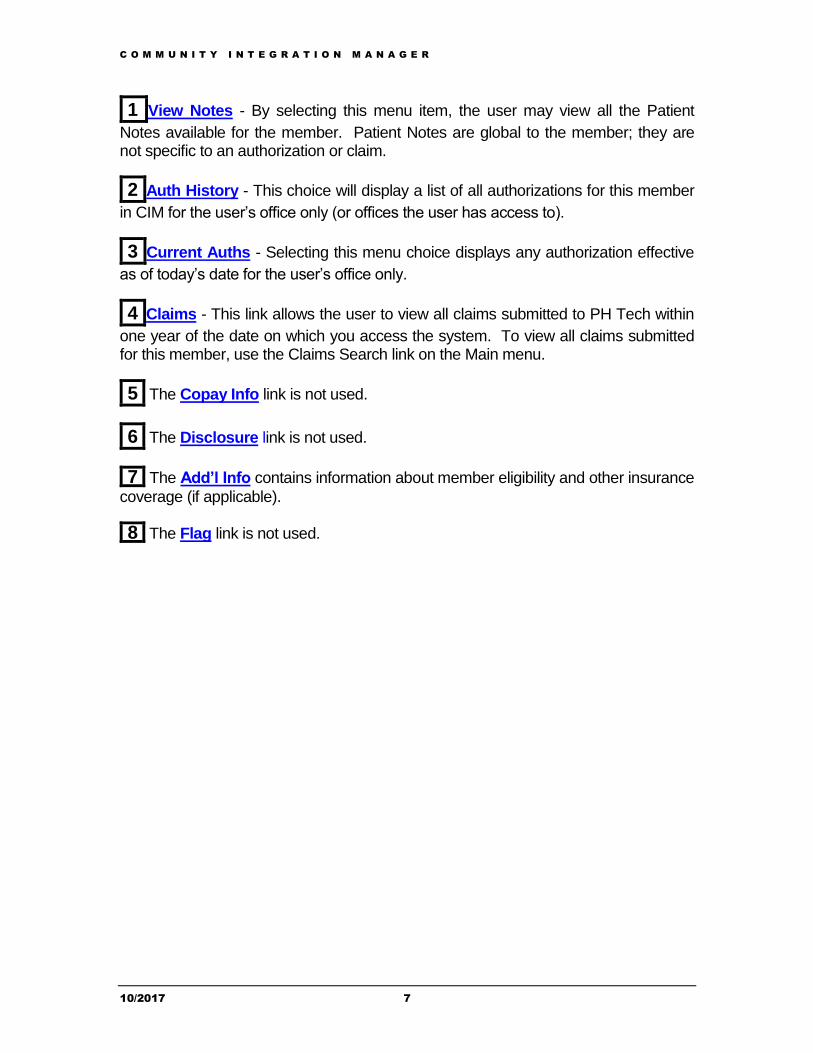
There are four menu choices available besides the action to submit an authorization: View Notes, Auth History, Current Auths, and Claims.
1 2 3 4 5 6 7 8
C O M M U N I T Y I N T E G R A T I O N M A N A G E R
10/2017 7
1 View Notes - By selecting this menu item, the user may view all the Patient
Notes available for the member. Patient Notes are global to the member; they are not specific to an authorization or claim.
2 Auth History - This choice will display a list of all authorizations for this member
in CIM for the user’s office only (or offices the user has access to).
3 Current Auths - Selecting this menu choice displays any authorization effective
as of today’s date for the user’s office only.
4 Claims - This link allows the user to view all claims submitted to PH Tech within
one year of the date on which you access the system. To view all claims submitted for this member, use the Claims Search link on the Main menu.
5 The Copay Info link is not used.
6 The Disclosure link is not used.
7 The Add’l Info contains information about member eligibility and other insurance
coverage (if applicable).
8 The Flag link is not used.

C O M M U N I T Y I N T E G R A T I O N M A N A G E R
10/2017 8
Entering Authorizations in CIM
Providers can enter authorization requests directly into CIM.
Creating an Authorization
The following steps should be followed to create an authorization for a member receiving services at your agency:
1) Find client and establish eligibility as described in Eligibility section at the beginning of this Manual.
2) Choose Submit Pre-Auth -->

C O M M U N I T Y I N T E G R A T I O N M A N A G E R
10/2017 9
The Submit Authorization screen (pictured below) appears.
The member’s eligibility auto-fills in the Member Details section of the authorization form. Click on the blue link to change eligibility dates, ie. for retro requests, etc.
Make sure that the Pre-Authorization button is selected.
Be sure the “Request Auth from PCP (“I am the specialist”)” checkbox is correct.
The default is unchecked indicating that this authorization request is from the PCP (that is not the specialist).
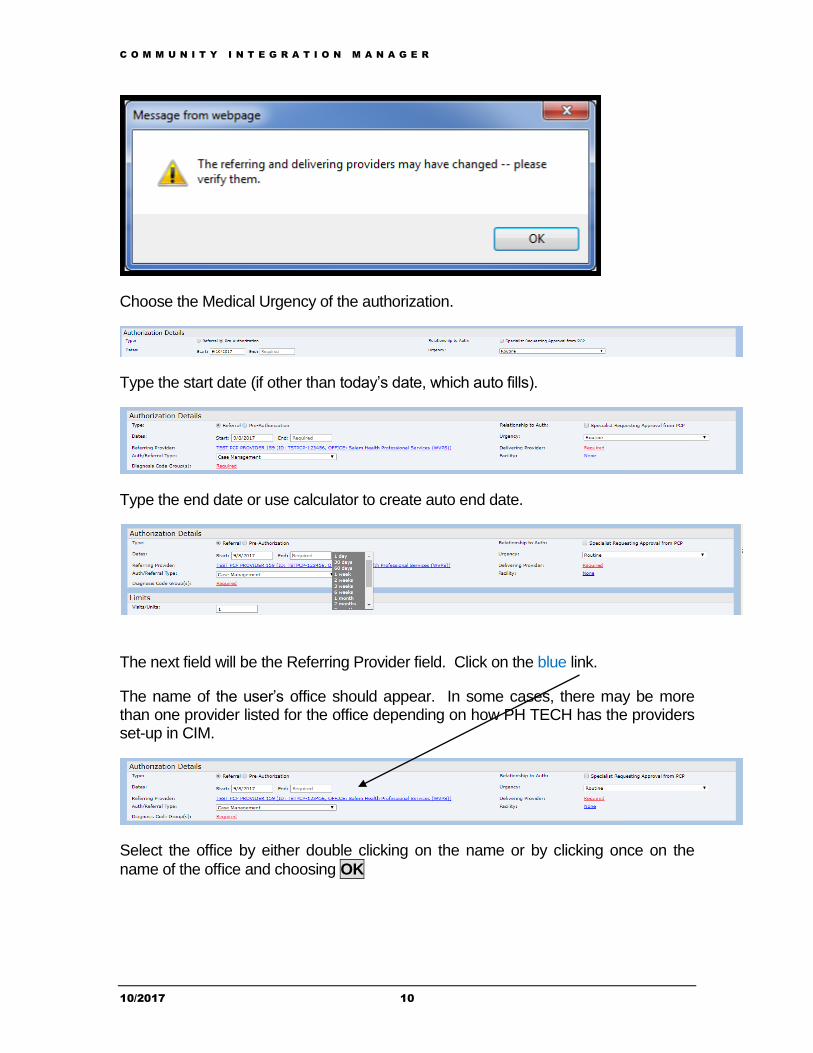
Check this box if this authorization request is from the specialist office. The first time it is checked, a warning message popup will display.
C O M M U N I T Y I N T E G R A T I O N M A N A G E R
10/2017 10
Choose the Medical Urgency of the authorization.
Type the start date (if other than today’s date, which auto fills).
Type the end date or use calculator to create auto end date.
The next field will be the Referring Provider field. Click on the blue link.
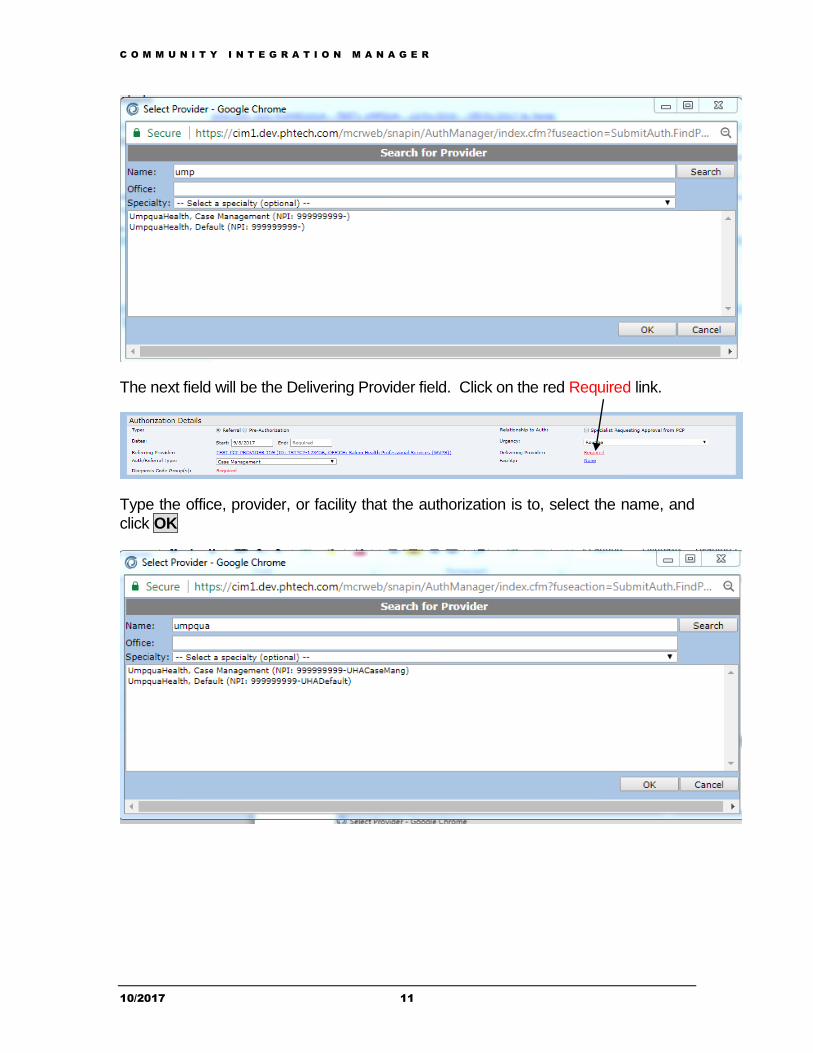
The name of the user’s office should appear. In some cases, there may be more than one provider listed for the office depending on how PH TECH has the providers set-up in CIM.
Select the office by either double clicking on the name or by clicking once on the
name of the office and choosing OK
C O M M U N I T Y I N T E G R A T I O N M A N A G E R
10/2017 11
The next field will be the Delivering Provider field. Click on the red Required link.
Type the office, provider, or facility that the authorization is to, select the name, and
click OK

C O M M U N I T Y I N T E G R A T I O N M A N A G E R
10/2017 12
Select an Authorization type.
The next field will be the Diagnosis Codes field. Click on the red Required link.
Type in the code, choose the diagnosis code from the dropdown list, and click search. When it appears under “Diagnosis Code Groups” click the appropriate box and click save. Please note: the “Default (Use specific codes)” codegroup is used when there is not a code group attached to the diagnosis code.

C O M M U N I T Y I N T E G R A T I O N M A N A G E R
10/2017 13
The next field is the Procedure Codes field. Click on the red Required link.

C O M M U N I T Y I N T E G R A T I O N M A N A G E R
10/2017 14
Type in the code, choose the procedure code from the dropdown list, and click search. When it appears under “Procedure Code Groups” click the appropriate box and click save.
The Limits section at the bottom of the screen is where requests for specific Visits/Units should be entered.
Click Save.

C O M M U N I T Y I N T E G R A T I O N M A N A G E R
10/2017 15
For Pharmacy requests:
The Delivering Provider field will need to be UHA Pharmacy. Click on the red Required link and pick UHA Pharmacy.
Pick Diagnois code in list.
Under Procedure Codes Pick “Exception Request”.

C O M M U N I T Y I N T E G R A T I O N M A N A G E R
10/2017 16
The Additional Information section is where any Comments or Documents can be placed.
For Pharmacy requests, put the name of prescription in the Comments field.
Users should also enter in the Comments field any information about authorizations that may be helpful to the plan.
Attach any chart notes or documents that would help the plan to complete the authorization review process. These documents can be uploaded from the user’s computer.
Click Submit if you are finished.
C O M M U N I T Y I N T E G R A T I O N M A N A G E R
10/2017 17
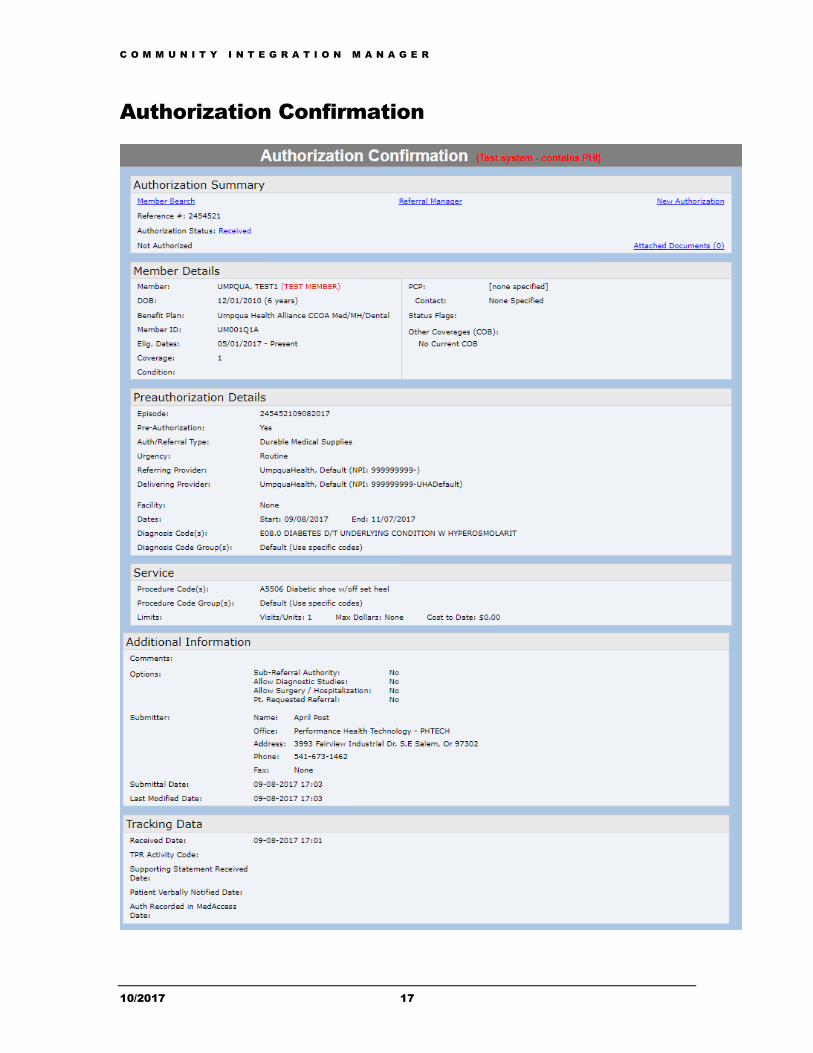
Authorization Confirmation

C O M M U N I T Y I N T E G R A T I O N M A N A G E R
10/2017 18
The Authorization Confirmation screen should appear and list the authorization information and an Authorization Status. To see the authorization request in more detail, select the Referral Manager link at the top of the page.
The authorization status will read Received. This message means that the authorization has been submitted but still needs to be reviewed by the plan.
Using Referral Manager
Your office can use Referral Manager to view authorizations to your office/agency. Below you will find specific instructions on locating authorizations.
Important Note: The Referral Manager function is not as detailed as the Referral Report function. For more informative reports that can be both printed and downloaded (into Microsoft Excel for example), please see the Referral Reports section of this manual.
Steps for finding status of authorizations:
1) Select Referral Manager from the Main Menu.
2) Type a date span to reflect the submission date of the authorizations you wish to view.
3) Select the authorization status you wish to view by clicking on it. Multiple statuses may be selected by holding down the Control key while selecting with the mouse.
Important Note: A specific “dummy” client name has been used in the example given above in order to preserve member confidentiality. Although you will have the option of searching by an individual member’s name or Recipient ID (Pt. ID:), in most cases you are trying to find all the authorizations entered for a particular day, week or month, and will not include a specific member’s name or identifying information.
4) Click on the Find button.
Along the left is a vertical listing of the members and associated Reference numbers in blue font. By clicking on the Reference # link on the left side of the screen, the authorization detail screen will appear in the frame to the right.
C O M M U N I T Y I N T E G R A T I O N M A N A G E R
10/2017 19
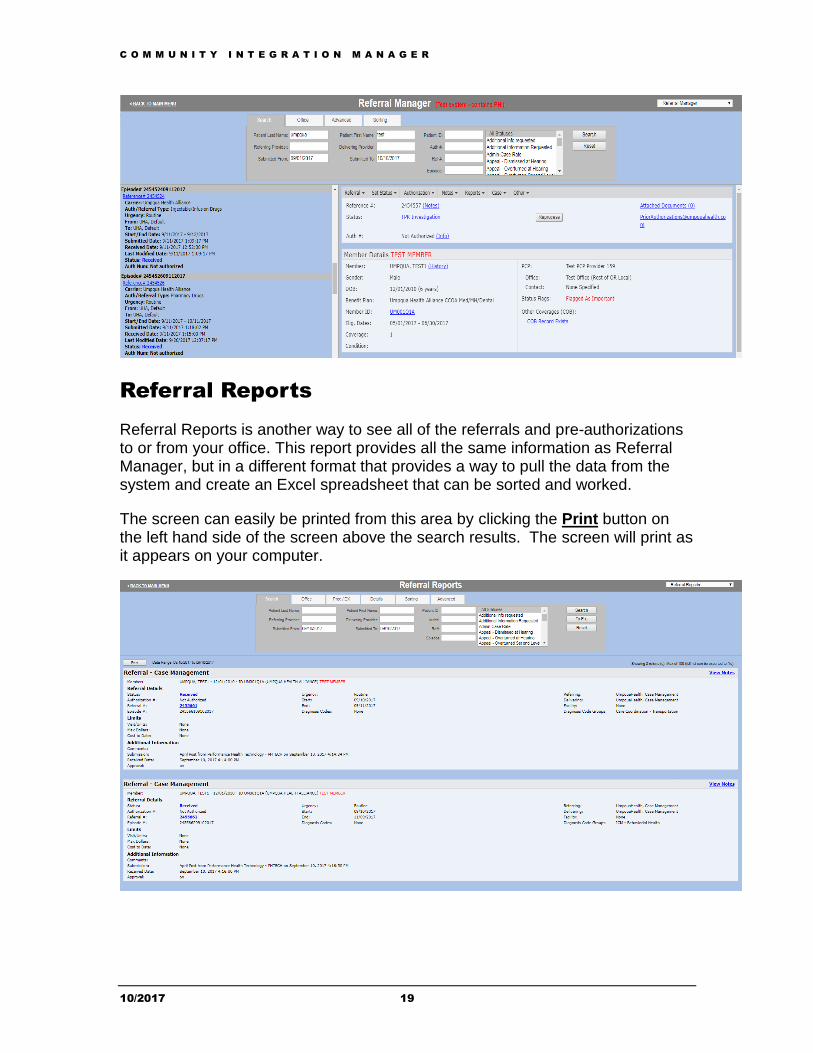
Referral Reports
Referral Reports is another way to see all of the referrals and pre-authorizations to or from your office. This report provides all the same information as Referral Manager, but in a different format that provides a way to pull the data from the system and create an Excel spreadsheet that can be sorted and worked.
The screen can easily be printed from this area by clicking the Print button on the left hand side of the screen above the search results. The screen will print as it appears on your computer.

C O M M U N I T Y I N T E G R A T I O N M A N A G E R
10/2017 20
Locating Open Authorizations for Renewing and Updating
An additional feature of the Referral Reports is that it allows you to select date ranges to provide a way to see what authorizations are due to expire thus allowing the user to see what authorizations are due to expire that may require them to be updated or renewed.
Below is an example of how to use search criteria in referral reports to query for open authorizations. Key elements for this query are the posted date, start dates and end dates. Below are screen prints with some hints and tips for this type of query.
You will use the tabs across the top to set the search criteria. The Search Tab is the first one. The Search tab is where you will set the provider information and dates as indicated below. Since security is tied to your office you do not have to list your agency.
The Submitted From and Submitted To dates will default to the current date. You will want to set your from date far enough back to catch any authorizations that may have been loaded in a retro authorization situation. The suggested date is 15 months from date of query. The “Submitted To” field will default to the day you log into the system. This date can be changed to any date after the “Submitted From” date.
You can set parameters in the other tabs to narrow down your search by Office, Procedure/Diagnosis code groups, Details, and Sorting.
Exporting to an Excel File
Select To File. The next screen notifies you that you have successfully created a file, followed by instructions on how to download the file and save to a targeted area.

C O M M U N I T Y I N T E G R A T I O N M A N A G E R
10/2017 21
Checking Claim Status Online
Claim Status
A user can check status of claims on the system by specific client, by provider, or by vendor.
1. Choose the Claims Search link from the Main Menu in CIM.
2. On the Search tab, enter the date range for which you want to query (defaults to today’s date). Choose the status to review (defaults to All Statuses) or select multiple statuses by holding down the Ctrl key while selecting.
3. Click Search.
C O M M U N I T Y I N T E G R A T I O N M A N A G E R
10/2017 22

C O M M U N I T Y I N T E G R A T I O N M A N A G E R
10/2017 23
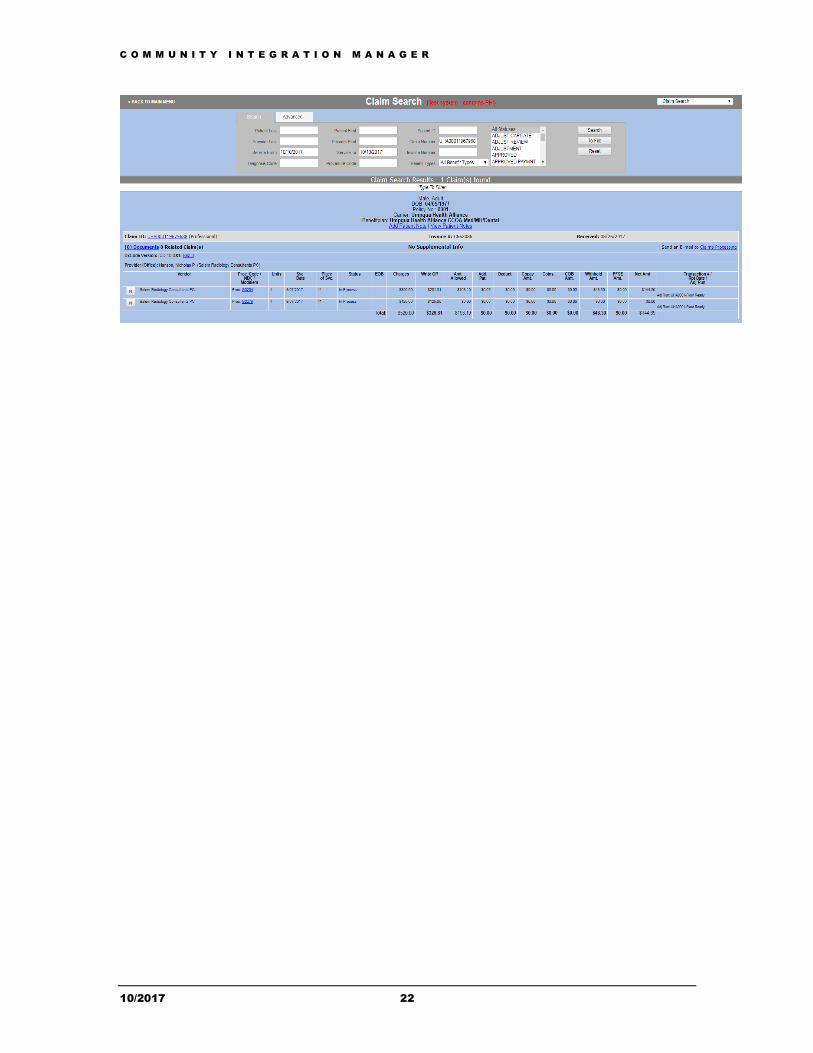
Member Name and DOB: The member’s name and date of birth will be located in the top middle of the screen. Policy Number: The member’s ID number will be located just under the member’s name. Claim Number: Located in the top left hand corner of screen in blue. The claim number will begin with the month/day/year followed by the analyst’s system ID number and a random sequence. Received date: This will reflect the date PH TECH received the claim. Send an Email to Claims Processing: This feature is highlighted in blue and should be used only when a claim has been fully processed and you wish to request a change in how the claim has been processed. This email will be sent to the Claims team. DX Field: The diagnoses billed on the claim will be displayed at the top left of the screen under the claim number. Provider of service: The name of the rendering provider will be located in this field. (Office): The rending provider’s office will appear in parentheses after the provider’s name. Procedure Code/Modifier: Billed procedures with modifiers will be located in this field. Service Date: This will indicate the date of service on the claim. Status: The status indicates where the claim is in the process. See details of claim statuses outlined below. EOB (Explanation of Benefits): This field will give a brief explanation on how the claim was processed. Charges: The amount billed, by line and then by total. Amount Allowed: This is the amount allowed by contract for the services billed. Withhold: This is the amount that is withheld from payment of the contracted amount, if a withhold applies. Payment: Payment made on the claim after withholds, if applicable.

C O M M U N I T Y I N T E G R A T I O N M A N A G E R
10/2017 24
CK#/Report Date: This is the check number the payment is included in and the date of the report/voucher.

C O M M U N I T Y I N T E G R A T I O N M A N A G E R
10/2017 25
Review of Claim Statuses
In Process: All claims that have this status with no report date or check number in the last column of the claim search screen have been received and are in the processing stage. Once they are in the final processing stage there will be a check number and report date and this status will change.
Denied or Approved: Claims in either status were auto-approved or auto-denied by CIM adjudication.
Approved Review or Denied Review: Indicates the claim was reviewed by a claim analyst before releasing.
Pend: Claim is being held for further review by a claim analyst or the plan.
Below is a link to the national CARC code list.
http://www.wpc-edi.com/reference/codelists/healthcare/claim-adjustment-reason-codes/

C O M M U N I T Y I N T E G R A T I O N M A N A G E R
10/2017 26
Using CIM Online Health Systems Division Line
Search
The Oregon Health Plan is administered in accordance to the prioritized list. This is known and referred to as the line and treatment pairs. This means that the diagnosis code has to pair with the procedure code being billed and must fall “above the line” to be a covered benefit. The Health Systems Division Line Search provides Oregon Health Plan benefit coverage information by offering the capability of determining, based on ICD-10 diagnosis codes and procedure codes, which medical and/or surgical conditions are eligible for reimbursement under the Oregon Health Plan benefit package, and which are considered to be “below the line.” Please note: the prioritized line changes frequently by the State so it’s important to check whether a diagnosis and service are covered for each visit. In order to assist your office in using the Health Systems Division Line Search accurately, please utilize the following definitions of “covered” versus “non-covered” diagnoses and treatments per the current “List of Prioritized Services” as determined by Oregon Health Authority, the State agency which administers Medicaid in Oregon: • “Above the Line” Items – These are diagnoses which, when entered into the Line Finder, rank within the Line Ranking 1 through 475 for 2017. These are considered to be “above the line” diagnoses, and are payable services, assuming all other applicable requirements (such as member eligibility, medical necessity, preauthorization approval, etc.) are met. • “Below the Line” Items – These are diagnoses which, when entered into the Line Finder, rank on lines 476 and beyond for 2017. These are “below the line” services, and are not covered by the Oregon Health Plan. • “Non-ranking” Items – These diagnoses which, when entered into the Line Finder, produce no message. These are conditions (usually symptom codes), and are not covered by the Oregon Health Plan without a more specific diagnosis code. Prioritized List Link: www.oregon.gov/DHS/healthplan/priorlist/main
C O M M U N I T Y I N T E G R A T I O N M A N A G E R
10/2017 27
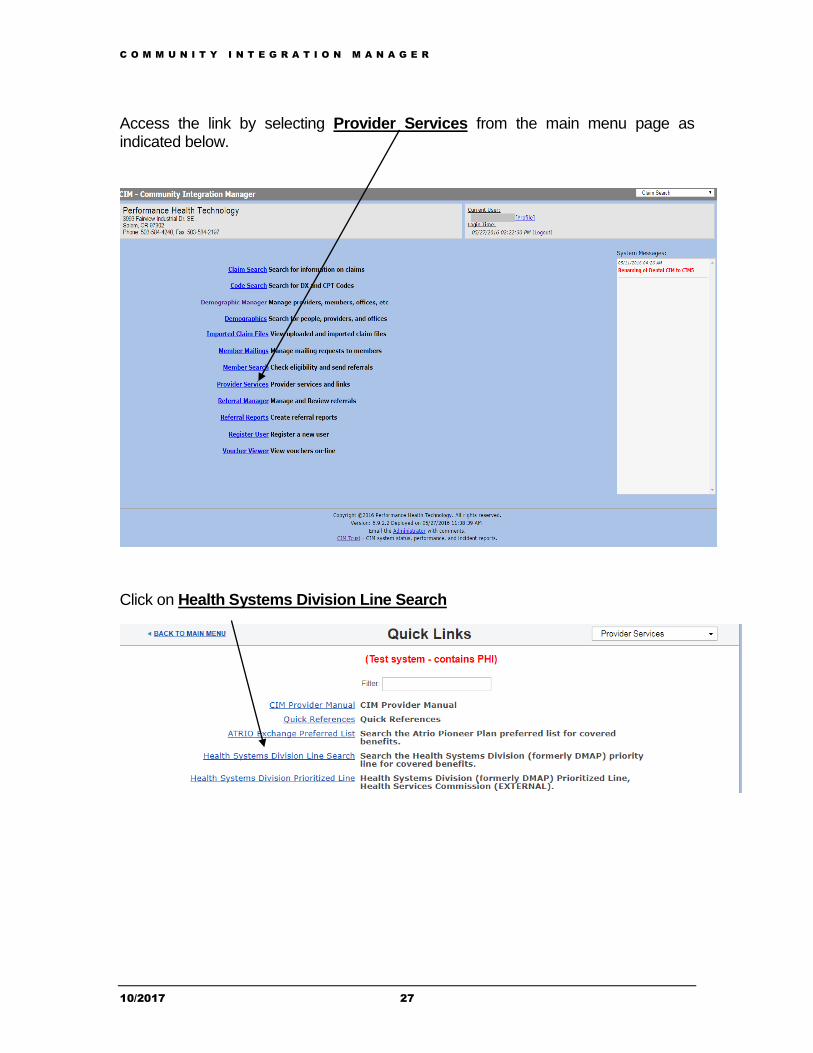
Access the link by selecting Provider Services from the main menu page as indicated below.
Click on Health Systems Division Line Search
C O M M U N I T Y I N T E G R A T I O N M A N A G E R
10/2017 28
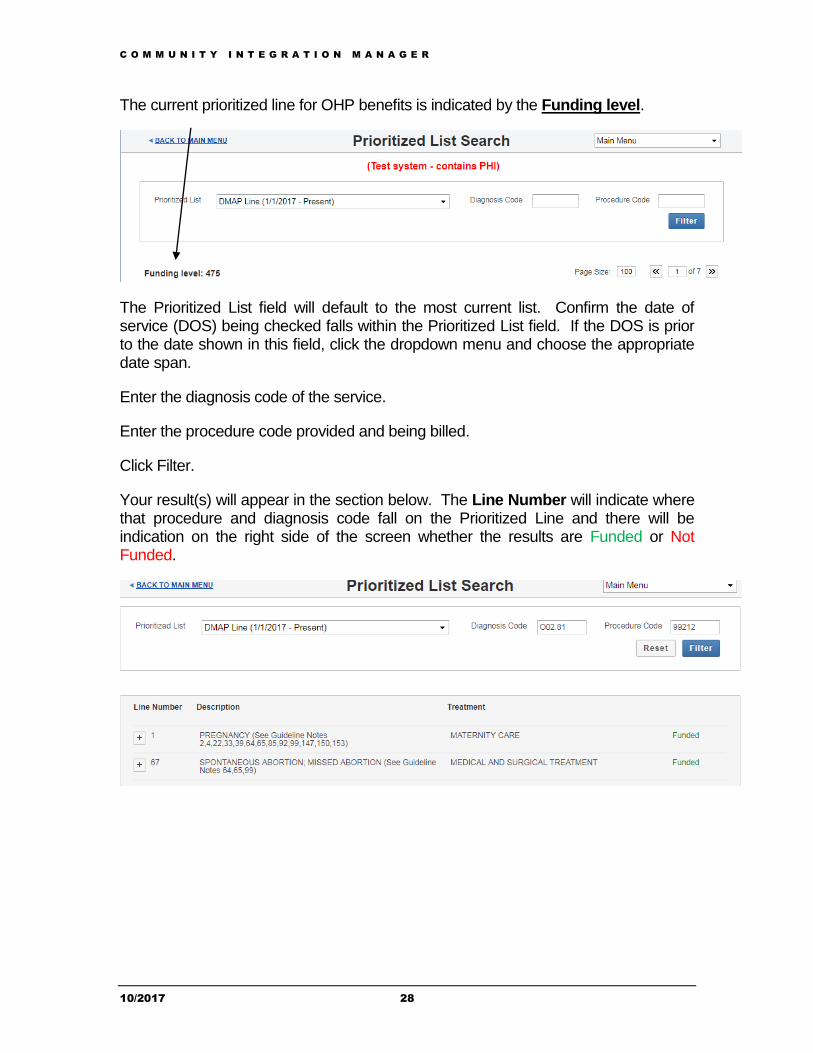
The current prioritized line for OHP benefits is indicated by the Funding level.
The Prioritized List field will default to the most current list. Confirm the date of service (DOS) being checked falls within the Prioritized List field. If the DOS is prior to the date shown in this field, click the dropdown menu and choose the appropriate date span.
Enter the diagnosis code of the service.
Enter the procedure code provided and being billed.
Click Filter.
Your result(s) will appear in the section below. The Line Number will indicate where that procedure and diagnosis code fall on the Prioritized Line and there will be indication on the right side of the screen whether the results are Funded or Not Funded.