aftersales services 售後服務 · prepare ingredients prepare ingredients needed for baking. 1...
TRANSCRIPT
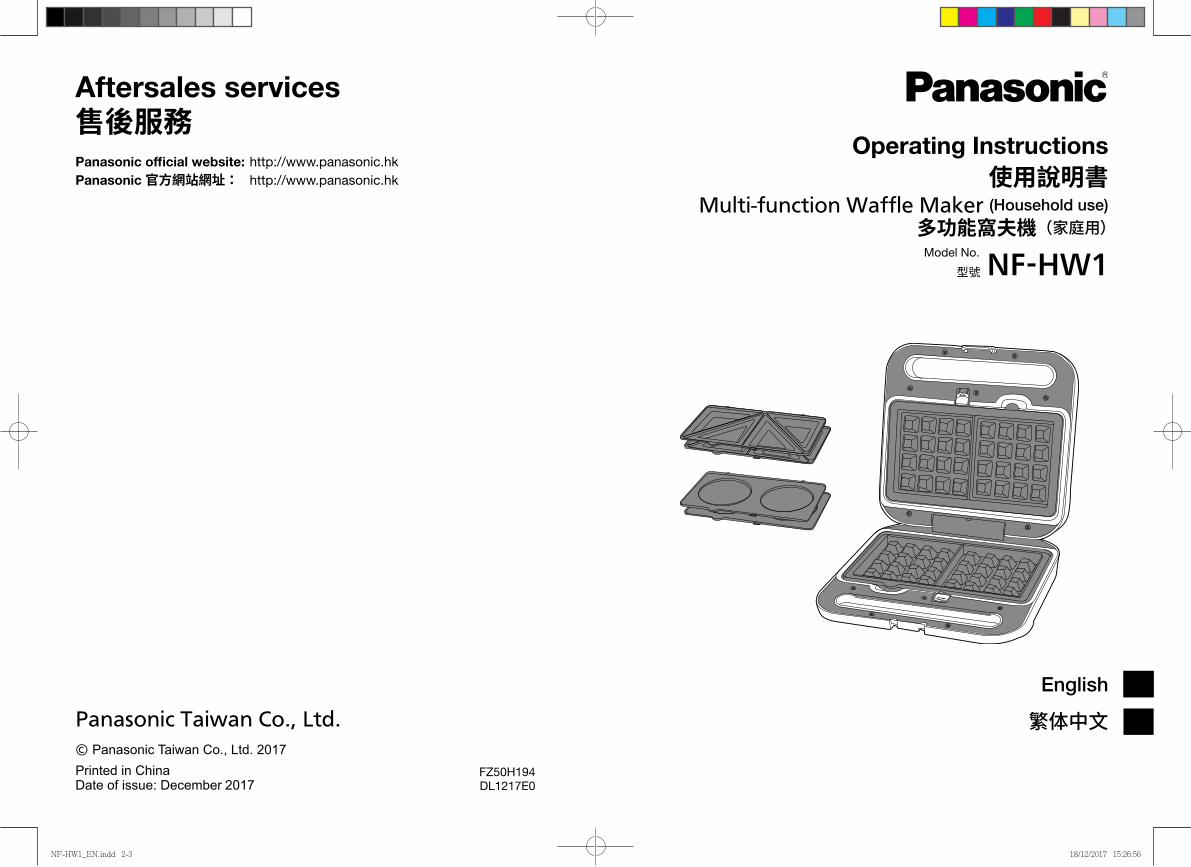
English
繁体中文
Operating Instructions使用說明書
Multi-function Waffle Maker (Household use)
多功能窩夫機(家庭用)Model No. NF-HW1 型號
FZ50H194DL1217E0
Aftersales services售後服務Panasonic of�cial website: http://www.panasonic.hkPanasonic 官方網站網址: http://www.panasonic.hk
Printed in ChinaDate of issue: December 2017
Panasonic Taiwan Co., Ltd.© Panasonic Taiwan Co., Ltd. 2017
NF-HW1_EN.indd 2-3 18/12/2017 15:26:56

EN4 EN5
Table of Contents Page
Safety Precautions EN3
Important Information EN5
Parts Names EN6
Product Disassembly and Assembly EN7
How to Use EN8
Recipes EN9
Cleaning EN14
Replacement Parts EN15
Specifications EN15
Thank you for purchasing Panasonic product.
● Please read these instructions carefully to use the product correctly and safely.● Please carefully read the “Safety Precautions” (P. EN3-EN5) and “Important
Information” (P. EN5) of the instructions before use.● This product is intended for household use only.● Please keep the Warranty Card and this Operating Instructions for future use.● Panasonic will not accept any liability if the appliance is subject to improper use,
or failure to comply with these instructions.
Safety Precautions Please make sure to follow these instructions.
To reduce the risk of personal injury, electric shock or fire, please observe the following:
■ The following signals indicate the degree of harm and damage when the appliance is misused.
■ The symbols are classified and explained as follows.
WARNING: Indicates potential hazard that could result in serious injury or death.
CAUTION: Indicates potential hazard that could result in minor injury or property damage.
This symbol indicates prohibition.
This symbol indicates requirement that must be followed.
WARNING
● Do not allow infants and children to play with packaging material.(It may cause suffocation.)
● Do not disassemble, repair or modify this appliance.➜ Consult the place of purchase or Panasonic service centre.
● Do not damage the power cord or power plug.Following actions are strictly prohibited:Modifying, touching on or placing near heating element or hot surfaces, bending, twisting, pull-ing, hanged / pulled over sharp edges, putting heavy objects on top, bundling the power cord or carrying the appliance by the power cord.
● Do not use the appliance if the power cord or power plug is damaged or the power plug is loosely connected to the socket.➜ If the power cord is damaged, it must be replaced by the manufacturer,
its service agent or similarly qualified person in order to avoid a hazard.
● Do not plug or unplug with wet hands.
● Do not immerse the appliance in water, or splash it with water and / or any liquid.
To avoid risk of electric shock, fire, scalding, burns or serious injury
Power cord
Power plug
NF-HW1_EN.indd 4-5 15/12/2017 12:00:26

EN6 EN7
● Do not use this appliance near or under any combustible materi-als such as curtains, as the bread maybe burn.
● Do not place the oil in the baking plate.➜ When it is necessary, brush the baking plate with moderate
amount of oil slightly.
● Do not insert any object in the gaps.
● Do not touch or put your face close to the appliance during use, as the steam will come out from the gaps of body.
● Do not block the gaps of body or cover body during use.
● This appliance is not intended for use by persons (including chil-dren) with reduced physical, sensory or mental capabilities, or lack of experience and knowledge, unless they have been given supervision or instruction concerning use of the appliance by a person responsible for their safety. Children should be supervised to ensure that they do not play with the appliance.
● Keep the appliance and its power cord out of reach of children.
● Make sure the voltage indicated on the label of the appliance cor-responds to your local supply. Also avoid plugging other devices into the same socket to prevent electrical overheating. However, if you are connecting a number of power plugs, make sure the total wattage does not exceed the rated wattage of the socket.
● Insert the power plug firmly.
● Dust off the power plug regularly.➜ Unplug the power plug, and wipe with a dry cloth.
● Discontinue using the appliance immediately and unplug in the unlikely event that this appliance stops working properly. Example for abnormal occurrences or breaking down:•Thepowerplugandthepowercordbecomeabnormallyhot.•Thepowercordisdamagedortheappliancepowerfails.•The main body is deformed, has visible damage or is abnormally hot.•Thereisabnormalnoisewhileinuse.•Thereisunpleasantsmell.•Thereisanotherabnormalityorfailure.➜ Consult the place of purchase or Panasonic service centre for
inspection or repair.
WARNING
Safety Precautions Please make sure to follow these instructions. CAUTION
● Do not use the appliance on following places.•Onunevensurfaces,onelectricalappliancessuchasarefrigera-
tor, on materials such as tablecloths or on carpets, etc.•Placeswhereitmaybesplashedwithwaterornearaheatsource.•Nearwallorfurniture.➜ Position the appliance on a firm, dry, clean, flat heatproof worktop.
● Do not place any object on or under the body.
● Never use baking plates without setting it on appliance correctly.
● Do not open the lid to bake ingredients.
● Do not replace any parts of this appliance with spare parts other than those specified in these instructions.
● Do not touch hot area such as inside of unit, heating element, plate release button or inside of the lid while the appliance is in use or immediately after use. The accessible surfaces may become hot during use. Be careful with the residual heat source especially after use.➜ Wait it to cool down before handle it.
● Do not use an external timer etc.•Thisapplianceisnotintendedtobeoperatedbymeansofan
external timer or separate remote-control system.
● Do not leave the appliance unattended when in use. Turn the appliance off before leave.
● Before moving or cleaning, unplug the appliance and allow it to cool down.
● Unplug when the appliance is not in use.
● Make sure to hold the power plug when unplugging it. Never pull on the power cord.
To avoid electric shock, fire, smoke, scalding, burns, injury or property damage
Important Information● Do not use the appliance for any purpose other than those
described in these instructions.● Do not drop the appliance to avoid damaging the appliance.● Do not use metal object to touch the baking plates, such as knife,
fork or similar objects to avoid damaging the baking plates. ● Make the bottom of appliance downward when storing it.● Follow the specificed quantity of the recipe to avoid spillage of ingredients or insufficient baking.
This symbol on the products indicates “Hot surface and should not be touched without caution”.
NF-HW1_EN.indd 6-7 15/12/2017 12:00:27
EN8 EN9
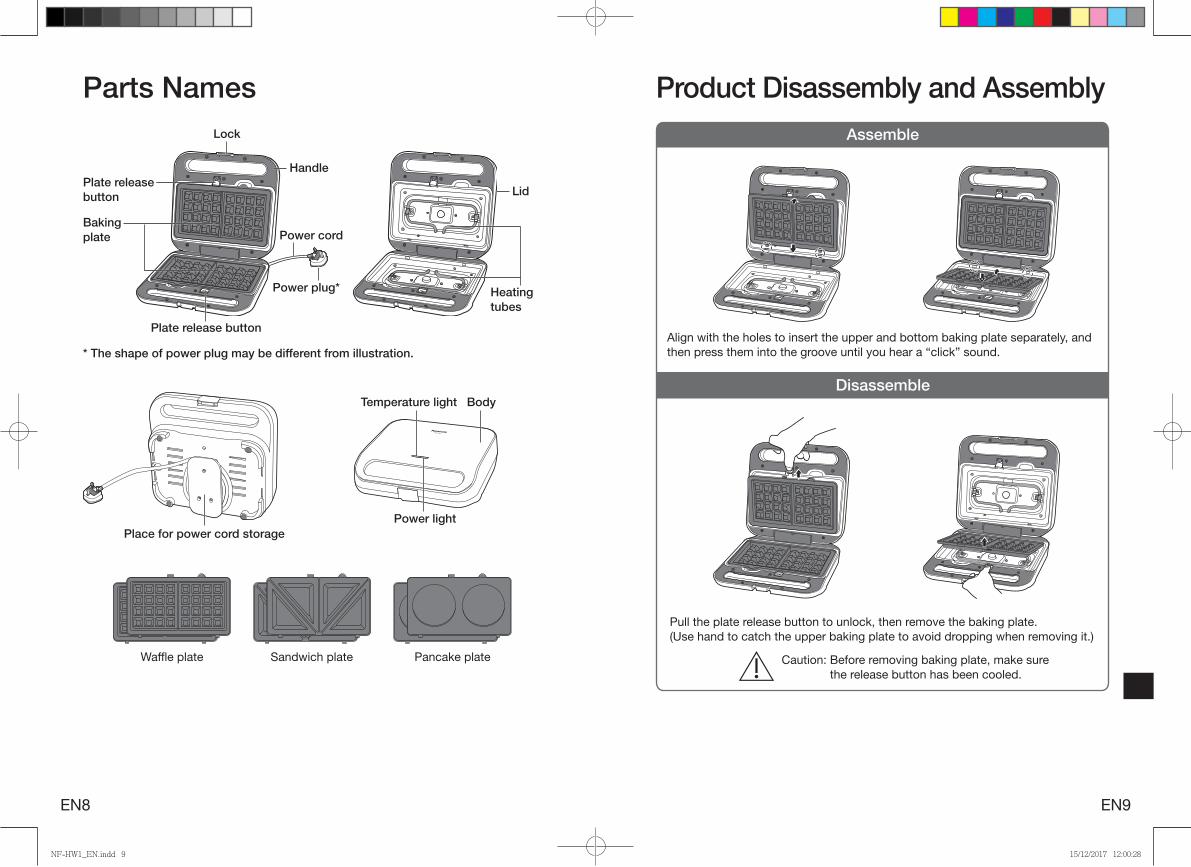
Parts Names
NF-HW1
Lock
Handle
Lid
Baking plate
Plate release button
Power cord
Power plug* Heating tubes
Temperature light Body
Power lightPlace for power cord storage
Waffle plate Pancake plateSandwich plate
Plate release button
* The shape of power plug may be different from illustration.
Assemble
Product Disassembly and Assembly
Align with the holes to insert the upper and bottom baking plate separately, and then press them into the groove until you hear a “click” sound.
Pull the plate release button to unlock, then remove the baking plate.(Use hand to catch the upper baking plate to avoid dropping when removing it.)
Disassemble
Caution: Before removing baking plate, make sure the release button has been cooled.
NF-HW1_EN.indd 9 15/12/2017 12:00:28
EN10 EN11
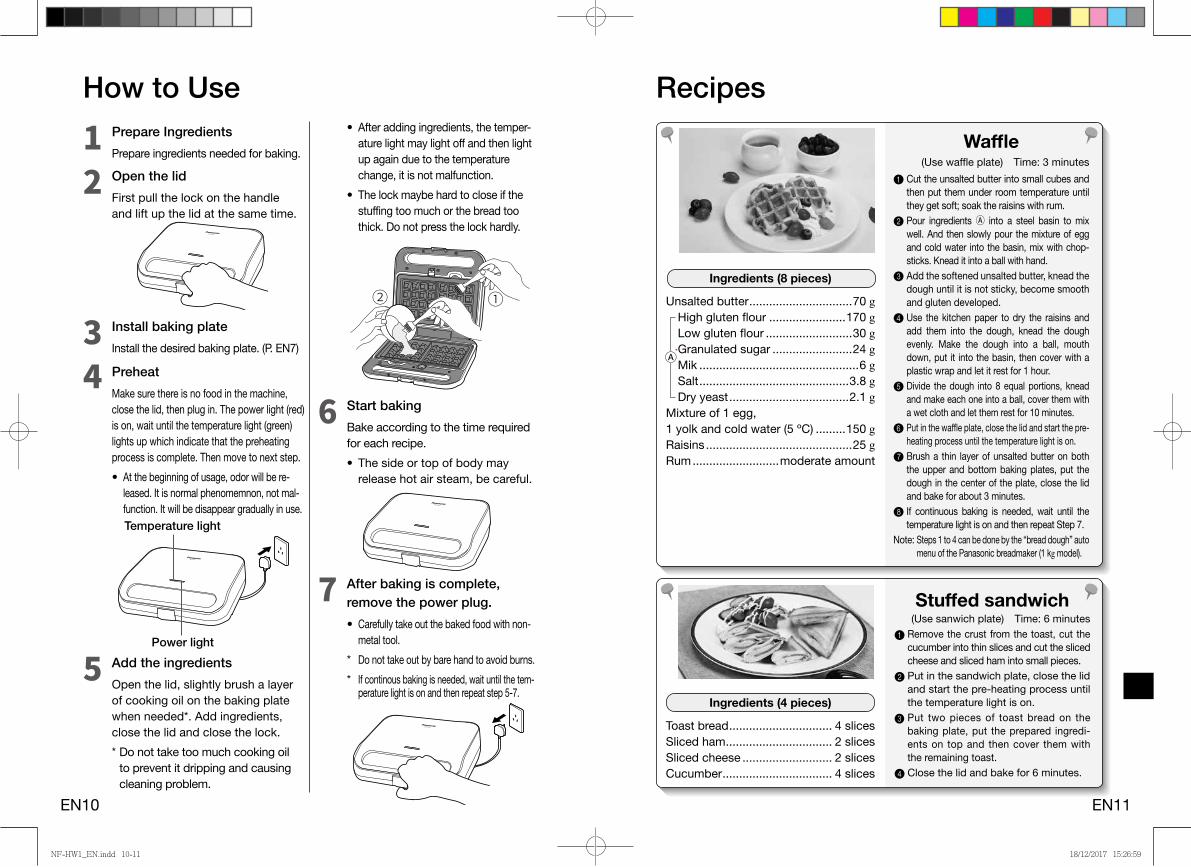
How to UsePrepare Ingredients
Prepare ingredients needed for baking.1
Install baking plate
Install the desired baking plate. (P. EN7)3
Open the lid
First pull the lock on the handle and lift up the lid at the same time.
2NF-HW1
①②
NF-HW1
NF-HW1
Preheat
Make sure there is no food in the machine, close the lid, then plug in. The power light (red) is on, wait until the temperature light (green) lights up which indicate that the preheating process is complete. Then move to next step.
• At the beginning of usage, odor will be re-leased. It is normal phenomemnon, not mal-function. It will be disappear gradually in use.
4
Add the ingredients
Open the lid, slightly brush a layer of cooking oil on the baking plate when needed*. Add ingredients, close the lid and close the lock.
* Do not take too much cooking oil to prevent it dripping and causing cleaning problem.
5
Start baking
Bake according to the time required for each recipe.
• Thesideortopofbodymayrelease hot air steam, be careful.
6
After baking is complete, remove the power plug.
•Carefully take out the baked food with non-metal tool.
* Do not take out by bare hand to avoid burns.
* If continous baking is needed, wait until the tem-perature light is on and then repeat step 5-7.
7NF-HW1
Temperature light
Power light
•After adding ingredients, the temper-ature light may light off and then light up again due to the temperature change, it is not malfunction.
• The lock maybe hard to close if the stuffing too much or the bread too thick. Do not press the lock hardly.
Recipes
Stuffed sandwich
1 Remove the crust from the toast, cut the cucumber into thin slices and cut the sliced cheese and sliced ham into small pieces.
2 Put in the sandwich plate, close the lid and start the pre-heating process until the temperature light is on.
3 Put two pieces of toast bread on the baking plate, put the prepared ingredi-ents on top and then cover them with the remaining toast.
4 Close the lid and bake for 6 minutes.
(Use sanwich plate) Time: 6 minutes
Toast bread ............................... 4 slicesSliced ham ................................ 2 slicesSliced cheese ........................... 2 slicesCucumber ................................. 4 slices
Ingredients (4 pieces)
1 Cut the unsalted butter into small cubes and then put them under room temperature until they get soft; soak the raisins with rum.
2 Pour ingredients Ⓐ into a steel basin to mix well. And then slowly pour the mixture of egg and cold water into the basin, mix with chop-sticks. Knead it into a ball with hand.
3 Add the softened unsalted butter, knead the dough until it is not sticky, become smooth and gluten developed.
4 Use the kitchen paper to dry the raisins and add them into the dough, knead the dough evenly. Make the dough into a ball, mouth down, put it into the basin, then cover with a plastic wrap and let it rest for 1 hour.
5 Divide the dough into 8 equal portions, knead and make each one into a ball, cover them with a wet cloth and let them rest for 10 minutes.
6 Put in the waffle plate, close the lid and start the pre-heating process until the temperature light is on.
7 Brush a thin layer of unsalted butter on both the upper and bottom baking plates, put the dough in the center of the plate, close the lid and bake for about 3 minutes.
8 If continuous baking is needed, wait until the temperature light is on and then repeat Step 7.
Note: Steps 1 to 4 can be done by the “bread dough” auto menu of the Panasonic breadmaker (1 kg model).
Waffle(Use waffle plate) Time: 3 minutes
Unsalted butter ...............................70 gHigh gluten flour .......................170 gLow gluten flour ..........................30 gGranulated sugar ........................24 gMik ................................................6 gSalt .............................................3.8 gDry yeast ....................................2.1 g
Mixture of 1 egg, 1 yolk and cold water (5 oC) .........150 gRaisins ............................................25 gRum ..........................moderate amount
Ⓐ
Ingredients (8 pieces)
NF-HW1_EN.indd 10-11 18/12/2017 15:26:59
EN12 EN13
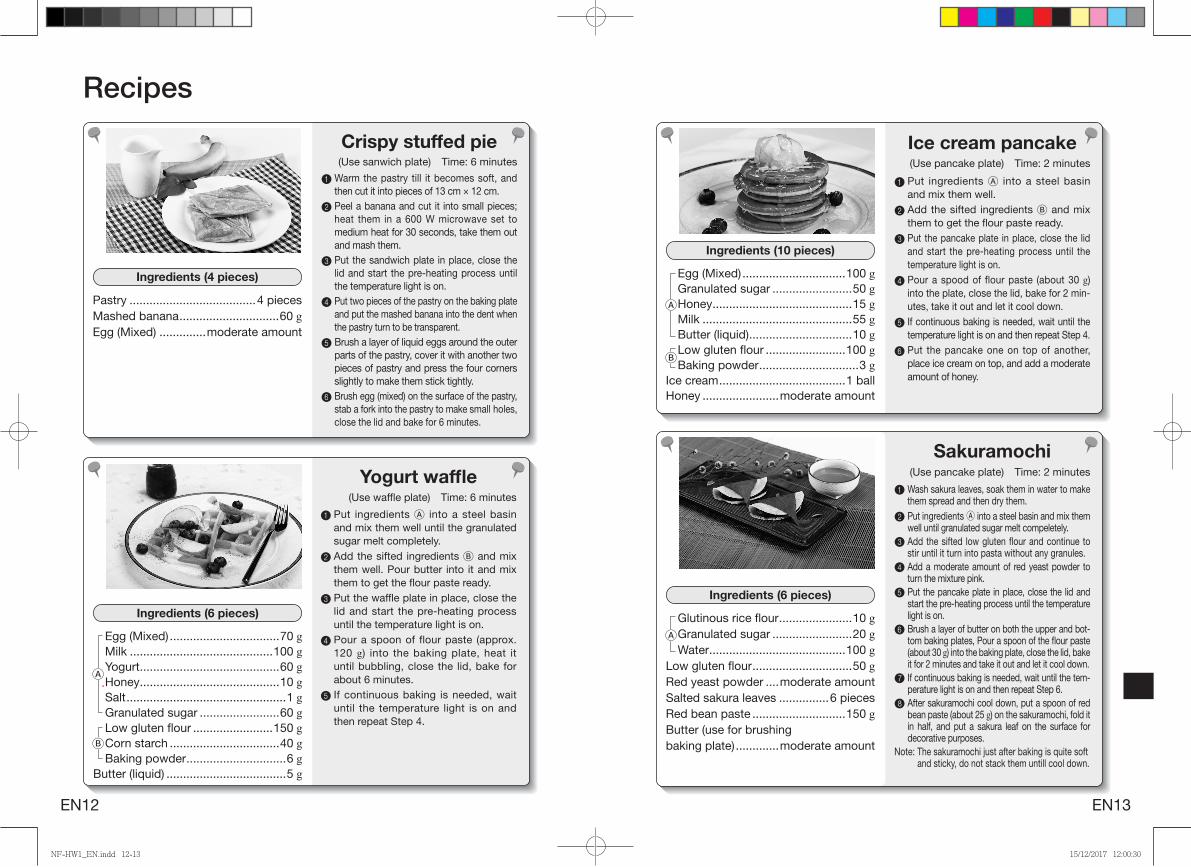
Recipes
1 Put ingredients Ⓐ into a steel basin and mix them well until the granulated sugar melt completely.
2 Add the sifted ingredients Ⓑ and mix them well. Pour butter into it and mix them to get the flour paste ready.
3 Put the waffle plate in place, close the lid and start the pre-heating process until the temperature light is on.
4 Pour a spoon of flour paste (approx. 120 g) into the baking plate, heat it until bubbling, close the lid, bake for about 6 minutes.
5 If continuous baking is needed, wait until the temperature light is on and then repeat Step 4.
Yogurt waffle(Use waffle plate) Time: 6 minutes
Egg (Mixed) .................................70 gMilk ...........................................100 gYogurt ..........................................60 gHoney ..........................................10 gSalt ................................................1 gGranulated sugar ........................60 gLow gluten flour ........................150 gCorn starch .................................40 gBaking powder ..............................6 g
Butter (liquid) ....................................5 g
Ⓐ
Ⓑ
Ingredients (6 pieces)
Crispy stuffed pie
1 Warm the pastry till it becomes soft, and then cut it into pieces of 13 cm × 12 cm.
2 Peel a banana and cut it into small pieces; heat them in a 600 W microwave set to medium heat for 30 seconds, take them out and mash them.
3 Put the sandwich plate in place, close the lid and start the pre-heating process until the temperature light is on.
4 Put two pieces of the pastry on the baking plate and put the mashed banana into the dent when the pastry turn to be transparent.
5 Brush a layer of liquid eggs around the outer parts of the pastry, cover it with another two pieces of pastry and press the four corners slightly to make them stick tightly.
6 Brush egg (mixed) on the surface of the pastry, stab a fork into the pastry to make small holes, close the lid and bake for 6 minutes.
(Use sanwich plate) Time: 6 minutes
Pastry ......................................4 piecesMashed banana ..............................60 gEgg (Mixed) ..............moderate amount
Ingredients (4 pieces)
Ice cream pancake
1 Put ingredients Ⓐ into a steel basin and mix them well.
2 Add the sifted ingredients Ⓑ and mix them to get the flour paste ready.
3 Put the pancake plate in place, close the lid and start the pre-heating process until the temperature light is on.
4 Pour a spood of flour paste (about 30 g) into the plate, close the lid, bake for 2 min-utes, take it out and let it cool down.
5 If continuous baking is needed, wait until the temperature light is on and then repeat Step 4.
6 Put the pancake one on top of another, place ice cream on top, and add a moderate amount of honey.
(Use pancake plate) Time: 2 minutes
Egg (Mixed) ...............................100 gGranulated sugar ........................50 gHoney ..........................................15 gMilk .............................................55 gButter (liquid) ...............................10 gLow gluten flour ........................100 gBaking powder ..............................3 g
Ice cream ......................................1 ballHoney .......................moderate amount
Ⓐ
Ingredients (10 pieces)
Sakuramochi
1 Wash sakura leaves, soak them in water to make them spread and then dry them.
2 Put ingredients Ⓐ into a steel basin and mix them well until granulated sugar melt compeletely.
3 Add the sifted low gluten flour and continue to stir until it turn into pasta without any granules.
4 Add a moderate amount of red yeast powder to turn the mixture pink.
5 Put the pancake plate in place, close the lid and start the pre-heating process until the temperature light is on.
6 Brush a layer of butter on both the upper and bot-tom baking plates, Pour a spoon of the flour paste (about 30 g) into the baking plate, close the lid, bake it for 2 minutes and take it out and let it cool down.
7 If continuous baking is needed, wait until the tem-perature light is on and then repeat Step 6.
8 After sakuramochi cool down, put a spoon of red bean paste (about 25 g) on the sakuramochi, fold it in half, and put a sakura leaf on the surface for decorative purposes.
Note: The sakuramochi just after baking is quite soft and sticky, do not stack them untill cool down.
(Use pancake plate) Time: 2 minutes
Glutinous rice flour ......................10 gGranulated sugar ........................20 gWater .........................................100 g
Low gluten flour ..............................50 gRed yeast powder ....moderate amountSalted sakura leaves ...............6 piecesRed bean paste ............................150 gButter (use for brushing baking plate) .............moderate amount
Ingredients (6 pieces)
Ⓑ
Ⓐ
NF-HW1_EN.indd 12-13 15/12/2017 12:00:30

EN14 EN15
Recipes
Fried egg
1 Put the pancake plate in place, close the lid and start the pre-heating process until the temperature light is on.
2 Brush a thin layer of salad oil on both the upper and bottom baking plates. Break the whole eggs to pour into the baking plate, close the lid, bake for 2 minutes and then take it out.
3 Sprinkle with a moderate amount of salt when serve.
Egg ........ 2pieces (approx. 45 g/pieces)Salad oil (use for brushing baking plate) .........................moderate amountSalt ...........................moderate amount
(Use pancake plate) Time: 2 minutes
Ingredients (2 pieces)
Mini okonomiyaki
1 Chop the cabbage into small pieces, and the bacon into small cubes and sprinkle a little bit black pepper pow-der and salt.
2 Put ingredients Ⓑ into a steel basin and mix them until smooth; add ingre-dients Ⓐ and mix them well.
3 Put the pancake plate in place, close the lid and start the pre-heating pro-cess until the temperature light is on.
4 Brush a thin layer of butter on both the upper and bottom baking plates, pour a spoon (about 60 g) of the mixed ingre-dients into the plate, close the lid and bake for 5 minutes. Then open the lid, turn over the mixture, close the lid again and go on baking for 2 more minutes.
5 If continuous baking is needed, wait until the temperature light is on and then repeat Step 4.
6 Sprinkle steak sauce, mayonnaise and also a moderate amount of bonito flakes and crumbled seaweeds.
(Use pancake plate) Time: 7 minutes
Cabbage .....................................75 gBacon ..........................................45 gSalt ................................................1 gBlack pepper powder .......moderate amountHigh gluten flour .........................20 gLow gluten flour ..........................20 gEgg (Mixed) .................................35 gWater ...........................................65 g
Butter (use for brushing baking plate) .........................moderate amountMatch with:Mayonnaise .............moderate amountSteak sauce ..............moderate amountCrumbled seaweeds ...moderate amountBonito flakes .............moderate amount
Ⓐ
Ⓑ
Ingredients (4 pieces)
Scallion pancake
1 Put the flour into a steel basin, and add hot water in circles over the basin. Meanwhile, use a chopstick to stir the mixture quickly until it do not have any dry flour.
2 Add 60 g water, use a rubber scraper or your hand to blend all the ingredients until they become a dough.
3 Turn the dough onto your work surface and con-tinue kneading to develop a ball. Then cover it with a plastic wrap and let it rest for 30 minutes.
4 Use a rolling pin to roll the dough into a rectangle (35 × 20 cm), brush salad oil evenly onto the dough and sprinkle salt and chopped green onions (to avoid spilling over the edge, leave about 1 cm space around the edge); start from the near end (the short edge direction) to squeeze out air, roll it, make the joint stick tightly, and then divide it into 10 even portions.
5 Put the pancake plate in place, close the lid and start the pre-heating process until the temperature light is on.
6 Brush a thin layer of salad oil on both the upper and bottom baking plates, put the dough into the plate and also brush some salad oil on the surface of the dough. Close the lid and bake for 8 minutes.
7 If continuous baking is needed, wait until the temperature light is on and then repeat Step 6.
Medium gluten flour .....................250 gHot water (boiling) ........................150 gWater ..............................................60 gChopped green onion .....................60 gSalt ...................................................2 gSalad oil ..........................................10 gSalad oil (use for brushing baking plate) .........................moderate amount
(Use pancake plate) Time: 8 minutes
Ingredients (10 pieces)
Rice cracker
1 Put rice on a plastic wrap, shape it into a bar and then take it out.
2 Use a scraper to divide it into 10 even portions, press it flat with your palm and make them similar in size to the baking plate (diameter: about 9 cm).
3 Put the pancake plate in place, close the lid and start the pre-heating process until the temperature light is on.
4 Brush a thin layer of salad oil on both the upper and bottom baking plates, put the flat rice onto the plate, close the lid and bake for 4 minutes.
5 Open the lid, brush soy sauce on both sides of the rice, close the lid again and go on baking for 2 minutes.
6 If continuous baking is needed, wait until the tem-perature light is on and then repeat step 4 and 5.
Note: As the rice will stick to the hand, wet hand when handle it.
(Use pancake plate) Time: 6 minutes
Rice ..............................................500 gSoy sauce .................moderate amountSalad oil (use for brushing baking plate) .........................moderate amount
Ingredients (10 pieces)
NF-HW1_EN.indd 14-15 15/12/2017 12:00:31

EN16 EN17
Cleaning■ Before cleaning, unplug and wait the appliance to cool down completely and then
take out the baking plates.
Note
• Do not use benzine, thinner, alcohol, bleach, polishing powder, metal brushes or nylon brushes etc., otherwise the surface will be damaged.
• Do not use metal object, otherwise, it may scratch or damage the non-stick coating of baking plates.
• Do not wash appliance in dishwasher.
•Wipewithawell-wrungsoftcloth.
NF-HW1External
•Wipewithawell-wrungsoftcloth.
Internal
•Wipewithawell-wrungsoftcloth.
Baking plates
Replacement partsReplacement parts are available at your dealer or Panasonic Service Center.
Replacement Parts Parts Number
Waffle plate AFA04P194
Sandwich plate AFA06P194
Pancake plate AFA10P194
SpecificationsNF-HW1
Power supply 220 V 50 Hz
Power consumption 900 W
Body dimension (W × D × H) (approx.) 245 × 240 × 98 mm
Baking plate dimension (W × D × H) (approx.) 230 × 140 × 22 mm
Body weight (approx.) 2.4 kgBaking plate weight (approx.) 280 - 330 g / piece
Length of power cord (approx.) 1.0 m
NF-HW1_EN.indd 16-17 15/12/2017 12:00:31
TC2 TC3
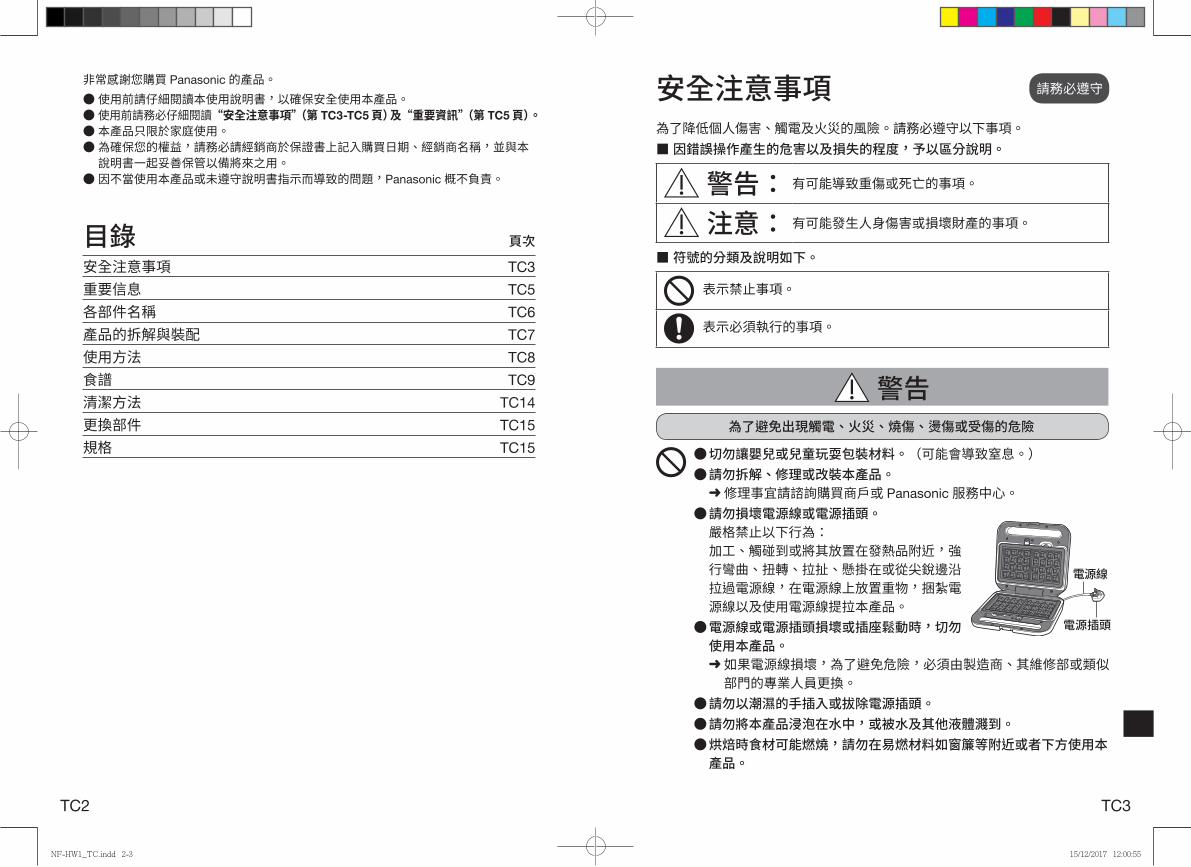
安全注意事項 請務必遵守
為了降低個人傷害、觸電及火災的風險。請務必遵守以下事項。■ 因錯誤操作產生的危害以及損失的程度,予以區分說明。
■ 符號的分類及說明如下。
警告: 有可能導致重傷或死亡的事項。
注意: 有可能發生人身傷害或損壞財產的事項。
表示禁止事項。
表示必須執行的事項。
警告
● 切勿讓嬰兒或兒童玩耍包裝材料。(可能會導致窒息。)● 請勿拆解、修理或改裝本產品。
➜ 修理事宜請諮詢購買商戶或 Panasonic服務中心。● 請勿損壞電源線或電源插頭。嚴格禁止以下行為:加工、觸碰到或將其放置在發熱品附近,強行彎曲、扭轉、拉扯、懸掛在或從尖銳邊沿拉過電源線,在電源線上放置重物,捆紮電源線以及使用電源線提拉本產品。
● 電源線或電源插頭損壞或插座鬆動時,切勿使用本產品。➜ 如果電源線損壞,為了避免危險,必須由製造商、其維修部或類似部門的專業人員更換。
● 請勿以潮濕的手插入或拔除電源插頭。● 請勿將本產品浸泡在水中,或被水及其他液體濺到。● 烘焙時食材可能燃燒,請勿在易燃材料如窗簾等附近或者下方使用本產品。
為了避免出現觸電、火災、燒傷、燙傷或受傷的危險
目錄 頁次
安全注意事項 TC3
重要信息 TC5
各部件名稱 TC6
產品的拆解與裝配 TC7
使用方法 TC8
食譜 TC9
清潔方法 TC14
更換部件 TC15
規格 TC15
非常感謝您購買 Panasonic的產品。● 使用前請仔細閱讀本使用說明書,以確保安全使用本產品。● 使用前請務必仔細閱讀“安全注意事項”(第 TC3-TC5頁)及“重要資訊”(第 TC5頁)。● 本產品只限於家庭使用。● 為確保您的權益,請務必請經銷商於保證書上記入購買日期、經銷商名稱,並與本說明書一起妥善保管以備將來之用。
● 因不當使用本產品或未遵守說明書指示而導致的問題,Panasonic概不負責。
電源線
電源插頭
NF-HW1_TC.indd 2-3 15/12/2017 12:00:55

TC4 TC5
● 請勿將食用油倒在烤盤上。➜ 必要時,請用刷子沾適量食用油輕輕地刷在烤盤上。
● 請勿在縫隙內插入任何物體。● 本產品在使用過程中會從機體縫隙噴出熱氣,請勿觸摸或將臉部靠近本產品。
● 使用過程中,請勿堵塞機體縫隙或覆蓋住機體。
● 本產品不打算由兒童或有體力、感官或精神缺陷的人或缺乏經驗知識的人使用,除非有負責他們安全的人對他們進行與產品使用有關的監督和指導。應看管好兒童,確保他們不玩耍本產品。
● 請務必確保嬰兒和兒童遠離本產品及其電源線。● 請務必確保本產品的標籤上指示的電壓與當地電源電壓一致。還應避免在同一電源插座中插入其它設備,以免電路過熱。但如果連接多個電源插頭,應確保總功率不超過電源插座的額定功率。
● 電源插頭須完全插入插座內。● 定期清除電源插頭上的灰塵。
➜ 先拔除電源插頭,再以乾布擦拭。● 若本產品發生運作異常時,請立即停止使用本產品,並拔除電源插頭。異常或故障示例:• 電源插頭和電源線異常發熱。• 電源線損壞或本產品電源故障。• 機體變形、有明顯損壞或異常發熱。• 使用過程中有異音。• 使用過程中有難聞的氣味。• 出現其它異常或故障。➜ 請與購買點或 Panasonic服務中心聯繫進行檢查和修理。
警告
安全注意事項 注意
● 請勿在下列場所使用本產品。• 不平整的表面、冰箱等電器上方、地毯上、非耐熱的表面或桌布上。• 可能會濺到水的地方或熱源附近。• 靠近牆壁或傢俱。➜ 請將本產品放在穩固、乾燥、清潔、平坦耐熱的工作枱上。
● 請勿在機體上面或下面放置任何物品。● 未正確安裝烤盤時,請勿使用。● 任何情況下,禁止打開上蓋煎烤食材。● 除本產品的原裝零件外,請勿使用其他零件取代本產品上的任何零件。● 請勿在使用本產品時或剛使用後觸碰高溫表面,如機體、上蓋、烤盤釋放按鈕以及烤盤。本產品在使用過程中可接觸部位可能會變熱。請特別小心使用後的餘熱。➜ 請等待其冷卻後再進行處理。
● 請勿使用外接定時器。• 本產品不能以外接計時器或獨立的遙控控制系統操作。
● 使用本產品時請勿離開。離開時,請關閉電源。● 移動、清潔本產品前, 請先拔除電源插頭,使其冷卻。● 不使用本產品時,請拔除電源插頭。● 拔除電源插頭時,務必握住電源插頭。禁止用力拉扯電源線。
為了避免出現觸電、火災、冒煙、燒傷、燙傷、受傷或財產損失的危險
重要信息● 請勿將本產品用於本說明書所示以外的其他用途。● 請勿讓本產品摔落以避免損壞。● 請勿使用金屬物體碰觸烤盤,如刀叉或類似器具,以免損壞烤盤。● 收納本產品時,須將把手朝上放置。● 請依照食譜所示的份量製作,以免造成食材溢出或烘烤效果不佳。
此符號表示:產品表面高溫,觸碰時請小心謹慎。
請務必遵守
NF-HW1_TC.indd 4-5 15/12/2017 12:00:55

TC6 TC7
裝配
各部件名稱 產品的拆解與裝配鎖扣
把手
上蓋
烤盤
烤盤釋放按鈕
電源線
電源插頭※發熱管
分別將上下烤盤對準小孔插入,並按壓使烤盤嵌入凹槽中,直到聽到“咔”一聲。
將烤盤釋放按鈕往外拉開後,即可解除鎖定取出烤盤。(卸下上烤盤時請用手接烤盤,以避免烤盤掉落。)
拆解
NF-HW1
溫度指示燈 機體
電源指示燈電源線收納處
窩夫烤盤 班戟烤盤三文治烤盤
烤盤釋放按鈕
※電源插頭的形狀可能與圖示不同。
注意: 拆卸烤盤前,請確認釋放按鈕已經冷卻。
NF-HW1_TC.indd 7 15/12/2017 12:00:56

TC8 TC9
食譜
餡料三文治
1 方包去邊,黃瓜切薄片,芝士片和火腿片切成適當的大小備用。
2 將三文治烤盤安裝好後蓋上上蓋進行預熱,預熱完成後溫度指示燈會亮起。
3 取兩片吐司放在烤盤上,放上準備好的材料後蓋上剩下的吐司。
4 蓋上上蓋烘烤6分鐘即可。
(使用三文治烤盤) 時間:6分鐘
方包 .................................................4片火腿片 ..............................................2片芝士片 ..............................................2片黃瓜 .................................................4片
材 料(4個)
1 無鹽牛油切成小塊後放置室溫軟化,葡萄乾浸泡在冧酒中備用。
2 將材料Ⓐ倒入鋼盆混合均勻後,慢慢倒入雞蛋冷水混合物,同時用筷子攪拌均勻,然後用手揉成團狀。
3 加入軟化後的無鹽牛油後不斷搓揉甩打至光滑的麵團,直至麵團不黏手並能輕輕拉出薄膜 。
4 使用廚房用紙將葡萄乾吸乾水分後加入到麵團中揉均勻,然後將麵團滾圓,收口朝下放入鋼盆中覆上保鮮膜靜置醒麵1小時。
5 麵團平均分成8等份,揉成團後蓋上擰乾的濕布靜置10分鐘。
6 將窩夫烤盤安裝好後蓋上上蓋進行預熱,預熱完成後溫度指示燈會亮起。
7 上下烤盤輕輕刷一層牛油,將麵團放入烤盤中央,蓋上上蓋烘烤3分鐘左右即可。
8 連續多次烘烤時,待溫度指示燈亮起後,重複步驟7。
附註: 步驟1~ 4可以使用Panasonic麵包機(1斤機型)的「麵包麵團」行程替代。
窩夫(使用窩夫烤盤) 時間:3分鐘
無鹽牛油 .........................................70 g高筋麵粉 ....................................170 g低筋麵粉 ......................................30 g砂糖 .............................................24 g奶粉 ...............................................6 g食鹽 ............................................3.8 g即溶酵母 .....................................2.1 g雞蛋1個及蛋黃1個、 冷水(5℃)混合物 .......................150 g葡萄乾 .............................................25 g冧酒 ...............................................適量
Ⓐ
材 料(8個)
使用方法準備材料準備好烘焙所需材料。1
安裝烤盤順著插入烤盤的方向,安裝好所需烤盤。(第 TC7頁)
3
打開上蓋先將把手上的鎖扣拉開同時向上提起上蓋。
2NF-HW1
①②
預熱確認機內無任何食物,蓋上上蓋,然後插上電源,電源指示燈亮起(紅色),待溫度指示燈亮起(綠色)表示預熱完成,可進入下一步驟。• 剛開始使用時,會釋放出臭味,此為正常非故障,此現象在使用中會逐漸消失。
4
放入材料打開上蓋,必要時用刷子在烤盤上輕輕刷一層食用油※,然後放入製作好的食材再蓋上上蓋並扣上鎖扣。※請勿沾取過多食用油,以防止油滴落,造成清潔困擾。
5
NF-HW1
開始烘焙依據每個食譜所需的時間進行烘焙。• 機體的側面或者頂部可能釋放熱氣,請小心注意。
6
NF-HW1
烘焙完畢後,拔除電源插頭。• 烘焙完成後,請使用非金屬類工具小心取出烘焙好的食物。※切勿徒手取出以免造成燙傷。※如需連續烘焙,請等待溫度指示燈亮起後再重複步驟5~7。
7NF-HW1
溫度指示燈
電源指示燈
• 放入材料後,因為溫度變化,溫度指示燈可能會熄滅而後再次亮起,不是故障。
• 如果很難扣上鎖扣,可能是放入的餡料太多、太厚、或者是麵包太厚。切勿用力扣上鎖扣。
NF-HW1_TC.indd 8-9 18/12/2017 15:09:47

TC10 TC11
食譜
1 將材料Ⓐ放入鋼盆中攪拌均勻,直至砂糖完全融化。
2 然後加入過篩後的材料Ⓑ攪拌均勻後倒入牛油攪勻成麵糊。
3 將窩夫烤盤安裝好後蓋上上蓋進行預熱,預熱完成後溫度指示燈會亮起。
4 舀一勺麵糊倒入烤盤鋪滿(約120 g),並加熱至麵糊起泡,蓋上上蓋烘烤6分鐘左右即可。
5 連續多次烘烤時,待溫度指示燈亮起後,重複步驟4。
乳酪窩夫(使用窩夫烤盤) 時間:6分鐘
蛋液 .............................................70 g牛奶 ...........................................100 g原味乳酪 ......................................60 g蜂蜜 .............................................10 g鹽 ..................................................1 g砂糖 .............................................60 g低筋麵粉 ....................................150 g玉米澱粉 ......................................40 g泡打粉 ...........................................6 g牛油(液態) ....................................5 g
Ⓐ
Ⓑ
材 料(6個)
雪糕班戟
1 將材料Ⓐ放入鋼盆中攪拌均勻。2 加入過篩後的材料B攪勻成麵糊。3 將班戟烤盤安裝好後蓋上上蓋進行預熱,預熱完成後溫度指示燈會亮起。
4 將1勺(約30 g)麵糊倒入烤盤中,蓋上上蓋烘烤2分鐘取出放涼。
5 連續多次烘烤時,待溫度指示燈亮起後,重複步驟4。
6 將班戟疊起,頂端放上雪糕,擠上適量蜂蜜裝飾即可。
(使用班戟烤盤) 時間:2分鐘
蛋液 ...........................................100 g砂糖 .............................................50 g蜂蜜 .............................................15 g牛奶 .............................................55 g牛油(液態) ..............................10 g低筋麵粉 ....................................100 g泡打粉 ...........................................3 g雪糕 .................................................1球蜂蜜 ...............................................適量
Ⓐ
材 料(10片)
酥皮餡料批
1 將酥皮回溫至軟身,切成13 cm× 12 cm的大小。
2 香蕉去皮後切成小塊,用微波爐600 W中火加熱30秒後取出,攪拌成香蕉泥。
3 將三文治烤盤安裝好後蓋上上蓋進行預熱,預熱完成後溫度指示燈會亮起。
4 取兩片酥皮放入烤盤中,待酥皮呈現出透明狀態後,在凹陷處填入香蕉泥。
5 在酥皮的四周刷上一層蛋液後,蓋上另外2片酥皮,四周用叉子輕輕壓緊。
6 酥皮表面刷適量的蛋液,用叉子在上面戳孔,蓋上上蓋烘烤6分鐘即可。
(使用三文治烤盤) 時間:6分鐘
市售酥皮 ..........................................4片香蕉泥 .............................................60 g蛋液 ...............................................適量
材 料(4個)
櫻花紅豆燒餅
1 櫻花葉洗淨,用清水泡開,擦乾後備用。
2 將材料Ⓐ放入鋼盆中攪拌均勻,直至砂糖完全融化。
3 加入過篩後的低筋麵粉繼續攪拌至無顆粒的糊狀。
4 加入適量的紅曲粉調成淡粉色。5 將班戟烤盤安裝好後蓋上上蓋進行預熱,預熱完成後溫度指示燈會亮起。
6 上下烤盤輕輕刷一層牛油,舀1勺(約30 g)麵糊倒入烤盤中,蓋上上蓋烘烤2分鐘取出放涼。
7 連續多次烘烤時,待溫度指示燈亮起後,重複步驟6。
8 麵皮放涼後,放入25 g左右的紅豆餡,將麵皮對折,表面放在一片櫻花葉裝飾即可。
附註: 烘烤後的麵皮很軟很黏,請勿疊放,等放涼之後再作業。
(使用班戟烤盤) 時間:2分鐘
Ⓑ
糯米粉 .........................................10 g砂糖 .............................................20 g水 ..............................................100 g低筋麵粉 .........................................50 g紅曲粉 ............................................適量鹽漬櫻花葉 .......................................6片紅豆餡 ...........................................150 g牛油(刷烤盤用) ..........................適量
材 料(6個)
Ⓐ
NF-HW1_TC.indd 10-11 15/12/2017 12:00:59

TC12 TC13
食譜蔥油餅
1 麵粉倒入鋼盆中,將熱開水用繞圈方式倒入麵粉中,並用筷子不停地快速攪拌至無乾粉。
2 倒入60 g水,用橡皮刮刀或手將所有材料混合均勻,直至成為濕黏麵團。
3 取出濕黏麵團,放在作業枱上,並用手繼續搓揉至成團即可,蓋上保鮮膜靜置30分鐘。
4 用擀麵杖將麵團擀成長方形(長×寬:35 cm×20 cm),用刷子將沙律油均勻地刷滿面皮後撒上鹽和蔥花(為避免從邊緣溢出,週邊留出1 cm左右),將麵團從近身(短邊方向)開始擠出空氣捲起來,接縫緊緊黏住後平均分成10等份。
5 將班戟烤盤安裝好後蓋上上蓋進行預熱,預熱完成後溫度中指示燈亮起。
6 上下烤盤輕輕刷一層沙律油,放入麵團後在表面刷一層沙律油,蓋上上蓋烘烤8分鐘左右即可。
7 連續多次烘烤時,待溫度指示燈亮起後,重複步驟6。
中筋麵粉 .......................................250 g熱開水(沸騰) ............................150 g水 ....................................................60 g蔥花 ................................................60 g鹽 ......................................................2 g沙律油 .............................................10 g沙律油(刷烤盤用) ......................適量
(使用班戟烤盤) 時間:8分鐘
材 料(10個)
燒米餅
1 將米飯放在保鮮膜上整形成長條狀。2 用刮板切成10等份,並用手掌或刮板壓扁至烤盤大小左右(直徑約9 cm)。
3 將班戟烤盤安裝好後蓋上上蓋進行預熱,預熱完成後溫度指示燈亮起。
4 上下烤盤輕輕刷一層沙律油,將壓扁的米飯放入烤盤中,蓋上上蓋烘烤4分鐘。
5 打開上蓋,兩面刷上醬油再蓋上上蓋烘烤2分鐘即可。
6 連續多次烘烤時,待溫度指示燈亮起後,重複步驟4~5。
附註: 由於米飯會黏手,作業時可以在手上沾點水。
(使用班戟烤盤) 時間:6分鐘
白米飯 ...........................................500 g醬油 ...............................................適量沙律油(刷烤盤用) ......................適量
材 料(10個)
煎蛋
1 將班戟烤盤安裝好後蓋上上蓋進行預熱,預熱完成後溫度指示燈會亮起。
2 上下烤盤輕輕刷一層沙律油,雞蛋倒入烤盤中,蓋上上蓋烘烤2分鐘後取出。
3 食用時撒上適量的鹽即可。雞蛋 .......................... 2個(約45 g/個)沙律油(刷烤盤用) ......................適量鹽 ...................................................適量
(使用班戟烤盤) 時間:2分鐘
材 料(2個)
迷你大阪燒
1 椰菜切碎,煙肉切粒,撒上適量黑胡椒粉和鹽。
2 將材料Ⓑ放入鋼盆中攪拌至無顆粒的糊狀,加入材料Ⓐ攪拌均勻。
3 將班戟烤盤安裝好後蓋上上蓋進行預熱,預熱完成後溫度指示燈會亮起。
4 上下烤盤輕輕刷一層牛油,將攪勻的食材舀1勺(約60 g)倒入烤盤中,蓋上上蓋烘烤5分鐘後,打開上蓋,翻面再蓋上上蓋繼續烘烤2分鐘後取出。
5 連續多次烘烤時,待溫度指示燈亮起後,重複步驟4。
6 淋上牛排醬、蛋黃醬,再放上適量柴魚片和紫菜碎即可享用。
(使用班戟烤盤) 時間:7分鐘
椰菜 .............................................75 g煙肉 .............................................45 g鹽 ..................................................1 g黑胡椒粉 .....................................適量高筋麵粉 ......................................20 g低筋麵粉 ......................................20 g蛋液 .............................................35 g水 ................................................65 g牛油(刷烤盤用) ..........................適量搭配用:蛋黃醬 ............................................適量牛排醬 ............................................適量紫菜碎 ............................................適量柴魚片 ............................................適量
Ⓐ
Ⓑ
材 料(4個)
NF-HW1_TC.indd 12-13 15/12/2017 12:01:00
TC14 TC15
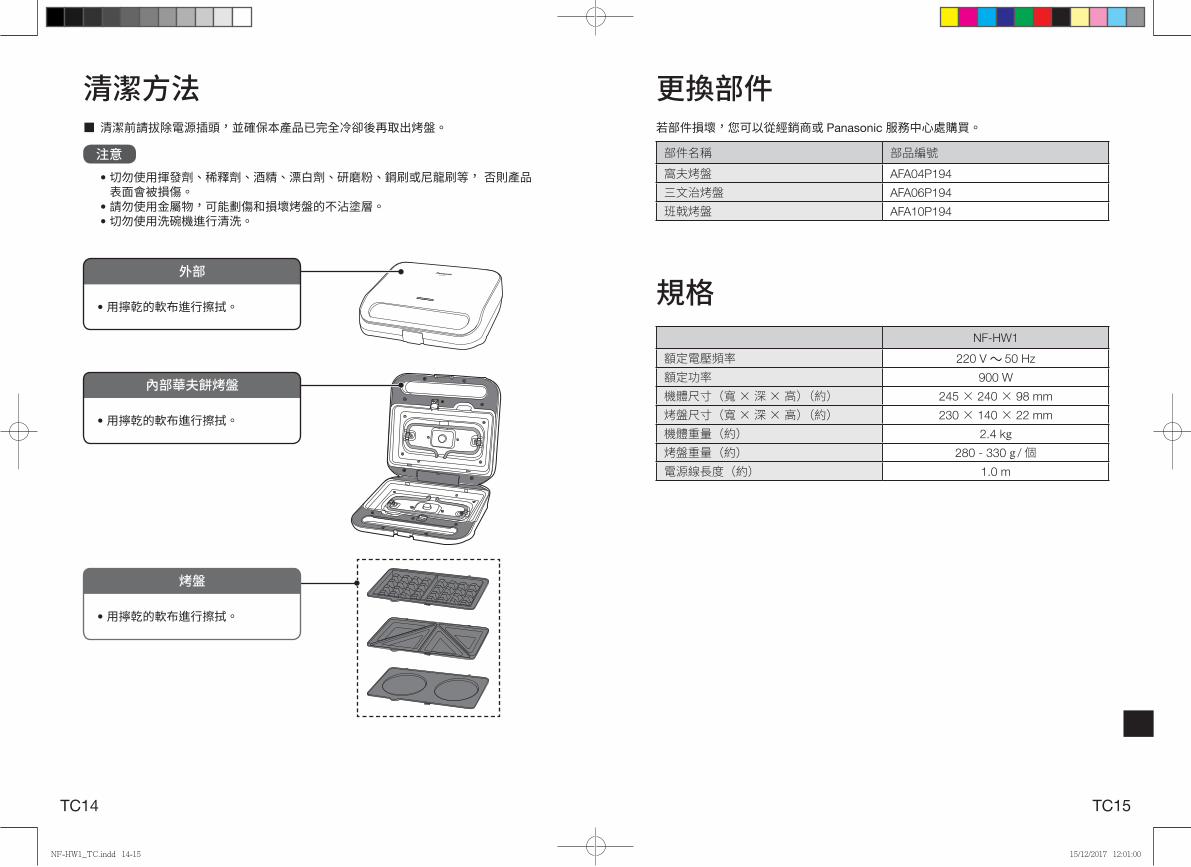
清潔方法■ 清潔前請拔除電源插頭,並確保本產品已完全冷卻後再取出烤盤。
注意• 切勿使用揮發劑、稀釋劑、酒精、漂白劑、研磨粉、鋼刷或尼龍刷等, 否則產品表面會被損傷。
• 請勿使用金屬物,可能劃傷和損壞烤盤的不沾塗層。• 切勿使用洗碗機進行清洗。
更換部件若部件損壞,您可以從經銷商或 Panasonic 服務中心處購買。
部件名稱 部品編號窩夫烤盤 AFA04P194
三文治烤盤 AFA06P194
班戟烤盤 AFA10P194
規格NF-HW1
額定電壓頻率 220 V 50 Hz
額定功率 900 W
機體尺寸(寬× 深× 高)(約) 245 × 240 × 98 mm
烤盤尺寸(寬× 深× 高)(約) 230 × 140 × 22 mm
機體重量(約) 2.4 kg烤盤重量(約) 280 - 330 g /個電源線長度(約) 1.0 m
• 用擰乾的軟布進行擦拭。
NF-HW1外部
• 用擰乾的軟布進行擦拭。
內部華夫餅烤盤
• 用擰乾的軟布進行擦拭。
烤盤
NF-HW1_TC.indd 14-15 15/12/2017 12:01:00

Memo Memo
NF-HW1_TC.indd 16-17 15/12/2017 12:01:00