rdz web services tutorial 03 cics web services … · rdz web services tutorial 03 cics web...
TRANSCRIPT

RDz Web Services Tutorial 03 CICS Web Services Enablement (bottom-up)
© Abteilung Technische Informatik, Institut für Informatik, Universität Leipzig © Abteilung Technische Informatik, Wilhelm Schickard Institut für Informatik,
Universität Tübingen Version 01, August 2012
Content 1.Tutorial Overview 1.1 Scenario 1.2 Tutorial Requirements 1.3 Section Overview 2.Preparation: Create Filters to display Catalog Manager Contents 3.Generate resources for the inquireSingle Web Service provider 3.1.Extract the existing program interface 3.2.Run the interpretive conversion 3.3.Review the output 4.Prepare HFS 17 4.1.Create the HFS directories 4.2.Copy WSBIND file to the Pickup Directory 5.Prepare CICS 5.1.Create a PIPELINE Resource Definition 5.2.Create a TCPIPService Resource Definition 5.3.Verify resource installation 6.Test the Web Service Appendix A, URIMAP resource definitions Appendix B, Using OMVS Appendix C, Build-in CICS Transactions Appendix D, CEDA Transaction, Resource definition online Appendix E, CEDA Define Appendix F, Executing the transaction, using BMS presentation logic

1. Tutorial Overview
Within this tutorial, you will enable one function of the CICS Catalog Manager as a Web Service. You will therefore use WebSphere Developer for System z Version 7 (WDz) to generate the required components, define new CICS resources, and test it. This method of enablement is called bottom up because you start from the bottom (i.e. your backend program) and generate the interface to the top. 1.1 Scenario CICS TS V3.1 on your z/OS system includes a sample application called CICS Catalog Manager. This is basically a catalog ordering system for office materials whose modular design makes it perfectly suitable for modernization and reuse. For more information about the CICS Catalog Manager read “Discover the CICS Catalog Manager”. It is located on DVD and should be in your virtual machine at C:\WDz_Tutorials\Tutorial06\CatMan_Ressources. The CICS catalog example is a working COBOL application that is designed to illustrate best practice when connecting CICS applications to external clients and servers. The example is constructed around a simple sales catalog and order processing application, in which the end user can perform these functions:
• List the items in a catalog. • Inquire on individual items in the catalog. • Order items from the catalog.
The base application has a 3270 user interface, but the modular structure, with well-defined interfaces between the components, makes it possible to add further components. In particular, the application comes with Web Service support, which is designed to illustrate how you can extend an existing application into the Web Services environment. The catalog data is stored in VSAM. You can run the transaction from a CICS® terminal using the Transaction ID (TRID) EGUI. An example, using BMS presentation logic is shown in Appendix E.

The example application has already been installed on 134.2.205.54 (hobbit). The 3270 user interface has been configured ready for you to use. The CICS System Definition (CSD) group DFH$EXBS contains the application resource definitions. Details of the CICS catalog manager example application can be found under: http://publib.boulder.ibm.com/infocenter/cicsts/v3r1/index.jsp?topic=/com.ibm.cics.ts31.doc/dfhxa/topics/dfhxa_t100.htm Assume you want to modernize the CICS Catalog Manager. You decide to use CICS Web Service support for the modernization. Your decision might result from the fact, that you might want to send data larger than 32k (this disqualifies the CICS Transaction Gateway). Alternatively you may want to provide a Web Service interface to de-couple your clients from the backend so they can use the application without having to know anything about the implementation. 1.2 Tutorial Requirements Please note that there are often several ways to perform functions in and for CICS. This tutorial will present one of the ways. If you are familiar with CICS, you will notice that some of the statements are general, and not necessarily true for every situation. This tutorial assumes that you are familiar with the CICS Catalog Manager and WebSphere Developer for zSeries. The appendices contain additional Information: Appendix A URIMAP resource definitions Appendix B Using OMVS Appendix C Build-in CICS Transactions Appendix D CEDA—Transaction, Resource definition online Appendix E CICS Catalog Manager (EGUI) Transaktion execution example
using BMS presentation logic .
1. Tutorial Overview (this section) 2. Preparation Create a filter to display Catalog Manager content We need a filter to be able to access content of the Catalog Manager. 3. Generate resources for the inquireSingle Web Service provider. You will use WDz to create all required resources to enable the inquireSingle function of the CICS Catalog Manager as Web Service. 4. Prepare HFS In this part of the exercise we will discuss the creation of HFS directories that are needed for our resource definitions and copy the generated wsbind-file to our remote z/OS system. 5. Prepare CICS In this part of the lab exercise we will first create a PIPELINE resource definition and reference the CICS supplied sample pipeline configuration file. Then we need to tell CICS to listen on a TCPIP port for incoming HTML. The TCPIPService resource definition allows us to do this. You will need a TCPIPService definition for each port you want CICS to listen on for incoming Web Service requests. And finally, we will take time to look at the URIMAP and WEBSERVICE definitions CICS has created for use when it did the SCAN and found a WSBIND file. 6. Test the Web Service We use the Web Services Explorer in WDz in this part of the lab to verify our work.
2.0 Preparation: Create Filters to display Catalog Manager Contents
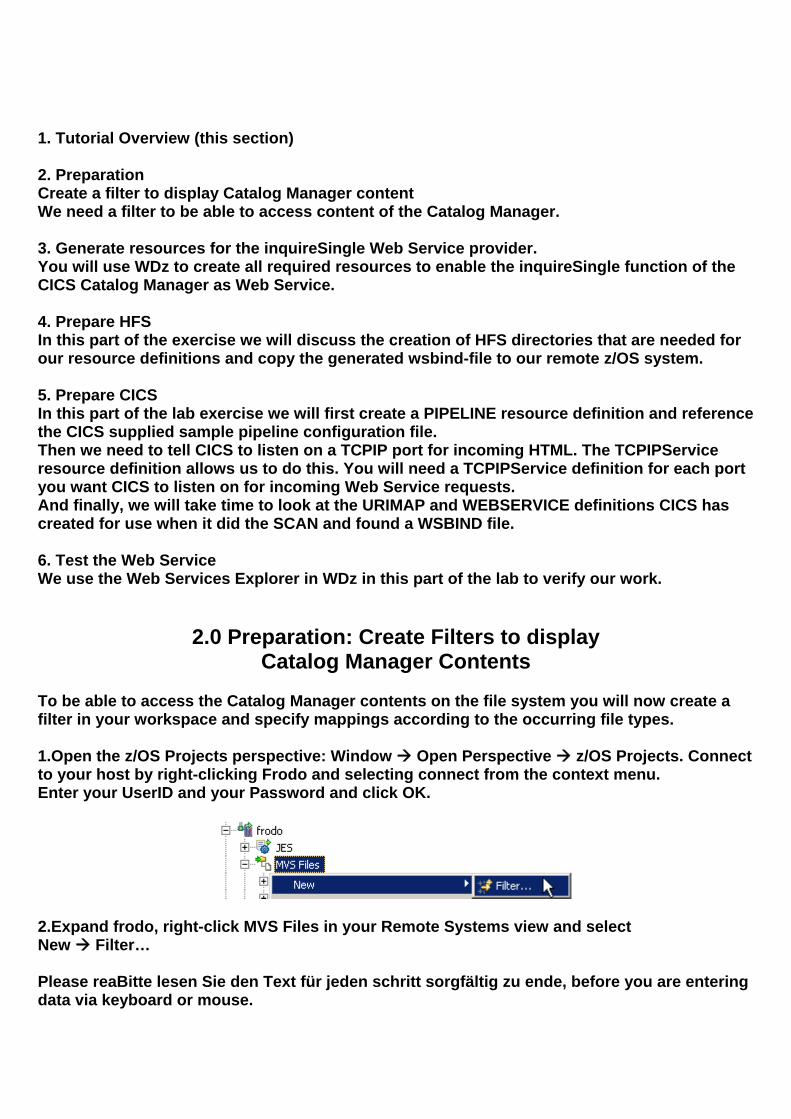
To be able to access the Catalog Manager contents on the file system you will now create a filter in your workspace and specify mappings according to the occurring file types. 1.Open the z/OS Projects perspective: Window Open Perspective z/OS Projects. Connect to your host by right-clicking Frodo and selecting connect from the context menu. Enter your UserID and your Password and click OK.
2.Expand frodo, right-click MVS Files in your Remote Systems view and select New Filter… Please reaBitte lesen Sie den Text für jeden schritt sorgfältig zu ende, before you are entering data via keyboard or mouse.
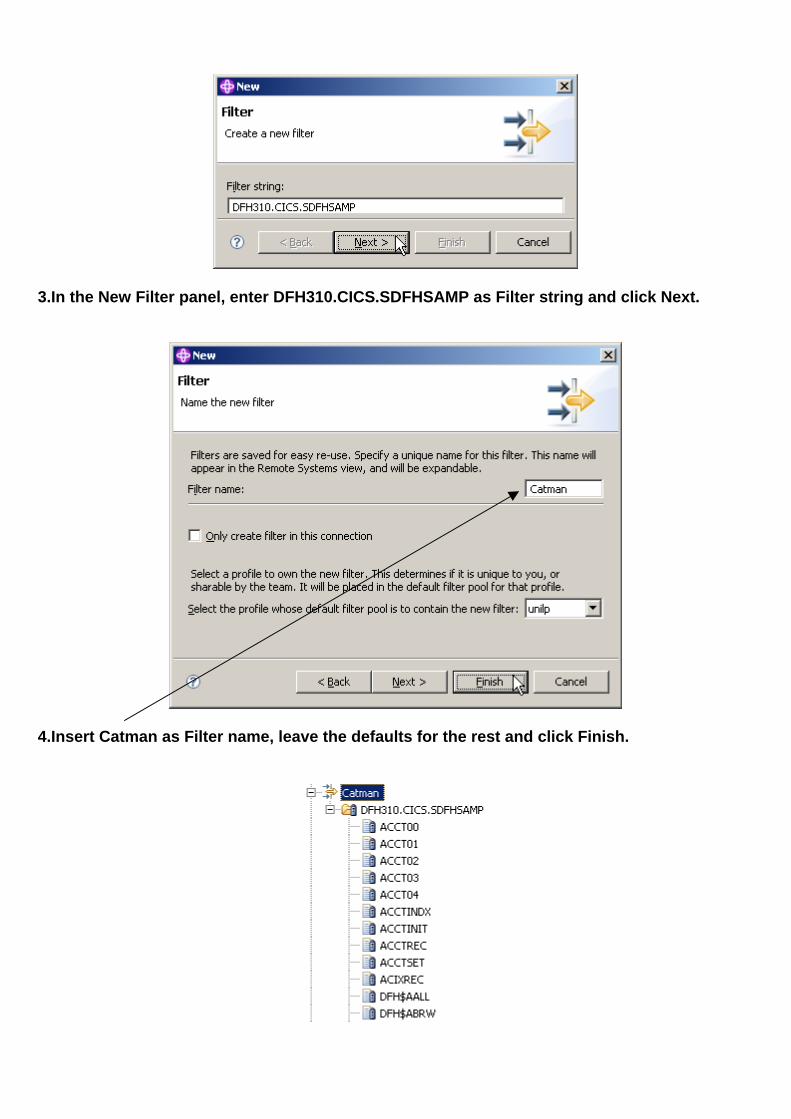
3.In the New Filter panel, enter DFH310.CICS.SDFHSAMP as Filter string and click Next.
4.Insert Catman as Filter name, leave the defaults for the rest and click Finish.

5.In the Remote Systems view expand MVS Files. Now we have Catman under MVS Files. If you expand Catman and DFH310.CICS.SDFHSAMP, wait up to a minute, and you will see many entries. Note: This is just the beginning...If you scroll down, you'll see the rest.
6.Switch to the z/OS File System Mapping view by clicking on the tab. We need to add mappings to be able to work with the datasets which the Catman filter provides.

7.To add a data set mapping, right-click anywhere in the z/OS File System Mapping view and select Add Data Set Mapping. Make sure, you are using the correct z/OS name (frodo in this example).
8.On the Add Data Set Mapping panel, specify **SDFHSAMP as Mapping Criterion, leave the defaults for the rest and click OK.
9.In the z/OS File System Mapping view, look for **SDFHSAMP, right-click it, and select Add Member Mapping. (Note: If you make a mistake, you can click on Delete Mapping and start again).

10.On the Add Data Set Mapping panel, specify DFH0XM** as Mapping Criterion, for Workstation File Extension click Other and specify it as bms. Click OK.
11.Expand the + on **SDFHSAMP and you will see another mapping criteria under **SDFHSAMP. Any member starting with DFH0XM** will be mapped as bms.
12.Now repeat step 10-11 for 3 additional members. Get the Details from the table above. Note: The filters are prioritized, so make sure to define the most common filter for cbl as the last one.
13. Expand **SDFHSAMP. Your filters should look like shown above

If you look at the Remote Systems view, you will see that all the members DFH0X** are marked either .bms, .cpy, or .cbl. It may (or may not) be that you see the endings bms, .cpy, or .cbl in the Remote System View not immediately, but only after you have shut down and restarted WDz. Of course, the files on the mainframe host have not been modified. The client (workstation) component of WDz has been notified that these members are either BMS, Copybook, or COBOL Files. The client component of WDz needs this information so that it knows what to do with them after it has downloaded them from the mainframe host. Now all the resources we need later in this tutorial have their corresponding file extensions so we can work with them.
3. Generate resources for the inquireSingle Web Service provider
To expose an existing CICS program (the sample application called CICS Catalog Manager) as a Web Service involves the following steps:
1. Run the CICS Web Services assistant to generate the required files 2. Extract the existing program interface 3. Run the program LS2WS (interpretative Enablement) 4. Customize the service location in the WSDL
Now, let us run the CICS Web Services assistant to generate the required files

3.1 Extract the existing program interface CICS TS V3.1 provides the Web Services assistant for generating
• Web Services definitions (WSDL) from supplied program language structures • language structures from supplied WSDL documents.
This assistant is actually two utility programs that run in MVS batch. Both programs use the IBM Java SDK. WDz offers two possibilities to generate the required files: Interpretive XML Conversion XML conversion is accomplished using generated metadata and an XML conversion component built into the runtime. While the Interpretive XML Conversion type has limited support for language structure data types and constructs, it requires fewer artifacts and does not involve compilation of XML converters. This conversion type is actually a local implementation of the z/OS batch Web Services Assistant. Compiled XML Conversion XML conversion is accomplished using a suite of generated high-level language (HLL) programs. A driver program interacts with the runtime and invokes bundled programs to provide conversion of XML to and from language structures. The compiled XML conversion type provides more extensive support for language structure data types and constructs than the interpretive XML conversion type, however compilation of XML Converters is required and there are more artifacts to manage. In this step we are generating a new WSDL file from an existing program and will use the interpretive conversion of WDz. As input WDz needs to import the language copybooks that matches the program’s COMMAREA for request and response as well as the program to be called. In this step the INQUIRE SINGLE ITEM function of the central catalog manager program (DFH0XCMN) will be deployed as a Web Service. The interface to this program is a COMMAREA structure which is defined in the supplied COBOL copybook DFH0XCP1. An excerpt from DFH0XCP1 is shown below:

* Catalogue COMMAREA structure 03 CA-REQUEST-ID PIC X(6). 03 CA-RETURN-CODE PIC 9(2). 03 CA-RESPONSE-MESSAGE PIC X(79). 03 CA-REQUEST-SPECIFIC PIC X(911). * Fields used in Inquire Catalog 03 CA-INQUIRE-REQUEST REDEFINES CA-REQUEST-SPECIFIC. 05 CA-LIST-START-REF PIC 9(4). 05 CA-LAST-ITEM-REF PIC 9(4). 05 CA-ITEM-COUNT PIC 9(3). 05 CA-INQUIRY-RESPONSE-DATA PIC X(900). 05 CA-CAT-ITEM REDEFINES CA-INQUIRY-RESPONSE-DATA OCCURS 15 TIMES. 07 CA-ITEM-REF PIC 9(4). 07 CA-DESCRIPTION PIC X(40). 07 CA-DEPARTMENT PIC 9(3). 07 CA-COST PIC X(6). 07 IN-STOCK PIC 9(4). 07 ON-ORDER PIC 9(3). * Fields used in Inquire Single 03 CA-INQUIRE-SINGLE REDEFINES CA-REQUEST-SPECIFIC. 05 CA-ITEM-REF-REQ PIC 9(4). 05 FILLER PIC 9(4). 05 FILLER PIC 9(3). 05 CA-SINGLE-ITEM. 07 CA-SNGL-ITEM-REF PIC 9(4). 07 CA-SNGL-DESCRIPTION PIC X(40). 07 CA-SNGL-DEPARTMENT PIC 9(3). 07 CA-SNGL-COST PIC X(6). 07 IN-SNGL-STOCK PIC 9(4). 07 ON-SNGL-ORDER PIC 9(3). 05 FILLER PIC X(840). * Fields used in Place Order 03 CA-ORDER-REQUEST REDEFINES CA-REQUEST-SPECIFIC. 05 CA-USERID PIC X(8). 05 CA-CHARGE-DEPT PIC X(8). 05 CA-ITEM-REF-NUMBER PIC 9(4). Notice that the CA-REQUEST-SPECIFIC field is re-defined by fields CA-INQUIRE-REQUEST, CA-INQUIRE-SINGLE and CA-ORDER-REQUEST. In essence this copybook defines three separate interfaces for the INQUIRE CATALOG, INQUIRE SINGLE ITEM, and the PLACE ORDER functions, which are overlaid on one another. However, the DFHLS2WS utility does not support the REDEFINES statement. So to use DFHLS2WS we need to create a new copybook that has only those elements that relate to the inquire single function. This has been done in the DFH0XCP4 copybook. An excerpt from DFH0XCP4 is shown below (strictly speaking the “DISPLAY” keywords are not required and can be ignored):

* Catalogue COMMAREA structure 03 CA-REQUEST-ID PIC X(6). 03 CA-RETURN-CODE PIC 9(2) DISPLAY. 03 CA-RESPONSE-MESSAGE PIC X(79). * Fields used in Inquire Single 03 CA-INQUIRE-SINGLE. 05 CA-ITEM-REF-REQ PIC 9(4) DISPLAY. 05 FILLER PIC 9(4) DISPLAY. 05 FILLER PIC 9(3) DISPLAY. 05 CA-SINGLE-ITEM. 07 CA-SNGL-ITEM-REF PIC 9(4) DISPLAY. 07 CA-SNGL-DESCRIPTION PIC X(40). 07 CA-SNGL-DEPARTMENT PIC 9(3) DISPLAY. 07 CA-SNGL-COST PIC X(6). 07 IN-SNGL-STOCK PIC 9(4) DISPLAY. 07 ON-SNGL-ORDER PIC 9(3) DISPLAY. For Web Service enablement using WDz the required resources have to be transferred to your workstation. 14.First of all, verify that the z/OS Projects perspective is active. Furthermore, ensure that the navigator view is available. (If not, open it through the menu bar Window Show view Other... and select General Navigator). 15.On the menu bar, select File New Project…
16.Expand General and select Project. Click the Next button.

17.On the New Project panel, specify the Project name as CICSWebServiceBottomUp, ensure Use default location is checked, then click the Finish button.
18.In the Remote Systems view, expand the Catman MVS Files filter that you created earlier. Scroll down and select DFH0XCMN.cbl, DFH0XCP2.cpy and DFH0XCP4.cpy while holding down the CTRL key.
19.Copy the selected files per drag&drop to your freshly created CICSWebServiceBottomUp project. Just drag and drop the 3 files to CICSWebServiceBottomUp in the Navigator pane.

20.As DFH0XCMN expects a copybook called DFH0XCP1 (which we transformed to DFH0XCP4 because of the redefine) rename DFH0XCP4.cpy to DFH0XCP1.cpy. Right-click on DFH0XCP4.cpy and select Rename.
21.Change the name from DFH0XCP4 to DFH0XCP1.cpy and hit Enter. 3.2 Run the interpretive conversion
22.In the Navigator pane, right-click DFH0XCMN.cbl and select Enable Enterprise Web Service.

23.For the Enterprise Service Tools Wizard Launchpad panel specify the values above and …
enter values like shown above, esp. Interpretive XML Conversion. Then click Start.
24.Now you are at the DFHLS2WS panel. Leave the defaults for the options on the Application Properties tab.

On the Service Properties tab, …
Inbound language structure
DFHCOMMAREA
Outbound language structure
DFHCOMMAREA
Service location
http://134.2.205.54/exampleApp/inquireSingle<Team_Number> for example if your user-ID is PRAK034: http://134.2.205.54/exampleApp/inquireSingle034
specify the values above and
click Next:

25.On the next panel, leave the default for the File container and name all service artefacts inquireSingle### (Replace ### with your UserID). Click Finish.
26.Your project should now look like shown above. If you are curious, you can double klick on inquireSingle034.log or inquireSingle034.wsd to examine the files.

3.3 Review the output Review the output in your workspace, in addition to the wsbind and wsdl file a log was generated. These files fulfill the following tasks:
• Log generated file • The log file contains detailed information on the steps the job has taken to create the
output files. The contents of the log file are not normally required by end users. However, it does contain a copy of the generated WSDL which can be used if the generated WSDL file is misplaced or could be used in problem determination.
• WSDL generated file • The WSDL file defines all the information required for a client to access this Web
Service. It contains an XML schema representation of the request and response and location information for the service. As generated, the only part of the WSDL file that needs to be customized before it can be published to clients is the service TCP/IP address and port.
• WSBIND generated file • The WSBIND file contains the meta-data that CICS uses at runtime to marshal and de-
marshal the request and response messages in XML into the format expected by the application program. The WSBIND file is read by CICS when a WEBSERVICE resource is installed onto a PIPELINE (it is not read on every request).
It is important to ensure that the version of the WSBIND file matches the WSDL file used by clients. If changes are made to the language structure, the WSDL and WSBIND file need to be re-generated, and the new WSDL sent to the client. If the PIPELINE scanning mechanism is used to install a WEBSERVICE, the resource name will be based on the name of the WSBIND file. It is suggested to keep the names of the WSBIND file and the WSDL file the same to ensure installed Web Services and clients match. (You can optionally perform the compiled conversion. Note that in addition to WSBIND and WSDL a COBOL converter program will be generated.) You generated all required resources, now you can go on and install them in CICS.

4. Prepare HFS To provide a web service, CICS requires some HFS (Hierarchical File System in Unix System Services) directories where it will look for the WSBIND and other files required. This part will demonstrate how to create the required directories and place all necessary files at the right position. 4.1 Create the HFS directories To expose a CICS program as a Web Service over HTTP, a TCPIPService and PIPELINE resources are required. The PIPELINE resource definition points to some HFS directories and also points to a pipeline configuration file. The setup requires configuring files and directories in the Hierarchical File System (HFS).
• Shelf directory: /var/cicsts/ The shelf directory is used by CICS to store the Web Service binding files that are associated with WEBSERVICE resources. Each WEBSERVICE resource is associated with a PIPELINE. The shelf directory is managed by CICS together with the PIPELINE resource. You should not modify the content in this directory. Several PIPELINEs can use the same shelf directory because CICS ensures a unique directory structure beneath the shelf directory for each PIPELINE. Since CICS writes to this directory, CICS requires appropriate security permissions. This directory has already been created for you.
• Pickup directory: /tutorial06/wspickup/provider:
The pickup directory contains the Web Service binding files that are to be associated with the PIPELINE. When a PIPELINE is installed or in response to a PERFORM PIPELINE SCAN command, CICS searches this directory for files ending in .wsbind. For each .wsbind-file, CICS dynamically creates a WEBSERVICE and URIMAP resource, associates it with the PIPELINE and installs them ready for use.
A Uniform Resource Identifier (URI) is a compact string of characters used to identify or name a resource on the Internet. URIMAP definitions are resource definitions that match the URIs of HTTP or Web service requests, and provide information on how to process the requests. Message handlers and pipelines
• A message handler is a program in which you can perform your own processing of Web service requests and responses.
• A pipeline is a set of message handlers that are executed in sequence. WSDL and the application data structure A Web service description contains abstract representations of the input and output messages used by the service. CICS uses the Web service description to construct the data structures used by application programs. At run time, CICS performs the mapping between the application data structures and the messages.

The Web service binding file The Web service binding file contains information that CICS uses to map data between input and output messages, and application data structures. For additional Details see Appendix.
In your Remote Systems view expand USS Files and then My Home and Root. My Home is still empty. Root shows the subdirectories usually found in a Unix system. Close both My Home and Root again.
27.Create the pickup directory by right-clicking the My Home filter in the USS Files of your Remote System Connection and select New Folder.

28.Name the folder tutorial06 and click Finish.
Sometimes you get an error message like shown above. Klick here for details

In this case, disconnect Frodo, reconnect again, and try again.
29.Assuning you are successful, right-click the tutorial06 folder to create a sub folder. Select New Folder.
30.Name the folder wspickup and click Finish. Note, that your Folder name will differ the one from above.
31.Right-click the wspickup folder to create a sub folder. Select New Folder.

32.Name the folder provider and click Finish.
33.Your My Home filter should now look like that: You just created the sub folders /tutorial06/wspickup/provider in your USS-Home directory. You have added a directory called provider for the pickup directory because in this tutorial we will define a PIPELINE for use when CICS is a service provider. In a later lab, we may define a PIPELINE that contains information to be used when CICS is a Web Service requester. You will need to specify a different PIPELINE for use when CICS is a service requester and provider. Separate PIPELINE definitions are needed because a PIPELINE definition can only reference one pipeline configuration file. The pipeline configuration files must be different for processing inbound Web Service requests versus outbound service requests.
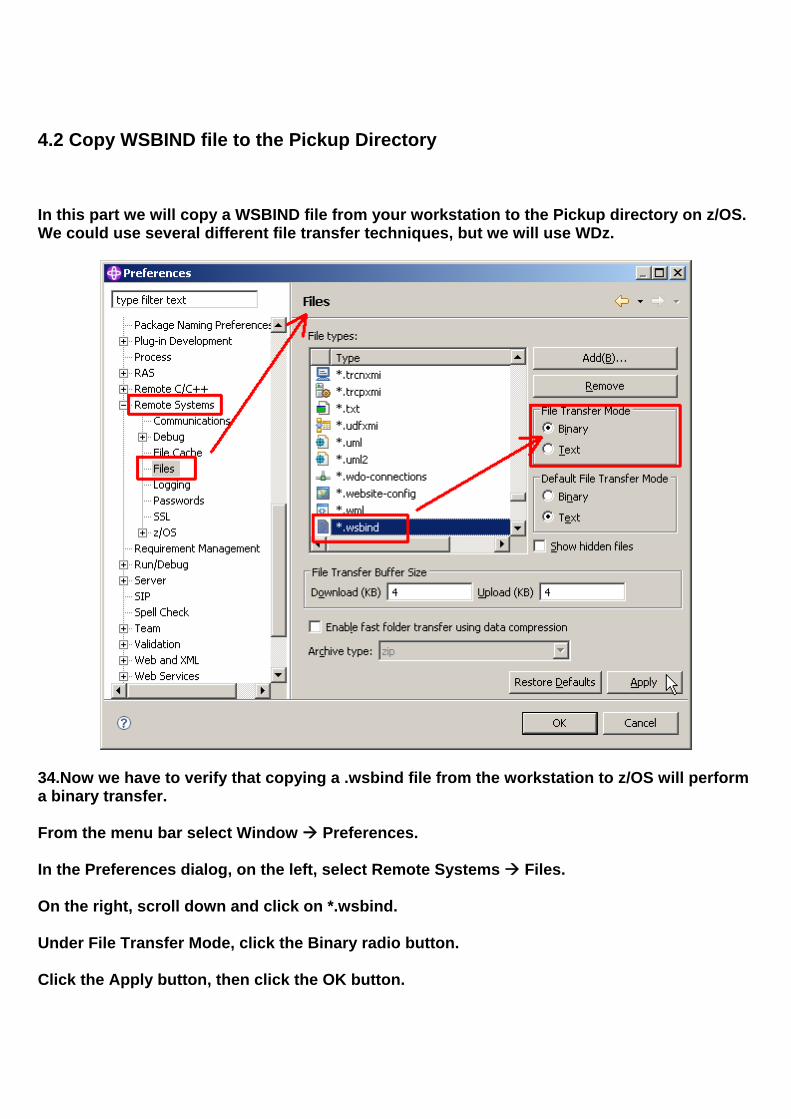
4.2 Copy WSBIND file to the Pickup Directory In this part we will copy a WSBIND file from your workstation to the Pickup directory on z/OS. We could use several different file transfer techniques, but we will use WDz.
34.Now we have to verify that copying a .wsbind file from the workstation to z/OS will perform a binary transfer. From the menu bar select Window Preferences. In the Preferences dialog, on the left, select Remote Systems Files. On the right, scroll down and click on *.wsbind. Under File Transfer Mode, click the Binary radio button. Click the Apply button, then click the OK button.

35.In the Navigator view, select the wsbind file inquireSingle###.wsbind you created earlier and drag or copy it to your Remote System USS folder /tutorial06/wspickup/provider.
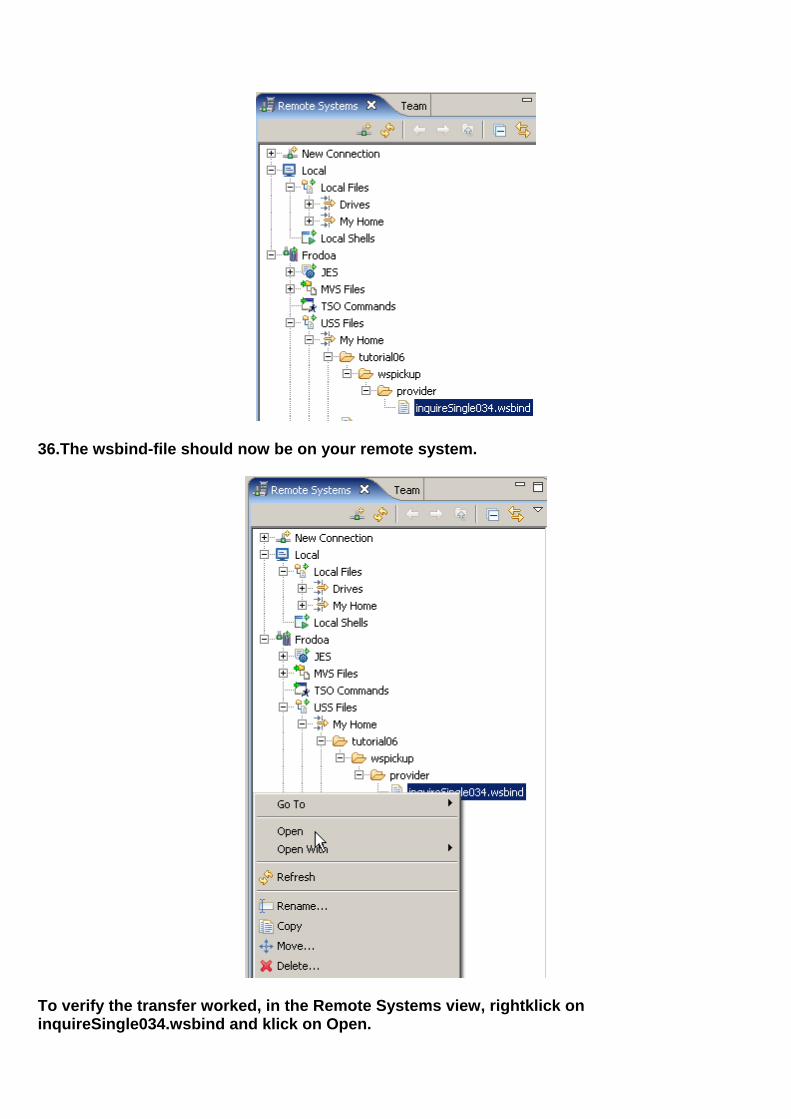
36.The wsbind-file should now be on your remote system.
To verify the transfer worked, in the Remote Systems view, rightklick on inquireSingle034.wsbind and klick on Open.

You will see something unintelligable in the editor window. This is the proof, something has been copied. You can also examine this file using TSO. For this, disconnect Frodo in the Remote Systems view. by logging in with your 3270 emulator, going to OMVS, and accessing in the directory /u/prak034 the subdirectory tutorial06/wspickup/provider/. You can use the oedit command to open the the file inquireSingle034.wsbind to see the text. See Appendix B for details.

5. Prepare CICS As a Systems Programmer, the TCPIPService and PIPELINE definition are the only definitions you need if you are using the WSBIND mechanism. A PIPELINE is associated with a pickup directory we specified earlier. When a PIPELINE is installed or in response to a PERFORM PIPELINE SCAN command, CICS searches this pickup directory for files ending with “.wsbind”. For each .wsbind file, CICS dynamically creates a WEBSERVICE and URIMAP resource, associates them with the PIPELINE and installs them ready for use.
Scan Installsomething.wsbind
inquireSingle###.wsbind
Pipeline
WEBSERVICE (inquireSingle###)
WEBSERVICE (something)
URIMAP (/some/uri)
URIMAP (/exampleApp/inquireSingle##)

5.1 Create a PIPELINE Resource Definition A PIPELINE tells CICS how to process a request. Multiple programs can look at and perform functions on the request body and headers. This type of program is called a message handler or a header handler. Ultimately a program will process the request. The PIPELINE definition points to a PIPELINE configuration file that specifies the name of the programs that will work on the body and headers, and will process the request
The PIPELINE definition is in XML format and details the message handlers that will act on Web service requests and responses as they pass through the pipeline. It specifies the name of the programs that will work on the body and headers, and will process the request. The configuration of a pipeline used to handle a Web service request is specified in an XML document, known as a pipeline configuration file.The pipeline configuration file is stored in the z/OS UNIX System Services hierarchical file system (HFS), and its name is specified in the CONFIGFILE attribute of a PIPELINE resource definition. When you work with configuration files, ensure that the character set encoding is US EBCDIC (Code page 037). There are two kinds of pipeline configuration:
• one describes the configuration of a service provider pipeline; • the other describes a service requester pipeline.
Each is defined by its own schema, and each has a different root element.
We are going to use the CICS supplied PIPELINE configuration file for a SOAP V1.1 handler. It is common to process headers and messages the same for multiple Web Services. This means that one pipeline configuration file can work with multiple Web services. This also means that as a CICS System programmer, we don’t need to make all these resource definitions and configuration files for each Web service. We can make a PIPELINE definition that will perform common header and message handling and also point to a pickup directory.

37.Right-click your Remote Systems connection frodo and select Host Connection Emulator Support to start a 3270 emulator.
134.2.205.54 benötigt port 423 (normally this is port 23). Click on Connect .

38.Type L CICS to log in to the CICS Subsystem and press the Return key.

39.Login using your Userid and password and press the Enter key . (Replace ### with your UserID)
The user friendly CICS Welcome screen greets you. You better know, the command line starts in the left upper corner at the cursor position.

40.When you are logged in to CICS, type (at the cursor position) CEDA DEFINE GROUP(PRAK###) PIPELINE(PIPE###) and press the Enter key (Replace ### with your UserID).
Attribute Value
Pipeline PIPE### (Replace ### with your UserID)
Group PRAK### (Replace ### with your UserID)
Description Basic SOAP 1.1 provider pipeline Status Enabled Configfile /usr/lpp/cicsts/cicsts31/samples/pipelines/basicsoap11provider.xmlShelf /var/cicsts/
WSDir /u/prak###/tutorial06/wspickup/provider/ (Replace ### with your UserID)
Basic SOAP 1.1 provider pipeline /usr/lpp/cicsts/cicsts31/samples/pipelines/basicsoap11provider.xml
(extends to next line of 3270 screen) /var/cicsts/ /u/prak034/tutorial06/wspickup/provider/
41.Enter the attributes shown above . Note that you may have to scroll down using the F8 key to be able to insert values to the WSDir-field. Press the Enter key.

(Screenshot before the scroll-down)
(Screenshot after the scroll-down) Tech-Tip: The initial screen displays on half of the WSDir field. To unlock the field, you will need to scroll forward with PF8. Since the Shelf and WSDir fields contain directory names, the entries must include a beginning and ending slash. The fields for Configfile, Shelf, and Wsdir are 255 characters long. These 255 characters are split over multiple 3270 fields. If your entry is longer that the field on the 3270 device, just keep typing and allow the line to ‘split’ into the next 3270 field (i.e. no spaces in the middle of a name)..

42.After confirming your input by pressing the Enter key, you should get a message at the bottom of the screen, that a new group is created (Here: group PRAK065) and that the define was successful.
43.Let’s have a short look at the pipeline configuration file basicsoap11provider.xml Pipeline configuration files specify 0 or more message handlers that should be invoked as Web Service messages pass through the pipeline to the ‘terminal handler’. The message handlers are invoked again as the Web Service response moves through the pipeline from the ‘terminal handler’ back to the service requester. “Terminal” in this case mean at the end of the pipeline (i.e. this program ‘terminates’ the pipeline). For the pipeline configuration file above, there are no message handlers specified, and a CICS supplied terminal handler called cics_soap_1.1_handler will be invoked. The supplied CICS SOAP handler knows how to remove the SOAP envelope from the message and will then invoke the DFHPITP program specified in the apphandler tag. The CICS supplied SOAP handler will also add a SOAP envelope to the response from DFHPITP. DFHPITP is a CICS supplied program that
• locates the WSBIND file associated with the Web Service using this pipeline • performs the XML to COMMAREA (or Container) conversion specified in the WSBIND
file • invokes the user application program specified in the WSBIND file • performs COMMAREA (or Container) to XML conversionl cics
44.To install the pipeline we just created, type CEDA INSTALL GROUP(PRAK###) PIPELINE(PIPE###) and press the Enter key (Replace ### with your UserID).

45.You should receive a message that says INSTALL SUCCESSFUL. Note: Depending on previous labs you might get warnings telling that parts of your group have already been installed.
46.Use the CEMT INQUIRE PIPELINE command Note: The CEMT transaction is used to invoke all the master terminal functions. The master terminal program provides dynamic user control of the CICS system. By using this function, an operator can inquire about and change the values of parameters used by CICS, alter the status of the system resources, terminate tasks, and shut down the CICS system.

to verify the PIPELINE was installed properly (You may need to scroll down using F8). You should see a status of Ena (Enabled) for your pipeline.
47.If you tab down and place an S to the left of your pipeline entry and press the enter button, you will see your pipeline’s details.
48.The Shelf and Wsdir entries are directories and must start and end with a „/“. Note: If you add a new WSBIND file to your PIPELINE pickup directory this will not automatically be noticed by CICS. The pickup directory is searched only at PIPELINE installation (as we just did) or if you perform an explicit scan. To scan your pipeline you would have to do the following: (just for your information, you don’t have to do this now) CEMT PERFORM PIPELINE(PIPE###) SCAN and press the enter key. You should see a message saying RESPONSE:NORMAL. If you have difficulties, the following URL contains an overview : http://publib.boulder.ibm.com/infocenter/cicsts/v3r1/index.jsp?topic=/com.ibm.cics.ts31.doc/dfha7/dfha71z.htm 5.2 Create a TCPIPService Resource Definition This tells CICS to listen on a specified TCPIP port and accept HTML. The port number CICS is listening on is defined in a TCPIPService definition. One TCPIPService can be used for several pipelines and Web Services. Therefore we can reuse the TCPIPService used in a previous tutorial (if it does exist) to tell CICS to receive the inbound HTTP requests on a specific port.

49.We need to ensure that the needed TCPIPService exists and that its status is OPEN. To check this, press F3 to end the CEDA DEFINE procedure we did before. You should get the message STATUS: SESSION ENDED as displayed in the screenshot below. Wir verlassen die Definition des Programms mit der Eingabe von F3, als Ergebnis davon erscheint "SESSION ENDED". Wir geben in die oberste Zeile den nächsten CEDA-Befehl ein
I
50.Now clear the screen clicking the Clear button below your 3270 screen.
51.Review the currently active service by typing CEMT I TCPIPService and …
hit Enter. Note:
1. Port of the TCPIPService (Here: 03601) 2. Status of the port (Here: Open) 3. Name of the TCPIPService (Here: EXMPPORT)
We need a TCPIPService on port 3601 with status open and it should be named SOAPPORT. If there is no such TCPIPService, we need to define it (like in the screenshot above, the active TCPIPService on port 3601 is EXMPPORT). Now there are several possibilities: Possibility # 1 : If your active (ope) TCPIPServiceon Port 3601 already is SOAPPORT, continue this tutorial with item 64.

52.Possibility # 2 : If your CEMT I TCPIPSERVICE request provided a closed ‘Clo’ SOAPPORT TCPIPService on port 3601, open it by overtyping Clo with Ope and pressing return. You should get the message NORMAL. 53.You can ensure that the TCPIPService SOAPPORT is opened by pressing F3, followed by the enter key (The command CEMT I TCPIPSERVICE is still typed in).
54.Possibility # 3 : If your active TCPIPService on port 3601 is not SOAPPORT, we need to close the active service of port 3601 first and add our needed SOAPPORT TCPIPService. Move your cursor to the status field (to the keyword Ope) by hitting your TAB key and overtype Ope with Clo (which stands for closed)…
55.…and hit enter. The lines containing the EXMPPORT TCPIPService should turn white and your returned status information should be NORMAL. 56.You can ensure that the TCPIPService EXMPPORT is closed by pressing F3, followed by the enter key (The command CEMT I TCPIPSERVICE is still typed in).
57.To add our needed TCPIPService, type in CEDA DEFINE GROUP(PRAK###) TCPIPSERVICE(SOAPPORT)

•

58.Change Portnumber to 03601 and Backlog to 00005. Press enter. You should get the message DEFINE SUCCESSFUL.
59.Press F3 to end the CEDA DEFINE procedure and Clear your screen.
60.In order to install our newly defined TCPIPService, insert CEDA INSTALL GROUP(PRAK###) TCPIPSERVICE(SOAPPORT) and press Enter (Replace ### with your UserID).

CEMT I 61.You should get the message INSTALL SUCCESSFUL.
62.Press F3 to end the CEDA INSTALL procedure and Clear your screen.
63.Let’s check the TCPIPSERVICEs once again. Type CEMT I TCPIPSERVICE and press enter. Our installed TCPIPService SOAPPORT on port 3601 should be displayed with Openstatus Ope. Continue here if you skipped steps 52 or 54 till 63 because you already had SOAPPORT as TCPIPService. If you did the last steps and added SOAPPORT, also continue.

64.Move your cursor to anywhere to the TCPIPService SOAPPORT entry and press enter. Your screen should look like below.
65.Press F3 to end the CEMT I TCPIPSERVICE procedure and Clear your screen. 5.3 Verify resource installation In this part of the tutorial, you will verify that the CICS resources were installed properly.
66.From the CICS session, type CEMT INQUIRE WEBSERVICE and press the enter key.
67.You may need to scroll down a few times, using the F8 key, until you find your corresponding inquireSingle### entry (Replace ### with your UserID). In this example the UserID is 065. Note: The resource is created with a name matching the WSBIND file name and the WEBSERVICE is associated with the PIPELINE that scanned it in.

68.Tab down using the TAB key and type S next to the WEBSERVICE entry, then press the enter key. Your screen should look similar to the following: Note: A WEBSERVICE resource definition provides more details about the Web Service. If we want CICS to do conversion between the XML that contains our application data and the COMMAREA or Container that delivers the application data to our CICS programs, the WEBSERVICE definition will point to a WSBIND file. The WSBIND file contains the directions to CICS on how to perform the conversion. If we want CICS to validate the request, which means that CICS will verify that the incoming request is valid based on the rules in the WSDL, then the WEBSERVICE definition must point to the WSDL file that CICS should use to validate the request.
69.Press F3 to end the CEMT INQUIRE procedure and Clear your screen.
70.Type CEMT INQUIRE URIMAP and press the enter key. This will list the installed URIMAPs.
71.Again, you may need to scroll down a few times using F8 until you find your corresponding entry (Use the Path of the URIMAPs to find your entry, it should be: /exampleApp/inquireSingle###). In this example the UserID is 065)

72.Tab down using the TAB key and type S next to the URIMAP entry and press the enter button. Your screen should look similar to the following: CICS uses this URIMAP resource to match the incoming URI with a specified action. A URIMAP points to a PIPLINE definition and a WEBSERVICE definition.
73.Press F3 to end the CEMT INQUIRE procedure and Clear your screen. 74.Sign off from CICS by typing the command CESF and close the Emulator window. Um uns aus CICS auszuloggen, betätigen wir einmal oder mehrmals die Taste F3, bis die Meldung "STATUS: SESSION ENDED" ausgegeben wird. In die Zeile darüber geben wir die Logoff-Transaktion "CESF LOGOFF", gefolgt von der Eingabetaste, ein.

6. Test the Web Service In this part of the tutorial we will test your newly installed Web Service. These testing steps will be similar to the testing steps you performed in an earlier tutorial. When testing the web service using the explorer we have to define the endpoint (i.e. the location) of the web service consisting of hostname, port and uri 75.In WDz double-click on inquireSingle###.wsdl (Replace ### with your UserID). This will open the file in a WSDL editor. Ensure you are looking at the graphical view (click the Graph tab on the bottom of the editor if needed)
76.Click on the DFH0XCMNPort in the service element called DFH0XCMNService.
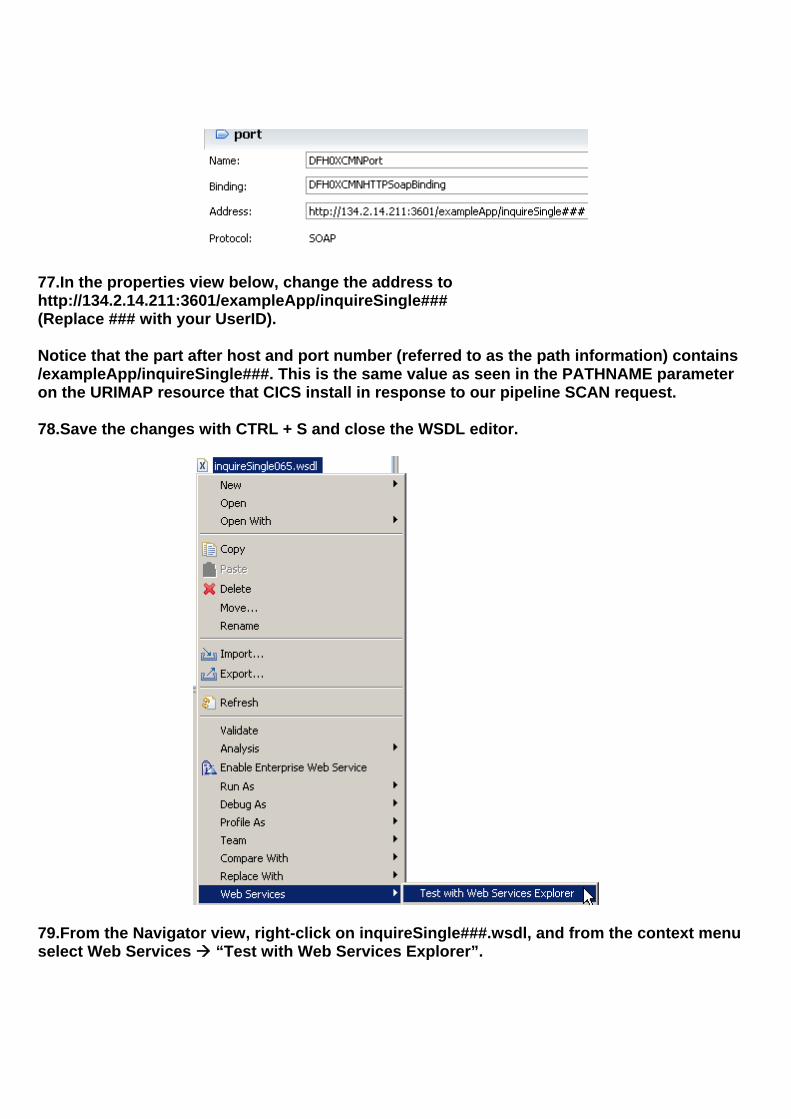
77.In the properties view below, change the address to http://134.2.14.211:3601/exampleApp/inquireSingle### (Replace ### with your UserID). Notice that the part after host and port number (referred to as the path information) contains /exampleApp/inquireSingle###. This is the same value as seen in the PATHNAME parameter on the URIMAP resource that CICS install in response to our pipeline SCAN request. 78.Save the changes with CTRL + S and close the WSDL editor.
79.From the Navigator view, right-click on inquireSingle###.wsdl, and from the context menu select Web Services “Test with Web Services Explorer”.

80.Verify again that the endpoint is http://134.2.14.211:3601/exampleApp/inquireSingle### (Replace ### with your UserID)
81.In the Navigator pane of the Web Services Explorer, expand DFH0XCMNHTTPSoapBinding and select DFH0XCMNOperation (this is the service operation). You should see a window similar to the following:
82.In the Actions pane, verify that the Endpoints field shows the new endpoint and type the above values and click the Go button.
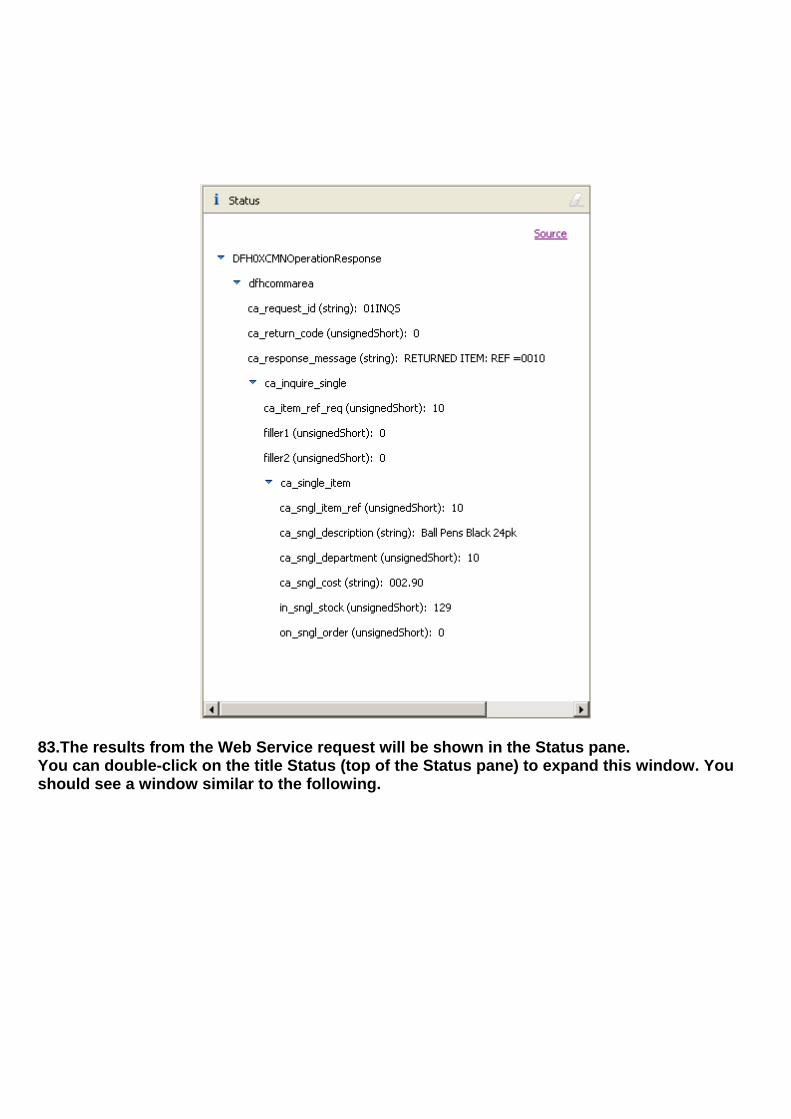
83.The results from the Web Service request will be shown in the Status pane. You can double-click on the title Status (top of the Status pane) to expand this window. You should see a window similar to the following.

84.Click on Source towards the top right in the Status pane to get a detailed Source Code view of the SOAP request and response. Use the scroll bar to see the complete message. 85.Double-click on the title Status to return to the previous Web Services Explorer view. 86.Close the Web Services Explorer and any open editors. Congratulation, you successfully completed Tutorial06!

Appendix A URIMAP resource definitions
A Uniform Resource Identifier (URI) is a compact string of characters used to identify or name a resource on the Internet. URIMAP definitions are resource definitions that match the URIs of HTTP or Web service requests, and provide information on how to process the requests. URIMAP definitions are used to provide three different Web-related facilities in CICS®:
1. Requests from a Web client, to CICS as an HTTP server. URIMAP definitions for requests for CICS as an HTTP server have a USAGE attribute of SERVER. These URIMAP definitions match the URLs of HTTP requests that CICS expects to receive from a Web client, and they define how CICS should provide a response to each request. You can use a URIMAP definition to tell CICS to: o Provide a static response to the HTTP request, using a document template or z/OS® UNIX® System Services HFS file. o Provide a dynamic response to the HTTP request, using an application program. Planning your CICS Web support architecture for CICS as an HTTP server has planning information for CICS as an HTTP server, and Resource definition for CICS Web support has instructions for creating a URIMAP definition for these purposes.
2. Requests to a server, from CICS as an HTTP client. URIMAP definitions for requests from CICS as an HTTP client have a USAGE attribute of CLIENT. These URIMAP definitions specify URLs that are used when a user application, acting as a Web client, makes a request through CICS Web support to an HTTP server. Setting up a URIMAP definition for this purpose means that you can avoid identifying the URL in your application program. HTTP client requests from a CICS application has instructions for creating a URIMAP definition for this purpose.
3. Web service requests. URIMAP definitions for Web service requests have a USAGE attribute of PIPELINE. These URIMAP definitions associate a URI for an inbound Web service request (that is, a request by which a client invokes a Web service in CICS) with a PIPELINE or WEBSERVICE resource that specifies the processing to be performed. Web services - start here has further information about Web services in CICS.
For CICS as an HTTP server, URIMAP definitions incorporate most of the functions that were previously provided by the analyzer program associated with the TCPIPSERVICE definition. An analyzer program may still be involved in the processing path if required. http://publib.boulder.ibm.com/infocenter/cicsts/v3r1/index.jsp?topic=/com.ibm.cics.ts31.doc/dfha4/r

Appendix B Using OMVS
z/OS Z18 Level 0609 IP Address = 88.67.133.73 VTAM Terminal = SC0TCP02 Application Developer System // OOOOOOO SSSSS // OO OO SS zzzzzz // OO OO SS zz // OO OO SSSS zz // OO OO SS zz // OO OO SS zzzzzz // OOOOOOO SSSS System Customization - ADCD.Z18.* ===> Enter "LOGON" followed by the TSO userid. Example "LOGON IBMUSER" or ===> Enter L followed by the APPLID ===> Examples: "L TSO", "L CICS", "L IMS3270 l tso

Für die Nutzung von Unix System Services (alte Bezeichnung OMVS), close the connection in the Remote Systems view and start your 3270 emulator. ------------------------------- TSO/E LOGON ----------------------------------- Enter LOGON parameters below: RACF LOGON parameters: Userid ===> PRAK034 Seclabel ===> Password ===> worsel New Password ===> Procedure ===> DBSPROC Group Ident ===> Acct Nmbr ===> ACCT# Size ===> 5000 Perform ===> Command ===> Enter an 'S' before each option desired below: -Nomail -Nonotice -Reconnect -OIDcard PF1/PF13 ==> Help PF3/PF15 ==> Logoff PA1 ==> Attention PA2 ==> Reshow You may request specific help information by entering a '?' in any entry field
logon
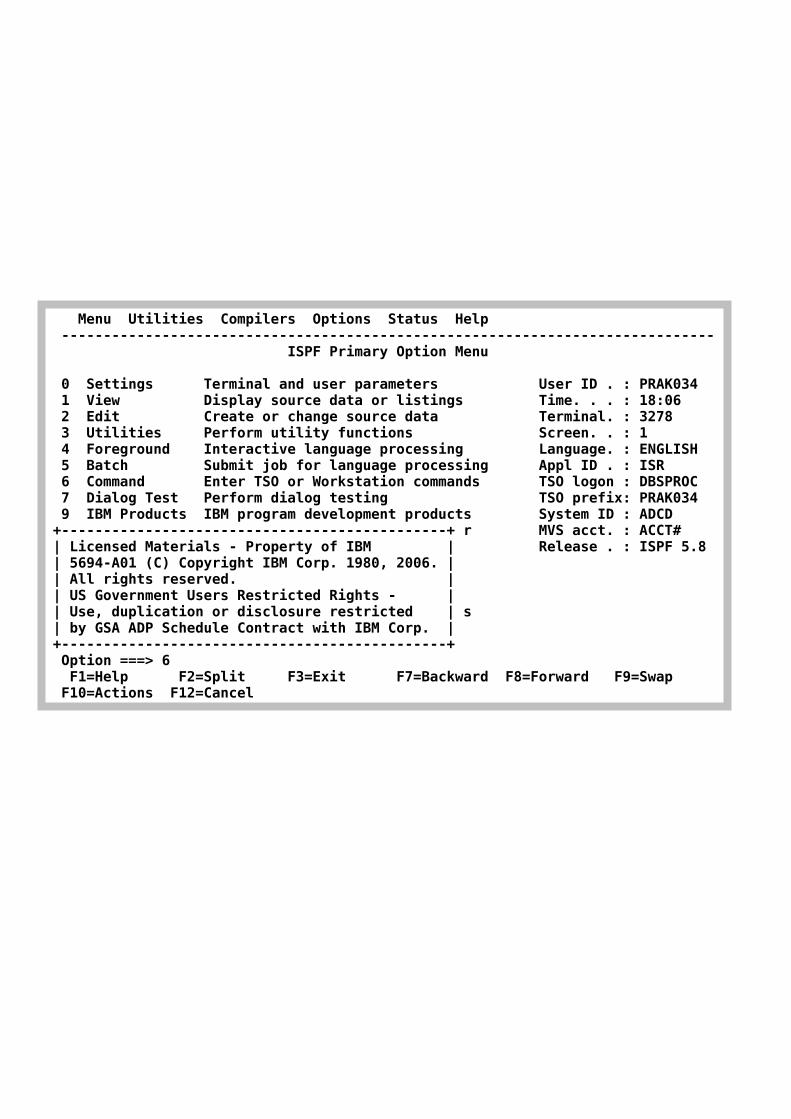
Menu Utilities Compilers Options Status Help ------------------------------------------------------------------------------ ISPF Primary Option Menu 0 Settings Terminal and user parameters User ID . : PRAK034 1 View Display source data or listings Time. . . : 18:06 2 Edit Create or change source data Terminal. : 3278 3 Utilities Perform utility functions Screen. . : 1 4 Foreground Interactive language processing Language. : ENGLISH 5 Batch Submit job for language processing Appl ID . : ISR 6 Command Enter TSO or Workstation commands TSO logon : DBSPROC 7 Dialog Test Perform dialog testing TSO prefix: PRAK034 9 IBM Products IBM program development products System ID : ADCD +----------------------------------------------+ r MVS acct. : ACCT# | Licensed Materials - Property of IBM | Release . : ISPF 5.8 | 5694-A01 (C) Copyright IBM Corp. 1980, 2006. | | All rights reserved. | | US Government Users Restricted Rights - | | Use, duplication or disclosure restricted | s | by GSA ADP Schedule Contract with IBM Corp. | +----------------------------------------------+ Option ===> 6 F1=Help F2=Split F3=Exit F7=Backward F8=Forward F9=Swap F10=Actions F12=Cancel

go to ISPF and enter “6” to go to the ISPF Shell. Now you can enter TSO commands. Menu List Mode Functions Utilities Help ------------------------------------------------------------------------------ ISPF Command Shell Enter TSO or Workstation commands below: ===> OMVS Place cursor on choice and press enter to Retrieve command => omvs => => => => => => => => => F1=Help F2=Split F3=Exit F7=Backward F8=Forward F9=Swap F10=Actions F12=Cancel
When you have used Unix System Services before, you see OMVS in the Commad List Area. Double click on it to move it to the command line.

IBM Licensed Material - Property of IBM 5694-A01 (C) Copyright IBM Corp. 1993, 2006 (C) Copyright Mortice Kern Systems, Inc., 1985, 1996. (C) Copyright Software Development Group, University of Waterloo, 1989. All Rights Reserved. U.S. Government users - RESTRICTED RIGHTS - Use, Duplication, or Disclosure restricted by GSA-ADP schedule contract with IBM Corp. IBM is a registered trademark of the IBM Corp. $ ===> pwd INPUT ESC=¢ 1=Help 2=SubCmd 3=HlpRetrn 4=Top 5=Bottom 6=TSO 7=BackScr 8=Scroll 9=NextSess 10=Refresh 11=FwdRetr 12=Retrieve
Now you have a familiar Unix command line Screen. On the Command line you may enter regular Unix commands, e.g. pwd, to show the present working directory

IBM Licensed Material - Property of IBM 5694-A01 (C) Copyright IBM Corp. 1993, 2006 (C) Copyright Mortice Kern Systems, Inc., 1985, 1996. (C) Copyright Software Development Group, University of Waterloo, 1989. All Rights Reserved. U.S. Government users - RESTRICTED RIGHTS - Use, Duplication, or Disclosure restricted by GSA-ADP schedule contract with IBM Corp. IBM is a registered trademark of the IBM Corp. $ pwd /u/prak034 $ ls -ls total 16 16 drwxrwxrwx 3 PRAK034 PRAKT 8192 Aug 4 15:57 tutorial06 0 -rw-rw-rw- 1 PRAK034 PRAKT 0 Aug 8 10:21 x $ ===> INPUT ESC=¢ 1=Help 2=SubCmd 3=HlpRetrn 4=Top 5=Bottom 6=TSO 7=BackScr 8=Scroll 9=NextSess 10=Refresh 11=FwdRetr 12=Retrieve
or ls –ls to show the content of the directory

$ cd tutorial06 $ pwd /u/prak034/tutorial06 $ ls -ls total 16 16 drwxrwxrwx 3 PRAK034 PRAKT 8192 Aug 4 16:53 wspickup $ ===> exit INPUT ESC=¢ 1=Help 2=SubCmd 3=HlpRetrn 4=Top 5=Bottom 6=TSO 7=BackScr 8=Scroll 9=NextSess 10=Refresh 11=FwdRetr 12=Retrieve
hit the F8 key

$ cd tutorial06 $ pwd /u/prak034/tutorial06 $ ls -ls total 16 16 drwxrwxrwx 3 PRAK034 PRAKT 8192 Aug 4 16:53 wspickup $ cd wspickup $ ls -ls total 16 16 drwxrwxrwx 2 PRAK034 PRAKT 8192 Aug 4 17:06 provider $ cd provider $ ls -ls total 0 0 -rw-rw-rw- 1 PRAK034 PRAKT 0 Aug 4 17:06 inquireSingle034.wsbi nd $ pwd /u/prak034/tutorial06/wspickup/provider $ ===> INPUT ESC=¢ 1=Help 2=SubCmd 3=HlpRetrn 4=Top 5=Bottom 6=TSO 7=BackScr 8=Scroll 9=NextSess 10=Refresh 11=FwdRetr 12=Retrieve
repeated cd shows subdirectories. Enter the OEDIT command to call the USS ISPF editor

File Edit Edit_Settings Menu Utilities Compilers Test Help ------------------------------------------------------------------------------- EDIT inquireSingle034.wsbind Columns 00001 00072 ****** ***************************** Top of Data ****************************** ==MSG> -CAUTION- Data contains invalid (non-display) characters. Use command ==MSG> ===> FIND P'.' to position cursor to these ==MSG> -Warning- The UNDO command is not available until you change ==MSG> your edit profile using the command RECOVERY ON. 000001 >WSBIND< 200808041620 C:\Dokumente und Einstellungen\LEIPZIG\IBM\r 000002 J } & { 000003 [ Ð ì 000004 J } & { 000005 [ Ð ì ****** **************************** Bottom of Data **************************** Command ===> Scroll ===> PAGE F1=Help F2=Split F3=Exit F5=Rfind F6=Rchange F7=Up F8=Down F9=Swap F10=Left F11=Right F12=Cancel
and you see the content of the file inquireSingle034.wsbind. Use exit to leave the editor and again exit and enter to leave USS. repeated F3 to logoff. In the Remote Systems view, connect Frodo again.

USS files corresponds to the content of the Remote Systems View

Appendix C Build-in CICS Transactions
CBAM - BTS browser CDBC - database control menu CDBI - database control inquiry CDBM - database control interface CEBR - temporary storage browse CEBT - master terminal (alternate CICS) CECI - command-level interpreter CECS - command-level syntax-checking transaction CEDA - resource definition online CEDF execution diagnostic facility CEDX also execution diagnostic facility CEMT - master terminal CEOT - terminal status CESF - sign off CESN - sign on CEST - supervisory terminal CETR - trace control CIND - in-doubt testing tool CLER - Language Environment run-time options CMAC - messages and codes display CMSG - message switching CPIA - unit of work resynchronization transaction COD0 - CICSPLex SM method-level debugging CODB - CICSPLex SM system-level debugging COLM - Restart CICSPLex SM management of a CICS system COLU - CICSPLex SM online utility COSH - Stop CICSPLex SM management of a CICS system COVC - CICSPlex SM Web User Interface server controller CRTE - remote transactions CSFE - terminal and system test CSPG - page retrieval CWTO - write to operator DSNC - CICS DB2 transaction Of these, the Transactions CEDA, CEMT, and CESF are used in this tutorial.

Appendix D CEDA—Transaction Resource definition online
Use CEDA to define resources to your CICS system while the system is running. With CEDA, you can update both the CICS System Definition (CSD) file and the running CICS system. Start the transaction by entering CEDA on the command line of the screen. Press ENTER. You get a screen, which shows the options available within CEDA
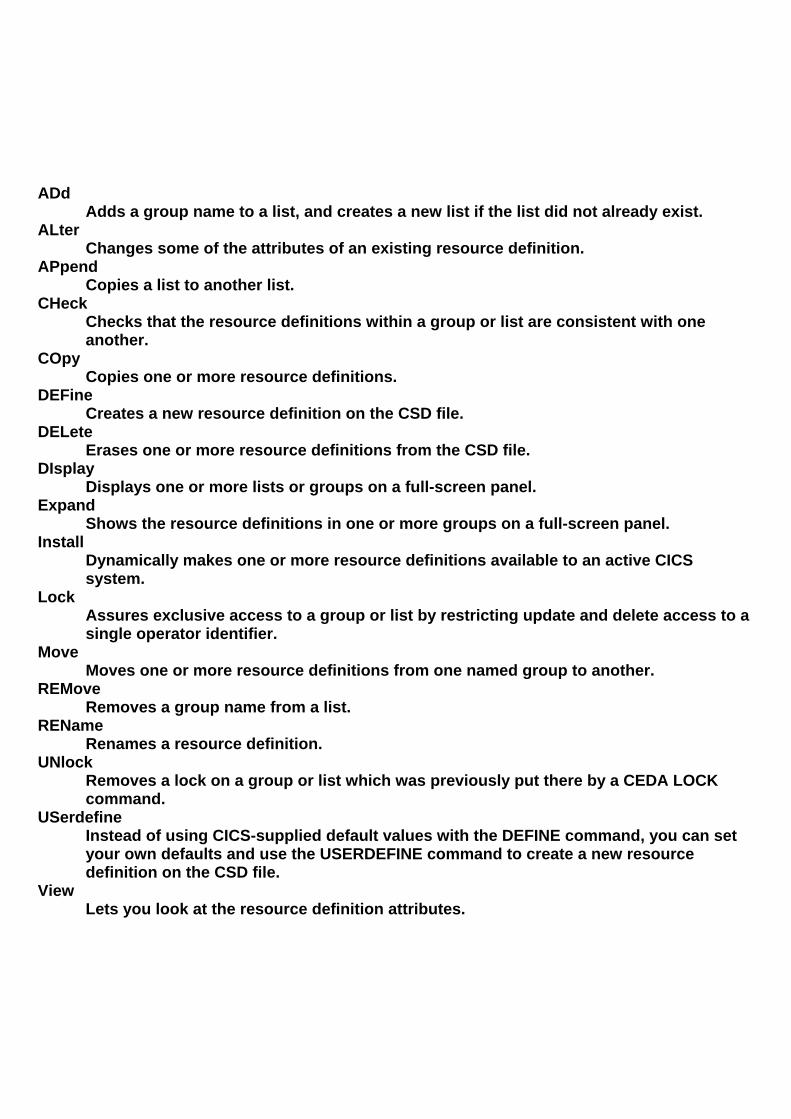
ADd ALter APpend CHeck COpy DEFine DELete DIsplay Expand Install Lock Move REMove REName UNlock USerdefine View
ADd
Adds a group name to a list, and creates a new list if the list did not already exist. ALter
Changes some of the attributes of an existing resource definition. APpend
Copies a list to another list. CHeck
Checks that the resource definitions within a group or list are consistent with one another.
COpy Copies one or more resource definitions.
DEFine Creates a new resource definition on the CSD file.
DELete Erases one or more resource definitions from the CSD file.
DIsplay Displays one or more lists or groups on a full-screen panel.
Expand Shows the resource definitions in one or more groups on a full-screen panel.
Install Dynamically makes one or more resource definitions available to an active CICS system.
Lock Assures exclusive access to a group or list by restricting update and delete access to a single operator identifier.
Move Moves one or more resource definitions from one named group to another.
REMove Removes a group name from a list.
REName Renames a resource definition.
UNlock Removes a lock on a group or list which was previously put there by a CEDA LOCK command.
USerdefine Instead of using CICS-supplied default values with the DEFINE command, you can set your own defaults and use the USERDEFINE command to create a new resource definition on the CSD file.
View Lets you look at the resource definition attributes.

http://publib.boulder.ibm.com/infocenter/cicsts/v3r1/index.jsp?topic=/com.ibm.cics.ts31.doc/dfha4/topics/dfha4_overview.htm

Appendix E
CEDA Define Parameters
Connection Requestmodel CORbaserver Sessions DB2Conn TCpipservice DB2Entry TDqueue DB2Tran Terminal DJar TRANClass DOctemplate TRANSaction Enqmodel TSmodel File TYpeterm Journalmodel Urimap Lsrpool Webservice Mapset PARTItionset PARTNer PIpeline PROCesstype PROFile PROGram
We used Mapset, PROGram, and TRANSaction in our first CICS tutorial. This Tutorial used PIpeline

Appendix E Ausführungsbeispiel der Transaktion unter Benutzung der BMS
Präsentationslogik
z/OS Z18 Level 0609 IP Address = 212.125.104.108 VTAM Terminal = SC0TCP01 Application Developer System // OOOOOOO SSSSS // OO OO SS zzzzzz // OO OO SS zz // OO OO SSSS zz // OO OO SS zz // OO OO SS zzzzzz // OOOOOOO SSSS System Customization - ADCD.Z18.* ===> Enter "LOGON" followed by the TSO userid. Example "LOGON IBMUSER" or ===> Enter L followed by the APPLID ===> Examples: "L TSO", "L CICS", "L IMS3270 l cics

Signon to CICS APPLID CICS WELCOME TO CICS Type your userid and password, then press ENTER: Userid . . . . prak034 Groupid . . . Password . . . xxxxxx_ Language . . . New Password . . . DFHCE3520 Please type your userid. F3=Exit

_ DFHCE3549 Sign-on is complete (Language ENU).

EGUI_ DFHCE3549 Sign-on is complete (Language ENU).

CICS EXAMPLE CATALOG APPLICATION - Main Menu Select an action, then press ENTER Action . . . . 1. List Items 2. Order Item Number 3. Exit F3=EXIT F12=CANCEL

CICS EXAMPLE CATALOG APPLICATION - Main Menu Select an action, then press ENTER Action . . . . 1 1. List Items 2. Order Item Number 3. Exit F3=EXIT F12=CANCEL

CICS EXAMPLE CATALOG APPLICATION - Inquire Catalog Select a single item to order with /, then press ENTER Item Description Cost Order ----------------------------------------------------------------- 0010 Ball Pens Black 24pk 2.90 0020 Ball Pens Blue 24pk 2.90 0030 Ball Pens Red 24pk 2.90 0040 Ball Pens Green 24pk 2.90 0050 Pencil with eraser 12pk 1.78 0060 Highlighters Assorted 5pk 3.89 0070 Laser Paper 28-lb 108 Bright 500/ream 7.44 0080 Laser Paper 28-lb 108 Bright 2500/case 33.54 0090 Blue Laser Paper 20lb 500/ream 5.35 0100 Green Laser Paper 20lb 500/ream 5.35 0110 IBM Network Printer 24 - Toner cart 169.56 0120 Standard Diary: Week to view 8 1/4x5 3/4 25.99 0130 Wall Planner: Eraseable 36x24 18.85 0140 70 Sheet Hard Back wire bound notepad 5.89 0150 Sticky Notes 3x3 Assorted Colors 5pk 5.35 F3=EXIT F7=BACK F8=FORWARD F12=CANCEL

CICS EXAMPLE CATALOG APPLICATION - Inquire Catalog Select a single item to order with /, then press ENTER Item Description Cost Order ----------------------------------------------------------------- 0010 Ball Pens Black 24pk 2.90 0020 Ball Pens Blue 24pk 2.90 0030 Ball Pens Red 24pk 2.90 0040 Ball Pens Green 24pk 2.90 / 0050 Pencil with eraser 12pk 1.78 0060 Highlighters Assorted 5pk 3.89 0070 Laser Paper 28-lb 108 Bright 500/ream 7.44 0080 Laser Paper 28-lb 108 Bright 2500/case 33.54 0090 Blue Laser Paper 20lb 500/ream 5.35 0100 Green Laser Paper 20lb 500/ream 5.35 0110 IBM Network Printer 24 - Toner cart 169.56 0120 Standard Diary: Week to view 8 1/4x5 3/4 25.99 0130 Wall Planner: Eraseable 36x24 18.85 0140 70 Sheet Hard Back wire bound notepad 5.89 0150 Sticky Notes 3x3 Assorted Colors 5pk 5.35 F3=EXIT F7=BACK F8=FORWARD F12=CANCEL

CICS EXAMPLE CATALOG APPLICATION - Details of your order Enter order details, then press ENTER Item Description Cost Stock On Order ----------------------------------------------------------------------------- 0060 Highlighters Assorted 5pk 3.89 0013 040 Order Quantity: 10 User Name: spruth Charge Dept: 4711 F3=EXIT F12=CANCEL

CICS EXAMPLE CATALOG APPLICATION - Main Menu Select an action, then press ENTER Action . . . . 3 1. List Items 2. Order Item Number 3. Exit ORDER SUCESSFULLY PLACED F3=EXIT F12=CANCEL

Thank You for using the Catalog Application