rav bluetooth truck aligners td8000 ws series …
TRANSCRIPT

TRUCK ALIGNMENT STEP BY STEP
SOFTWARE NAVIGATION
3 Axle Alignment Using the RAV Truck Alignment System

STEP BY STEP
TYPICAL 3 AXLE CONFIGURATION

Main Screen Four button operation from
keyboard, sensor head, phone, or tablet.

Select Measurement Mode Normal is the default setting. Select F for FastCheck to test or adjust steer axle only.

Select Vehicle Specs E-Z Specs for most trucks and HD vehicles.
Choose trailers for alignment of trailer axles.

From E-Z Spec Database choose the manufacturer of the truck. You are offered a choice of databases or create your own by inputting custom target data.
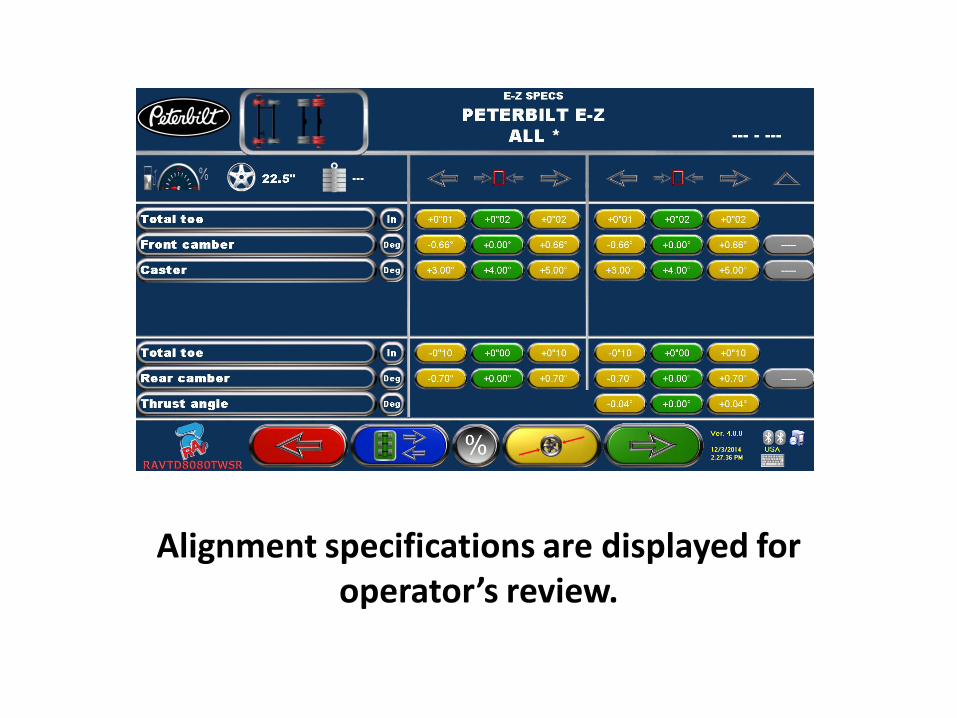
Alignment specifications are displayed for operator’s review.

List of preparatory steps to be done before alignment measurement begins.
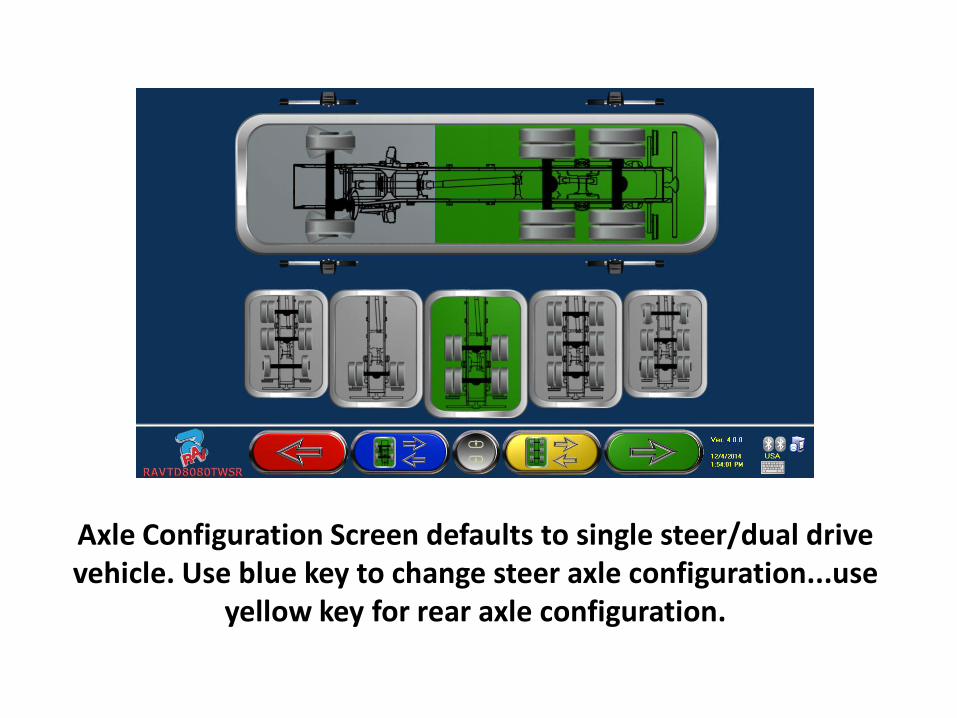
Axle Configuration Screen defaults to single steer/dual drive vehicle. Use blue key to change steer axle configuration...use
yellow key for rear axle configuration.

Use blue key to choose steer axle configuration...use yellow key for rear axle configuration. If vehicle has 4, 5, or 6 REAR axles
choose the appropriate icon and system will configure your alignment routine for you.
Choose the Axle Configuration

Install fast clamps and sensor heads on the first two axles…Runout compensation is not required.

Steer to straight ahead and level front sensor heads. Toe and camber are measured.

Caster is measured by turning routine. Default setting is 10 degrees. Blue key allows choice of 10
degree, 20 degree, or Ackerman angles.

After completion of turning routine operator is prompted to apply steering wheel lock.

Review of alignment diagnosis before adjustment axle by axle. This screen can be hidden by turning it
off in the set-up menu.

Live displays indicate amount and direction axle needs to be moved.
Red and green graphic indicates within or outside of specification.
Thrust Angle Adjustment Screen of
Rear Driving Axle
From adjustment screen
select INSERT key from
keyboard and table
displays shim thickness
required.

If additional data is needed for the first rear axle select the yellow key for additional angles.

Green arrow forward to adjustment of the steer axle. Total and individual toe values are displayed.

If adjustment of caster angle is desired select yellow key to display live or frozen caster, camber, cross
caster, and cross camber values.

After adjustment of caster select blue key to re-measure caster and update value. When caster adjustment is complete
select yellow key to adjust total toe.

After caster is adjusted and re-measured set total toe. Be certain steering wheel lock is in place and
move forward with the green key.

To remove and relocate the steering wheel in a straight spoke position….watching smaller bar graph… turn the steering
wheel to place pointer in the center. Maintaining this position remove steering wheel and replace with straight spoke.
Straightening the Steering Wheel using the
STEER AHEAD Screen (must be switched
on in SETUP Menu.

Remove sensors and fast clamps from rear drive axle and install them on the front drive axle.
Keep steering wheel locked.

Front drive axle is now being measured. Leveling of rear heads is not required.

System flows to adjustment of 2nd drive axle. Adjustment graphics guide the operator to precise
adjustment of the scrub angle.

If additional information is needed select yellow key for displays of toe and camber.
Axle offset for the 2nd rear axle can be automatically measured if it is turned “on”
in the set-up menu.

After adjustment of the final axle system flows to the diagnosis (Before) and adjustment (After) of all axles.
Select Red to Print

Input customer information….yellow fields are required. Enter information and select TAB key.
Select center Grey key to SAVE and PRINT.
Preparing to Save and Print

Select blue key for graphic style printout. SELECT YELLOW TO PRINT

After printing and saving select green home button to return to the main screen ready for the next vehicle.

FASTCHECK TO SELL MORE ALIGNMENT SERVICES
FASTCHECK MODE

SELECT “F” TO CHANGE FROM NORMAL TO FASTCHECK MODE THEN SELECT GREEN TO MOVE FORWARD
FASTCHECK MODE

From E-Z Spec Database choose the manufacturer of the truck. You are offered a choice of databases or create your own by inputting custom target data.
FASTCHECK MODE

Install clamps and sensors on the steering axle. Axle configuration graphic does not specify which axle to install
the sensors on. You choose which axle to FastCheck.
FASTCHECK MODE

Alignment specifications are displayed for operator’s review. Select Green and move forward.
FASTCHECK MODE

List of preparatory steps to be done before alignment measurement begins.
FASTCHECK MODE

Level heads… Do not steer unless the graphic prompts you.

Software flows to printable summary screen. Choose Red To Move Forward to Print
FASTCHECK MODE

Preparing to Save and Print
Input customer information….yellow fields are required. Enter information and select TAB key.
Select center GREY key to SAVE and PRINT.

Email the printout to your customer or to your front desk from your Smart
Phone or Tablet!
Select Blue for graphic style printout
then select Yellow to Print.

Your RAV system can be operated and viewed
from your smart phone or tablet!
Email the printout to your customer or
to your front desk from your
Smartphone or Tablet!

RAV FASTLINER TRUCK ALIGNERS TD8000 WS SERIES
Trailer Alignment Procedures

Select Trailer from the Database then select Green to move forward.

Select Full trailer for trailer with front steering axle. Select Semi Trailer for trailer with king pin.

Select number of axles and Green to move forward.

Review target data and select Green to move forward.

Preparatory steps before beginning alignment.

Mount the special trailer fixture to the trailer kingpin. Install rear heads on the fixture facing rearward.
Install front heads on the rear axle as shown.

First trailer axle is measured. Software flows to the adjustment screen.

Adjust thrust angle of the first trailer axle. Select Green to move to next step.

Remove rear heads from trailer fixture and install them on the 2nd trailer axle. Use extra set of long tubes on the
FastClamps. Select Green to move forward.

Adjust Scrub angle of 2nd trailer axle then select Green to move forward.

For multiple axles you simply keep moving the rear sensor heads forward.
If you have selected more than 2 axles the program instructs you to move sensors from 2nd axle and install
them on the 3rd axle.

When adjustment of all axles is complete select Red for Print Menu.

Input customer information….yellow fields are required.
Enter information and select TAB key. Select center GREY key to SAVE and PRINT.
Preparing to Save and Print

Green allows you to change values on printout from red ink to black ink if you choose.
Choose Yellow to print.

RAV FASTLINER TRUCK ALIGNERS TD8000 WS SERIES
Default Settings in the Set-up Menu

Select Blue to enter set-up menu.

Measuring Units should be configured as shown in screenshot above.

Move back with Red and select Equipment Configuration. Equipment configuration should match image above.

KEYBOARD SHORTCUTS HIDDEN FUNCTIONS ACCESSIBLE WITH THE KEYBOARD
Shortcuts on Aligners WS Software Version (SW ≥ 4.1.6) EVERYWHERE
Esc , F4 BACK LOGO
F12 SAVE SCRENSHOT (in :\TMLAB\ALIGNERS9\TEMP\) Ctrl + ↑ + M SHOW / HIDE MEMORY TEST AND BUILD RELEASE
Ctrl + ↑ + D DEBUG MODE /NORMAL MODE
Ctrl + D DEMO PROGRAM / NORMAL PROGRAM
LOGO PAGE
Ctrl + F2 SERVICE MENU
Ctrl + F12 DATA LOG F2 SAVE into USBKEY
(DC = Diagnosed Cars/ RC = Registered Cars / SC = Saved Cars) Alt + F2 SELECT QUICK CHECK MODE
DATA BANK - VEHICLE LIST DISPLAYING
Alt + F2 COMPRESS AND DECOMPRESS IF VEHICLES (if compact model view
option is set to “group similar ones” ) Alt + F5 ADDITIONAL INFO (where present) PRINT PREVIEW
Alt + F2 SELECT ANOTHER PRINTER
CHASSIS DIAGNOSIS DISPLAYING Alt + F3 SET BACK LIVE VISUALIZATION

DIAGNOSIS / ADJUSTMENT ↑ + F5 TOE TOTAL / TOE PARTIAL Ctrl + F4 TOE in mm/ Toe in centesimal Degree° / Toe in sexagesimal Degree° REAR ADJUSTMENT ↑ + F6 FREEZE/UNFREEZE CASTER VALUES Alt + F3 SET-BACK LIVE ADJUSTMENT Alt + F1 SHOW MOVIES FOR ADJUSTMENT HELP (model provided, where present) FRONT ADJUSTMENT ↑ + F6 FREEZE/UNFREEZE CASTER VALUES Alt + F1 KING PIN LIVE ADJUSTMENT HELP (available if set in menu) Alt + F2 CASTER LIVE ADJUSTMENT HELP (available if set in menu) Alt + F4 SHOW CLIP FOR ADJUSTMENT HELP (model provided, where present) ADJUSTMENT (Truck mode) Alt + F3 SET-BACK LIVE ADJUSTMENT INTERMEDIATE SUMMARY (Truck mode)
Alt + F1 CUSTOMER DATA ENTRY PAGE BEFORE PRINT PREVIEW
KEYBOARD SHORTCUTS CONT. HIDDEN FUNCTIONS ACCESSIBLE WITH THE KEYBOARD