quick reference faxing > > configure the settings
TRANSCRIPT
Quick Reference
Copying
Making copies1 Load an original document into the ADF tray or on the scanner
glass.
Note: To avoid a cropped image, make sure that the originaldocument and the output have the same paper size.
2 From the control panel, specify the number of copies.
3 If necessary, adjust the copy settings.
4 Copy the document.
Note: To make a quick copy, from the control panel, press .
Copying on both sides of the paper1 Load an original document into the ADF tray or on the scanner
glass.
2 From the control panel, navigate to:
> Copy > > Sides
3 Adjust the setting.
4 Copy the document.
Copying multiple pages onto a singlesheet1 Load an original document into the ADF tray or on the scanner
glass.
2 From the control panel, navigate to:
> Copy > > Pages Per Side
3 Adjust the settings.
4 Copy the document.
Faxing
Setting up the printer to fax
Setting up the fax function using analog fax
Notes:
• Some connection methods are applicable only in somecountries or regions.
• If the fax function is enabled and not fully set up, then theindicator light may blink red.
• If you do not have a TCP/IP environment, then use thecontrol panel to set up fax.
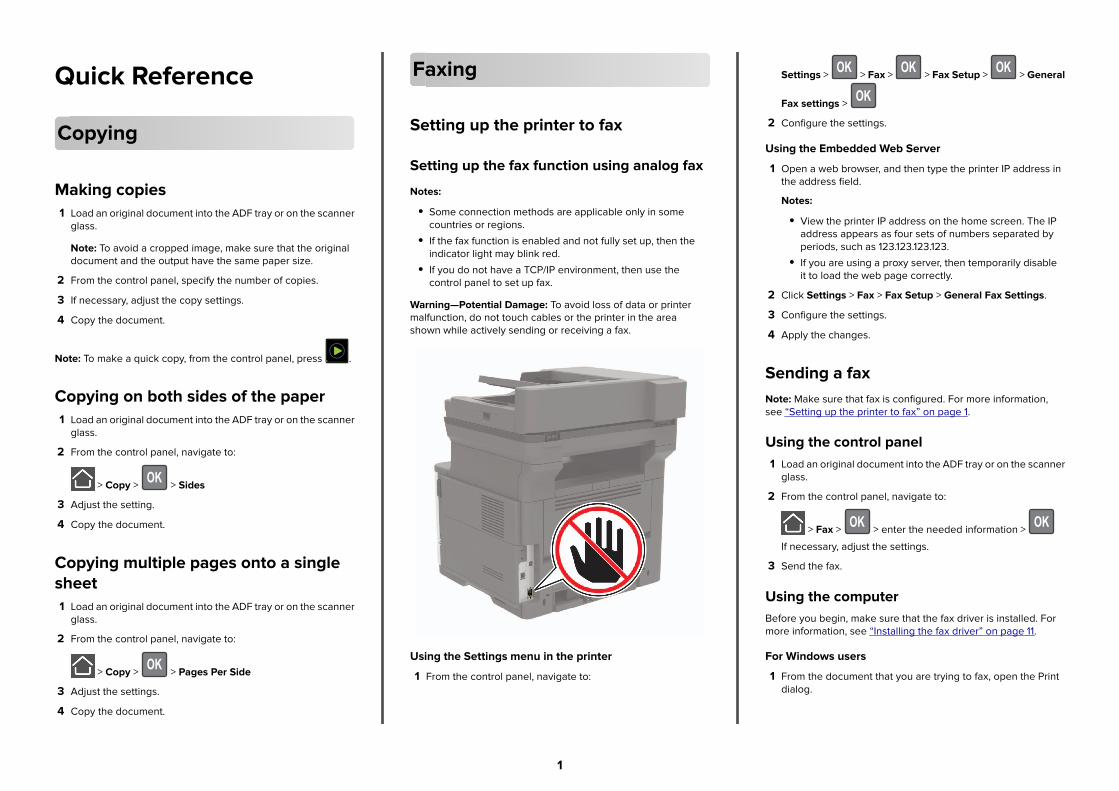
Warning—Potential Damage: To avoid loss of data or printermalfunction, do not touch cables or the printer in the areashown while actively sending or receiving a fax.
Using the Settings menu in the printer
1 From the control panel, navigate to:
Settings > > Fax > > Fax Setup > > General
Fax settings >
2 Configure the settings.
Using the Embedded Web Server
1 Open a web browser, and then type the printer IP address inthe address field.
Notes:
• View the printer IP address on the home screen. The IPaddress appears as four sets of numbers separated byperiods, such as 123.123.123.123.
• If you are using a proxy server, then temporarily disableit to load the web page correctly.
2 Click Settings > Fax > Fax Setup > General Fax Settings.
3 Configure the settings.
4 Apply the changes.
Sending a faxNote: Make sure that fax is configured. For more information,see “Setting up the printer to fax” on page 1.
Using the control panel1 Load an original document into the ADF tray or on the scanner
glass.
2 From the control panel, navigate to:
> Fax > > enter the needed information >
If necessary, adjust the settings.
3 Send the fax.
Using the computerBefore you begin, make sure that the fax driver is installed. Formore information, see “Installing the fax driver” on page 11.
For Windows users
1 From the document that you are trying to fax, open the Printdialog.
1

2 Select the printer, and then click Properties, Preferences,Options, or Setup.
3 Click Fax > Enable fax > Always display settings prior tofaxing, and then enter the recipient number.
If necessary, configure other fax settings.
4 Send the fax.
For Macintosh users
1 With a document open, choose File > Print.
2 Select the printer that has ‑ Fax added after its name.
3 In the To field, enter the recipient number.
If necessary, configure other fax settings.
4 Send the fax.
E-mailing
Configuring the e‑mail SMTP settingsConfigure the Simple Mail Transfer Protocol (SMTP) settings tosend a scanned document through e-mail. The settings vary witheach e‑mail service provider.
Before you begin, make sure that the printer is connected to anetwork and that the network is connected to the Internet.
Using the Embedded Web Server
1 Open a web browser, and then type the printer IP address inthe address field.
Notes:
• View the printer IP address on the printer home screen.The IP address appears as four sets of numbersseparated by periods, such as 123.123.123.123.
• If you are using a proxy server, then temporarily disableit to load the web page correctly.
2 Click Settings > E‑mail.
3 From the E‑mail Setup section, configure the settings.
Notes:
• For more information on the password, see the list ofe‑mail service providers.
• For e‑mail service providers that are not on the list,contact your provider and ask for the settings.
4 Click Save.
Using the Settings menu in the printer
1 From the control panel, navigate to:
Settings > > E‑mail > > E‑mail Setup >
2 Configure the settings.
Notes:
• For more information on the password, see the list ofe‑mail service providers.
• For e‑mail service providers that are not on the list,contact your provider and ask for the settings.
E‑mail service providers• AOL Mail
• Comcast Mail
• Gmail
• iCloud Mail
• Mail.com
• NetEase Mail (mail.126.com)
• NetEase Mail (mail.163.com)
• NetEase Mail (mail.yeah.net)
• Outlook Live or Microsoft 365
• QQ Mail
• Sina Mail
• Sohu Mail
• Yahoo! Mail
• Zoho Mail
Notes:
• If you encounter errors using the settings provided, thencontact your e‑mail service provider.
• For e‑mail service providers that are not on the list, contactyour provider.
AOL Mail
Setting Value
Primary SMTPGateway
smtp.aol.com
Primary SMTPGateway Port
587
Use SSL/TLS Required
Require TrustedCertificate
Disabled
Reply Address Your e‑mail address
SMTP ServerAuthentication
Login / Plain
Device‑Initiated E‑mail Use Device SMTP Credentials
Device UserID Your e‑mail address
Device Password App password
Note: To create an app password,go to the AOL Account Securitypage, log in to your account, andthen click Generate app password.
Comcast Mail
Setting Value
Primary SMTP Gateway smtp.comcast.net
Primary SMTP Gateway Port 587
Use SSL/TLS Required
Require Trusted Certificate Disabled
Reply Address Your e‑mail address
SMTP Server Authentication Login / Plain
Device‑Initiated E‑mail Use Device SMTP Credentials
Device UserID Your e‑mail address
Device Password Account password
2

GmailTM
Note: Make sure that two‑step verification is enabled on yourGoogle account. To enable two‑step verification, go to theGoogle Account Security page, log in to your account, and thenfrom the “Signing in to Google” section, click 2‑StepVerification.
Setting Value
Primary SMTPGateway
smtp.gmail.com
Primary SMTPGateway Port
587
Use SSL/TLS Required
Require TrustedCertificate
Disabled
Reply Address Your e‑mail address
SMTP ServerAuthentication
Login / Plain
Device‑InitiatedE‑mail
Use Device SMTP Credentials
Device UserID Your e‑mail address
Device Password App password
Notes:
• To create an app password, go tothe Google Account Security page,log in to your account, and thenfrom the “Signing in to Google”section, click App passwords.
• “App passwords” shows only iftwo‑step verification is enabled.
iCloud Mail
Note: Make sure that two‑step verification is enabled on youraccount.
Setting Value
Primary SMTPGateway
smtp.mail.me.com
Primary SMTPGateway Port
587
Use SSL/TLS Required
Setting Value
Require TrustedCertificate
Disabled
Reply Address Your e‑mail address
SMTP ServerAuthentication
Login / Plain
Device‑InitiatedE‑mail
Use Device SMTP Credentials
Device UserID Your e‑mail address
Device Password App password
Note: To create an app password, goto the iCloud Account Managementpage, log in to your account, and thenfrom the Security section, clickGenerate Password.
Mail.com
Setting Value
Primary SMTP Gateway smtp.mail.com
Primary SMTP Gateway Port 587
Use SSL/TLS Required
Require Trusted Certificate Disabled
Reply Address Your e‑mail address
SMTP Server Authentication Login / Plain
Device‑Initiated E‑mail Use Device SMTP Credentials
Device UserID Your e‑mail address
Device Password Account password
NetEase Mail (mail.126.com)
Note: Make sure that the SMTP service is enabled on youraccount. To enable the service, from the NetEase Mail homepage, click Settings > POP3/SMTP/IMAP, and then enableeither IMAP/SMTP service or POP3/SMTP service.
Setting Value
Primary SMTP Gateway smtp.126.com
Primary SMTP Gateway Port 465
Setting Value
Use SSL/TLS Required
Require Trusted Certificate Disabled
Reply Address Your e‑mail address
SMTP Server Authentication Login / Plain
Device‑Initiated E‑mail Use Device SMTP Credentials
Device UserID Your e‑mail address
Device Password Authorization password
Note: The authorizationpassword is provided whenIMAP/SMTP service orPOP3/SMTP service isenabled.
NetEase Mail (mail.163.com)
Note: Make sure that the SMTP service is enabled on youraccount. To enable the service, from the NetEase Mail homepage, click Settings > POP3/SMTP/IMAP, and then enableeither IMAP/SMTP service or POP3/SMTP service.
Setting Value
Primary SMTP Gateway smtp.163.com
Primary SMTP Gateway Port 465
Use SSL/TLS Required
Require Trusted Certificate Disabled
Reply Address Your e‑mail address
SMTP Server Authentication Login / Plain
Device‑Initiated E‑mail Use Device SMTP Credentials
Device UserID Your e‑mail address
Device Password Authorization password
Note: The authorizationpassword is provided whenIMAP/SMTP service orPOP3/SMTP service isenabled.
3
NetEase Mail (mail.yeah.net)
Note: Make sure that the SMTP service is enabled on youraccount. To enable the service, from the NetEase Mail homepage, click Settings > POP3/SMTP/IMAP, and then enableeither IMAP/SMTP service or POP3/SMTP service.
Setting Value
Primary SMTP Gateway smtp.yeah.net
Primary SMTP Gateway Port 465
Use SSL/TLS Required
Require Trusted Certificate Disabled
Reply Address Your e‑mail address
SMTP Server Authentication Login / Plain
Device‑Initiated E‑mail Use Device SMTP Credentials
Device UserID Your e‑mail address
Device Password Authorization password
Note: The authorizationpassword is provided whenIMAP/SMTP service orPOP3/SMTP service isenabled.
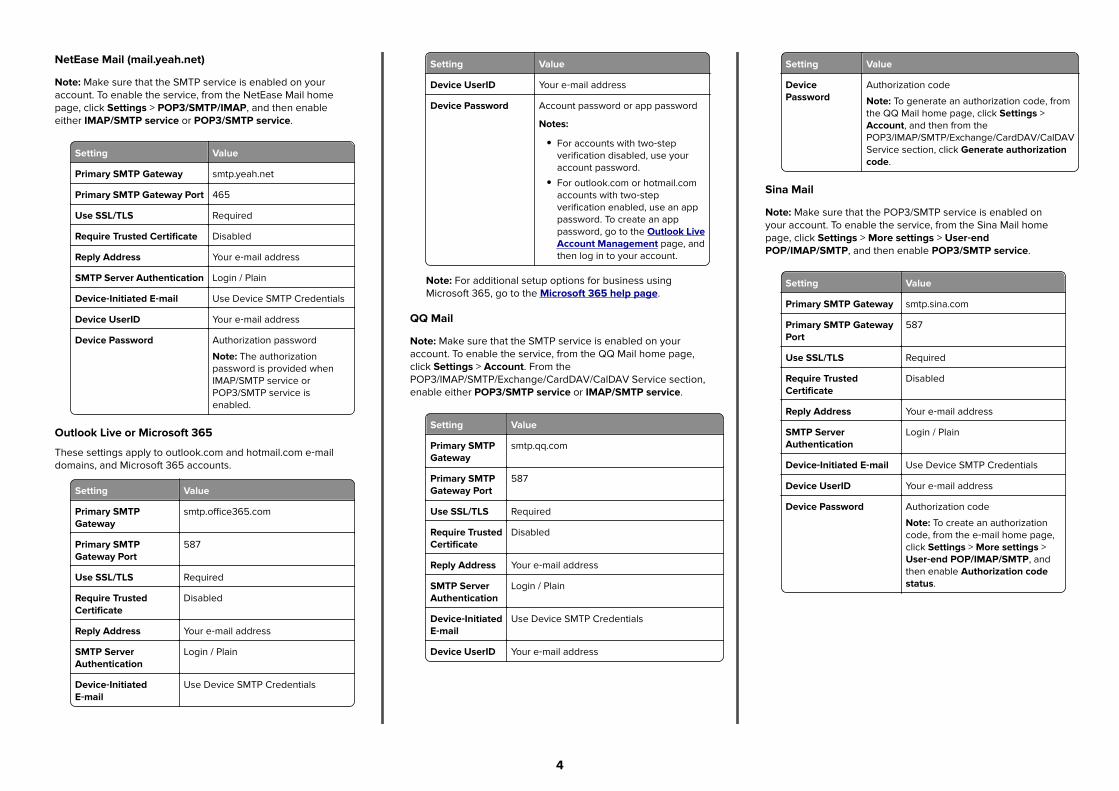
Outlook Live or Microsoft 365
These settings apply to outlook.com and hotmail.com e‑maildomains, and Microsoft 365 accounts.
Setting Value
Primary SMTPGateway
smtp.office365.com
Primary SMTPGateway Port
587
Use SSL/TLS Required
Require TrustedCertificate
Disabled
Reply Address Your e‑mail address
SMTP ServerAuthentication
Login / Plain
Device‑InitiatedE‑mail
Use Device SMTP Credentials
Setting Value
Device UserID Your e‑mail address
Device Password Account password or app password
Notes:
• For accounts with two‑stepverification disabled, use youraccount password.
• For outlook.com or hotmail.comaccounts with two‑stepverification enabled, use an apppassword. To create an apppassword, go to the Outlook LiveAccount Management page, andthen log in to your account.
Note: For additional setup options for business usingMicrosoft 365, go to the Microsoft 365 help page.
QQ Mail
Note: Make sure that the SMTP service is enabled on youraccount. To enable the service, from the QQ Mail home page,click Settings > Account. From thePOP3/IMAP/SMTP/Exchange/CardDAV/CalDAV Service section,enable either POP3/SMTP service or IMAP/SMTP service.
Setting Value
Primary SMTPGateway
smtp.qq.com
Primary SMTPGateway Port
587
Use SSL/TLS Required
Require TrustedCertificate
Disabled
Reply Address Your e‑mail address
SMTP ServerAuthentication
Login / Plain
Device‑InitiatedE‑mail
Use Device SMTP Credentials
Device UserID Your e‑mail address
Setting Value
DevicePassword
Authorization code
Note: To generate an authorization code, fromthe QQ Mail home page, click Settings >Account, and then from thePOP3/IMAP/SMTP/Exchange/CardDAV/CalDAVService section, click Generate authorizationcode.
Sina Mail
Note: Make sure that the POP3/SMTP service is enabled onyour account. To enable the service, from the Sina Mail homepage, click Settings > More settings > User‑endPOP/IMAP/SMTP, and then enable POP3/SMTP service.
Setting Value
Primary SMTP Gateway smtp.sina.com
Primary SMTP GatewayPort
587
Use SSL/TLS Required
Require TrustedCertificate
Disabled
Reply Address Your e‑mail address
SMTP ServerAuthentication
Login / Plain
Device‑Initiated E‑mail Use Device SMTP Credentials
Device UserID Your e‑mail address
Device Password Authorization code
Note: To create an authorizationcode, from the e‑mail home page,click Settings > More settings >User‑end POP/IMAP/SMTP, andthen enable Authorization codestatus.
4
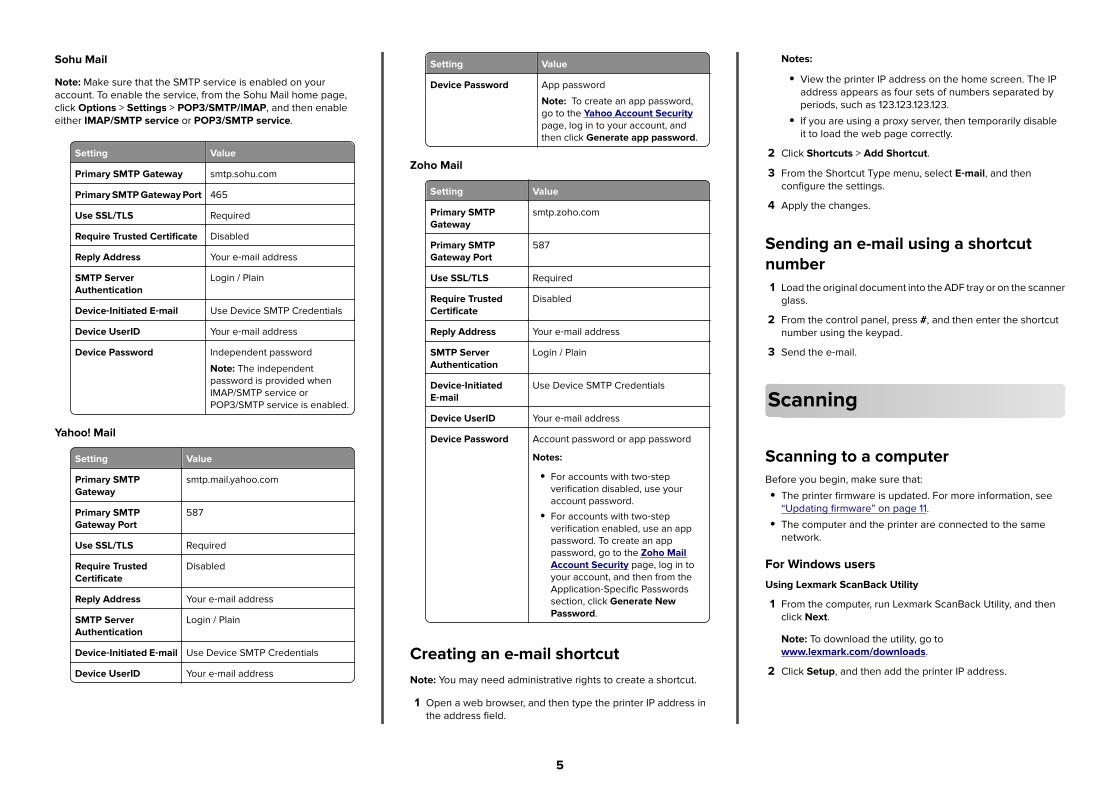
Sohu Mail
Note: Make sure that the SMTP service is enabled on youraccount. To enable the service, from the Sohu Mail home page,click Options > Settings > POP3/SMTP/IMAP, and then enableeither IMAP/SMTP service or POP3/SMTP service.
Setting Value
Primary SMTP Gateway smtp.sohu.com
Primary SMTP Gateway Port 465
Use SSL/TLS Required
Require Trusted Certificate Disabled
Reply Address Your e‑mail address
SMTP ServerAuthentication
Login / Plain
Device‑Initiated E‑mail Use Device SMTP Credentials
Device UserID Your e‑mail address
Device Password Independent password
Note: The independentpassword is provided whenIMAP/SMTP service orPOP3/SMTP service is enabled.
Yahoo! Mail
Setting Value
Primary SMTPGateway
smtp.mail.yahoo.com
Primary SMTPGateway Port
587
Use SSL/TLS Required
Require TrustedCertificate
Disabled
Reply Address Your e‑mail address
SMTP ServerAuthentication
Login / Plain
Device‑Initiated E‑mail Use Device SMTP Credentials
Device UserID Your e‑mail address
Setting Value
Device Password App password
Note: To create an app password,go to the Yahoo Account Securitypage, log in to your account, andthen click Generate app password.
Zoho Mail
Setting Value
Primary SMTPGateway
smtp.zoho.com
Primary SMTPGateway Port
587
Use SSL/TLS Required
Require TrustedCertificate
Disabled
Reply Address Your e‑mail address
SMTP ServerAuthentication
Login / Plain
Device‑InitiatedE‑mail
Use Device SMTP Credentials
Device UserID Your e‑mail address
Device Password Account password or app password
Notes:
• For accounts with two‑stepverification disabled, use youraccount password.
• For accounts with two‑stepverification enabled, use an apppassword. To create an apppassword, go to the Zoho MailAccount Security page, log in toyour account, and then from theApplication‑Specific Passwordssection, click Generate NewPassword.
Creating an e-mail shortcutNote: You may need administrative rights to create a shortcut.
1 Open a web browser, and then type the printer IP address inthe address field.
Notes:
• View the printer IP address on the home screen. The IPaddress appears as four sets of numbers separated byperiods, such as 123.123.123.123.
• If you are using a proxy server, then temporarily disableit to load the web page correctly.
2 Click Shortcuts > Add Shortcut.
3 From the Shortcut Type menu, select E‑mail, and thenconfigure the settings.
4 Apply the changes.
Sending an e-mail using a shortcutnumber1 Load the original document into the ADF tray or on the scanner
glass.
2 From the control panel, press #, and then enter the shortcutnumber using the keypad.
3 Send the e‑mail.
Scanning
Scanning to a computerBefore you begin, make sure that:
• The printer firmware is updated. For more information, see“Updating firmware” on page 11.
• The computer and the printer are connected to the samenetwork.
For Windows users
Using Lexmark ScanBack Utility
1 From the computer, run Lexmark ScanBack Utility, and thenclick Next.
Note: To download the utility, go towww.lexmark.com/downloads.
2 Click Setup, and then add the printer IP address.
5

Note: View the printer IP address on the printer homescreen. The IP address appears as four sets of numbersseparated by periods, such as 123.123.123.123.
3 Click Close > Next.
4 Select the size of the original document, and then click Next.
5 Select a file format and scan resolution, and then click Next.
6 Type a unique scan profile name, and then click Next.
7 Browse to the location you want to save the scanneddocument, create a file name, and then click Next.
Note: To reuse the scan profile, enable Create Shortcut, andthen create a unique shortcut name.
8 Click Finish.
9 Load an original document into the automatic documentfeeder or on the scanner glass.
10 From the printer home screen, touch Scan to Computer, andthen select a scan profile.
Note: Make sure that Scan to Computer is enabled. From thehome screen, touch Settings > Device > Visible HomeScreen Icons > Scan to Computer > Display.
Using Windows Fax and Scan
Note: Make sure that the printer is added to the computer. Formore information, see “Adding printers to a computer” onpage 12.
1 Load an original document into the automatic documentfeeder or on the scanner glass.
2 From the computer, open Windows Fax and Scan.
3 From the Source menu, select a scanner source.
4 If necessary, change the scan settings.
5 Scan the document.
For Macintosh users
Note: Make sure that the printer is added to the computer. Formore information, see “Adding printers to a computer” onpage 12.
1 Load an original document into the automatic documentfeeder or on the scanner glass.
2 From the computer, do either of the following:
• Open Image Capture.
• Open Printers & Scanners, and then select a printer. ClickScan > Open Scanner.
3 From the Scanner window, do one or more of the following:
• Select where you want to save the scanned document.
• Select the size of the original document.
• To scan from the ADF, select Document Feeder from theScan Menu or enable Use Document Feeder.
• If necessary, configure the scan settings.
4 Click Scan.
Printing
Printing from a computerNote: For labels, card stock, and envelopes, set the paper sizeand type in the printer before printing the document.
1 From the document that you are trying to print, open the Printdialog.
2 If necessary, adjust the settings.
3 Print the document.
Printing from a mobile device
Printing from a mobile device using MopriaPrint ServiceMopria® Print Service is a mobile printing solution for mobiledevices running on AndroidTM version 5.0 or later. It allows you toprint directly to any Mopria‑certified printer.
Note: Make sure that you download the Mopria Print Serviceapplication from the Google PlayTM store and enable it in themobile device.
1 From your Android mobile device, launch a compatibleapplication or select a document from your file manager.
2 Tap > Print.
3 Select a printer, and then adjust the settings, if necessary.
4 Tap .
Printing from a mobile device using AirPrintThe AirPrint software feature is a mobile printing solution thatallows you to print directly from Apple devices to anAirPrint‑certified printer.
Notes:
• Make sure that the Apple device and the printer areconnected to the same network. If the network has multiplewireless hubs, then make sure that both devices areconnected to the same subnet.
• This application is supported only in some Apple devices.
1 From your mobile device, select a document from your filemanager or launch a compatible application.
2 Tap > Print.
3 Select a printer, and then adjust the settings, if necessary.
4 Print the document.
Printing from a mobile device using Wi‑FiDirect®Wi‑Fi Direct® is a printing service that lets you print to any Wi‑FiDirect‑ready printer.
Note: Make sure that the mobile device is connected to theprinter wireless network. For more information, see “Connectinga mobile device to the printer” on page 13.
1 From your mobile device, launch a compatible application orselect a document from your file manager.
2 Depending on your mobile device, do one of the following:
• Tap > Print.
• Tap > Print.
• Tap > Print.
3 Select a printer, and then adjust the settings, if necessary.
4 Print the document.
6
Maintaining the printer
Attaching cablesCAUTION—SHOCK HAZARD: To avoid the risk ofelectrical shock, do not set up this product or make anyelectrical or cabling connections, such as the power cord,fax feature, or telephone, during a lightning storm.
CAUTION—POTENTIAL INJURY: To avoid the risk of fireor electrical shock, connect the power cord to anappropriately rated and properly grounded electricaloutlet that is near the product and easily accessible.
CAUTION—POTENTIAL INJURY: To avoid the risk of fireor electrical shock, use only the power cord provided withthis product or the manufacturer's authorized replacement.
CAUTION—POTENTIAL INJURY: To reduce the risk of fire,use only a 26 AWG or larger telecommunications (RJ-11)cord when connecting this product to the public switchedtelephone network. For users in Australia, the cord mustbe approved by the Australian Communications and MediaAuthority.
Warning—Potential Damage: To avoid loss of data or printermalfunction, do not touch the USB cable, any wireless networkadapter, or the printer in the areas shown while actively printing.
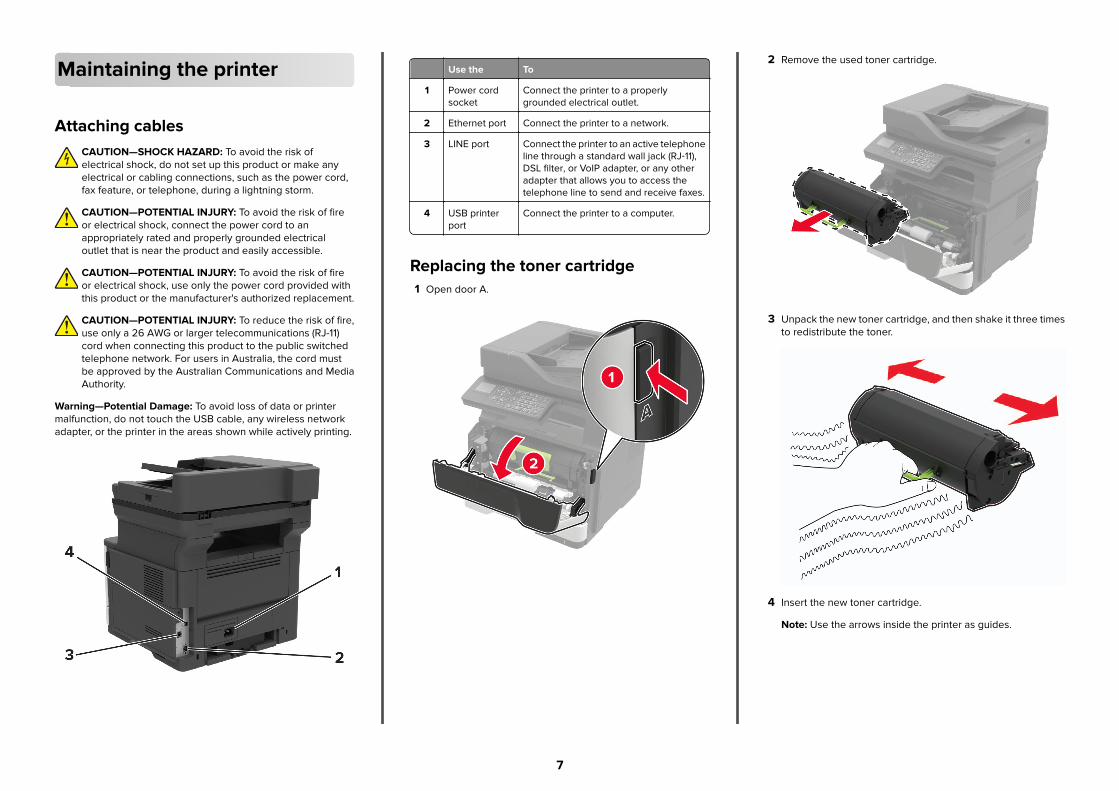
Use the To
1 Power cordsocket
Connect the printer to a properlygrounded electrical outlet.
2 Ethernet port Connect the printer to a network.
3 LINE port Connect the printer to an active telephoneline through a standard wall jack (RJ‑11),DSL filter, or VoIP adapter, or any otheradapter that allows you to access thetelephone line to send and receive faxes.
4 USB printerport
Connect the printer to a computer.
Replacing the toner cartridge1 Open door A.
2 Remove the used toner cartridge.
3 Unpack the new toner cartridge, and then shake it three timesto redistribute the toner.
4 Insert the new toner cartridge.
Note: Use the arrows inside the printer as guides.
7

5 Close door A.
Replacing the imaging unit1 Open door A.
2 Remove the toner cartridge.
3 Remove the used imaging unit.
4 Unpack the new imaging unit, and then shake it three times toredistribute the toner.
Warning—Potential Damage: Do not expose the imagingunit to direct light for more than 10 minutes. Extendedexposure to light may cause print quality problems.
Warning—Potential Damage: Do not touch thephotoconductor drum. Doing so may affect the quality offuture print jobs.
5 Insert the new imaging unit.
Note: Use the arrows inside the printer as guides.
8

6 Insert the toner cartridge.
Note: Use the arrows inside the printer as guides.
7 Close door A.
Cleaning the scanner1 Open the scanner cover.
2 Using a damp, soft, lint-free cloth, wipe the following areas:
• ADF glass
• ADF glass pad
9
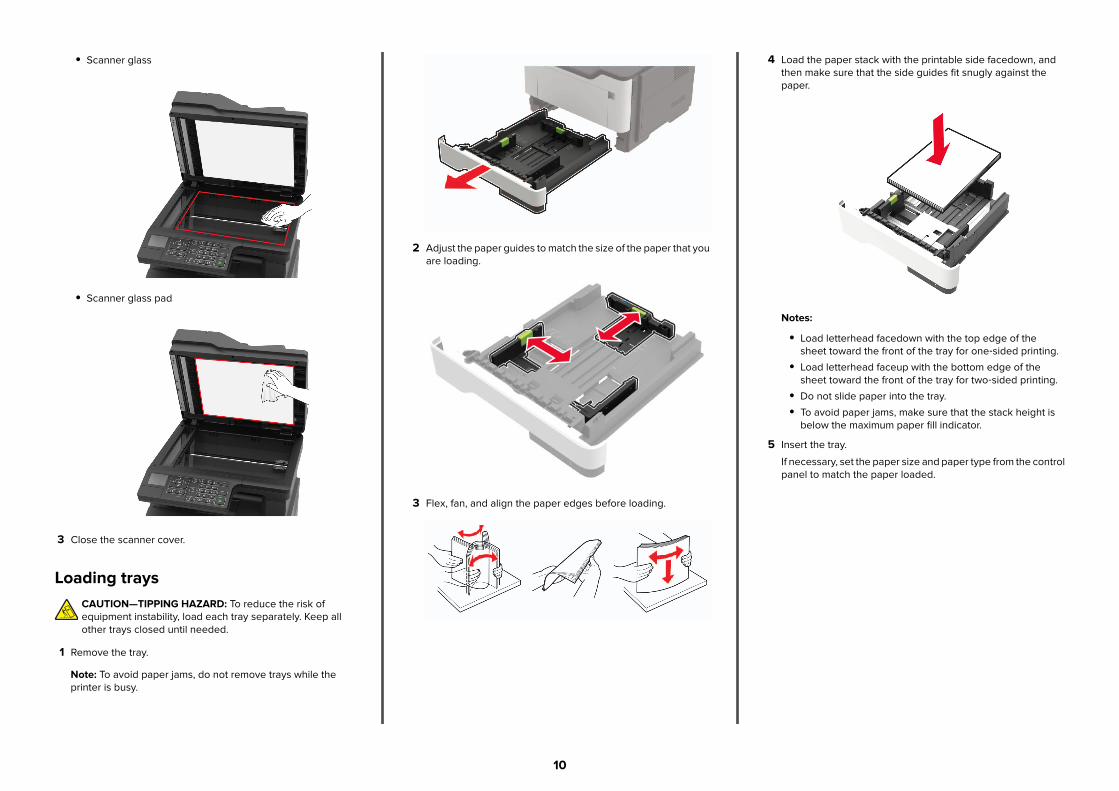
• Scanner glass
• Scanner glass pad
3 Close the scanner cover.
Loading traysCAUTION—TIPPING HAZARD: To reduce the risk ofequipment instability, load each tray separately. Keep allother trays closed until needed.
1 Remove the tray.
Note: To avoid paper jams, do not remove trays while theprinter is busy.
2 Adjust the paper guides to match the size of the paper that youare loading.
3 Flex, fan, and align the paper edges before loading.
4 Load the paper stack with the printable side facedown, andthen make sure that the side guides fit snugly against thepaper.
Notes:
• Load letterhead facedown with the top edge of thesheet toward the front of the tray for one‑sided printing.
• Load letterhead faceup with the bottom edge of thesheet toward the front of the tray for two‑sided printing.
• Do not slide paper into the tray.
• To avoid paper jams, make sure that the stack height isbelow the maximum paper fill indicator.
5 Insert the tray.
If necessary, set the paper size and paper type from the controlpanel to match the paper loaded.
10

Loading the multipurpose feeder1 Open the multipurpose feeder.
2 Adjust the guide to match the size of the paper that you areloading.
3 Flex, fan, and align the paper edges before loading.
4 Load paper with the printable side faceup.
Notes:
• Load letterhead faceup with the top edge of the sheettoward the front of the tray for one‑sided printing.
• Load letterhead facedown with the bottom edge of thesheet toward the front of the tray for two‑sided printing.
• Load envelopes with the flap facedown on the left side.
• Load European envelopes with the flap facedown andentering the printer first.
Warning—Potential Damage: Do not use envelopes withstamps, clasps, snaps, windows, coated linings, or self‑stickadhesives.
5 From the control panel, set the paper size and paper type tomatch the paper loaded.
Setting the size and type of thespecialty media1 From the control panel, navigate to:
> Settings > > Paper > > Tray Configuration
> > Paper Size/Type >
2 Select a paper source, and then configure the size and type ofthe specialty media.
Installing the printer softwareNotes:
• The print driver is included in the software installer package.
• For Macintosh computers with macOS version 10.7 or later,you do not need to install the driver to print on an AirPrint-
certified printer. If you want custom printing features, thendownload the print driver.
1 Obtain a copy of the software installer package.
• From the software CD that came with your printer.
• Go to www.lexmark.com/downloads.
2 Run the installer, and then follow the instructions on thecomputer screen.
Installing the fax driver1 Go to www.lexmark.com/downloads, search for your printer
model, and then download the appropriate installer package.
2 From your computer, click Printer Properties, and thennavigate to the Configuration tab.
3 Select Fax, and then click Apply.
Updating firmwareSome applications require a minimum device firmware level tooperate correctly.
For more information on updating the device firmware, contactyour Lexmark representative.
1 Open a web browser, and then type the printer IP address inthe address field.
Notes:
• View the printer IP address on the printer home screen.The IP address appears as four sets of numbersseparated by periods, such as 123.123.123.123.
• If you are using a proxy server, then temporarily disableit to load the web page correctly.
2 Click Settings > Device > Update Firmware.
3 Do either of the following:
• Click Check for updates > I agree, start update.
• Upload the flash file.
Note: To get the latest firmware, go towww.lexmark.com/downloads, and then search for yourprinter model.
a Browse to the flash file.
Note: Make sure that you have extracted thefirmware zip file.
b Click Upload > Start.
11

Adding printers to a computerBefore you begin, do one of the following:
• Connect the printer and the computer to the same network.For more information on connecting the printer to a network,see “Connecting the printer to a Wi‑Fi network” on page 12.
• Connect the computer to the printer. For more information, see“Connecting a computer to the printer” on page 13.
• Connect the printer to the computer using a USB cable. Formore information, see “Attaching cables” on page 7.
Note: The USB cable is sold separately.
For Windows users
1 From a computer, install the print driver.
Note: For more information, see “Installing the printersoftware” on page 11.
2 Open Printers & scanners, and then click Add a printer orscanner.
3 Depending on your printer connection, do one of the following:
• Select a printer from the list, and then click Add device.
• Click Show Wi‑Fi Direct printers, select a printer, and thenclick Add device.
• Click The printer that I want isn’t listed, and then from theAdd Printer window, do the following:a Select Add a printer using a TCP/IP address or
hostname, and then click Next.b In the “Hostname or IP address” field, type the printer
IP address, and then click Next.
Notes:
– View the printer IP address on the printer homescreen. The IP address appears as four sets ofnumbers separated by periods, such as123.123.123.123.
– If you are using a proxy server, then temporarilydisable it to load the web page correctly.
c Select a print driver, and then click Next.d Select Use the print driver that is currently installed
(recommended), and then click Next.e Type a printer name, and then click Next.f Select a printer sharing option, and then click Next.g Click Finish.
For Macintosh users
1 From a computer, open Printers & Scanners.
2 Click , and then select a printer.
3 From the Use menu, select a print driver.
Notes:
• To use the Macintosh print driver, select either AirPrintor Secure AirPrint.
• If you want custom printing features, then select theLexmark print driver. To install the driver, see “Installingthe printer software” on page 11.
4 Add the printer.
Connecting the printer to a Wi‑FinetworkMake sure that Active Adapter is set to Auto. From the controlpanel, navigate to:
Settings > > Network/Ports > > Network Overview
> > Active Adapter > > Auto >
Using the control panel
1 From the control panel, navigate to:
Settings > > Network/Ports > > Wireless >
> Setup On Printer Panel > > Choose Network >
2 Select a Wi‑Fi network, and then type the network password.
Note: For Wi‑Fi‑network‑ready printer models, a prompt forWi‑Fi network setup appears during initial setup.
Using Lexmark Mobile Assistant
1 Depending on your mobile device, download the LexmarkMobile Assistant application from either the Google Play storeor App Store online store.
2 From the printer control panel, navigate to:
Settings > > Network/Ports > > Wireless >
> Setup Using Mobile App > > Printer ID >
3 From your mobile device, launch the application, and thenaccept the Terms of Use.
Note: If necessary, grant permissions.
4 Tap Connect to Printer > Go to Wi‑Fi Settings.
5 Connect your mobile device to the printer wireless network.
6 Return to the application, and then tap Setup Wi-FiConnection
7 Select a Wi-Fi network, and then type the network password.
8 Tap Done.
Configuring Wi‑Fi DirectNote: This feature is available only in some printer models.
Wi-Fi Direct® is a Wi-Fi-based peer-to-peer technology that allowswireless devices to connect directly to a Wi-Fi Direct‑enabledprinter without using an access point (wireless router).
1 From the control panel, navigate to:
Settings > > Network/Ports > > Wi-Fi Direct >
2 Configure the settings.
• Enable Wi‑Fi Direct—Enables the printer to broadcast itsown Wi‑Fi Direct network.
• Wi‑Fi Direct Name—Assigns a name for the Wi‑Fi Directnetwork.
• Wi‑Fi Direct Password—Assigns the password fornegotiating the wireless security when using the peer‑to-peer connection.
• Show Password on Setup Page—Shows the password onthe Network Setup Page.
• Auto-Accept Push Button Requests—Lets the printeraccept connection requests automatically.
Note: Accepting push‑button requests automatically isnot secured.
12
Connecting a mobile device to theprinterBefore connecting your mobile device, make sure that Wi‑Fi Directhas been configured. For more information, see “ConfiguringWi‑Fi Direct” on page 12.
Connecting using Wi‑Fi Direct
Note: These instructions apply only to Android mobile devices.
1 From the mobile device, go to the settings menu.
2 Enable Wi‑Fi, and then tap Wi‑Fi Direct.
3 Select the printer Wi-Fi Direct name.
4 Confirm the connection on the printer control panel.
Connecting using Wi‑Fi
1 From the mobile device, go to the settings menu.
2 Tap Wi‑Fi, and then select the printer Wi-Fi Direct name.
Note: The string DIRECT-xy (where x and y are two randomcharacters) is added before the Wi-Fi Direct name.
3 Enter the Wi-Fi Direct password.
Connecting a computer to the printerBefore connecting your computer, make sure that Wi‑Fi Direct hasbeen configured. For more information, see “Configuring Wi‑FiDirect” on page 12.
For Windows users
1 Open Printers & scanners, and then click Add a printer orscanner.
2 Click Show Wi-Fi Direct printers, and then select the printerWi‑Fi Direct name.
3 From the printer display, take note of the eight-digit PIN of theprinter.
4 Enter the PIN on the computer.
Note: If the print driver is not already installed, then Windowsdownloads the appropriate driver.
For Macintosh users
1 Click the wireless icon, and then select the printer Wi‑Fi Directname.
Note: The string DIRECT-xy (where x and y are two randomcharacters) is added before the Wi-Fi Direct name.
2 Type the Wi‑Fi Direct password.
Note: Switch your computer back to its previous network afterdisconnecting from the Wi-Fi Direct network.
Clearing jams
Avoiding jams
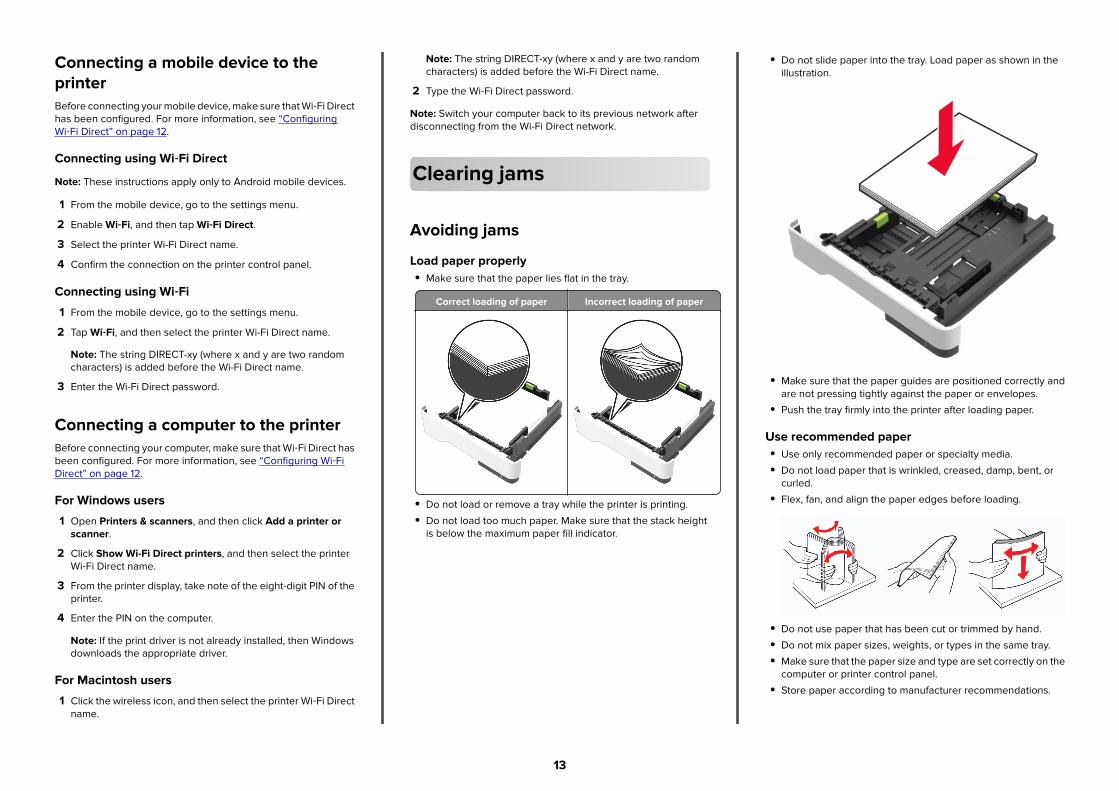
Load paper properly• Make sure that the paper lies flat in the tray.
Correct loading of paper Incorrect loading of paper
• Do not load or remove a tray while the printer is printing.
• Do not load too much paper. Make sure that the stack heightis below the maximum paper fill indicator.
• Do not slide paper into the tray. Load paper as shown in theillustration.
• Make sure that the paper guides are positioned correctly andare not pressing tightly against the paper or envelopes.
• Push the tray firmly into the printer after loading paper.
Use recommended paper• Use only recommended paper or specialty media.
• Do not load paper that is wrinkled, creased, damp, bent, orcurled.
• Flex, fan, and align the paper edges before loading.
• Do not use paper that has been cut or trimmed by hand.
• Do not mix paper sizes, weights, or types in the same tray.
• Make sure that the paper size and type are set correctly on thecomputer or printer control panel.
• Store paper according to manufacturer recommendations.
13

Identifying jam locationsNotes:
• When Jam Assist is set to On, the printer automaticallyflushes blank pages or partially printed pages with after ajammed page is cleared. Check your printed output forblank pages.
• When Jam Recovery is set to On or Auto, the printer reprintsjammed pages.
Jam location
1 Automatic document feeder
2 Standard bin
3 Rear door
4 Standard 250‑sheet tray
5 Optional 250‑ or 550‑sheet tray
6 Multipurpose feeder
7 Door A
Paper jam in door A1 Remove the tray.
2 Open door A.
3 Remove the toner cartridge.
4 Remove the imaging unit.
Warning—Potential Damage: Do not expose the imagingunit to direct light for more than 10 minutes. Extendedexposure to light may cause print quality problems.
Warning—Potential Damage: Do not touch thephotoconductor drum. Doing so may affect the quality offuture print jobs.
14

5 Remove the jammed paper.
CAUTION—HOT SURFACE: The inside of the printermight be hot. To reduce the risk of injury from a hotcomponent, allow the surface to cool before touchingit.
Note: Make sure that all paper fragments are removed.
6 Insert the imaging unit.
Note: Use the arrows inside the printer as guides.
7 Insert the toner cartridge.
Note: Use the arrows inside the printer as guides.
8 Close door A.
9 Insert the tray.
Paper jam in the rear door1 Open the rear door.
15
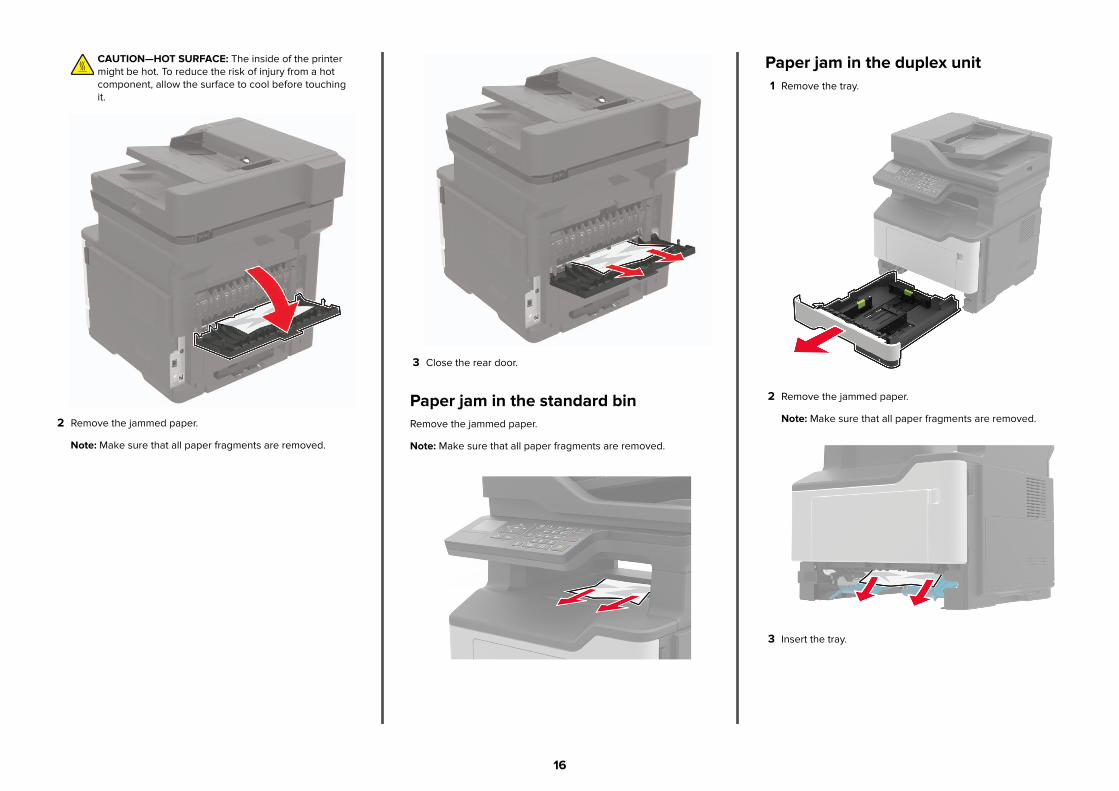
CAUTION—HOT SURFACE: The inside of the printermight be hot. To reduce the risk of injury from a hotcomponent, allow the surface to cool before touchingit.
2 Remove the jammed paper.
Note: Make sure that all paper fragments are removed.
3 Close the rear door.
Paper jam in the standard binRemove the jammed paper.
Note: Make sure that all paper fragments are removed.
Paper jam in the duplex unit1 Remove the tray.
2 Remove the jammed paper.
Note: Make sure that all paper fragments are removed.
3 Insert the tray.
16

Paper jam in trays1 Remove the tray.
2 Remove the jammed paper.
Note: Make sure that all paper fragments are removed.
3 Insert the tray.
Paper jam in the multipurpose feeder1 Remove paper from the multipurpose feeder.
2 Remove the jammed paper.
Note: Make sure that all paper fragments are removed.
3 Flex, fan, and align the paper edges before loading.
4 Reload paper, and then adjust the paper guide.
Paper jam in the automatic documentfeeder1 Remove all original documents from the ADF tray.
2 Open the ADF cover.
3 Remove the jammed paper.
Note: Make sure that all paper fragments are removed.
4 Close the ADF cover.
17