quick buyer guide the rft process - etenders.gov.ie · 4 introduction this document is designed as...
TRANSCRIPT

1
Quick Buyer Guide The RFT Process
May 2016

2
Contents Introduction .................................................................................................................................... 4
To Begin ........................................................................................................................................... 4
Create a Workspace ........................................................................................................................ 5
Create a Tender ............................................................................................................................... 7
RFT Checklist ............................................................................................................................................. 9
Manage Lots .......................................................................................................................................... 9
Set Message Recipients ......................................................................................................................... 9
Select CPV Codes ................................................................................................................................. 10
RFT Dates / Planned activities in this process ..................................................................................... 11
Publication Sites .................................................................................................................................. 12
Pricing Required (if any) ...................................................................................................................... 13
Manage Questionnaire........................................................................................................................ 13
Documents .......................................................................................................................................... 18
Prepare zip file .................................................................................................................................... 18
Internal Documents............................................................................................................................. 18
Invitation Letter ................................................................................................................................... 19
Set weights .......................................................................................................................................... 20
Define opening committee ................................................................................................................. 20
Prepare and manage publications ...................................................................................................... 21
Contract Notice ................................................................................................................................... 23
Publish ................................................................................................................................................. 39
Suppliers .............................................................................................................................................. 40
Pre-register supplier ............................................................................................................................ 42
Send invitations ................................................................................................................................... 43
Opening Procedure ............................................................................................................................. 44
Assign Evaluator .................................................................................................................................. 44
Evaluation ............................................................................................................................................ 44
Set Award Values ................................................................................................................................ 45
Intention to Award .............................................................................................................................. 45
Create Contract ................................................................................................................................... 46
Prepare and manage award publications ........................................................................................... 49
Publish Award Notice .......................................................................................................................... 57
CloseRFT .............................................................................................................................................. 57

3
Version Control
Version Date By Description
0.1 18-08-2014 Vivien Pierce First Draft
0.2 29-10-2014 Vivien Pierce Revised
0.3 30-01-2015 Vivien Pierce Revised
0.4 09-05-2016 Aoife Donovan Updated new Standard OJEU Forms and Tender Checklist
changes – went live in eTenders 2nd May 2016

4
Introduction
This document is designed as a quick buyer guide on the Tender process from creating an RFT (Request
for Tender) through to Awarding a Contract. For a more detailed tender process, please read the EUS
CTM Buyer User Guide which can be found on the eTenders website.
To Begin
Go to http://etenders.gov.ie/ and click on LOGIN to enter the system;
Enter your user credentials and click Log In;

5
Welcome to your eTenders Homepage. To see all Tenders, click on one of the links in the panel on the left of the page; My ongoing, Ongoing, Closed as below;
Create a Workspace
In this section you can create a new workspace which will act like a project folder/category folder for
related tenders e.g. All tenders in the “ICT and Office Equipment” category. A team can be assigned to a
workspace for access to all tenders within.
You can decide to create / not create a workspace before setting up a tender. A tender can be created
outside of a workspace for example if your tender is not related to any other tenders or if you don’t want workspace members to view this particular tender.
To create a workspace, click on the button at the bottom of the page Create new Workspace.

6
You are now presented with the Workspace form to fill in. Enter a reference, name and address for the
new Workspace and click Save.
Note: All fields with a * are mandatory fields.

7
You can Add/Remove members to the Workspace now and assign appropriate permissions as follows; Note: Members can have one or more permissions.
Editor - Has permissions to update and view information.
Limited editor - Same as Editor but cannot create objects.
Viewer - Can only view information. Will not receive any system or email alerts.
Limited viewer – Same as Viewer but cannot view quotation information.
Evaluator - User can be selected as evaluator in a RFT if not "strict evaluation" is enabled.
Create a Tender
Create a Tender by clicking Create RFT within a Workspace or by clicking Create RFT outside of the
Workspace at the bottom of the page.
Choose Works, Supplies or Services as appropriate. Enter the estimated value of the contract and click
Next.
Select a Procedure and click Next. For this example, ‘Open Procedure (OJEU)’ is selected which is for
Open Procedures above threshold that will be published to TED.
NOTE: OJEU – Official Journal European Union, TED – Tenders Electronic Daily.

8
If you check the box for ‘Allow use of template based on a lower threshold value’, you'll have to select
one of the exceptions in the list provided.
Next you enter a tender Reference, Short description and Detailed description. In the example below,
the procedure selected is ‘Open Procedure (OJEU)’. Indicate your Response deadline and check the Use
a tender box if you plan to open the Tender responses online. If you decide to open the tender responses
offline i.e. receiving the responses on paper, uncheck Use a tender box and check the Disable submission
of online proposals. You can also check the box provided if you want the awarded supplier to make a discount bid.
If you plan to split the tender into lots, enter the number of lots and click Ok, otherwise click Skip for only one lot.

9
RFT Checklist You are now presented with the RFT Checklist, partial example below.
Where there is a hyperlink to the right of a section on the check list, click it and follow the instructions in
the left panel or as below;
Manage Lots If you have broken the RFT into more than one lot, you can manage the lots here by clicking on each of
the lot links to the right of the checklist. You can create, delete, copy or edit lots for this RFT. Click Edit
to enter more details about a lot and then click Save. Click Delete to remove a lot and then click OK. Click
Copy lot… to create a new lot, enter details and click Save. Click Done when finished managing lots.
Set Message Recipients Set/change who is going to receive messages from suppliers for this RFT. Each message received is seen
on the message tab by all members but selected recipients will receive an email alert/eTenders notification of a new message. If no recipient is selected only the owner will receive alerts.
To set a message recipient, check the box beside the member you wish to add and click Save.

10
Select CPV Codes CPV (Common Procurement Vocabulary) codes are used like a barcode to reference the particular item(s)
you require. They are useful to Buyers when searching for Suppliers to add to their RFT. They are also
useful to potential suppliers to search for business opportunities and to receive alerts for same. For this reason they are highly recommended otherwise suppliers will not be notified of your tender.
Select CPV codes by clicking Add
You are then presented with the Category Tree (partial example below) and a list of CPV codes. Search by
category name or select the code appropriate for your Tender request and click Add selected categories.
Once you have added the appropriate CPV code, click Done.
Next step is to set CPV Code as Main CPV. Check the box next to the code which will be your Main CPV
code.

11
Click on the button “Set Main CPV” - this will then pre-fill automatically to your OJEU Form. The star icon identifies the main CPV Code you have set. Set Main CPV Code even if just one CPV Code is listed.
RFT Dates / Planned activities in this process Here you can set/change all dates for the whole RFT. Select dates in chronological order. If you select dates in the wrong order, you will receive a warning. Check the boxes for the dates you wish to set.
Set Publication of notice date for RFT here. The date has to be the same for all publication sites,
e.g. eTenders and TED.
Set Deadline of clarification questions. No questions will be answered after this date.
Set Response deadline for last date suppliers can respond to RFT. Tender box/envelopes can be
opened after this date.
Set Validity of tender date to ensure supplier maintains Tender offer until this date.
Set Planned award date for when buyer plans to award the contract.
Set Publication of award date for when the RFT process is finished and awarded supplier will be
published to any of the publication sites. The publishing of award can only be done after a
completed RFT process.
Click Save when complete.

12
Publication Sites Select the publication site where the notice and award will be published. The selection of publication
sites cannot be changed once the notice publication date has passed. Select the Sector, e.g. General procurement, Utilities or Defence and security. Click Save when finished.

13
Pricing Required (if any) Here, you can decide the types of quotes you wish to receive from suppliers;
Check Total quote requested and click Save if you wish to get one full quote
If you have more than one package, you will need to do this for each package
If you will allow suppliers to provide a quote with add-on’s, check Option total quotes and click Save
o State the number of add-on’s allowed.
Manage Questionnaire In this section, you can set questions for the suppliers to answer in relation to the RFT. You will use the
answers to these questions in your evaluation. Predefined questions are available right away with every
template and if you don’t want to use them you should delete them. You can add questions from a template or create sections and then create questions within each section.
Note: If you do not want to receive any responses through the system then you should disable the Pricing
Required and Manage Questionnaire sections.
Click Add from template… to add a predefined question.

14
Select a template from the dropdown menu, e.g. Evaluation criteria (4), check the main box for the full set of related questions or check only the questions required.
Please see
Click Link to import questions in an un-editable format or Copy for an editable format.
You now have a list of predefined questions. If you would like to add more questions, click Create section… as below.

15
Give the section a name, e.g. Criteria. Click Save when complete.
Check the Section (Criteria) box and click Create question… to add a question within that section.
Choose the question type and click Next. For the purpose of this manual, I have chosen ‘Single Choice’
so the answer is only right or wrong. Choose the question type that suits your question.

16
Select section where you want your question to appear (Criteria). Give the question a code, this is just a
number for your question, I have numbered it 1 here, you could add a second question and give it code
2. Next, enter your question, then enter the possible answers to choose from. By checking the Mandatory requirement box at the bottom, this highlights the Mandatory requirement values boxes.
NOTE: This mandatory requirement is not that you must answer the question but more so that you must
give the correct answer, such as No, I am not bankrupt!
Click Save as draft when complete.

17
The question is now set as Draft and will not be seen by the supplier until it is updated to a new version,
check the box beside the question and click Update to new version.

18
Draft has changed to 1 as below and will now be seen by the supplier. Click Done when finished adding questions.
Documents Here you can upload documents for the suppliers to download;
Click on Upload files… to upload files (documents) from your computer, check the box beside
the file you want and click Upload.
Click on Add from shared folder… to add files already uploaded to eTenders
Click on Manage Folders… to create folders to put your files in. Do this if you want to bundle
uploaded files into folders for zipping.
Click Done when complete.
Prepare zip file Here you can zip up files from the previous section for a supplier to download all at once. Click Zip
documents
Internal Documents This is the same process as the ‘Documents’ stage above, but in this case, uploaded files are internal for the RFT and are not visible to suppliers.

19
Invitation Letter Here you can create/select from template a letter to go out to suppliers receiving the RFT.
You can write your own letter, click Save and Done or;
Click Load template… to load a predefined letter template.
Use the Variable settings to add fields to your letter such as RFT.owner, RFT.description, Date
etc.

20
Set weights In this section you can put a weight beside particular areas of your specification that you consider
important in your decision making. For example, if you have asked a particular question that you consider
to be worth 50% of the decision to tender, put 50% beside this question. All weighting must add up to
100%.
Define opening committee Here you can select users to open the tender box.
To select users, click on a user from the All users field on the left and click the arrow pointing to the right, that user is now one of the Selected Users to open the Tender Box.
If you want all users in the project required to open the tender box, click on All users at the bottom and
click Save. Though, it is recommended that you click Other and enter in a minimum of 2 users for opening a tender box as this way you won’t have to wait for every user to open the tender box.
Click Save when finished adding/removing members.

21
Prepare and manage publications Here you can prepare the contract notice for both eTenders (alone if below threshold value) and TED.
Select Contract Notice and click Save.
OJEU:

22
Click the TED link for the TED contact notice (OJEU). Select Contract Notice (or another option from the drop down menu) and click Save.
You can now fill in the Contract notice form to go up on TED. Click Fill in Form.
You can change the publication date now if you wish and view the contract notice to be published to
eTenders. When finished click Done.

23
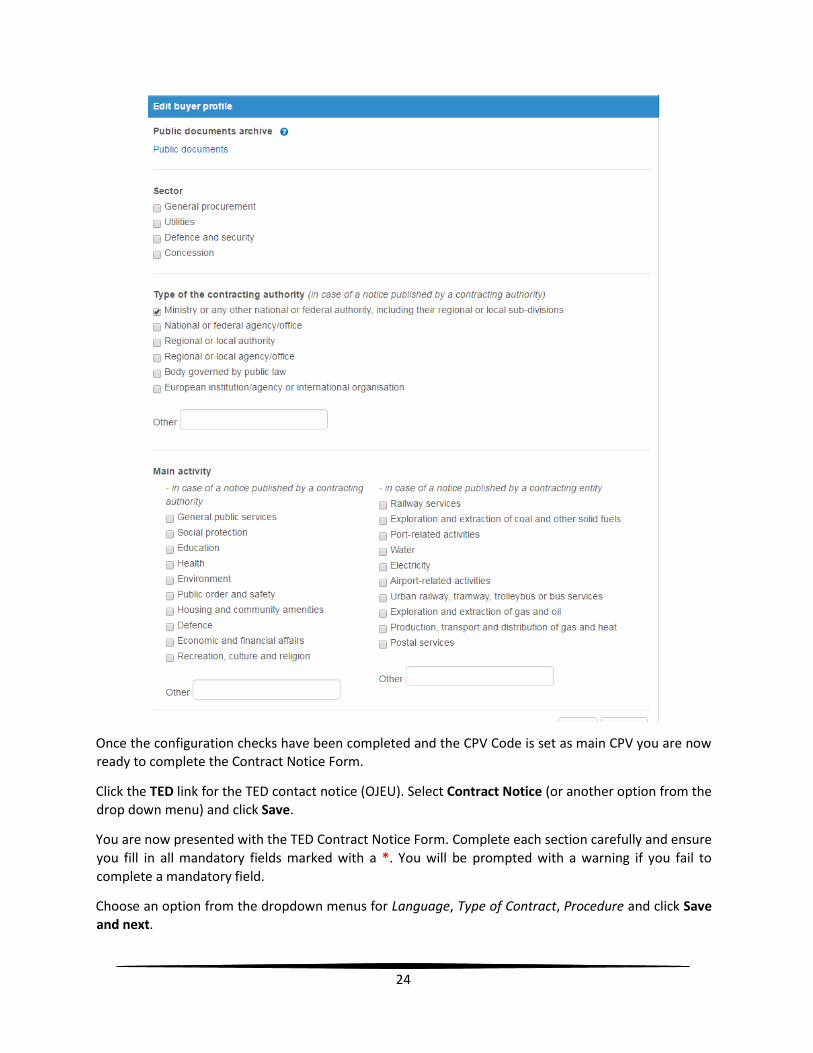
Contract Notice Please note before filling in Contract Notice form for TED there are initial configuration checks on
Company Administration Section that will aid pre-filling of information throughout different sections of
the OJEU Forms. It is also mandatory to save 1 CPV Code as Main CPV code, in the Tender Checklist, to
complete an OJEU Form.
Within Company Administration Click on “Edit” beside Company Profile – tick the sector and main activity
that is appropriate for your authority.
24
Once the configuration checks have been completed and the CPV Code is set as main CPV you are now ready to complete the Contract Notice Form.
Click the TED link for the TED contact notice (OJEU). Select Contract Notice (or another option from the drop down menu) and click Save.
You are now presented with the TED Contract Notice Form. Complete each section carefully and ensure
you fill in all mandatory fields marked with a *. You will be prompted with a warning if you fail to
complete a mandatory field.
Choose an option from the dropdown menus for Language, Type of Contract, Procedure and click Save and next.

25
Fill in your company contact details as per screenshot below. Some details may be pre-populated from
Section I Contracting Authority will be pre-filled if you have completed the configuration checks. If you have not
completed this you will need to add your company profile here, for example;
Name
Address
Telephone
Website
When complete click Save and next.
Select the Type of contracting authority you are from the dropdown menu and if you choose ‘Other’, you
must fill in the Other field. Select your Main activity. Check the box at the bottom if your Contract Award is on behalf of other contracting entities.
When complete click Save and next.

26
For the NUTS code, click the Add button, select ‘Ireland’ and use the + symbol to drill down in specific
locations within Ireland if appropriate and click Save. Nuts Code Selection.

27
Section IA Contracting Authority
Communication – only change if appropriate.
For additional information, choose one if appropriate.
The URL that is auto-populated, seen in screenshot below, do not change.
When complete click Save and next.

28
Section IB Contracting Authority
This information will be pre-filled from the Company Profile. If you have not completed the configuration
checks you will need to select 1 from options I.4 and I.5 seen in example screenshot below.
Section II A Most of this information will now be pre-filled from your checklist.

29
Note main CPV code has been added – this is based on the Main CPV Code you have previously selected in the Tender List, see example below.
Estimated value will be pre-filled based on information filled in from the Tender.
If you have divided the RFT up into lots, select Yes for the first question below and complete the rest of
the fields on the page for Lot 1. If you have more than 1 Lot this will need to be added at the Tender
Checklist stage. Once it has been completed details for Lot 2, for Lot 3 and so on will appear below Lot 1.
If you have only the one Lot, select No for the first question below.
When complete click Save and next.
Fill in all fields for Object of the Contract as per screenshot below. When entering in the estimated cost
excluding VAT, enter in the full value, or choose to enter in a range of values. Ensure you select the
correct currency.

30
Section II B Notice Additional CPV Codes are pre-filled from the Tender Checklist. Please fill in this section appropriately.

31
Choose Award criteria – please note lowest price not acceptable
OR

32
Section II B:
Click on the box for duration of contract e.g. months or days
Select yes/no if contract will be renewed – if renewable a description is required
Enter envisaged number of candidates – this is a required field except in Open Procedures
Enter min or max number and objective criteria if appropriate
Choose if variants are accepted Yes/ No

33
Section II B – If there is information about options choose yes and give a description of the options.
Section III – Legal, Economic, Financial and Technical Information Fill in all fields for legal, economic, financial and technical information as per screenshot below. This
information will not be pre filled from Company Information.
When complete click Save and next.

34

35

36
Section IV Procedure Fill in all fields for Procedure as per screenshot below. When complete click Save and next.
Example of OpenProcedure:
Language is pre-filled but this can be changed e.g. Below example has pre-filled English language but
the user could de-select “EN” and select “GA” for Irish Language (as Gaeilge)

37
Section VI – Complementary Information Fill in all fields for Complementary Information as per screenshot below.
Choose whether this is a recurrent procurement
When complete click Save and next.

38
Review and finalize Finally, review and finalise the Contract Notice. Read carefully through the form data and click Accept.
Click To checklist to go back to the RFT checklist in order to now publish the Contract Notice.
You can now see that the Contract notice is ready to be published indicated by the green tick, click Done.

39
Publish Publish to the site selected in the Process template.
eTenders site is http://etenders.gov.ie/
TED is http://ted.europa.eu/

40
OJEU Forms:
You will notice that the status has changed from ‘Not published’ to ‘Ready for publication’. This will
change to ‘Sent for review’ when the publish deadline is reached and then finally status will become ‘Published’, see example screenshots below.
Suppliers This section is used to search for suppliers to add to your RFT. The following search facilities are available
and you can search using any of the filters within any of the search tabs, make your selection and click
Search;
Quick Search – for help on each field in this search. Click on question mark symbol again to clear
the help pop-out.
RFT Search
Category Search
Approved Suppliers

41
Quick Search
RFT Search
Click on question
mark symbol (?) Notice Pop-outs for
each “?” selected

42
Category Search
Approved Suppliers: Under this tab, you can list approved suppliers and simply click Add to RFT.
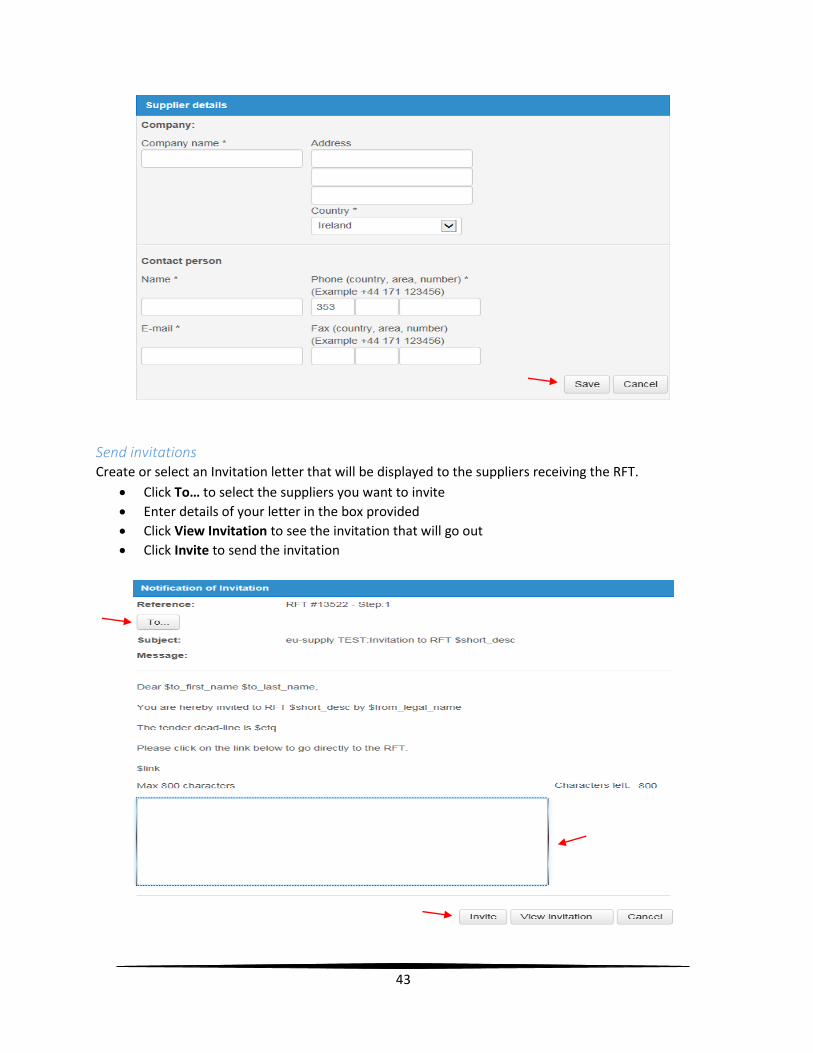
Pre-register supplier In this section you can pre-register any non-existing supplier to this RFT and include them in the invitation
email. You should firstly ensure that the pre-registered supplier does not exist in eTenders already, to do this please see Supplier Search on eTenders homepage or through the Tender Checklist.
Simply fill in the supplier’s details as below and click Save.
43
Send invitations Create or select an Invitation letter that will be displayed to the suppliers receiving the RFT.
Click To… to select the suppliers you want to invite
Enter details of your letter in the box provided
Click View Invitation to see the invitation that will go out
Click Invite to send the invitation

44
Opening Procedure In this section you open the tender box to see all responses to the RFT. A minimum of two users is
required to open the tender box. Click Open beside the name of each user, enter the user credentials
and click Open.
Note: Please be aware that it is only possible to change the opening committee before the Tenderbox
has been opened.
Assign Evaluator In this section, you can assign evaluators to question sections if required. Simply check the box beside a
user to assign them to a question section and click Save/Notify. The user will receive a message telling
them they have a task to perform. You can remove the evaluator task in the same way, just this time
uncheck the box beside a user and click Save/Notify.
PLEASE NOTE: If you assign one user to a question section, the other users in the list will not be able
to edit any of the sections of the questionnaire. In that case you need to check the boxes beside all
users that need access to the question sections.
Evaluation In this section, you can evaluate responses through the evaluation tool. You can rank and score each
supplier based on their responses by clicking Get rank and score.

45
Set Award Values In this section, you can add/modify the award values for each response submitted or if a supplier has
expressed an interest in the RFT but did not respond online. Enter the award value in the box provided
for each supplier.
Where a response has been submitted, you will see the value below the box, enter this value in
the box provided.
Where there is an expression of interest but no response submitted online, there will be no value
given below the box provided, you can enter the value given from paper or non-eTenders
response.
Click Save and Done when complete.
Intention to Award In this section, you choose which suppliers to award. You can choose one or more suppliers. If choosing
more than one supplier, you can rank them if you wish. If there is a red mark beside a supplier, they are

46
not fully compliant with requirements. You can score and rank the suppliers to see where they came in
the evaluation by clicking Show score and rank. To award, simply check the Award box beside your
chosen supplier. If more than one chosen and you wish to rank them, enter 1, 2, 3 etc. in the rank box.
You can inform suppliers of the award by clicking Create message.
Click Save when complete.
You now enter a reason/justification for your decision and click Save.
Create Contract In this section, you simply create the contract. Fill in the required fields in the screenshot below.
The left panel gives a brief description of each selection to fill in. Click Save when complete.

47
In the form you see the following fields;
Work flow type is used to select whether to sign the contract on paper or digitally. We sign on
paper so select ‘Signing outside of CTM’.
Contract Type can be Project, Framework Agreement or Call Off. Select as appropriate.
Call-off type is used when Framework Agreement is selected. Select as appropriate.
In the next section, check the box beside the package to be included in the framework agreement.
Click Save when complete.

48
You are now presented with the Contract Checklist where you can do the following;
Setup contract add-ons and set their values. Enter the add-on and click Save.
Attach internal and external (visible to supplier) documents the same way as when attaching
documents to the RFT.
Add/edit internal information. This is not visible to the suppliers.
Select Suppliers for the contract, simply check the box and click Save.
Manage supplier information; you can enter additional information per supplier in the contract.
Enter the information in the box provided, click Save and Done.
You can create/select from template a cover letter that will be sent to awarded suppliers, in the
same way as you created the invitation letter.
Finally save the contract by clicking Save as final.

49
You can add/remove members to the contract and assign them rights in the same way you do when
creating the Workspace and creating an RFT. Click Assign user rights…
Click Done when complete.
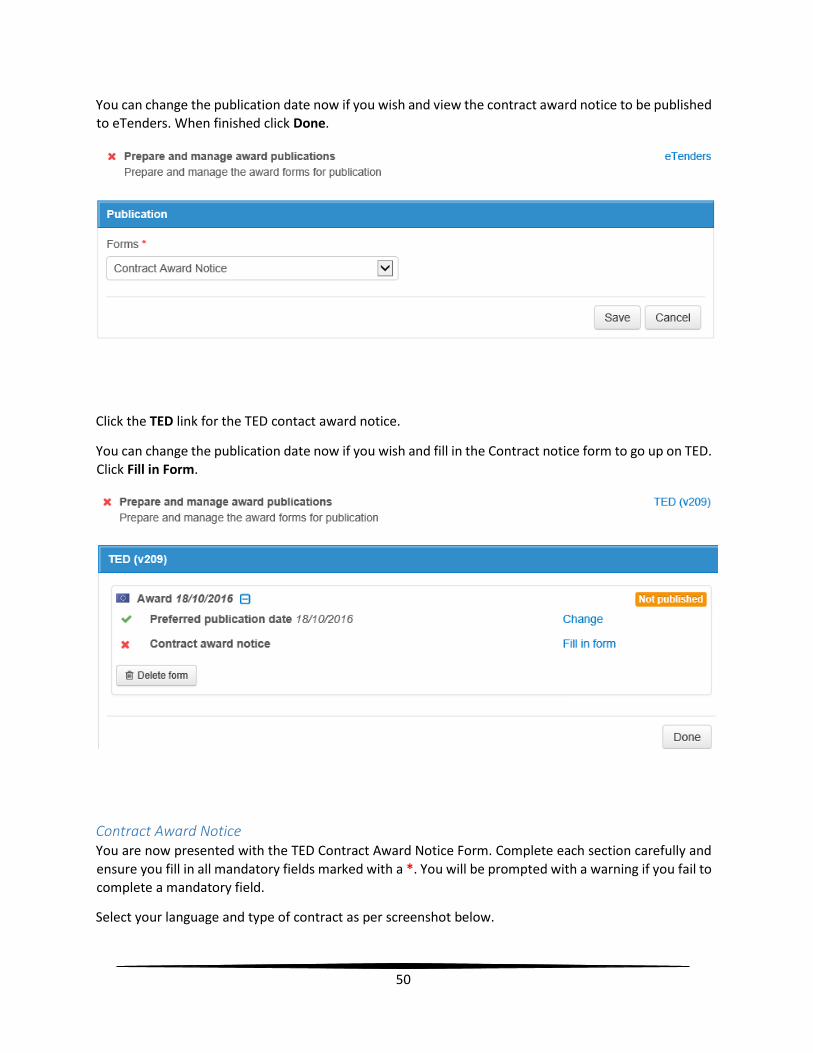
Prepare and manage award publications Here you can prepare the contract award notice for both eTenders (alone if below threshold value) and TED.
Click the This Site link for the eTenders contract award notice.
50
You can change the publication date now if you wish and view the contract award notice to be published to eTenders. When finished click Done.
Click the TED link for the TED contact award notice.
You can change the publication date now if you wish and fill in the Contract notice form to go up on TED.
Click Fill in Form.
Contract Award Notice You are now presented with the TED Contract Award Notice Form. Complete each section carefully and
ensure you fill in all mandatory fields marked with a *. You will be prompted with a warning if you fail to
complete a mandatory field.
Select your language and type of contract as per screenshot below.

51
When complete click Save and next.
Fill in your company contact details as per screenshot below. Some details may be pre-populated from your company profile, for example;
Name
Address
Telephone
Website
When complete click Save and next.

52

53
Fill in all fields for the Object of the Contract as per screenshots below.
As before, for the NUTS code, click the Add button, select ‘Ireland’ and click Save.
When complete click Save and next.

54
Fill in all fields as per screenshot below. When complete, click Save and next.
Fill in all fields as per screenshot below. When complete, click Save and next.

55
Fill in all fields for each Lot as per screenshot below. When complete, click Save and next.

56
Fill in all fields as per screenshot below. When complete, click Save and next.
Finally, review and finalise the Contract Award Notice. Read carefully through the form data and click
Accept. Click To checklist to go back to the RFT checklist in order to now publish the Contract Award Notice.
You can now see that the Contract Award Notice is ready to be published indicated by the green tick, click Done.

57
Publish Award Notice
Publish to the site selected in the Process template.
This site is http://etenders.gov.ie/
TED is http://ted.europa.eu/
Click on the blue Publish All button.
You will notice that the status has changed from ‘Not published’ to ‘Ready for publication’. This will
change to ‘Sent for review’ when the publish deadline is reached and then finally status will become
‘Published’.
Close RFT Closing the RFT sets the RFT in a non-editable mode and moves it to the completed list of RFTs.
Click Close.
You will be prompted to make sure you are ready to close as you cannot make any more changes after
this point.