quest authentication services...
TRANSCRIPT

Quest Authentication Services 4.0
Installation Guide

Copyright (c) 2010 Quest Software, Inc.ALL RIGHTS RESERVED.
This guide contains proprietary information protected by copyright. The software described in this guide is furnishedunder a software license or nondisclosure agreement. This software may be used or copied only in accordance with theterms of the applicable agreement. No part of this guide may be reproduced or transmitted in any form or by any means,electronic or mechanical, including photocopying and recording for any purpose other than the purchaser’s personal usewithout the written permission of Quest Software, Inc.
The information in this document is provided in connection with Quest products. No license, express or implied, by estoppelor otherwise, to any intellectual property right is granted by this document or in connection with the sale of Quest products.EXCEPT AS SET FORTH IN QUEST'S TERMS AND CONDITIONS AS SPECIFIED IN THE LICENSE AGREEMENT FOR THIS PRODUCT,QUEST ASSUMES NO LIABILITY WHATSOEVER AND DISCLAIMS ANY EXPRESS, IMPLIED OR STATUTORY WARRANTY RELATINGTO ITS PRODUCTS INCLUDING, BUT NOT LIMITED TO, THE IMPLIED WARRANTY OF MERCHANTABILITY, FITNESS FOR APARTICULAR PURPOSE, OR NON-INFRINGEMENT. IN NO EVENT SHALL QUEST BE LIABLE FOR ANY DIRECT, INDIRECT,CONSEQUENTIAL, PUNITIVE, SPECIAL OR INCIDENTAL DAMAGES (INCLUDING, WITHOUT LIMITATION, DAMAGES FOR LOSSOF PROFITS, BUSINESS INTERRUPTION OR LOSS OF INFORMATION) ARISING OUT OF THE USE OR INABILITY TO USE THISDOCUMENT, EVEN IF QUEST HAS BEEN ADVISED OF THE POSSIBILITY OF SUCH DAMAGES. Quest makes no representationsor warranties with respect to the accuracy or completeness of the contents of this document and reserves the right tomake changes to specifications and product descriptions at any time without notice. Quest does not make any commitmentto update the information contained in this document.
If you have any questions regarding your potential use of this material, contact:
Quest Software World HeadquartersLEGAL Dept5 Polaris WayAliso Viejo, CA 92656www.quest.comemail: [email protected]
Refer to our Web site for regional and international office information.
PatentsProtected by U.S. Patent # 7,617,501. Additional patents pending.
TrademarksQuest, Quest Software, the Quest Software logo, AccessManager, ActiveRoles, Aelita, Akonix, Benchmark Factory, BigBrother, BridgeAccess, BridgeAutoEscalate, BridgeSearch, BridgeTrak, BusinessInsight, ChangeAuditor, CI Discovery,Defender, DeployDirector, Desktop Authority, Directory Analyzer, Directory Troubleshooter, DS Analyzer, DS Expert,Foglight, GPOADmin, Help Desk Authority, Imceda, IntelliProfile, InTrust, Invirtus, iToken, JClass, JProbe, LeccoTech,LiteSpeed, LiveReorg, LogADmin, MessageStats, Monosphere, NBSpool, NetBase, NetControl, Npulse, NetPro, PassGo,PerformaSure, Point, Click, Done!, Quest vToolkit, Quest vWorkSpace, ReportADmin, RestoreADmin, ScriptLogic,SelfServiceADmin, SharePlex, Sitraka, SmartAlarm, Spotlight, SQL Navigator, SQL Watch, SQLab, Stat, StealthCollect, StorageHorizon, Tag and Follow, Toad, T.O.A.D., Toad World, vAutomator, vConverter, vEcoShell, VESI,vFoglight, vPackager, vRanger,vSpotlight, vStream, vToad, Vintela, Virtual DBA, VizionCore, Vizioncore vAutomation Suite, Vizioncore vEssentials, VizioncorevWorkflow, WebDefender, Webthority, Xaffire, and XRT are trademarks and registered trademarks of Quest Software, Incin the United States of America and other countries. Other trademarks and registered trademarks are property of theirrespective owners.

Third Party ContributionsThis product may contain one or more of the following third party components. For copies of the text of any license listed,please go to http://www.quest.com/legal/third-party-licenses.aspx .
NotesComponentApache LicenseApache Commons 1.2Version 2.0, January 2004Boost Software LicenseBoostVersion 1.0, August 2003© 1998, 1999, 2000 Thai Open Source Software Center LtdExpat 2.0.0© 2004 - 2007 Kungliga Tekniska HögskolanHeimdal Krb/GSSapi 1.2(Royal Institute of Technology, Stockholm, Sweden).All rights reserved.This product includes software developed by the OpenSSL Project for use in theOpenSSL Toolkit (http://www.openssl.org/)
OpenSSL 0.9.8d
© 1998-2008 The OpenSSL Project. All rights reserved.


Contents
Chapter 1: About This Guide......................................................................7Quest One Identity Solution............................................................................................................................................8Conventions..........................................................................................................................................................................8About Quest Software.......................................................................................................................................................9Contacting Quest Support...............................................................................................................................................9
Chapter 2: Introducing Quest Authentication Services.........................11System Requirements.....................................................................................................................................................12
Licensing QAS......................................................................................................................................................12Windows Permissions.......................................................................................................................................12Unix Permissions................................................................................................................................................14
Chapter 3: Installing and Configuring QAS.............................................19Install the Web Console..................................................................................................................................................20
Installing Quest Identity Manager for Unix...............................................................................................20Install QAS Windows Components............................................................................................................................20
Installing QAS Windows Components.......................................................................................................20Configure Active Directory for QAS...........................................................................................................................21
Configuring Active Directory for QAS.........................................................................................................21Configure Unix Agent Components..........................................................................................................................22
To Configure the Web Console for Active Directory.............................................................................23To Prepare Unix Hosts for Active Directory User Access......................................................................23To Enable Active Directory Users for Unix.................................................................................................24
Chapter 4: Installing and Joining from the Unix Command Line..........27The QAS Pre-Installation Diagnostic Tool................................................................................................................28
Running Preflight...............................................................................................................................................28QAS Windows Components.........................................................................................................................................29The QAS Install Script......................................................................................................................................................30
Installing the QAS Agent.................................................................................................................................30Installation Script Options...............................................................................................................................31
Licensing QAS....................................................................................................................................................................32Verifying QAS License Information..............................................................................................................32To Add Licenses..................................................................................................................................................32Installing Licenses Manually...........................................................................................................................33
Joining the Domain..........................................................................................................................................................33Joining the Domain Using VASTOOL..........................................................................................................33Joining the Domain Using VASJOIN Script...............................................................................................34
Quest Authentication Services | TOC | 5

Dynamic DNS Update Tool.............................................................................................................................35
Chapter 5: Getting Started with QAS.......................................................37Getting Acquainted with the QAS Control Center...............................................................................................38
Web Console........................................................................................................................................................38Group Policy.........................................................................................................................................................39Tools........................................................................................................................................................................40Preferences...........................................................................................................................................................40
Learning the Basics..........................................................................................................................................................45Run Reports..........................................................................................................................................................45Associate Active Directory Authentication to a Local User.................................................................46Change the Default Unix Attributes............................................................................................................47Add a New Active Directory User and User Group.................................................................................47Use QAS PowerShell..........................................................................................................................................48Track Changes to Active Directory...............................................................................................................51Enable Strong Authentication.......................................................................................................................52
Appendix A: Troubleshooting..................................................................53Resolving Preflight Failures...........................................................................................................................................54Unable to Install or Upgrade .......................................................................................................................................56Unable to Log In................................................................................................................................................................57Unable to Join the Domain...........................................................................................................................................57Resolving DNS Problems................................................................................................................................................57Time Synchronization Problems.................................................................................................................................58System Optimization.......................................................................................................................................................58Pointer Record (PTR) Updates are Rejected............................................................................................................58Long Startup Delays on Windows..............................................................................................................................58Getting Help from Quest Support..............................................................................................................................59
Appendix B: Enterprise Package Deployment........................................61Install the QAS Agent Package.....................................................................................................................................62Upgrade the QAS Agent Package...............................................................................................................................63
Restart QAS Services..........................................................................................................................................65Uninstall the QAS Agent Packages.............................................................................................................................66Solaris 10 Zones/Containers Support........................................................................................................................66
QAS and Solaris 10 Zones Installation Guidelines..................................................................................67
6 | Quest Authentication Services | TOC
Chapter
1About This Guide
The Quest Authentication Services Installation Guide is intended for Windows,Unix, Linux and Mac system administrators, network administrators,
Topics:
• Quest One Identity Solution consultants, analysts, and any other IT professionals who will be installing• Conventions and configuring QAS for the first time. This guide walks you through the
process of installing, upgrading, and uninstalling the QAS agent.• About Quest Software• Contacting Quest Support

Quest One Identity Solution
Quest Single Sign-on for SAP is a component of the Quest One Identity Solution, a set of enabling technologies,products, and integration that empowers organizations to simplify identity and access management by:
• Reducing the number of identities• Automating identity administration• Ensuring the security of identities• Leveraging existing investments, including Microsoft Active Directory
Quest One improves efficiency, enhances security and helps organizations achieve and maintain compliance byaddressing identity and access management challenges as they relate to:
• Single sign-on• Directory consolidation• Provisioning• Password management• Strong authentication• Privileged account management• Audit and compliance
Conventions
In order to help you get the most out of this guide, we have used specific formatting conventions. These conventionsapply to procedures, icons, keystrokes and cross-references.
ConventionElement
This word refers to actions such as choosing orhighlighting various interface elements, such as files andradio buttons.
Select
Used to indicate elements that appear in the graphicaluser interface that you are to select such as the OKbutton.
Bold text
Interface elements that appear in Quest products, suchas menus and commands.
Italic text
Used to indicate host names, file names, program names,command names, and file paths.
courier text
Indicates an interactive link to a related topic.Blue Text
Used to highlight additional information pertinent to theprocess or topic being described.
A plus sign between two keystrokes means that you mustpress them at the same time.
+
A pipe sign between elements means that you mustselect the elements in that particular sequence.
|
8 | Quest Authentication Services | About This Guide

About Quest Software
Note: Quest Authentication Services, formerly Vintela Authentication Services (or VAS), has beenre-branded for the 4.0 release.
Now more than ever, organizations need to work smart and improve efficiency. Quest Software creates and supportssmart systems management products—helping our customers solve everyday IT challenges easier and faster. ContactQuest for more information:
Contacting Quest Software
949.754.8000 (United States and Canada)Phone:
Quest Software, Inc.Mail:
World Headquarters
5 Polaris Way
Aliso Viejo, CA 92656 USA
www.quest.comWeb site:
Contacting Quest Support
Quest Support is available to customers who have a trial version of a Quest product or who have purchased a Questproduct and have a valid maintenance contract. Quest Support provides unlimited 24x7 access to SupportLink, ourself-service portal.
Contact PointsInformation Sources
SupportLink: support.quest.comQuest Support
Quest SupportLink gives you access to these tools and resources:
• Product Information
Most recent product solutions, downloads, documentation, notifications andproduct lifecycle table.
• Product Downloads
Download the latest Quest product releases and patches.
• Product Documentation
Download Quest product documentation, such as installation, administrator, userguides and release notes.
• Search KnowledgeBase
Search our extensive repository for answers to Quest-product related issues orquestions.
• Case Management
Create new support cases and manage existing cases.
Quest Authentication Services | About This Guide | 9

Contact PointsInformation Sources
Email: [email protected]
Phone: 1.800.306.9329
The Community site is a place to find answers and advice, join a discussion forum,or get the latest documentation and release information: Inside Vintela.
Public Forum
View the Global Support Guide for a detailed explanation of support programs, onlineservices, contact information, policies and procedures. The guide is available atsupport.quest.com.
Global Support Guide
10 | Quest Authentication Services | About This Guide

Chapter
2Introducing Quest Authentication Services
Quest Authentication Services (formerly Vintela Authentication Services) ispatented technology that enables organizations to extend the security and
Topics:
• System Requirements compliance of Active Directory to Unix, Linux, and Mac platforms andenterprise applications. It addresses the compliance need for cross-platformaccess control, the operational need for centralized authentication and singlesign-on, and enables the unification of identities and directories for simplifiedidentity and access management.

System Requirements
Prior to installing Quest Authentication Services, ensure your system meets the minimum hardware and softwarerequirements for your platform. QAS consists of Windows management tools and Unix integration agents.
Quest Authentication Services 4.0 supports: Windows 7, Vista, XP, Windows 2008 and Windows 2003.
For a list of supported QAS platforms, refer to the Quest Authentication Services Platform Support.
Licensing QAS
Quest Authentication Services must be licensed in order for Active Directory users to authenticate on Unix and Machosts.
Note: While you can install and configure QAS on Windows and use the included management tools toUnix-enable users and groups in Active Directory without installing a license, you must have the QASlicense installed for full QAS functionality.
Contact your account representative for a license.
Windows Permissions
To install QAS on Windows, you must have:
• Local administrator rights• Rights to create a container and a child container in Active Directory (first-time only)
Authenticated Users must have rights to read cn, displayName, description, and whenCreated attributes for containerobjects located under the root Active Directory configuration container. To change Active Directory configurationsettings, Administrators must have rights to Create Child Object (container) and Write Attribute for cn, displayName,description, showInAdvancedViewOnly for the Active Directory configuration root container and all child objects.
Table 1: Required Windows Permissions
AttributesObject ClassFor UserRights Required
ContainerQAS Administrators OnlyCreate Child Object
cn, displayName,description,showInAdvancedViewOnly
ContainerQAS Administrators OnlyWrite Attribute
cn, displayName,description, whenCreated
ContainerAuthenticated UsersRead Attribute
Windows Management Tools Requirements
The following are the minimum requirements for installing QAS in your Windows environment:
Table 2: QAS Windows Requirements
System Requirements:
Can be installed on 32-bit or 64-bit editions of thefollowing configurations:
Supported Windows Platforms
• Windows XP SP2 (or later)
12 | Quest Authentication Services | Introducing Quest Authentication Services

System Requirements:
• Windows Vista• Windows 7• Windows 2003 SP1 (or later)• Windows 2008• Windows 2008 R2
Note: When running QAS Control Centeron Windows 2008 R2, functioning as adomain controller, the process must beelevated. As a best practice, Quest doesnot recommend that you install or run theQAS Windows components on ActiveDirectory domain controllers. Therecommended configuration is to installthe QAS Windows components on anadministrative workstation.
You can download all of the following prerequisitesoftware free from the Microsoft website:
Prerequisite Windows Software
• Windows Installer 3.1(http://support.microsoft.com/kb/893803)
• Microsoft .NET Framework 3.5 SP1 or higher• Windows PowerShell 1.0 or higher
(http://support.microsoft.com/kb/968929
If any of the prerequisites are missing, the QASinstaller suspends the installation process to allowyou to download the required component; it thencontinues the install.
QAS Windows Components
QAS includes the following Windows components:
Table 3: Windows Components
DescriptionWindows Component
A single console to provide access to all of the tools andconfiguration settings for QAS
QAS Control Center
Provides Unix management extensions for ActiveDirectory users and groups
Active Directory Users and Computers MMC SnapinExtensions
Provides Group Policy management for Unix, Linux andMac
Group Policy Management Editor MMC Snapin Extensions
Provides the ability to manage NIS data in Active DirectoryRFC2307 NIS Map Editor MMC Snapin
Import NIS data into Active DirectoryNIS Map Import Wizard
Import Unix identity data into Active DirectoryUnix Account Import Wizard
Provides the ability to script Unix management tasksQAS PowerShell cmdlets
Quest Authentication Services | Introducing Quest Authentication Services | 13

DescriptionWindows Component
Full product documentation and online helpDocumentation
Unix Permissions
To install QAS on Unix, Linux, or Mac, you must have:
• root access rights
QAS Permissions Matrix
The following table details the permissions required for full QAS functionality.
Table 4: QAS Permissions
Local Client Req'd PermissionsAD Req'd PermissionsFunction
NALocation in Active Directory withCreate Container Object rights
Application Configuration: creation
NAUpdate permission to the containerscreated above (no particular
Application Configuration: changes
• Unix Global Settings permissions if you are the one whocreated it)• Licensing
• Custom Unix Attributes
NAEnterprise Administrator rightsDisplay Specifier Registration
NAAdministrator rightsEditing Users
NAGroup Policy Creator Owners rightsCreate any group policy objects
NALocation in Active Directory withCreate Container Object rights (youcreate containers for each NIS map)
RFC 2307 NIS Import Map Wizard
NAAdministrator rights (you are creatingnew accounts)
Unix Account Import Wizard
NAWrite permissions to the file systemfolder you want to create the logs in
Logging Options
vasd must run as rootThe client computer object isexpected to have read access to user
vasd daemon
and group attributes, which is thedefault.
In order for QAS to update the hostobject operating system attributesautomatically, set the following rightsfor "SELF" on the client computerobject: Write Operating System,Write operatingSystemHotfix, andWrite operatingSystemServicePack.
Any local userNA (updated by means of vasd)QAS/VAS PAM module
Any local userNA (updated by means of vasd)QAS/VAS NSS module
14 | Quest Authentication Services | Introducing Quest Authentication Services

Local Client Req'd PermissionsAD Req'd PermissionsFunction
vastool nss
Any local user for most commandsDepends on which vastoolcommand is run
vastool command-line tool
rootcomputer creation or deletionpermissions in the desired container
vastool join
vastool unjoin
rootNAvastool configure
vastool unconfigure
Any local userread permission for the desiredobjects (regular Active Directory user)
vastool search
vastool attrs
Any local userwrite permissions for the desiredobject
vastool setattrs
Run as root if you want all tablesincluding authcache
NAvastool cache
Any local user; root needed to createa new local computer
permissions to create new users,groups, and computers as specified
vastool create
Any local userpermissions to delete existing users,groups, or computers as specified;
vastool delete
permissions to remove the keytabentry for the host object created (rootor write permissions in the directoryand the file)
rootThe client computer object isexpected to have read access to use
vastool flush
and group attributes, which shouldbe the default
Any local userpermission to modify groupmembership
vastool group add
vastool group del
Any local userread permission for the desiredobjects (regular Active Directory user)
vastool group hasmember
Any local userNAvastool info { site |domain | domain -n |forest-root | forest-root-dn | server | acl }
Any local userread permission for the desiredobjects (regular Active Directory user)
vastool info { id |domains | domains -dn |adsecurity | toconf }
Any local userNAvastool isvas
vastool inspect
Quest Authentication Services | Introducing Quest Authentication Services | 15

Local Client Req'd PermissionsAD Req'd PermissionsFunction
vastool license
Any local userlocal client needs permissions tomodify the keytab specified, defaultis the computer object which is root.
vastool kinit
vastool klist
vastool kdestroy
root if you are using the defaulthost.keytab file
NAvastool ktutil
Any local userread permission for the desiredobjects (regular Active Directory user)
vastool list (with -l option)
Any local userpermissions to create users andgroups in the desired container
vastool load
rootNAvastool merge
vastool unmerge
Any local userRegular Active Directory uservastool passwd
Any local userActive Directory user with passwordreset permission
vastool passwd <AD user>
Any local userRegular Active Directory uservastool schema list
vastool schema detect
root (to modify the local cache file)Regular Active Directory uservastool schema cache
Any local userRegular Active Directory uservastool service list
NAActive Directory user with permissionto create/delete service principals indesired container
vastool service { create| delete }
rootNAvastool smartcard
rootNAvastool status
root, if you only query the time fromAD, you can run as any local user
NAvastool timesync
Any local userneeds modify permissions on the ADObject
vastool user { enable |disable }
Any local userNAvastool user { checkaccess| checkconflict }
Any local userAccess to Active Directory userspassword
vastool user checklogin
QAS Unix Components
QAS includes the following Unix components:
16 | Quest Authentication Services | Introducing Quest Authentication Services

Table 5: QAS Unix Components
DescriptionUnix Component
The QAS agent background process that manages thepersistent cache of Active Directory information used by
vasd
the other QAS components. vasd is installed as a systemservice. You can start and stop vasd using the standardservice start/stop mechanism for your platform. vasd ispart of the vasclnt package.
The QAS command line administration utility that allowsyou to join a Unix host to an Active Directory Domain;
vastool
access and modify information about users, groups andcomputers in Active Directory; and configure the QAScomponents. vastool is installed at/opt/quest/bin/vastool. vastool is part of thevasclnt package.
A command line utility that allows you to manage theapplication of Group Policy settings to QAS clients.
vgptool
vgptool is installed at /opt/quest/bin/vgptool.vgptool is part of the vasgp package.
A command line utility that allows you to modify fileownership on local Unix hosts to match user accounts in
oat (Ownership Alignment Tool)
Active Directory. oat is installed at/opt/quest/libexec/oat/oat. oat is part of thevasutil package.
A background process that secures the authenticationchannel for applications using LDAP bind to authenticate
LDAP proxy
users without introducing the overhead of configuringsecure LDAP (LDAPS). The LDAP proxy is installed by thevasproxy package.
A background process that acts as a NIS server which canprovide backwards compatibility with existing NIS
NIS proxy
infrastructure. The NIS proxy is installed by the vasyppackage.
The vasdev package, the QAS programming API.SDK package
Quest Authentication Services | Introducing Quest Authentication Services | 17


Chapter
3Installing and Configuring QAS
To extend the authentication, authorization, and administration infrastructureof Active Directory to the rest of your enterprise, allowing Unix, Linux, andMac systems to act as full citizens within Active Directory, follow these steps:
Topics:
• Install the Web Console• Install QAS Windows Components
1. Install the Quest Identity Manager for Unix web console.• Configure Active Directory for QAS
2. Install Quest Authentication Services Windows components.• Configure Unix Agent Components 3. Configure Active Directory for QAS.
4. Configure the web console for Active Directory.5. Prepare the Unix hosts for Active Directory user access by means of the
Quest Identity Manager for Unix following these steps:
• Add and profile a host, to prepare a host for Active Directory log in.• Check the host for readiness to join Active Directory.• Install QAS agent software on the host to allow Active Directory user
access.
Note: For users to authenticate on Unix, Linux, and Machosts with Active Directory credentials, your Unix hostsmust have the QAS agent installed.
• Join the host to Active Directory.

Install the Web Console
In preparing for your Quest Authentication Services installation, Quest recommends that you install Quest IdentityManager for Unix. This provides a web console that is a powerful and easy-to-use tool that dramatically simplifiesdeployment, enables management of local Unix users and groups, provides granular reports on key data andattributes, and streamlines the overall management of your Unix, Linux, and Mac OS X hosts.
Of course, you can install QAS without using Quest Identity Manager for Unix. You can find those instructions in theQAS Installation Guide, as described in Installing and Joining from the Unix Command Line on page 27.
Installing Quest Identity Manager for UnixThe easiest way to install and configure QAS Unix agent components is by means of the Quest Identity Manager forUnix web console.
To install Quest Identity Manager for Unix on a supported Windows platform
1. Log into any Windows machine on the domain.2. Insert the QAS distribution media.
The Autorun Home page displays.
Note: If the Autorun Home page does not display, navigate to the root of the distribution media anddouble-click autorun.exe.
3. From the Home page, click the Setup tab.4. From the Setup page, click Quest Identity Manager for Unix.
The install wizard guides you through the rest of the setup pages:
• Quest Identity Manager for Unix License Agreement• Installation Directory• Configure TCP/IP Port• Completing the Quest Identity Manager for Unix installation
5. On the Complete page, leave the Launch Quest Identity Manager for Unix option unselected when you clickFinish to exit the install wizard and return to the Autorun Setup tab.
Once you have installed Quest Identity Manager for Unix, you are ready to install or upgrade the QAS WindowsComponents.
Install QAS Windows Components
Quest recommends that you install the Windows components and configure Active Directory before you install theUnix components.
Installing QAS Windows ComponentsInstall Quest Authentication Services on each Windows Workstation you plan to use to administer Unix data in ActiveDirectory.
To install the QAS Windows components
1. From the Autorun Setup page, click Quest Authentication Services to launch the Setup wizard.2. Click Next at the Welcome page and follow the wizard prompts.
20 | Quest Authentication Services | Installing and Configuring QAS

The wizard leads you through the following pages:
• License Agreement• Choose Destination Location• Ready to Install the Program• InstallShield Wizard Complete
3. Leave the Launch Quest Authentication Services option selected on the InstallShield Wizard Complete page, andclick Finish to automatically start the QAS Control Center.
Note: If this is the first time running QAS Control Center, the QAS Active DirectoryConfiguration Wizard starts automatically to walk you through the process ofconfiguring Active Directory for QAS. This is a one-time task, if the configuration hasalready been performed when you click Finish, the QAS Control Center launches.
Configure Active Directory for QASTo use QAS 4.0 with Active Directory, you must first prepare Active Directory to store the configuration settings thatit uses. This is a one-time process.
If you have not configured Active Directory for QAS, the QAS Active Directory Configuration Wizard starts automaticallyto assist you in setting up the configuration the first time you start the QAS Control Center Control Center.
Note: To use the QAS Active Directory Configuration Wizard, you must have rights to create a containerin Active Directory.
Configuring Active Directory for QAS
The first time you install QAS in your environment, you must perform a one-time Active Directory configuration step.This section walks you through the configuration process. If you have already performed this configuration, skip thissection.
To configure Active Directory for QAS
1. At the QAS Active Directory Configuration Wizard Welcome page, click Next.2. At the Connect to Active Directory page:
a) Provide Active Directory login credentials for the wizard to use for this task:
• Select Use my current AD logon credentials if you are a user with permission to create a container inActive Directory.
• Select Use different AD logon credentials to specify the Active Directory credentials of another user andenter the User name and Password.
Note: The wizard does not save these credentials; it only uses them for this setup task.
b) Indicate how you want to connect to Active Directory:Select whether to connect to an Active Directory Domain Controller or ActiveRoles Server.
Note: If you have not installed the ActiveRoles Server MMC Console on your computer, theActiveRoles Server option is not available.
c) Optionally enter the Domain or domain controller and click Next.
Quest Authentication Services | Installing and Configuring QAS | 21

3. At the License QAS 4.0 page, browse to select your license file and click Next.
Note: You can add additional licenses later from the QAS Control Center Preferences Licensing page.
4. At the Configure Settings in Active Directory page, accept the default location in which to store the configurationor browse to select the Active Directory location where you want to create the container and click Setup.
Note: You must have rights to create a container in the selected location. For more information onthe structure and rights required see Windows Permissions on page 12.
5. Once you have configured Active Directory for QAS, click Close.
The QAS Control Center opens. You can now begin using QAS Control Center to manage your Unix hosts.
About Active Directory Configuration
The first time you install or upgrade to QAS 4.0 you must configure Active Directory for QAS. This is typically aone-time process. Most organizations will not need to update the Active Directory configuration unless they wantto change default values for new users. You can modify the settings using the QAS Control Center Preferences page.
QAS stores configuration information in Active Directory. The first time you run the QAS Control Center, the QASActive Directory Configuration wizard walks you through the setup and it stores the following information in ActiveDirectory:
• Application Licenses• Settings controlling default values and behavior for Unix-enabled users and groups• Schema configuration
QAS uses the information found in the Active Directory configuration to maintain consistency across the enterprise.Without the Active Directory configuration none of the QAS components function correctly. The Unix agents usethe Active Directory configuration to validate license information and determine schema mappings. Windowsmanagement tools read this information to determine the schema mappings and the default values it uses whenUnix-enabling new users and groups.
The Active Directory configuration is stored in a "root" container objectcn={786E0064-A470-46B9-83FB-C7539C9FA27C}. There can only be one Active Directory configuration.If multiple configurations are found, QAS uses the one created first as determined by reading the whenCreatedattribute. If another group in your organization has already created an Active Directory configuration, use the existingconfiguration. You may want to discuss which global configuration settings you want to use. You can use the providedPowerShell cmdlet Move-QasConfiguration to move the configuration data to another location in ActiveDirectory. At any time you can completely remove the QAS Active Directory configuration using theRemove-QasConfiguration cmdlet.
Without the Active Directory configuration
• QAS Unix agents will not join the domain• QAS updates will not complete• QAS management tools will not function
Configure Unix Agent Components
QAS 4.0 allows you to perform all of your Unix identity management tasks from the QAS Control Center.
Note: If the QAS Control Center is not currently open, you can either double-click the desktop icon oraccess it by means of the Start menu.
Follow the steps outlined on the QAS Control Center Home page to get your Unix agents ready.
22 | Quest Authentication Services | Installing and Configuring QAS

Of course, you may perform your Unix agent management tasks from the Unix command line, if you prefer. You canfind those instructions in the Quest Authentication Services Administrator's Guide, located in the QAS Control CenterTools page in the Documentation section, or in the docs directory of the Installation media.
To Configure the Web Console for Active Directory
1. Note: To launch the Control Center in your default browser, click the Tools link in the left-navigationpane, open the Quest Authentication Services section and click Launch in default browser underQuest Identity Manager for Unix.
From the QAS Control Center, click the Web Console link in the left-navigation pane.The first time you launch the web console the setup wizard asks how you plan to use Quest Identity Manager forUnix.
2. On the Setup Quest Identity Manager for Unix page, indicate that you have a license and click Next.3. On the Configure console for Quest Authentication Services page,
a) Enter the name of the domain you will manage with the web console.b) Enter the user name and password and click Verify Configuration.c) When you see the message that indicates your AD configuration is verified, click Next.
4. On the Set up console access page, select at least one Active Directory account to access the web console andclick Next.
5. On the Identify Console page, enter information about this console and click Next.The QAS Control Center uses this information to find and identify this console on the network.
6. On the Set console password page, enter a password for the web console supervisor account and click Next.
Note: The Supervisor is the only account that has rights to modify system settings in Quest IdentityManager for Unix.
7. On the Console setup summary page, click Finish.The Quest Identity Manager for Unix web console opens within the QAS Control Center.
To Prepare Unix Hosts for Active Directory User Access
Since you are using Quest Identity Manager for Unix with a licensed version of Quest Authentication Services, youare ready to prepare your host for Active Directory user access.
1. From the Quest Identity Manager for Unix Getting Started page, click the middle button entitled Get started withthe Add and Join Host wizard.
2. At the Welcome page, click Next.3. In the Add and Profile Host page:
a) Enter the name of the Unix host you want to add.b) Enter the login credentials and the SSH Port number for that Unix host.c) Indicate if you want to Run task as another user (su) and enter the appropriate information in the User name
and Password boxes. (optional).d) Click Add and profile host.
Note: If the Validate Host SSH Keys dialog displays, select the hosts and click OK to accept the newfingerprint for each host and cache them on the server.
Note: If you are performing an upgrade and attempted to add and join a host that was previouslyjoined to your Active Directory domain, the Add and Join a Host process displays a Summary pagethat indicates the wizard will skip the remaining steps.
Quest Authentication Services | Installing and Configuring QAS | 23

4. At the Check for AD Readiness page:a) Enter the name of the domain you want to use for the readiness check.b) Enter your credentials to log into Active Directory.c) Click Check AD Readiness.
Note: If the Check for Readiness to Join Active Directory completed with "advisories", indicated by
an , you can ignore them for now; click Next to continue. However, you must resolve anyfailures before going on.
5. At the Select Software to Install page, select services and components you want to install on your host and clickInstall.
6. At the Join the Host to Active Directory page:a) Enter the name of the domain to which you want to join the host.b) Enter the computer account name.
Leave this blank to generate a name based on the host DNS name.
c) Enter a name for the container where you want to create the computer account.Leave this blank to create the computer account in the "computers" container.
d) Enter your Active Directory login credentials and click Join Host to AD.
7. At the Summary page, click View the host properties to close the wizard and open the host Properties page; orclick Close to close the wizard and go to the All Hosts tab of Quest Identity Manager for Unix.
8. Click the Getting Started tab to prepare for the next step.
To Enable Active Directory Users for Unix
Now that your host is joined to Active Directory, you can enable Active Directory users for Unix to allow them accessto the host.
1. From the Getting Started tab, click the Go to the Active Directory view to enable AD users button.The Quest Identity Manager for Unix web console's Active Directory tab opens.
2.Click next to the Search by name box to search for Active Directory objects and locate an Active Directoryuser.
Note: For step-by-step instructions on using the search controls at the top of this page refer to theQuest Identity Manager for Unix Administrator's Guide. You can access it from the web console Help |PDF link.
3. Double-click an Active Directory user to open its Property page.4. Select the Unix Account tab and select the Unix-enabled option.
It populates the Properties page with default Unix attribute values.
5. Make any required changes and click OK to Unix-enable the user using these settings.
Note: There are additional settings that you can set using PowerShell which allows you to validateentries for the GECOS, Home Directory, and Login Shell attributes. Refer to Use QAS PowerShell onpage 48 to learn more about that.
Once enabled for Unix, you can log on to the host with that Active Directory user's log on name and password.
6. Enter the Host name and User name in the Login to remote host boxes in the left navigation panel of the QASControl Center and click Login.
7. At the command line enter the password
24 | Quest Authentication Services | Installing and Configuring QAS

8. At the Unix client command line, enter:
/opt/quset/bin/vastool -v
vastool returns the QAS Version, proving that you have installed QAS on your Unix host.
Note: Refer to Getting Started with QAS on page 37 to learn how to do some basicsystem administration tasks using the QAS Control Center and Quest Identity Managerfor Unix.
Quest Authentication Services | Installing and Configuring QAS | 25


Chapter
4Installing and Joining from the Unix Command Line
While you can use Quest Identity Manager for Unix to install and configureQAS as explained in Installing and Configuring QAS on page 19, you can also
Topics:
• The QAS Pre-Installation DiagnosticTool
manually install the QAS agent on each Unix, Linux, or Mac OS X host fromthe command line.
• QAS Windows Components The sections in this chapter walk you through the process of installing theQAS Unix agent directly from the command line. For information about• The QAS Install Script
• Licensing QAS installing, upgrading, and uninstalling the QAS agent on supported platformsin an enterprise environment using platform package management tools,refer to Enterprise Package Deployment on page 61.
• Joining the Domain
Before installing and configuring the QAS Unix agent, Quest recommendsthat you run the preflight tool to check a host's suitability to run QAS.After you determine that the Unix host is ready, run the QAS installation script,install.sh, to install the Unix/Linux agent.
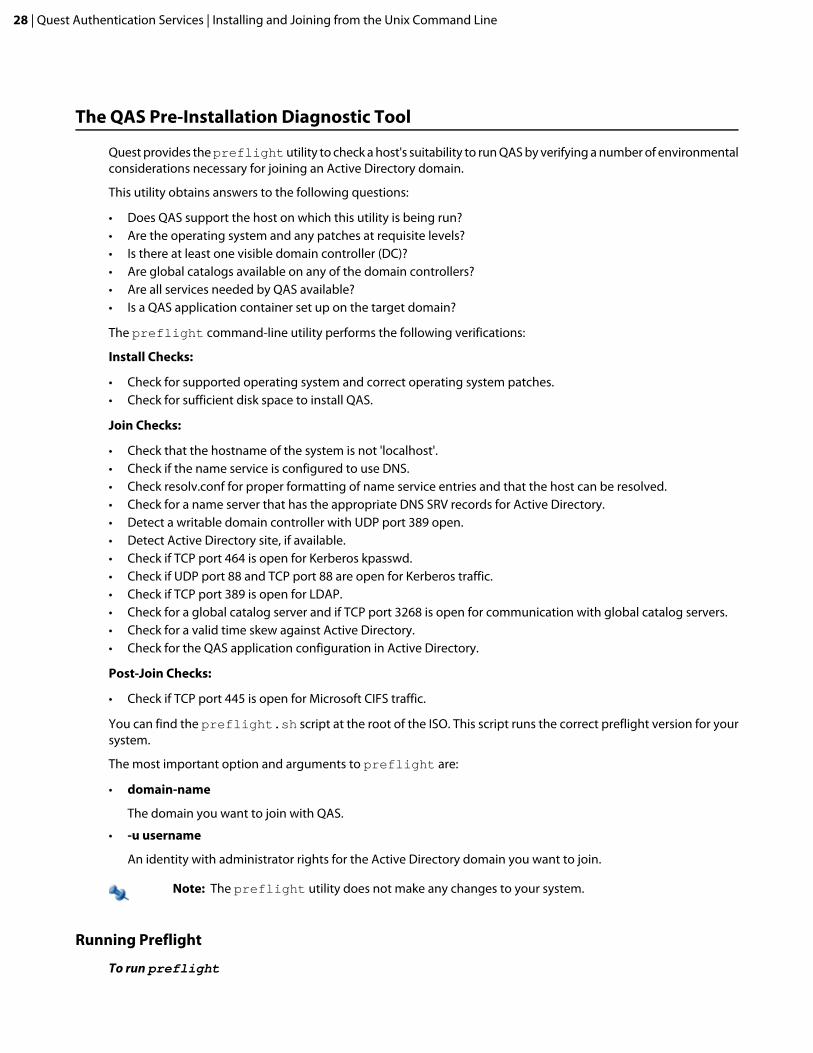
The QAS Pre-Installation Diagnostic Tool
Quest provides the preflight utility to check a host's suitability to run QAS by verifying a number of environmentalconsiderations necessary for joining an Active Directory domain.
This utility obtains answers to the following questions:
• Does QAS support the host on which this utility is being run?• Are the operating system and any patches at requisite levels?• Is there at least one visible domain controller (DC)?• Are global catalogs available on any of the domain controllers?• Are all services needed by QAS available?• Is a QAS application container set up on the target domain?
The preflight command-line utility performs the following verifications:
Install Checks:
• Check for supported operating system and correct operating system patches.• Check for sufficient disk space to install QAS.
Join Checks:
• Check that the hostname of the system is not 'localhost'.• Check if the name service is configured to use DNS.• Check resolv.conf for proper formatting of name service entries and that the host can be resolved.• Check for a name server that has the appropriate DNS SRV records for Active Directory.• Detect a writable domain controller with UDP port 389 open.• Detect Active Directory site, if available.• Check if TCP port 464 is open for Kerberos kpasswd.• Check if UDP port 88 and TCP port 88 are open for Kerberos traffic.• Check if TCP port 389 is open for LDAP.• Check for a global catalog server and if TCP port 3268 is open for communication with global catalog servers.• Check for a valid time skew against Active Directory.• Check for the QAS application configuration in Active Directory.
Post-Join Checks:
• Check if TCP port 445 is open for Microsoft CIFS traffic.
You can find the preflight.sh script at the root of the ISO. This script runs the correct preflight version for yoursystem.
The most important option and arguments to preflight are:
• domain-name
The domain you want to join with QAS.
• -u username
An identity with administrator rights for the Active Directory domain you want to join.
Note: The preflight utility does not make any changes to your system.
Running Preflight
To run preflight
28 | Quest Authentication Services | Installing and Joining from the Unix Command Line

1. Mount the QAS distribution media.2. Enter the following command at the root of the QAS ISO:
# ./preflight.sh -u Administrator example.com
where Administrator is your username and example.com is the name of your domain.
By default preflight outputs the results of the verifications for the three types of checks (Install Checks, JoinChecks and Post-Join Checks) to the console. Run the preflight utility with the --verbose option to obtaindetailed information about the various checks in those categories.
The last line of the output tells you whether you are ready to continue deploying QAS.
If you did not get a "Preflight Checks ... complete with status Success" message, correct any failures indicatedbefore continuing with the QAS installation. Be aware of any "Advisories" that it returns, as they may impact yourability to install or join.
Note: If you get a message that says, "Unable to locate QAS ApplicationConfiguration", you can ignore that error for now and proceed with the QASinstallation. The QAS Active Directory Configuration Wizard starts automatically tohelp you configure Active Directory for QAS the first time you start the QAS ControlCenter.
Note: (See Resolving Preflight Failures on page 54 for additional help in resolvingissues.
Note: For information about other preflight options, either run preflight--help or refer to the preflight man page located in the docs directory of theinstallation media.
QAS Windows Components
Quest recommends that you install the Windows components and configure Active Directory before you install theUnix components.
To install the QAS Windows components
1. From the root of the QAS installation media, double-click autorun.exe.
2. From the Autorun Setup page, click Quest Authentication Services to launch the Setup wizard.3. Click Next at the Welcome page and follow the wizard prompts.
The wizard leads you through the following pages:
• License Agreement• Choose Destination Location• Ready to Install the Program• InstallShield Wizard Complete
4. Leave the Launch Quest Authentication Services option selected on the InstallShield Wizard Complete page, andclick Finish to automatically start the QAS Control Center.The first time you start the QAS Control Center the QAS Active Directory Configuration Wizard starts automaticallyto prepare Active Directory to store the configuration settings for Quest Authentication Services.
5. At the QAS Active Directory Configuration Wizard Welcome page, click Next.
Quest Authentication Services | Installing and Joining from the Unix Command Line | 29

6. At the Connect to Active Directory page:a) Provide Active Directory login credentials for the wizard to use for this task:
• Select Use my current AD logon credentials if you are a user with permission to create a container inActive Directory.
• Select Use different AD logon credentials to specify the Active Directory credentials of another user andenter the User name and Password.
Note: The wizard does not save these credentials; it only uses them for this setup task.
b) Indicate how you want to connect to Active Directory:Select whether to connect to an Active Directory Domain Controller or ActiveRoles Server.
Note: If you have not installed the ActiveRoles Server MMC Console on your computer, theActiveRoles Server option is not available.
c) Optionally enter the Domain or domain controller and click Next.
7. At the License QAS 4.0 page, browse to select your license file and click Next.
Note: You can add additional licenses later from the QAS Control Center Preferences Licensing page.
8. At the Configure Settings in Active Directory page, accept the default location in which to store the configurationor browse to select the Active Directory location where you want to create the container and click Setup.
Note: You must have rights to create a container in the selected location. For more information onthe structure and rights required see Windows Permissions on page 12.
9. Once you have configured Active Directory for QAS, click Close.
The QAS Control Center opens. You can now begin using QAS Control Center to manage your Unix hosts or youcan use the QAS Install Script from the Unix client command line.
The QAS Install Script
The QAS installation script, install.sh, installs Quest Authentication Services, joins the domain, and allows youto install licenses. You can run the install script in interactive mode by using the -i option. This provides you witha menu of valid operations to perform, including Running preflight.
You can also automate the installation process by running install.sh in "unattended" mode using -q option.In this mode you may specify a set of commands for the script to perform.
Note: For more information on the QAS installation script, run
install.sh --help
Installing the QAS Agent
To install the QAS agent with install.sh
1. Log in and open a root shell.2. Mount the installation DVD for your selected platform and navigate to the mount point.3. Run install.sh by entering the following command:
# ./install.sh vasclnt
30 | Quest Authentication Services | Installing and Joining from the Unix Command Line

Note: After installing QAS some services such as cron, sshd and gdm may need to be restarted inorder to reload NSS configuration. If you are unsure of which services to restart, reboot the system.
Installation Script Options
If you run install.sh with no option, it installs (or upgrades) Quest Authentication Services and QuestAuthentication Services Group Policy, installs the license, and joins the domain.
The following is a list of the available options to the QAS install script:
Table 6: install.sh Options
FUNCTIONOPTION
Interactive mode; provides a menu showing choices based on existing QAS softwareinstallation and includes a help mode.
-i
Help; displays usage information including a brief summary of options.-h
Unattending mode; executes script in unattended (automatic) mode; requires other options.-q
Accept License; signals acceptance of Quest Software, Inc. EULA.-a
License; path to Quest license file to copy (unattended mode).-l
In unattended mode, the following arguments are useful for scripting the components you want to install or uninstall.
Table 7: install.sh Unattended Mode Arguments
FUNCTIONARGUMENT
Installs or upgrades QAS agentvasclnt
Installs or upgrades QAS Group Policy agentvasgp
Installs or upgrades QAS YP servervasyp
Installs or upgrades QAS Proxy daemonvasproxy
Installs or upgrades QAS utilities (OAT)vasutil
Installs or upgrades QAS SDKvasdev
Installs or upgrades QAS Smartcard agentvassc
Uninstalls the QAS agentnovasclnt
Uninstalls the QAS Group Policy agentnovasgp
Uninstalls the QAS YP servernovasyp
Uninstalls the QAS Proxy daemonnovasproxy
Uninstalls the QAS utilities (OAT)novasutil
Uninstalls the QAS SDKnovasdev
Uninstalls the QAS Smartcard agentnovassc
Quest Authentication Services | Installing and Joining from the Unix Command Line | 31

Licensing QASYou must have the QAS license installed for full Quest Authentication Services functionality on Unix.
There are four ways to manage licenses
1. Using the QAS Control Center
Quest recommends this as a best practice. See To Add Licenses on page 40
2. Using the Quest Authentication Services Group Policy utilities
See Licensing Policy
3. Running the install.sh script with the -l option.
This allows you to enter a path. The script then places the license in the proper location. See Installation ScriptOptions on page 31 for more information about running the install.sh script
4. Manually copying files
See Installing Licenses Manually on page 33
To obtain a license, complete the form located at: Request License Key or contact your account representative for anew license file.
Verifying QAS License Information
To verify that you have a valid QAS license
Run the following vastool command:
vastool license –q
You will see output similar to the following if you have a valid license installed:
Number of Unix Enabled users in use: 150---QAS---Number of Licensed Unix Enabled Users: 1000Valid licenses: 1
To Add Licenses
1. Click the Preferences navigation button on the left panel of the QAS Control Center.2. Expand the Licensing section.
The list box displays all licenses currently installed in Active Directory.
3. Click Add a license... from the Actions menu.4. Browse for the license file and click Open.
The license appears in the list box.
Note: Unix hosts check for new licenses when the host is joined to the domain or every 24 hours bydefault. This can be changed by modifying the configuration-refresh-interval settingin vas.conf.
To remove a license, select it and click Remove license.
To restore a removed license, click Undo Remove.
32 | Quest Authentication Services | Installing and Joining from the Unix Command Line

Installing Licenses ManuallyWith root privileges, you can manually install a valid license by copying the new license file to the licenses directoryon the Unix host.
To install a QAS license manually
1. Copy the license file to the /etc/opt/quest/vas/.licenses directory.
2. Ensure the permissions on the license file are set to 0644.3. Restart vasd as root by running the command corresponding to your platform:
• Linux/Solaris:
/etc/init.d/vasd restart
• HPUX:
/sbin/init.d/vasd restart
• AIX:
/etc/rc.d/init.d/vasd restart
• Mac OSX:
launchctl unload /Library/LaunchDaemons/com.quest.vasd.plistlaunchctl load /Library/LaunchDaemons/com.quest.vasd.plist
Joining the DomainFor full Quest Authentication Services functionality on Unix, you must join the Unix system on which you installedthe QAS agent to the Active Directory domain. You can join an Active Directory domain either by running vastooljoin from the command line or the interactive join script, vasjoin.sh.
Before you join the Unix host to the Active Directory domain, you may want to determine if you are already joined.
To determine if you are joined to an Active Directory domain
Run the following command.
# /opt/quest/bin/vastool info domain
If you are joined to a valid domain this command returns the domain name. If you are not joined to a domain,you will see the following error:
ERROR: No domain could be found.ERROR: VAS_ERR_CONFIG: at ctx.c:414 in _ctx_init_default_realmdefault_realm not configured in vas.conf. Computer may not be joined to domain
Joining the Domain Using VASTOOL
You can join your Unix host to Active Directory with the vastool join command directly from the commandline.
Before you join the QAS agent to the Active Directory domain, collect the following information:
• The DNS name of the Active Directory domain of which you want the QAS agent to be a member.• The user name and password of a user that has sufficient administrative privileges to create computer objects
in Active Directory.
Quest Authentication Services | Installing and Joining from the Unix Command Line | 33
To join Active Directory using vastool join
1. Run the following command as the root user at a shell prompt:
vastool -u <user> join <domain-name>
2. Enter the user’s password when prompted.The vastool join results are shown on the shell’s standard output.
Note: vastool join supports many options that allow you to customize theway the computer is joined to the domain. You can specify the name of the computerobject. You can join to a specific organizational unit or use a pre-created computerobject.
For a list of all vastool join options, refer to the vastool man page.
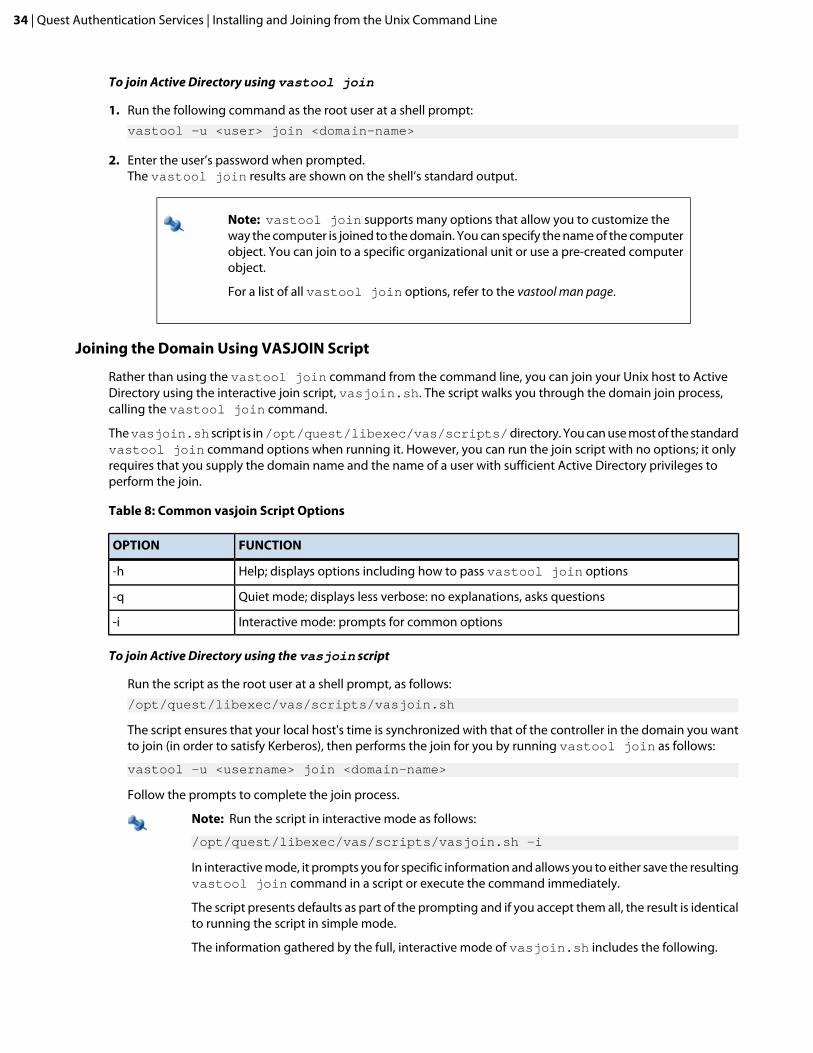
Joining the Domain Using VASJOIN Script
Rather than using the vastool join command from the command line, you can join your Unix host to ActiveDirectory using the interactive join script, vasjoin.sh. The script walks you through the domain join process,calling the vastool join command.
The vasjoin.sh script is in /opt/quest/libexec/vas/scripts/ directory. You can use most of the standardvastool join command options when running it. However, you can run the join script with no options; it onlyrequires that you supply the domain name and the name of a user with sufficient Active Directory privileges toperform the join.
Table 8: Common vasjoin Script Options
FUNCTIONOPTION
Help; displays options including how to pass vastool join options-h
Quiet mode; displays less verbose: no explanations, asks questions-q
Interactive mode: prompts for common options-i
To join Active Directory using the vasjoin script
Run the script as the root user at a shell prompt, as follows:
/opt/quest/libexec/vas/scripts/vasjoin.sh
The script ensures that your local host's time is synchronized with that of the controller in the domain you wantto join (in order to satisfy Kerberos), then performs the join for you by running vastool join as follows:
vastool -u <username> join <domain-name>
Follow the prompts to complete the join process.
Note: Run the script in interactive mode as follows:
/opt/quest/libexec/vas/scripts/vasjoin.sh -i
In interactive mode, it prompts you for specific information and allows you to either save the resultingvastool join command in a script or execute the command immediately.
The script presents defaults as part of the prompting and if you accept them all, the result is identicalto running the script in simple mode.
The information gathered by the full, interactive mode of vasjoin.sh includes the following.
34 | Quest Authentication Services | Installing and Joining from the Unix Command Line

• Specific domain controllers to use• domain to join• user, usually administrator, to use in joining• keytab file• confirm fixing of Kerberos clock skew, if any• overwrite your host's existing Active Directory ComputerName object• change the name of the AD ComputerName object• AD container in which to put the ComputerName object• site name• UPM mode (yes or no)• user search path on which to look later for AD users• alternate group search path• workstation mode (yes or no)• alternate domains in which to search if you want cross-domain logins• self-enrollment of existing /etc/passwd users (yes or no)• shows path to lastjoin (/etc/opt/quest/vas/lastjoin)
The lastjoin file contains something similar to:
/opt/quest/bin/vastool -u administrator join -f acme.com
Dynamic DNS Update Tool
When QAS joins a new computer to a domain, it becomes known to the LDAP and Kerberos protocols, but not toDNS. This is because the IP address of the host is not directly under the control of this part of Active Directory.
Although Active Directory comes with a integrated DHCP and DNS servers, some sites run their own DHCP servers.This means that the leased IP addresses must be communicated to Active Directory's DNS server through another(often manual) means.
The dnsupdate tool performs this communication. It can automatically and securely inform Active Directory's DNSserver of IP address changes of the host due to DHCP lease acquisition and renewal.
Because dnsupdate uses Kerberos to authenticate itself to the DNS server, only the computer joined with thatname can update its record.
When running the QAS installation script, install.sh, you can select the Dynamic DNS option. Dynamic DNSautomatically integrates into the host's native DHCP client infrastructure to securely update DNS servers when itsIP address changes.
Note: If Pointer Record (PTR) updates are being rejected, it may be because the DHCP server is doingthe update already. Refer to the documentation for the DHCP server being used in your environment.Microsoft's DHCP server does updates on behalf of the client and this is controlled by the Fully QualifiedDomain Name (FQDN) option. Please refer to Microsoft's Active Directory DNS/DHCP documentation.
Quest Authentication Services | Installing and Joining from the Unix Command Line | 35


Chapter
5Getting Started with QAS
Once you have successfully installed QAS you will want to learn how to dosome basic system administration tasks using the QAS Control Center andQuest Identity Manager for Unix.
Topics:
• Getting Acquainted with the QASControl Center
• Learning the Basics

Getting Acquainted with the QAS Control Center
Quest Authentication Services consists of plug ins, extensions, security modules and utilities spread across nearlyevery operating system imaginable. The QAS Control Center pulls those parts together and provides a single placefor you to find the information and resources you need.
Control Center installs on Windows and is a great starting place for new users to get comfortable with some ofAuthentication Services‘ capabilities.
Table 9: Quest Authentication Services Control Center
DescriptionControl CenterSection
"Introduction" section contains information about what‘s new in Authentication Services4.0.
Home
The "Get Started with QAS 4.0" sections provide the steps needed to authenticate an ActiveDirectory user to a Unix system using the Quest Authentication Services' web-basedadministration console—Quest Identity Manager for Unix.
"How Do I…" section provides additional information about tools and features to solvecommon tasks withQuest Authentication Services.
You can run the new web console (Quest Identity Manager for Unix) within the QAS ControlCenter or you can run it separately in a supported web browser. The console is a separate
Web Console
install that you can launch from the ISO. You can install it on Windows, Unix, Linux, or Macand typically you would install it one time per environment.
Provides the ability to search on Active Directory Group Policy Objects that have Unix andMac settings defined. Also provides links to edit these GPO‘s and run reports that show thedetailed settings of the Group Policy Objects
Group Policy
Contains links to tools and resources additionally available with Quest AuthenticationServices – a great starting place for anyone new to the product.
Tools
Centrally manage the preferences and settings of Quest Authentication Services. Thiscapability affects the behavior of all the ADUC snap-ins installed in an environment. The
Preferences
settings also impact the default behavior of the included PowerShell cmdlets and even theUnix command-line tools (/opt/quest/bin/vastool).
Note: The Preferences section now is a place to centrally manage the defaultvalues that are generated by the various Authentication Services managementtools, including the ADUC snap-in, the PowerShell cmdlets, and the Unixcommand-Line tools (for example /opt/quest/bin/vastool‘).
A simple SSH client (built on PuTTY) for remote access to Unix systems – simplifies newinstalls from having to find and install a separate PuTTY client.
Log into remote host
To run QAS Control Center you must be logged in as a domain user. To make changes to global settings you musthave rights in Active Directory to create, delete, and modify objects in the QAS configuration area of Active Directory.
Web Console
Quest Identity Manager for Unix allows you to centrally manage Quest Authentication Services agents running onUnix, Linux and Mac OS X systems. With the web console you can:
38 | Quest Authentication Services | Getting Started with QAS

• Remotely deploy the QAS agent software.• Manage local user and group accounts.• Configure account mappings from local users to Active Directory accounts.• Report on a variety of security and host access related information.
You can install the web console on any operating system. Once installed, you can access it from a browser usingdefault port of 9443 or from the QAS Control Center.
Group Policy
Microsoft Group Policy provides excellent policy-based configuration management tools for Windows. QAS GroupPolicy enables you to manage Unix resources in much the same way. QAS Group Policy allows you to consolidateconfiguration management tasks by using the Group Policy functionality of Microsoft Windows Server to manageUnix operating systems and Unix application settings.
To open QAS Group Policy, click the Group Policy navigation button on the left panel of the QAS Control Center.
Filter Options
To filter the list of GPOs
1. Double-click Filter Options or click the expansion arrow in the right corner of the window.2. Enter all or part of a name to filter the list of GPOs.3. Open the Domain drop down menu to choose a domain.4. Select the Unix Settings or Mac Settings List Only options to further filter the GPO list.
If you select both options, only the GPOs configured for both Unix and Mac display.
Edit GPO
To edit a group policy object
From the Group Policy window, select a GPO in the list and click Edit GPO... from the Actions menu.The Group Policy Object Editor opens for the selected GPO.
Note: For more information about the Group Policies, refer to the QAS Administrator's Guide, locatedin QAS Control Center Tools page in the Documentation section, or in the docs directory of theinstallation media.
Settings Report
A settings report displays all of the Quest Authentication Services group policy object settings that apply to Unix orMac systems.
To generate a Unix settings report
From the Group Policy window, select a GPO Name and click Settings Report... from the Actions menu.
An HTML report of the currently configured Unix and Mac settings displays.
Note: You can select multiple GPOs to run several reports simultaneously.
Show Files
To open the Windows Explorer
From the Group Policy window, select a GPO in the list and click Show Files... from the Actions menu.
Quest Authentication Services | Getting Started with QAS | 39

The Windows Explorer opens and displays the Group Policy Templates for the selected GPO.
Launch GPMC
To launch the Group Policy Management Console
From the Group Policy window, click Launch GPMC... from the Actions menu.
Tools
The Tools link on the QAS Control Center gives you access to
• Quest Authentication Services
Direct links to installed applications and tools related to Quest Authentication Services.
• Additional Quest Products
Direct links to other Quest product plug ins.
Note: The Additional Quest Products link is only available if you have installed other Quest productssuch as Quest Defender, Authentication Services for Smart Cards. or ActiveRoles Server.
• Other Tools
Direct links to tools related to Quest Authentication Services.
Note: The Other Tools link is only available if you have installed the Group Policy ManagementConsole.
• Documentation
Direct links to Quest Authentication Services documentation.
Preferences
Quest Authentication Services stores certain preferences and settings in Active Directory. This information is usedby QAS clients and management tools so that behavior remains consistent across all platforms and tools. ThePreferences window allows you to configure these settings and preferences.
Licensing
The Licensing section of the Preferences window in the QAS Control Center displays a list of installed license files. Youcan add and remove license files at any time. The license files are stored in Active Directory and QAS Unix hostsautomatically download and apply new license files from Active Directory.Licensing QAS
Quest Authentication Services must be licensed in order for Active Directory users to authenticate on Unix and Machosts.
Note: While you can install and configure QAS on Windows and use the included management tools toUnix-enable users and groups in Active Directory without installing a license, you must have the QASlicense installed for full QAS functionality.
Contact your account representative for a license.To Add Licenses
1. Click the Preferences navigation button on the left panel of the QAS Control Center.2. Expand the Licensing section.
40 | Quest Authentication Services | Getting Started with QAS

The list box displays all licenses currently installed in Active Directory.
3. Click Add a license... from the Actions menu.4. Browse for the license file and click Open.
The license appears in the list box.
Note: Unix hosts check for new licenses when the host is joined to the domain or every 24 hours bydefault. This can be changed by modifying the configuration-refresh-interval settingin vas.conf.
To remove a license, select it and click Remove license.
To restore a removed license, click Undo Remove.
Global Unix Options
The Global Unix Options section displays the currently configured options for Unix-enabling users and groups.
Click Modify Global Options... to change these settings.
Note: QAS uses the Global Unix Options when enabling users and groups for Unix log in.
Table 10: Unix User Defaults
DescriptionOption
Select to require a unique user login name attribute within the forest.Require unique user loginnames
Select to require a unique user's Unix ID (UID) number within the forest.Require unique UID on users
Enter a minimum value for the Unix User ID (UID) number. Typically you set this to avalue higher than the highest UID among local Unix users to avoid conflicts withusers in Active Directory and local user accounts.
Minimum UID Number
Enter a maximum value for the Unix User ID (UID) number. Typically you would notchange this value unless you have a legacy Unix platform that does not support thefull 32-bit integer range for UID number.
Maximum UID Number
Enter the default value for the Primary GID number when Unix-enabling a user.Primary GID Number
Select to set the primary GID number to the User ID number.Set primary GID to UID
Enter any text in this box.Default Comments (GECOS)
Enter the default value for the login shell used when Unix-enabling a user.Login Shell
Enter the default prefix used when generating the home directory attribute whenUnix-enabling a user. The default value is /home/; use a different value if your Unix
Home Directory
user home directories are stored in another location on the file system. QAS uses theuser's effective Unix name when generating the full home directory path.
Select to use a lower-case representation of the user's effective Unix name whengenerating the full home directory path as a user is Unix-enabled.
Use lowercase user name forhome directory
Table 11: Unix Group Defaults
DescriptionOption
Select to require a unique Unix group name attribute within the forest.Require unique GroupNames
Quest Authentication Services | Getting Started with QAS | 41

DescriptionOption
Select to require a unique Unix Group ID (GID) attribute within the forest.Require unique GID Number
Enter the minimum value for the Unix Group ID (GID). Typically this is set to a valuehigher than the highest GID among local Unix groups to avoid conflicts with groupsin Active Directory and local group accounts.
Minimum GID Number
Enter the maximum value for the Unix Group ID (GID). Typically you would not changethis value unless you have a legacy Unix platform that does not support the full 32-bitinteger range for GID.
Maximum GID Number
Table 12: Unique IDs
DescriptionSub-OptionOption
These options control the algorithmsused to generate unique user andgroup IDs:
Generate based on
An ID generated from a hash of theuser or group object GUID attribute.
Object GUID Hash
This is a fast way to generate an IDwhich is usually unique. If thegenerated value conflicts with anexisting value, the ID is re-generatedby searching the forest.
An ID generated from the SID of thedomain and the RID of the user or
Samba Algorithm
group object. This method works wellwhen there are few domains in theforest. If the generated value conflictswith an existing value, the ID isre-generated by searching the forest.
An ID generated by searching forexisting ID values in the forest. This
Legacy Search Algorithm
method generates an ID that is notcurrently in use.
Modifications you make to these Global Unix Options take effect after you restart the Microsoft Management Console(MMC).
Note: It is a best practice to either use the generated default IDs or set the ID manually. Mixing the twomethods can lead to ID conflicts.
Logging Options
The Logging Options section allows you to enable logging for all Quest Authentication Services Windows components.This setting only applies to the local computer. Logging can be helpful when trying to troubleshoot a particularproblem. Because logging causes components to run slower and use more disk space, you should set the Log Levelto disabled when you are finished troubleshooting.Enable Debug Logging on Windows
To enable debug logging for all Quest Authentication Services Windows components
1. Open QAS Control Center and click the Preferences navigation button on the left panel.2. Expand the Logging Options section.
42 | Quest Authentication Services | Getting Started with QAS

3. Open the Log level drop-down menu and set the log level to Debug.Debug generates the most log output. Higher levels generate less output. You can set the Log level to Disabledto disable logging.
4.Click to specify a folder location where you want to write the log files.Quest Authentication Services Windows components log information into the specified log folder the next timethey are loaded. Each component logs to a text file named after the DLL or EXE that generates the log message.
Custom Unix Attributes
In Quest Authentication Services 4.0 the Unix schema attributes are fully customizable. The Custom Unix Attributessection allows you to see which LDAP attributes are mapped to Unix attributes. You can modify this mapping toenable QAS to work with any schema configuration. To customize the mapping, you select a schema template orspecify your own custom attributes. A schema template is a pre-defined set of common mappings which adhere tocommon schema extensions for storing Unix data in Active Directory. QAS supports the following schema templatesif the required schema is installed:
Table 13: Unix Schema Attributes
DescriptionSchema Template
A template that encodes Unix attribute data in an existing multi-valued attribute.Schemaless
A template that uses attributes from the Windows 2003 R2 schema extension.Windows 2003 R2
A template that uses attributes from the SFU 2.0 schema extension.Services for Unix 2.0
A template that uses attributes from the SFU 3.0 schema extension.Services for Unix 3.0
Note: It is a best practice to use a schema designed for storing Unix data in Active Directory wheneverpossible. Schemas designed for storing Unix data in Active Directory include: Windows 2003 R2, SFU 2,and SFU 3. Only use "schemaless" or custom mappings if it is impossible to make schema extensions inyour environment.
Active Directory Schema Extensions
Quest Authentication Services stores Unix identity and login information in Active Directory. Quest designed QASto provide support for the following standard Active Directory schema extensions:
Table 14: Active Directory Schema Extensions
DescriptionSchema Extension
This schema extension is provided by Microsoft and adds support for the PosixAccountauxiliary class, used to store Unix attributes on user and group objects.
Windows 2003 R2 Schema
Microsoft provides this schema extension with the Services for Unix 2.0 set of tools.It adds custom attributes to user and group objects, used to store Unix accountinformation.
Services for Unix 2.0
Microsoft provides this schema extension with the Services for Unix 3.0 set of tools.It adds custom attributes to user and group objects, used to store Unix accountinformation.
Services for Unix 3.0
With QAS 4.0 it is possible to customize the schema setup to work with any schema configuration. No schemaextensions are necessary with the new "schemaless" storage feature. When you configure QAS for the first time, QASattempts to auto-detect the best schema configuration for your environment. The schema configuration is a global
Quest Authentication Services | Getting Started with QAS | 43

application setting that applies to all QAS management tools and Unix agents. You can change the detected settingsat any time using QAS Control Center.Configure a Custom Schema Mapping
If you do not have a schema that supports Unix data storage in Active Directory, you can configure QAS to useexisting, unused attributes of users and groups to store Unix information in Active Directory.
To configure a custom schema mapping
1. Open the QAS Control Center and click the Preferences navigation button on the left panel.2. Expand the Custom Unix Attributes.3. Click Customize....4. Type the LDAP display names of the attributes that you want to use for Unix data. All attributes must be string-type
attributes except User ID Number, User Primary Group ID and Group ID Number which may be integers. If anattribute does not exist or is of the wrong type, the border will turn red indicating that the LDAP attribute isinvalid.
Note: To customize the schema mapping, ensure that the attributes used for User ID Number andGroup ID Number are indexed and replicated to the global catalog.
5. Click OK to validate and save the specified mappings in Active Directory.
Active Directory Optimization
Indexing certain attributes used by the Quest Authentication Services Unix agent can have a dramatic effect on theperformance and scalability of your Unix and Active Directory integration project. The Custom Unix Attributespanel in the Preferences section of QAS Control Center displays a warning if the Active Directory configuration isnot optimized according to best practices.
Quest recommends that it is a best practice to index the following attributes in Active Directory. Note: LDAP displaynames vary depending on your Unix attribute mappings.
• User UID Number• User Unix Name• Group GID Number• Group Unix Name
It is also a best practice to add all Unix identity attributes to the global catalog. This reduces the number of ActiveDirectory lookups that need to be performed by QAS Unix agents. You can find the LDAP display name for each Unixattribute in the Custom Unix Attributes panel in the Preferences section of QAS Control Center. For example, youcan add the following attributes to the global catalog:
• logonHours• accountExpires• pwdLastSet• lockOutTime
Click the Optimize Schema link to run a script that updates these attributes as necessary.
Note: The Optimize Schema option is only available if you have not optimized the Active Directoryschema.
This operation requires administrative rights in Active Directory. If you do not have the necessary rights to optimizeyour schema, it generates a schema optimization script. You can send the script to an Active Directory administratorwho has rights to make the necessary changes.
All schema optimizations are reversible and no schema extensions are applied in the process.
44 | Quest Authentication Services | Getting Started with QAS

Learning the BasicsThe topics in this section help you learn how to do some basic system administration tasks using the new QAS ControlCenter and Quest Identity Manager for Unix.
Note: The exercises in this section assume that you have successfully installed Quest AuthenticationServices and Quest Identity Manager for Unix by following the steps in these topics:
1. Install the Web Console on page 202. Install QAS Windows Components on page 203. Configure Active Directory for QAS on page 214. Configure Unix Agent Components on page 22
Run ReportsQAS allows you to run various reports to capture key information about your Unix hosts and the Active Directory domainsjoined to these hosts.
To run reports
1. From the Quest Identity Manager for Unix web console, click the Reporting tab.2. Click the Reports tab.3. Expand the report group names to view the available reports, if necessary.
• Host Reports
Unix host information gathered during the profiling process.
• User Reports
Local and AD Unix user information
• Group Reports
Local and AD Unix group information
• Logon Policy Reports
Log on Policy information
4. Assuming that you successfully added a host and joined it to the domain during the installation process, open
the Host Reports group and click the icon to run the Unix Host Migration Planning report.5. Review the report parameters.
Note that all of the report parameters are selected by default. This information will be included in the report. Toexclude information from the report, unselect the parameter.
6. Click Generate report as to open a context menu from which you can select a format for the report: HTML, PDF(default), XML, XLS or RTF.
7. Select a format to launch a new browser or application page displaying the report in the selected format.8. When you have reviewed the report, you may close it or save it for later reference.
Quest Identity Manager for Unix report names and descriptions
DescriptionReport Name
Provides a snapshot of the readiness of each host to integrate with Active Directory.This report is best used for planning and monitoring the readiness of each host totrack progress of projects.
Unix Host MigrationPlanning
Quest Authentication Services | Getting Started with QAS | 45

DescriptionReport Name
Provides a summary of the information about each host gathered while profiling thehosts.
Unix Host Profiles
Displays all Unix computers in Active Directory in the requested scope.Unix Computers in AD
Reports on all users on all Unix systems, or the Unix systems where a specified useraccount exists in /etc/passwd.
Local Unix Users
Identifies local user accounts that would conflict with a specified user name and UIDon other hosts. This report is useful for planning user consolidation projects acrossUnix systems.
Local Unix User Conflicts
Identifies which local Unix accounts are required to use Active Directory credentialsfor log into the host.
Local Unix Users with ADLogin
Displays all Active Directory users that have Unix user attributes.Unix Enabled AD Users
Displays all users with Unix UID numbers that are assigned to other Unix enableduser accounts.
AD User Conflicts
Identifies the hosts where a specified group exists in /etc/group.Local Unix Groups
Displays all Active Directory groups that have Unix group attributes.Unix Enabled AD Groups
Displays all groups with Unix GID numbers that are assigned to other UnixAD Group Conflicts
Identifies the Unix systems where one or more AD users have been granted loginpermissions.
Login Policy for AD User
Identifies the AD users that have been granted login permissions for one or moreUnix systems.
Login Policy for Unix Host
Associate Active Directory Authentication to a Local UserThis feature, also known as user mapping, allows you to associate an Active Directory user account with a local Unix user.Allowing a local user to log into a Unix host using Active Directory credentials enables that user to take advantage of thebenefits of Active Directory security and access control.
To associate Active Directory authentication to a local user
1. Add a local group:a) In Quest Identity Manager for Unix, navigate to the Hosts | All Hosts tab,.b) Double-click a host, select the Groups tab and click Add Group.c) In the Add New Group dialog, enter localgroup in the Group Name box and click Add Group.d) In the Log on to Host dialog, enter your credentials and click OK.
2. Add a local user:a) Select the Users tab and click Add User.b) In the Add New User dialog, enter localuser in the User name box.c) Select the localgroup as the Primary group.d) Select /bin/bash for the Login shell.e) Enter the Password and click Add User.f) In the Log on to Host dialog, verify your credentials and click OK.
3. Associate Active Directory authentication to a local user:a) From the Users tab, double-click the local user named 'localuser' to open the properties dialog.b) On the AD Login tab, select the Require an AD password to log into Host option.c) Click Select to open the Select AD user dialog.
46 | Quest Authentication Services | Getting Started with QAS

d)Click to display the list of Active Directory users.
e) Select the Active Directory user account to use for logging into the selected host and click OK.f) From the 'localuser' properties dialog, click OK twice.g) In the Log on to Host dialog, verify your credentials and click OK.Now you can log into your local host using your Active Directory login credentials.
4. Open QAS Control Center, and locate Login to remote host in the left navigation panel.a) In the Host name box, enter the name of the Unix host that you prepared for Active Directory log in.b) In the User name box, enter the name of the local user (such as, localuser) to which you have associated
the Active Directory user and click Login.A PuTTY window displays.
5. Enter the Active Directory user password.6. After a successful login with the local user, verify that the user obtained a Kerberos ticket.
a) At the Unix host command line, enter
# /opt/quest/bin/vastool klist
The vastool klist command lists the Kerberos tickets stored in a user's credentials cache. This provesthe local user is using the Active Directory user credentials.
Change the Default Unix AttributesYou can modify the Unix attributes that are generated by default when users are Unix-enabled. To change the LoginShell you must have rights to create and delete child objects in the QAS application configuration in Active Directory.
To change the default Unix attributes
1. Click the Preferences navigation button on the left panel of the QAS Control Center.2. Expand Global Unix Options.
The window displays the current settings for Unix-enabling users, groups and the method used for creatingunique IDs.
3. Click Modify Global Unix Options… on the right side of the window.The Modify Global Options dialog opens.
4. Change the Login Shell to /bin/bash and click OK.The defaults are saved to Active Directory.
Note: Now, when you Unix-enable a user from Active Directory Users and Computers, PowerShell, orthe Unix command line, the login shell defaults to /bin/bash. You can customize the other Unixdefaults similarly.
Add a New Active Directory User and User GroupQuest Authentication Services provides additional tools to help you manage different aspects of migrating Unixhosts into an Active Directory environment. Links to these tools are available from Tools in the QAS Control Center.
To create a new user and user group in Active Directory
1. Click the Tools navigation button on the left panel of the QAS Control Center.2. Expand the Quest Authentication Services section.3. Click QAS Extensions for Active Directory Users and Computers.
The Active Directory Users and Computers Console opens.
Note: Windows Vista/Windows 7: You must have the Remote Server Administration Tools installedand enabled.
Quest Authentication Services | Getting Started with QAS | 47

Note: Windows 2003/Windows XP: You must have the Windows 2003 Server Administration Toolsinstalled.
4. Expand the domain folder and right-click Users.5. Select New | Group.
The New Object - Group dialog opens.6. Enter UNIXusers in the Group name box and click OK.
7. Right-click Users again and choose New | User.The New Object - User wizard starts automatically to guide you through the rest of the user setup process.
8. Enter information to define a new user named testQAS.
The PowerShell examples that follow refer to this user and user group object.
9. After you click Finish, navigate to Users folder in the Active Directory Users and Computers Console.10. Double-click testQAS to open the Properties dialog.11. Select the Unix Account tab.
Note: To Unix-enable a user, you can select the Unix-enabled option here or you can use the QASPowerShell modules.
12. Do not Unix-enable this user for now; close the Active Directory Users and Computers console and return to theQAS Control Center.
Use QAS PowerShell
Quest Authentication Services includes PowerShell modules which provide a "scriptable" interface to many QASmanagement tasks. You can access a customized PowerShell console from the QAS Control Center Tools navigationlink.
You can perform the following tasks using PowerShell cmdlets:
• Unix-enable Active Directory users and groups• Unix-disable Active Directory users and groups• Manage Unix attributes on Active Directory users and groups• Search for and report on Unix-enabled users and groups in Active Directory• Install product license files• Manage QAS global configuration settings• Find Group Policy objects with Unix/Mac settings configured
Using the QAS PowerShell modules, it is possible to script the import of Unix account information into Active Directory.
To Unix-Enable a User and User Group
1. From the QAS Control Center, navigate to Tools | Quest Authentication Services, if necessary.2. Click QASPowerShell Console.
Note: The first time you launch the PowerShell Console it asks you if you want to run software fromthis untrusted publisher. Enter A at the PowerShell prompt to import the digital certificate to yoursystem as a trusted entity. Once you have done this you will never be asked this question again.
3. At the PowerShell prompt, enter the following:
Enable-QasUnixGroup UNIXusers | Set-QasUnixGroup -GidNumber 1234567
Note: You created the UNIXusers group in a previous exercise. (See Add a New Active DirectoryUser and User Group on page 47.
48 | Quest Authentication Services | Getting Started with QAS

Unix attributes are generated automatically based on the Default Unix Attributes settings that were configuredearlier and look similar to the following:
ObjectClass : groupDistinguishedName : CN=UNIXusers,CN=Users,DC=example.,DC=comGroupName : UNIXusersUnixEnabled : TrueGidNumber : 1234567AdsPath : LDAP://windows.example.com/CN=UNIXusers,CN=Users, DC=example,DC=comCommonName : UNIXusers
4. At the PowerShell prompt, to Unix-enable an Active Directory user using the default Unix attribute values, enter:
Enable-QasUnixUser testQAS | Set-QasUnixUser -PrimaryGidNumber 1234567
The Unix properties of the user display:
ObjectClass : userDistinguishedName : CN=testQAS, CN=Users,DC=example.,DC=comUserName : testQASUnixEnabled : TrueUidNumber : 2062157421PrimaryGidNumber : 1234567Gecos :HomeDirectory : /home/testQASLoginShell : /bin/bashAdsPath : LDAP://windows.example.com/CN=testQAS,CN=Users, DC=example,DC=comCommonName : testQAS
Note: To disable the testQAS user for Unix login, enter
Disable-QasUnixUser testQAS
at the PowerShell prompt.
Note: To completely clear all Unix attribute information, enter
Clear-QasUnixUser testQAS
Now that the user is Unix-enabled, that user can log into systems running the QAS agent.
5. In the left panel of the Control Center, locate Login to remote host.a) In the Host name box, enter the name of the Unix host that you prepared for Active Directory log in.b) In the User name box, enter the name of the local user, testQAS, and click Login.
A PuTTY window displays.
Note: PuTTY attempts to log in using Kerberos, but will fail over to password authentication if Kerberosis not enabled or properly configured for the remote SSH service.
6. Enter the user's Active Directory password, when prompted.7. After a successful log in, verify that the user obtained a Kerberos ticket by entering:
/opt/quest/bin/vastool klist
The vastool klist command lists the Kerberos tickets stored in a user's credentials cache. This proves thelocal user is using the Active Directory user credentials.
Quest Authentication Services | Getting Started with QAS | 49

PowerShell Cmdlets
Quest Authentication Services 4.0 supports the flexible scripting capabilities of PowerShell to automate administrative,installation, and configuration tasks. A wide range of new PowerShell cmdlets are included in Quest AuthenticationServices 4.0:
Table 15: PowerShell Cmdlets
Descriptioncmdlet Name
Installs an Authentication Services license file in Active Directory. Licenses installedthis way are downloaded by all Unix clients.
Add-QasLicense
Clears the Unix identity information from group object in Active Directory. The groupis no longer Unix-enabled. The group no longer exists on Authentication ServicesUnix clients.
Clear-QasUnixGroup
Clears the Unix identity information from a user object in Active Directory. The useris no longer Unix-enabled. The user no longer exists on Authentication Services Unixclients.
Clear-QasUnixUser
"Unix-disables" a group. The group will no longer exist on QAS Unix clients. Similarto Clear-QasUnixGroup except the Unix group name is retained.
Disable-QasUnixGroup
Removes an Active Directory user‘s ability to log in on Unix hosts. (The user still exists.)Disable-QasUnixUser
Enables an Active Directory group for Unix by giving a Unix GID number. The GIDnumber is automatically generated.
Enable-QasUnixGroup
Enables an Active Directory user for Unix. The required account attributes UID number,primary GID, GECOS, login shell and home directory are generated automatically.
Enable-QasUnixUser
Returns the currently configured schema definition from the Quest AuthenticationServicesapplication configuration.
Get-QasSchema
Returns an object representing the Authentication Services application configurationdata stored in Active Directory.
Get-QasConfiguration
Returns a set of objects representing GPOs with Unix and/or Mac settings configured.Get-QasGpo
Returns objects representing the Authentication Services product licenses stored inActive Directory.
Get-QasLicense
Returns a set of configurable global options stored in Active Directory that affect thebehavior of Authentication Services.
Get-QasOption
Returns a set of schema templates that are supported by the current Active Directoryforest.
Get-QasSchemaDefinition
Returns an object that represents an Active Directory group as a Unix group. Thereturned object can be piped into other cmdlets such as Clear-QasUnixGroup orEnable-QasUnixGroup.
Get-QasUnixGroup
Returns an object that represents an Active Directory user as a Unix user. The returnedobject can be piped into other cmdlets such as Clear-QasUnixUser orEnable-QasUnixUser.
Get-QasUnixUser
Returns the version of Authentication Services currently installed on the local host.Get-QasVersion
Moves the Authentication Services application configuration information from onecontainer to another in Active Directory.
Move-QasConfiguration
50 | Quest Authentication Services | Getting Started with QAS

Descriptioncmdlet Name
Creates an object that represents a connection to Active Directory using specifiedcredentials. You can pass a connection object to most Authentication Services cmdletsto execute commands using different credentials.
New-QasAdConnection
Creates an object that represents a connection to a Quest ActiveRoles Server usingthe specified credentials. You can pass a connection object to most AuthenticationServices cmdlets to execute commands using different credentials.
New-QasArsConnection
Creates a default Authentication Services application configuration in Active Directoryand returns an object representing the newly created configuration.
New-QasConfiguration
Accepts an Authentication Services application configuration object as input andremoves it from Active Directory. This cmdlet produces no output.
Remove-QasConfiguration
Accepts an Authentication Services product license object as input and removes thelicense from Active Directory. This cmdlet produces no output.
Remove-QasLicense
Accepts an Authentication Services options set as input and saves it to ActiveDirectory.
Set-QasOption
Accepts an Authentication Services schema template as input and saves it to ActiveDirectory as the schema template that will be used by all Authentication ServicesUnix clients.
Set-QasSchema
Accepts a Unix group object as input and saves it to Active Directory. You can alsoset specific attributes using command line options.
Set-QasUnixGroup
Accepts a Unix user object as input and saves it to Active Directory. You can also setspecific attributes using command line options.
Set-QasUnixUser
Track Changes to Active Directory
Quest ChangeAuditor allows you to track changes and send alerts on:
• Changes to Active Directory objects and attributes• Changes to Unix and Mac settings in Group Policy Objects• Changes to Product settings and configuration
Install Quest ChangeAuditor
To install Quest ChangeAuditor
Note: ChangeAuditor installation requires a license file. A limited license for ChangeAuditor is includedwith Quest Authentication Services; however, to take advantage of all Quest ChangeAuditor functionality,you must purchase a full ChangeAuditor license.
1. Insert the QAS distribution media.The Autorun Home page displays.
Note: If the Autorun Home page does not display, navigate to the root of the distribution media anddouble-click autoroun.exe
2. Click the Setup tab and select Quest ChangeAuditor.The Quest ChangeAuditor for Active Directory web page opens.
3. Click the Download link from the left navigation panel.
4. Follow the online instructions to gain access to the Trail Download page.
Quest Authentication Services | Getting Started with QAS | 51

5. From the Trial Download: ChangeAuditor for Active Directory page, click the Installation Guide link.6. Read the ChangeAuditor Installation Guide to obtain detailed steps for installing Quest Defender.
Enable Strong AuthenticationQuest Defender, another Quest product, provides strong authentication functionality that makes it possible for anActive Directory user to use a hardware or software token to authenticate to Unix, Linux or Mac platforms.
Install Quest Defender
In order to use strong authentication you must download and install Quest Defender.
To install Quest Defender
Note: Quest Defender installation requires a license file. A fully-functional 25-user license for Defenderis included with Quest Authentication Services.
1. Insert the QAS distribution media.The Autorun Home page displays.
Note: If the Autorun Home page does not display, navigate to the root of the distribution media anddouble-click autoroun.exe
2. From the Home page, click the Setup tab.3. From the Setup page, click Quest Defender.
The Quest Defender web page opens.4. Click the Download link from left navigation panel.5. Follow the online instructions to gain access to the Trail Download page.6. From the Trial Download: Defender page, click the Defender Documentation Archive link.7. Read the Defender Installation Guide to obtain detailed steps for installing Quest Defender.8. Once you have installed Quest Defender, see the Quest Defender Integration Guide located in the QAS Control
Center Tools page, or in the docs directory of the QAS Installation media, for detailed configuration instructionsabout integrating Quest Defender with Quest Authentication Services.
52 | Quest Authentication Services | Getting Started with QAS

Appendix
ATroubleshooting
To help you troubleshoot, Quest recommends the following resolutions tosome of the common problems you might encounter as you deploy and useQuest Authentication Services.
Topics:
• Resolving Preflight Failures• Unable to Install or Upgrade• Unable to Log In• Unable to Join the Domain• Resolving DNS Problems• Time Synchronization Problems• System Optimization• Pointer Record (PTR) Updates are
Rejected• Long Startup Delays on Windows• Getting Help from Quest Support

Resolving Preflight Failures
If one of the preflight checks fail, preflight prints a suggested resolution. The following table provides additionalproblem resolution information. The checks are listed by the associated command-line flags.
Table 16: Install Checks
ResolutionCheckPreflight Option
Install the QAS agent on a supported operatingsystem that has the required operating system
Checks for supported operating system andcorrect operating system patches.
--os-patch
patches. For a list of supported QAS platforms,refer to the Quest website.
Free up more disk space. QAS requires diskspace in /opt, /etc, and /var to install.
Checks for sufficient disk space to install QAS.--disk-space
Table 17: Join Checks
ResolutionCheckPreflight Option
Quest recommends that you have a uniquehostname in order to maintain uniqueness of
Checks that the hostname of the system is not'localhost'
--hostname
computer names in Active Directory. Anotheroption is to ignore this check and use -ncomputer_name when joining. (See thevastool man page for more information.)
Ensure your host is configured to use DNSproperly. Consult your platform
Checks if the name service is configured to useDNS.
--name-service
documentation to determine the propermethod to enable DNS for hostnameresolution. See Resolving DNS Problems onpage 57 for solutions.
Check your /etc/resolv.conf file toensure that name server entries are present
Ensures that the host can resolve names usingDNS.
--host-resolve
and that the name servers are correct andreachable. Make sure that UDP port 53 (DNS)is open. This check attempts to resolve thedomain name and can fail if your DNSconfiguration is invalid. This check expects tofind properly formatted IPv4 addresses. Invalidor unreachable name server entries will causedelays even though the check will pass if atleast one valid name server is found. If younotice delays when running this check, makesure that your name server configuration doesnot reference invalid name servers. SeeResolving DNS Problems on page 57 forsolutions.
SRV records advertise various Active Directoryservices. Your configured name server must
Checks for a nameserver that has theappropriate DNS SRV records for ActiveDirectory
--srv-records
provide SRV records in order for QAS to take
54 | Quest Authentication Services | Troubleshooting

ResolutionCheckPreflight Option
advantage of automatic detection and failover. Ensure that UDP port 53 (DNS) is open.
If a domain controller is passed on the preflightcommand line, preflight checks that UDP
Detects a writable domain controller with UDPport 389 open.
--dc
port 389 is open and that the domaincontroller is writable. In this case, you may beable to specify a different domain controller.
If you do not pass in the name of a domaincontroller, this check attempts to locate awritable domain controller using DNS SRVrecords. Ensure that your DNS SRV records areup to date in the configured DNS server. QAScan work with read-only domain controllers,but the computer object must have alreadybeen created with the proper settings in ActiveDirectory.
This check warns you if QAS was unable tolocate an Active Directory site based on your
Detects Active Directory site, if available.--site
computer's network address. A siteconfiguration is not necessary but QASperforms better if site information isconfigured in Active Directory. To resolve thisproblem, configure a site in Active Directory.
Ensure that TCP port 464 (kpasswd) is open.This port must be open in order for QAS to setthe computer object's password.
Checks if TCP port 464 is open for Kerberoskpasswd.
--kerberos-password
These ports are the main Kerberoscommunication channels; they must be open
Checks if UDP port 88 and TCP port 88 areopen for Kerberos traffic.
--kerberos-traffic
for QAS to authenticate to Active Directory. Bydefault QAS uses UDP, with TCP fail over forlarger packets. If UDP is blocked or droppingfragmented packets, enable theuse-tcp-only setting in the [libvas]section of vas.conf, to force QAS to use TCPexclusively for Kerberos.
This port must be open for QAS tocommunicate with domain controllers using
Checks if TCP port 389 is open for LDAP.--ldap
LDAP. This communication is GSS SASLencrypted and signed.
QAS can function in a limited way without aglobal catalog server, however, QAS will be
Checks whether the Global Catalog isaccessible on TCP port 3268.
--global-catalog
unable to resolve Active Directory users andgroups from domains in the forest other thanthe one to which the host is joined. In addition,some searches may be slower. Make sure thatTCP port 3268 (global catalog) is open and thatyou have configured at least one domaincontroller as a global catalog and that theglobal catalog server is up and reachable.
Quest Authentication Services | Troubleshooting | 55

ResolutionCheckPreflight Option
If the time difference between the Unix hostand the domain controller is too large,
Checks the machine's time is not skewed toofar from Active Directory.
--timesync
Kerberos traffic will not succeed. You canusually resolve this failure by runningvastool timesync to synchronize timewith the Active Directory domain. Port 123UDP must be open in order to synchronizetime with the domain controller. This checkautomatically synchronizes the time if youspecify the -S option and run the applicationwith root permissions.
This checks fails if you have not configured theActive Directory forest for QAS. Use QAS
Checks for the QAS application configurationin Active Directory.
--app-configuration
Control Center (Windows) to create thenecessary application configuration. This checkcan also fail due to an invalidusername/password or if there is a timesynchronization problem between the Unixhost and the domain controller.
Note: If you get a message that says, "Unable to locate QAS Application Configuration", you can ignorethat error and proceed with the QAS installation. The QAS Active Directory Configuration Wizard startsautomatically to help you configure Active Directory for QAS the first time you start the QAS ControlCenter.
Table 18: Post-Join Checks
ResolutionCheckPreflight Option
In order to use Group Policy on Unix, this portmust be open to allow QAS to use the CIFS
Checks if TCP port 445 is open for MicrosoftDirectory Services CIFS traffic.
--ms-cifs
protocol to download Group Policy objectsfrom domain controllers.
Unable to Install or Upgrade
The most common installation or upgrade failure is that the Unix host cannot read the QAS application configurationin Active Directory. Ensure that you have followed the instructions in Configure Active Directory for QAS on page 21and that the configuration has been created successfully.
During an upgrade you may see an error that QAS cannot upgrade because the application configuration cannotbe located. If you previously joined to a specific domain controller QAS disabled DNS SRV record lookups. This meansthat QAS cannot resolve other domains in the forest and may be unable to locate the application configuration. Inthis case you must ensure that the domain controller you specified is a global catalog. Otherwise, you must createthe QAS application configuration in the domain that you join or you must properly configure DNS to return SRVrecords and join normally, rather than specifying a domain controller when you join.
56 | Quest Authentication Services | Troubleshooting

Unable to Log In
If you are unable to log in as an Active Directory user after installing, check the following:
1. Log in as root on the Unix host.2. Check the status of the QAS subsystems. To do this, run the following command:
vastool status
Correct any errors reported by the status command, then try logging in again.3. Ensure the user exists locally and is allowed to log in. To check this, run the following command:
vastool user checklogin <username>
The output displays whether the user is a known Active Directory user. If not, you may need to map the user toan Active Directory account or Unix-enable the Active Directory account. If the user is known, an access controlrule may prevent them from logging in. The output of the command displays which access control rules are ineffect for the user.
You may need to restart window managers such as gdm in order for the window manager to reload NSS modules.Until the window manager reloads the NSS configuration, you will be unable to log in with an Active Directory user.Other services such as cron may also be affected by NSS changes. If you are unsure which services need to bereloaded, reboot the system.
Unable to Join the Domain
If you are unable to join the domain, verify the following:
• Check that the Active Directory account specified during join has rights to join the computer to the domain.• Check that the Unix host is able to properly resolve the domain name through DNS.
If you are joining to a specific domain controller you must ensure that QAS can locate and read the configurationinformation in Active Directory. You should do one of the following:
• Make sure the domain controller you specify is a global catalog.• Create the QAS application configuration in the domain to which you are joining.• Properly configure DNS to return srv-records and avoid joining to a specific domain controller.
Resolving DNS Problems
It is imperative that DNS is correctly configured. QAS relies on DNS in order to locate domain controllers. Followthese steps to verify that domain controllers can be located using DNS:
1. Use dig to test whether your DNS configuration can locate a domain controller. Enter the following at the Unixcommand prompt, replacing <DNS Domain Name> with your Active Directory DNS domain name:
dig -t any _ldap._tcp.dc._msdcs.<DNS Domain Name>
If DNS is configured correctly, you will see a list of domain controllers for your domain. If not, work with your DNSadministrator to resolve the issue.
Quest Authentication Services | Troubleshooting | 57

2. Use dig to test whether you can locate a domain controller in your site. Enter the following at the Unix commandprompt, replacing <Site Name> with the name of your Active Directory site and <DNS Domain Name> with yourActive Directory DNS domain name.
dig -t _ldap._tcp.<Site Name>._sites.dc._msdcs.<DNS Domain Name>
If DNS is configured correctly, you will see a list of domain controllers for your site. If not, work with your DNSadministrator to resolve the issue.
It is possible to work around DNS problems using the vastool join command to specify the domain controllerhost name on the command line. QAS can work without DNS configured as long as the forward lookup in the/etc/hosts file exists. The forward lookup resolves the domain controller host name to an IP address.
You can test this on Linux by firewalling DNS (port 53) with iptables. Make sure that you have an entry for yourdomain controller in /etc/hosts then as root, enter the following commands replacing <administrator> with thename of an Active Directory administrator <DNS Domain Name> with your Active Directory DNS domain name and<DC Host Name> with the host name of your domain controller:
iptables -A INPUT -p udp --dport 53 -j DROP iptables -A OUTPUT -p udp --dport 53 -j DROP /opt/quest/bin/vastool -u <administrator> join <DNS Domain Name> <DC Host Name>
Time Synchronization Problems
Kerberos is a time-sensitive protocol. Your Unix hosts must be synchronized within five minutes of your ActiveDirectory domain controllers. Run the following command as root to have QAS synchronize the local time with ActiveDirectory:
vastool timesync
System Optimization
QAS kerberos works best with a random number generator package installed on the OS. If one is not installed, it willuse a potential slow fallback entropy generating system.
Pointer Record (PTR) Updates are Rejected
If Pointer Record (PTR) updates are being rejected, it may be because the DHCP server is doing the update already.Refer to the documentation for the DHCP server used in your environment. Microsoft's DHCP server does updateson behalf of the host and this is controlled by the FQDN option. Please refer to Microsoft's Active Directory DNS/DHCPdocumentation.
Long Startup Delays on Windows
You may experience long delays (over a minute) when starting the QAS Windows installer or certain Windowsmanagement tools such as QAS Control Center. All QAS Windows binaries are Authenticode-signed so that you canbe sure that the binaries are authentic and have not been tampered with. This problem occurs when the .NET runtimeattempts to verify the Authenticode signature by checking against certificate revocation lists (CRLs) atcrl.microsoft.com. If this site cannot be reached, the .NET framework check will time out (up to 60 seconds).
58 | Quest Authentication Services | Troubleshooting

This timeout occurs every time a signed assembly is loaded which can lead to very long load times. You can fix thisproblem by allowing access to crl.microsoft.com. See Microsoft KB article Microsoft KB article 936707 forbackground information.
If the computer is not connected to the internet, you can disable CRL checks for the entire system in Internet Explorer.Go to Options, select the Advanced tab, under Settings unselect the Check for publisher's certification revocationoption.
It is also possible to specify a generatePublisherEvidence element in an <app>.exe.config that willdisable CRL checks for the specific application that you are running. Keep in mind that if you are using QAS componentsin PowerShell or MMC, you would need to add this configuration for the powershell.exe.config and/ormmc.exe.config. Refer to <generatePublisherEvidence> Element for details.
Getting Help from Quest SupportIf you are still unable to determine the solution to the problem, contact Quest Support for help.
Note: See Contacting Quest Support on page 9 for contact information.
Before you contact support, please collect the following information:
1. Take a system information snapshot. To do this, run the following command as root:
/opt/quest/libexec/vas/scripts/vas_snapshot.sh
This produces an output file in /tmp.
2. Make note of the Unix attributes for the user that cannot log in (if applicable). To do this, capture the output fromthe following commands:
vastool -u host/ attrs <username>id <username>
Note: Depending on your platform, you may need to run id -a instead of id.
3. Copy the text from any error messages that you see.4. Save the results of running a "double su". To do this, log in as root and run su <username> note any error
messages. Then run su <username> again and note any error messages.
Once you have collected the information listed above, contact Quest Support at support.quest.com.
Quest Authentication Services | Troubleshooting | 59


Appendix
BEnterprise Package Deployment
This section details how to install, upgrade, and uninstall the QAS agent onsupported platforms in an enterprise environment using platform packagemanagement tools.
Topics:
• Install the QAS Agent Package• Upgrade the QAS Agent Package• Uninstall the QAS Agent Packages• Solaris 10 Zones/Containers Support
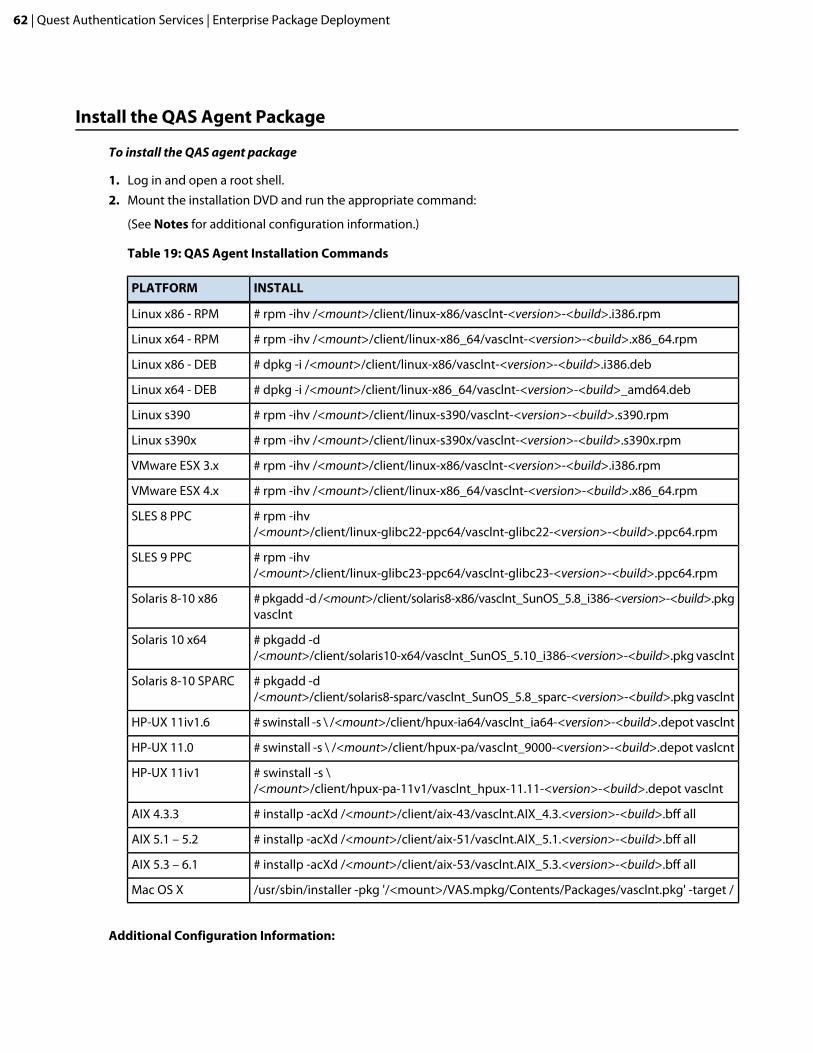
Install the QAS Agent Package
To install the QAS agent package
1. Log in and open a root shell.2. Mount the installation DVD and run the appropriate command:
(See Notes for additional configuration information.)
Table 19: QAS Agent Installation Commands
INSTALLPLATFORM
# rpm -ihv /<mount>/client/linux-x86/vasclnt-<version>-<build>.i386.rpmLinux x86 - RPM
# rpm -ihv /<mount>/client/linux-x86_64/vasclnt-<version>-<build>.x86_64.rpmLinux x64 - RPM
# dpkg -i /<mount>/client/linux-x86/vasclnt-<version>-<build>.i386.debLinux x86 - DEB
# dpkg -i /<mount>/client/linux-x86_64/vasclnt-<version>-<build>_amd64.debLinux x64 - DEB
# rpm -ihv /<mount>/client/linux-s390/vasclnt-<version>-<build>.s390.rpmLinux s390
# rpm -ihv /<mount>/client/linux-s390x/vasclnt-<version>-<build>.s390x.rpmLinux s390x
# rpm -ihv /<mount>/client/linux-x86/vasclnt-<version>-<build>.i386.rpmVMware ESX 3.x
# rpm -ihv /<mount>/client/linux-x86_64/vasclnt-<version>-<build>.x86_64.rpmVMware ESX 4.x
# rpm -ihv/<mount>/client/linux-glibc22-ppc64/vasclnt-glibc22-<version>-<build>.ppc64.rpm
SLES 8 PPC
# rpm -ihv/<mount>/client/linux-glibc23-ppc64/vasclnt-glibc23-<version>-<build>.ppc64.rpm
SLES 9 PPC
# pkgadd -d /<mount>/client/solaris8-x86/vasclnt_SunOS_5.8_i386-<version>-<build>.pkgvasclnt
Solaris 8-10 x86
# pkgadd -d/<mount>/client/solaris10-x64/vasclnt_SunOS_5.10_i386-<version>-<build>.pkg vasclnt
Solaris 10 x64
# pkgadd -d/<mount>/client/solaris8-sparc/vasclnt_SunOS_5.8_sparc-<version>-<build>.pkg vasclnt
Solaris 8-10 SPARC
# swinstall -s \ /<mount>/client/hpux-ia64/vasclnt_ia64-<version>-<build>.depot vasclntHP-UX 11iv1.6
# swinstall -s \ /<mount>/client/hpux-pa/vasclnt_9000-<version>-<build>.depot vaslcntHP-UX 11.0
# swinstall -s \/<mount>/client/hpux-pa-11v1/vasclnt_hpux-11.11-<version>-<build>.depot vasclnt
HP-UX 11iv1
# installp -acXd /<mount>/client/aix-43/vasclnt.AIX_4.3.<version>-<build>.bff allAIX 4.3.3
# installp -acXd /<mount>/client/aix-51/vasclnt.AIX_5.1.<version>-<build>.bff allAIX 5.1 – 5.2
# installp -acXd /<mount>/client/aix-53/vasclnt.AIX_5.3.<version>-<build>.bff allAIX 5.3 – 6.1
/usr/sbin/installer -pkg '/<mount>/VAS.mpkg/Contents/Packages/vasclnt.pkg' -target /Mac OS X
Additional Configuration Information:
62 | Quest Authentication Services | Enterprise Package Deployment

Note: To enable QAS authentication for all services you must restart all services thatrequire QAS authentication or restart the system.
Note: Linux - RPM:
The x86_64 QAS rpm contains 64-bit and 32-bit libraries, and has an RPM dependencyon both the 32-bit libpam library and the 64-bit libpam library. If the 64-bit Linuxoperating system on which you are installing QAS does not have any 32-bitsupporting libraries installed, use the -- nodeps RPM flag to force the installationand avoid error messages about missing dependencies.
Note: VMware:
You must enter the following additional command, to configure the VMwareauthentication services:vastool configure pam vmware-authd
Note: Solaris:
For information on Solaris 10 Zones support and installation guides, see Solaris 10Zones/Containers Support on page 66 Solaris 10 Zones Support.
In certain situations pkgadd requests additional information. Respond appropriatelyfor your system configuration. Initialization scripts that are part of the vasclntpackage run during installation to help configure the system.
Note: HP-UX:
QAS requires that the Unix host system clock be synchronized with the ActiveDirectory server’s system clock. By default, HP-UX uses xntpd for time services. Toproperly synchronize the system clocks either configure xntpd to sync with a DomainController, or disable xntpd to allow QAS to synchronize the system time. Consultthe xntpd documentation for information on disabling xntpd and configuringxntpd.
You must reboot the HP-UX machine to ensure that all of the new files are installed.HP-UX does not allow you to overwrite files that are in use—this is done as part ofthe boot sequence.
Note: Mac OS X:
To install from the command line, you must first mount the QAS DMG image file.
On Mac 10.4 enter:
hdiutil attach <media>/client/macos-104/VAS-<version>.dmg
On Mac 10.6 enter:
hdiutil attach <media>/client/macos-106/VAS-<version>.dmg
Upgrade the QAS Agent Package
To upgrade the QAS agent package
1. Log in and open a root shell.
Quest Authentication Services | Enterprise Package Deployment | 63

2. Mount the installation DVD and run the appropriate command:
(See Notes for additional configuration information.)
Table 20: QAS Agent Upgrade Commands
INSTALLPLATFORM
# rpm -Uhv /<mount>/client/linux-x86/vasclnt-<version>-<build>.i386.rpmLinux x86 - RPM
# rpm -Uhv /<mount>/client/linux-x86_64/vasclnt-<version>-<build>.x86_64.rpmLinux x64 - RPM
# dpkg -i /<mount>/client/linux-x86/vasclnt-<version>-<build>.i386.debLinux x86 - DEB
# dpkg -i /<mount>/client/linux-x86_64/vasclnt-<version>-<build>_amd64.debLinux x64 - DEB
# rpm -Uhv /<mount>/client/linux-s390/vasclnt-<version>-<build>.s390.rpmLinux s390
# rpm -Uhv /<mount>/client/linux-s390x/vasclnt-<version>-<build>.s390x.rpmLinux s390x
# rpm -Uhv /<mount>/client/linux-x86/vasclnt-<version>-<build>.i386.rpmVMware ESX 3.x
# rpm -Uhv /<mount>/client/linux-x86_64/vasclnt-<version>-<build>.x86_64.rpmVMware ESX 4.x
# rpm -Uhv/<mount>/client/linux-glibc22-ppc64/vasclnt-glibc22-<version>-<build>.ppc64.rpm
SLES 8 PPC
# rpm -Uhv/<mount>/client/linux-glibc23-ppc64/vasclnt-glibc23-<version>-<build>.ppc64.rpm
SLES 9 PPC
# pkgadd -d /<mount>/client/solaris8-x86/vasclnt_SunOS_5.8_i386-<version>-<build>.pkgvasclnt
Solaris 8-10 x86
# pkgadd -d/<mount>/client/solaris10-x64/vasclnt_SunOS_5.10_i386-<version>-<build>.pkg vasclnt
Solaris 10 x64
# pkgadd -d/<mount>/client/solaris8-sparc/vasclnt_SunOS_5.8_sparc-<version>-<build>.pkg vasclnt
Solaris 8-10 SPARC
# swinstall -s \ /<mount>/client/hpux-ia64/vasclnt_ia64-<version>-<build>.depot vasclntHP-UX 11iv1.6
# swinstall -s \ /<mount>/client/hpux-pa/vasclnt_9000-<version>-<build>.depot vaslcntHP-UX 11.0
# swinstall -s \/<mount>/client/hpux-pa-11v1/vasclnt_hpux-11.11-<version>-<build>.depot vasclnt
HP-UX 11iv1
# installp -acXd /<mount>/client/aix-43/vasclnt.AIX_4.3.<version>-<build>.bff allAIX 4.3.3
# installp -acXd /<mount>/client/aix-51/vasclnt.AIX_5.1.<version>-<build>.bff allAIX 5.1 – 5.2
# installp -acXd /<mount>/client/aix-53/vasclnt.AIX_5.3.<version>-<build>.bff allAIX 5.3 – 6.1
/usr/sbin/installer -pkg '/<mount>/VAS.mpkg/Contents/Packages/vasclnt.pkg' -target /Mac OS X
Additional Configuration Information:
Note: During the upgrade, vasd reloads and updates its user and group cache. Torestart the QAS caching service, see Restart QAS Services on page 65.
Note: If you are using the licensed version of the QASagent earlier than 3.0, seeLicensing QAS on page 32 for licensing instructions.
64 | Quest Authentication Services | Enterprise Package Deployment

Note: VMware:
VMware provides a Host Update Utility to upgrade an ESX 3.5 agent to 4.0, but ifQAS is left installed and configured during the procedure, the machine will beinaccessible after the upgrade. This is because the previous 3.5 installation is pushedaside and mounted under the /esx3-installation directory, but all the keyconfiguration files, like /etc/nsswitch.conf and the pam.d directory, arepreserved.
If QAS is still configured in those files it leaves the machine in a bad state. Becauseof this, Quest recommends that you uninstall QAS before attempting to upgrade toESX 4.0. In the vSphere Upgrade Guide, VMware warns that "no third-partymanagement agents or third-party software applications are migrated," but it doesnot explicitly say they should be uninstalled prior to upgrade.
Should you accidentally leave QAS installed or configured during the upgrade, usethe following steps to fix the machine:
1. Boot into single user mode2. Copy /etc/pam.d/vmware-authd.esx4 over
/etc/pam.d/vmware-authd (backup vmware-authd first if desired)3. Copy /etc/pam.d/system-auth-generic.esx4 over
/etc/pam.d/system-auth-generic
4. Remove "vas4" from the passwd, group, and any other configured lines innsswitch.conf
5. Reboot the machine--the machine should now be accessible6. Install the linux-x86_64 QAS packages
Note: Solaris:
The -a vasclient-defaults option specifies an alternative default file forpkgadd administrative options that allows pkgadd to overwrite an existing packagewith a new package.
pkgadd does not support the concept of upgrading a package, so this allows youto upgrade without having to rejoin your machine to the Active Directory domain,or uninstalling the old version first.
Note: HP-UX:
Reboot the HP-UX machine to ensure that all of the new files are installed. HP-UXdoes not allow you to overwrite files that are in use—this is done as part of the bootsequence.
Restart QAS Services
To force QAS to reload configuration settings, restart the QAS services.
To restart the QAS services
The method for restarting services varies by platform:a) To restart QAS on Linux or Solaris, enter:
/etc/init.d/vasd restart
b) To restart QAS on HP-UX, enter:
/sbin/init.d/vasd restart
Quest Authentication Services | Enterprise Package Deployment | 65

c) To restart QAS on AIX, enter:
stopsrc -s vasdstartsrc -s vasd
Uninstall the QAS Agent Packages
To uninstall the QAS agent packages
1. Log in and open a root shell.2. Run the following commands to remove the packages:
(See Notes for additional configuration information.)
Table 21: QAS Agent Uninstall Commands
COMMANDPACKAGE
# rpm -e vasclntRPM
# dpkg -r vaslcntDEB
# pkgrm vasclntSolaris
# swremove vasclntHP-UX
# installp -u vasclntAIX
/<mount>/Uninstall.app/Contents/MacOS/Uninstall' --console --force vasclntMac OS X
Additional Configuration Information:
Note: Linux:
The rpm –e vasclnt and the dpkg -r vaslcnt commands run scripts thathalt the daemon, unconfigure QAS, flush and delete the QAS cache before finallyremoving the files.
Note: HP-UX:
The swremove vasclnt command does not clean up the empty directories thatthe vasclnt package used. In order to clean these up, manually remove the/opt/quest directory after you uninstall.
Solaris 10 Zones/Containers SupportSun introduced Zones (or containers) in Solaris 10. Zones is a partitioning technology used to virtualize operatingsystem services and provide an isolated and secure environment for running applications. There are two types ofnon-global zone root filesystem models:
• sparse root• whole root
66 | Quest Authentication Services | Enterprise Package Deployment

The sparse root zone model optimizes the sharing of objects while the whole root zone model provides the maximumconfigurability. Additional information on Solaris 10 and Zones can be found at www.sun.com.
QAS and Solaris 10 Zones Installation GuidelinesTo install QAS in a Solaris 10 Zones configuration
• In Solaris 10 Zones, only the global zone is permitted to do time synchronization. Therefore, if you want to runQAS in "any" Solaris Zone configuration, you must timesync the Global Zone with Active Directory. Timesynchronization is a requirement of the Kerberos protocol and since QAS is built on Kerberos, QAS also has thisrequirement.
• The same version of QAS should be installed in any combination of global, whole root, and sparse root zoneconfigurations.
• To disable time synchronization for QAS on the sparse zone, run the below command:
vastool configure vas vasd timesync-interval 0
• The following symlinks must exist in the global zone in order for the sparse zones to work correctly:
• /usr/lib/security/pam_vas3.so | /opt/quest/lib/security/pam_vas3.so• /usr/lib/security/sparcv9/pam_vas3.so |
/opt/quest/lib/security/sparcv9/pam_vas3.so
If /usr is shared, you need the following symlinks in the global zone pointing to counterpart files in/opt/quest/lib:
• /usr/lib/nss_vas4.so.1 | /opt/quest/lib/nss/nss_vas4.so.1• /usr/lib/security/pam_vas3.so | /opt/quest/lib/security/pam_vas3.so
In such a scenario, you do not need QAS joined to a domain in the global zone in order for sparse zones to work,but the symlinks must exist.
Each zone must have its own unique copy of /etc and /var because QAS stores zone-specific information in thoselocations. Sharing /etc and /var with the global zone is not a supported configuration.
Quest Authentication Services | Enterprise Package Deployment | 67


Index
A
Active Directory 12, 13changing configuration settings 12, 13
Active Directory configuration 22determines schema mappings 22moving the configuration data 22purpose defined 22updating 22validates license information 22
Active Directory schema 43how Quest Authentication Services uses 43
ActiveRoles Server option 21, 22not available if ActiveRoles Server agent is not installed 21, 22
B
Best Practice: 12, 32, 33, 41, 43, 44add Unix identity attributes to global catalog 44do not install or run the QAS Windows components on ActiveDirectory domain controllers 12index attributes in Active Directory 44license management 32, 33use generated UIDs and GIDs 41use schema designed for storing Unix data in AD 43, 44
C
contacting 9Control Center 38, 39, 40, 41, 42, 43, 44
described 38, 39, 40, 41, 42, 43, 44must be logged in as domain user 38, 39, 40, 41, 42, 43, 44
conventions 8customize the schema mapping 44
D
debug logging 42enabling 42
Dynamic DNS Update Tool 35
E
enable debug logging 42
F
Filter Options 39
G
global settings modifications 38, 39, 40, 41, 42, 43, 44Global Unix Options 41
I
install software agents on host 23requires elevated privileges 23
install.sh 30, 31about 30, 31
Installation Script Options 31installing 27, 28, 29, 30, 31, 32, 33, 34, 35, 62
QAS Linux agent 62QAS Unix agent 27, 28, 29, 30, 31, 32, 33, 34, 35
J
join host to Active Directory 23requires elevated privileges 23
joining domain 33, 34, 35determining if joined 33, 34, 35
joining the AD domain 33, 34
L
LDAP attributes 43, 44mapped to Unix attributes 43, 44
license 12, 40installing 12, 40
License 40adding 40
licenses 32, 33installing 33
Logging 42enabling 42setting options 42
O
Optimize Schema 44requires AD administrator rights 44
P
performance and scalability 44Permissions 12, 13, 14, 16
required 12, 13Unix 14, 16
permissions required for full QAS functionality 14PosixAccount auxiliary class schema extension 43Preferences 40, 41, 42, 43, 44
configuring settings 40, 41, 42, 43, 44preflight Diagnostic Tool 28
About 28preflight utility 28
running 28PTR updates are rejected 58
Quest Authentication Services | Index | 69

Q
QAS installation script 30using 30
QAS Linux agent 62installing 62
QAS Unix agent 27, 28, 29, 30, 31, 32, 33, 34, 35about installing 27, 28, 29, 30, 31, 32, 33, 34, 35
Quest One Identity Solution 8Quest Support 9
R
reload configuration settings 65Reports 45required AD rights 38, 39, 40, 41, 42, 43, 44Requirements 12
Windows Management Tools 12Requirements: 12, 13, 14, 16
QAS Permissions 14Unix Permissions 14, 16Windows Permissions 12, 13
restart services 65
S
schema 43, 44configuration 43, 44Custom Unix attributes 43, 44extensions 43, 44LDAP attributes 43, 44templates 43, 44Unix attributes 43, 44
schema configuration 43defined 43
schema extension 43PosixAccount auxiliary class 43
schema mappings 44customizing 44
index and replicate GUI and UID attributes to globalcatalog 44
set global value 41standard Active Directory schema extensions 43System Optimization 58
T
TERM 24troubleshooting 53, 54, 56, 57, 58, 59Troubleshooting 42, 58
rejected PTR updates 58using logs 42
Troubleshooting: 28, 33, 34, 35, 58determine if joined to AD 33, 34, 35Diagnostic Tool 28PTR updates are rejected 35vastool kinit delay 58
U
Unix agent 61, 62, 63, 65, 66, 67manual install steps 61, 62, 63, 65, 66, 67
Unix Group ID (GID) 41Unix identity management tasks 22, 23, 24
performing from QAS Control Center 22, 23, 24Unix User ID (UID) 41
V
vasd 65restart 65
vasjoin Script 34using 34
vasjoin.sh 33, 34, 35using 33, 34, 35
vastool join 33using 33
W
where to set 41
70 | Quest Authentication Services | Index