quattro fx nv - resmed · the quattro fx nv is intended to be used with active-exhaust-valve...
TRANSCRIPT
Quattro™ FX NVNON-VENTED FULL FACE MASK
User GuideEnglish

i
Fitting / 佩戴步骤佩戴步骤 / 配戴步驟
NV
1
3
5
NV
NV
2
4
6
Quattro™ FX NVNON-VENTED FULL FACE MASK / 无通气孔全脸面罩 / 封閉式全罩式面罩
ii
Headgear position / 头带位置头带位置 / 頭帶位置
Cushion check / 护垫检查护垫检查 / 軟墊檢查
NV NV
NV
NV
NV
NV
1 2 3
4
Disassembly / 拆卸拆卸 / 拆卸
iii
NV
NV
NV
NV NV
1 2 3
4 5 6
Reassembly / 重新组装重新组装 / 重新組合

iv
Quattro FX NVNON-VENTED
NV
A
1
23
7
6
8
9
4
5
v
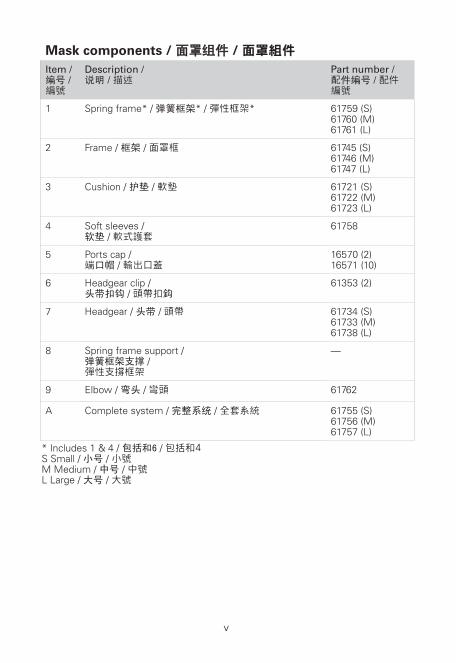
Mask components / 面罩组件面罩组件 / 面罩組件
Item / 编号 / 編號
Description / 说明 / 描述
Part number / 配件编号 / 配件編號
1 Spring frame* / 弹簧框架* / 彈性框架* 61759 (S)61760 (M)61761 (L)
2 Frame / 框架 / 面罩框 61745 (S)61746 (M)61747 (L)
3 Cushion / 护垫 / 軟墊 61721 (S)61722 (M)61723 (L)
4 Soft sleeves / 软垫 / 軟式護套
61758
5 Ports cap / 端口帽 / 輸出口蓋
16570 (2)16571 (10)
6 Headgear clip / 头带扣钩 / 頭帶扣鈎
61353 (2)
7 Headgear / 头带 / 頭帶 61734 (S)61733 (M)61738 (L)
8 Spring frame support / 弹簧框架支撑 / 彈性支撐框架
—
9 Elbow / 弯头 / 彎頭 61762
A Complete system / 完整系统 / 全套系統 61755 (S)61756 (M)61757 (L)
* Includes 1 & 4 / 包括和6 / 包括和4S Small / 小号 / 小號M Medium / 中号 / 中號L Large / 大号 / 大號

1
Engl
ish
Quattro™ FX NVNON-VENTED FULL FACE MASK
Thank you for choosing the Quattro FX Non-Vented (NV) mask. The Quattro FX NV channels airfl ow noninvasively to a patient with or without supplemental oxygen.
Intended useThe Quattro FX NV is intended to be used with active-exhaust-valve ventilator systems, to provide ventilatory assistance to patients with respiratory insuffi ciency and respiratory failure.The Quattro FX NV is: • to be used by adult patients (> 30 kg) requiring non-life-support ventilatory
assistance. • intended for single-patient re-use in the home or multipatient re-use in the
hospital/institutional environment.
WARNING • This mask must not be used without qualifi ed supervision for patients
who are unable to remove the mask themselves. • This mask is not for use on patients with impaired laryngeal refl exes
or other conditions predisposing to aspiration in the event of regurgitation or vomiting.
• The mask should not be worn unless the ventilator system is turned on and operating properly.
• At a fi xed rate of supplemental oxygen fl ow (if used), the inhaled oxygen concentration will vary depending on the pressure settings, patient breathing pattern, mask size selection and leak rate.
• If oxygen is used with the ventilator, the oxygen fl ow must be turned off when the ventilator is not operating, so that unused oxygen does not accumulate within the device enclosure and create a risk of fi re.
• Discontinue using this mask if you have ANY adverse reaction to the use of the mask, and consult your physician or sleep therapist.
• Using a mask may cause tooth, gum or jaw soreness or aggravate an existing dental condition. If symptoms occur, consult your physician or dentist.
• Remove all packaging before using the mask. • Ensure the soft sleeves are fi tted at all times during use.

2
Using your maskResMed has tinted the Quattro FX NV elbow blue to identify it as a non-vented mask.The Quattro FX NV has a standard female 22mm tapered fi tting for external connection to the ventilator.Refer to the Technical specifi cations section in this user guide for information about mask leak, dead space and resistance.
FittingPrior to fi tting your mask, remove the spring frame support from the rear of your mask and retain for future use.
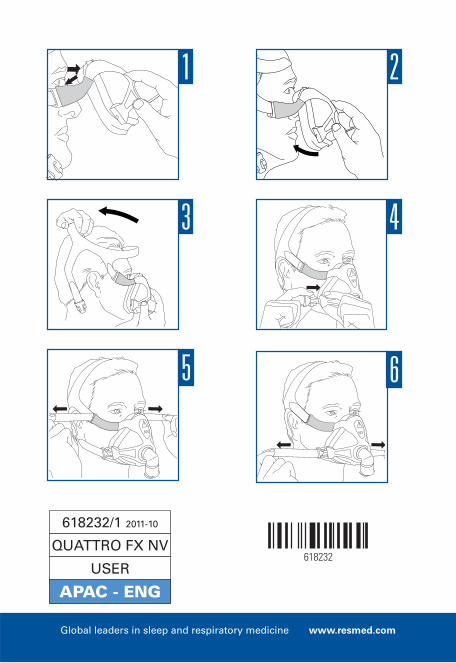
The Fitting illustrations section in this guide show the sequence for obtaining the best fi t and comfort in using your mask.
Fitting Steps
1. With both lower headgear clips released, position your mask at an angle against your face, ensuring that the top of the cushion contacts your nasal bridge fi rst.
2. Keeping the upper position of the mask in place, swing the lower half of the mask down against your face so that it rests halfway between your bottom lip and chin.
3. Hold the mask fi rmly against your face and pull the headgear over your head.
4. Bringing the lower straps below your ears, clip the headgear into the lower part of the spring frame.
5. Unfasten the Velcro®, pull the upper headgear straps evenly until they are comfortable and fi rm, and reattach the Velcro.
5. Repeat step 5 with the lower headgear straps.
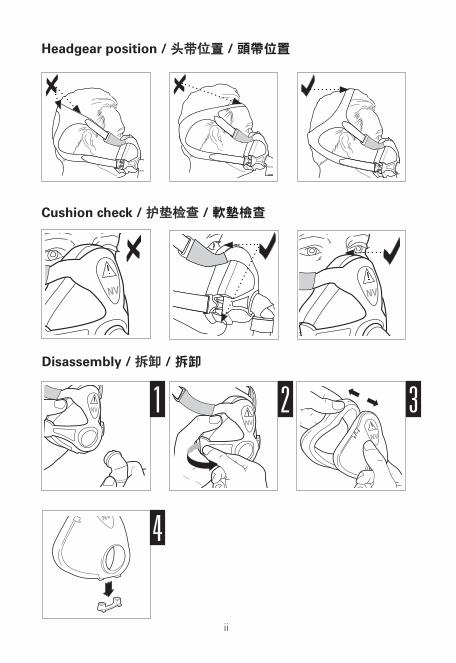
Headgear and Cushion Check • Ensure your headgear is positioned correctly. Refer to the Headgear
check illustrations in this user guide
• The Quattro FX cushion is designed to sit mid-bridge. Refer to the Cushion check illustrations for correct positioning.
3
Engl
ish
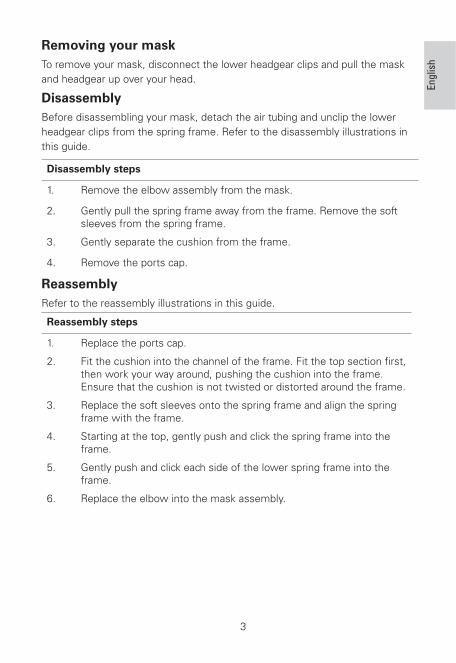
Removing your maskTo remove your mask, disconnect the lower headgear clips and pull the mask and headgear up over your head.
DisassemblyBefore disassembling your mask, detach the air tubing and unclip the lower headgear clips from the spring frame. Refer to the disassembly illustrations in this guide.
Disassembly steps
1. Remove the elbow assembly from the mask.
2. Gently pull the spring frame away from the frame. Remove the soft sleeves from the spring frame.
3. Gently separate the cushion from the frame.
4. Remove the ports cap.
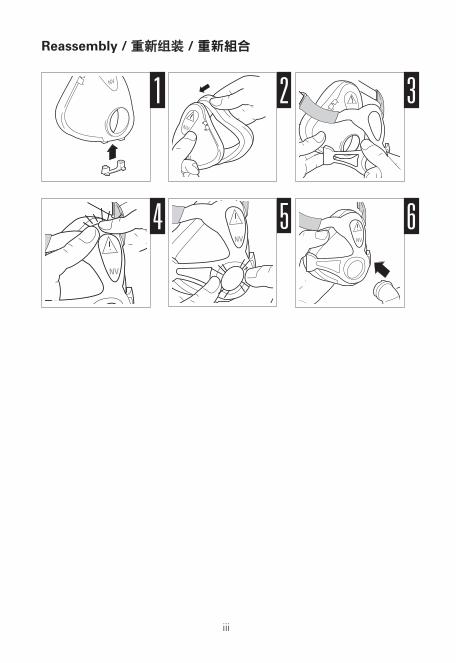
ReassemblyRefer to the reassembly illustrations in this guide.
Reassembly steps
1. Replace the ports cap.
2. Fit the cushion into the channel of the frame. Fit the top section fi rst, then work your way around, pushing the cushion into the frame. Ensure that the cushion is not twisted or distorted around the frame.
3. Replace the soft sleeves onto the spring frame and align the spring frame with the frame.
4. Starting at the top, gently push and click the spring frame into the frame.
5. Gently push and click each side of the lower spring frame into the frame.
6. Replace the elbow into the mask assembly.
4
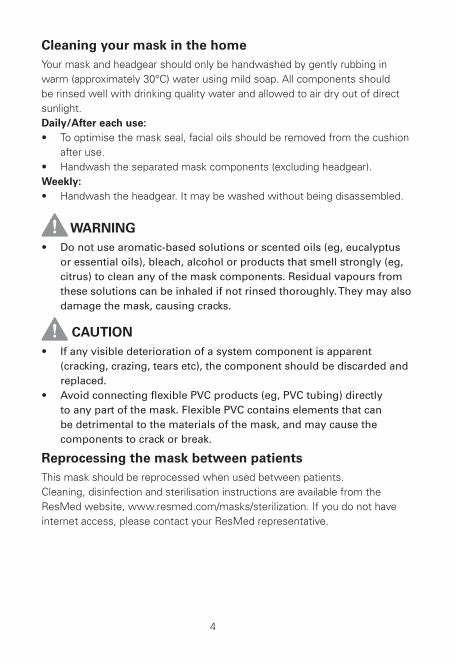
Cleaning your mask in the homeYour mask and headgear should only be handwashed by gently rubbing in warm (approximately 30°C) water using mild soap. All components should be rinsed well with drinking quality water and allowed to air dry out of direct sunlight. Daily/After each use: • To optimise the mask seal, facial oils should be removed from the cushion
after use. • Handwash the separated mask components (excluding headgear).
Weekly: • Handwash the headgear. It may be washed without being disassembled.
WARNING • Do not use aromatic-based solutions or scented oils (eg, eucalyptus
or essential oils), bleach, alcohol or products that smell strongly (eg, citrus) to clean any of the mask components. Residual vapours from these solutions can be inhaled if not rinsed thoroughly. They may also damage the mask, causing cracks.
CAUTION • If any visible deterioration of a system component is apparent
(cracking, crazing, tears etc), the component should be discarded and replaced.
• Avoid connecting fl exible PVC products (eg, PVC tubing) directly to any part of the mask. Flexible PVC contains elements that can be detrimental to the materials of the mask, and may cause the components to crack or break.
Reprocessing the mask between patientsThis mask should be reprocessed when used between patients.Cleaning, disinfection and sterilisation instructions are available from the ResMed website, www.resmed.com/masks/sterilization. If you do not have internet access, please contact your ResMed representative.
5
Engl
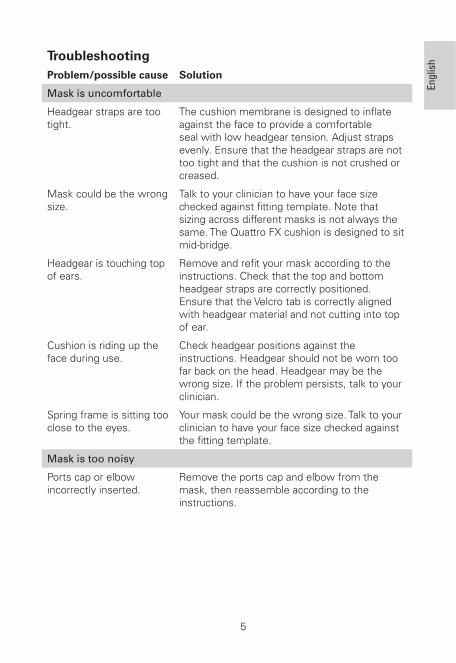
ishTroubleshooting
Problem/possible cause Solution
Mask is uncomfortable
Headgear straps are too tight.
The cushion membrane is designed to infl ate against the face to provide a comfortable seal with low headgear tension. Adjust straps evenly. Ensure that the headgear straps are not too tight and that the cushion is not crushed or creased.
Mask could be the wrong size.
Talk to your clinician to have your face size checked against fi tting template. Note that sizing across different masks is not always the same. The Quattro FX cushion is designed to sit mid-bridge.
Headgear is touching top of ears.
Remove and refi t your mask according to the instructions. Check that the top and bottom headgear straps are correctly positioned. Ensure that the Velcro tab is correctly aligned with headgear material and not cutting into top of ear.
Cushion is riding up the face during use.
Check headgear positions against the instructions. Headgear should not be worn too far back on the head. Headgear may be the wrong size. If the problem persists, talk to your clinician.
Spring frame is sitting too close to the eyes.
Your mask could be the wrong size. Talk to your clinician to have your face size checked against the fi tting template.
Mask is too noisy
Ports cap or elbow incorrectly inserted.
Remove the ports cap and elbow from the mask, then reassemble according to the instructions.
6
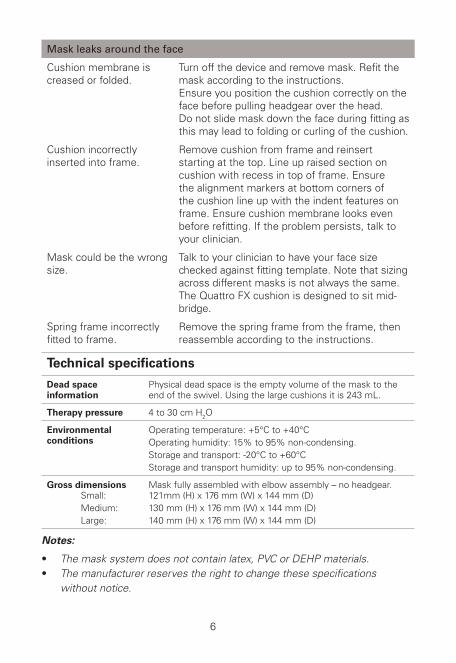
Mask leaks around the face
Cushion membrane is creased or folded.
Turn off the device and remove mask. Refi t the mask according to the instructions.Ensure you position the cushion correctly on the face before pulling headgear over the head.Do not slide mask down the face during fi tting as this may lead to folding or curling of the cushion.
Cushion incorrectly inserted into frame.
Remove cushion from frame and reinsert starting at the top. Line up raised section on cushion with recess in top of frame. Ensure the alignment markers at bottom corners of the cushion line up with the indent features on frame. Ensure cushion membrane looks even before refi tting. If the problem persists, talk to your clinician.
Mask could be the wrong size.
Talk to your clinician to have your face size checked against fi tting template. Note that sizing across different masks is not always the same. The Quattro FX cushion is designed to sit mid-bridge.
Spring frame incorrectly fi tted to frame.
Remove the spring frame from the frame, then reassemble according to the instructions.
Technical specifi cations
Dead space information
Physical dead space is the empty volume of the mask to the end of the swivel. Using the large cushions it is 243 mL.
Therapy pressure 4 to 30 cm H2O
Environmental conditions
Operating temperature: +5°C to +40°COperating humidity: 15% to 95% non-condensing.Storage and transport: -20°C to +60°CStorage and transport humidity: up to 95% non-condensing.
Gross dimensionsSmall:Medium:Large:
Mask fully assembled with elbow assembly – no headgear.121mm (H) x 176 mm (W) x 144 mm (D) 130 mm (H) x 176 mm (W) x 144 mm (D) 140 mm (H) x 176 mm (W) x 144 mm (D)
Notes:
• The mask system does not contain latex, PVC or DEHP materials. • The manufacturer reserves the right to change these specifi cations
without notice.
7
Engl
ish
StorageEnsure that the mask is thoroughly clean and dry before storing it for any length of time. Store the mask in a dry place out of direct sunlight.To maintain optimum care of your mask, ensure the spring frame support is fi tted when travelling.
DisposalThis mask does not contain any hazardous substances and may be disposed of with your normal household refuse.
Symbols
Caution, consult accompanying documents; LOT Lot number; REF Part number; European Authorised Representative;
Temperature limitation; Humidity limitation; Does not contain
latex; Manufacturer; Indicates a Warning or Caution and alerts you to a
possible injury or explains special measures for the safe and effective use of
the device; Keep away from rain; This way up; Fragile, handle with
care.
Consumer WarrantyResMed acknowledges all consumer rights granted under the EU Directive 1999/44/EG and the respective national laws within the EU for products sold within the European Union.

Manufacturer: ResMed Ltd 1 Elizabeth Macarthur Drive Bella Vista NSW 2153 AustraliaDistributed by: ResMed Corp 9001 Spectrum Center Boulevard San Diego CA 92123 USA ResMed (UK) Ltd 96 Milton Park Abingdon Oxfordshire OX14 4RY UK
See www.resmed.com for other ResMed locations worldwide.
For patent information, see www.resmed.com/ip
Velcro is a trademark of Velcro Industries B.V.Quattro is a trademark of ResMed Ltd.
© 2011 ResMed Ltd.
Global leaders in sleep and respiratory medicine www.resmed.com
618232/1 2011-10
QUATTRO FX NV
USER
APAC - ENG
618232
1 2
3
NV
4
5
NV
6
NV