quasar ii owners manual.pdf
TRANSCRIPT

OWNER’S MANUAL
MAIN &RESERVE
THE
Rev. C 11/2000 P/N 510050Price $5.00
Harness/Container assemblyP/N 115100
Reserve CanopyP/N 436000
STRONG ENTERPRISES11236 SATELLITE BLVD.
ORLANDO, FL 32837Tel (407) 859-9317Fax (407) 850-6978
E-mail: [email protected]
THE PARACHUTE COMPANY WITH IMAGINATION

Parachuting is a hazardous activity that can result in serious injury or death. Failureto follow all warnings, instructions and required procedures may result in seriousinjury or death. Parachutes sometimes malfunction even when they are properlydesigned, built, assembled, packed, maintained and used. The results of such mal-functions are sometimes serious injury or death. There are so many factors, bothhuman and natural beyond our control, that we want you to clearly understand that byusing or letting someone else use your Quasar II or its components, you are acceptingthe fact that they may malfunction causing serious injury or death. If you are not will-ing to accept these risks, you may return your Quasar II, unused, to the dealer whereit was purchased for a full refund.
Due to the inherent dangers associated with sport parachuting, the Quasar II and all ofits components are sold as is with all faults and no warranty of fitness for any purposeis either expressed or implied. The manufacturer also disclaims any liability in tort fordamages, direct or consequential, including personal injury and property damage,resulting from a malfunction of the Quasar II or from a defect in its design, material,workmanship, or manufacturing process whether caused by negligence on the part ofthe manufacturer or otherwise.
DISCLAIMER - NO WARRANTY
WARNING
2 Quasar II Owners Manual Rev.C 11/2000
Strong Enterprises

3Quasar II Owners Manual Rev.C 11/2000
Strong Enterprises
WARNING..........................................................................2
DISCLAIMER ..................................................................2
TABLE OF CONTENTS...................................................3
INTRODUCTION..............................................................4Product Description ....................................................................4Features and Options.................................................................5List Of Components ................................................................6Stellar Reserve Canopy Description .........................................7Canopy Compatibility Chart .....................................................8
REQUIRED TRAINING .................................................8BEFORE JUMPING .........................................................9
USING THE QUASAR II .................................................9Donning and Adjusting .............................................................9Pre- Jump Check .....................................................................10Main Deployment and Malfunctions......................................11Reserve Deployment...............................................................12
AAD INSTALLATION....................................................12
RESERVE PACKING INSTRUCTIONS .................................13Rigger Qualifications and Required Tools ...............................13Round Reserve..........................................................................13Assembly...................................................................................13Folding The Canopy .................................................................14Ram Air Reserve .....................................................................15Packing the Stellar Reserve ....................................................16Folding The Canopy Into The Free Bag .................................19Line Stows ..............................................................................22Bag Placement ..........................................................................22Closing The Container...........................................................23
MAIN PACKING INSTRUCTIONS ..............................26Proper 3-Ring Assembly .........................................................26Attaching The Pilot Chute And Deployment Bag ..................27The Deployment Bag ..............................................................28Closing the Container .............................................................28Folding the Pilot Chute ...........................................................30
MAINTENANCE AND CARE.......................................31Inspection and Cleaning ........................................................31Closing Loop Length Chart...................................................31
FAA TSO APPROVAL...................................................32ORDER INFORMATION .............................................33ORDER FORM ..............................................................34
TABLE OF CONTENTS

INTRODUCTION
Thank you for purchasing your new Quasar II harness/container system from StrongEnterprises. You are now the owner of the most attractive, state of the art, quality rig available onthe market today.
The Quasar was originally developed in 1993 with the design intent to build a sport rig possessingall of the qualities of today’s discriminating skydivers expect and demand from their gear. StrongEnterprises has met those demands while continuing to incorporate our high standards of the past40 years to build reliable, durable and safe gear.
Just as sport skydiving is forever changing, so has the Quasar, evolving into the Quasar II. Newand faster skydiving techniques require new designs to match higher speeds and distinct bodypositions. The Quasar II has risen to all skydiving demands while retaining its high quality andattractive appearance. The Quasar II is now available to hold from the smallest to the largest ofcanopies. The Quasar II “Shorty” was introduced to accommodate the smallest of skydivers, andthe Quasar Trainer model can be built to handle what ever student training you may use.
PRODUCT DESCRIPTION
The Quasar II is a single harness, dual parachute pack designed for the discriminating sky-diver. Built Cypress ready, the Quasar II features single pin closure for the main and reserve con-tainers. It is characterized by the main and reserve pin protector flaps which securely tuck downinto a pocket on the opposed flaps. A wide variety of main and reserve container sizes are avail-able which allow the Quasar II to accept main and reserve canopies from the smallest to thelargest, including round or ram-air reserves. The Quasar II has been tested in accordance withSAE Aeronautical Standard AS-8015A and is approved under FAA TSO C-23c, category B.
Strong Enterprisesis continuously working to provide jumpers with reliable, durable and safe prod-ucts, as well as being comfortable and great looking. We have dedicated ourselves to improvingour products and to making skydiving a safe and enjoyable sport.
Take care of your rig and you can expect years of safe and carefree jumping. We welcome yourcomments so that we may continue to improve our products and keep skydiving a safe and enjoy-able sport.
4 Quasar II Owners Manual Rev.C 11/2000
Strong Enterprises

FEATURES
• Single pin reserve closure with internal pilot chute.• Reserve static line with quick release (RSL).• CYPRES AAD ready (Easy 5 minute installation).• “Molar” type reserve free bag prevents closing loop from contacting canopy.• NO VELCRO® in areas of high wear such as riser covers, main and reserve pin protector
flaps, and RSL attachment.• Reserve container is extremely clean with no protrusions to snag suspension lines (No
Skysurf, Freefly or CRW mods necessary).• Custom harness sizing for a superior fit.• Shipped with 1” mini risers which feature Kevlar reinforcement (Pull tested to over 3300
lbs). Type 8 risers also available.• Step-in harness.• 1” type 17 or 1.75” type 8 chest strap.• Hand deploy pilot chute, bottom of main container (BOC).• 16 different reserve container sizes to fit canopies from 265 to 700 cu. in.• 60 different main container sizes to fit canopies from 225 to 800 cu. in.• Regular, Shorty and Xtra Large container lengths available. The shorter version is designat-
ed QIIS”.• 85 possible container combinations.• Metal release housing.• Nickel plated hardware.
OPTIONS
The following Quasar II options are available for either no charge or a minimal extra charge. Pleaseconsult order form for prices.
• Type 8 main risers• Type 17, 1” chest strap• Articulated ring harness• Custom embroidery• B-12 snaps• Collapsible main pilot chute, 27”, 30” and 33”. (U.S. Patent #4,399,969) • Matching kit bag (U.S. Team Bag)• Matching Pak Mat• Hackey handle on pilot chute.• Hook Knife on main lift web• Pilot chute on leg pad (ROL)• Single width leg straps for Skysurfers
5Quasar II Owners Manual Rev.C 11/2000
Strong Enterprises

LIST OF COMPONENTSYour new Quasar II is shipped with the following components:
Qty Description Part Number
1 ea Harness / Container assembly, CYPRES ready ............................................1151001 ea Reserve pilot chute* .......................................................................................................7901451 ea Molar type reserve free bag with 13’ bridle (Square Reserve Only)** ..........7304001 ea alt. PN for “Shorty” version..........................................................................7305001 ea 40” Reserve bridle (Round Reserve Only) ...................................................8101501 pr Toggles, reserve, Red ....................................................................................8660371 ea Reserve closing loop, Dyneema for Cypres .................................................8610181 ea Reserve ripcord .............................................................................................6112741 ea Reserve static line with quick release ...........................................................7806271 ea Hand-deploy main pilot chute with bridle ....................................................7904001 ea Main deployment bag, Standard version ......................................................7206001 ea Main deployment bag, Shorty version..........................................................7208001 pr Main risers, T 17, 1” .....................................................................................8345091 pr Toggles, main, Gold ......................................................................................8660361 ea Single point release handle (Cutaway Handle).............................................8620171 ea alt.Single point release handle (Cutaway Handle for Q8-Q9 .......................8620272 ea Main closing loop..........................................................................................86101310 ea Rubber bands.................................................................................................9710111 ea Pull up cord ...................................................................................................9841191 ea Reserve packing data card ............................................................................5705001 ea Quasar II Owner’s Manual............................................................................510050OPTIONS
1 pr Risers, Type 8, 1 3/4” w/mini rings ..............................................................8341011 ea Collapsible pilot chute .................................................................................790200
* Only the Quasar II reserve pilot chute is approved for use with this system. Do not substitute anyother pilot chute.
** Only the Quasar II molar type reserve free bag is approved for use when packing a ram air reserveinto this system. Do not substitute any other free bag.
All components listed above are also available separately from:
6 Quasar II Owners Manual Rev.C 11/2000
Strong Enterprises
STRONG ENTERPRISES11236 SATELLITE BLVD.
ORLANDO, FL 32837Tel (407) 859-9317Fax (407) 850-6978
E-mail: [email protected]
THE PARACHUTE COMPANY WITH IMAGINATION

STELLAR RESERVE CANOPY
DESCRIPTION
A low pack volume, 7-cell canopymanufactured with 1.1 oz/0-3 CFM ripstopNylon. Spectra 725 lbs lines attached tostainless steel Rapide links are standard.
The Stellar line of reserves was testedwith the Quasar II harness/container assem-bly, and is approved by the FAA to TSOC23c, Category B.
7Quasar II Owners Manual Rev.C 11/2000
Strong Enterprises
RESERVEby STRONG
THE
PN Model Area Cord Span Max. Susp Pack.Vol. CanopySq.Ft. Ft/m Ft/m Weight Cu. In. Weight
lbs/kg lbs/kg
430120 Stellar 120 120 7.50/2,29 15.96/4,86 144/65 265 4.2/1,9430140 Stellar 140 140 8.08/2,46 17.13/5,22 168/76 305 4.6/2,1430160 Stellar 160 160 8.81/2,69 18.70/5,17 192/87 345 5.1/2,3430180 Stellar 180 180 9.24/2,82 19.46/5,93 216/98 385 5.6/2,5430200 Stellar 200 200 9.75/2,97 20.52/6,25 240/108 425 6.6/3,0430220 Stellar 220 220 10.22/3,12 21.50/6,55 254/115 465 7.6/3,430240 Stellar 240 240 10.73/3,27 22.60/6,89 254/115 505 8.1/3,7

CANOPY COMPATIBILITY CHART
To determine the pack volume of the Quasar II’s main and reserve containers, consult theTSO tag on the inside of the right front riser. It will be stamped with a Q number followed by a sec-ond number. Look up your rig’s Q number on the chart below to determine its reserve container size.The second number will be a 1, 2, 3, or 4. Follow straight down the column from your reserve sizeto determine the volume of your main container. For example: If your TSO tag read Q3/2, your con-tainer sizes would be 345 cu. in. for the reserve, and 325 cu. in. for the main.
REQUIRED TRAININGCaution!! This manual is not a course of instruction on parachute jumping. No one should usethis equipment to make a parachute jump, or allow it to be used by others, if they have not first com-pleted a controlled program of instruction on the use of this type of equipment by a certified instruc-tor.
Furthermore, it is the sole responsibility of the user to ensure that the Quasar II has beenassembled and packed correctly by a person who is qualified to do so.
8 Quasar II Owners Manual Rev.C 11/2000
Strong Enterprises
Quasar II Standard Container
Reserve Q# Q1 Q2 Q3 Q4 Q5 Q6 Q7 Q8 Q9
Reserve Vol. 265 325 345 385 425 465 505 560 700
Main #1 225 265 305 345 385 425 465 625 N/A
Main #2 245 285 325 365 405 445 485 700 700
Main #3 265 305 345 385 425 465 505 800 N/A
Main #4 285 325 365 405 445 485 525 N/A N/A
Main #5 N/A N/A N/A N/A N/A N/A 550 N/A N/A
Quasar II Shorty Container
Reserve Vol. 305 325 345 385 425 465 505 N/A N/A
Reserve Q# Q1S Q2S Q3S Q4S Q5S Q6S Q7S Q8S Q9S
Main #1 245 265 305 345 385 425 465 625 N/A
Main #0 200 N/A N/A N/A N/A N/A N/A N/A N/A
Main #2 265 285 325 365 405 445 485 N/A N/A
Main #3 285 305 345 385 425 465 505 N/A N/A
Main #4 305 325 365 405 445 485 525 N/A N/A
Main #5 N/A N/A N/A N/A N/A 525 550 N/A N/A
Main #6 N/A N/A N/A 475 N/A 640 550 N/A N/A

BEFORE JUMPING
After receiving your new Quasar II, inspect its contents to ensure that no components aremissing. A detailed list of components can be found on page 5 of the Quasar II Owner’s Manual.Then thoroughly inspect the rig before beginning assembly. Is it the same color pattern that youordered? Are the main and reserve containers sized properly to fit your canopies? To check this, con-sult the canopy compatibility chart on page 8. Look at all of the stitching, especially at the harnessjunctions. In the unlikely event that you find anything out of the ordinary, please contact StrongEnterprises immediately. Your business is important to us and we want you to be satisfied with yourpurchase.
USING THE QUASAR IIThe following information is provided as a general guideline and is not intended to be used
as a first jump course. No one should use this equipment to make a parachute jump unless he or shehas first completed a controlled program of instruction in the use of this harness/container systemand the canopies contained therein.
DONNING AND ADJUSTING
1. If the rig is equipped with step-in style leg strap adapters, first ensure that the straps are adjustedall the way out and not twisted, then step through the leg straps. If equipped with B-12 snaps,unhook them and let them hang free.
2. Now lift the rig up by its main lift web and put it on as you would a coat.
3. Thread the chest strap through its friction adapter and tighten until both main lift webs are paral-lel with each other. Be sure it is not routed through the reserve ripcord handle.
4. Stow the excess chest strap in the supplied elastic keeper.
5. B-12 SNAPS ONLY. Route the leg straps between your legs, removing all twists and fasten thesnaps to their V-rings.
6. Tighten the leg straps evenlyuntil they are snug but not uncom-fortable and stow their excess web-bing in the pocket at the end ofeach leg pad. You are now ready fora pre-jump equipment check.
Note: Be sure that the straps are threaded through the adapters exactly as shown or they may nothold.
9Quasar II Owners Manual Rev.C 11/2000
Strong Enterprises

PRE-JUMP CHECK
You should always check your gear before putting it on, and get a full gear check before boardingand again before exiting the airplane. However, many skydivers don’t like others opening and clos-ing their flaps, etc. The Quasar II allows you to receive a full gear check with a minimum of han-dling and fuss.The reserve pin can be checked without opening the pin protector flap by looking under the side ofthe flap. The main pin can be checked the same way as the reserve. (It is also very easy to open andclose either pin protector flap without disturbing the pin.)
1. Starting at the top of the rig, check the 3-ring release for proper hook-up.
2. Check the RSL for proper routing. It should exit from under the wearer's right hand side of thereserve pin protector flap, then travel down the front side of the right front reserve riser where it issecured by tucking its plastic stiffener into the provided pockets. Finally, it should be hooked to therear of the right riser using its stainless steel snap shackle.
3. Make sure the release handle's velcro is mated securely and that there is no more than one halfinch of yellow release cable exposed between the handle and the chest strap.
4. Make sure the reserve ripcord handle is seated completely into its pocket and that the cable movesfreely in its housing.
5. Check for proper routing of the chest strap through its adapter and that it is not routed through thereserve ripcord handle.
6. Check the routing of the leg straps through their hardware and ensure that the free ends are securedinside the leg pad's channel or with an elastic keeper.
7. The reserve pin should be seated completely into the closing loop and should not be bent or con-tain any nicks. The closing loop should not be worn or frayed. The pin protector flap should beclosed by tucking its tip into the pocket on the bottom reserve flap.
8.The main pin should be seated at least half way into the closing loop, and should not contain anynicks. The closing loop should not be worn or frayed.
9. The bridle should be routed correctly, straight down from the pin, tucked under the right side flap,and then entering the spandex pocket under the pilot chute.
10. The main pin protector flap should be closed by inserting the end of the tab into the pocket locat-ed under the mid flap.
11. The AAD, if equipped, should be properly calibrated and armed.
10 Quasar II Owners Manual Rev.C 11/2000
Strong Enterprises

MAIN DEPLOYMENT
1. While in a stable face-to-earth position, after waving off and clearing the air above you, reach backand grasp the pilot chute’s deployment handle.
2. With one smooth motion, pull the pilot chute out of its pouch and throw it vigorously straight outto the side deploying it into clean air.
Note: Do not simply pull the pilot chute from its pouch and release it. It must be thrown to the sideto deploy it into clean air away from the jumper’s burble.
MALFUNCTIONS
This section is only to be used as a general guideline for identifying and dealing with mal-functions. It is not a course of instruction. Only professional training from a qualified instructorusing a suspended harness can prepare you for dealing with a malfunction.
Malfunctions are divided into two categories, total malfunctions and partial malfunctions. Ofthese, the latter is divided into High Speed and Low Speed.
A total malfunction is defined as when you are for some reason unable to initiate deploymentof the main parachute. This can occur because of a number of reasons including a lost or floatingripcord handle, a hard ripcord pull (Student version), or a lost pilot chute handle. Because you willstill be at or near terminal velocity, a total malfunction requires immediate action. The proper pro-cedure is to promptly activate the reserve while remaining in a stable, face-to-earth position.
A partial malfunction is when you have initiated deployment of the main parachute, but forsome reason it did not deploy fully. Examples of partial malfunctions include pilot chute in tow, baglock, streamer, hung slider, line over, broken lines, torn cells and any spinning malfunction. Of these,the the first three are considered high speed malfunctions, and require immediate action. The oth-ers, considered low speed generally slow the jumper to a speed which allows more time to evaluatethe situation. In either case, the proper procedure is to first look at and grasp the cutaway handlelocated on the inside of the right main lift web with your right hand. Then look at and grasp thereserve ripcord handle located on the inside of the left main lift web with your left hand. Now peelaway the velcro that attaches the cutaway handle to the main lift web and in one smooth motion pullthe cut-away handle vigorously to full arm extension. Immediately upon reaching full arm extensionwith your right hand, pull the reserve ripcord handle vigorously with your left until it also reachesfull arm extension. Throw away both handles and assume a hard arch position.
11Quasar II Owners Manual Rev.C 11/2000
Strong Enterprises

RESERVE DEPLOYMENT
This section is not intended to be a course in dealing with skydiving emergencies. It is sim-ply a general description of how the Quasar II emergency parachute is deployed.
In order for the reserve container to preform as designed, it is recommended that the jumperbe in a stable face to earth position when deploying the reserve. However, there are some instancesthat require use of the reserve now, and in these situations simply pulling the reserve should takeprecedence over pulling with stability.
1. First, look at and grasp the reserve ripcord handle with both hands.
2. In one motion, vigorously pull the reserve ripcord handle to full arm’s length.
3. Arch hard into a stable, student type freefall position.
AAD INSTALLATIONCurrently the CYPRES AAD is the only unit that is approved for use with the Quasar II har-
ness/container system. All CYPRES channels and pockets are factory-stitched into the rig and nomodifications are necessary. Installation requires no tools and can be accomplished by a senior ormaster rigger in under five minutes using the following technique.
1. Slide the processing unit into its spandex pocket located inside the reserve container on the bot-tom flap. Ensure that the unit is oriented so that the exiting wires lie adjacent to the bottom wall ofthe container.
2. First route the release unit (cutter) up through the grommet located near the base of the bottomsub flap, and then through the channel, sewn to the left side flap and seat it into the elastic pocket.The hole in the end of the release unit should be aligned with the flap’s grommet.
3. Now route the control unit up through the supplied channel located on the bottom of the reservecontainer. After exiting the end of the channel the control unit is then inserted through the slot to thechannel’s immediate right and seated into its pocket inside the backpad. A short section of Type IIItape is stitched into the pocket to aid in installation.
4. Coil all excess cables in front of the processing unit and cover them with the supplied flap by mat-ing its Velcro. Coils should not be smaller than 1” diameter.
Note: Use only special CYPRES closing loop with washer when installing this AAD.
All batteries, which are 2 years or longer in a CYPRES, must be replaced. CYPRES needs to bereturned four years from the original date of manufacture as stated on the unit label. A “window” ofplus/minus three months is allowed. CYPRES News 12/95.
12 Quasar II Owners Manual Rev.C 11/2000
Strong Enterprises

RESERVE PACKING INSTRUCTIONSPlease read these instructions fully to gain a thorough understanding of the Quasar II and its
components before starting to pack. If the rig is to be fitted with an AAD, refer to page 12 of thismanual for detailed installation instructions before continuing.
RIGGER QUALIFICATIONS
FAR Part 105.43 (2) states that only a certificated and appropriately rated senior or masterparachute rigger may pack a reserve parachute that will be carried for use aboard an aircraft in theU.S. By following the instructions in this manual, any current, appropriately rated rigger should beable to assemble and pack the Quasar II reserve.
REQUIRED TOOLS
1 ea. temporary locking pin1 ea. 60” pull up cord1 ea. packing paddle2 ea. 1.5” x 6” pile Velcro® (Ram Air Reserve Only)
ROUND RESERVE
Note: Only round reserves with a full stow diaper may be packed into the Quasar II. No provisionsare provided for stowing the lines in the container.
Follow the packing instructions provided by the manufacturer of the particular canopy you areinstalling for assembly, flaking, and line stowage.
ASSEMBLY
1. Attach the 40" reserve bridle to the pilotchute with a lark’s head knot that passesthrough all three of the pilot chute's dacronline loops.
2. Attach the bridle to the canopy’s apexwith a lark’s head knot as well.
13Quasar II Owners Manual Rev.C 11/2000
Strong Enterprises

FOLDING THE CANOPY
3. Lines should be stowed to within 12-18" of the links. Spread the connector links and reserve ris-ers evenly across the bottom of the container so as not to create a lump in the wearer's back.
4. Place the diaper into the lower left corner ofthe container with the canopy extending out tothe right side. If the lines are stowed parallelwith the canopy's radial seams as on theStrong 26' Lite, then position the canopy sothat the lines face toward the main container.
5. Continue S-folding the canopy toward thetop of the container, keeping the folds slightlywider than the side flaps. The closing loopshould extend between the fourth and fifthfold from the bottom.
14 Quasar II Owners Manual Rev.C 11/2000
Strong Enterprises

6. Position the apex of the canopyunder the center of the top sub-flapwith the bridle exiting to the rightside.
SEE PAGE 23 FOR “CLOSING THE CONTAINER”
RAM AIR RESERVE
Note: The following canopy packing instructions are only for use with Strong Enterprises Stellarseries reserve canopies. If you are installing another manufacturer’s ram air reserve into the QuasarII you should refer to that manufacturer’s instructions for canopy packing and go directly to the sec-tion entitled Folding the Canopy into the Free Bag for further instructions.
ASSEMBLY
1. Attach the 13’ bridle/free-bag assembly to the pilot chute with a lark’s head knot that passesthrough all three of the pilot chute’s dacron line loops.
2. Attach the canopy to the reserve risers using the supplied #5 stainless steel rapid links.
3. Tighten the links securely.
4. Route the control lines down through the rearslider grommets and their corresponding guiderings on the risers.
5. Attach the toggles by passing the loop at theend of the control line up through the toggle’sgrommet, and then around the end of the toggle.
6. Once complete, perform a thorough continuitycheck. This may include inflating the canopy to be absolutely sure it is oriented properly.
15Quasar II Owners Manual Rev.C 11/2000
Strong Enterprises

PACKING THE STELLAR RESERVE
7. Layout the harness/container assembly asthough the wearer was lying face down,head towards canopy. Anchor the rig so thatit cannot slide forward by weighting its packtray or by hooking the leg straps to a securefixture.Insert the ripcord cable into its housing androute the pin out of the yoke through thereinforced slot located just beneath thereserve top flap.
8. Set the right and the left deployment brakes bypulling the brake loop through the guide ring and theninserting the end of the toggle through the loop. Stowthe excess control line under the toggle.
16 Quasar II Owners Manual Rev.C 11/2000
Strong Enterprises

9. Standing near the rig, reach down andpick up the canopy's lines near the connec-tor links. Use your fingers to separate thefront riser lines, the rear riser lines, and thecontrol lines.
10. Walk toward the canopy pushing theslider ahead of you as you go. Continueuntil the slider is completely seated againstits stops and cannot move any further.Ensure that the lines are tensioned evenlyand that all are taut.
11. Flake out all seven cells of the nose andplace them between your knees.
12. Reach down into the center of thecanopy and pleat all excess material out-ward from between each set of line attach-ment points. Clear out the stabilizers aswell.
13. Flake the tail neatly with all line tabs tothe inside and resting on top of the othersuspension lines.
17Quasar II Owners Manual Rev.C 11/2000
Strong Enterprises
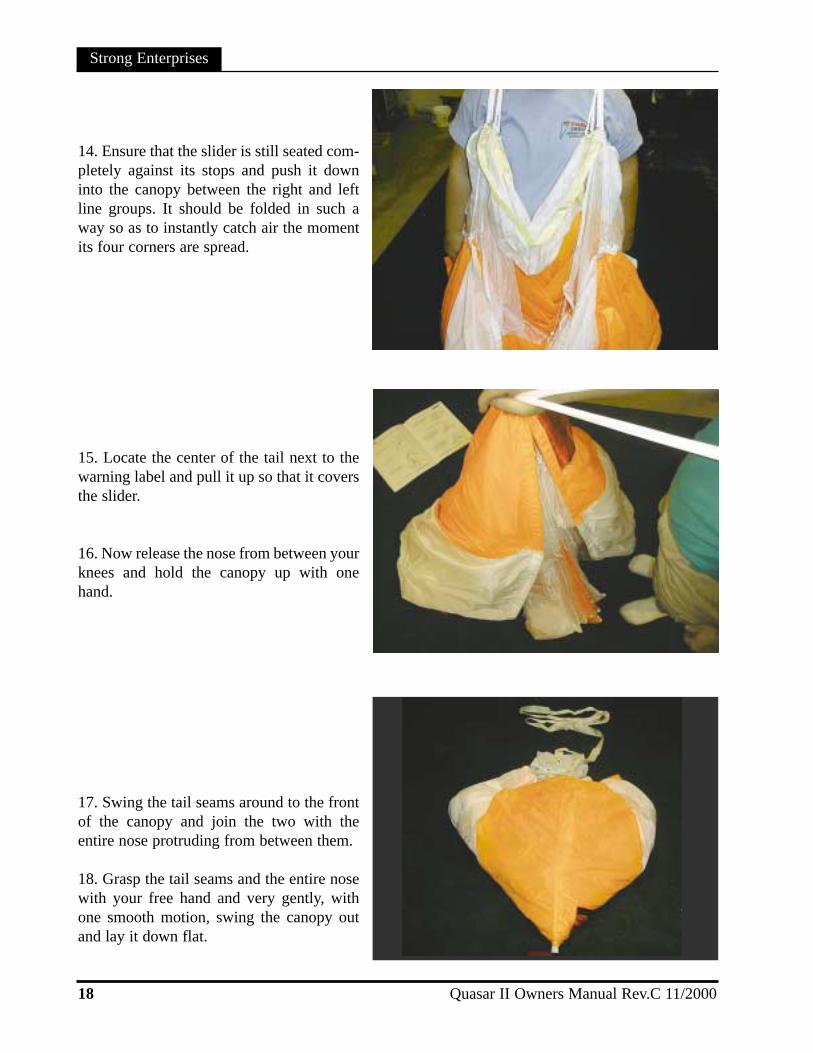
14. Ensure that the slider is still seated com-pletely against its stops and push it downinto the canopy between the right and leftline groups. It should be folded in such away so as to instantly catch air the momentits four corners are spread.
15. Locate the center of the tail next to thewarning label and pull it up so that it coversthe slider.
16. Now release the nose from between yourknees and hold the canopy up with onehand.
17. Swing the tail seams around to the frontof the canopy and join the two with theentire nose protruding from between them.
18. Grasp the tail seams and the entire nosewith your free hand and very gently, withone smooth motion, swing the canopy outand lay it down flat.
18 Quasar II Owners Manual Rev.C 11/2000
Strong Enterprises

FOLDING THE CANOPY INTO THE
FREEBAG
19. Place your knees on the base of thecanopy to maintain control and keep thelines taut.
20. Follow the center seam forward from thewarning label towards the nose, spreadingthe canopy into two halves as you go untilyou reach the nose opening of the centercell.
21. Fold the entire center cell straight underthe base of the canopy and again kneel on itto maintain control. The canopy is nowdivided evenly into three sections, the cen-ter cell you are kneeling on, and the two earswhich contain the outer three cells fromeach side of the canopy.
19Quasar II Owners Manual Rev.C 11/2000
Strong Enterprises

22. Find the three nose openings on theinside edge of each ear and pleat them outneatly on top of each other.
23. Now dress the ears to approximately thesame width as the ear pockets in the top ofthe molar bag.
24. Fold the ends of the ears under abouteight inches and slide them into the molarbag, inserting each into its respective pock-et.
20 Quasar II Owners Manual Rev.C 11/2000
Strong Enterprises

25. Grasp the entire bag and fold it back ontop of the canopy.
26. Now pull the bag towards you whilefolding it under the canopy to create an S-fold deep enough to fill the bottom of thebag below the ears.
27. The remainder of the canopy should beS-folded between the previous fold and thebag mouth.
21Quasar II Owners Manual Rev.C 11/2000
Strong Enterprises

LINE STOWS
28. Lock the bag closed with two bights ofsuspension line through the elastic safetystow. Make the bight between 1.25 and 1.5inches in length beyond the elastics.
29. Rotate the bag onto its ears so that it isupside down and open the pouch on the bot-tom of the bag. Use the 1.5 X 6 inch pileVelcro®, mentioned in the Required Toolssection, to cover the hook Velcro® on thebag side of the pouch so it will not snag thelines. S-fold the remainder of the suspen-sion line into the pouch leaving abouttwelve inches from the bag to the links, thenremove the pile Velcro® strips and mate thebag’s Velcro® securely, being careful not tocapture any lines.
BAG PLACEMENT
30. Spread the rapid links and reserve risersevenly across the bottom of the container soas not to create a lump in the wearer’s back.
31. Place the bag into the container with theline pouch facing down against the packtray.
32. Route the pull up cord up through thegrommet in the free bag.
31. S-fold the bridle up and down in the cen-ter of the bag between the grommet and thetop of the ears approximately five feet fromthe pilot chute. Bridle should exit towardseither bottom corner of reserve container.
22 Quasar II Owners Manual Rev.C 11/2000
Strong Enterprises
CLOSING THE RESERVE CONTAINER
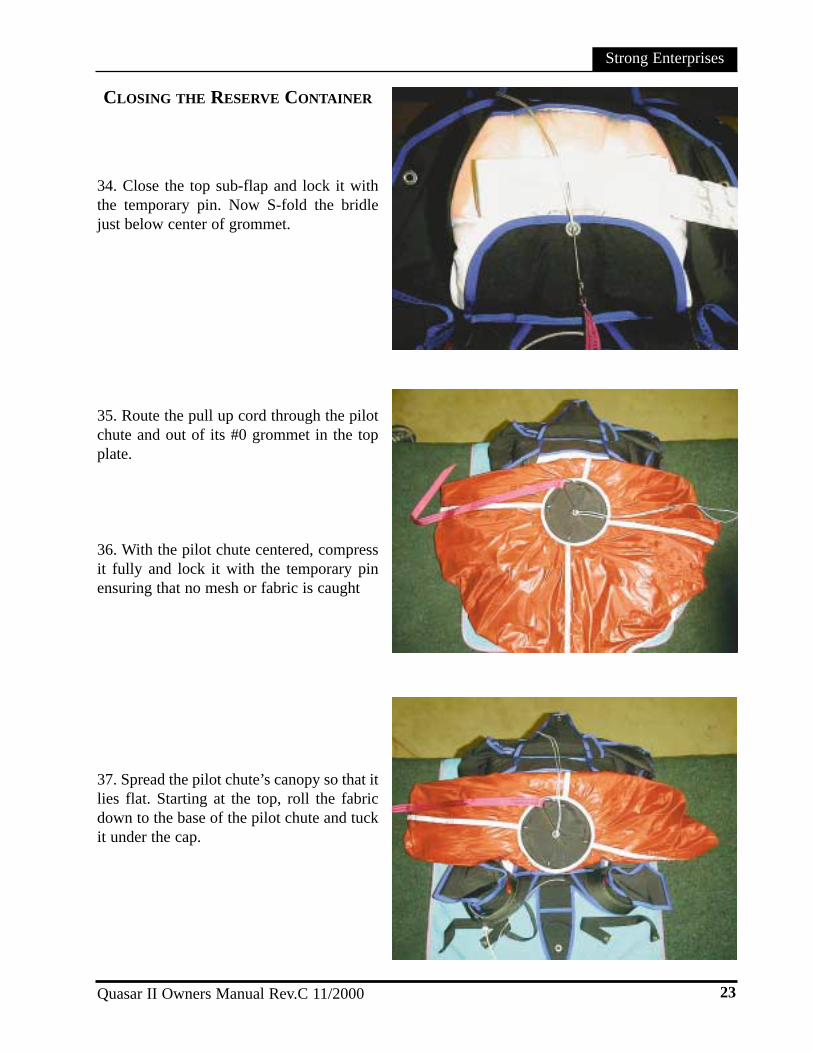
34. Close the top sub-flap and lock it withthe temporary pin. Now S-fold the bridlejust below center of grommet.
35. Route the pull up cord through the pilotchute and out of its #0 grommet in the topplate.
36. With the pilot chute centered, compressit fully and lock it with the temporary pinensuring that no mesh or fabric is caught
37. Spread the pilot chute’s canopy so that itlies flat. Starting at the top, roll the fabricdown to the base of the pilot chute and tuckit under the cap.
23Quasar II Owners Manual Rev.C 11/2000
Strong Enterprises

38. Next fold the bottom of the canopy upbut don’t tuck it under the cap like the top,instead let it rest next to the cap to serve asa cushion to help hide its edge.
39. Likewise, fold the sides in the samemanner as the bottom, letting all of the fold-ed material lie in a 1.5 to 2 inch space besidethe cap.Next, close the left side flap over the pilotchute and lock it closed with the temporarypin.
40. Now close the remaining right side flapand lock it closed with the temporary pin.
Using a packing paddle, insert the top sub-flap tuck-in tabs into the container under thereserve canopy.
24 Quasar II Owners Manual Rev.C 11/2000
Strong Enterprises

41. Slide the RSL onto the cable and thenroute the pin through the channel on the bot-tom of the reserve top flap until it is pro-truding from the end of the flap.
42. Close the top reserve flap and lock itclosed with the temporary pin.Close the bottom reserve flap, remove thetemporary pin and lock it closed with theripcord pin.
43. Seal the ripcord pin and record yourwork on the packing data card.
44. COUNT YOUR TOOLS!
25Quasar II Owners Manual Rev.C 11/2000
Strong Enterprises

MAIN PACKING INSTRUCTIONSDue to the wide variety of canopies currently available on the sport market we have elected
not to cover main canopy packing. For this, you should follow the packing instructions provided bythe manufacturer of the particular canopy you are going to use.
ATTACHING THE RISERS
1. Attach your canopy to the main risers using the rapid links supplied by its manufacturer.
2. Tighten the links securely.
3. Route the control lines down through the rear slider grommets and their corresponding guide ringson the main risers.
4. Attach the toggles by passing the loop at the end of the control line up through the grommet, andthen around the end of the toggle. Refer to page 15, step 5.
PROPER 3-RING ASSEMBLY
Inspecting the 3-Ring release. Riser releases shouldbe inspected prior to every jump. They should be disas-sembled and cleaned at the beginning of every jump day.but at least once a month. It should be done more often inhumid, muddy or freezing conditions or after dragging orwater landing. Any mud or dirt must be removed. Use soapand water and then dry throughly. Any rusted parts must bereplaced.
26 Quasar II Owners Manual Rev.C 11/2000
Strong Enterprises

ATTACHING THE PILOT CHUTE AND DEPLOYMENT BAG
1. To attach, pass the loop at the end of the pilot chute bridle through the bag’s grommet. The loopshould extend out of the grommet on the inside of the bag.
2. Now pass the loop through the metal ring, which is sewn to the top of your canopy, and then passthe entire pilot chute and deployment bag back through the loop and pull tight
Note:: If your canopy does not have a metal ring but simply a loop made of nylon webbing, then theuse of a rapid link is necessary for attachment. DO NOT tie the bridle directly to the canopywithout a ring or rapid link. This will cause canopy fabric to be pulled through the bag’sgrommet upon deployment causing canopy damage.
ATTACHING THE OPTIONAL COLLAPSIBLE PILOT CHUTE/BAG ASSEMBLY
Assembly
1. Insert free end of bridle with deflation lineand retainer into grommet in top of bag (mini-mum grommet size #4).2. Insert #4 Rapide link in bridle loops oninside of bag. Make sure deflation line (whiteSpectra) is in the center of link.3. Attach deflation line and retainer strap (TypeI 9/16") to canopy attachment point with #4Rapide link.
Operation
1. Pack the canopy per manufacturer's instruc-tion2. S-fold the canopy into the D-bag.3. Pull all the excess line out of the D-bagthrough the grommet. The connector link at thecanopy should lay against the bag grommetwithout pinching any material.4. Lock the bag and stow the remainder of thelines in the normal manner.5. Place the bag in the pack tray so that it willnot slide.6. Grasp the pilot chute handle and pull it untilall slack line is inside the bridle. Check win-dow to see P/C is cocked.7. Close the container in the normal manner.
27Quasar II Owners Manual Rev.C 11/2000
Strong Enterprises
Bridle
Grommet
Retainer strap
Deflation line
Rapide link #4
Rapide link #4
Canopy attachment

THE DEPLOYMENT BAG
The Quasar II deployment bag is constructed of para-pak and contains no Velcro® closuresto wear out. It utilizes two locking stows and can be fitted with either rubber bands or ‘Tube Stoes’.
1. After packing your canopy according to its manufacturer’s instructions, S-fold it and place it intothe bag. Ensure that all excess bridle or deflation line is pulled out through the bag's grommet andthe ring located on the canopy is seated against the grommet.
2. Lock the bag closed with two bights of suspension line, then stow the remainder of the lines acrossthe bottom of the bag. Leave approximately 18” of line free between the last line stow and the topof the risers.
Note: If you have installed a Strong Enterprises collapsible pilot chute, it must now be “Inflated”.First ensure that the canopy’s bridle attachment ring (or Link) is seated firmly against the bag’sgrommet without capturing any canopy fabric. Now pull the pilot chute handle away from the baguntil all of the deflation line rests inside of the hollow bridle. Check window in bridle to make surepilot chute is cocked.Failure to do so may result in a pilot chute in tow malfunction.
CLOSING THE CONTAINER
1. Thread a pull up cord through the main container closing loop.
2. Place the bag into the pack tray with the lines oriented toward the bottom of the container androute the risers neatly down both sides of the rig and into the pack tray.
3. Lift up on the pull up cord while you rotate the bag downward and seat it firmly into the container.
4. Close the bottom flap first.Then the top flap. Withthe bridle exiting to the right, temporarily insert-ing the bridle’s curved ripcord pin.
28 Quasar II Owners Manual Rev.C 11/2000
Strong Enterprises

29Quasar II Owners Manual Rev.C 11/2000
Strong Enterprises
5. Stand the rig up vertically and close the riser cov-ers by folding their plastic tongues into the riser coverpockets located on the inside of the yoke.
6. Lay the rig flat once again and close the left sideflap next, followed by the right side flap and securethem with the bridle’s curved ripcord pin.Safety Tip! Pin should point up, so that shiftingprior to the jump will be to keep the pin secure.
7. Tuck the bridle under the right side flap into thebridle flap of the container and then close the pinprotector flap by folding it up over the side flaps andinserting it into the slot in the center flap.

FOLDING THE PILOT CHUTE
8. Spread the pilot chute out adjacent to the maincontainer with the mesh side facing up and fold it inhalf.
9. Now fold its curved side and the bridle back tothe handle.
10. Fold the pilot chute in thirds and then roll it intoa tight cylindrical shape.
11. Slide the folded pilot chute and all excess bridleinto the Spandex pouch located on the bottom of thecontainer.
30 Quasar II Owners Manual Rev.C 11/2000
Strong Enterprises

MAINTENANCE AND CARE
The Quasar II is manufactured under strict quality control standards from the finest materi-als available, however your care will determine the useful service life of the system. Always use adrag mat under the container when packing to avoid damage. Keep the rig out of direct sunlight asmuch as possible to prevent the colors from fading. Never pack canopies of improper size into thecontainer. If they are too small, the pins will be loose and the likelihood of a premature containeropening is greatly increased. On the other hand if the canopies are too big, the pins will fit very tightwhich may cause a hard pull on the reserve or a pilot chute in tow malfunction on the main. Also,the container flaps will be stretched and their plastic stiffeners distorted, seriously shortening thecontainer’s life.
INSPECTION
The Quasar II and its components should be inspected for signs of wear or damage every fiftyjumps or at each reserve repack, whichever comes first. The closing loop, deployment bag, and pilotchute of the main container will receive the majority of the wear and these items should be checkedeach time the main is packed. The reserve closing loop should be replaced at each reserve repack.
Cleaning
When cleaning any of the rig’s closing flaps, the canopies should be removed first. To removeminor soiled areas use a clean cloth dampened with warm soapy water. Grease and other petroleumcan be removed with lighter fluid. If the rig is severely soiled it may be washed in warm soapy waterafter removing both canopies and all handles, AADs, etc. Use a mild soap such as Ivory Snow anda soft brush.
31Quasar II Owners Manual Rev.C
Strong Enterprises

32 Quasar II Owners Manual Rev.C 11/2000
Strong Enterprises

33Quasar II Owners Manual Rev.C 11/2000
Strong Enterprises
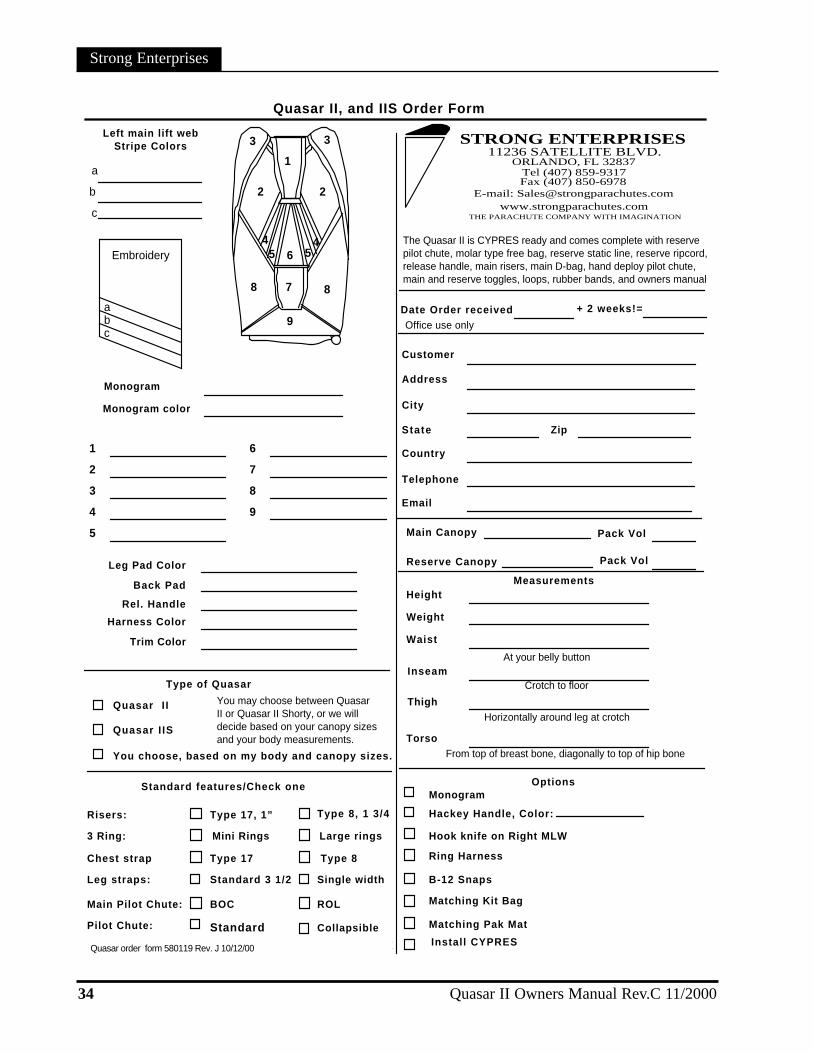
Quasar II Order Information
The QUASAR II comes CYPRES ready, andincludes risers with toggles, deployment bags,reserve ripcord, reserve pilot chute, main throw-outpilot chute, and Owner’s manual.
Features:Equipped for square reserve with your choice of thefollowing:Risers: Type 8 or Type 173 ring release: Mini or Standard ringsChest strap: Type 8 or Type 17Leg strap: Standard 3 1/2 or Single widePilot chute: Standard or CollapsibleMain P/C location: BOC or ROL
Options:Embroidery (ten letters) $25Hackey handle: custom color $30 stock color $20Hook knife on right MLW $15B12 Snaps on Leg Straps $25Ringed harness (@ leg strap) $150Matching Gear Bag $125Matching Pak Mat $30CYPRES AAD (Installed) call
Spare Parts:Free Bag with Bridle $70Reserve Pilot Chute $90Reserve Ripcord $30Cutaway handle (pillow) $30Main Deployment Bag $60Throw-Out Pilot Chute $65Collapsible Pilot Chute $90Main Risers, Type 17, (1”) $75Main Risers, Type 8 (1.75”) $75RSL w/ stainless steel snap shackle $24Steering Toggles (Main or Reserve) $15Closing Loop (Main) $1Closing Loop (Reserve) $1Owner’s Manual $5
The QUASAR II container is manufactured with1000 denier Cordura for durability. Parapak (420denier) is also available.The Strong Enterprises gear bag has been the choiceof the U.S. Style/ Accuracy and Para Ski Teams forseveral years. It is made out of 1000 denier Cordurain your custom colors, has four pockets, andshoulder strapsThe Pak Mat comes in your custom colors, and haspockets for rubber bands and pull-up cords.
Measuring GuideInseam: Without shoes, from crotch to floor. Thisis not necessarily the same as your pants inseam.Thigh: Horizontally around your leg at the crotch.Height: Without shoesWeight: Fully dressedWaist: At belly buttonTorso: From the top of the hipbone, to the bottomof the hollow spot at the base of your neck. (Seeillustration)
STRONG ENTERPRISES11236 SATELLITE BLVD.
ORLANDO, FL 32837Tel (407) 859-9317Fax (407) 850-6978
E-mail: [email protected]
THE PARACHUTE COMPANY WITH IMAGINATION
Quasar order form 580119 Rev. J 10/12/00 Page 1
Quasar II Order Information
34 Quasar II Owners Manual Rev.C 11/2000
Strong Enterprises
Quasar II, and IIS Order Form
Main Canopy
Reserve Canopy
Date Order received + 2 weeks!=
Height
Weight
Waist
Inseam
Thigh
Torso
Type of Quasar
Customer
Leg Pad Color
Back Pad
Rel. Handle
Harness Color
Trim Color
Hackey Handle, Color:
Monogram
Type 8, 1 3/4
B-12 Snaps
Main Pilot Chute: Matching Kit Bag
Matching Pak Mat
Left main lift webStripe Colors
Pack Vol
Pack Vol
Quasar order form 580119 Rev. J 10/12/00
Ring Harness
Hook knife on Right MLW
Single width
Measurements
Quasar I I
Quasar I IS
1
2
3
4
5
6
7
8
9
1
2 2
3 3
4 45 56
78 8
9
STRONG ENTERPRISES11236 SATELLITE BLVD.
ORLANDO, FL 32837Tel (407) 859-9317Fax (407) 850-6978
E-mail: [email protected]
THE PARACHUTE COMPANY WITH IMAGINATION
Address
City
State Zip
Country
Telephone
Embroidery
Options
Collapsible
$25.00
$30.00
$15.00
$150.00
$25.00
$125.00
$30.00
Install CYPRES Call
You may choose between QuasarII or Quasar II Shorty, or we willdecide based on your canopy sizesand your body measurements.
You choose, based on my body and canopy sizes.
Standard
Standard features/Check one
Type 17, 1”Risers:
Mini Rings Large rings3 Ring:
Chest strap Type 17 Type 8
Leg straps: Standard 3 1/2
ROLBOC
Pilot Chute:
From top of breast bone, diagonally to top of hip bone
Horizontally around leg at crotch
Crotch to floor
At your belly button
Monogram
Monogram color
a
b
c
The Quasar II is CYPRES ready and comes complete with reservepilot chute, molar type free bag, reserve static line, reserve ripcord,release handle, main risers, main D-bag, hand deploy pilot chute,main and reserve toggles, loops, rubber bands, and owners manual
Office use onlycba
Page 2

35Quasar II Owners Manual Rev.C 11/2000
Strong Enterprises
If you have any question about rigging andpacking your Quasar II parachute
system, do not hesitate to call Strong Enterprises: 800-344-6319
or fax: 407-850-6978
or email: [email protected]
This manual is available in color on our websitewww.strongparachutes.com/manuals.html

Strong Enterprises
STRONG ENTERPRISES11236 SATELLITE BLVD.
ORLANDO, FL 32837Tel (407) 859-9317Fax (407) 850-6978
E-mail: [email protected]
THE PARACHUTE COMPANY WITH IMAGINATION