programming manual - videx security · gsmsk - programming manual enuk - v.1.2 - 29/07/16 4 gsmsk...
TRANSCRIPT

GSMSK PC SOFTWARE ENUKV.1.229/07/16
WE RECOMMENDThis equipment is installed by a competent Electrician, Security or Communications Engineer.
Programming Manual
GSMSK(GSM PC PROGRAMMING SOFTWARE)

MINIMUM PC REQUIREMENTS
The GSMSK PC software is a windows based programming software and therefore does not support MAC or Android devices. The minimum PC requirements are: Windows 7 (Service Pack 1) or later and should have the .NET 4 framework installed.
CUSTOMER SUPPORT
VIDEX SECURITY LTD.www.videxuk.com
Tech Line: 0191 224 3174
Fax: 0191 224 1559
Email: [email protected]
CE conformity marking indicates that the product respects the requirements of the applicable European Community Directives in force specifically EMC 2004/108/ECC, LVD 2006/95/ECC and CE-MARKING 93/68/ECC. CE marking is applied by the manufacturer (or party delegated to do so by the manufacturer) under their own responsibility. It was created to eliminate obstacles to the circulation of products in European Union Member States by harmonising different national standards.
GSMSK - PROGRAMMING MANUAL ENUK - V.1.2 - 29/07/162
GSMSK (GSM PC PROGRAMMING SOFTWARE) VIDEX
GSMSK - PROGRAMMING MANUAL ENUK - V.1.2 - 29/07/163
GSMSK (GSM PC PROGRAMMING SOFTWARE) VIDEXCONTENTSMANUAL INTRODUCTION ........................................................................................................................................ 4
SOFTWARE INTRODUCTION .................................................................................................................................... 4
INSTALLING THE PC SOFTWARE (GSMSK) AND RELEVANT DRIVERS ................................................................... 5
FITTING THE SIM AND CONNECTING POWER ........................................................................................................ 6
POWER UP INITIALISATION SEQUENCE .................................................................................................................. 7
CONNECTING THE GSM MODULE TO THE PC ......................................................................................................... 8
PROGRAMMING WITH THE PC SOFTWARE (Ver 3.0.0.5 or later) ......................................................................... 8
THE MAIN PROGRAMMING SCREEN ......................................................................................................................10
THE SETTINGS SCREEN ...........................................................................................................................................12
THE CALL SETUP SCREEN ........................................................................................................................................16
THE DIAL TO OPEN SCREEN ....................................................................................................................................17
THE PROX SCREEN ...................................................................................................................................................17
THE EVENTS SCREEN ...............................................................................................................................................21
THE LOGO SCREEN .................................................................................................................................................24
GSMSK SOFTWARE TOP MENU ..............................................................................................................................25
PROGRAMMER SCREEN STATUS AND PROGRESS BAR ........................................................................................32
UNDERSTANDING THE BEEPS ................................................................................................................................32
SOFTWARE UPDATES ..............................................................................................................................................33
NOTES .......................................................................................................................................................................33

GSMSK - PROGRAMMING MANUAL ENUK - V.1.2 - 29/07/164
GSMSK (GSM PC PROGRAMMING SOFTWARE) VIDEXMANUAL INTRODUCTION
The information in this manual is intended as an introduction and a guide to programming the 4000 series GSM PRO (Art.4810) audio intercom using the GSMSK PC software. This manual should be read carefully before programming commences. For details on installing the GSM PRO intercom Videx recommends reading the technical manual; GSM4K MANUAL ENUK V1.3 (or later version), any damage caused to the equipment due to faulty installation where the information in either manual has not been followed is not the responsibility of Videx Security Ltd.
It is recommended that the GSM PRO audio intercom is installed by a competent electrician, security or communications engineer.
VIDEX run free training courses for engineers who are unfamilier or who have not installed this system before. Technical help is also available on 0191 224 3174 during office hours (8:30am - 5:00pm MON to FRI) or via e-mail: [email protected].
A copy of this Programming Manual can also be downloaded from the Videx website: www.videxuk.com.
SOFTWARE INTRODUCTION
The GSMSK software is designed to work with the GSM PRO intercom (and in the future the Digital GSM PRO). It allows a user to program the call buttons (up to 50 call buttons with 3 diverts per button), additional settings including two auxiliary inputs/outputs and proximity fobs/cards (up to 1000 users) and download a record of up to 4000 events. Features of the software include:
• Set up of up to 50 call buttons (with up to 3 divert numbers for each button) and dial to open numbers (up to 1000 numbers).
• Programmable time settings incluing: call, divert, relay, DTMF delay and auxiliary times.
• Setting auxiliary A1 mode (6 mode settings available).
• Enabling/disabling ‘dial 0 on answer’ feature and silent dialling.
• One programmable timeband function.
• Enabling/disabling onboard proximity reader and function for programming fobs/cards (for up to 1000 users) using the PROXE desktop reader.
• Programmable master code (default set as 1111), balance check string (for O2 and vodafone only) and master telephone number.
• Programmable auxiliary A2 message (up to 32 characters).
• Enabling/disabling speech board and programmable volume control setting.
• Programmable GSM speech volume (mic and speaker setting).
• Setting DTMF tone after answer feature (for button 1 and button 1 divert only).
• Integrated bootloader function (for updating intercom panel firmware).
• Event logging system (which can record up to 4000 events).
• Logo Editing feature (for use on Digital GSM only, currently unavailable).
GSMSK - PROGRAMMING MANUAL ENUK - V.1.2 - 29/07/165
GSMSK (GSM PC PROGRAMMING SOFTWARE) VIDEXINSTALLING THE PC SOFTWARE (GSMSK) AND RELEVANT DRIVERS
The connection to the GSM PRO intercom is via a micro USB cable between the intercom and the PC.
IMPORTANT NOTE: The GSMSK PC software is a windows based software and therefore does not support MAC or Android devices. The minimum PC requirements are: Windows 7 (Service Pack 1) or later and should have the .NET 4 framework installed.
USB Driver Installation
Before connecting the GSM PRO intercom to the PC first install the driver for the micro USB cable. Follow the steps below to install the driver:
1. Insert the GSMSK installation CD into the CD-ROM drive of the PC.
2. Select ‘RUN’ from the start menu.
3. Type in ‘D:\CDM20824_setup.exe’ then press the ‘OK’ button.
4. The relevant drivers for the USB cable will be installed.
GSMSK PC Software Installation
After the USB driver has been installed follow the steps below to install the PC software:
1. Insert the GSMSK installation CD into the CD-ROM drive of the PC (if it hasn’t already been done).
2. Select ‘RUN’ from the start menu.
3. Type in ‘D:\GSMPRO2\setup.exe’ then press the ‘OK’ button (where D is the letter of your CD-ROM drive).
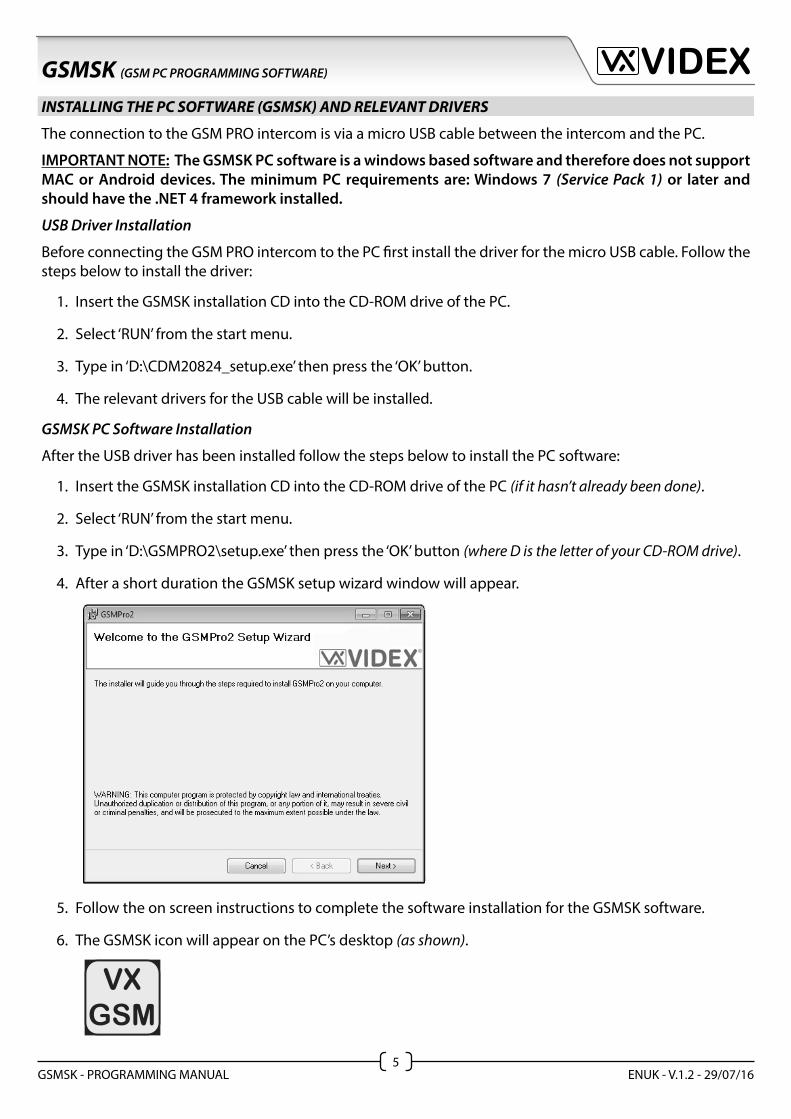
4. After a short duration the GSMSK setup wizard window will appear.
5. Follow the on screen instructions to complete the software installation for the GSMSK software.
6. The GSMSK icon will appear on the PC’s desktop (as shown).

GSMSK - PROGRAMMING MANUAL ENUK - V.1.2 - 29/07/166
GSMSK (GSM PC PROGRAMMING SOFTWARE) VIDEXPROXE Desktop Reader Driver Installation
If proximity access is required for the installation and the PROXE desktop reader is being used to program the fob/cards then follow the steps below to install the driver:
1. Before launching the GSMSK software plug the USB cable of the PROXE desktop reader into a spare USB port on the PC.
2. The drivers will automatically be installed by the PROXE reader.
3. The PROXE will emit a single short beep followed by a double beep and the red LED will switch ON.
4. The PROXE driver has been installed.
FITTING THE SIM AND CONNECTING POWER
Ensure the GSM PRO intercom has the Art.432 antenna securely connected. Insert a registered SIM card into the SIM holder following the steps below:
• First slide the SIM holder on the back of the GSM module to the left until it ‘clicks’.
• The SIM holder is hinged and will open out to the left.
• Place the SIM card into the holder (it will only fit one way) and fold the holder back down.

GSMSK - PROGRAMMING MANUAL ENUK - V.1.2 - 29/07/167
GSMSK (GSM PC PROGRAMMING SOFTWARE) VIDEX• Slide the SIM holder back to the right until it ‘clicks’.
• Once the SIM is in place connect the appropriate call buttons following the examples shown in the technical manual: GSM4K MANUAL ENUK V1.3 (or later version). If the GSM PRO module has onboard buttons (modules Art.4810-1, Art.4810-2, Art.4810-1D and Art.4810-2D) then no button wiring is required as these are all internally wired in the GSM module.
• Check all the button connections have been made correctly, then connect the 12Vdc power, as shown, and follow the initialisation process.
POWER UP INITIALISATION SEQUENCE
The GSM PRO intercom requires approximately 30 seconds to initialise properly. We recommend NOT sending SMS messages or pressing buttons during this time. The busy LED will flash while initialising.
• 2 short beeps.
• Approx. 15 seconds delay.
• 1 short beep.
• Approx. 15 seconds delay.
• 1 short beep.
• Wait for busy LED to stop flashing.
• System is ready.
If you hear a different combination of beeps in place of the last short single beep the meaning of these beeps can be found on pages 32 and 33 towards the back of this manual.

GSMSK - PROGRAMMING MANUAL ENUK - V.1.2 - 29/07/168
GSMSK (GSM PC PROGRAMMING SOFTWARE) VIDEXCONNECTING THE GSM MODULE TO THE PC
After the initialisation procedure has finished connect the GSM PRO intercom to the PC as shown in Fig.1.
PROGRAMMING WITH THE PC SOFTWARE (Ver 3.0.0.5 or later)
After all relevant software and drivers have been installed and the GSM PRO intercom connected to the PC via the USB cable ‘double click’ on the GSMSK desktop icon to launch the software.
After a brief delay the start up window will appear, as shown below.
The GSMSK software will check for devices connected to the PC (shown at the top of the window). If the software cannot detect a device the panel type window will appear, as shown below.
Click on the ‘Functional GSM (VER >=3)’ button. The main programmer window will appear (as shown on page 9).
Fig.1
GSMSK - PROGRAMMING MANUAL ENUK - V.1.2 - 29/07/169
GSMSK (GSM PC PROGRAMMING SOFTWARE) VIDEX
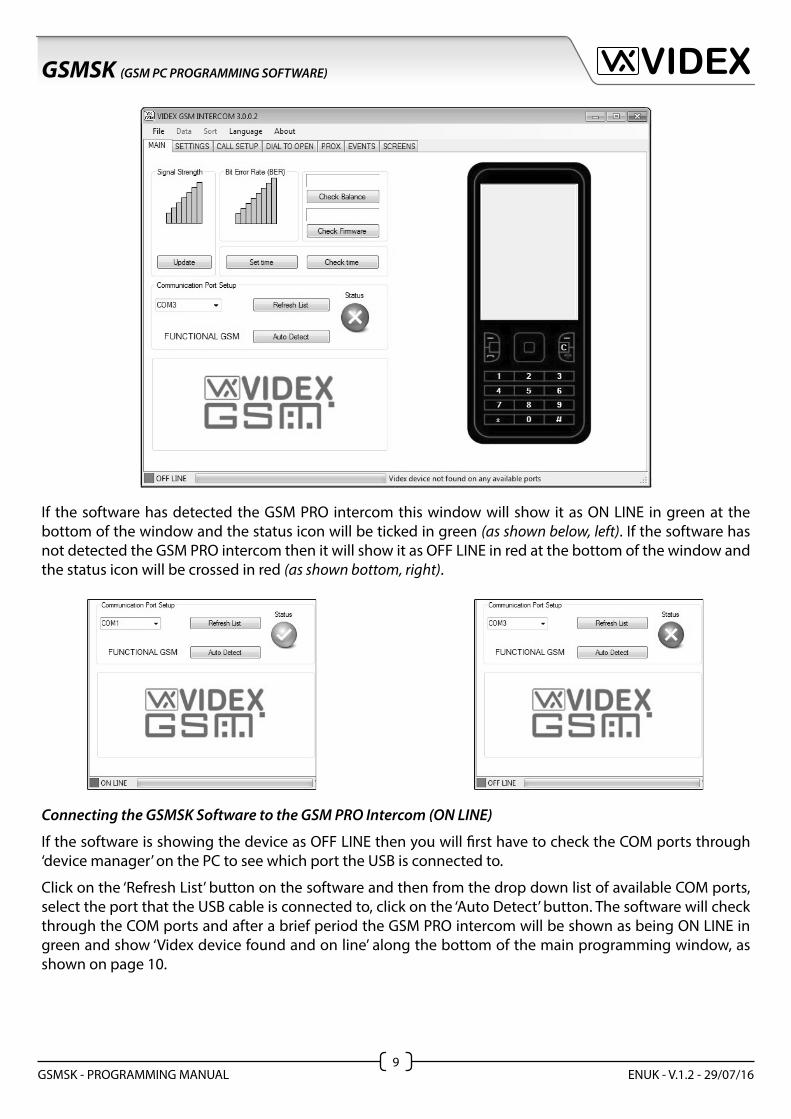
If the software has detected the GSM PRO intercom this window will show it as ON LINE in green at the bottom of the window and the status icon will be ticked in green (as shown below, left). If the software has not detected the GSM PRO intercom then it will show it as OFF LINE in red at the bottom of the window and the status icon will be crossed in red (as shown bottom, right).
Connecting the GSMSK Software to the GSM PRO Intercom (ON LINE)
If the software is showing the device as OFF LINE then you will first have to check the COM ports through ‘device manager’ on the PC to see which port the USB is connected to.
Click on the ‘Refresh List’ button on the software and then from the drop down list of available COM ports, select the port that the USB cable is connected to, click on the ‘Auto Detect’ button. The software will check through the COM ports and after a brief period the GSM PRO intercom will be shown as being ON LINE in green and show ‘Videx device found and on line’ along the bottom of the main programming window, as shown on page 10.

GSMSK - PROGRAMMING MANUAL ENUK - V.1.2 - 29/07/1610
GSMSK (GSM PC PROGRAMMING SOFTWARE) VIDEX
THE MAIN PROGRAMMING SCREEN
From the main programming screen it is possible to do the following:
Check Signal Strength (inc. BER)
Click on the ‘Update’ button to retrieve the signal strength from the unit. The signal strength will be between 1 - 31, whereby 31 is excellent and 1 is poor (a good signal is indicated by green bars, a poor signal is indicated by red bars). A signal strength of at least 10 is required for the system to work satisfactorily. When checking the signal strength the software also confirms the BER (Bit Error Rate). Ideally the BER should be as low as possible (a low BER is good and is indicated by green bars whereas a high BER is poor and is indicated by red bars).
Check Balance (only applicable for PAY AS YOU GO SIM)
For this to work you must first store the check string required by the service provider on the settings window. For example, the string *#1345# is used by Vodafone to retrieve the current balance. Once this has been stored and uploaded to the GSM PRO intercom, clicking the ‘Check Balance’ button will retrieve it from the intercom.
Check Firmware Version
Click the ‘Check Firmware’ button to retrieve the current firmware version of the GSM PRO intercom. This will be useful to technical support should you need to call and can also give an indication of functions available.

GSMSK - PROGRAMMING MANUAL ENUK - V.1.2 - 29/07/1611
GSMSK (GSM PC PROGRAMMING SOFTWARE) VIDEXSet Time & Date
Click the ‘Set time’ button to synchronise the time & date of the GSM PRO intercom with the time & date of the PC.
Check Time & Date
Click the ‘Check time’ button to confirm the time & date settings in the GSM PRO intercom.
Communication Port Setup
Although the communication port should setup automatically when the software is started it is also possible to manually setup the communication port (also refer to notes on page 9).
If the communication port status is showing as OFF LINE (as shown) first press the ‘Refresh List’ button which will find all available communication ports, then select the port which is connected to the GSM PRO intercom from the drop down list. Press the ‘Auto Detect’ button to check for the device. Alternatively just click on the ‘Auto Detect‘ button to check all available ports. If the device is found, the status will change to ON LINE.
Mobile Phone
The mobile phone (as shown on the main programming screen) can be used like a normal mobile phone to make calls from the GSM PRO intercom connected. This can be useful when setting up the GSM unit’s SIM card with functions such as switching off voice mail and text alert or listening to the SIM cards balance through the intercom’s speaker. Simply type the number to call on the keypad and
click the call button . To end the call click the call end button and to clear the display press the ‘C’ button.
IMPORTANT NOTE: After making any changes to the settings and stored telephone numbers on the PC, they must then be uploaded to the GSM PRO intercom before they will take effect. It is also advisable to save these changes before uploading.

GSMSK - PROGRAMMING MANUAL ENUK - V.1.2 - 29/07/1612
GSMSK (GSM PC PROGRAMMING SOFTWARE) VIDEXTHE SETTINGS SCREEN
The settings screen is split into four groups; Times, Modes, Time Bands and General Settings. From this screen it is possible to edit the following:
Times
The time settings can be adjusted using the up () and down () buttons to the right of the field.
Call Time
This is the maximum length of a call before it automatically clears down (between 20 - 240 seconds). The default setting is 40 seconds.
Relay Time
This is the relay activation time (from 1 - 99 seconds). Set the relay time to ‘0’ for latching. The default setting is 5 seconds.
Auto Dial (days)
This is the number of days the GSM PRO intercom will wait without a call being made before it makes a short call to keep the system live and connected on the network (from 1 - 99 days). The default setting is 30 days.
Divert Time
This is the time (from 1 - 99 seconds) the GSM PRO intercom will ring the programmed telephone number before it cancels the call and then diverts to the next programmed (divert) number. The default setting is 15 seconds.

GSMSK - PROGRAMMING MANUAL ENUK - V.1.2 - 29/07/1613
GSMSK (GSM PC PROGRAMMING SOFTWARE) VIDEXAux Out 1 Time
This is the switched ‘0V’ time for auxiliary output A1 (from 1 - 99 seconds or 0 = latching). The default setting is 5 seconds. Please note this time setting is only applicable when the auxiliary output A1 mode is set to either:
mode 01: ‘on when triggered’
ormode 04: ‘on at beginning of call for aux out time’
When the time is set for latching the auxiliary output A1 mode must be set to mode 01: ‘on when triggered’, (refer to notes below for the different mode settings).
Aux Out 2 Time
This is the switched ‘0V’ time for auxiliary output A2 (from 1 - 99 seconds or 0 = latching). The default setting is 5 seconds.
Modes
The modes of the GSM PRO intercom can be set here.
Aux 1 Mode
There are six modes for auxiliary output A1. The default setting for this is mode 01: ‘on when triggered’. From the drop down list the other modes can be selected:
mode 00: ‘on during a call’
mode 01: ‘on when triggered’
mode 02: ‘used for status indicator’
mode 03: ‘used to divert calls to master number’
mode 04: ‘on at beginning of call for aux out time’
mode 05: ‘used to enable/disable dial open function
Enable D0 Function
When this box is ticked it will enable the dial ‘0’ on answer feature. The default setting for this is disabled (switched off). When this is enabled the user receiving the call from the GSM intercom must press 0 after the call is answered to accept it preventing the call being diverted to the next number.
Enable Silent Dialling
When this box is ticked, dialling will not be heard from the GSM PRO intercom speaker, instead a series of beeps will be heard every few seconds. The default setting is disabled (mode 01, i.e. ringing will be heard).

GSMSK - PROGRAMMING MANUAL ENUK - V.1.2 - 29/07/1614
GSMSK (GSM PC PROGRAMMING SOFTWARE) VIDEXTime Bands
The GSM PRO intercom only has one time band setting which can be adjusted using the up () and down () buttons to the right of the ON/OFF fields. The default time band setting is: ON = 00:00, OFF = 23:59. The time band sets when the call button will call their relevant telephone number(s) and when the call buttons will be diverted to the master number. If no master number is stored the intercom will beep and the busy LED will flash once to indicate no call is taking place (if the speech board is switched on, the intercom will announce “the phone is switched off please try later”).
General Settings
The following general settings of the GSM PRO can be set:
Master Code
The master code must be 4 digits (the factory default is 1111) and is required when using the SMS facilities on the GSM PRO intercom and also when dialling into the intercom from a number which is not stored.
Balance Check String
The balance check string allows the balance on certain pay as you go SIM cards to be checked. This must be stored in the GSM PRO intercom to allow the balance to be checked (also refer to notes on page 10, please also note that only Vodafone and O2 pay as you go check strings are known by Videx at this time).
Master Telephone Number
The master telephone number is the telephone number which will receive the SMS messages for low balance (if this is feature is setup) or if auxiliary input 2 is triggered. It is also the telephone number that will be called if the timeband feature is used (see notes above).
AUX2 Message
When auxliary input 2 is triggered (short between terminals g & 4) on the GSM PRO intercom this is the message that will be sent to the master number (max. of 32 characters and cannot include spaces or “ as part of the message).
Speach Board Volume
The speech board volume in the GSM PRO intercom can be adjusted using the up () and down () buttons to the right of the speech board field and can be set between 00 up to 99 (the default setting is 75).
GSMSK - PROGRAMMING MANUAL ENUK - V.1.2 - 29/07/1615
GSMSK (GSM PC PROGRAMMING SOFTWARE) VIDEXSpeech Board Mode
The call progress speech annunciation in the GSM PRO can be enabled or disabled using the drop down list. The default setting is enabled.
Speaker Volume
The speaker volume can be adjusted using the up () and down () buttons to the right of the field with any number from 1 - 14 (14 = highest volume, the default volume settings is 7).
Mic Volume
The mic volume can be adjusted using the up () and down () buttons to the right of the field with any number from 1 - 7 (7 = highest volume, the default volume settings is 7).
DTMF Tone After Answer Button 1 Primary
The GSM PRO intercom is able to send a DTMF tone after the call to the primary number for button 1 is answered. This function can be used with automated answering systems where a DTMF tone is required to select a particular option from the menu. The drop down list can be used to select the DTMF tone required (from 0 to 9) and the default setting is none.
DTMF Tone After Answer Button 1 Divert
The GSM PRO intercom can also send a DTMF tone after the call to the divert number for button 1 is answered. The drop down list can be used to select the DTMF tone required (from 0 to 9) and the default setting is none.
DTMF Tone After Answer Delay
The Tone After Answer Delay is the delay time from when the call is answered to when the DTMF tone, for the above commands, is sent. The default is set for 3 seconds and can be set from 1 to 12 seconds.
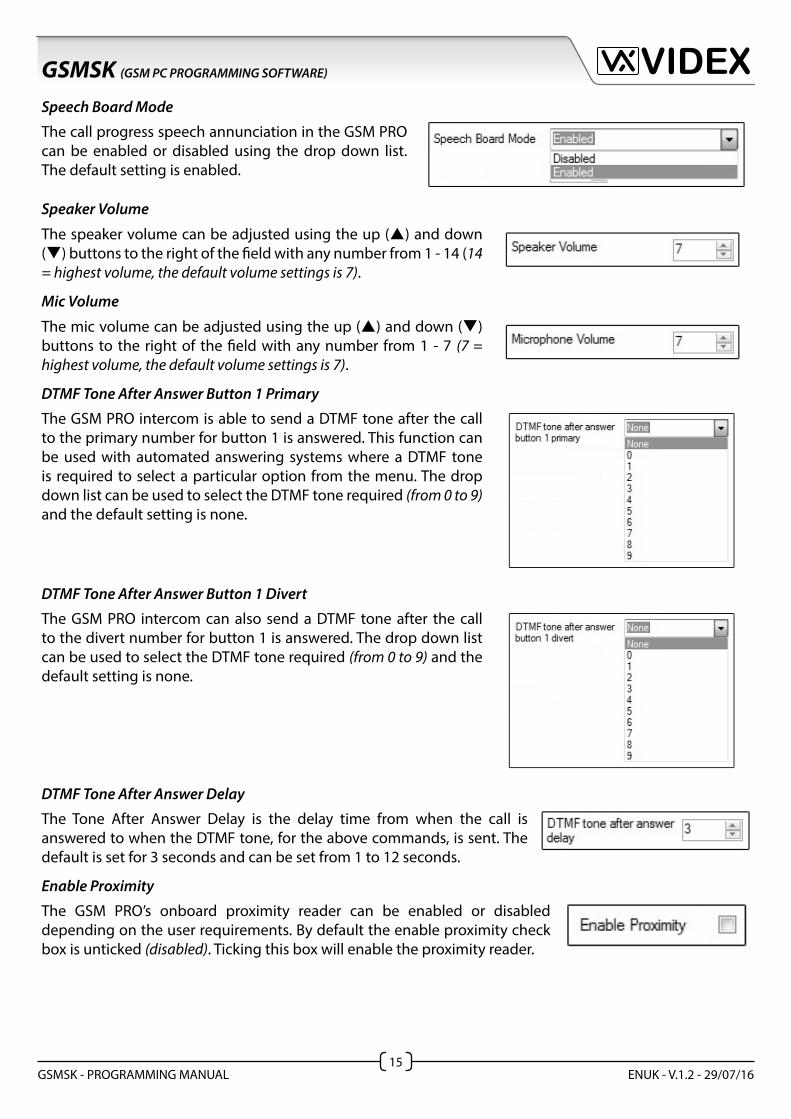
Enable Proximity
The GSM PRO’s onboard proximity reader can be enabled or disabled depending on the user requirements. By default the enable proximity check box is unticked (disabled). Ticking this box will enable the proximity reader.

GSMSK - PROGRAMMING MANUAL ENUK - V.1.2 - 29/07/1616
GSMSK (GSM PC PROGRAMMING SOFTWARE) VIDEXProximity Bytes
Depending on which type of proximity fob/card is used will determine which number of bytes the onboard reader should be set to read (refer to the notes ‘understanding the fob format and card number’ on page 17). The default is set to read 2 bytes. The drop down list can be used to select the required number of bytes to read (2, 3 or 4 bytes).
THE CALL SETUP SCREEN
Call Setup
On the call setup screen it is possible to assign up to 4 telephone numbers for each of the 50 available call buttons (one primary number and three divert numbers). The divert telephone numbers will be used if the primary number is busy or not answered and will divert to these numbers (DIV1, DIV2 and DIV3 in that order) after the divert time has elapsed. If no divert number is stored, the first number will continue to ring until the call times out.

GSMSK - PROGRAMMING MANUAL ENUK - V.1.2 - 29/07/1617
GSMSK (GSM PC PROGRAMMING SOFTWARE) VIDEXTHE DIAL TO OPEN SCREEN
Dial To Open
It is possible to store up to 1000 telephone numbers which will activate the GSM PRO relay when they call the GSM. The GSM PRO intercom will drop the call so there will be no charge for these calls. In the table it is possible to assign a telephone number and a name to each of the 1000 possible locations (000 - 999).
IMPORTANT NOTE: The Name is only for convenience when using the PC software and is not uploaded to the GSM PRO intercom.
If a call is made to the GSM module from a number on the dial to open list but the number is withheld the GSM PRO intercom will drop the call and no further action will be taken (the relay will not activate). This is because the GSM PRO intercom will not recognise a withheld number.
THE PROX SCREEN
Understanding the Fob Format and Card Number
Before programming any fobs/cards it is important to understand the relationship between the fob format and the card number when setting up the proximity reader to check for the correct number of bytes.
• Fobs/Cards with 5 digit number (user code): If a proximity fob/card has no site code but a 5 digit user code (e.g. 955/T or 955/C) the fob format must be set to check for 2 bytes.
• Fobs/Cards with 3 digit site code and 5 digit user code: If using a fob/card with a 3 digit site code and 5 digit user code (e.g. PBX1E or PBX2) the fob format must be set to check for 2 bytes or 3 bytes.
• Fobs/Cards programmed using the PROXE desktop reader: If using the PROXE desktop reader to program the fobs/cards the fob format can be set to check for 2, 3 or 4 bytes.

GSMSK - PROGRAMMING MANUAL ENUK - V.1.2 - 29/07/1618
GSMSK (GSM PC PROGRAMMING SOFTWARE) VIDEXBytes Setting Description2 bytes Will read all fobs/cards types programmed.3 bytes Will not read fobs/cards programmed with only 2 bytes (5 digit) information.4 bytes Will not read fobs/cards programmed with only 2 bytes (5 digit) or 3 bytes (8 digit)
information.
Proximity Programming
On the Prox screen it is possible to program proximity fobs/cards. Programming can be carried out in one of two ways:
• entering the fob/card number (site and user code) that is printed on the fob/card into the site code and user code fields.
• using a PROXE deskmount reader.
Programming Fobs/Cards Using Site and User Codes
Place the cursor in the first site code field (location 0) and enter the site code number (if the fob/card has one) then tab across to the user field and enter the user code printed on the fob/card. When these details are entered into these fields the Wiegand 26 and card no. fields will automatically update with the card’s Wiegand number and card number respectively, as shown below. The cursor will then drop down to the next line (location 1).
The Name field is optional information (the user name can be entered here for example) which is not uploaded

GSMSK - PROGRAMMING MANUAL ENUK - V.1.2 - 29/07/1619
GSMSK (GSM PC PROGRAMMING SOFTWARE) VIDEXto the GSM PRO intercom, however, can still be viewed on a print out of the settings or listed in the events.
Programming Fobs/Cards Usig the PROXE Deskmount Reader
If the column showing the PROXE icon is greyed out (as shown in Fig.2A) then the PROXE deskmount reader has not been detected. If necessary follow the steps on page 6 to install the PROXE drivers. Only after this has been done will the PROXE icon column be highlighted (as shown in Fig.2B).
To program a fob/card follow the steps below:
• click on the PROXE icon next to the location where the fob/card is going to be stored.
• at the bottom of the prox screen (in red) the software will advise ‘Present the card or fob’.
• the green LED on the PROXE deskmount reader will switch ON (for approximately 10 seconds before automatically switching OFF if a fob/card hasn’t been presented).
• present the fob/card on the PROXE reader and the green LED will switch OFF.
• the site code, user code, Wiegand 26 and card no. fields in the location that was selected will automatically update with the fob/card information (if required the name details can be entered into the Name field).
• repeat these steps for programming more fobs/cards.
Fig.2A Fig.2B

GSMSK - PROGRAMMING MANUAL ENUK - V.1.2 - 29/07/1620
GSMSK (GSM PC PROGRAMMING SOFTWARE) VIDEXIMPORTANT NOTE: The Name is only for convenience when using the PC software and is not uploaded to the GSM PRO intercom.
Whether programming using the site code and user code or by using the PROXE reader the correct proximity bytes must be selected from the drop down list on the settings screen (if using the PROXE deskmount reader the 4 bytes setting can be selected from the drop down list). Also the ‘Enable Proximity’ check box must be ticked and the settings uploaded to the GSM PRO intercom.
Fob/Card Find Feature
The PC software also includes a ‘find’ feature at the top of the prox screen that finds the location of where a particular fob/card is stored. To find a location of a fob/card follow the steps below:
• first click on the PROXE icon to the left of the site code field at the top of the prox screen.
• at the bottom of the prox screen (in red) the software will advise ‘Present the card or fob’.
• the green LED on the PROXE deskmount reader will switch ON (for approximately 10 seconds before automatically switching OFF if a fob/card hasn’t been presented).
• present the fob/card on the PROXE reader and the green LED will switch OFF.
• the site code and user code fields will update with the fob/card information.
• click on the find button. After a brief delay the location of the fob/card (and user name if the name field was used) will appear to the right of the find button. Also the software will skip to the fob/card location in the list (as shown on page 21)

GSMSK - PROGRAMMING MANUAL ENUK - V.1.2 - 29/07/1621
GSMSK (GSM PC PROGRAMMING SOFTWARE) VIDEX
THE EVENTS SCREEN
Events
The GSM PRO intercom can log up to 4000 events. Using the 5 buttons at the bottom of the screen it is possible to:
• OPEN any event log that has previously been saved.
• DOWNLOAD, save and view the stored events.
• PRINT a copy of the events.
• SEARCH for a specific event.
• RESET the event logger.

GSMSK - PROGRAMMING MANUAL ENUK - V.1.2 - 29/07/1622
GSMSK (GSM PC PROGRAMMING SOFTWARE) VIDEXOpen a previously saved Event log
• click on the OPEN button at the bottom of the event screen (refer to page 21).
• locate the file location of the saved event log (these are saved as XML documents).
• once the XML open window appears select the file and click open.
• the Events screen will display with the saved event log.
Download an Event log stored in the GSM PRO intercom
• click on the DOWNLOAD button at the bottom of the event screen (refer to page 21).
• the ‘save as’ window will appear.
• select a file location and create a file name for the event log (these are saved as XML documents).
• click on the save button to save the file (if no further action is required click on the cancel button to exit the save function).
• after a brief moment the ‘clear downloaded events’ window will appear, as shown.
• if the events currently stored in the GSM intercom need to be cleared (and deleted) from the intercom then click on the YES button, if not then click on the NO button (the stored events will still be retained in the GSM’s event logger memory).
IMPORTANT NOTE: Once the GSM’s event logger memory has been cleared/deleted it will not be possible to retrieve this information again from the GSM intercom until a new series of events have been logged. It is therefore recommended that any stored events be downloaded first (and saved) from the intercom. Once these events have been saved they can be opened, searched and printed off as required.
• the PC software will download the events currently stored on the GSM PRO intercom and display them on the main Events screen.

GSMSK - PROGRAMMING MANUAL ENUK - V.1.2 - 29/07/1623
GSMSK (GSM PC PROGRAMMING SOFTWARE) VIDEX
Print an Event log
A copy of either a saved event log or recently downloaded event log can be printed. To do this first follow the relevant OPEN or DOWNLOAD steps on page 22 and then follow the steps below:
• click on the PRINT button at the bottom of the event screen.
• after a brief delay the print window will appear showing the list of events. The left (<) and right (>) buttons at the top of the window can be used to scroll through the pages of events.
GSMSK - PROGRAMMING MANUAL ENUK - V.1.2 - 29/07/1624
GSMSK (GSM PC PROGRAMMING SOFTWARE) VIDEX• to print a copy simply click on the printer icon to select a printer connected to the PC.
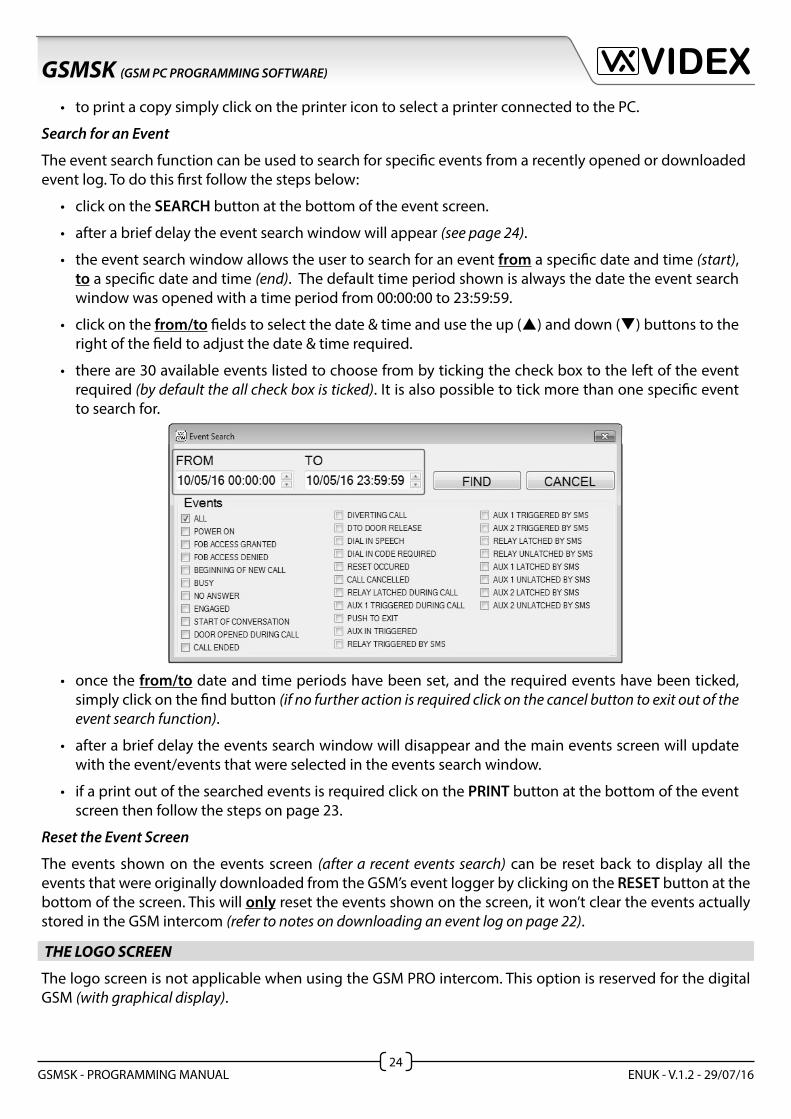
Search for an Event
The event search function can be used to search for specific events from a recently opened or downloaded event log. To do this first follow the steps below:
• click on the SEARCH button at the bottom of the event screen.
• after a brief delay the event search window will appear (see page 24).
• the event search window allows the user to search for an event from a specific date and time (start), to a specific date and time (end). The default time period shown is always the date the event search window was opened with a time period from 00:00:00 to 23:59:59.
• click on the from/to fields to select the date & time and use the up () and down () buttons to the right of the field to adjust the date & time required.
• there are 30 available events listed to choose from by ticking the check box to the left of the event required (by default the all check box is ticked). It is also possible to tick more than one specific event to search for.
• once the from/to date and time periods have been set, and the required events have been ticked, simply click on the find button (if no further action is required click on the cancel button to exit out of the event search function).
• after a brief delay the events search window will disappear and the main events screen will update with the event/events that were selected in the events search window.
• if a print out of the searched events is required click on the PRINT button at the bottom of the event screen then follow the steps on page 23.
Reset the Event Screen
The events shown on the events screen (after a recent events search) can be reset back to display all the events that were originally downloaded from the GSM’s event logger by clicking on the RESET button at the bottom of the screen. This will only reset the events shown on the screen, it won’t clear the events actually stored in the GSM intercom (refer to notes on downloading an event log on page 22).
THE LOGO SCREEN
The logo screen is not applicable when using the GSM PRO intercom. This option is reserved for the digital GSM (with graphical display).

GSMSK - PROGRAMMING MANUAL ENUK - V.1.2 - 29/07/1625
GSMSK (GSM PC PROGRAMMING SOFTWARE) VIDEXGSMSK SOFTWARE TOP MENU
At the top of the main programmer screen there are 5 menu options: File, Data, Sort, Language and About. If the GSM PRO intercom was not detected (OFF LINE) when the software was first opened the Data and Sort options will be ‘grayed’ out. Once the GSM PRO intercom is detected and ON LINE both the Data and Sort options will become available (also refer to notes on pages 9 and 11 to connect the GSM PRO ON LINE).
File
When File has been selected (as shown below) from the top menu the following options from the list are available:
• New - selecting this option will allow a new file to be created and saved.
• Open - selecting this option will open an existing file that has previously been saved.
• Open Recent - select this option from the drop down list to show the most recent files that were previously opened (as shown below).
To open highlight and click on the file required. The different programming screens will update with all file information.
• Save - select this option to save the current file that is open.
• Save As - select this option from the drop down list to save the file under a new file name (if required) and in a specific file location.

GSMSK - PROGRAMMING MANUAL ENUK - V.1.2 - 29/07/1626
GSMSK (GSM PC PROGRAMMING SOFTWARE) VIDEX• Import - select this option from the drop down list (as shown below) to import an old .dat file from
previous versions of the GSM PC software (GSMPRO version 2.0.9 or earlier). This option can also be used to import excel files containing call button setup, dial to open numbers or proxmity fob/card numbers.
Import Old Dat File: to import an old .dat file select this option from the next drop down list. After the open window appears locate the .dat file required then click on the OPEN button. All the .dat file information (i.e. the settings, call button setup and dial to open numbers) will appear in the relevant fields under the relevant tabs.
Import Calls From Excel: select this option from the drop down list to import call button setup numbers that have previously been saved as an excel file. After the open window appears locate the relevant excel file (containing call button programming) and click on the OPEN button. After a short delay a confirmation window will appear advising ‘Import complete’, simply click on the OK button. The relevant fields under the call setup tab will show all the imported call button numbers.
Import DTO From Excel: select this option from the drop down list to import dial to open numbers that have previously been saved as an excel file. After the open window appears locate the relevant excel file (containing dial to open numbers) and click on the OPEN button. After a short delay a confirmation window will appear advising ‘Import complete’, simply click on the OK button. The relevant fields under the dial to open tab will show all the imported dial to open numbers.
Import Prox From Excel: select this option from the drop down list to import proximity fob/card numbers that have previously been saved as an excel file. After the open window appears locate the relevant excel file (containing proximity fob/card numbers) and click on the OPEN button. After a short delay a confirmation window will appear advising ‘Import complete’, simply click on the OK button. The relevant fields under the prox tab will show all the imported fob/card numbers.
Export - select this option from the drop down list (as shown on page 27) to export either call button number programming, dial to open numbers or proximity fob/card numbers and save as a windows excel file.
GSMSK - PROGRAMMING MANUAL ENUK - V.1.2 - 29/07/1627
GSMSK (GSM PC PROGRAMMING SOFTWARE) VIDEX
Export Calls To Excel: select this option from the list to export call button numbers that have been entered in the call setup screen (refer to page 16). After the ‘Save As’ window appears find a location to save the file and create a filename, then click on the SAVE button. After a short delay a confirmation window will appear advising ‘Export complete and saved as...’ , simply click on the OK button. The call button numbers will be saved as a windows excel file.
Export DTO To Excel: select this option from the list to export dial to open numbers that have been entered in the dial to open screen (refer to page 17). After the ‘Save As’ window appears find a location to save the file and create a filename, then click on the SAVE button. After a short delay a confirmation window will appear advising ‘Export complete and saved as...’ , simply click on the OK button. The dial top open numbers will be saved as a windows excel file.
Export Prox To Excel: select this option from the list to export proximity fob/card numbers that have been entered in the prox screen (refer to pages 17 - 21). After the ‘Save As’ window appears find a location to save the file and create a filename, then click on the SAVE button. After a short delay a confirmation window will appear advising ‘Export complete and saved as...’ , simply click on the OK button. The proximity fob/card numbers will be saved as a windows excel file.
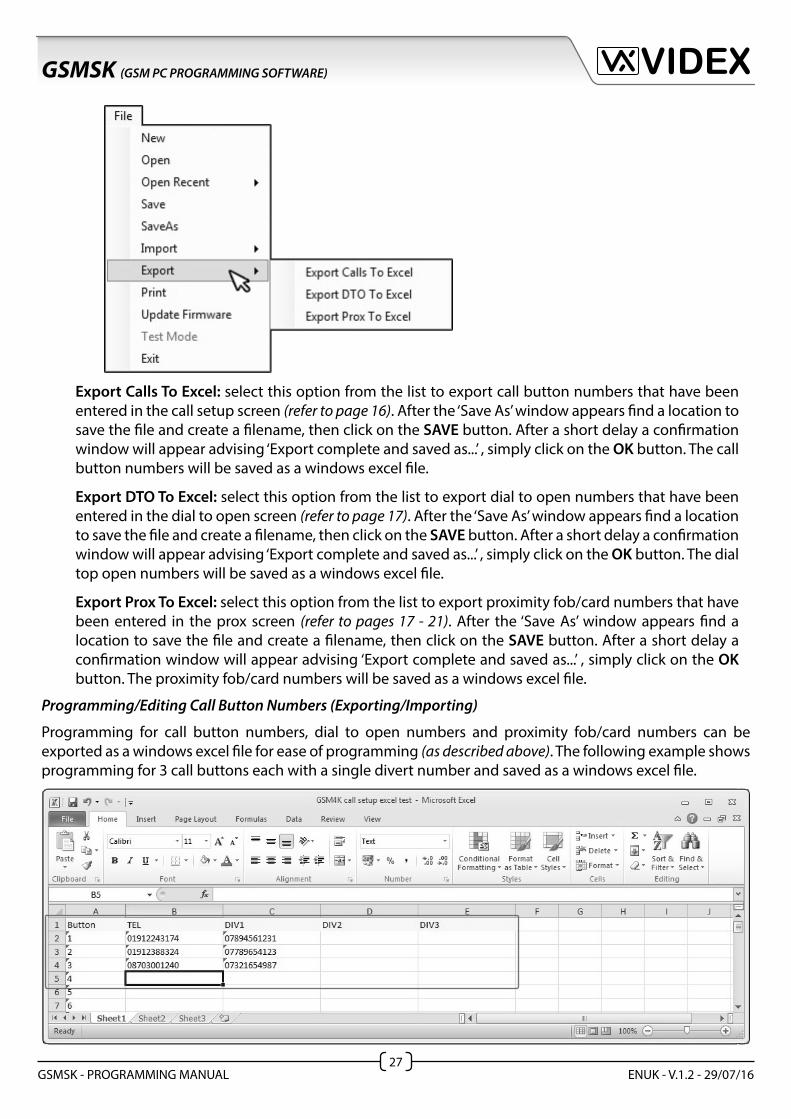
Programming/Editing Call Button Numbers (Exporting/Importing)
Programming for call button numbers, dial to open numbers and proximity fob/card numbers can be exported as a windows excel file for ease of programming (as described above). The following example shows programming for 3 call buttons each with a single divert number and saved as a windows excel file.

GSMSK - PROGRAMMING MANUAL ENUK - V.1.2 - 29/07/1628
GSMSK (GSM PC PROGRAMMING SOFTWARE) VIDEXThe layout of the call button numbers and divert numbers follows a typical excel spreadsheet layout (column titles: Button, TEL, DIV1, DIV2 and DIV3 highlighted in yellow at the top with editable cell rows across the page). The numbers can be edited in the usual way using the standard tab key, up, down, left and right (, , , ) arrow keys to move the cursor to the required cell to add or edit the information. After any edits the file can be saved in the normal way as an excel file and then imported into the GSMSK PC software using the ‘Import Calls From Excel’ menu option as described on page 26. The imported excel file will update the call button information into the relevant fields on the call setup screen as shown below.
• Print - select this option to print out a copy of all the file information: all settings in the GSM intercom including call button setup, dial to open numbers and any proximity fobs/cards (as shown on page 26).
The left (<) and right (>) buttons at the top of the window can be used to scroll through the pages of settings, dial to open numbers and proximity access fobs/cards details (as shown below).

GSMSK - PROGRAMMING MANUAL ENUK - V.1.2 - 29/07/1629
GSMSK (GSM PC PROGRAMMING SOFTWARE) VIDEX
• Update Firmware - if a firmware update is required (these are saved as .vxd files) on the GSM intercom this option can be selected. Click on this option and the following firmware update window will appear.
Click on the file open icon (as shown below).
The open file window will appear. Locate the firmware update file (.vxd file) then click on the OPEN button and the latest firmware update will be uploaded to the GSM PRO intercom as shown below.
If no firmware update is required or this option was selected in error simply click on the cancel icon (as shown below) to exit from this option.

GSMSK - PROGRAMMING MANUAL ENUK - V.1.2 - 29/07/1630
GSMSK (GSM PC PROGRAMMING SOFTWARE) VIDEX• Exit - To exit and close the GSMSK software click on this option.
Data
When Data has been selected (as shown below) from the top menu the following options from the drop down list are available:
• Upload select this option from the drop down list to reveal a further 5 upload options (as shown below): Upload All, Upload Settings, Upload All Calls, Upload Dial To Opens and Upload Proximity Keys (the option to ‘Upload Calls in Range’ is greyed out and is reserved for the Digital GSM).
Upload All - select this option from the list to upload all the settings, call button numbers, dial to open numbers and any proximity fobs/cards. At the bottom of the software screen the progress of the upload can be seen (as shown below) as it uploads all the data to the GSM intercom.
The red busy LED on the front of the GSM module will illuminate to indicate that an upload is in progress (as shown).
Once all the data has been uploaded the software will confirm this by showing an ‘Upload complete’ window, simply click on the OK button. The busy LED will switch off and the GSM module will emit a single beep to indicate that the upload is complete.
Upload Settings - select this option to only upload the settings entered in the settings screen (refer to pages 12 - 16). The uploading procedure follows the same process as described above.
Upload All Calls - select this option to only upload the call button numbers (both primary and divert numbers) entered in the call setup screen (refer to page 16). The uploading procedure follows the same process as described above.
Upload Calls in Range - this option is reserved for the Digital GSM module only and not available for the GSM PRO intercom.
Upload Dial To Opens - select this option to only upload the dial to open numbers entered in the dial to open screen (refer to page 17). The uploading procedure follows the same process as described on page 30.

GSMSK - PROGRAMMING MANUAL ENUK - V.1.2 - 29/07/1631
GSMSK (GSM PC PROGRAMMING SOFTWARE) VIDEXUpload Proximity Keys - select this option to only upload the proximity fob/card numbers entered in the prox screen (refer to pages 17 - 21). The uploading procedure follows the same process as described on page 30.
• Download select this option from the drop down list to reveal a further 6 download options (as shown below): Download All, Download Settings, Download Calls, Download Dial To Opens, Download Proximity Keys and Download Events.
Download All - select this option to download all the settings, call button numbers, dial to open numbers and any proximity fobs/cards. At the bottom of the software screen the progress of the download can be seen (as shown below) as it downloads all the data from the GSM intercom.
The red busy LED on the front of the GSM module will illuminate to indicate that a download is in progress. Once all the data has been downloaded the software will confirm this by showing an ‘Download complete’ window, simply click on the OK button. The busy LED will switch off to indicate that the download is complete.
Download Settings - select this option to only download the current settings stored in the GSM module. The downloading procedure follows the same process as described above.
Download Calls - select this option to only download the call button numbers (both primary and divert numbers) stored in the GSM module. The downloading procedure follows the same process as described above.
Download Dial To Opens - select this option to only download the dial to open numbers currently stored in the GSM module. The downloading procedure follows the same process as described above.
Download Proximity Keys - select this option to only download the proximity fobs/cards currently stored in the GSM module. The downloading procedure follows the same process as described above.
Download Events - select this option to only download the events currently stored in the GSM module (also refer to notes on downloading stored events via the events screen on pages 22). The downloading procedure follows the same process as described above.
Sort
Although this option is shown on the top menu both the sort ‘By Apartment No.’ and sort ‘By Name’ feature is reserved for the Digital GSM module only and not available for the GSM PRO intercom.
Language
The default language setting for the GSMSK software is in English.

GSMSK - PROGRAMMING MANUAL ENUK - V.1.2 - 29/07/1632
GSMSK (GSM PC PROGRAMMING SOFTWARE) VIDEXAbout
This option from the top menu confirms the current version of the GSMSK software being used.
PROGRAMMER SCREEN STATUS AND PROGRESS BAR
At the bottom of the main programming screen is the status and progress bar to indicate if the GSMSK software is connected to the GSM intercom. It also shows the progress of an upload or download to and from the GSM module. The following notes describe the different statuses the software will show:
• OFF LINE - (shown below) this indicates that the GSM module has not been detected by the GSMSK software and is not connected. Please note that when the GSMSK status is showing as OFF LINE the ‘Data’ option from the top menu is ‘greyed’ out and not available. This menu option will become available again once the software is connected with the GSM module and showing as ON LINE. Also refer to the notes on ‘Connecting the GSMSK software to the GSM PRO intercom’ on page 9 and the notes on ‘Communication Port Setup’ on page 11 to reconnect the software with the GSM module.
ON LINE - (shown below) this indicates that the GSM module has been detected by the GSMSK software and is currently connected.
UPLOADING (ON LINE) - (shown below) this indicates that the software is currently uploading programmable settings, call button numbers, dial to open numbers and proximity card/numbers to the GSM module.
DOWNLOADING (ON LINE) - (shown below) this indicates that the software is currently downloading programmable settings, call button numbers, dial to open numbers, proximity card/numbers or stored events from the GSM module.
UNDERSTANDING THE BEEPS
Functions and errors are indicated by a series of beeps from the GSM intercom panel. The following beeps heard during initialisation will help you understand their meaning and what, if anything, needs to be done in response to the beeps.
IMPORTANT NOTE: It should be noted that the GSM intercom will not work with the 3 network and therefore is not recommended by Videx. The following network providers are acceptable: O2, Vodafone, EE (inc. T-Mobile and Orange) to name a few. If in doubt please contact Videx technical on 0191 224 3174.
Beep Reason SolutionFour long beeps. Not registered with a network provider,
but still trying to register.Leave it a short while to see if it manages to find the network. If the beeps repeat every 30 seconds then try moving the antenna to a better location or changing the SIM to another network provider.

GSMSK - PROGRAMMING MANUAL ENUK - V.1.2 - 29/07/1633
GSMSK (GSM PC PROGRAMMING SOFTWARE) VIDEXSix long beeps. Unknown registering problem. Try moving the antenna to a better
location. Try changing the SIM card to another network provider.
Eight long beeps. Registered, but roaming for a better network.
This could happen if it registers to another network instead of its primary one. This may result in higher call charges. Try another SIM provider for that area.
Single short beep every 10 seconds after power up.
Unable to see SIM card. Check the SIM card is fitted correctly in the SIM holder. Try removing the SIM card and cleaning it the fitting it again. Try a different SIM card.
SOFTWARE UPDATES
Date Software Version Revision10/05/2016 3.0.0.5 Launch of GSMSK PC software (for the GSM PRO intercom)20/07/2016 3.0.0.6 Update to event log download
NOTES

GSMSK - PROGRAMMING MANUAL ENUK - V.1.2 - 29/07/1634
GSMSK (GSM PC PROGRAMMING SOFTWARE) VIDEX

GSMSK - PROGRAMMING MANUAL ENUK - V.1.2 - 29/07/1635
GSMSK (GSM PC PROGRAMMING SOFTWARE) VIDEX

Northern OfficeVidex Security Ltd.Unit 4-7 Chillingham Industrial EstateNewcastle Upon TyneNE6 2XX
Southern OfficeVidex Security Ltd.1 Osprey, Trinity ParkTrinity Way, LondonE4 8TD
GSMSK - PROGRAMMING MANUAL ENUK - V.1.2 - 29/07/16
VIDEX