printing and primary student (grades 1-3) · pdf fileprinting and the primary student (grades...
TRANSCRIPT

© Developed by the Partnering for Change team, CanChild, McMaster University, 2013 Page 1 of 4
Printing and the Primary Student (Grades 1-3) - Lunch & Learn
Goals: What to do we want to achieve?
1) To transfer knowledge and help teachers with:
the identification of students who have coordination challenges contributing to difficulties
with printing
knowing when and how to intervene when an atypical pencil grasp pattern is used
teaching letter formation, line use and spatial organization
strategies to ensure literacy development is not impeded by difficulties with the motor
aspects of printing
Activities: How can we achieve the goals?
1) Lunch and Learns: 20-30 minutes seems to be a reasonable amount of time to expect the
teachers to take out of their day for a lunch and learn. This can be offered during a nutrition or
lunch break, at a team meeting, before or after school.
PENCIL GRASP Lunch and Learn have a variety of writing tools laid out so teachers
can experiment with them as participants are gathering- for example:
short/long pencils, markers and crayons
magnetic and stamp letters
vertical surface
scrabble tiles
various pencil grips
Handwriting Without Tears wooden pieces, letter cards, magnadoodle
and magnetic wood pieces
alphasmart if available
drawer liner (to make chair non slip)
options for footrest (e.g.: dollar store basket attached to chair legs with
velcro)
chair with exercise band around the legs
Handout GET A GRIP! O.T. TIPS FOR PROPER PENCIL GRASP
Content Begin with a discussion as to whether or not the way a child grasps a
writing tool is important. Stress the longer term concerns and preventative
issues to help the teachers see beyond the primary years. Review and
demonstrate the typical developmental progression of pencil grasp.
Have the teachers try out the different grasp patterns to experience how
they feel and the limitations they may impose.
- encourage/facilitate discussion- e.g.: Anything surprise you about this typical
developmental progression? Does this knowledge impact your expectations for your
students? If a student is using an atypical grasp, but their work is legible and they are

© Developed by the Partnering for Change team, CanChild, McMaster University, 2013 Page 2 of 4
completing work in a timely fashion, should I try to change it?
- demonstrate some of the materials which can be used as alternatives for students with
limited printing skills, for example: scrabble tiles, letter stamps, magnetic letters,
technology
-encourage/facilitate discussion-Does literacy development have to be negatively
impacted for students with limited printing skills?
TIPS FOR TEACHING PRINTING:
- have a variety of tools and materials laid out so teachers can experiment with them as
participants are gathering- for example:
printing programmes such as Handwriting Without Tears and The Print
Club
variety of paper types
vertical surface and a desk easel
variety of pencil grips and writing tools
alternatives for students with limited printing skills, for example: scrabble
tiles, letter stamps, technology (alphasmart, laptop, iPad, digital voice
recorder)
-if you have a longer lunch and learn, it may be helpful to start with the calligraphy
experiential exercise found in this package to illustrate the impact of coordination
challenges on printing
Handouts TEACHING UPPER CASE LETTERS: OT TIPS
TEACHING LOWER CASE LETTERS: OT TIPS
“To Write or To Type: That is the Question” (CanChild) -optional handout
Start by asking the teachers for some of the strategies they currently use to help a
student who is struggling with letter formation. Often teachers will provide worksheets for
students to trace and copy letters for extra practice. Some will have the student dictate
answers which they then print with a highlighter for the student to trace. Others will
provide an alphabet strip on the desk to provide a visual model for letter formation.
There are limitations to these strategies. Integrate a discussion of the limitations as
appropriate:
Limitations of Tracing:
Tracing letters certainly helps reinforce what the letter looks like and develops eye-hand
coordination and pencil control. But, the child may not trace the letter the same way
every time. Forming the letter the same way every time helps to establish the motor
pattern and sequence for printing the letter independently and from memory.

© Developed by the Partnering for Change team, CanChild, McMaster University, 2013 Page 3 of 4
Limitations of Visual Models:
With only a visual model, the student may not know where to start and stop the strokes
to form the letter. Again, they may form it differently every time, interfering with the
establishment of a consistent motor pattern.
Demonstrate some of the more effective strategies following the discussion:
Developmental Learning Sequence: Generally, children learn to imitate an adult
printing a letter before they can copy the letter from a visual model, and finally can form
the letter from memory. Use a multisensory approach to meet the needs of the variety
of learners in the classroom.
1. SHOW: demonstrate how the letter is formed step by step
2. TELL: say what you are doing while demonstrating the letter formation- provide
some examples of verbal cuing from The Print Club or Handwriting Without Tears
3. DO: ask the students to isolate their magic pointer finger and print the letter in the air
(using the whole arm provides more sensory feedback from muscles and joints for
the kinesthetic learners)
4. TRY: have the students try to print the letter on the white board, on blank paper, in a
rice tray or finger paint
Additional Tips for Teaching Printing:
-teaching letters in groups that have similar motor patterns (here you can show
examples from The Print Club, Handwriting Without Tears or Loops and Other Groups)
Paper: have samples available to show teachers
-when focusing on letter formation, it is not necessary to use lines
- it is often helpful to provide blocks in which to form the letters to help with organization
of space and motor control, particularly for the beginners or those having trouble
organizing their printing on blank paper
-when focusing on positioning of letters on lines, provide structure through the use of
paper with extra visual cues when compared to plain blue lined paper ( e.g.: solid ceiling
and baseline with a dashed middle line)- it is helpful to name the areas in the lines (e.g.:
sky, grass, dirt or upstairs, downstairs and basement).
-note: Encourage consistency in terminology amongst the teachers so that the language
will be familiar to students in subsequent years.
-encourage/facilitate discussion-Does literacy development have to be negatively
impacted for students with limited printing skills? What are some alternatives if a child
cannot print well enough to complete classroom activities legibly and in a timely fashion?
- demonstrate some of the materials which can be used as alternatives for students with
limited printing skills, for example: scrabble tiles, letter stamps, technology
© Developed by the Partnering for Change team, CanChild, McMaster University, 2013 Page 4 of 4
-stress the need to focus on the goal of the activity- for example, if the goal of the activity
is to tell a story with a beginning, middle and end, then an oral response on a digital
voice recorder or dictation to a scribe may be appropriate
-often the topic of when to introduce a keyboard is raised by teachers, with the concern
that if introduced too early, it may negatively impact on the development of printing skills-
it may be useful to refer to the “To Write or To Type: That is the Question” (CanChild) to
prepare for this discussion
Follow Up Suggestions:
Offer to teach a lesson, or series of lessons, in order to model strategies to the teacher-
the lesson(s) might focus on letter formation (printing or cursive), line use, spatial
organization, posture and positioning when writing.
Conduct a classroom screening of students' grasps, posture/positioning, printing- review
the results with the teacher and discuss specific strategies as indicated (e.g.: changing
paper type, altering expectations re: quality or speed, introduction of accommodations).
Offer small group sessions to students who continue to struggle with aspects of printing.
Be in the classroom during a time when printing/cursive will be a part of the lesson plan-
trial strategies and introduce accommodations and monitor the student’s response.
Match paper type to student needs- offer to put together notebooks for these students
(often teachers like the idea of using a different type of paper for a student, but don’t
have the time to follow through with this step)- introduce the paper to the student during
an appropriate classroom activity, modelling how to teach the student to use it
effectively.
Speak with the grade 3 teachers who are preparing for EQAO testing- ask them if there
are students for whom they are concerned that written productivity will interfere with
their success on the tests (they’re bright but can’t write). Working together with the
SERT and classroom teacher, follow up on these students to determine if
accommodations might be necessary for the EQAO testing.

© Developed by the Partnering for Change team, CanChild, McMaster University, 2013 Page 1 of 3
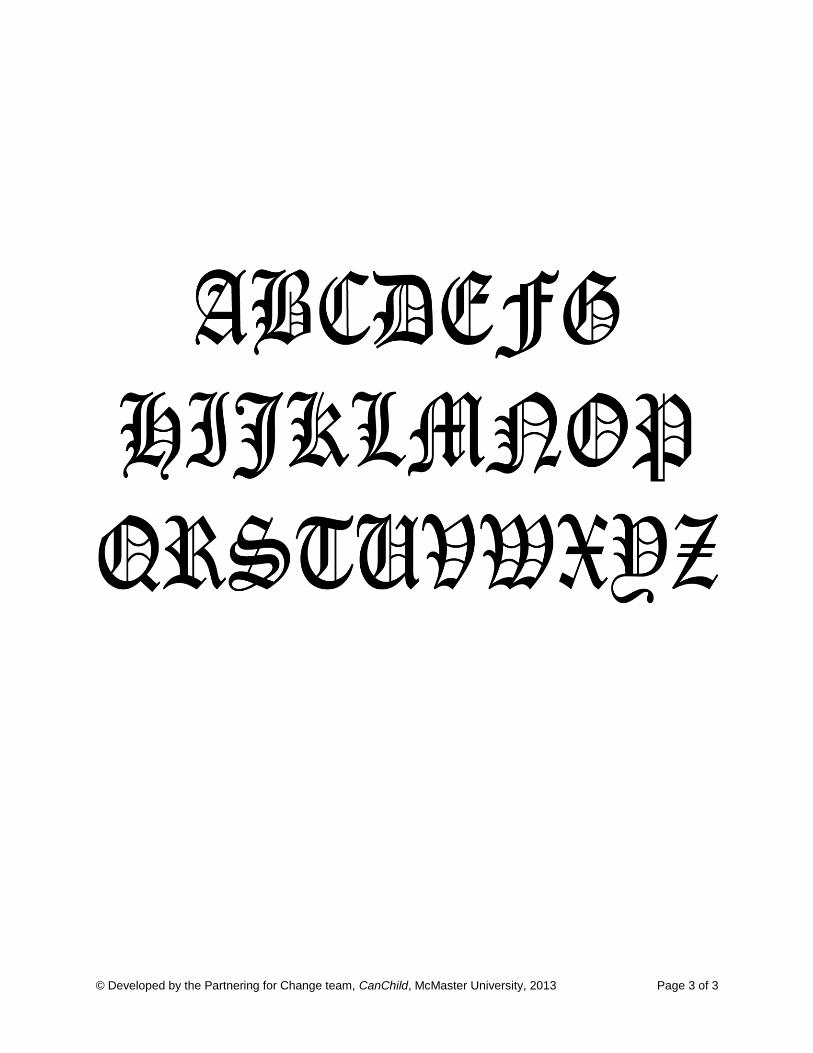
Calligraphy Exercise
Materials Required:
Lined paper
Pen or pencil
Calligraphy letters within easy view (handout attached) Instructions for Participants:
“Take the pen in your hand” “Now switch the pen to your other, non dominant hand.” “Picture your first name and print your name using these letters.” (using calligraphy
letters attached)
Instructions for OT
Impose time pressure- “try to go faster, we are almost out of time”, “hurry up”, “I assume you are almost done”, “Anyone need more time?”
After a reasonable amount of time, stop the exercise and ask…”How did you feel?”
Typical Comments/Observations from participants after completing this exercise &
suggested responses to illustrate challenges of children with DCD when printing or
performing other motor based activities
Not confident
- Kids with DCD have a sense of what they want to achieve but are not confident in
their ability. Repeated failure experiences over time.
Slow
- Speed accuracy trade off. Kids with DCD may appear sometimes to be able to be
accurate with things like printing or writing but, in order to do this, they have to slow
down. They are so much slower than other children that it is not functional – can talk
about how they do not finish tasks on time, etc. but emphasize that there is a trade
off – if they try to keep up, their handwriting will be messy and may be illegible.
There are so many details in the letters to memorize
- Kids with DCD have trouble keeping a motor pattern or sequence in their memory;
they stay at the new learning stage and do not seem to get to the “automatic” level
with many tasks. Every time they do a task, it is like they are doing it for the first time.
Took a lot of effort
- Everything kids with DCD do with their bodies takes extra effort. There is evidence
that kids with DCD have to recruit more parts of their brain to do a task that is simple.
Kept looking up and back to page
© Developed by the Partnering for Change team, CanChild, McMaster University, 2013 Page 2 of 3
- Unable to keep a picture in mind. In the literature, kids with DCD rely heavily on
vision. Keyboarding is easier for kids because once they have learned where fingers
have to go, they don’t have to look at the keys.
Kept changing my plan – sometimes started letters in middle, sometimes at the top
- Every task is like they are doing something for the first time. Kids with DCD are
highly variable in performance. They do not seem to learn from experience and
become more efficient performers.
Wanted to shorten my name
- Kids with DCD commonly shorten tasks to get them done. These are bright kids who
know what they want to say but may go to very elaborate effort to shorten what they
have to do – particularly with regard to written output.
Was frustrated with what I saw and what I produced
- Kids with DCD are often frustrated. They know what they want to do, they know what
they want to produce but their work never looks like they think it should (e.g., of kids
work up on the walls, everyone knows whose it is). It is difficult and can be
frustrating. We know that outbursts may occur - particularly with boys – and that
there may be task avoidance. Girls may be more likely to be withdrawn and
depressed.
Disappointed when told to stop
- Kids with DCD don’t get their work done – they may be punished by being held in at
recess or, at the end of the school day, to have to bring work home. They are already
more fatigued at the end of the day than other kids.
Messy (can also use this comment for speed/accuracy trade off)
- See kids with DCD trying to erase work because it does not look the way they want it
to look.
I was focused on what I was doing, I lost track of what to do next
- Difficulty with motor programming, automaticity etc.
- DCD has secondary effects on written language, spelling and math. Losing track of
where you are can lead to omissions in spelling, organizational and spacing errors
on the page.
© Developed by the Partnering for Change team, CanChild, McMaster University, 2013 Page 3 of 3
© Developed by the Partnering for Change team, CanChild, McMaster University, 2013 Page 1 of 2
GET A GRIP!
O.T. TIPS FOR PROPER PENCIL GRASP
Why care about pencil grasp?
Incorrect grasps can strain muscles and lead to fatigue and reduced endurance for writing
Some grasp patterns can put finger joints at risk for damage over the long term Some grasps impede the development of legible and efficient handwriting Pencil use requires the use of the “skilled side of the hand”- thumb, finger and middle
fingers. These are the same fingers we need to complete many daily tasks (fastening/unfastening buttons and zippers, using eating utensils, opening containers, using the computer mouse).
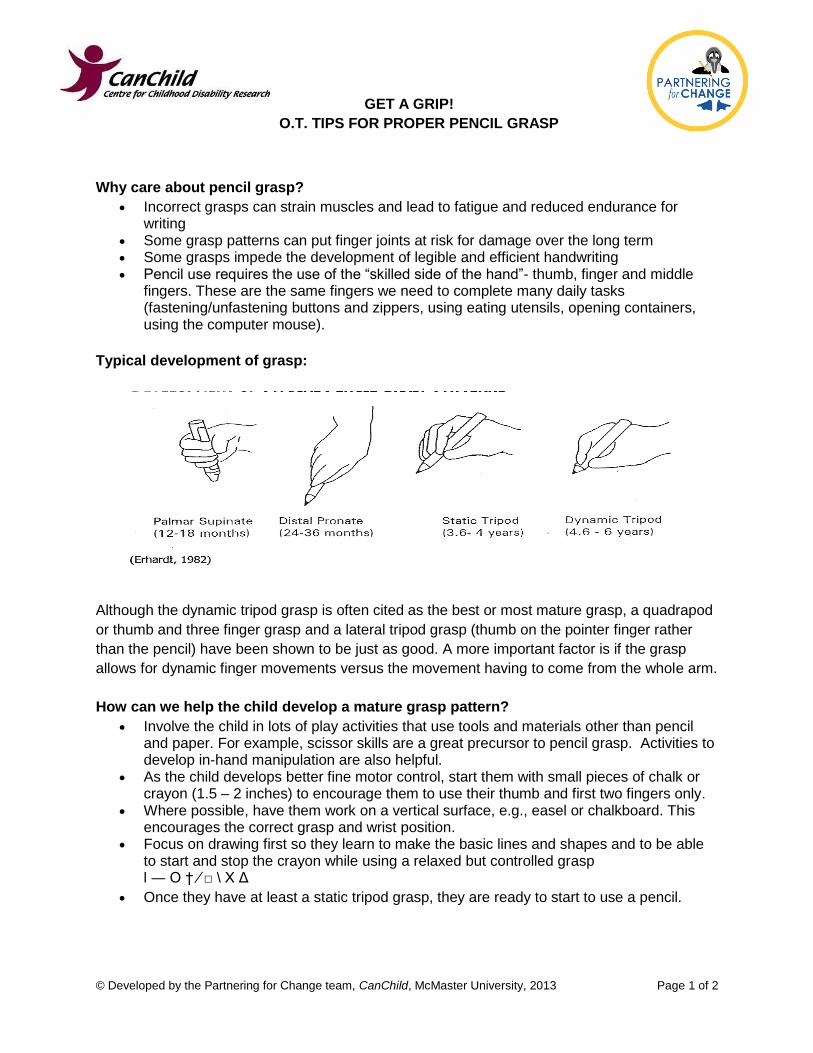
Typical development of grasp:
Although the dynamic tripod grasp is often cited as the best or most mature grasp, a quadrapod
or thumb and three finger grasp and a lateral tripod grasp (thumb on the pointer finger rather
than the pencil) have been shown to be just as good. A more important factor is if the grasp
allows for dynamic finger movements versus the movement having to come from the whole arm.
How can we help the child develop a mature grasp pattern?
Involve the child in lots of play activities that use tools and materials other than pencil and paper. For example, scissor skills are a great precursor to pencil grasp. Activities to develop in-hand manipulation are also helpful.
As the child develops better fine motor control, start them with small pieces of chalk or crayon (1.5 – 2 inches) to encourage them to use their thumb and first two fingers only.
Where possible, have them work on a vertical surface, e.g., easel or chalkboard. This encourages the correct grasp and wrist position.
Focus on drawing first so they learn to make the basic lines and shapes and to be able to start and stop the crayon while using a relaxed but controlled grasp l ― O † ⁄ □ \ X Δ
Once they have at least a static tripod grasp, they are ready to start to use a pencil.
© Developed by the Partnering for Change team, CanChild, McMaster University, 2013 Page 2 of 2
What if they are struggling or don’t have the proper grasp?
If you can, use alternatives to pencil and paper until they are ready, stamps, small crayons, letter tiles, stickers.
Trying to grasp a pencil and learn to form letters correctly before the hand is ready will lead to poor grasp patterns and these will become habits very quickly
Once the grasp pattern is established, it is very difficult to change, prevention is the key For children in older grades who have an awkward grasp, first ask yourself if it is
interfering with their handwriting Many of us have awkward and unusual grasps, but are able to write without difficulty If it does seem to be interfering, try out one of the commercially available grips There are many different kinds and they don’t all work for all children Have the child take them for a “test drive” for a day or two. Have them try to scribble or
draw a simple picture rather than try to print with it right away. Typically, they feel quite awkward at first.
Have the child rate the grip on a 1 to 10 scale so they are really giving it a try, rather than quickly rejecting it because it feels different.

Handwriting difficulties are almost always present in children who have coordination difficulties. Handwriting is a very complex skill that requires the child to integrate postural control, visual and motor abilities. These physical demands, combined with the attention, memory, cognitive and language demands are often overwhelming for a child who has coordination difficulties. Children who have developmental coordination disorder (DCD) may:
• be slow and laboured when printing or writing; • produce work that is disorganized and illegible; • rush through written work and make many errors, • avoid writing and stall, argue, or act out when it is
time to do seat work or homework; • generate a written product that is inferior to their
verbal language abilities. Poor handwriting can impact on children’s academic progress, result in poor grades, set up conflicts with teachers and parents, and leave a child feeling embarrassed or discouraged. The use of a computer or word processor is often suggested as an alternative strategy to writing and is frequently included as an accommodation in a child’s Individual Education Plan (IEP). Some of the things that parents and teachers need to think about when considering typing with a child with DCD are addressed below. Why should children with DCD use a computer/word processor? In order to print or write a letter, the child needs to:
• hold a pencil with a suitable grip • apply a moderate amount of pressure • coordinate the small movements of the muscles of the fingers and thumb • visualize what the letter looks like • remember the motor pattern that makes that letter • draw the letter
TO WRITE OR TO TYPE – THAT IS THE QUESTION!

Writing and Typing for Children with Coordination Difficulties
© N. Pollock & C. Missiuna, 2005 CanChild Centre for Childhood Disability Research McMaster University
• monitor whether the motor commands are correct to make the muscles move with the right amount of force and distance
• make the letter the correct size • place the letter neatly on a line • leave the correct amount of space between that letter and the one that comes next.
Computers/word processors have several advantages over pencil and paper for the child who struggles with written work. The task demands are significantly lower in typing. In order to type a letter, the child needs to:
• isolate a finger • recognize the letter • locate the letter on the keyboard • press the key.
When typing, the page doesn’t move around when the child writes and the letter appears formed and placed correctly. The distance that the key moves up and down, the layout of the keyboard and the location of the letter stays the same. For both writing and typing, spelling, sequencing, and grammar come into play when the child moves to words, sentences, and longer passages. The basic production of a letter, however, is still much simpler with a keyboard. The finished typed product is always neat and legible. For a child who is struggling with handwriting, the reward of a readable product may be motivational and may boost their confidence and willingness to write.
Does keyboarding mean we are giving up on writing? Absolutely not! Rather than thinking about one method or the other, we need to think about the two skills as developing in parallel. If a child learns to ride a scooter, they can still learn to ride a bicycle. The rules about cars, helmets and stop signs are the same and both are means of transportation that children enjoy. The effort and balance required, and the choice of timing for each method might differ. Typing and writing are two socially acceptable ways to produce written work. Children need to know how to do both. Although computers are widely accepted in our society, it is not always possible, desirable or convenient to use a computer. Children will always need to be able to write their names, their homework lists or reminder notes with some proficiency. They do not, however, need to produce every science project or English essay in neatly formed handwriting. A healthy balance needs to be achieved

Writing and Typing for Children with Coordination Difficulties
© N. Pollock & C. Missiuna, 2005 CanChild Centre for Childhood Disability Research McMaster University
between the content that is to be learned and the written product that results. For example, if the goal is to improve handwriting then the product should be handwritten, if the goal is to display the learning that has been mastered, there is no necessity for it to be handwritten.
What about printing versus cursive writing? Children in the public school systems are usually taught cursive writing in grade 3. For some children with DCD, cursive writing is actually easier than printing. Writing has more fluidity and flow. The letters all start from the same place and issues around sizing and spacing often disappear with cursive writing. It is important to expose children to both methods of handwriting, to allow them ample teaching and practice and then decide which is most effective for that child. The other important thing to remember is that children need to learn to read cursive writing even if they don’t use it themselves as many adults write rather than print.
If children have fine motor problems, can they learn to type? Children with motor difficulties can learn to type, even to touch type (that is, typing without looking at one’s fingers), efficiently and effectively. It may take some children a bit longer, though, and require more practice and instruction. The motor demands are less in typing than in handwriting and are easier for children with DCD to learn. Every time one presses a key, the force and direction of that finger is the same as the next time that one presses the same key. Every time one prints a letter, the coordination of the muscles change depending on the angle of the paper, the pressure of the pencil, the size between the lines and the location of the letter within the sentence. Once learned, the motor program that a child needs to put in place is actually much more simple and repetitive in typing. This makes typing an easier motor skill for children with DCD to learn than handwriting. Ultimately, the goal of typing is that children will be able to reduce the amount of mental energy they have to expend on producing legible printing/writing and increase their ability to focus on the content of what they are writing. Studies that have looked at the relationship between typing proficiency and underlying components, such as motor coordination, finger recognition, integration of eyes and hands, and visual perception, have demonstrated weak relationships. In other words, improving pinch grip or learning to recognize same from different shapes will not help a child type more easily. These types of practice exercises do not help a child print more efficiently either. Learning to type is a new skill for all children. As with many other tasks such as tying shoes, cutting with a knife and fork, and catching a ball, children with DCD will require practice with the actual activity, as well as support and encouragement, in order to become proficient.

Writing and Typing for Children with Coordination Difficulties
© N. Pollock & C. Missiuna, 2005 CanChild Centre for Childhood Disability Research McMaster University
When should I introduce keyboarding? Evidence from the research literature and expert opinions are varied on this question. The eventual goal is to learn to touch type so that children can increase their keyboarding accuracy and speed. It is likely that children in Grade 2 or 3 can learn to touch type. The question is whether an earlier introduction to the keyboard will be advantageous or whether younger children will just learn poor habits (e.g., hunt and peck method) that might be harder to unlearn later. There is very little evidence to support either claim in the research literature. Children who are exposed to the keyboard early, who use it to type short passages, write emails and spelling lists, show an increase in typing speed even without typing instruction. They learn to use the functions of the keyboard and mouse, to become familiar with the key locations and to start to use two hands to type. Early exposure does not seem to prevent children from learning to touch type. If keyboard use is introduced but touch typing is delayed until the child is much older, it is not clear how easy it will be for them to learn new motor programs. For the child with DCD, recognizing that typing is a challenging but useful task to learn, the early exposure and practice is probably a good idea.
What is the best method of instruction? Most keyboarding instruction programs follow a similar progression with only minor variations. There is no escape from the need to learn the locations of individual keys or the need to increase speed and accuracy through repetition and drill. Typing programs differ in:
• the order of instruction, • the use of graphics, • the type and timing of the feedback, • the degree of repetition and pacing; • the specific games that are used to maintain motivation.
An excellent review of instructional typing programs can be found at http://www.superkids.com/aweb/pages/reviews/typing/ Computer-based instruction programs typically cost about $20-30 (Canadian) and are available through major computer and electronics chain stores, some educational supply stores and on the internet. It is important to choose a typing program that is of greatest interest to the child so they will be motivated to practice.

Writing and Typing for Children with Coordination Difficulties
© N. Pollock & C. Missiuna, 2005 CanChild Centre for Childhood Disability Research McMaster University
Some agencies and local associations such as learning disability groups offer keyboarding classes and these can be very supportive if the child likes to learn in groups. The instruction that children receive through school computer labs, however, is often not sufficient for children with DCD. They need to start earlier and practice more often if they are to become proficient. The literature suggests that most children who do not have coordination problems need at least 25 hours of instruction and practice to learn to touch type: children with DCD may need even more. It is best to do this in short (15-20) minutes sessions that are scheduled frequently (3-4 times/week). Some of the typing programs have wonderful built-in reward programs that are very reinforcing to the child.
What if the child also has a learning disability? There is a high rate of co-occurrence of learning disabilities and DCD, so this question is pretty common. Keyboarding and the use of the computers are even more important for children who have coordination and learning difficulties. Many assistive learning technologies are extremely helpful for the struggling reader or writer. Word prediction software, graphic organizers, read back programs and even simple spelling- and grammar-checking can make a world of difference to the child who has learning difficulties. There is some evidence that computer-assisted writing programs are generally quite effective in improving children’s written language abilities.
When should a child use voice-to-text software? Increasingly, software programs are becoming available that completely eliminate the need to write or type. In the past, many of these programs were inaccessible as they required many, many hours for the computer to learn to respond to the sound and pattern of the individual’s voice. Although this feature has vastly improved, voice-to-text software is still not very useful for most young children. Children’s voices fluctuate and are unstable in both volume and pitch. As children mature, their voices change in ways that are often unrecognizable by the trained software program. The speech patterns used for oral communication are also quite different than the protocols used in writing and children need to learn these rules for written language. As a result, voice-to-text software is not generally recommended until children are moving into adolescence. As a final observation, children with DCD are almost always able to learn to type so the emphasis should be placed on encouraging the development of this skill. If a child also has a learning disability, has quite severe motor coordination issues or has not mastered touch typing by secondary school, then voice-to-text software may be a very appropriate consideration.
Writing and Typing for Children with Coordination Difficulties
© N. Pollock & C. Missiuna, 2005 CanChild Centre for Childhood Disability Research McMaster University
To type or not to type . . . what is the answer? In today’s society, keyboarding is an important skill for all children to learn, but it is particularly important for children with motor coordination difficulties. With support and appropriate instruction, even young children with coordination difficulties can learn to be very proficient typists. The computer can open up a world of possibilities for learning and for success at school.
The authors are grateful to: Andrew Freeman, Joyce MacKinnon and Linda Miller for ideas suggested in their excellent review article:
Freeman, A., MacKinnon, J., & Miller, L. (2005). Keyboarding for students with handwriting problems: A literature review, Physical and Occupational Therapy in Pediatrics, 25, 119-160.
For more information about children with DCD, visit the
CanChild Centre for Childhood Disability Research website:
www.fhs.mcmaster.ca/canchild
Nancy Pollock, M.Sc., OT Reg. (Ont.) School of Rehabilitation Science and CanChild
McMaster University, Hamilton, Ontario [email protected]
Cheryl Missiuna, Ph.D., OT Reg. (Ont.) School of Rehabilitation Science and CanChild
McMaster University, Hamilton, Ontario [email protected]
McMaster University Institute for Applied Health Sciences 1400 Main St. West, Rm. 408 Hamilton, ON, L8S 1C7 Phone: 905-525-9140 ext. 27850

© Developed by the Partnering for Change team, CanChild, McMaster University, 2013 Page 1 of 4
LEARNING TO PRINT LOWER CASE LETTERS
O.T. TIPS
(Adapted from Handwriting Without Tears and The Print Club)
Developmental Sequence:
Preprinting: Generally, children learn to imitate an adult drawing the stroke before they
can copy the stroke from a visual model, then finally are able to form the stroke from
memory.
| _ ○ + \ / X
Learning to Print Letters: When learning to print letters, children generally progress in
the same developmental sequence…imitate, copy, from memory.
Limitations of Tracing:
Tracing letters certainly helps reinforce what the letter looks like and develops eye-hand
coordination and pencil control. But, the child may not trace the letter the same way every time.
Forming the letter the same way every time helps to establish the motor pattern and sequence
for printing the letter independently and from memory.
Multisensory Teaching:
Often, children are expected to learn to print by tracing letters or copying a model which
is provided. Adding visual and auditory cues helps both the visual and auditory learners.
Printing letters in the air, in sand or rice trays, tracing sandpaper letters, forming letters out of
playdough and making their bodies into the shape of letters, helps the tactile/kinesthetic learner.
Additional Tips for Teaching Lower Case Letters:
Try teaching the letters in groups that have similar motor patterns (see section below on
formation: Wagon Wheels, Fire Poles etc.). If the student is not able to imitate a diagonal
stroke, start with the letters that use vertical, horizontal and curves before adding letters that
require a diagonal stroke. Focus first on formation of the letters. Later, the focus can be on
positioning them appropriately on the lines (see section below on positioning).
Paper:
When focusing on letter formation, it is not necessary to use lines. It is often helpful to
provide blocks in which to form the letters to help with organization of space and motor control.
When focusing on positioning of letters on lines, use paper with a solid ceiling and baseline, and
a dotted or dashed middle line. This type of paper is available in many widths from the internet
and can be found in some notebooks.
© Developed by the Partnering for Change team, CanChild, McMaster University, 2013 Page 2 of 4
□□□□□□
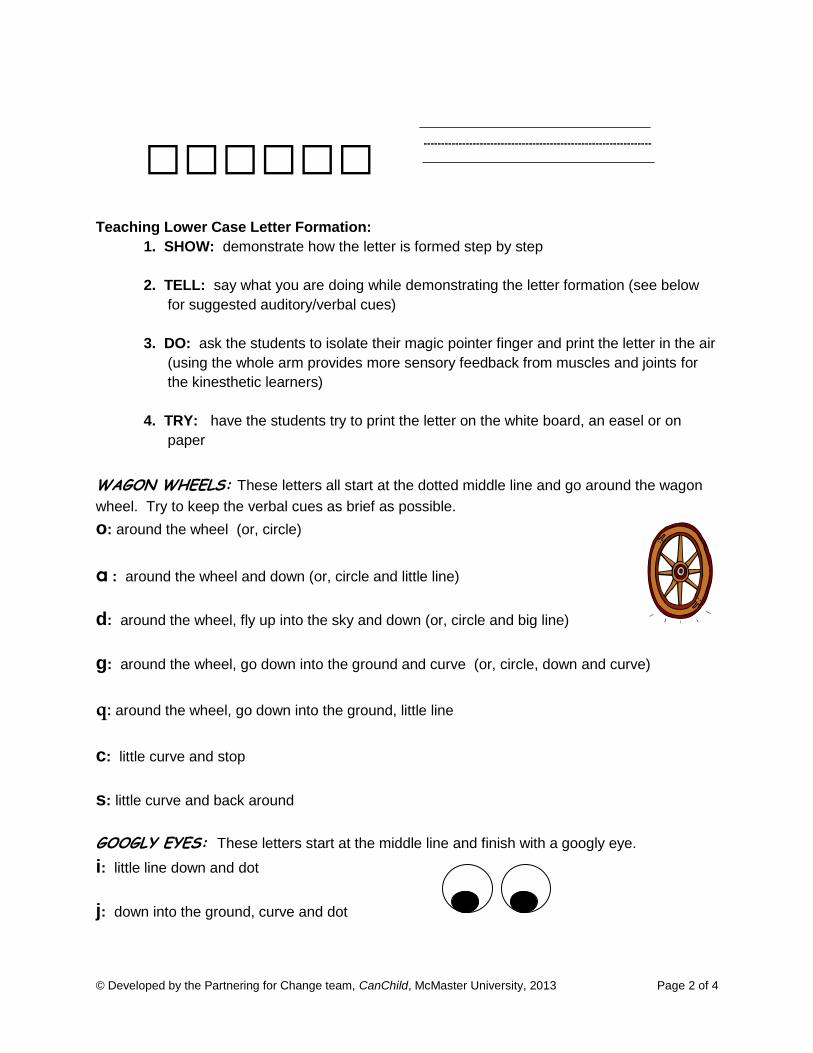
Teaching Lower Case Letter Formation:
1. SHOW: demonstrate how the letter is formed step by step
2. TELL: say what you are doing while demonstrating the letter formation (see below
for suggested auditory/verbal cues)
3. DO: ask the students to isolate their magic pointer finger and print the letter in the air
(using the whole arm provides more sensory feedback from muscles and joints for
the kinesthetic learners)
4. TRY: have the students try to print the letter on the white board, an easel or on
paper
WAGON WHEELS: These letters all start at the dotted middle line and go around the wagon
wheel. Try to keep the verbal cues as brief as possible.
o: around the wheel (or, circle)
a : around the wheel and down (or, circle and little line)
d: around the wheel, fly up into the sky and down (or, circle and big line)
g: around the wheel, go down into the ground and curve (or, circle, down and curve)
q: around the wheel, go down into the ground, little line
c: little curve and stop
s: little curve and back around
GOOGLY EYES: These letters start at the middle line and finish with a googly eye.
i: little line down and dot
j: down into the ground, curve and dot
----------------------------------------------------------------------------------------------------------------------------------

© Developed by the Partnering for Change team, CanChild, McMaster University, 2013 Page 3 of 4
FIRE POLES: These letters start at the top line and slide down the fire pole.
I: slide down
t: slide down and cross
b: slide down, up and around
h: slide down, up and over the hill
k: slide down, kick in, kick out
POGO STICKS: These letters start at the middle line, slide down and bounce back up like a
pogo stick.
n: down, up and over, bump the bottom
m: down, up and over, bump the bottom, up and over, bump the bottom
r: down, up and over
p: down into the ground, up and around
SLIDE LETTERS: These letters start at the middle line and slide down the hill.
v: slide down, climb up
w: slide down, climb up, slide down, climb up
y: little slide down, big slide down into the ground
x: little slide, little slide across
ODD BALLS: These letters don’t fit into the other groups and must be learned separately.
e: drive out of the garage and around the corner
f: curve up and over, down to bump the bottom and across (or, candy cane and across)
u: down, curve, up and down to bump the bottom
z: across, slide down, across the bottom (or, make a 7 then across the bottom)
© Developed by the Partnering for Change team, CanChild, McMaster University, 2013 Page 4 of 4
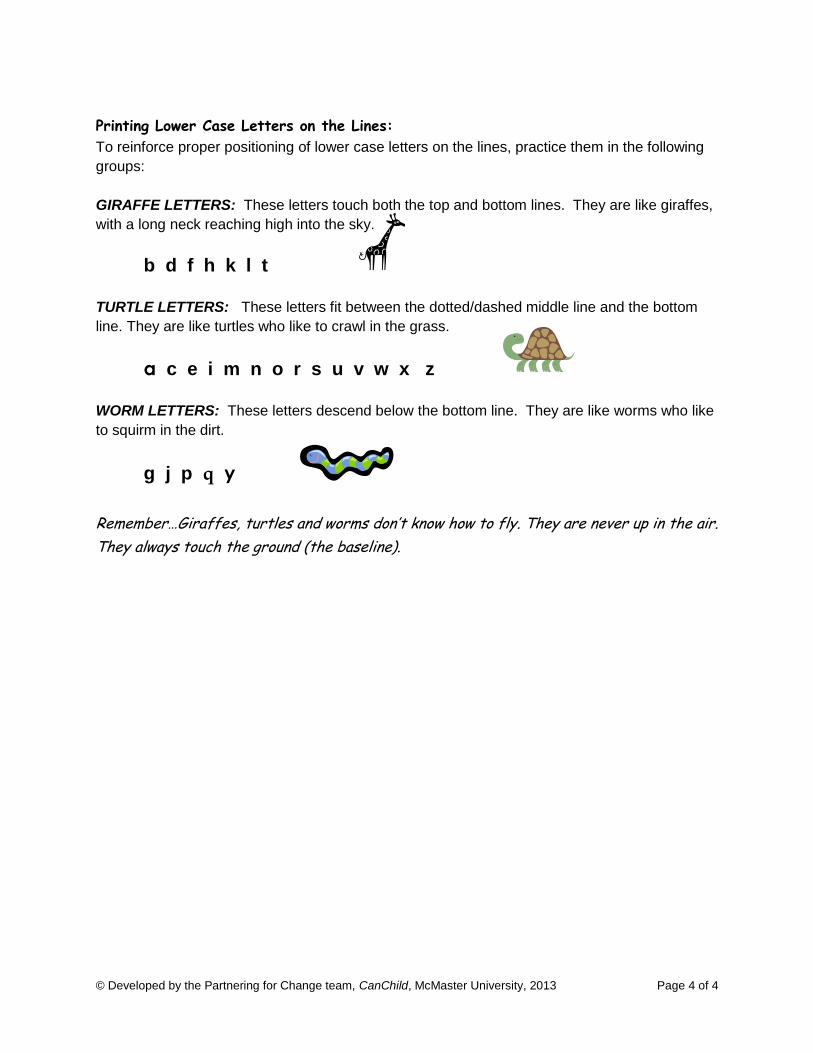
Printing Lower Case Letters on the Lines:
To reinforce proper positioning of lower case letters on the lines, practice them in the following
groups:
GIRAFFE LETTERS: These letters touch both the top and bottom lines. They are like giraffes,
with a long neck reaching high into the sky.
b d f h k l t
TURTLE LETTERS: These letters fit between the dotted/dashed middle line and the bottom
line. They are like turtles who like to crawl in the grass.
a c e i m n o r s u v w x z
WORM LETTERS: These letters descend below the bottom line. They are like worms who like
to squirm in the dirt.
g j p q y
Remember…Giraffes, turtles and worms don’t know how to fly. They are never up in the air.
They always touch the ground (the baseline).
© Developed by the Partnering for Change team, CanChild, McMaster University, 2013 Page 1 of 3
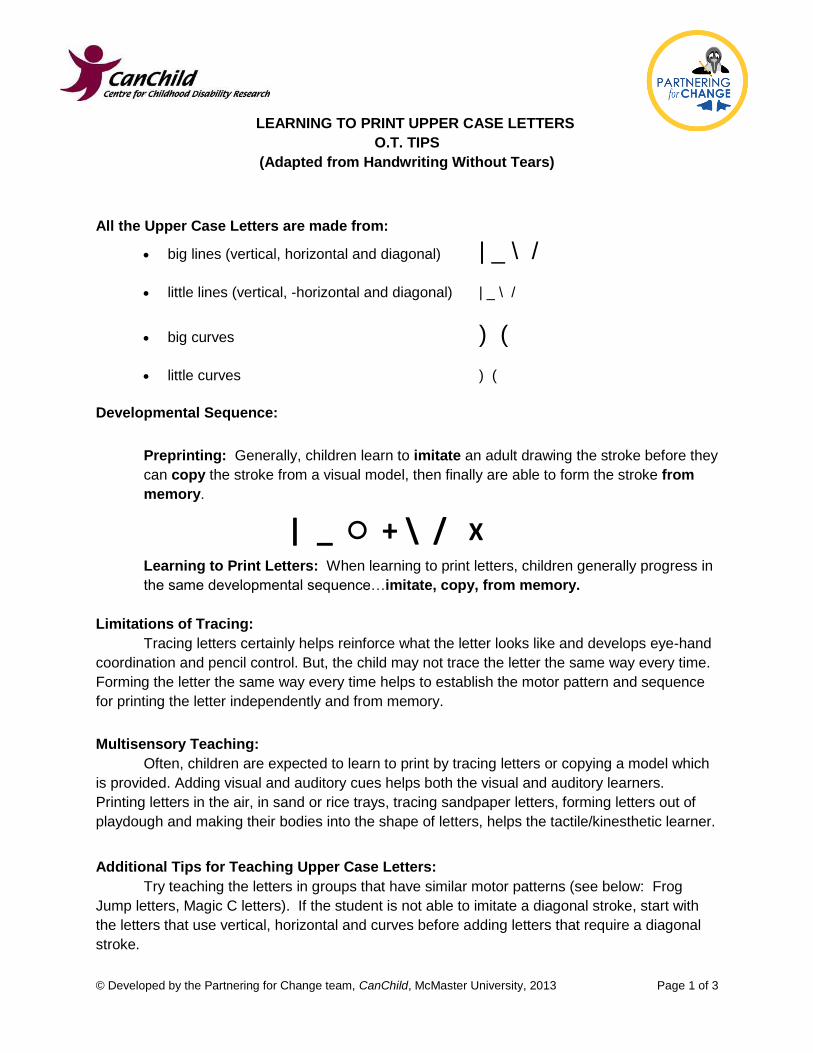
LEARNING TO PRINT UPPER CASE LETTERS
O.T. TIPS
(Adapted from Handwriting Without Tears)
All the Upper Case Letters are made from:
big lines (vertical, horizontal and diagonal) | _ \ /
little lines (vertical, -horizontal and diagonal) | _ \ /
big curves ) (
little curves ) (
Developmental Sequence:
Preprinting: Generally, children learn to imitate an adult drawing the stroke before they
can copy the stroke from a visual model, then finally are able to form the stroke from
memory.
| _ ○ + \ / X Learning to Print Letters: When learning to print letters, children generally progress in
the same developmental sequence…imitate, copy, from memory.
Limitations of Tracing:
Tracing letters certainly helps reinforce what the letter looks like and develops eye-hand
coordination and pencil control. But, the child may not trace the letter the same way every time.
Forming the letter the same way every time helps to establish the motor pattern and sequence
for printing the letter independently and from memory.
Multisensory Teaching:
Often, children are expected to learn to print by tracing letters or copying a model which
is provided. Adding visual and auditory cues helps both the visual and auditory learners.
Printing letters in the air, in sand or rice trays, tracing sandpaper letters, forming letters out of
playdough and making their bodies into the shape of letters, helps the tactile/kinesthetic learner.
Additional Tips for Teaching Upper Case Letters:
Try teaching the letters in groups that have similar motor patterns (see below: Frog
Jump letters, Magic C letters). If the student is not able to imitate a diagonal stroke, start with
the letters that use vertical, horizontal and curves before adding letters that require a diagonal
stroke.

© Developed by the Partnering for Change team, CanChild, McMaster University, 2013 Page 2 of 3
Teaching Upper Case Letter Formation:
1. SHOW: demonstrate how the letter is formed step by step
2. TELL: say what you are doing while demonstrating the letter formation (see below
for suggested auditory/verbal cues)
3. DO: ask the students to isolate their magic pointer finger and print the letter in the air
(using the whole arm provides more sensory feedback from muscles and joints for
the kinesthetic learners)
4. TRY: have the students try to print the letter on the white board, an easel or on
paper with a top and bottom line
FROG JUMP CAPITALS: These letters all start with a big line down and a frog jump back to
the top. Try to keep the verbal cues as brief as possible. (Additional words are suggested in
the brackets for use if necessary.)
F: big line down, frog jump, little line (at the top), little line (in the middle)
E: big line down, frog jump, little line (at the top), little line (in the middle), little line (at the
bottom)
D: big line down, frog jump, big curve
P: big line down, frog jump, little curve (to the middle)
B: big line down, frog jump, little curve (to the middle), little curve (to the bottom)
Remember…work on these only if the child is able to imitate a diagonal line.
R: big line down, frog jump, little curve (to the middle), slide down (or kicks out)
N: big line down, frog jump, slide down, climb up
M: big line down, frog jump, slide down, climb up, slide down
MAGIC C LETTERS: These letters all start with a “Magic C” curve. Try to keep the verbal
cues as brief as possible. (Additional words are suggested in the brackets for use if necessary.)
C: big curve

© Developed by the Partnering for Change team, CanChild, McMaster University, 2013 Page 3 of 3
O: magic C, keep on going, stop at the top
Q: magic C, keep on going, stop at the top, jump down, little line
G: magic C, fly up like a helicopter, little line in to land
S: little magic C, curve back
OTHER CAPITALS: Try to keep the verbal cues as brief as possible. (Additional words are
suggested in the brackets for use if necessary.)
H: big line down, jump, big line down, little line across (the middle)
L: big line down, little line across
U: big line down, curve, big line up
I: big line down, little line across (the top), little line across (the bottom)
T: big line down, jump, little line across (the top)
J: big line down, curve, jump, little line across (the top)
Remember….work on these only if the child is able to imitate a diagonal line.
K: big line down, jump, kick in (to the middle), kick out
V: big line slides down, climb up
W: big line slides down, climb up, slide down, climb up
A: big line slides down, jump up, big line slides down, little line across
X: big line slides down (to the bottom corner), jump (to the other top corner), big line slides
down (to the other bottom corner)
Y: little slide, big slide
Z: little line across, slide down, little line across