preparation of mouse retinal slices and identification of...
TRANSCRIPT

Preparation of mouse retinal slices and identification of rod bipolar cells (RBCs)
K. Essin, 2012
• Solutions, electrodes, application pipettes and materials • Retinal slices preparation
• Targeting and identification of rod bipolar cells in retinal slices • Preparation and handling precautions
• Cells survival and functionality of application system

Solutions, electrode and application pipettes
• Bath solution (mM): NaCl 122.5, KCl 5, MgCl2 1, CaCl2 2, NaH2PO4 1.25, NaHCO3 26, HEPES 10, EGTA 2, glucose 20 (pH adjusted to 7.4 with carbogen). Osmolarity ~315 mOsm.
• Pipette solution (mM): Cs-gluconate 120, CaCl2 1, MgCl2 1, HEPES‐Na 10, EGTA 11,TEA‐Cl 10 (pH adjusted to 7.2 with CsOH). Osmolarity ~305 mOsm.
For patch-clamp recordings from a RBC soma the “ideal” pipette resistance is ~ 8 MOm . Patch pipettes of ~5 MOm can be fabricated with a puller from glass tubes ( e.g. GB150F-8P, www.science-products.com) and fire polished to 8 MOm with a microforge. Fabricate drug application pipettes of ~5µm tip diameter for a picospritzer (e.g. PDES-DXH, www.npielectronic.com) using same puller.
Keep bath solution at room temperature. Do not freeze! Prepare fresh each day before operation and bubble with carbogen, O2 95%, CO2 5%, for at least 30 min. A cold solution could reduce the glutamate-evoked responses of bipolar cells.

Materials and equipment list I Petri dishes, 50mm and 90mm. A piece of filter paper ~ 5 x 5 cm. Two plastic Pasteur pipettes. Ethanol 70%. Microscope slides ca. 76 x 26 mm, Menzel, SuperFrost, ISO 8037/1. A binocular microscope (e.g. Olympus SZ51).
Millipore nitrocellulose membrane gridded filter type 0.8µm AABG (www.millipore.com ).
Plastic coverslips, 25mm diameter ( Sarstedt, No. 83.1840, www.sarstedt.com )
Baysilone-Paste (GE Bayer Silicones) or Dow Corning (R) high vacuum grease.
Paste/grease home-made applicator (3 ml syringe with a plastic tip).
Curved-tip scissors to extract the eyes.
Syringe Needle G27, 0,42 x 22 mm, B. Braun Melsungen AG to puncture the eyeball.
Scalpel blades #10, FST No. 10010-00.
Fine scissors to cut the sclera into two half-spheres.
Two fine forceps (#5 or #55) and one coarse forceps.

Materials and equipment list II Home-made slicer based on Newport M460-P ( US PAT 6.163.147, www.newport.com )
Blades for the home made slicer (Martor Solinger, ww.mator.com, CatNr 1044.29, Argentax).
Slicing chamber fabricated from a microscope slide.
Slice storage chamber made from Petri dishes.
Recording chamber.

Preparing I
1. Cut out the tip of a plastic Pasteur pipette. The pipette will be used to transfer an eye.
2. Prepare 1 liter bottle of fresh bath solution and bubble with carbogen (O2 95%, CO2 5%) for at least 30 min.
5. Apply two drops of grease on each of these pieces to fix the slices later on (video).
3. Cut out rectangular pieces of nitrocellulose filter to mount retina.
4. Cut out several rectangular pieces of plastic coverslip to mount slices.
a carbogen line
original filter
a rectangular piece
original coverslip
a rectangular piece Video

Prepare the slicing chamber and the slicer • Insert a new blade to the slicer. Do not fix it tightly. • Apply two drops of grease to hold the slicing chamber • Apply two drops of grease to hold retina in the slicing chamber • Fix the slicing chamber in the slicer • Gently press the blade against the surface of the slicing chamber to adjust blade position
and fix the blade tightly.
Blade
Slicing chamber
Preparing II
Slicer without chamber Slicer with chamber
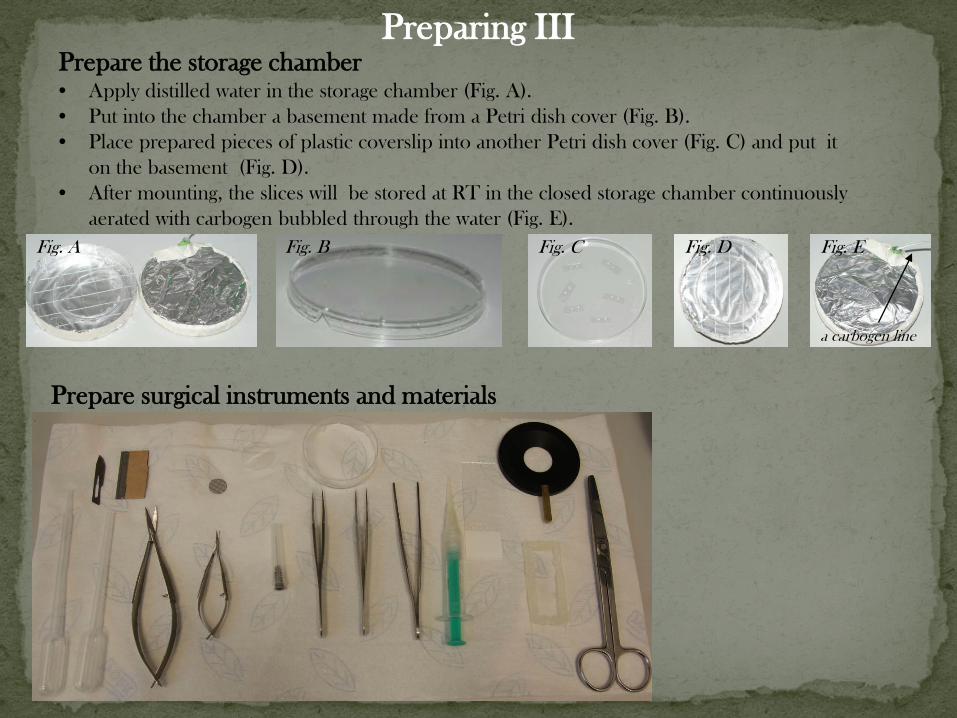
Preparing III Prepare the storage chamber • Apply distilled water in the storage chamber (Fig. A). • Put into the chamber a basement made from a Petri dish cover (Fig. B). • Place prepared pieces of plastic coverslip into another Petri dish cover (Fig. C) and put it
on the basement (Fig. D). • After mounting, the slices will be stored at RT in the closed storage chamber continuously
aerated with carbogen bubbled through the water (Fig. E).
Fig. A Fig. B Fig. C Fig. D Fig. E
a carbogen line
Prepare surgical instruments and materials

Retinal slices preparation
• Kill a mouse by cervical dislocation • Extract an eye
• Puncture the eye and cut out the cornea • Remove vitreous and isolate retina
• Cut out a piece of retina and mount it on a piece of nitrocellulose filter
• Prepare 200 µm slices and mount each slice on a piece of plastic cover slip • Put the slices in the storage chamber
Retinal slices preparation

Retinal slices preparation
Video
Quickly extract an eye using curved scissors
Avoid skin cutting and blood appearance. Blood could be toxic to retina.

Retinal slices preparation
• Transfer the eye to a filter paper. • Puncture the eye with a fine needle. Puncture site is marked with a blue circle in the figure below. • Insert one tip of the forceps in the puncture hole and hold the eye. Do not tough retina with the forceps. • Make an additional incision for the scissors (marked with a red circle). • Transfer the eye back to the Petri dish holding it with the forceps. • Then put the scissors into the incision and cut out the cornea.
Puncture the eye and cut out the cornea
Scissors
Needle

Retinal slices preparation
Puncture here with a fine needle
Transfer the eye back to the Petri dish with a forceps.
Still holding with the forceps, cut out the cornea.
Puncture the eye, cut out the cornea and sclera
Transfer the eye to a filter paper with a plastic Pasteur pipette
Use forceps to gently remove vitreous attached to the retina.
vitreous
Cut the sclera. Try not to cut retina.
retina
Video
1
2
3
4
5
6

Retinal slices preparation
Use forceps to gently remove sclera attached to the retina.
Sclera Retina. Photoreceptor cell layer is up.
The optic disc, a part of the retina called “the blind spot
Cut the retina into two pieces. For slicing, use a central part of the retina,
which was less damaged by forceps (marked red).
Remove sclera and cut the retina into two pieces

Cut out a square piece of the retina with a scalpel
Retinal slices preparation
Place one half of the retina on a clean micrscope slide. Photoreceptor side down.
Remove excessive liquid with paper towels and flatten the retina with forceps
Cut a piece of retina by rolling a scalpel blade across it.
A square piece of central retina. Ready to be mounted.
Filter paper to remove excessive liquid
central retina
1
2
3
4
Video
Video
a scalpel

Attach the retina to the filter
Video 1 Video 2
Filter, grid side faces up.
Filter, grid side faces up.
Place the filter, grid side faces up, on the retina, oriented photoreceptor-side down (Video 1). Wait until the filter became wet and apply a drop of batch solution to the filter (Video 2). Filter with retina will de-attach from the microscope slide.
Slide
1
2
Retinal slices preparation
Retina, photoreceptor-side down.
Retina, photoreceptor-side down.

Put the mounted retina into a Petri dish filled with a fresh portion of carbogen bubbled solution. Cut filter paper with retina to a smaller square. It improves mechanical stability of the future prep.
Place the filter, to which the retina is attached, into the slicing chamber filled with a fresh portion of carbogen bubbled solution. Attach the filter to the bottom of the chamber with grease. Minimize share stress by crossing the border between the air and solution( see the slide Precautions and tips for the retinal slices handling and preparation about share stress).
1
2
3
retina
filter
Mount the retina into the slicing chamber I
Slicing chamber Slicing chamber
scalpel
Retinal slices preparation

Retinal slices preparation
Use grease to mount slicing chamber with the retina into the slicer.
Cut line
Mount the retina into the slicing chamber II
Blade
Slicing chamber
Slicer without chamber Slicer with chamber
Grease

Retinal slices preparation
Cut 200-µm thick retinal slices
Video
Press the blade gently but hard. A click sound confirms that the nitrocellulose filter is well cut.

Retinal slices preparation
Place the slicing chamber with the cutted retina undo binocular.
Separate slices and mount them on coverslips I
Place a piece of plastic coverslip with grease drops on it to the slicing chamber.
a piece of plastic coverslip
Slicing chamber
Storage chamber
slicing chamber
grease slicing chamber
plastic coverslips

Separate slices and mount them on coverslips II
Separate a slice
1
2
3
4
Attach to a coverslip
Rotate a slice
Transfer to a cover slip
Separate a slice
Retinal slices preparation

Transfer the slice to the storage chamber with forceps. Minimize share stress by crossing the border between the air and solution ( see slides Placing slices in the recording chamber and Precautions and tips for the retinal slices handling and preparation about share stress.)
Apply a drop of fresh carbonated bath solution to the slice
Put the slices in the storage chamber I
Fig. A Fig. B
Retinal slices preparation

Put the slices in the storage chamber II
Slice storage chamber continuously aerated with carbogen bubbled through the water
the water
carbogen
slices water
each slice is covered by a drop of the bath solution
Retinal slices preparation

Before placing a slice in the recording chamber, apply two drops of grease to the bottom of the chamber (Fig. A and B) and fill the chamber with the carbogen-oxygenated bath solution. Then put into the chamber a piece of plastic cover slip with a slice. By crossing a boder between air and solution, orient the slice as shown below to minimize slice damage ( Fig. A).
Fig. A
Fig. B
Placing slices in the recording chamber

Retinal slice orientation

There are at least nine morphological types of cone bipolar (CB) and one type of rod bipolar (RB) cells in the mouse retina (Ghosh et al., 2004). The rod bipolar cell body was usually high in the inner nuclear layer (INL) and the stout axon descended into the lower inner plexiform layer (IPL), where it terminated in a small group of fat varicosities.
38 % of bipolar cells are RB cells ( calculated from Table 1 in Wässle et al., 2009 )
Types of bipolar cells in the mouse retina. Krishna K Ghosh et al. The Journal of comparative neurology 469 (1), 70-82 (26 Jan 2004) Cone contacts, mosaics, and territories of bipolar cells in the mouse retina. Heinz Wässle et al. The Journal of neuroscience 29 (1), 106-17 (07 Jan 2009)
Morphological identification of mouse rod bipolar cells I

Rod bipolar cells can be identified on the basis of their characteristic shape: a spheroid soma of 5–8 µm in diameter and a relatively stout axon (diameter 0.5 µm) and a relatively large lobulated terminal (diameter 2 µm). Of the 112 bipolar cells that had morphological features suggestive of rod bipolar cells (large terminals, thick axons), 93 (roughly 83%) double-labeled for PKC, confirming their identity as rod bipolar cells. Zhen-Yu Zhou et al., 2006
Morphological identification of mouse rod bipolar cells II
Capacitance measurements in the mouse rod bipolar cell identify a pool of releasable synaptic vesicles. Zhen-Yu Zhou et al. Journal of neurophysiology 96 (5), 2539-48 (Nov 2006)
Rod bipolar cell. Scale bar = 10 μm.

Cell bodies from rod bipolar cells were targeted according to their relatively large size and typical location in the distal part of the inner nuclear layer (INL), immediately apposed to the outer plexiform layer (OPL) (Oltedal et al 2006). Below are shown the slices obtained from 4 weeks old BL6 mouse. ROIs mark bipolar cell bodies (presumably rod bipolar cells). Crosses mark wrong choices (swelling and unhealthy cells ). Avoid a cell that has a clearly pronounced initial axon segment, what indicates cell swelling.
INL INL INL
Patch-clamp investigations and compartmental modeling of rod bipolar axon terminals in an in vitro thin-slice preparation of the mammalian retina. Leif Oltedal et al. Journal of neurophysiology 97 (2), 1171-87 (Feb 2007)
Targeting and identification of rod bipolar cells in retinal slices I

Targeting and identification of rod bipolar cells in retinal slices II The retinal slice. Sulphorodomine 101 ( 1µM) was included into the pipette to visualize cell morphology. The cell was identified as a rod bipolar cell because of a) typical location of the cell body in the distal part of the inner nuclear layer (INL). b) the axon projected through the retinal layers and terminated with large lobulated terminals in the IPL, at the ganglion cell layer.
INL
Sulphorodomine 101 Bright field microscopy image
Application pipette Patch pipette

For patch-clamp recordings from a RBC soma the “ideal” pipette resistance is ~ 8 MOm . Patch pipettes of ~5 MOm can be fabricated with a puller from glass tubes ( e.g. GB150F-8P, www.science-products.com) and fire polished to 8 MOm with a microforge. Fabricate drug application pipettes of ~5µm tip diameter for a picospritzer (e.g. PDES-DXH, www.npielectronic.com) using same puller. An access resistance of ~50 Mom is acceptable, taking in mind cell´s high input resistance. Healthy rod bipolar cells should have input resistance more than 1GOm ( up to 3GOm, Cangiano et al., 2007 ). The membrane capacitance is about 3.8 pF (Zhou et al., 2006). The rod bipolar cell resting potential in darkness is -60 mV (Wu et al. 2004).
Passive electrical properties of RBCs
High-pass filtering of input signals by the Ih current in a non-spiking neuron, the retinal rod bipolar cell. Cangiano et al., PloS One, 2007 Capacitance measurements in the mouse rod bipolar cell identify a pool of releasable synaptic vesicles. Zhen-Yu Zhou et al. Journal of neurophysiology 96 (5), 2539-48 (Nov 2006) Synaptic circuitry mediating light-evoked signals in dark-adapted mouse retina. Samuel M Wu, Fan Gao, and Ji-Jie Pang Vision research 44 (28), 3277-88 (Dec 2004)

The glycine or GABA evoked responses can be obtained to check the survival of the cells and functionality of application system.
20 pA
100 pA
1 s
1 sholding potential 0 mV
holding potential +40 mV
Glycine 300 nM
Glycine 300 nM
Picospritzer PDES-DXH npi, 4psi application pressure and 0.3 psi holding pressure. Distance from the application pipette of and an ON bipolar cell axon terminal was 100µm approximately. Pipette of 10µm diameter were fabricated by Sutter Instruments P-87 puller from Kimble Glass tube capillary 1.5-1.8 mm ( ArtNr 34500-99, www.hll.de ).
Cells survival and functionality of application system
Retinal rod bipolar axon terminals receive presynaptic input from different types of amacrine cells, some of which are glycinergic (Morkve and Hartveit 2009). Therefore focal application of 300 nM glycine to the axon terminal evokes Cl- outward current recorded from the soma of the retinal rod bipolar cell. For our extra/intracellular solutions ( reversal potential for Cl is ~ - 60mV) the holding potential should be set at 0 mV or above to increase the chloride driving force.
Properties of glycine receptors underlying synaptic currents in presynaptic axon terminals of rod bipolar cells in the rat retina. Svein Harald Mørkve and Espen Hartveit The Journal of physiology 587 (Pt 15), 3813-30 (01 Aug 2009)

Precautions and tips for the retinal slices handling and preparation •Prepare the bath solution for the operation fresh each day. • Use fresh blades for cutting the slices. Use fresh microscope slides or treat the surface of the slides with ethanol. • Slices should be obtained within 10 min after mouse cervical dislocation and will survive within 3 h. • Prepare all possible things before kill a mouse. Use only one eye for the operation. • After killing a mouse by cervical dislocation, quickly remove an eye using curved scissors. Avoid skin cutting and blood appearance. Blood could be toxic to retina. • Do not use a cold solution for the operation. Cold solution may negatively affect glutamate transmission in retina. • Avoid to cut the retina and hold it with a forceps, unless it necessary. • Use a central part of the retina to obtain slices, the part that was minimally stressed during preparation. • Avoid shear stress for the surface of the retinal slices. For that
o Keep each of the prepared slice under a drop of the carbogen-oxygenated bath solution. The surface tension of the drop minimizes the movement of the solution over the slice surface ( see slide Put the slices in the storage chamber II above).
o By mounting a slice in a recording chamber, first fill the chamber with the carbogen-oxygenated bath solution and then put in the slice attached to a piece of plastic cover slip. By crossing a boder between air and solution, orient the slice as shown in the slide Placing slices in the recording chamber above.

Rat retinal slices. Drugs were dissolved in the bath solution and applied from six-barrelled pneumatic puffer pipettes. The tip diameter of each pipette was about 10 µm and the pipettes were placed close (20-25 µm) to the cell. In control experiments all six barrels were filled with the same solution, for example, 2µM GABA, to make sure that each barrel was positioned correctly to allow the test solutions to engulf the recorded cells maximally.
Voltage- and transmitter-gated currents of all-amacrine cells in a slice preparation of the rat retina. R Boos, H Schneider, and H Wässle. The Journal of neuroscience 13 (7), 2874-88 (Jul 1993)
Multiple drug application system