premium business gateway – devg2020 - telstra business gateway – devg2020 dot (digital office...
TRANSCRIPT

Premium Business Gateway – DEVG2020DOT (Digital Office Technology)™ User Guide

Need more support?
1. Installing the Netgear DEVG2020 Gateway
2. Turning on/off WiFi (Wireless)
3. Activate DOT Broadband Back-Up
4. Netgear gateway configuration for Remote Client access
5. Procedure for installing VPN ProSafe Client Lite for Windows
6. How to open a VPN connection with the ProSafe Client
7. Site-to-Site VPN configuration
Appendix 1 – Minimum system requirements for ProSafe VPN Client
Need more support?
If you have questions beyond this guide, we want to help.
To learn more about your Business Broadband or DOT tools and features, visit the Business Broadband support page at https://business.telstra.com.au/t5/How-to/Welcome-to-DOT/ta-p/804 or if you are a DOT customer, visit DOT Online Support page at www.telstra.com/dot/support
To speak with a DOT consultant, or set up a DOT training session, phone us on 13 2000 and say “Digital Office Technology” when prompted. Our consultants are available 24 hours a day.
When calling, please have your Account Number or phone number, including area code, ready for the consultant.
Conventions used in this guide
The following typographical conventions are used in this guide for simplicity and readability:
Web addresses, e-mail addresses and hyperlinks are shown in bold, for example https://www.telstra.com.au/small-business
Need more support?
1. Installing the Netgear DEVG2020 Gateway
2. Turning on/off WiFi (Wireless)
3. Activate DOT Broadband Back-Up
4. Netgear gateway configuration for Remote Client access
5. Procedure for installing VPN ProSafe Client Lite for Windows
6. How to open a VPN connection with the ProSafe Client
7. Site-to-Site VPN configuration
Appendix 1 – Minimum system requirements for ProSafe VPN Client
1. Installing the Netgear DEVG2020 Gateway
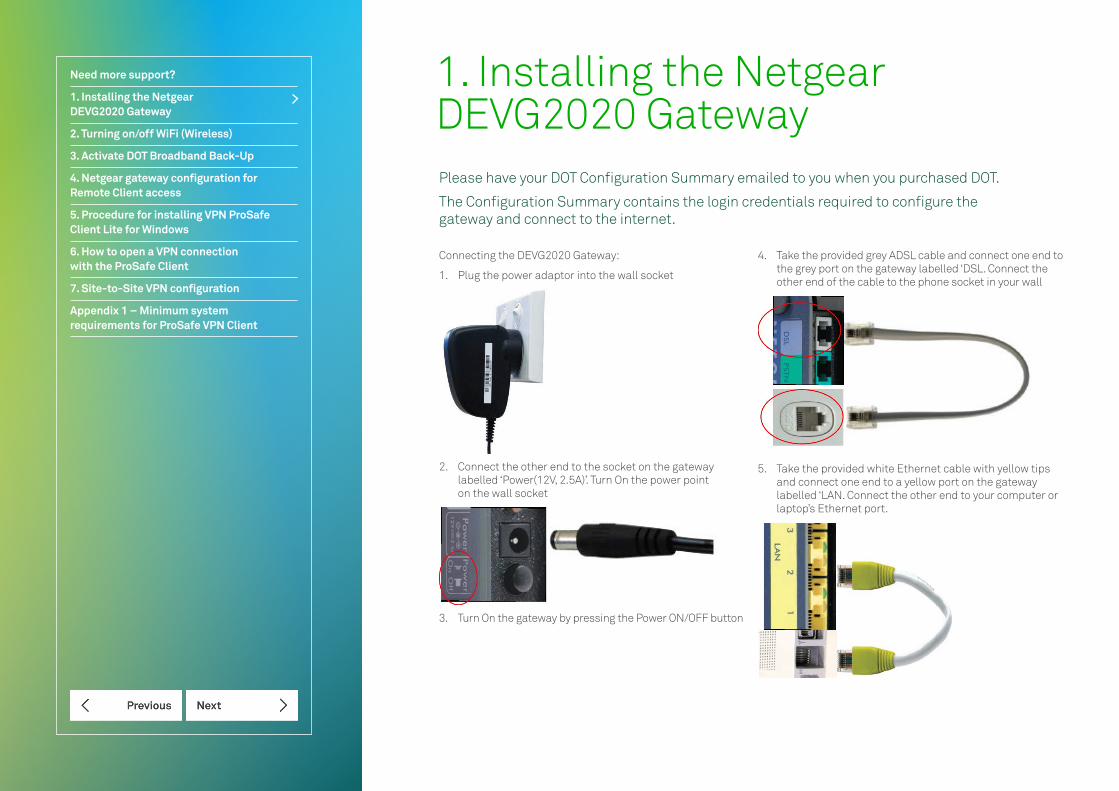
Connecting the DEVG2020 Gateway:
1. Plug the power adaptor into the wall socket
2. Connect the other end to the socket on the gateway labelled ‘Power(12V, 2.5A)’. Turn On the power point on the wall socket
3. Turn On the gateway by pressing the Power ON/OFF button
4. Take the provided grey ADSL cable and connect one end to the grey port on the gateway labelled ‘DSL. Connect the other end of the cable to the phone socket in your wall
5. Take the provided white Ethernet cable with yellow tips and connect one end to a yellow port on the gateway labelled ‘LAN. Connect the other end to your computer or laptop’s Ethernet port.
Please have your DOT Configuration Summary emailed to you when you purchased DOT.
The Configuration Summary contains the login credentials required to configure the gateway and connect to the internet.
Need more support?
1. Installing the Netgear DEVG2020 Gateway
2. Turning on/off WiFi (Wireless)
3. Activate DOT Broadband Back-Up
4. Netgear gateway configuration for Remote Client access
5. Procedure for installing VPN ProSafe Client Lite for Windows
6. How to open a VPN connection with the ProSafe Client
7. Site-to-Site VPN configuration
Appendix 1 – Minimum system requirements for ProSafe VPN Client
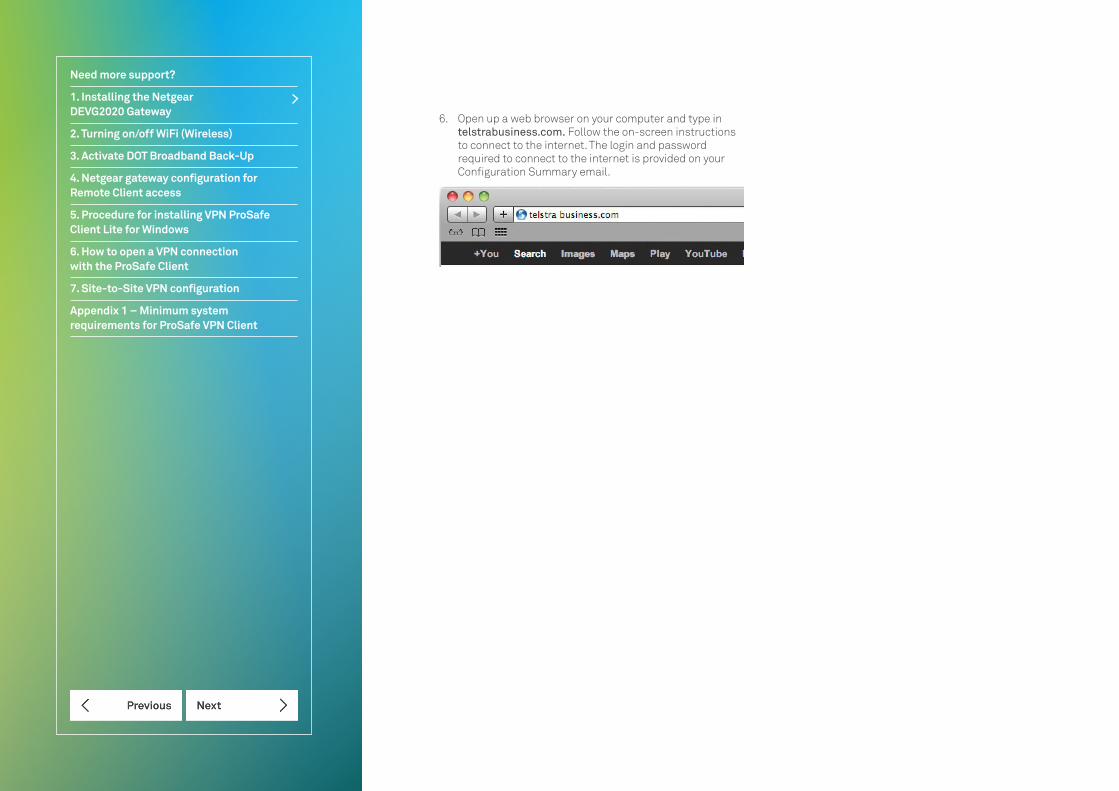
6. Open up a web browser on your computer and type in telstrabusiness.com. Follow the on-screen instructions to connect to the internet. The login and password required to connect to the internet is provided on your Configuration Summary email.

Need more support?
1. Installing the Netgear DEVG2020 Gateway
2. Turning on/off WiFi (Wireless)
2.1. Changing WiFi Credentials
3. Activate DOT Broadband Back-Up
4. Netgear gateway configuration for Remote Client access
5. Procedure for installing VPN ProSafe Client Lite for Windows
6. How to open a VPN connection with the ProSafe Client
7. Site-to-Site VPN configuration
Appendix 1 – Minimum system requirements for ProSafe VPN Client
The DEVG2020 Gateway is delivered with its WiFi turned On and configured with a unique WiFi Id and WPA2 Key (Password). The Id, also known as SSID, and the WPA2 Key, are available on a card provided in the packaging (Figure 1).
Figure 1: WiFi Credentials Card
You can switch Off the WiFi on the router by pressing the WiFi On/Off button on the front of the Gateway (Figure 2).
Figure 2: Turning On/Off the WiFi
2. Turning on/off WiFi (Wireless)
Need more support?
1. Installing the Netgear DEVG2020 Gateway
2. Turning on/off WiFi (Wireless)
2.1. Changing WiFi Credentials
3. Activate DOT Broadband Back-Up
4. Netgear gateway configuration for Remote Client access
5. Procedure for installing VPN ProSafe Client Lite for Windows
6. How to open a VPN connection with the ProSafe Client
7. Site-to-Site VPN configuration
Appendix 1 – Minimum system requirements for ProSafe VPN Client
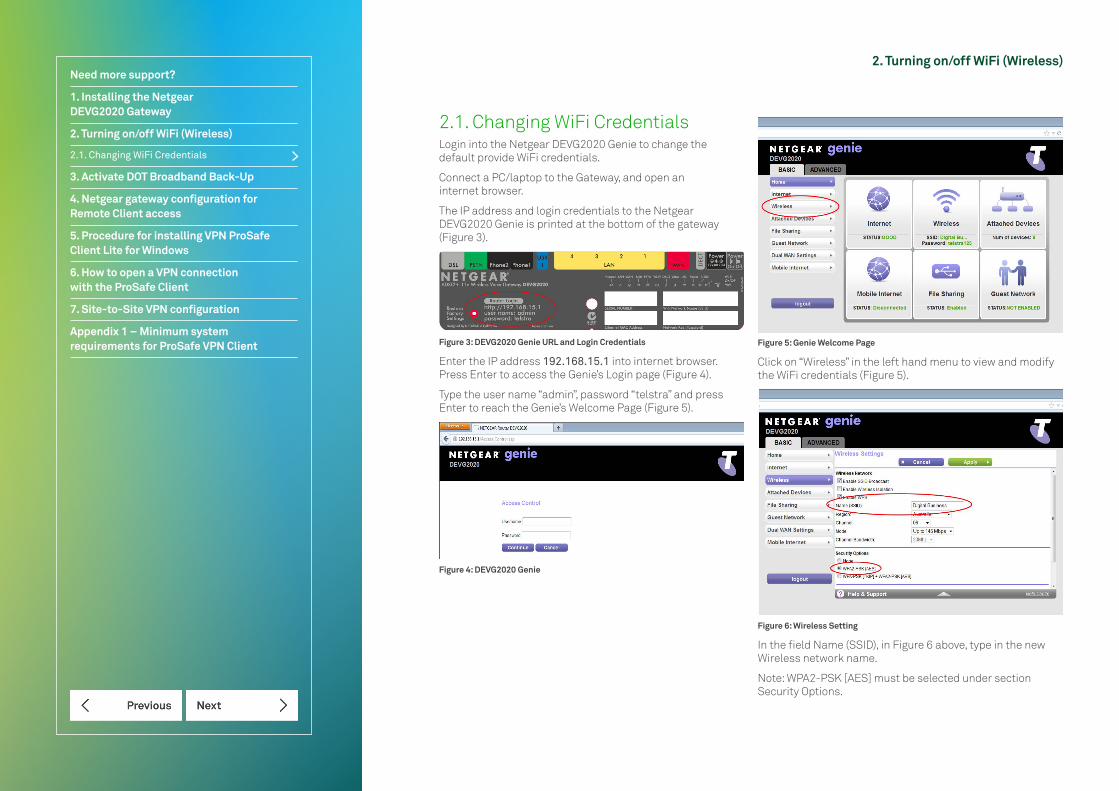
2.1. Changing WiFi CredentialsLogin into the Netgear DEVG2020 Genie to change the default provide WiFi credentials.
Connect a PC/laptop to the Gateway, and open an internet browser.
The IP address and login credentials to the Netgear DEVG2020 Genie is printed at the bottom of the gateway (Figure 3).
Figure 3: DEVG2020 Genie URL and Login Credentials
Enter the IP address 192.168.15.1 into internet browser. Press Enter to access the Genie’s Login page (Figure 4).
Type the user name “admin”, password “telstra” and press Enter to reach the Genie’s Welcome Page (Figure 5).
Figure 4: DEVG2020 Genie
Figure 5: Genie Welcome Page
Click on “Wireless” in the left hand menu to view and modify the WiFi credentials (Figure 5).
Figure 6: Wireless Setting
In the field Name (SSID), in Figure 6 above, type in the new Wireless network name.
Note: WPA2-PSK [AES] must be selected under section Security Options.
2. Turning on/off WiFi (Wireless)

Need more support?
1. Installing the Netgear DEVG2020 Gateway
2. Turning on/off WiFi (Wireless)
2.1. Changing WiFi Credentials
3. Activate DOT Broadband Back-Up
4. Netgear gateway configuration for Remote Client access
5. Procedure for installing VPN ProSafe Client Lite for Windows
6. How to open a VPN connection with the ProSafe Client
7. Site-to-Site VPN configuration
Appendix 1 – Minimum system requirements for ProSafe VPN Client
Scroll down the page to change the WPA2 key in the field name Paraphrase. Press Apply to save changes (Figure 7).
Figure 7: Changing WPA2 Key (Password)
Figure 8: Wireless Network credentials updated
The new SSID and WPA2 key will displayed on the welcome page (Figure 8).
Note: Computers, Tablets and phones must be reconfigured to connect to the Wireless network using the new credentials. This includes previously connected devices.
2. Turning on/off WiFi (Wireless)

Need more support?
1. Installing the Netgear DEVG2020 Gateway
2. Turning on/off WiFi (Wireless)
3. Activate DOT Broadband Back-Up
4. Netgear gateway configuration for Remote Client access
5. Procedure for installing VPN ProSafe Client Lite for Windows
6. How to open a VPN connection with the ProSafe Client
7. Site-to-Site VPN configuration
Appendix 1 – Minimum system requirements for ProSafe VPN Client
Figure 9: DOT Broadband Back-up.
Enter the IP address 192.168.15.1 into internet browser and press Enter to access the Genie’s Login page (Figure 4).
Type the user name “admin”, password “telstra” and press Enter to reach the Genie’s Welcome Page (Figure 9).
Figure 9: Genie Welcome Page
Click on “Mobile Internet” in the left hand menu (Figure 9) to reach the Mobile Set-up page (Figure 10).
Figure 10: Mobile Set-up
Set “Does your Internet connection require a login?” to No
Select “telstra.extranet” for the APN.
Type in “*99***1#” in the Dial String.
Click Apply to save the changes and press Logout .
Connect the Mobile broadband USB modem to the either USB ports on the gateway.
Reboot the Gateway by turning Off the power and waiting 1 minute before turning it On.
3. Activate DOT Broadband Back-Up

Need more support?
1. Installing the Netgear DEVG2020 Gateway
2. Turning on/off WiFi (Wireless)
3. Activate DOT Broadband Back-Up
4. Netgear gateway configuration for Remote Client access
4.1. Configuration of the gateway via the GUI
4.2. Configuration of the gateway via the Wizard
5. Procedure for installing VPN ProSafe Client Lite for Windows
6. How to open a VPN connection with the ProSafe Client
7. Site-to-Site VPN configuration
Appendix 1 – Minimum system requirements for ProSafe VPN Client
This section describes the connection configuration details for remote client use to access the Gateway.
4.1. Configuration of the gateway via the GUIThis section outlines how to configure VPN access from the Netgear gateway GUI after the initial Wizard installation
1. Under the ‘ADVANCED’ tab, click on the ‘VPN’ menu and then click on the ‘Manage VPN’ link.
Configurig VPN Connection
2. Under the ‘Remote Client to GW VPN Configuration’ heading, Click the ‘Edit’ button to activate the Pre-Shared Key (PSK) textbox.
3. Enter a Pre-Shared that will be used for the Phase 1 IKEv1 negotiation and then click the adjacent ‘Save’ button. (This is an alpha-numeric string with a maximum length of 32 characters)
4. In the ‘VPN remote Virtual IP’ and ‘Mask’ fields, enter the IP address and Subnet Mask. This will determine the pool of IP addresses to assign to the Clients connecting through VPN. (NOTE: this IP address range entered here must be separate to the LAN IP address setup for this DEVG2020 device.)
5. Click the ‘Save’ button.
Adding Remote VPN Users
6. Under the ‘VPN Users’ heading, Click on the ‘Add’ button.
7. Enter the Username and Password for the client to connect with into the corresponding text boxes
8. Click on the ‘Save’ button to confirm the details.
9. Repeat steps 7-9 for any additional client users.
Enabling VPN Status
10. Under the ‘VPN Status’ heading, click on the ‘Enable’ radio button.
11. Click on the ‘Apply’ button at the top of the frame.
4. Netgear gateway configuration for Remote Client access

Need more support?
1. Installing the Netgear DEVG2020 Gateway
2. Turning on/off WiFi (Wireless)
3. Activate DOT Broadband Back-Up
4. Netgear gateway configuration for Remote Client access
4.1. Configuration of the gateway via the GUI
4.2. Configuration of the gateway via the Wizard
5. Procedure for installing VPN ProSafe Client Lite for Windows
6. How to open a VPN connection with the ProSafe Client
7. Site-to-Site VPN configuration
Appendix 1 – Minimum system requirements for ProSafe VPN Client
4.2. Configuration of the gateway via the Wizard1. Tick the ‘Setup Remote Access (VPN)’ checkbox in the Wizard, and click the ‘Next’ button.
Initial page of setup Wizard
2. Tick the ‘Enable VPN’ checkbox.
3. Enter a Pre-Shared Key (PSK) password. This is an alpha-numeric string with a maximum length of 32 characters.
4. In the ‘VPN Client IP Pool’ and ‘Subnet Mask’ fields, enter the IP address and Subnet Mask. This will determine the pool of IP addresses to assign to the Clients connecting through VPN. Note that this IP address range must be separate to the LAN IP address setup for the DEVG2020 device – eg if the gateway is configured with the default LAN ip address range of 192.168.15.1, you might choose 192.168.16.1 for the VPN client users.
5. Click the ‘Next’ button.
VPN configuration entry page
6. Click the ‘Add’ button to set up user accounts for the VPN client.
7. Enter the Username and Password for the client to connect with into the corresponding text boxes.
8. Click the ‘Save’ button to confirm the details.
9. Repeat steps 6-9 for any additional clients. (Note multiple clients can use the same login credentials.)
10. Click on the ‘Next’ button to finalise the process.
At this point, the remote client to GW VPN server feature is configured and running on the device.
Configuring VPN Remote Client users
Adding VPN Remote Client users
4. Netgear gateway configuration for Remote Client access

Need more support?
1. Installing the Netgear DEVG2020 Gateway
2. Turning on/off WiFi (Wireless)
3. Activate DOT Broadband Back-Up
4. Netgear gateway configuration for Remote Client access
5. Procedure for installing VPN ProSafe Client Lite for Windows
6. How to open a VPN connection with the ProSafe Client
7. Site-to-Site VPN configuration
Appendix 1 – Minimum system requirements for ProSafe VPN Client
In order to access your gateway remotely over secure VPN, you will need to install the ProSafe Lite client on a Windows PC (with minimum system requirements as outlined in Appendix 1), as per the procedure below:
1. Download the ProSafe Lite VPN client zip file from www.telstra.com/business/vpnsetup and save it on your pc.
2. Navigate to the folder where you saved the downloaded zip file.
3. Right click on the zip file and select “extract all”
4. Choose a folder to extract it to and click extract
5. Double click on the file NETGEARVPNClientLite_Setup.exe to run the installation process. Follow the prompts through the install process.
6. After completing the installation, launch the VPN client.
7. Enter your License Number and email address when prompted for Software Activation, and click “Next”, as per screen shots below. You will find the license number on a card in the box that the DEVG 2020 gateway came in. Each license number can be used for up to five clients. Note that you must be connected to the internet in order to complete the activation.
Click “Run” after successful activation.
8. The application will now be running in the system tray. Right click the icon in the system tray, and select “Configuration Panel”.
9. Click the “Configuration” pull down menu in the top left corner, and select “Import”.
5. Procedure for installing VPN ProSafe Client Lite for Windows

Need more support?
1. Installing the Netgear DEVG2020 Gateway
2. Turning on/off WiFi (Wireless)
3. Activate DOT Broadband Back-Up
4. Netgear gateway configuration for Remote Client access
5. Procedure for installing VPN ProSafe Client Lite for Windows
6. How to open a VPN connection with the ProSafe Client
7. Site-to-Site VPN configuration
Appendix 1 – Minimum system requirements for ProSafe VPN Client
10. In the “Look in:” field, navigate to the folder where you extracted the downloaded zip file, and then select the file “global default settings config.tgb” and click “Open”
11. The Configuration Panel will now look like the screen capture below:
12. Select “Fixed Line Config” on the left side navigation pane, and enter your IP address and Pre-shared key in the “Authentication” tab to match the configuration in Netgear DEVG2020 gateway, as per screen shot below. Do not change any other settings in this tab.
13. Select the “Advanced” tab and populate User Name and Password set up on the Netgear gateway VPN settings, as per screen shot below. Do not change any other settings in this tab.
5. Procedure for installing VPN ProSafe Client Lite for Windows

Need more support?
1. Installing the Netgear DEVG2020 Gateway
2. Turning on/off WiFi (Wireless)
3. Activate DOT Broadband Back-Up
4. Netgear gateway configuration for Remote Client access
5. Procedure for installing VPN ProSafe Client Lite for Windows
6. How to open a VPN connection with the ProSafe Client
7. Site-to-Site VPN configuration
Appendix 1 – Minimum system requirements for ProSafe VPN Client
14. Next select “Tunnel” on the left side navigation pane. Check and confirm that “Remote LAN address” matches the LAN IP Address range configured on the Netgear gateway. If you are using the default 192.168.15.1, then no change is required. Do not change any other settings on this tab, or the “Advanced” tab.
15. Next click apply and save, as per screen shot below
16. Next click the Configuration pull down menu in the top left corner of the Configuration Pz`anel, and select “Export”. Choose whether you want to secure the configuration with a password, then enter a name for the configuration, and click “Save”, as per screen shot below.
17. If you have Mobile Broadband backup, and wish to be able to use VPN when Mobile Broadband is in use for the WAN connection on your Netgear DEVG2020 gateway, you will need to setup a second configuration. This second configuration is exactly the same as the ADSL configuration above, except that the Remote Gateway address field at step 12 above will be different. The address will be of the following format:
<MBB service nr in international format>.mobile.telstra.com.au
For example if the phone nr of the mobile broadband service is 0407 123 456, then the remote gateway address would be: “61407123456.mobile.telstra.com.au”, as per screen shot below.
You should also rename the config, to identify it is mobile broadband, by right clicking and selecting “Rename”, as per screen shot below.
5. Procedure for installing VPN ProSafe Client Lite for Windows

Need more support?
1. Installing the Netgear DEVG2020 Gateway
2. Turning on/off WiFi (Wireless)
3. Activate DOT Broadband Back-Up
4. Netgear gateway configuration for Remote Client access
5. Procedure for installing VPN ProSafe Client Lite for Windows
6. How to open a VPN connection with the ProSafe Client
7. Site-to-Site VPN configuration
Appendix 1 – Minimum system requirements for ProSafe VPN Client
18. The next step is to save this configuration by using the export function as per step 16, but with a different name, as per screen shot below.
After completing build of the MBB config, reload the Fixed Line configuration saved at step 16, by using the import function available from the “Configuration” pull down menu (as per steps 9 and 10) and click the “Apply” and “Save” buttons, as per step 15.
5. Procedure for installing VPN ProSafe Client Lite for Windows

Need more support?
1. Installing the Netgear DEVG2020 Gateway
2. Turning on/off WiFi (Wireless)
3. Activate DOT Broadband Back-Up
4. Netgear gateway configuration for Remote Client access
5. Procedure for installing VPN ProSafe Client Lite for Windows
6. How to open a VPN connection with the ProSafe Client
7. Site-to-Site VPN configuration
Appendix 1 – Minimum system requirements for ProSafe VPN Client
Import the Fixed line or MBB connection configuration, as above, according to whether your Negear DEVG gateway is connected with fixed line (ADSL or NBN), or Mobile Broadband.
1. Right click on “Tunnel”, and select “Open Tunnel”
2. A window pops up above the system tray, showing status of the connection. Once the tunnel is opened, the ProSafe client system tray icon turns green, as per screen shot below.
6. How to open a VPN connection with the ProSafe Client

Need more support?
1. Installing the Netgear DEVG2020 Gateway
2. Turning on/off WiFi (Wireless)
3. Activate DOT Broadband Back-Up
4. Netgear gateway configuration for Remote Client access
5. Procedure for installing VPN ProSafe Client Lite for Windows
6. How to open a VPN connection with the ProSafe Client
7. Site-to-Site VPN configuration
Appendix 1 – Minimum system requirements for ProSafe VPN Client
This section describes the connection configuration details for Site-to-Site VPN connection establishment
between 2 DEVG2020 GW devices. The LAN subnets of these 2 devices have to be in unique range for the connection to be established successfully.
1. On the first DEVG2020 GW device, navigate to the Advanced tab and select VPN > “Manage VPN” menu on the left pane. Browse down to the Site-to-Site VPN configuration section of the page.
2. Enter an alphanumeric string (max 32 characters) in the Pre-Shared Key (PSK) field. Note that this PSK field is unique to the Site-to-Site VPN configuration and should not be confused with the Remote client to GW configuration.
3. Under the Configuration Details section, select Add and enter proper values for the following fields:
i. Site Name – this is a user friendly name to the connection entry
ii. WAN IP – enter the remote GW WAN IP address.
iii. Remote Site IP address and Subnet – this is the remote GW LAN subnet. As mentioned earlier, each of these 2 GWs in this configuration need to have a unique non-overlapping IP address range – for example if Gateway 1 is configured with the default LAN IP address range of 192.168.15.1, then you might choose 192.168.20.1 for Gateway 2.
iv. Save the changes.
4. On the second DEVG2020 GW device, repeat steps (1) through (3) above
5. Once the configuration is complete, enable VPN on both GWs
6. At this point, the IPSec VPN tunnel will be established between these 2 DEVG2020 GWs and LAN side resources from one GW access the other through this tunnel. You should now be able to see/navigate to devices at the other site.
7. Site-to-Site VPN configuration

Need more support?
1. Installing the Netgear DEVG2020 Gateway
2. Turning on/off WiFi (Wireless)
3. Activate DOT Broadband Back-Up
4. Netgear gateway configuration for Remote Client access
5. Procedure for installing VPN ProSafe Client Lite for Windows
6. How to open a VPN connection with the ProSafe Client
7. Site-to-Site VPN configuration
Appendix 1 – Minimum system requirements for ProSafe VPN Client
The minimum requirements for the ProSafe VPN Client are:
OS supported:
• Windows XP 32-bit, all service packs
• Windows Server 2003 32-bit
• Windows Server 2008 32/64-bit
• Windows Vista 32/64-bit
• Windows 7 32/64-bit
• Windows 8 32/64-bit
Disk space and memory
The size of the setup, the size of the installed program, and the impact of the program on RAM are all below 10MB
Appendix 1 – Minimum system requirements for ProSafe VPN Client
© Telstra Corporation Limited (ABN 33 051 775 556) 2013. All rights reserved.
This work is copyright. Apart from any use as permitted under the Copyright Act 1968, information contained within this manual cannot be used for any other purpose other than the purpose for which it was released. No part of this publication may be reproduced, stored in a retrieval system, or transmitted in any form or by any means, electronic, mechanical, photocopying, recording or otherwise, without the written permission of Telstra Corporation Limited.
Words mentioned in this book that are known to be trademarks, whether registered or unregistered, have been capitalised or use initial capitals. Terms identified as trademarks include Cisco®, Microsoft®, Microsoft PC®, Apple®, AirPort®, Mac®, Linksys®. C046 AUG17

Thank you