powerpro rto user manualpowerprorto.com.au/tms/powerpromanual.pdf · powerpro rto user manual page...
TRANSCRIPT

User Manual can be found online using the link below
http://powerprorto.com.au//tms/powerpromanual.pdf
VIDATEK
PowerPro RTO
User Manual
VERSION 3.0.1301 (C)

PowerPro RTO User Manual Page 2 of 106
About this Manual
About the software
PowerPro RTO is a total training management solution designed to help registered training
organisations manage their records in an easy and effective manner.
Using the Australian standard training terminology and fully AVETMISS 6.1 compliant, PowerPro is
the essential training management database tool for any training organisation or business involved in
the delivery of training.
In use by RTO’s since mid 2004 in industries that range from transport to communication, PowerPro
is a mature and stable product with an ever increasing number of features and capabilities.
Assuming no one knows the needs of a product better than those who use it, we utilise input from
our clients to choose the features to implement in upcoming versions of the product.
This makes Power Pro a software application that is guided by those involved in the training industry
and therefore tailored for the training industry.
About this manual
This manual is designed to provide a basic introduction to the features and capabilities of the
PowerPro application. It provides an overview of each component and takes you through the basic
steps of adding and managing data for clients, courses, enrolments and results, trainers and
assessors through to client invoicing and payment management.
PowerPro is a highly configurable application and allows organisations to establish
Important information about the system is highlighted using the ‘notes’ field:
NOTE: This is an example of a note highlighting important information regarding PowerPro.
Further help information is available from the frequently asked questions page on the PowerPro
website: www.powerprorto.com.au/faq.

PowerPro RTO User Manual Page 3 of 106
Table of Contents
1. SOME FUNDAMENTAL CONCEPTS 5
2. FINDING YOUR WAY AROUND 6
2.1. Logging on 6
2.2. Using shortcut keys 7
2.3. Using the filter 8
2.4. Using the calendar 8
2.5. Mandatory fields 9
2.6. Entering data 9
3. CLIENTS 10
4. ENROLMENTS AND RESULTS 16
5. QUALIFICATION RULES 34
6. ACCREDITED COURSES 37
7. NON-ACCREDITED COURSES 45
8. CLIENT COMPANIES 46
8.1. Company Divisions, Departments and Locations 47
8.2. Company Invoices 48
8.3. Company Contact Log 48
8.4. Company Documents 49
9. TRAINERS AND ASSESSORS 51
10. TRAINER SCHEDULER 53
11. INVOICES AND PAYMENTS 60

PowerPro RTO User Manual Page 4 of 106
11.1. Qualification Check Error! Bookmark not defined.
12. AVETMISS/RAPT 70
13. REPORTS 80
14. TOOLS AND SYSTEM CONFIGURATION 92
14.1. Application Options 92
14.2. User management and roles 93
14.3. Victorian Student Number 80
APPENDIX A GLOSSARY 105
PowerPro RTO User Manual Page 5 of 106
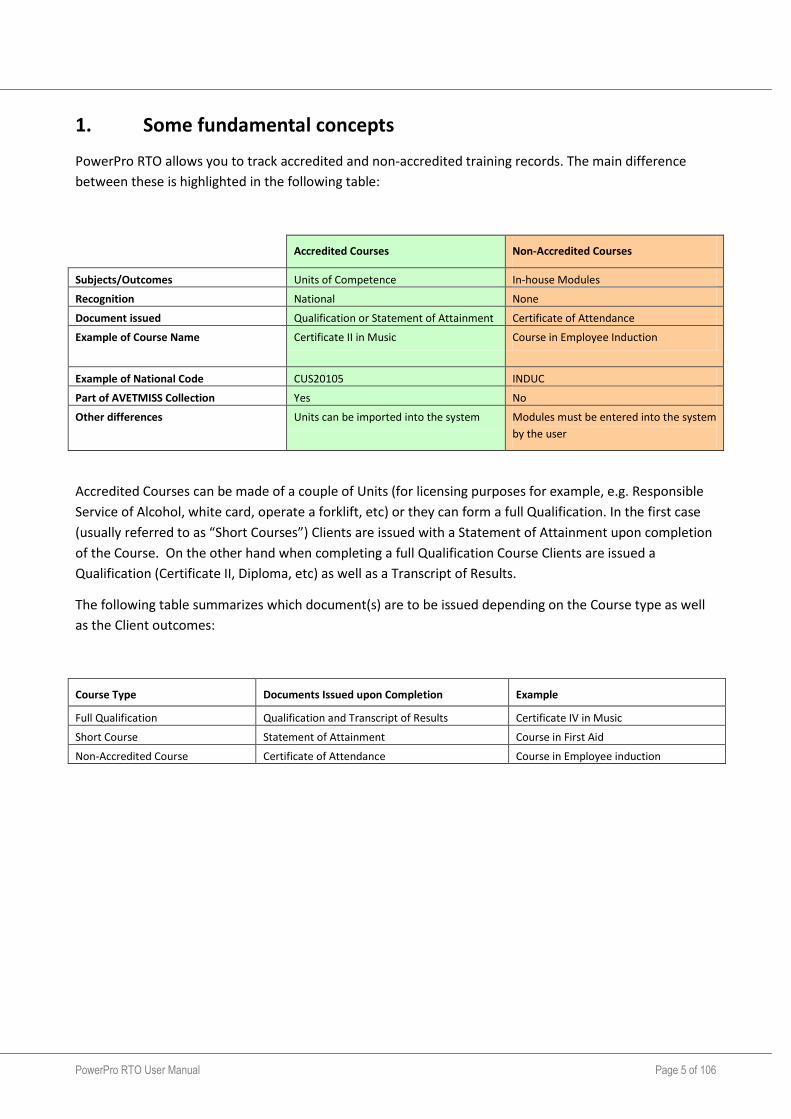
1. Some fundamental concepts
PowerPro RTO allows you to track accredited and non-accredited training records. The main difference
between these is highlighted in the following table:
Accredited Courses Non-Accredited Courses
Subjects/Outcomes Units of Competence In-house Modules
Recognition National None
Document issued Qualification or Statement of Attainment Certificate of Attendance
Example of Course Name Certificate II in Music Course in Employee Induction
Example of National Code CUS20105 INDUC
Part of AVETMISS Collection Yes No
Other differences Units can be imported into the system Modules must be entered into the system
by the user
Accredited Courses can be made of a couple of Units (for licensing purposes for example, e.g. Responsible
Service of Alcohol, white card, operate a forklift, etc) or they can form a full Qualification. In the first case
(usually referred to as “Short Courses”) Clients are issued with a Statement of Attainment upon completion
of the Course. On the other hand when completing a full Qualification Course Clients are issued a
Qualification (Certificate II, Diploma, etc) as well as a Transcript of Results.
The following table summarizes which document(s) are to be issued depending on the Course type as well
as the Client outcomes:
Course Type Documents Issued upon Completion Example
Full Qualification Qualification and Transcript of Results Certificate IV in Music
Short Course Statement of Attainment Course in First Aid
Non-Accredited Course Certificate of Attendance Course in Employee induction
PowerPro RTO User Manual Page 6 of 106
2. Finding your way around
2.1. Logging on
PowerPro is a multi-user application with integrated authentication. This means that you require an
account with a username and password to log in to the application.
The username and password for each account are controlled by the system administrator. By default, the
system administrator account has the username ‘RTOADM’ and password ‘MANAGER’. It is recommended
that the password for the administrator account is changed after the first login.
The administrator is able to access specific functions not available to other users such as user management,
report settings and client deletion.
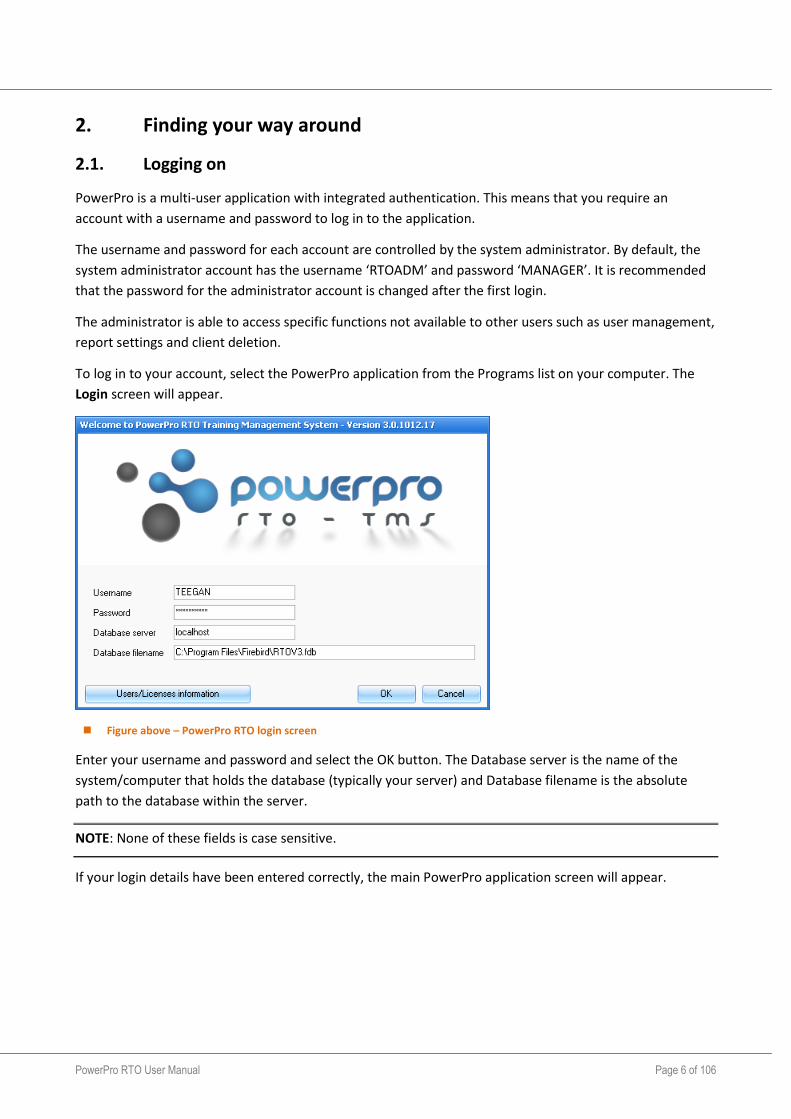
To log in to your account, select the PowerPro application from the Programs list on your computer. The
Login screen will appear.
Figure above – PowerPro RTO login screen
Enter your username and password and select the OK button. The Database server is the name of the
system/computer that holds the database (typically your server) and Database filename is the absolute
path to the database within the server.
NOTE: None of these fields is case sensitive.
If your login details have been entered correctly, the main PowerPro application screen will appear.
PowerPro RTO User Manual Page 7 of 106
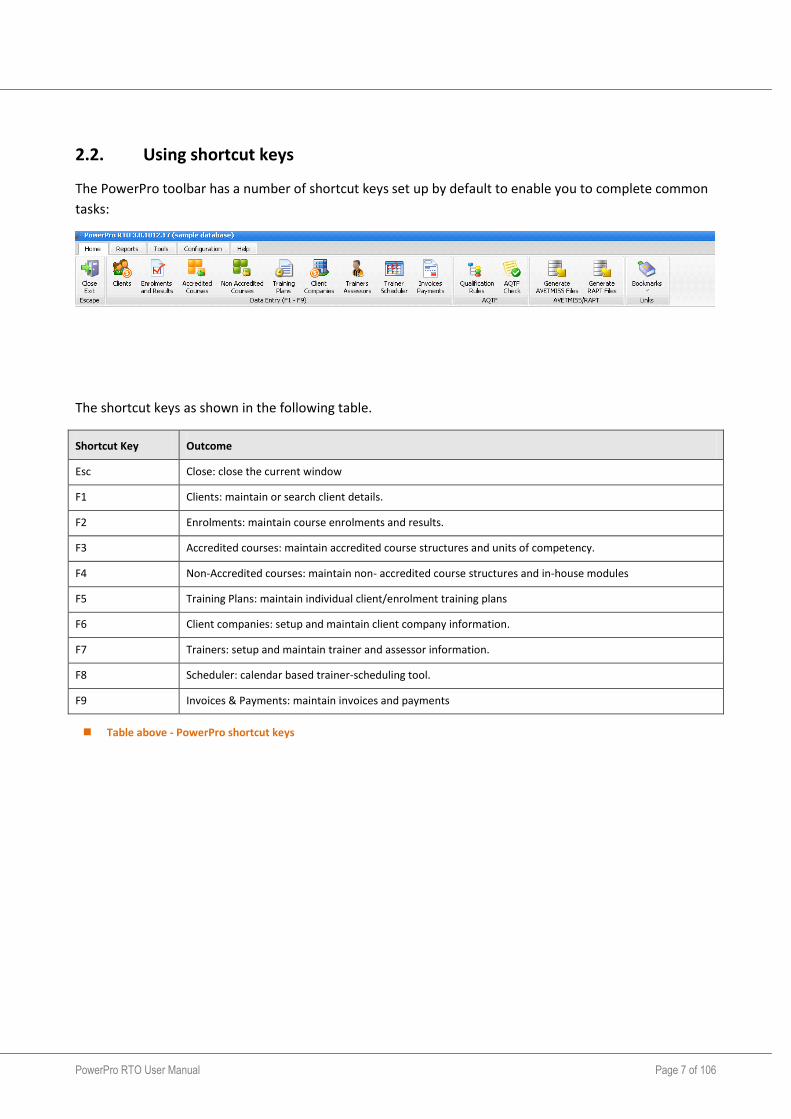
2.2. Using shortcut keys
The PowerPro toolbar has a number of shortcut keys set up by default to enable you to complete common
tasks:
The shortcut keys as shown in the following table.
Shortcut Key Outcome
Esc Close: close the current window
F1 Clients: maintain or search client details.
F2 Enrolments: maintain course enrolments and results.
F3 Accredited courses: maintain accredited course structures and units of competency.
F4 Non-Accredited courses: maintain non- accredited course structures and in-house modules
F5 Training Plans: maintain individual client/enrolment training plans
F6 Client companies: setup and maintain client company information.
F7 Trainers: setup and maintain trainer and assessor information.
F8 Scheduler: calendar based trainer-scheduling tool.
F9 Invoices & Payments: maintain invoices and payments
Table above - PowerPro shortcut keys
PowerPro RTO User Manual Page 8 of 106
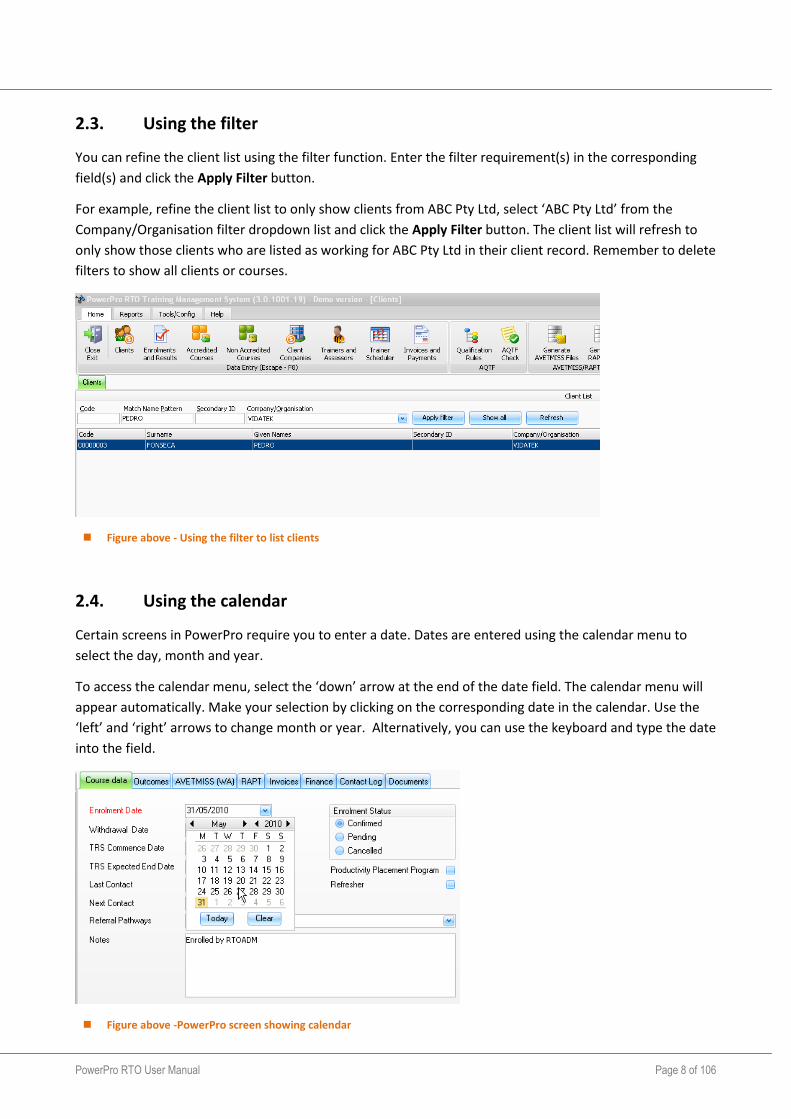
2.3. Using the filter
You can refine the client list using the filter function. Enter the filter requirement(s) in the corresponding
field(s) and click the Apply Filter button.
For example, refine the client list to only show clients from ABC Pty Ltd, select ‘ABC Pty Ltd’ from the
Company/Organisation filter dropdown list and click the Apply Filter button. The client list will refresh to
only show those clients who are listed as working for ABC Pty Ltd in their client record. Remember to delete
filters to show all clients or courses.
Figure above - Using the filter to list clients
2.4. Using the calendar
Certain screens in PowerPro require you to enter a date. Dates are entered using the calendar menu to
select the day, month and year.
To access the calendar menu, select the ‘down’ arrow at the end of the date field. The calendar menu will
appear automatically. Make your selection by clicking on the corresponding date in the calendar. Use the
‘left’ and ‘right’ arrows to change month or year. Alternatively, you can use the keyboard and type the date
into the field.
Figure above -PowerPro screen showing calendar

PowerPro RTO User Manual Page 9 of 106
2.5. Mandatory fields
Mandatory fields are shown in red. When you are providing input to a screen with mandatory fields, you
must complete these fields before you can save this information or move to the next screen.
Administrators of the system can configure which fields are mandatory for each screen. This means that the
screenshots in this manual may appear differently to the version you are using of PowerPro.
2.6. Entering data
When entering data into PowerPro it is important to be as accurate as possible, to avoid having to edit at a
later date.
Try to input as much information as possible to ensure awider search result and to include in reporting.
When required to edit or amend either clients or course details, note that you need to select the
client/course and then editto make any changes and remember to save. If you navigate to another window
and you haven’t finished saving that record youwill more than likely experience an error msg that will not
able you to continue on the current screen. You will need to check back on other opened screens to make
sure that you haven’t left any actions not completed.
PowerPro RTO User Manual Page 10 of 106
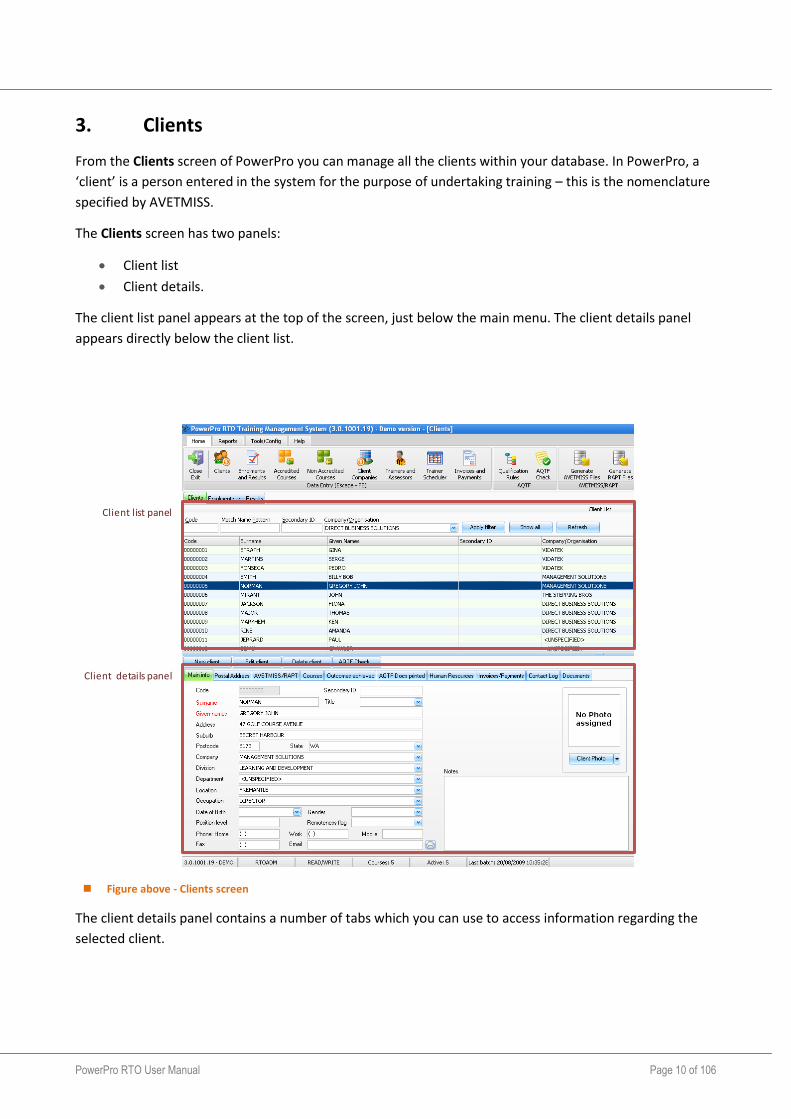
3. Clients
From the Clients screen of PowerPro you can manage all the clients within your database. In PowerPro, a
‘client’ is a person entered in the system for the purpose of undertaking training – this is the nomenclature
specified by AVETMISS.
The Clients screen has two panels:
Client list
Client details.
The client list panel appears at the top of the screen, just below the main menu. The client details panel
appears directly below the client list.
Figure above - Clients screen
The client details panel contains a number of tabs which you can use to access information regarding the
selected client.
Client list panel
Client details panel
PowerPro RTO User Manual Page 11 of 106
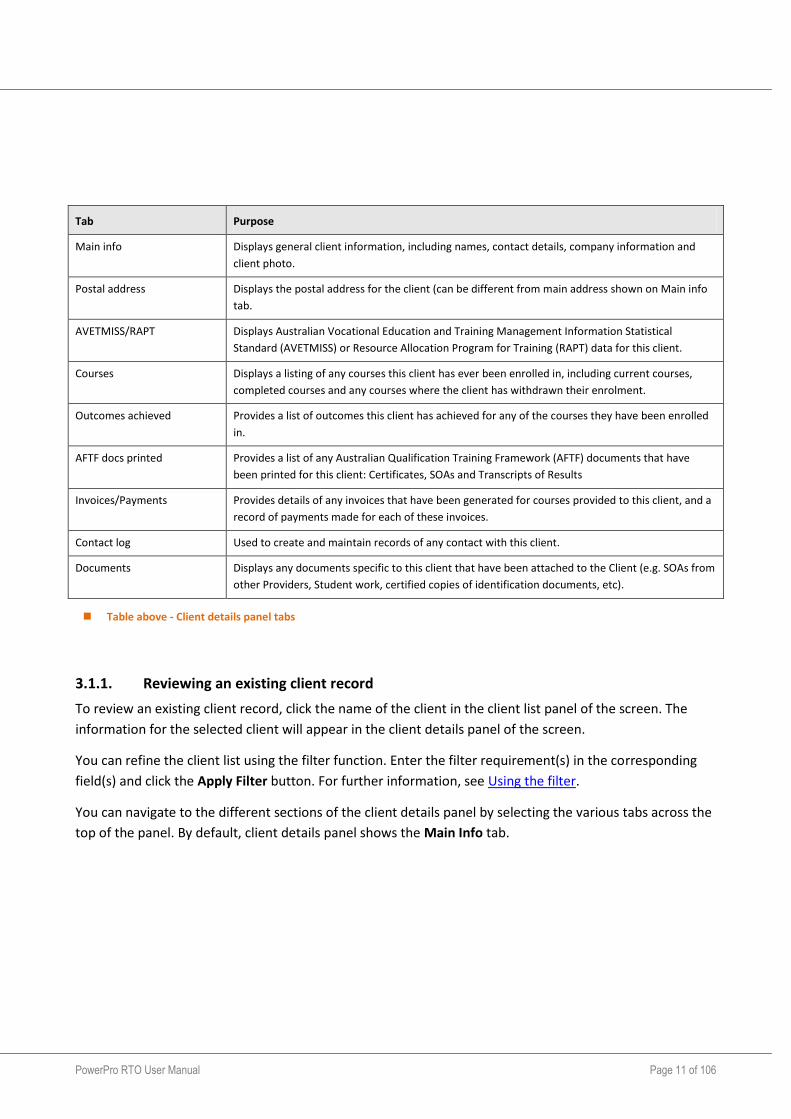
Tab Purpose
Main info Displays general client information, including names, contact details, company information and
client photo.
Postal address Displays the postal address for the client (can be different from main address shown on Main info
tab.
AVETMISS/RAPT Displays Australian Vocational Education and Training Management Information Statistical
Standard (AVETMISS) or Resource Allocation Program for Training (RAPT) data for this client.
Courses Displays a listing of any courses this client has ever been enrolled in, including current courses,
completed courses and any courses where the client has withdrawn their enrolment.
Outcomes achieved Provides a list of outcomes this client has achieved for any of the courses they have been enrolled
in.
AFTF docs printed Provides a list of any Australian Qualification Training Framework (AFTF) documents that have
been printed for this client: Certificates, SOAs and Transcripts of Results
Invoices/Payments Provides details of any invoices that have been generated for courses provided to this client, and a
record of payments made for each of these invoices.
Contact log Used to create and maintain records of any contact with this client.
Documents Displays any documents specific to this client that have been attached to the Client (e.g. SOAs from
other Providers, Student work, certified copies of identification documents, etc).
Table above - Client details panel tabs
3.1.1. Reviewing an existing client record
To review an existing client record, click the name of the client in the client list panel of the screen. The
information for the selected client will appear in the client details panel of the screen.
You can refine the client list using the filter function. Enter the filter requirement(s) in the corresponding
field(s) and click the Apply Filter button. For further information, see Using the filter.
You can navigate to the different sections of the client details panel by selecting the various tabs across the
top of the panel. By default, client details panel shows the Main Info tab.
PowerPro RTO User Manual Page 12 of 106
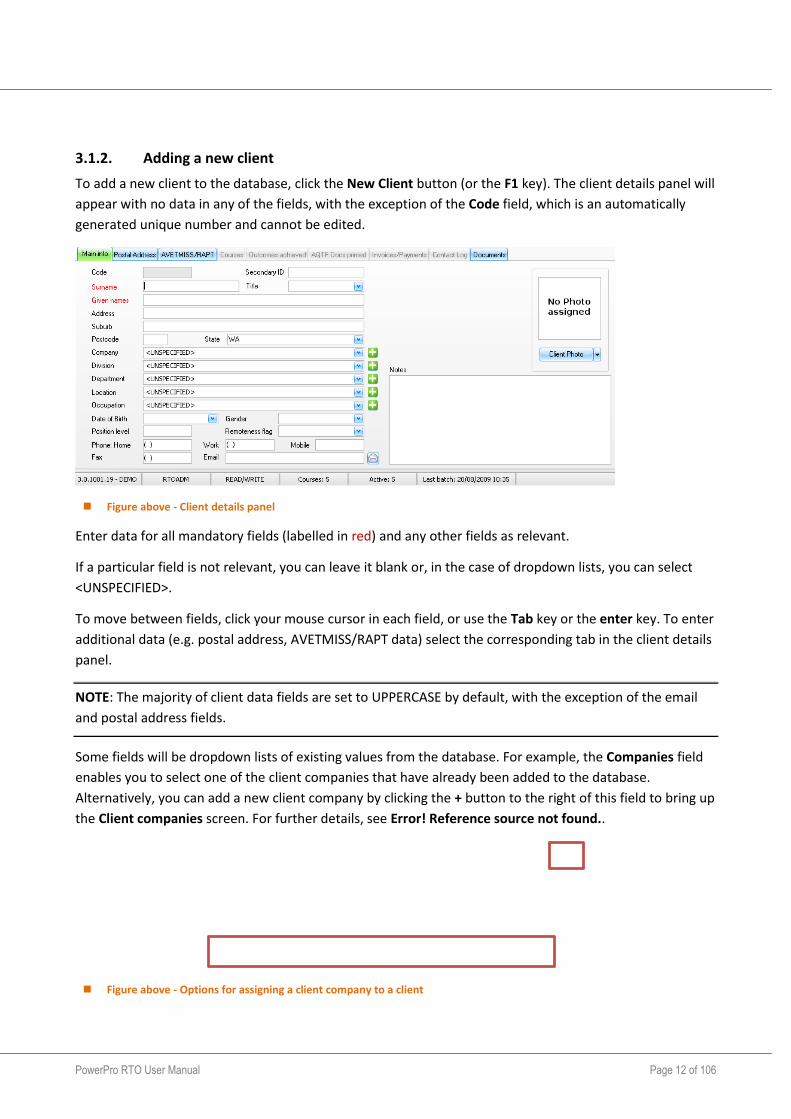
3.1.2. Adding a new client
To add a new client to the database, click the New Client button (or the F1 key). The client details panel will
appear with no data in any of the fields, with the exception of the Code field, which is an automatically
generated unique number and cannot be edited.
Figure above - Client details panel
Enter data for all mandatory fields (labelled in red) and any other fields as relevant.
If a particular field is not relevant, you can leave it blank or, in the case of dropdown lists, you can select
<UNSPECIFIED>.
To move between fields, click your mouse cursor in each field, or use the Tab key or the enter key. To enter
additional data (e.g. postal address, AVETMISS/RAPT data) select the corresponding tab in the client details
panel.
NOTE: The majority of client data fields are set to UPPERCASE by default, with the exception of the email
and postal address fields.
Some fields will be dropdown lists of existing values from the database. For example, the Companies field
enables you to select one of the client companies that have already been added to the database.
Alternatively, you can add a new client company by clicking the + button to the right of this field to bring up
the Client companies screen. For further details, see Error! Reference source not found..
Figure above - Options for assigning a client company to a client
Company dropdown list
Add new company button
PowerPro RTO User Manual Page 13 of 106
Select the Postal Address tab to set the postal address details for the client. You can enter a specific postal
address, or click the Same as Main button if this address is the same as entered under the Main Info tab.
Figure above - Postal address options
Select the AVETMISS/RAPT tab to enter relevant AVETMISS and/or RAPT data for this client.
Select the Documents tab to view, upload or modify any documents specific to this client (e.g. certified
copies of identification documents).
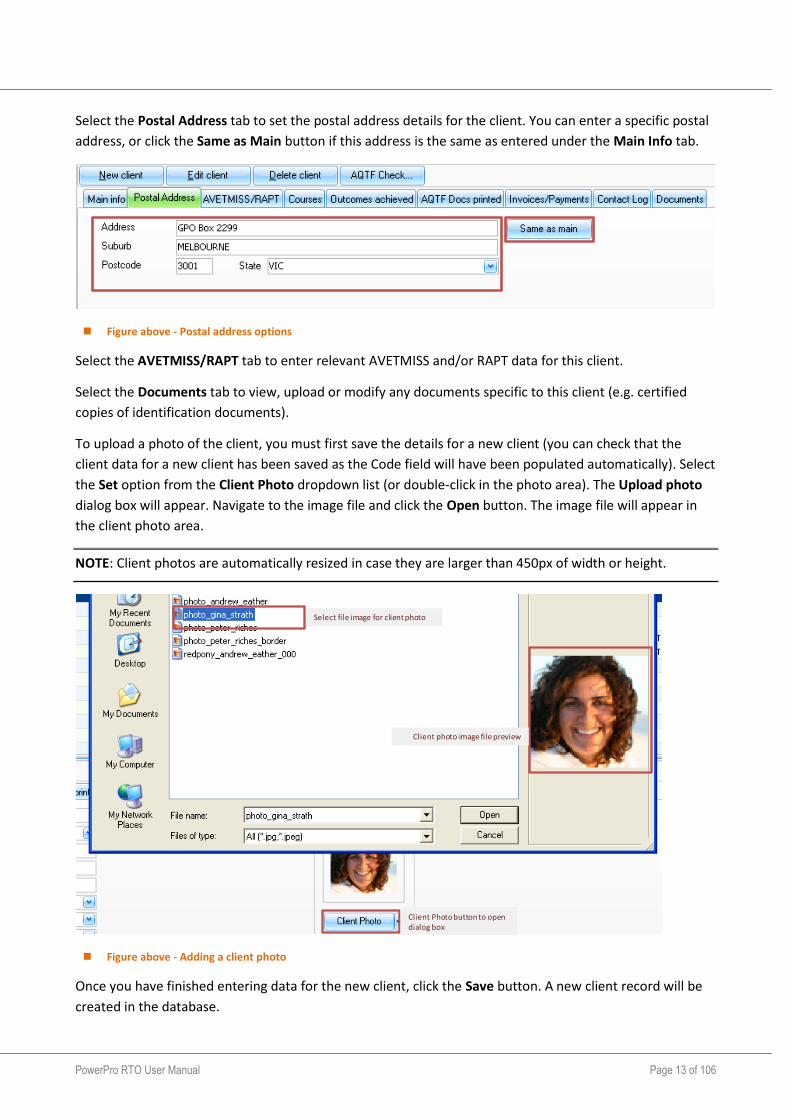
To upload a photo of the client, you must first save the details for a new client (you can check that the
client data for a new client has been saved as the Code field will have been populated automatically). Select
the Set option from the Client Photo dropdown list (or double-click in the photo area). The Upload photo
dialog box will appear. Navigate to the image file and click the Open button. The image file will appear in
the client photo area.
NOTE: Client photos are automatically resized in case they are larger than 450px of width or height.
Figure above - Adding a client photo
Once you have finished entering data for the new client, click the Save button. A new client record will be
created in the database.
Select file image for client photo
Client Photo button to open dialog box
Client photo image file preview
PowerPro RTO User Manual Page 14 of 106
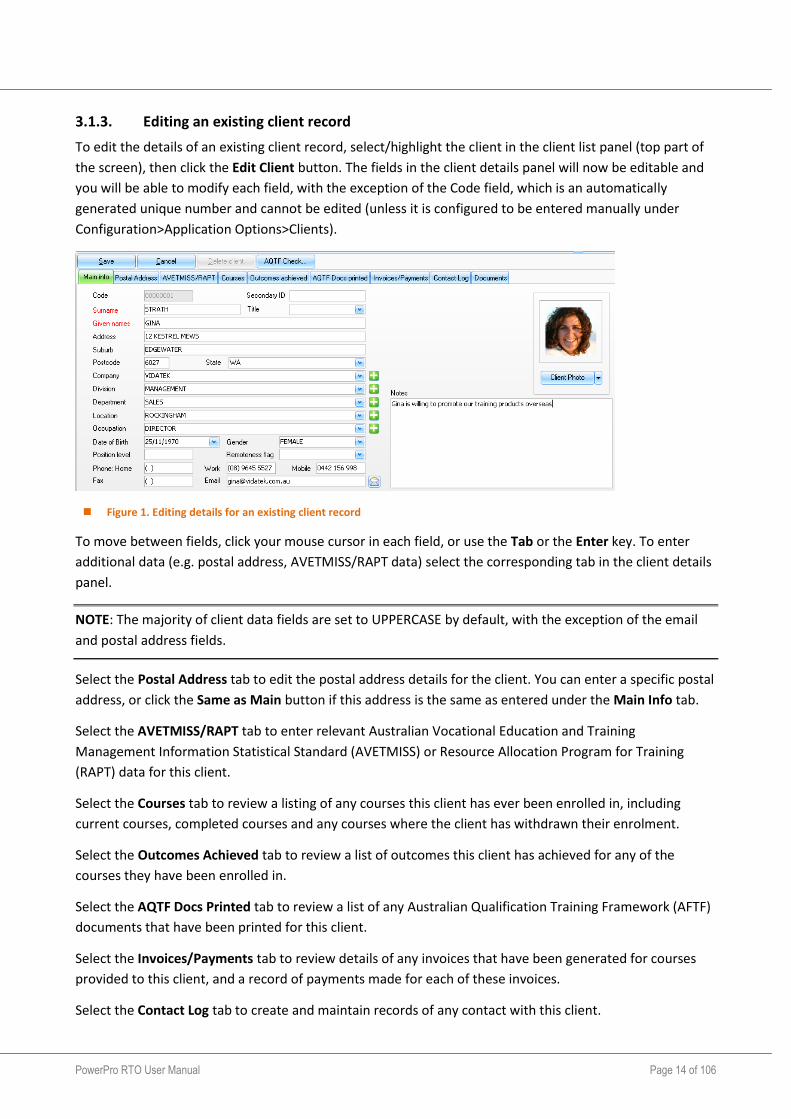
3.1.3. Editing an existing client record
To edit the details of an existing client record, select/highlight the client in the client list panel (top part of
the screen), then click the Edit Client button. The fields in the client details panel will now be editable and
you will be able to modify each field, with the exception of the Code field, which is an automatically
generated unique number and cannot be edited (unless it is configured to be entered manually under
Configuration>Application Options>Clients).
Figure 1. Editing details for an existing client record
To move between fields, click your mouse cursor in each field, or use the Tab or the Enter key. To enter
additional data (e.g. postal address, AVETMISS/RAPT data) select the corresponding tab in the client details
panel.
NOTE: The majority of client data fields are set to UPPERCASE by default, with the exception of the email
and postal address fields.
Select the Postal Address tab to edit the postal address details for the client. You can enter a specific postal
address, or click the Same as Main button if this address is the same as entered under the Main Info tab.
Select the AVETMISS/RAPT tab to enter relevant Australian Vocational Education and Training
Management Information Statistical Standard (AVETMISS) or Resource Allocation Program for Training
(RAPT) data for this client.
Select the Courses tab to review a listing of any courses this client has ever been enrolled in, including
current courses, completed courses and any courses where the client has withdrawn their enrolment.
Select the Outcomes Achieved tab to review a list of outcomes this client has achieved for any of the
courses they have been enrolled in.
Select the AQTF Docs Printed tab to review a list of any Australian Qualification Training Framework (AFTF)
documents that have been printed for this client.
Select the Invoices/Payments tab to review details of any invoices that have been generated for courses
provided to this client, and a record of payments made for each of these invoices.
Select the Contact Log tab to create and maintain records of any contact with this client.
PowerPro RTO User Manual Page 15 of 106
Select the Documents tab to view, upload or modify any documents specific to this client (e.g. certified
copies of identification documents).
To upload a photo of the client, select the Set option from the Client Photo dropdown list (or double-click
in the photo area). The Upload photo dialog box will appear. Navigate to the image file and click the Open
button. The image file will appear in the client photo area.
NOTE: Client photos image files must be smaller than or equal to 64Kb. The ideal dimensions for image files
are 85 x 85 pixels.
Once you have finished modifying the details of this client, click the Save button. The changes to the client
record will be saved in the database.
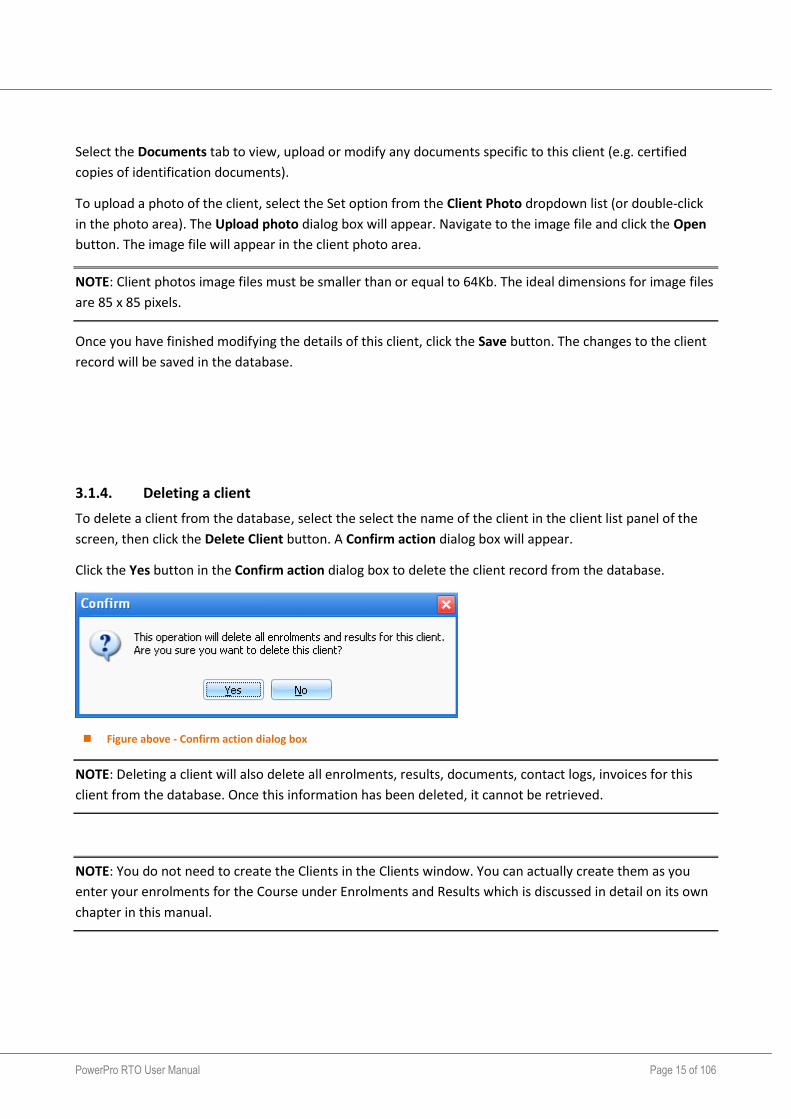
3.1.4. Deleting a client
To delete a client from the database, select the select the name of the client in the client list panel of the
screen, then click the Delete Client button. A Confirm action dialog box will appear.
Click the Yes button in the Confirm action dialog box to delete the client record from the database.
Figure above - Confirm action dialog box
NOTE: Deleting a client will also delete all enrolments, results, documents, contact logs, invoices for this
client from the database. Once this information has been deleted, it cannot be retrieved.
NOTE: You do not need to create the Clients in the Clients window. You can actually create them as you
enter your enrolments for the Course under Enrolments and Results which is discussed in detail on its own
chapter in this manual.
PowerPro RTO User Manual Page 16 of 106
Enrolments and Results This is the screen where most day-to-day tasks are performed. Examples of these tasks are: enrolling clients
in a course, modifying their Unit selection, checking/changing their results/outcomes and dates, attaching
relevant documents to the enrolment record, registering contact logs and creating invoices.
NOTE: From the Enrolments and results screen of PowerPro you can manage the enrolments for both
accredited and non-accredited courses.
NOTE: Before a client can be enrolled in a course, that course must first be created – please see the
relevant chapters in this manual for further information about creating courses.
The Enrolments and results screen has three panels:
course list
course enrolments
enrolment details.
The course list panel appears at the top of the screen, just below the main menu. The course enrolments
panel appears directly below the course list on the left, and the enrolments details panel appears on the
right.
PowerPro RTO User Manual Page 17 of 106
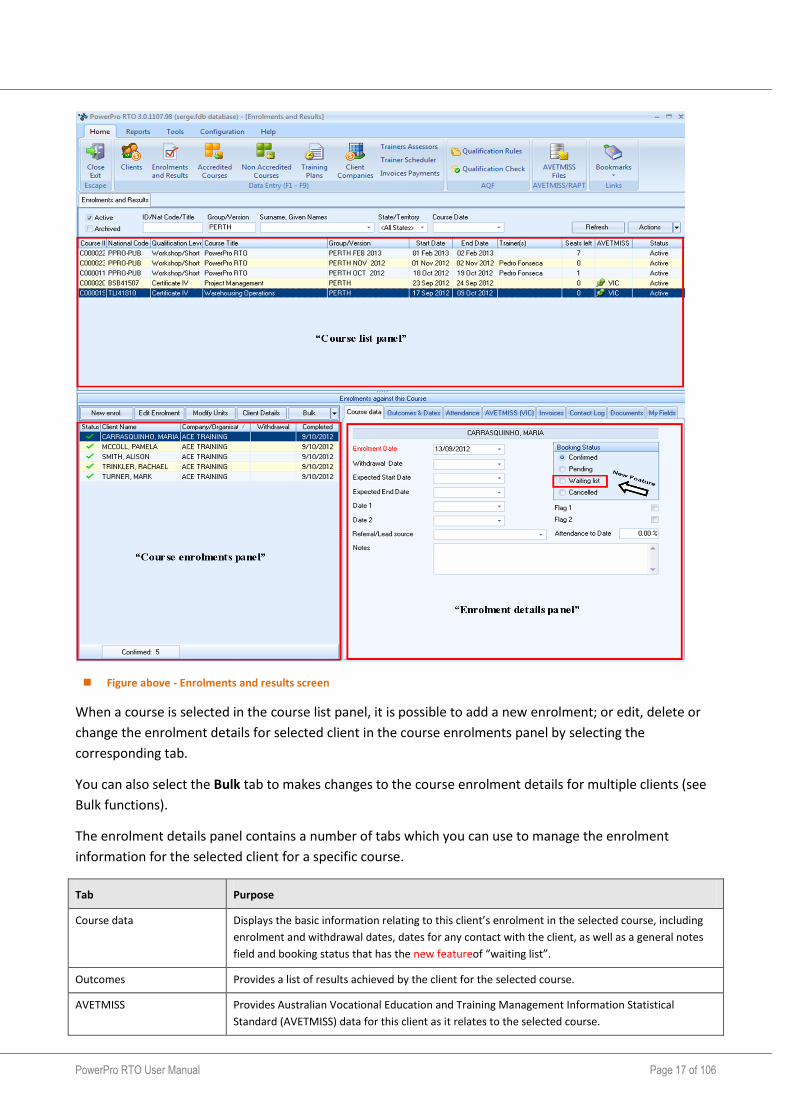
Figure above - Enrolments and results screen
When a course is selected in the course list panel, it is possible to add a new enrolment; or edit, delete or
change the enrolment details for selected client in the course enrolments panel by selecting the
corresponding tab.
You can also select the Bulk tab to makes changes to the course enrolment details for multiple clients (see
Bulk functions).
The enrolment details panel contains a number of tabs which you can use to manage the enrolment
information for the selected client for a specific course.
Tab Purpose
Course data Displays the basic information relating to this client’s enrolment in the selected course, including
enrolment and withdrawal dates, dates for any contact with the client, as well as a general notes
field and booking status that has the new featureof “waiting list”.
Outcomes Provides a list of results achieved by the client for the selected course.
AVETMISS Provides Australian Vocational Education and Training Management Information Statistical
Standard (AVETMISS) data for this client as it relates to the selected course.
PowerPro RTO User Manual Page 18 of 106
RAPT Provides Resource Allocation Program for Training (RAPT) data for this client as it relates to the
selected course.
Invoices Provides details of any invoices that have been generated for this client and the selected course,
and a record of payments made for each of these invoices.
Contact log Used to create and maintain records of any contact with this client as it relates to their enrolment
in the selected course.
Documents Displays any documents specific to this client as they relate to their enrolment in the selected
course (e.g. transcripts of course results for credit transfers).
Table above - Enrolment details panel tabs
3.1.5. Reviewing existing enrolments
To review the list of clients enrolled in course, click the name of the course in the course list panel of the
screen. All clients who have been enrolled in this course at some point (including those who subsequently
withdrew their enrolment) will be listed in the course enrolments panel of the screen.
You can refine the course list using the filter function. Enter the filter requirement(s) in the corresponding
field(s) and click the Refresh button. For further information, see Using the filter.
You can review details of the enrolment for a specific client by selecting the client in the course enrolments
panel, then navigating to the different sections of the enrolment details panel by selecting the various tabs
across the top of the panel. By default, client details panel shows the Course Data tab.
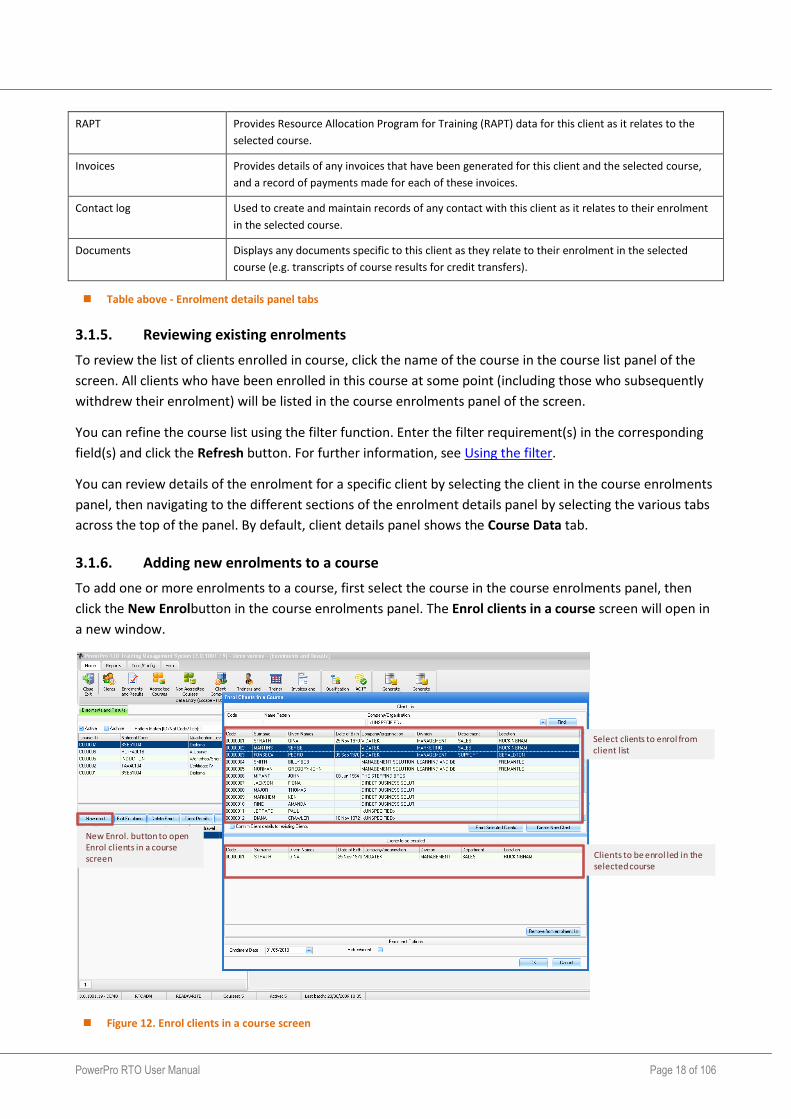
3.1.6. Adding new enrolments to a course
To add one or more enrolments to a course, first select the course in the course enrolments panel, then
click the New Enrolbutton in the course enrolments panel. The Enrol clients in a course screen will open in
a new window.
Figure 12. Enrol clients in a course screen
New Enrol. button to open Enrol clients in a course screen
Select clients to enrol from client list
Clients to be enrol led in the selected course
PowerPro RTO User Manual Page 19 of 106
Select the clients to enrol from the client list in the top section of the screen, and click the Enrol Selected
Clients button to add them to the clients to be enrolled list in the bottom section of the screen. To select
multiple clients, hold down the Control key.
You can refine the client list using the filter function. Enter the filter requirement(s) in the corresponding
field(s) and click the Find button. For further information, see Using the filter.
You can add new clients to the database by clicking the Create New Client button. The New client screen
will open in a new window. See the section Adding a new client for further information.
Use the Enrolment Date field to set the date of enrolment for all clients in the clients to be enrolled list.
Select the Refresher checkbox if this course is a refresher course (as opposed to a course the client is
undertaking for the first time). This is required so that the system can determine what type of certificate to
issue for the client on completion of the course.
Once you have finished adding clients to the clients to be enrolled list, click the OK button.
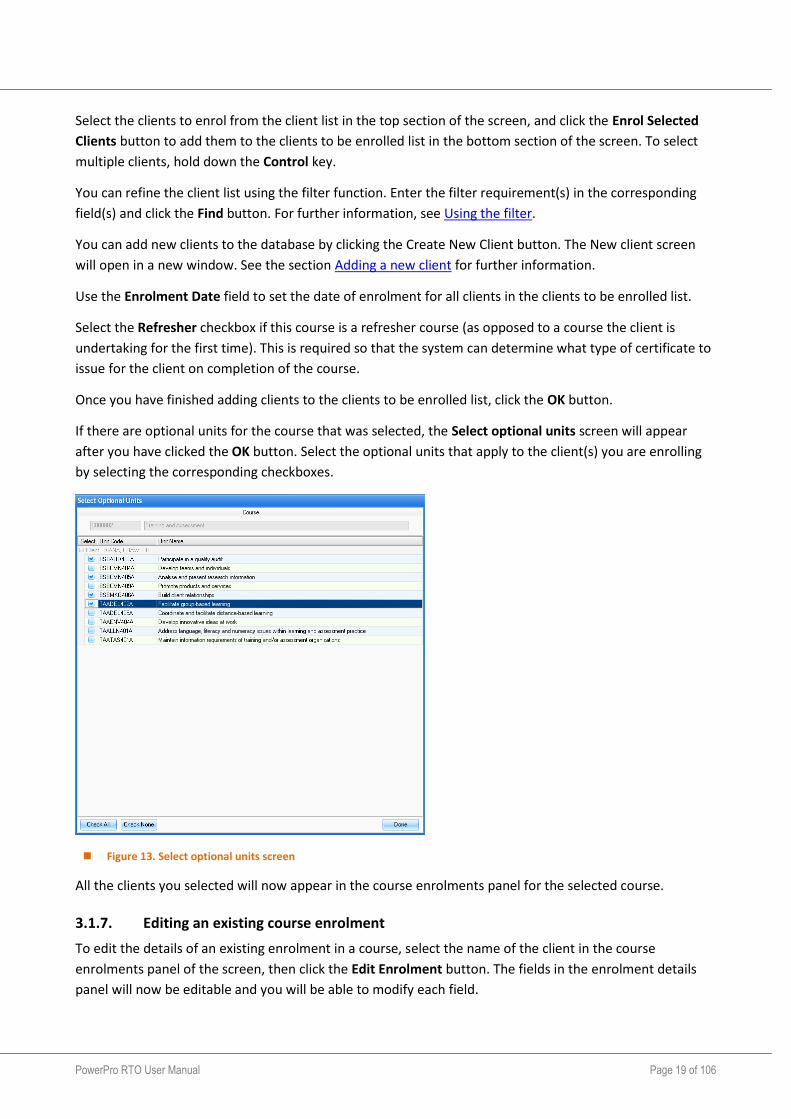
If there are optional units for the course that was selected, the Select optional units screen will appear
after you have clicked the OK button. Select the optional units that apply to the client(s) you are enrolling
by selecting the corresponding checkboxes.
Figure 13. Select optional units screen
All the clients you selected will now appear in the course enrolments panel for the selected course.
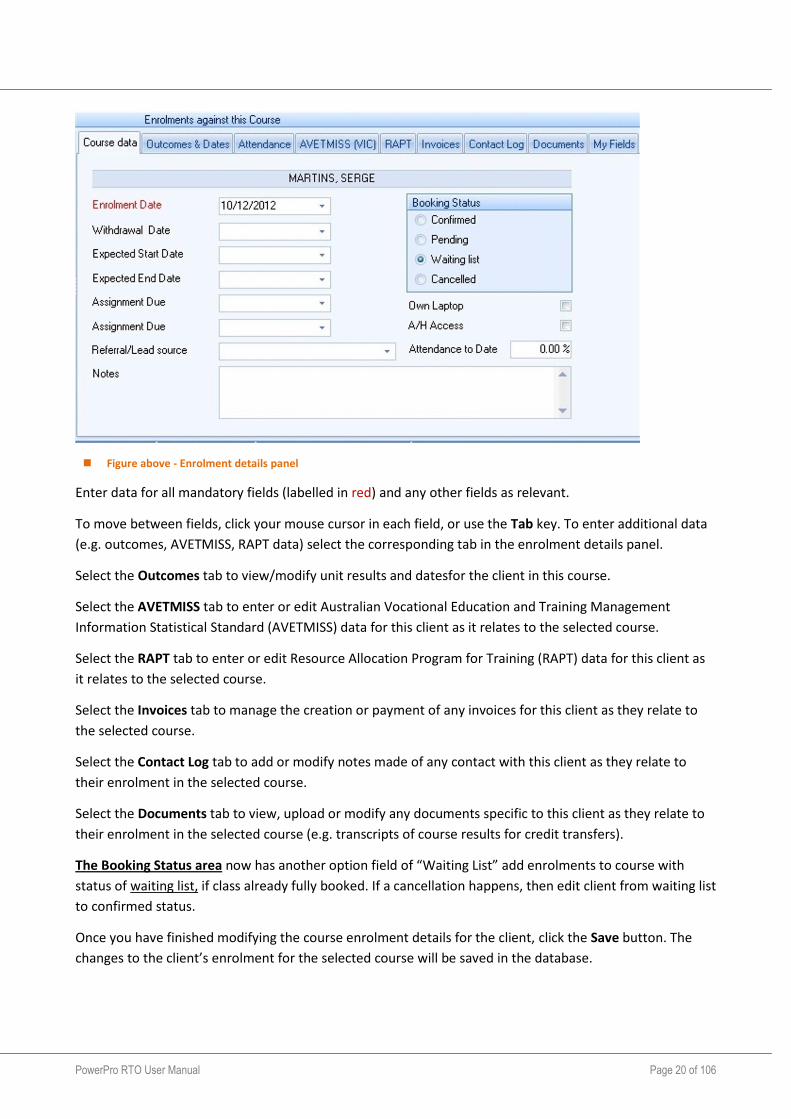
3.1.7. Editing an existing course enrolment
To edit the details of an existing enrolment in a course, select the name of the client in the course
enrolments panel of the screen, then click the Edit Enrolment button. The fields in the enrolment details
panel will now be editable and you will be able to modify each field.
PowerPro RTO User Manual Page 20 of 106
Figure above - Enrolment details panel
Enter data for all mandatory fields (labelled in red) and any other fields as relevant.
To move between fields, click your mouse cursor in each field, or use the Tab key. To enter additional data
(e.g. outcomes, AVETMISS, RAPT data) select the corresponding tab in the enrolment details panel.
Select the Outcomes tab to view/modify unit results and datesfor the client in this course.
Select the AVETMISS tab to enter or edit Australian Vocational Education and Training Management
Information Statistical Standard (AVETMISS) data for this client as it relates to the selected course.
Select the RAPT tab to enter or edit Resource Allocation Program for Training (RAPT) data for this client as
it relates to the selected course.
Select the Invoices tab to manage the creation or payment of any invoices for this client as they relate to
the selected course.
Select the Contact Log tab to add or modify notes made of any contact with this client as they relate to
their enrolment in the selected course.
Select the Documents tab to view, upload or modify any documents specific to this client as they relate to
their enrolment in the selected course (e.g. transcripts of course results for credit transfers).
The Booking Status area now has another option field of “Waiting List” add enrolments to course with
status of waiting list, if class already fully booked. If a cancellation happens, then edit client from waiting list
to confirmed status.
Once you have finished modifying the course enrolment details for the client, click the Save button. The
changes to the client’s enrolment for the selected course will be saved in the database.
PowerPro RTO User Manual Page 21 of 106
3.1.8. Deleting and existing enrolment
To delete a client’s enrolment in a course, select the select the name of the client in the course enrolments
panel of the screen, then click the Delete Enrol.button. A Confirm action dialog box will appear.
Click the Yes button in the Confirm action dialog box to delete the client record from the database.
Figure above - Confirm action dialog box
NOTE: Deleting an enrolment will also delete all results for this client in this course from the database.
Once this information has been deleted, it cannot be retrieved.
Once an enrolment has an invoice payment against it, the enrolment cannot be deleted.
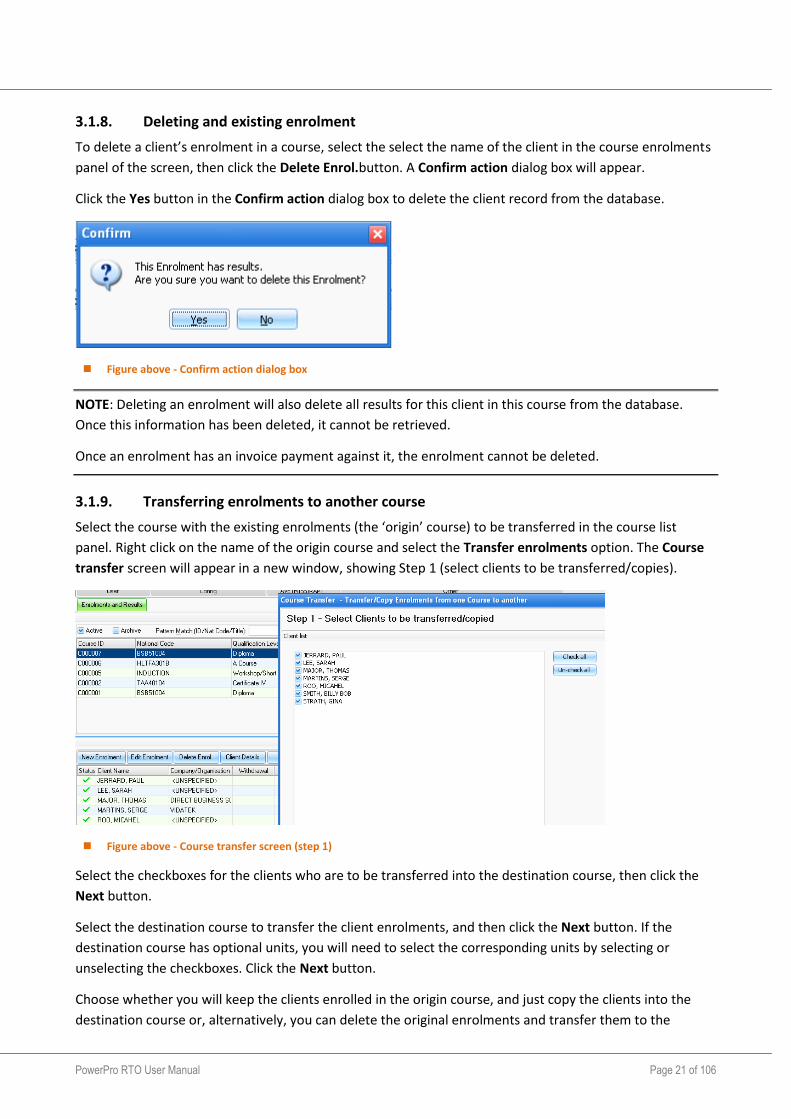
3.1.9. Transferring enrolments to another course
Select the course with the existing enrolments (the ‘origin’ course) to be transferred in the course list
panel. Right click on the name of the origin course and select the Transfer enrolments option. The Course
transfer screen will appear in a new window, showing Step 1 (select clients to be transferred/copies).
Figure above - Course transfer screen (step 1)
Select the checkboxes for the clients who are to be transferred into the destination course, then click the
Next button.
Select the destination course to transfer the client enrolments, and then click the Next button. If the
destination course has optional units, you will need to select the corresponding units by selecting or
unselecting the checkboxes. Click the Next button.
Choose whether you will keep the clients enrolled in the origin course, and just copy the clients into the
destination course or, alternatively, you can delete the original enrolments and transfer them to the

PowerPro RTO User Manual Page 22 of 106
destination course. You can also choose whether or not to copy the outcome results for any matching units
in the destination course from the original course. Once you have made your selections, click the Finish
button. The selected enrolments will be transferred into the destination course.
Figure above - Course transfer screen (step 4)
NOTE: You can transfer the enrolment of a client into a new course by right clicking the client’s name in the
course enrolments panel of the Enrolments and Results screen and following the same steps.
3.1.10. Printing a course roll
To print a roll of clients enrolled in a specific course, select the course in the course list panel. Right click on
the course name and select the Print roll option. The Select document template screen will appear in a
new window.
Figure above - Selecting 'print roll' option to print all course enrolments
Select the required template, and choose whether or not to include impending enrolments in the roll. Click
the OK button.
The printed roll will open in the application of the selected template (e.g. Microsoft Word).
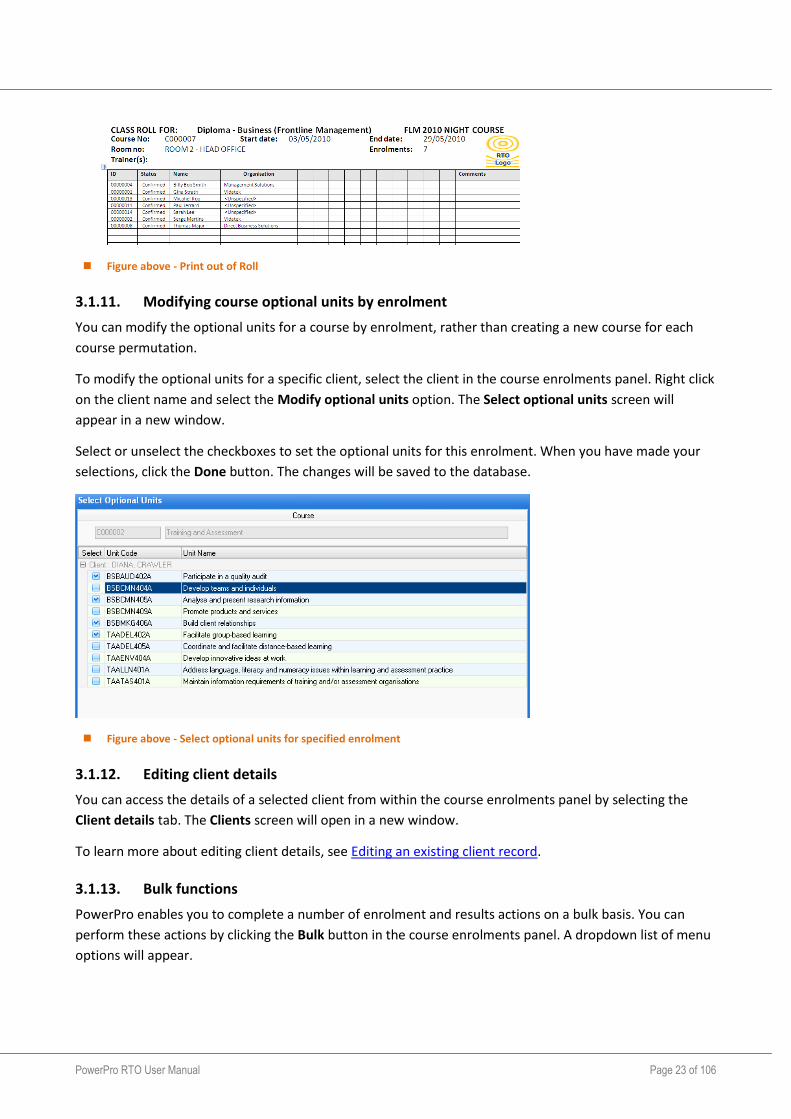
PowerPro RTO User Manual Page 23 of 106
Figure above - Print out of Roll
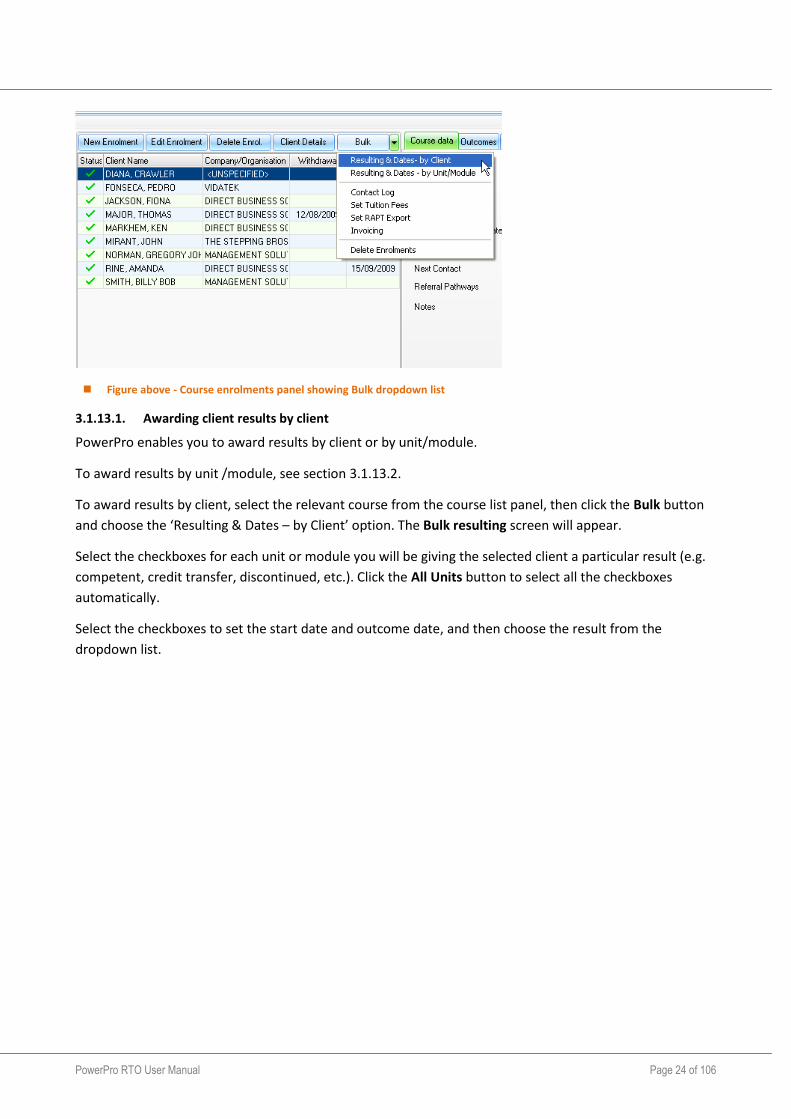
3.1.11. Modifying course optional units by enrolment
You can modify the optional units for a course by enrolment, rather than creating a new course for each
course permutation.
To modify the optional units for a specific client, select the client in the course enrolments panel. Right click
on the client name and select the Modify optional units option. The Select optional units screen will
appear in a new window.
Select or unselect the checkboxes to set the optional units for this enrolment. When you have made your
selections, click the Done button. The changes will be saved to the database.
Figure above - Select optional units for specified enrolment
3.1.12. Editing client details
You can access the details of a selected client from within the course enrolments panel by selecting the
Client details tab. The Clients screen will open in a new window.
To learn more about editing client details, see Editing an existing client record.
3.1.13. Bulk functions
PowerPro enables you to complete a number of enrolment and results actions on a bulk basis. You can
perform these actions by clicking the Bulk button in the course enrolments panel. A dropdown list of menu
options will appear.
PowerPro RTO User Manual Page 24 of 106
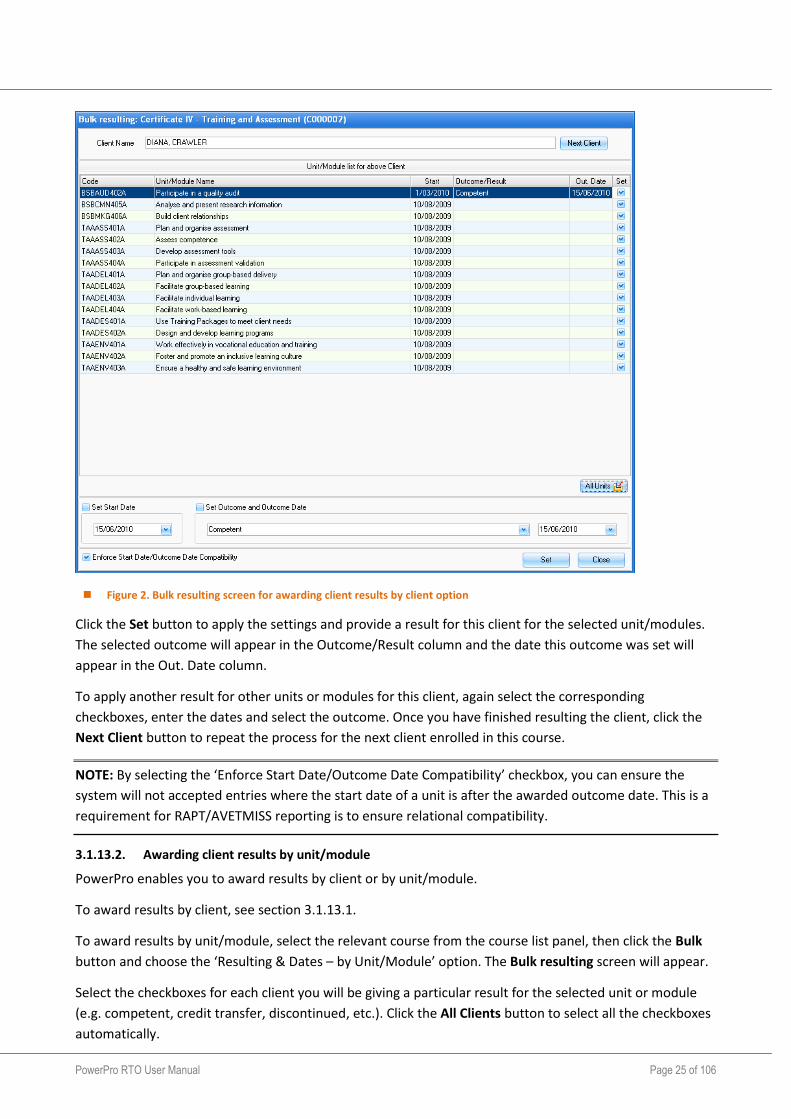
Figure above - Course enrolments panel showing Bulk dropdown list
3.1.13.1. Awarding client results by client
PowerPro enables you to award results by client or by unit/module.
To award results by unit /module, see section 3.1.13.2.
To award results by client, select the relevant course from the course list panel, then click the Bulk button
and choose the ‘Resulting & Dates – by Client’ option. The Bulk resulting screen will appear.
Select the checkboxes for each unit or module you will be giving the selected client a particular result (e.g.
competent, credit transfer, discontinued, etc.). Click the All Units button to select all the checkboxes
automatically.
Select the checkboxes to set the start date and outcome date, and then choose the result from the
dropdown list.
PowerPro RTO User Manual Page 25 of 106
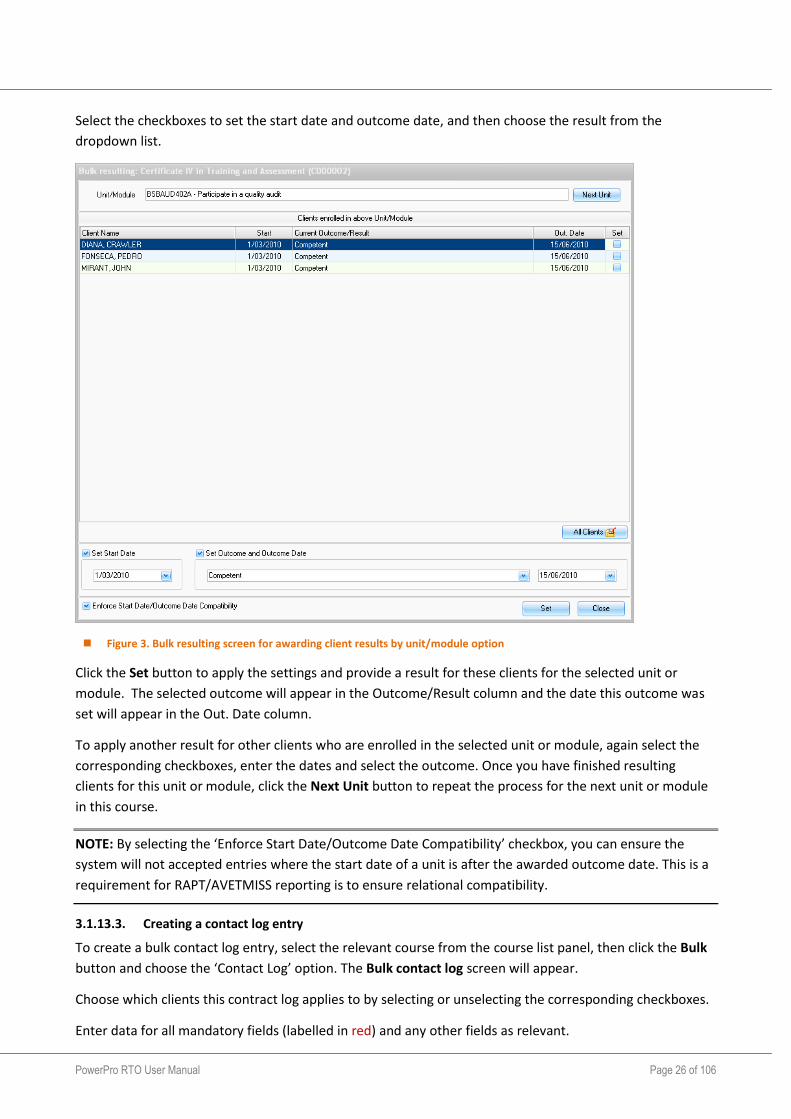
Figure 2. Bulk resulting screen for awarding client results by client option
Click the Set button to apply the settings and provide a result for this client for the selected unit/modules.
The selected outcome will appear in the Outcome/Result column and the date this outcome was set will
appear in the Out. Date column.
To apply another result for other units or modules for this client, again select the corresponding
checkboxes, enter the dates and select the outcome. Once you have finished resulting the client, click the
Next Client button to repeat the process for the next client enrolled in this course.
NOTE: By selecting the ‘Enforce Start Date/Outcome Date Compatibility’ checkbox, you can ensure the
system will not accepted entries where the start date of a unit is after the awarded outcome date. This is a
requirement for RAPT/AVETMISS reporting is to ensure relational compatibility.
3.1.13.2. Awarding client results by unit/module
PowerPro enables you to award results by client or by unit/module.
To award results by client, see section 3.1.13.1.
To award results by unit/module, select the relevant course from the course list panel, then click the Bulk
button and choose the ‘Resulting & Dates – by Unit/Module’ option. The Bulk resulting screen will appear.
Select the checkboxes for each client you will be giving a particular result for the selected unit or module
(e.g. competent, credit transfer, discontinued, etc.). Click the All Clients button to select all the checkboxes
automatically.
PowerPro RTO User Manual Page 26 of 106
Select the checkboxes to set the start date and outcome date, and then choose the result from the
dropdown list.
Figure 3. Bulk resulting screen for awarding client results by unit/module option
Click the Set button to apply the settings and provide a result for these clients for the selected unit or
module. The selected outcome will appear in the Outcome/Result column and the date this outcome was
set will appear in the Out. Date column.
To apply another result for other clients who are enrolled in the selected unit or module, again select the
corresponding checkboxes, enter the dates and select the outcome. Once you have finished resulting
clients for this unit or module, click the Next Unit button to repeat the process for the next unit or module
in this course.
NOTE: By selecting the ‘Enforce Start Date/Outcome Date Compatibility’ checkbox, you can ensure the
system will not accepted entries where the start date of a unit is after the awarded outcome date. This is a
requirement for RAPT/AVETMISS reporting is to ensure relational compatibility.
3.1.13.3. Creating a contact log entry
To create a bulk contact log entry, select the relevant course from the course list panel, then click the Bulk
button and choose the ‘Contact Log’ option. The Bulk contact log screen will appear.
Choose which clients this contract log applies to by selecting or unselecting the corresponding checkboxes.
Enter data for all mandatory fields (labelled in red) and any other fields as relevant.
PowerPro RTO User Manual Page 27 of 106
Once you have entered the required information, click the OK button to save this contact log entry.
3.1.13.4. Set tuition fees
To set the tuition fees for units or modules for each client, select the relevant course from the course list
panel, then click the Bulk button and choose the ‘Set Tuition Fees’ option. The Set tuition fees screen will
appear.
Select the checkboxes for each unit or module that will have the same fee for the selected client, then
enter this amount in the ‘Set tuition fee to’ field. Click the All Units button to select all the checkboxes
automatically.
Click the Set button to apply this fee for this client and the selected unit/modules. The amount will appear
in the Tuition Fee column.
To apply a different tuition for other units or modules for this client, again select the corresponding
checkboxes, then enter the amount in the ‘Set tuition fee to’ field. Once you have finished applying a
tuition fee for units and modules for this client, click the Next Client button to repeat the process for the
next client enrolled in this course.
3.1.13.5. Set RAPT export
To set the RAPT data to be exported for a particular course, select the relevant course from the course list
panel, then click the Bulk button and choose the ‘Set RAPT export’ option. The Set RAPT export screen will
appear.
Choose which clients the data export will apply to by selecting or unselecting the corresponding
checkboxes.
Once you have made your selection, click the Set button to set the clients whose RAPT will be exported.
When you have finished selecting RAPT data to be exported, click the Close button to return to the
Enrolments and Results screen.
3.1.13.6. Invoicing clients
To invoice clients in bulk for a particular course, select the relevant course from the course list panel, then
click the Bulk button and choose the ‘Invoicing’ option. The Bulk Invoice screen will appear.
Select the clients to invoice by selecting or unselecting the corresponding checkboxes. Click the Next
button.
Enter data for all mandatory fields (labelled in red) and any other fields as relevant. Select the invoice
template to be used from the Template dropdown list.
Once you have entered the required information, click the Finish button to save this invoicing information
and the invoices will be ready for printing and sending to these clients.
For more information about Invoices and Payments, see section 10.
3.1.13.7. Delete enrolments
To delete course enrolments in bulk for a particular course, select the relevant course from the course list
panel, then click the Bulk button and choose the ‘Delete enrolments’ option. The Bulk enrolment delete
screen will appear.
PowerPro RTO User Manual Page 28 of 106
Select the clients to have their enrolment in the course deleted by selecting or unselecting the
corresponding checkboxes. Click the Apply button to delete these enrolments.
When you have finished selecting clients to have their enrolment in the course deleted, click the Close
button to return to the Enrolments and Results screen.
3.1.14. Printing Certificates and Statements of Attainment (full qualification courses)
To print Certificates and Statements of Attainment you need to conduct a qualification check(for a client or
for a group of clients). This checks if the client(s) have completed the units required for a Qualification (e.g.
Diploma of Business). The units required are specified in Qualification rules (see relevant chapter in this
manual).
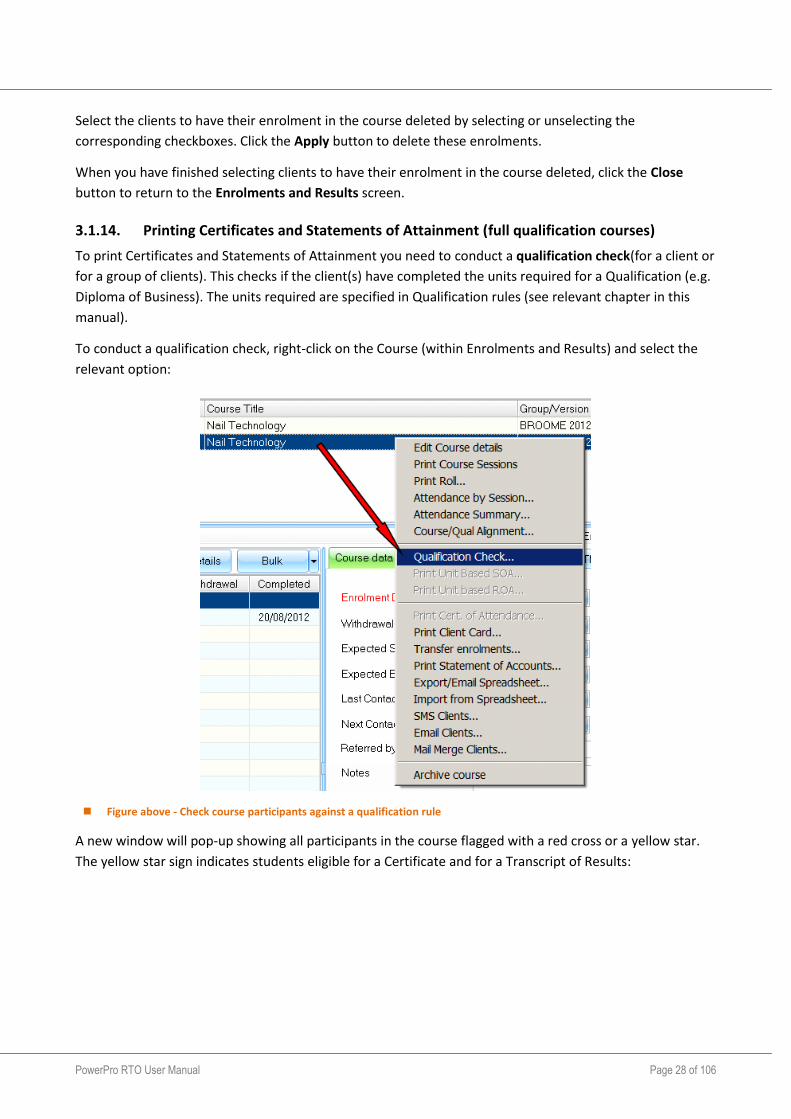
To conduct a qualification check, right-click on the Course (within Enrolments and Results) and select the
relevant option:
Figure above - Check course participants against a qualification rule
A new window will pop-up showing all participants in the course flagged with a red cross or a yellow star.
The yellow star sign indicates students eligible for a Certificate and for a Transcript of Results:
PowerPro RTO User Manual Page 29 of 106
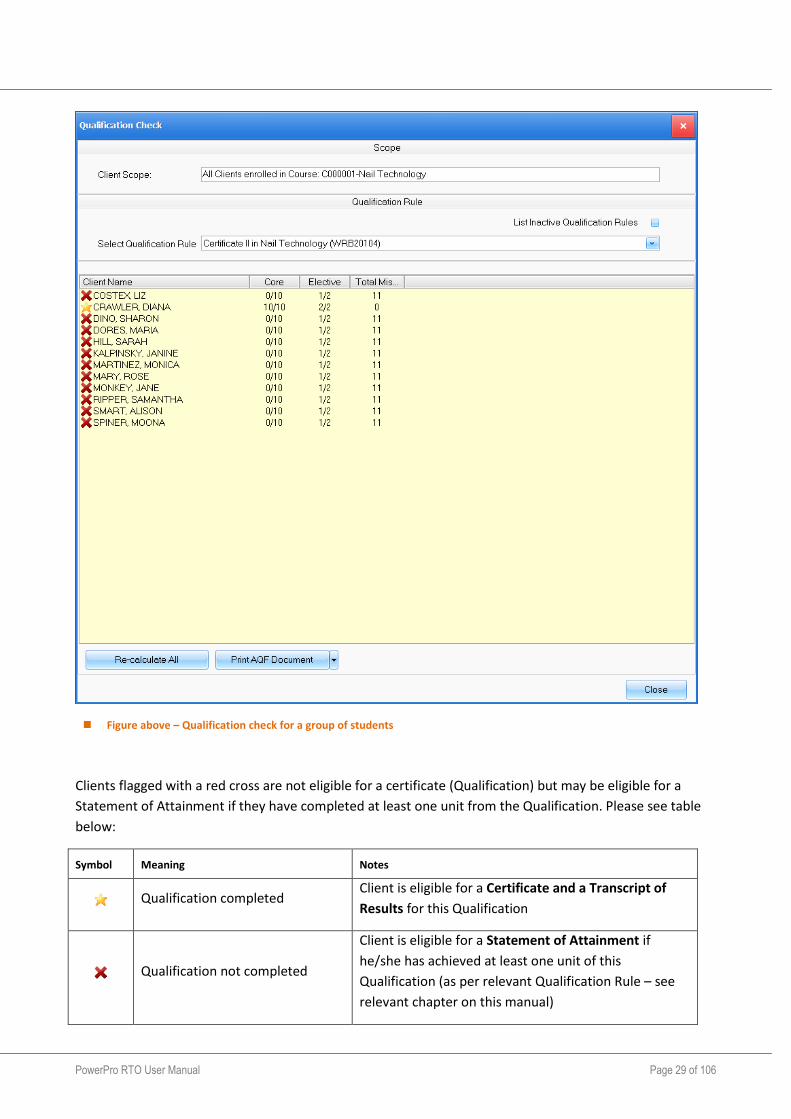
Figure above – Qualification check for a group of students
Clients flagged with a red cross are not eligible for a certificate (Qualification) but may be eligible for a
Statement of Attainment if they have completed at least one unit from the Qualification. Please see table
below:
Symbol Meaning Notes
Qualification completed Client is eligible for a Certificate and a Transcript of
Results for this Qualification
Qualification not completed
Client is eligible for a Statement of Attainment if
he/she has achieved at least one unit of this
Qualification (as per relevant Qualification Rule – see
relevant chapter on this manual)
PowerPro RTO User Manual Page 30 of 106
Table above –Qualification check symbols
To print Certificates, Statements of Attainment and Transcripts of Results press the Print AQF Document
dropdown button and select the relevant option from the menu:
Figure above – Print AQF Document menu
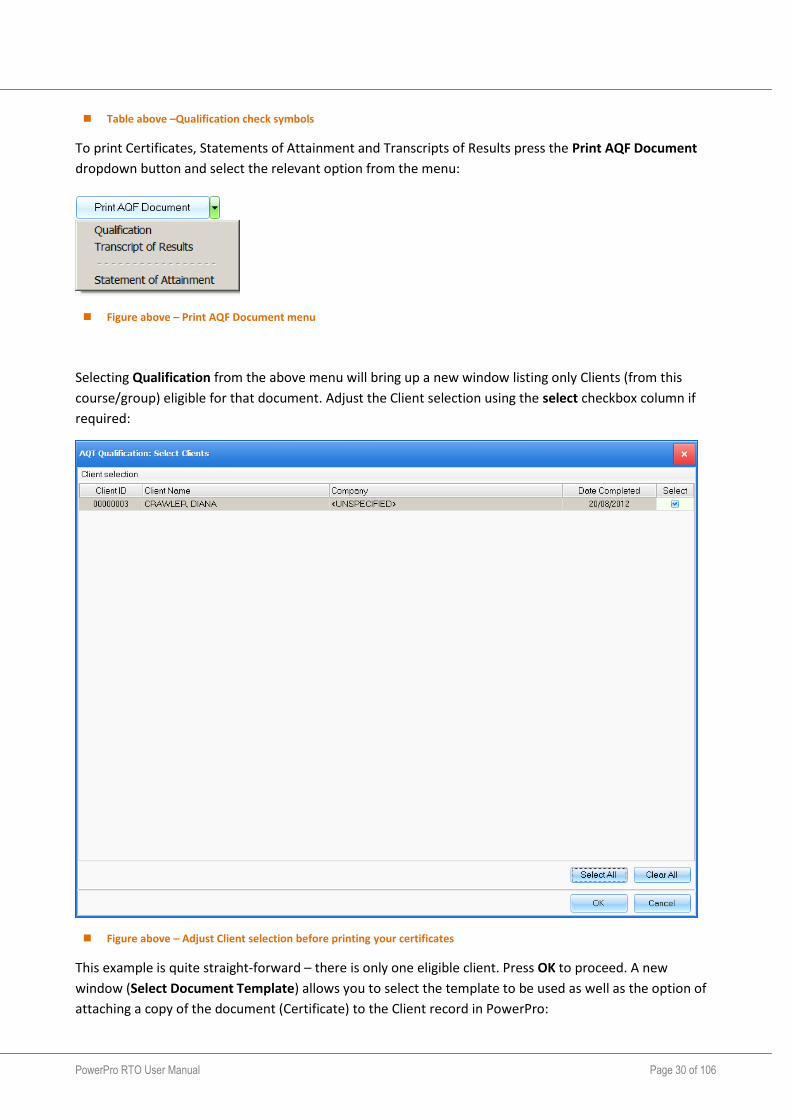
Selecting Qualification from the above menu will bring up a new window listing only Clients (from this
course/group) eligible for that document. Adjust the Client selection using the select checkbox column if
required:
Figure above – Adjust Client selection before printing your certificates
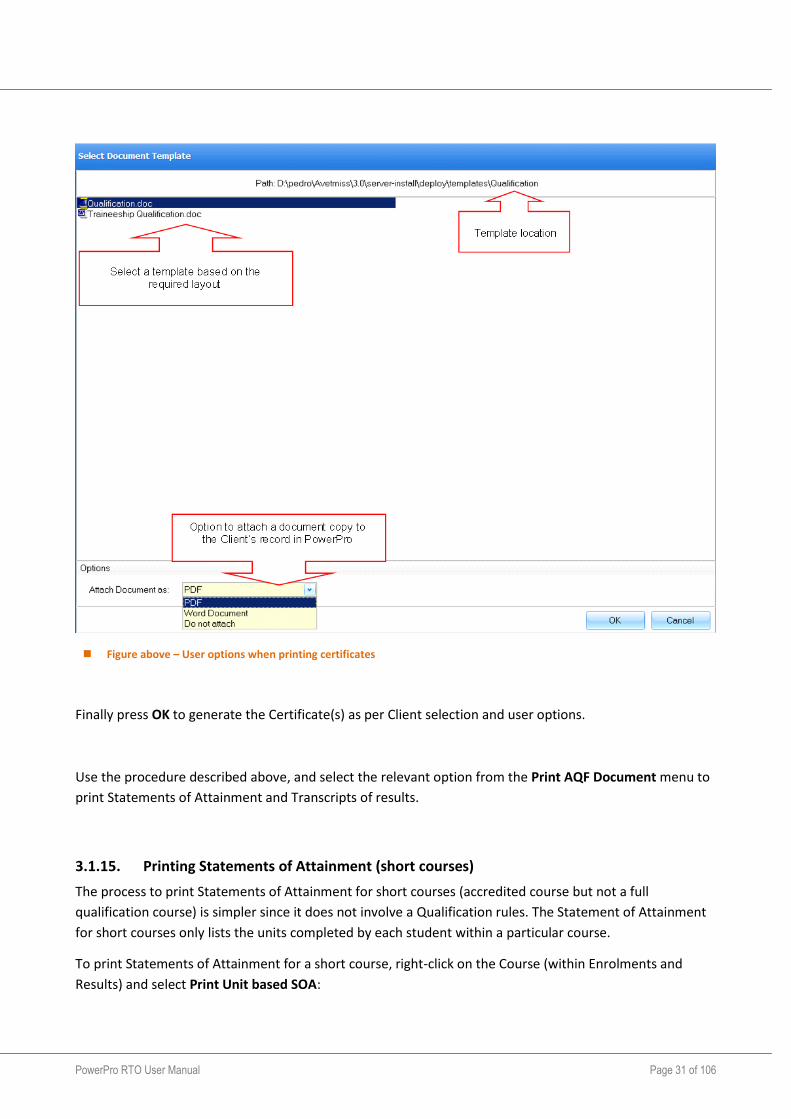
This example is quite straight-forward – there is only one eligible client. Press OK to proceed. A new
window (Select Document Template) allows you to select the template to be used as well as the option of
attaching a copy of the document (Certificate) to the Client record in PowerPro:
PowerPro RTO User Manual Page 31 of 106
Figure above – User options when printing certificates
Finally press OK to generate the Certificate(s) as per Client selection and user options.
Use the procedure described above, and select the relevant option from the Print AQF Document menu to
print Statements of Attainment and Transcripts of results.
3.1.15. Printing Statements of Attainment (short courses)
The process to print Statements of Attainment for short courses (accredited course but not a full
qualification course) is simpler since it does not involve a Qualification rules. The Statement of Attainment
for short courses only lists the units completed by each student within a particular course.
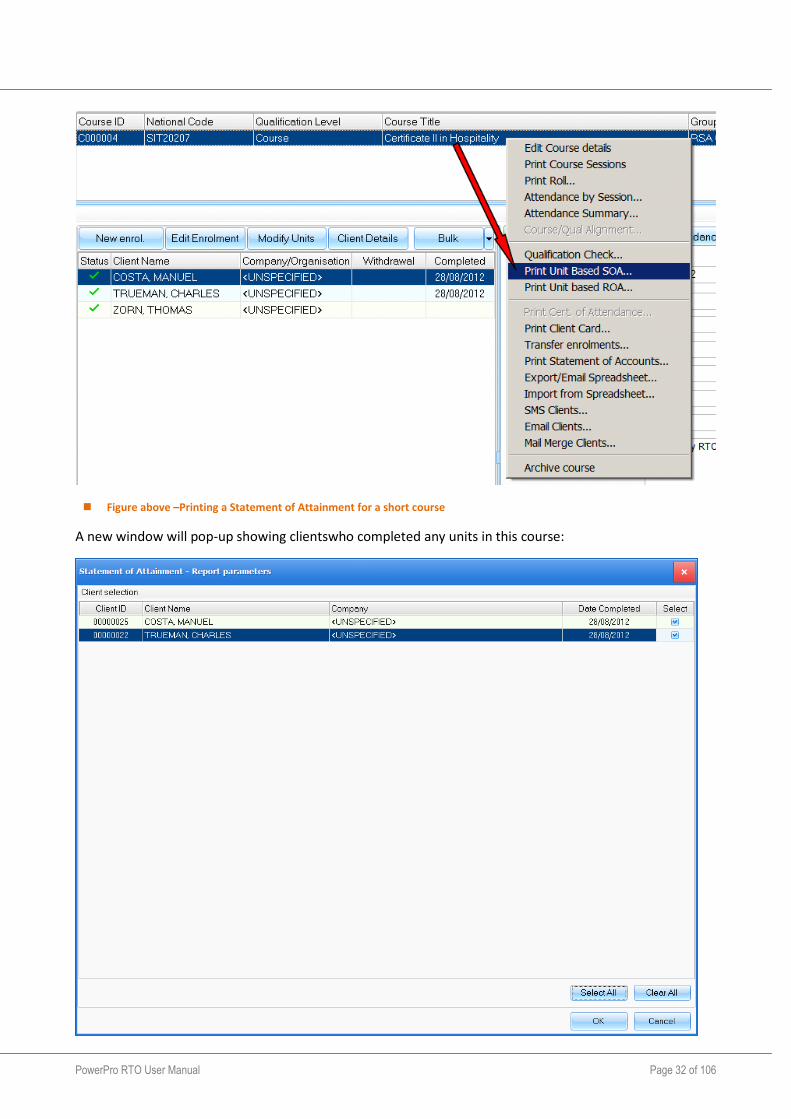
To print Statements of Attainment for a short course, right-click on the Course (within Enrolments and
Results) and select Print Unit based SOA:
PowerPro RTO User Manual Page 32 of 106
Figure above –Printing a Statement of Attainment for a short course
A new window will pop-up showing clientswho completed any units in this course:
PowerPro RTO User Manual Page 33 of 106
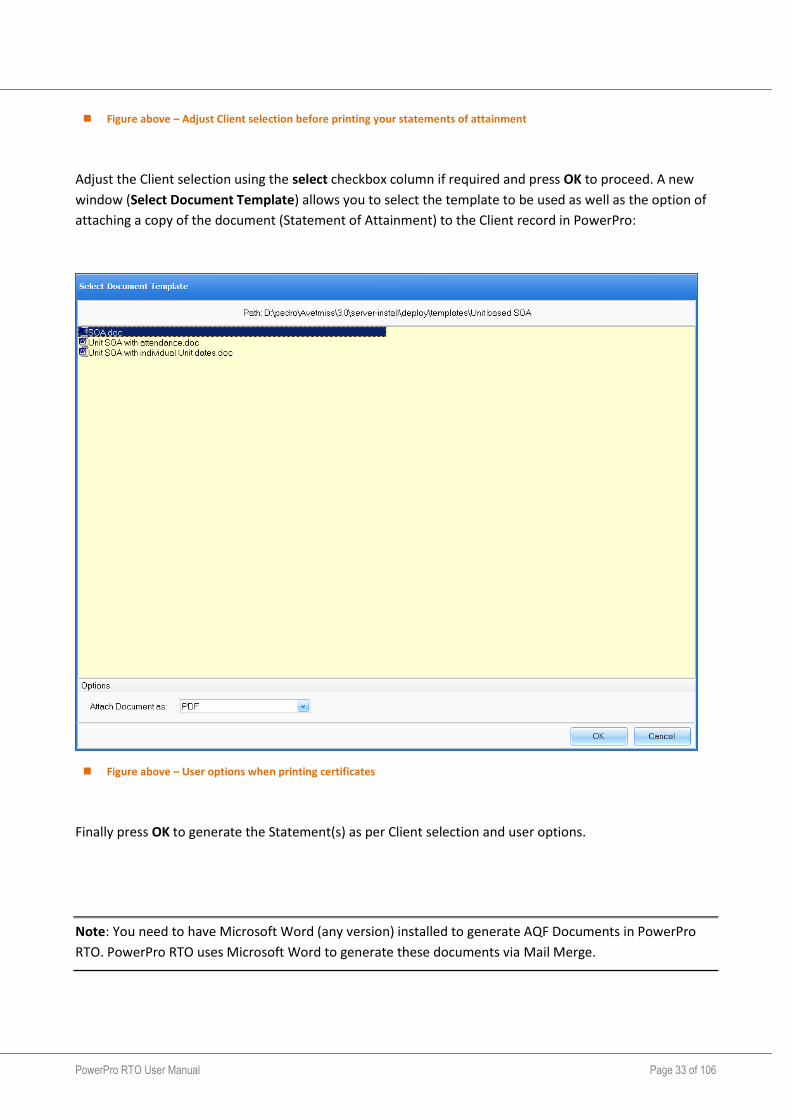
Figure above – Adjust Client selection before printing your statements of attainment
Adjust the Client selection using the select checkbox column if required and press OK to proceed. A new
window (Select Document Template) allows you to select the template to be used as well as the option of
attaching a copy of the document (Statement of Attainment) to the Client record in PowerPro:
Figure above – User options when printing certificates
Finally press OK to generate the Statement(s) as per Client selection and user options.
Note: You need to have Microsoft Word (any version) installed to generate AQF Documents in PowerPro
RTO. PowerPro RTO uses Microsoft Word to generate these documents via Mail Merge.
PowerPro RTO User Manual Page 34 of 106
4. Qualification rules
This section is only relevant if your RTO is scoped to deliver full qualifications or accredited courses (e.g.
TAA40110, 91499NSW). If you do only deliver short courses (Statements of Attainment) you do not need to
enter/configure qualification rules.
Similarly to the packaging rules in Training Packages, a Qualification Rule enables the system to determine
whether students/clients are eligible for a Qualification (if they complete the required units as defined in
the Qualification Rule) or not. It is critical to have these set up correctly as will determine the type of
document to be issued: Qualification or Statement of Attainment.
Use this area of the system to record each Qualification delivered (e.g. Certificate II in Business, Diploma of
Media, etc).
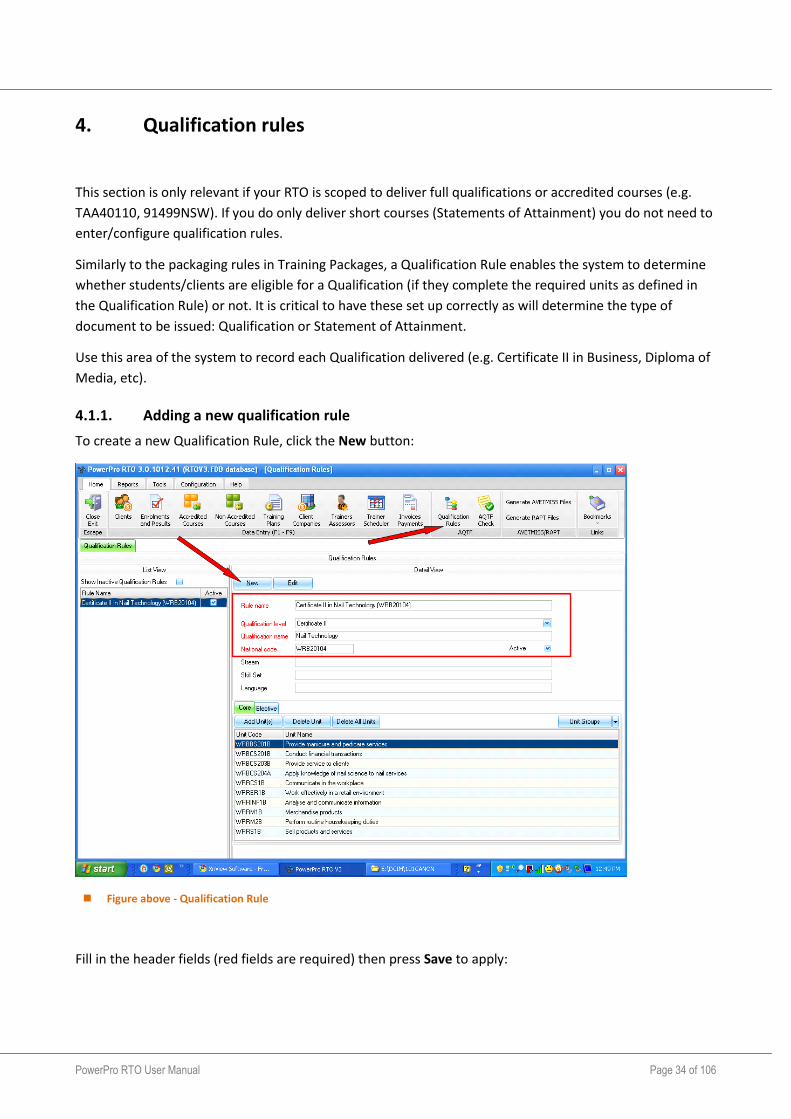
4.1.1. Adding a new qualification rule
To create a new Qualification Rule, click the New button:
Figure above - Qualification Rule
Fill in the header fields (red fields are required) then press Save to apply:
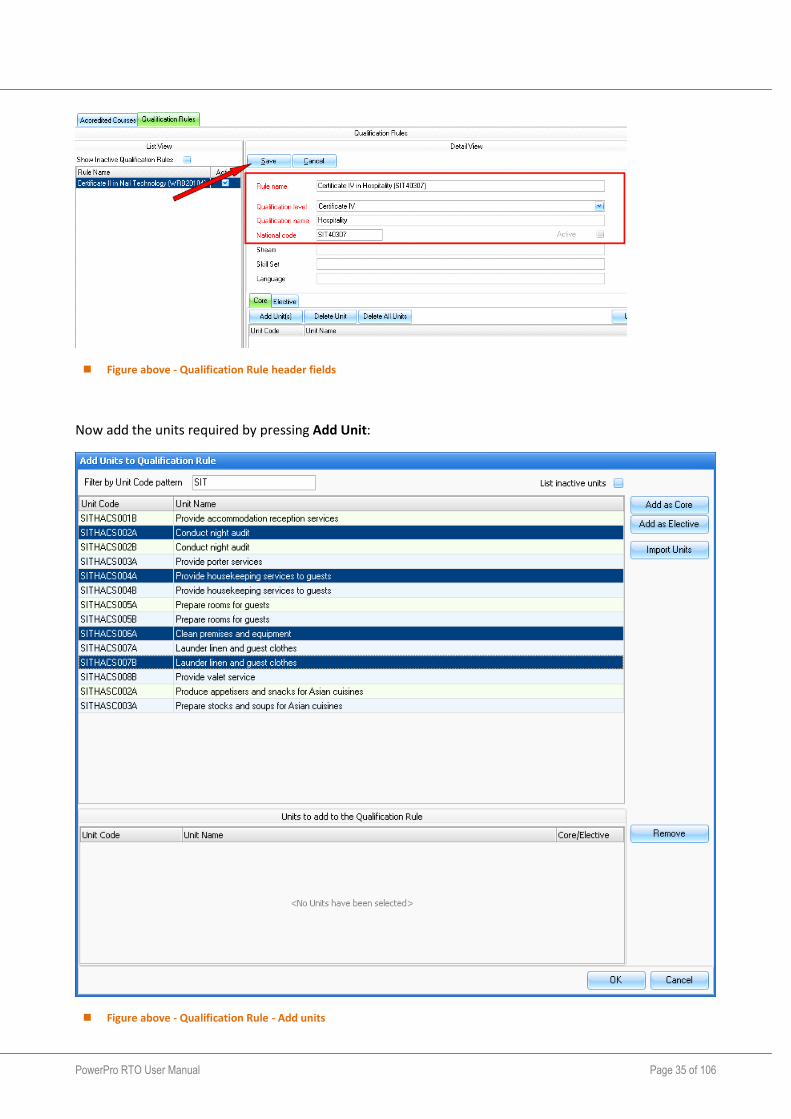
PowerPro RTO User Manual Page 35 of 106
Figure above - Qualification Rule header fields
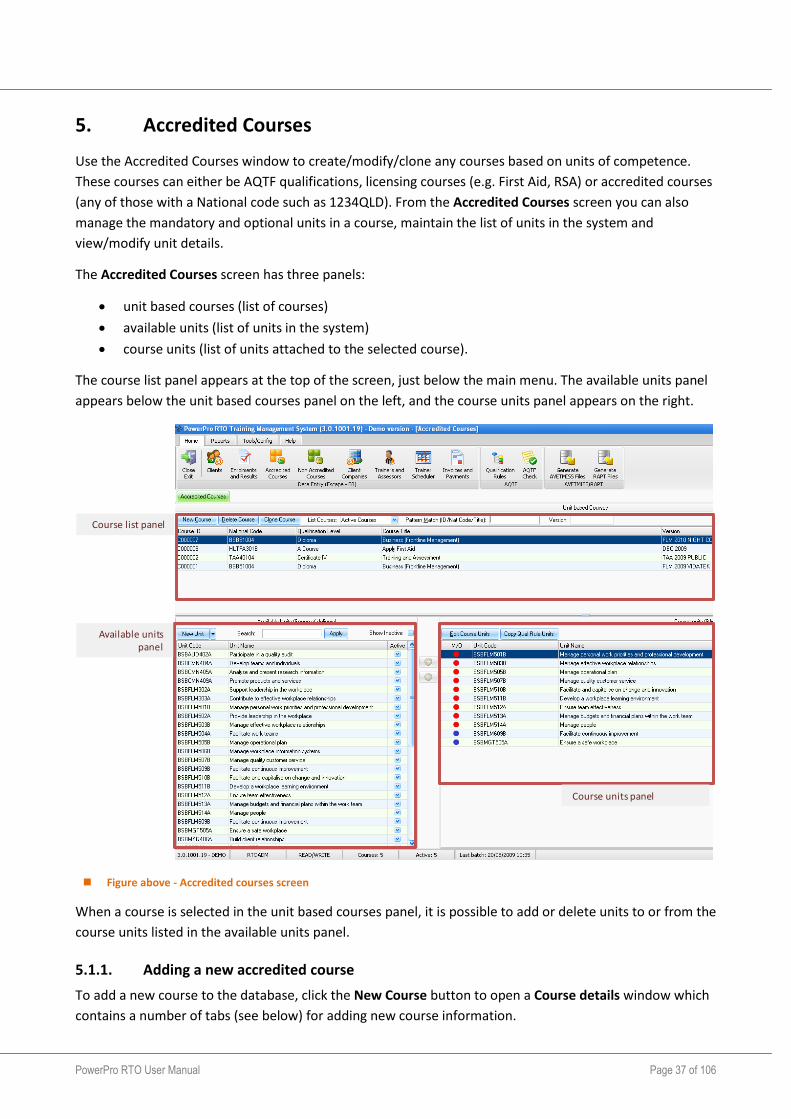
Now add the units required by pressing Add Unit:
Figure above - Qualification Rule - Add units

PowerPro RTO User Manual Page 36 of 106
A list of units is displayed; these are all the units currently active in your database. Select the relevant units
and add them as Core or Elective depending on whether the unit is required or can be selected amongst
other units. When you are done with the unit selection click OK to finally attach the units to the
qualification rule
Should you need additional units please use the Import Units button to launch this function.
4.1.2. Superseded qualification rule
At some stage some of your training package(s) will become superseded. You will need to add the new
qualifications to the system and perhaps make the superseded ones inactive. To do this, select the
superseded qualification from the list on the left side, click Edit and then uncheck the Active check box.
PowerPro RTO User Manual Page 37 of 106
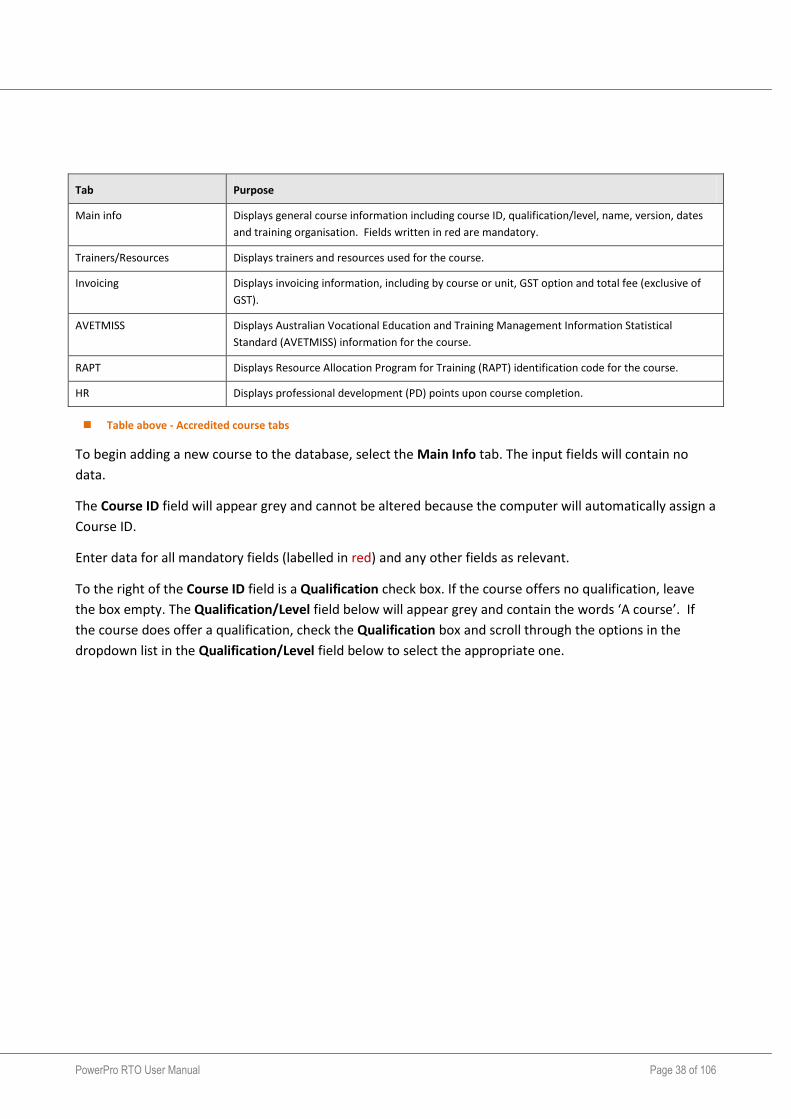
5. Accredited Courses
Use the Accredited Courses window to create/modify/clone any courses based on units of competence.
These courses can either be AQTF qualifications, licensing courses (e.g. First Aid, RSA) or accredited courses
(any of those with a National code such as 1234QLD). From the Accredited Courses screen you can also
manage the mandatory and optional units in a course, maintain the list of units in the system and
view/modify unit details.
The Accredited Courses screen has three panels:
unit based courses (list of courses)
available units (list of units in the system)
course units (list of units attached to the selected course).
The course list panel appears at the top of the screen, just below the main menu. The available units panel
appears below the unit based courses panel on the left, and the course units panel appears on the right.
Figure above - Accredited courses screen
When a course is selected in the unit based courses panel, it is possible to add or delete units to or from the
course units listed in the available units panel.
5.1.1. Adding a new accredited course
To add a new course to the database, click the New Course button to open a Course details window which
contains a number of tabs (see below) for adding new course information.
Course list panel
Available units panel
Course units panel
PowerPro RTO User Manual Page 38 of 106
Tab Purpose
Main info Displays general course information including course ID, qualification/level, name, version, dates
and training organisation. Fields written in red are mandatory.
Trainers/Resources Displays trainers and resources used for the course.
Invoicing Displays invoicing information, including by course or unit, GST option and total fee (exclusive of
GST).
AVETMISS Displays Australian Vocational Education and Training Management Information Statistical
Standard (AVETMISS) information for the course.
RAPT Displays Resource Allocation Program for Training (RAPT) identification code for the course.
HR Displays professional development (PD) points upon course completion.
Table above - Accredited course tabs
To begin adding a new course to the database, select the Main Info tab. The input fields will contain no
data.
The Course ID field will appear grey and cannot be altered because the computer will automatically assign a
Course ID.
Enter data for all mandatory fields (labelled in red) and any other fields as relevant.
To the right of the Course ID field is a Qualification check box. If the course offers no qualification, leave
the box empty. The Qualification/Level field below will appear grey and contain the words ‘A course’. If
the course does offer a qualification, check the Qualification box and scroll through the options in the
dropdown list in the Qualification/Level field below to select the appropriate one.
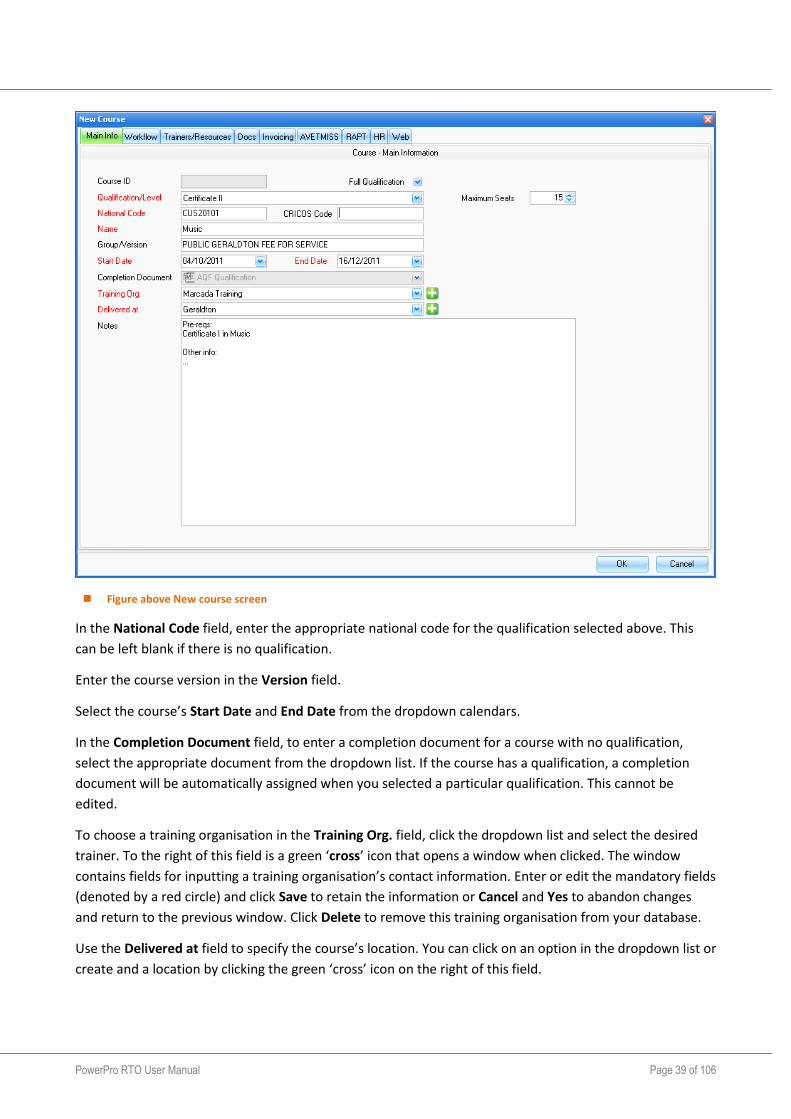
PowerPro RTO User Manual Page 39 of 106
Figure above New course screen
In the National Code field, enter the appropriate national code for the qualification selected above. This
can be left blank if there is no qualification.
Enter the course version in the Version field.
Select the course’s Start Date and End Date from the dropdown calendars.
In the Completion Document field, to enter a completion document for a course with no qualification,
select the appropriate document from the dropdown list. If the course has a qualification, a completion
document will be automatically assigned when you selected a particular qualification. This cannot be
edited.
To choose a training organisation in the Training Org. field, click the dropdown list and select the desired
trainer. To the right of this field is a green ‘cross’ icon that opens a window when clicked. The window
contains fields for inputting a training organisation’s contact information. Enter or edit the mandatory fields
(denoted by a red circle) and click Save to retain the information or Cancel and Yes to abandon changes
and return to the previous window. Click Delete to remove this training organisation from your database.
Use the Delivered at field to specify the course’s location. You can click on an option in the dropdown list or
create and a location by clicking the green ‘cross’ icon on the right of this field.
PowerPro RTO User Manual Page 40 of 106
Click the Trainers/Resources tab to add details of course trainers and resources. Under the left panel, click
Add Trainer or Remove Trainer to add or remove trainer and session details. To add, edit or remove
course resources, under the right panel click Add Resource, Edit Resource or Remove Resource.
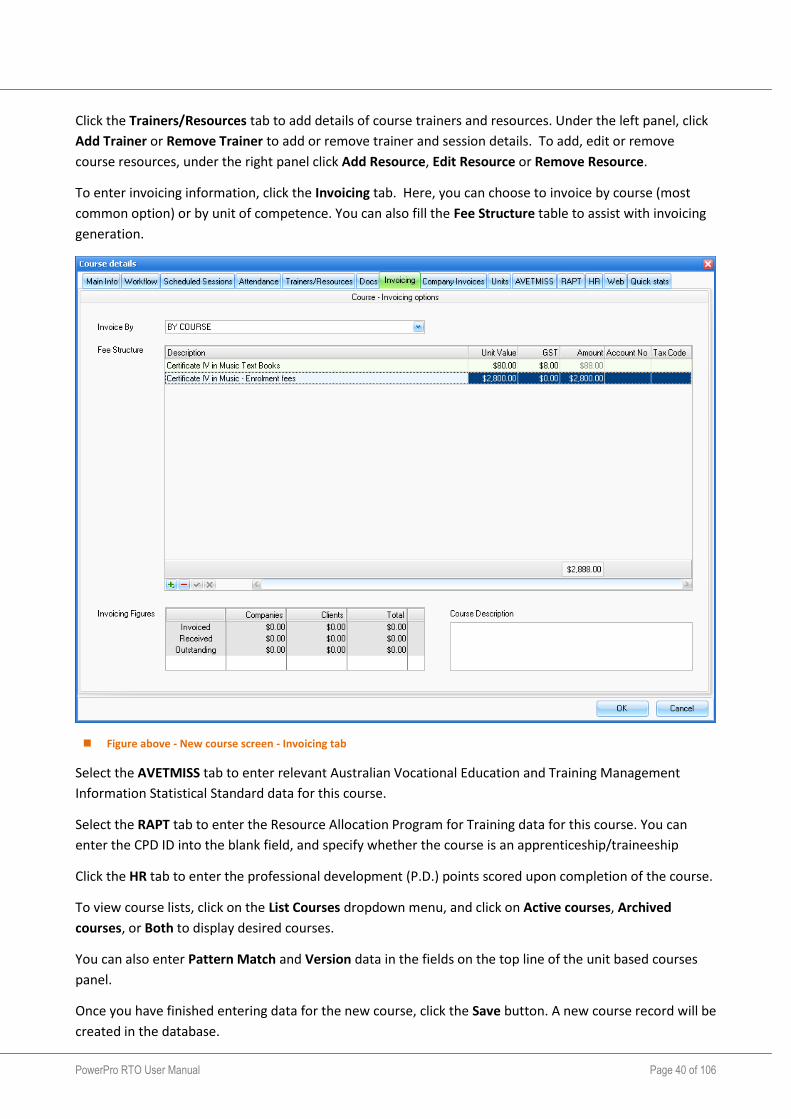
To enter invoicing information, click the Invoicing tab. Here, you can choose to invoice by course (most
common option) or by unit of competence. You can also fill the Fee Structure table to assist with invoicing
generation.
Figure above - New course screen - Invoicing tab
Select the AVETMISS tab to enter relevant Australian Vocational Education and Training Management
Information Statistical Standard data for this course.
Select the RAPT tab to enter the Resource Allocation Program for Training data for this course. You can
enter the CPD ID into the blank field, and specify whether the course is an apprenticeship/traineeship
Click the HR tab to enter the professional development (P.D.) points scored upon completion of the course.
To view course lists, click on the List Courses dropdown menu, and click on Active courses, Archived
courses, or Both to display desired courses.
You can also enter Pattern Match and Version data in the fields on the top line of the unit based courses
panel.
Once you have finished entering data for the new course, click the Save button. A new course record will be
created in the database.

PowerPro RTO User Manual Page 41 of 106
5.1.2. Editing an existing course
To view/modify course attributes just double-click on the relevant course in the course list panel. This will
open the Course details window with the following tabs.
Tab Purpose
Main info Displays general course information including course ID, qualification/level, name, version, dates
and training organisation. Fields written in red are mandatory.
Scheduled Sessions Displays date, day, time, location, trainer and unit(s) studied.
Attendance Displays and allows editing the student attendance for the course.
Trainers/Resources Displays trainers and resources used for the course.
Docs Displays a list of any documents attached to this course. Good document candidates are student
and trainer signed class roles - do NOT use this to store course material/content documents
Invoicing Displays invoicing information, including by course or unit, GST option and total fee (exclusive of
GST).
Company invoices Displays invoice and payment details.
Units Displays units in the course.
AVETMISS Displays Australian Vocational Education and Training Management Information Statistical
Standard information (AVETMISS) for the course.
RAPT Displays Resource Allocation Program for Training (RAPT) identification code for the course.
HR Displays professional development (PD) points upon course completion.
WEB Information about if and how the course is to be displayed online.
Quick stats Displays enrolment statistics.
Table above - course tabs
Select the Scheduled Sessions tab to view and edit course session details. Here you can click New Session
to create an extra session. You can input and edit relevant information in the Trainer, Course, Units,
Location and Caption fields, and specify start and finish times for the session.
Select the Company Invoices tab to manage the creation or payment of any invoices for this course.
To view units in the course, select Units tab. This will display unit codes, names and dates. A red circle
signifies a mandatory unit; a blue circle denotes an optional unit.
Clicking the Quick Stats tab displays important enrolment statistics at a glance.
5.1.3. Deleting an existing accredited course
Click the Delete Course button to remove a course.
A Confirm action dialogue box will appear to delete the course from the database.
PowerPro RTO User Manual Page 42 of 106
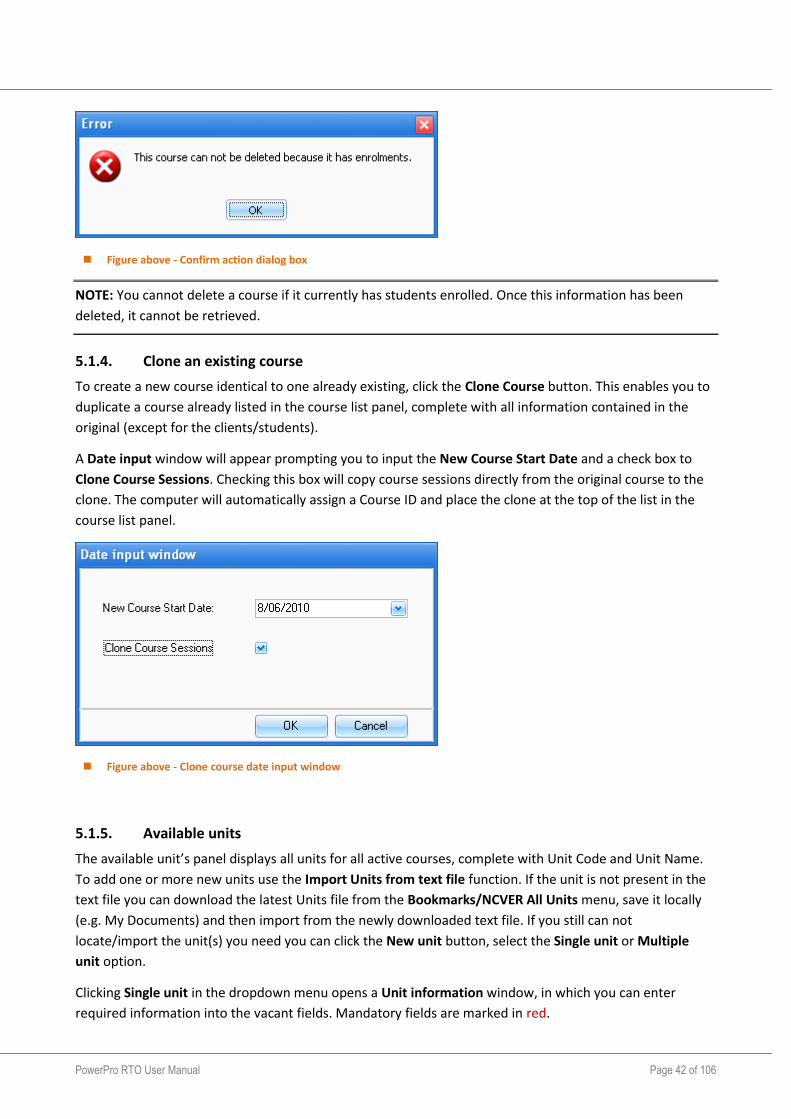
Figure above - Confirm action dialog box
NOTE: You cannot delete a course if it currently has students enrolled. Once this information has been
deleted, it cannot be retrieved.
5.1.4. Clone an existing course
To create a new course identical to one already existing, click the Clone Course button. This enables you to
duplicate a course already listed in the course list panel, complete with all information contained in the
original (except for the clients/students).
A Date input window will appear prompting you to input the New Course Start Date and a check box to
Clone Course Sessions. Checking this box will copy course sessions directly from the original course to the
clone. The computer will automatically assign a Course ID and place the clone at the top of the list in the
course list panel.
Figure above - Clone course date input window
5.1.5. Available units
The available unit’s panel displays all units for all active courses, complete with Unit Code and Unit Name.
To add one or more new units use the Import Units from text file function. If the unit is not present in the
text file you can download the latest Units file from the Bookmarks/NCVER All Units menu, save it locally
(e.g. My Documents) and then import from the newly downloaded text file. If you still can not
locate/import the unit(s) you need you can click the New unit button, select the Single unit or Multiple
unit option.
Clicking Single unit in the dropdown menu opens a Unit information window, in which you can enter
required information into the vacant fields. Mandatory fields are marked in red.
PowerPro RTO User Manual Page 43 of 106
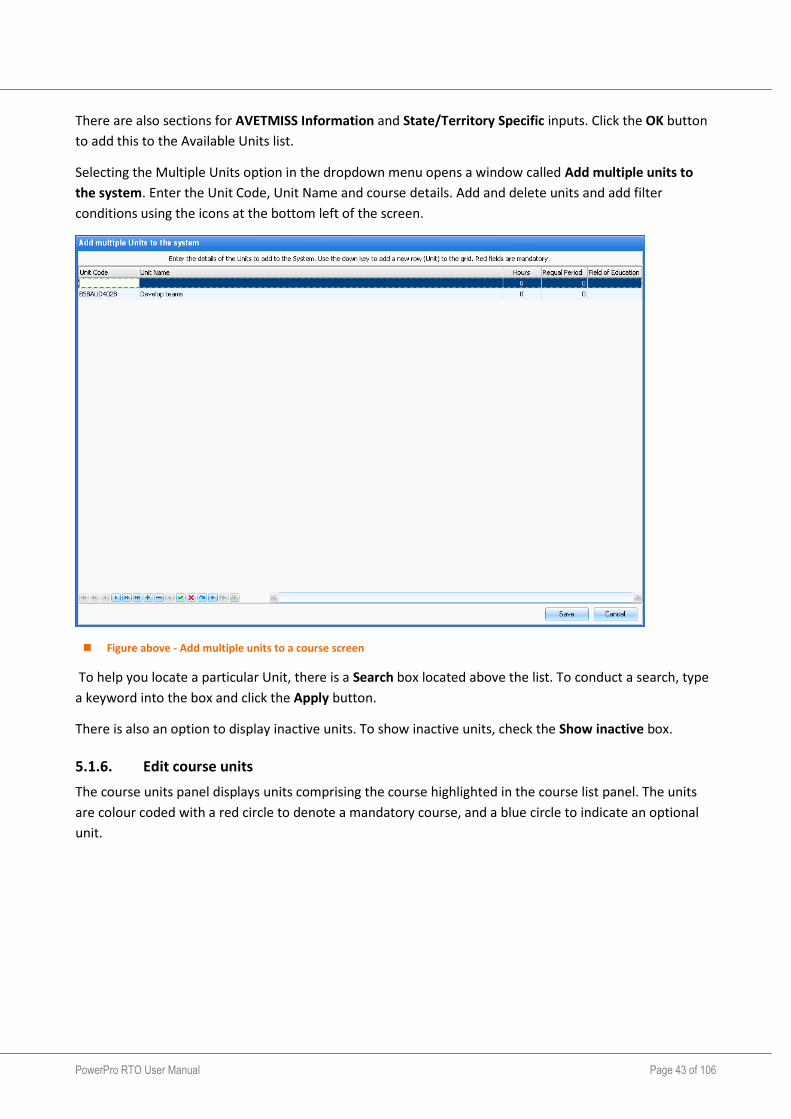
There are also sections for AVETMISS Information and State/Territory Specific inputs. Click the OK button
to add this to the Available Units list.
Selecting the Multiple Units option in the dropdown menu opens a window called Add multiple units to
the system. Enter the Unit Code, Unit Name and course details. Add and delete units and add filter
conditions using the icons at the bottom left of the screen.
Figure above - Add multiple units to a course screen
To help you locate a particular Unit, there is a Search box located above the list. To conduct a search, type
a keyword into the box and click the Apply button.
There is also an option to display inactive units. To show inactive units, check the Show inactive box.
5.1.6. Edit course units
The course units panel displays units comprising the course highlighted in the course list panel. The units
are colour coded with a red circle to denote a mandatory course, and a blue circle to indicate an optional
unit.
PowerPro RTO User Manual Page 44 of 106
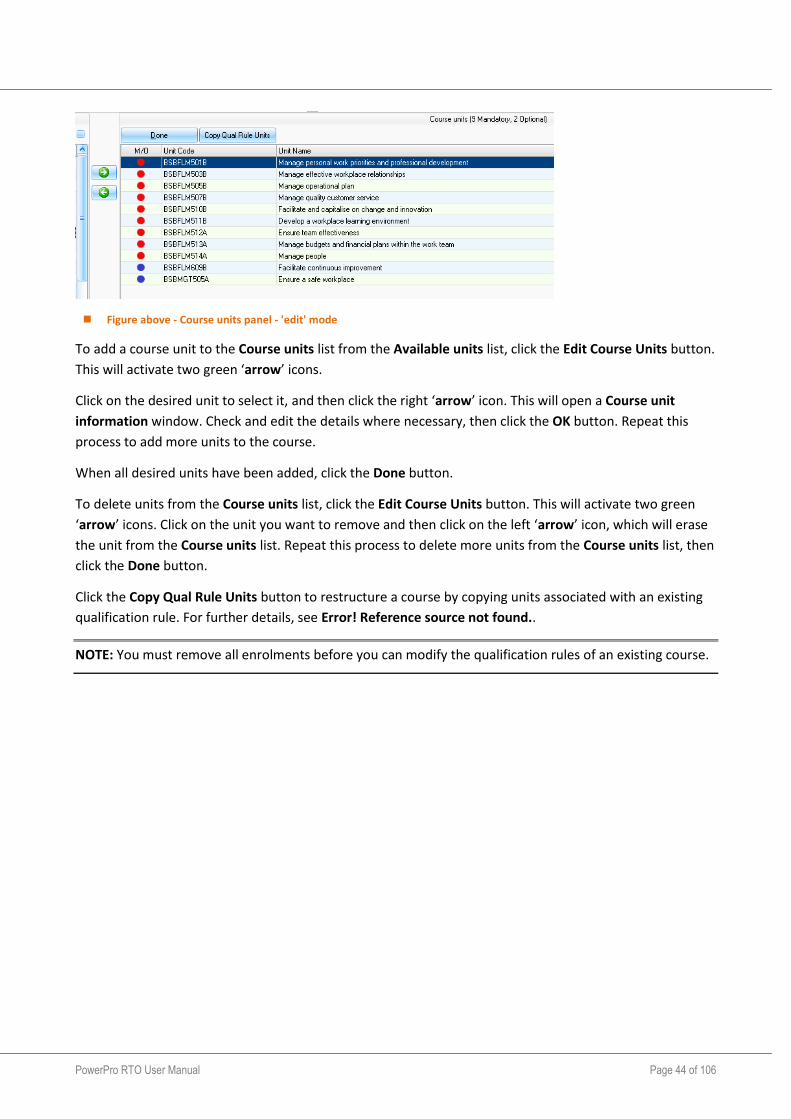
Figure above - Course units panel - 'edit' mode
To add a course unit to the Course units list from the Available units list, click the Edit Course Units button.
This will activate two green ‘arrow’ icons.
Click on the desired unit to select it, and then click the right ‘arrow’ icon. This will open a Course unit
information window. Check and edit the details where necessary, then click the OK button. Repeat this
process to add more units to the course.
When all desired units have been added, click the Done button.
To delete units from the Course units list, click the Edit Course Units button. This will activate two green
‘arrow’ icons. Click on the unit you want to remove and then click on the left ‘arrow’ icon, which will erase
the unit from the Course units list. Repeat this process to delete more units from the Course units list, then
click the Done button.
Click the Copy Qual Rule Units button to restructure a course by copying units associated with an existing
qualification rule. For further details, see Error! Reference source not found..
NOTE: You must remove all enrolments before you can modify the qualification rules of an existing course.

PowerPro RTO User Manual Page 45 of 106
6. Non-accredited Courses
The non-accredited courses component of PowerPro enables organisations to run in-housetraining courses
that are not nationally accredited. Examples of non-accredited courses are employee inductions and
Professional Development activities.
Non-accredited courses work in a very similar fashion to accredited courses except these courses are based
on modules instead of units of competence. For that reason there is no option to import the modules, since
these are your own modules they need to be entered manually into the system.
For assistance in administering non-accredited courses within PowerPro, refer to the corresponding section
under accredited courses.
PowerPro RTO User Manual Page 46 of 106
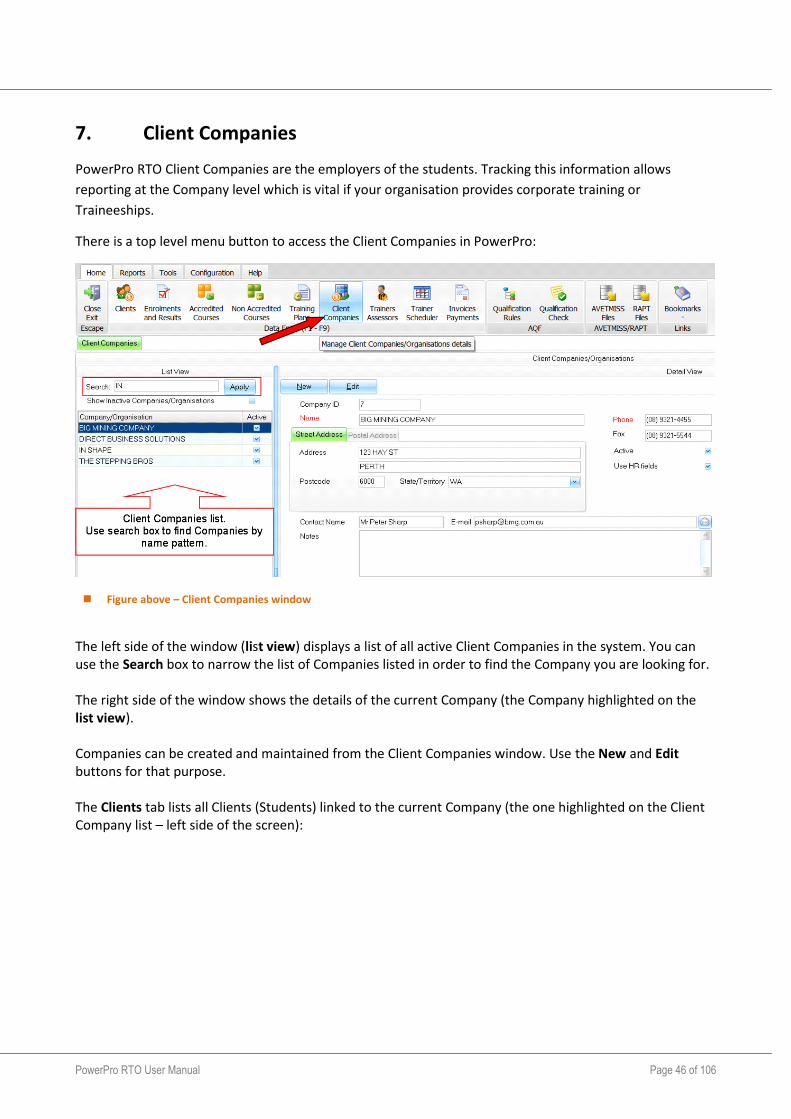
7. Client Companies
PowerPro RTO Client Companies are the employers of the students. Tracking this information allows
reporting at the Company level which is vital if your organisation provides corporate training or
Traineeships.
There is a top level menu button to access the Client Companies in PowerPro:
Figure above – Client Companies window
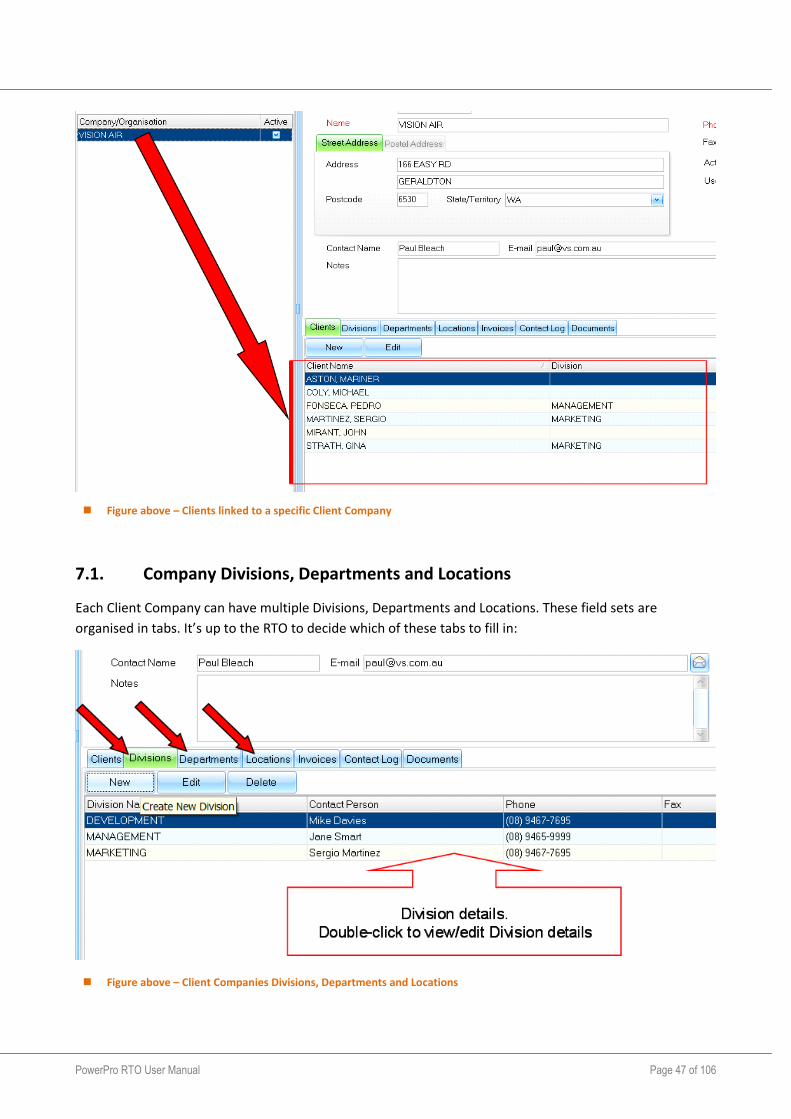
The left side of the window (list view) displays a list of all active Client Companies in the system. You can use the Search box to narrow the list of Companies listed in order to find the Company you are looking for. The right side of the window shows the details of the current Company (the Company highlighted on the list view). Companies can be created and maintained from the Client Companies window. Use the New and Edit buttons for that purpose. The Clients tab lists all Clients (Students) linked to the current Company (the one highlighted on the Client Company list – left side of the screen):
PowerPro RTO User Manual Page 47 of 106
Figure above – Clients linked to a specific Client Company
7.1. Company Divisions, Departments and Locations
Each Client Company can have multiple Divisions, Departments and Locations. These field sets are
organised in tabs. It’s up to the RTO to decide which of these tabs to fill in:
Figure above – Client Companies Divisions, Departments and Locations
PowerPro RTO User Manual Page 48 of 106
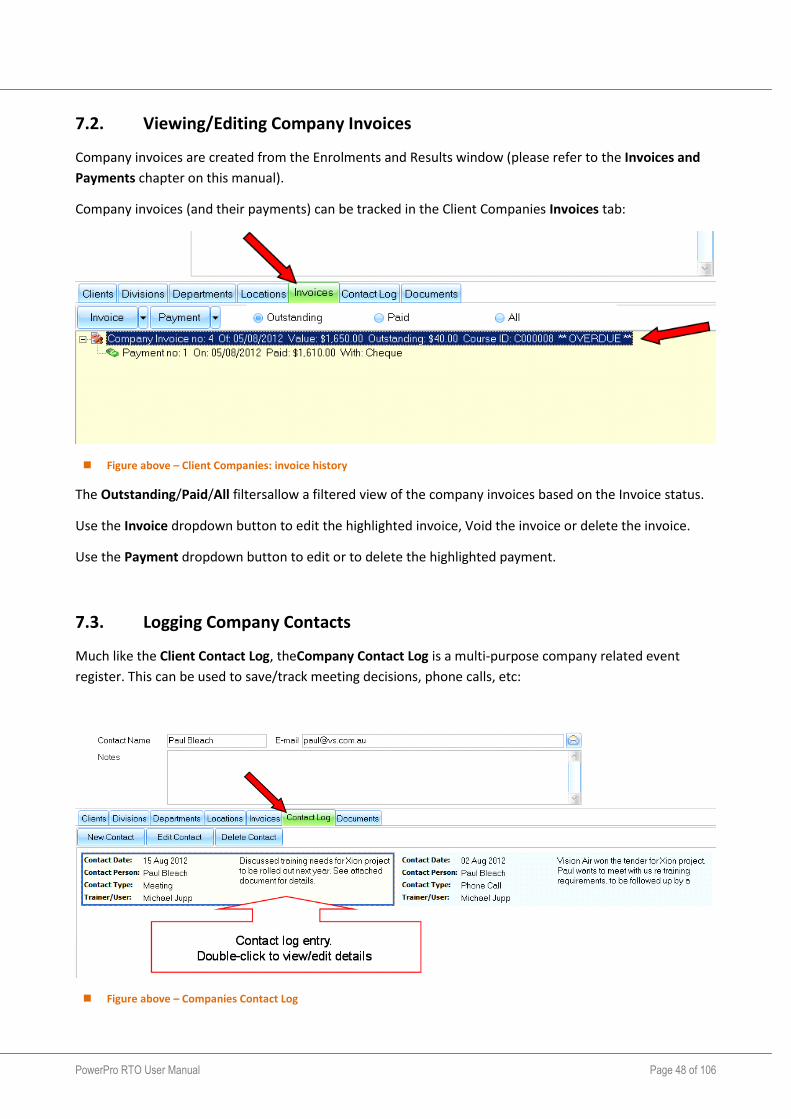
7.2. Viewing/Editing Company Invoices
Company invoices are created from the Enrolments and Results window (please refer to the Invoices and
Payments chapter on this manual).
Company invoices (and their payments) can be tracked in the Client Companies Invoices tab:
Figure above – Client Companies: invoice history
The Outstanding/Paid/All filtersallow a filtered view of the company invoices based on the Invoice status.
Use the Invoice dropdown button to edit the highlighted invoice, Void the invoice or delete the invoice.
Use the Payment dropdown button to edit or to delete the highlighted payment.
7.3. Logging Company Contacts
Much like the Client Contact Log, theCompany Contact Log is a multi-purpose company related event
register. This can be used to save/track meeting decisions, phone calls, etc:
Figure above – Companies Contact Log
PowerPro RTO User Manual Page 49 of 106
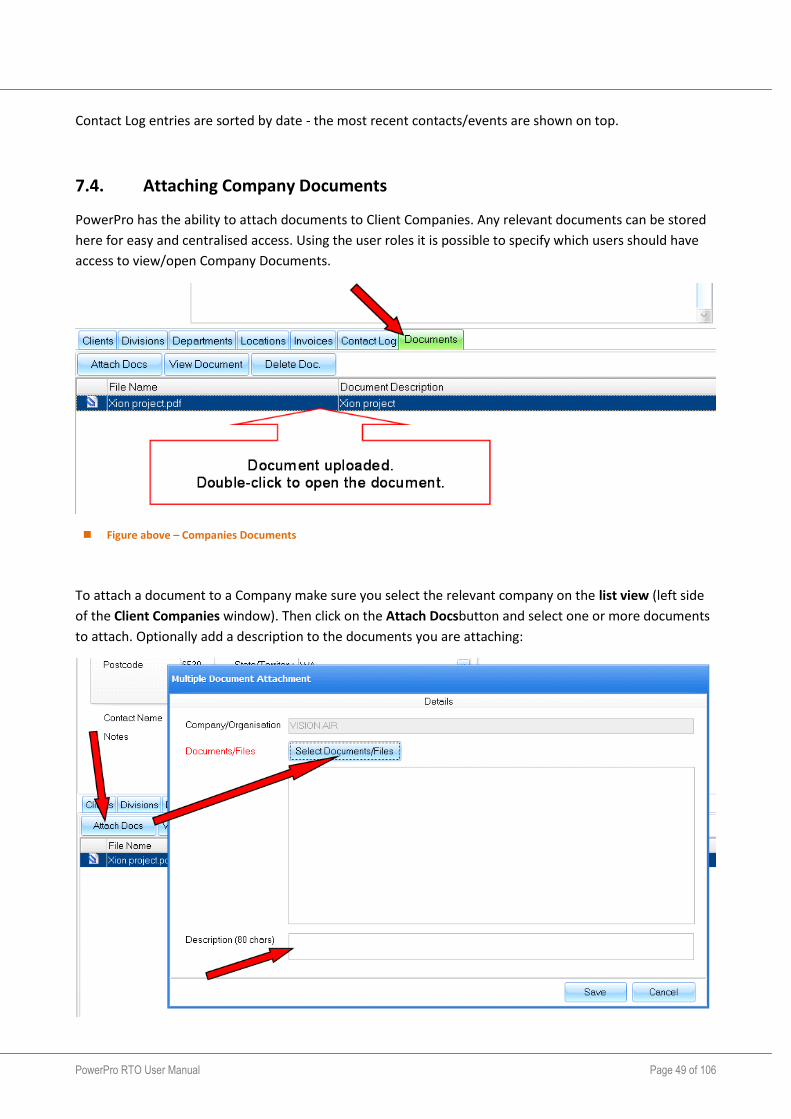
Contact Log entries are sorted by date - the most recent contacts/events are shown on top.
7.4. Attaching Company Documents
PowerPro has the ability to attach documents to Client Companies. Any relevant documents can be stored
here for easy and centralised access. Using the user roles it is possible to specify which users should have
access to view/open Company Documents.
Figure above – Companies Documents
To attach a document to a Company make sure you select the relevant company on the list view (left side
of the Client Companies window). Then click on the Attach Docsbutton and select one or more documents
to attach. Optionally add a description to the documents you are attaching:
PowerPro RTO User Manual Page 50 of 106
Figure above – Attaching Company Documents
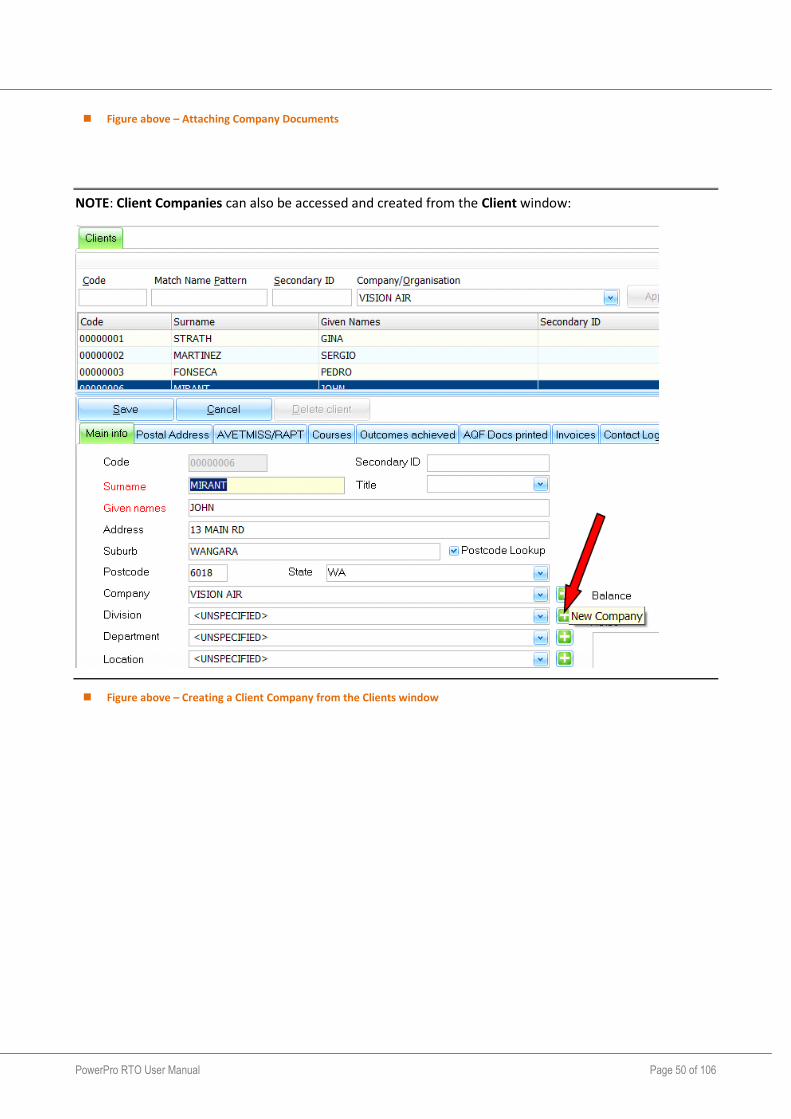
NOTE: Client Companies can also be accessed and created from the Client window:
Figure above – Creating a Client Company from the Clients window
PowerPro RTO User Manual Page 51 of 106
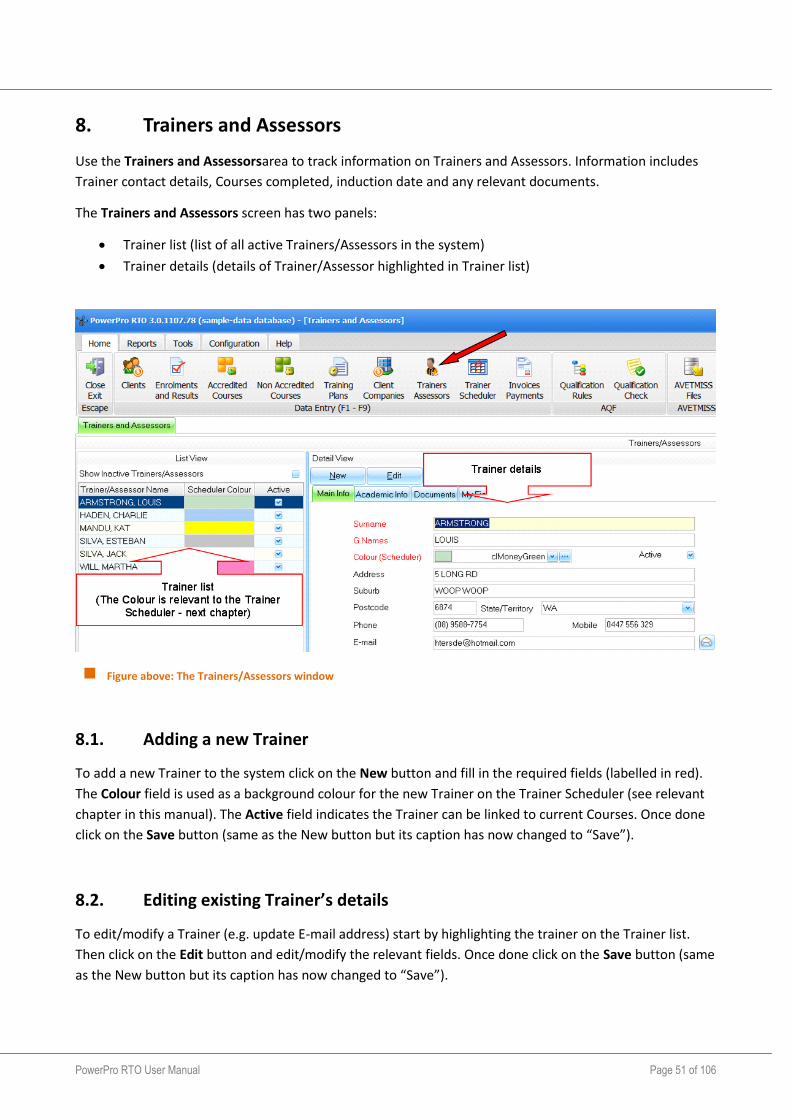
8. Trainers and Assessors
Use the Trainers and Assessorsarea to track information on Trainers and Assessors. Information includes
Trainer contact details, Courses completed, induction date and any relevant documents.
The Trainers and Assessors screen has two panels:
Trainer list (list of all active Trainers/Assessors in the system)
Trainer details (details of Trainer/Assessor highlighted in Trainer list)
Figure above: The Trainers/Assessors window
8.1. Adding a new Trainer
To add a new Trainer to the system click on the New button and fill in the required fields (labelled in red).
The Colour field is used as a background colour for the new Trainer on the Trainer Scheduler (see relevant
chapter in this manual). The Active field indicates the Trainer can be linked to current Courses. Once done
click on the Save button (same as the New button but its caption has now changed to “Save”).
8.2. Editing existing Trainer’s details
To edit/modify a Trainer (e.g. update E-mail address) start by highlighting the trainer on the Trainer list.
Then click on the Edit button and edit/modify the relevant fields. Once done click on the Save button (same
as the New button but its caption has now changed to “Save”).

PowerPro RTO User Manual Page 52 of 106
8.3. Editing a Trainer’s Academic Information
To edit/modify a Trainer’s Academic Information (e.g. Induction date, Training Areas, etc) start by
highlighting the trainer on the Trainer list. Then click on the Edit button and edit/modify the relevant fields
on the Academic Info tab. Once done click on the Save button (same as the New button but its caption has
now changed to “Save”):
Figure above: Editing a Trainer’s Academic Information
8.4. Editing a Trainer’s courses
The Courses Completed tab allows tracking courses/PDs completed/attended by the trainer:
Figure above: Trainer Courses (part of the Academic Info tab)
Use the Add Course button to append a course to the trainer Courses Achieved list.
Use the Edit Course button to modify details of a course on the trainer Courses Achieved list.
Use the Delete Course button to remove a course from the trainer Courses Achieved list.
NOTE: Trainer Academic Information (including Courses Achieved) can be viewed on the Trainer details
report:
PowerPro RTO User Manual Page 53 of 106
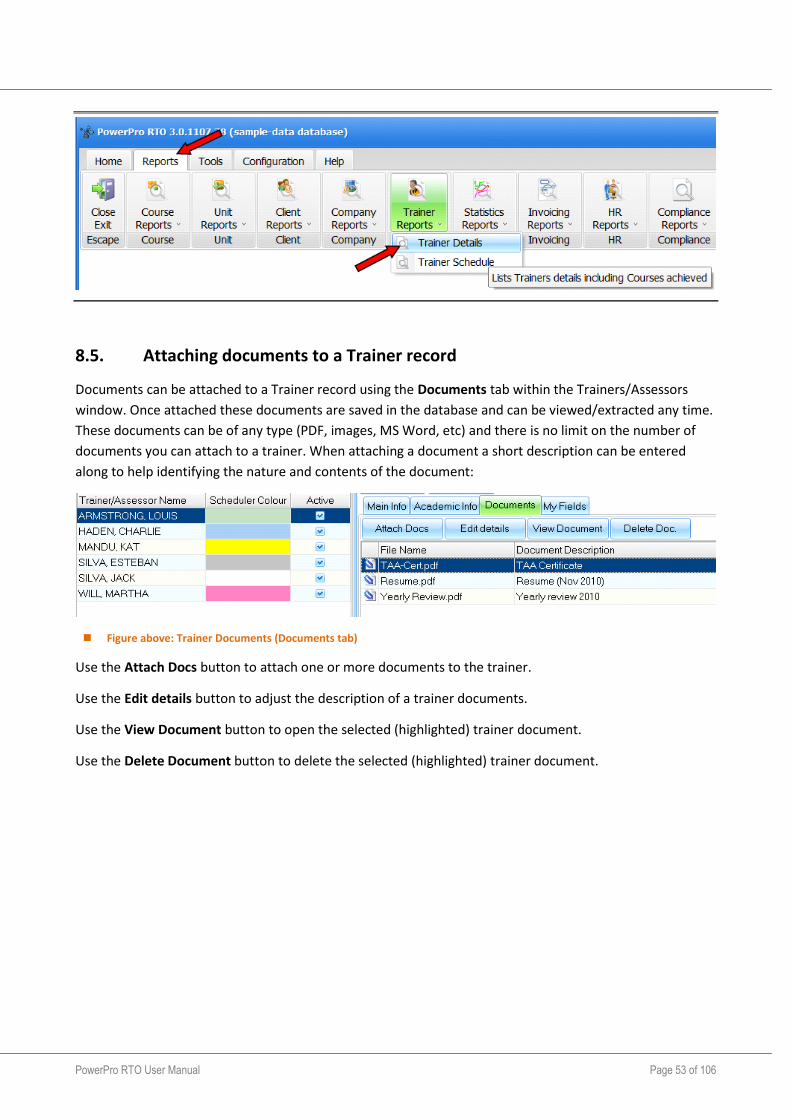
8.5. Attaching documents to a Trainer record
Documents can be attached to a Trainer record using the Documents tab within the Trainers/Assessors
window. Once attached these documents are saved in the database and can be viewed/extracted any time.
These documents can be of any type (PDF, images, MS Word, etc) and there is no limit on the number of
documents you can attach to a trainer. When attaching a document a short description can be entered
along to help identifying the nature and contents of the document:
Figure above: Trainer Documents (Documents tab)
Use the Attach Docs button to attach one or more documents to the trainer.
Use the Edit details button to adjust the description of a trainer documents.
Use the View Document button to open the selected (highlighted) trainer document.
Use the Delete Document button to delete the selected (highlighted) trainer document.
PowerPro RTO User Manual Page 54 of 106
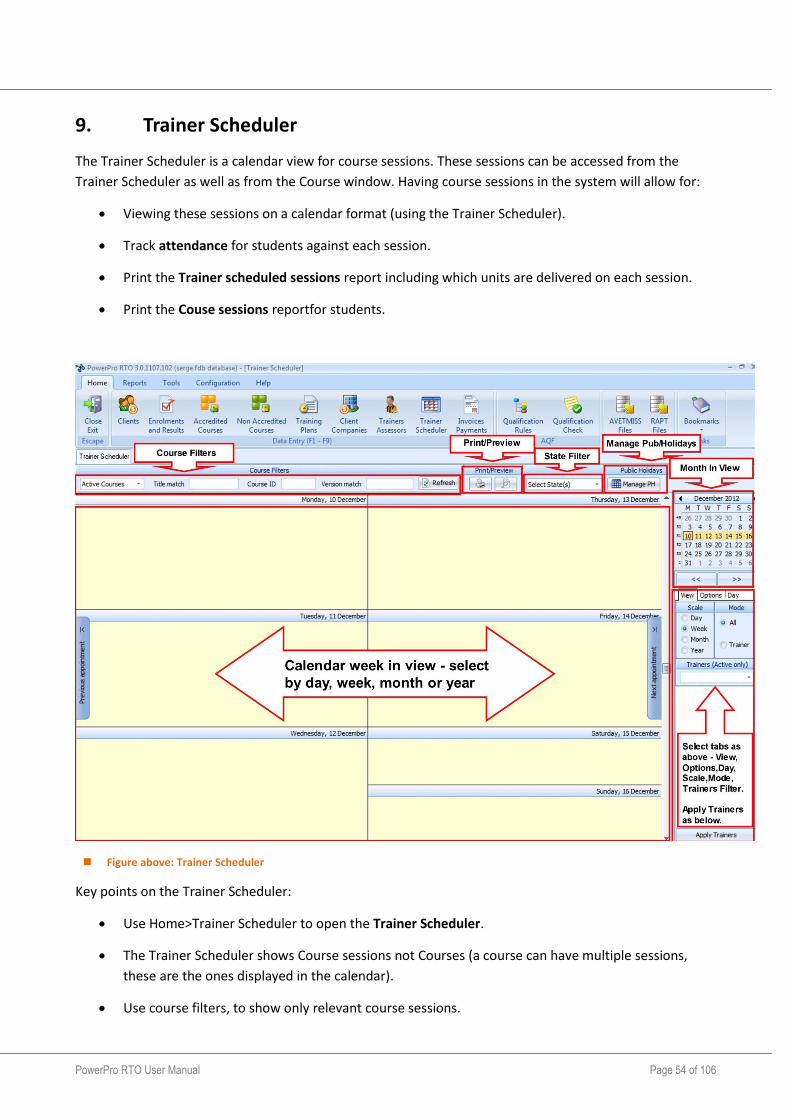
9. Trainer Scheduler
The Trainer Scheduler is a calendar view for course sessions. These sessions can be accessed from the
Trainer Scheduler as well as from the Course window. Having course sessions in the system will allow for:
Viewing these sessions on a calendar format (using the Trainer Scheduler).
Track attendance for students against each session.
Print the Trainer scheduled sessions report including which units are delivered on each session.
Print the Couse sessions reportfor students.
Figure above: Trainer Scheduler
Key points on the Trainer Scheduler:
Use Home>Trainer Scheduler to open the Trainer Scheduler.
The Trainer Scheduler shows Course sessions not Courses (a course can have multiple sessions,
these are the ones displayed in the calendar).
Use course filters, to show only relevant course sessions.
PowerPro RTO User Manual Page 55 of 106
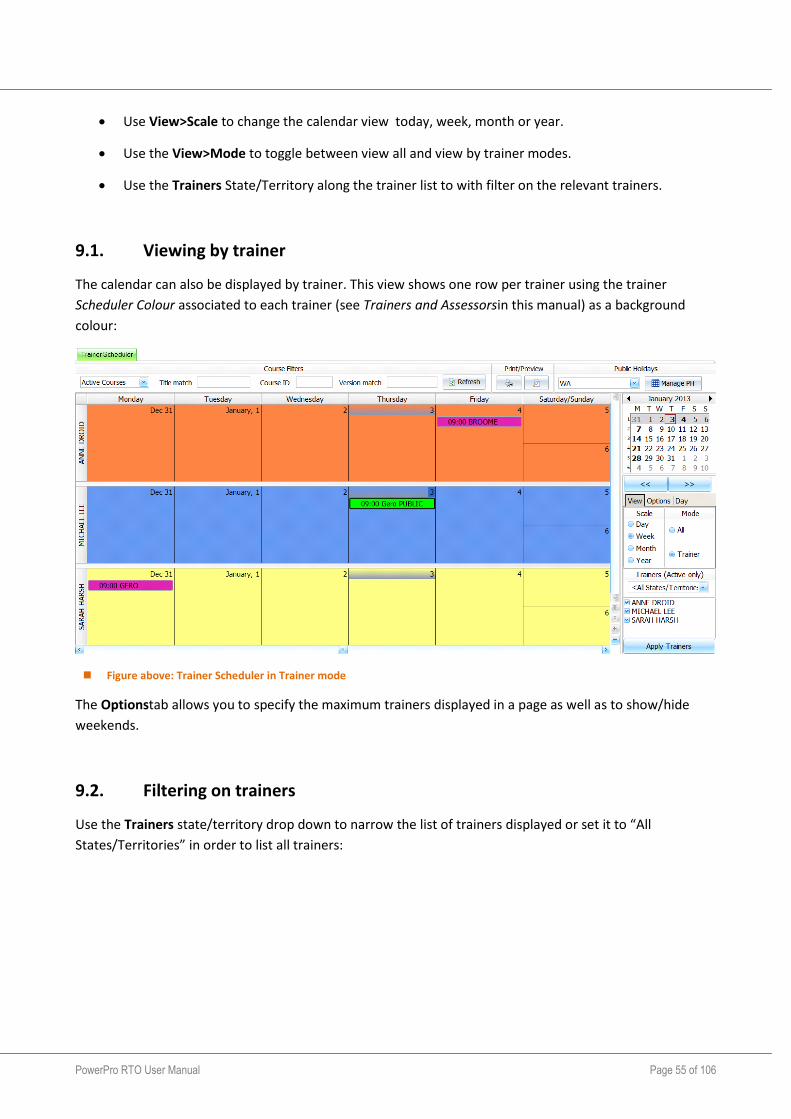
Use View>Scale to change the calendar view today, week, month or year.
Use the View>Mode to toggle between view all and view by trainer modes.
Use the Trainers State/Territory along the trainer list to with filter on the relevant trainers.
9.1. Viewing by trainer
The calendar can also be displayed by trainer. This view shows one row per trainer using the trainer
Scheduler Colour associated to each trainer (see Trainers and Assessorsin this manual) as a background
colour:
Figure above: Trainer Scheduler in Trainer mode
The Optionstab allows you to specify the maximum trainers displayed in a page as well as to show/hide
weekends.
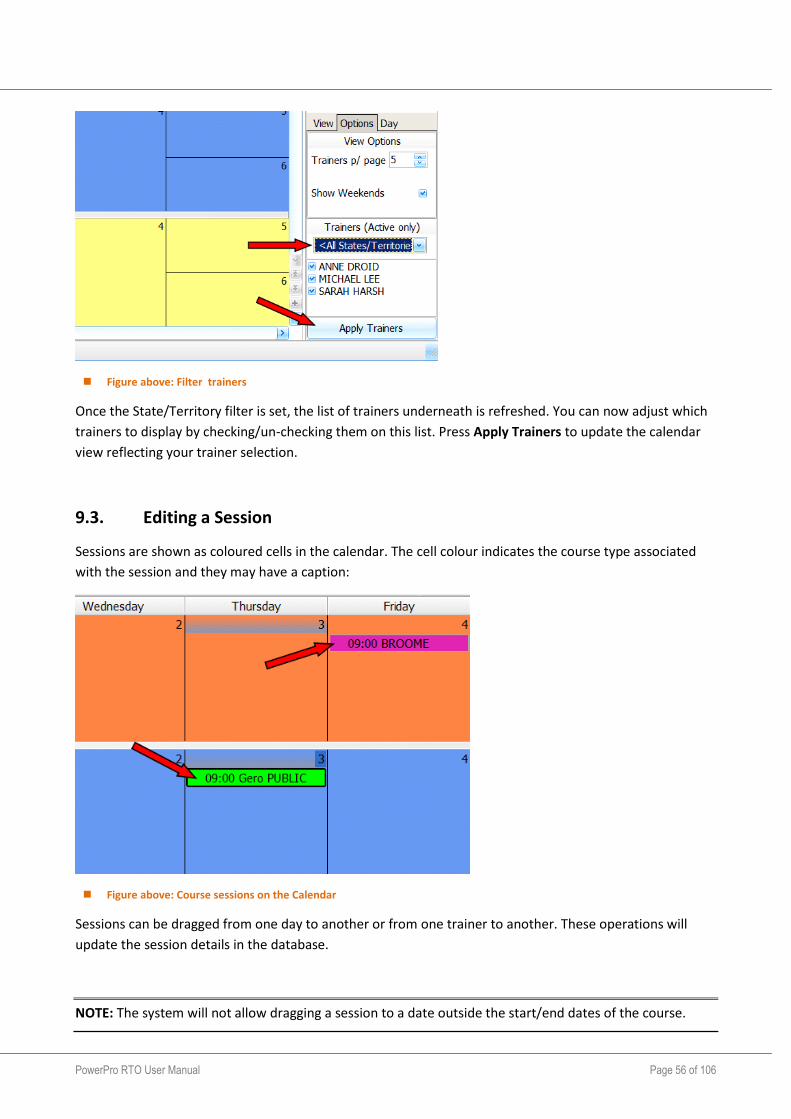
9.2. Filtering on trainers
Use the Trainers state/territory drop down to narrow the list of trainers displayed or set it to “All
States/Territories” in order to list all trainers:
PowerPro RTO User Manual Page 56 of 106
Figure above: Filter trainers
Once the State/Territory filter is set, the list of trainers underneath is refreshed. You can now adjust which
trainers to display by checking/un-checking them on this list. Press Apply Trainers to update the calendar
view reflecting your trainer selection.
9.3. Editing a Session
Sessions are shown as coloured cells in the calendar. The cell colour indicates the course type associated
with the session and they may have a caption:
Figure above: Course sessions on the Calendar
Sessions can be dragged from one day to another or from one trainer to another. These operations will
update the session details in the database.
NOTE: The system will not allow dragging a session to a date outside the start/end dates of the course.
PowerPro RTO User Manual Page 57 of 106
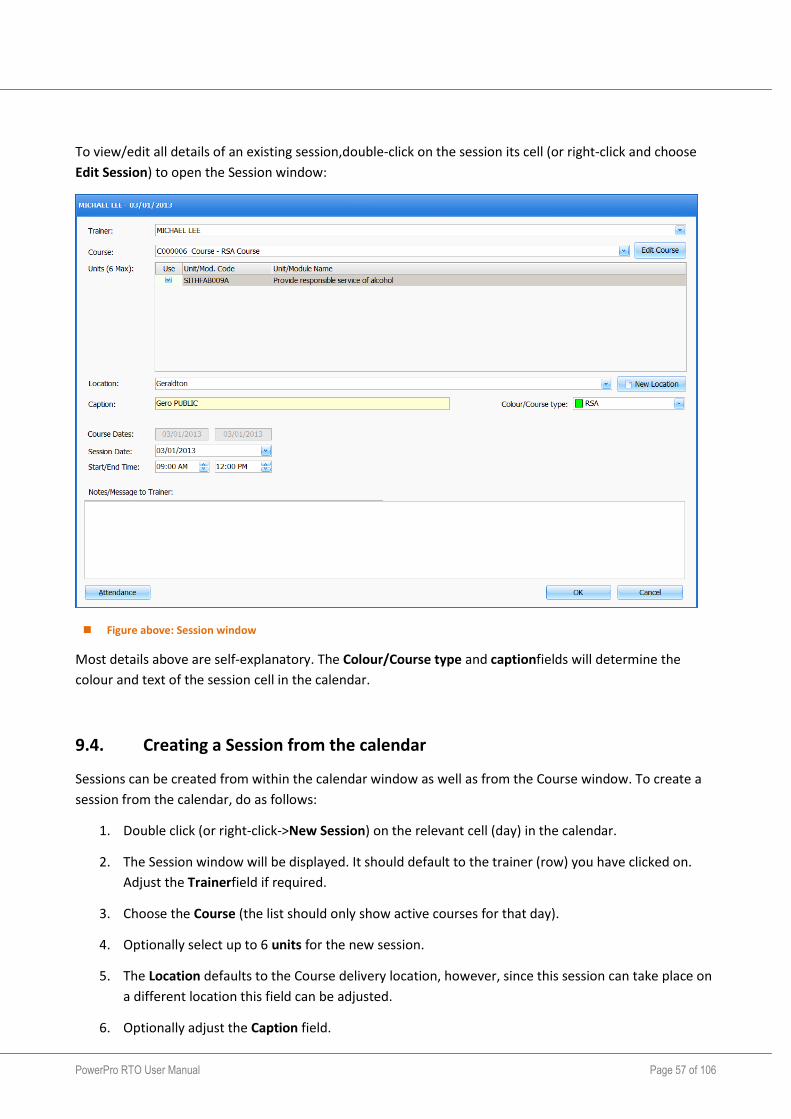
To view/edit all details of an existing session,double-click on the session its cell (or right-click and choose
Edit Session) to open the Session window:
Figure above: Session window
Most details above are self-explanatory. The Colour/Course type and captionfields will determine the
colour and text of the session cell in the calendar.
9.4. Creating a Session from the calendar
Sessions can be created from within the calendar window as well as from the Course window. To create a
session from the calendar, do as follows:
1. Double click (or right-click->New Session) on the relevant cell (day) in the calendar.
2. The Session window will be displayed. It should default to the trainer (row) you have clicked on.
Adjust the Trainerfield if required.
3. Choose the Course (the list should only show active courses for that day).
4. Optionally select up to 6 units for the new session.
5. The Location defaults to the Course delivery location, however, since this session can take place on
a different location this field can be adjusted.
6. Optionally adjust the Caption field.
PowerPro RTO User Manual Page 58 of 106
7. Set the Colour/Course type to match the course type the session relates to.
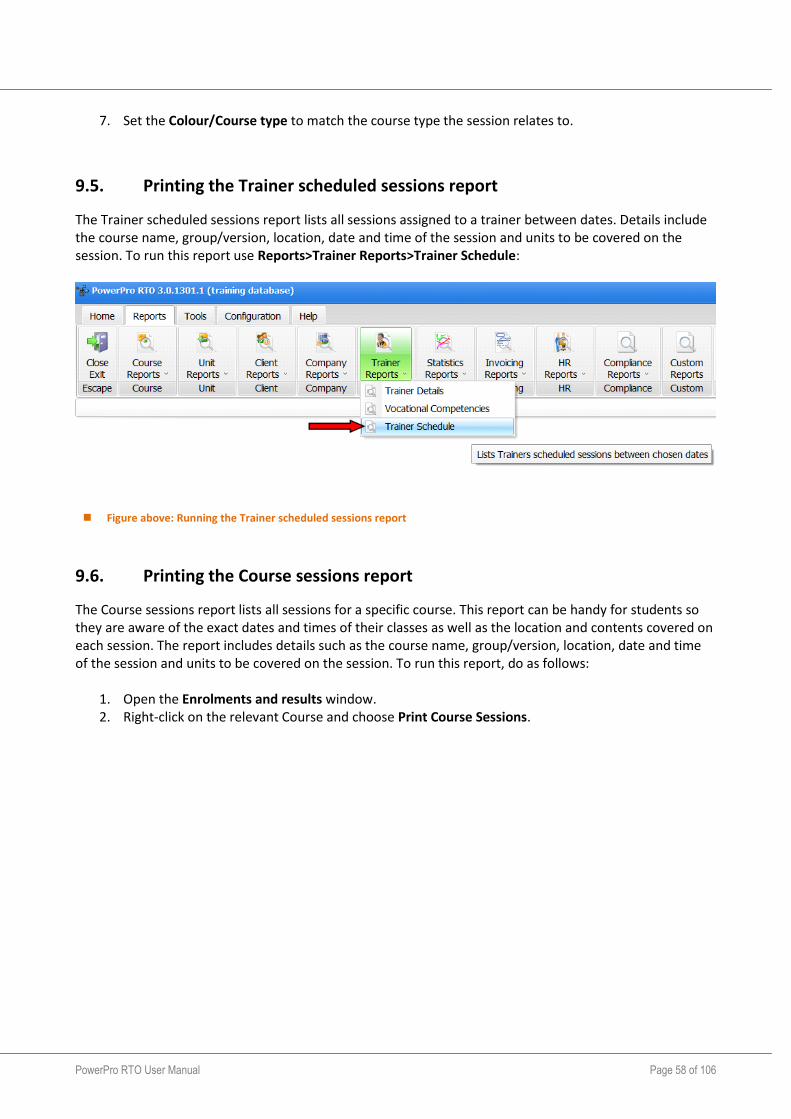
9.5. Printing the Trainer scheduled sessions report
The Trainer scheduled sessions report lists all sessions assigned to a trainer between dates. Details include the course name, group/version, location, date and time of the session and units to be covered on the session. To run this report use Reports>Trainer Reports>Trainer Schedule:
Figure above: Running the Trainer scheduled sessions report
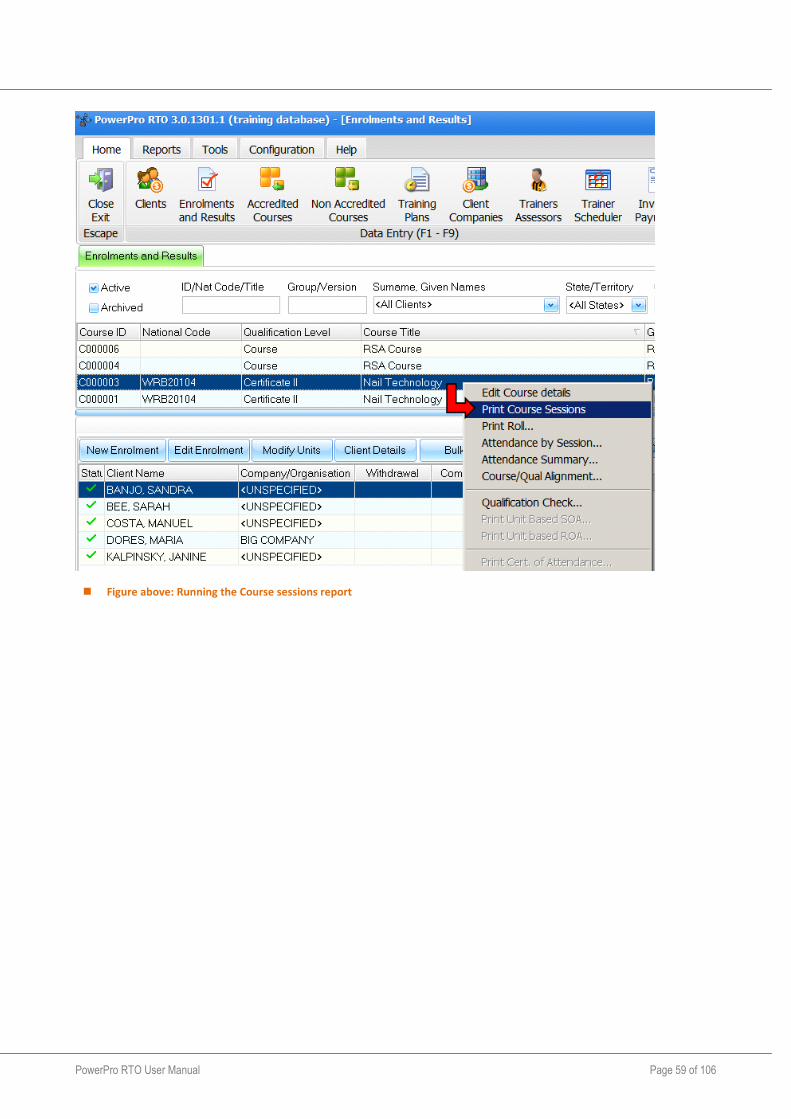
9.6. Printing the Course sessions report
The Course sessions report lists all sessions for a specific course. This report can be handy for students so they are aware of the exact dates and times of their classes as well as the location and contents covered on each session. The report includes details such as the course name, group/version, location, date and time of the session and units to be covered on the session. To run this report, do as follows:
1. Open the Enrolments and results window. 2. Right-click on the relevant Course and choose Print Course Sessions.
PowerPro RTO User Manual Page 59 of 106
Figure above: Running the Course sessions report
PowerPro RTO User Manual Page 60 of 106
10. Invoices and Payments
PowerPro RTO has an Invoicing subsystem where Invoices can be created against students (Client Invoice)
or Companies (Company Invoice). To assist with data entry, thereare two areas of pre-defined invoicing
items: a generic Pricelist available to any Invoice and a Course fee structure specific for each type of
Course. When a course is cloned, its Course fee structure is cloned with it.
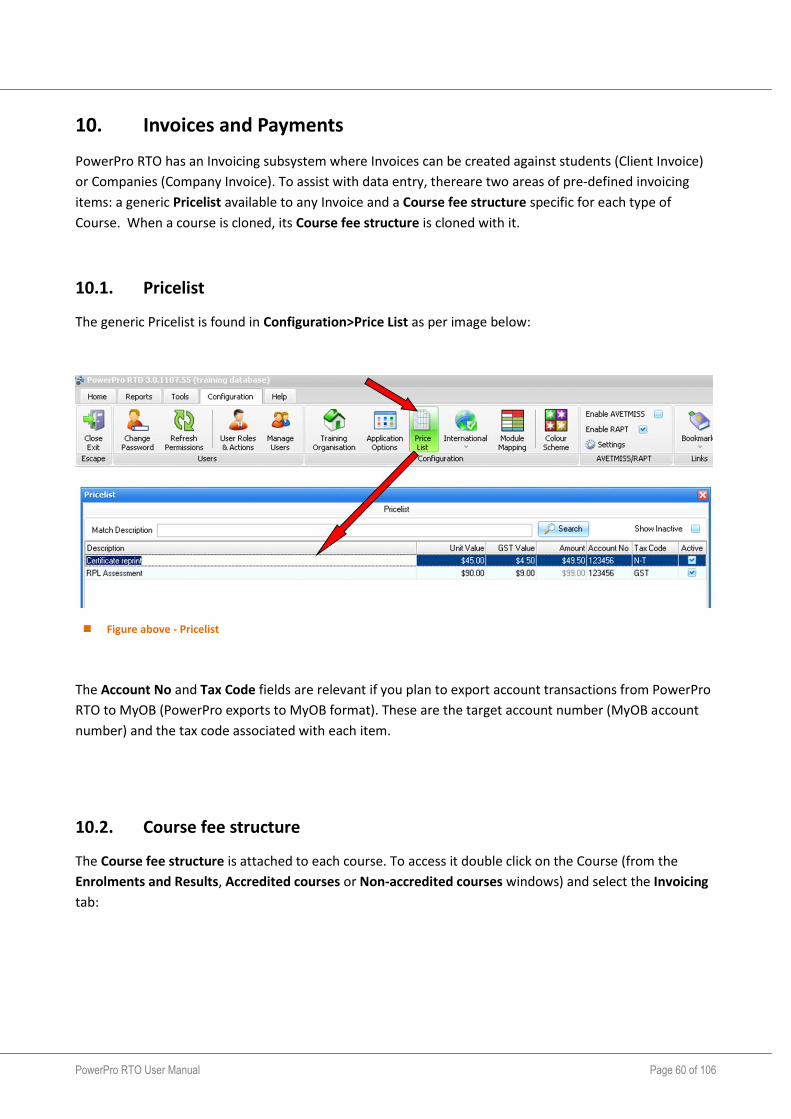
10.1. Pricelist
The generic Pricelist is found in Configuration>Price List as per image below:
Figure above - Pricelist
The Account No and Tax Code fields are relevant if you plan to export account transactions from PowerPro
RTO to MyOB (PowerPro exports to MyOB format). These are the target account number (MyOB account
number) and the tax code associated with each item.
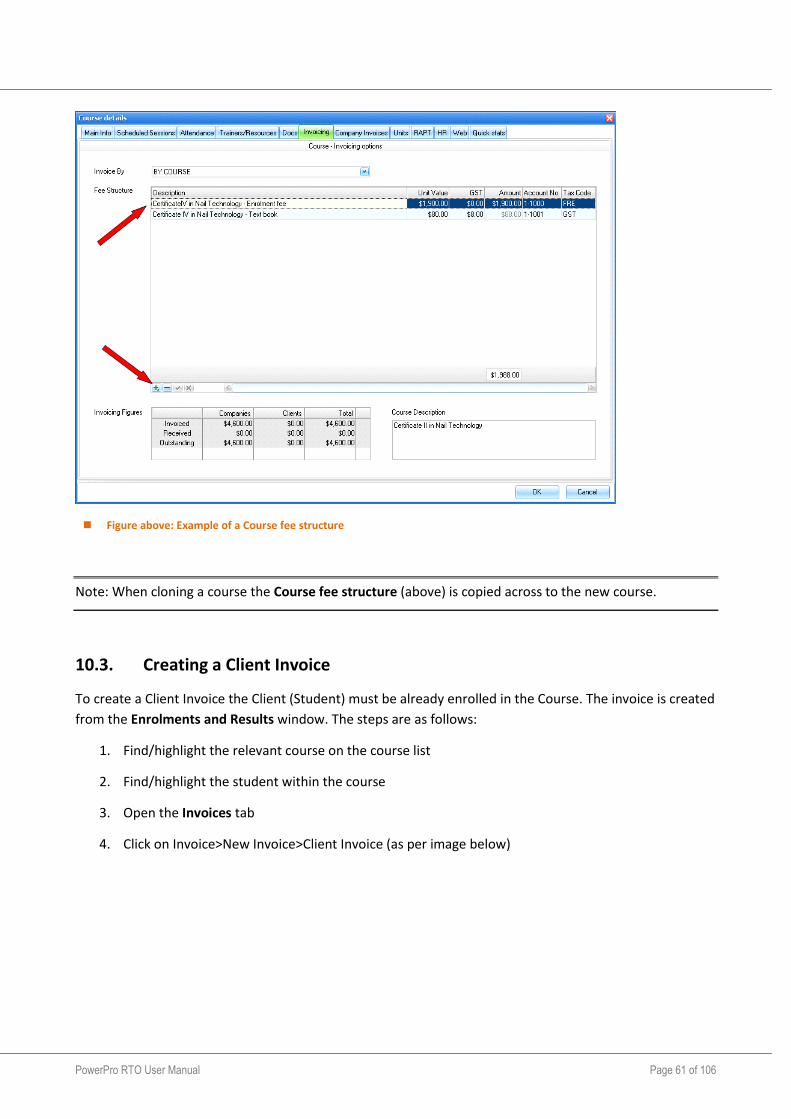
10.2. Course fee structure
The Course fee structure is attached to each course. To access it double click on the Course (from the
Enrolments and Results, Accredited courses or Non-accredited courses windows) and select the Invoicing
tab:
PowerPro RTO User Manual Page 61 of 106
Figure above: Example of a Course fee structure
Note: When cloning a course the Course fee structure (above) is copied across to the new course.
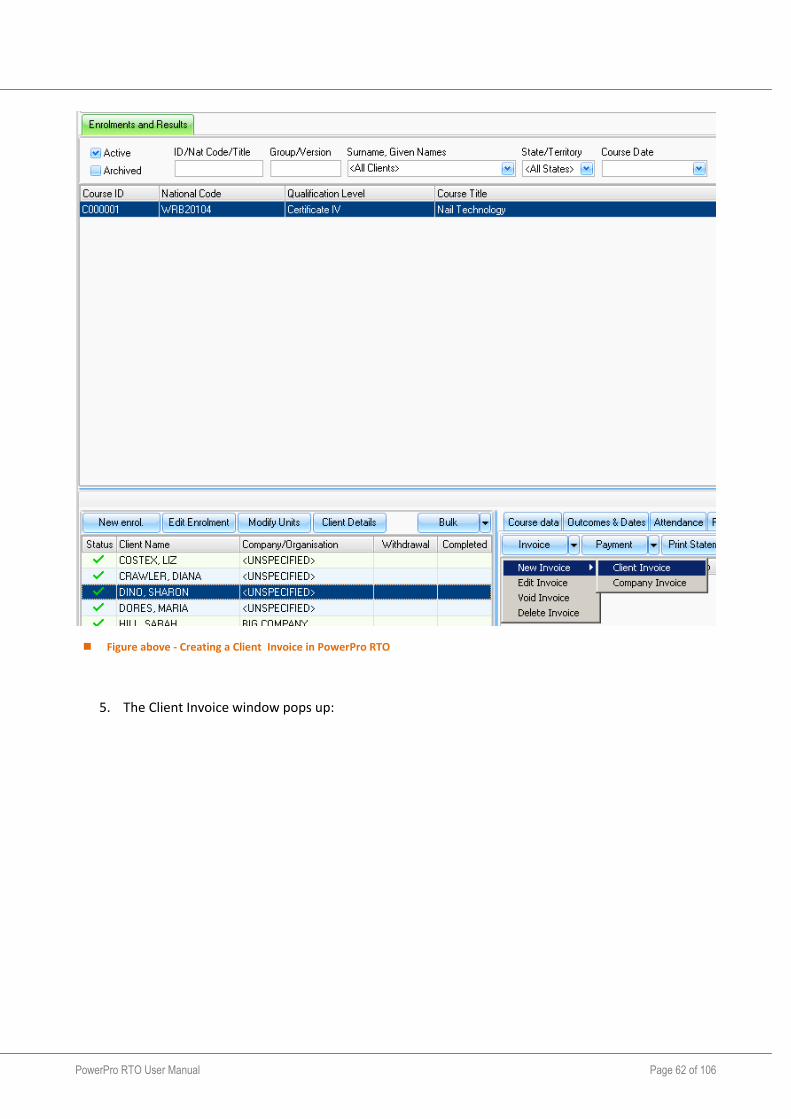
10.3. Creating a Client Invoice
To create a Client Invoice the Client (Student) must be already enrolled in the Course. The invoice is created
from the Enrolments and Results window. The steps are as follows:
1. Find/highlight the relevant course on the course list
2. Find/highlight the student within the course
3. Open the Invoices tab
4. Click on Invoice>New Invoice>Client Invoice (as per image below)
PowerPro RTO User Manual Page 62 of 106
Figure above - Creating a Client Invoice in PowerPro RTO
5. The Client Invoice window pops up:
PowerPro RTO User Manual Page 63 of 106
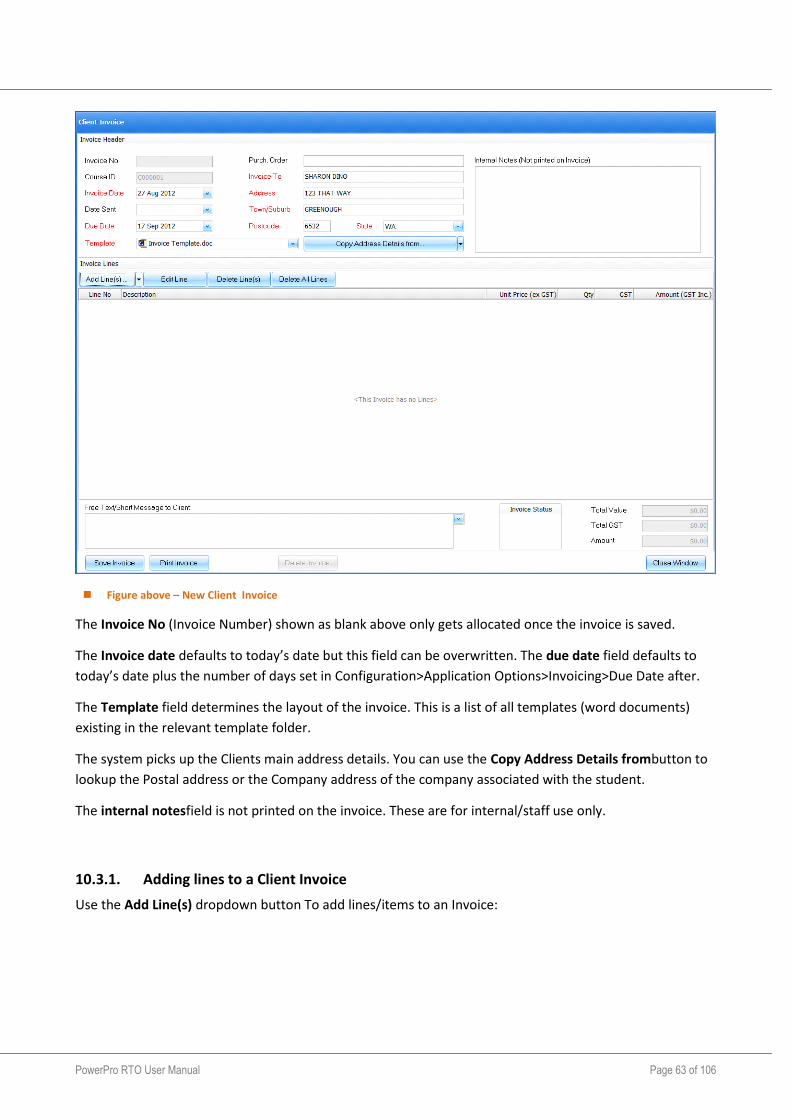
Figure above – New Client Invoice
The Invoice No (Invoice Number) shown as blank above only gets allocated once the invoice is saved.
The Invoice date defaults to today’s date but this field can be overwritten. The due date field defaults to
today’s date plus the number of days set in Configuration>Application Options>Invoicing>Due Date after.
The Template field determines the layout of the invoice. This is a list of all templates (word documents)
existing in the relevant template folder.
The system picks up the Clients main address details. You can use the Copy Address Details frombutton to
lookup the Postal address or the Company address of the company associated with the student.
The internal notesfield is not printed on the invoice. These are for internal/staff use only.
10.3.1. Adding lines to a Client Invoice
Use the Add Line(s) dropdown button To add lines/items to an Invoice:
PowerPro RTO User Manual Page 64 of 106
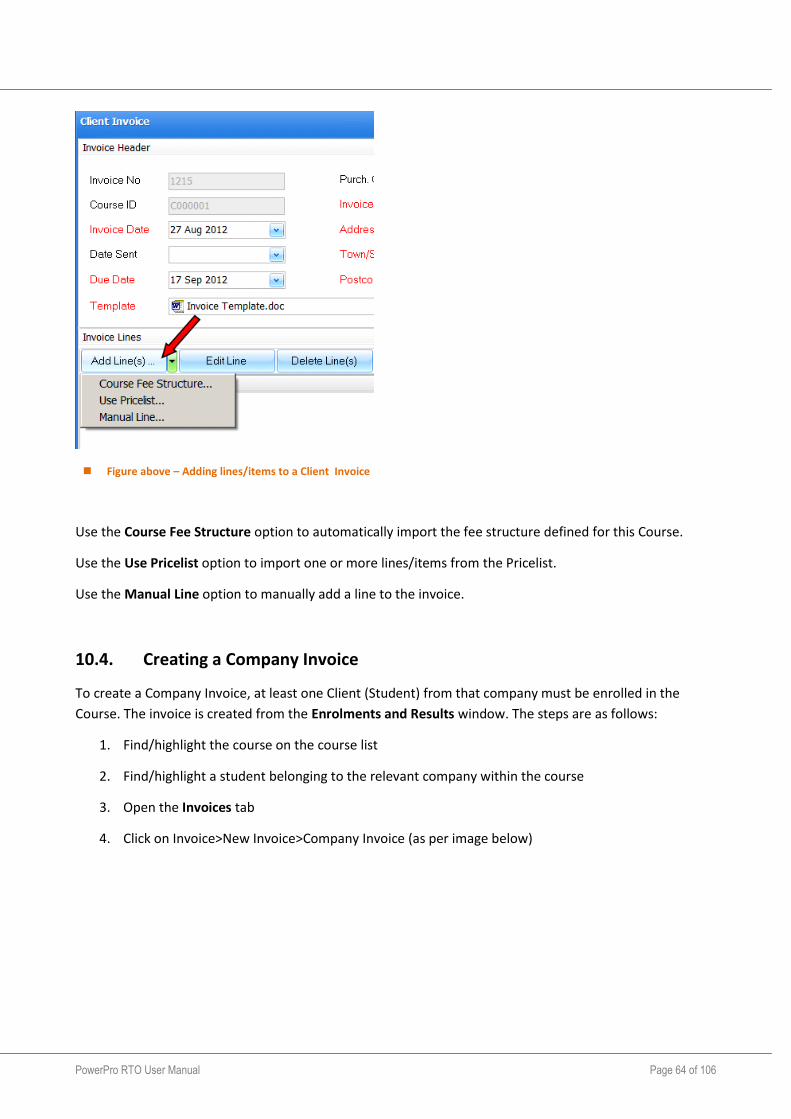
Figure above – Adding lines/items to a Client Invoice
Use the Course Fee Structure option to automatically import the fee structure defined for this Course.
Use the Use Pricelist option to import one or more lines/items from the Pricelist.
Use the Manual Line option to manually add a line to the invoice.
10.4. Creating a Company Invoice
To create a Company Invoice, at least one Client (Student) from that company must be enrolled in the
Course. The invoice is created from the Enrolments and Results window. The steps are as follows:
1. Find/highlight the course on the course list
2. Find/highlight a student belonging to the relevant company within the course
3. Open the Invoices tab
4. Click on Invoice>New Invoice>Company Invoice (as per image below)

PowerPro RTO User Manual Page 65 of 106
Figure above - Creating a Client Invoice in PowerPro RTO
5. The Client Invoice window pops up:
PowerPro RTO User Manual Page 66 of 106
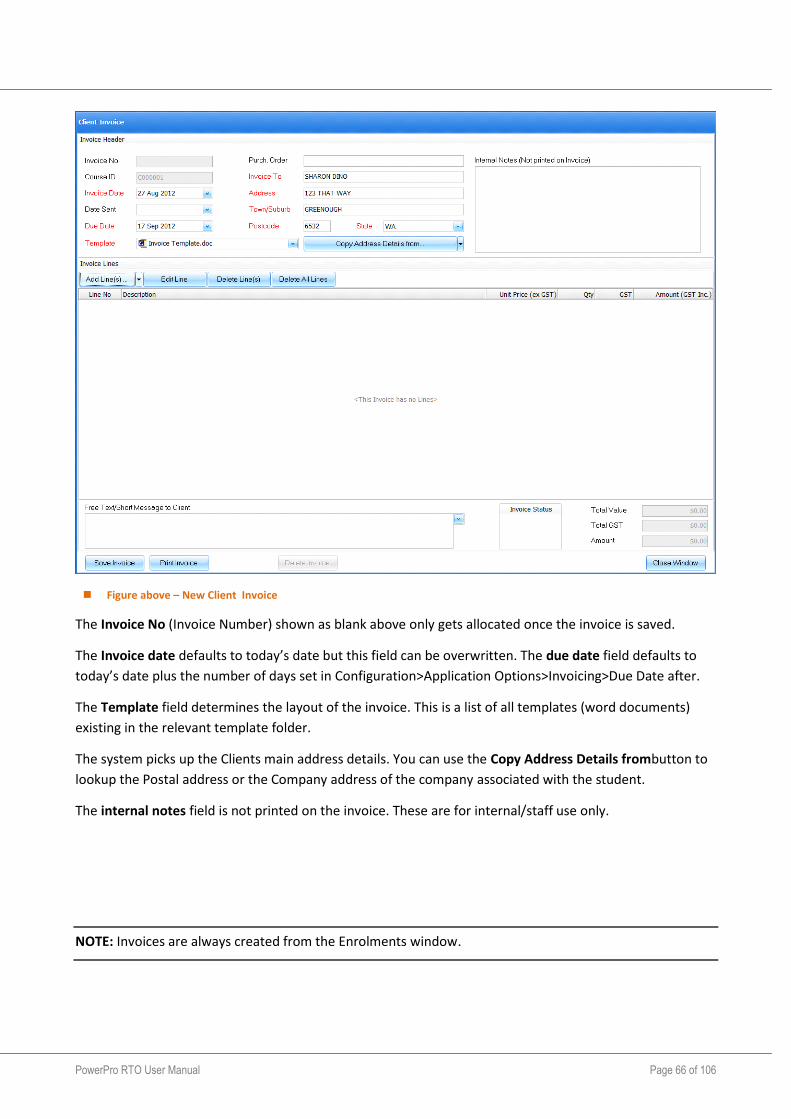
Figure above – New Client Invoice
The Invoice No (Invoice Number) shown as blank above only gets allocated once the invoice is saved.
The Invoice date defaults to today’s date but this field can be overwritten. The due date field defaults to
today’s date plus the number of days set in Configuration>Application Options>Invoicing>Due Date after.
The Template field determines the layout of the invoice. This is a list of all templates (word documents)
existing in the relevant template folder.
The system picks up the Clients main address details. You can use the Copy Address Details frombutton to
lookup the Postal address or the Company address of the company associated with the student.
The internal notes field is not printed on the invoice. These are for internal/staff use only.
NOTE: Invoices are always created from the Enrolments window.
PowerPro RTO User Manual Page 67 of 106
11. Enquiries
PowerPro can assist in tracking enquiries from prospective students. The Enquiries window can be opened
from the Tools tab:
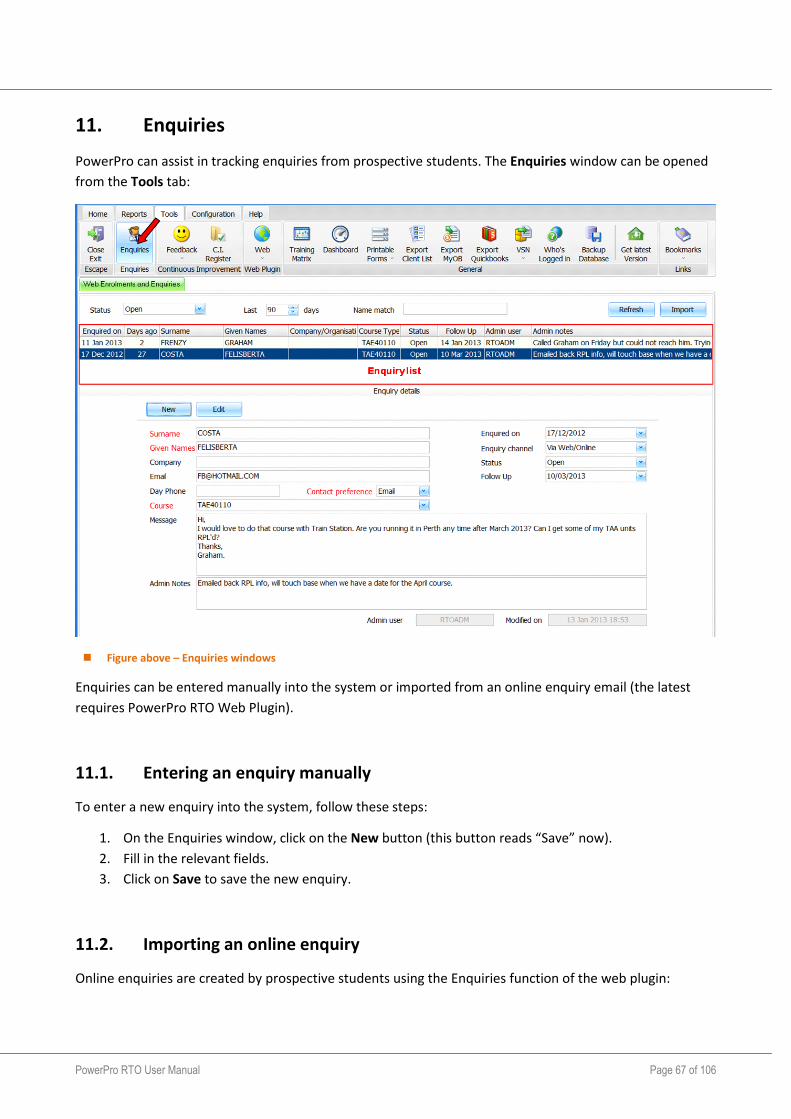
Figure above – Enquiries windows
Enquiries can be entered manually into the system or imported from an online enquiry email (the latest
requires PowerPro RTO Web Plugin).
11.1. Entering an enquiry manually
To enter a new enquiry into the system, follow these steps:
1. On the Enquiries window, click on the New button (this button reads “Save” now).
2. Fill in the relevant fields.
3. Click on Save to save the new enquiry.
11.2. Importing an online enquiry
Online enquiries are created by prospective students using the Enquiries function of the web plugin:
PowerPro RTO User Manual Page 68 of 106
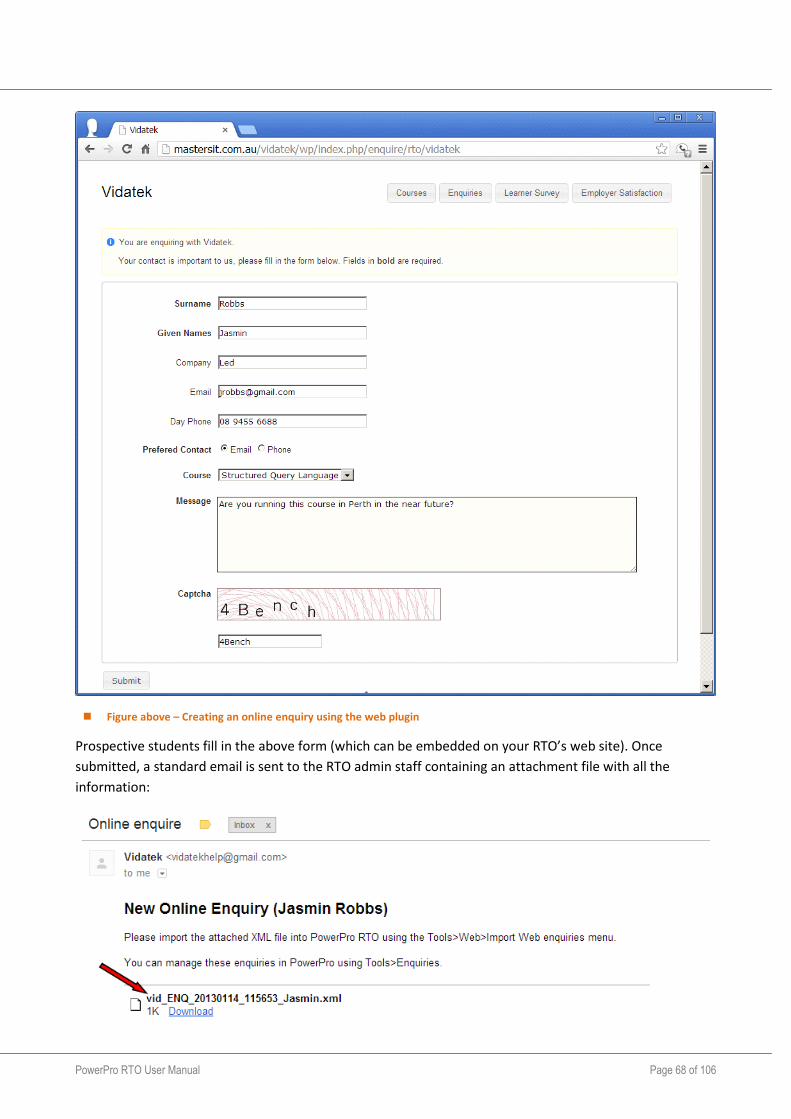
Figure above – Creating an online enquiry using the web plugin
Prospective students fill in the above form (which can be embedded on your RTO’s web site). Once
submitted, a standard email is sent to the RTO admin staff containing an attachment file with all the
information:
PowerPro RTO User Manual Page 69 of 106
Figure above –Online enquiry email
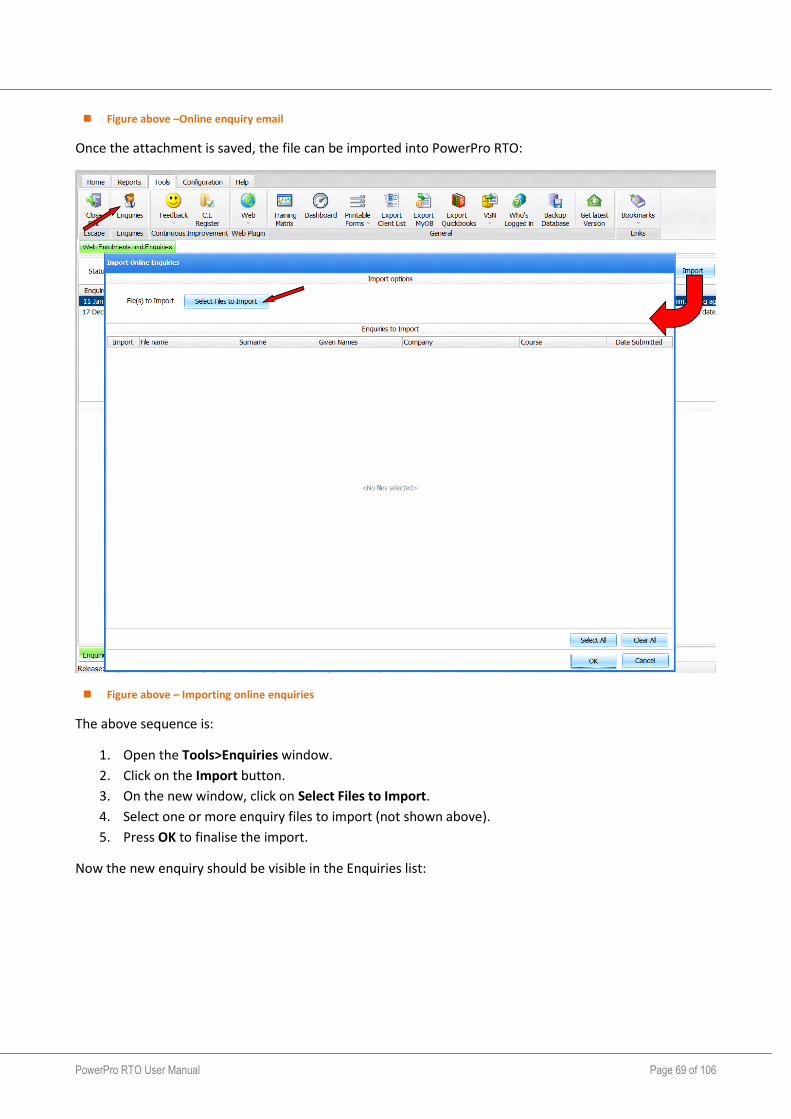
Once the attachment is saved, the file can be imported into PowerPro RTO:
Figure above – Importing online enquiries
The above sequence is:
1. Open the Tools>Enquiries window.
2. Click on the Import button.
3. On the new window, click on Select Files to Import.
4. Select one or more enquiry files to import (not shown above).
5. Press OK to finalise the import.
Now the new enquiry should be visible in the Enquiries list:
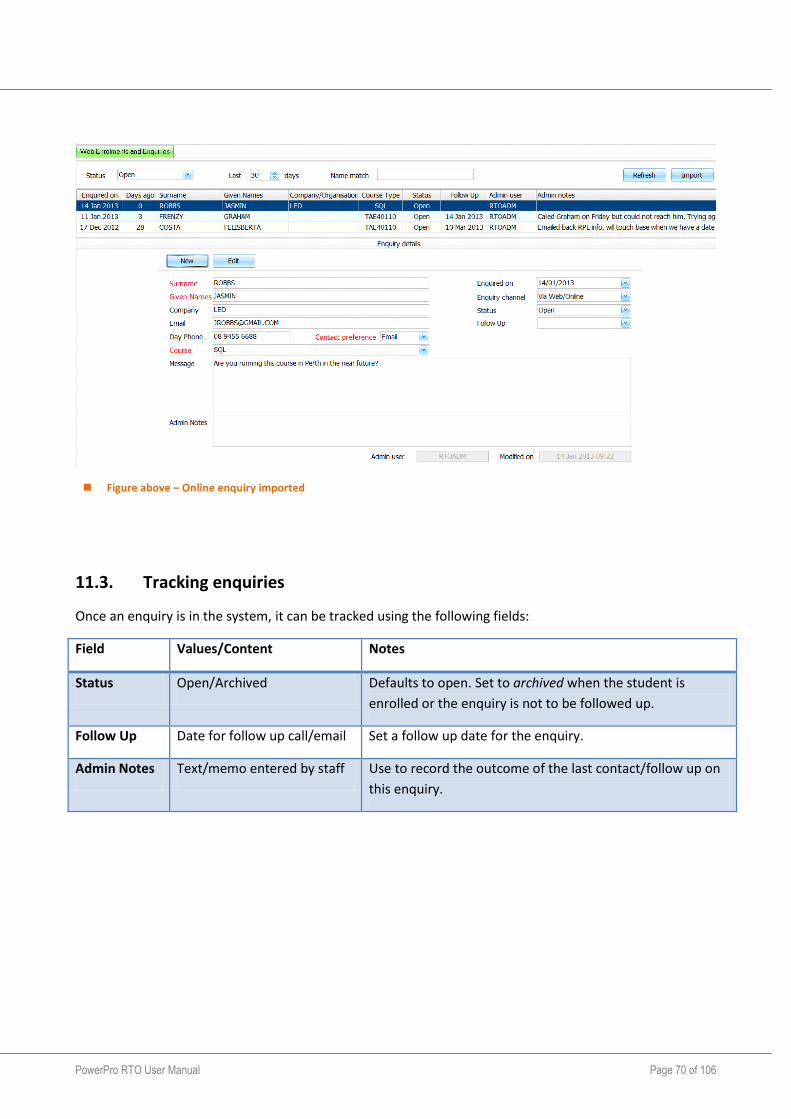
PowerPro RTO User Manual Page 70 of 106
Figure above – Online enquiry imported
11.3. Tracking enquiries
Once an enquiry is in the system, it can be tracked using the following fields:
Field Values/Content Notes
Status Open/Archived Defaults to open. Set to archived when the student is
enrolled or the enquiry is not to be followed up.
Follow Up Date for follow up call/email Set a follow up date for the enquiry.
Admin Notes Text/memo entered by staff Use to record the outcome of the last contact/follow up on
this enquiry.
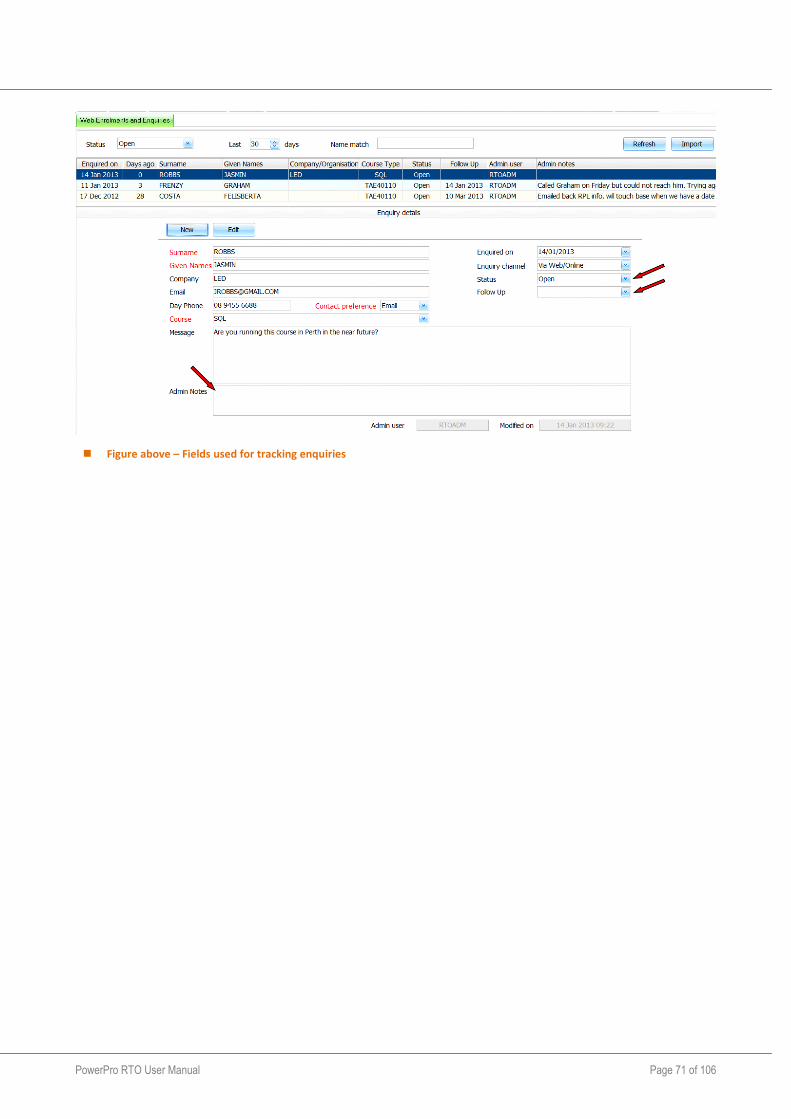
PowerPro RTO User Manual Page 71 of 106
Figure above – Fields used for tracking enquiries

PowerPro RTO User Manual Page 72 of 106
12. AVETMISS reporting
AVETMISS reporting is a key requirement for RTOs. It consists of a set of text files (called NAT files:
NAT00020, NAT00030, etc.) containing very detailed information on the training activity of the RTO for a
specific calendar year. It includes information about student demographics, units and courses delivered,
start/end dates, outcomes (e.g. “Competent”, “RPL”, etc.), course completions, delivery locations, funding
source codes and contract numbers and more. AVETMISS fields exist in different areas/screens of the
system as they might relate to the RTO, to the delivery location, to the unit of competence, to the course,
to the client, to the enrolment or to the unit outcome.
Although AVETMISS is a national standard, there are slight differences on how each state/territory
implements it. Each state/Territory has its own web portal to be used by RTOs when uploading their
AVETMISS files. Most of these portals expect the NAT files to be uploaded as a zip file (which PowerPro can
do for you).
The following table lists the NAT files as well as their contents:
File name Contents Notes
NAT00010 Training Organisation details Contains only one row normally.
NAT00020 Deliver locations details Contains one row per different location reported.
NAT00030 Course details Contains as many rows as the different courses (national
codes) reported (Name, Nat. code, field of education, etc.)
NAT00060 Unit details Contains one row for each unit reported (code, name,
nominal hours, etc.)
NAT00080 Client details Contains one row for each student being reported.
NAT00085 Client postal details Contains one row for each student being reported.
NAT00090 Disability Contains one row for each student flagged with a disability.
NAT00100 Prior educational
achievement
Contains one row for each student flagged with a prior
qualification.
NAT00120 Enrolment Most important file, each row contains information on a
client/unit combination (student ID, Unit ID, start/end
dates, outcome, delivery mode, etc.)
NAT00130 Qualification completed Contains one row for each student that has completed a
Qualification or accredited course. It also lists whether the
Qualification (certificate) has been issued.
NOTE: To fully understand the AVETMISS rules and specifications we suggest reading the current AVETMISS
documentation found in http://www.ncver.edu.au.
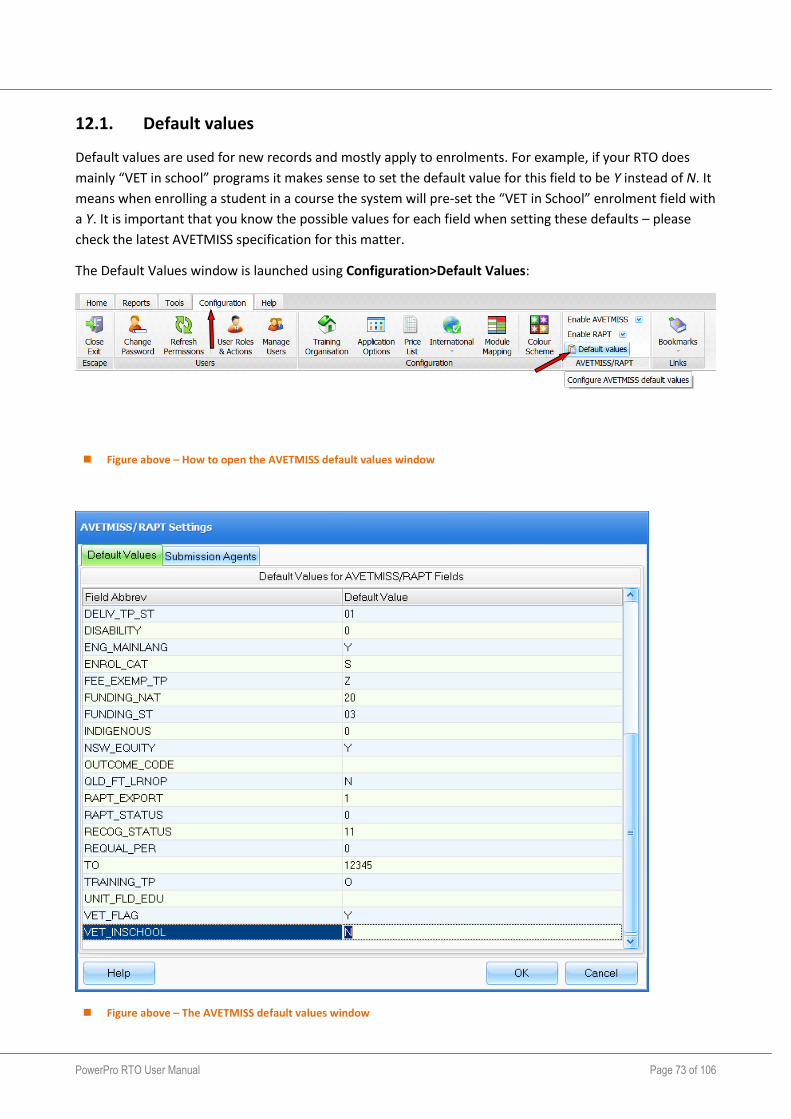
PowerPro RTO User Manual Page 73 of 106
12.1. Default values
Default values are used for new records and mostly apply to enrolments. For example, if your RTO does
mainly “VET in school” programs it makes sense to set the default value for this field to be Y instead of N. It
means when enrolling a student in a course the system will pre-set the “VET in School” enrolment field with
a Y. It is important that you know the possible values for each field when setting these defaults – please
check the latest AVETMISS specification for this matter.
The Default Values window is launched using Configuration>Default Values:
Figure above – How to open the AVETMISS default values window
Figure above – The AVETMISS default values window

PowerPro RTO User Manual Page 74 of 106
12.2. Training organisation AVETMISS details
Make sure your RTO details match those recorded in http://training.gov.au. To configure/adjust your RTO
details use the Configuration>Training Organisation screen:
Figure above – Training Organisation fields
All fields except for Notes in the above image are relevant to AVETMISS reporting. In fact this is what is
reported in the NAT00010 file.
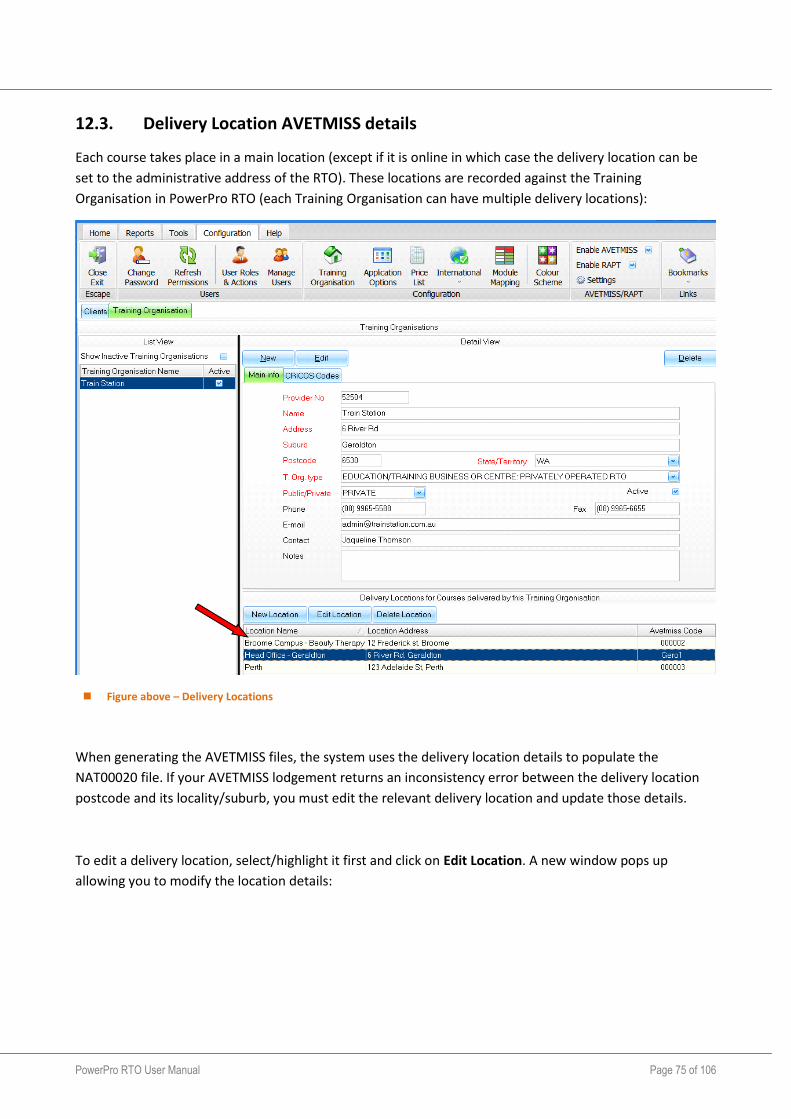
PowerPro RTO User Manual Page 75 of 106
12.3. Delivery Location AVETMISS details
Each course takes place in a main location (except if it is online in which case the delivery location can be
set to the administrative address of the RTO). These locations are recorded against the Training
Organisation in PowerPro RTO (each Training Organisation can have multiple delivery locations):
Figure above – Delivery Locations
When generating the AVETMISS files, the system uses the delivery location details to populate the
NAT00020 file. If your AVETMISS lodgement returns an inconsistency error between the delivery location
postcode and its locality/suburb, you must edit the relevant delivery location and update those details.
To edit a delivery location, select/highlight it first and click on Edit Location. A new window pops up
allowing you to modify the location details:
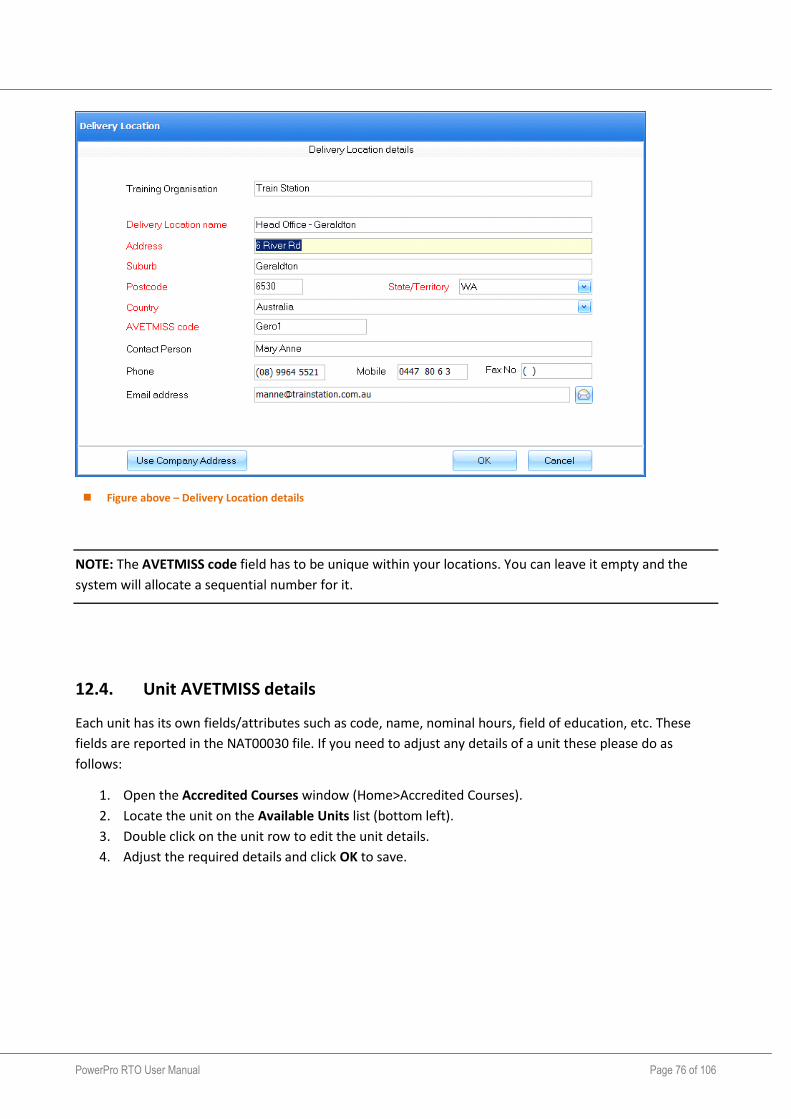
PowerPro RTO User Manual Page 76 of 106
Figure above – Delivery Location details
NOTE: The AVETMISS code field has to be unique within your locations. You can leave it empty and the
system will allocate a sequential number for it.
12.4. Unit AVETMISS details
Each unit has its own fields/attributes such as code, name, nominal hours, field of education, etc. These
fields are reported in the NAT00030 file. If you need to adjust any details of a unit these please do as
follows:
1. Open the Accredited Courses window (Home>Accredited Courses).
2. Locate the unit on the Available Units list (bottom left).
3. Double click on the unit row to edit the unit details.
4. Adjust the required details and click OK to save.
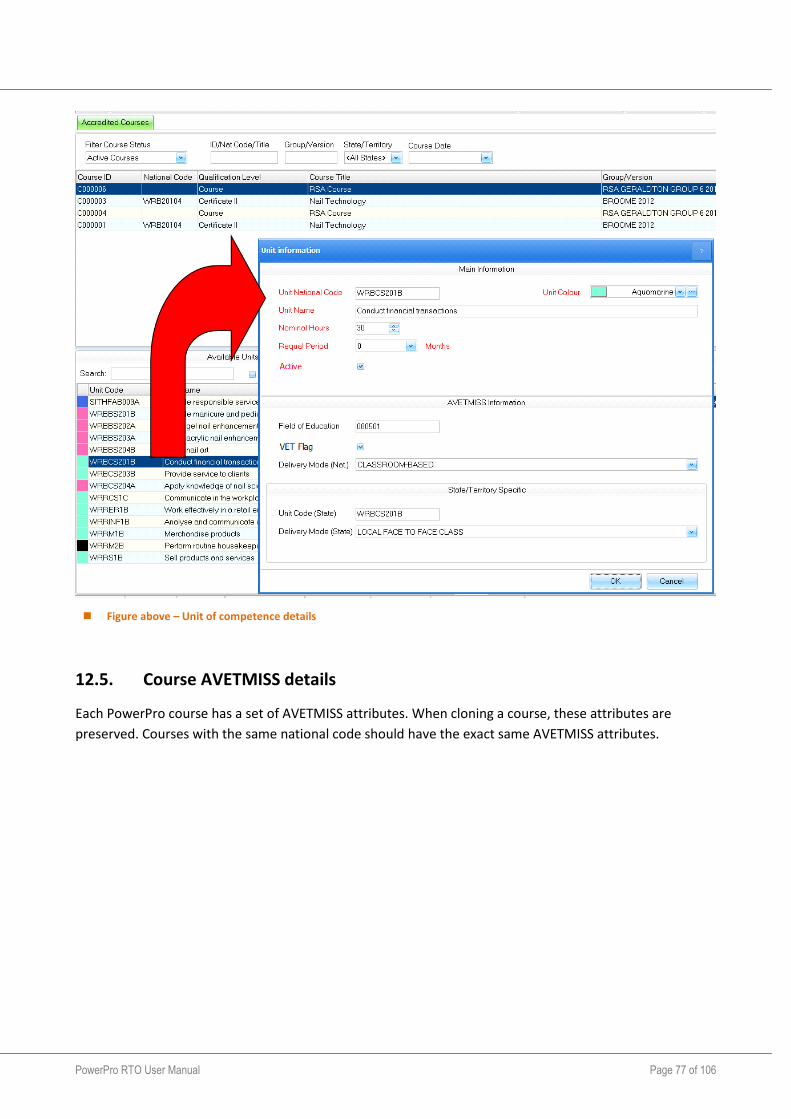
PowerPro RTO User Manual Page 77 of 106
Figure above – Unit of competence details
12.5. Course AVETMISS details
Each PowerPro course has a set of AVETMISS attributes. When cloning a course, these attributes are
preserved. Courses with the same national code should have the exact same AVETMISS attributes.
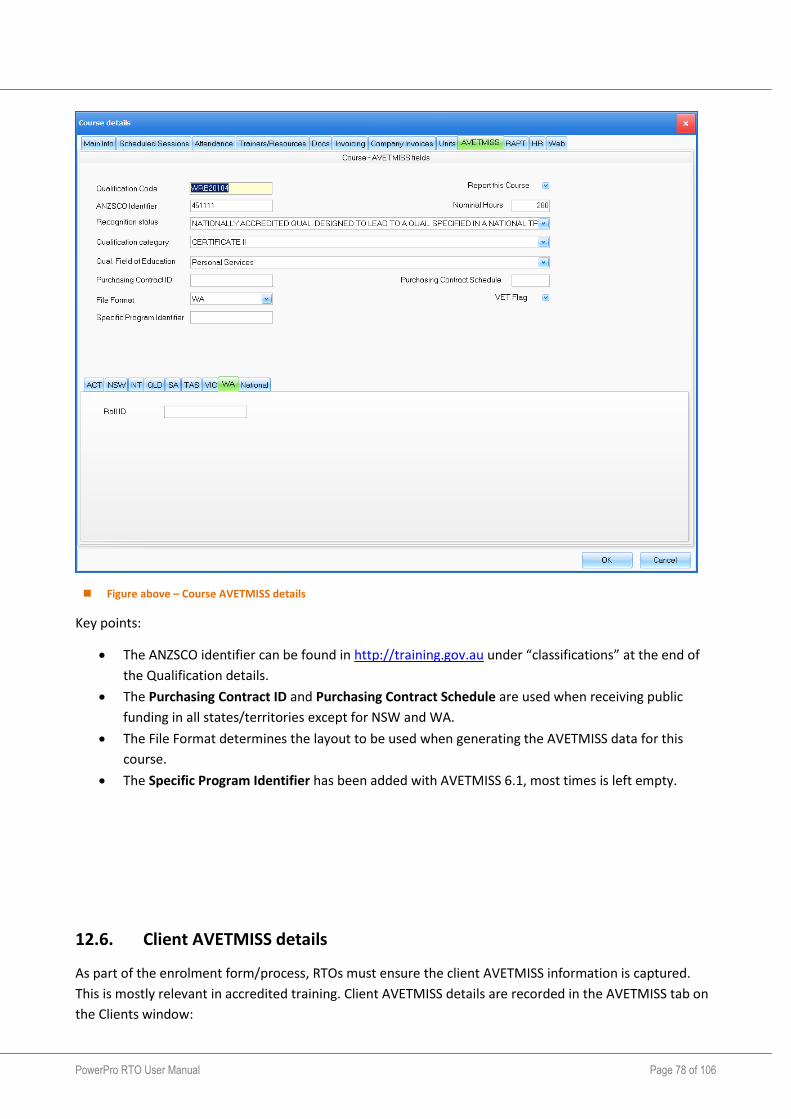
PowerPro RTO User Manual Page 78 of 106
Figure above – Course AVETMISS details
Key points:
The ANZSCO identifier can be found in http://training.gov.au under “classifications” at the end of
the Qualification details.
The Purchasing Contract ID and Purchasing Contract Schedule are used when receiving public
funding in all states/territories except for NSW and WA.
The File Format determines the layout to be used when generating the AVETMISS data for this
course.
The Specific Program Identifier has been added with AVETMISS 6.1, most times is left empty.
12.6. Client AVETMISS details
As part of the enrolment form/process, RTOs must ensure the client AVETMISS information is captured.
This is mostly relevant in accredited training. Client AVETMISS details are recorded in the AVETMISS tab on
the Clients window:
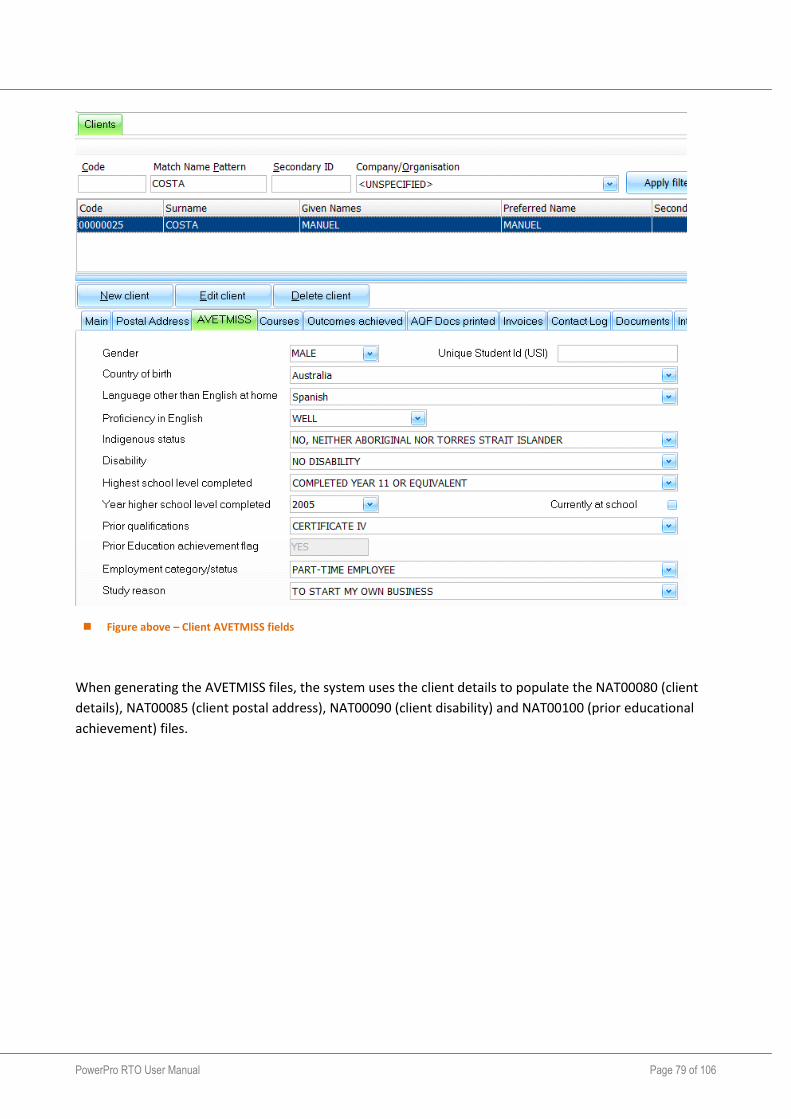
PowerPro RTO User Manual Page 79 of 106
Figure above – Client AVETMISS fields
When generating the AVETMISS files, the system uses the client details to populate the NAT00080 (client
details), NAT00085 (client postal address), NAT00090 (client disability) and NAT00100 (prior educational
achievement) files.

PowerPro RTO User Manual Page 80 of 106
13. Victorian Student Number
PowerPro RTO implements VSN (Victorian Student Number) as a field linked to the Client (AVETMISS tab):
Figure above - client VSN number in PowerPro
Use this field to record/maintain the client VSN.
You need to maintain VSN information if your training organisation is registered with VRQA.
Students in scope are:
Students under 17 years old undergoing any kind of training (accredited or not) delivered in Victoria
Students under 25 years old undergoing accredited training or Non-accredited funded training
delivered in Victoria
13.1.1. Notifying clients about their VSN
The ‘Mail Merge Clients’ facility in PowerPro is very convenient for this - you can have your own letter
layout (in MS Word) to communicate/inform your clients about their VSNs.
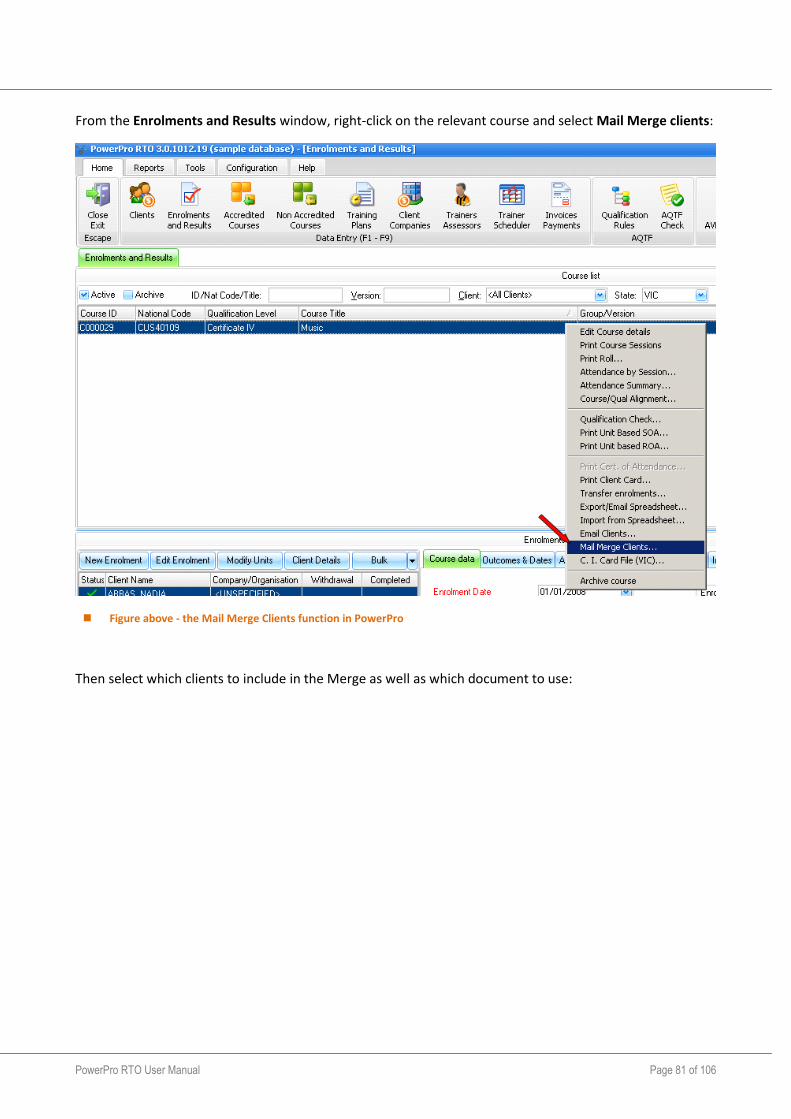
PowerPro RTO User Manual Page 81 of 106
From the Enrolments and Results window, right-click on the relevant course and select Mail Merge clients:
Figure above - the Mail Merge Clients function in PowerPro
Then select which clients to include in the Merge as well as which document to use:
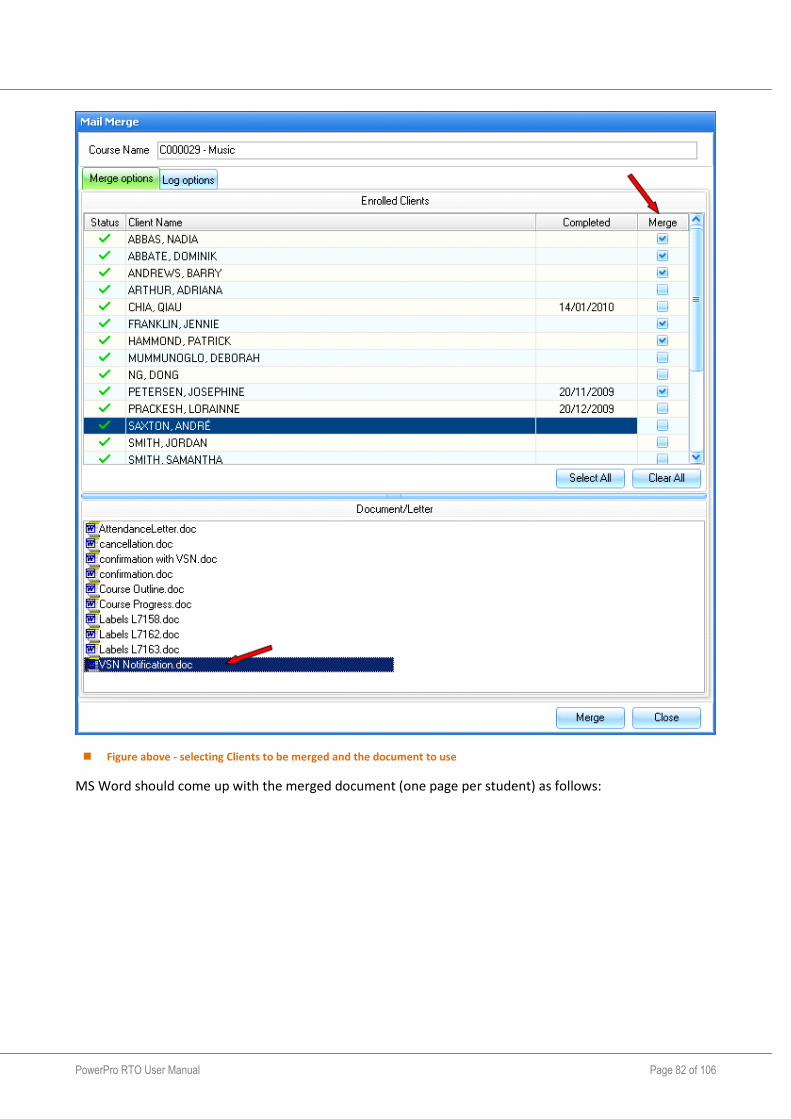
PowerPro RTO User Manual Page 82 of 106
Figure above - selecting Clients to be merged and the document to use
MS Word should come up with the merged document (one page per student) as follows:
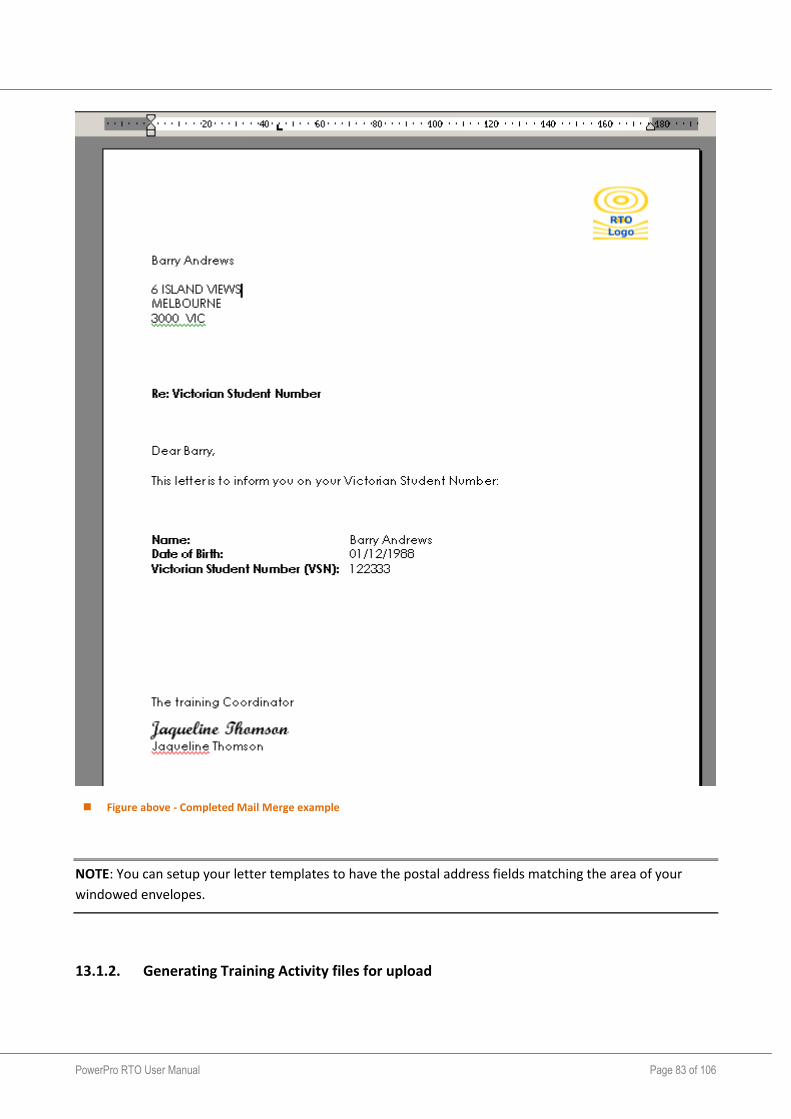
PowerPro RTO User Manual Page 83 of 106
Figure above - Completed Mail Merge example
NOTE: You can setup your letter templates to have the postal address fields matching the area of your
windowed envelopes.
13.1.2. Generating Training Activity files for upload
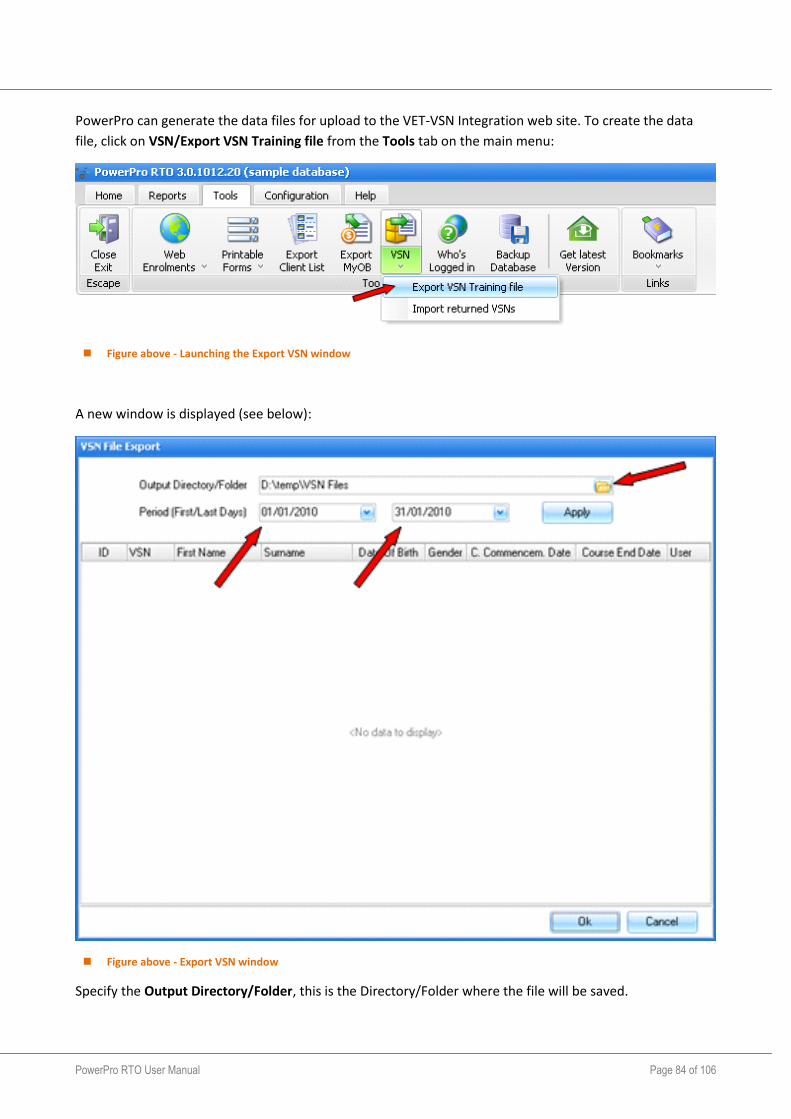
PowerPro RTO User Manual Page 84 of 106
PowerPro can generate the data files for upload to the VET-VSN Integration web site. To create the data
file, click on VSN/Export VSN Training file from the Tools tab on the main menu:
Figure above - Launching the Export VSN window
A new window is displayed (see below):
Figure above - Export VSN window
Specify the Output Directory/Folder, this is the Directory/Folder where the file will be saved.
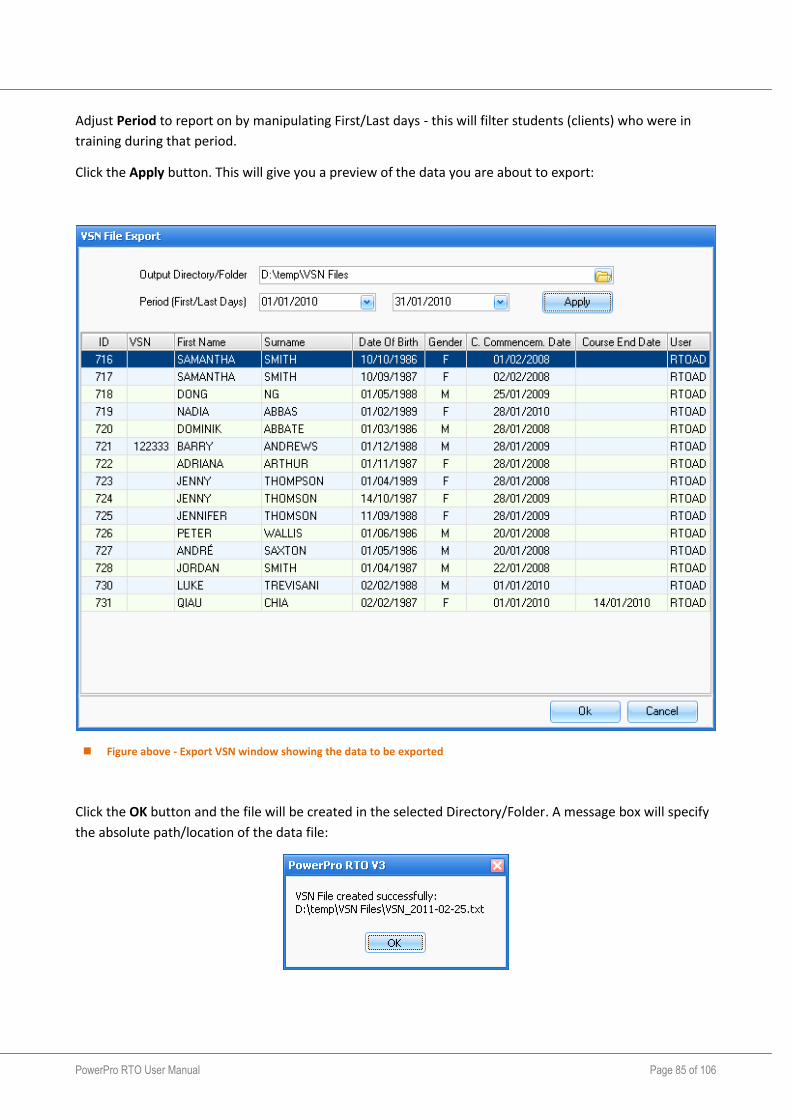
PowerPro RTO User Manual Page 85 of 106
Adjust Period to report on by manipulating First/Last days - this will filter students (clients) who were in
training during that period.
Click the Apply button. This will give you a preview of the data you are about to export:
Figure above - Export VSN window showing the data to be exported
Click the OK button and the file will be created in the selected Directory/Folder. A message box will specify
the absolute path/location of the data file:
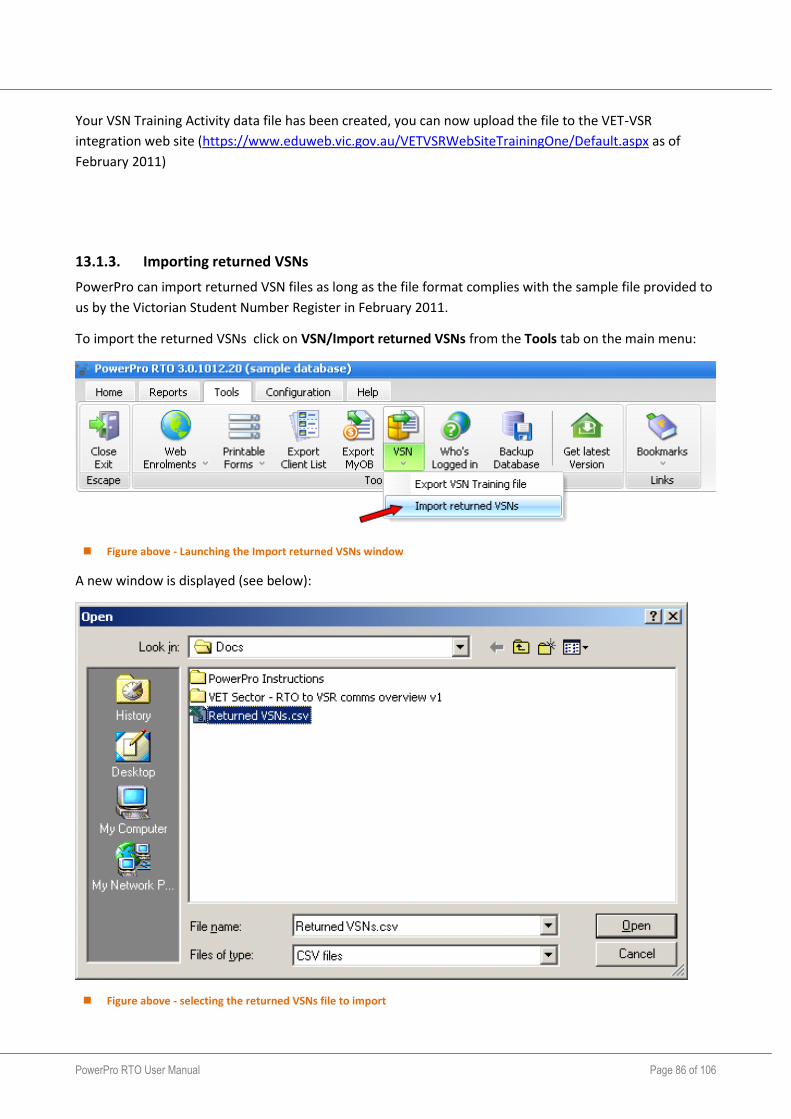
PowerPro RTO User Manual Page 86 of 106
Your VSN Training Activity data file has been created, you can now upload the file to the VET-VSR
integration web site (https://www.eduweb.vic.gov.au/VETVSRWebSiteTrainingOne/Default.aspx as of
February 2011)
13.1.3. Importing returned VSNs
PowerPro can import returned VSN files as long as the file format complies with the sample file provided to
us by the Victorian Student Number Register in February 2011.
To import the returned VSNs click on VSN/Import returned VSNs from the Tools tab on the main menu:
Figure above - Launching the Import returned VSNs window
A new window is displayed (see below):
Figure above - selecting the returned VSNs file to import
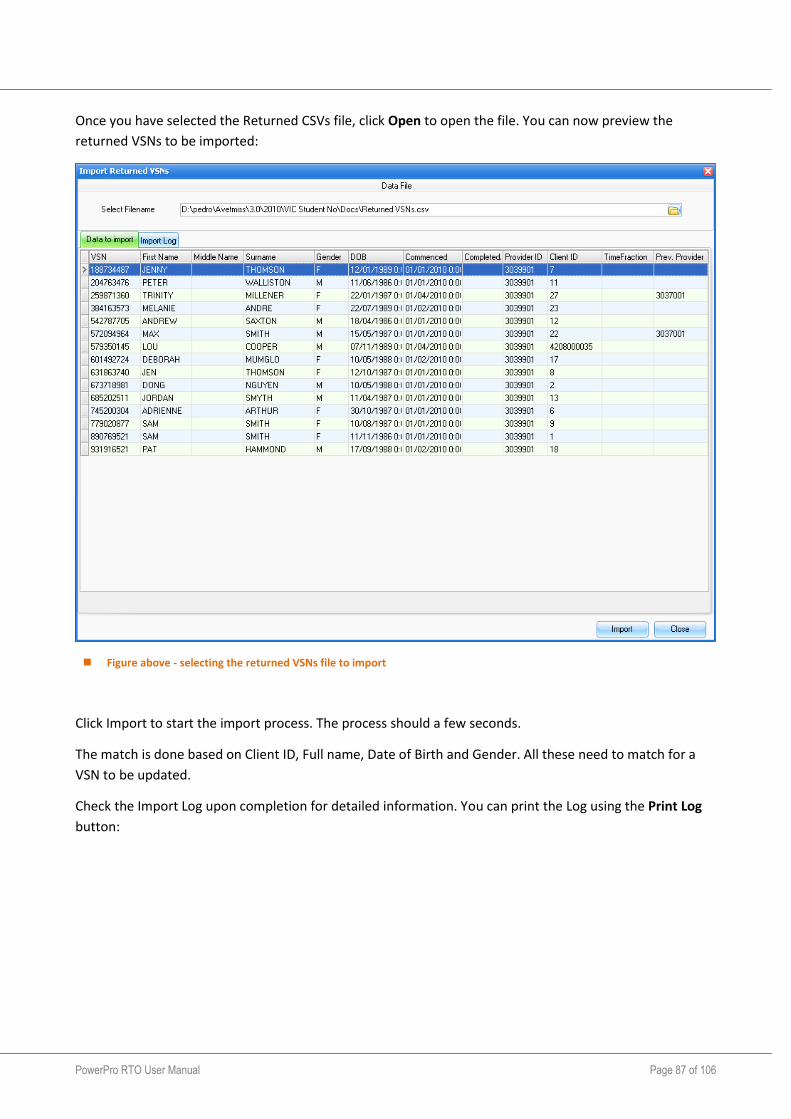
PowerPro RTO User Manual Page 87 of 106
Once you have selected the Returned CSVs file, click Open to open the file. You can now preview the
returned VSNs to be imported:
Figure above - selecting the returned VSNs file to import
Click Import to start the import process. The process should a few seconds.
The match is done based on Client ID, Full name, Date of Birth and Gender. All these need to match for a
VSN to be updated.
Check the Import Log upon completion for detailed information. You can print the Log using the Print Log
button:
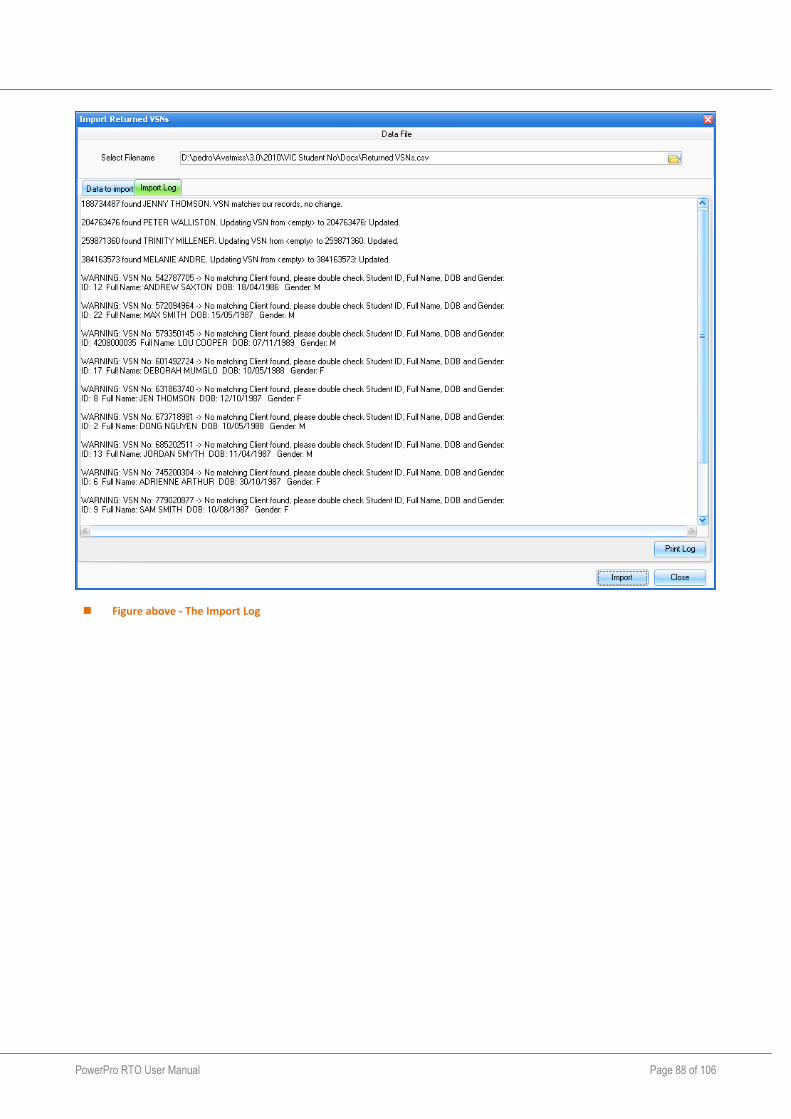
PowerPro RTO User Manual Page 88 of 106
Figure above - The Import Log
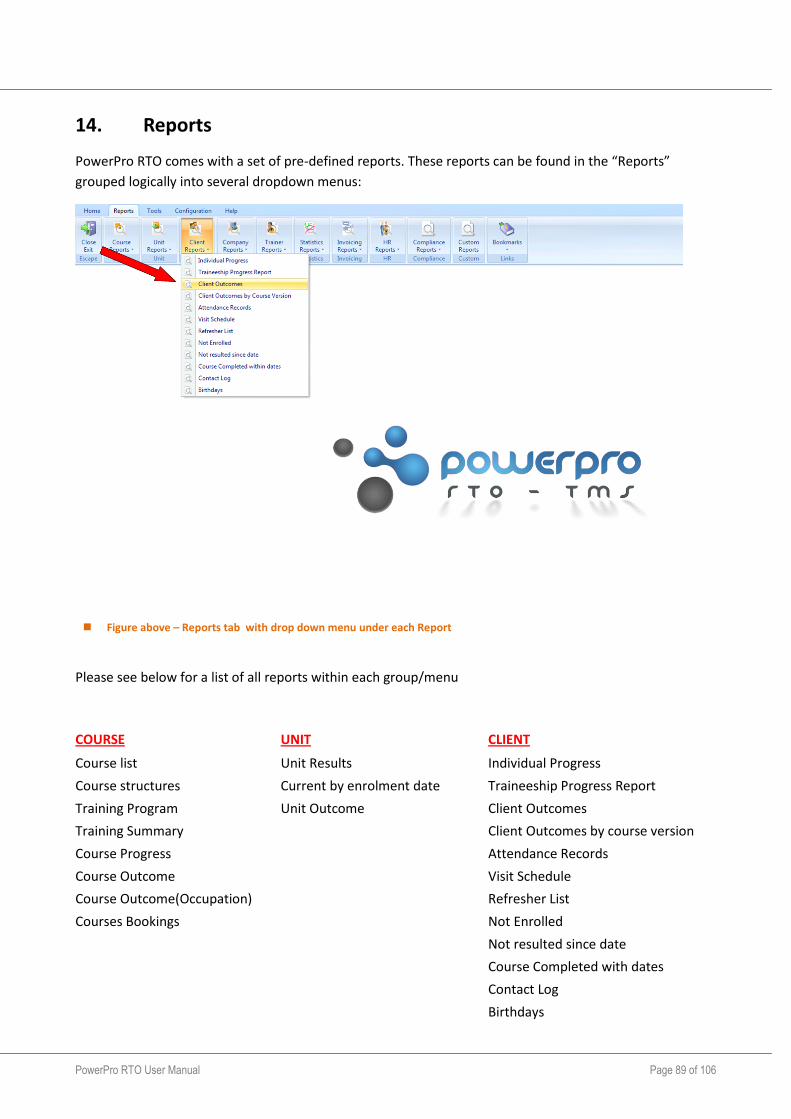
PowerPro RTO User Manual Page 89 of 106
14. Reports
PowerPro RTO comes with a set of pre-defined reports. These reports can be found in the “Reports”
grouped logically into several dropdown menus:
Figure above – Reports tab with drop down menu under each Report
Please see below for a list of all reports within each group/menu
COURSE UNIT CLIENT
Course list Unit Results Individual Progress
Course structures Current by enrolment date Traineeship Progress Report
Training Program Unit Outcome Client Outcomes
Training Summary Client Outcomes by course version
Course Progress Attendance Records
Course Outcome Visit Schedule
Course Outcome(Occupation) Refresher List
Courses Bookings Not Enrolled
Not resulted since date
Course Completed with dates
Contact Log
Birthdays
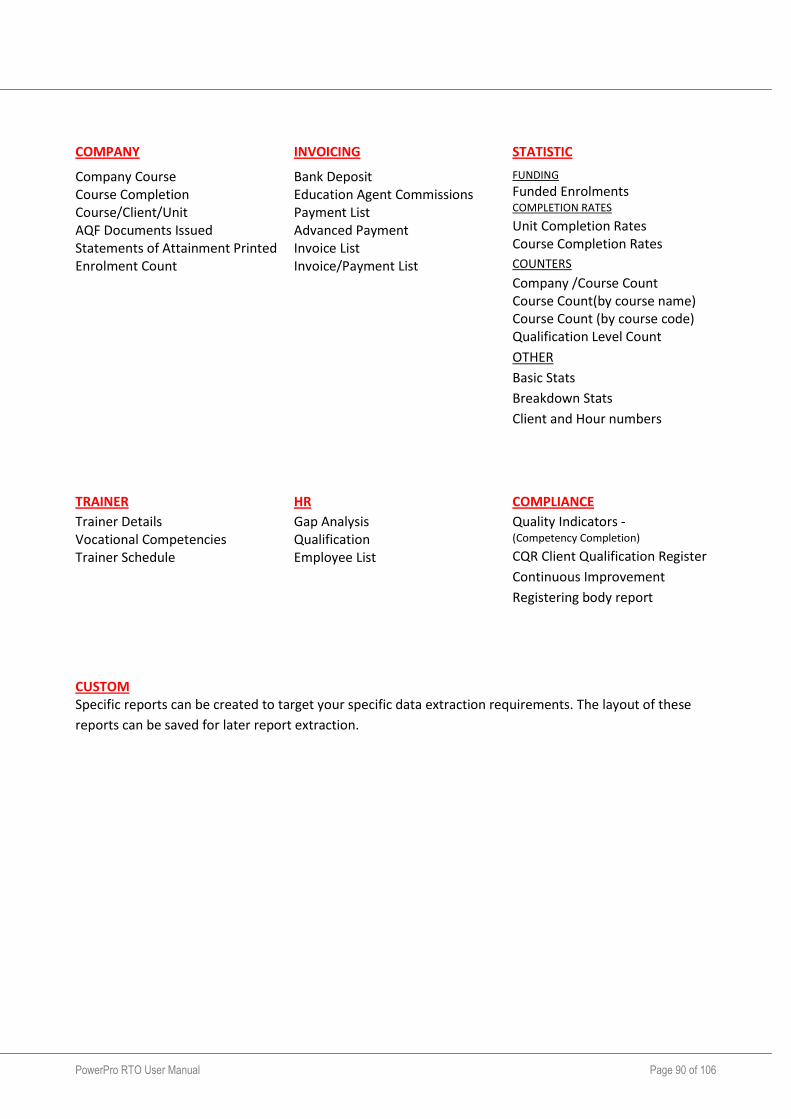
PowerPro RTO User Manual Page 90 of 106
COMPANY INVOICING STATISTIC
Company Course Course Completion Course/Client/Unit AQF Documents Issued Statements of Attainment Printed Enrolment Count
Bank Deposit Education Agent Commissions Payment List Advanced Payment Invoice List Invoice/Payment List
FUNDING
Funded Enrolments COMPLETION RATES
Unit Completion Rates Course Completion Rates
COUNTERS
Company /Course Count Course Count(by course name) Course Count (by course code) Qualification Level Count
OTHER
Basic Stats
Breakdown Stats
Client and Hour numbers
TRAINER HR COMPLIANCE
Trainer Details Vocational Competencies Trainer Schedule
Gap Analysis Qualification Employee List
Quality Indicators - (Competency Completion)
CQR Client Qualification Register
Continuous Improvement
Registering body report
CUSTOM Specific reports can be created to target your specific data extraction requirements. The layout of these
reports can be saved for later report extraction.
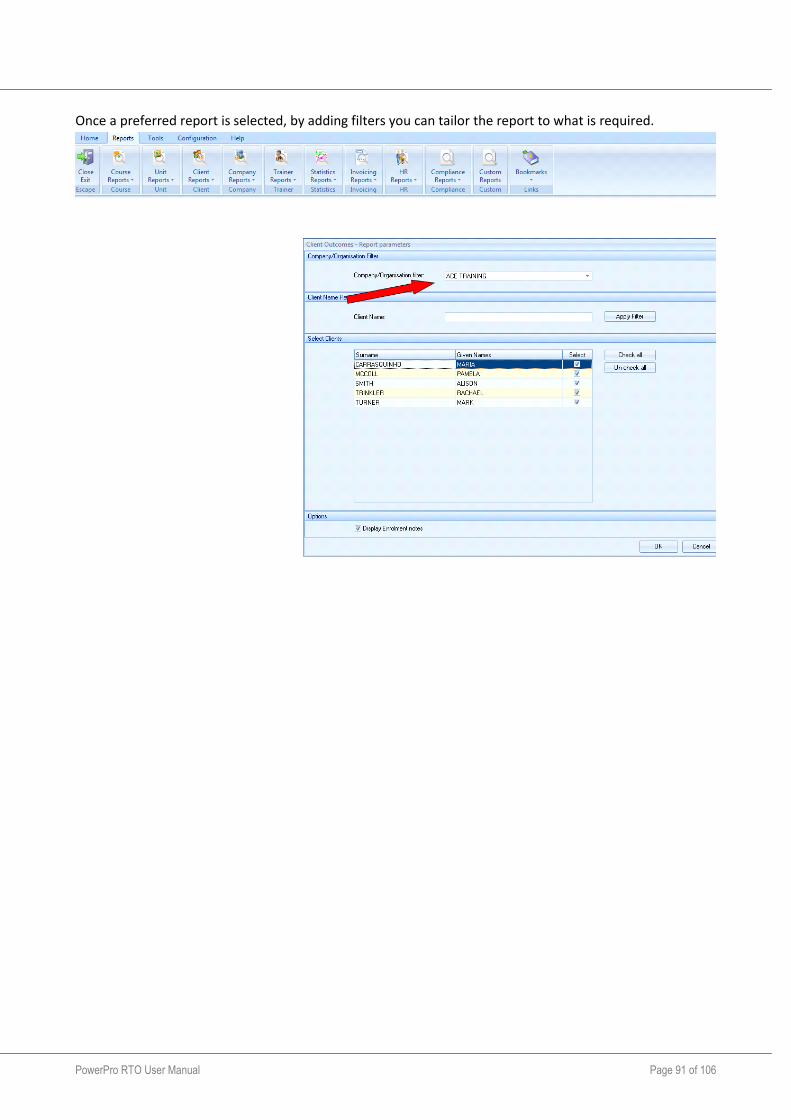
PowerPro RTO User Manual Page 91 of 106
Once a preferred report is selected, by adding filters you can tailor the report to what is required.
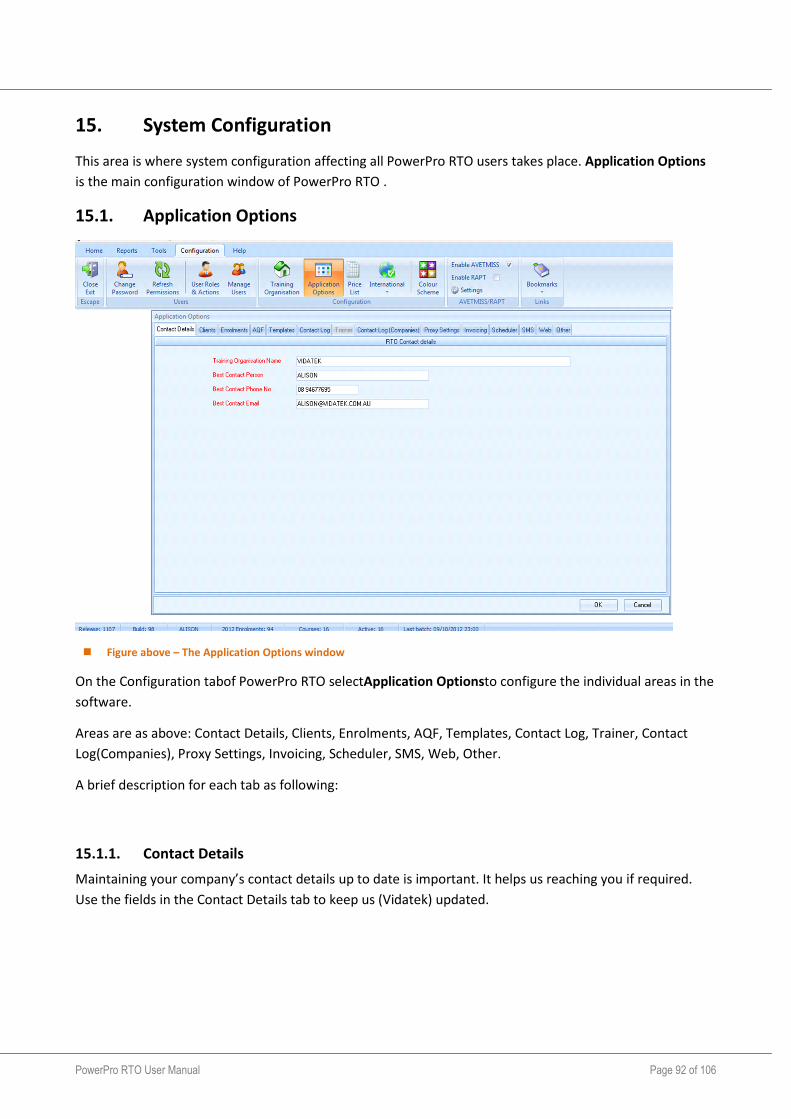
PowerPro RTO User Manual Page 92 of 106
15. System Configuration
This area is where system configuration affecting all PowerPro RTO users takes place. Application Options
is the main configuration window of PowerPro RTO .
15.1. Application Options
Figure above – The Application Options window
On the Configuration tabof PowerPro RTO selectApplication Optionsto configure the individual areas in the
software.
Areas are as above: Contact Details, Clients, Enrolments, AQF, Templates, Contact Log, Trainer, Contact
Log(Companies), Proxy Settings, Invoicing, Scheduler, SMS, Web, Other.
A brief description for each tab as following:
15.1.1. Contact Details
Maintaining your company’s contact details up to date is important. It helps us reaching you if required.
Use the fields in the Contact Details tab to keep us (Vidatek) updated.
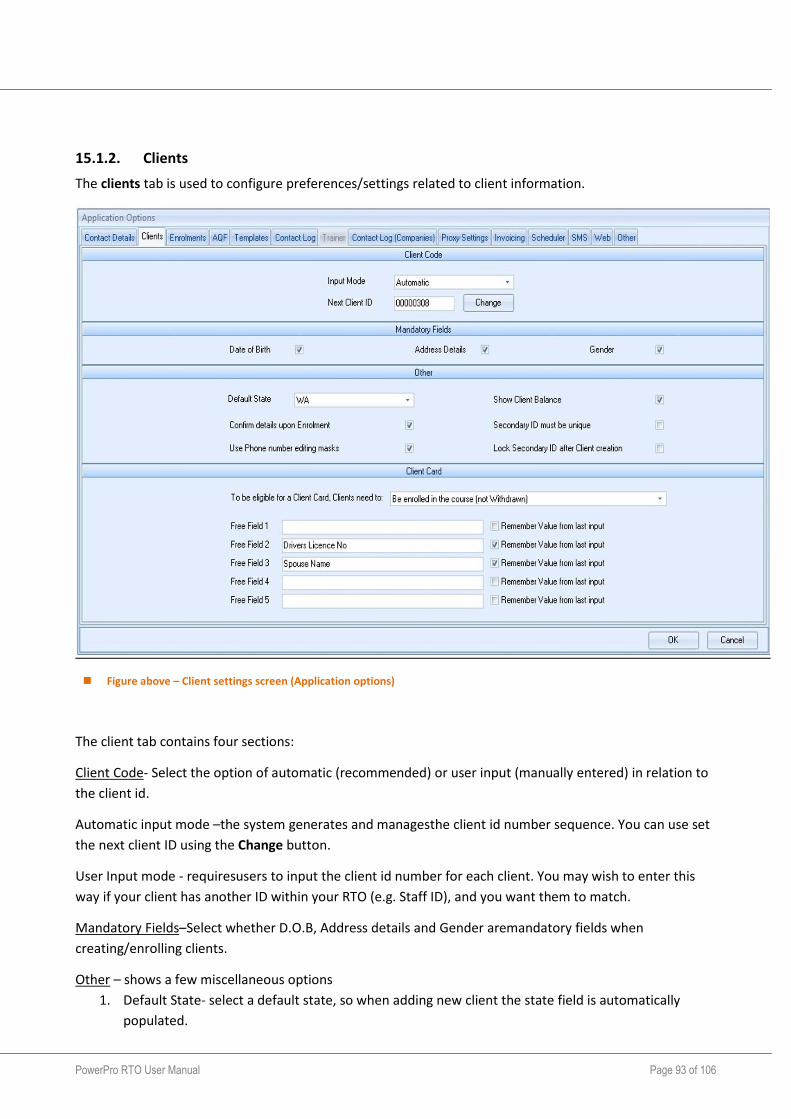
PowerPro RTO User Manual Page 93 of 106
15.1.2. Clients
The clients tab is used to configure preferences/settings related to client information.
Figure above – Client settings screen (Application options)
The client tab contains four sections:
Client Code- Select the option of automatic (recommended) or user input (manually entered) in relation to
the client id.
Automatic input mode –the system generates and managesthe client id number sequence. You can use set
the next client ID using the Change button.
User Input mode - requiresusers to input the client id number for each client. You may wish to enter this
way if your client has another ID within your RTO (e.g. Staff ID), and you want them to match.
Mandatory Fields–Select whether D.O.B, Address details and Gender aremandatory fields when
creating/enrolling clients.
Other – shows a few miscellaneous options
1. Default State- select a default state, so when adding new client the state field is automatically
populated.
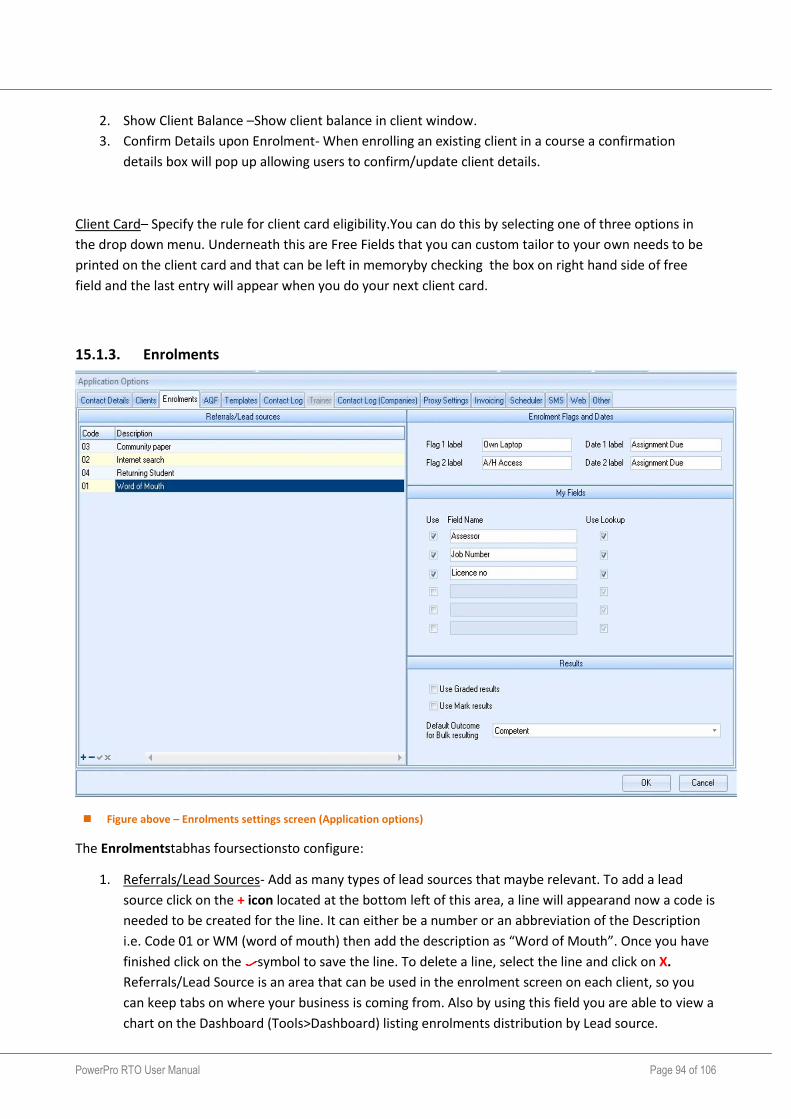
PowerPro RTO User Manual Page 94 of 106
2. Show Client Balance –Show client balance in client window.
3. Confirm Details upon Enrolment- When enrolling an existing client in a course a confirmation
details box will pop up allowing users to confirm/update client details.
Client Card– Specify the rule for client card eligibility.You can do this by selecting one of three options in
the drop down menu. Underneath this are Free Fields that you can custom tailor to your own needs to be
printed on the client card and that can be left in memoryby checking the box on right hand side of free
field and the last entry will appear when you do your next client card.
15.1.3. Enrolments
Figure above – Enrolments settings screen (Application options)
The Enrolmentstabhas foursectionsto configure:
1. Referrals/Lead Sources- Add as many types of lead sources that maybe relevant. To add a lead
source click on the + icon located at the bottom left of this area, a line will appearand now a code is
needed to be created for the line. It can either be a number or an abbreviation of the Description
i.e. Code 01 or WM (word of mouth) then add the description as “Word of Mouth”. Once you have
finished click on the symbol to save the line. To delete a line, select the line and click on X.
Referrals/Lead Source is an area that can be used in the enrolment screen on each client, so you
can keep tabs on where your business is coming from. Also by using this field you are able to view a
chart on the Dashboard (Tools>Dashboard) listing enrolments distribution by Lead source.
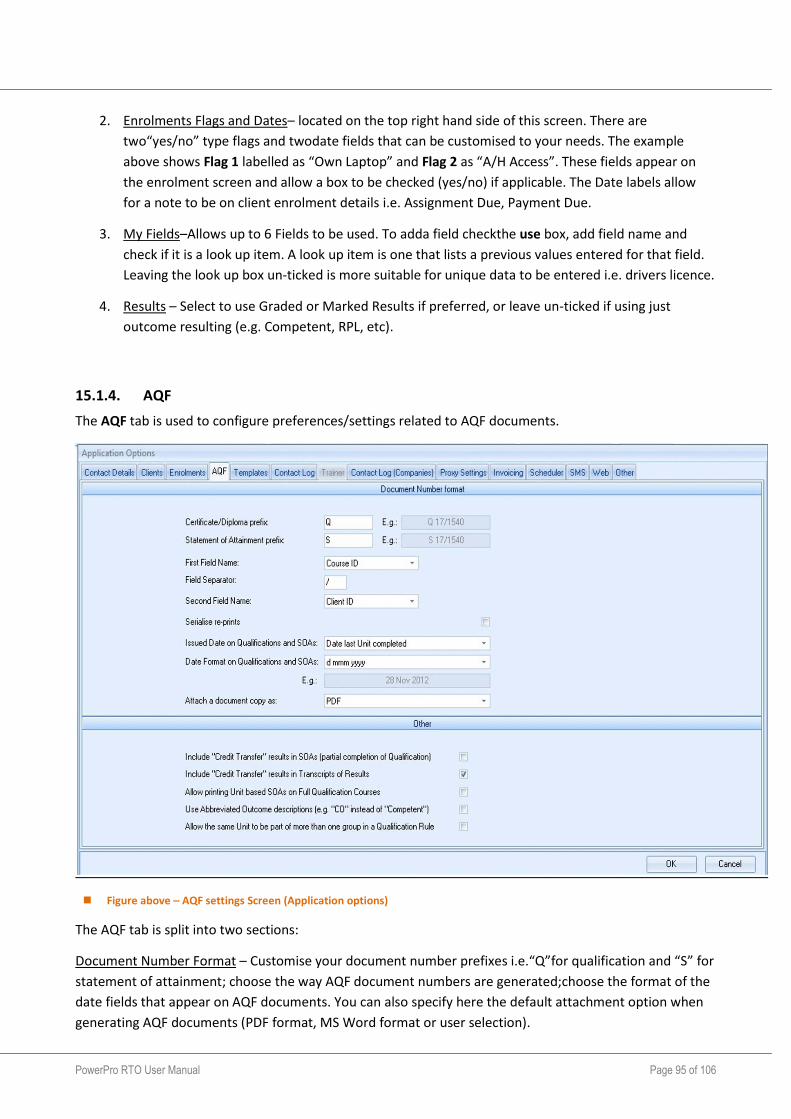
PowerPro RTO User Manual Page 95 of 106
2. Enrolments Flags and Dates– located on the top right hand side of this screen. There are
two“yes/no” type flags and twodate fields that can be customised to your needs. The example
above shows Flag 1 labelled as “Own Laptop” and Flag 2 as “A/H Access”. These fields appear on
the enrolment screen and allow a box to be checked (yes/no) if applicable. The Date labels allow
for a note to be on client enrolment details i.e. Assignment Due, Payment Due.
3. My Fields–Allows up to 6 Fields to be used. To adda field checkthe use box, add field name and
check if it is a look up item. A look up item is one that lists a previous values entered for that field.
Leaving the look up box un-ticked is more suitable for unique data to be entered i.e. drivers licence.
4. Results – Select to use Graded or Marked Results if preferred, or leave un-ticked if using just
outcome resulting (e.g. Competent, RPL, etc).
15.1.4. AQF
The AQF tab is used to configure preferences/settings related to AQF documents.
Figure above – AQF settings Screen (Application options)
The AQF tab is split into two sections:
Document Number Format – Customise your document number prefixes i.e.“Q”for qualification and “S” for
statement of attainment; choose the way AQF document numbers are generated;choose the format of the
date fields that appear on AQF documents. You can also specify here the default attachment option when
generating AQF documents (PDF format, MS Word format or user selection).
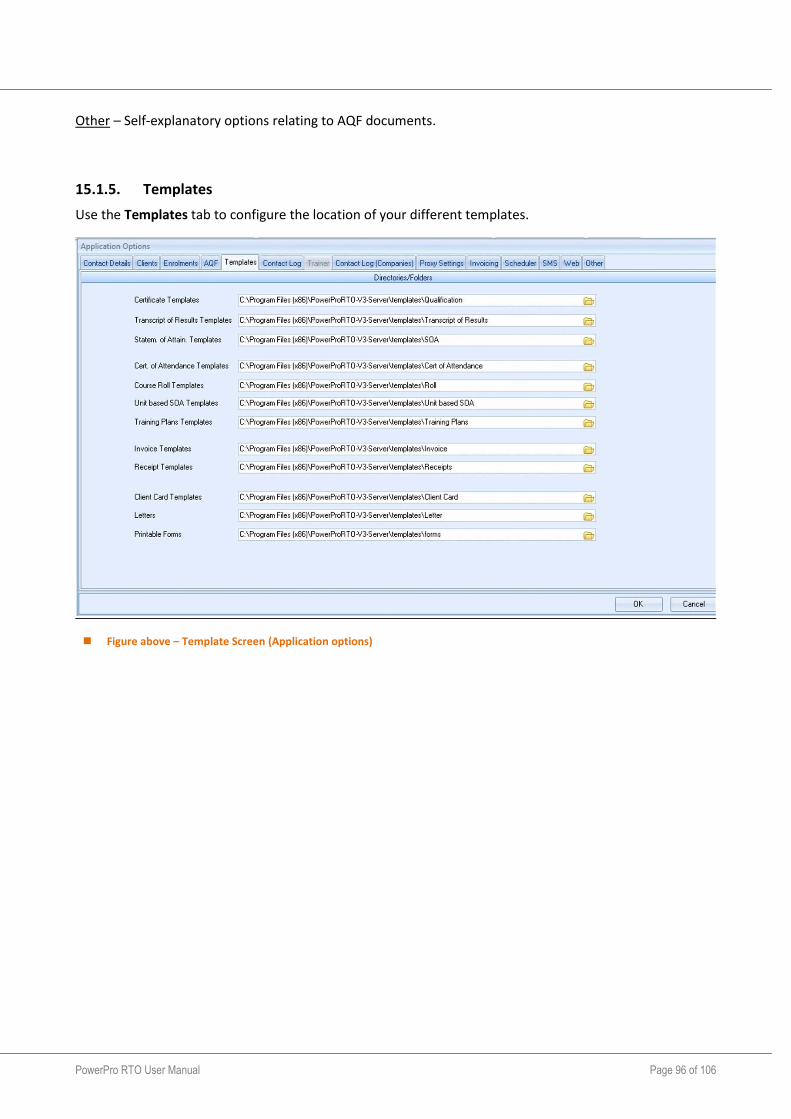
PowerPro RTO User Manual Page 96 of 106
Other – Self-explanatory options relating to AQF documents.
15.1.5. Templates
Use the Templates tab to configure the location of your different templates.
Figure above – Template Screen (Application options)
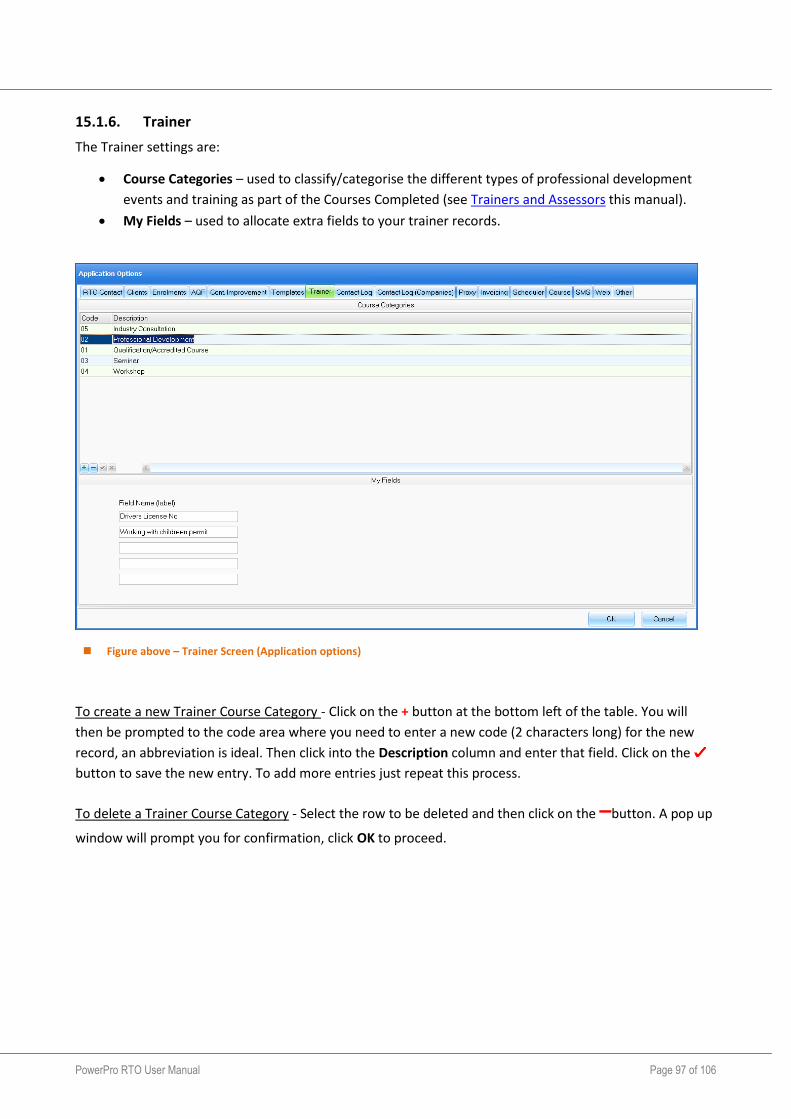
PowerPro RTO User Manual Page 97 of 106
15.1.6. Trainer
The Trainer settings are:
Course Categories – used to classify/categorise the different types of professional development
events and training as part of the Courses Completed (see Trainers and Assessors this manual).
My Fields – used to allocate extra fields to your trainer records.
Figure above – Trainer Screen (Application options)
To create a new Trainer Course Category - Click on the + button at the bottom left of the table. You will
then be prompted to the code area where you need to enter a new code (2 characters long) for the new
record, an abbreviation is ideal. Then click into the Description column and enter that field. Click on the
button to save the new entry. To add more entries just repeat this process.
To delete a Trainer Course Category - Select the row to be deleted and then click on the –button. A pop up
window will prompt you for confirmation, click OK to proceed.
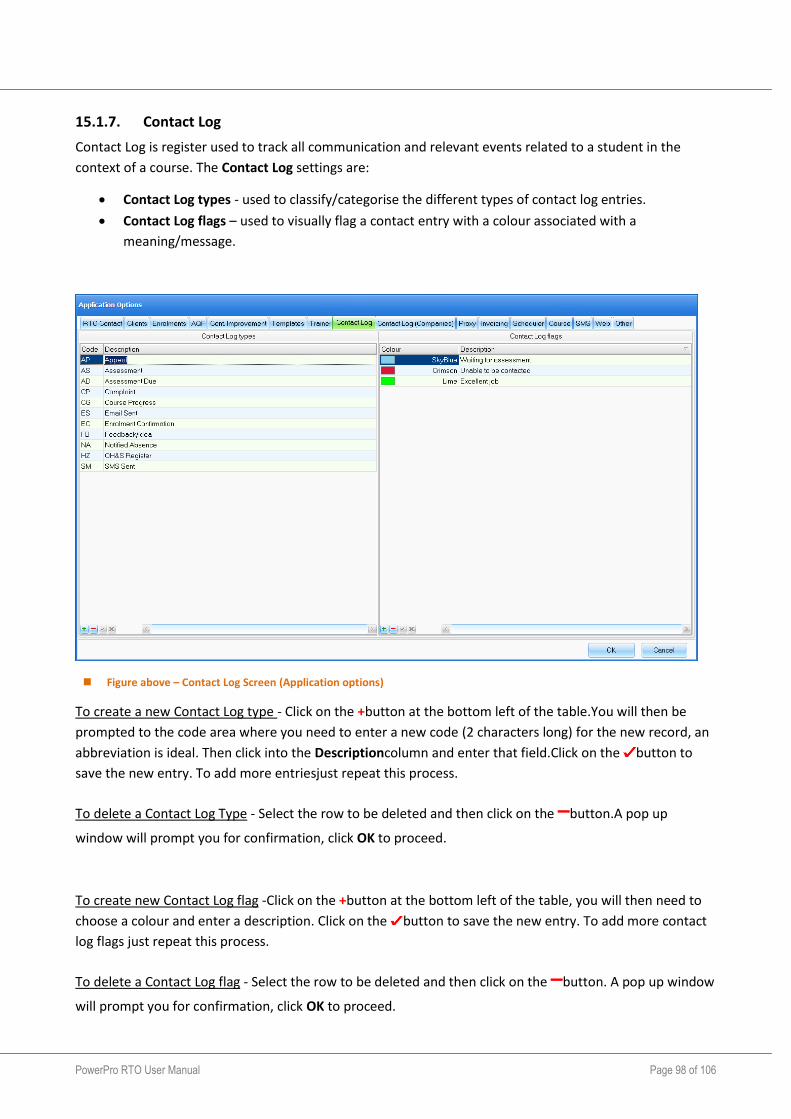
PowerPro RTO User Manual Page 98 of 106
15.1.7. Contact Log
Contact Log is register used to track all communication and relevant events related to a student in the
context of a course. The Contact Log settings are:
Contact Log types - used to classify/categorise the different types of contact log entries.
Contact Log flags – used to visually flag a contact entry with a colour associated with a
meaning/message.
Figure above – Contact Log Screen (Application options)
To create a new Contact Log type - Click on the +button at the bottom left of the table.You will then be
prompted to the code area where you need to enter a new code (2 characters long) for the new record, an
abbreviation is ideal. Then click into the Descriptioncolumn and enter that field.Click on the button to
save the new entry. To add more entriesjust repeat this process.
To delete a Contact Log Type - Select the row to be deleted and then click on the –button.A pop up
window will prompt you for confirmation, click OK to proceed.
To create new Contact Log flag -Click on the +button at the bottom left of the table, you will then need to
choose a colour and enter a description. Click on the button to save the new entry. To add more contact
log flags just repeat this process.
To delete a Contact Log flag - Select the row to be deleted and then click on the –button. A pop up window
will prompt you for confirmation, click OK to proceed.

PowerPro RTO User Manual Page 99 of 106
15.1.8. Contact Log (Companies)
The Contact Log for companies follows the same concept used for the Clients Contact Log – it allows tracking communication and relevant events related to corporate clients (companies).
Figure above – Contact Log (Companies) Screen (Application Options)
The process of adding/removing Contact Log types for companies is identical to the one explained in the
previous topic.
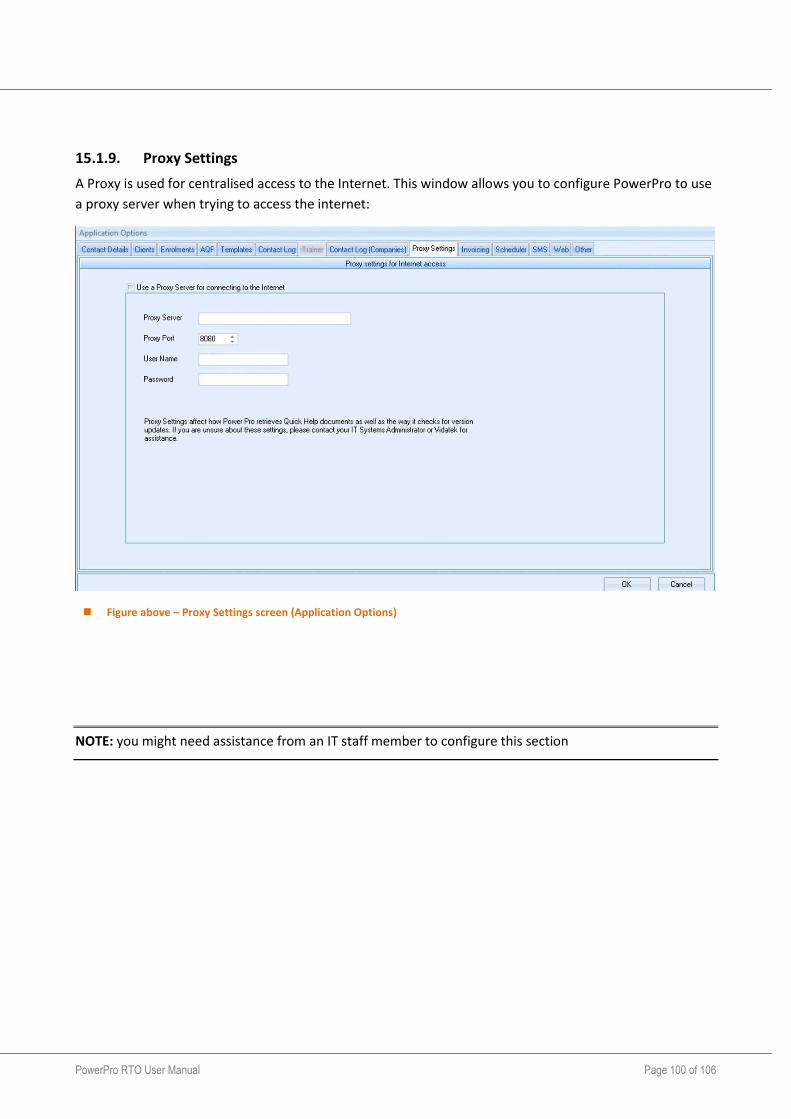
PowerPro RTO User Manual Page 100 of 106
15.1.9. Proxy Settings
A Proxy is used for centralised access to the Internet. This window allows you to configure PowerPro to use
a proxy server when trying to access the internet:
Figure above – Proxy Settings screen (Application Options)
NOTE: you might need assistance from an IT staff member to configure this section
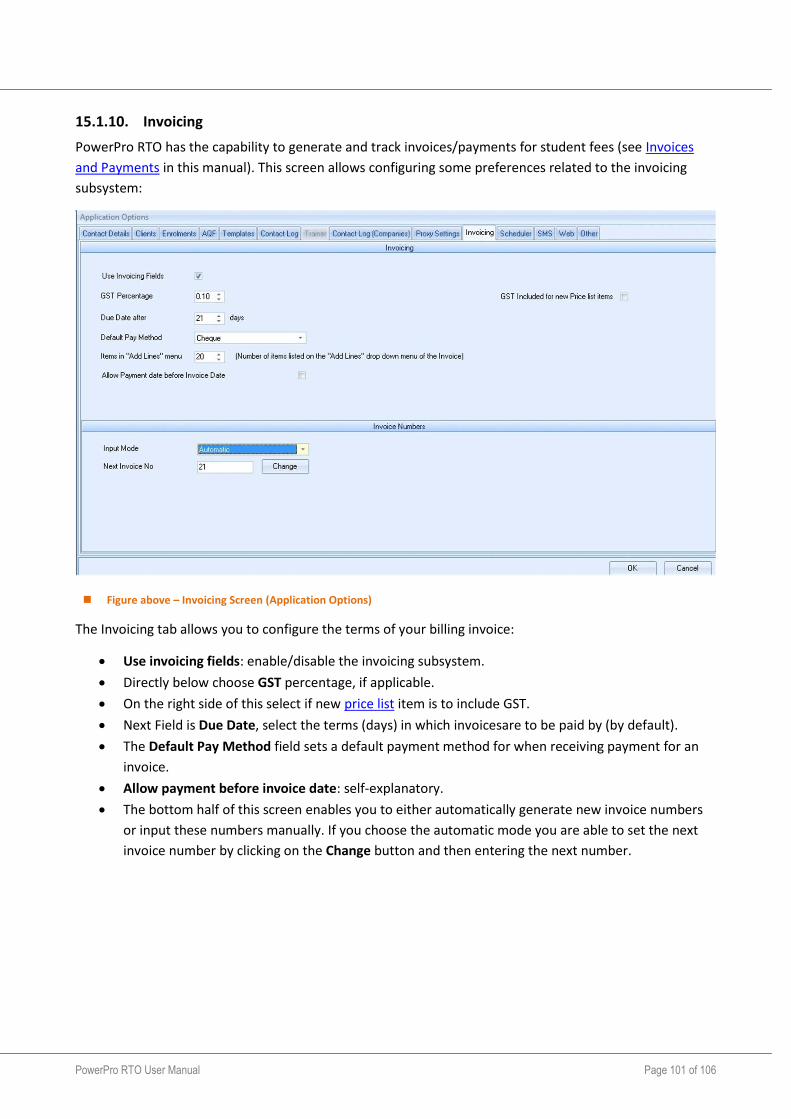
PowerPro RTO User Manual Page 101 of 106
15.1.10. Invoicing
PowerPro RTO has the capability to generate and track invoices/payments for student fees (see Invoices
and Payments in this manual). This screen allows configuring some preferences related to the invoicing
subsystem:
Figure above – Invoicing Screen (Application Options)
The Invoicing tab allows you to configure the terms of your billing invoice:
Use invoicing fields: enable/disable the invoicing subsystem.
Directly below choose GST percentage, if applicable.
On the right side of this select if new price list item is to include GST.
Next Field is Due Date, select the terms (days) in which invoicesare to be paid by (by default).
The Default Pay Method field sets a default payment method for when receiving payment for an
invoice.
Allow payment before invoice date: self-explanatory.
The bottom half of this screen enables you to either automatically generate new invoice numbers
or input these numbers manually. If you choose the automatic mode you are able to set the next
invoice number by clicking on the Change button and then entering the next number.
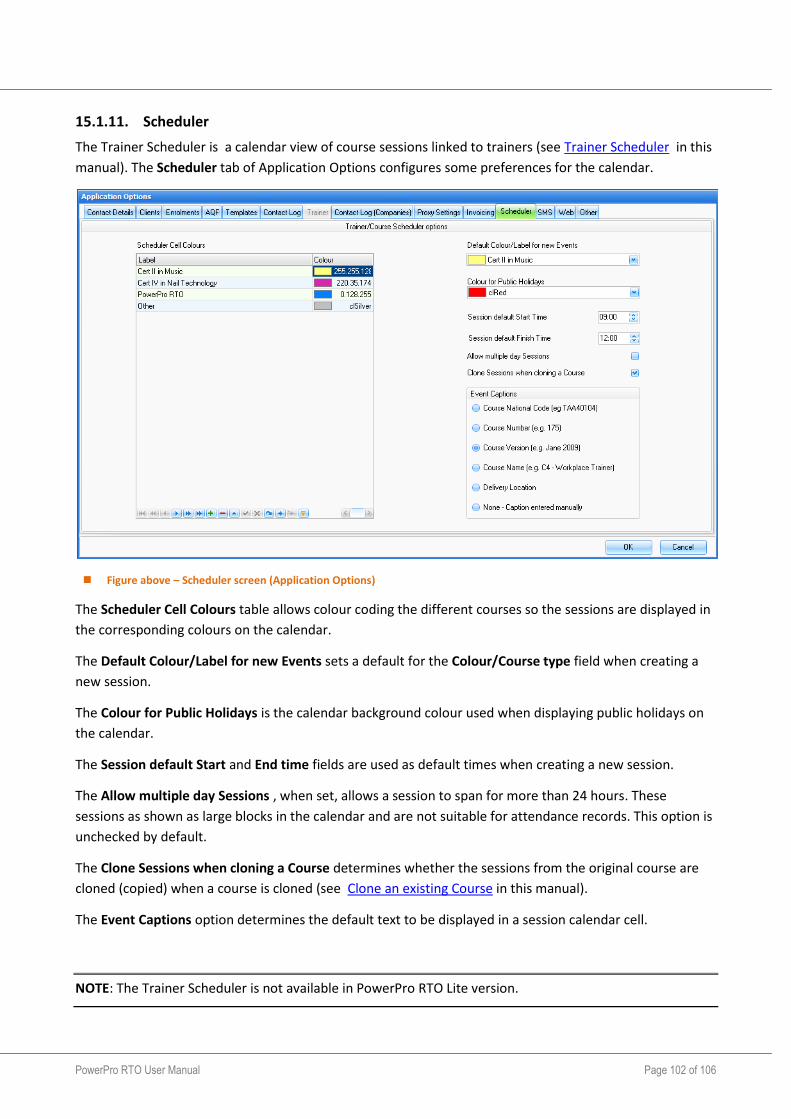
PowerPro RTO User Manual Page 102 of 106
15.1.11. Scheduler
The Trainer Scheduler is a calendar view of course sessions linked to trainers (see Trainer Scheduler in this
manual). The Scheduler tab of Application Options configures some preferences for the calendar.
Figure above – Scheduler screen (Application Options)
The Scheduler Cell Colours table allows colour coding the different courses so the sessions are displayed in
the corresponding colours on the calendar.
The Default Colour/Label for new Events sets a default for the Colour/Course type field when creating a
new session.
The Colour for Public Holidays is the calendar background colour used when displaying public holidays on
the calendar.
The Session default Start and End time fields are used as default times when creating a new session.
The Allow multiple day Sessions , when set, allows a session to span for more than 24 hours. These
sessions as shown as large blocks in the calendar and are not suitable for attendance records. This option is
unchecked by default.
The Clone Sessions when cloning a Course determines whether the sessions from the original course are
cloned (copied) when a course is cloned (see Clone an existing Course in this manual).
The Event Captions option determines the default text to be displayed in a session calendar cell.
NOTE: The Trainer Scheduler is not available in PowerPro RTO Lite version.
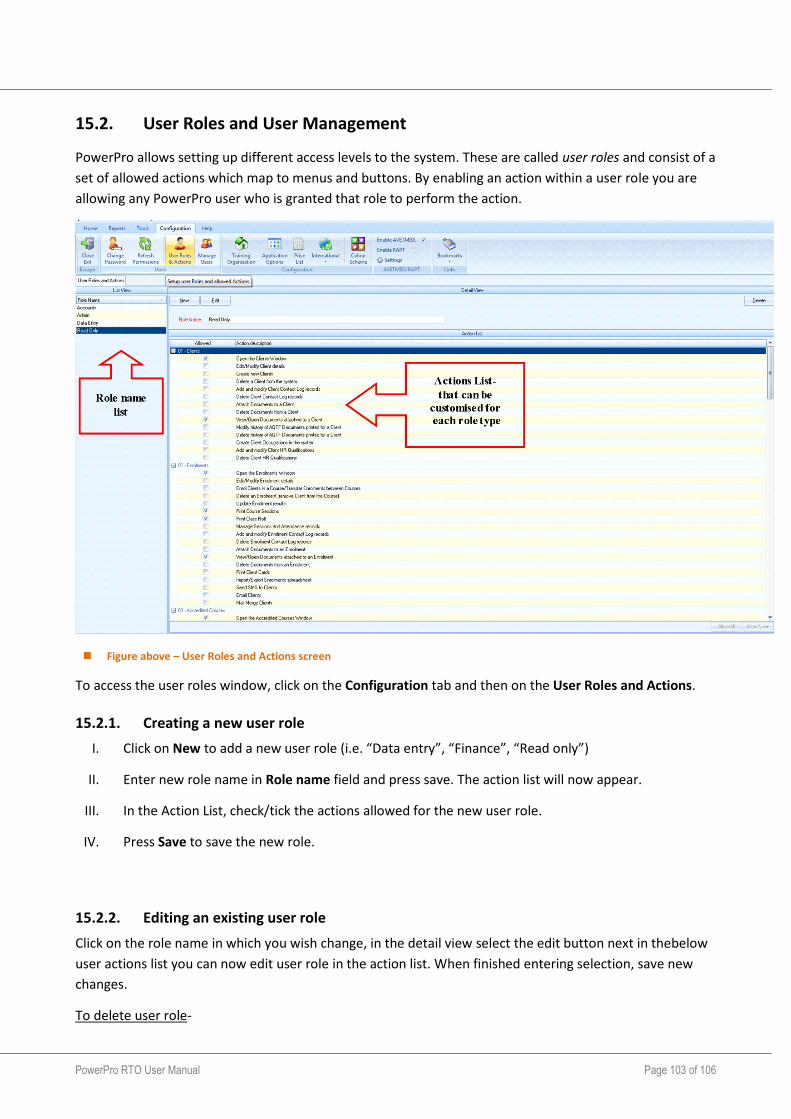
PowerPro RTO User Manual Page 103 of 106
15.2. User Roles and User Management
PowerPro allows setting up different access levels to the system. These are called user roles and consist of a
set of allowed actions which map to menus and buttons. By enabling an action within a user role you are
allowing any PowerPro user who is granted that role to perform the action.
Figure above – User Roles and Actions screen
To access the user roles window, click on the Configuration tab and then on the User Roles and Actions.
15.2.1. Creating a new user role
I. Click on New to add a new user role (i.e. “Data entry”, “Finance”, “Read only”)
II. Enter new role name in Role name field and press save. The action list will now appear.
III. In the Action List, check/tick the actions allowed for the new user role.
IV. Press Save to save the new role.
15.2.2. Editing an existing user role
Click on the role name in which you wish change, in the detail view select the edit button next in thebelow
user actions list you can now edit user role in the action list. When finished entering selection, save new
changes.
To delete user role-

PowerPro RTO User Manual Page 104 of 106
In the role name list select the user role in which you wish to remove, and then on the very far right of the
detail view area you will see the delete button. Click to delete user and you will have a pop up that ask you
if you wish to go ahead with the deletion, if you don’t then select cancel.

PowerPro RTO User Manual Page 105 of 106
Appendix A Glossary Acronym Meaning
ANZSCO Australian and New Zealand Standard Classification of Occupations
AVETMISS Australian Vocational Education and Training Management Information Statistical
StandardSStaStatistical Standard ANTA Australian National Training Authority
AQF Australian Qualification Framework
AQTF Australian Qualification Training Framework
CIR Continuous Improvement Register
CMS Curriculum Management System - for managing accredited training products
CPS Contracted Program of Study
CQR Client Qualification Register
CRICOS Commonwealth Register of Institutions and Courses for overseas students
DEEWR Department of Education, Employment and Workplace Relations
EEO Equal Employment Opportunity
E&A Enrolment and Attendance
EAC Education Advisory Council
FAQs Frequently Asked Questions
GTCs Group Training Companies
HR Human Resources
ICT Information and Communication Technology
IR Industry Relations
ISC Industry Skills Council
IT Information Technology
ITAB Industry Training Advisory Board
LLN Language ,Literacy and Numeracy
LOTE Language other than English
NAC National Apprenticeships Centre
NAWT National Assessors and Workplace Trainers
NQC National Quality Council
NRT Nationally Recognised Training
NTIS National Training Information Service
OLC Online Learning Community
RAPT Resource Allocation Payment Training (WA Only)
RCABs Registration and Course Accreditation Bodies
RCC Recognised of Current Competency
RTO Registered Training Organisation
RPL Recognised Prior Learning
SOA
Statement of Attainment - issued when a student completes one or more units (as part or not a full qualification)
STARS State Training and Recognition System
TAC Training Advisory Council
TMS Training Management System
TRS Training Records System
VSN Victorian Student Number
VET Vocational Education and Training
VEGAS Vocational and Educational Guidance for Aboriginal Schemes
VETiS Vocational Education and Training in Schools
VIIP Vocational Infrastructure for Indigenous People

PowerPro RTO User Manual Page 106 of 106
VL Vocational Learning