powerpoint workshop 1 - university of hawaii€¢ save a presentation what is powerpoint powerpoint...
TRANSCRIPT

PowerPoint Work Shop SeriesIntro to Power PointWorking with PowerPointAccessing PowerPoint Presentations
Session 1: Intro to PowerPointObjectives- Following the workshop, Intro to PowerPoint, attendees will be ableto:• Open PowerPoint utilizing:
Content WizardTemplateBlank presentationExisting presentation
• Have knowledge of:ToolbarsCommon Tasks barAltering ViewsShortcuts
• Build a simple presentation in Outline View• Save a presentation
What is PowerPoint PowerPoint is a complete presentation graphicspackage. The program supplies everything you needto produce a professional looking presentation.PowerPoint offers word processing, outlining,drawing, graphing, and presentation management inan easy to use package.
Opening PowerPoint PowerPoint offers four alternatives to opening apresentation: Content Wizard, Templates, Blank, oran existing presentation.

AutoContent Wizard AutoContent Wizard produces an outline for yourpresentation, including selected background and textformat.
Choose AutoContent Wizard and click OK button.
Follow AutoContent Wizard as it takes you throughthe process of organizing your presentation.
Click Next > button to continue with instructions.
At the above screen, select the type of presentationthat best suits your goals and objectives by clicking oneach subject heading, such as: general, corporate,projects, operations, sales, or personal, and CarnegieCoach. "All" contains the listing of all templatesavailable in the Content Wizard.

Click Next > to continue to the next selection process.
The above screen asks how your presentationselection will be used, is it to be a normal face to facepresentation, or will it be prepared for the Internet orKiosk. Select Presentations for this workshop.
Click Next > to continue.
The next screen, illustrated above, has you select thetype of output for your presentation. Select On-screenpresentation and leave the rest at the default for thisworkshop.
Click Next > to continue.
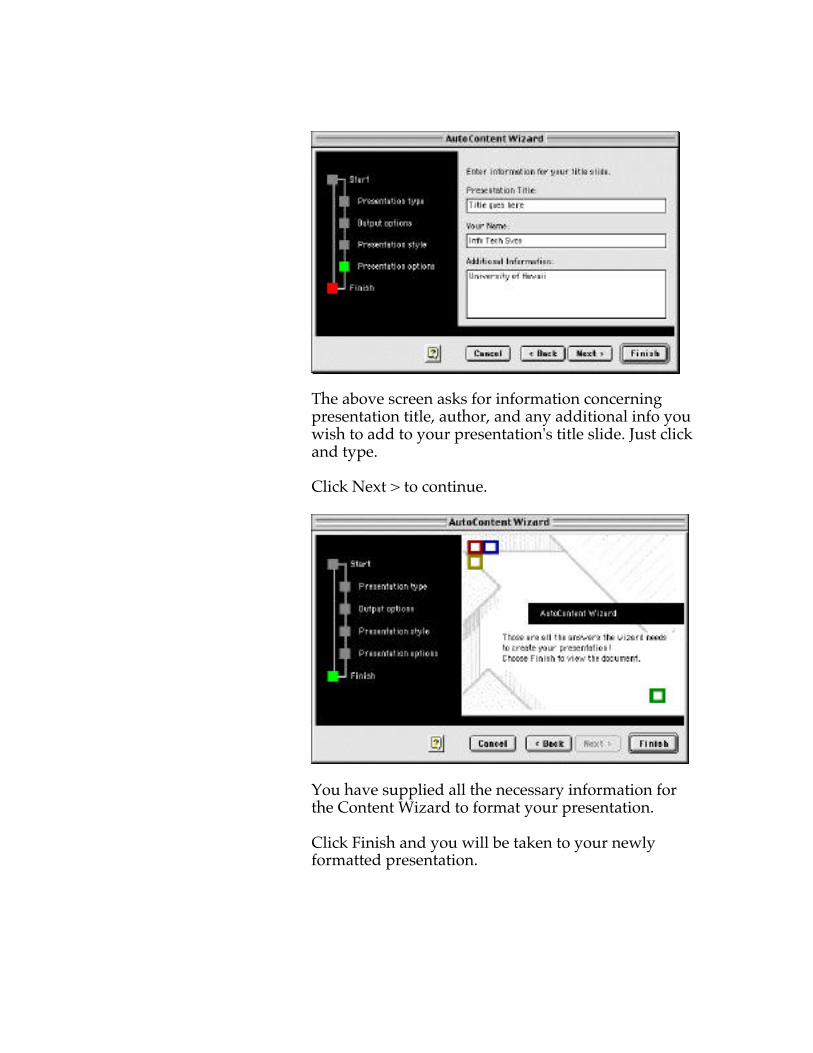
The above screen asks for information concerningpresentation title, author, and any additional info youwish to add to your presentation's title slide. Just clickand type.
Click Next > to continue.
You have supplied all the necessary information forthe Content Wizard to format your presentation.
Click Finish and you will be taken to your newlyformatted presentation.

This view is considered the Outline View and will bediscussed in detail later on. The screen illustrates theText format you have chosen for the your selectedpresentation type. Included is a view of thebackground layout.
To add your own text, just highlight existing text andType.
Templates Templates allow you to designate a look and feel toyour presentation without the concern of buildingone from scratch. You can also build your owntemplates and store them in the Template file forfuture presentations.
Once you select Template, there are three areas inwhich to choose from: General, Presentation Design,and Presentations.
Outline View
Background Layout

General: takes you to the ContentAuto Wizard and aBlank presentation.
Presentation Design: provides you with a consistentbackground. Click on a design that best suits yourpresentation. You can quickly view each template bylooking at the Preview screen.
Presentations: Provides you with a background andtext layout much like the ContentAuto Wizard. Justselect a presentation style that best suits your goalsand objectives. You can quickly view each templateby looking at the Preview screen.
Preview Screen
Preview Screen

Blank Presentation Blank presentations allow you to build yourpresentations from scratch, focusing on content ratherthan layout.
The above New Slide screen appears once you haveselected the Blank Presentation as your openingchoice. PowerPoint provides a variety of slide layoutsfor you to choose from. For the purpose of thisworkshop session, please select the Blank layout.
Click OK.
Views Once you have opened PowerPoint to fit your needsyou are ready to begin building your presentation.There a many ways in which do anything inPowerPoint, from adding and manipulating text, toadding and altering slide layouts.
Utilizing Toolbars, Common Task box, the ViewMenu, and Shortcuts will aid in speeding you alongin building a dynamic, motivating, and excitingpresentation.
Toolbars Toolbar selection allows you to control PowerPointtools for easy and fast results. The most commonused toolbars are:• Formatting• Animation Effects• Common Tasks• Drawing
Click View in your main Toolbar, select Toolbars toview a submenu of all available tools.
Blank Layout

Formatting: selecting to view the formatting tooladds the above bar to your screen. It allows you toquickly manipulate text including font size, position,bullets, and color. Just highlight text you want toalter, choose a formatting option.
Animation Effects: selecting to view the Animationtool adds the above box to your screen. It allows youto quickly animate text and graphics, includingadding transitions and sound.
Common Tasks: selecting to view the Common Taskstool adds the above box to your screen. It allows youto quickly manipulate and add slides to yourpresentation. This box is discussed in greater detaillater on in the manual.
Draw: selecting to view the Draw tool adds the abovebar to your screen. It allows you to quicklymanipulate clip art including color, position, andview.
Common Tasks The Common Tasks box contains three selections:New Slide, Slide Layout, and Apply Design.

New Slide: adds a new slide to your presentation.
At the above screen just choose a new slide formatthat best suits your needs for the next slide. Click OK.
Slide Layout: alters the layout of a slide.
At the above screen, choose a new layout for yourslide. Click Reapply.
Apply Design: adds a background design to yourslide.
Choose a design that best suits your presentation andclick Apply.

View Menu In the main menu of PowerPoint, View allows you toquickly access differing slide views that aid inbuilding your slide presentation.
There are six main views that we will cover in theseries, we will begin with the first five: slide, outlineview, slide sorter, notes page, and slide show.
Slide view: provides you with a view of the slide inwhich you are currently working.
Outline view: provides you with a textual view ofyour slide show which aids in maintaining focus oncontent rather than on structure and backgrounddesign.
This is an Outline View
This is a Slide view

Slide Sorter view: provides a view of all slides in apresentation within one area. Slide order can bealtered by clicking on a slide and dragging it to thedesired location.
Notes Page view: allows for adding textual notes forindividual slides for instructors to use during apresentation. Just click and type in the dotted box.
This is the Slide Sorter View
This is the Notes Page view

Slide Show view: allows you to view yourpresentation in full screen mode. Just click to go tothe next slide in your presentation.
Shortcuts Shortcuts allow for quick selection of many of theabove views.
The above shortcut selection, found in the main toolbar area, allows for quick access to New Slide,Layout, and Background Design respectively. Justclick icon to apply desired function.
The above shortcut selection, located at the bottomleft corner of your slide screen, allows for quick accessto Slide View, Outline View, Slide Sorter, Notes page,and Slide Show, respectively. Just click icon to enterdesired view.
This is a Slide Show view
Click on arrow and select"End Show" to quit thisview.

Building a Presentation
Blank Presentation Open a Blank presentation, unless one is alreadyavailable.
PowerPoint prompts you to select a slide layout.PowerPoint's layout defaults with a Title slide.
Click OK.
Since we do not want to bother with the backgrounddesign and layout yet, and want to concentrate on thecontent of the presentation, click on Outline View.
From main menu, click View, then click Outline view,or use the shortcut found at the bottom left of screen,click on the icon that illustrates multiple straight lines.
Outline menu
The above screen shows the Outline View, just click andtype to begin adding content to your presentation. Noticethe View screen, it provides a single slide view of yourtext.

Outline menu
Manipulating Text Utilizing the side menu in Outline view allows you toadd slides, demote and promote text, and alter slidepositions.
• Click Promote arrow to enter text from either abullet or to a new slide.
• Click the Demote arrow to add bulleted text.
• Click the Move Up arrow to move a slide up oneposition.
• Click to Move Down arrow to move a slide downone position.
• Click Hide Text to hide text for easier viewing ofslides.
• Click Reveal Text to open previously hidden texton a slide.
Promote
Demote
Move Up
Move Down
Reveal Text
Hide Text

Saving To save a PowerPoint presentation, click File in theMain Tool bar, and select "Save As." Save As allowsyou to insert your own title for the presentation andselect where you want to save it on your computer.
Type in a title for your presentation in the Save Asbox. This is a good time to get in the habit of comingup with short, lowercase titles.
Creating , naming, and saving your presentation to aspecified folder provides you with control of your fileand aids in locating it if you choose to upload to theInternet server or WebCT. Click on New (folder)button to create a new folder to hold yourpresentation file.
Click the Save button.
Next Workshop sessions covers working inPowerPoint slide presentations.