powerpay getting started guide - payroll - ceridian · powerpay getting started 5 opening powerpay...
TRANSCRIPT

Getting Started
Powerpay Version 4.1

Powerpay Getting Started 3
Contents
Opening Powerpay ........................................................................................................ 5 Before you open Powerpay ........................................................................ 5 Opening Powerpay for the first time .......................................................... 5 Log on to Powerpay for the first time......................................................... 6 Password restrictions and guidelines........................................................ 9
Restrictions ................................................................................................ 9 Guidelines .................................................................................................. 9 Password ideas ........................................................................................ 10 Find your way around Powerpay.............................................................. 10
Menus ...................................................................................................... 10 Save data .................................................................................................. 12 Reset page data ........................................................................................ 13 Getting help .............................................................................................. 13 Log off from Powerpay ............................................................................. 14
Specifying Company Settings .................................................................................... 16 Approve your payroll calendar ................................................................. 16 Set up deduction and contribution cycles ............................................... 16 Set up department names and ID fields ................................................... 18 Set up timesheet defaults ......................................................................... 19 Set up sort and filter defaults ................................................................... 20
Sorting ..................................................................................................... 20 Filtering .................................................................................................... 20
Set up rapid entry defaults ....................................................................... 21 Set up new hire defaults ........................................................................... 22 Set up second payment options .............................................................. 23
Setting Up a Payroll ..................................................................................................... 24 Create a new pay period ........................................................................... 24 Complete the Employee Profile ................................................................ 25 Set up direct deposits .............................................................................. 26 Set up permanent rates, factors and earnings ......................................... 28 Set up special tax considerations ............................................................ 29 Set up deductions and contributions ....................................................... 29
Processing a Payroll.................................................................................................... 31 Process overview ..................................................................................... 31 Open an existing pay period .................................................................... 31 Reverse any incorrect payments issued prior to this pay period ............ 32 Record manual payments issued prior to this pay period ....................... 32 Change employee status .......................................................................... 33 Create a Record of Employment (ROE) .................................................... 34 Enter hours and earnings to be paid ........................................................ 35
Rapid Entry .............................................................................................. 35
Opening Powerpay Version 4.1
4 Powerpay Getting Started
Regular Payment ...................................................................................... 36 Second Payment....................................................................................... 37 Employee Timesheet ................................................................................ 37 Regular Payment ...................................................................................... 38 Second Payment....................................................................................... 38 Verify the payroll data .............................................................................. 40 Preview the payroll ................................................................................... 40 Submit the payroll for processing ............................................................ 41 View and save online reports ................................................................... 42
Powerpay Getting Started 5
Opening Powerpay
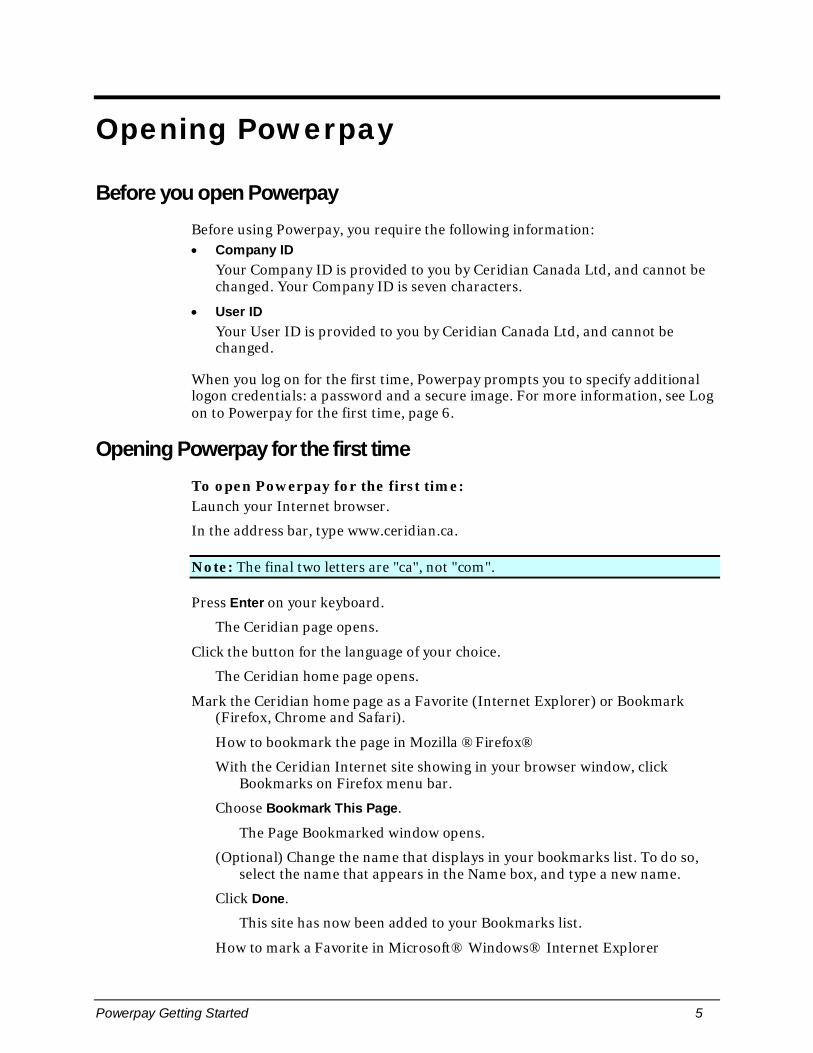
Before you open Powerpay Before using Powerpay, you require the following information: • Company ID
Your Company ID is provided to you by Ceridian Canada Ltd, and cannot be changed. Your Company ID is seven characters.
• User ID Your User ID is provided to you by Ceridian Canada Ltd, and cannot be changed.
When you log on for the first time, Powerpay prompts you to specify additional logon credentials: a password and a secure image. For more information, see Log on to Powerpay for the first time, page 6.
Opening Powerpay for the first time To open Powerpay for the first time: Launch your Internet browser.
In the address bar, type www.ceridian.ca.
Note: The final two letters are "ca", not "com".
Press Enter on your keyboard.
The Ceridian page opens.
Click the button for the language of your choice.
The Ceridian home page opens.
Mark the Ceridian home page as a Favorite (Internet Explorer) or Bookmark (Firefox, Chrome and Safari).
How to bookmark the page in Mozilla ®Firefox®
With the Ceridian Internet site showing in your browser window, click Bookmarks on Firefox menu bar.
Choose Bookmark This Page.
The Page Bookmarked window opens.
(Optional) Change the name that displays in your bookmarks list. To do so, select the name that appears in the Name box, and type a new name.
Click Done.
This site has now been added to your Bookmarks list.
How to mark a Favorite in Microsoft® Windows® Internet Explorer
Opening Powerpay Version 4.1
6 Powerpay Getting Started
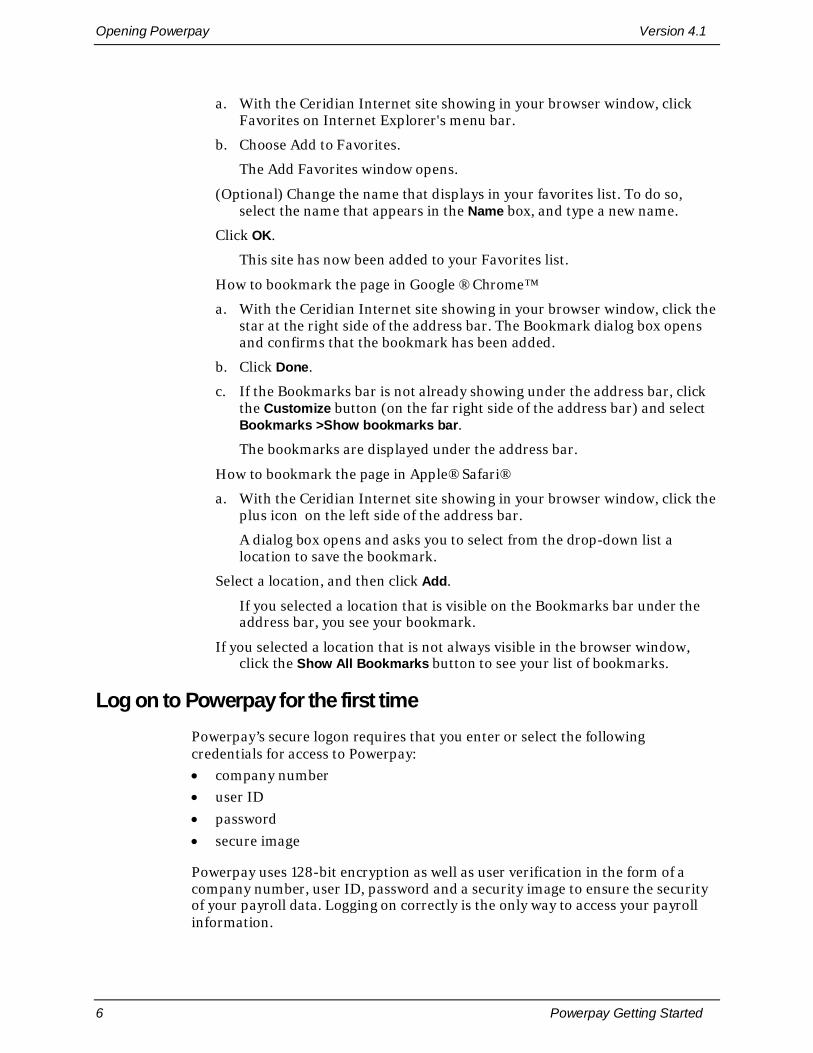
a. With the Ceridian Internet site showing in your browser window, click Favorites on Internet Explorer's menu bar.
b. Choose Add to Favorites.
The Add Favorites window opens.
(Optional) Change the name that displays in your favorites list. To do so, select the name that appears in the Name box, and type a new name.
Click OK.
This site has now been added to your Favorites list.
How to bookmark the page in Google ®Chrome™
a. With the Ceridian Internet site showing in your browser window, click the star at the right side of the address bar. The Bookmark dialog box opens and confirms that the bookmark has been added.
b. Click Done.
c. If the Bookmarks bar is not already showing under the address bar, click the Customize button (on the far right side of the address bar) and select Bookmarks >Show bookmarks bar.
The bookmarks are displayed under the address bar.
How to bookmark the page in Apple®Safari®
a. With the Ceridian Internet site showing in your browser window, click the plus icon on the left side of the address bar.
A dialog box opens and asks you to select from the drop-down list a location to save the bookmark.
Select a location, and then click Add.
If you selected a location that is visible on the Bookmarks bar under the address bar, you see your bookmark.
If you selected a location that is not always visible in the browser window, click the Show All Bookmarks button to see your list of bookmarks.
Log on to Powerpay for the first time Powerpay’s secure logon requires that you enter or select the following credentials for access to Powerpay:
• company number
• user ID
• password
• secure image
Powerpay uses 128-bit encryption as well as user verification in the form of a company number, user ID, password and a security image to ensure the security of your payroll data. Logging on correctly is the only way to access your payroll information.
Version 4.1 Log on to Powerpay for the first time
Powerpay Getting Started 7
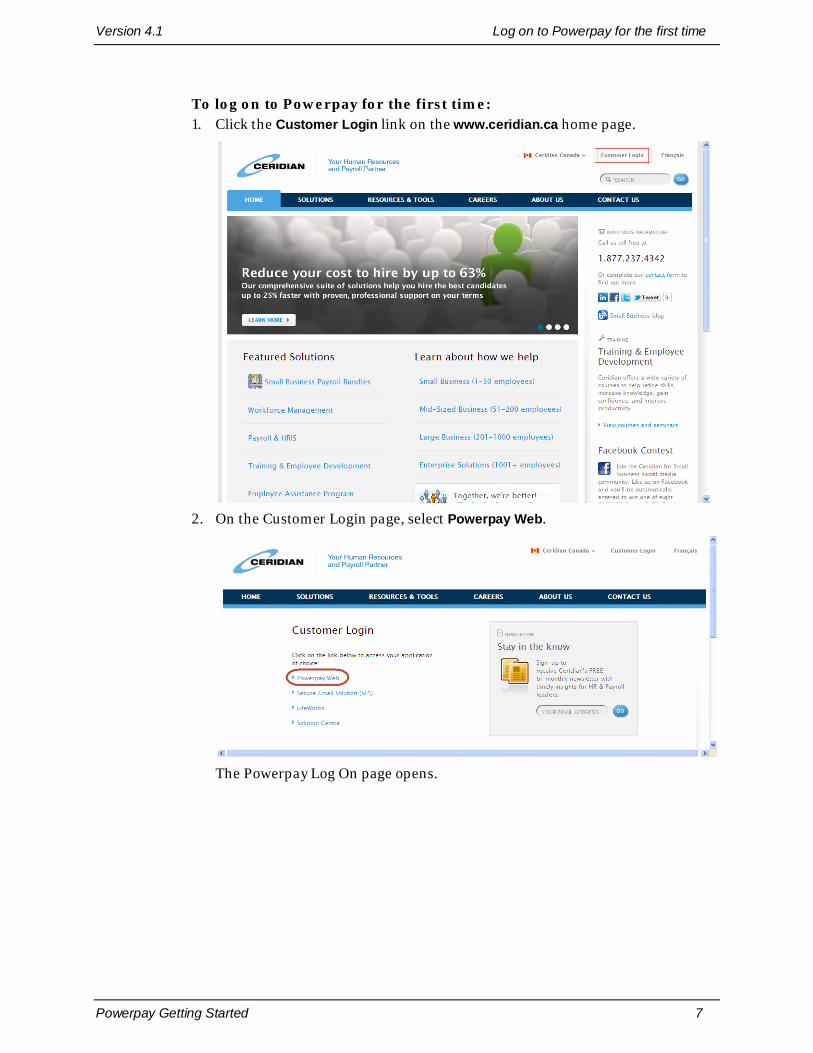
To log on to Powerpay for the first time: 1. Click the Customer Login link on the www.ceridian.ca home page.
2. On the Customer Login page, select Powerpay Web.
The Powerpay Log On page opens.
Opening Powerpay Version 4.1
8 Powerpay Getting Started
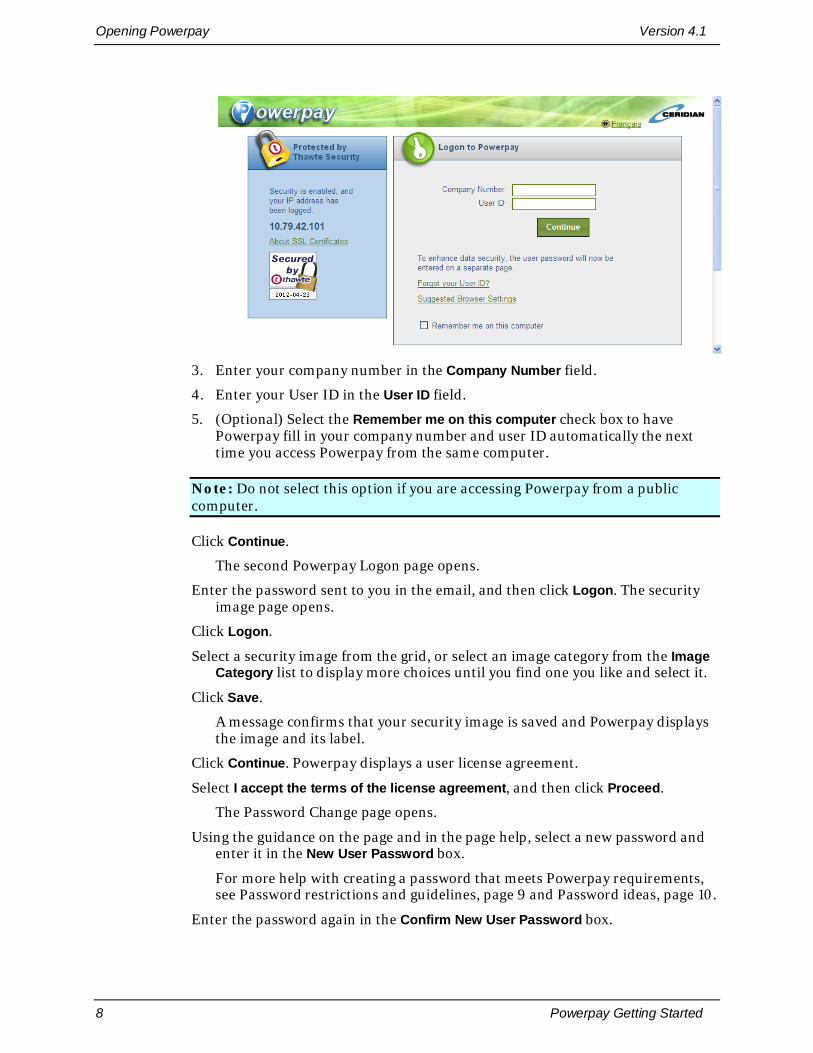
3. Enter your company number in the Company Number field.
4. Enter your User ID in the User ID field.
5. (Optional) Select the Remember me on this computer check box to have Powerpay fill in your company number and user ID automatically the next time you access Powerpay from the same computer.
Note: Do not select this option if you are accessing Powerpay from a public computer.
Click Continue.
The second Powerpay Logon page opens.
Enter the password sent to you in the email, and then click Logon. The security image page opens.
Click Logon.
Select a security image from the grid, or select an image category from the Image Category list to display more choices until you find one you like and select it.
Click Save.
A message confirms that your security image is saved and Powerpay displays the image and its label.
Click Continue. Powerpay displays a user license agreement.
Select I accept the terms of the license agreement, and then click Proceed.
The Password Change page opens.
Using the guidance on the page and in the page help, select a new password and enter it in the New User Password box.
For more help with creating a password that meets Powerpay requirements, see Password restrictions and guidelines, page 9 and Password ideas, page 10.
Enter the password again in the Confirm New User Password box.

Version 4.1 Password restrictions and guidelines
Powerpay Getting Started 9
If your password meets all the requirements, Powerpay displays a Data Saved message.
Click Continue.
Powerpay opens and displays the Info Centre page. The Info Centre page contains helpful hints, important dates and other information that can help you with payroll tasks. Information on this page is updated regularly by Ceridian Canada.
You are ready to begin working with Powerpay.
Password restrictions and guidelines Restrictions
The following password restrictions are meant to enforce creation of strong passwords that make it difficult for unauthorized users to access your payroll information. Your password will not be accepted unless it meets these requirements:
• Must be a minimum of 8 characters and a maximum of 14 characters.
• Must include at least one character of each of the following types:
• Upper case letter (Example: A,B,C...Z)
• Lower case letter (Example: a,b,c...z)
• Number
Note: Do not use a number as the first or last character of the password.
• Cannot contain blank spaces
• Must be different from any passwords in the last 12 months.
• Cannot have more than two identical, consecutive characters (not hbbb4tdC).
• Cannot include your User ID
• Cannot include any reserved words, including Ceridian, Powerpay, PAY, PP, CCL, Insync, or Micropay
Note: Powerpay passwords are case-sensitive. For example, Thlns2Mnk is not equal to thlns2mnk.
Guidelines To ensure that your payroll data remains protected from unauthorized users, it is important to choose a strong password that cannot be guessed or easily deciphered. Follow these guidelines:
• Include both uppercase and lowercase letters, a number and a special character (for example, #,$, %, &, *) in any password you select.
Opening Powerpay Version 4.1
10 Powerpay Getting Started
• Do not use a password that is your name, your immediate family’s names, your company name, or easily identifiable numbers such as your telephone number, birth date or home address.
• Do not write your password down and leave it in an easily accessible place.
Password ideas Can’t think of a password? Try one of these suggestions:
• Choose a line or two from a song or poem, and use the first letter of each word. Put in some upper and lower case letters, replace one letter with a number, and add a special character. For example, Do you know the way to San Jose? Becomes dyktw2SJ?
• Alternate between one consonant and one or two vowels to make nonsense words that are pronounceable and thus easily remembered. Use upper and lower case letters, and add a character and a number. Examples include “rout2Boo+”, “quad4Pop+”, and so on
• Use another form of an acronym that means something to you. For example, Oliver Starr loves to ride his new Dodge becomes O*l2rhnD.
• Choose two short words and put them together with a punctuation character and a number between or around them. For example, “doG2;rain”, “book&mug7”, “1kiD?goat”
• Pick a pattern on your keyboard. For example, zse$4RFV is simply an upside down V on the keyboard starting at the Z. By alternating which characters are capitalized and which are lower case, you can create several passwords from this pattern such as ZSE4$rfv, Zse$4rFV, or Zse$4rFv.
• If you are a touch typist, shift your hands one row on the keyboard and type a meaningful word or a short phrase with one or more capital letters in it. For instance “GoodnightU” becomes “T99eh8ty5&” when shifted up.
• On laptop keyboards there is a numeric keypad built in, starting on the J key as 1 K as 2, and so on. Pick a number that is easy to remember, say your home phone number. By holding down the Shift and Number Lock keys at different times while you type the number and adding a character you have a strong password. For example, 123-4567 becomes JKL*uio7* or 1k3**u5o7.
Find your way around Powerpay When you log on to Powerpay, you see the Info Centre page. Click the Home menu to return to the Info Centre at any time.
Menus
The menus you can see when you log on are:
• Home Presents the Info Centre page
• Pay Period Lists the pay periods on your payroll calendar. You can view and edit payrolls, create new ones, or enter a payroll to add data.
• Company Is where you go to set up information presented in the Powerpay pages.

Version 4.1 Find your way around Powerpay
Powerpay Getting Started 11
• Year End Provides information on how you complete the payroll year.
• HR Provides a place to gather information about company employees, including emergency contact information, skills and company-funded memberships.
• Reports Generates up-to-date reports of payroll and other data.
After you open the Pay Period page and select a specific pay period to work on, two additional menus appear:
• Payroll Provides the pages in which you to enter all payroll data.
• Process Provides access to pages where you verify payroll data, request and view a preview of a payroll, and submit a payroll to Ceridian Canada for processing.
The company number of the company you specified at login is shown in the bar above the menu bar. When you select a pay period to work on, the pay period is shown there also.
If you work on payrolls for more than one company, you can switch to another company without logging off from Powerpay. Click the Switch Company button and, in the Enter Company dialog box, enter the company number and then click Switch Payroll.
Page Features and Tips
Powerpay pages have a number of common functions. • Breadcrumb Navigation
To return to a page that you viewed previously, click any underlined (linked) page name in the breadcrumb navigation bar.
Note: Be sure to save changes on the current page before you navigate to another page.
• Employee List The Employee List is available on every page on which you need to select an individual employee record to work with.
Click the Employee List icon to display the list of employees for the selected company. Select a name to work with that employee's record. Powerpay displays the employee's Name, Number, Pay Type, and Pay Rate at the top of the page.
Opening Powerpay Version 4.1
12 Powerpay Getting Started
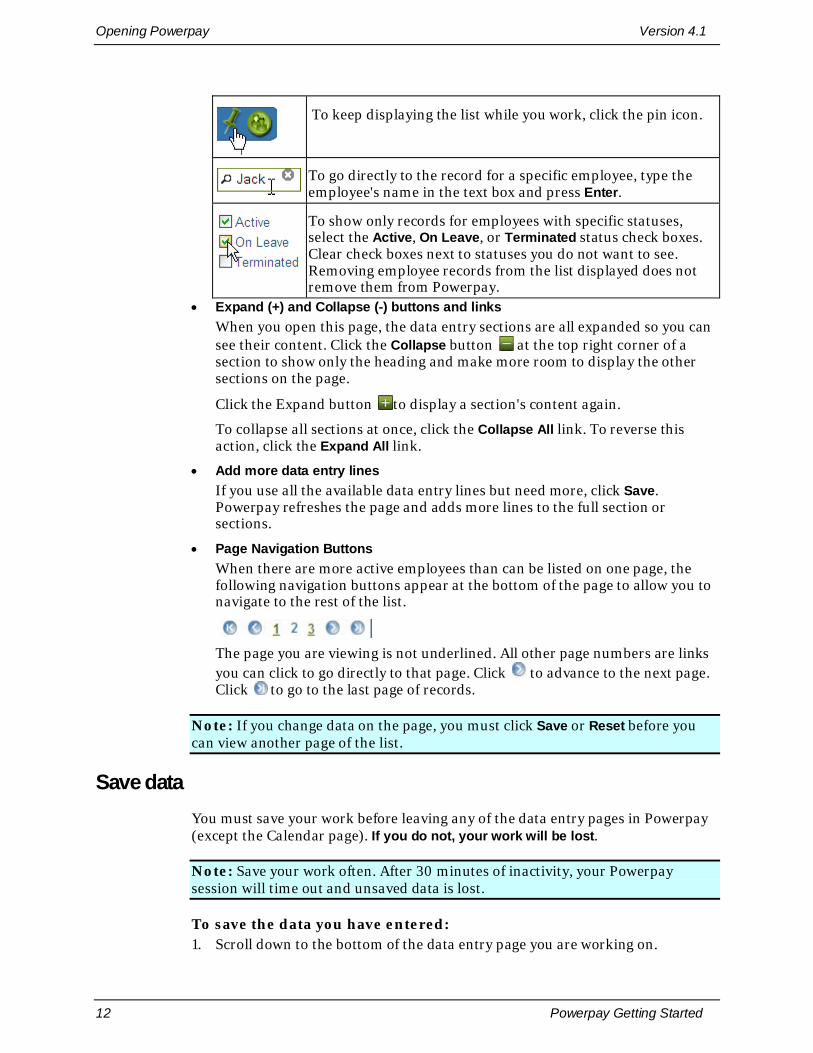
To keep displaying the list while you work, click the pin icon.
To go directly to the record for a specific employee, type the employee's name in the text box and press Enter.
To show only records for employees with specific statuses, select the Active, On Leave, or Terminated status check boxes. Clear check boxes next to statuses you do not want to see. Removing employee records from the list displayed does not remove them from Powerpay.
• Expand (+) and Collapse (-) buttons and links When you open this page, the data entry sections are all expanded so you can see their content. Click the Collapse button at the top right corner of a section to show only the heading and make more room to display the other sections on the page.
Click the Expand button to display a section's content again.
To collapse all sections at once, click the Collapse All link. To reverse this action, click the Expand All link.
• Add more data entry lines If you use all the available data entry lines but need more, click Save. Powerpay refreshes the page and adds more lines to the full section or sections.
• Page Navigation Buttons When there are more active employees than can be listed on one page, the following navigation buttons appear at the bottom of the page to allow you to navigate to the rest of the list.
The page you are viewing is not underlined. All other page numbers are links you can click to go directly to that page. Click to advance to the next page. Click to go to the last page of records.
Note: If you change data on the page, you must click Save or Reset before you can view another page of the list.
Save data You must save your work before leaving any of the data entry pages in Powerpay (except the Calendar page). If you do not, your work will be lost.
Note: Save your work often. After 30 minutes of inactivity, your Powerpay session will time out and unsaved data is lost.
To save the data you have entered: 1. Scroll down to the bottom of the data entry page you are working on.
Version 4.1 Reset page data
Powerpay Getting Started 13
Click Save.
If there are any errors in the data you have entered, Powerpay displays warning and error messages.
Review any error or warning messages displayed, and correct the errors.
If required, click Save again.
Note: If there are any errors on the page, even in just in one employee's data, no data for any employee on that page is saved.
Reset page data The Reset button is found at the bottom of the page next to the Save button.
Click Reset to clear any changes you made to the current data entry page before you saved the page. Information on the page is restored as it was the last time the page was saved. Reset does not undo saved changes.
Tip: Save page data frequently, for example, after completing each employee record or section of entry fields, so that if you need to use Reset to correct an entry, you do not lose a lot of work.
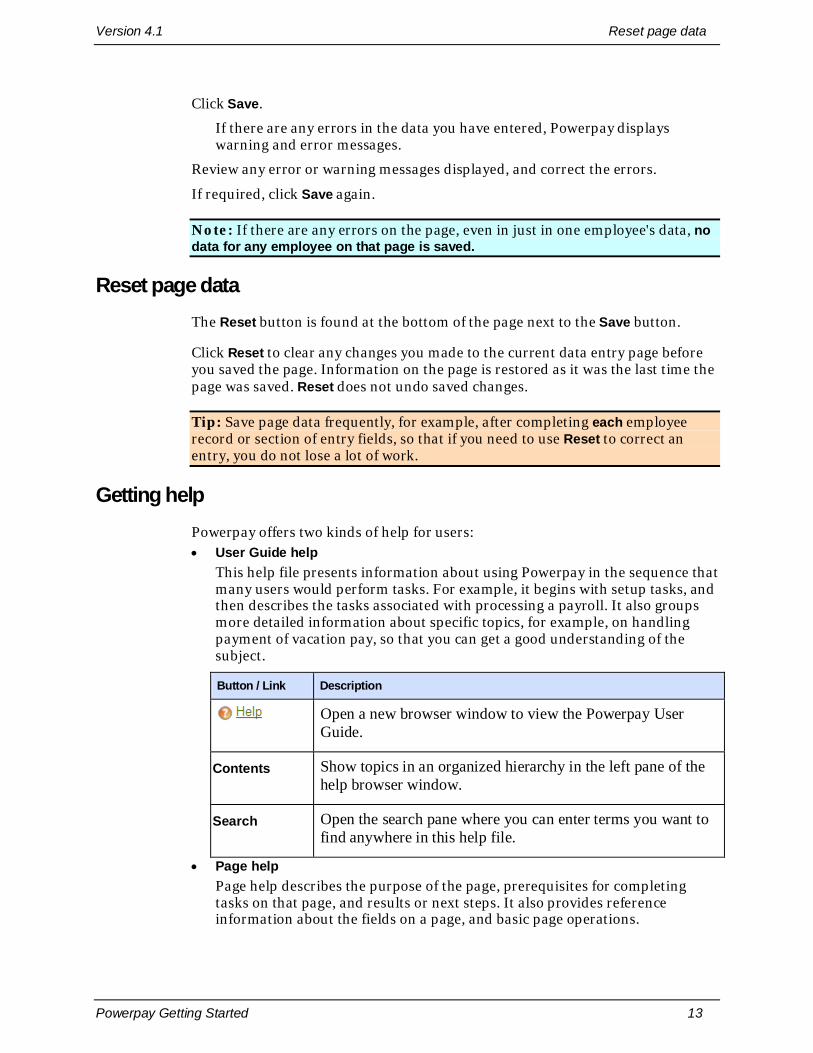
Getting help Powerpay offers two kinds of help for users: • User Guide help
This help file presents information about using Powerpay in the sequence that many users would perform tasks. For example, it begins with setup tasks, and then describes the tasks associated with processing a payroll. It also groups more detailed information about specific topics, for example, on handling payment of vacation pay, so that you can get a good understanding of the subject.
Button / Link Description
Open a new browser window to view the Powerpay User Guide.
Contents Show topics in an organized hierarchy in the left pane of the help browser window.
Search Open the search pane where you can enter terms you want to find anywhere in this help file.
• Page help Page help describes the purpose of the page, prerequisites for completing tasks on that page, and results or next steps. It also provides reference information about the fields on a page, and basic page operations.
Opening Powerpay Version 4.1
14 Powerpay Getting Started
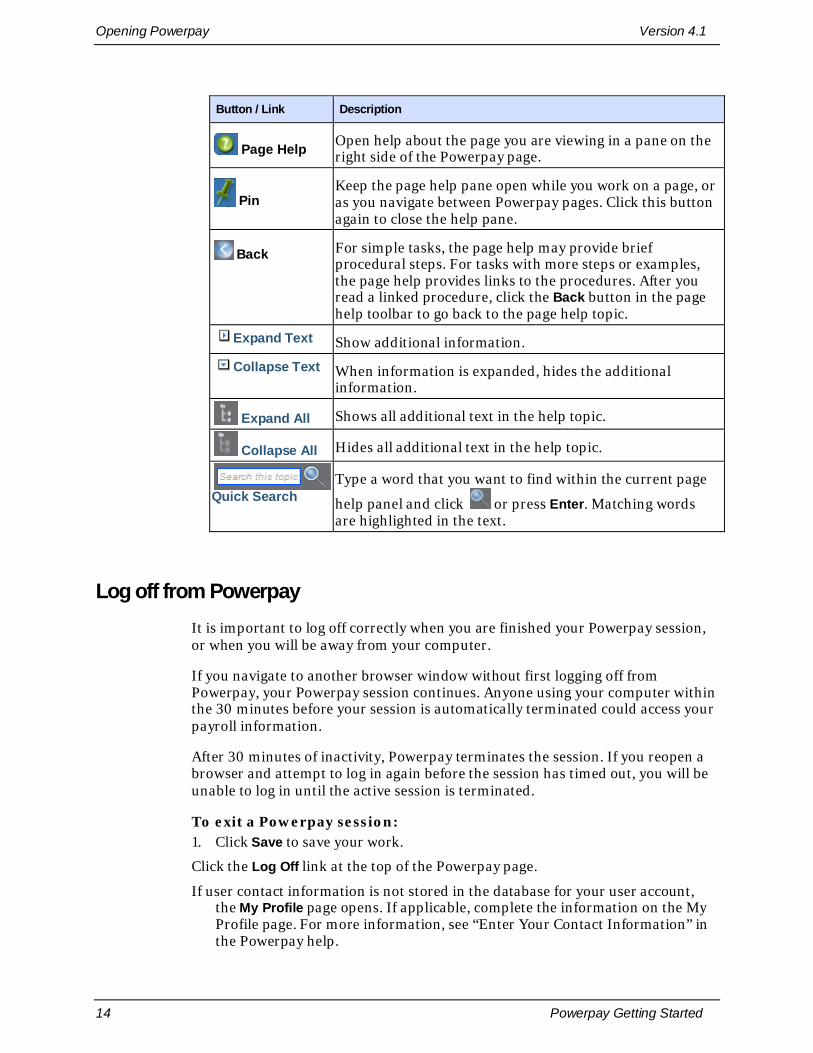
Button / Link Description
Page Help Open help about the page you are viewing in a pane on the right side of the Powerpay page.
Pin Keep the page help pane open while you work on a page, or as you navigate between Powerpay pages. Click this button again to close the help pane.
Back For simple tasks, the page help may provide brief procedural steps. For tasks with more steps or examples, the page help provides links to the procedures. After you read a linked procedure, click the Back button in the page help toolbar to go back to the page help topic.
Expand Text Show additional information.
Collapse Text When information is expanded, hides the additional information.
Expand All Shows all additional text in the help topic.
Collapse All Hides all additional text in the help topic.
Quick Search
Type a word that you want to find within the current page
help panel and click or press Enter. Matching words are highlighted in the text.
Log off from Powerpay It is important to log off correctly when you are finished your Powerpay session, or when you will be away from your computer.
If you navigate to another browser window without first logging off from Powerpay, your Powerpay session continues. Anyone using your computer within the 30 minutes before your session is automatically terminated could access your payroll information.
After 30 minutes of inactivity, Powerpay terminates the session. If you reopen a browser and attempt to log in again before the session has timed out, you will be unable to log in until the active session is terminated.
To exit a Powerpay session: 1. Click Save to save your work.
Click the Log Off link at the top of the Powerpay page.
If user contact information is not stored in the database for your user account, the My Profile page opens. If applicable, complete the information on the My Profile page. For more information, see “Enter Your Contact Information” in the Powerpay help.
Version 4.1 Log off from Powerpay
Powerpay Getting Started 15
If you require assistance with your payroll run, click the Contact Us link for information about reaching the Ceridian Customer Care Centre.
(Optional) If you would like to give us feedback about the Powerpay application, click the Yes button next to the question Was your Powerpay experience was a positive one? and type your comments in the box provided.
Click Log Off.
A confirmation window prompts you to confirm that you want to log off.
To log off, click OK.
Your Internet browser displays the Ceridian home page.

Specifying Company Settings Version 4.1
16 Powerpay Getting Started
Specifying Company Settings
Approve your payroll calendar The payroll calendar lists all of your regularly scheduled pay periods for the calendar year. It shows you the Year, Pay Period Number, Ending Date, Payment Date, Submit for Processing by... date, and whether or not the pay has been processed for each pay period.
A payroll calendar has been created for you by the Ceridian Customer Care Team. When you log on to Powerpay for the first time, you must approve the calendar before you can begin to prepare a payroll. Each year, usually in October, you are prompted to approve your calendar for the upcoming year.
To approve your payroll calendar: 1. Open the View Calendar page. You can do this in one of the following ways:
• Click the link in the message you received instructing you to approve your calendar.
OR
• From the Company menu, select Calendar > View Calendar.
Review the Pay Period Numbers, Pay Period Ending Dates, and Payment Dates to ensure they accurately represent your payroll requirements.
Tip: Pay special attention to those pay periods that fall around a statutory holiday to ensure that you know when you need to submit your payroll.
If the calendar meets your requirements, scroll to the bottom of the page and click Approve. The message Data Saved should appear after a few seconds.
or
If you require changes to the calendar, click Do not approve, and then click the Contact Us link at the bottom right of the Powerpay page to contact the Ceridian Customer Care Team to discuss the changes you require.
Set up deduction and contribution cycles Use Deduction and Contribution Cycles to select which employee deductions and employer contributions you want to be applied to any particular pay period in a month. You can create up to five cycles. Whenever you select a check box listed below one of the five cycles, that deduction or contribution is applied when that particular pay cycle is selected on creation of a new regular run. Choosing a cycle is an efficient way to semi-automate deductions and contributions so that you do not need to select them each pay.

Version 4.1 Set up deduction and contribution cycles
Powerpay Getting Started 17
If you want to apply the same deductions and benefits every pay period, you only need to set up one cycle. If you need to apply certain deductions and contributions on the first pay of every month and a different combination on the next pay, you would set up 2 cycles. Remember that there is not always the same number of pay periods every month if you are paying weekly or biweekly.
If you pay... Then you could use... Monthly Cycle 1 Semi-monthly Cycles 1 and 2 Biweekly Cycles 1, 2 and 3 Weekly Cycles 1, 2, 3 and 4
You must complete this step if your payroll has deductions and employer contributions in addition to the statutory deductions (CPP/QPP, Employment Insurance, and Tax). If your payroll has only statutory deductions, you do not need to complete this procedure.
To set up cycles for non-statutory deductions and contributions: 1. From the Company menu, select Cycles > Deduction & Contributions Cycle
Setup.
Notice that the Ceridian Customer Care Team has entered the names of non-statutory deductions and contributions for you.
Select the check boxes to indicate which deductions and contributions you want to apply to each cycle.
Example
For example, in the preceding page capture, the Life and LTD Insurance deduction is deducted from employees only on the first pay of each month. In this instance, you would select the Life and LTD Insurance deduction on Cycle 1 but not on Cycle 2 or Cycle 3 (for a biweekly payroll).
If you require changes to the set of deductions and contributions that are displayed, click the Contact Us link at the bottom right of the Powerpay page to contact Ceridian’s Customer Care Team to discuss the changes you require. If there is an employer contribution and an employee deduction, both are

Specifying Company Settings Version 4.1
18 Powerpay Getting Started
calculated. The deductions and contributions shown on this page are defaults. You can override them for individual employees.
Tip: If you have an extra pay period, or a pay period in which none of the usual cycles match the deductions and contributions you want to activate, use the This Pay Only field to create and activate a temporary set of deductions and contributions.
Set up department names and ID fields Department Names are the names of any departments, branches, or offices your company might have. If you do not have any departments in your company, Powerpay assigns all of your employees to ID Dept #100 - Default. In addition to identifying departments, you can use the ID fields to identify other employee categories such as job function, union classification, division, or full-time or part-time status.
Powerpay uses the department number and name, when assigned to an employee, to allocate the employee’s earnings and company contributions to that department for costing and reporting purposes. When you receive your Payroll Distribution Summary and Journal Entry from Ceridian, you see the salaries and wages as well as any employer contributions charged to these departments. You can use the Powerpay Sort/Filter page to sort the employees in the Employee List by department, and have the department number print on employee pay stubs to make them easier to distribute. You can also use the department number or any other ID fields to sort pay stubs and the payroll register. Contact the Ceridian Customer Care Team to request any of these options.
To set up department names and ID fields: 1. Open the Department/Distribution Setup page. From the Company menu,
select Department/Distribution Setup.
In the Description column under ID Dept - Department, enter department names beside the appropriate department numbers. If you need to add more departments than there are lines available, fill in all available lines and click Save. More blank lines appear at the end of the table.
If your company uses other identifiers, type the codes and their corresponding descriptions in other ID columns (ID Y, ID Z, or ID X). Enter custom descriptions (up to 20 characters) in the English and French fields for each ID, as required.
Example
Version 4.1 Set up timesheet defaults
Powerpay Getting Started 19
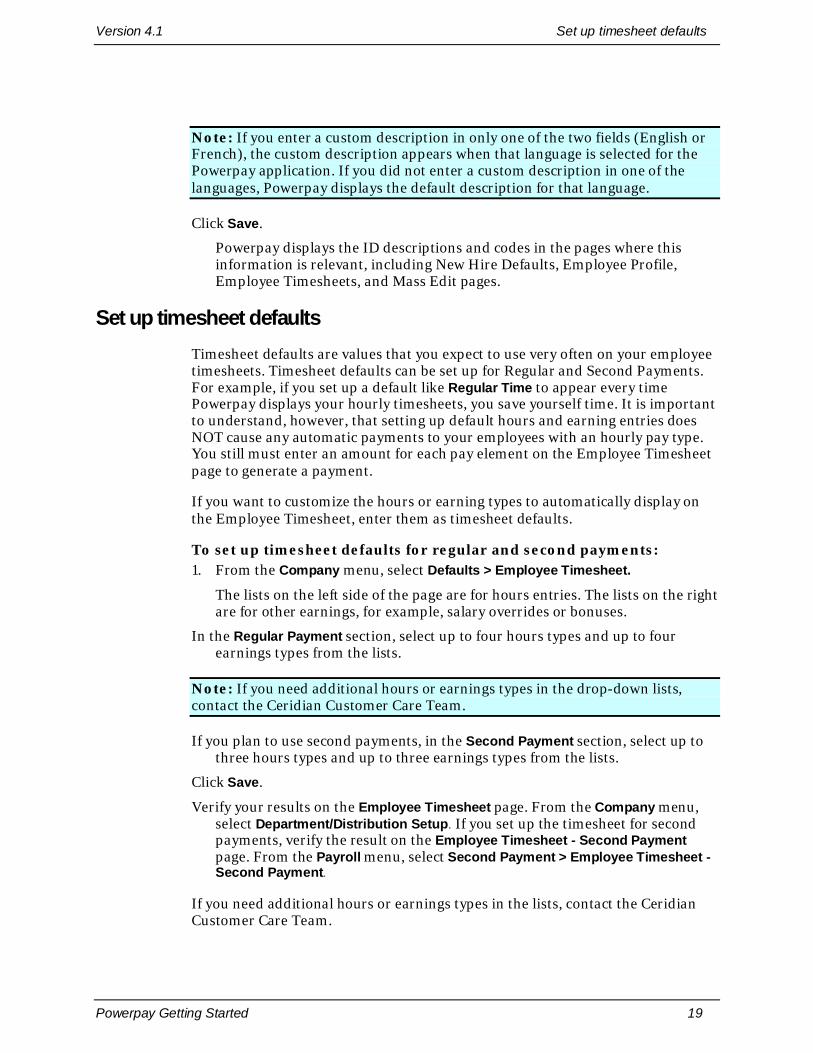
Note: If you enter a custom description in only one of the two fields (English or French), the custom description appears when that language is selected for the Powerpay application. If you did not enter a custom description in one of the languages, Powerpay displays the default description for that language.
Click Save.
Powerpay displays the ID descriptions and codes in the pages where this information is relevant, including New Hire Defaults, Employee Profile, Employee Timesheets, and Mass Edit pages.
Set up timesheet defaults Timesheet defaults are values that you expect to use very often on your employee timesheets. Timesheet defaults can be set up for Regular and Second Payments. For example, if you set up a default like Regular Time to appear every time Powerpay displays your hourly timesheets, you save yourself time. It is important to understand, however, that setting up default hours and earning entries does NOT cause any automatic payments to your employees with an hourly pay type. You still must enter an amount for each pay element on the Employee Timesheet page to generate a payment.
If you want to customize the hours or earning types to automatically display on the Employee Timesheet, enter them as timesheet defaults.
To set up timesheet defaults for regular and second payments: 1. From the Company menu, select Defaults > Employee Timesheet.
The lists on the left side of the page are for hours entries. The lists on the right are for other earnings, for example, salary overrides or bonuses.
In the Regular Payment section, select up to four hours types and up to four earnings types from the lists.
Note: If you need additional hours or earnings types in the drop-down lists, contact the Ceridian Customer Care Team.
If you plan to use second payments, in the Second Payment section, select up to three hours types and up to three earnings types from the lists.
Click Save.
Verify your results on the Employee Timesheet page. From the Company menu, select Department/Distribution Setup. If you set up the timesheet for second payments, verify the result on the Employee Timesheet - Second Payment page. From the Payroll menu, select Second Payment > Employee Timesheet - Second Payment.
If you need additional hours or earnings types in the lists, contact the Ceridian Customer Care Team.
Specifying Company Settings Version 4.1
20 Powerpay Getting Started
Set up sort and filter defaults By default, Powerpay sorts your Employee List by Employee Number, and displays all employees.
Use the Default - Sort/Filter page to specify the order in which you want employee records to be listed and the employee records that should appear in the Employee List. The settings you specify here do not affect your payroll register and reports. They are only meant to display the Employee List in a way that makes entering your payroll data in Powerpay easier. You can change the sorting and filtering of the list at any time, but the default settings you specify using this procedure are applied each time you open the Employee List.
Sorting
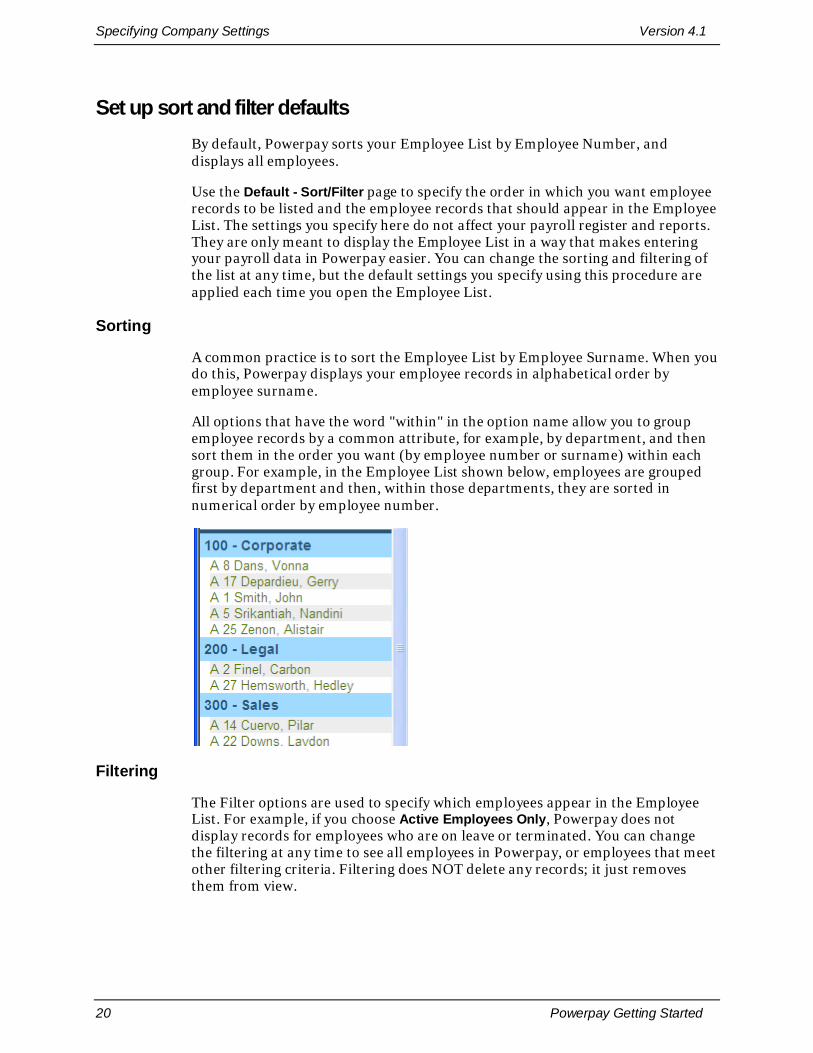
A common practice is to sort the Employee List by Employee Surname. When you do this, Powerpay displays your employee records in alphabetical order by employee surname.
All options that have the word "within" in the option name allow you to group employee records by a common attribute, for example, by department, and then sort them in the order you want (by employee number or surname) within each group. For example, in the Employee List shown below, employees are grouped first by department and then, within those departments, they are sorted in numerical order by employee number.
Filtering
The Filter options are used to specify which employees appear in the Employee List. For example, if you choose Active Employees Only, Powerpay does not display records for employees who are on leave or terminated. You can change the filtering at any time to see all employees in Powerpay, or employees that meet other filtering criteria. Filtering does NOT delete any records; it just removes them from view.
Version 4.1 Set up rapid entry defaults
Powerpay Getting Started 21
Sort and Filter options work together. For example, choosing the Employee Surname sort option and the Active Employees Only filter, results in the Employee List displays only active employees in alphabetical order by surname.
To set up the default sort order and filtering of records in the Employee List: 1. From the Company menu, select Defaults > Sort/Filter.
Note: Only the options that are appropriate for your company appear for sorting. For example, if your company does not use the ID fields, they are not displayed.
In the Sort employees within Powerpay by section, select the button next to the sort order you want to apply as the default for the Employee List.
If applicable, in the Sort employees for the Payroll Input Document (PID) by section, select the button next to the sort order you want to apply as the default for the Payroll Input Document.
In the Filter employees within Powerpay by section, select the button next to the filter you want to apply as the default for the Employee List:
• Active Employees Only
• All Active and On Leave Employees Only
• No filter - show all employees
Click Save to confirm the default settings for your Employee List.
Set up rapid entry defaults If you plan to use Rapid Entry pages to enter payroll data (as opposed to Employee Timesheets), use the Rapid Entry Default setup pages to specify the pay elements and deduction and contribution elements that you want and where you want them on the following Rapid Entry pages:
• Regular Run (Regular Payment)
• Extra Run (Regular Payment)
• Regular Run (Second Payment)
• Extra Run (Second Payment)
You can select only elements that have already been set up for your payroll. If you need to add or modify pay elements, contact the Ceridian Customer Care Team.
To specify the default setups for Rapid Entry pages: 1. From the Company menu, select Defaults > Rapid Entry > Regular Run
(Regular Pmt).
The Rapid Entry Set Up Regular Payment - Regular Run page opens.
In the Number of employees to display per page on the corresponding Rapid Entry Screen box, type the number of employee records you want to display on each Rapid Entry page.
Specifying Company Settings Version 4.1
22 Powerpay Getting Started
Tip: Data entry is most efficient if you display the number of employees that fit on one page without scrolling. This number varies depending on the size of your page and your page resolution. Experiment to find the best number.
Select the elements you want to display on your rapid entry data page. To do so, for each Element (Column 1 to Column 6), select one option from among the four lists on the Hours, Earnings, Deductions, and Contributions boxes.
Note: Only the elements that apply to your setup have options.
Tip: To delete an element, select the blank space from the drop-down list on any element.
The following illustration shows how choices made on the Rapid Entry Setup page affect what elements appear on the Rapid Entry page and where they are placed.
Click Save to save your default setup for the Rapid Entry - Regular Run (Regular Pmt) page.
Repeat steps 1 to 5 for the remaining rapid entry pages:
• Extra Run (Regular Payment)
• Regular Run (Second Payment)
• Extra Run (Second Payment)
Set up new hire defaults New Hire defaults speed up data entry for new employees. You can specify default values for the information displayed in the Employee Profile page and have them appear on the record for each new employee. You can modify the default values for a specific employee if they do not apply.
To set up default Employee Profile values for new hire records: 1. From the Company menu, select Defaults > New Hire.
The Defaults - New Hire page opens.
Fill in any boxes for which the values are common to many newly hired employees.
Click Save to confirm the default values for your Employee Profile.
Version 4.1 Set up second payment options
Powerpay Getting Started 23
Set up second payment options The options selected on this page are the defaults that apply to Second Payments on any open payroll run and all future payroll runs that have Second Payments.
Note: You can specify one-time overrides to these defaults, as required, on the Employee Timesheet – Second Payment page.
Note: Any garnishees that apply to Second Payments – Extra Runs must be determined manually in the Garnishee section of the Employee Timesheet – Second Payment page.
When you access the Second Payments Options page for the first time, you can set defaults for all future payrolls that have Second Payments. The default settings are for miscellaneous deductions and contributions, garnishees, the applicable period of time, and direct deposit overrides.
To set up second payment options: 1. From the Company menu, select Defaults >Second Payments Options.
The Defaults - Second Payment Options page opens. The most common options have been pre-selected for you.
To change any of the pre-selected options, select the buttons next to the options you want.
Click Save to confirm the default setting for your second payments.
Setting Up a Payroll Version 4.1
24 Powerpay Getting Started
Setting Up a Payroll
Create a new pay period A pay period is a specific period of time that is identified by a pay period start and end date and a unique identifying number. The number of regular pay periods in a year is determined by your pay frequency.
You must create a new pay period and select it in order to access the Payroll and Process tabs and enter information.
To create a new pay period. 1. Click the Pay Period menu.
The Pay Period - Select Pay page opens.
Click the Create New Regular Run button,
The Create Pay Period page opens.
Verify that the Pay Period Ending Date is correct.
To select the payment date, click the Payment Date box and, from the calendar that pops up, choose a month, year, and day. When you have selected the date, click Done to close the calendar.
Select the Journal Entry This Pay check box to receive a Journal Entry. A Journal Entry contains all data from the time the last Journal Entry was requested, to the present. Typically, you request a Journal Entry either every pay or at the end of the month.
If required, select the Statistics Canada Report check box to receive this report. A Statistics Canada Report contains all data from the time of the last report entry to the entries processed on this pay period. It contains all the information that Statistics Canada requires for reporting purposes.
Note: If you have been selected to participate in the Statistics Canada Business Payroll Survey, you are required by law to produce the report at the end of every month. You must sign and submit this report to Statistics Canada after receiving it from Ceridian Canada in your payroll package. Request a Statistics Canada report on the last pay period of the month. You must consistently choose either the Pay Period Ending Date or the Payment Date when you consider which pay is the last pay period of the month.
From the list on the Deductions & Contributions Cycle box, select a cycle. Cycle 1 refers to the first pay of the month. Cycle 2 refers to the second pay date of the month, and so on. This cycle represents a group of deductions and contributions that are applied to a payroll run.
To override all employee direct deposits and transfers, select Cancel all Direct Deposits for this payroll run. After you select this option, all employees receive
Version 4.1 Complete the Employee Profile
Powerpay Getting Started 25
cheques for the selected payroll run. This feature is often used in the following situations:
• to produce bonus cheques for employees
• to process the payroll when there is insufficient time to process a direct deposit before the payment date
Note: If this option is selected and cannot be changed, it means that you have indicated to Ceridian Canada that you will not be making direct deposits to employee bank accounts.
In the Company level message for pay stubs box, type a message to be printed on employee pay stubs for this payroll run. You can enter the message in two languages.
Click Save.
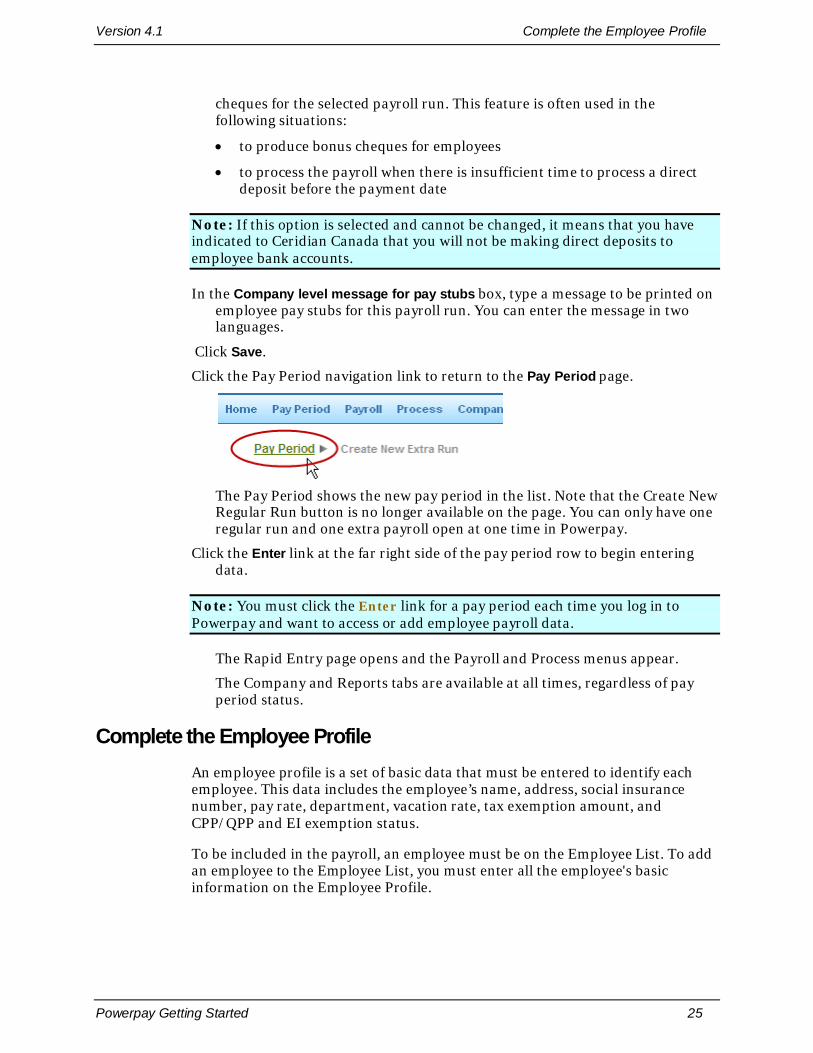
Click the Pay Period navigation link to return to the Pay Period page.
The Pay Period shows the new pay period in the list. Note that the Create New Regular Run button is no longer available on the page. You can only have one regular run and one extra payroll open at one time in Powerpay.
Click the Enter link at the far right side of the pay period row to begin entering data.
Note: You must click the Enter link for a pay period each time you log in to Powerpay and want to access or add employee payroll data.
The Rapid Entry page opens and the Payroll and Process menus appear.
The Company and Reports tabs are available at all times, regardless of pay period status.
Complete the Employee Profile An employee profile is a set of basic data that must be entered to identify each employee. This data includes the employee’s name, address, social insurance number, pay rate, department, vacation rate, tax exemption amount, and CPP/QPP and EI exemption status.
To be included in the payroll, an employee must be on the Employee List. To add an employee to the Employee List, you must enter all the employee's basic information on the Employee Profile.
Setting Up a Payroll Version 4.1
26 Powerpay Getting Started
Powerpay can be configured to import employee information from recognized workforce management systems. Contact your Ceridian Customer Care Team (click the Contact Us link) for more information.
To view the list of employees, click the Employee List button. This button is only available on the Powerpay pages on which you can work with employee-level data.
To add an employee to the Employee List and enter data for that employee: 1. From the Payroll menu, select Hire/Profile > Employee Profile > Add a new
employee.
The Employee Profile page opens. Any default information previously entered on the New Hire Defaults page appears in the corresponding field on this page, but you can override the default information, if desired.
Enter all applicable data for the employee. See “Field Information” in the page help for descriptions of all fields. For more detailed information about employee taxation, see “Basic tax setup for an employee” in the Powerpay help.
Note: Do not use commas in employee addresses.
Click Save.
Repeat this procedure for every employee you want to add to your Employee List.
Tip: To edit the record on an employee already in the Employee List, click the employee name in the Employee List.
Note: Due to the need to maintain the integrity of the data, if you need to delete an employee, contact your Ceridian Customer Care Team (click the Contact Us link).
Set up direct deposits A direct deposit arrangement allows your company to deposit employee payments directly into employee bank accounts instead of distributing cheques.
If your company has been approved for direct deposits, you must enter your employees' banking data and payment instructions into Powerpay for your employees to be paid by direct deposit. If no banking information is entered for an employee, that employee is paid with a paper cheque.
Powerpay can also be configured to import employee information from recognized workforce management systems. Contact your Ceridian Customer Care Team (click the Contact Us link) for more information.
Version 4.1 Set up direct deposits
Powerpay Getting Started 27
To set up a direct deposit for an employee: 1. From the Payroll menu, select Hire/Profile > Direct Deposit.
The Hire/Profile - Direct Deposit page opens. If you performed an action on a particular employee record before opening this page, the selected employee information is already displayed on this page.
If no employee profile is already displayed, or if you want to set up direct deposit for another employee, click the Employee List icon and, from the list, select an employee.
Ensure the Enable Deposit check box is selected
Enter the employee’s banking data from the employee’s void cheque:
• Name of Financial Institution From the list, choose the name of a financial institution.
• Transit No. Enter the 5-digit transit number that corresponds with the selected financial institution.
• Account No. Enter the 14-digit account number.
Click Save.
Powerpay saves the data and displays it. The Add New Deposit button appears.
If an employee requests that their payment be divided and paid into more than one account, click Add New Deposit. Ceridian can make direct deposits to a maximum of six accounts for each pay period.
The Additional Deposit Detail section of the page appears.
Ensure that Enable Deposit is selected.
From the list on the Deposit Priority box, select the priority of this additional deposit.
Enter the banking data and payment instructions for the second deposit.
Select one of the following Deposit Type options:
• Dollar Value Choose this option to specify an actual dollar amount to be deposited in the additional deposit account for each pay period. In the Deposit Value box, enter the dollar amount.
• Percentage Choose this option to specify a percentage of the payment that should be deposited in the additional deposit account for each pay period. In the Deposit Value box, enter the percentage.
(Optional) If you chose the Dollar value option in the previous step, you can specify a one-time dollar amount (not the default) to be deposited in the additional deposit account for the current pay period.
Repeat steps 5 to 10 for each additional direct deposit account (maximum 4 accounts). For additional deposits, you can, optionally, specify a Deposit Override Value for the current pay period.
Click Save, to confirm all Direct Deposit settings.
Setting Up a Payroll Version 4.1
28 Powerpay Getting Started
Repeat the procedure for each employee in the Employee List that requires direct deposit.
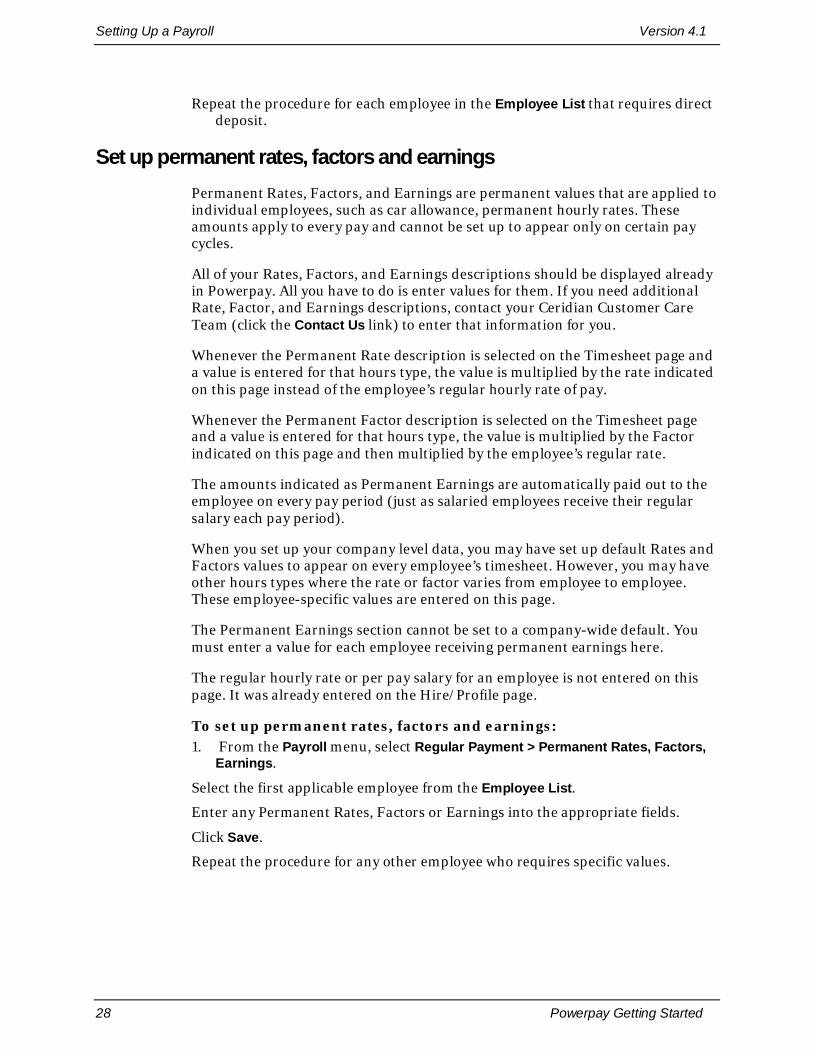
Set up permanent rates, factors and earnings Permanent Rates, Factors, and Earnings are permanent values that are applied to individual employees, such as car allowance, permanent hourly rates. These amounts apply to every pay and cannot be set up to appear only on certain pay cycles.
All of your Rates, Factors, and Earnings descriptions should be displayed already in Powerpay. All you have to do is enter values for them. If you need additional Rate, Factor, and Earnings descriptions, contact your Ceridian Customer Care Team (click the Contact Us link) to enter that information for you.
Whenever the Permanent Rate description is selected on the Timesheet page and a value is entered for that hours type, the value is multiplied by the rate indicated on this page instead of the employee’s regular hourly rate of pay.
Whenever the Permanent Factor description is selected on the Timesheet page and a value is entered for that hours type, the value is multiplied by the Factor indicated on this page and then multiplied by the employee’s regular rate.
The amounts indicated as Permanent Earnings are automatically paid out to the employee on every pay period (just as salaried employees receive their regular salary each pay period).
When you set up your company level data, you may have set up default Rates and Factors values to appear on every employee’s timesheet. However, you may have other hours types where the rate or factor varies from employee to employee. These employee-specific values are entered on this page.
The Permanent Earnings section cannot be set to a company-wide default. You must enter a value for each employee receiving permanent earnings here.
The regular hourly rate or per pay salary for an employee is not entered on this page. It was already entered on the Hire/Profile page.
To set up permanent rates, factors and earnings: 1. From the Payroll menu, select Regular Payment > Permanent Rates, Factors,
Earnings.
Select the first applicable employee from the Employee List.
Enter any Permanent Rates, Factors or Earnings into the appropriate fields.
Click Save.
Repeat the procedure for any other employee who requires specific values.
Version 4.1 Set up special tax considerations
Powerpay Getting Started 29
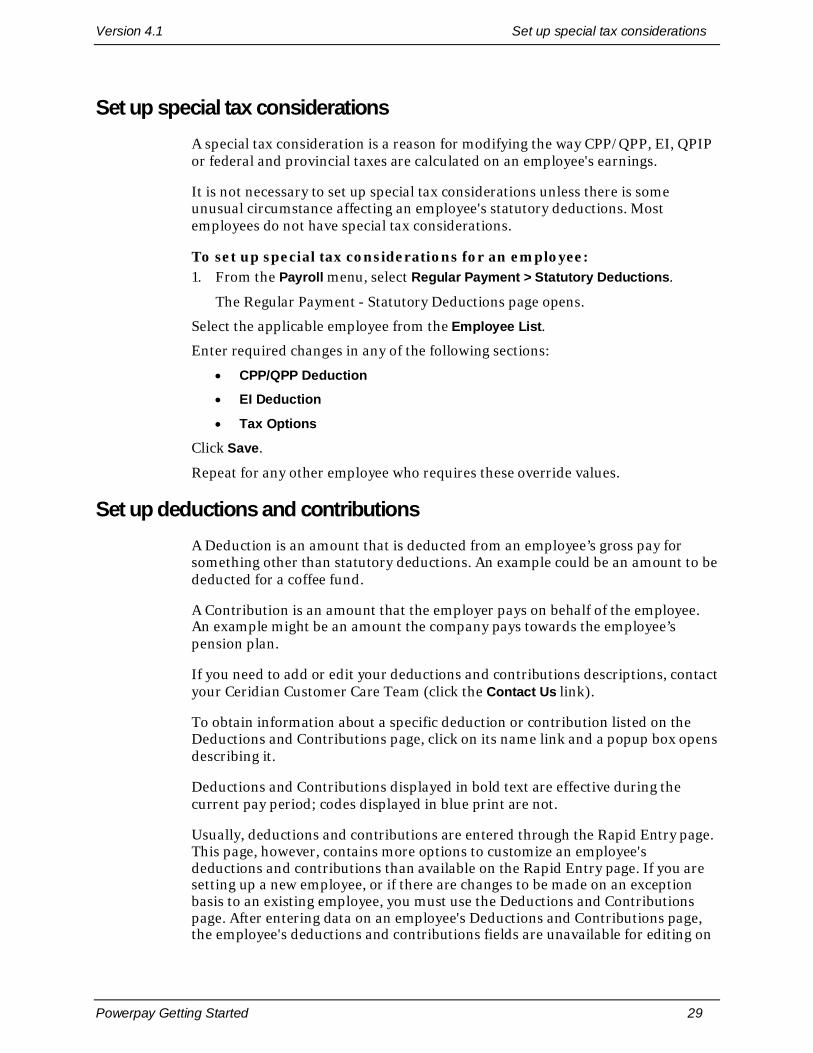
Set up special tax considerations A special tax consideration is a reason for modifying the way CPP/QPP, EI, QPIP or federal and provincial taxes are calculated on an employee's earnings.
It is not necessary to set up special tax considerations unless there is some unusual circumstance affecting an employee's statutory deductions. Most employees do not have special tax considerations.
To set up special tax considerations for an employee: 1. From the Payroll menu, select Regular Payment > Statutory Deductions.
The Regular Payment - Statutory Deductions page opens.
Select the applicable employee from the Employee List.
Enter required changes in any of the following sections:
• CPP/QPP Deduction
• EI Deduction
• Tax Options
Click Save.
Repeat for any other employee who requires these override values.
Set up deductions and contributions A Deduction is an amount that is deducted from an employee’s gross pay for something other than statutory deductions. An example could be an amount to be deducted for a coffee fund.
A Contribution is an amount that the employer pays on behalf of the employee. An example might be an amount the company pays towards the employee’s pension plan.
If you need to add or edit your deductions and contributions descriptions, contact your Ceridian Customer Care Team (click the Contact Us link).
To obtain information about a specific deduction or contribution listed on the Deductions and Contributions page, click on its name link and a popup box opens describing it.
Deductions and Contributions displayed in bold text are effective during the current pay period; codes displayed in blue print are not.
Usually, deductions and contributions are entered through the Rapid Entry page. This page, however, contains more options to customize an employee's deductions and contributions than available on the Rapid Entry page. If you are setting up a new employee, or if there are changes to be made on an exception basis to an existing employee, you must use the Deductions and Contributions page. After entering data on an employee's Deductions and Contributions page, the employee's deductions and contributions fields are unavailable for editing on
Setting Up a Payroll Version 4.1
30 Powerpay Getting Started
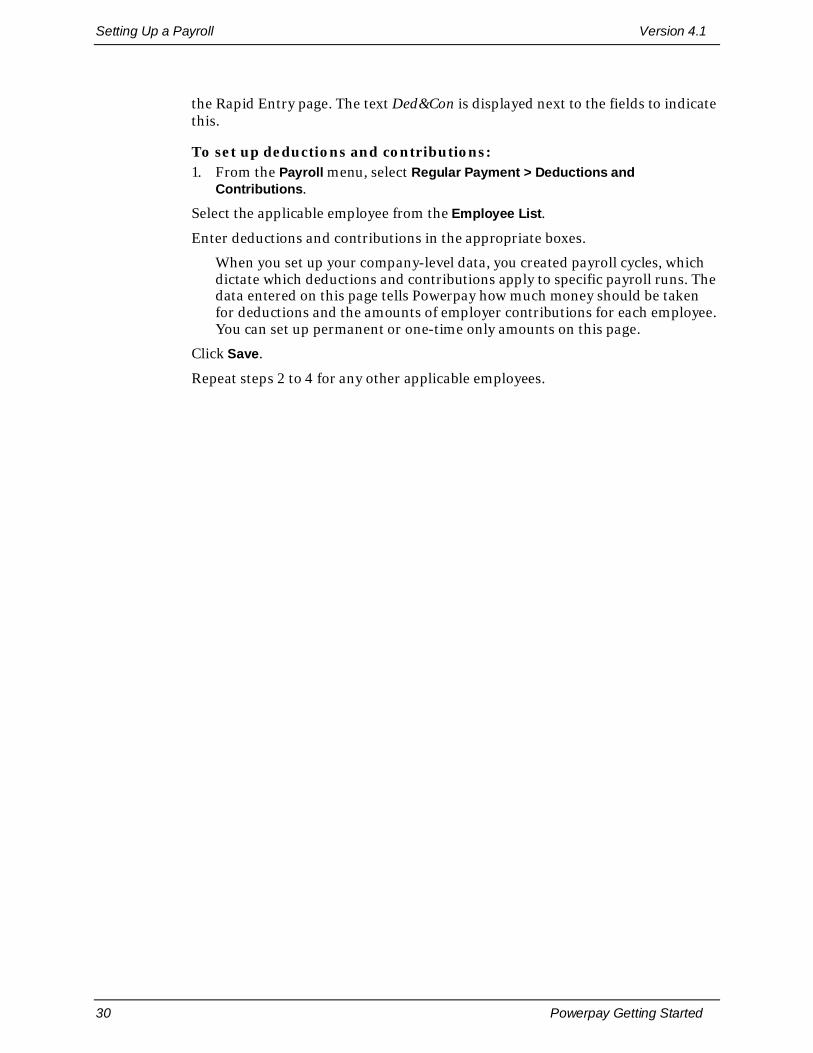
the Rapid Entry page. The text Ded&Con is displayed next to the fields to indicate this.
To set up deductions and contributions: 1. From the Payroll menu, select Regular Payment > Deductions and
Contributions.
Select the applicable employee from the Employee List.
Enter deductions and contributions in the appropriate boxes.
When you set up your company-level data, you created payroll cycles, which dictate which deductions and contributions apply to specific payroll runs. The data entered on this page tells Powerpay how much money should be taken for deductions and the amounts of employer contributions for each employee. You can set up permanent or one-time only amounts on this page.
Click Save.
Repeat steps 2 to 4 for any other applicable employees.
Powerpay Getting Started 31
Processing a Payroll
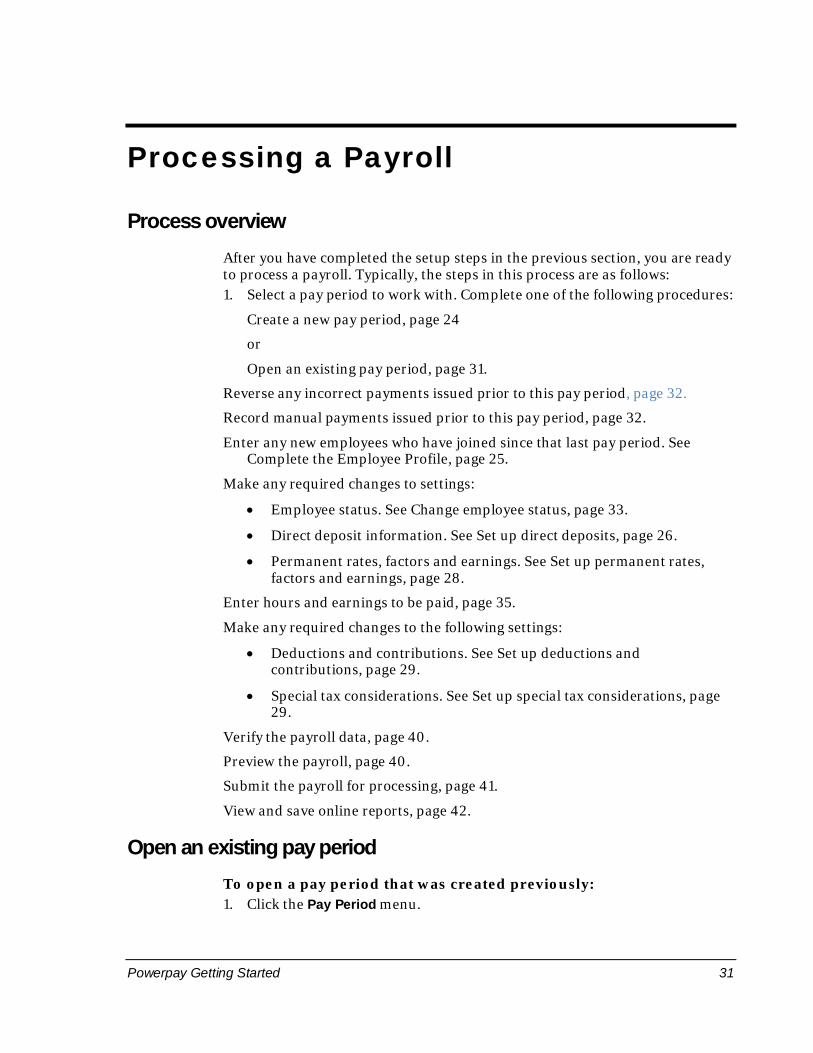
Process overview After you have completed the setup steps in the previous section, you are ready to process a payroll. Typically, the steps in this process are as follows: 1. Select a pay period to work with. Complete one of the following procedures:
Create a new pay period, page 24
or
Open an existing pay period, page 31.
Reverse any incorrect payments issued prior to this pay period, page 32.
Record manual payments issued prior to this pay period, page 32.
Enter any new employees who have joined since that last pay period. See Complete the Employee Profile, page 25.
Make any required changes to settings:
• Employee status. See Change employee status, page 33.
• Direct deposit information. See Set up direct deposits, page 26.
• Permanent rates, factors and earnings. See Set up permanent rates, factors and earnings, page 28.
Enter hours and earnings to be paid, page 35.
Make any required changes to the following settings:
• Deductions and contributions. See Set up deductions and contributions, page 29.
• Special tax considerations. See Set up special tax considerations, page 29.
Verify the payroll data, page 40.
Preview the payroll, page 40.
Submit the payroll for processing, page 41.
View and save online reports, page 42.
Open an existing pay period To open a pay period that was created previously: 1. Click the Pay Period menu.

Processing a Payroll Version 4.1
32 Powerpay Getting Started
The Pay Period - Select Pay page opens.
Click the Enter link at the far right side of the pay period for the pay period you want to work with.
The Rapid Entry page opens and the Payroll and Process tabs become available.
Reverse any incorrect payments issued prior to this pay period A reversal deletes all of the entries that were made for employee year-to-date amounts when an incorrect payment was processed. Reversals do not stop payments and they should only be entered in Powerpay after you have stopped payment on the incorrect payment.
By reversing all the amounts used to calculate the original incorrect cheque, you ensure that the employee’s year-to-date values for Tax Forms (for example, T4s) are updates, all earnings are in Powerpay to create an accurate Record of Employment (ROE), and the employer portion of CPP/QPP and EI are adjusted. Vacation accrual and provincial payroll taxes are also adjusted, if applicable.
To reverse the record of an incorrect payment in the previous payroll: 1. From the Payroll menu, select Adjustments > Reversal.
Put a Stop Payment on the incorrect payment. If the payment was issued by Ceridian, call the toll-free number on the Adjustments - Reversal page. This toll-free number is also available on the first page of your payroll reports. For more information, see “Stop payment on an employee's deposit or cheque” in the Powerpay help.
Open the Employee List and select the employee whose payment was incorrect.
Enter all of the amounts used to create the original payment, but enter them as negative numbers (preceded by a minus sign).
Click Display Results.
A message informs you whether the entry is balanced and can be saved.
If the message says you can save, click Save.
or
If the message indicates that the entry is not balanced, adjust the entries and Save again. See the online help for information to help you adjust your entries.
Record manual payments issued prior to this pay period A manual payment is a cheque written by your company to replace or add to an incorrect or missing payment.
Version 4.1 Change employee status
Powerpay Getting Started 33
By entering all of the amounts used to calculate manual cheques, you ensure that the employee’s year-to-date values for T4s are updated, all earnings are in Powerpay to create an accurate ROE, and the employer portion of CPP/QPP and EI remittances are adjusted. Vacation accrual and provincial payroll taxes are also adjusted, if applicable.
To record manual payments issued prior to this pay period: 1. From the Payroll menu, select Adjustments > Manual.
Open the Employee List and select the employee for whom a manual payment was issued.
Enter all amounts used to create the manual cheque.
Click Display Results.
A message informs you whether the entry is balanced and can be saved.
If the message says you can save, click Save.
or
If the message indicates that the entry is not balanced, adjust the entries and Save again. See the online help for information to help you adjust your entries.
Change employee status A status change is an event that changes an employee’s working status such as activating, terminating, re-hiring, or placing an employee on leave.
An employee’s status directly affects whether or not they are paid. Active employees are paid. Employees who are terminated or on-leave are not paid. Some status changes generate a Record of Employment (ROE) for the employee whose status has changed.
To change the status of an employee: 1. From the Payroll menu, select Employee Status Change.
From the Employee List, select the employee whose status has changed.
From the Action to be Taken list, choose the applicable option. See option descriptions in the Help for the Status Change page.
Click Go.
Depending on the option you choose, any additional fields that you must complete appear on the page.
Complete the additional fields, if required.
Click Save.
Processing a Payroll Version 4.1
34 Powerpay Getting Started
Create a Record of Employment (ROE) You initiate the creation of a Record of Employment (ROE) when you choose any one of the status change options that contains the phrase Produce ROE form or Create Replacement ROE.
To create a Record of Employment (ROE): 1. Open the Status Change page. From the Payroll menu, select Employee Status
Change.
From the Employee List, select the employee for whom an ROE is required.
From the list on the Action to be Taken box, select the appropriate action for the selected employee. To produce an ROE, it must be one of the actions that includes the phrase Produce ROE form or Create Replacement ROE.
The ROE form fields appear on the Employee Status Change page. Some information about the selected employee is automatically filled in on the form.
Verify the accuracy of the pre-populated information and correct or update it, as required.
Complete the remaining required data entry fields.
Note: If you chose the Create Replacement ROE; Employee remains terminated action, enter the serial number of the form that you are replacing in box 2. For all other actions. leave box 2 empty.
Click Save.
Request a payroll preview.
Verify the accuracy of the DRAFT ROE as part of the payroll preview (ROE Forms link).
ROE forms become official as part of the back-office processes initiated when a payroll is submitted for processing. At that point, a serial number is issued. Until a serial number is attached, the form is a Draft, and can be used only for previewing and validation.
Ensure all other required tasks related to the payroll run are completed before submitting the payroll for processing.
Submit the payroll for processing (Process > Submit).
(Optional) View and print the completed ROE provided with the online payroll reports. The ROE report is accessible as part of the pay period reports.
Distribute employee and employer copies of the form printed from the online payroll report or in your payroll package.
Note: An electronic copy is submitted to Service Canada on your behalf. Do not mail a copy to Service Canada or HRSDC).
Version 4.1 Enter hours and earnings to be paid
Powerpay Getting Started 35
ROE forms are transmitted securely to Service Canada on the cheque date for the pay period. If a payroll is canceled prior to that date, the ROE forms are not sent and you must re-create them. If a payroll is canceled after the cheque date, you may need to create a replacement ROE form.
Online electronic copies are available for your future reference for 13 months (or seven years if you subscribe to online archiving). The reports are available within the payroll pay period.
Enter hours and earnings to be paid There are two different ways you can manually enter hours and earnings through Powerpay:
• If you have completed the Rapid Entry Setup for the type of payroll you are entering (Regular or Extra Runs, Regular or Second Payments), enter employee hours, earnings, deductions and contributions on the Rapid Entry pages that you set up for easy data entry. The Rapid Entry method is a good choice for most payments.
• If you have not completed the Rapid Entry setup, if you want to enter a payment for only one employee, or if you want to enter exceptions to a particular employee’s payments, use the Detailed Employee Timesheet – Regular Payment or Detailed Employee Timesheet – Second Payment pages for that employee.
You must enter data on either the Rapid Entry page or the Employee Timesheet page (or Employee Timesheet – Second Payment page) in order for your employees to be paid. Typically, Powerpay users use both methods on a regular basis.
If you plan to use both methods to enter your payroll data, complete the Rapid Entry page information first before moving to the Employee Timesheet. Entries made on the Employee Timesheet cannot be edited on the Rapid Entry pages.
Powerpay can also be configured to import employee information from recognized time and attendance and workforce management systems. Contact the Ceridian Customer Care Team (click the Contact Us link at the bottom right of the Powerpay page) for more information.
You can also set up employee garnishments in Powerpay. For more information, see Powerpay help.
Rapid Entry
The Rapid Entry pages are where you can enter multiple employee’s hours, earnings, deductions and contributions for a payroll run. The number of employees appearing on each page, as well as the choice of pay elements and their positions are configurable so that you can create a Rapid Entry page that is most efficient for the data entry of your payroll.
Processing a Payroll Version 4.1
36 Powerpay Getting Started
Remember: On a Regular run, salaried employees are paid automatically, so you do not have to enter values for them unless you want to pay an additional amount over their regular salary.
Before you begin, here are a few rules for data entered on the Rapid Entry page:
• All entries made are for This Pay Only
• All entries made are for the current pay period
• All entries for an employee are allocated to that employee’s current home department
• All entries for an employee are calculated at the employee’s current base rate of pay in conjunction with any permanent rates, or factors for that employee
• Any entries made on an employee’s Detailed Timesheet or Deductions and Contributions pages override data on the Rapid Entry page, and the fields on the Rapid Entry page will no longer be editable for that employee (the text Timesheet or Ded&Con is displayed next to the affected fields).
Regular Payment
Note: To enter exceptions to any of the above circumstances, enter the data for the employees in question on the Detailed Timesheet and Deductions and Contributions pages.
To enter data on the Rapid Entry page for Regular Payments: 1. From the Payroll menu, select Regular Payment > Rapid Entry.
For customers with import functionality activated, the Import Status page is the default page.
Beginning with the first employee in the Employee List, enter hours, earnings, deductions, and contributions amounts for each employee.
Note: Salaried employees are paid automatically. Do not enter their regular salary amount here or they will be paid twice.
Tip: Press the Tab key to move to the next data entry field.
When you finish entering data for each employee, click Save.
Note: Be sure to read any error or warning messages that appear after you click Save and make corrections, as required. If any of the data is invalid, no data on that page is saved for any of the employees.
Version 4.1 Second Payment
Powerpay Getting Started 37
If you have more active employees than can be displayed on one page, navigation buttons appear under the Save and Reset buttons.
Repeat steps 1 and 2 until you have entered hours and earnings information for all employees.
Second Payment To enter data on the Rapid Entry page for Second Payments: 1. From the Payroll menu, select Second Payment Options > Rapid Entry -
Second Payment.
Review the current Second Payment options displayed at the top of the page. Use the links to amend any settings as required.
Enter all relevant information for each employee.
Tip: If no Second Payment is required for a given employee, leave the fields for that employee blank.
All earnings and hours entered are allocated to the current pay period, for insurable history purposes. If this Second Payment is to apply to a different pay period, you must use the Employee Timesheet – Second Payment page to allocate the payment to the appropriate pay period.
Click Save.
(Optional) For those employees requiring exceptions such as exception rates, allocation to a different period of time, exception distributions, salary overrides and any vacation pay codes or additional accumulator pay codes, use the Employee Timesheet Second Payment page.
Employee Timesheet The Employee Timesheet page is where you can enter a specific hours or earnings for an employee in a pay period. The Employee Timesheet page contains more options to customize an employee’s payment than are available on the Rapid Entry page.
Use the Employee Timesheet page (or Employee Timesheet – Second Payment page) to do the following actions:
• Set up a new employee
• Enter exceptions such as overriding a salaried employee's normal payments.
Note: On a regular run, salaried employees are paid automatically, so you do not have to enter values for them unless you want to pay an additional amount over their regular salary.
• Pay out vacation pay
Processing a Payroll Version 4.1
38 Powerpay Getting Started
• Change the applicable period of time for which a payment is made
After you enter data on an employee’s Employee Timesheet page (or Employee Timesheet – Second Payment page), that employee’s hours and earnings fields are no longer editable on the Rapid Entry page. On the Rapid Entry page, fields that have been edited in the Employee Timesheet display the text Timesheet.
Regular Payment To enter exceptions to regular hours and earnings on the Employee Timesheet for a regular payment: 1. From the Payroll menu, select Regular Payment > Employee Timesheet.
Tip: Complete any Rapid Entry information before moving to the Detailed Employee Timesheet. Entries made on the Detailed Employee Timesheet cannot be edited on the Rapid Entry page.
From the Employee List, select the employee for whom you need to enter regular payment data.
If the period of time applicable for this payment is different from the time period already displayed, from the Applicable Period of Time list, select a period of time.
If you are paying an employee for a pay period other than the current one, select the appropriate pay period from the For which pay period? list.
Enter Hours, Earnings, or Vacation Accumulator amounts, as required.
Click Save.
Repeat for all employees for whom you want to make Detailed Employee Timesheet entries.
Second Payment To enter hours and earnings on the Employee Timesheet for a second payment: 1. From the Payroll menu, select Second Payment > Employee Timesheet –
Second Payment.
Tip: Complete any Rapid Entry information before moving to the Employee Timesheet – Second Payment. Entries made on the Employee Timesheet – Second Payment page cannot be edited on the Rapid Entry page.
From the Employee List, select the employee for whom you need to enter second payment data.

Version 4.1 Second Payment
Powerpay Getting Started 39
Tip: Default data entered on the Rapid Entry - Second Payment page appears on this page. You can edit this data, as required.
Enter all relevant information for the employee.
Note: The amount displayed in the Current amount in vacation pay accumulator field does not reflect earnings yet to be allocated for current pay period.
a. Confirm the Applicable Period of Time. If it is not correct, select the appropriate value from the list.
b. Enter Hours and Earnings information, as required.
Note: For Second Payments, any permanent salary or permanent earning types are not paid, therefore, it is not necessary to enter a "0" override amount.
Enter Salary Overrides in the Earnings section, if required.
Select the appropriate option from the Vacation Pay Accumulator list.
Enter Government Deductions, as required.
Note: Any additional permanent, permanent fixed amounts of tax or permanent percentages of tax set up for an employee on the employee’s Statutory Deductions page automatically apply to an employee’s Second Payment. If you do not want this to occur, consider entering a one-time tax override.
Enter Miscellaneous Deductions and Contributions, as required.
Note: Any permanent deductions and contributions are highlighted in red and apply to the Second Payment for this payroll run even if no amount is displayed. Any values entered in the amount field are processed as dollar amounts and override the permanent value. If off-cycle values (shown in black) are required, you must enter them if they are to apply to the selected employee’s Second Payment.
Enter Garnishee Deductions, as required.
The Direct Deposit Override section may be displayed, depending on the option selected on the Second Payment Options page and if the employee has enabled direct deposit information. If the option is set to be based on the employee-level selection, select the appropriate option.
Note: If the employee’s direct deposit information is disabled or not set up, this section indicates that the employee will receive a cheque for the Second Payment.

Processing a Payroll Version 4.1
40 Powerpay Getting Started
Click Save.
Repeat steps 2 to 4 for each applicable employee.
Verify the payroll data Data verification ensures that you payroll data has been entered accurately. A series of warning messages are displayed for your review on the Data Verification page. On the bottom of the page, you find totals for the information you have entered for the current payroll.
You should verify your data before you submit it to Ceridian for processing to make sure that your payroll is error free.
To verify payroll data: 1. From the Process menu, select Data Verification.
Check the messages displayed and review the totals of your one-time entries for accuracy.
• Warning messages report data that you should review. The issues displayed in the warnings do not stop the payroll from being produced. You must correct them before you can continue.
• Error messages are serious errors that stop the pay from being produced.
If you discover an error on the Data Verification page, return to the appropriate page to enter the correction, and then check the Data Verification page again to make sure the correction did not cause any further errors. Keep checking the Data Verification page until you are satisfied that your payroll is completely accurate.
Preview the payroll A preview is a simulated payroll run that shows you what your payroll would look like if you submitted it with the data you have entered. It includes a preview of any requested Records of Employment (ROE). It is not a real payroll and does not produce payments or reports.
Previewing the payroll is the final step in the process of verifying that your payroll and any requested ROEs have no errors before submitting them to Ceridian. If you find errors on the preview, you still have time to correct them. You can run as many previews as required before you submit your payroll for processing.
To preview a payroll: 1. From the Process menu, select Payroll Preview > Request.
Powerpay displays a message that explains how your payroll preview request is handled.

Version 4.1 Submit the payroll for processing
Powerpay Getting Started 41
Click the Request button.
If you do not want to wait for your request to be completed, you can log off from Powerpay and return to the Preview page later.
When the request process is complete, the Company Totals, Employee Totals and ROE Forms buttons appear. Powerpay also displays a message that indicates that the request process is complete.
Click any of the following buttons to see payroll information.
• Company Totals Displays amounts that apply to the entire payroll such as the total hours and earnings, total employee deductions, total employer contributions, and overall totals.
• Employee Totals Displays the total gross pay, deductions, and net pay for each employee. It also lists various payroll warnings such as large payments and employees without any pay. To see details about an employee’s pay, click an employee name.
• ROE Forms Displays a complete preview of all ROEs for your payroll. Use the preview for validation and review purposes only, as this preview is not a final ROE. The ROE is not final until a serial number is attached during processing. All ROEs display the word DRAFT in place of the serial number and a Draft watermark in the background. The first page (PAGE 1) of each ROE is displayed. At the end of the ROE Report, following Page 1 of the form for each employee, Powerpay displays a single PAGE 2 (back of the ROE) which is the same for every employee. Powerpay displays the ROE in each employee’s preferred language.
If you find errors in your payroll preview, from the Payroll menu, open the relevant pages and make corrections.
If required, run the preview again to verify that your payroll is correct. Run as many previews as necessary until you are satisfied that your payroll is free of errors.
Note: The Preview page does not provide a statement of the final payment owing to Ceridian.
Submit the payroll for processing When you submit your payroll for processing, you are actually giving Ceridian your final approval to go ahead and pay your employees using the data you entered in Powerpay. This process also triggers the official generation of any requested Records of Employment (ROE). A copy of each completed ROE is sent to service Canada on your behalf.
When you submit your payroll, you signal to Ceridian that you have checked your payroll data and it is ready to be used to create accurate payments, reports and ROEs (if requested). If you do not submit your payroll for processing every
Processing a Payroll Version 4.1
42 Powerpay Getting Started
pay period, none of your employees will be paid. If you submit early, employees will still be paid on the payment date indicated in your contract.
To submit the payroll for processing: 1. From the Process menu, select Submit Payroll.
Click the Submit Payroll Data button. After your payroll has been submitted for processing, Powerpay displays a message that confirms that your payroll has been sent for processing. You will not be able to enter further payroll data for this pay period.
Note: If there is an error when transmitting the payroll data, Powerpay displays an error message and provides instructions on how to correct the error.
View and save online reports Online Reports let you to view your payroll reports online, even before receiving your payroll package. You can view and download reports that were generated in the last 13 months.
The following reports are available:
• Employee Reports View reports of general employee data, birth dates, compensation and home department distribution.
• Payroll Reports View or print one or more of the reports included in the Standard Reports package, Additional Reports, or ROE Forms for the pay period that you specify
• Year-End Reports View, print or download reports from Year-end Adjustment runs, Employee Tax Forms and Tax Form runs.
• Human Resources Reports - View reports on a number of kinds of information about the employees in your company, including emergency contacts, certifications, and training.
To view reports online: 1. From the Reports menu, choose the type of report you want to see.
The page for the selected report opens.
Enter any required report selection criteria, for example, the year the report applies to or the subject of the report. The selection criteria differ for each kind of report.
Click Go.
Note: You must have Adobe® Reader® installed on your computer to read documents in Adobe® Portable Document Format (PDF). Click here if you do not have it.

Version 4.1 View and save online reports
Powerpay Getting Started 43
Note: Certain reports may take some time to load due to their size. If a report is displayed in the wrong orientation (sideways), you can rotate the page. To do so, in Adobe Reader, from the View menu, select Rotate View > Clockwise or Counterclockwise, or click on the Rotate Clockwise or Rotate Counterclockwise button on the toolbar.