pontoon installation manual - bluewave pontoons manual.pdf · 8. how to fill the cubes with water...
TRANSCRIPT

Bluewave (UK) Ltd, UNIT 7, HARRIER COURT, WESTCOTT LANE EXETER AIRPORT, EXETER, DEVON, ENGLAND EX5 2DR T +44(0)1392 364222 F +44(0)1392 364223
Bluewave (UK) Company Limited All right Reserved Page 1 of 12
Pontoon Installation Manual
1. How to Install cubes ………………………………………………………………………P.2 2. How to install the short pin ……………………………………………………………………P. 2 3. How to install the long pin ……………………………………………………………………P.3 4. How to install the short screw & nut …………………………………………………………P.4 5. How to install the long screw & nut for double layers ……………………………………P.4 6. How to install the cleats ………………………………………………………………………P.5 7. How to install the HDPE railing ……………………………………………………………P.5 8. How to fill the cubes with water ……………………………………………………………P.6 9. How to install the stainless steel bollards/cleats/railings ………………………………P.7
10. How to install the stainless steel chain connectors ………………………………………P.7 11. How to fix the pontoon by anchors and chain(Anchoring Plan) …………………………P.8 12. How to fix the pontoon by piles(Piling Plan) ………………………………………………P.8 13. How to install the jet ski dock (small cube) …………………………………………………P.10

Bluewave (UK) Ltd, UNIT 7, HARRIER COURT, WESTCOTT LANE EXETER AIRPORT, EXETER, DEVON, ENGLAND EX5 2DR T +44(0)1392 364222 F +44(0)1392 364223
The main features of the Modular Float System (plastic pontoon) are the four fixing lugs around the cube and the short pin in the middle which holds the four lugs coming together when we assemble 4 cubes. In this module system way, we can expand the assembled surfaces to any form, any size as we wish. The Modular Float System can also be used for 2 or 3 layers of pontoon fixing with long pin. Please note the lugs no.1 to 4 as below:
1. How to Install the cubes: Please note the lugs No. 1 to 4 as below, install the cubes according to 1,2,3,4 lugs, then we can get the cubes coming together and expand the cubes to the size as we wish.
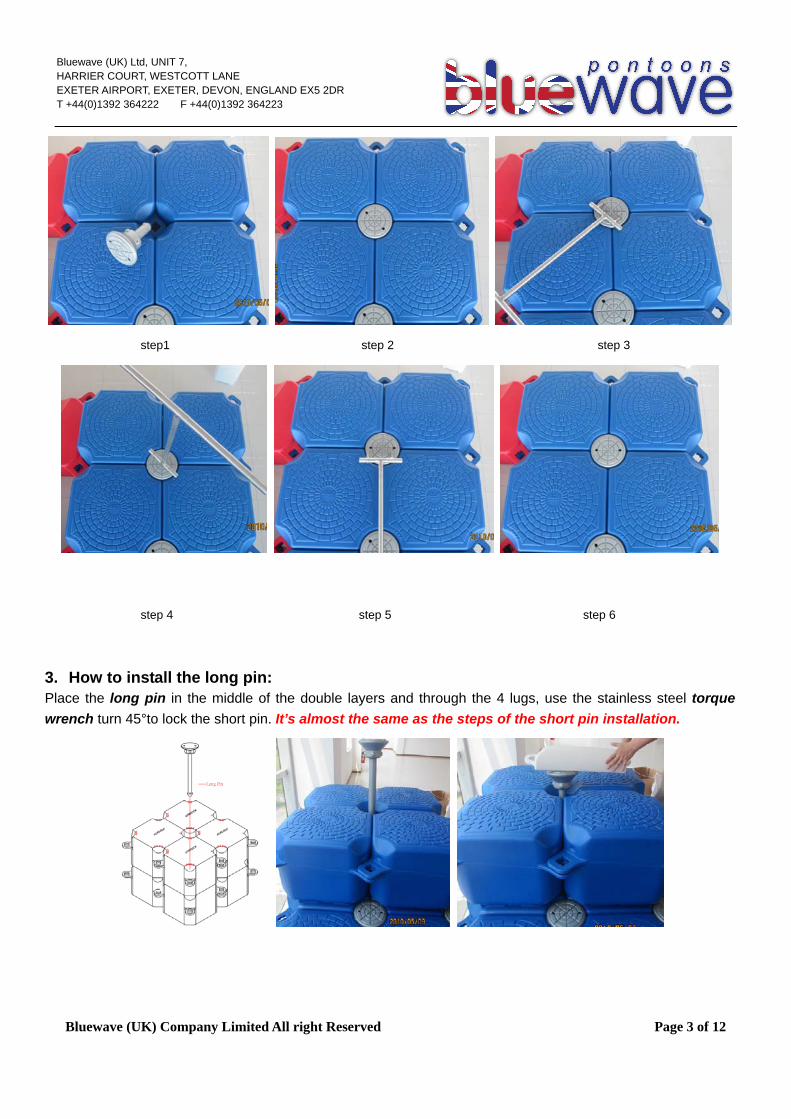
2. How to install the short pin:
Place the short pin in the middle and through the 4 lugs, use the stainless steel torque wrench turn 45° to lock the short pin: Step1: Place the short pin into the lugs.
Step 2: Please note the holes of the pin, are unlocked.
Step 3: Put the torque wrench into the holes.
Step 4: Turn 45°to lock the short pin.
Step 5: Take the torque wrench out.
Step 6: Ensure note the holes of the pin, are now locked.
Bluewave (UK) Company Limited All right Reserved Page 2 of 12
Bluewave (UK) Ltd, UNIT 7, HARRIER COURT, WESTCOTT LANE EXETER AIRPORT, EXETER, DEVON, ENGLAND EX5 2DR T +44(0)1392 364222 F +44(0)1392 364223
step1 step 2 step 3
step 4 step 5 step 6
3. How to install the long pin: Place the long pin in the middle of the double layers and through the 4 lugs, use the stainless steel torque wrench turn 45°to lock the short pin. It’s almost the same as the steps of the short pin installation.
Bluewave (UK) Company Limited All right Reserved Page 3 of 12
Bluewave (UK) Ltd, UNIT 7, HARRIER COURT, WESTCOTT LANE EXETER AIRPORT, EXETER, DEVON, ENGLAND EX5 2DR T +44(0)1392 364222 F +44(0)1392 364223
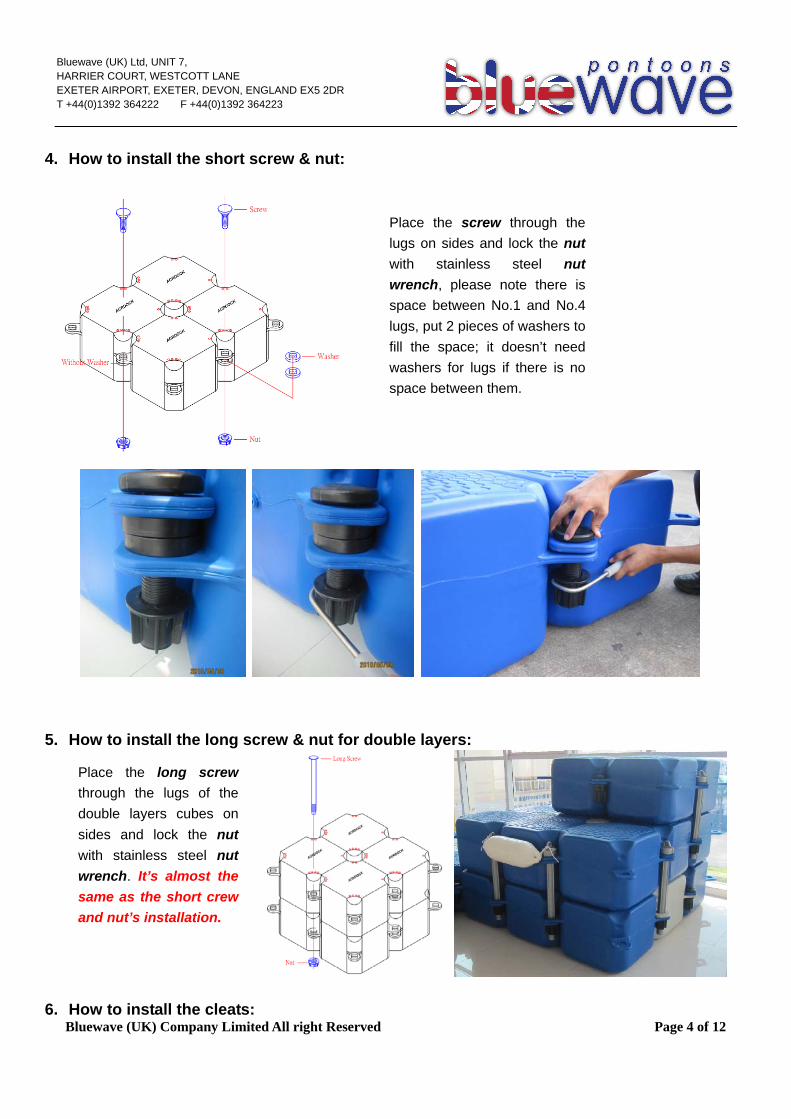
4. How to install the short screw & nut:
Place the screw through the lugs on sides and lock the nut with stainless steel nut wrench, please note there is space between No.1 and No.4 lugs, put 2 pieces of washers to fill the space; it doesn’t need washers for lugs if there is no space between them.
5. How to install the long screw & nut for double layers:
Place the long screw through the lugs of the double layers cubes on sides and lock the nut with stainless steel nut wrench. It’s almost the same as the short crew and nut’s installation.
Bluewave (UK) Company Limited All right Reserved Page 4 of 12 6. How to install the cleats:

Bluewave (UK) Ltd, UNIT 7, HARRIER COURT, WESTCOTT LANE EXETER AIRPORT, EXETER, DEVON, ENGLAND EX5 2DR T +44(0)1392 364222 F +44(0)1392 364223
Place the cleat through the lugs on sides and lock the nut with stainless steel nut wrench. It’s almost the same as the short crew & nut’s installation.
7. How to install the HDPE railings: 7.1 On sides: please put the railing through the lugs on sides and lock the nut with stainless steel nut
wrench, please note each railing should get 3 pieces of washers according to the lugs’ number then we can lock the railing tighten; please note the rings of the railings should be on the same line.
7.2 In middle: Please put the railing through the lugs of cubes and lock the nut from the bottom of the cubes. We may need to use steel sleeve to lock the nuts. Please note we need put 1 piece of washer before lock the nut; and please note the rings of the railings should be on the same line.
HDPE Railings on sides
Bluewave (UK) Company Limited All right Reserved Page 5 of 12

Bluewave (UK) Ltd, UNIT 7, HARRIER COURT, WESTCOTT LANE EXETER AIRPORT, EXETER, DEVON, ENGLAND EX5 2DR T +44(0)1392 364222 F +44(0)1392 364223
HDPE Railings in middle
The rings are on the same line
8. How to fill the cubes with water: ide of the Lug 1 and 4, open the cover with the stainless steel
Please find the hole of the cube, on the sflooding key, fill water into the cube.
Bluewave (UK) Company Limited All right Reserved Page 6 of 12

Bluewave (UK) Ltd, UNIT 7, HARRIER COURT, WESTCOTT LANE EXETER AIRPORT, EXETER, DEVON, ENGLAND EX5 2DR T +44(0)1392 364222 F +44(0)1392 364223
Bluewave (UK) Company Limited All right Reserved Page 7 of 12
. How to install the stainless steel bollards/cleats/railings: nd lock the stainless steel nut from
9Place the stainless steel bollard/cleat/railing through the lugs of cubes athe bottom of the cubes. You may need to use a steel sleeve to lock the nuts.
10. How to install the stainless steel chain connectors: in connector through the lugs of cubes and 10.1 Outside Chain Connector: Please put the outside cha
lock the stainless steel washer and bolt from the top. Please note we need 2 pieces of HDPE washers to fill the space between the outside chain connector and lugs.
10.2 Inside Chain Connector: please put the inside chain connector through the lugs of cubes from the
bottom, and locks it with stainless steel washer and bolts 1, cover the short pin on it and lock with stainless steel bolt 2.

Bluewave (UK) Ltd, UNIT 7, HARRIER COURT, WESTCOTT LANE EXETER AIRPORT, EXETER, DEVON, ENGLAND EX5 2DR T +44(0)1392 364222 F +44(0)1392 364223
Bluewave (UK) Company Limited All right Reserved Page 8 of 12
11. How to fix the pontoon by anchors and chain(Anchoring Plan):
11.1. Please note anchoring plan is recommended for site locations where waves are expected. 11.2. The anchors could be heavy concrete blocks or steel anchors. 11.3. The diameter of the chain should be more than 10mm. 11.4. The length of the chain should match with the water depth and tide data on the site. 11.5. Please note there is one inside chain connector with one chain, and two outside chain connectors
with one chain. 11.6. If concrete anchors are used, we recommend fabrication, on site location, and pre-set stainless steel
connectors in the blocks which are for anchoring shackles. uld be
e size could be 0.4x0.4x0.3m. cks should be at least 2 times than the total
concrete blocks (or other kinds of anchors such as steel anchors.)
ess
12.2.2 Please note we need at least a couple of small piles for each 8m to fix the pontoon/dock.
project such as yacht club or dock for big boats.
lateral loads.
echnical report. The pilings shall
the pile tops during
11.7. If concrete anchors, we recommend the concrete block be at least 500kg/pc, the size co1x1x0.5m; make the small concrete block to be more than 80kg/pc, th
11.8. Please note the total weight of the heavy concrete bloweight of all the pontoons.
11.9. Please note that we need anchors on both sides of the pontoon, at least each 10m needs one couples of heavy
12. How to fix the pontoon by piles(Piling Plan):
12.1 Please note piling plan is for site locations where there is almost no waves expected. 12.2 Please note the small piles are good for small docks and the highest water depth should be l
than 3m. Our small pile is stainless steel grade 316 pile, length is 6m, diameter is 44.5mm, and thickness is 3mm. 12.2.1 Please note the small piles should be into the sand at least 2m, and extend about 1m above the mean tide
level to prevent floats from floating over the pile tops during wavey conditions.
12.3 Please note the large piles are good for largeNormally, used 400mm to 600mm diameter piles. 12.3.1 Please note the piles could be wooden piles, PHC (concrete) piles or steel tube piles.
12.3.2 Please note as an engineering project, you need to consider the site soil conditions, water depths, pile spacing
and applicable
12.3.3 Please note the length of piles depending on the site location: they should be long enough for the highest high
water level, and into the rock at least 1m, you may need have a specific geot
extend a minimum of 1.5m above the mean tide level to prevent floats from floating over

Bluewave (UK) Ltd, UNIT 7, HARRIER COURT, WESTCOTT LANE EXETER AIRPORT, EXETER, DEVON, ENGLAND EX5 2DR T +44(0)1392 364222 F +44(0)1392 364223
Bluewave (UK) Company Limited All right Reserved Page 9 of 12
be match with the diameter of piles. The size could be
storm surge conditions.
12.3.4 Please note the size of the pile guides should
customized.
12.4 Please note if the waves are higher than 0.5m, we do not recommend using piling plan.
13. How to install the jet ski dock (small cube): Jet Ski dock of small cube’s installation, take a 4x2m Jet Ski dock for example as below:

Bluewave (UK) Ltd, UNIT 7, HARRIER COURT, WESTCOTT LANE EXETER AIRPORT, EXETER, DEVON, ENGLAND EX5 2DR T +44(0)1392 364222 F +44(0)1392 364223
13.1 Fill the first 2 lines of cubes with water, please note the first line of cubes should be filled with about
ing to the plan; please note the numbers of lugs.
70 litres water(about 28cm of the cubes), and second line of cubes should be filed with about 35 litres of water(about 14cm of the cubes).
13.2 Put all the cubes together accord
13.3 Lock all the short pins.
uts for the ramps at the right points; please note the lugs of the ramps, the 13.4 Put the long screws & nright lug is higher than the left lug of each ramp; please note the washers’ quantity, we need the washers to make the ramps on the same level.
Bluewave (UK) Company Limited All right Reserved Page 10 of 12

Bluewave (UK) Ltd, UNIT 7, HARRIER COURT, WESTCOTT LANE EXETER AIRPORT, EXETER, DEVON, ENGLAND EX5 2DR T +44(0)1392 364222 F +44(0)1392 364223
13.5 Lock all the long screws & nuts with stainless steel nut wrench. Please note how to put the washers in order to keep all the ramps on the same level. Photos for reference as below:
13.6 Lock all the short screws & nuts and cleats on sides. One Jet Ski dock done.
Bluewave (UK) Company Limited All right Reserved Page 11 of 12 13.7 Several Jet Ski docks together as one pontoon dock, you can install each Jet Ski dock on shore at

Bluewave (UK) Ltd, UNIT 7, HARRIER COURT, WESTCOTT LANE EXETER AIRPORT, EXETER, DEVON, ENGLAND EX5 2DR T +44(0)1392 364222 F +44(0)1392 364223
first, and then launch into the water and connect all the docks together.
Bluewave (UK) Company Limited All right Reserved Page 12 of 12