polycom visualboard technology application user's guide
TRANSCRIPT
[Type the document title]
Polycom Document Title 1
Document Version 2.0 | July 2013 | 3725-65174-002/AUser’s Guide
Polycom® VisualBoard™ Technology Application

© 2013 Polycom, Inc. All rights reserved.
Polycom, Inc. 6001 America Center Drive San Jose CA 95002 USA
No part of this document may be reproduced or transmitted in any form or by any means, electronic or mechanical, for any purpose, without the express written permission of Polycom, Inc. Under the law, reproducing includes translating into another language or format.
As between the parties, Polycom, Inc., retains title to and ownership of all proprietary rights with respect to the software contained within its products. The software is protected by United States copyright laws and international treaty provision. Therefore, you must treat the software like any other copyrighted material (e.g., a book or sound recording).
Every effort has been made to ensure that the information in this manual is accurate. Polycom, Inc., is not responsible for printing or clerical errors. Information in this document is subject to change without notice.
ii
Trademark Information POLYCOM® and the names and marks associated with Polycom's products are trademarks and/or service marks of Polycom, Inc., and are registered and/or common law marks in the United States and various other countries.
All other trademarks are the property of their respective owners.
Patent Information The accompanying product may be protected by one or more U.S. and foreign patents and/or pending patent applications held by Polycom, Inc.

Polycom, Inc. iii
About this Guide
The Polycom VisualBoard Technology Application User’s Guide explains how to install a touch monitor and how to use the Polycom VisualBoard application, including annotating, working with slides, and capturing content.
This guide is intended for all users of the Polycom VisualBoard application. Chapter 3 of this document is intended for administrators who need to install and configure the system.
Additional Polycom documentation is available at the Polycom web site, http://www.polycom.com/support/video/index.html.
For support or service, please contact your Polycom distributor or go to Polycom Support at http://support.polycom.com.
The Polycom VisualBoard Technology application was formerly known as the Polycom ActiveTouch application.

Polycom VisualBoard Application User’s Guide
iv Polycom, Inc.

Contents
Polycom, Inc. v
Contents
1 Introducing the Polycom VisualBoard Application . . . . . 1
2 Using the Polycom VisualBoard Application . . . . . . . . . . 3Starting and Exiting the Polycom VisualBoard Application . . . . . . . . . . . . 3
Annotating with the Polycom VisualBoard Application . . . . . . . . . . . . . . . 5
Working with the SMART Board Pens . . . . . . . . . . . . . . . . . . . . . . . . . . . 7
Working with Slides . . . . . . . . . . . . . . . . . . . . . . . . . . . . . . . . . . . . . . . . . . 8
Saving Slides . . . . . . . . . . . . . . . . . . . . . . . . . . . . . . . . . . . . . . . . . . 12Understanding Slide Order . . . . . . . . . . . . . . . . . . . . . . . . . . . . . 12Using Folders . . . . . . . . . . . . . . . . . . . . . . . . . . . . . . . . . . . . . . . 12
Importing Slides to PowerPoint from VisualBoard . . . . . . . . . . . . . . 13
Exporting Slides to PowerPoint from VisualBoard . . . . . . . . . . . . . . 13
Capturing and Annotating Live Content . . . . . . . . . . . . . . . . . . . . . . 14
Troubleshooting . . . . . . . . . . . . . . . . . . . . . . . . . . . . . . . . . . . . . . . . . . . 16
3 Installing and Configuring a Touch Monitor . . . . . . . . . . 17Installing a Touch Monitor . . . . . . . . . . . . . . . . . . . . . . . . . . . . . . . . . . . . 17
Installing a Touch Monitor in Addition to a Current Content Monitor . . . . 19
Installing Multiple Touch Monitors . . . . . . . . . . . . . . . . . . . . . . . . . . . . . . 21
Installing Multiple Touch Monitors in Addition to a CurrentContent Monitor . . . . . . . . . . . . . . . . . . . . . . . . . . . . . . . . . . . . . . . . . . . . 24
Installing a USB Mouse . . . . . . . . . . . . . . . . . . . . . . . . . . . . . . . . . . . . . . 26
Setting up an HDX 4500 System . . . . . . . . . . . . . . . . . . . . . . . . . . . . . . 27
Installing a SMART Board as a Touch Monitor . . . . . . . . . . . . . . . . . . . . 27
Calibrating the SMART Board . . . . . . . . . . . . . . . . . . . . . . . . . . . . . . . . . 30
Setting up the Monitor . . . . . . . . . . . . . . . . . . . . . . . . . . . . . . . . . . . . . . . 31
Configuring the HDX . . . . . . . . . . . . . . . . . . . . . . . . . . . . . . . . . . . . . . . . 31
Showing Content on Monitor Two . . . . . . . . . . . . . . . . . . . . . . . . . . . 31
Enabling and Disabling the Shrink Content Feature . . . . . . . . . . . . . 31

Polycom VisualBoard Application User’s Guide
vi Polycom, Inc.
Polycom, Inc. 1
1Introducing the Polycom VisualBoard Application
The Polycom VisualBoard application allows you to show and annotate content in real-time from Polycom HDX systems by using a touch screen monitor. You can use the monitor as your only content monitor or you can use it in addition to your current content monitor. You can annotate on the content using your finger, a stylus, or a mouse.
The VisualBoard application is an integrated application that works with the following systems and hardware versions:
• Polycom HDX 7000 HD system with Hardware Version D
• Polycom HDX 7000 HD system with Hardware Version C
• Polycom HDX 8000 HD system with Hardware Version B
• Polycom HDX 9006 system
• Polycom HDX 4500 system (A mouse is recommended with an HDX 4500 system since the VisualBoard application will always appear onMonitor 1.)
The VisualBoard application works with HDX software version 3.1.0 and later versions.
If your system is already installed and configured, refer to the following chapter for instructions on using the VisualBoard application.
If you need to install and configure your system, refer to Chapter 3 for instructions on how to install a touch monitor and how to configure the system.

Polycom VisualBoard Application User’s Guide
2 Polycom, Inc.

Polycom, Inc. 3
2Using the Polycom VisualBoard Application
Now that you have installed and configured the Polycom VisualBoard application, follow the steps in this chapter to perform the following tasks.
• Start and exit the application
• Annotate with the application
• Work with the SMART Board pens
• Work with slides
• Troubleshoot issues
If you have not yet installed and configured the Polycom VisualBoard application, refer to Chapter 3.
Starting and Exiting the Polycom VisualBoard Application
To start the Polycom VisualBoard application:
>> Do one of the following:
— Double-tap the content display screen with your finger.
— Double-tap the content display screen with a stylus.
— Double-click the left mouse button.
To exit the Polycom VisualBoard application:
>> Touch with your finger, stylus, or mouse to exit the VisualBoard
application.
When you start the Polycom VisualBoard application, the main screen appears with the Annotation toolbar on the left side as shown in Figure 2-1.

Polycom VisualBoard Application User’s Guide
4 Polycom, Inc.
Figure 2-1 Polycom VisualBoard Application Screen
When you insert a USB stick, the Slides toolbar appears along the bottom of the screen as shown in Figure 2-2.
Figure 2-2 Polycom VisualBoard Application Screen with Slides Toolbar
12
3

Using the Polycom VisualBoard Application
Polycom, Inc. 5
Refer to the following table for a description of the VisualBoard screen elements.
Table 2-1 VisualBoard Screen Elements
Annotating with the Polycom VisualBoard Application
To annotate with the Polycom VisualBoard application:
>> From the Annotation toolbar, use your finger, stylus, or mouse to perform the functions listed in Table 2-2. To disable a tool, simply select any other tool.
Figure 2-3 Annotation Toolbar
Reference Number Description
1 Drawing Space
2 Annotation Toolbar
3 Slides Toolbar
1
8
7
6
54
3
2

Polycom VisualBoard Application User’s Guide
6 Polycom, Inc.
Refer to the following table for a description of the Annotation toolbar elements.
Table 2-2 Annotation Toolbar Elements
Reference Number Icon Task Notes
1 Point to sections of a slide Point to sections on a slide without making annotations. You will see a white glow around the icon when selected.
When using a mouse, the arrow pointer will always be present. There is no need to touch the arrow pointer when presenting slides.
2 Select the line thickness The currently selected line thickness is highlighted. To select a different thickness, touch the icon one or two times to select the desired thickness.
3 Select color of annotations You will see a glow around the selected color.
4 Erase a section of annotations You will see a pink glow around the eraser icon when selected.
If you are annotating over an uploaded slide, the original slide will not be erased.
Hold the eraser icon down for one second to delete all the annotations you made. All deletions are final.
5 Undo annotations Touch the red undo icon to remove the last annotation or erasure.
Hold the undo icon down for two seconds to delete all the annotations you made. All deletions are final.

Using the Polycom VisualBoard Application
Polycom, Inc. 7
Working with the SMART Board Pens
To work with the SMART Board pens:
1 Select a blue, red, or green pen from the pen tray at the base of the SMART Board.
2 Write over your screen or application with the selected pen.
— To change colors, put the current pen back in the slot on the tray and select another pen.
— To erase pen marks, pick up the eraser from the SMART Board tray and rub over the pen marks.
6 Create a new whiteboard Create a whiteboard when you or the far-site is viewing content on a projector.
If you have annotated on a whiteboard and you bring up a new whiteboard or blackboard, the previous whiteboard will be saved automatically.
The default annotation color is black.
7 Create a new blackboard Create a blackboard when you or the far-site is viewing content on a monitor. The dark background is easier on the viewer’s eyes.
If you have annotated on a blackboard and you bring up a new blackboard or whiteboard, the previous blackboard will be saved automatically.
The default annotation color is white.
8 Exit the VisualBoard application
When the application exits, you will hear a beep and see a red glow around the icon.
Reference Number Icon Task Notes
Be sure that only one pen or eraser is out of its slot at one time. Also be sure that all pens and the eraser are back in their slots when you use your finger as a mouse.

Polycom VisualBoard Application User’s Guide
8 Polycom, Inc.
Working with Slides
To work with slides:
1 Insert a USB stick into the USB hub connected to the HDX system’s USB port. The USB stick must be formatted FAT-32. NTFS and Mac formats are not readable by the VisualBoard application.
The Slides toolbar appears at the bottom of the VisualBoard application screen.
2 From the Slides toolbar, use your finger, stylus, or mouse to perform the tasks listed in Table 2-3.
Figure 2-4 Slides Toolbar
When you perform the following actions without a USB drive, your content and annotations will be cleared from the screen:
• Answer a call.
• Open a new whiteboard or blackboard.
• The far-site user sends content or starts the VisualBoard application.
1 432
5
87
6
10 119

Using the Polycom VisualBoard Application
Polycom, Inc. 9
Refer to the following table for a description of the Slides toolbar elements.
Table 2-3 Slides Toolbar Elements
Reference Number Icon Task Notes
1 Exit the VisualBoard application
When the application exits, you will hear a beep and see a red glow around the icon.
2 Save slides (to the “My Whiteboard” folder automatically created by the VisualBoard application)
You will hear a beep when the current slide has been saved. You will see a green glow around the Save icon when selected.
The current slide will be saved after the last slide you viewed.
If you annotate a slide and save your changes, a copy of the original slide is saved on the USB drive.
If you want to load slides without using a USB drive, you need to create a “My Whiteboard” folder.
Save error icon You can store up to 200 folders and slides in any folder on the USB drive. When the maximum number of slides and folders is stored, the Save icon displays a red “X” and no other slides can be saved.
3 Delete slides Slide and folder thumbnails will display. Navigate to the slide you want to delete and touch the red “X” icon in the corner of the slide. The slide and all annotations will be deleted from the USB drive.
If you touch outside of the red “X”, the slide will display and will not be deleted.
Folders may not be deleted.

Polycom VisualBoard Application User’s Guide
10 Polycom, Inc.
Slide thumbnails If there are more than 20 slides or folders inside the current folder, a page number will display at the top of the thumbnails screen. A yellow highlight will appear around the active slide.
Use the Previous and Next icons to navigate through the thumbnail pages. If you are using a mouse, you can also use the scroll wheel to navigate.
If you are in Deletion mode, you can select a folder thumbnail to move into that folder. You can also select the icon to move up a level.
Slide icon to be deleted All slide thumbnails display a red “X” in the top left corner. The folder thumbnails do not display a red “X” because folders cannot be deleted.
A yellow highlight will appear around the active slide.
4 View thumbnails When you open the thumbnail view for the first time, you will begin in the “My Whiteboard” folder.
You will see thumbnails that represent individual slides, a folder that contains images, or a folder that contains other folders.
You can load up to 10 pages of thumbnails with 20 thumbnails on each page.
Folders will be displayed first and then the slides will be displayed.
Basic folder thumbnail If a folder contains nothing, you will see a basic folder thumbnail.
Folder with images thumbnail
If a folder contains only images, you will see the first image in that folder displayed on the folder thumbnail.
Reference Number Icon Task Notes

Using the Polycom VisualBoard Application
Polycom, Inc. 11
Folder with folders thumbnail
If a folder contains other folders, you will see other folders displayed on the folder thumbnail.
5 Move to upper level folder Touch the Up arrow to move to the level above the current folder. You cannot move above the “My Whiteboard” folder.
6 Create a new folder Touch the new folder icon to create a new folder inside the current folder.
7 View the previous slide in the current folder
You will see a white glow around the icon when selected.
8 The left thumbnail displays a thumbnail of the previous slide
9 The middle thumbnail displays a thumbnail of the current slide
You will see a yellow glow around the current slide.
10 The right thumbnail displays a thumbnail of the next slide
11 View the next slide in the current folder
You will see a white glow around the icon when selected.
Reference Number Icon Task Notes

Polycom VisualBoard Application User’s Guide
12 Polycom, Inc.
Saving Slides
Slides and annotations are automatically saved in the following situations so you never lose your work:
• While drawing on the whiteboard when the system is not in a call, and you receive an incoming call, the whiteboard exits and the current slide is saved automatically.
• While drawing on the whiteboard during a call and the far site hangs up the call, the whiteboard exits and the current slide is saved automatically.
• While drawing on the whiteboard during a call and you hang up the call, the whiteboard exits and the current slide is saved automatically.
• While drawing on a whiteboard or blackboard, and you bring up another whiteboard or blackboard, the previous whiteboard is saved automatically.
Understanding Slide Order
When slides are deleted or saved, slide order is maintained so there are no gaps in slide numbering. Therefore, when you save or email the slides after your class or presentation, every slide appears in order without any missing slides.
The VisualBoard application will maintain the order of all slides when you add or delete slides. If you add slides during your class or presentation, they will be in the order that you presented to your audience.
Using Folders
Different presentations can be stored within the “My Whiteboard” folder. An education example is shown in Figure 2-5.
Figure 2-5 VisualBoard Screen with Folders

Using the Polycom VisualBoard Application
Polycom, Inc. 13
Importing Slides to PowerPoint from VisualBoard
You can import slides one at a time to PowerPoint from VisualBoard on either a PC or a Mac.
To import slides to PowerPoint from VisualBoard:
1 Create a new blank presentation in PowerPoint.
2 Go to Design > Page Setup.
3 Go to Insert > Photo Album > New Photo Album.
4 Select Insert picture from: File/Disk...
Select the USB device with the JPG files created with VisualBoard that you want to import into your presentation.
5 Click Create.
To import slides in bulk to PowerPoint from VisualBoard:
• On a PC, you can use the PC version of Microsoft Office PowerPoint.
• On a Mac, Microsoft Office 2011 does not support importing a whole photo album. Check the web for solutions that allow you to import many JPG files. Here is one that works well for Macs running OSX Snow Leopard and Mountain Lion: http://depts.washington.edu/soail/wordpress/?p=258.
Exporting Slides to PowerPoint from VisualBoard
If you have previously used the USB drive with the VisualBoard application, you can export content and save it to the “My Whiteboard” folder or you can create another folder on the USB stick called “My Whiteboard.”
To export slides to PowerPoint from VisualBoard:
1 Insert a USB drive into your computer.
2 Open the PowerPoint presentation you want to export.
3 Select File > Save As.
4 Select the file destination folder “My Whiteboard” on your USB drive.
5 Change Save as type to JPEG File Interchange format (*.jpg).
The maximum size JPG file that the VisualBoard application will import is 18.3 Mb or 15360 x 8640. If a JPG file is larger, it will not be seen on the VisualBoard application.

Polycom VisualBoard Application User’s Guide
14 Polycom, Inc.
6 Select Save.
A PowerPoint dialog box appears.
Figure 2-6 Slide Export Dialog Box
5 Select Every Slide and click OK.
6 Remove the USB drive from your computer and insert it into the USB hub attached to the HDX.
7 Double-tap the touch screen or double-click the mouse to start the VisualBoard application.
8 Touch the thumbnail icon to view your slides.
Capturing and Annotating Live Content
You can capture and annotate live content displayed by the far-site or near-site using the VisualBoard application. Note that you must have a USB stick installed in order to save content.
Capturing and Annotating Live Content from a PC or Mac
To capture and annotate live content from a PC or Mac:
1 Display content on your PC using People+Content IP.
People+Content IP is a free application you can use to share your desktop during a call. You can download it here: People+Content IP.
2 Double-tap the touch monitor to start the VisualBoard application and capture the content.
3 Make annotations on the content on your PC.
4 Select Save to save a slide of the PC screen with your annotations.
To create 16:9 slides in PowerPoint that fill the screen of most display monitors, go to Design > Page Setup. Select On-screen Show (16:9) from the Slides sized for drop-down.

Using the Polycom VisualBoard Application
Polycom, Inc. 15
Capturing and Annotating Live Content from Other Content Sources
To capture and annotate live content from other content sources:
1 Display content using your content source, such as the following:
— VCR/DVD
— Laptop connected with a VGA or DVI cable
— Document camera
2 Double-tap the touch monitor to start the VisualBoard application and capture the content.
3 Make annotations on the displayed content.
4 Select Save to save a slide of the content with your annotations.
Capturing and Annotating Live Content from the Far Site
While in a call, you can capture and annotate live content from the far site using Multisite Collaboration. Multisite Collaboration allows every site in a call (either point-to-point or multipoint) to take control of the VisualBoard application.
To capture and annotate live content from the far site:
• Double-tap the screen to take control of the VisualBoard application.
• When you are finished annotating, the far-site can double-tap their screen to take control. The slide you are working on will be saved and sent to the far-site, allowing them to make additional annotations.
• Each time control switches between the near-site and the far-site, the slide is saved to the USB drive.
Using Captured Content
You can use captured content in various ways, such as:
• Viewing the content later on your computer.
• Emailing the content to the meeting attendees.
• Importing the content into PowerPoint to create a presentation.

Polycom VisualBoard Application User’s Guide
16 Polycom, Inc.
TroubleshootingIf you experience problems, try the following possible solutions.
• Ensure that the cable connecting the touch monitor to the HDX system is securely attached at both ends.
• Verify that a VisualBoard application is detected.
— On an HDX system: Go to System > Diagnostics > UC Board.
— On a Polycom Touch Control: Go to System > HDX System > UC Board
A screen will appear with a list of the connected devices (except for USB sticks) and will indicate if the UC Board is operating correctly.
» You can have a combination of up to 16 touch devices and a mouse to use for annotation.
» You can only connect one UC Board sensor and pen with 15 other touch devices.
» Use active powered hubs if you are connecting several USB devices.
Figure 2-7 Verifying the VisualBoard Application
• Restart the HDX system.

Polycom, Inc. 17
3Installing and Configuring aTouch Monitor
The VisualBoard application is compatible with the following touch monitors:
• Planar PXL2430MW 23.5” Monitor
• Planar PX2230MW 22” Monitor
• Planar PCT2785 27” Monitor
• Planar PT3285PW 32” Monitor
• Sharp PN-L702B 70” Monitor
• Dell ST2220T 22” Monitor
• HP Compaq L2105 Monitor
• Smart® Technologies 84” SMART Board®
• Samsung 50” 3M Microtouch Monitor
• Samsung 50” Elo Touch Systems Monitor
Other touch displays that are Windows 7 compatible may also work with the VisualBoard application.
Installing a Touch MonitorIf you already have a content monitor, skip to the Installing a Touch Monitor in Addition to a Current Content Monitor section on page 19.
You will need the following components to install a touch monitor.
• USB hub (Use this for saving and retrieving slides with a USB stick formatted -32. NTFS and Mac formats are not readable by the VisualBoard application.)
• DVI or HDMI cable
• USB cable

Polycom VisualBoard Application User’s Guide
18 Polycom, Inc.
To install a touch monitor:
1 Connect one end of a DVI cable to the DVI Input port on the touch monitor.
2 Connect the other end of the DVI cable to the Monitor 2 DVI Output port on the HDX system.
3 Connect the touch monitor to the HDX system.
a Connect one end of a USB cable to the USB port on the touch monitor.
b Connect the other end of the USB cable to the USB port on the HDX system.
» HDX 8000 HD and HDX 7000 HD: The USB port is located in the back of the device.
» HDX 9006: The USB port is located in the front of the device.
If additional USB ports are needed, you can connect a USB hub between the touch monitor and the HDX system. A USB stick can also be installed in the USB hub for importing and exporting slides, images, or photos.
Figure 3-1 Installing a Touch Monitor
Polycom recommends the use of digital output for content (DVI-D or HDMI) instead of analog (VGA or YPbPr) when using the VisualBoard application. Digital content produces the optimum results with alignment of the VisualBoard application.
You can also use a DVI-to-HDMI converter and HDMI cable instead of the DVI-to-DVI cable.
TouchMonitor
DVI In
USBUSB Hub(Optional)Polycom
HDX System
Monitor1

Installing and Configuring a Touch Monitor
Polycom, Inc. 19
Installing a Touch Monitor in Addition to a CurrentContent Monitor
If you already have a content monitor and you are installing a touch monitor, follow the steps in this section.
You will need the following components to install a touch monitor.
• Powered DVI splitter
• 2 DVI-to-DVI (or DVI-to-HDMI) cables
• USB hub (for saving and retrieving slides with a USB stick)
• USB cable
To install a touch monitor in addition to a current content monitor:
1 Connect the DVI splitter to the HDX system.
a Connect one end of the DVI cable to the Monitor 2 DVI Output port on the HDX system.
b Connect the other end of a DVI cable to the SOURCE port on the DVI splitter.
2 Connect the monitors to the powered DVI splitter.
a Connect one end of a cable (DVI-DVI or DVI-HDMI) to the DVI splitter.
b Connect the other end of the cable (DVI-DVI or DVI-HDMI) to the DVI Input port on your touch monitor.
c Repeat steps a and b for Monitor 2.
You can also install an active USB extension cable from the USB hub to the HDX system so that the USB hub can be placed on the table to be more convenient.

Polycom VisualBoard Application User’s Guide
20 Polycom, Inc.
Figure 3-2 Installing a Touch Monitor in Addition to a Content MonitorUsing a DVI Splitter
3 Connect the USB hub to the HDX system.
— HDX 8000 HD and HDX 7000 HD: The USB port is located in the back of the device.
— HDX 9006: The USB port is located in the front of the device.
4 Connect the touch monitor to the USB hub.
If you are using a Polycom UC Board sensor with your current content monitor, the sensor is connected to the USB hub.
a Connect one end of a USB cable to the USB port of the touch monitor.
TouchMonitor
DVI InPolycom
HDX System
Monitor1
Monitor2
DVI In
SOURCE 4 3 2 1
SOURCE
You can also install an active USB extension cable from the USB hub to the HDX system so that the USB hub can be placed on the table to be more convenient.

Installing and Configuring a Touch Monitor
Polycom, Inc. 21
b Connect the other end of the USB cable to the USB hub.
A USB stick can also be installed in the USB hub for importing and exporting slides, images, or photos.
Figure 3-3 Installing a Touch Monitor in Addition to a Content Monitor Using a USB Hub
Installing Multiple Touch MonitorsIf you already have a content monitor, refer to the Installing Multiple Touch Monitors in Addition to a Current Content Monitor section on page 24.
You can use up to sixteen USB devices with a Polycom HDX system. These USB devices can be any combination of monitors, mice, a Polycom UC Board sensor, a SMART Board, etc. You are limited to either one Polycom UC Board sensor or SMART Board. USB drives will not affect this device limit.
You will need the following components to install multiple touch monitors.
• Powered DVI splitter
• 1 DVI-to-DVI or DVI-to-HDMI cable for the DVI splitter
• 1 DVI-to-DVI or DVI-to-HDMI cable for each touch monitor
• USB hub (for saving and retrieving slides with a USB stick)
• 1 USB cable for each touch monitor
TouchMonitor
PolycomHDX System
Monitor1
USBUSB Hub
USBStick
Monitor2

Polycom VisualBoard Application User’s Guide
22 Polycom, Inc.
To install multiple touch monitors:
1 Connect the powered DVI splitter.
a Connect one end of the cable (DVI-DVI or DVI-HDMI) to the Monitor 2 DVI Output port on the HDX system.
b Connect the other end of a cable (DVI-DVI or DVI-HDMI) to the DVI splitter.
2 Connect the touch monitors to the DVI splitter.
a Connect one end of a cable (DVI-DVI or DVI-HDMI) to the DVI splitter.
b Connect the other end of the cable (DVI-DVI or DVI-HDMI) to the DVI port on your touch monitor.
c Repeat steps a and b for each touch monitor.
Figure 3-4 Installing Multiple Touch Monitors Using a DVI Splitter
TouchMonitor
DVI In
PolycomHDX System
Monitor1
TouchMonitor
DVI In
SOURCE 4 3 2 1
SOURCE

Installing and Configuring a Touch Monitor
Polycom, Inc. 23
3 Connect the touch monitors to the USB hub.
a Connect one end of a USB cable to the USB port of each touch monitor.
b Connect the other end of the USB cable to the USB hub.
A USB stick can also be installed in the USB hub for importing and exporting slides.
4 Connect the USB hub to the HDX system.
— HDX 8000 HD and HDX 7000 HD: The USB port is located in the back of the device.
— HDX 9006: The USB port is located in the front of the device.
Figure 3-5 Installing Multiple Touch Monitors Using a USB Hub
TouchMonitor
PolycomHDX System
Monitor1
USB
USB Hub
USBStick
TouchMonitorUSB
You can also install an active USB extension cable from the USB hub to the HDX system so that the USB hub can be placed on the table to be more convenient.

Polycom VisualBoard Application User’s Guide
24 Polycom, Inc.
Installing Multiple Touch Monitors in Addition to a Current Content Monitor
If you already have a content monitor and you are installing multiple touch monitors, follow the steps in this section.
You will need the following components to install multiple touch monitors in addition to a current content monitor.
• Powered DVI splitter
• 1 DVI-to-DVI (or DVI-to-HDMI) cable for each touch monitor
• 1 DVI-to-DVI (or DVI-to-HDMI) cable for your current content monitor
• USB hub (for saving and retrieving slides with a USB stick)
• 1 USB cable for each touch monitor
To install multiple touch monitors in addition to a current content monitor:
1 Connect the powered DVI splitter.
a Connect one end of the cable (DVI-DVI or DVI-HDMI) to the Monitor 2 DVI Output port on the HDX system.
b Connect the other end of a cable (DVI-DVI or DVI-HDMI) to the DVI splitter.
2 Connect the touch monitors to the DVI splitter.
a Connect one end of a cable (DVI-DVI or DVI-HDMI) to the DVI splitter.
b Connect the other end of the cable (DVI-DVI or DVI-HDMI) to the DVI port on the touch monitor.
c Repeat steps a and b for each touch monitor.

Installing and Configuring a Touch Monitor
Polycom, Inc. 25
Figure 3-6 Installing Multiple Touch Monitors in Addition to a Current Content Monitor Using a DVI Splitter
3 Connect the USB hub to the HDX system.
— HDX 8000 HD and HDX 7000 HD: The USB port is located in the back of the device.
— HDX 9006: The USB port is located in the front of the device.
4 Connect the touch monitors to the USB hub.
If you are using a Polycom UC Board sensor with your current content monitor, the sensor is connected to the USB hub.
a Connect one end of a USB cable to the USB port of each touch monitor.
Monitor1
Monitor2
TouchMonitor
DVI In
PolycomHDX System
TouchMonitor
DVI In
DVI In
SOURCE 4 3 2 1
SOURCE
You can also install an active USB extension cable from the USB hub to the HDX system so that the USB hub can be placed on the table to be more convenient.

Polycom VisualBoard Application User’s Guide
26 Polycom, Inc.
b Connect the other end of the USB cable to the USB hub.
A USB stick can also be installed in the USB hub for importing and exporting slides.
Figure 3-7 Installing Multiple Touch Monitors in Addition to a Current Content Monitor Using a USB Hub
Installing a USB MouseUsing a USB mouse with your VisualBoard application will allow you to make annotations and present slides without a UC Board sensor or touch monitor. A mouse will also make it easy to navigate the VisualBoard application from anywhere in the room.
You can use either a wired mouse or a wireless mouse with a paired receiver.
To install a mouse:
>> Connect the mouse to the USB hub following the instructions that came with the mouse.
PolycomHDX System
Monitor1
Monitor2
USB Hub
USBStick
TouchMonitorUSB
TouchMonitorUSB

Installing and Configuring a Touch Monitor
Polycom, Inc. 27
Setting up an HDX 4500 SystemBy attaching a mouse to an HDX 4500 system, you can use the VisualBoard application. Content and video will both be displayed on the HDX 4500 system.
To use an HDX 4500 system:
1 Connect the mouse to the USB port on the HDX 4500 system following the instructions that came with the mouse.
If additional USB ports are needed, you can connect a USB hub between the touch monitor and the HDX system. A USB stick can also be installed in the USB hub for importing and exporting slides, images, or photos.
2 Double-click the left mouse button to begin using the VisualBoard application.
Figure 3-8 Installing a Polycom HDX 4500 System
Installing a SMART Board as a Touch MonitorA SMART Technologies SMART Board may be used as a touch monitor for the VisualBoard application. With the SMART Board, you can use the VisualBoard application as you would with any other touch monitor.
You can also use the colored pens and eraser included with the SMART Board to change the color of your annotations or to erase annotations.
You will need the following components to install a SMART Board:
• DVI or HDMI cable
• USB cable
To install a SMART Board:
1 Disconnect the short USB cable from the module attached to the bottom right corner of the back of the SMART Board.
USB
PolycomHDX 4500
System
USB Hub(Optional)
Polycom VisualBoard Application User’s Guide
28 Polycom, Inc.
2 Connect a SMART Board to the Polycom HDX system.
a Connect one end of a DVI or DVI-to-HDMI cable to the DVI Input port on the SMART Board.
b Connect the other end of the DVI or DVI-to-HDMI cable to the Monitor 2 DVI Output port on the HDX system.
3 Connect the SMART Board to the HDX system using the cable you disconnected from the SMART Board.
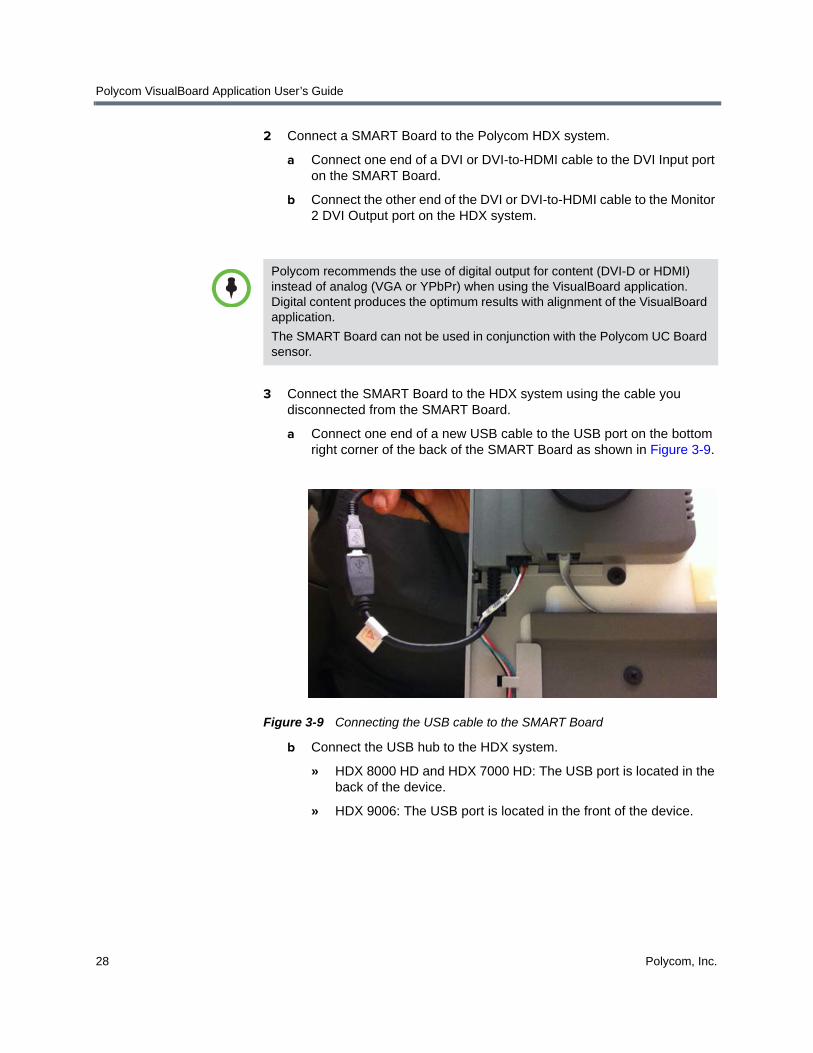
a Connect one end of a new USB cable to the USB port on the bottom right corner of the back of the SMART Board as shown in Figure 3-9.
Figure 3-9 Connecting the USB cable to the SMART Board
b Connect the USB hub to the HDX system.
» HDX 8000 HD and HDX 7000 HD: The USB port is located in the back of the device.
» HDX 9006: The USB port is located in the front of the device.
Polycom recommends the use of digital output for content (DVI-D or HDMI) instead of analog (VGA or YPbPr) when using the VisualBoard application. Digital content produces the optimum results with alignment of the VisualBoard application.
The SMART Board can not be used in conjunction with the Polycom UC Board sensor.

Installing and Configuring a Touch Monitor
Polycom, Inc. 29
c Connect the other end of the USB cable to the USB hub.
A USB stick can also be installed in the USB hub for importing and exporting slides.
Figure 3-10 Installing a SMART Board
DVI In
USB
PolycomHDX System
SMART Board
Projector
USB Hub
USBStick

Polycom VisualBoard Application User’s Guide
30 Polycom, Inc.
Calibrating the SMART Board
To calibrate the SMART Board:
1 Press and hold the Keyboard and Mouse buttons simultaneously until the calibration screen appears.
Figure 3-11 Activating the SMART Board Calibrating Screen
2 Using the SMART Board pen, touch the center of each of the nine red squares.
Calibration is complete when all nine red squares have turned green.
Figure 3-12 Calibrating the SMART Board

Installing and Configuring a Touch Monitor
Polycom, Inc. 31
Setting up the MonitorSome monitors apply post processing, which may delay the time between writing and seeing what you’ve written. When using the VisualBoard application with a monitor, set the monitor to its fastest response with no post processing selected, sometimes called Game Mode.
Configuring the HDX
Showing Content on Monitor Two
To show content on Monitor Two:
1 On the Home screen, go to System > Monitors > Monitors.
2 On the Monitor 1 screen, select both Display Near Video and Display Far Video.
3 Navigate to the Monitor 2 screen and set the resolution to either 720p or 1080p.
4 Enable Display Content to show shared content and annotations.
Enabling and Disabling the Shrink Content Feature
If the VisualBoard application goes off the screen, enable the Shrink Content feature. If the VisualBoard application does not fill the screen, disable the Shrink Content feature.
This only affects what is seen on the near-end monitors. Content seen by the far-site is not changed.
To enable and disable the Shrink Content feature through the Web UI:
1 Navigate to your HDX IP address using a web browser.
2 Go to Admin Settings > Monitors.
To improve performance, configure your monitor or projector to use Game Mode, if available.

Polycom VisualBoard Application User’s Guide
32 Polycom, Inc.
3 Enable or disable the Shrink Content feature on the monitor you are using to display content:
— If the VisualBoard application goes off the screen, select the Shrink Content checkbox. A black border will appear around the content to prevent it from going off the screen.
— If the VisualBoard application does not fill the screen, deselect the Shrink Content checkbox.
To enable and disable the Shrink Content feature through the local interface:
1 From the Home screen, go to System > Monitors > Monitors.
2 Navigate to the settings page for your content monitor, either Monitor 1 or Monitor 2.
3 Enable or disable the Shrink Content feature for your content monitor:
— If the VisualBoard application goes off the screen, select the Shrink Content checkbox. A black border will appear around the content to prevent it from going off the screen.
— If the VisualBoard application does not fill the screen, deselect the Shrink Content checkbox.