plotting planes...plotting planes before we discuss plotting a plane, it is important to think about...
TRANSCRIPT

Plotting Planes Before we discuss plotting a plane, it is important to think about how we
describe the orientation of a plane in space. Strike and dip is a specialized spherical coordinate system used by geologists. Strike is the azimuth or compass direction of the unique horizontal line contained in the dipping plane. (A horizontal plane does not have a strike because every line is horizontal.) Strike ranges from 0 to 360. With the advent of stereonet computer programs, it has become common to use the Right-Hand-Rule (RHR) for reporting strike and dip. Imagine looking parallel to the strike direction so the plane is dipping down to your right (Fig. 11). That is the direction you use for strike. If you turned around 180 degrees, the plane would be dipping to your left, not the strike direction. (An alternative system is to use either direction for strike, the dip value in degrees, and the direction of dip. This requires three pieces of information as opposed to the RHR system, which only requires two.) If you use the RHR system, and the plane dips north, its strike is 270, east is 0 or 360, south is 90, and west is 180. Dip is the angle between a plane and the horizontal as measured in a vertical plane that is perpendicular to the strike direction (Fig. 11). It ranges between 0 and 90; we never use negative values or values between 90 and 180! A horizontal plane has a dip of 0, a vertical plane has a dip of 90. Thus, two values, strike and dip, uniquely define the orientation of a plane.
Figure 11. Strike and dip of a plane. Plane strikes 320 using the right-hand-rule, and dips 60.
It is a good habit to try to visualize where a plane should be drawn before you
actually plot it accurately. Planes will appear as great circles on the stereonet. Picture a compass with the 16 points commonly used by mariners: N, NNE, NE, ENE, E, etc. (Fig. 7). Based on the strike of the plane, estimate the direction in which the strike of the plane will plot on the stereonet using the RHR system. Starting from the strike direction on the circumference of the stereonet, the plane will plot as a great circle to the right of the strike direction. Shallowly dipping planes will coincide with great circles close to the circumference. Steeply dipping planes will be great circles close to the center of the stereonet. Vertical planes will be straight lines that pass through the center of the stereonet.
To plot the plane accurately, put a piece of tracing paper over the stereonet. Put a thumb tack in the center of the stereonet so you can rotate the tracing paper but keep it centered over the net. Make a mark in ink on the tracing paper in the
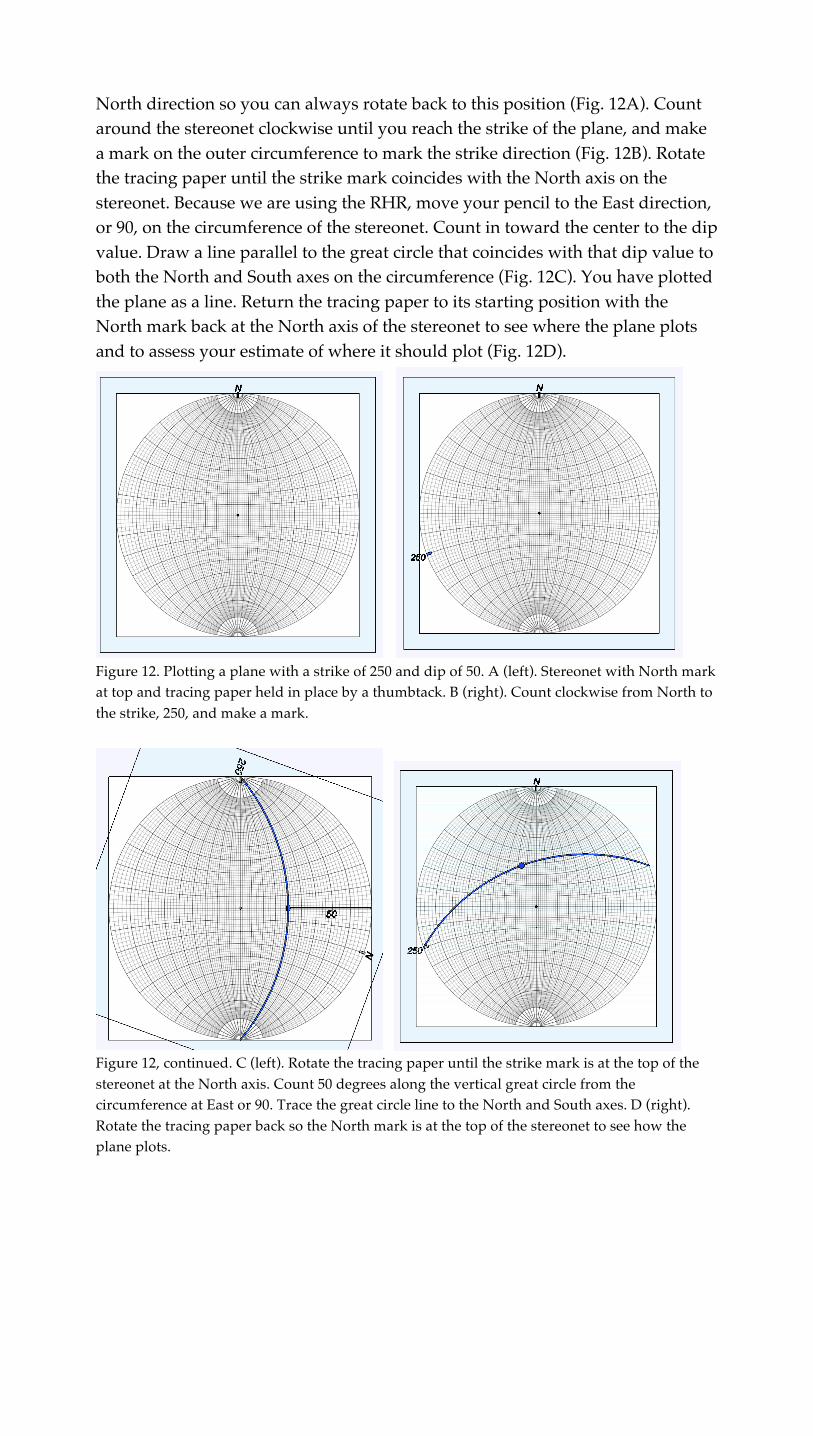
North direction so you can always rotate back to this position (Fig. 12A). Count around the stereonet clockwise until you reach the strike of the plane, and make a mark on the outer circumference to mark the strike direction (Fig. 12B). Rotate the tracing paper until the strike mark coincides with the North axis on the stereonet. Because we are using the RHR, move your pencil to the East direction, or 90, on the circumference of the stereonet. Count in toward the center to the dip value. Draw a line parallel to the great circle that coincides with that dip value to both the North and South axes on the circumference (Fig. 12C). You have plotted the plane as a line. Return the tracing paper to its starting position with the North mark back at the North axis of the stereonet to see where the plane plots and to assess your estimate of where it should plot (Fig. 12D).
Figure 12. Plotting a plane with a strike of 250 and dip of 50. A (left). Stereonet with North mark at top and tracing paper held in place by a thumbtack. B (right). Count clockwise from North to the strike, 250, and make a mark.
Figure 12, continued. C (left). Rotate the tracing paper until the strike mark is at the top of the stereonet at the North axis. Count 50 degrees along the vertical great circle from the circumference at East or 90. Trace the great circle line to the North and South axes. D (right). Rotate the tracing paper back so the North mark is at the top of the stereonet to see how the plane plots.