pineleaf’s pictorial primer to...
TRANSCRIPT

Pineleaf’s Pictorial Primer to Skirmishing
Update 21.3 Edition Chapter 2: Solo Lieutenants Page | 1
Pineleaf ’s Pictorial Primer to Skirmishing
A guide to the skirmish system in The Lord of the Rings Online
Chapter 2: Solo Lieutenants
By Pineleaf Needles for LOTRO Players
http://www.lotroplayers.com

Pineleaf’s Pictorial Primer to Skirmishing
Update 21.3 Edition Chapter 2: Solo Lieutenants Page | 2
Contents
Introduction .............................................................................................................................................. 3
Basic Information ...................................................................................................................................... 4
Morale Levels ............................................................................................................................................ 5
Lieutenant Spawns .................................................................................................................................... 6
Rewards................................................................................................................................................. 6
Deeds .................................................................................................................................................... 6
Bearer of Blight ......................................................................................................................................... 7
Blood-Rook ................................................................................................................................................ 8
Daywalker Berserker ................................................................................................................................. 9
Death-Monger ......................................................................................................................................... 10
Defender of the Vile ................................................................................................................................ 11
Dourhand Keg-Master ............................................................................................................................. 12
Dourhand Storm-Keeper ......................................................................................................................... 13
Echo of Death .......................................................................................................................................... 14
Forest-Born Reaver ................................................................................................................................. 15
Pale Trapper ............................................................................................................................................ 16
Shepherd of Filth ..................................................................................................................................... 17
Troll Wound-Taker .................................................................................................................................. 18
Venomous Blood-Arrow.......................................................................................................................... 19
Zealot of Pain .......................................................................................................................................... 20

Pineleaf’s Pictorial Primer to Skirmishing
Update 21.3 Edition Chapter 2: Solo Lieutenants Page | 3
Introduction Welcome to the third edition of Pineleaf’s Pictorial Primer to Skirmishing. In this series, we will look at
the skirmish system in The Lord of the Rings Online™. In this chapter, we will examine each of the
lieutenants that you can encounter in any sized skirmish (from solo up to raid). I refer to these as “solo
lieutenants” as they are the only lieutenants that appear in solo settings. The next two chapters include
the lieutenants that only appear in larger group settings.
In this chapter, we will look at each lieutenant, including which skirmishes they can appear in, their
abilities, and any tactics you can use to defeat them.
Pineleaf Needles
Follow the latest LOTRO news at LOTRO Players at http://www.lotroplayers.com.
Pineleaf facing two lieutenants at once while assaulting the Ringwraiths’ Lair

Pineleaf’s Pictorial Primer to Skirmishing
Update 21.3 Edition Chapter 2: Solo Lieutenants Page | 4
Basic Information There are a total of 14 lieutenants that can appear in solo skirmishes. There are four versions of each of
these lieutenants: one that appears in solo skirmishes (signature quality), one that appears in duo and
small fellowship skirmishes (elite quality), one that appears in full fellowship skirmishes (elite master
quality), and one that appears in raid skirmishes (nemesis quality). The higher quality versions tend to
have either more special abilities or more powerful special abilities than the lower-quality versions.
Not all lieutenants appear in all skirmishes. The table below lists all the lieutenants that appear in solo
runs of each skirmish. The majority of the skirmishes allow all of the lieutenants.
The top two lines of the table show the average and maximum number of lieutenants I have faced in a
run of each skirmish. For Rescue in Nûrz Gâshu, the numbers assume that you hit each Torech cleanly
and not spawn any additional waves (as each wave will include its own lieutenant). The number given
for Tuckborough does not include any lieutenants summoned by the final boss during group runs.
Lieutenant Tuck
bo
rou
gh
Go
nd
amo
n
Sto
rm o
f M
eth
edra
s
Am
on
Sû
l
Att
ack
at D
awn
Thie
very
& M
isch
ief
Pra
nci
ng
Po
ny
Ford
of
Bru
inen
Bar
row
Do
wn
s
The
Icy
Cre
vass
e
Bat
tle
of
Dee
p-w
ay
Bat
tle
Way
of
Smit
h
Bat
tle
of
the
21
st
Dan
nen
glo
r
Thra
ngú
lhad
Nec
rom
ance
r's
Gat
e
Rin
gwra
ith
s’La
ir
Bat
tle
in t
he
Tow
er
Nû
rz G
âsh
u
Average # LT per run 11 12 4 6 9 7 5 10 6 6 8 6 6 3.5 7 12 10 10 6
Maximum # LT per run 11 16 8 12 9 9 6 12 20 6 10 8 8 9 15 15 10 12 6
Bearer of Blight √ √ √ √ √ √ √ √ √ √ √ √ √ √ √ √ √ √
Blood Rook √ √ √ √ √ √ √ √ √ √ √ √ √ √ √ √ √
Daywalker Berserker √ √ √ √ √ √ √ √ √ √ √ √ √ √ √ √
Death-Monger √ √ √ √ √ √ √ √ √ √ √ √ √ √ √ √ √ √ √
Defender of the Vile √ √ √ √ √ √ √ √ √ √ √ √ √ √ √ √ √ √ √
Dourhand Keg-Master √ √ √ √ √ √ √ √ √ √ √ √ √
Dourhand Storm-Keeper √ √ √ √ √ √ √ √ √ √ √ √ √
Echo of Death √ √ √ √ √ √ √ √ √ √ √ √ √ √ √ √
Forest-Born Reaver √ √ √ √ √ √ √ √ √ √ √ √ √ √ √ √
Pale Trapper √ √ √ √ √ √ √ √ √ √ √ √ √ √ √ √
Shepherd of Filth √ √ √ √ √ √ √ √ √ √ √ √ √ √ √ √ √ √ √
Troll Wound-Taker √ √ √ √ √ √ √ √ √ √ √ √ √ √ √ √ √
Venomous Blood-Arrow √ √ √ √ √ √ √ √ √ √ √ √ √ √ √ √ √ √
Zealot of Pain √ √ √ √ √ √ √ √ √ √ √ √ √ √ √ √ √

Pineleaf’s Pictorial Primer to Skirmishing
Update 21.3 Edition Chapter 2: Solo Lieutenants Page | 5
Morale Levels As with most mobs, each lieutenant is assigned a morale class. Most lieutenants maintain the same
morale class for each skirmish size, though some change morale class between sizes.
Lieutenant morale levels also have a multiplier based on the skirmish size. This is generally 2 for solo
runs (though many lieutenants only have a multiplier of 1 for solo runs), 2.97 for duos, 4.5 for small
fellowship, 10 for fellowship, and 20 for raid.
Lieutenant Solo Duo Small F Fellowship Raid
Multiplier 1 or 2 2.97 4.5 10 20
Bearer of Blight 1xB+1 B+1 B+1 B+1 B+1
Blood- Rook 2xB-1 B-1 B-1 B-1 B-1
Daywalker Berserker 2xB B B B B
Death-monger 1xB-2 B-2 B-2 B-2 B-2
Defender of the Vile 1xB+1 B+1 B+1 B+1 B+1
Dourhand Keg-master 1xB+1 B+1 B+1 B+1 B+1
Dourhand Storm-keeper 1xB+1 B+1 B+1 B+1 B+1
Echo of Death 2xB B B B B
Forest-born Reaver 2xB+1 B+1 B+1 B+1 B+1
Pale Trapper 1xB-1 B-1 B-1 B-1 B-1
Shepherd of Filth 1xB-1 B-1 B-1 B-1 B-1
Troll Wound-taker 1xA-1 A-1 A-1 A-1 A-1
Venomous Blood-arrow 1xB-1 B+1 B+1 B+1 B+1
Zealot of Pain 1xB B B B B
The table below lists the morale for level-115 lieutenants in a Tier 1 skirmish.
Morale Class Solo 1 Solo 2 Duo Small F Fellowship Raid
Multiplier 1 2 2.97 4.5 10 20
A-1 70,523 N/A 209,454 317,354 705,232 1,410,463
B+1 64,753 129,506 192,317 291,389 647,531 1,295,062
B 64,112 128,224 190,413 288,504 641,120 1,282,239
B-1 63,471 126,942 188,508 285,619 634,709 1,269,417
B-2 62,830 N/A 186,604 282,734 628,297 1,256,595

Pineleaf’s Pictorial Primer to Skirmishing
Update 21.3 Edition Chapter 2: Solo Lieutenants Page | 6
Lieutenant Spawns Lieutenants have their own spawn points independent of those for other mobs. Each spawn point has a
chance of actually spawning a lieutenant. Generally, these spawn points are near supporting trash mobs.
As such, you will usually face a single lieutenant with several other mobs. There are four cases where
you may face more than one lieutenant at a time:
1. Assault on the Ringwraiths’ Lair has two counterattacks that include two lieutenant spawns and
no supporting mobs.
2. Some large areas include multiple groups with each group having its own lieutenant spawn. In
these cases, it is generally possible to avoid pulling multiple lieutenants at a time.
3. In group runs, the boss fight in Trouble in Tuckborough includes summoned lieutenants. If you
keep attacking the boss while a lieutenant is present, the boss may summon another lieutenant
before you defeat the current one.
4. In raids, each lieutenant spawn has a chance of generating two lieutenants rather than one.
All lieutenants appearing in full fellowship and raid skirmishes have the following ability in addition to
those listed under the individual lieutenant:
Protection from Slows: Unaffected by debuffs which slow movement.
Rewards
Whenever you defeat a lieutenant, there is a chance that the lieutenant will drop loot. Bounties are the
most common drops, marks are the next most common, relics are uncommon, and other legendary
accessories (such as Starlit Crystals) are rare.
Deeds
Each lieutenant also has an associated slayer deed. There are two tiers for each of these deeds: kill the
lieutenant five times then kill the lieutenant 50 times. There is no title for the deed but you do gain 50
skirmish marks for completing the first tier and 500 skirmish marks for completing the second tier. A
lieutenant only counts if the level of the lieutenant is at least green (meaning you will need to run the
skirmish somewhere near your own level).
There is no meta deed for completing all of the lieutenant slayer deeds.
Pineleaf’s Pictorial Primer to Skirmishing
Update 21.3 Edition Chapter 2: Solo Lieutenants Page | 7
Bearer of Blight
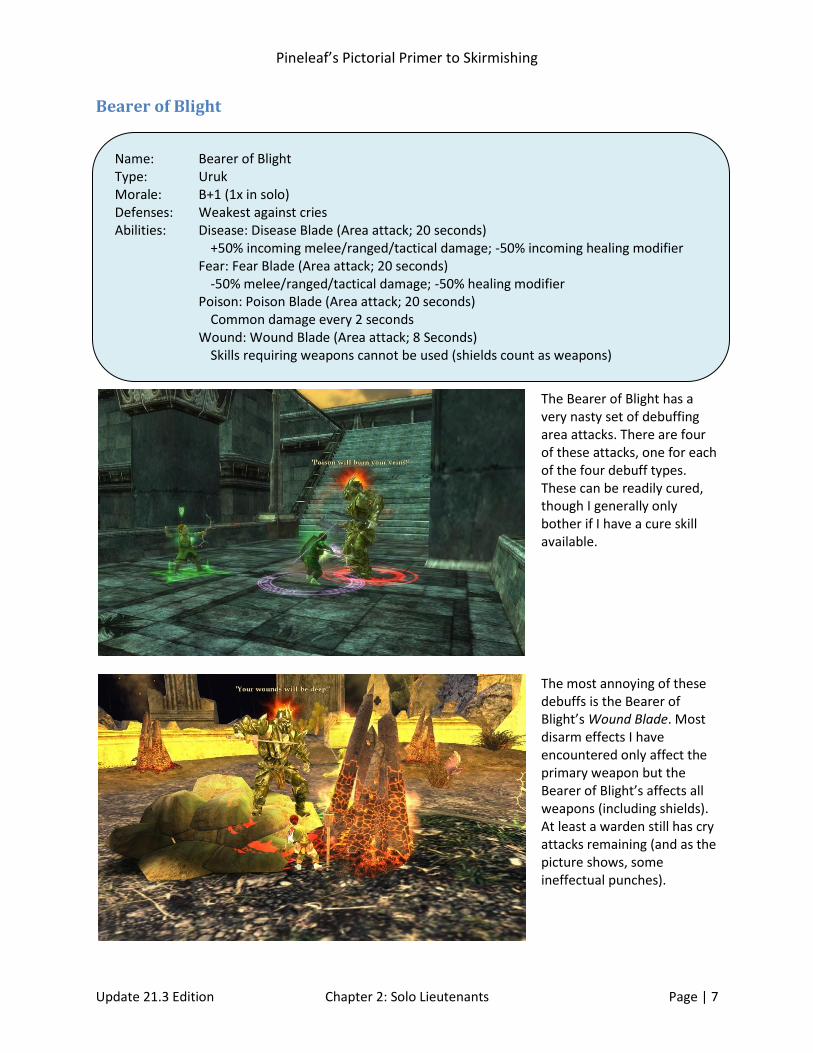
The Bearer of Blight has a very nasty set of debuffing area attacks. There are four of these attacks, one for each of the four debuff types. These can be readily cured, though I generally only bother if I have a cure skill available.
The most annoying of these debuffs is the Bearer of Blight’s Wound Blade. Most disarm effects I have encountered only affect the primary weapon but the Bearer of Blight’s affects all weapons (including shields). At least a warden still has cry attacks remaining (and as the picture shows, some ineffectual punches).
Name: Bearer of Blight Type: Uruk Morale: B+1 (1x in solo) Defenses: Weakest against cries Abilities: Disease: Disease Blade (Area attack; 20 seconds) +50% incoming melee/ranged/tactical damage; -50% incoming healing modifier Fear: Fear Blade (Area attack; 20 seconds) -50% melee/ranged/tactical damage; -50% healing modifier Poison: Poison Blade (Area attack; 20 seconds) Common damage every 2 seconds Wound: Wound Blade (Area attack; 8 Seconds) Skills requiring weapons cannot be used (shields count as weapons)

Pineleaf’s Pictorial Primer to Skirmishing
Update 21.3 Edition Chapter 2: Solo Lieutenants Page | 8
Blood-Rook
Blood-rooks are gregarious: the more company they have, the better they like it. When they are in the company of allies, you will see a red cloud in the vicinity of the Blood-rook. This means that they are dishing out additional damage and taking less damage.
When its companions are either defeated or out of range, the cloud disappears. There are two ways to handle the blood-rook. One is to kill its companions before you take on the rook. The other is to pull the Blood-rook away from its companions.
Name: Blood-Rook Type: Craban Morale: B-1 (2x in solo) Defenses: Finesse Feeble Immunities None Resistances Good (F S, Ph) Mitigations Sup (Fire/Lt Good) Abilities: Aid of Allies Increased melee damage per nearby ally Decreased incoming damage per nearby ally Interrupt
Pineleaf’s Pictorial Primer to Skirmishing
Update 21.3 Edition Chapter 2: Solo Lieutenants Page | 9
Daywalker Berserker
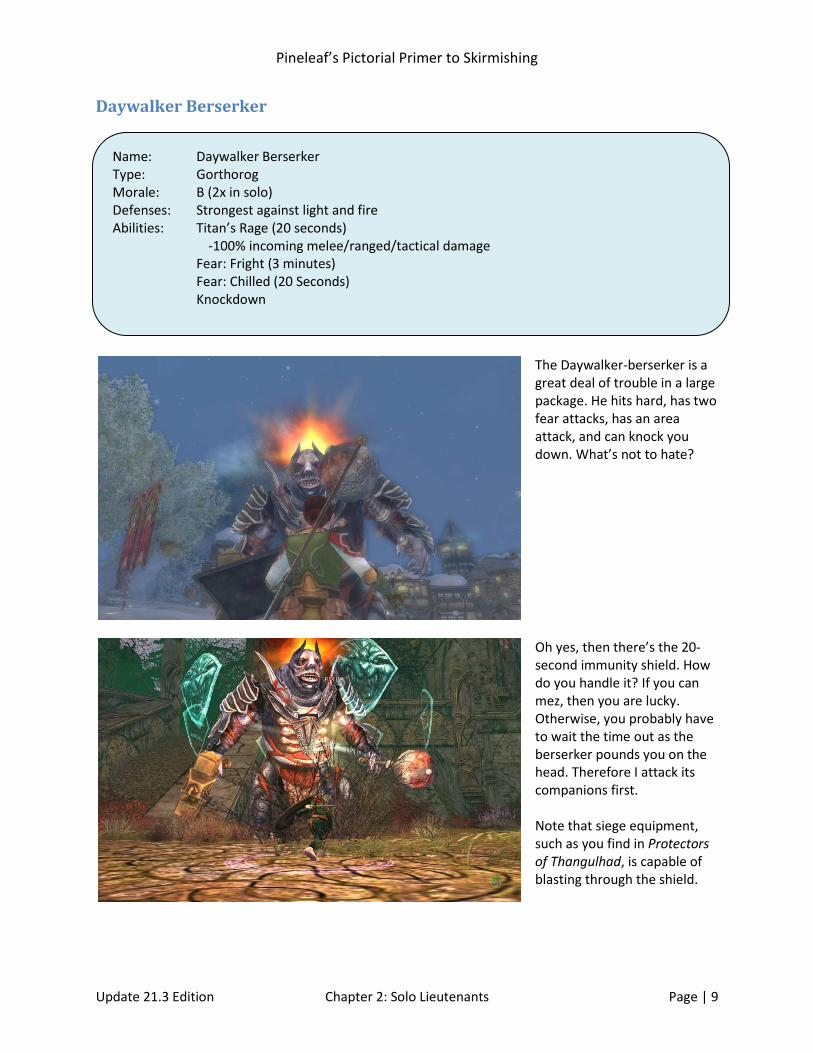
The Daywalker-berserker is a great deal of trouble in a large package. He hits hard, has two fear attacks, has an area attack, and can knock you down. What’s not to hate?
Oh yes, then there’s the 20-second immunity shield. How do you handle it? If you can mez, then you are lucky. Otherwise, you probably have to wait the time out as the berserker pounds you on the head. Therefore I attack its companions first. Note that siege equipment, such as you find in Protectors of Thangulhad, is capable of blasting through the shield.
Name: Daywalker Berserker Type: Gorthorog Morale: B (2x in solo) Defenses: Strongest against light and fire Abilities: Titan’s Rage (20 seconds) -100% incoming melee/ranged/tactical damage Fear: Fright (3 minutes) Fear: Chilled (20 Seconds) Knockdown
Pineleaf’s Pictorial Primer to Skirmishing
Update 21.3 Edition Chapter 2: Solo Lieutenants Page | 10
Death-Monger
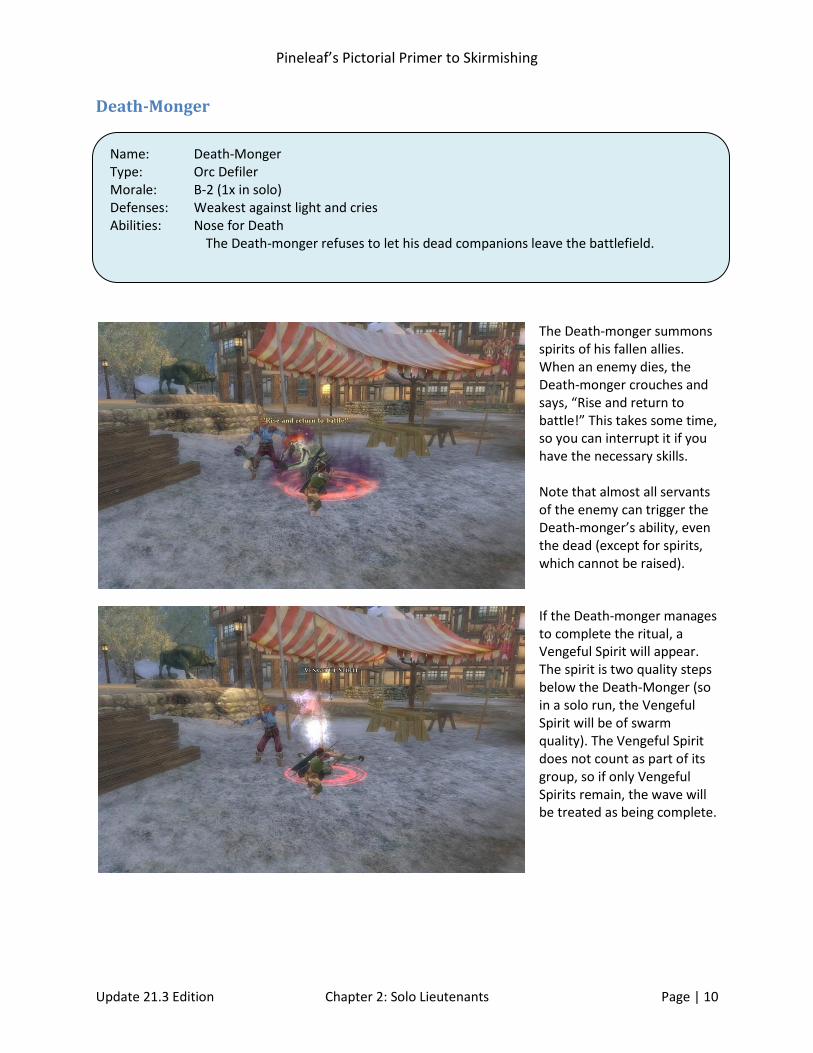
The Death-monger summons spirits of his fallen allies. When an enemy dies, the Death-monger crouches and says, “Rise and return to battle!” This takes some time, so you can interrupt it if you have the necessary skills. Note that almost all servants of the enemy can trigger the Death-monger’s ability, even the dead (except for spirits, which cannot be raised).
If the Death-monger manages to complete the ritual, a Vengeful Spirit will appear. The spirit is two quality steps below the Death-Monger (so in a solo run, the Vengeful Spirit will be of swarm quality). The Vengeful Spirit does not count as part of its group, so if only Vengeful Spirits remain, the wave will be treated as being complete.
Name: Death-Monger Type: Orc Defiler Morale: B-2 (1x in solo) Defenses: Weakest against light and cries Abilities: Nose for Death The Death-monger refuses to let his dead companions leave the battlefield.

Pineleaf’s Pictorial Primer to Skirmishing
Update 21.3 Edition Chapter 2: Solo Lieutenants Page | 11
Defender of the Vile
The Defender of the Vile provides a defensive bonus to his companions. Therefore, the combat will be easier if you kill the Defender of the Vile first. The competence bonus is a reduction to incoming damage that varies based on the group size setting of the skirmish: -25% for solo, -50% for duo and small fellowships, -75% for full fellowships, and -100% for raids.
Isn’t this fun? You are being pounded to pieces and your choice is to either kill the toughest opponent first or work through a series of opponents with enhanced defenses. The occasional disarm (as on the left) is just a little salt to add to the situation, though at least I can keep my shield against the Defender.
Name: Defender of the Vile Type: Orc Morale: B+1 (1x in solo) Defenses: Weakest against light and cries Abilities: Defender of the Vile The presence of a Defender of the Vile inspires competence in battle. Aura: Vile Defense -25% Incoming Melee, Tactical, and Ranged damage -50% in duo/SF; -75% in fellowship; -100% in raid Wound: Primary weapon: Disarmed (5 seconds)

Pineleaf’s Pictorial Primer to Skirmishing
Update 21.3 Edition Chapter 2: Solo Lieutenants Page | 12
Dourhand Keg-Master
The Keg-master is the obligatory drunken fighter. He can either take a swig or spit some brew in your face. This is the only lieutenant that is equally willing to cast the same effect on either you or himself. As the picture to the left demonstrates, he is also able to heal himself. How’s that for annoying?
If you are in a group, the Keg Master truly earns his name by placing kegs on the ground. As you can guess from the fire coming out of the keg, it is getting ready to explode. Anyone near a keg when it explodes is stunned.
Name: Dourheand Keg-Master Type: Dourhand dwarf Morale: B+1 (1x in solo) Defenses: Poor defenses and great mitigations Abilities: I Drink (40 seconds, stackable) +20% melee/ranged/tactical damage +20% incoming melee/ranged/tactical +20% miss chance You Drink (40 seconds, stackable) Exactly the same as “I Drink” except that it targets someone fighting the lieutenant Explosive Brew (Duo +) Wound: Serious Wound (20 seconds) Healing

Pineleaf’s Pictorial Primer to Skirmishing
Update 21.3 Edition Chapter 2: Solo Lieutenants Page | 13
Dourhand Storm-Keeper
The Storm-keeper may be a little shocking but he is otherwise the least annoying of the lieutenants you can face in solo play. In some backdrops, the lighting attack can even be a little pretty as in the picture to the left.
In group modes, the Storm-keeper becomes a more serious opponent. He can drop Sigils of Destruction that generate an aura of fire. I highly recommend that you destroy any sigils that appear as quickly as possible. I wonder how that rock compares to a volcanic runestone.
Name: Dourheand Storm-keeper Type: Dourhand dwarf Morale: B+1 (1x in solo) Defenses: Finesse Feeble Immunities None Resistances Good Mitigations Remarkable Abilities: Sigil of Destruction (Duo+; 1 in duo/small fellowship; 2 in Fellowship; 3 in raid) Creates an aura of Deadly Inferno Wound: Sigil: Deadly Inferno (Duo+, Area effect around Sigil of Destruction) 181 Fire damage every 2 seconds (level 57) Wound: Shocking Grasp (Fellowship+; 30 seconds) Lightning damage every 2 seconds

Pineleaf’s Pictorial Primer to Skirmishing
Update 21.3 Edition Chapter 2: Solo Lieutenants Page | 14
Echo of Death
This is one of the nastier lieutenants you will face in solo mode. Its ability causes you to take extra damage from melee and ranged effects, which are the most common types you will face during skirmishes. Therefore, tanking the Echo of Death and the trash at the same time is going to get you hurt. Note that soldiers will not attack an Echo of death without orders.
The Echo of Death inflicts tactical damage, so you will at least not take any extra damage from the Echo of Death itself. For this reason, it is generally best to clear the trash first and then attack the Echo of Death. Another possibility is to allow your soldiers and the defender to work on the trash while you fight the Echo of Death alone. This way, you might avoid using your attack horn.
Name: Echo of Death Type: Shade Morale: B (2x in solo) Defenses: Strongest against physical; weakest against Song and Westernesse Abilities: Death’s Echo (on any damage, 25% chance to reflect effect for 20 seconds) +100% incoming melee/ranged damage (note: NOT tactical damage) Fear: Distraught (32 seconds) Fear: Major Fright 4 minutes

Pineleaf’s Pictorial Primer to Skirmishing
Update 21.3 Edition Chapter 2: Solo Lieutenants Page | 15
Forest-Born Reaver
The Forest-born Reaver is a wood troll. It’s only special attack is a ranged stun. It has excellent mitigations against common damage, so I recommend doing some other damage type if available. Beleriand is your best choice of damage type but fire and light are almost as good.
This troll can become enraged. When enraged, the troll not only becomes faster but it also places priority on attacking soldiers. If my soldier is far off, the troll will ignore her, but if my soldier is nearby there is nothing that will get the troll off her for the next ten seconds.
Name: Forest-born Reaver Type: Wood Troll Morale: B+1 (2x in solo) Defenses: Finesse Feeble Immunities None Resistances Good (F Song) Mitigations Sup (Fire Av. Lt Fa, AD/Bel Good) Abilities: Knockdown Enragement (10 seconds) This creature is enraged and hates soldiers -30% attack duration, +30% run speed, will attack a soldier is nearby.

Pineleaf’s Pictorial Primer to Skirmishing
Update 21.3 Edition Chapter 2: Solo Lieutenants Page | 16
Pale Trapper
The Pale Trapper will occasionally blow a horn and set off a trap. While blowing the horn, you are caught in a Snare Trap that slows you down as the main trap is being set. There are three possible main traps. In solo runs, the main trap is a fire trap as depicted in the picture. It’s deadly (at least at lower levels) but you can easily avoid it.
The second main trap is only used in group runs and it can slow you for ten seconds (this is the weakest of the three possible traps). In full fellowship and raid runs, The Trapper gains a third trap that brings tentacles from the ground to root you in place. This trap is very, very annoying, so I recommend moving out of its area when you’re not rooted.
Name: Pale Trapper Type: Pale Folk Morale: B-1 (1x in solo) Defenses: Weakest against light Abilities: Poison: Major Crippling Poison (4 minutes) Poison: Major Poison (30 seconds) Snare Trap (5 seconds) -40% run speed Wound: Deadly Inferno (Area) Fire damage every 2 seconds Slowed: -25% Run speed (Duo+, 10 seconds) Rooting Tentacle Trap (Fellowship+) Fire damage (203 at level 65) if in area every 2 seconds

Pineleaf’s Pictorial Primer to Skirmishing
Update 21.3 Edition Chapter 2: Solo Lieutenants Page | 17
Shepherd of Filth
The Shepherd is one of the masters of annoyance. Those crawlers can create a real mess. If you have neither an area attack nor a stun, you have my condolences when you face this nasty goblin.
The shepherd won’t attempt to summon anything until it is damaged. After the first attempt, additional summoning attempts are triggered by time. Therefore, either avoid hitting the shepherd at all or burn it down quickly. More often than not, an NPC will attack the shepherd and force you to take the latter course.
Name: Shepherd of Filth Type: Goblin Morale: B-1 (1x in solo) Defenses: Finesse Feeble Immunities None Resistances Good (F Cry) Mitigations Sup (Fire/B Good, Lt Average) Abilities: Rooted (10 seconds) Cannot move. Damage has a moderate chance to end this state Filth Crawlers Calls up three filth crawlers (102 morale at level 65 solo) Filth Crawler Goo (30 seconds, penalties are per tier, five tiers maximum) -30% attack direction, -10% run speed, +10% all inductions per tier

Pineleaf’s Pictorial Primer to Skirmishing
Update 21.3 Edition Chapter 2: Solo Lieutenants Page | 18
Troll Wound-Taker
Troll Wound-takers can heal their allies by sacrificing some of their own morale. I therefore kill it before I attack the allies. Note that the healing provided is more than the morale spent. Thus, running into a pair of these that start healing each other can be quite annoying (especially in raids).
When the troll is attempting to heal a companion, he pounds the ground in the direction of the companion.
Name: Troll Wound-Taker Type: Troll Morale: A-1 (1x in solo) Defenses: Finesse Feeble Immunities None Resistances Good (F Song) Mitigations Sup (Fire/Lt Fa, AD/Bel Good) Abilities: Wound: Laceration (42 seconds) Wound: Injury (1 minute 30 seconds) Wound: Dislocation (42 seconds) Healing by spending own morale Wound: Degrading Wound
Pineleaf’s Pictorial Primer to Skirmishing
Update 21.3 Edition Chapter 2: Solo Lieutenants Page | 19
Venomous Blood-Arrow
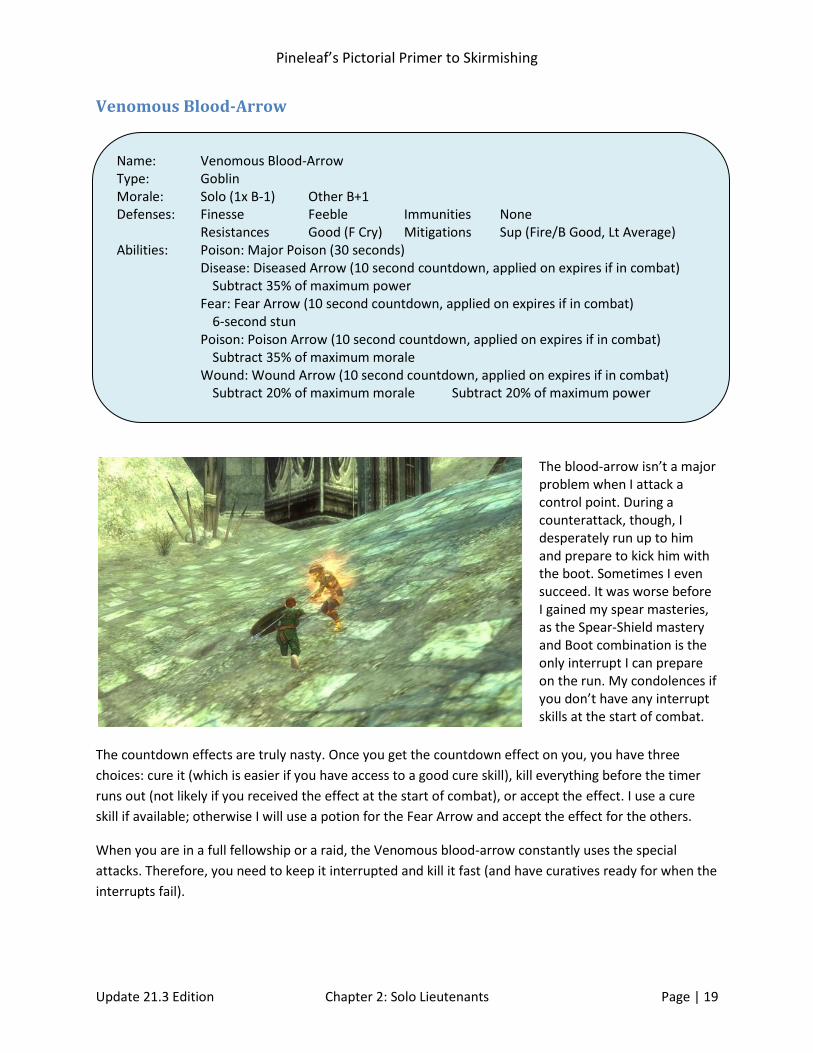
The blood-arrow isn’t a major problem when I attack a control point. During a counterattack, though, I desperately run up to him and prepare to kick him with the boot. Sometimes I even succeed. It was worse before I gained my spear masteries, as the Spear-Shield mastery and Boot combination is the only interrupt I can prepare on the run. My condolences if you don’t have any interrupt skills at the start of combat.
The countdown effects are truly nasty. Once you get the countdown effect on you, you have three
choices: cure it (which is easier if you have access to a good cure skill), kill everything before the timer
runs out (not likely if you received the effect at the start of combat), or accept the effect. I use a cure
skill if available; otherwise I will use a potion for the Fear Arrow and accept the effect for the others.
When you are in a full fellowship or a raid, the Venomous blood-arrow constantly uses the special
attacks. Therefore, you need to keep it interrupted and kill it fast (and have curatives ready for when the
interrupts fail).
Name: Venomous Blood-Arrow Type: Goblin Morale: Solo (1x B-1) Other B+1 Defenses: Finesse Feeble Immunities None Resistances Good (F Cry) Mitigations Sup (Fire/B Good, Lt Average) Abilities: Poison: Major Poison (30 seconds) Disease: Diseased Arrow (10 second countdown, applied on expires if in combat) Subtract 35% of maximum power Fear: Fear Arrow (10 second countdown, applied on expires if in combat) 6-second stun Poison: Poison Arrow (10 second countdown, applied on expires if in combat) Subtract 35% of maximum morale Wound: Wound Arrow (10 second countdown, applied on expires if in combat) Subtract 20% of maximum morale Subtract 20% of maximum power

Pineleaf’s Pictorial Primer to Skirmishing
Update 21.3 Edition Chapter 2: Solo Lieutenants Page | 20
Zealot of Pain
As long as I can keep everyone from attacking the Zealot of Pain, he is no real trouble. This is why I prefer to face counterattacks with lieutenants away from the defenders. Fortunately, soldiers will not attack a Zealot without orders until he is too low in health to trigger his shout.
Sometimes, circumstances just don’t go your way and you are forced to face a pair of them. This is especially bad in the Tuckborough courtyard fight, as it generally means that you pulled a large number of adds with them. Here I am low in morale against two mobs that my soldier will only attack when commanded. When you add their painful buff, I wonder how I survived that fight.
Name: Zealot of Pain Type: Brigand Morale: B (1x in solo) Defenses: No specific strengths or weaknesses Abilities: No Pain No Gain (applied at three morale levels during the fight) Provides a stackable Zealot’s Rallying Cry to nearby allies Zealot’s Rallying Cry (expires if out of combat, stackable) +20% melee/ranged/tactical damage Knock Down.