philadelphia university faculty of information technology ... sheets … · philadelphia university...
TRANSCRIPT

Philadelphia University
Faculty of Information Technology
Visual Programming
Using C#
-Work Sheets-
Prepared by:
Dareen Hamoudeh
Eman Al Naji
Work Sheet 1
Form, Buttons and labels Properties
Changing properties through properties window:
1. Change the following Form properties:
a) Change the form title to “worksheet1” (text).
b) Set the Background color to blue (BackColor).
c) Set the font color to red (ForeColor).
d) Change e font style (Font)
e) Set the interior spacing to 10 (Padding).
f) Specify the Maximum form Size to be 500 x 500 (MaximumSize).
g) Specify the Minimum form Size to be 100 x 100 (MinimumSize).
2. Place three Buttons on the form, and change their properties as follows:
a) Change buttons titles to “Ok, Exit, Disable “(text).
b) Change buttons names to “Ok, Exit, “(Name).
c) Set the buttons size to 50 x 50 (size).
d) Set the location for the ok button to be 60,60. And the Exit button to be
150,60.
e) Set the tab index order as the following:
Ok button: 0, Exit button:1, Disable:2
f) Disable any button and notice the change (Enable).
g) Set the visible property to be false for any button and notice the change
(visible).
h) Using the property (Anchor) keep the “ok , Exit buttons” located to the
left side of the form.
i) Set the (Dock) property to: Top for the “Disable” button.
j) Back to form properties, set (AcceptButton) to the Ok button, and
CancelButton to the Exit button.
3. Drag a label on the form:
a. Write the following text on it:” welcome to project 1”.
b. Change font style, color and alignment.
Changing properties at run time:
Write the appropriate code to apply the following:
a) Insert a button that changes the Form’s background color.
b) Insert a button that hides\shows the label.
c) Disable button will disable the “Hide” button.
d) The Ok button shows a welcome message.
e) Exit button closes the form.
Work Sheet 2
Textboxes Properties and Exercises
Changing properties through properties window:
4. Drag a Textbox to the current form, and change the following Form
properties:
h) Enable your textbox to contain several lines (Multiline)
i) Show scrollbars in the textbox (ScrollBars).
j) Enable your textbox to create a new line whenever you reach the border.
(WordWrap).
k) Add a default value to your textbox (Text).
l) Change the font color in the textbox (forecolor)
m) Forbid user to write in the textbox (Readonly)
n) Forbid user access to the textbox (Enabled)
o) Use your textbox for entering a password (PasswordChar)
p) Use your textbox for entering a password, using the system symbol
(UseSystemPasswordChar).
q) Add other 3 textboxes.
r) Change the TabIndex property for each textbox, so that the navigation
between them will change.

Exercise 1:
Create the following form:
Add code that does the following:
a) Change Title: Changes the title of the form according to the text entered in
the textbox (title).
b) Show/Hide: Shows and hides the label, the textbox and the button of the
Title.
c) Join: Joins the first name and last name inserted in the textboxes, and stores
the results in Full Name.
d) Go to Title: transfers the focus to Title.
e) Repeat the code written in Join button, so that it occurs in "Textchanged"
event.
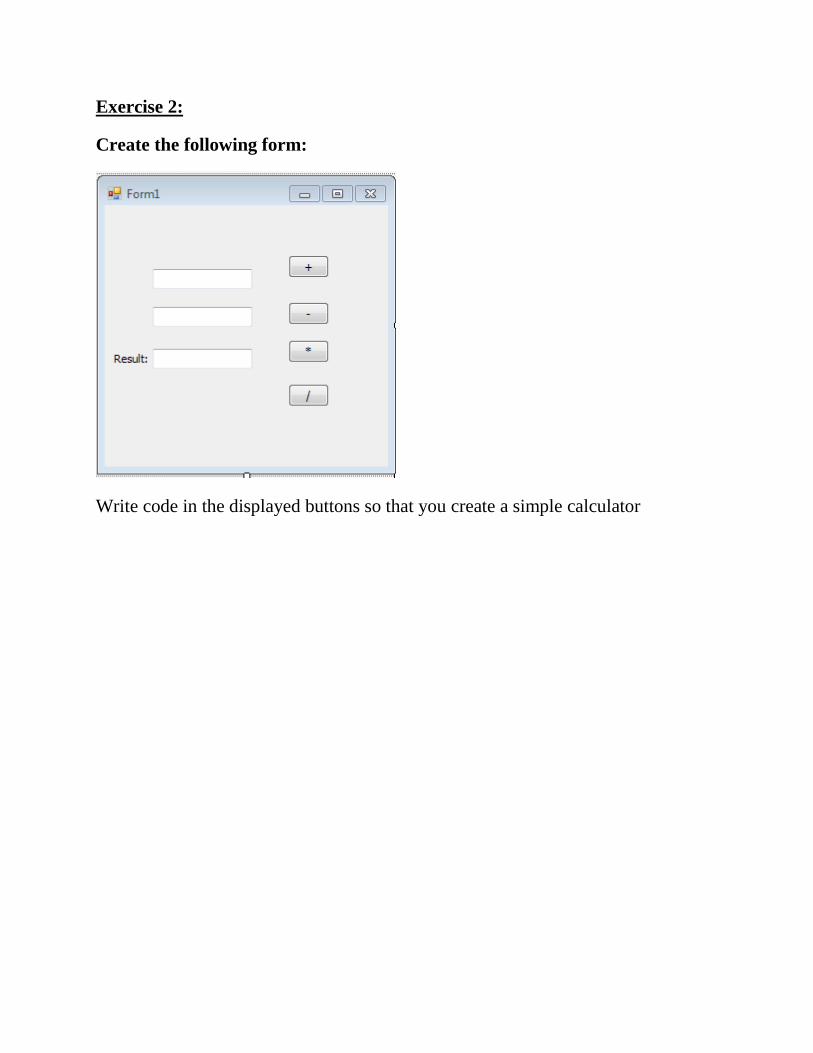
Exercise 2:
Create the following form:
Write code in the displayed buttons so that you create a simple calculator

Work Sheet 3
Group boxes and panels
Group boxes and panels: are used to group and contain controls, when moving
them all controls (inside them) moves.
Create the following form that contains a group box and a panel.
Notice the differences between them through the following properties:
Group box Caption No
Scrollbar
Same border
panel No caption Scrollbars Change border
Exercise:
Add a Button "Hide", in the form above, to hide the "Greetings GroupBox".

Work Sheet 4
Check boxes and Radio buttons
Create the following form:
1. Study the following properties for check boxes:
Text.
Checked.
Check state.
2. Study the following properties for Radio buttons:
Text.
Checked.
3. write code to do the following:
1. Activate the 4 checkboxes in the form, so that whenever a checkbox is checked,
the corresponding property is applied, otherwise it becomes false.
2. Activate the 2 radio buttons, so that whenever the "Personal" is checked, the first
panel is shown, and the other is hidden, and whenever the "Education" is checked,
vice versa.
3. Add a button, "Reset", that changes the checkstate property of any chosen
checkbox to "indeterminate".
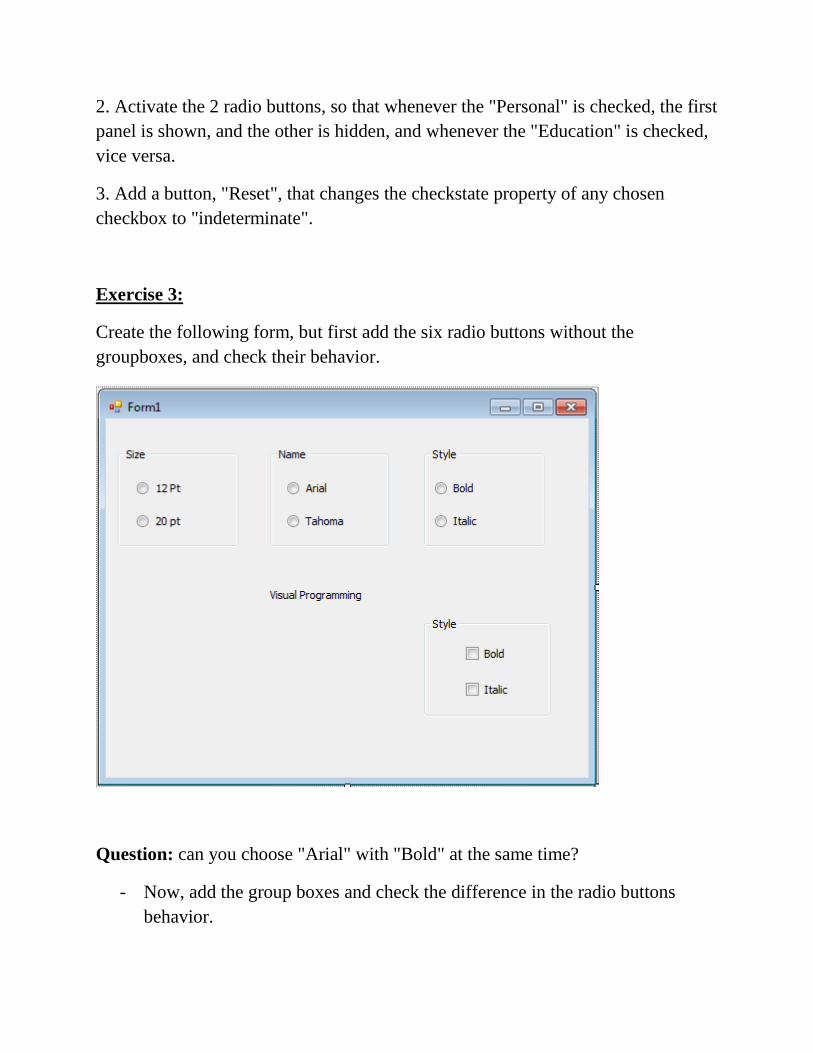
Exercise 3:
Create the following form, but first add the six radio buttons without the
groupboxes, and check their behavior.
Question: can you choose "Arial" with "Bold" at the same time?
- Now, add the group boxes and check the difference in the radio buttons
behavior.
- Activate the radio buttons so that they change the size, name and style of the
label font.
- Check the behavior of the "Style" radio buttons, can you select "Bold" and
"Italic" at the same time?
- Activate the checkboxes, and note the difference.

Work Sheet 5
Message box and picture box
Build the following form, where:
1. When the user clicks on the button, the following message box shows:
2. If the user clicks on the OK button, a label shows with “you clicked the Ok
button”.
3. If the user clicks on the Cancel button, a label shows with “you clicked the
Cancel button”.

4. Each time the user clicks on the picture box, the image changes.
Exercise 4:
Create the following form, where each radio button executes the corresponding
operation.

Work Sheet 6
Mouse events
Create the following form, where:
1. While the cursor moves over the image, the coordinates x and y for the
curser position appear on the form.
2. When the user clicks on the image, the coordinates x and y for the curser
position appear on the form.
3. When the cursor enters the text box, the font size increases, and when the
cursor leaves the text box, the font size returns to its default size.
4. The text in label 2 will be changed to up, down or hover according to the
event performed on the mouse.
5. The text in label 3 will be changed to ”left” if the user clicked on the left
mouse button , and to ”right” if the user clicked on the right mouse button.
Label 2
Label 3

Work Sheet 7
Keyboard Events
Create the following form, where:
We will study the following Keyboard Events:
KeyEventArgs
Events Properties
Key Down
Key Up
Alt
Ctrl
Shift
Keycode
KeyData
KeyValue
KeyPressEventArgs
Events Properties
Key Press KeyChar

Work sheet 8
ToolTip, NumericUpDown and LinkLabel
Create the following form, where:
1. The value in the age textbox must be between 18 and 30 (numericupdown).
2. When the user chooses his age, the value will show in label5 too.
3. When the curser hovers over the age textbox, a note (using tooltip control)
shows as shown in the picture.
4. The user can write his age in textbox3, the value will be stored in the
numericupdown.
5. When the user clicks on Philadelphia link, the university website opens.
6. When the user clicks on calculator link, the calculator application opens.
7. When the user clicks on MS word link, the MS word application opens.
8. When the user clicks on Pictures link, the Pictures folder opens.
Textbox3
Label5

Work sheet 9
Menus
First: Create the following form, with the displayed menu:
Discuss the following concepts:
Menustrip
Menuitem (Add, modify and delete)
Separater Line
Submenus
Shortcuts (Using &)
ShortCut property + ShowShortcut
Righttoleft property
Second: Create another form, with the following Menu

Add an ordinary label to the form, then
Activate the displayed menu items as follows:
A) Close Closes the form
B) Red Changes the font color of the label into red
C) Blue Changes the font color of the label into blue
D) Green Changes the font color of the label into green
E) Times New Roman Changes the font name of the label to "Times New
Roman"
F) Arial Changes the font name of the label to "Arial"
G) Tahoma Changes the font name of the label to "Tahoma"
H) Bold, Italic and Underline each changes the style of the label font
Hint: Make them act like Checkboxes, working with properties
(CheckOnClick and Checked)
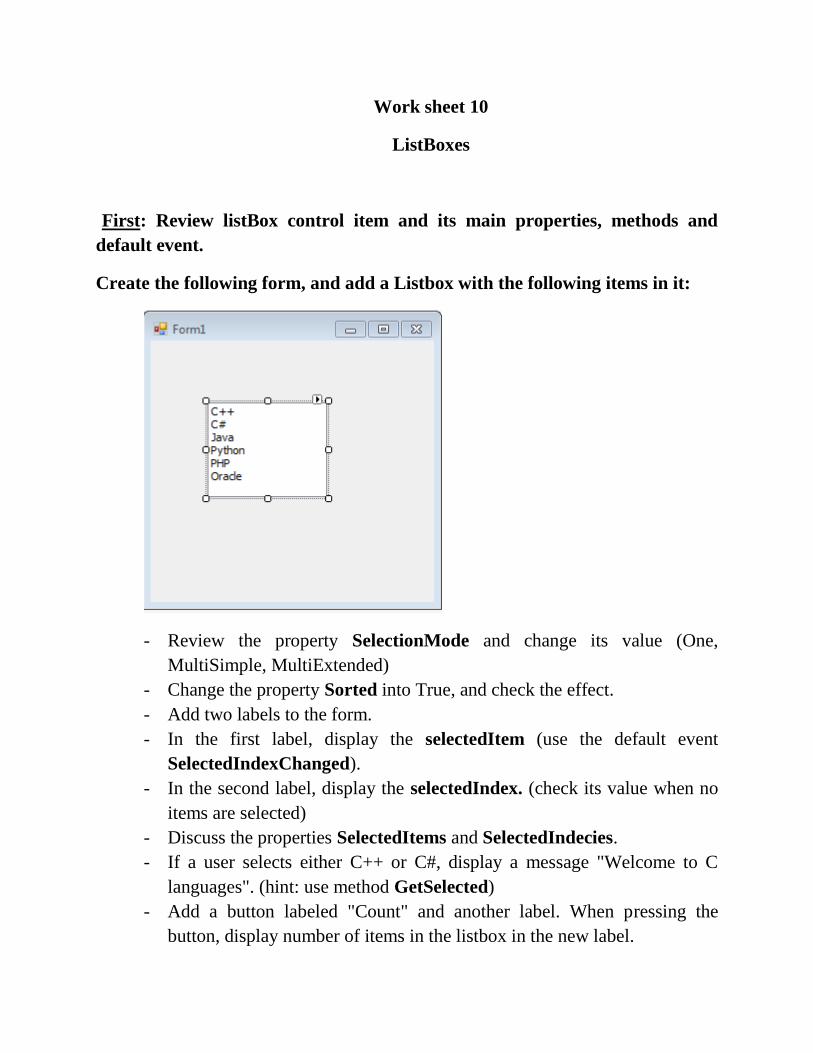
Work sheet 10
ListBoxes
First: Review listBox control item and its main properties, methods and
default event.
Create the following form, and add a Listbox with the following items in it:
- Review the property SelectionMode and change its value (One,
MultiSimple, MultiExtended)
- Change the property Sorted into True, and check the effect.
- Add two labels to the form.
- In the first label, display the selectedItem (use the default event
SelectedIndexChanged).
- In the second label, display the selectedIndex. (check its value when no
items are selected)
- Discuss the properties SelectedItems and SelectedIndecies.
- If a user selects either C++ or C#, display a message "Welcome to C
languages". (hint: use method GetSelected)
- Add a button labeled "Count" and another label. When pressing the
button, display number of items in the listbox in the new label.

Second: Practice several actions on the listBox.
Create the following form:
Activate the displayed buttons as follows:
1. Add: Adds the item entered in the textbox into the listbox.
2. Remove: Removes the selected item in the listbox (Ex: Change it to
remove the written item in the textbox).
3. Clear List: Clears/removes all items in the listbox
4. Clear Selected: Removes the selection on items in the listbox.

Exercise 5:
Create the following form:
Activate the displayed buttons, so that:
1. > : moves the selected item from left listbox to the right one.
2. <: moves the selected item from right listbox to the left one
3. >>: moves all items from left listbox to the right one.
4. <<: moves all items from right listbox to the left one.
Change the code in > and < buttons, so that they move the selected
items.
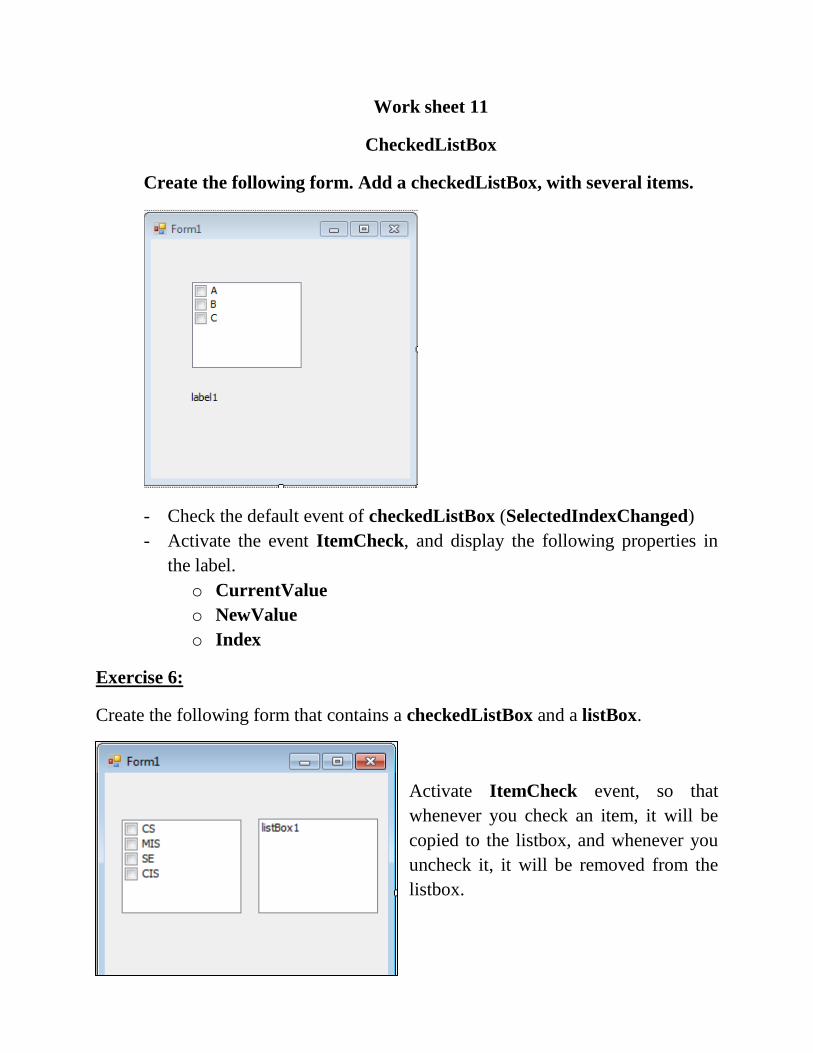
Work sheet 11
CheckedListBox
Create the following form. Add a checkedListBox, with several items.
- Check the default event of checkedListBox (SelectedIndexChanged)
- Activate the event ItemCheck, and display the following properties in
the label.
o CurrentValue
o NewValue
o Index
Exercise 6:
Create the following form that contains a checkedListBox and a listBox.
Activate ItemCheck event, so that
whenever you check an item, it will be
copied to the listbox, and whenever you
uncheck it, it will be removed from the
listbox.

Work Sheet 12
Combo box
Create the following form, where:
Study the following properties:
Items
Text.
Dropdownstyle.
MaxDropdownstyle
SelectedItem
SelectedIndex

Exercise 7:
Create the following form that contains a ComboBox to choose between two group
boxes:
Add/Sub and Mul/Div as the following:
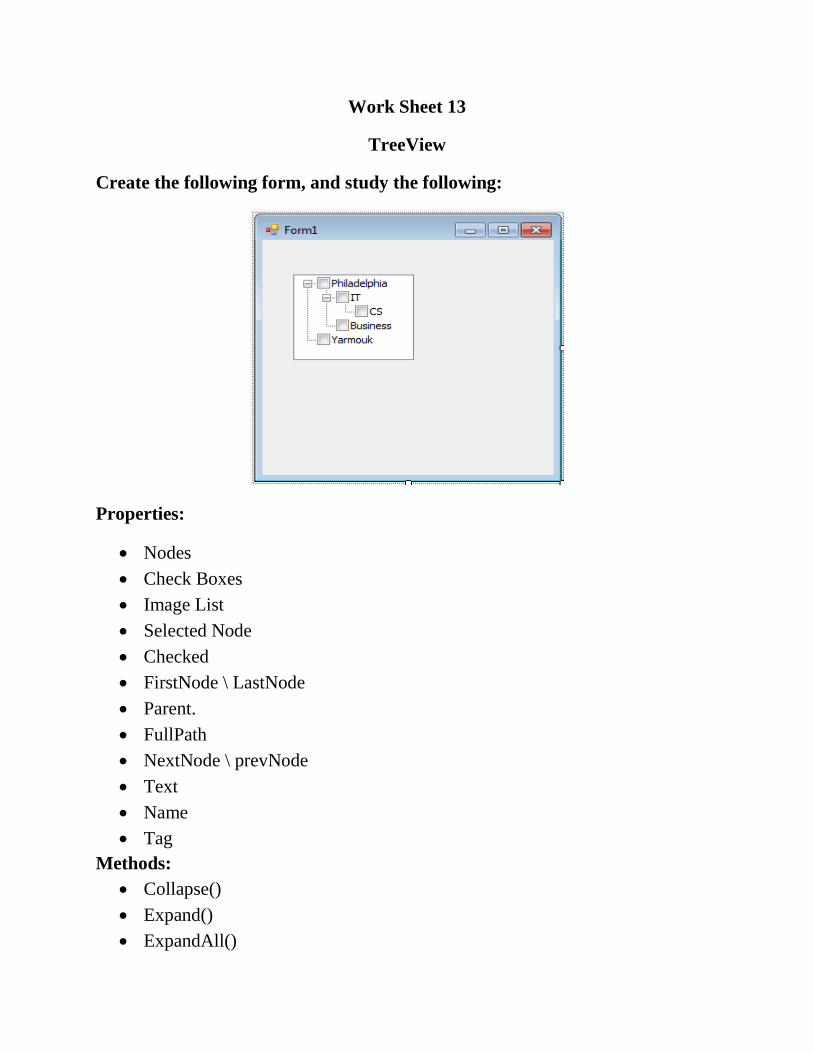
Work Sheet 13
TreeView
Create the following form, and study the following:
Properties:
Nodes
Check Boxes
Image List
Selected Node
Checked
FirstNode \ LastNode
Parent.
FullPath
NextNode \ prevNode
Text
Name
Tag
Methods:
Collapse()
Expand()
ExpandAll()
GetNodeCount()
Add()
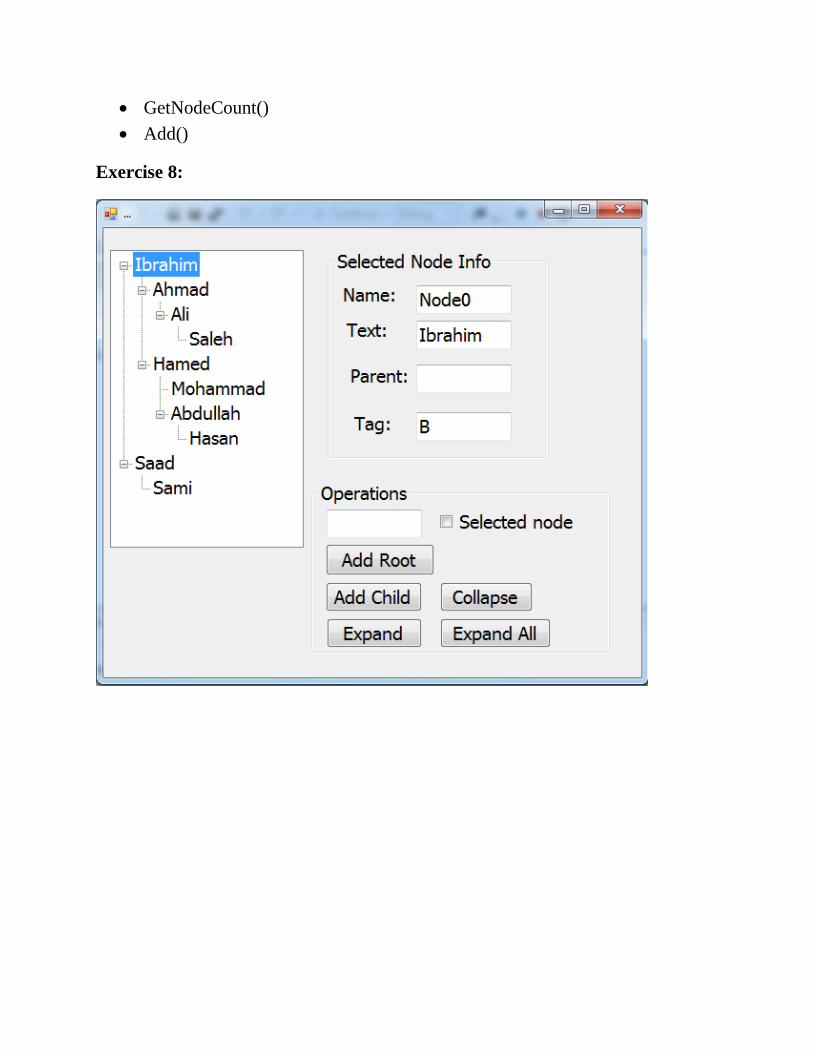
Exercise 8:

Work Sheet 14
List View, Image list
1. Create the following form:
Study the following properties:
Items
View
Columns
MultiSelect
LargeImageList
SmallImageList
SelectedItems
subItems
Count
Study the following Methods:
Items.Add()
Subitems. Add()
Items.Clear()
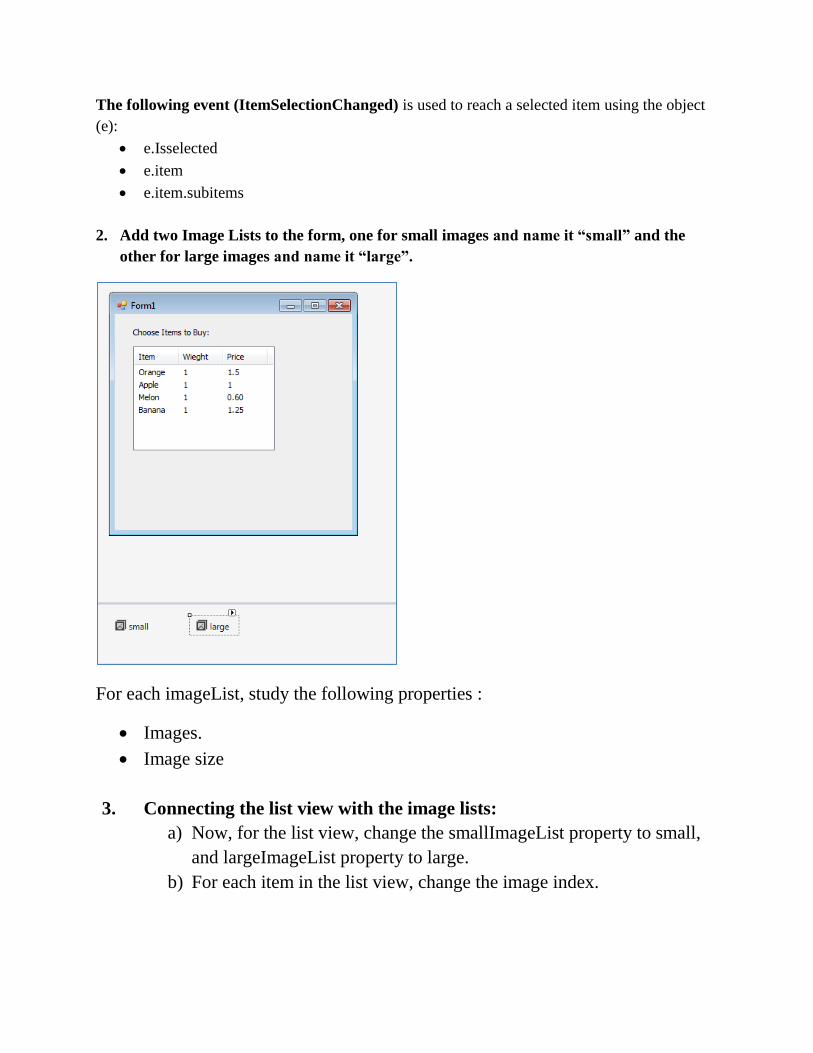
The following event (ItemSelectionChanged) is used to reach a selected item using the object
(e):
e.Isselected
e.item
e.item.subitems
2. Add two Image Lists to the form, one for small images and name it “small” and the
other for large images and name it “large”.
For each imageList, study the following properties :
Images.
Image size
3. Connecting the list view with the image lists:
a) Now, for the list view, change the smallImageList property to small,
and largeImageList property to large.
b) For each item in the list view, change the image index.

Exercise 9:
Create the following form

Work Sheet 15
Multiple Forms
4. Create the following form:
5. Now create form2:
To create another form on your project: Go to "Solution Explorer", right-click on your
project name, and select this option.

Click New item, and the following screen will appear:
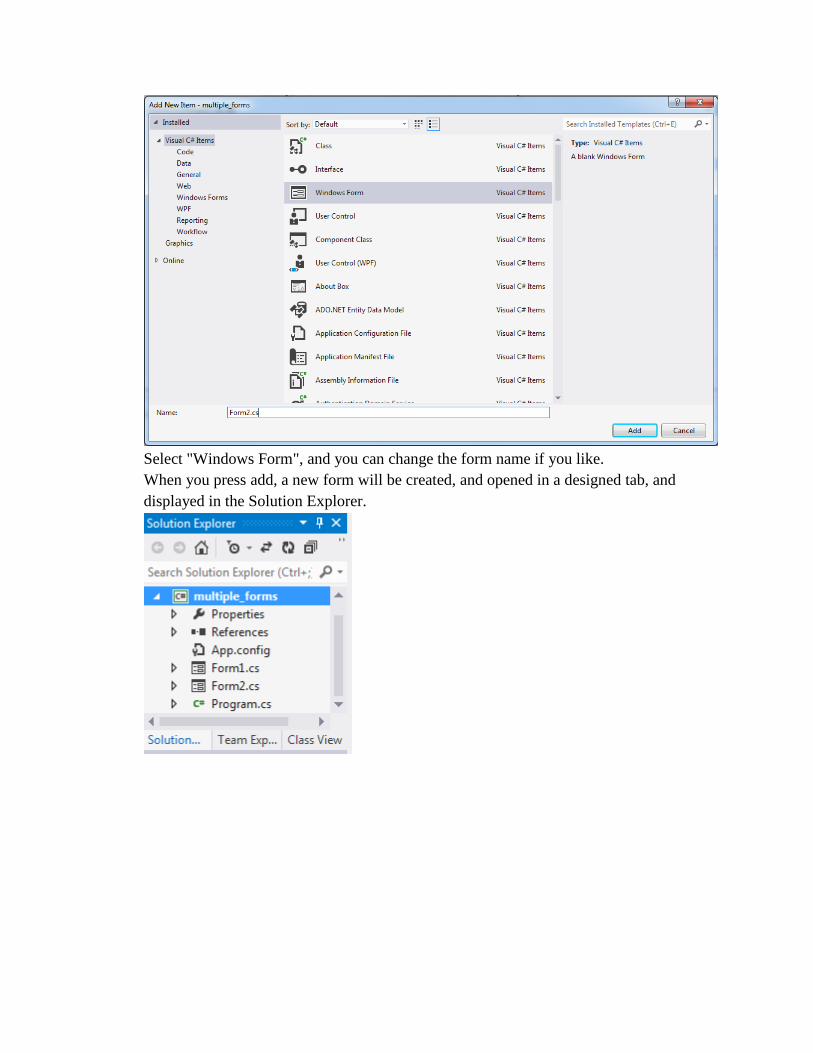
Select "Windows Form", and you can change the form name if you like.
When you press add, a new form will be created, and opened in a designed tab, and
displayed in the Solution Explorer.
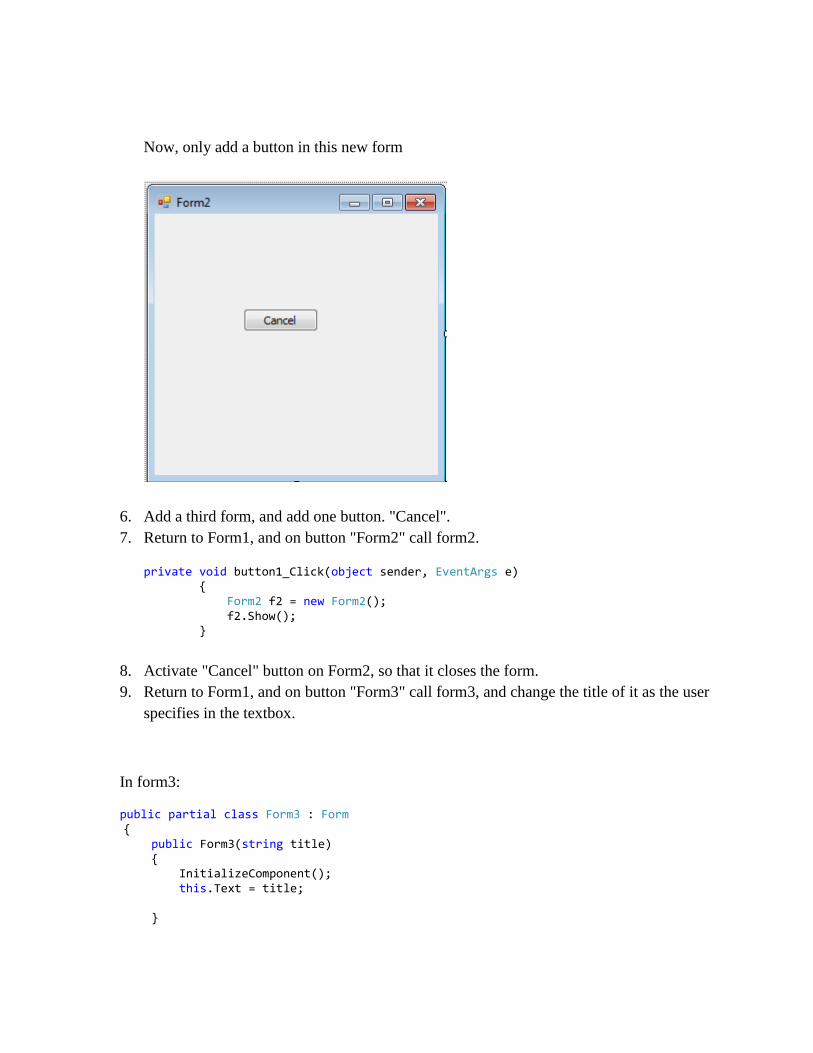
Now, only add a button in this new form
6. Add a third form, and add one button. "Cancel".
7. Return to Form1, and on button "Form2" call form2. private void button1_Click(object sender, EventArgs e) { Form2 f2 = new Form2(); f2.Show(); }
8. Activate "Cancel" button on Form2, so that it closes the form.
9. Return to Form1, and on button "Form3" call form3, and change the title of it as the user
specifies in the textbox.
In form3:
public partial class Form3 : Form { public Form3(string title) { InitializeComponent(); this.Text = title; }

In form1:
private void button2_Click(object sender, EventArgs e) { Form3 f3 = new Form3(textBox1.Text); f3.Show(); }
10. Activate the cancel button in Form3, to close the form.
11. Activate the Close button in Form1, to close the form.
Notes:
1. You can call the same form several times, and opens it several times, because you are
actually creating an object several times.
2. When you close the main form (which called the other forms), all forms are closed.