pearson onscreen platform (pop) - edexcel pages... · p r or 05 previous next minimum...
TRANSCRIPT

Pearson OnscreenPlatform (POP)Local Area Network (LAN) indepth guide
Version 1.0 October 2014

Pearson Onscreen Platform (POP) Local Area Network (LAN) indepth guide
02
NextPrevious
What’s in this guide?Contents 1 Technical requirements
Read more
2 Installation Read more
3 Administrator DashboardRead more
4 Invigilator DashboardRead more
5 Test PlayerRead more
6 Upgrading POPRead more
Pearson Onscreen Platform (POP) Local Area Network (LAN) indepth guide
03
NextPrevious
Section Two
Technical requirements
106 Communication & networking
04 Introduction
05 Minimum specifications
07 Test Player machine setup

Pearson Onscreen Platform (POP) Local Area Network (LAN) indepth guide
04
NextPrevious
In this section
This section will outline the minimum requirements to run the Pearson Onscreen Platform (POP) software,
Introduction
In order to successfully run tests, the following four pieces of software will need to be installed:
1. Exam Centre Service – on the server or networked computer, to allow local distribution of the software, including communication between the centre and the Pearson server. 2. Administrator Dashboard – to allow the administration of the exams and setting up of Invigilators. 3. Invigilator Dashboard – to control the test and monitor learner progression. 4. Test Player – to allow learners to sit the test.
Connection to the Internet is required only for the Exam Centre Service and this must be available for the duration of the exam. A normal ADSL connection is recommended (1Mb) although higher speeds will enhance the overall performance.
It is essential that all machines used are set to Greenwich Mean Time. This will synchronise with our servers and allow all machines to communicate with each other. You can use Time Protocol to make sure your systems are set up to the correct time.
!Please note that the software
has been made to run on professional operating systems
and we do not support Home edition of Windows.

Pearson Onscreen Platform (POP) Local Area Network (LAN) indepth guide
05
NextPrevious
Minimum specifications
Exam Centre Service PC with:
• Pentium III with 900Mhz processor • Access to Internet (ADSL 1Mb minimum) via reliable ISP 10/100 Mbps network interface adapter • Disk space according to centre size and needs a shared drive visible for all network users, with minimum 1Gb of space to be used for installation, test and response packages. This space will vary depending on the number of learners in the centre, the number and the size of tests. • Windows XP or above • Microsoft .Net 4.0 (Full or Extended version) or above
Important: Firewall ports that need to be open 52221, 52222, 443
Test Player PCs with:
• Pentium III with 900Mhz processor • 1Gb RAM memory• 100Mb storage capacity • Minimum 1024 x 768 screen resolution • 10/100 Mbps network interface adapter (for local mode only) • Sound recording device (for language assessments) • Speakers/headphones (for sound-based assessments) • Windows Media Player 11 (or above) • Microsoft Visual C++ 2012 • Access to Internet (ADSL 1Mb mini-mum) via reliable ISP (if online mode) • Windows XP or above• Microsoft .Net 4.0 (Full or Extended version) or above
Administrator Dashboard / Invigilator Dashboard PC with:
• Pentium III with 900Mhz processor • 2Gb RAM memory • 10/100 Mbps network interface adapter • Printer (local or netork) – optional • Windows XP (or above) • Microsoft .Net 4.0 (Full or Extended version) or above Important: Firewall ports that need to be open 52221, 52222, 443

Pearson Onscreen Platform (POP) Local Area Network (LAN) indepth guide
06
NextPrevious
Communication and networking
The Exam Centre Service server communicates via ‘https’ (Port 443 TCP) to Pearson servers using the two service endpoints below:
The Exam Centre Service client communicates to the Exam Centre Service server over ports 52222 and then incrementally thereafter.
Port range to be open of 52222 – 52250.
Any software firewall on the Exam Centre Service server will need to be open to allow Exam Centre Service to communication.
!Important:
Your network must have bi-directional access over port
443 to reach IP/web addresses 159.182.72.158 and
btecng.pearson.com.

Pearson Onscreen Platform (POP) Local Area Network (LAN) indepth guide
07
NextPrevious
Test Player machine setup
Before running a test on the Test Player ensure that there are no background applications running. Test Players are designed to stop candidates from using other applications while the Test Player is active.
The Test Player will show an error if an application runs during the test, this could cause the candidate to lose time while the error is resolved.
The prompt for this error is as follows: Test Violation Error - Loss of focus.If you are seeing this error call your account specialist on 0844 463 2535 to unblock the relevant Test Player.
Pearson Onscreen Platform (POP) Local Area Network (LAN) indepth guide
08
NextPrevious
Section Three
Installation
2
09 Overview of software setup
10 Installation

Pearson Onscreen Platform (POP) Local Area Network (LAN) indepth guide
09
NextPrevious
In this section
This section will show you how to install and set up the Pearson Onscreen Platform so that you can run onscreen tests for next generation BTEC Firsts (NQF).
Overview of software setup
The Pearson Onscreen Platform installation package consists of four separate components as described below:
1. Exam Centre Service: This component is installed on your server, although it may be installed on any networked computer. This service runs in thebackground and is used by the other components of the software to communicate with one another and Pearson.
2. Administrator Dashboard: This component should be installed on the Exam Officer’s machine. It is used to download the onscreen tests and assign tests to Invigilators.
3. Invigilator Dashboard: This component needs to be installed on a computer in all rooms where tests are taking place (usually a teacher’s machine). Only one Invigilator Dashboard is needed per room.
4. Test Player: These components must be installed on each computer where learners will be sitting tests. It is the program that learners log into in order to sit a test.
When installing the Pearson Onscreen Platform software there is an accompanying video podcast to help you with the installation.
!You must have administration
rights to the computer in order to install this software.

Pearson Onscreen Platform (POP) Local Area Network (LAN) indepth guide
10
NextPrevious
Installation
STEP 1 - Installing the Exam Centre Service
The computers with the Dashboards and Test Players on them must have full access to the Exam Centre Service. Some servers will not allow for full access from networked computers. We would therefore recommend that the Exam Centre Service is installed on a networked machine apart from the server.
This machine must be accessible over the network and have an outgoing connection to the internet.
Good practice is to put the Exam Centre Service on the machine where you intend to install the Administrator Dashboard. This ensures that the Administrator Dashboard has direct access to the Exam Centre Service.
Download the Exam Centre Service installation package by clicking here.
The Exam Centre Service installer is an ‘.msi’ package. To install the programme, run this package on the computer or server you wish to install the Exam Centre Service on and follow the ‘setup wizard’ instructions onscreen.

Pearson Onscreen Platform (POP) Local Area Network (LAN) indepth guide
11
NextPrevious
Installationcontinued
We recommend you use the file paths which are specified in the installation process. Changing these paths may cause errors when the software is running.
If you have a proxy server you may use the enable proxy option in the installer and insert your proxy settings. However, if proxy settings are held elsewhere on the computer (e.g. Internet Explorer) the installer will pick these details up without ticking the ‘enable proxy’ box.
STEP 2 - Installing the Administrator Dashboard, Invigilator Dashboard and Test Player
The installation packages for the software will now be available within ‘Apps’ in the data store folder. From the computer where you wish to install the packages, navigate to the shared data store folder.
• We would recommend that you install the Administrator dashboard on the exams officer’s computer as the application is used for the administrator of exams.
• Invigilator Dashboard must be installed on only one computer in each exam room (to be used by the Lead Invigilator during the test).
!Proxy settings must be in the
correct format: http://proxyserver:8080/

Pearson Onscreen Platform (POP) Local Area Network (LAN) indepth guide
12
NextPrevious
Installationcontinued
• The Test Player must be installed on a separate computer to the rest of the software components.
When installing the Test Player it may not be necessary to insert an address into the ‘Invigilator’s Full Computer Name’ box. The software should automatically find the opened Invigilator Dashboard on the network.
If you e-mail a copy of the ‘README’ notepad (the ‘README’ file opens by default after installing the Exam Centre Service) to yourself, you can copy and paste the relevant install link contained in the ‘README’ file to a web browser or into the ‘Run’ (windows key + R) on the relevant PC.

Pearson Onscreen Platform (POP) Local Area Network (LAN) indepth guide
13
NextPrevious
Installationcontinued
STEP 3 - Run the demo test
You will be able to run the demo test titled ‘Test unit 1’ from the Administrator Dashboard. This will confirm the software has downloaded and that it is working correctly.
Guides and videos for using the Pearson Onscreen Platform software can be found on the Edexcel website. You can also use the live chat within the Edexcel website to contact the support team for further assistance and guidance.

Pearson Onscreen Platform (POP) Local Area Network (LAN) indepth guide
14
NextPrevious
Section Four
Administrator Dashboard
3
15 Logging in and server selection
16 Creating invigilators
17 Creating rooms
18 Downloading test package
19 Activating test package
20 Preparing assessment
23 Monitor learner progress
24 Uploading

Pearson Onscreen Platform (POP) Local Area Network (LAN) indepth guide
15
NextPrevious
In this section
In this section you will be shown how to create new exam rooms, invigilator accounts, and how to set up exams by assigning learners to rooms.
Reminder:
The Administrator Dashboard is used to download, activate and assign tests to specific rooms and invigilators within your centre.
It is typically installed on Exam Officer’s computer and communicates with the rest of the software.
Logging in and server selection
• Log into the Administrator Dashboard• If you have not received your login details please contact your Account Specialist for further support
• If you can’t see your server, try either clicking the ‘Refresh’ button or ‘Add manually’. • When adding manually, type in the full name (including domain) of the PC where the Exam Centre Service has been installed to, then press ‘Test’ to make sure the server has been found and click ‘Add’ to save the changes.

Pearson Onscreen Platform (POP) Local Area Network (LAN) indepth guide
16
NextPrevious
Creating invigilators
Once you have successfully logged in you will need to create an invigilator for the test.
1. Click on ‘Create New’ under the Invigilators tab in the left hand side menu2. Complete all of the fields, make sure to tick the ‘Active’ box and click ‘Create’
3. Make a note of the username and password, which you can pass onto the invigilator4. Once completed, click ‘List Invigilators’ to view all the invigilators you have created5. From here you are able to manage the invigilators by either selecting the ‘bin’ icon to delete or the ‘padlock’ icon to change the password
!If the invigilator tries to log in with incorrect password more than 3 times, the account will be locked and you need to
tick the ‘Active’ box again to unlock the invigilator

Pearson Onscreen Platform (POP) Local Area Network (LAN) indepth guide
17
NextPrevious
Creating rooms
Once you have created invigilator accounts you need to create a room where you will place the candidates.
1. Click on ‘Create New Room’ under the ‘Classrooms’ tab in the left hand side menu.2. Name your room and assign the invigilator from the drop-down menu.
3. Once completed, click ‘List Rooms’ to view all the rooms you have created4. From here you are able to manage the rooms by either selecting the ‘bin’ icon to delete the room or clicking the name of the room to edit the name and change the invigilator
Watch this video to find out how to create rooms and invigilators.
!Always assign different
invigilator for every room you have created!

Pearson Onscreen Platform (POP) Local Area Network (LAN) indepth guide
18
NextPrevious
Downloading test package
Now that you have created your rooms and invigilators, you can download the test package.
1. Click on ‘List Orders’ under the ‘Orders’ tab in the left hand side menu2. Select the required test package and click ‘Download package’ icon from the ‘Actions’ column
3. If the download doesn’t start automatically, click ‘Download’ button4. Once downloaded, you will get the confirmation box5. The status now says ‘Package Downloaded’

Pearson Onscreen Platform (POP) Local Area Network (LAN) indepth guide
19
NextPrevious
Activating test package
Once the package is downloaded it is important to activate it otherwise you won’t be able to see your learners when preparing the assessment.
1. Go back to ‘List Orders’ page and click the first icon in the ‘Actions’ column, which now says ‘Activate Package’
2. On the next screen click ‘Activate’ 3. Once activated, you will get the confirmation box4. The status now says ‘Package Activated’
Pearson Onscreen Platform (POP) Local Area Network (LAN) indepth guide
20
NextPrevious
Preparing assessment
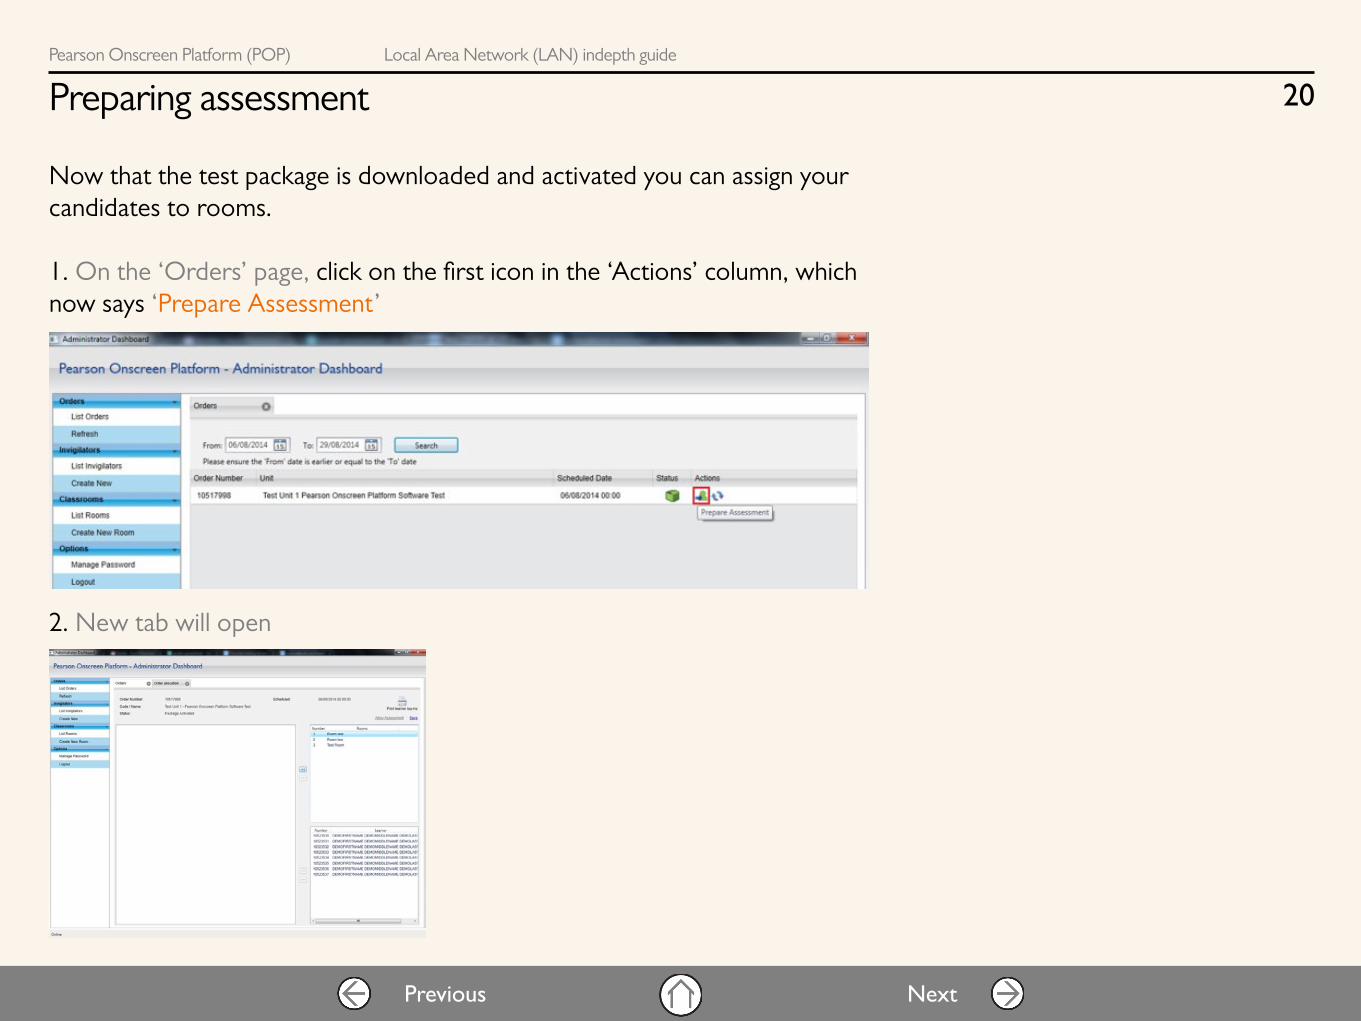
Now that the test package is downloaded and activated you can assign your candidates to rooms.
1. On the ‘Orders’ page, click on the first icon in the ‘Actions’ column, which now says ‘Prepare Assessment’
2. New tab will open
Pearson Onscreen Platform (POP) Local Area Network (LAN) indepth guide
21
NextPrevious
Preparing assessment
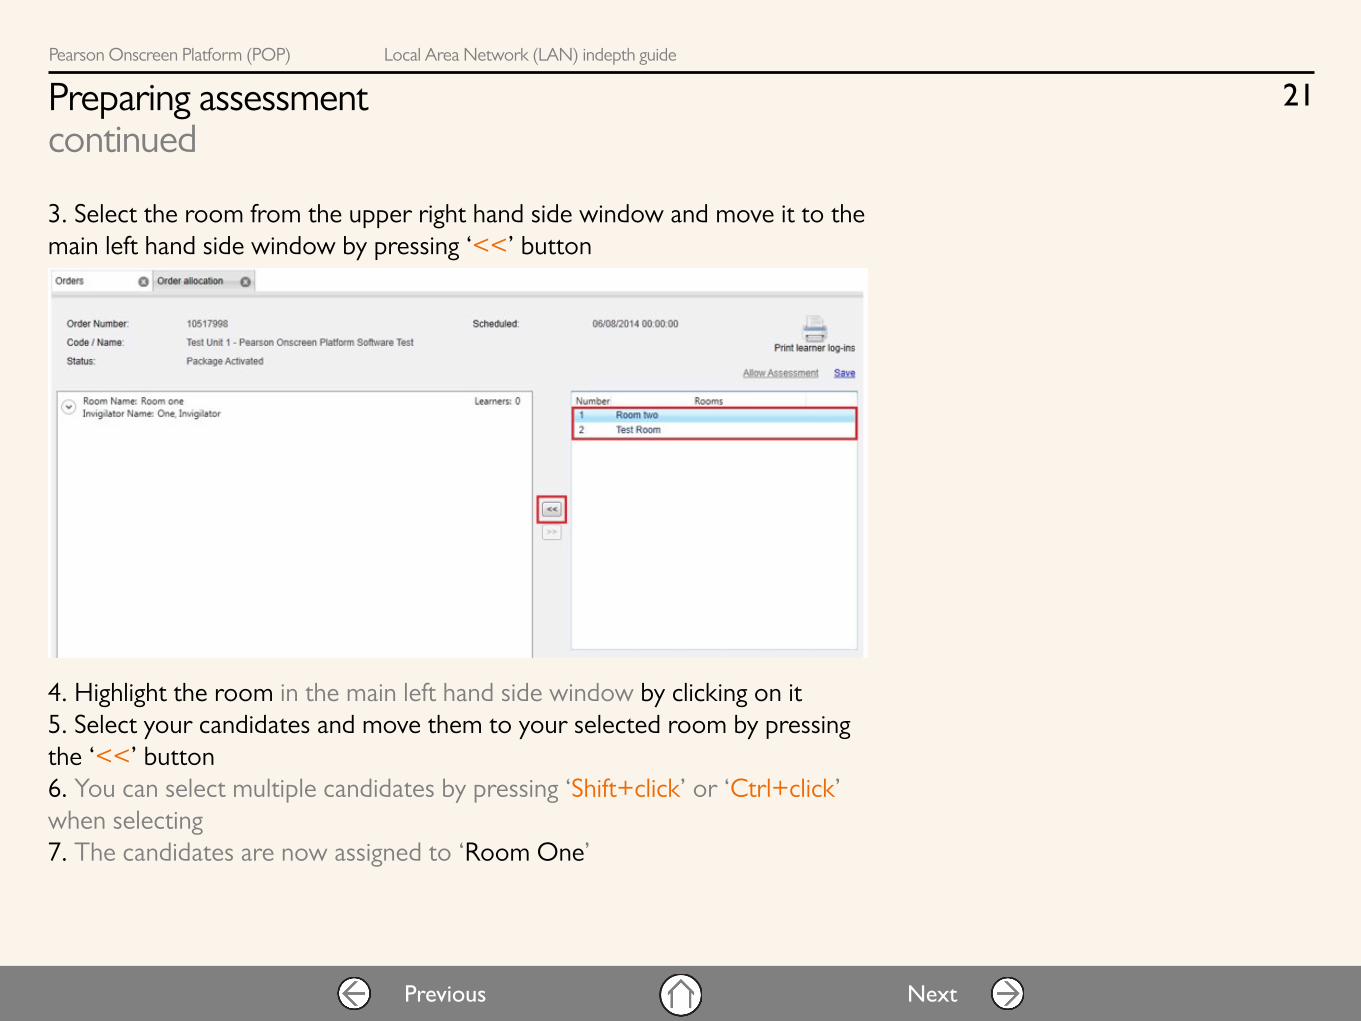
3. Select the room from the upper right hand side window and move it to the main left hand side window by pressing ‘<<’ button
4. Highlight the room in the main left hand side window by clicking on it 5. Select your candidates and move them to your selected room by pressing the ‘<<’ button6. You can select multiple candidates by pressing ‘Shift+click’ or ‘Ctrl+click’ when selecting7. The candidates are now assigned to ‘Room One’
continued

Pearson Onscreen Platform (POP) Local Area Network (LAN) indepth guide
22
NextPrevious
Preparing assessment
8. You are able to assign the candidates to different rooms by highlighting ‘Room Two’ and moving the candidates as shown in previous step9. It is important to assign all the candidates even if they aren’t attending the exam, otherwise you won’t be able to save the assessment10. Once all the candidates are assigned to your rooms, click ‘Save’ and then ‘Allow Assessment’11. The status now says ‘Assessment Allowed’
Watch this video to find out how to prepare the assessment.
continued

Pearson Onscreen Platform (POP) Local Area Network (LAN) indepth guide
23
NextPrevious
Monitor learner progress
Now the test package is prepared for the candidates to sit the test. You can monitor their progress by clicking ‘Monitor Learner Progress’ button in the ‘Actions’ column.
From there you can:
• See the candidates assigned to your rooms• Mark them as absent if they don’t show up for the exam• See the status of their exam• Monitor the upload progress

Pearson Onscreen Platform (POP) Local Area Network (LAN) indepth guide
24
NextPrevious
Uploading
Once learners have completed the test it will automatically upload onto Edexcel servers. The ‘Uploaded Status’ column status will change from ‘N/A’ to ‘Uploaded’, and the upload progress bar will turn green. Once all learners have been uploaded or marked absent, please click on ‘Complete Exam’ to close the test.
The status now says ‘Assessment Completed’.

Pearson Onscreen Platform (POP) Local Area Network (LAN) indepth guide
25
NextPrevious
Section Five
Invigilator Dashboard
4
26 Logging in and server selection
27 Accessing learner login details
28 Starting the test
30 Marking candidates as absent
31 Monitor learner progress
32 Completed tests
33 Checklist for invigilators

Pearson Onscreen Platform (POP) Local Area Network (LAN) indepth guide
26
NextPrevious
In this section
In this section you will be shown how to control and monitor the tests.
Reminder:
The Invigilator Dashboard is used to start tests, monitor test progress, print learner login details and mark candidates as absent.
It is installed on the invigilators PC in every room where exams takes place.
Logging in and server selection
• Log into the Invigilator Dashboard• If you have not received your login details please contact your Exams Officer who will be able to provide one for you
• If you can’t see your server, try either clicking the ‘Refresh’ button or ‘Add manually’. • When adding manually, type in the full name (including domain) of the PC where the Exam Centre Service has been installed to, then press ‘Test’ to make sure the server has been found and click ‘Add’ to save the changes.
Pearson Onscreen Platform (POP) Local Area Network (LAN) indepth guide
27
NextPrevious
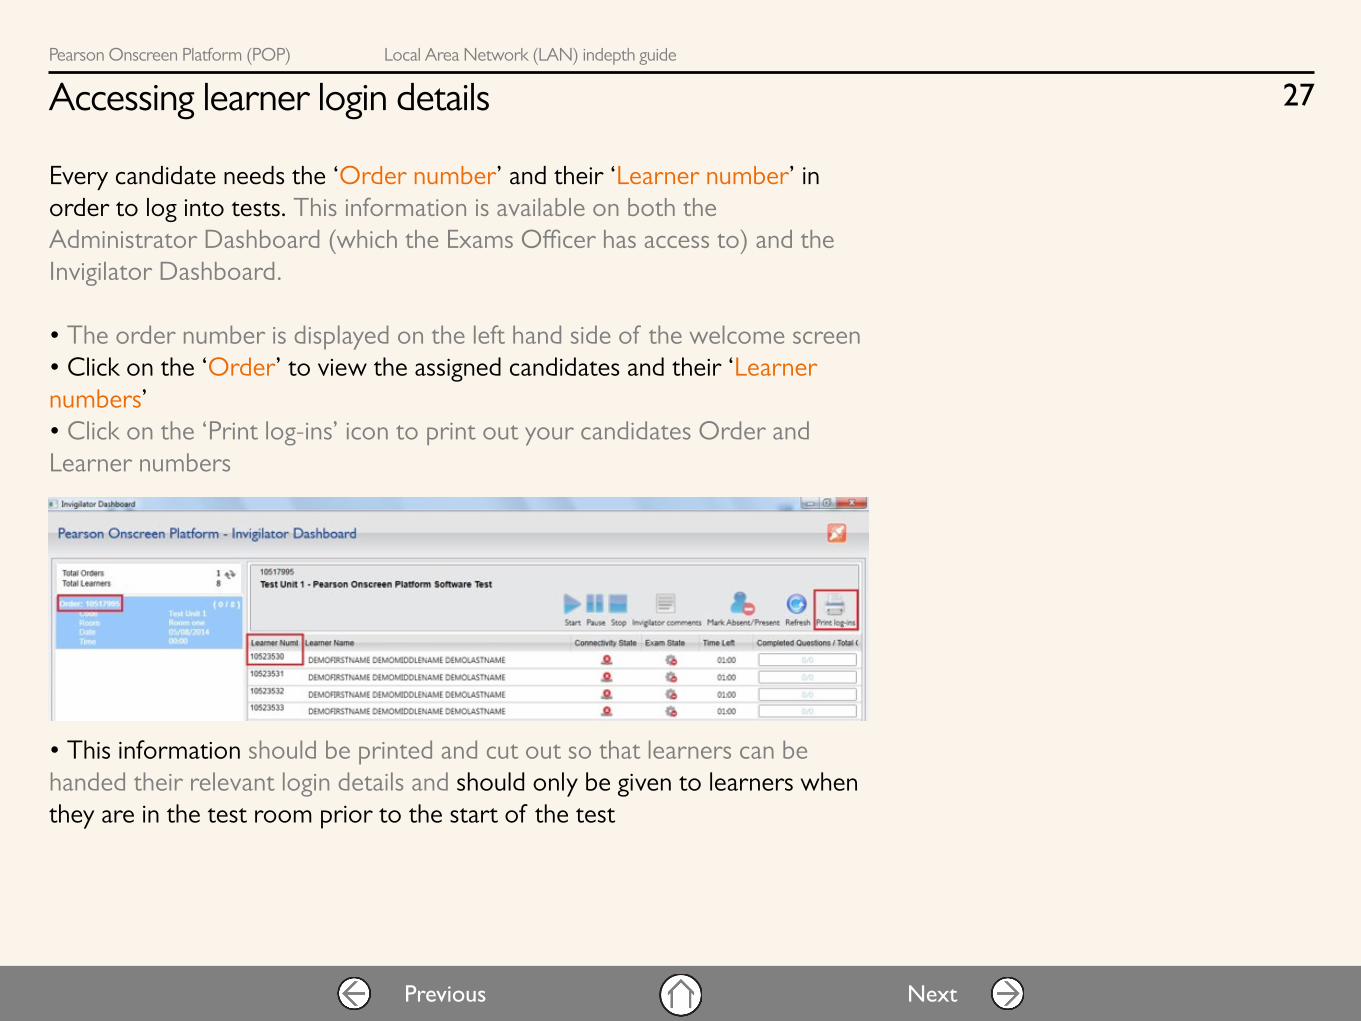
Accessing learner login details
Every candidate needs the ‘Order number’ and their ‘Learner number’ in order to log into tests. This information is available on both the Administrator Dashboard (which the Exams Officer has access to) and the Invigilator Dashboard.
• The order number is displayed on the left hand side of the welcome screen• Click on the ‘Order’ to view the assigned candidates and their ‘Learner numbers’• Click on the ‘Print log-ins’ icon to print out your candidates Order and Learner numbers
• This information should be printed and cut out so that learners can be handed their relevant login details and should only be given to learners when they are in the test room prior to the start of the test

Pearson Onscreen Platform (POP) Local Area Network (LAN) indepth guide
28
NextPrevious
Starting the test
Once the learners have received their login details, they are ready to log into the Test Player.
All the learner computers should be displaying the welcome screen:
The learners will be able to enter their Order and Learner numbers and click ‘OK’. This will log them into the start screen of their test where they need to wait for the invigilator to proceed.
!Important:
Make sure to disable anybackground applications on learner computers before
running a test

Pearson Onscreen Platform (POP) Local Area Network (LAN) indepth guide
29
NextPrevious
Starting the test
As the learners log in to start the test, the Invigilator Dashboard will update the ‘connectivity’ and ‘exam state’:
• Connectivity state will change from Offline [ ] to Online [ ]• Exam state will change from Not started [ ] to Awaiting approval [ ]
1. Select the learners by clicking on their names2. In order to select multiple learners, hold ‘Ctrl’ key when selecting3. Once the learners are ready to start, press the ‘Start’ button
4. The learners will now be able to press ‘Start Test’ button on their Test Player
Watch this video to find out how to start the test.
continued
!Important:
You must ensure that learners DO NOT start the test until you advise them to do so.
It is recommended to check the learner details are correct
on each of the learner computers, i.e. their name
and test.

Pearson Onscreen Platform (POP) Local Area Network (LAN) indepth guide
30
NextPrevious
Marking candidates as absent
If the learners don’t show up for the exam, you will need to mark them as absent.
1. Highlight the absent candidate2. Press ‘Mark Absent/Present’ button 3. If the learner arrives after being marked as absent, press the button again to mark them as present
4. The Exam state will now change to Absent [ ]
Watch this video to find out how to mark candidates as absent.

Pearson Onscreen Platform (POP) Local Area Network (LAN) indepth guide
31
NextPrevious
Monitor learner progress
You will be able to monitor each learner’s progress on the dashboard - how much time is left and how many questions have been answered so far. This is updated in real time as the learner moves to another question in the test.
If you have applied for extra time and the request has been granted for the learner, it will be visible in the ‘Time Left’ column (additional 25%).
Ensure that all the guidelines in the Instruction for the Conduct of the Examination (ICE) document are followed throughout the duration of the test until learners have left the test room.
Please refer to the ICE document for further information about conduct during the examination.
Learners with extra time
Conduct during the test

Pearson Onscreen Platform (POP) Local Area Network (LAN) indepth guide
32
NextPrevious
Completed tests
At the end of each test, learners can click on the ‘Finish’ button to end the session/complete the test and return to the welcome screen.
• Once a learner has completed the test, their Connectivity state will change to Offline [ ] and the Exam state will change to Completed [ ].
• This is applicable to learners who have either completed the test or they have run out of time• Learners should quietly advise you if they finish the test early• When the learner completes the test, the computer should be displaying the welcome screen• Click the red cross at the top right hand side of the screen to close the Test Player

Pearson Onscreen Platform (POP) Local Area Network (LAN) indepth guide
33
NextPrevious
Checklist for invigilators
The identity of every learner attending the test has been confirmed
Learners are seated in accordance with the prescribed seating arrangements
An IT technician is available during setup and at the start of the test
Learners have been made aware that they must not end the test without ad-vising an invigilator
Learners have been instructed not to bring any notes into the test room
A blank sheet of paper has been provided to all learners for making rough notes. Learners have been notified that these notes will not be marked
All tests have been unlocked
The correct learner is sitting the correct test
Before the test
Pearson Onscreen Platform (POP) Local Area Network (LAN) indepth guide
34
NextPrevious
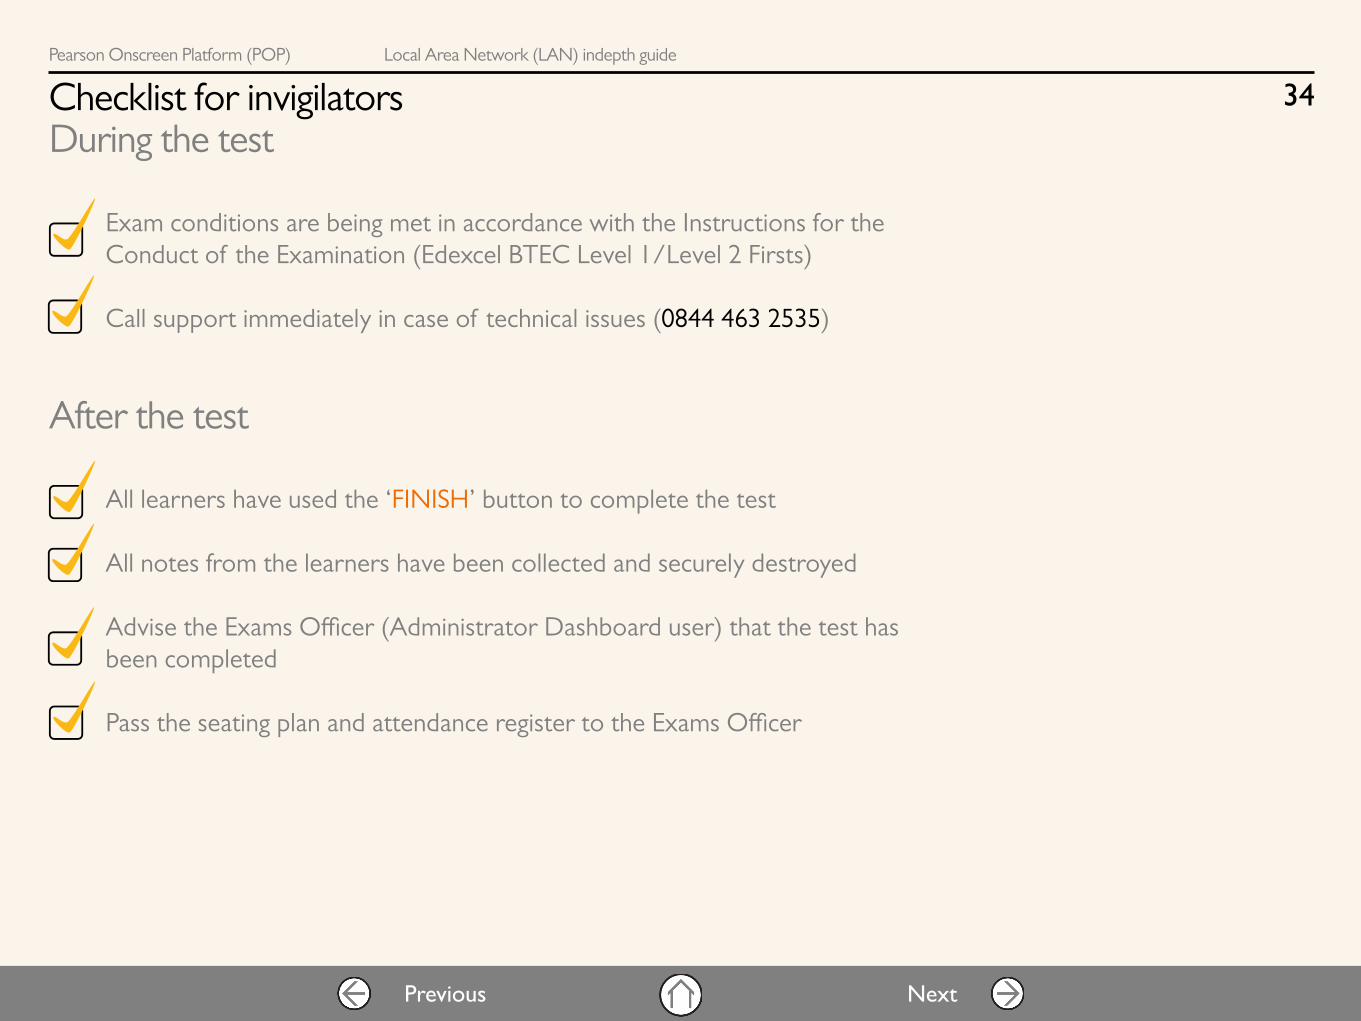
Checklist for invigilators
Exam conditions are being met in accordance with the Instructions for the Conduct of the Examination (Edexcel BTEC Level 1/Level 2 Firsts)
Call support immediately in case of technical issues (0844 463 2535)
During the test
All learners have used the ‘FINISH’ button to complete the test
All notes from the learners have been collected and securely destroyed
Advise the Exams Officer (Administrator Dashboard user) that the test has been completed
Pass the seating plan and attendance register to the Exams Officer
After the test

Pearson Onscreen Platform (POP) Local Area Network (LAN) indepth guide
35
NextPrevious
Section Six
TestPlayer
5
36 Accessibility guidance
42 Security features
43 Unblocking test violations
44 Connectivity settings
47 Recovering tests

Pearson Onscreen Platform (POP) Local Area Network (LAN) indepth guide
36
NextPrevious
In this section
In this section you will be introduced to the Test Player. It has been designed to serve test candidates and adhere to individual needs, whilst maintaining the security of tests.
Accessibility guidance
• Activate the notepad via the toolbar• The size and colour of the font for your notes can be adjusted using the controls provided • Notes you make will be kept for the duration of the test. If you leave a question and return to it later, your notes will still be there. You will need to open the notepad again via the toolbar to see them. However, they will be available to you at all times during the test. • Notes you make are specific to the question they are made on so can only be seen when on that question. • Notes will not be marked and will be discarded at the end of the test.
• If required you will be able to activate the calculator via the toolbar • You are able to copy your calculations directly into the working box when the question requires it with a button on the calculator called ‘copy to working box’.
Notepad
Calculator

Pearson Onscreen Platform (POP) Local Area Network (LAN) indepth guide
37
NextPrevious
Accessibility guidance
• Hotspot questions are completed by selecting an area on a diagram or image corresponding to the correct answer • When moving the mouse pointer over a diagram containing one or more hotspots it will change into a hand when over a selectable area. • Click on the area to select it as your answer, it will change colour to indicate that you have selected it
‘Hotspot’ questions
Pearson Onscreen Platform (POP) Local Area Network (LAN) indepth guide
38
NextPrevious
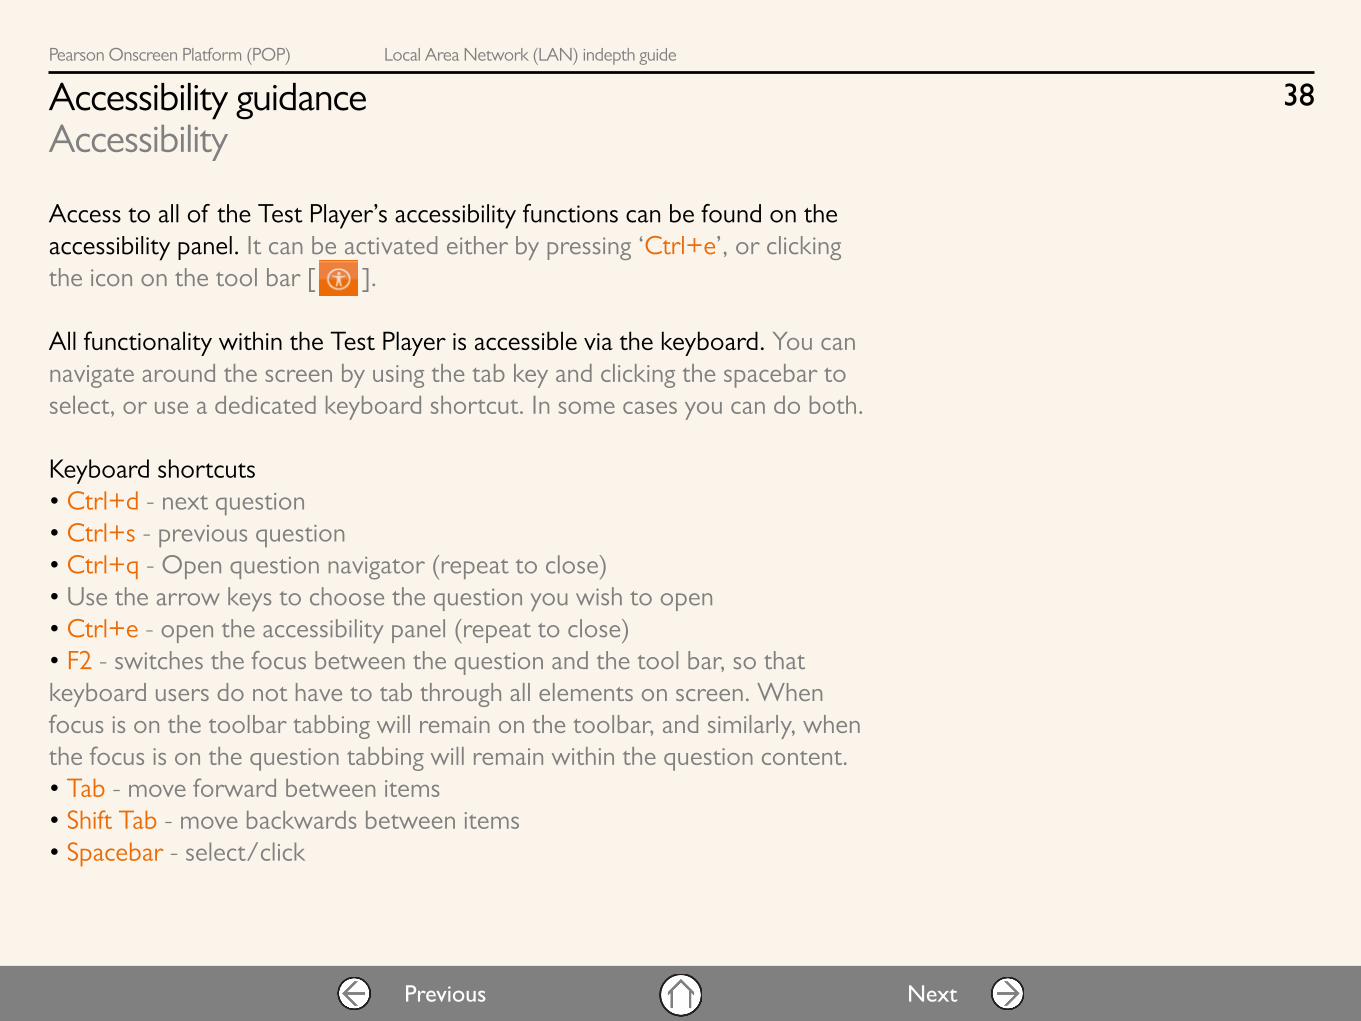
Accessibility guidance
Access to all of the Test Player’s accessibility functions can be found on the accessibility panel. It can be activated either by pressing ‘Ctrl+e’, or clicking the icon on the tool bar [ ].
All functionality within the Test Player is accessible via the keyboard. You can navigate around the screen by using the tab key and clicking the spacebar to select, or use a dedicated keyboard shortcut. In some cases you can do both.
Keyboard shortcuts• Ctrl+d - next question • Ctrl+s - previous question • Ctrl+q - Open question navigator (repeat to close) • Use the arrow keys to choose the question you wish to open • Ctrl+e - open the accessibility panel (repeat to close) • F2 - switches the focus between the question and the tool bar, so that keyboard users do not have to tab through all elements on screen. When focus is on the toolbar tabbing will remain on the toolbar, and similarly, when the focus is on the question tabbing will remain within the question content. • Tab - move forward between items • Shift Tab - move backwards between items • Spacebar - select/click
Accessibility

Pearson Onscreen Platform (POP) Local Area Network (LAN) indepth guide
39
NextPrevious
Accessibility guidance
‘Drag & Drop’ questions• Keyboard users should tab to and select the option that they think is correct, or the area they want to drag something to. • Tabbing to and selecting the appropriate counterpart, label or drop area will complete the movement.
‘Drop-down box’ questionsKeyboard users should tab to the drop-down box they require and use the up and down arrow keys to choose the answer they wish to select.
Enlarging visual mediaRight-clicking with the mouse on visual media, such as pictures and diagrams toggles between normal and full screen view.
Zoom • Zoom functionality can be accessed via the accessibility panel. • Adjust the zoom level using the plus and minus buttons provided. Zoom level can be reset to the default level using the refresh button
Accessibility continued

Pearson Onscreen Platform (POP) Local Area Network (LAN) indepth guide
40
NextPrevious
Accessibility guidance
Use the directional buttons found on the same part of the accessibility panel to navigate around the screen.
Colour Filters A number of coloured filters can be activated using the accessibility panel.
These are intended to mimic the action of coloured overlays used by some dyslexia sufferers, who find them useful when interacting with text-based materials. However, some of the videos and animations used within our tests are difficult to see clearly when using the filters. On questions where there is a video or animation, candidates are advised to temporarily turn-off the filter they are using whilst viewing the video or animation and re-activate the filter once they have viewed it.
Accessibility continued

Pearson Onscreen Platform (POP) Local Area Network (LAN) indepth guide
41
NextPrevious
Accessibility guidance
Tooltips Additional help on the function of icons/buttons can be activated via the tooltip option within the accessibility panel.
Calculator • Activate the calculator via the toolbar• The calculator is keyboard accessible and can be operated using the tab or arrow keys to move to numbers or symbols and the spacebar to select.
Accessibility continued

Pearson Onscreen Platform (POP) Local Area Network (LAN) indepth guide
42
NextPrevious
Security features
The Test Player is designed to ‘lock down’ the test computer so thatcandidates cannot access other applications during tests. When a test candidate logs in, any applications which are open, such as an instance of Internet Explorer or Microsoft Word, are closed.
If candidates attempt to come out of the test whilst it is running, they will receive a message saying ‘Test Violation – Loss of Focus’.
The Invigilator Dashboard will indicate that the specific candidate’s test has ‘Faulted’. This may occur because a candidate has attempted to minimise or close down the Test Player using keystrokes such as ‘Ctrl-Alt-Delete’ or ‘Ctrl-Esc’.
Pearson Onscreen Platform (POP) Local Area Network (LAN) indepth guide
43
NextPrevious
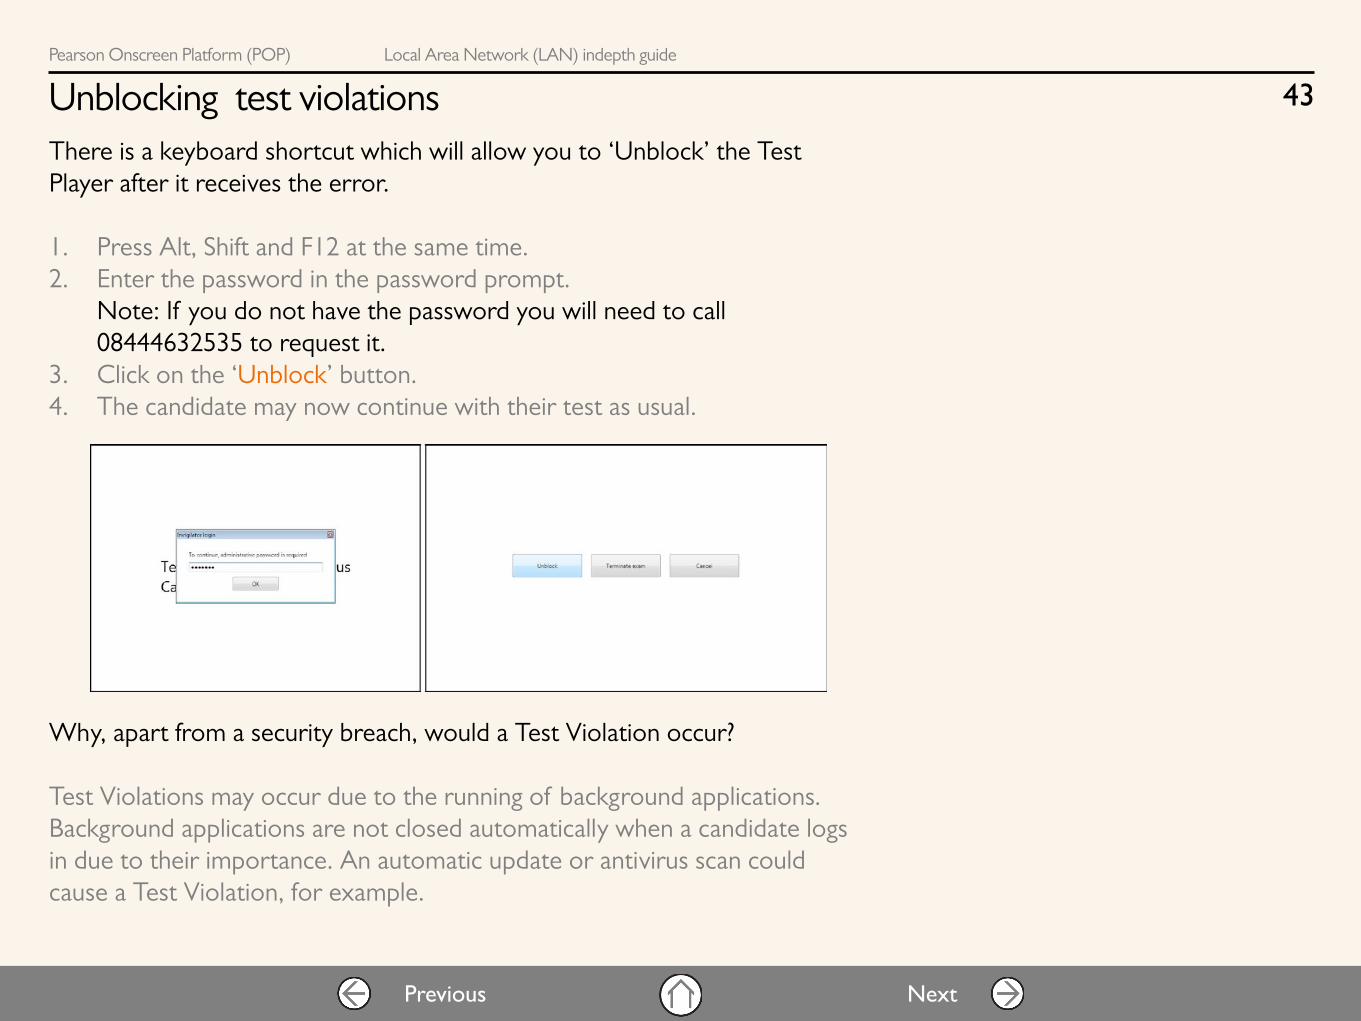
Unblocking test violationsThere is a keyboard shortcut which will allow you to ‘Unblock’ the Test Player after it receives the error.
1. Press Alt, Shift and F12 at the same time. 2. Enter the password in the password prompt. Note: If you do not have the password you will need to call 08444632535 to request it. 3. Click on the ‘Unblock’ button. 4. The candidate may now continue with their test as usual.
Why, apart from a security breach, would a Test Violation occur?
Test Violations may occur due to the running of background applications. Background applications are not closed automatically when a candidate logs in due to their importance. An automatic update or antivirus scan could cause a Test Violation, for example.

Pearson Onscreen Platform (POP) Local Area Network (LAN) indepth guide
44
NextPrevious
Connectivity settings
The Test Player includes features to troubleshoot connectivity to the Invigilator Dashboard and Exam Centre Service.
Initialising a connectionWhen the Test Player is first opened it will attempt to find an Invigilator Dashboard automatically. Bear in mind that the Invigilator Dashboard has to be running to be found.If the Test Player cannot automatically find the Invigilator Dashboard a screen titled ‘Check Connection to Service’ will appear.
To direct the Test Player to an Invigilator Dashboard:
1. Try using the ‘Start auto discover’ button. If a computer icon appears skip to step 4.
2. If nothing appears, use the ‘Add manually button’.
Pearson Onscreen Platform (POP) Local Area Network (LAN) indepth guide
45
NextPrevious
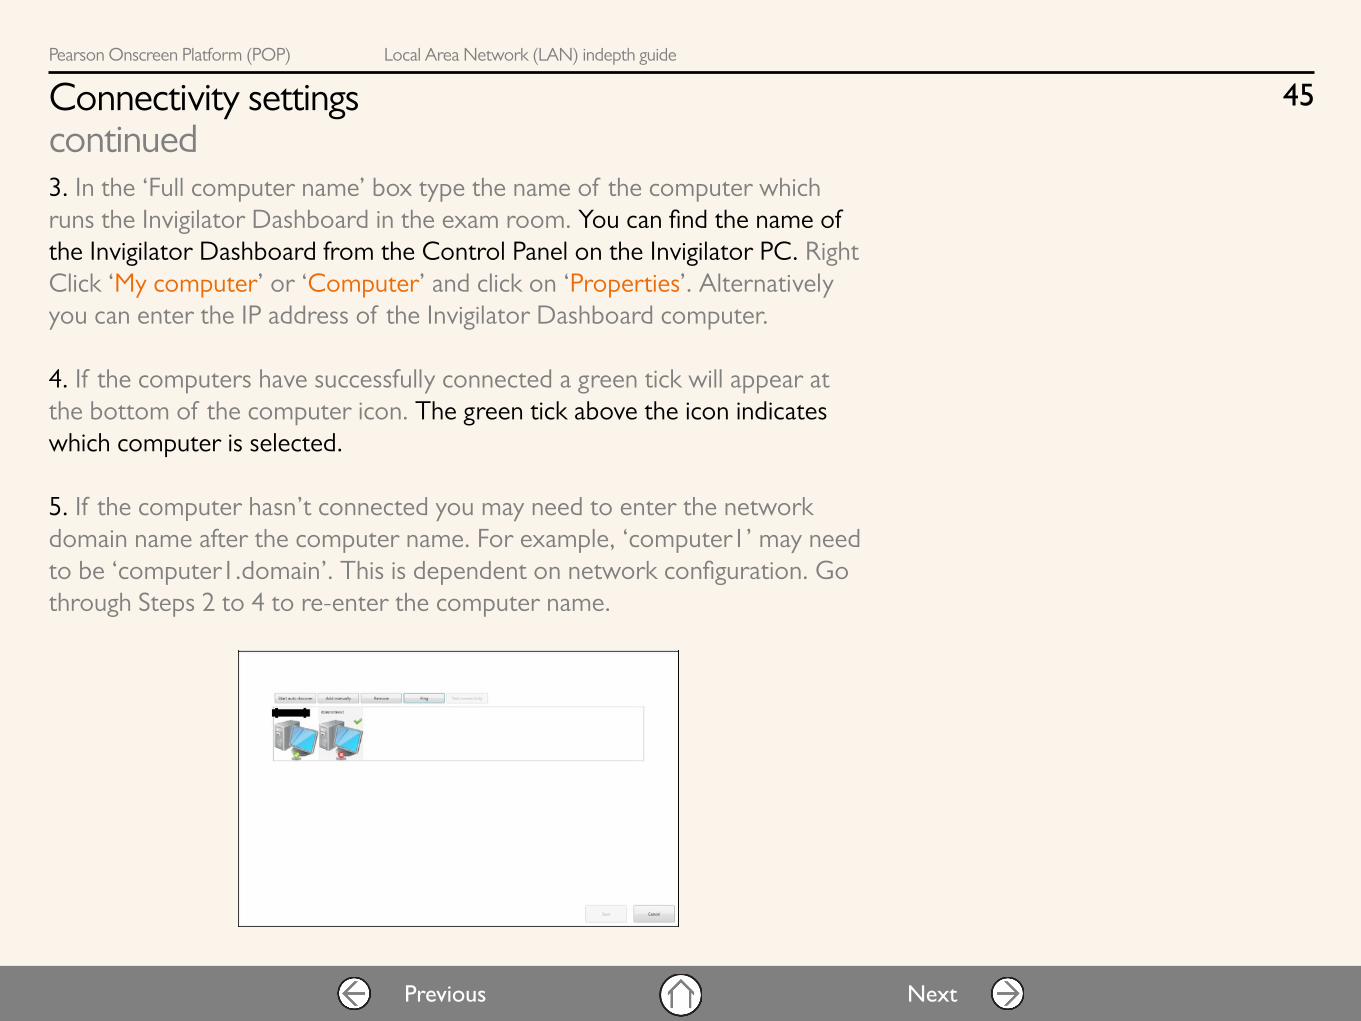
Connectivity settings
3. In the ‘Full computer name’ box type the name of the computer which runs the Invigilator Dashboard in the exam room. You can find the name of the Invigilator Dashboard from the Control Panel on the Invigilator PC. Right Click ‘My computer’ or ‘Computer’ and click on ‘Properties’. Alternatively you can enter the IP address of the Invigilator Dashboard computer.
4. If the computers have successfully connected a green tick will appear at the bottom of the computer icon. The green tick above the icon indicates which computer is selected.
5. If the computer hasn’t connected you may need to enter the network domain name after the computer name. For example, ‘computer1’ may need to be ‘computer1.domain’. This is dependent on network configuration. Go through Steps 2 to 4 to re-enter the computer name.
continued

Pearson Onscreen Platform (POP) Local Area Network (LAN) indepth guide
46
NextPrevious
Connectivity settings
6. When you have successfully connected use the ‘Test Connectivity’ button which will run the specific tests shown below:
Even if the final test ‘Reporting test completion’ triggers a red cross (as shown) the connectivity test has been successful.
If any of the other tests fail there may be issues with your LAN connectivity.
Click ‘Finish’ when you are happy with the configuration.
continued
!If you experience connectivity
issues after a candidate has logged in you can access the same connectivity screens by pressing ‘Alt-Shift-F12’, typing the password in the password
prompt and selecting the ‘Configure and Diagnose’
button.

Pearson Onscreen Platform (POP) Local Area Network (LAN) indepth guide
47
NextPrevious
Recovering tests
If your centre experiences a hardware issue during a test, candidates may need to recover a test from a different PC.
1. Load the Test Player on a new machine and login with the candidate’s details.
2. Press ‘Alt-Shift-F12’ and enter the password.
3. The Recover button will be available, press it and the candidate can continue from where they left off.
Note: If you do not have the password you will need to call 08444632535 to request it.

Pearson Onscreen Platform (POP) Local Area Network (LAN) indepth guide
48
NextPrevious
Section One
Upgrading POP
651 Component upgrades
49 Uninstall
50 Install upgrade

Pearson Onscreen Platform (POP) Local Area Network (LAN) indepth guide
49
NextPrevious
In this section
The purpose of this section is to help you upgrade the Pearson Onscreen Platform to the latest version available.
Uninstall
The first step is to remove (uninstall) any existing versions that you have stored on your server or networked PC.
To find the software you can follow this file path:Start>Control Panel>Programmes and Features>
Scroll down the installed programmes until you find Exam Centre Service. If you place your cursor over the ‘Exam Centre Service’ and right click, it will give you an option to uninstall. Click uninstall, like so:
Some uninstalls require you to restart your PC. If so, make sure that you save any important work and close all running programmes. The uninstall will not affect the other parts of the software (Admin dashboard, Invigilator dashboard, Test players), which should be installed on other PC’s.

Pearson Onscreen Platform (POP) Local Area Network (LAN) indepth guide
50
NextPrevious
Install upgrade
Once your PC restarts you can install the latest version of the software, by clicking here. You may be asked to confirm the running of this programme, like so:
After you click ‘Run’ you will be asked to enter your centre number into a text box for the Exam Centre Service setup (upgrade). Once entered, click ‘Verify’ and then ‘Next’.
The next stages of the upgrade will run as if the software is completing a new installation, but it is actually just updating the Exam Centre Service and the files for the Administrator Dashboard, Invigilator Dashboard and Test Player, which are held in the ‘Apps’ folder of your Data store.

Pearson Onscreen Platform (POP) Local Area Network (LAN) indepth guide
51
NextPrevious
Component upgrades
Now that you have completed the upgrade of the Exam Centre Service, the upgrades of the other software components will need to be completed too. You do not need to uninstall these programmes.
When you open the Administrator Dashboard you will get a message that will ask you to download an upgrade. Do so, and allow the files to update the Administrator Dashboard software. Upon completion log into the Administrator Dashboard and check that the service is working correctly.
Repeat this process with the Invigilator Dashboard and Test Players. Each PC with the Test Player software installed on it will need to be upgraded. Again, log into the Invigilator Dashboard and Test Players to check that the software is running correctly.
Please contact [email protected] and inform them that you have now updated your Pearson Onscreen Platform and would like to order a demo test to make sure your software is now running correctly.
Please ensure that you run a demo test on any updated software before booking and running live tests.
!Guides, videos and a live chat support can be found on our
website to help with any questions or queries you may
have about any stage of running or using the Pearson
Onscreen Platform.