peak performer 1 rcp manual v3.2 - peak laboratories€¦ · peak performer 1 users manual page # 7...
TRANSCRIPT

Peak Performer 1 Users Manual
Page # 1
Peak Performer 1 RCP User Manual
Peak Laboratories, LLC
www.peaklaboratories.com
650-691-1267
Version 3.2 11/20/2008

Peak Performer 1 Users Manual
Page # 2
Forward This manual is a reference guide for the operation of the Peak Performer 1 series of gas analyzers. The Peak Performer 1 should only be operated by trained personnel familiar with the safe operating procedures of the analyzer. The following cautions should always be considered:
High voltages are required for proper detector operation and are present when the unit is energized. High operating temperatures are required for proper detector and chromatographic operation. Hot surfaces may be present when the unit is energized RCP equipped instruments utilize an intense ultraviolet light source. Proper eye protection to block 254 nm radiation is required whenever the UV lamp cover is removed.
Illustrations and photographs contained herein are for example only. Actual configurations may vary depending on specific application and installed options. Improper installation, operation or service of the analyzer can cause permanent damage to the instrument. The analyzer is designed to be operated with all covers installed, connected to a properly grounded 3 conductor AC line source.
RCP equipped instruments utilize small amounts of mercury (Hg) based compounds, and small amounts of mercury may be present in the detector, bed and scrubber after use. Proper safety protection to block mercury
ingestion is required when handling these components.
In event of fire, Class A, B, or C fire extinguishers can be used.
The Peak Performer 1 must have standard electrical power and applicable gas supply pressures as noted on the test documentation for proper operation. Permanent damage and voiding of the warranty may result from improper use.

Peak Performer 1 Users Manual
Page # 3
Operators should not attempt to repair the instrument except under directed to do so by factory trained service technicians. Permanent damage and voiding of the warranty may result of improper operation.
Normal life of the mercury scrubber is 24 months under continuous use. Replace and dispose of properly in accordance with local and federal regulations.
Glossary and Terms RCP Reducing Compound Photometer HgO Mercuric Oxide Hg Scrubber Mercury vapor trap Molecular Sieve Zeolite column packing material Unibeads Silica column packing material HSD HayeSep D column packing material Molecular Sieve Zeolite column packing material Unibeads Silica column packing material Gas Purity Amount of undesired elements in a gas supply Span Gas Gas supply with known, certified amounts of specific compounds Response Factor Proportionality factor between area count units and concentration
units Name Peak identification tag PkCen Expected peak retention time (in seconds) LW Typical time span measured from the start of the peak’s baseline rise to
the peak apex “PkCen” (in seconds) RW Typical time span measured from the peak’s apex “PkCen” to the end of
the peak’s baseline decline (in seconds) PkWin Total tolerance window (in seconds) for assignment of a “Name” to a
quantified chromatographic peak. The tolerance window is centered upon the “PkCen” value
PkHgt Variable for establishing the cross-over point in peak detection modes. Chromatographic peaks higher than this parameter will be quantified using the “Variable” mode heights, peaks with height less than or equal to ”PkHgt” will be quantified using the “ForceB” mode.
Flt Convolution filter value expressing the overall peak shape. Flt = 2 is recommended for sharp, narrow peaks such as H2, and Flt = 8 is recommended for broad peaks.

Peak Performer 1 Users Manual
Page # 4
Table of Contents
1.0 Introduction 6 2.0 Installation Considerations 7 2.1 Unpacking Instructions 7 2.2 General Considerations 7 2.3 Electrical Connections 7 2.4 Rack Mount Specifications 8 2.5 Gas Supplies and Connections 10 2.5.1 Carrier Gas Supply 11 2.5.1.1 Carrier Gas Purity 11 2.5.1.2 Carrier Gas Purity Requirements 13 2.5.1.3 Carrier Gas Connection 13 2.5.2 Actuator Gas Supply 14 2.5.3 Sample Supply 14 2.5.3.1 Second Sample Gas Supply 15 2.5.4 Span Gas Supply 15 3.0 Standard Start-up Procedure 16 3.1 Quick Start Sequence 16 3.2 Column Conditioning 17 3.3 Detector Conditioning 18 3.4 Sample Analysis 18 3.5 Calibration 19 3.5.1 Establishing New Instrument Response Factors 19 3.6 Shutdown and Transport 20 4.0 Peak Performer 1 Operator Interface 21 4.1 Set-up Screen 21 4.1.1 Set-up Screen Upper Section 22 4.1.1.1 Set-up Screen Upper Section Button Functions 22 4.1.2 Set-up Screen Middle Section (Power-up) 23 4.1.2.1 Set-up Screen Middle Section Button Functions (Power-up) 23 4.1.3 Set-up Screen Middle Section (Normal) 24 4.1.3.1 Set-up Screen Middle Section Button Functions (Normal) 24 4.1.4 Set-up Screen Lower Section 25 4.1.4.1 Display Screen Button Functions 25 4.1.4.2 Clearing Error Messages on the Set-up Screen 26 4.1.4.2.1 Set-up Screen Lower Section Button Functions 26 4.2 Analog Interface Screen 28 4.2.1 Analog Interface Screen Button Function 28 4.2.2 Analog Interface Connections and Wiring 29 4.3 Calibration Database Screen 30 4.3.1 Calibration Screen Button Functions 31 4.3.2 Calibration 31 4.3.2.1 Establishing New instrument Response Factors 32 4.4 Analysis Database Screen 32 4.4.1 Analysis Screen Parameters 33 4.4.2 Analysis Screen Button Function 34

Peak Performer 1 Users Manual
Page # 5
4.5 Event Program Editor Screen 35 4.5.1 Event Program Commands 35 4.5.2 Event Editor Screen Button Function 36 4.6 Stream Selector Sequence Editor Screen 36 4.6.1 Stream Selector Commands 36 4.6.2 Stream Selector Program Editor Screen Button Function 37 4.7 Run / Chromatogram Screen 37 4.7.1 Run Screen Button Functions 38 4.7.2 Run Screen / Continuous Monitoring Analysis 39 4.7.3 Manual Screen (Sub-Screen of Run Screen) 39 4.7.3.1 Manual Screen Button Functions 40 4.7.4 Display Screen (Sub-screen of Run Screen) 40 4.7.4.1 Display Screen Button Functions 41 5.0 Viewer Software 42 5.1 Sytem Requirements 42 5.2 Installing the Viewer Software 42 5.3 Starting the Viewer Software 42 5.4 Communications Settings Window 42 5.5 COM1 / COM2 Port and Cable Wiring 43 5.6 Viewer Software Window 44 5.6.1 File Menu on the Viewer Taskbar 45 5.6.1.1 Viewer Line Details Window 47 5.6.2 Start Menu on the Viewer Taskbar 48 5.6.3 Stop Menu on the Viewer Taskbar 48 5.6.4 Chrom View Window and Chromatogram Viewer Window 49 5.6.4.1 Chromatogram Files 49 5.6.4.2 File Menu on the Chrom Viewer Taskbar 50 5.6.4.3 Viewer Menu on the Chrom Viewer Taskbar 51 6.0 Communication Port Protocols and Data Formats 52 6.1 COM1 / COM2 Port and Cable Wiring 52 6.2 Port 1 Protocol 52 6.2.1 COM 1 Port Settings 52 6.2.2 Viewer Output Format 52 6.2.3 Detector Output Format 53 6.2.3.1 External Start Command String 53 6.2.3.2 Detector Signal Data String 53 6.2.4 EZChrom Elite Output Protocol 54 6.3 Port 2 Protocol (PLC) 54 6.3.1 COM 2 Port Settings 54 6.3.2 COM 2 Port Output Format 55 6.4 Trend / Analog Output Format 56 6.5 Setting Up a RS485 Network 57 6.5.1 RS232 to RS485 Converters 57 6.5.2 PP1 Port 2 Protocol 57 7.0 Chromatographic Principles 58 7.1 Sample Injection 58 7.2 Carrier Gas Purification 58
Peak Performer 1 Users Manual
Page # 6
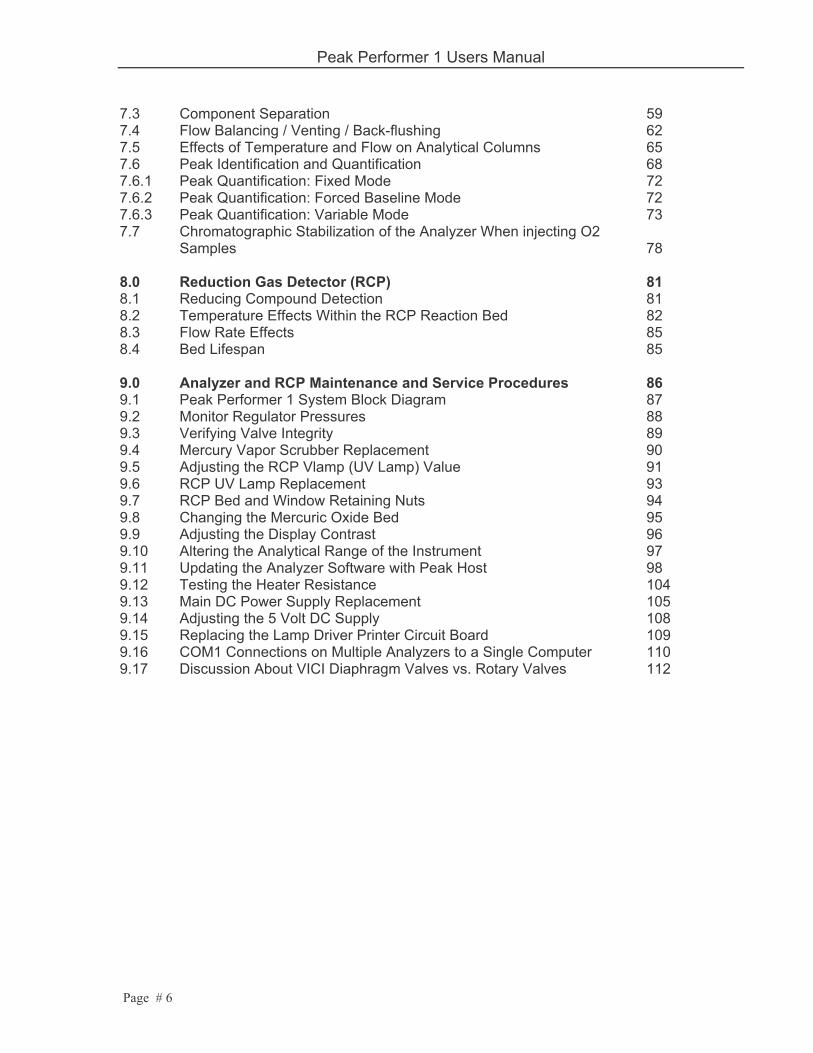
7.3 Component Separation 59 7.4 Flow Balancing / Venting / Back-flushing 62 7.5 Effects of Temperature and Flow on Analytical Columns 65 7.6 Peak Identification and Quantification 68 7.6.1 Peak Quantification: Fixed Mode 72 7.6.2 Peak Quantification: Forced Baseline Mode 72 7.6.3 Peak Quantification: Variable Mode 73 7.7 Chromatographic Stabilization of the Analyzer When injecting O2 Samples 78 8.0 Reduction Gas Detector (RCP) 81 8.1 Reducing Compound Detection 81 8.2 Temperature Effects Within the RCP Reaction Bed 82 8.3 Flow Rate Effects 85 8.4 Bed Lifespan 85 9.0 Analyzer and RCP Maintenance and Service Procedures 86 9.1 Peak Performer 1 System Block Diagram 87 9.2 Monitor Regulator Pressures 88 9.3 Verifying Valve Integrity 89 9.4 Mercury Vapor Scrubber Replacement 90 9.5 Adjusting the RCP Vlamp (UV Lamp) Value 91 9.6 RCP UV Lamp Replacement 93 9.7 RCP Bed and Window Retaining Nuts 94 9.8 Changing the Mercuric Oxide Bed 95 9.9 Adjusting the Display Contrast 96 9.10 Altering the Analytical Range of the Instrument 97 9.11 Updating the Analyzer Software with Peak Host 98 9.12 Testing the Heater Resistance 104 9.13 Main DC Power Supply Replacement 105 9.14 Adjusting the 5 Volt DC Supply 108 9.15 Replacing the Lamp Driver Printer Circuit Board 109 9.16 COM1 Connections on Multiple Analyzers to a Single Computer 110 9.17 Discussion About VICI Diaphragm Valves vs. Rotary Valves 112

Peak Performer 1 Users Manual
Page # 7
1.0 Introduction The Peak Laboratories Peak Performer 1 (PP1) gas analyzer is a trace level gas analysis system capable of detecting part per trillion (ppt) concentrations of reducing gases and hydrocarbon gases in a variety of sample matrices. Due to the specific nature of the detection method, analysis times are rapid and chromatographic complexity is minimized. The result is a simple and reliable system capable of following rapid trends in component concentration in laboratory, field, and process gas applications.
The Peak Performer 1 has a fully integrated, stand-alone microprocessor operating system. Key functions of the operating systems include detector and temperature control, data collection and analysis, and operator / data interface
Sampling hardware 4, 6, and 10 port VICI valves Column oven Covered
Type Isothermal, Mandrel Heating Capacity Single or Multiple 1/8” Columns
Temperature range 50°C –> 295°C Temperature accuracy ± 0.5°C
Power required 160 watts maximum

Peak Performer 1 Users Manual
Page # 8
2.0 Installation Considerations 2.1 Unpacking Instructions:
Remove the Peak Performer 1 from the packing material or traveling case, taking care to not scar the exterior surfaces of the analyzer. Set the analyzer on a firm, even surface and remove the protective plastic wrap. Each analyzer ships with adequate supplies for installation. Be certain to remove the installation accessories (tubing, power cord, compression fittings, etc.) from the packing materials. Remove the sleeve containing the Certificate of Conformity and Installation CD from the analyzer top panel. All shipping materials are reusable, please recycle these materials appropriately.
2.2 General Considerations • Analyzer size is 26” L x 17” W x 7” H • Maximum operating environment for the PP1 analyzer is 30°C • Power consumption is 160 watts maximum. • Fuse size is 2.5 ampere @ 250 VAC, 5 x 20 mm SLO-BLO • Free air flow for adequate ventilation to the rear of the unit is required. • Communication between the PP1 and your PC is via 9-pin straight through cable
connection to COM 1 and COM 2. • Analog outputs are available from the DIN screw terminal strip on the rear panel • The PP1 RCP contains an extremely light sensitive detector, do not place the analyzer in
a location where bright light / sunlight can enter the rear air vent slots.
2.3 Electrical Connections Verify the correct operating voltage as marked on the rear of the analyzer at the main power switch. Attach a standard power cable to the rear of the instrument (see Figure 1) and connect to an appropriately grounded outlet.
Figure 1. AC Power Connection Details
Power Cord End PP1 Power Entry Module

Peak Performer 1 Users Manual
Page # 9
For best sensitivity, power to the analyzer should originate from on an electrical circuit free from large inductive or other current loads. Be sure to mount the analyzer in an area of adequate ventilation and make sure the cooling fan inlet is unobstructed.
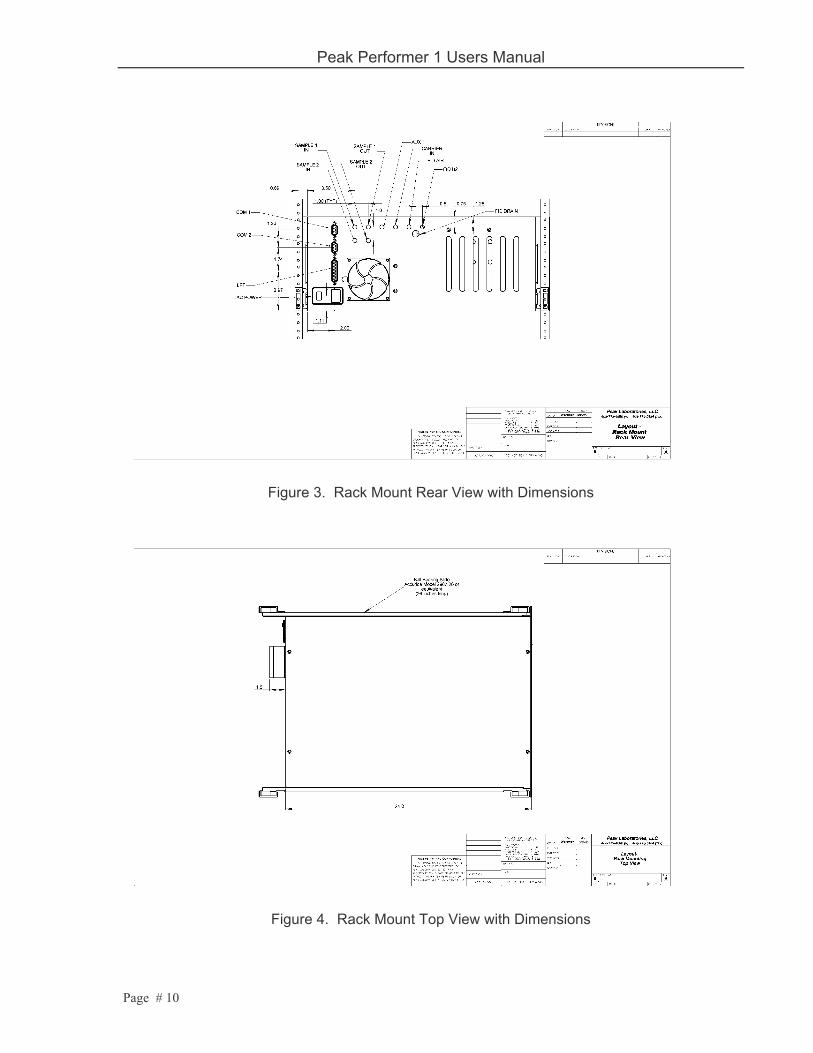
2.4 Rack Mount Specifications
The PP1 is designed for mounting in a standard 19” instrument rack. The analyzer occupies 4U (6.9”) of panel height, 26 “ in depth.
Rack retaining flanges provided with the Peak rack mount kit attach via the analyzer top cover to provide secure connection to the instrument rack rails.
Peak recommends use of high quality 26” full extension ball bearing slides for instrument mounting, such as Jonathan QD375-26 or equivalent.
Figure 2. Rack Mount Front View with Dimensions
Peak Performer 1 Users Manual
Page # 10
Figure 3. Rack Mount Rear View with Dimensions
Figure 4. Rack Mount Top View with Dimensions

Peak Performer 1 Users Manual
Page # 11
2.5 Gas Supplies and Connections
All plumbing connections are 1/16” female VICI bulkhead fittings.
The Peak Performer 1 is shipped with tubing and fittings required to connect the analyzer to gas sources. Replacement materials are available from Peak Laboratories, or may purchased directly. a. Standard gas fittings are 1/16” VICI compression fittings (VICI P/N ZN1 & ZF1) b. Supply tubing is 1/16” O.D x 0.03” I.D, cleaned and baked T300 stainless steel tubing (Restek P/N 21508).
Figure 5. Rear View of PP1 (Some Fittings May Not Be Present on Certain Models)
ACTUATOR SUPPLY
5N NITROGEN GAS SUPPLY
SAMPLE GAS SUPPLY
ACTUATOR IN
SAMPLE IN
CARRIER IN
Figure 6. RCP PP1 Gas Supply Schematic

Peak Performer 1 Users Manual
Page # 12
2.5.1 Carrier Gas Supply The instrument will accept a variety of carrier gases including N2, Ar, He, or Air.
** CAUTION**: Oxygen is never a suitable carrier or actuator supply gas. Oxygen is highly reactive, and many pneumatic components contain greases and oils that combust spontaneously when exposed to oxygen.
Consult the test data shipped with the analyzer (in CD format) for carrier gas details specific for your analyzer.
Commonly, the PP1 will utilize highly purified nitrogen as the carrier gas supply, and nitrogen is considered the best multi-purpose carrier gas. However, the best carrier to use approximates the sample matrix (i.e. nitrogen carrier for analysis of impurities in nitrogen). Matching the carrier gas to the sample will prevent upsets caused by the elution of high concentration sample balance peaks.
For optimum performance, the carrier gas must match the balance gas of your analytical sample, although other carrier gases can be used for specific applications with factory assistance.
PLEASE CONSULT THE TEST DATA ATTACHED TO YOUR ANALYZER IF
UNCERTAINTY OF CARRIER GAS SELECTION EXISTS.
2.5.1.1 Carrier Gas Purity Chromatographic instrument detection limit is directly related to carrier gas purity. Improved carrier gas purity enables improved sensitivity.

Peak Performer 1 Users Manual
Page # 13
Typical 99.999% Carrier Gas Specifications (Pre-Purification)
Source High Pressure Cylinder or Liquid Dewar
Gas Type N2 (Ar, He alternative)
THC Concentration < 1 ppm
CO, CO2 Concentration < 3 ppm
O2 Concentration < 3 ppm
H2, H2O Concentration < 3 ppm
Zero Air Gas Specifications (Pre-Purification)
Source High Pressure Cylinder or Zero Air Generator
Gas Type 79%N2, 21%O2
THC Concentration < 10 ppm
CO Concentration < 10 ppm
CO2 Concentration < 1000 ppm
H2, H2O Concentration < 100 ppm
Synthetic air sources suitable for use as Zero Air include “Zero” and “Breathing Quality” grades.
** CAUTION** : Compressed room air is not recommended unless refined by regenerative drying and combustion purification.
Consequently, the analyzer’s minimum detectable quantity (MDQ) would be quite high (> 10 ppm ) unless the carrier gas is purified. A catalytic combustor is included as an integral component of the carrier gas flow path of the RCP equipped PP1. Hydrogen and Carbon Monoxide carrier gas impurities are reduced to less than 10 ppt by this combustor.

Peak Performer 1 Users Manual
Page # 14
Internal Metallic Catalytic Combustor Specifications
Type Heated Mn / Cu Metal Oxide
Maximum Flowrate >300 cc/min, < 5 L/min
Gases Purified N2 (Ar, He or Air alternative)
CO Concentration (outlet) < 10 ppt
H2 Concentration (outlet) < 10ppt
Expected Life Infinite / Regenerable
2.5.1.2 Gas Purity Requirements
Gas Supply Gas Purity Nominal Pressure Typical Flow
Carrier Nitrogen,
Argon, Helium or Air
< 100 ppt total contaminants 60 psig 100 sccm
Actuator Clean, Dry Air or better
< 10 ppm H2O 70 psig 80 sccm
Heated reactive metal getters can also be used for generating the specified carrier gas purification. Cold metallic getters and absorption getters do not reliably remove all common critical bulk gas contaminants.
2.5.1.3 Carrier Gas Connection The PP1 carrier gas connection utilizes a 1/16” female VICI bulkhead labeled “CARRIER IN” on the front or rear panel. The PP1 RCP has an internal carrier gas pressure regulator for final gas carrier flow control.
1) Connect carrier gas supply gas (N2, Ar, He or Air) to the carrier bulkhead and set the
source regulator to 70 - 100 psig. 2) The internal carrier regulator of the RCP PP1 are pre-set at the factory using this
external pressure,

Peak Performer 1 Users Manual
Page # 15
3) Verify detector flow with a flow meter attached to the mercury scrubber outlet at the rear panel is approximately 20 sccm.
4) Verify the “BYPASS OUT” is flowing approximately 25 sccm.
Carrier flow exiting the internal combustor is split with a portion of the flow passing through a gas sampling valve, another portion of the carrier flow passing through a restrictor tube terminating at the location of the detector inlet, and a third portion passing through a restrictor tube terminating at the location of the “BYPASS OUT” port. Under normal operating conditions these ports are capped.
During column reconditioning, the plug may be removed and the “SAMPLE IN” switched to the bypass flow. In this manner, column reconditioning may be performed without requiring a shutdown of the sample gas flow, avoiding the lengthy re-equilibration period.
2.5.2 Actuator Supply The actuator supply is normally independent of the carrier gas inlet. Actuator supply is normally attached to the rear panel of the instrument. Attach the air or inert gas actuator supply to “ACTUATOR IN” port on the rear panel. Preset the source to 60 - 80 psig.
Gas Supply Gas Purity Nominal Pressure Typical Flow
Actuator Clean, Dry Air or better
< 10 ppm H2O 70 psig 100 sccm
If a combined carrier / actuator inlet is requested, connect a source of 60 - 80 psig of air or inlet gas to the CARRIER IN port.
2.5.3 Sample Supply Sample lines are normally attached to the rear panel of the instrument. Attach sample or span gas lines to the SAMPLE IN port on the rear panel. The SAMPLE OUT port must be unrestricted.
Sample gas must be supplied to the analyzer at low pressure (0.3 to 1.0 psig) and moderate flow (30 to 120 ml/min). The analyzer does not have any sample gas pressure / flow regulation equipment – Please contact the factory for sample handling instructions if these input conditions are not available.

Peak Performer 1 Users Manual
Page # 16
SAMPLE GAS SUPPLY
Figure 7. Sample Supply Flow Schematic
2.5.3.1 Second Sample Gas Supply Peak Labs offers an optional second sample inlet stream for most analyzers. Connection to the SAMPLE 1 IN and SAMPLE 2 IN ports should replicate Figure 7.Sample lines are normally attached to the rear panel of the instrument. Attach sample or span gas lines to the SAMPLE IN port on the rear panel. The SAMPLE OUT port must be unrestricted.
2.5.4 Span Gas Supply Peak Labs offers an optional internal span gas blender for most analyzers. Connection to the SPAN GAS IN port should replicate Figure 8. It is important to measure the pressure applied to the SPAN GAS IN port as closely to the analyzer rear panel as possible.
Figure 8. Span Gas Supply Flow Schematic

Peak Performer 1 Users Manual
Page # 17
3.0 Standard Start-up Procedure Peak Labs recommends that the user read the entire operating manual prior to using the “Quick Start” sequence.
** CAUTION** Do not begin detector heating without carrier gas flow. Damage to the detector may result.
3.1 Quick Start Sequence
1. Confirm that all gas connections and supplies are properly made. 2. Remove the top cover of the instrument. 3. Disconnect the bed inlet tube from the column outlet and connect to the standby outlet.
Figure 9. RCP Detector Showing Column Outlet and Standby Fittings
4. Pressurize the carrier gas supply line to 60 to 100 psig. 5. Verify that sample is flowing freely through loop - exit flow from the rear SAMPLE OUT
port should be 20 to 120 cc/min. 6. Verify “BYPASS OUT” flow > 20 cc/minute. 7. Verify the analyzer is connected to the correct line voltage supply. 8. Energize the main power switch (located to the right of the power cable, see Figure 1). 9. After energizing, the instrument will display the RUN screen in the IDLE state. 10. Press the “PAGE” command once. 11. Press “↓” command three times to position the cursor in the middle 1/3 of the screen. 12. Press the “HEAT” command once to activate heater zones. 13. Allow the 4 –6 hours for the analyzer to thoroughly stabilize the heated zones.

Peak Performer 1 Users Manual
Page # 18
14. After temperature stabilization:
15. Verify that the RCP Vlamp reading is greater than 1000 mV and less than 2450 mV. 16. If the analyzer has been stored or idle without carrier gas flow for more than a few days,
consider column conditioning as described in Section 3.2 17. Press the “PAGE” command 4 times to reach the RUN SCREEN. 18. If automatic sample cycles are desired, press the “SINGLE” command once to change
the setting to “CYCLE” 19. To initiate sampling, press the “RUN” command once. The P1 event program will be
automatically loaded and run. NOTE: To display concentration data only, press the upper right corner of the RUN screen once – this will hide the chromatogram and display data in large text format. To reveal the chromatogram again, press the upper right corner of the RUN screen again.
20. To halt sampling, press the “IDLE” command once.
3.2 Column Conditioning
*** CAUTION *** Be sure to put the RCP detector on standby flow before conditioning columns.
Conditions warranting column reconditioning are:
a) Start-up after storage / shipment b) Reduced detector response, c) Unstable baseline d) Merging of peaks.
Normal column operating temperatures are 90° to 130°C. The maximum PP1 RCP column operating temperatures 195oC.
*** CAUTION *** Never energize heaters of the instrument unless carrier gas flowing. *** CAUTION*** Do not exceed 210°C of column oven temperature. Temperatures in excess of 210°C can destroy column material.
1) Connect the front jumper tube between SAMPLE IN and BYPASS OUT. 2) Use the ↑, ↓, ← and → keys to navigate and alter the SET value for the “Column” heater
zone to 180° to 200°C. 3) After 8 to 12 hours of stable conditioning temperature, the column temperature may be
restored to the original factory setting.

Peak Performer 1 Users Manual
Page # 19
4) After normal operating temperature is achieved, the front jumper tube may be reconnected between SAMPLE IN and SAMPLE OUT.
5) The detector inlet may be switched back to the column outlet after normal operating temperature is achieved. After a 5-10 minute detector re-equilibration period, samples may be run.
6) After a 5-10 minute detector re-equilibration period, samples may be run. Normal operating temperatures vary with specific application. Consult the Final Test Data for special settings, special reconditioning requirements, etc. for your application.
3.3 Detector Conditioning
** CAUTION ** The maximum detector operating temperatures for the RCP is 295oC.
The RCP detector does not normally require conditioning treatment, however it does require 18 to 24 hours at normal operating temperature to achieve optimum stable performance. Normal detector operating temperature for the RCP is 265oC, although operating temperatures vary with the specific application. See Section 8 for details concerning the effects of operating parameters (temperature and flow) on RCP detector performance.
Normal life of the scrubber is 24 months under continuous use. Replace and dispose of properly in accordance with local and federal regulations.
3.4 Sample Analysis Verify that sample is flowing freely through loop - exit flow from the rear SAMPLE OUT port should be 30 to 120 cc/min. Press the “ESC” or “PAGE” commands as needed to navigate to the RUN screen If multiple sample runs are desired, press the “SINGLE” command to toggle to “CYCLE” (repetitive analysis) mode Press the “RUN” key to initiate analysis – the P1 event program will be loaded automatically and executed. Allow the analyzer to fully execute the event program. Current concentration data will be displayed as an overlay on the RUN screen as peaks are identified and quantified.

Peak Performer 1 Users Manual
Page # 20
3.5 Calibration The Peak Performer 1 chromatograph determines concentration peak area to quantify the amount of contaminants in the sample gas. The direct instrument response (in units of uV-sec) is reported simultaneously as an overlay on the RUN / CHROMATOGRAM SCREEN and in the AREA column on the CALIBRATION DATABASE SCREEN. As the concentration peak area is determined, the analyzer applies the pre-programmed response factor as an inverse proportional factor to generate the reported concentration value.
PEAK CONCENTRATION = PEAK AREA RESPONSE / RESPONSE FACTOR
3.5.1 Establishing New Instrument Response Factors Connect a known calibration standard gas (span gas) to the analyzer at the SAMPLE IN port on the front panel. (If span gas connection is made at the rear panel SAMPLE IN port, ensure that the front jumper is connected between SAMPLE OUT and SAMPLE IN on the front panel) Verify that sample is flowing freely through loop - exit flow from the SAMPLE OUT should be 30 to 120 cc/min. Press the ESC or PAGE keys as needed to navigate to the RUN screen Press the SINGLE / CYCLE / RERUN key to toggle to SINGLE mode Press the RUN key to initiate analysis – the P1 event program will be loaded automatically and executed. Allow the analyzer to fully execute the event program. Current concentration data will be displayed as an overlay on the RUN screen as peaks are identified and quantified. Press the PAGE key as needed to toggle to the CALIBRATION DATA BASE screen Place the “ * “ at the first compound of interest and press the EDIT key – use the up, down, left and right arrow keys to enter the span gas concentration in the CONC field. Be certain to use the right arrow key to fully exit the CONC field or all updates will be lost. With the “ * ” before the compound name, press the UPDATE key. The analyzer will recalculate the appropriate response factor for the compound based upon the span gas concentration and analyzer area response using the following formula:
RESPONSE FACTOR = AREA RESPONSE / SPAN GAS CONCENTRATION NOTE: The LED on the analyzer’s front panel will change from green to red to remind the user that the current calibration information is stored in volatile (temporary) memory only, and will need to be saved to permanent memory at a later time. Repeat the sequence for each of the compounds shown on the CALIBRATION DATA BASE screen.

Peak Performer 1 Users Manual
Page # 21
Repeat analysis of the span gas sample and verify that the analyzer reports data values within normal calibration tolerances (i.e. + / - 5%).
3.6 Shutdown and Transport 1. Allow the temperature zones to cool below 50°C (approximately 2 hours). 2. Allow carrier to flow during cool down time. 3. Shut off carrier after cool down time and plug the CARRIER IN port on the rear of the
analyzer. 4. Power off analyzer. 5. Cap the SAMPLE IN, SAMPLE OUT and ACTUATOR IN ports. 6. Plug the BYPASS OUT port on the front panel. 7. Ensure that the front jumper tube is connected between SAMPLE IN and SAMPLE OUT. 8. Package the analyzer in a hard cover carrying case or comparable shipping container. If
cardboard packaging is used, Peak recommends double boxing of the analyzer using at least 2” of resilient packing material between the inner and outer box walls..

Peak Performer 1 Users Manual
Page # 22
4.0 Peak Performer Operator Interface
Figure 10. Software Menu Structure
4.1 Set-up Screen The Set-up screen is multi-functional. Different command buttons appear at the bottom line of the screen dependent upon the section containing the asterick cursor (“*”). 1) The upper section (3 lines) contains commands related to analyzer set-up. 2) The middle section (5 lines) contains commands related to temperatures zones and detector parameters. 3) The lower section is reserved for error messages and non-volatile memory updates.

Peak Performer 1 Users Manual
Page # 23
4.1.1 Set-up Screen Upper Section
Figure 11. Set-up (or Main) Screen – Upper Section
4.1.1.1 Set-up Screen Upper Section Button Functions
↑ : Moves the cursor “*” upwards.
↓ : Moves the cursor “*” downwards.
Edit: Allows the user to change the Date, Time, or Protocols.
Page: Advances the user to the next screen.

Peak Performer 1 Users Manual
Page # 24
4.1.2 Set-up Screen Middle Section (Power-up) The middle section of the Setup screen is concerns temperature zone and detector function.
Figure 12. Screen Commands Upon Power-up NOTE: The heater zones are not energized automatically upon power-up, and the detector electronics are not fully initialized until the ZERO command is invoked.
4.1.2.1 Set-up Screen Middle Section Button Functions (Power-up) If both heater zones are de-energized, the following command buttons are available:
Zero: Allows the initialize the detector electronics and establish a consistent baseline signal.
↑ : Moves the cursor “*” upwards.
↓ : Moves the cursor “*” downwards.
Edit: Allows the user to energize each heater zone or change heater setpoint temperatures.
Heat: Energizes all the heater zones.
Page: Advances the user to the next screen.

Peak Performer 1 Users Manual
Page # 25
4.1.3 Set-up Screen Middle Section (Normal) The middle section of the Setup screen is concerns temperature zone and detector function.
Figure 13. Screen Commands After Warm-up
4.1.3.1 Set-up Screen Middle Section Button Functions (Normal)
Zero: Allows the initialize the detector electronics and establish a consistent baseline signal.
↑ : Moves the cursor “*” upwards.
↓ : Moves the cursor “*” downwards.
Edit: Allows the user to energize / de-energize each heater zone or change heater setpoint temperatures.
Page: Advances the user to the next screen.

Peak Performer 1 Users Manual
Page # 26
4.1.4 Set-up Screen Lower Section
The lower portion of the Setup screen is reserved for error messages and non-volatile memory updates.
4.1.4.1 Error Messages on the Set-up Screen Lower Section All error conditions are enunciated by a RED color on front panel LED, and a shift in the ERROR FLAG parameter transmitted through the COM1 and COM2 output ports – see Section 6.1 for additional details.
Figure 14. Set-up Screen Displaying an Error Message There are ten individual error conditions that can cause the status LED on the front panel to glow red:
• Detector Communication Error • Temperature Zone - Out of Range • Temperature Zone Disabled • Detector Zeroing Target Error • Vlamp Low Voltage - Out of Range (RCP analyzers Only) • FID Flame Temperature - Out of Range (FID Analyzers Only) • Event Program Load Error • Stream Selector Program Error

Peak Performer 1 Users Manual
Page # 27
• System Parameters Corrupted • Parameter Change, Update Needed
4.1.4.2 Clearing Error Messages and on the Set-up Screen Lower Section
Figure 15. Typical RCP Vlamp Error Message
All error messages (except PARAMETER UPDATE) can be cleared at any time by pressing the ACCEPT button. However, if the error condition continues to exist, the error message may re-appear.
Accept: Allows the user to acknowledge and clear error messages.
↑ : Moves the cursor “*” upwards.
↓ : Moves the cursor “*” downwards.
Page: Advances the user to the next screen.
4.1.4.2.1 Set-up Screen Lower Section Button Functions
The PARAMETER CHANGE, UPDATE NEEDED error message can only be cleared when the analyzer is not performing an analysis, i.e. is in IDLE mode. The parameter update action forces a complete re-write of permanent memory and is irreversible. Peak Labs recommends reviewing all parameter screens before performing a parameter update. Once in Idle mode, the Main / Set-up screen appears as Figure 13.

Peak Performer 1 Users Manual
Page # 28
Figure 16. Parameter Change Error Message
Accept: Allows the user to initiate permanent updates to non-volatile memory.
↑ : Moves the cursor “*” upwards.
↓ : Moves the cursor “*” downwards.
Page: Advances the user to the next screen.
Pressing the ACCEPT button alters the screen appearance.
Figure 17. Parameter Change Prompt

Peak Performer 1 Users Manual
Page # 29
Save: Allows the user to make changes to permanent non-volatile memory.
Esc: Aborts updates to non-volatile memory.
4.2 Analog Interface (Trend and Recorder Output) Screen The compound (or Channel) information for the ANALOG INTERFACE screen is automatically populated using the information from the ANALYSIS DATABASE screen. If no compound name is present in the ANALYSIS DATABASE for the 4th compound, Channel 4 is dedicated for a direct analog signal from the detector for use with a chart recorder or integrator. Analog signals generated from this information appear on the rear panel’s green DIN terminal blocks. See Figure 19.
Figure 18. Analog Interface Screen
4.2.1 Analog Interface Screen Button Function
↑ : Moves the cursor “*” upwards.
↓ : Moves the cursor “*” downwards.
Range: Allows the user to select the full scale concentration range associated with the maximum 1.25 VDC signal for each compound. The ranges are as follows:
- 0 ->125 ppb - 0 ->1250 ppb

Peak Performer 1 Users Manual
Page # 30
- 0 -> 5500 ppb - 0 -> 12500 ppb - 0 -> 125000 ppb e.g. 0 – 1250 ppb readings in the analyzer = 0 – 1.25 VDC output scale. At the end of each run, the analog signal is updated and holds until the next run is completed. As an accessory, Peak can provide standard commercial VDC -> mA converters as needed. If “RECORDER” appears in the 4th compound location, the RANGE button for the recorder function is not tied to any specific concentration range. In lieu of a specific concentration range, the RANGE button for the recorder function toggles through 4 choices of raw signal attenuation: X1, X2, X4, X8. This function is similar to the RANGE switch on a chart recorder.
Manset: Temporarily over-rides the signal output with a known output voltage for test purposes.
Four MANSET options are available: 0.00 VDC, 0.312 VDC, 0.625 VDC, and 1,250 VDC. There is not any zero offset or full voltage scale adjustment within the PP1 – if this function is a requirement, Peak Labs recommends the use of standard commercial voltage converters attached externally to the analyzer.
Page: Advances the user to the next screen.
4.2.2 Analog Interface Connections All analog interface connections are made via the rear panel DIN connector. To make a proper connection, strip all wires back approx. 3/8”, unscrew the terminal locking screw fully , insert the wire and tighten. A common error is insufficient length of bare wire creating the condition where the terminal contacts only the wire insulation

Peak Performer 1 Users Manual
Page # 31
Figure 19. Analog Output Connections
NOTE: The analog outputs are locked if the Port 1 Protocol on the MAIN SCREEN is set to DETECTOR. See Section 4.1.1
Figure 20. Analog Output Wiring Schematic
4.3 Calibration Database Screen The Calibration Database screen stores critical information regarding calibration (span) gas concentrations and instrument response, and provides tools to easily update the response factors.

Peak Performer 1 Users Manual
Page # 32
Figure 21. Calibration Database Screen
4.3.1 Calibration Screen Button Function
Update: Allows the analyzer to calculate new RFactor.
↑ : Moves the cursor “*” upwards.
↓ : Moves the cursor “*” downwards.
Edit: Allows the user to change concentration data or response factor.
Page: Advances the user to the next screen.
4.3.2 Calibration The Peak Performer 1 chromatograph determines concentration peak area to quantify the amount of contaminants in the sample gas. The direct instrument response (in units of uV-sec) is reported simultaneously as an overlay on the RUN / CHROMATOGRAM SCREEN and in the AREA column on the CALIBRATION DATABASE SCREEN. As the concentration peak area is determined, the analyzer applies the pre-programmed response factor as an inverse proportional factor to generate the reported concentration value.
PEAK CONCENTRATION = PEAK AREA RESPONSE / RESPONSE FACTOR

Peak Performer 1 Users Manual
Page # 33
4.3.2.1 Establishing New Instrument Response Factors Connect a known calibration standard gas (span gas) to the analyzer at the SAMPLE IN port on the front panel. (If span gas connection is made at the rear panel SAMPLE IN port, ensure that the front jumper is connected between SAMPLE OUT and SAMPLE IN on the front panel) Verify that sample is flowing freely through loop - exit flow from the SAMPLE OUT should be 30 to 120 cc/min. Press the ESC or PAGE keys as needed to navigate to the RUN screen Press the SINGLE / CYCLE / RERUN key to toggle to SINGLE mode Press the RUN key to initiate analysis – the P1 event program will be loaded automatically and executed. Allow the analyzer to fully execute the event program. Current concentration data will be displayed as an overlay on the RUN screen as peaks are identified and quantified. Press the PAGE key as needed to toggle to the CALIBRATION DATA BASE screen Place the “ * “ at the first compound of interest and press the EDIT key – use the up, down, left and right arrow keys to enter the span gas concentration in the CONC field. Be certain to use the right arrow key to fully exit the CONC field or all updates will be lost. With the “ * ” before the compound name, press the UPDATE key. The analyzer will recalculate the appropriate response factor for the compound based upon the span gas concentration and analyzer area response using the following formula:
RESPONSE FACTOR = AREA RESPONSE / SPAN GAS CONCENTRATION NOTE: The LED on the analyzer’s front panel will change from green to red to remind the user that the current calibration information is stored in volatile (temporary) memory only, and will need to be saved to permanent memory at a later time. Repeat the sequence for each of the compounds shown on the CALIBRATION DATA BASE screen. Repeat analysis of the span gas sample and verify that the analyzer reports data values within normal calibration tolerances (i.e. + / - 5%). 4.4 Analysis Database Screen The Analysis Database screen stores critical information regarding peak identification and quantification parameters.

Peak Performer 1 Users Manual
Page # 34
Figure 22. Analysis Database Screen
4.4.1 Analysis Database Parameters Name = The peak identification tag, expressed as 5 alphanumeric characters (A-Z, 0-9) PkCen = The normally expected peak retention time (in seconds), used for assigning the appropriate “Name” LW = The typical time span measured from the start of the peak’s baseline rise to the peak apex “PkCen” (in seconds). Minimum value is 3, maximum is 35 RW = The typical time span measured from the peak’s apex “PkCen” to the end of the peak’s baseline decline (in seconds) Minimum value is 3, maximum is 35 PkWin = Total tolerance window (in seconds) for assignment of a “Name” to a quantified chromatographic peak. The tolerance window is centered upon the “PkCen” value PkHgt = A variable for establishing the cross-over point in peak detection modes. Chromatographic peaks higher than this parameter will be quantified using the “Variable” mode heights, peaks with height less than or equal to ”PkHgt” will be quantified using the “ForceB” mode. Flt = The convolution filter value expressing the overall peak shape. Flt = 2 is recommended for sharp, narrow peaks such as H2, and Flt = 8 is recommended for broad peaks such as CO. As a general rule, LW and RW values do not change significantly with peak concentration, so calibration peak size is not critical in determining proper LW and RW values.

Peak Performer 1 Users Manual
Page # 35
H2 Peak - Left and Right Widths as a Function of Concentration
0.0
1.0
2.0
3.0
4.0
5.0
6.0
7.0
8.0
9.0
10.0
1 10 100 1000 10000
Blended Concentration (ppb)
Left
Wid
th (s
econ
ds)
0.0
2.0
4.0
6.0
8.0
10.0
12.0
14.0
Rig
ht W
idth
(sec
onds
)
Left WidthRight Width
CO P e a k - Le f t a nd R i ght Wi dt hs a s a Func t i on of Conc e nt r a t i on
0.0
2.5
5.0
7.5
10.0
12.5
15.0
1 10 100 1000 10000
Bl ended Concent r at i on ( ppb)
0.0
5.0
10.0
15.0
20.0
25.0
30.0
Left WidthRight Width
Figure 23. Left and Right Peak Width as a Function of Concentration
• Total peak width (LW + RW) is primarily a function of sample loop unloading. • Larger sample loops require a long time period to fully inject. • The relative values of LW and RW are dictated by the skew factor of the peak. • Peaks need about 25 –30 data points minimum to be well measured - at 5 data points
per second, this means total peak width should be greater than 6 seconds.
Therefore, it is recommended to use a substantial calibration peak concentration to facilitate easy LW and RW measurements.
4.4.2 Analysis Screen Button Function
↑ : Moves the cursor “*” upwards.
↓ : Moves the cursor “*” downwards.
Edit: Allows the user to enter new peak compound name or analysis
parameters.
Page: Advances the user to the next screen

Peak Performer 1 Users Manual
Page # 36
Analysis Averaging - When enabled, the last four chromatograms are averaged data point by data point to create a composite chromatogram, which is then quantified using normal techniques. Analysis averaging does not average concentration data values. From a cold start, it will take approximately 30 minutes to obtain the best averaged results. 4.5 Event Program Editor Screen The Event Program Editor screen stores critical information regarding pre-programmed instrument actions needed to perform an analysis.
Figure 24: Event Editor Screen
4.5.1 Event Program Commands The instrument actions can be pre-programmed to create an analysis method or Event Program. The analyzer stores up to 4 distinct Event Programs. V1 ⁄ (CW) Moves V1 to the Inject position V1 \ (CCW) Moves V1 to Load position V2 ⁄ (CW) Moves V2 to the In-line position V2 \ (CCW) Moves V2 to the Vent position ZERO Invokes the detector ZERO command END Ends the Event Program and prepares the analyzer for the next run HEAT ON Not currently in use HEAT OFF Not currently in use

Peak Performer 1 Users Manual
Page # 37
4.5.2 Event Editor Screen Button Function
↑ : Moves the cursor “*” upwards.
↓ : Moves the cursor “*” downwards.
Load 1: Allows the user to load the event program # 1.
Toggle: Allows the user to scroll through event program choices.
Page: Advances the user to the next screen
4.6 Stream Selector Program Editor Screen Peak offers a dual sample stream option for most analyzers. The selection and timing of sample streams can be pre-programmed on this screen. NOTE: This screen will only appear when the STREAM method of analysis is selected on the RUN screen
Figure 25. Stream Selector Sequence Screen
4.6.1 Stream Selector Commands The selection of sample streams and appropriate Event Program can be run in a pre-programmed sequence. Stream # Establishes which sample stream to be utilized for analysis Event Prog # Establishes which Event Program to be utilized for the sample stream Cycles Establishes the number of repeat analysis

Peak Performer 1 Users Manual
Page # 38
4.6.2 Stream Selector Program Editor Screen Button Function
↑ : Moves the cursor “*” upwards.
↓ : Moves the cursor “*” downwards.
Edit: Allows the user to chose event program # and # of repetitions.
Page: Advances the user to the next screen
4.7 Run / Chromatogram Screen The Run / Chromatogram screen is provides the real time display and data processing of sample analysis. The screen displays the running chromatogram, peak markers, and concentration data. The information displayed on this screen is useful for evaluating instrument health, event program validity, and analytical stability,
Figure 26. Run / Chromatogram screen in the Idle state, and the mode displayed upon initial power up

Peak Performer 1 Users Manual
Page # 39
Figure 27. Run screen in Single mode, with chromatogram being drawn
Figure 28. Run screen in Idle mode at end of run
4.7.1 Run Screen Button Functions
Run: Loads a standard event program and runs an analysis in the mode selected.
Idle: Stops the analysis immediately.
Manual: Opens the Manual Run Screen
Disp: Opens the Display Screen
Single: (Toggle). Starting a run in the Single mode will command the PP1 to run one time and return to the idle mode.

Peak Performer 1 Users Manual
Page # 40
Cycle: (Toggle). Starting a run in the Cycle mode shall configure the PP1 to run continuously until the Idle key is pressed.
ReRun: (Toggle). Starting a run in the ReRun mode shall recompute the area and concentration based on the parameters in the analysis data base.
Stream: (Toggle). Starting a run in the Stream mode will configure the PP1 to initiate the Stream Selector Sequence until the Idle key is pressed.
Page: Advances the user to the next screen.
4.7.2 Continuous Monitoring Analysis Continuous monitoring is intended for on-line analysis or other applications which ReRun analysis is not required. Use the “PAGE” key to scroll to reach the Run screen. Toggle the Single / Cycle / ReRun key until Cycle appears. (see Figure 28) Press Run to initiate a repetitive analytical cycle By pressing the “RUN” key, event program 1 (P1) is automatically loaded and the system will begin to collect data in repetitive mode (see Figure 28). To halt the cycle, pressing the “IDLE” will cause the analysis run to cease immediately. Toggle between the Single, Cycle, Rerun (or optional Stream) to select the next mode of analysis.
4.7.3 Manual Screen (Sub-Screen of the Run Screen) The Manual sub-screen allows the operator to invoke all the event program commands on demand.

Peak Performer 1 Users Manual
Page # 41
Figure 29. Run / Manual screen
4.7.3.1 Manual Screen Button Functions Zero: Pressing this key will electronically zero the detector. V1: Toggles Valve 1 between CW and CCW positions. V2: Toggles Valve 2 between CW and CCW positions. Esc: Exits from the Manual sub-screen to the Run screen.
4.7.4 Display Screen (Sub-Screen of the Run Screen) The Display sub-screen allows the operator to adjust the horizontal scale, vertical scale and baseline offset of the chromatogram. These functions mimic those of a standard chart recorder.

Peak Performer 1 Users Manual
Page # 42
Figure 30. Run / Display screen
4.7.4.1 Display Screen Button Functions
+VOff: Scrolls the screen up (maximum Voff = 11) without changing the scale.
-VOff: Scrolls the screen down (minimum Voff = 0) without changing the scale.
+Attn: Toggles the attenuation / vertical scaling (max. Attn = 11) up.
-Attn: Toggles the attenuation / vertical scaling (min. Attn = 1) down.
Span: Toggles the window view (horizontal scaling) in seconds.
Esc: Exits from the Display sub-screen to the Run screen.

Peak Performer 1 Users Manual
Page # 43
5.0 Viewer Software The Viewer software has two main capabilities. Primary functions concern acquisition and archiving of compound concentration and acquisition and collection of the chromatogram data. The software also provides the ability to display and print the data from a remote computer platform. Viewer software is written specifically for the Peak Laboratories Peak Performer 1 (PP1) gas analyzer covering communications port protocols and data formats and is not intended for use with other manufacturer’s analyzers.
5.1 System Requirements 1.2 GHz, 20 GB, 256 Mb RAM, 1 USB port Windows XP or Windows VIsta USB to DB9 (RS232) Adapter – SIIG US2308 / JU-CB1S12 or equivalent
DB9 Extension cable, DB9M to DB9F, wired straight-through, 10 feet Optional : USB 4 port self-powered Hub – Inland # 08302 or equivalent
5.2 Installing the Viewer Software 1) Place Viewer software CD-ROM disk into CD-ROM drive. 2) If Autorun is enabled, follow the installation screen prompts. 3) If the CD-ROM does not automatically launch, select “SETUP” from CD-ROM disk. 4) The installation software will auto-install the Viewer in a folder under the PC’s main drive as the default. The user has options from the installation process to create a new folder and install in a new location.
5.3 Starting the Viewer Software 1) Double-click the Viewer icon on the Desktop
or
1) Select “START” button on the bottom Taskbar.
2) Select “PROGRAMS”, select “VIEWER ”, and double-click to launch.move to “Viewer”
5.4 Communication Settings Window The Communication Settings window is shown in figure 31. This screen displays the serial communication settings used by the PC to communicate to the PP1.
The baud rate, data bits, and stop bits settings should match all of the settings in figure 16, baud rate 38400, data bit 8, stop bit 1.

Peak Performer 1 Users Manual
Page # 44
The COM port number must match the COM port designated by the PC’s terminal. The COM Port number is determined by which COM port the serial cable is plugged into on the PC, not the PP1. Clicking the “OK” button will configure the COM port to the correct options and save the settings in a file on the computer.
Figure 31. Viewer Software Communications Setting screen
5.5 COM1 / COM2 Port and Cable Wiring The cable connected from the PC to the PP1 should be a straight-through wired 9 pin M/F cable, attached to the PC’s COM port and the PP1’s COM port. Figure 32 is the minimum cable configuration. See Section 6 for details on communications protocols.
Figure 32. COM Cable Wiring

Peak Performer 1 Users Manual
Page # 45
5.6 Viewer Software Window The Viewer window shown in Figure 33 shows the main Viewer screen with a RED DOT in the upper right corner. This RED DOT signifies that there is a connection problem with the PC and the PP1. Verifying the following can solve this connection problem.
• Communication Settings • Connection of 9-pin cable between PC and PP1. • RS-232 cable plugged into the PP1’s COM 1 port. • PP1 is powered off
After the connection problem has found and corrected, the RED DOT should be CLICKED to verify if communication between the PC and PP1can be properly established.
Figure 33. Viewer main window showing Communications Error The Viewer window shown in Figure 34 shows the viewer screen without the RED DOT. This signifies the communication connection between the PC and the PP1 is function correctly.

Peak Performer 1 Users Manual
Page # 46
Figure 34. Viewer main window showing no Communications Error
5.6.1 File Menu on the Viewer Taskbar
Figure 35. File Menu on the taskbar
Peak Performer 1 Users Manual
Page # 47
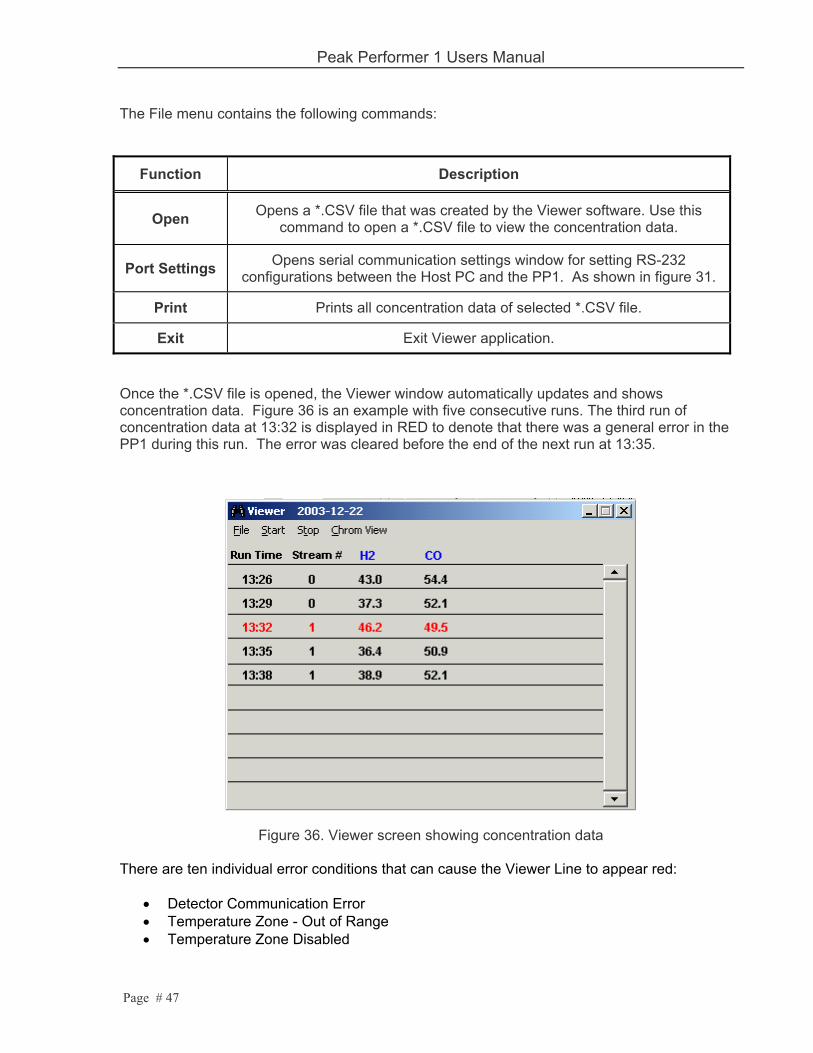
The File menu contains the following commands:
Function Description
Open Opens a *.CSV file that was created by the Viewer software. Use this command to open a *.CSV file to view the concentration data.
Port Settings Opens serial communication settings window for setting RS-232 configurations between the Host PC and the PP1. As shown in figure 31.
Print Prints all concentration data of selected *.CSV file.
Exit Exit Viewer application.
Once the *.CSV file is opened, the Viewer window automatically updates and shows concentration data. Figure 36 is an example with five consecutive runs. The third run of concentration data at 13:32 is displayed in RED to denote that there was a general error in the PP1 during this run. The error was cleared before the end of the next run at 13:35.
Figure 36. Viewer screen showing concentration data
There are ten individual error conditions that can cause the Viewer Line to appear red:
• Detector Communication Error • Temperature Zone - Out of Range • Temperature Zone Disabled

Peak Performer 1 Users Manual
Page # 48
• Detector Zeroing Target Error • Vlamp Low Voltage - Out of Range (RCP Analyzers Only) • FID Flame Temperature - Out of Range (FID Analyzers Only) • Event Program Load Error • Stream Selector Program Error • System Parameters Corrupted • Parameter Change, Update Needed
5.6.1.1 Viewer Line Details Window This window is displayed by double clicking on any time-stamp on the Viewer window. The screen provides detailed analytical information about the run selected. Figure 37 shows the data on a Viewer Details window screen
Figure 37. Viewer Detail screen showing raw analysis data. The information on the screen is linked to run 13:35 displayed in figure 36.

Peak Performer 1 Users Manual
Page # 49
5.6.2 Start Menu on the Viewer Taskbar
Figure 38. Start menu on the taskbar The Start menu contains the following commands:
Function Description
Single Run Single Run selection commands the PP1 to start a Single Run.
Cycle Run Cycle Run option commands the PP1 to start a continuous Cycle Run.
Stream Run Stream Run selection commands the PP1 to start a Stream Selection Run. (This operation only function if the Stream Selection option is installed)
5.6.3 Stop Command on the Viewer Taskbar The Stop Command selection instantly sends a command the PP1 to terminate the current run immediately.

Peak Performer 1 Users Manual
Page # 50
5.6.4 Chrom View Menu and Chromatograph Viewer Window The Chrom View menu selection opens the Chromatograph Viewer window. Two methods can open the Chrom Viewer window. 1) The first method is to select the Chrom View menu selection from the Viewer taskbar and then select a “.chm” file to display. 2) The second method of opening the Chrom Viewer is double-clicking one of the concentration values displayed in the Viewer window. Using either method, after the chromatogram data is loaded, the display can be adjusted by the Offset, Attenuation, and Span scroll bars.
Figure 39. Chromatogram Viewer Window
NOTE: Viewer window scaling does not match the analyzer’s display scaling . A higher degree of resolution is available in the Viewer window. For instance, Viewer ATTN 8 approximately is equivalent to analyzer display ATTN 1
5.6.4.1 Chromatogram Files Chromatograms are archived on the host computer as text files, suffixed “.chm”. The text files can be imported into most common laboratory analysis, spreadsheet and word processor programs as needed.

Peak Performer 1 Users Manual
Page # 51
Data points in the chromatogram file are time sequenced at 0.2 seconds per data point. The filename of the chromatogram file is generated by time of day on the host computer, and the file is stored in a folder that corresponds to the date of collection. A corresponding Viewer data file is created and / or updated at the time the chromatogram file is created. As an example, the fourth chromatogram shown in Figure 36 would be archived on the host computer as follows: Main directory C:\ Viewer Sub-directory 2003-12-22 [ (YYYY-MM-DD) of archive creation ] Viewer filename 2003-12-22.csv Filename 1335.chm
5.6.4.2 File Menu on the Chrom Viewer Taskbar
Figure 40. Baseline Selected

Peak Performer 1 Users Manual
Page # 52
Figure 41. Baseline Deselected The File menu offers the following commands:
Function Description
Open Opens a chromatogram file. Use this command to open and load the chromatogram data for display.
Save As Save the chromatogram data that is currently displayed.
BaseLine Enables display of compound name and integration baseline information.
Print Prints window.
Exit Exit window.
5.6.4.3 Viewer Menu on the Chrom Viewer Taskbar The Viewer menu selection returns the user to the original Viewer window. (See Figure 36)
Peak Performer 1 Users Manual
Page # 53
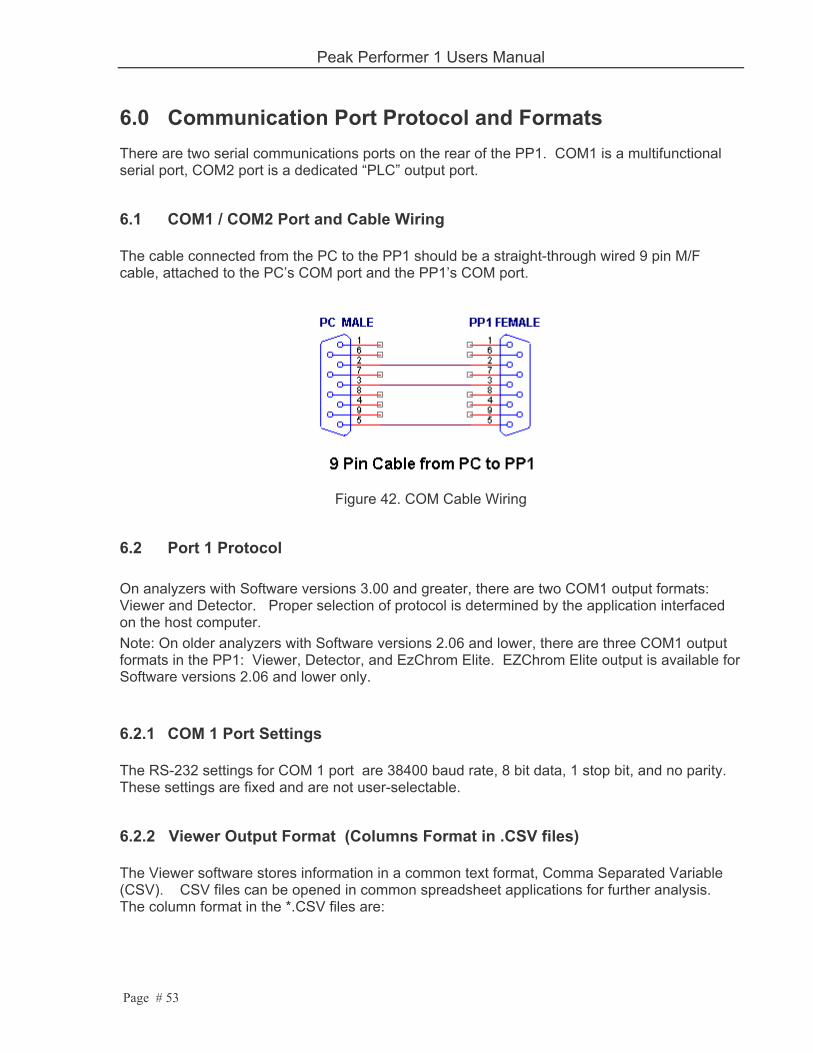
6.0 Communication Port Protocol and Formats There are two serial communications ports on the rear of the PP1. COM1 is a multifunctional serial port, COM2 port is a dedicated “PLC” output port.
6.1 COM1 / COM2 Port and Cable Wiring The cable connected from the PC to the PP1 should be a straight-through wired 9 pin M/F cable, attached to the PC’s COM port and the PP1’s COM port.
Figure 42. COM Cable Wiring
6.2 Port 1 Protocol On analyzers with Software versions 3.00 and greater, there are two COM1 output formats: Viewer and Detector. Proper selection of protocol is determined by the application interfaced on the host computer. Note: On older analyzers with Software versions 2.06 and lower, there are three COM1 output formats in the PP1: Viewer, Detector, and EzChrom Elite. EZChrom Elite output is available for Software versions 2.06 and lower only.
6.2.1 COM 1 Port Settings The RS-232 settings for COM 1 port are 38400 baud rate, 8 bit data, 1 stop bit, and no parity. These settings are fixed and are not user-selectable.
6.2.2 Viewer Output Format (Columns Format in .CSV files) The Viewer software stores information in a common text format, Comma Separated Variable (CSV). CSV files can be opened in common spreadsheet applications for further analysis. The column format in the *.CSV files are:

Peak Performer 1 Users Manual
Page # 54
A = Data/ Time B = Run Mode C = Analysis Buffer Number and Stream Number D = General Error Alarm E = RCP Lamp Voltage or FID Flame Temperature F = Compound Name G = Retention Time H = Left Point Offset I = Right Point Offset J = Area K = Response Factor L = Processing Flag Columns F to L are repeated for M to S, T to Z, and AA to AG for the next three compounds listed in the Calibration Data Base.
6.2.3 Detector Output Format The detector output format of the COM1 interface currently supports one command from a host computer system. This command remotely starts a RUN. The PP1 system processes the external start command only if the analyzer is in IDLE mode. (Not running a sample). Upon receipt of the external start command, the PP1 performs the following functions:
• Sets system run mode to SINGLE RUN mode. • Loads event program P1. • Starts a Single Run. • Sends Detector Signal Data stream (i.e. Vout reading) to the COM1 port. • At the end of the run, the PP1 sends an End-Of-Data string to identify the end of the
data stream. • Sets analyzer to IDLE mode and waits for the next start command.
6.2.3.1 External Start Command String The External Start Command string format transmitted by host computer must consist of three ASCII characters. Below are four forms of the same command: Form # 1 Start-Of-Text "S" End-Of-Text Form # 2 STX "S" EXT Form # 3 ^B S ^C Form # 4 02 53 03 6.2.3.2 Detector Signal Data String The PP1 Detector Signal Data string format is a decimal number followed by a carriage return (CR) and line feed (LF).
Peak Performer 1 Users Manual
Page # 55
An example: 104345 104763 104832 ... The End-Of-Data string format consists of three ASCII characters. The following are four forms of the same command: Form # 1 Start-Of-Text "E" End-Of-Text Form # 2 STX "E" EXT Form # 3 ^B E ^C Form # 4 02 45 03 An example: … 104345 104763 104832 // Last sample sent to Host ^BE^C // End-Of-Data command to Host from PP1
6.2.4 EzChrom Elite Output Protocol The EzChrom Elite output protocol is used when the PP1 is interfacing with EzChrom Elite, please consult the EZChrom manual for details on setup of the host computer.
6.3 Port 2 Protocol (PLC) The COM2 port is a dedicated RS232 output intended for use with PLCs (programmable logic controller) There are two modes of operation: AUTO and POLL. Proper selection of protocol is determined by the application interfaced on the host computer.
6.3.1 COM 2 Port Settings The RS-232 settings for COM 2 port are 9600 baud rate, 8 bit data, 1 stop bit, and no parity. Two modes of transmission are available: AUTO or POLL:
• In AUTO mode, the current PLC data string is transmitted at the end of analytical cycle.
• In POLL mode, the PP1 will transmit the latest PLC data string only when prompted by the host computer. This mode is recommended for use in a RS-485 network.
Peak Performer 1 Users Manual
Page # 56
Selecting the POLL mode on the MAIN SCREEN configures the PP1 to wait for a request before transmitting. The master controller of the RS-485 network must first request data from the PP1 in order for receive the COM2 port output data. The protocol to request data from the PP1 consists of:
1) A start of transmission character 2) Followed by the unit serial number 3) An end of transmission character. or STX character (02 hex) SSS ETX character (03 hex) The requesting command format follows: <STX>SSS<ETX> , where SSS = serial number of unit is used as the RS-485 ID.
6.3.2 COM 2 Port Output Format The COM 2 port output format consists of date and time stamp, error alarm, stream number, and impurity data. This data format is transmitted at the end of every run automatically, using a general protocol envelope. This envelope consists of a start of transmission character followed by data, and end of transmission character. The record start of transmission indicator is STX character (02 hex) and the record end of transmission indicator is ETX character (03 hex). The fields within each record are defined as follows: <STX>YYYY-MM-DD,HH:MM:SS,E,X,N1,AREA1,CONC1,N2,AREA2,CONC2, N3,AREA3,CONC3,N4,AREA4,CONC4,<ETX> YYYY-MM-DD = Date (2003-03-23) HH:MM:SS = Time (12:23:44 = 12 hours, 23 minutes, 44 seconds) E = General Error Alarm (0 = No error , “1” = Error) X = Stream Number N1 = Name of impurity 1from Calibration Database AREA1 = Area of impurity 1 CONC1 = Concentration of impurity 1 in 0.1 ppb N2 = Name of impurity 2 from Calibration Database AREA2 = Area of impurity 2 CONC2 = Concentration of impurity 2 in 0.1 ppb N3 = Name of impurity 3 from Calibration Database AREA3 = Area of impurity 3

Peak Performer 1 Users Manual
Page # 57
CONC3 = Concentration of impurity 3 in 0.1 ppb N4 = Name of impurity 4 from Calibration Database AREA4 = Area of impurity 4 CONC4 = Concentration of impurity 4 in 0.1 ppb IMPORTANT NOTE: The least significant decimal of the concentration resolution represents 0.1 ppb. I.E., a CONC1 reading of “1” represents a 0.1 ppb concentration level. 6.4 Trend / Analog Output Format Three independent impurity trend outputs are provided via 0 – 1.25 VDC screw terminals. Each impurity can be scaled from the front screen to match desired range. The ranges are as follows:
- 0 ->125 ppb - 0 ->1250 ppb - 0 -> 5500 ppb - 0 -> 12500 ppb - 0 -> 125000 ppb
e.g. 0 – 1000 ppb = 0 – 1 VDC scale. At the end of each run, the analog signal is updated and holds until the next run is completed. As an accessory, Peak can provide standard commercial VDC >> mA converters as needed.

Peak Performer 1 Users Manual
Page # 58
6.5 Setting up a RS485 Network The RS-485 specification supports two-wire half-duplex communications (only one unit may transmit at a time), but allows up to 32 users on a “party line” network. NOTE: The RS-422 specification supports four-wire full-duplex communications (two units may transmit at a time), and also allows up to 32 users on a “party line” network. The following information is provided to enable the users to install the Peak Performer 1 into a RS-485 network. This system diagram consists of the PP1, RS-232 to RS-485 converter, and master host controller.
Figure 43. System configuration diagram with basic connections.
6.5.1 RS232 to RS485 Converters There are numerous manufacturers of RS232 to RS485 converters, and the selection of the converter must be determined by the system engineer / designer to meet unique requirements.
6.5.2 PP1 Port 2 Protocol
Please refer to Section 6.3.1 and 6.3.2 for information on the PP1 COM 2 Port Protocols

Peak Performer 1 Users Manual
Page # 59
7.0 Chromatographic Principles As an analytical system, the PP1 - RCP performs five primary functions:
• Sample injection • Component separation • Component analysis • Integrated microprocessor system control with operator and data interface
7.1 Sample Injection A standard, air-actuated VICI injection valve is used to inject samples. Standard RCP analysis methods use stainless steel 1 cc sample loops. An on-column injection adapter is available from Peak Labs if smaller sample volumes are required, using standard micro-volume or Luer type syringes.
7.2 Carrier Gas Purification Chromatographic instrument detection limit is directly related to carrier gas purity. Improved carrier gas purity enables improved sensitivity.
Typical 99.999% Carrier Gas Specifications (Pre-Purification)
Source High Pressure Cylinder or Liquid Dewar
Gas Type N2 (Ar, He alternative)
THC Concentration < 1 ppm
CO, CO2 Concentration < 3 ppm
O2 Concentration < 3 ppm
H2, H2O Concentration < 3 ppm
Air Carrier Gas Specifications (Pre-Purification)
Source High Pressure Cylinder or Zero Air Generator
Gas Type 79%N2, 21%O2

Peak Performer 1 Users Manual
Page # 60
THC Concentration < 10 ppm
CO Concentration < 10 ppm
CO2 Concentration < 1000 ppm
H2, H2O Concentration < 100 ppm
Synthetic air sources suitable for use as FID Air include “Zero” and “Breathing Quality” grades.
** CAUTION** : Compressed room air is not recommended unless refined by regenerative drying and combustion purification.
Consequently, the analyzer’s minimum detectable quantity (MDQ) would be quite high (> 10 ppm ) unless the carrier gas is purified. A catalytic combustor is included as an integral component of the carrier gas flow path of the RCP equipped PP1. Hydrogen and Carbon Monoxide carrier gas impurities are reduced to less than 10 ppt by this combustor.
Internal Metallic Catalytic Combustor Specifications
Type Heated Mn / Cu Metal Oxide
Maximum Flowrate >300 cc/min, < 5 L/min
Gases Purified N2 (Ar, He or Air alternative)
CO Concentration (outlet) < 10 ppt
H2 Concentration (outlet) < 10ppt
Expected Life Infinite / Regenerable
7.3 Component Separation Component separation is normally performed by isothermal packed analytical columns. Column materials vary by application and are noted in the Test report documentation. Contact Peak Laboratories for additional details specific to your application.
Peak Performer 1 Users Manual
Page # 61
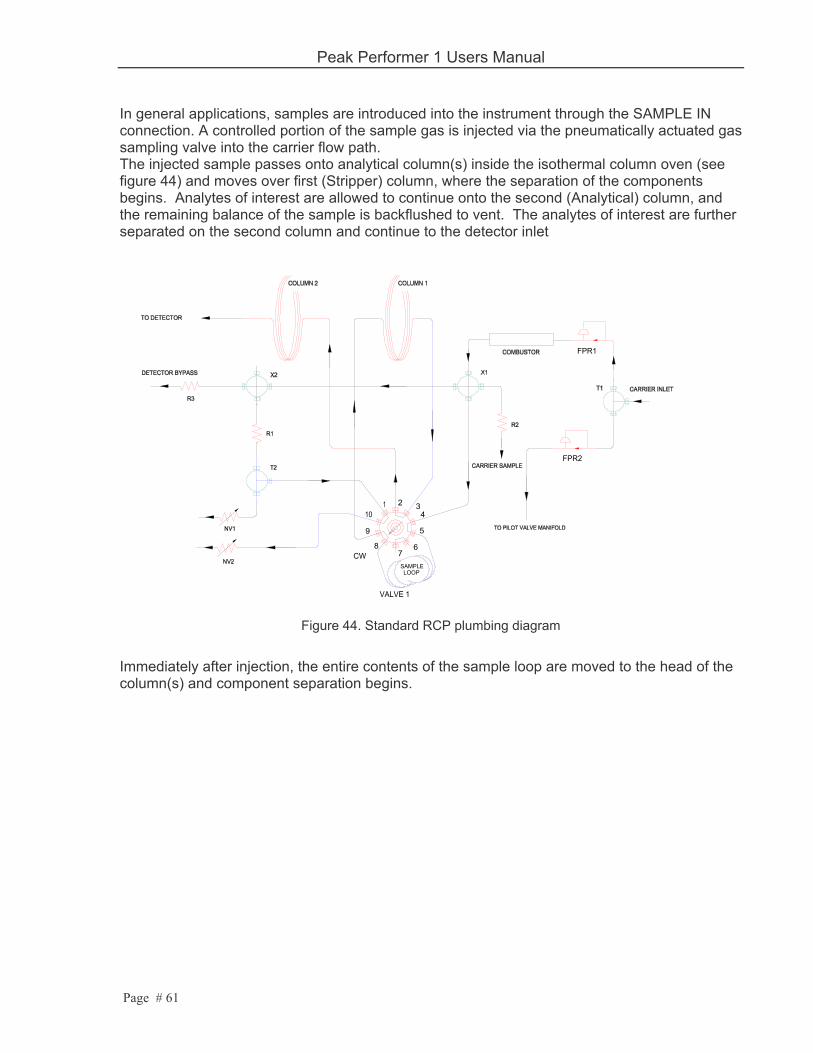
In general applications, samples are introduced into the instrument through the SAMPLE IN connection. A controlled portion of the sample gas is injected via the pneumatically actuated gas sampling valve into the carrier flow path. The injected sample passes onto analytical column(s) inside the isothermal column oven (see figure 44) and moves over first (Stripper) column, where the separation of the components begins. Analytes of interest are allowed to continue onto the second (Analytical) column, and the remaining balance of the sample is backflushed to vent. The analytes of interest are further separated on the second column and continue to the detector inlet
SAMPLELOOP
VALVE 1
5
4321
768
9
10
CW
FPR1
FPR2
Figure 44. Standard RCP plumbing diagram
Immediately after injection, the entire contents of the sample loop are moved to the head of the column(s) and component separation begins.

Peak Performer 1 Users Manual
Page # 62
Figure 45. Peak Development on the Analytical Column Soon After Injection
Figure 46. Peak Development Midway on the Analytical Column
Figure 47. Peak Development Midway on the Analytical Column

Peak Performer 1 Users Manual
Page # 63
Analytes of interest can be allowed to continue on to the detector as long as desired. In some cases, the resulting chromatogram can become quite long in duration. In other circumstances, it is not necessary to quantify all possible peaks, and the remaining balance of the sample is backflushed to vent or detector.
Figure 48. Peak Development on the Analytical Column After Backflush
Figure 49. The Completed Chromatogram
7.4 Flow Venting and Balancing Several problems can arise in the development of the chromatogram:
• Presence of compounds that may be damaging to the detector • Disproportionate peak sizes • Length of analysis
Several models of Peak analyzers are equipped with one or two valve plumbing arrangements to handle these situations. Often a second valve is used to perform “cutting” actions at particular times during the chromatogram, redirecting the column effluent towards a safe flow controlled “vent” outlet.

Peak Performer 1 Users Manual
Page # 64
During the “cutting” action, it is necessary to maintain pure gas flow to the detector. This pure gas flow is provided by an additional branch on the internal carrier gas main line feeding other ports on the valve. Ultra-high purity flow control components can be bulky and expensive. To diminish installed cost of flow control components, Peak has chosen a different method based upon flow restrictors to create a flow divider. A typical flow divider is shown in Figure 50.
Figure 50. Flow Divider Schematic The gas flow path to the detector is extremely clean and free of moving parts. Gas passing from the main flow limiting restrictor can be split to follow both gas paths. Studying the schematic, it can be seen that the detector flow can be adjusted by changing the amount of gas that is allowed to exit via the excess flow vent; as more gas exits the excess flow vent, less gas is available to flow towards the detector. The controlling needle valves for detector flow rate and column venting are co-mounted in the chassis for convenience. (see Figure 61). The detector flow control needle valve is color-coded red. Differences in DETECTOR flow during normal and venting valve positions can be expressed as shifts in detector baseline. Careful adjustment of the detector flow control needle valve will enable the operator to minimize baseline drift and create a smooth chromatogram.
Figure 51. Properly Flow Balanced Baseline

Peak Performer 1 Users Manual
Page # 65
Figure 52. High FID flow from NV1 (note rise after the V1 CCW command)
Figure 53. Low FID flow from NV1 (note drop after the V1 CCW command) Differences in COLUMN flow during normal and venting valve positions will be expressed as shifts in peak retention time compared to a chromatogram without any venting action.

Peak Performer 1 Users Manual
Page # 66
0 20 40 60 80 100 120 140 160 180 200 220 240
NV2 Flow = 59 sccm
NV2 Flow = 39 sccm
NV2 Flow = 79 sccm
CH4 RT = 93 sec
CH4 RT = 97 sec
CH4 RT = 102 sec
Figure 54. Peak Shifting as a Result of Improper Vent Needle Valve Flow Comparison of retention times for un-vented versus vented chromatograms will reveal improper adjustment of the vent flow control needle valve. Careful adjustment of the vent needle valve will enable the operator to minimize peak retention drift and create a consistent chromatogram.
7.5 Effects of Temperature and Flow on Analytical Columns The normal chromatogram can be affected by changes in column flow and temperature. Be aware that changes of operating parameters from final test conditions can require parametric adjustments (i.e. peak detection parameters, response factors, valve timing) within the analyzer.
Peak Performer 1 Users Manual
Page # 67
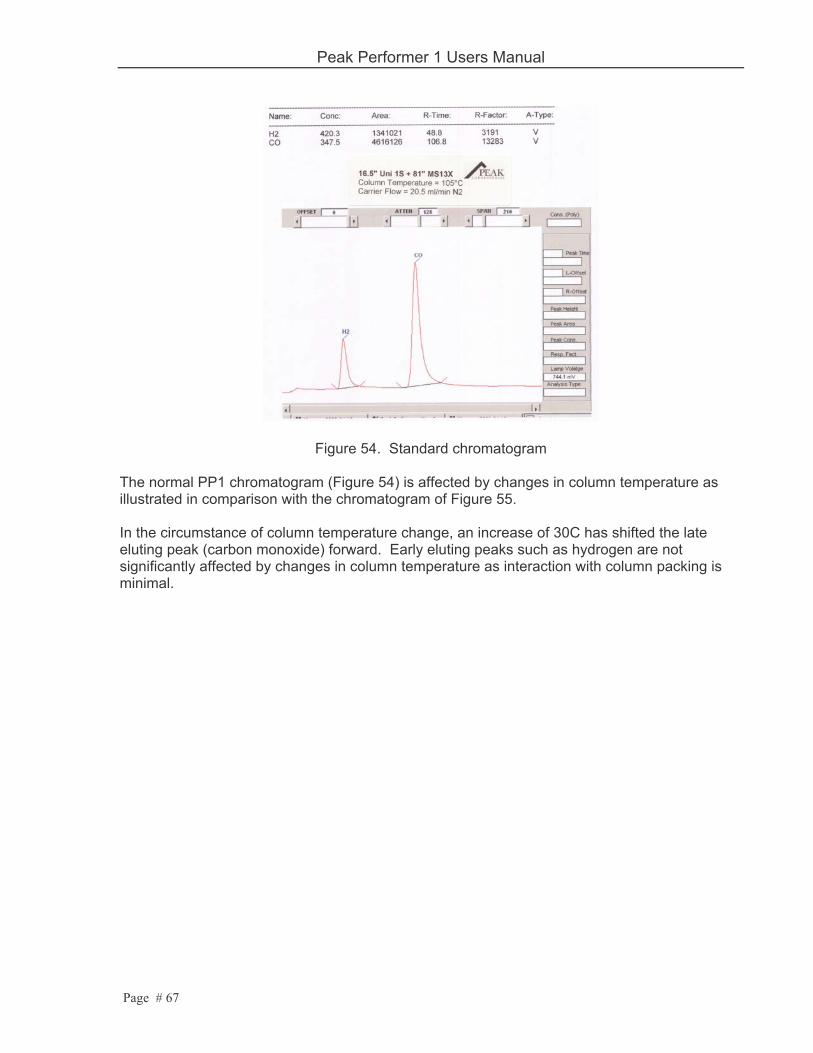
Figure 54. Standard chromatogram The normal PP1 chromatogram (Figure 54) is affected by changes in column temperature as illustrated in comparison with the chromatogram of Figure 55. In the circumstance of column temperature change, an increase of 30C has shifted the late eluting peak (carbon monoxide) forward. Early eluting peaks such as hydrogen are not significantly affected by changes in column temperature as interaction with column packing is minimal.

Peak Performer 1 Users Manual
Page # 68
Figure 55. Effect of 30C Increase in Column Temperature
Column flow rate changes can directly affect peak retention times as peaks are pushed down the column faster or slower. Comparison of Figure 56 with Figure 54 shows the decreased peak retention times
Figure 56. Effect of 2X Increase in Column Flow Rate

Peak Performer 1 Users Manual
Page # 69
7.6 Peak Identification and Quantification A typical chromatographic peak is generated by the detector’s electronic signal as a function of time
Figure 58. Typical Chromatographic Detector Signal Showing a Peak
Chromatographic peaks in the PP1 are measured by establishment of the “normal” stable detector signal, then determining the “added” electronic signal that was created by the peak passing through the detector. Since the analyzer is monitoring the detector electronic signal over time, the “added” signal is measured in real units such as volt-sec. By virtue of a conversion factor (called the Response Factor), the volt-sec signal can be directly related to concentration units.

Peak Performer 1 Users Manual
Page # 70
Figure 59. Illustration of Measurement of Chromatographic Peak Area
Note: The PP1 analyzer supports only area-based concentration determinations. Determinations based upon peak height as not currently available. The first task in quantifying peaks is establishment of the “normal” stable detector signal (“baseline”). This is accomplished by determining the signal departure and return points for the peak event. The parameters used when defining detector baseline signal and peaks are:
Figure 60. Typical PP1 Peak Analysis Database

Peak Performer 1 Users Manual
Page # 71
Figure 61. Illustration of Chromatographic Peak Parameters
Name = The peak identification tag, expressed as 5 alphanumeric characters (A-Z, 0-9) PkCen = The normally expected peak retention time (in seconds), used for assigning the appropriate “Name” LW = The typical time span measured from the start of the peak’s baseline rise to the peak apex “PkCen” (in seconds). Minimum value is 3, maximum is 35 RW = The typical time span measured from the peak’s apex “PkCen” to the end of the peak’s baseline decline (in seconds) Minimum value is 3, maximum is 35 PkWin = Total tolerance window (in seconds) for assignment of a “Name” to a quantified chromatographic peak. The tolerance window is centered upon the “PkCen” value. NOTE: The peak top detection algorithm processes only the data within this window. PkHgt = A variable for establishing the cross-over point in peak detection modes. Chromatographic peaks higher than this parameter will be quantified using the “Variable” mode heights, peaks with height less than or equal to ”PkHgt” will be quantified using the “ForceB” mode. Flt = The convolution filter value expressing the overall peak shape. Flt = 2 is recommended for sharp, narrow peaks such as H2, and Flt = 8 is recommended for broad peaks such as CO. For good peak quantification, it is important to consistently determine when the peak begins (the positive increase in detector signal), when the signal maximum occurs, and when the peak ends (the return to stable detector signal). PkCen, LW, and RW are used to establish starting and ending points for mathematical analysis of the baseline.

Peak Performer 1 Users Manual
Page # 72
All modes of peak are calculation require locating the “peak top”, usually the point of maximum peak signal. In cases where the detector signal is strong, locating the peak maximum value is straightforward. Often the concentration regime of interest is the opposite case, where it is desirable to detect and extract the smallest possible peak signal. Under these circumstances, it is advantageous to utilize signal processing techniques that magnify signal differences. Mathematical convolution is one such method. Convolution “rolls” two waveforms together as the product of data matrices, with the resulting new waveform having exaggerated characterisitcs.
‘
Figure 62. Convolution to Enhance Signal Characteristics As seen in Figure 62, it is much simpler to identify the peak maximum on the convolved baseline. Convolution functions work best when the convolving peak (filter) width closely matches the expected chromatographic peak width. Chromatographic peak width can vary significantly depending upon column selection, detector characteristics, sample loop size, etc. Consequenlty, there are several different convolving

Peak Performer 1 Users Manual
Page # 73
peak widths available in the PP1’s mathematics package; Flt =1 is the narrowest filter width, Flt =8 is the widest filter width. NOTE: Final determination of the optimum filter width is best performed by re-processing chromatograms representing typical peaks. 7.6.1 Peak Quantification : “Fixed” Mode When the PkHgt variable is set to zero, the Fixed Mode of detector baseline is enabled. In this mode, the normal detector baseline is calculated very simply: Peak start time = [PkCen – LW]) Peak end time = [PkCen + RW]) All other possible aspects of peak start and end time determination are disabled and the normal detector baseline is rigidly established only by the Peak Database parameters.
Figure 63. Baseline as Established in Fixed Mode
Peaks quantified using this method are denoted with an “F” in the last column of the data report
7.6.2 Peak Quantification : “Forced Baseline” Mode The Forced Baseline Mode is enabled when the maximum detector signal value at the calculated peak maximum signal is less than the PkHgt parameter value, but is greater than zero. The time associated with the peak maximum signal is always calculated first for Forced Baseline and Variable modes by using the convolution filter to find the maximum detector signal point.

Peak Performer 1 Users Manual
Page # 74
The time associated with the peak maximum signal must be within the time regime of interest (= [PkCen +/– ½ PkWin]) for any peak quantification to occur.
In Forced Baseline Mode, the normal detector baseline is calculated based upon the peak maximum signal time value, rather than the PkCen value. Peak start time = [Peak signal maximum time value – LW] Peak end time = [Peak signal maximum time value + RW]
Figure 64. Baseline as Established in Forced Baseline Mode
Peaks quantified using this method are denoted with a “B” in the last column of the data report.
7.6.3 Peak Quantification : “Variable” Mode If the peak maximum signal value exceeds the PkHgt value, the Variable Mode is enabled for determination of peak start and end points. The time associated with the peak maximum signal is always calculated first for Forced Baseline and Variable modes by using the convolution filter to find the maximum detector signal point.

Peak Performer 1 Users Manual
Page # 75
Figure 65. Initial parameters for Baseline Determination
Initially, the mathematics package makes a trial evaluation of peak area using a fixed percentage of the LW and RW values as initial baseline points, illustrated as the hypothetical baseline between points “2/3 of LW” and “2/3/ of RW” in Figure 65. The hypothetical calculation of the peak start time is labeled “L” in Figure 66.
Figure 66. Progression of Peak Start Time Calculation
After calculating the hypothetical peak area based upon the L and R values, the mathematics package makes another peak area calculation, using a slightly earlier time value. The peak areas of the two calculations are compared, and if the peak area increases by more than +0.5%, the mathematics package repeats the process. The net effect is illustrated in Figure 66, where multiple hypothetical peak start points were evaluated. The final value is represented by point “5”, when the change in peak area became less than +0.5%.

Peak Performer 1 Users Manual
Page # 76
The trial evaluation of peak area continues for the peak ending point, again using a fixed percentage of the LW and RW values as intial baseline points, again illustrated as the hypothetical baseline between points “L” and “R” in Figure 67. The first hypothetical calculation of the peak end time is labeled “1” in Figure 67.
After calculating the hypothetical peak area, the mathematics package makes another peak area calculation, using a slightly later time value. The peak areas of the two calculations are compared, and if the peak area increases by more than +0.5%, the mathematics package repeats the process. The net effect is illustrated in Figure 67, where multiple hypothetical peak start points were evaluated. The final value is represented by point “6”, when the change in peak area became less than +0.5%.
Figure 67. Progression of Peak End Time Calculation
Using the newly established peak start and end times, the mathematics package determines the “normal” detector baseline, as illustrated in Figure 68. The signal contribution due to the peak passing through the detector can then be quantified by area calculation using time slices and signal differentials above the newly established baseline.

Peak Performer 1 Users Manual
Page # 77
Figure 68. Peak Area Calculation
The formula for peak area calculation can be expressed as:
Peak Area = (½ x [Hgt1 + Hgt2] x t1) + (½ x [Hgt2 + Hgt3] x t2) + (½ x [Hgt3 + Hgt4] x t3) +……
where: Hgtx = the signal differential between the instantaneous baseline level and the peak signal value
tx = the time difference between data points Using a constant value for tx , the peak area calculation simplifies to:
Peak Area = tx x [Hgt1 + Hgt2 + Hgt3 + Hgt4 +……]
Peaks quantified using the Variable method are denoted with a “V” in the last column of the data report.

Peak Performer 1 Users Manual
Page # 78
7.7 Chromatographic Stabilization of the Analyzer When Injecting O2 Samples O2 samples present particular challenges for the RCP PP1 analyzer due to the extreme reactivity of ~100% O2 with any possible carbon source even at relatively low temperatures via these basic reactions:
2C + O2 => 2CO C + O2 => CO2
Potential carbon sources include residual carbon within stainless steel tubing and valve bodies, polymeric valve components, and column packing materials. CO produced from these sources can be detected in the RCP and create a wide variety of symptoms:
• Unstable detector baseline • False positive peaks when measuring pure O2 samples • Difficult small peak quantification • Transient peaks in the chromatogram
The chromatographic parameters for the RCP O2 analyzers are adjusted to minimize this reactivity – undergoing an extensive set of proprietary processes for stabilizing the packing materials for O2 service. Do not use commercially available columns intended for Inert gas sampling in an RCP O2 PP1 – the detection limit of the analyzer will be severely compromised.
RCP PP1 - False CO Peaks During O2 Conditioning
0
200000
400000
600000
800000
1000000
1200000
1400000
1600000
1800000
2000000
0 50 100 150 200 250
Time (seconds)
Det
ecto
r Sig
nal (
Vout
)
At the Start of O2 Conditioning
After 0.3 Hours of O2 Conditioning
After 0.7 Hours of O2 Conditioning
O2 Upset
CO Peak
Figure 69: False CO Peaks Created by Free Carbon on the Column Materials The chromatograms overlaid in Figure 69 show one of the effects of 100% O2 on commercially available column packing materials. A false CO peak has been created by carbon reactions at the head of the column set; over repeated injections of O2, the false CO peak diminishes in amplitude as this source of free carbon is depleted.

Peak Performer 1 Users Manual
Page # 79
These chromatographic improvements occur as the free carbon on the internal surfaces of the analyzer system is consumed. Many of the sources (i.e. polymeric valve seals) do not become carbon-free over time, however the available surface carbon can become greatly diminished with continuous exposure to O2. Free carbon may reside within the main body of materials in the system, and diffusion forces may bring this carbon load to the surface again during idle analyzer times. Consequently, it is not unusual to see these instabilities reappear in a previously clean system after extended periods of inactivity. The new free carbon can again be diminished by continuous exposure to O2.
****CAUTION*** Under certain circumstances, the reduction of the analyzer surface carbon may be accelerated with above-normal operating temperatures and continuous exposure to O2. As a general rule, O2 conditioning temperatures are much lower than
standard conditioning temperatures – the high reactivity of pure O2 with polymers at elevated temperatures can easily destroy the valve seals and column packing materials. If O2 is being sampled, do not exceed 180°C for the RCP Column temperature zone, and 295°C for the RCP Detector temperature zone. With proper conditioning methodology, the column can be scrubbed of free carbon and accurate results obtained.
RCP PP1 - Stabilization to Pure O2 Samples
0
500000
1000000
1500000
2000000
2500000
0 50 100 150 200 250
Time (seconds)
Det
ecto
r Sig
nal (
Vout
)
The First Pure O2 Sample
After 2 Pure O2 Samples
After 3 Pure O2 Samples
After 4 Pure O2 Samples
O2 Upset
Figure 70. A Sequence of Pure O2 Sample Chromatograms Showing Improvements With
Additional Injections

Peak Performer 1 Users Manual
Page # 80
Figure 70 overlays several O2 chromatograms over a period of ~ 0.5 hour. The overall O2 upset undergoes a significant shift as more O2 samples are taken:
• Decreasing magnitude of the O2 upset • Improved baseline stability at the CO peak retention time
Each of these chromatographic changes will directly enhance the lower detection limit of the analyzer by making it easier to clearly define peak start / end points and peak magnitude. The chromatographic improvements illustrated in Figure 70 originate with the spontaneous reaction dynamics of mercuric oxide and oxygen.
HgO (solid) + heat => Hg (vapor) + O2 This reaction creates a continual low-level background of Hg vapor within the detector. The reaction can be driven backwards if the O2 presence is high, recreating non-reactive HgO. The sensitivity of the HgO bed to this back-reaction decreases with exposure to O2, therefore the O2 upset in the chromatogram tends to diminish with repeated injections of O2 samples. To achieve maximum analyzer performance when measuring O2 samples, Peak Labs recommends continuous O2 sample cycling to minimize surface carbon reactions.

Peak Performer 1 Users Manual
Page # 81
8.0 Reducing Compound Photometer (RCP)
** CAUTION** Do not begin detector heating without carrier gas flow. Damage to the detector may result. ** CAUTION *** Never energize heaters of the instrument unless carrier gas flowing.
Be sure to put the RCP detector on standby flow before conditioning columns.
** CAUTION ** The maximum detector operating temperatures for the RCP is 295oC.
The RCP detector does not normally require conditioning treatment, however it does require 18 to 24 hours at normal operating temperature to achieve optimum stable performance. Normal detector operating temperature for the RCP is 265oC, although operating temperatures vary with the specific application. The table below illustrates some typical compounds and detection capabilities of the RCP.
8.1 Reducing Compound Detection Compounds eluting from the column pass directly into a heated bed of mercuric oxide (HgO). Within this bed, the following general reaction occurs:
X + HgO (solid) => XO + Hg (vapor) where X is any appropriate reducing gas.
The liberated mercury vapor is quantitatively determined utilizing an ultraviolet (254nm) absorption photometer located immediately downstream of the bed.
Detected Compound Typical Detection Limit
Hydrogen < 800 ppt
Carbon Monoxide < 300 ppt
Unsaturated Hydrocarbons < 1 ppb
Helium No Significant Response
Argon No Significant Response
Nitrogen No Significant Response
Oxygen No Significant Response
Other Inerts No Significant Response

Peak Performer 1 Users Manual
Page # 82
Figure 71. Standard RCP Section
The relative ease of measuring mercury vapor at low concentrations lends the technique its inherent sensitivity. For carbon monoxide and hydrogen, the equilibrium reactions are as follows:
CO + HgO (solid) => CO2 + Hg (vapor) H2 + HgO (solid) => H2O + Hg (vapor)
The hydrogen reaction undergoes approximately 15% conversion to mercury vapor in relation to carbon monoxide. As a result, the H2 sensitivity is roughly five times lower than carbon monoxide. In contrast, sensitivity to double and triple bonded hydrocarbons, such as acetylene or ethylene, is higher in relation to carbon monoxide.
C2H2 + 5 HgO (solid) => H2O + 2 CO2 + 5 Hg (vapor)
Normal life of the scrubber is 24 months under continuous use. Replace and dispose of properly in accordance with local and federal regulations.
8.2 Temperature Effects Within The RCP Reaction Bed At a given carrier gas flowrate, the concentration of mercury vapor entering the photometer cell is dependent upon two processes:

Peak Performer 1 Users Manual
Page # 83
1. Thermal dissociation of mercuric oxide to free mercury vapor.
2. Oxidation of reducing gases on the HgO bed.
These reactions proceed:
2HgO => 2Hg(v) + O2 and X + HgO => Hg(v) + XO
The rate of each of these reactions is temperature dependent, and not all compound reactions proceed to complete oxidation.
The thermal dissociation rate to Hg(v) roughly doubles for every 10°C increase in HgO (detector) temperature. For the oxidation reaction of H2 gas, the reaction does not proceed fully at temperatures below the sublimation point of HgO (315°C), although higher detector temperatures do increase H2 sensitivity.
Relative Area Response vs. Bed Temperature
0
0.2
0.4
0.6
0.8
1
1.2
1.4
1.6
90 115 140 165 190 215 240 265 290 315
Bed Temperature (°C)
H2
Res
pons
e (%
of 2
65°C
val
ue)
0.5
0.6
0.7
0.8
0.9
1
1.1
1.2
1.3
CO
Res
pons
e (%
of 2
65°C
val
ue)
H2CO
Figure 72. RCP Temperature Response for H2 and CO

Peak Performer 1 Users Manual
Page # 84
H2 Ar e a Re sponse a s a Func t i on of Conc e nt r a t i onS N 0 6 8
1000
10000
100000
1000000
10000000
1 10 100 1000 10000
Bl ended Concent r at i on ( ppb)
Figure 73. Typical Area Response Curve for Hydrogen, Showing Linear Range
CO Ar e a Re sponse a s a Func t i on of Conc e nt r a t i onS N 0 6 8
10000
100000
1000000
10000000
100000000
1 10 100 1000 10000
Bl ended Concent r at i on ( ppb)
Figure 74. Typical Area Response Curve for Carbon Monoxide, Showing Linear Range

Peak Performer 1 Users Manual
Page # 85
The CO oxidation reaction proceeds more completely at all normal detector temperatures, and therefore exhibits more uniform response to temperature changes. At detector operating temperatures above ~220°C, however there are other competitive reactions that tend to slightly reduce bed response from its maximum.
The nominal detector operating temperature of 265°C has been selected on a basis of compromise of several of these factors.
8.3 Flow Rate Effects Carrier gas flowrate through the bed can affect both the Hg(v) concentration in the cell as well as the degree of oxidation gas reaction completion by affecting the residence time of the compound within the HgO bed.
In the case of H2, the analyzer response is roughly inversely proportional to carrier flow rate.
It should be noted that detector noise and drift increase as detector flow rate decreases and latent cell mercury vapor concentration increases.
Nominal detector flow is 20 sccm at the mercury vapor scrubber outlet.
8.4 Bed Lifespan
With constant cell heating, the effective life of the mercuric oxide bed is approximately two years. High concentration samples (> 10 ppm) combined with large sample volumes and high detector temperatures will deplete the reaction bed much faster than sub-ppm concentration level samples.
Serial dilutions, gas blenders, or small sample volumes can help to extend the life of the bed to its maximum potential.
Contamination of carrier gases with reactive compounds such as sulfides, chlorides, and aromatics will irreversibly impair reactivity and will necessitate bed replacement, and possibly detector overhaul.
When using columns that permit the passage of such compounds, care should be taken to bypass the detector as these compounds elude.

Peak Performer 1 Users Manual
Page # 86
9.0 Analyzer and RCP Maintenance and Service Procedures
Figure 75 . Chassis Overview PEAK PERFORMER 1 RCP COMPONENT LAYOUT 1. MCPU PCB ASSEMBLY, P/N 604-002 2. RCP UV LAMP DRIVER PCB ASSEMBLY and COVER 3. HgO BED ASSEMBLY 4. RCP ASSEMBLY, P/N 614-001 5. VALVE 1 (10 port) 6. n/a 7. COLUMN OVEN and COVER 8. FLOW CONTROL NEEDLE VALVE ASSEMBLY 9. n/a 10. n/a 11. LCD / TOUCHSCREEN ASSEMBLY, P/N 604-013 12. REAR PANEL PCB ASSEMBLY (INCLUDES MAIN DC POWER SUPPLY), P/N 604-001
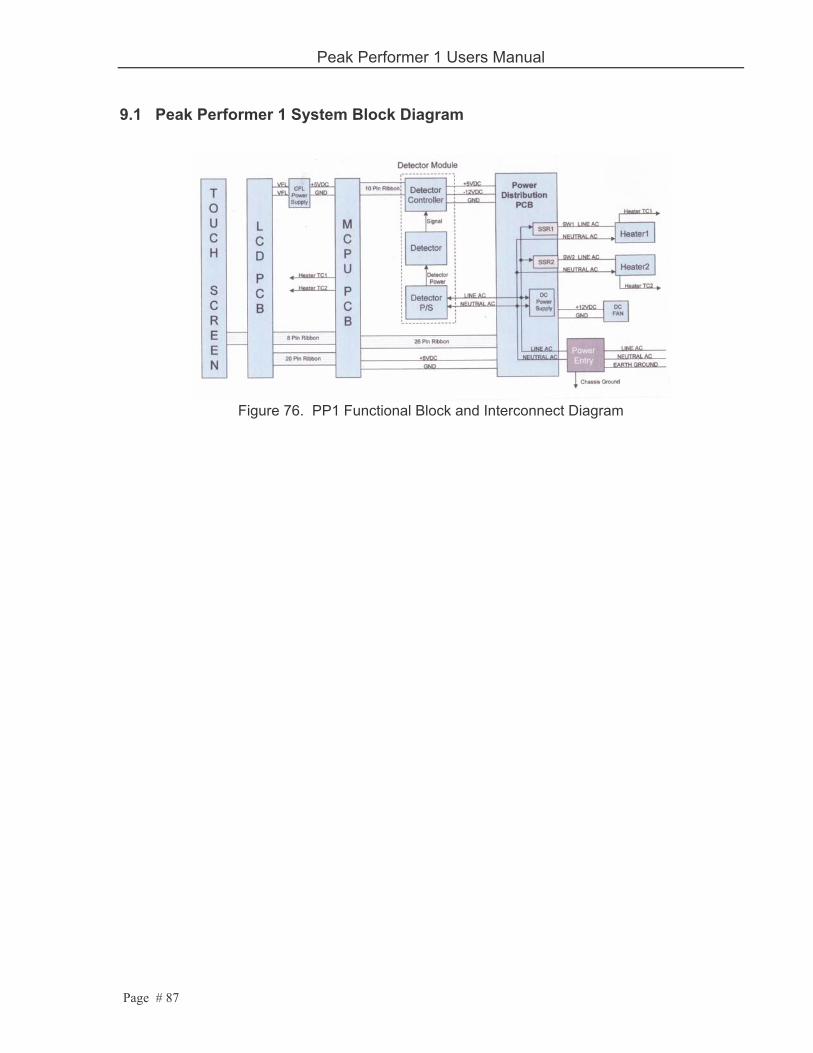
Peak Performer 1 Users Manual
Page # 87
9.1 Peak Performer 1 System Block Diagram
Figure 76. PP1 Functional Block and Interconnect Diagram

Peak Performer 1 Users Manual
Page # 88
9.2 Monitor Regulator Pressures Carrier supply settings should not vary. Carrier and Actuator Air settings may shift when supply cylinders run low due to “regulator creep” and should be checked periodically to maintain consistent gas flows and peak retention times. Varying carrier pressures can cause peaks to shift out of set retention times and not be flagged properly. Critical operating parameters are listed on the top page of the Final Test Data shipped with the analyzer. Peak Labs recommends the user create a logbook of critical parameters on a routine basis as an aid to troubleshooting. Suggested parameters for frequent logging are:
• Analyzer S/N: • Date and Time: • Carrier Gas Type: • Carrier Gas Supply Pressure: • Carrier Gas Flow at Hg Scrubber Outlet (V1 CW): • Carrier Gas Flow at Hg Scrubber Outlet (V1 CCW): • Carrier Gas Flow at Front Panel Bypass Out Port: • Carrier Gas Flow at NV1 Outlet (V1 CCW): • Carrier Gas Flow at NV2 Outlet: (V1 CCW) • Actuator Gas Supply Pressure: • Sample Gas Type: • Sample Gas Flow at Rear Panel Sample Out Port: • Column Setpoint and Measured Temperature: • Detector Setpoint and Measured Temperature: • RCP Vout Signal (after zeroing): • RCP Vlamp Reading: • Rfactor for compounds 1, 2, 3 & 4 (from Calibration Database screen) • PkCen for compounds 1, 2, 3 & 4 (from Analysis Database screen)
Other critical parameters that should be verified occasionally:
• Actuator Gas Type: • Port 1 Protocol Setting • Port 2 Protocol Setting • Calibration Database Screen Parameters (all) • Analog Interface Screen Parameters (all) • Analysis Database Screen Parameters (all) • Event Program Editor Screen Parameters (for all active Event Programs)

Peak Performer 1 Users Manual
Page # 89
9.3 Verifying Valve Integrity (Carrier Blank, Zero Gas) In addition to periodic calibration checks, the integrity of the rotary valve seal must be tested. Determination of valve seal quality is performed by analyzing known purified gas as a sample. 1) Connect the front panel SAMPLE IN port to the front panel BYPASS OUT port. This will begin flow of purified gas through the sample loop. 2) Wait 10 minutes to purge the analyzer completely of any residual gas samples. 3) Initiate a standard sampling run in CYCLE mode. 4) Collect 5 sample runs with Peak Viewer. 5) Average the concentration data of the 5 runs for each peak of interest. 6) Average readings higher than 1 ppb for any compound indicates a loss of valve seal integrity and possibly suggests valve head replacement.

Peak Performer 1 Users Manual
Page # 90
9.4 Mercury Vapor Scrubber Replacement After use, the mercury vapor scrubber contains trace amounts of mercury (Hg) and activated charcoal. While the quantity of mercury contained in the scrubber is significantly less than that contained in a single fluorescent lamp (< 50 micrograms), Disposal of used scrubbers should be made in accordance with local or federal regulation. . Consult with local and federal authorities for proper disposal instructions The Hg scrubber has a conservative nominal life of 5,000 continuous hours. Scrubber replacement is recommended each six months of the analyzer use:
1. Power the analyzer OFF. 2. Allow the detector to cool to below 100°C 3. Remove the analyzer top cover. 4. Snap the used scrubber out of the black plastic retainer clips. 5. Holding the end cap of the scrubber to ensure that it remains intact, slide the clear
plastic detector outlet tubing off the end of the used scrubber. 6. Install the new scrubber into the clear plastic detector outlet tubing. 7. Snap the new scrubber into the black retaining clips. 8. Install the analyzer top cover. 9. Power ON the analyzer 10. Energize the heater zones and allow several hours for stabilization before use.
**CAUTION**: Safety gloves are recommended to handle mercury scrubbers. Never open the mercury scrubber. **CAUTION**: Disposal of used scrubbers should be made in accordance with local or federal regulation. . Consult with local and federal authorities for proper disposal instructions.

Peak Performer 1 Users Manual
Page # 91
9.5 Adjusting RCP Vlamp (UV Lamp) Value
Figure 77. Location of the UV Lamp (Protective cover removed)
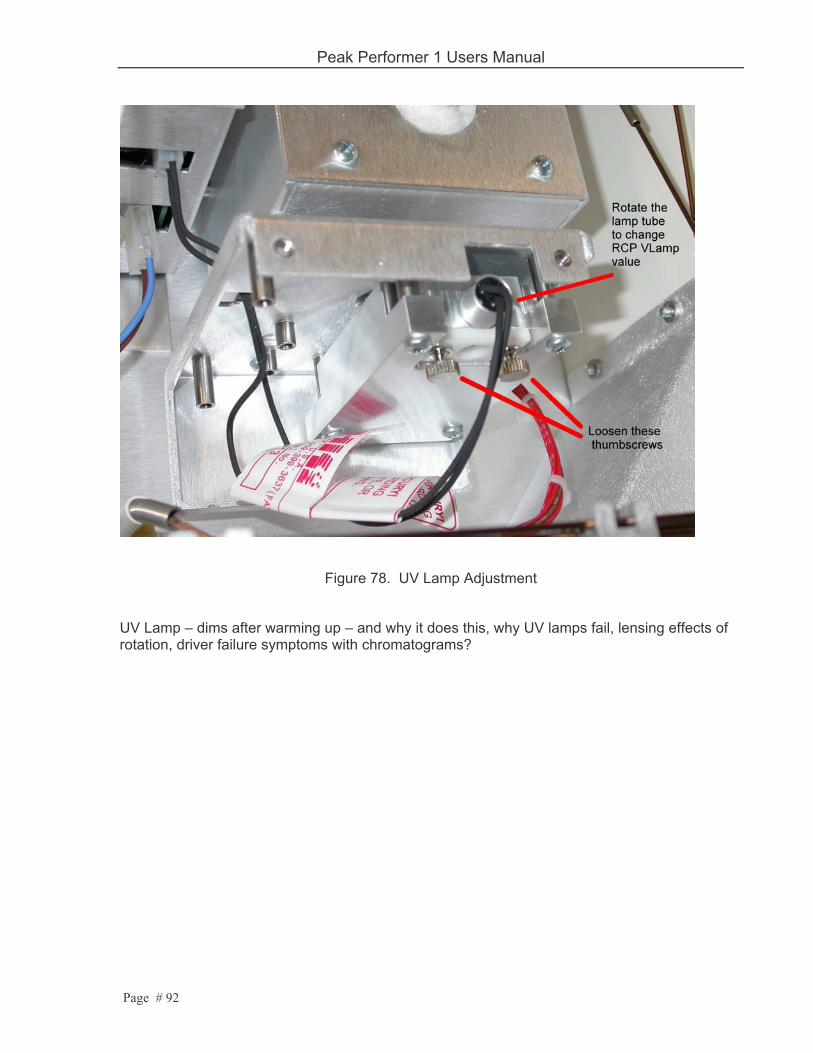
Peak Performer 1 Users Manual
Page # 92
Figure 78. UV Lamp Adjustment
UV Lamp – dims after warming up – and why it does this, why UV lamps fail, lensing effects of rotation, driver failure symptoms with chromatograms?
Peak Performer 1 Users Manual
Page # 93
9.6 RCP UV Lamp Replacement The mercury vapor lamp used in the photometer has a nominal life of 5,000 continuous hours. Lamp replacement is indicated when excessive noise is observed on the high- sensitivity ranges or low Vlamp is verified. Other causes of low Vlamp include the following:
1. Impurities in carrier gas. 2. Contaminated column. 3. Contaminated valves, tubing, etc.
One means of checking the noise source is by turning the detector heater off and evaluating the detector noise level after the unit has cooled. If noise persists, lamp replacement is recommended. The procedure for lamp replacement is as follows:
1. Power the analyzer OFF. 2. Remove the analyzer top cover. 3. Unplug the lamp connector (2 pin white plastic “Molex”) from the detector control board. 4. Unscrew the 2 thumb nuts securing the lamp enclosure cover on the detector’s right-
hand side. 5. Remove the lamp enclosure cover 6. Feed the connector and wire back through the opening in the lamp enclosure. 7. Loosen (do not remove) the 2 thumb nuts securing the lamp in the block. 8. Pull up on the old lamp wire to remove from the lamp block. 9. Insert the new lamp base fully into the block. It should not require forcing. There is no
specific orientation required. 10. Feed the new lamp’s connector and wire back through the opening in the lamp
enclosure. 11. Plug the lamp connector (2 pin white plastic “Molex”) into the detector control board.
Note that the connector is keyed and will insert easily in only one orientation. 12. Power the analyzer ON. Allow 10 minutes for the lamp to partially stabilize. 13. Note the Vlamp voltage on the main screen. 14. Adjust the Vlamp value to > 1800 mV by rotating the lamp within the lamp block – DO
NOT LIFT THE UV LAMP FROM THE BLOCK 15. Tighten the 2 thumb nuts securing the lamp in the block. 16. Re-install lamp enclosure cover. 17. Re-install the 2 thumb nuts securing the lamp enclosure cover. 18. Install the analyzer top cover. 19. Energize the heater zones and allow several hours for stabilization before use.
**CAUTION**: Safety glasses are required. Never look at an energized UV lamp without safety glasses. UV radiation can contribute to the formation of cataracts of the human eye. **CAUTION**: Do not handle the clear (quartz) portion of the new lamp with bare fingers. **CAUTION**: UV lamps are uncoated fluorescent lamps, and as such, contain small quantities of mercury (Hg). Disposal of UV lamps should be made in accordance with local or federal regulation. Consult with local and federal authorities for proper disposal instructions

Peak Performer 1 Users Manual
Page # 94
9.7 RCP Bed and Window Retaining Nuts Tightening of the detector retaining nuts is recommended when the sample cell temperature has been cycled repeatedly. The two window retaining nuts are located at either end of the optical cell and are recessed within the cell insulating supports. The nut wrench provided for this procedure has fingers which extend into the recessed nuts and engage the slotted head. Move the wrench slightly vertically and rotationally until it seats in a slot (nuts are slotted every 60o). Use only slight wrench pressure in tightening (clockwise). The nut retaining the reaction bed can be similarly tightened with the opposite end of the wrench or screwdriver inserted into one of the slots.

Peak Performer 1 Users Manual
Page # 95
9.8 Changing The Mercuric Oxide Bed This procedure is only used for pre-treated Peak Laboratories mercuric oxide beds. The mercuric oxide bed has a nominal life of 2 years. Bed replacement is indicated when a 50% decrease in instrument response for any detectable compound is indicated:
1. Power the analyzer OFF. 2. Allow the detector to cool below 100°C. 3. Remove the analyzer top cover. 4. Measure detector flow at the mercury scrubber outlet. Note the flow rate for future
reference. 5. Neatly remove or push back any insulation from around the bed inlet area to create a
clear opening around the bed retaining nut. 6. Gently vacuum any insulation dust away from the head of the bed retaining nut. 7. Use a flat blade screwdriver or special retaining nut wrench to engage the nut slots and
loosen the nut by ½ turn counterclockwise . Do not fully remove the nut 8. Lift the used bed to remove it from the detector. 9. Disconnect the 1/16ø bed inlet tube from the used bed. 10. Gently vacuum the bottom of the detector’s bed inlet fitting to remove and shreds of
graphite ferrule that may have fallen into the inlet fitting. 11. If damage to the graphite ferrule is suspected, fully remove the retaining nut and gently
dig out the old ferrule. Vacuum thoroughly and install a new ferrule and the nut onto the new bed before installation. Examine for any graphite flakes prior to installation.
12. Connect the new bed to the 1/16”ø bed inlet tube. 13. Seat the new bed through the retaining nut, gently through the graphite ferrule. 14. Press the bed fully into the bottom of the detector’s inlet fitting and tighten the nut to
moderate resistance. 15. Verify detector flow at the mercury scrubber outlet. Re-tighten the bed retaining nut if
flow rate is < 90% of the value noted in step 4. 16. Power the analyzer ON. 17. Energize the heater zones and allow several hours for stabilization. 18. Re-tighten the bed retaining nut 1/8 turn clockwise. 19. Re-install any bed insulation material into the detector’s bed access opening. 20. Re-install the top cover. 21. Allow bed stabilization for at least 12 hours.
**CAUTION**: Use safety glasses and gloves when handling mercuric oxide bed. **CAUTION**: Detector insulation dust is non-hazardous but can be an airway irritant. Use vacuum to remove insulation dust. **CAUTION**: Used mercuric oxide beds contain small quantities of mercury < 50 micrograms. Disposal of mercuric oxide beds should be made in accordance with local or federal regulation. . Consult with local and federal authorities for proper disposal instructions.

Peak Performer 1 Users Manual
Page # 96
9.9 Adjusting the LCD Contrast
Figure 79. View of the MCPU Showing the LCD Contrast Potentiometer

Peak Performer 1 Users Manual
Page # 97
9.10 ALTERING THE ANALYTICAL RANGE OF THE INSTRUMENT Sample loops are very easy to customize. 1) Determine the desired loop volume. Analytical range is directly proportional to sample loop size 2) Select tubing (tube internal diameter) to use. In general, use the largest ID tube possible to avoid flow restrictions. Guidelines: 0.040" ID for 3/8 cc to 2 cc loops 0.030" ID for 3/16 cc to 1/2 cc loops 0.020" ID for 50 uL to 1/4 cc loops Note: the shortest practical length of tubing for a sample loop is about 8 inches. Note: Do not use tubing less than 0.016" ID as it acts like a flow restrictor, instead of a sample loop 3) The correct length for the loop tubing is calculated as follows: Internal volume (V in cc's) = [ 3.142 x ID ^ 2 (in inches) ] x L (in inches) x 16.38 / 4 re-arranging: L (in inches) = 0.777 x [ V (in cc's)] / [ ID ^ 2 (in inches)] an example for a 1 cc loop: L (inches) = 0.777 x 1cc / (0.040" ^2) = 49 inches tube length 4) Measure to length, cut, and install VICI fittings 5) Blow the tube out with compressed air to remove any particles

Peak Performer 1 Users Manual
Page # 98
9.11 UPDATING THE ANALYZER SOFTWARE WITH PEAK HOST Procedure:
1) Power down analyzer chassis. 2) Connect DB9 serial cable and host computer to COM1 port on the rear of the PP1
analyzer 3) Power up analyzer chassis. Do not re-energize the heaters at this time. 4) Open the PeakHost.exe program on the host computer. 5) Adjust the PeakHost serial communications settings as required to establish
communications with the PP1 analyzer. Normal settings are COM3, 38400, 8, 1. The PeakHost program will automatically start acquiring information from the analyzer.
6) Force the PeakHost program to obtain fresh analyzer information - under the PeakHost program main screen toolbar, select “File”, then “Receive From Analyzer”
7) Save the analyzer operating parameters by using the print function in PeakHost - under the PeakHost program main screen toolbar, select “File”, then “Print”. If not printer is available, manually write the following parameter values: Zone 1 Set Point = Zone 1 P Value = Zone 1 I Value = Zone 1 I Limit = Zone 2 Set Point = Zone 2 P Value = Zone 2 I Value = Zone 2 I Limit = Zone 3 Set Point = Zone 3 P Value = Zone 3 I Value = Zone 3 I Limit = Analyzer Serial # = MCPU Version # = Detector Version # = RCP (y/n) = (checked circle = yes) FID (y/n) = (checked circle = yes) Valve 1 Cycles = Valve 2 Cycles = Oper Hours = Rotary (y/n) = (checked circle = yes) Diaphragm (y/n) = (checked circle = yes) Stream Select (y/n) = (checked box = yes) FID Flame Temperature =
8) Force the PeakHost program to obtain fresh analyzer peak database information -
under the PeakHost program main screen toolbar, select “Analysis Database”, the peak database window will pop-up. Under the Peak Analysis Database main screen toolbar, select “File”, then “Receive From Analyzer” to force an update of the information.
9) Save the peak analysis database parameters by using the print function in the Peak Analysis Database window - under the toolbar, select “File”, then “Print”. If no printer is

Peak Performer 1 Users Manual
Page # 99
available, manually write the following all four columns of the peak analysis database parameters: Peak Name = Peak Center = RT Window = Peak Height = Left Width = Right Width = Convo. Filter = Response Factor = Beer’s Law Factor =
10) Close the Peak Analysis Database window. 11) Force the PeakHost program to obtain fresh Event program information - under the
PeakHost program main screen toolbar, select “Event”, the event editor window will pop-up. Under the Event Editor main screen toolbar, select “File”, then “Receive From Analyzer” to force retrieval of the P1 event program.
12) Save the event program information by using the print function in the Event Editor window - under the toolbar, select “File”, then “Print”. If no printer is available, manually write down the P1 event program
13) Repeat steps 11 and 12 for the other 3 event programs by selecting the other radio buttons under the heading “File #”.
14) Close the Event Editor window. The analyzer is now documented and ready for software update and/or parameter re-initialization.
15) Place the new motherboard software file (typical name file name is MCPU vX.XX . hex) in the same directory on the host computer as the Viewer and Peak host programs
16) Under the PeakHost program main screen toolbar, note that the UPLOAD command on
the upper toolbar is not fully visible or active. Double mouse click on the number box located to the right of the words “MCPU Version #” and the “Upload” button on the main toolbar will become fully visible and active.

Peak Performer 1 Users Manual
Page # 100
Figure 80. Peak Host Main Window (Normal)
Figure 81. Peak Host Main Window with Upload Command Visible
17) Double click the “Upload” button. The standard Windows “Open” window will pop up.

Peak Performer 1 Users Manual
Page # 101
Figure 82. Selecting the Analyzer Software file
18) Mouse click select the latest *.HEX file (e.g. MCPU1.99.HEX), then mouse click on the “Open” tab on the right side of the window. Uploading will begin immediately – do not interrupt or cut power to the host computer or analyzer as all operating parameters could become corrupt if this operation is not completed.
19) When software updating is complete, the “Programming Complete!!” message will appear in the lower left corner window of the PeakHost main screen and the analyzer will perform a full re-boot.
20) Power down analyzer, but leave the PeakHost wondow open on the computer. Verification of Successful MCPU Software Upload
21) Power up analyzer chassis. Do not re-energize the heaters at this time. 22) Force the PeakHost program to obtain fresh analyzer information - under the PeakHost
program main screen toolbar, select “File”, then “Receive From Analyzer” 23) Verify the correctness of the temperature control parameters compared to the original
values. If errors are noted, overwrite each Setpoint, Pvalue, I Value, and I Limit parameter, including any zero values recorded for all zones.
24) Force an analyzer update of the temperature control parameters by mouse clicking on the large SEND box directly below the I Limit label. The analyzer may display a red light after this action.
25) If the analyzer displays a red light on the front panel, the parameters must be accepted and saved on-board the analyzer before proceeding any further.

Peak Performer 1 Users Manual
Page # 102
a. Press “PAGE” touchpad until the SETUP SCREEN appears (this screen has SN and temperature zone controls).
b) Press the DOWN arrow until you reach the “Parameter Change, Update Needed”line. c) Press the “ACCEPT” touchpad button, then the “SAVE” touchpad button to permanently
save the temperature parameters in analyzer memory. 26) Force the PeakHost program to obtain fresh analyzer information - under the PeakHost
program main screen toolbar, select “File”, then “Receive From Analyzer” 27) Verify the correctness of the temperature control parameters again.
Verify / Install the Peak Analysis Database:
28) Force the PeakHost program to obtain fresh analyzer information - under the PeakHost program main screen toolbar, select “Analysis DB”, then under “File”, select “Receive From Analyzer”
29) Verify the correctness of the peak analysis parameters compared to the original values. If errors are noted, overwrite each parameter, including any zero values recorded for all fields. Be sure to include all the zero values in the entire database table. Note: while you cannot enter a blank value (e.g. spacebar) for the unused peak names, it is best to enter a number 3 or 4 so there is some value stored in memory. It will not be displayed on the analyzer database if the Peak Center value is zero.
30) Force the PeakHost program to upload the peak analysis database into the analyzer - under the Analysis DB” window, select “File”, then “Send to Analyzer”.
31) The analyzer may display a red light after this action. 32) If the analyzer displays a red light on the front panel, the parameters must be accepted
and saved on-board the analyzer before proceeding any further. a. Press “PAGE” touchpad until MAIN SCREEN appears (has SN and temperature
zone controls). d) Press the DOWN arrow until you reach the “Parameter Change, Update Needed”line. e) Press the “ACCEPT” touchpad button, then the “SAVE” touchpad button permanently
save the temperature parameters in analyzer memory. Install the Event Programs:
33) Force the PeakHost program to obtain fresh analyzer information - under the PeakHost program main screen toolbar, select “Event”, then under “File”, select “Receive From Analyzer”
34) Verify the correctness of the P1 event program parameters compared to the original values. If errors are noted, input the previously saved P1 event program into the editor window.
35) Make sure the P1 radio button under File # is selected. 36) Force the PeakHost program to upload the event program into the analyzer - under the
“Event Editor” window, select “File”, then “Send to Analyzer”. 37) The analyzer may display a red light after this action. 38) If the analyzer displays a red light on the front panel, the parameters must be accepted
and saved on-board the analyzer before proceeding any further. a. Press “PAGE” touchpad until MAIN SCREEN appears (has SN and temperature
zone controls). f) Press the DOWN arrow until you reach the “Parameter Change, Update Needed”line. g) Press the “ACCEPT” touchpad button, then the “SAVE” touchpad button permanently
save the temperature parameters in analyzer memory.

Peak Performer 1 Users Manual
Page # 103
39) Repeat steps 33 through 38 for the other 3 event programs by selecting the other radio buttons under the heading “File #”, entering the appropriate event program parameters, and then forcing the PeakHost to send the event program to the analyzer.
40) Close the Event Editor window. 41) Close the PeakHost program.
The analyzer should be fully updated and ready for use at this time. Be sure to make record of any new parameters that were installed in the PP1 analyzer. Please consult the factory if a power outage occurs during this function.

Peak Performer 1 Users Manual
Page # 104
9.12 Testing the Heater Resistance
Figure 83. Heater Resistance for 90 – 120 VAC AC Service
Figure 84. Heater Resistance for 200-240 VAC AC Service

Peak Performer 1 Users Manual
Page # 105
9.13 Main DC Power Supply Replacement Purpose: Replace / upgrade Phihong PSA4531 DC Supply with Power-One MAP40-300 DC Power Supply Procedure: Power off analyzer – if gas umbilical tubing is used, it is not necessary to cool down the analyzer. Maintain normal gas supplies. Disconnect AC power cord. Remove top cover. Locate the main DC power supply in the right rear portion of the chassis –see Figure 1.
Figure 85 – Main DC Power Supply Location Remove the 4 each 6-32 screws that hold down the plastic protective shield to expose the DC power supply – see Figure 84.

Peak Performer 1 Users Manual
Page # 106
Figure 86. Main DC Power Supply with Shield Removed Unscrew the 4 each ¼” standoffs that retain the DC power supply to the rear panel circuit board. Disconnect only the two cable assemblies that attach the DC power supply to the rear panel circuit board – it is recommended to disconnect the cables at the circuit board connector end. Remove the DC power supply by sliding it under the overlayed cable assemblies – do not remove the other cable assemblies – see Figure 87.
Figure 87. Main DC Power Supply Fully Removed

Peak Performer 1 Users Manual
Page # 107
Lay the old DC power supply on the workbench aside the new Power-one DC power supply. Orient such that the 6 pin and 2 pin connectors are aligned – see Figure 86.
Figure 88. Correct Alignment and Cable Transfer from Old to New DC Power Supply Transfer the two cable assemblies from the old power supply to the new supply. Install the new DC Power Supply by reversing the disassembly sequence. After installation and power-up, it may be necessary to re-adjust the contrast on the front panel display (it may be too light or too dark)

Peak Performer 1 Users Manual
Page # 108
9.14 Adjusting the 5 Volt DC Supply
Figure 89. Adjusting the 5 Volt DC Supply
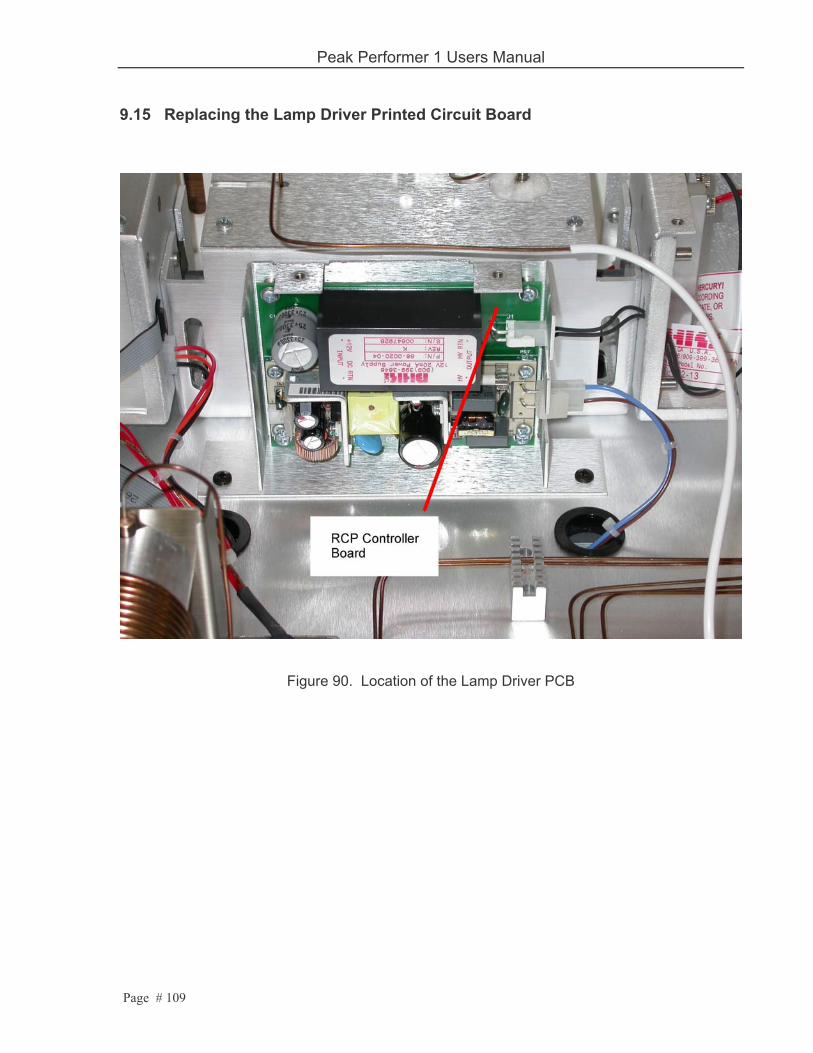
Peak Performer 1 Users Manual
Page # 109
9.15 Replacing the Lamp Driver Printed Circuit Board
Figure 90. Location of the Lamp Driver PCB

Peak Performer 1 Users Manual
Page # 110
9.16 COM 1 Connections on Multiple Analyzers to a Single Computer Equipment: 1 each - Computer: 1.2 GHz, 20 Gb Hard drive, 256 Mb RAM, CD-R drive, with at least 1 USB port: (Dell Inspiron 8500 laptop or equivalent) Operating System: Windows XP Home Edition, v2002 Service Pack 1 1 each - USB Hub: Inland “4 Port USB Hub”, Self-powered, Stock #08302 (manufactured by Inland International – www.inland-products.com) 2 each - USB to DB9 (RS232) Adapter: SIIG, Inc “USB to Serial Adapter” Model # US2308, Part # JU-CB1S12 (manufactured by SIIG, Inc – www.siig.com) Comes with installation software 2 each - DB9 Extension Cable: DB9M to DB9F, wired straight through, 10 feet long: GQ Cables “10’ Mouse/Keyboard Extension, DB9M to DB9F” Part # M05-103
Figure 91. Multiple Analyzers Connected to a Single Computer For Using Viewer Software Installation of Multiple Analyzers via USB:
1) Connect DB9M to DB9F extension cables to analyzers. 2) Power up analyzers – do not heat. 3) Set Port 1 Protocol on the analyzers to Viewer.
4 Port USB Hub
USB to DB9 Adapters

Peak Performer 1 Users Manual
Page # 111
4) Insert 4 port USB hub into computer USB port – your computer should detect the connection and automatically install any required Windows drivers for USB hubs.
5) Connect the USB to DB9 adapters to the DB9 extension cables. 6) Insert first USB to DB9 adapter into 4 port USB hub – your computer should detect the
connection and launch the hardware installation program. 7) Insert USB to DB9 adapter INSTALL CD in CD drive (it will launch automatically if
autoplay in enabled on your computer) 8) Follow installation instructions that come with USB to DB9 adapter (I confirm that it is
okay to click the “Continue anyway” box) 9) Your computer may prompt to install the USB to DB9 adapter a second time – do not
cancel, it is best to let the computer re-install the software again. 10) Create a new Desktop folder for each analyzer that you will connect with a USB to DB9
adapter. Be sure to give the folders a name that relates to the analyzer that you will connect to that adapter.
11) Copy the Viewer .exe files into each new folder. Open one of the new folders and select the Viewer.exe file
12) Double-click to launch a Viewer window. 13) Go to Windows’ Device Manager (Settings>Control Panel>System>Hardware>Device
Manager) to see what the port assignments on your computer are. 14) In the Device Manager, click on “Ports” to expand heading so you can see what COM
port number your computer gave to the USB to DB9 adapter 15) Note which COM port number is now assigned to the new USB to Serial (RS232) Port
(adapter) – it’s COM4 on most computers. 16) Go back to the Viewer window 17) Under “File” on toolbar, select “Port Settings” 18) Enter COM number assigned to first USB to DB9 adapter (probably COM4), check that
Baud Rate = 38400, Data Bits =8, Stop Bits = 1 19) Click OK box to save these settings. 20) Communications settings for that USB to DB9 adapter will be saved in the folder and will
be used automatically every time you launch the Viewer software in that folder. 21) Leave the first Viewer window open. 22) Insert second USB to DB9 adapter into USB hub – your computer should detect the
connection and launch the hardware installation program. 23) Insert USB to DB9 adapter INSTALL CD in CD drive (it will launch automatically if
autoplay in enabled on your computer) 24) Follow installation instructions that come with USB to DB9 adapter (I confirm that it is
okay to click the “Continue anyway” box) 25) Your computer may prompt to install the USB to DB9 adapter a second time – do not
cancel, it is best to let the computer re-install the software again. 26) Open the second new folder and select the Viewer.exe file in that folder. 27) Double-click to launch Viewer.exe (you might get a COM port error message window –
simply click OK and proceed) 28) Go to Windows’ Device Manager > Settings > Control Panel > System > Hardware >
Device Manager) to see what the additional port assignment on your computer is. 29) In the Device Manager, click on “Ports” to expand heading so you can see what COM
port number your computer gave to the second USB to DB9 adapter – it will be displayed directly under the note for the first USB to DB9 adapter.
30) Note which COM port number is now assigned to the second USB to Serial (RS232) Port (adapter) – it’s COM5 on most computers.
31) Go back to the Viewer window

Peak Performer 1 Users Manual
Page # 112
32) Under “File” on toolbar, select “Port Settings” 33) Enter COM number assigned to second USB to DB9 adapter (probably COM5), check
that Baud Rate = 38400, Data Bits =8, Stop Bits = 1 34) Click OK box to save these settings. 35) Communications settings for that USB to DB9 adapter will be saved in the folder and will
be used automatically every time you launch the Viewer software in that folder. 36) Viewer should automatically connect to the other analyzer.
At this point, you should have two PeakHost windows open, connected to the different analyzers. If you run the analyzers, the chromatographic data for each analyzer will be automatically stored in the folder that matches where the Viewer.exe file is stored.

Peak Performer 1 Users Manual
Page # 113
9.17 Discussion About VICI Diaphragm Valves vs. Rotary Valves
Figure 92. Diaphragm Valve Cross-Section (CCW Position)
CCW Position - Not Pressurized - Gas flows from Port 1 to Port 2, Port 3 to Port 4, etc.. The diaphragm and pistons are moved into position by the return spring and carrier and sample gas pressure.
Figure 93. Diaphragm Valve Cross-Section (CCW Position)
CW position - Pressurized - Gas flows from Port 2 to Port 3, etc.. The diaphragm and pistons are moved into position by the actuation pressure.

Peak Performer 1 Users Manual
Page # 114
Disadvantages:
• Higher back-pressure through this style of valve because of the requirement of the internal gas stream to force the gas path open.
• Possible incomplete “sweep” of the gas flow path due to residual volume between the gas port and piston / diaphragm pinch point.
• Larger circumferential seal length • Low sealing force to atmospheric intrusion – single screw generates all sealing force for
interior and exterior flat diaphragm seal faces • Increased internal cross-port leakage • More expensive
Advantages
• Fewer moving parts • Smaller size • Single pilot valve required