raspberry pi - crc - center for research...
TRANSCRIPT

Raspberry Pi
Michael Joy

What will we be doing today?First Half:
• Learn about the Raspberry Pi
• See demos of what the Pi can do
• Short break
Second Half:
• Setup the Raspberry Pi
• Learn how to use the command line
• See demos of the Pi Camera
• Learn how to use Python to interact with the Pi Camera

What is the Raspberry Pi?• Affordable credit-card sized computer
• Plugs into a computer monitor or TV
• Uses standard keyboard and mouse
• Can browse the internet and play HD video
• Can also interact with the outside world!

Raspberry Pi FoundationEducational charity based in the UK
The Foundation’s goal is to advance the education of
adults and children in the field of computers, computer
science, and related subjects.
https://www.raspberrypi.org/about

Why was the Pi created?Concern over the decline in computer literacy
• In the 1990s most new Computer Science students
were experienced hobbyist programmers.
• The 2000s were very different; a typical applicant may
have only done a little web programming.

Your Raspberry PiRaspberry Pi 2 Model B Camera Kit

Camera Kit ContentsRaspberry Pi 2 B Micro SD Card WiFi Dongle
Raspberry Pi Case Power Supply Pi Camera

Raspberry Pi 2 Model B Stats• 900MHz quad-core ARM Cortex-A7 CPU
• VideoCore IV 3D graphics core
• 1GB RAM
• 4 USB ports
• Full HDMI port
• Ethernet port
• Micro SD card slot
• Combined 3.5mm audio jack and composite video
• Camera and display interface
• 40 General Purpose Input / Output pins (GPIOs)

Helpful WebsitesOfficial Raspberry Pi website
https://www.raspberrypi.org/
The MagPi, online Raspberry Pi magazine
https://www.raspberrypi.org/magpi/
PiWeekly, online Raspberry Pi newsletter
http://piweekly.net/
Raspberry Pi IV Beginners
https://www.youtube.com/user/RaspberryPiBeginners
The Raspberry Pi Guy
http://www.theraspberrypiguy.com/

What you can do with the PI

Raspberry Pi Demo
George Sparrow

Hands-On: Assembling the PiSetup your Raspberry Pi components in front of you
Camera Kit Supplies Additional Hardware

Hands-On: Assembling the Pi1. Attach rubber adhesive feet to the Pi case
2. Examine how the pegs inside the case match holes on
the Raspberry Pi

Hands-On: Assembling the Pi3. Slide the Raspberry Pi into the case on the GPIO side
with the small plastic clips next to the stand-off holes
4. Gently push down until it snaps into place on the
opposite side

Hands-On: Assembling the Pi5. Thread the camera cable into the top of the Pi case with
the camera facing down and the tin contacts facing up

Hands-On: Assembling the Pi6. Gently pull up the camera socket locking lever

Hands-On: Assembling the Pi7. Insert the camera cable evenly with the tin connecters
facing the HDMI port and gently secure the locking lever

Hands-On: Assembling the Pi8. Snap the two halves of the Pi case together
9. Insert the micro SD card into the slot on the underside of
the Pi case

Hands-On: Assembling the Pi10. Plug the USB WiFi dongle into one of the USB ports
11. Plug in keyboard and mouse
12. Plug in monitor using the HDMI port
13. Make sure monitor is turned on
14. Don’t plug in the power supply just yet

Hands-On: Assembling the PiWhere is the power button?
• The Raspberry Pi doesn’t have a power button. It boots
up as soon as you plug in the power supply.
• If you’ve completed all the previous steps, plug in the
power supply to boot the Raspberry Pi.

Hands-On: Configuring the PiInstalling the Operating System
The micro SD that you have comes pre-installed with the
Linux based Raspbian OS. Raspbian is a fork of another
Linux distribution called Debian.

Hands-On: Configuring the PiHow to log into the Raspberry Pi for the first time
You won’t see the password as you type it. This is a Linux
security feature.
Login: pi
Password: raspberry

Hands-On: Configuring the PiConfiguring the Raspberry Pi for the first time
Launch the Raspberry Pi Configuration Tool
~$ sudo raspi-config

Hands-On: Configuring the PiSetting the keyboard layout
1. Choose option 4 Internationalization Options

Hands-On: Configuring the PiSetting the keyboard layout
2. Choose option I3 Change Keyboard Layout

Hands-On: Configuring the PiSetting the keyboard layout
3. Choose an appropriate US keyboard type

Hands-On: Configuring the PiSetting the keyboard layout
4. Choose English (US) for keyboard layout

Hands-On: Configuring the PiSetting special command keys for the keyboard
5. Choose the default for the keyboard layout

Hands-On: Configuring the PiSetting special command keys for the keyboard
6. Select No for the Control+Alt+Backspace command

Hands-On: Configuring the PiEnabling the camera socket
7. Choose option 5 Enable Camera

Hands-On: Configuring the PiEnabling the camera socket
8. Select Enable

Hands-On: Configuring the PiOptional: Set to automatically boot to GUI
9. Choose option 3 Enable Boot to Desktop/Scratch

Hands-On: Configuring the PiOptional: Set to automatically boot to GUI
10. Select Log in as user ‘pi’ at the graphical desktop
then select Ok
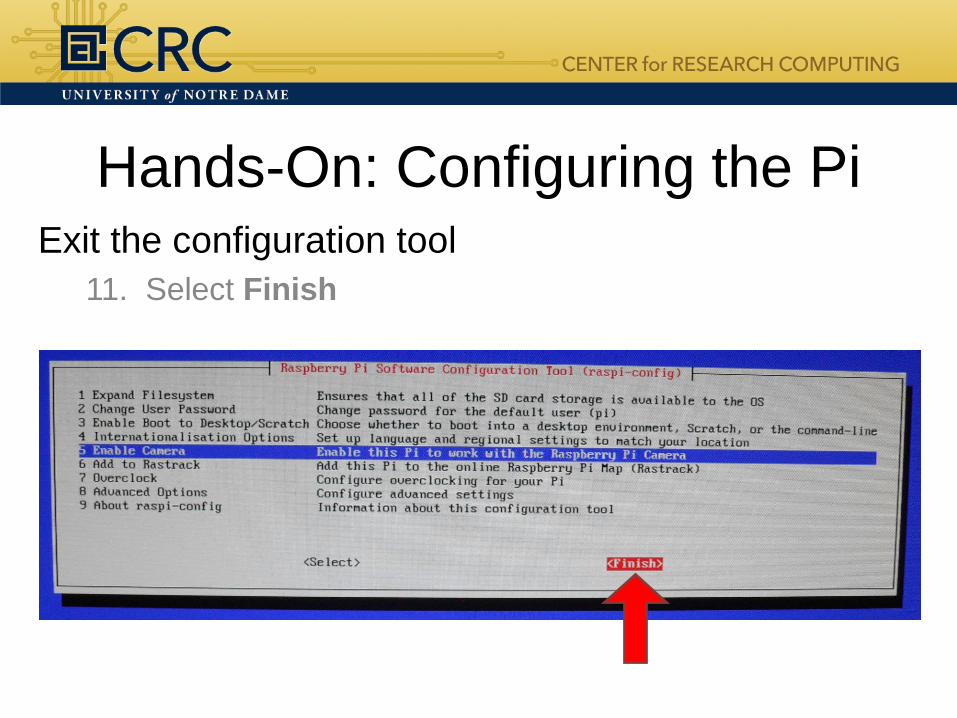
Hands-On: Configuring the PiExit the configuration tool
11. Select Finish

Hands-On: Configuring the PiExit the configuration tool
12. Select Yes if prompted to reboot

Hands-On: WiFi SetupLogin: pi
Password: raspberry
The Command Line
~$
Type the following command and press ENTER
~$ startx

Hands-On: WiFi SetupThe Raspbian Desktop
x

Hands-On: WiFi SetupConfirm that the WiFi dongle has been detected
1. Click the LXTerminal button in the top left menu bar
2. Type the command below into the command line
~$ ifconfig
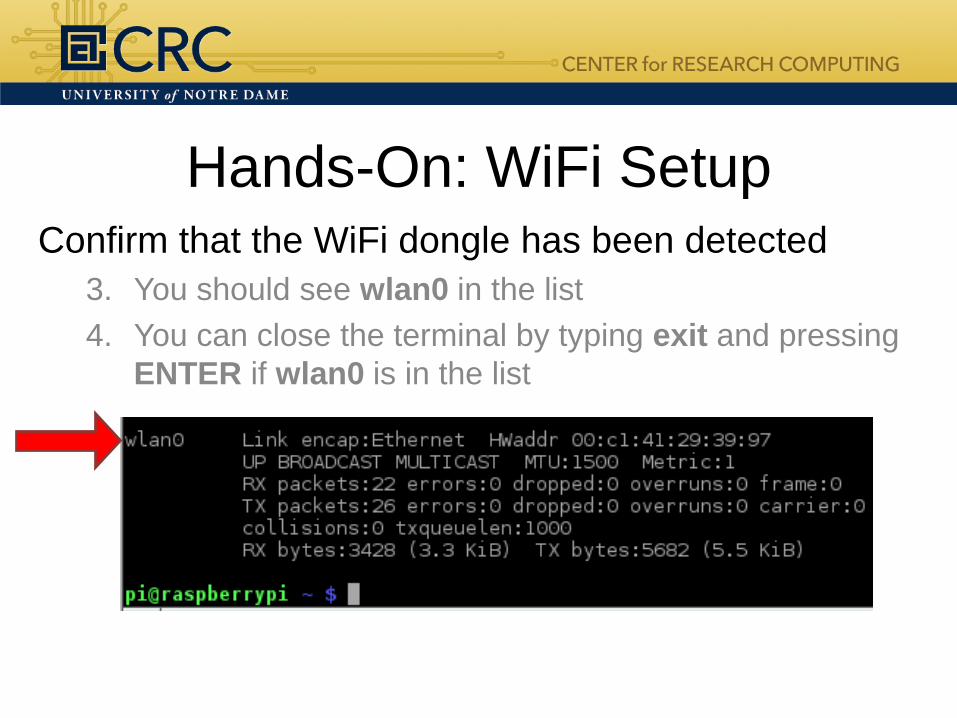
Hands-On: WiFi SetupConfirm that the WiFi dongle has been detected
3. You should see wlan0 in the list
4. You can close the terminal by typing exit and pressing
ENTER if wlan0 is in the list

Hands-On: WiFi SetupConnect to ND-Guest
5. Click the menu button find Preferences
6. From Preferences select WiFi Configuration
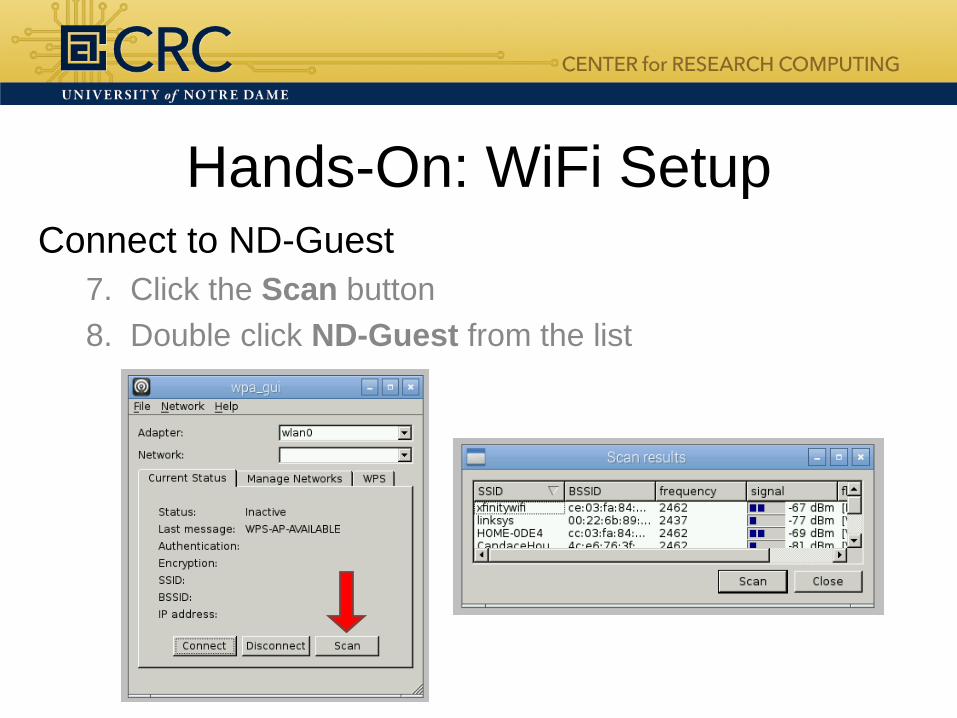
Hands-On: WiFi SetupConnect to ND-Guest
7. Click the Scan button
8. Double click ND-Guest from the list

Hands-On: WiFi SetupConnect to ND-Guest
9. Click on the Add button
without making any
changes to ND-Guest

Hands-On: WiFi SetupConnect to ND-Guest
10. Make sure ND-Guest
is the selected network
11. Click the Connect button

Hands-On: WiFi SetupThe Wifi connection should now be working
The WiFi Configuration Tool will be running in the
background. You might see it in the top right corner
of your screen.
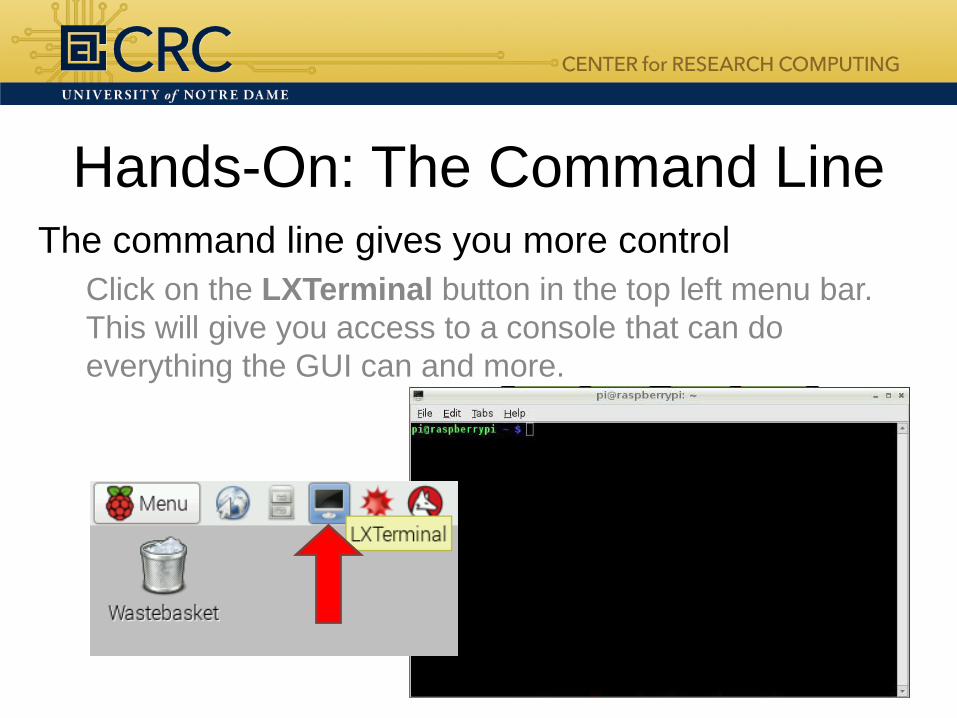
Hands-On: The Command LineThe command line gives you more control
Click on the LXTerminal button in the top left menu bar.
This will give you access to a console that can do
everything the GUI can and more.
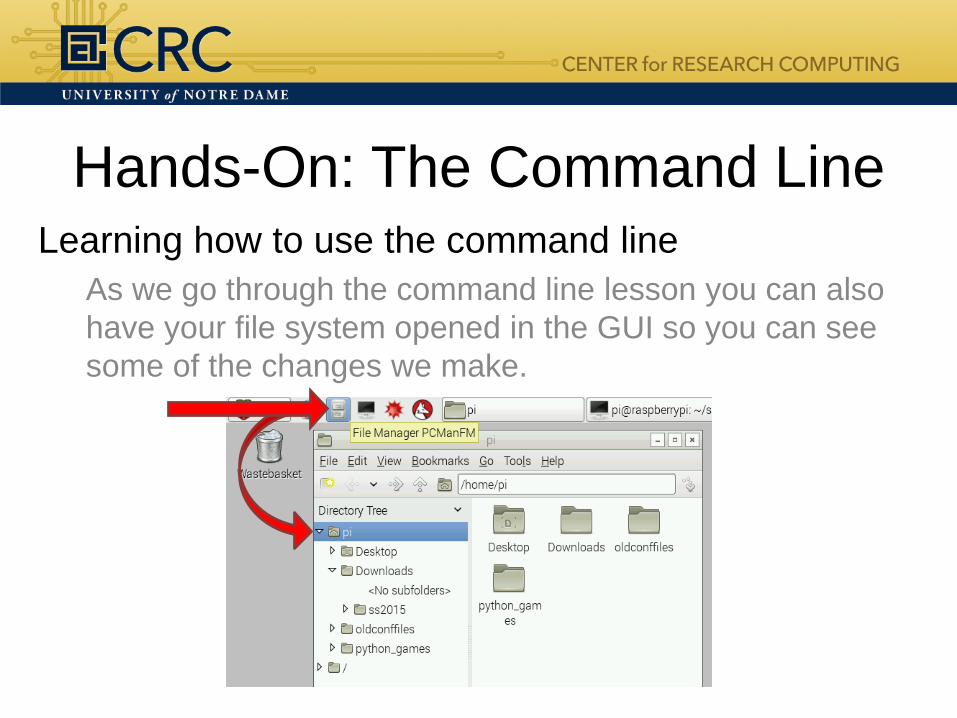
Hands-On: The Command LineLearning how to use the command line
As we go through the command line lesson you can also
have your file system opened in the GUI so you can see
some of the changes we make.

Hands-On: The Command LineLearning how to use the command line
You may have already used a few different commands
during this presentation.
~$ sudo raspi-config
~$ startx
~$ ifconfig
Now we can learn some more commands. Try each
command as we go through them.

Hands-On: The Command LineLearning how to use the command line
Echo will print the argument to the console.

Hands-On: The Command LineLearning how to use the command line
Man will show you the manual page for the argument.
Press Q on the keyboard to exit the manual page.
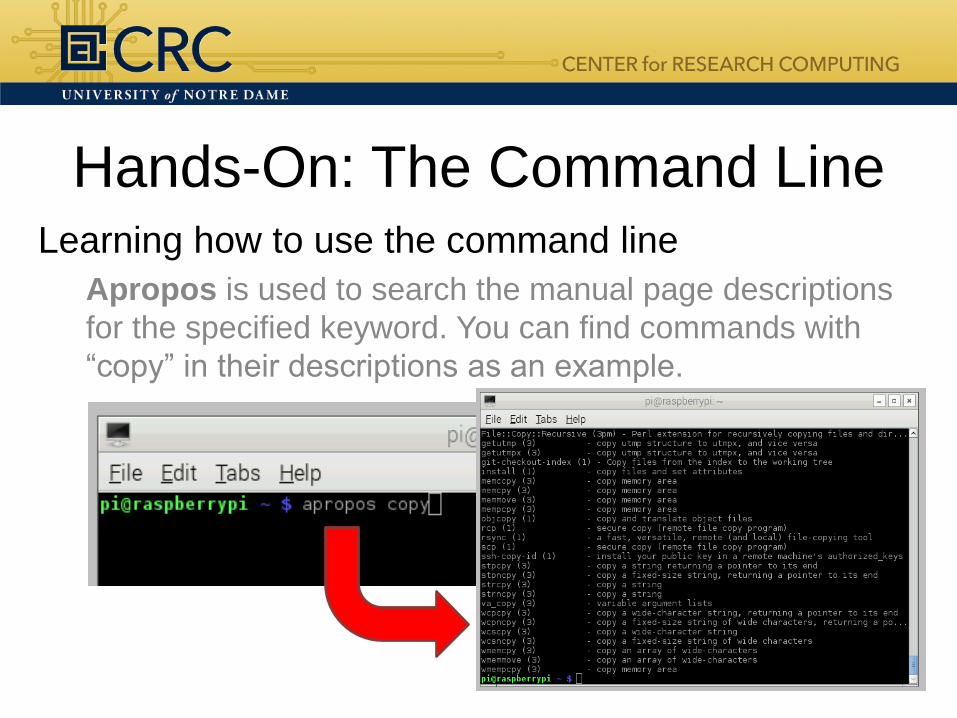
Hands-On: The Command LineLearning how to use the command line
Apropos is used to search the manual page descriptions
for the specified keyword. You can find commands with
“copy” in their descriptions as an example.

Hands-On: The Command LineLearning how to use the command line
Clear will move the prompt to the top of the console
window. This effectively clears the console.

Hands-On: The Command LineLearning how to use the command line
Pwd will print the current working directory path. This is
basically “where you are” with this console.

Hands-On: The Command LineLearning how to use the command line
Ls will list the directories in the current working directory.

Hands-On: The Command LineLearning how to use the command line
Most commands have options (arguments) that change
their behavior. The options usually start with a “-” and are
typed after the command.
~$ ls -a Display hidden files
~$ ls -l List files in long format

Hands-On: The Command LineLearning how to use the command line
You can combine most arguments. Try using both “a” and
“l” after the ls command.

Hands-On: The Command LineLearning how to use the command line
Mkdir will create a new directory with the name you
specify after the command. Use mkdir and then use ls to
see the directory you created.

Hands-On: The Command LineLearning how to use the command line
Cd is used to change the current working directory.
Specify the directory or directory path after the command.
You can also use the tab key to auto-complete directory
and file names in the console.

Hands-On: The Command LineLearning how to use the command line
Type the pwd command again to see how the current
working directory path has changed.

Hands-On: The Command LineLearning how to use the command line
Create and open a simple text file with leafpad myfile.txt
This creates a text file called myfile.txt and opens it in a
text editor called LeafPad automatically.
Type a short message

Hands-On: The Command LineLearning how to use the command line
Use the ls command to see the new text file. If you want
to view the contents of the text file without opening
LeafPad back up, use the cat command followed by the
file name.

Hands-On: The Command LineLearning how to use the command line
Cp will copy your file to the specified directory. In this
example you can type ls /home/pi to see the copied file.

Hands-On: The Command LineLearning how to use the command line
Rm will remove the specified file or files. Add the
argument “-v” (verbose) to have an explanation of what is
being done printed to the console.

Hands-On: The Command LineLearning how to use the command line
To navigate back one directory use cd ..
To return to your home directory use cd ~
Hands-On: The Command LineLearning how to use the command line
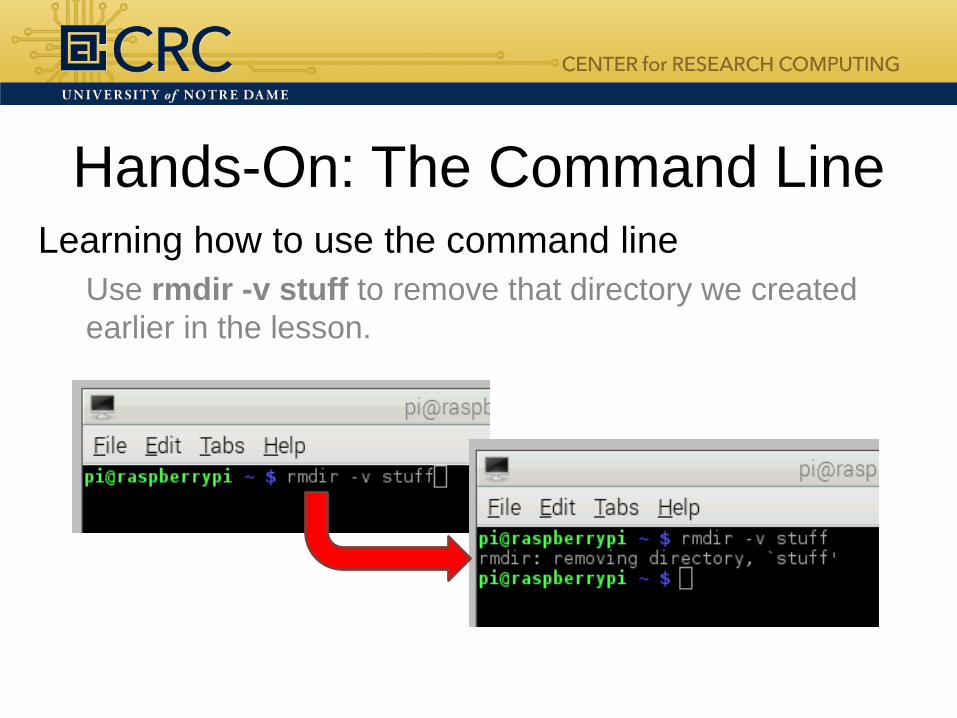
Use rmdir -v stuff to remove that directory we created
earlier in the lesson.

Hands-On: The Command LineUpdating the Raspberry Pi
• Sudo means Super-User DO and is followed by a
command that requires the super-user to complete.
• Apt-get is a package manager that you use to install,
update, and upgrade your software.
• Wget is used to access files from the internet.

Hands-On: The Command LineUpdating the Raspberry Pi
Use the following command to download a file I have
prepared from the internet. The file will be downloaded into
your current working directory.
~$ wget https:/www.dropbox.com/s/
pLmz498wo3kgnpj/ss2015.tar

Hands-On: The Command LineUpdating the Raspberry Pi
You downloaded a type of archive called a tar file. To
extract the contents of the tar file into your current
directory, use the following command:
~$ tar -xvf ss2015.tar

Hands-On: The Command LineUpdating the Raspberry Pi
The contents of the tar file will be displayed as they are
extracted because of the “-v” option we used. You can use
cd ss2015 and ls -l to see the contents of the directory.

Hands-On: The Command LineUpdating the Raspberry Pi
A file called update-script.sh is in the ss2015 directory.
This is a shell script. It’s a text file that contains console
commands that will execute if you run the shell script. Type
cat update-script.sh to see the contents of the script.
~$ cat update-script.sh

Hands-On: The Command LineUpdating the Raspberry Pi
Try to run the shell script by typing the following:
~$ ./update-script.sh
What did it do?

Hands-On: The Command LineUpdating the Raspberry Pi
You need to set permissions for the shell script file. Type
ls -l to see the permissions for the files in ss2015.
R = read, W = write, X = execute
Owner Group World
r w x r w x r w x

Hands-On: The Command LineUpdating the Raspberry Pi
We want the file to have full permissions for the owner,
and read/execute permissions for all others. We use the
chmod command to accomplish this.
~$ chmod 755 update-script.sh

Hands-On: The Command LineUpdating the Raspberry Pi
You can use ls -l to see that the file now has the proper
permissions.
-rwxr-xr-x

Hands-On: The Command LineUpdating the Raspberry Pi
Now you can run the shell script!
~$ ./update-script.sh
If you are prompted to confirm any of your updates, just
press Y and then press ENTER. Also, the update may
create the oldconffiles directory.

Raspberry Pi Demo
Mike Reece
Hands-On: The Command LineInstalling the Python Pi Camera module
To install this module type the following:
~$ sudo apt-get install python-picamera
If you are prompted to confirm any of your updates, just
press Y and then press ENTER.

Raspberry Pi Demo
Michael Joy

Hands-On: Python and PiCameraGetting exposed to Python programming
Python is a fun and easy to learn programming language
with wide use in the professional development world.
You’ll only get a small taste of it here. There will be a 3
hour Python training session later in the week.
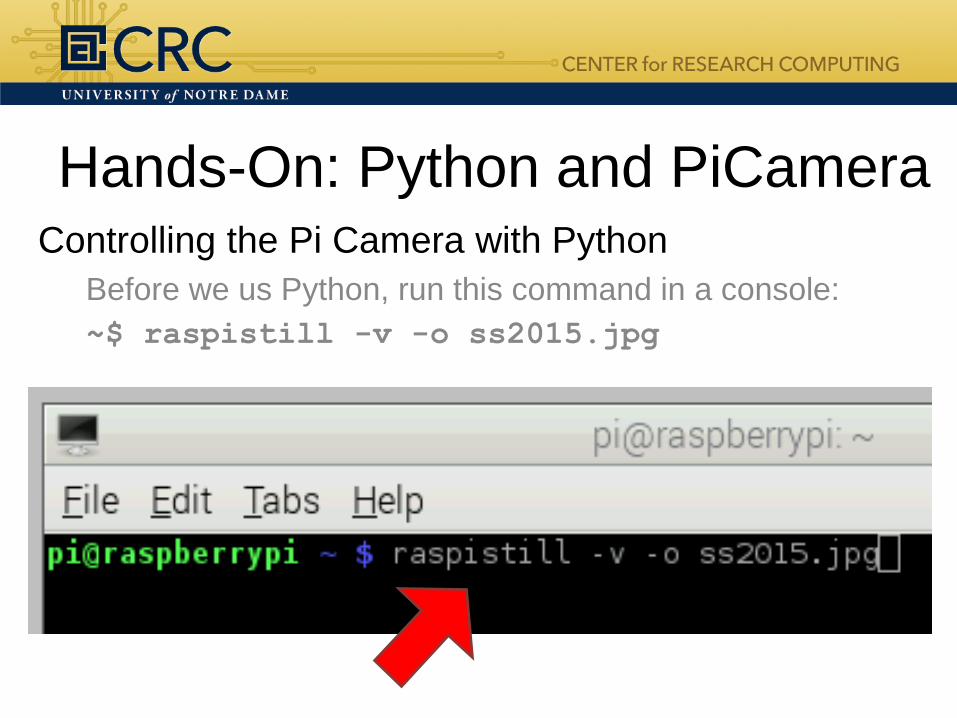
Hands-On: Python and PiCameraControlling the Pi Camera with Python
Before we us Python, run this command in a console:
~$ raspistill -v -o ss2015.jpg

Hands-On: Python and PiCameraControlling the Pi Camera with Python
This command will take a picture with the Pi Camera
using the default settings. The picture will be called
“ss2015.jpg” (unless you called it something else).
The text that printed out are all
options that we can control.
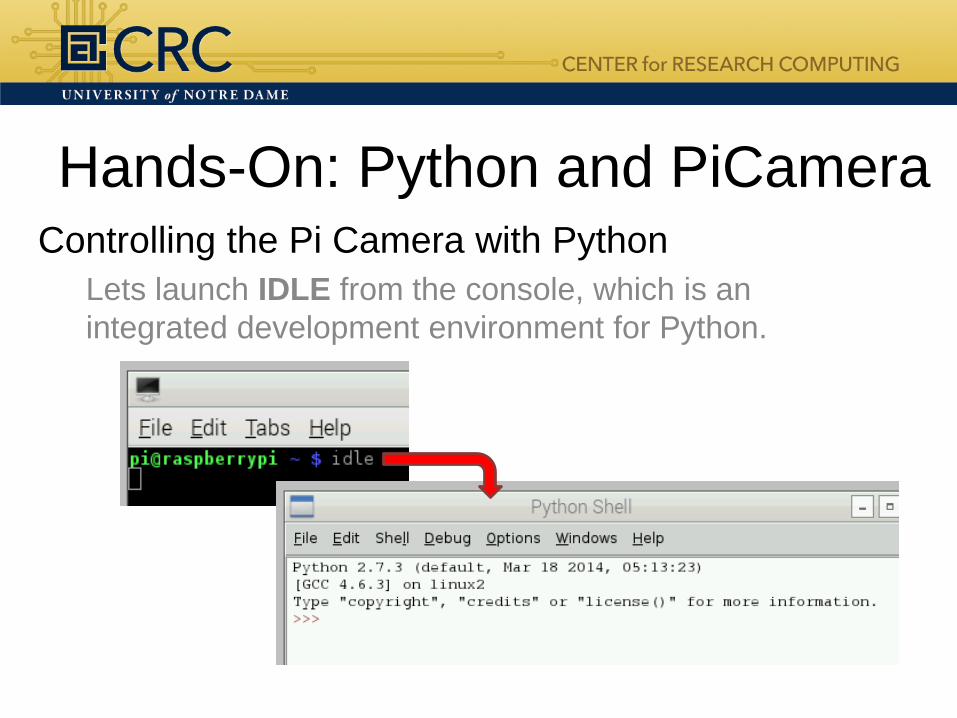
Hands-On: Python and PiCameraControlling the Pi Camera with Python
Lets launch IDLE from the console, which is an
integrated development environment for Python.
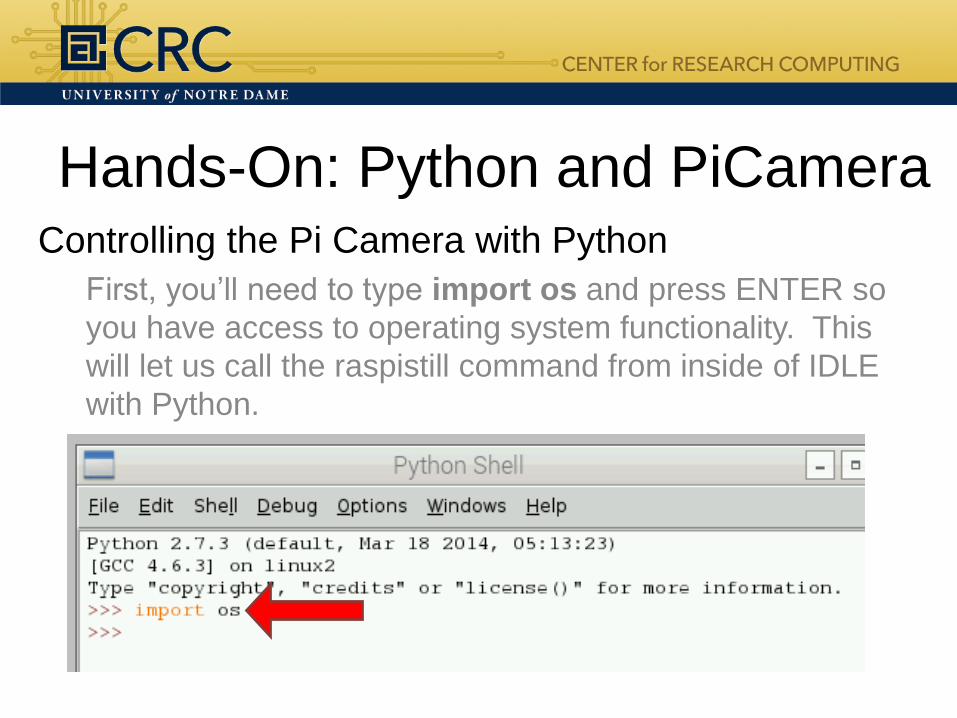
Hands-On: Python and PiCameraControlling the Pi Camera with Python
First, you’ll need to type import os and press ENTER so
you have access to operating system functionality. This
will let us call the raspistill command from inside of IDLE
with Python.

Hands-On: Python and PiCameraControlling the Pi Camera with Python
Now we can call the same command we used earlier in
the console. To do that type the following:
os.system(“raspistill -v -o hello.jpg”)

Hands-On: Python and PiCameraControlling the Pi Camera with Python
Now try using some of these options for the camera:
-w 600 –h 800 –q 70 –ifx cartoon

Hands-On: Python and PiCameraControlling the Pi Camera with Python
You can also take video with the camera:
os.system(“raspivid -o myvideo.h264”)

Hands-On: Python and PiCameraControlling the Pi Camera with Python
Use this command to see a small preview of your video:os.system(“omxplayer --win ‘0 0 320 240’ myvideo.h264”)
Or this to see it full size:
os.system(“omxplayer myvideo.h264”)

Hands-On: Python and PiCameraOptions for the raspistill and raspivid commands
-o output file name (-o picture.jpg or vid.h264)
-w width (-w 600)
-h height (-h 800)
-sh sharpness, -100 to 100 (-sh 75)
-co contrast, -100 to 100 (-co 50)
-br brightness, 0 to 100 (-br 65)
-sa saturation, -100 to 100 (-sa 85)
-vf vertically flip image
-hf horizontally flip image

Hands-On: Python and PiCameraOptions for the raspistill and raspivid commands
-q jpeg image quality, 0 to 100 (-q 70)
-ifx image effects (-ifx negative, solarise, sketch,
oilpaint, hatch, pastel, film,
watercolour, emboss, blur,
cartoon, and more!)
There are many more options for the Pi Camera:
https://www.raspberrypi.org/documentation/raspbian
/applications/camera.md

Raspberry PiFeel free to experiment with the remaining time
• To exit IDLE, type exit() and press ENTER or click the
X in the top right corner.
• To shutdown your Raspberry Pi select Shutdown from
the menu in the top left corner then press OK.
Thank You!