payroll end of month user guide - pcschool this report against your monthly validation reports: ......
TRANSCRIPT
© PCSchool Payroll End of Month User Guide
Created in version 2009.4.0.117 1/13
Payroll End of Month User Guide

© PCSchool Payroll End of Month User Guide
Created in version 2009.4.0.117 2/13
Table of Contents
Prerequisite ........................................................................................ Error! Bookmark not defined. Payroll End of Month .................................................................................................................... 3
New Zealand – IRD ..................................................................................................................... 4 Aus – End of Year ....................................................................................................................... 5
End of Year Procedure ............................................................................................................ 6
Backup Data. Path: Finance → Utilities → Backup Prior to running the End of Year rollover a full backup needs to be completed by your IT staff. Make a backup of the Finance tmp files. If you do not have the security for the Backup ask your System Administrator to complete the Backup before rolling for both;
End of Year
End of Month
1. Click Select All.
2. A tick will be placed in all the boxes.
3. Click Backup Data.
© PCSchool Payroll End of Month User Guide
Created in version 2009.4.0.117 3/13
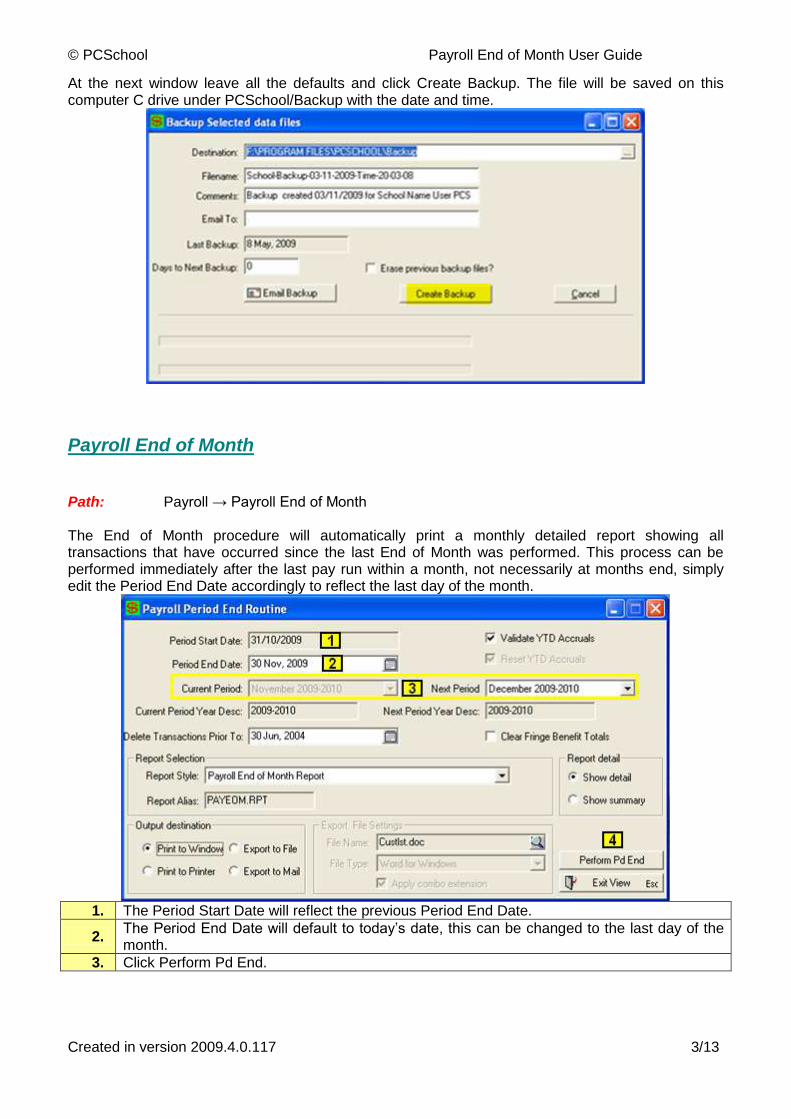
At the next window leave all the defaults and click Create Backup. The file will be saved on this computer C drive under PCSchool/Backup with the date and time.
Payroll End of Month Path: Payroll → Payroll End of Month The End of Month procedure will automatically print a monthly detailed report showing all transactions that have occurred since the last End of Month was performed. This process can be performed immediately after the last pay run within a month, not necessarily at months end, simply edit the Period End Date accordingly to reflect the last day of the month.
1. The Period Start Date will reflect the previous Period End Date.
2. The Period End Date will default to today’s date, this can be changed to the last day of the month.
3. Click Perform Pd End.

© PCSchool Payroll End of Month User Guide
Created in version 2009.4.0.117 4/13
New Zealand – IRD
Path: Payroll → Payroll Payment Summary In addition to the rollover and printout of monthly figures New Zealand users are obliged to electronically process payroll figures to the IRD Department.
1. If a multi Entity School, check the Entity is correct.
2. The dates will default, check these are correct.
3. Enter a Contact Name.
4. Check Export to File in Output destination.
5. In the Export File Settings, locate and Name File for export to I.R.D.
6. Click Process or Print Certificate.
The file will be created for uploading.
© PCSchool Payroll End of Month User Guide
Created in version 2009.4.0.117 5/13
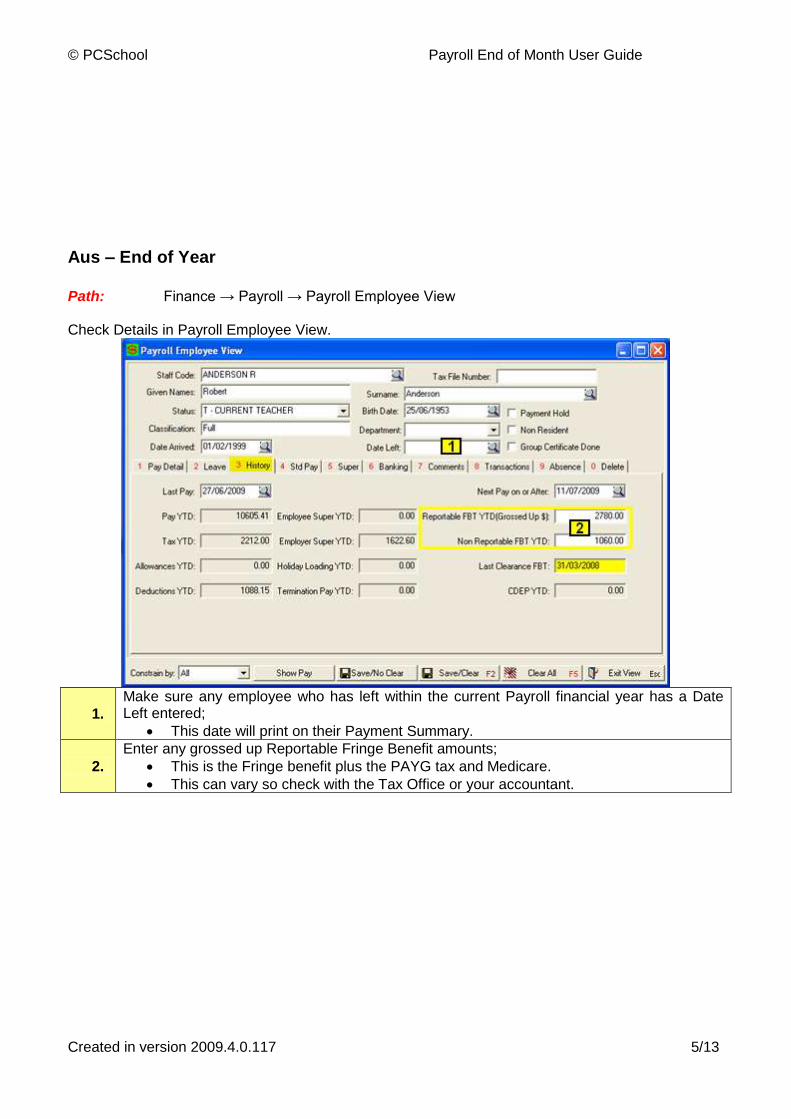
Aus – End of Year
Path: Finance → Payroll → Payroll Employee View Check Details in Payroll Employee View.
1.
Make sure any employee who has left within the current Payroll financial year has a Date Left entered;
This date will print on their Payment Summary.
2.
Enter any grossed up Reportable Fringe Benefit amounts;
This is the Fringe benefit plus the PAYG tax and Medicare.
This can vary so check with the Tax Office or your accountant.
© PCSchool Payroll End of Month User Guide
Created in version 2009.4.0.117 6/13
End of Year Procedure
Follow the 8 steps listed below to complete the Payroll End of Year process.
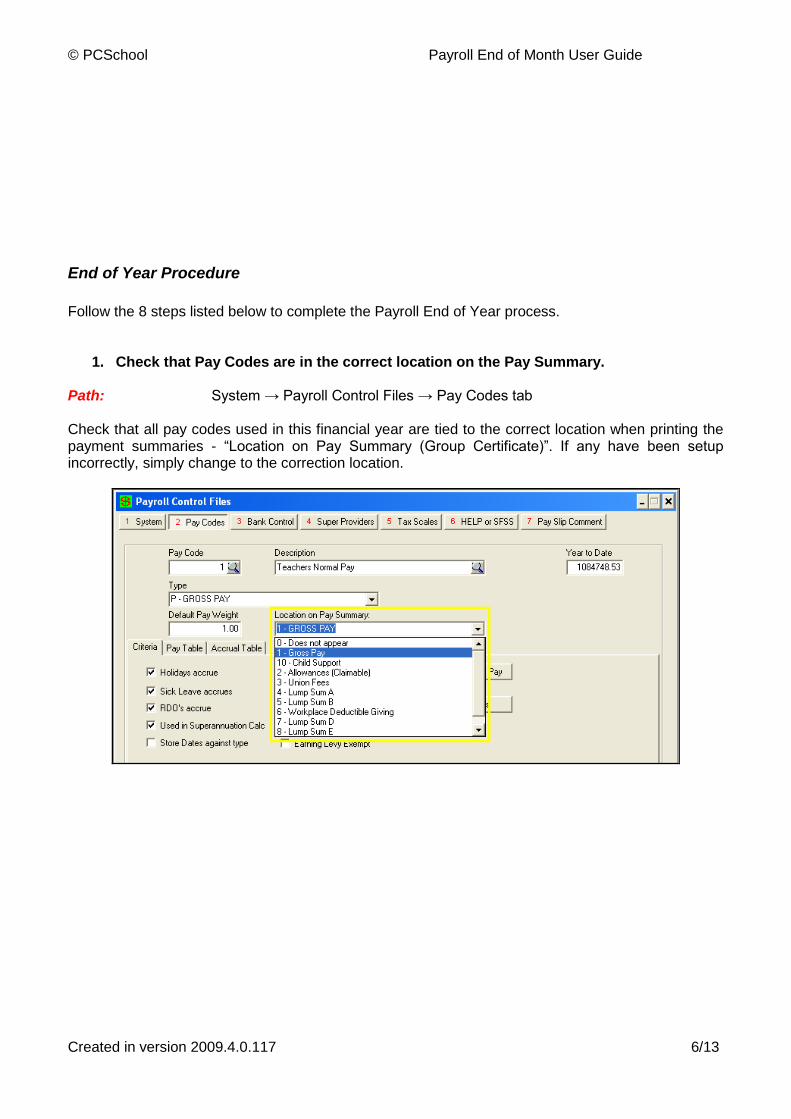
1. Check that Pay Codes are in the correct location on the Pay Summary. Path: System → Payroll Control Files → Pay Codes tab Check that all pay codes used in this financial year are tied to the correct location when printing the payment summaries - “Location on Pay Summary (Group Certificate)”. If any have been setup incorrectly, simply change to the correction location.
© PCSchool Payroll End of Month User Guide
Created in version 2009.4.0.117 7/13
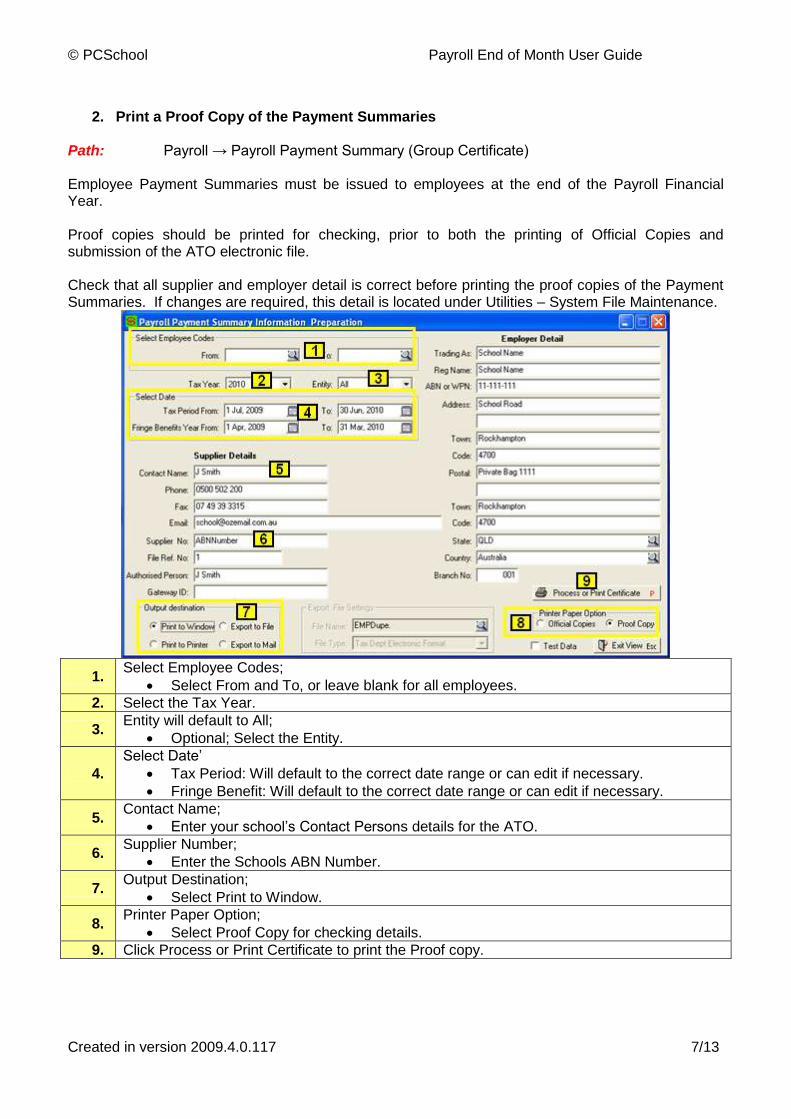
2. Print a Proof Copy of the Payment Summaries Path: Payroll → Payroll Payment Summary (Group Certificate) Employee Payment Summaries must be issued to employees at the end of the Payroll Financial Year. Proof copies should be printed for checking, prior to both the printing of Official Copies and submission of the ATO electronic file. Check that all supplier and employer detail is correct before printing the proof copies of the Payment Summaries. If changes are required, this detail is located under Utilities – System File Maintenance.
1. Select Employee Codes;
Select From and To, or leave blank for all employees.
2. Select the Tax Year.
3. Entity will default to All;
Optional; Select the Entity.
4.
Select Date’
Tax Period: Will default to the correct date range or can edit if necessary.
Fringe Benefit: Will default to the correct date range or can edit if necessary.
5. Contact Name;
Enter your school’s Contact Persons details for the ATO.
6. Supplier Number;
Enter the Schools ABN Number.
7. Output Destination;
Select Print to Window.
8. Printer Paper Option;
Select Proof Copy for checking details.
9. Click Process or Print Certificate to print the Proof copy.
© PCSchool Payroll End of Month User Guide
Created in version 2009.4.0.117 8/13
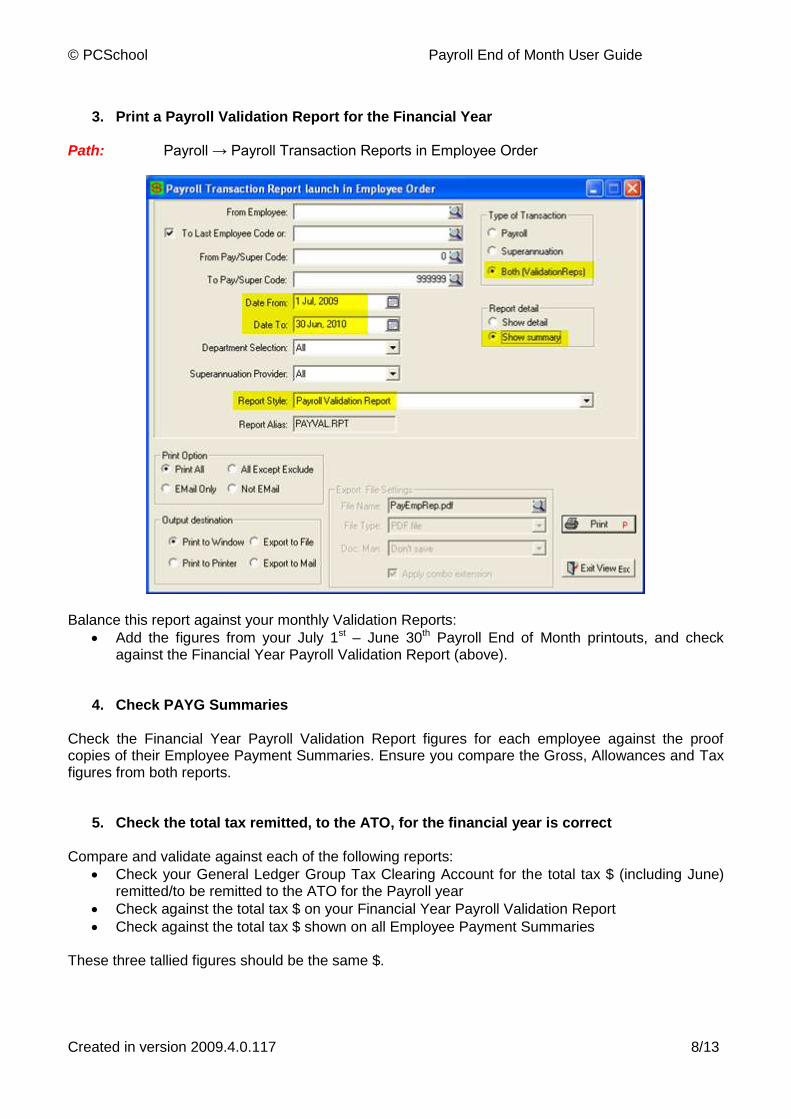
3. Print a Payroll Validation Report for the Financial Year Path: Payroll → Payroll Transaction Reports in Employee Order
Balance this report against your monthly Validation Reports:
Add the figures from your July 1st – June 30th Payroll End of Month printouts, and check against the Financial Year Payroll Validation Report (above).
4. Check PAYG Summaries Check the Financial Year Payroll Validation Report figures for each employee against the proof copies of their Employee Payment Summaries. Ensure you compare the Gross, Allowances and Tax figures from both reports.
5. Check the total tax remitted, to the ATO, for the financial year is correct Compare and validate against each of the following reports:
Check your General Ledger Group Tax Clearing Account for the total tax $ (including June) remitted/to be remitted to the ATO for the Payroll year
Check against the total tax $ on your Financial Year Payroll Validation Report
Check against the total tax $ shown on all Employee Payment Summaries These three tallied figures should be the same $.
© PCSchool Payroll End of Month User Guide
Created in version 2009.4.0.117 9/13
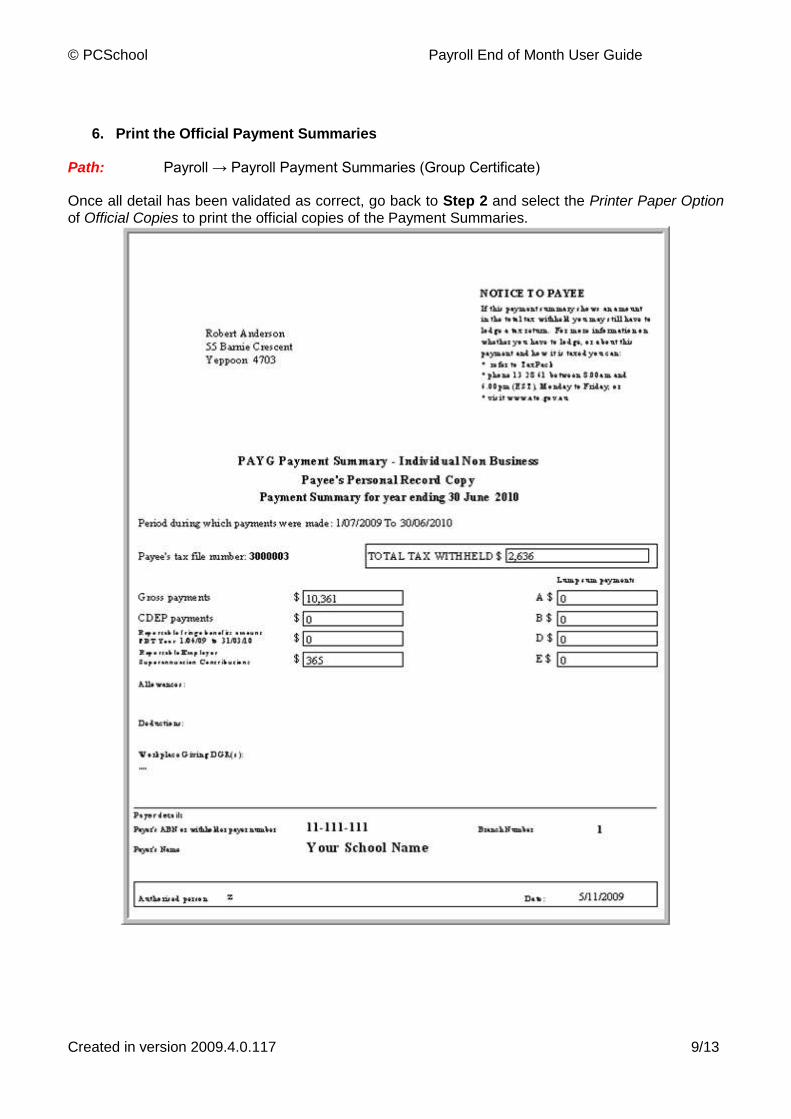
6. Print the Official Payment Summaries Path: Payroll → Payroll Payment Summaries (Group Certificate) Once all detail has been validated as correct, go back to Step 2 and select the Printer Paper Option of Official Copies to print the official copies of the Payment Summaries.
© PCSchool Payroll End of Month User Guide
Created in version 2009.4.0.117 10/13
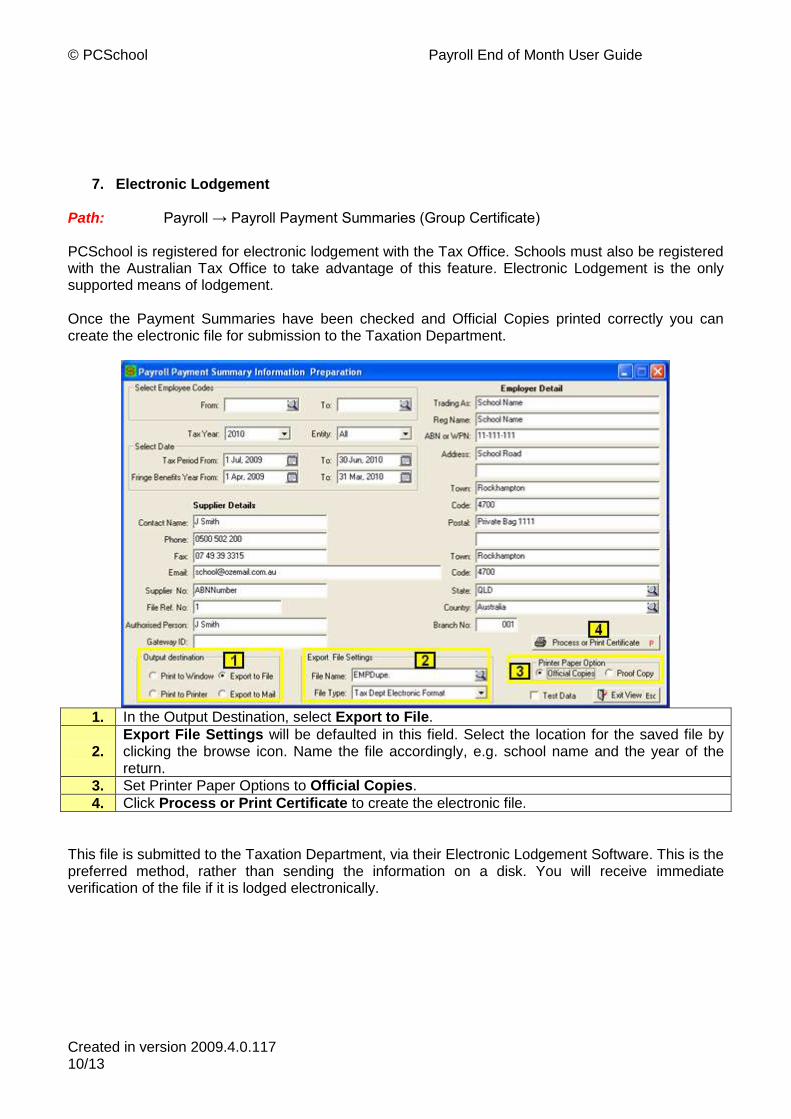
7. Electronic Lodgement Path: Payroll → Payroll Payment Summaries (Group Certificate) PCSchool is registered for electronic lodgement with the Tax Office. Schools must also be registered with the Australian Tax Office to take advantage of this feature. Electronic Lodgement is the only supported means of lodgement. Once the Payment Summaries have been checked and Official Copies printed correctly you can create the electronic file for submission to the Taxation Department.
1. In the Output Destination, select Export to File.
2. Export File Settings will be defaulted in this field. Select the location for the saved file by clicking the browse icon. Name the file accordingly, e.g. school name and the year of the return.
3. Set Printer Paper Options to Official Copies.
4. Click Process or Print Certificate to create the electronic file.
This file is submitted to the Taxation Department, via their Electronic Lodgement Software. This is the preferred method, rather than sending the information on a disk. You will receive immediate verification of the file if it is lodged electronically.
© PCSchool Payroll End of Month User Guide
Created in version 2009.4.0.117 11/13
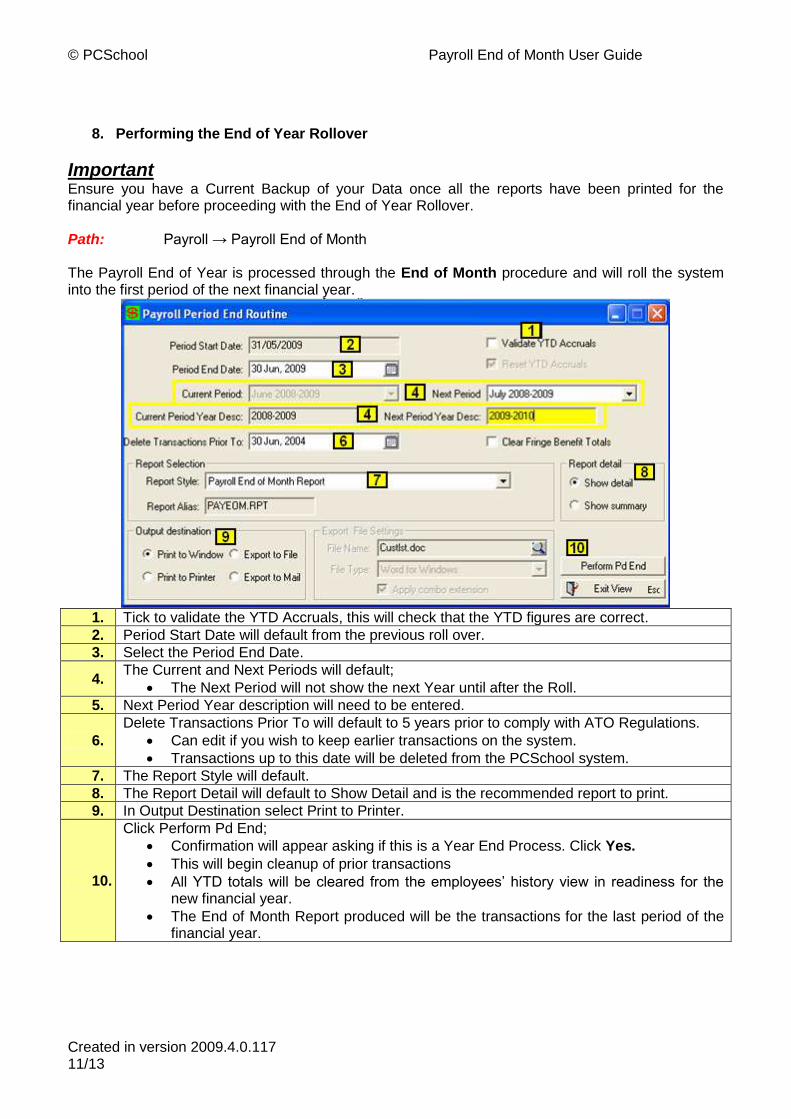
8. Performing the End of Year Rollover
Important Ensure you have a Current Backup of your Data once all the reports have been printed for the financial year before proceeding with the End of Year Rollover. Path: Payroll → Payroll End of Month The Payroll End of Year is processed through the End of Month procedure and will roll the system into the first period of the next financial year.
1. Tick to validate the YTD Accruals, this will check that the YTD figures are correct.
2. Period Start Date will default from the previous roll over.
3. Select the Period End Date.
4. The Current and Next Periods will default;
The Next Period will not show the next Year until after the Roll.
5. Next Period Year description will need to be entered.
6.
Delete Transactions Prior To will default to 5 years prior to comply with ATO Regulations.
Can edit if you wish to keep earlier transactions on the system.
Transactions up to this date will be deleted from the PCSchool system.
7. The Report Style will default.
8. The Report Detail will default to Show Detail and is the recommended report to print.
9. In Output Destination select Print to Printer.
10.
Click Perform Pd End;
Confirmation will appear asking if this is a Year End Process. Click Yes.
This will begin cleanup of prior transactions
All YTD totals will be cleared from the employees’ history view in readiness for the new financial year.
The End of Month Report produced will be the transactions for the last period of the financial year.

© PCSchool Payroll End of Month User Guide
Created in version 2009.4.0.117 12/13
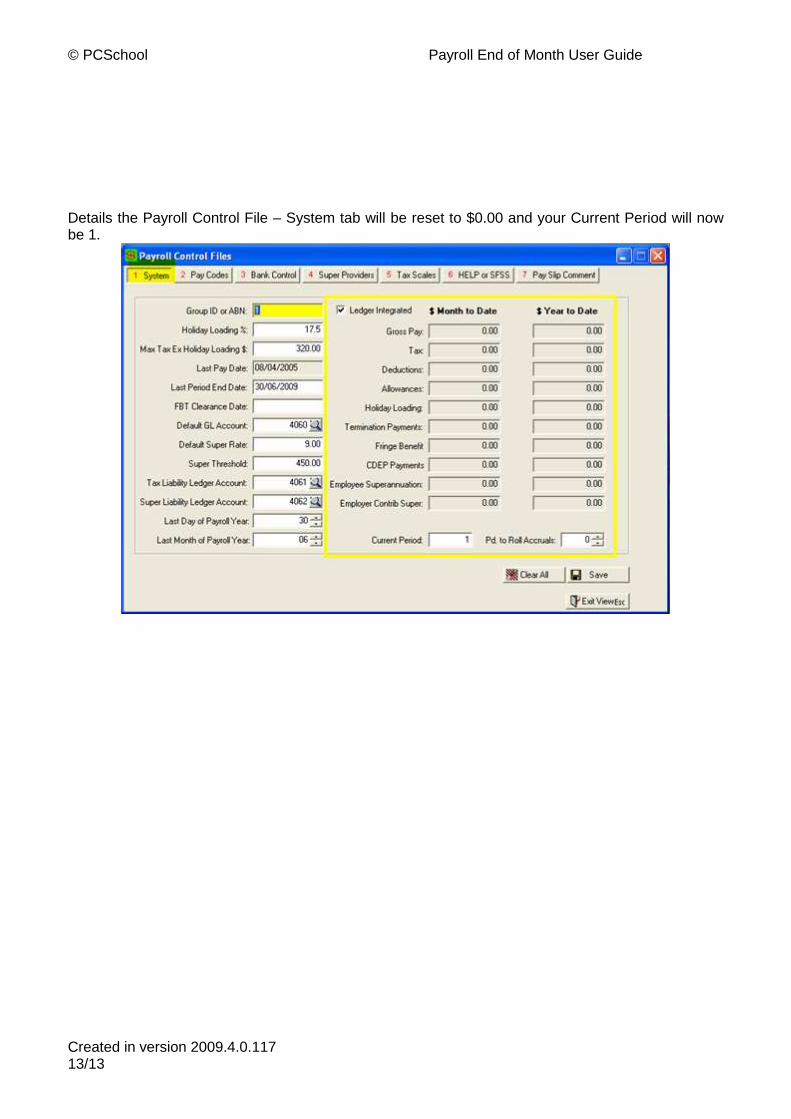
Payroll End of Year Rollover is now Complete At the end of this process your Payroll will be in July of the next Payroll financial year.
The Year to Date figures in the Payroll Employee View - History tab will be reset to $0.00.
© PCSchool Payroll End of Month User Guide
Created in version 2009.4.0.117 13/13
Details the Payroll Control File – System tab will be reset to $0.00 and your Current Period will now be 1.