payroll analysis tool - dpro.com · (9) payroll analysis tool user manual notice that this excel...
TRANSCRIPT

(1) Payroll Analysis Tool User Manual
Payroll Analysis Tool
You may download this product for FREE now at:
www.dpro.com/ACA/PRAnalysisSetup.exe
The Payroll Analysis Tool is an application which may be installed on your workstation or accounting server to provide a direct link between the Infinity POWER Accounting Software Payroll module and Microsoft’s Excel Spreadsheet program. This program should only be installed on the user’s workstation(s) that have some responsibility related to Payroll. The application will need to install and register the “client” component that communicates with the POWERServer module that facilities the direct “retrieval” of data from the Payroll system.
As a special utility that sits inside Microsoft Excel (required), the Payroll Analysis Tool makes direct calls to the Infinity POWER Payroll module using special “POWERServer” commands. POWERServer is an advanced technology that comes standard with every Infinity POWER System Administrator module. System Administrator (either Part #100 or #695 for SQL) is required to run any Infinity POWER module.
This product may be installed on any user’s desktop within your organization. However, you don’t have to worry that your staff, without the proper security rights, are going to be able to view your Payroll data in an unauthorized fashion! That’s because you must have the proper accounting software security rights to get to the Payroll data files. Why?
Because the POWERServer module directly communicates with your company’s Payroll data files and all communications require that only valid users that have been predefined in the Infinity POWER Advanced Security Administrator module can gain access to your Payroll data files based on the security rules that you have defined, in advance. In addition, the user rights are defined either on a “group” or “user” level, which means that “management” controls who gets access to specific program options and/or data files.

(2) Payroll Analysis Tool User Manual
Thus, if “User A” doesn’t have rights to the Payroll module, they won’t be able to “extract” any information or perform “analysis” at all from the Payroll module. Some companies may have their SYSADM control this module with full rights and simply save the various Excel data files on their network for specific users to use, when applicable. There are many ways to use this advanced tool!
Keep in mind, this is very valuable information that you are data mining from your accounting Payroll data files. Once “extracted,” these new spreadsheets of data searches should be stored on your PC or Network with the same level of special security you use now for your accounting data files. Therefore, you need to make special considerations as to who can make these data “extractions” and where they can store this information.
With the growing level of concern regarding the loss of personal information and identity theft, these Excel data files need to be highly protected from access by third parties. This tool is for use with products such as Pro-Ware’s ACA 1095 Reporting software for those companies with more than 50 full time equivalent employees.
The Affordable Care Act (ACA) has created new reporting requirements based on the health care coverage provided to employees in 2015. Employers of 50 or more full-time equivalent employees are required to complete a transmittal form (1094-B or 1094-C) containing information about the employer and an employee form (1095-B or 1095-C) for each full-time employee. These forms must be filed with the Internal Revenue Services in early 2016.
The Payroll Analysis Tool isn’t designed to comply with the actual filing of these IRS mandated forms. It is an analysis tool designed to help Employers analyze their Payroll data files and generate “census” data for compliance with a variety of insurance and 401k reporting matters. However, it does also help companies determine whether or not they meet the threshold of having to file the ACA forms and if so, to provide a direct link from the company’s Payroll data to Pro-Ware’s ACA 1095 Reporting software. This is explained in greater detail at the end of this document.
From there, the Pro-Ware ACA 1095 Reporting software provides a set of tools which allow Employers to manage the other data regarding offered health care coverages, spouses and children, which is completely out of the scope of the Infinity POWER Payroll accounting module. The requirements of the ACA are purely database reporting items and not transactional in nature, which is what the Infinity POWER Payroll module was designed to be all along.
Should companies determine that they have fifty (50) or more full time equivalent employees and need to handle the compliance of ACA reporting, there are two levels of Pro-Ware software. The “Single Client” mode is for a company with just one Federal ID Number. The “Multi-Client” mode is designed to support where there is common ownership among several companies with multiple Federal ID Numbers.

(3) Payroll Analysis Tool User Manual
More information and licensing information for Pro-Ware can be found at:
http://www.proware-cpa.com/aca-features.html
Installing the Payroll Analysis Tool The first requirement of using the Payroll Analysis Tool is that you MUST have a licensed copy of Microsoft Excel to use this product. Versions 2003, 2007, 2010 or 2013 are compatible. The Payroll Analysis Tool may be downloaded from the Data Pro Accounting Software web site at:
www.dpro.com/ACA/PRAnalysisSetup.exe.
You don’t need your normal “Customer Number” and “Password” to login to get access to this program option. When you download the PRAnalysissetup.exe file, first you will save it to your network drive or your local PC drive. Once you have saved it, use “Windows Explorer” to go to the folder where you saved the file to be able to open the file.
Double click on the PRAnalysisSetup.exe file. The installer program will begin.
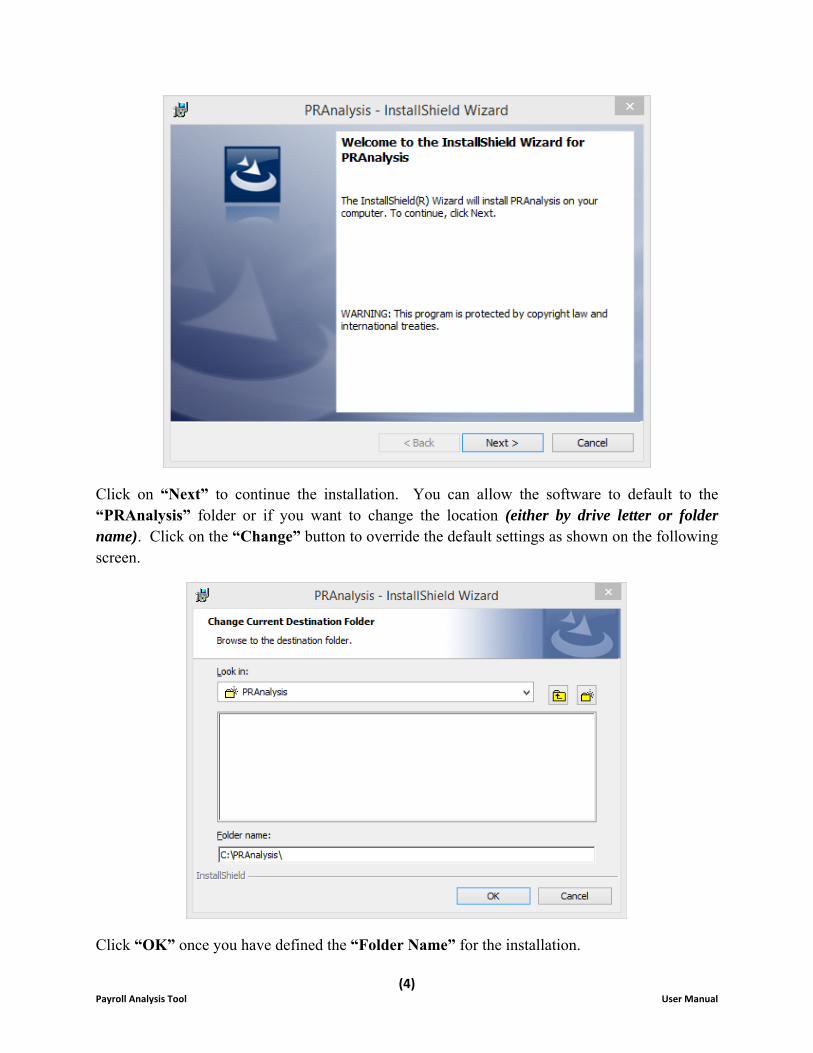
Once it is ready for installation, the following screen will appear:
(4) Payroll Analysis Tool User Manual
Click on “Next” to continue the installation. You can allow the software to default to the “PRAnalysis” folder or if you want to change the location (either by drive letter or folder name). Click on the “Change” button to override the default settings as shown on the following screen.
Click “OK” once you have defined the “Folder Name” for the installation.
(5) Payroll Analysis Tool User Manual
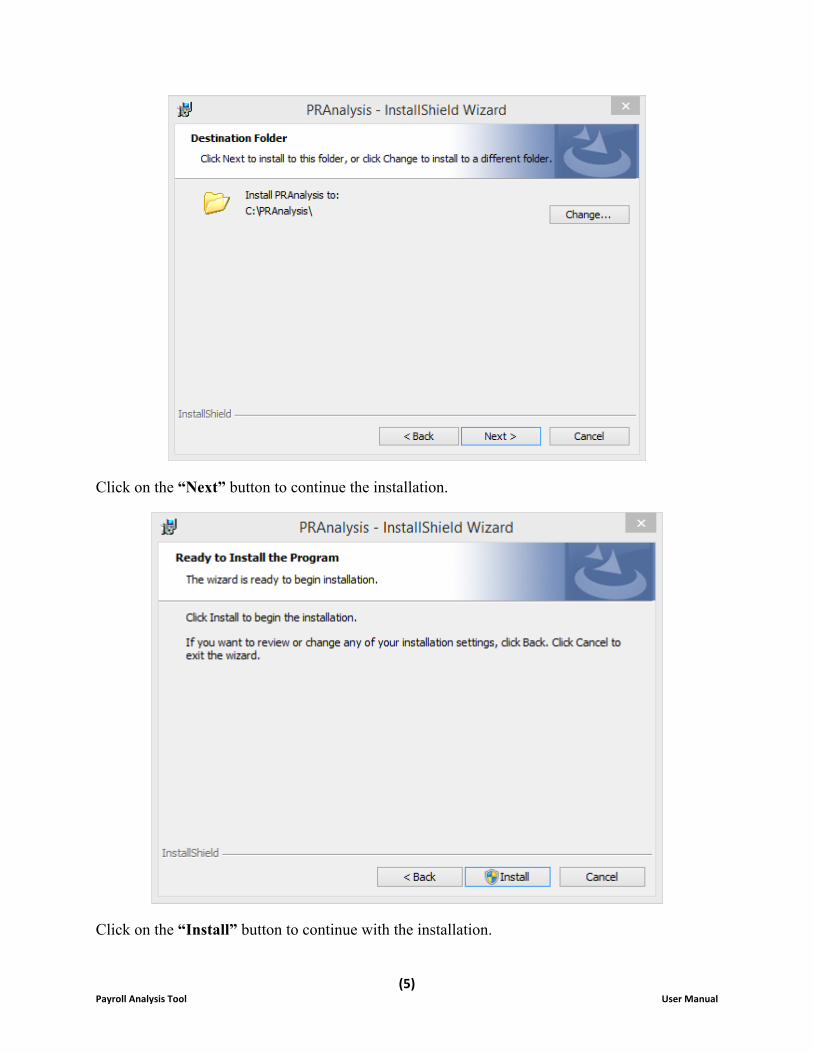
Click on the “Next” button to continue the installation.
Click on the “Install” button to continue with the installation.

(6) Payroll Analysis Tool User Manual
The system will begin to install files and show its progress at this point. Once it is completed the following screen will appear. Click on “Finish” to complete the installation.
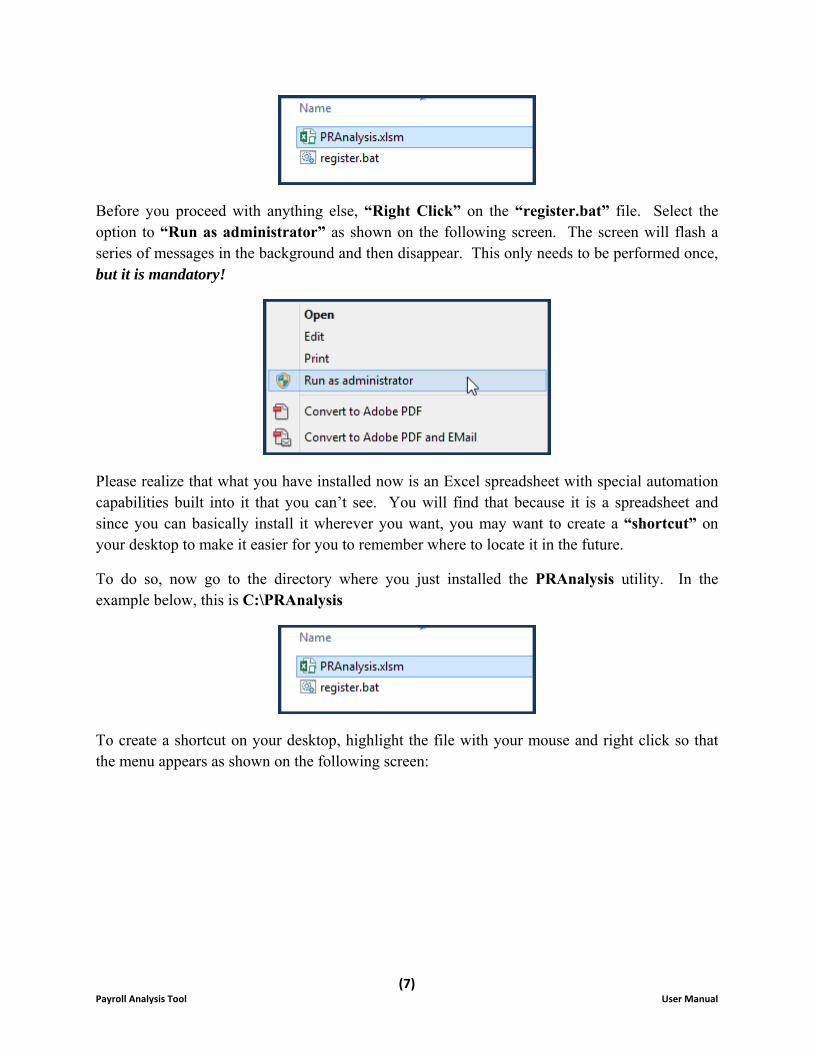
Once you are done, you will find that there are two additional files now installed into this folder.
(7) Payroll Analysis Tool User Manual
Before you proceed with anything else, “Right Click” on the “register.bat” file. Select the option to “Run as administrator” as shown on the following screen. The screen will flash a series of messages in the background and then disappear. This only needs to be performed once, but it is mandatory!
Please realize that what you have installed now is an Excel spreadsheet with special automation capabilities built into it that you can’t see. You will find that because it is a spreadsheet and since you can basically install it wherever you want, you may want to create a “shortcut” on your desktop to make it easier for you to remember where to locate it in the future.
To do so, now go to the directory where you just installed the PRAnalysis utility. In the example below, this is C:\PRAnalysis
To create a shortcut on your desktop, highlight the file with your mouse and right click so that the menu appears as shown on the following screen:

(8) Payroll Analysis Tool User Manual
This will have the effect of creating an icon on your desktop similar to the following image:
Now, you can simply double click on the shortcut and the system will launch Microsoft Excel and open the PRAnalysis file automatically. When it does, the opening screen will appear as shown on the following screen. If this is the first time you have loaded the file, you may get a “Security Warning (as shown) that Macros have been disabled.”
Click on the “Enable Content” button to proceed.

(9) Payroll Analysis Tool User Manual
Notice that this Excel spreadsheet opens with a series of boxes dedicated to a variety of configuration options and questions along with a series of tabs along the bottom of the screen. They are tied together. The lower box will make the request for data from the Payroll module and will then extract and deposit the data into the associated tab below.
However, first things first! The top right box must be defined to communicate with your accounting server using the POWERServer module and then to specify which company you want to access (Data Pro does support multi-company processing).
In the “Specify Connection to the Accounting System” box, the first configuration option is to define the “POWERServer Hostname.”
This would be the name of the computer where the POWERServer has been installed and is communicating directly with your accounting software modules. If this computer is the same computer as where you are installing PRAnalysis, you can use the default setting of “Localhost” which means it is calling the same computer that both applications are installed on.
(10) Payroll Analysis Tool User Manual
If at this time, you have never set up the POWERServer as a feature of your Infinity POWER modules, then skip to the end of this document where there is documentation on how to set up the POWERServer, which is repeated here for convenience. It is normally found as part of the Advanced Security Administrator module setup in the System Administrator module.
Likewise, if you do not have the Advanced Security Administrator feature turned on in your software and have been using the “Standard Security” feature, then you will have to first deploy this feature before you can proceed.
Data Pro Technical Support at 727-803-1550 can assist users with this security reconfiguration.
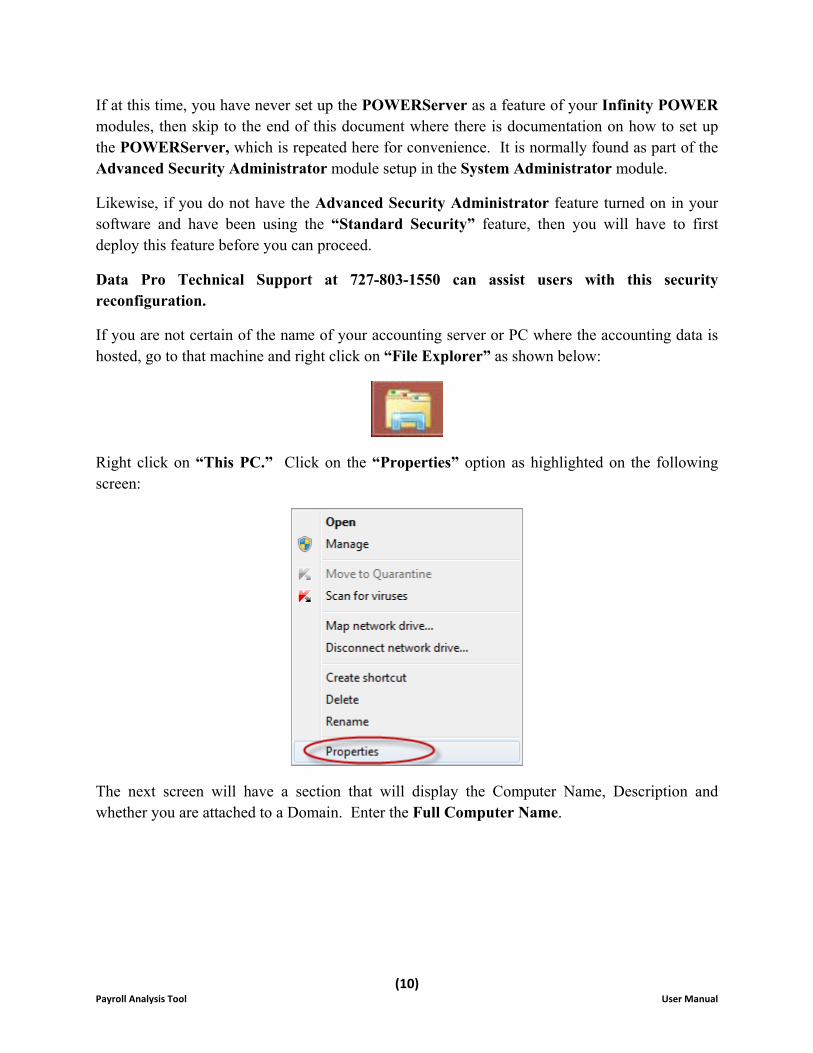
If you are not certain of the name of your accounting server or PC where the accounting data is hosted, go to that machine and right click on “File Explorer” as shown below:
Right click on “This PC.” Click on the “Properties” option as highlighted on the following screen:
The next screen will have a section that will display the Computer Name, Description and whether you are attached to a Domain. Enter the Full Computer Name.

(11) Payroll Analysis Tool User Manual
Do not enter the IP Address as it may change over time. The computer name most likely will not. Notice in the example below that it is “accountingserver.”

(12) Payroll Analysis Tool User Manual
Next, enter the POWERServer Port Number. This is the PORT # on the network where the traffic may flow. This is part of the configuration of the POWERServer. Port 9500 is generally the standard port number that is used.
You will next enter the three character Company ID. This alpha/numeric identifier tells the software which company you are processing transactions on. You may have tens of thousands of combinations using the three digit options.
You may also want to save PRAnalysis multiple times in the same directory using a naming structure associated to different Company IDs, if you plan to extract data regularly from differing companies. That way, you can configure each variation uniquely to each company once and then call it up based on a unique icon from your desktop as needed, or simply by its unique filename.
For instance, the default name of the file is: PRAnalysis.xlsm. If you had three companies, you could name them: PRAnalysis100.xlsm, PRAnalysis200.xlsm & PRAnalysis300.xlsm. You would open up each file separately and you would probably be calling the same POWERServer Hostname and Port Number, but would use a different Company ID for each implementation.
Next, you will enter the same User ID and Password you would use when logging into the Infinity POWER software.
This will control the Advanced Security rights that will be passed to PRAnalysis in the same way as they are passed to you when you login to the accounting software. Whatever rights you have in the accounting software, they will be the same in PRAnalysis.
If you do not have rights to Payroll in the software, you will not be able get access to any of that data in PRAnalysis. As mentioned earlier, keep in mind that if you do have all rights to all modules, once you have “extracted” data into a spreadsheet, you will want to save it in a network secure directory or on your local machine where you have proper security as the data is now in a Microsoft Excel file and no longer protected by the Infinity POWER Advanced Security Administrator module.
Much care must be exercised when utilizing this tool. Also, you may have rights in Company 100, but not in Company 200 and Company 300. Therefore, different users may be configured for differing filenames.
*** N O T E ***
Do not save the PRAnalysis file with your “User Name” and “Password” stored in the main file. For instance, if you create a shortcut to launch the spreadsheet for convenience, but you have left your credentials in the file, then you have basically made all of your Payroll data available to anyone who clicks on your desktop icon. It is recommended to “never” save you credentials in this file.

(13) Payroll Analysis Tool User Manual
Employee Data Retrieval Criteria:
The prompts below this header in the tool are designed to allow for unique extractions of Payroll data each time. Some extractions are for “census” reporting to insurance companies and/or mutual funds. Others extractions of Payroll data will be used in helping determine whether or not your firm is required to comply under the Affordable Care Act (ACA) rules.
Since there are multiple ways that the ACA can calculate whether an employee is considered “full time,” “part time,” or “seasonal,” it is the Employer’s responsibility to ensure they have met all of the necessary criteria. If you only have ten employees, then the calculation is rather simple. You currently have no requirements under the ACA to file additional forms and reporting.
In performing your analysis of your Payroll data files, choose from the following questions to “extract” the data in the manner you seek. Once you have extracted the data, you can then save it off to another Excel file (*.xls or *.xlsx are most compatible with programs like Pro-Ware).
The PRAnalysis software will automatically clear the tabs located at the bottom of the spreadsheet as shown below each time the “Retrieve Data” button is selected.
Therefore, saving the extracted data to a unique filename separately allows you to keep as many variations of the queries as you desire.
Once the query using the POWERServer has been completed to the Payroll data files, the following notification will appear to let you know you can proceed.
The following screen is a series of user prompts that control which data is extracted each time from the Payroll data files.
(14) Payroll Analysis Tool User Manual
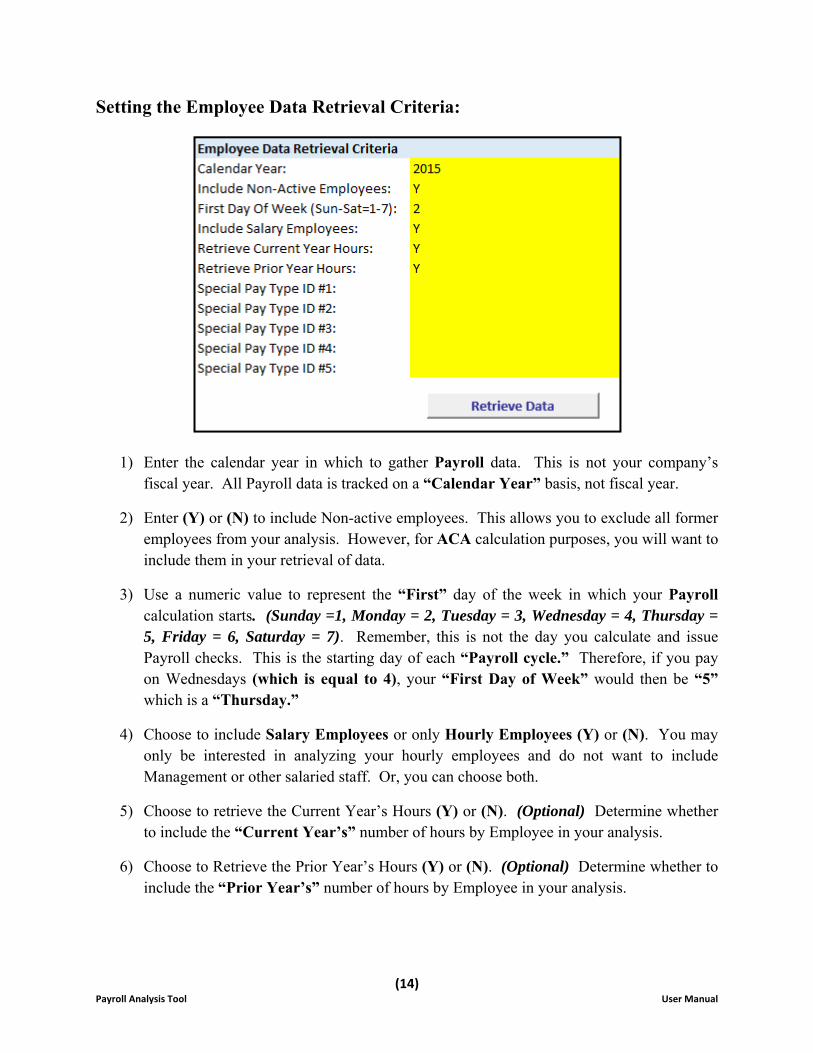
Setting the Employee Data Retrieval Criteria:
1) Enter the calendar year in which to gather Payroll data. This is not your company’s fiscal year. All Payroll data is tracked on a “Calendar Year” basis, not fiscal year.
2) Enter (Y) or (N) to include Non-active employees. This allows you to exclude all former employees from your analysis. However, for ACA calculation purposes, you will want to include them in your retrieval of data.
3) Use a numeric value to represent the “First” day of the week in which your Payroll calculation starts. (Sunday =1, Monday = 2, Tuesday = 3, Wednesday = 4, Thursday = 5, Friday = 6, Saturday = 7). Remember, this is not the day you calculate and issue Payroll checks. This is the starting day of each “Payroll cycle.” Therefore, if you pay on Wednesdays (which is equal to 4), your “First Day of Week” would then be “5” which is a “Thursday.”
4) Choose to include Salary Employees or only Hourly Employees (Y) or (N). You may only be interested in analyzing your hourly employees and do not want to include Management or other salaried staff. Or, you can choose both.
5) Choose to retrieve the Current Year’s Hours (Y) or (N). (Optional) Determine whether to include the “Current Year’s” number of hours by Employee in your analysis.
6) Choose to Retrieve the Prior Year’s Hours (Y) or (N). (Optional) Determine whether to include the “Prior Year’s” number of hours by Employee in your analysis.

(15) Payroll Analysis Tool User Manual
7) Enter a “Special Pay Type” for analysis. (Up to five Special Pay Types per retrieval) This field and the next four fields allow the user to enter the title of the “Special Pay Type” to be included in the analysis of the Payroll Data. This is ideal for “Census” reporting.
For instance, you may need to see how much money was pulled from your employee’s pay checks for their 401k plans. If you have a matching program, this analysis would allow you in Excel to create a formula to calculate how much the Employer’s “match amount” should be based on your specific company’s rules so it can be submitted for payment.
The PRAnalysis Tool will generate all of the data with up to five (5) Special Pay Types information at once. Should you need more than five Special Pay Types’ worth of information, you may save this information to a separate Excel Worksheet and re-run this option as many times as you desire using the additional Special Pay Types and add the data from each run to the original Excel Worksheet.
The Worksheet Tabs below are where the data is extracted to:
Census:
The following fields are extracted into the “Census” tab whenever the “Retrieve Data” button is selected on the main “PRAnalysis Settings” screen.
This can be selected as many times as desired as information is updated. Each time it is selected, it will clear the data from the prior retrieval and update all tabs with the latest information found in the Payroll data files. That’s why you should save it off to a separate worksheet once you are satisfied with the results.

(16) Payroll Analysis Tool User Manual
The fields that are extracted from the Payroll data files will include the following fields, and optionally include any Special Pay Types at the end based on any selections you have made. If none are selected or if only one or two Special Pay Types are chosen, only those that are entered will be displayed on the “Census” tab.
Fields included in Census Tab:
1) Employee Number 2) First Name 3) Last Name 4) Social Security Number 5) Address 1 6) Address 2 7) City 8) State 9) Zip 10) Status (Active, Resigned, Terminated, Leave of Absense or Laid Off) 11) Department (if option turned on) 12) Worker’s Compensation Class (if option turned on) 13) Marital Status 14) Gender 15) Race 16) Birth Date 17) Hire Date 18) Termination Date (if non-active employees are included) 19) Up to five additional Special Pay Types as entered by the user. (None if none
entered.)
Once the data has been “retrieved” from your Payroll data files into the PRAnalysis Tool, the recommended procedure is to now save this query off to a new Excel Spreadsheet with its own naming convention. This is because each time you perform a unique or different click on the “Retrieve Data” button, a new retrieval of Payroll information will be made.
When this occurs, whatever data was previously retrieved and sitting in the “Census,” “Hours Current Year” or “Hours Prior Year” tab will automatically be removed and replaced by the new “retrieval.”
Therefore, if you were pleased with the retrieval that you made and wanted to use it for part of your current Payroll Analysis, then you should click on the triangle in the upper left of the Excel Spreadsheet.

(17) Payroll Analysis Tool User Manual
This will automatically highlight all data in the current Excel tab. You can then click on the “Copy” option at the top of the screen or use the CTRL C function to copy the data. Then, click on “File,” “New”, and select “Blank Workbook” in Excel and “Paste” (CTRL V) the data into the new Workbook and save it with new filename as shown in the following screen.
Notice in red how you can uniquely name the tab or name each tab its original name from the default PRAnalysis file that it was created from.
This way you know what you are looking at and when it should be used. Just remember to save the files in a secure place on your PC or network drives. These are now normal Excel files and anyone can gain access to this sensitive data in Excel now that you have extracted the data from the security of the Infinity POWER Accounting Software.
You may not want everyone having full access to your entire employee list! Keep in mind, these files have Social Security Numbers and important address information which is ideal material for “Identity Theft.” This is very important that this information is secured at this point. A password on the Excel file would be highly recommended!!!
Therefore, when you go to save the Excel file as a separate worksheet, once you have given it a name, click on the “Tools” option at the bottom of the screen as shown below:

(18) Payroll Analysis Tool User Manual
Click on “General Options.” The following screen will appear:
Enter your passwords to open and to modify the file. You may also select whether to have Excel “Always create a backup copy” and whether to open the file in “Read-only mode.” These are all choices for you to make and determine.
Depending on the Special Pay Types you enter for your firm, you can see up to five per retrieval as shown on the following screen which is on the far right of the spreadsheet:

(19) Payroll Analysis Tool User Manual
Notice on the above screen that as the data is retrieved that it does not come in with any special formatting characteristics. In other words, if you want to “bold,” “center” or “color” specific titles and columns, you may do so since you are working in Microsoft Excel. Just keep in mind, that if you do so and do not save your data out to a separate worksheet, the next time you click on the “Retrieve Data” button, it will all be overwritten! So, if you are just in the process of review, you may want to wait on special formatting until you have compiled your data for the year.
Hours Current Year:
When the “Retrieve Data” button is selected, not only is the tab labeled “Census” updated but so are the others titled “Hours Current Year” and “Hours Prior Year.” You can use the information in these tabs to assist you in determining whether your firm is subject to the more advanced reporting requirements of the Affordable Care Act (ACA).
Employers of fifty (50) or more full-time equivalent employees are required to complete a transmittal form (1094-B or 1094-C) containing information about the employer and an employee form (1095-B or 1095-C) for each full-time employee. Forms must be filed with the Internal Revenue Service in early 2016. Failure to file is mandated by significant penalties if you don’t file timely or don’t file all the required forms.
Most of the information required on these new forms isn’t found inside the Infinity POWER Payroll module. The Payroll module is designed to maintain information regarding the company’s employees and how to calculate payments to them while withholding Payroll taxes and other items. It is a fully transaction based software module with direct integration to the General Ledger, Job Cost Main Module, Check Reconciliation and DP/DashBoard modules.
The reporting requirements of the ACA for firms with fifty (50) or more full-time equivalent employees are required to keep and track data found completely outside the scope of the Payroll module. This would include items such as an employee’s spouse’s name, social security number and whether they were covered by insurance elsewhere in any given month. Likewise is true for every one of the employee’s dependents.
The Payroll module has nowhere to store and report this database kind of information. That is a task to be done by the Employer, according to the ACA. The Payroll Analysis Tool’s mission is to first assist companies in determining whether or not they must meet these new mandatory reporting requirements. This information is summarized by Employee at the far right of this Tab (Hours Current Year) to help Employer’s determine how many Employees meet the current definition of “full time” employment (currently 30 hours). This may change over time.
The following screen illustrates the summary of Employees on a weekly Payroll schedule and then summarized at year-end for analysis.
(20) Payroll Analysis Tool User Manual
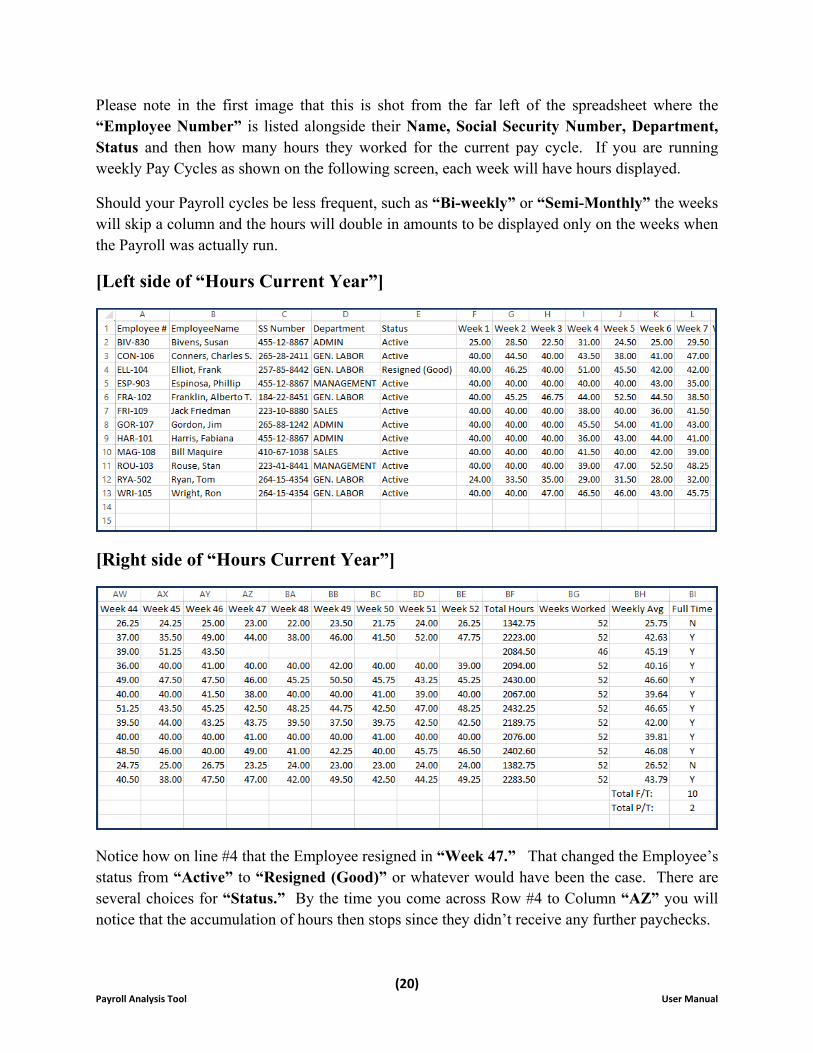
Please note in the first image that this is shot from the far left of the spreadsheet where the “Employee Number” is listed alongside their Name, Social Security Number, Department, Status and then how many hours they worked for the current pay cycle. If you are running weekly Pay Cycles as shown on the following screen, each week will have hours displayed.
Should your Payroll cycles be less frequent, such as “Bi-weekly” or “Semi-Monthly” the weeks will skip a column and the hours will double in amounts to be displayed only on the weeks when the Payroll was actually run.
[Left side of “Hours Current Year”]
[Right side of “Hours Current Year”]
Notice how on line #4 that the Employee resigned in “Week 47.” That changed the Employee’s status from “Active” to “Resigned (Good)” or whatever would have been the case. There are several choices for “Status.” By the time you come across Row #4 to Column “AZ” you will notice that the accumulation of hours then stops since they didn’t receive any further paychecks.

(21) Payroll Analysis Tool User Manual
The Employee is still coded as a “Full Time” status since all of the Payroll runs that they participated in during their tenure were as a “Full Time” employee. Those employees with less than 30 hours per week “Susan Bivens and Tom Ryan” are coded as “N” to Full Time status. Then, at the bottom right of the summary, the system performs a calculation automatically totaling up the number of “Full Time Employees (10)” and the total number of “Part Time Employees (2)” in this example.
This isn’t the only calculation that Employers should use in their determinations of full time equivalents, but it should provide a good guideline in concluding whether or not they may need to comply with the more advanced reporting requirements of the Affordable Care Act (ACA). In this example, that would not be the case.
Hours Prior Year:
The ACA may also require Employers to perform a “look back” function which means that since different Employees start and stop employment at varying intervals throughout the year, you may need to combine the information from more than just the current year to determine whether or not an Employee is considered a full-time equivalent employee. If you choose “Yes” to the prompt on the main screen, the PRAnalysis Tool will update the tab “Hours Prior Year” simultaneously for analysis. The format of the information is identical to the “Hours Current Year” format.
PRO-WARE ACA 1095 Reporting
If you use the PRAnalysis Tool and determine that you haven’t reached the threshold where you need to comply with the more advanced reporting requirements, you need to only allow your insurance company to provide the requisite reporting for your ACA needs.
For those companies that determine that they are near or have exceeded this threshold, then the Data Pro PRAnalysis Tool was designed to integrate directly with the “PRO-WARE ACA 1095 Reporting” software program. It specializes in the actual additional tracking of the database information you’ll need to accumulate and report to the government, not only on your actual employees, but also on their spouses, dependents and health care coverages as well.
Pro-Ware’s ACA 1095 Reporting will generate all necessary forms and includes an e-file option in the event your data needs to be e-filed. Employers with more than 250 employees will need to e-file their forms instead of submitting paper forms.
Further, since many Data Pro customers take advantage of the “multi-company” capabilities, Pro-Ware offers two solutions. One is a “Single Client” license for those firms with a single Federal ID #.

(22) Payroll Analysis Tool User Manual
However, under the terms of the ACA, companies with multiple Federal ID #’s, but yet with common ownership, still have to calculate all of their employees together to determine whether or not they meet the minimum number of Employee threshold.
As such, Pro-Ware also supports a “multi-client” software product solution as well.
Why Pro-Ware ACA 1095 Reporting?
If you put absolutely no value on your time, you could simply enter your employee data, dependent data, and health coverage codes into fillable PDF forms. You will even find some software applications that use this approach. However, Pro-Ware’s ACA 1095 Reporting takes a much more expeditious approach that results in a process that can be completed in very little time.
Once you accept the fact that this is not something you can put off any longer, the first step is to get your employee and, if necessary, dependent data into ACA 1095 Reporting. To accomplish this, you can use their flexible and easy-to-use “import” option.
This is what the Data Pro PRAnalysis Tool is designed to specifically utilize and integrate with. This tool provides you with the basis to get all of your company’s core Employee data extracted from your Infinity POWER Payroll software database (dBase, FoxPro or SQL) and into a position so that it can be easily imported into a wide range of third party applications, including Pro-Ware’s ACA 1095 Reporting software product(s).
Once you have imported this core data, you can even assign default coverage codes to all imported employees to save even more time. Once you have your employee data in Pro-Ware’s ACA 1095 Reporting software, you may need to make changes to the data for new hires, terminations, and health coverage changes. This is where their ACA 1095 Reporting can save you even more time because of a feature they call “multi-select.”
“Multi-Select” allows you to select groups of employees and make changes to all of them instead of having to edit each one individually. “Multi-Select” can also be used to print reports making report generation very flexible.
More importantly, Pro-Ware was selected as an integrated partner because of the specific ability to import your current Payroll information immediately and begin management of this ACA process while you may still be in the process of hiring and firing employees throughout the rest of the calendar year.
Instead of a “one time only” opportunity to import the data into Pro-Ware at the beginning of January, once the calendar year for Payroll has been completed, you can do the export to Pro-Ware immediately and then proceed to provide updates on any recurring basis as changes occur.
(23) Payroll Analysis Tool User Manual
These changes could include items such as an Employee’s Address, Status and other fields that are essential to the ACA reporting process. Based on the master settings, the Pro-Ware import process can be defined to only allow changes to the database for those items that are either “new” or minor “database” changes without overwriting the rest of the Employee’s record.
You wouldn’t want a situation with a product whereby you start to perform your maintenance of the spousal and dependent information and it gets overwritten by a later import. This is the primary reason why Pro-Ware’s ACA 1095 Reporting was selected for an integrated software partner.
Importing PRAnalysis Data Into PRO-Ware
Once you have “retrieved” your Payroll data into Microsoft Excel using the Data Pro PRAnalysis Tool, you have now put it in a position where it can be “imported” into the “PRO-WARE ACA 1095 Reporting” software program for further management and reporting under the rules and regulations of the Affordable Care Act. Again, this only applies to your firm if you have fifty (50) or more full time equivalent employees. If not, you will not need to purchase the Pro-Ware software or any other product to submit and manage this data for the requirements of the ACA.
However, if you firm does meet this criteria, then you must purchase either the “PRO-WARE ACA 1095 Reporting” software program or some other reporting tool to provide the necessary database tracking and filing options to meet the requirements of the ACA.
Assuming you have acquired the Pro-Ware software reporting software, the following steps will guide you to illustrate that the PRAnalysis Tool has the information in place to provide the proper basis of extracting your Employee’s data into the Pro-Ware software. Once imported into Pro-Ware, it will allow you to manage and maintain all of the other data that is completely outside the scope of the Infinity POWER Payroll application itself.
First, you would go to the Pro-Ware web site and order the proper version of the product that you would need, based on your company’s current situation (whether you have a single company or multi-company environment that needs to report as one under the ACA rules).
http://www.proware-cpa.com/aca-features.html
(24) Payroll Analysis Tool User Manual
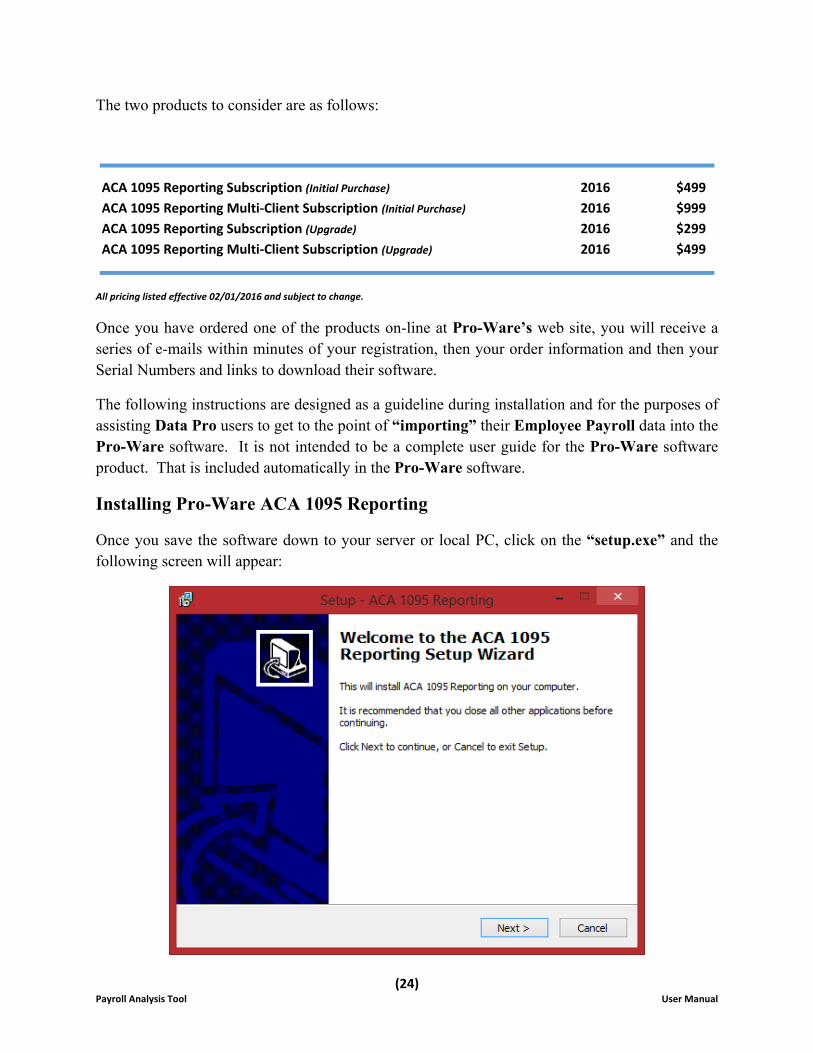
The two products to consider are as follows:
All pricing listed effective 02/01/2016 and subject to change.
Once you have ordered one of the products on-line at Pro-Ware’s web site, you will receive a series of e-mails within minutes of your registration, then your order information and then your Serial Numbers and links to download their software.
The following instructions are designed as a guideline during installation and for the purposes of assisting Data Pro users to get to the point of “importing” their Employee Payroll data into the Pro-Ware software. It is not intended to be a complete user guide for the Pro-Ware software product. That is included automatically in the Pro-Ware software.
Installing Pro-Ware ACA 1095 Reporting
Once you save the software down to your server or local PC, click on the “setup.exe” and the following screen will appear:
ACA 1095 Reporting Subscription (Initial Purchase) 2016 $499
ACA 1095 Reporting Multi‐Client Subscription (Initial Purchase) 2016 $999
ACA 1095 Reporting Subscription (Upgrade) 2016 $299
ACA 1095 Reporting Multi‐Client Subscription (Upgrade) 2016 $499

(25) Payroll Analysis Tool User Manual
Click “Next” to continue.
You need to accept their License Agreement and click on “Next.”
Select the default location to install the software or override it. Click on “Next” to continue.

(26) Payroll Analysis Tool User Manual
Select the Start Menu Folder. Click on “Next.”
Make sure to click on the “Create a desktop icon” option so that it will be easy for you to remember where to find this application. Click on “Next.”
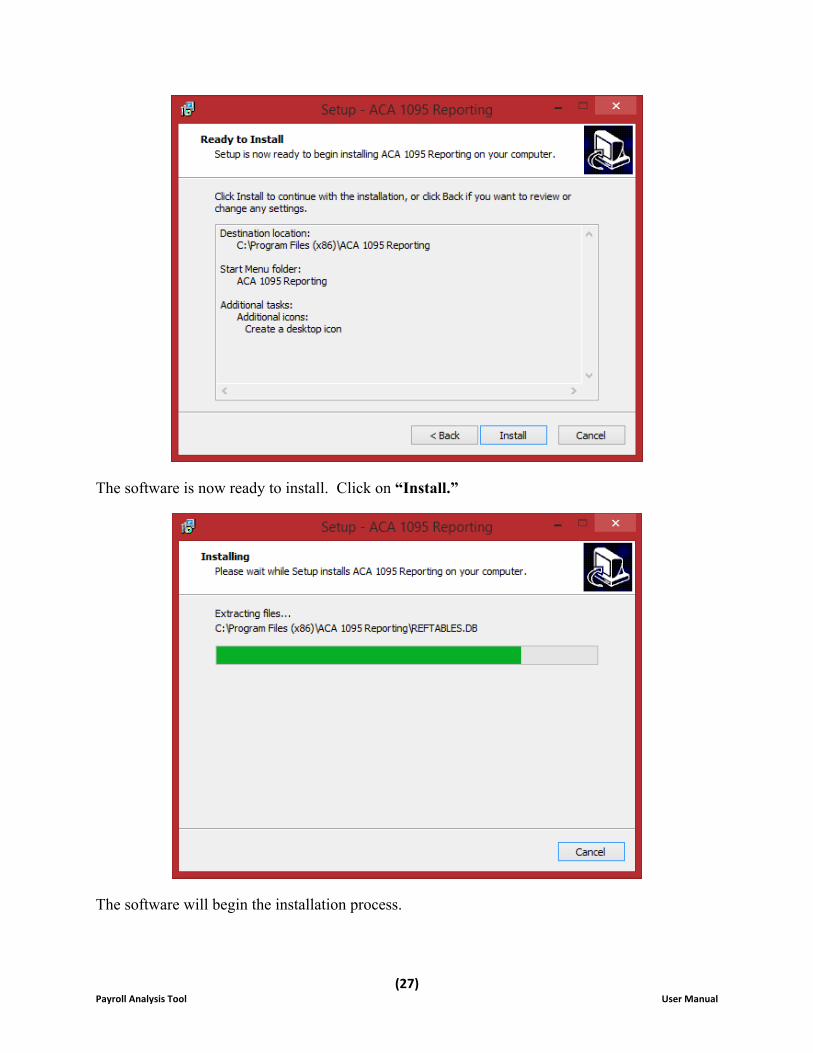
(27) Payroll Analysis Tool User Manual
The software is now ready to install. Click on “Install.”
The software will begin the installation process.
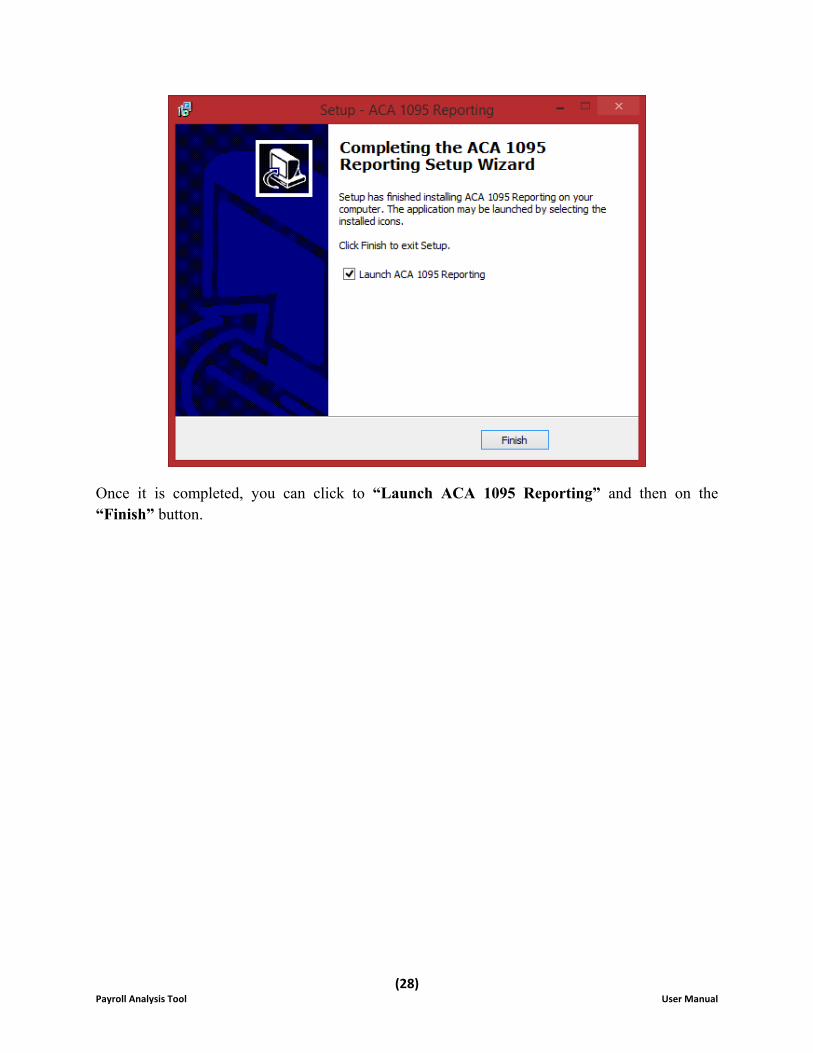
(28) Payroll Analysis Tool User Manual
Once it is completed, you can click to “Launch ACA 1095 Reporting” and then on the “Finish” button.
(29) Payroll Analysis Tool User Manual
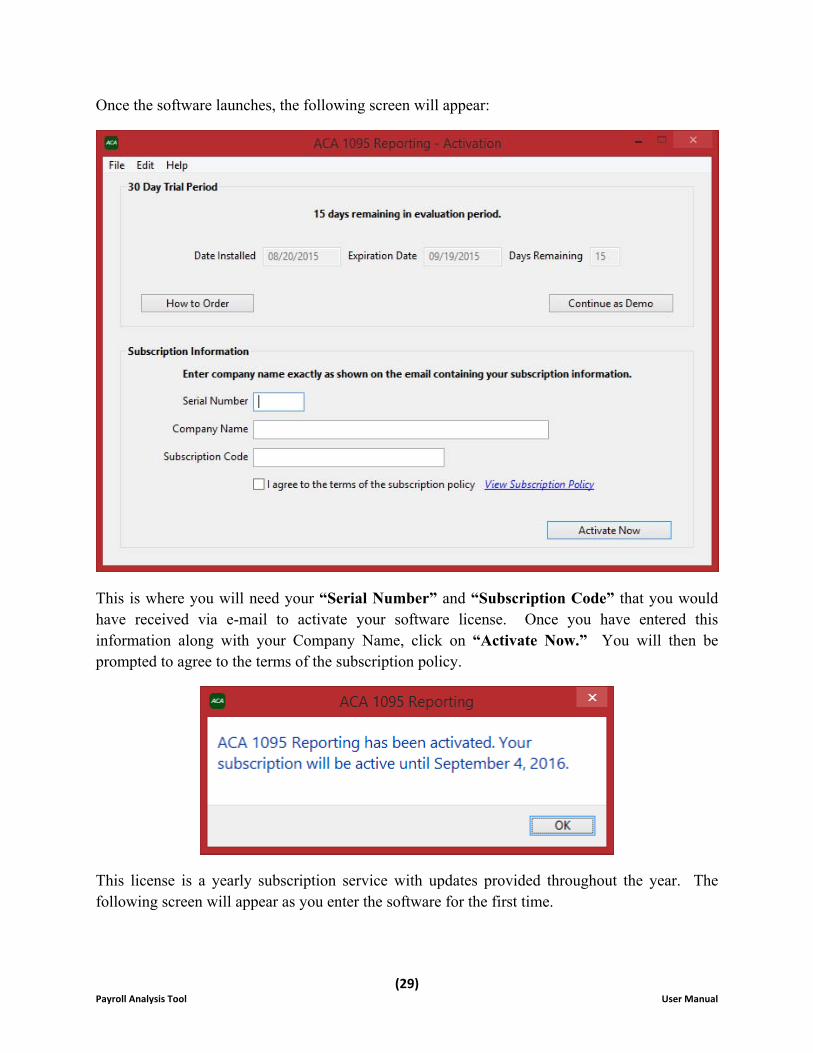
Once the software launches, the following screen will appear:
This is where you will need your “Serial Number” and “Subscription Code” that you would have received via e-mail to activate your software license. Once you have entered this information along with your Company Name, click on “Activate Now.” You will then be prompted to agree to the terms of the subscription policy.
This license is a yearly subscription service with updates provided throughout the year. The following screen will appear as you enter the software for the first time.

(30) Payroll Analysis Tool User Manual
Click on “OK” to continue. Pro-Ware will also provide you with updates and changes news as you enter the software.

(31) Payroll Analysis Tool User Manual
You will then be introduced to the “Main Menu.” Remember, this documentation is to only describe the steps necessary for you to import your “Employee Payroll” data into Pro-Ware ACA 1095 Reporting and not for every step and function on how to use their software.
From the “Main Menu,” click on “File” and then “Import Data” as shown below:
(32) Payroll Analysis Tool User Manual
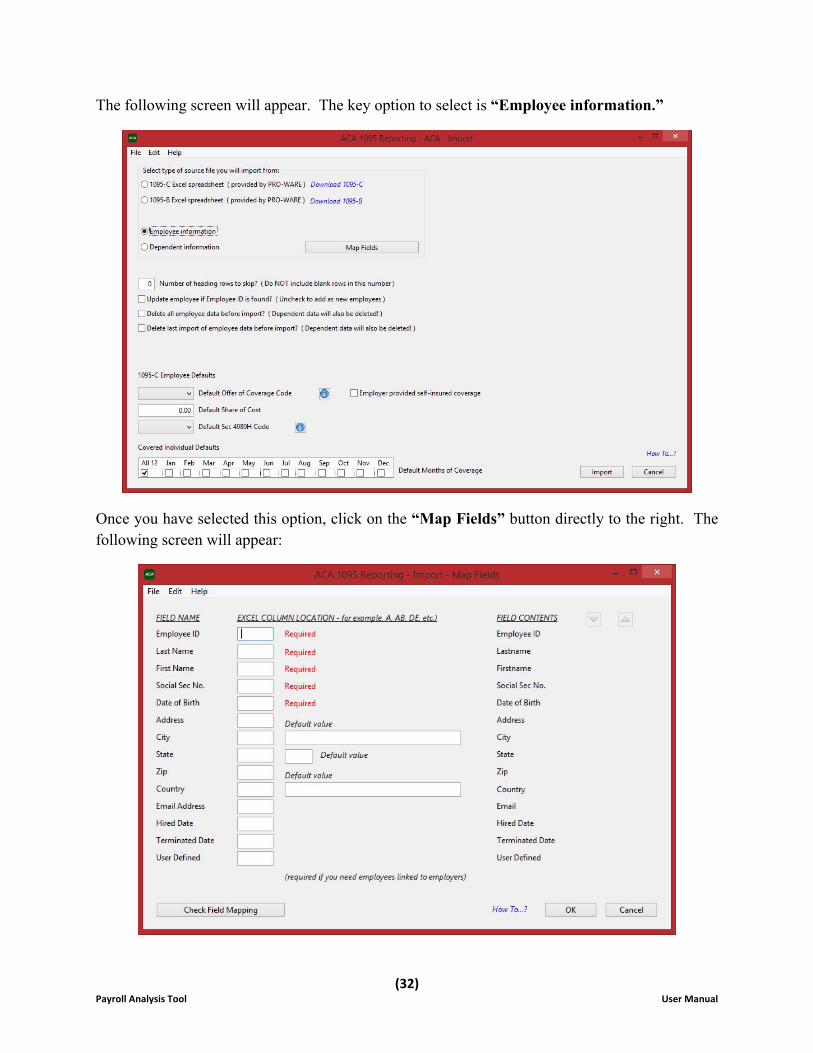
The following screen will appear. The key option to select is “Employee information.”
Once you have selected this option, click on the “Map Fields” button directly to the right. The following screen will appear:
(33) Payroll Analysis Tool User Manual
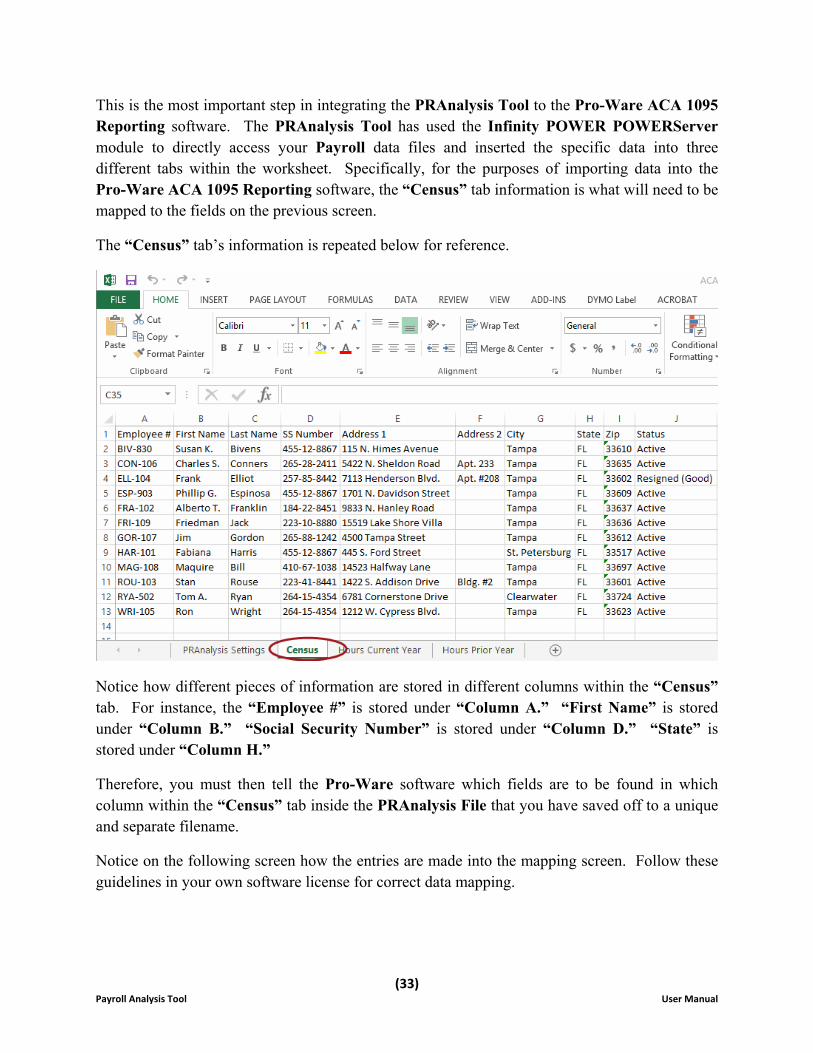
This is the most important step in integrating the PRAnalysis Tool to the Pro-Ware ACA 1095 Reporting software. The PRAnalysis Tool has used the Infinity POWER POWERServer module to directly access your Payroll data files and inserted the specific data into three different tabs within the worksheet. Specifically, for the purposes of importing data into the Pro-Ware ACA 1095 Reporting software, the “Census” tab information is what will need to be mapped to the fields on the previous screen.
The “Census” tab’s information is repeated below for reference.
Notice how different pieces of information are stored in different columns within the “Census” tab. For instance, the “Employee #” is stored under “Column A.” “First Name” is stored under “Column B.” “Social Security Number” is stored under “Column D.” “State” is stored under “Column H.”
Therefore, you must then tell the Pro-Ware software which fields are to be found in which column within the “Census” tab inside the PRAnalysis File that you have saved off to a unique and separate filename.
Notice on the following screen how the entries are made into the mapping screen. Follow these guidelines in your own software license for correct data mapping.
(34) Payroll Analysis Tool User Manual
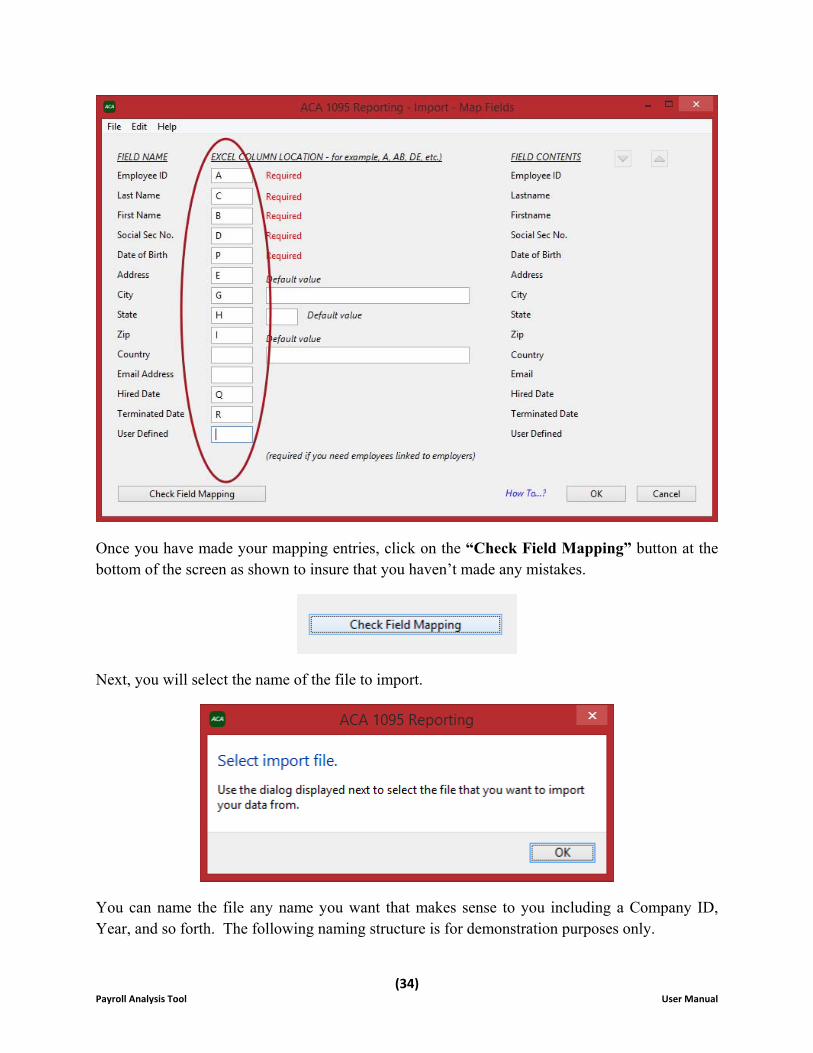
Once you have made your mapping entries, click on the “Check Field Mapping” button at the bottom of the screen as shown to insure that you haven’t made any mistakes.
Next, you will select the name of the file to import.
You can name the file any name you want that makes sense to you including a Company ID, Year, and so forth. The following naming structure is for demonstration purposes only.

(35) Payroll Analysis Tool User Manual
Go to the directory (folder) where you have stored your PRAnalysis worksheet and select the filename. Click on “Select” once you have it highlighted. Click “OK” once you are done. The overlay window for “mapping” will close and you will return to the original screen. Next, there are a couple of very important options that must be chosen in this process.
The first one is to enter the number one (1) for the question “Number of heading rows to skip?” The PRAnalysis Tool only has one row for headings and you don’t want those headings imported into the Pro-Ware software. The second and most important option is to click on the box for “Update employee if Employee ID is found?” This tells the “import” function to only update any changes for an employee it sees each time you run this option instead of deleting their record and adding them as a new employee.
The consequences of not doing this would mean that all the work you are about to do to manage and maintain the database information for reporting on the Employee’s spouse and dependents and their health care options will be removed.
You only want this import process to pick up New Employees, mark Employees as Terminated or Resigned, Change their Address and the like. You want to be in “change mode only!” So, pay very careful attention that you select this box!!!!
(36) Payroll Analysis Tool User Manual
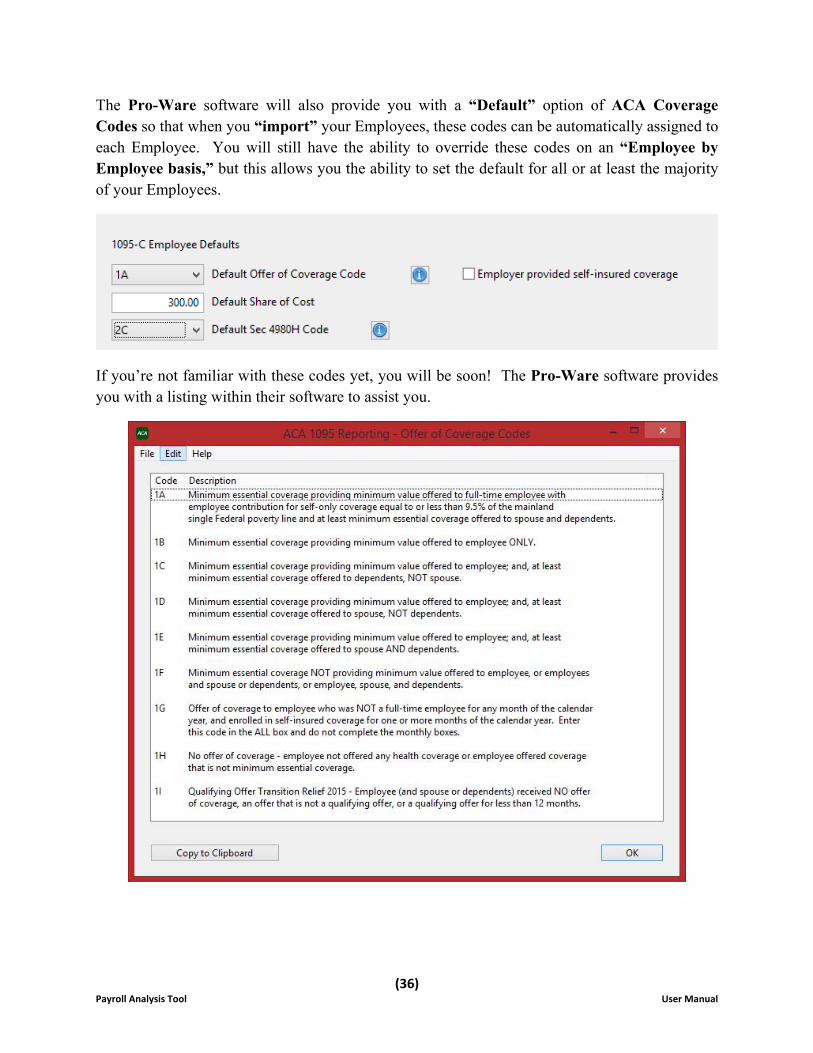
The Pro-Ware software will also provide you with a “Default” option of ACA Coverage Codes so that when you “import” your Employees, these codes can be automatically assigned to each Employee. You will still have the ability to override these codes on an “Employee by Employee basis,” but this allows you the ability to set the default for all or at least the majority of your Employees.
If you’re not familiar with these codes yet, you will be soon! The Pro-Ware software provides you with a listing within their software to assist you.

(37) Payroll Analysis Tool User Manual
This section of the screen also allows you to define your default “Share of the Cost of Insurance” provided. The second default codes to set are for the “Section 4908H Codes.” These too are listed in detail by the software to assist you in defining what should be used as a default when making the import of Employee data.
Finally, you can establish whether these defaults apply to all Employees for all twelve (12) months of Coverage or for just selected months. You must choose what applies.

(38) Payroll Analysis Tool User Manual
Once you have defined all of these options, click on the “Import” button at the bottom right of the screen. The software will prompt you once more for the name of the file to “import” as shown on the following screen:
Click “OK” to continue.
Select the name of the PRAnalysis file that you saved previously as shown below:
Click on “Select” to continue. Click on “Yes” to continue the import of the file.

(39) Payroll Analysis Tool User Manual
If everything was configured properly, you should see the following message only with the correct record count of the number of employees in your specific file:
Once you click on “OK,” you will be returned to the Main Menu. From there, click on the “Employees” button at the top of the menu. You will see a screen displayed similar to the following showing a listing of all your “imported” employees.

(40) Payroll Analysis Tool User Manual
At this point, you can choose any of the Employees on the list and click to highlight them. Their specific data will now appear on the right side of the screen.

(41) Payroll Analysis Tool User Manual
Below this specific Employee information lies the starting point of where Pro-Ware ACA 1095 Reporting now takes over from your Payroll data. Now, you are getting into “Health Care Offers and Coverage” information on not only your actual Employees, but their Spouses and their dependents.
This is where the line is drawn for the Affordable Care Act and transactional accounting. The bottom right of this screen allows you to “manage” this specific information on each employee, spouse and dependent.
Further, if you don’t line up the coverages correctly, the Pro-Ware software will assist you with “error trapping” to prevent you from making reporting errors to the government.
(42) Payroll Analysis Tool User Manual
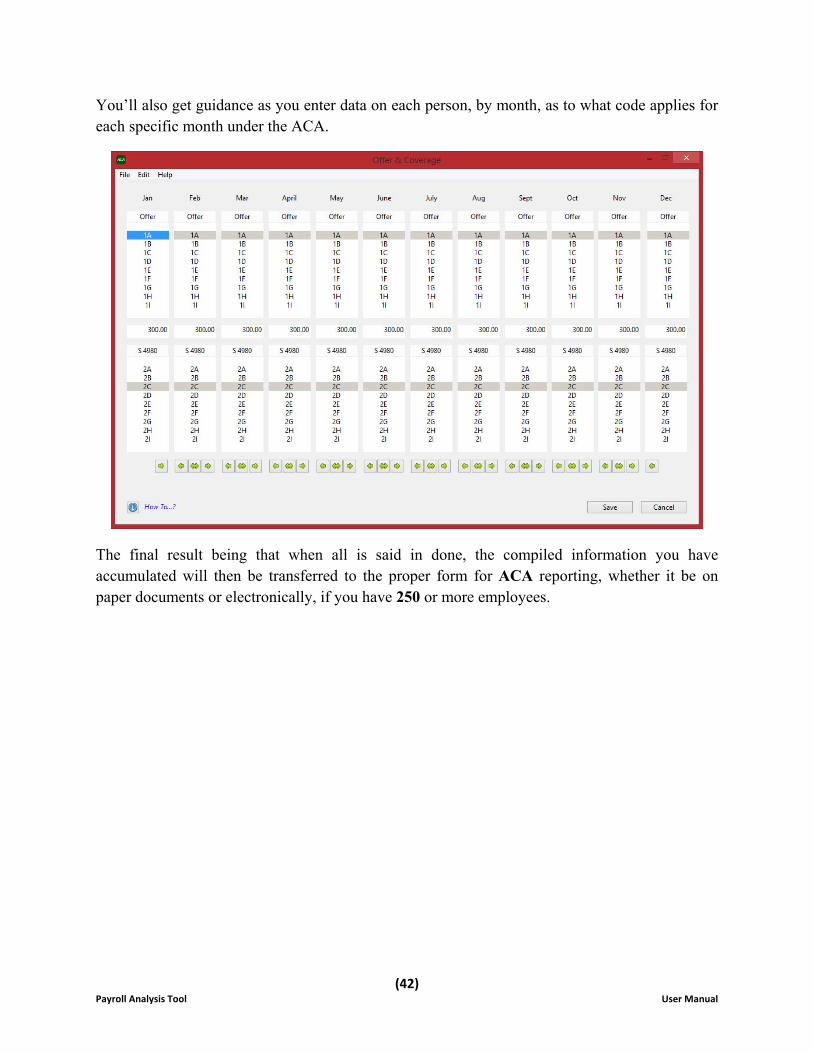
You’ll also get guidance as you enter data on each person, by month, as to what code applies for each specific month under the ACA.
The final result being that when all is said in done, the compiled information you have accumulated will then be transferred to the proper form for ACA reporting, whether it be on paper documents or electronically, if you have 250 or more employees.

(43) Payroll Analysis Tool User Manual
For more information on Pro-Ware’s ACA 1095 Reporting, go to the following web site and order on-line directly:
http://www.proware-cpa.com/aca-features.html
Or call them directly at:
Phone: 402-861-8800 Fax: 402-861-8653
Monday - Friday: 8:30 am - 5:00 pm CST

(44) Payroll Analysis Tool User Manual
Pricing
All pricing listed effective 02/01/2016 and subject to change.
ACA 1095 Reporting Subscription (Initial Purchase) 2016 $499
ACA 1095 Reporting Multi‐Client Subscription (Initial Purchase) 2016 $999
ACA 1095 Reporting Subscription (Upgrade) 2016 $299
ACA 1095 Reporting Multi‐Client Subscription (Upgrade) 2016 $499
(45) Payroll Analysis Tool User Manual
POWERServer This section will cover the general concepts of the POWERServer module which is included as a core component of the System Administrator module. It is included here as it is required that the POWERServer be configured and running for the PRAnalysis Tool to be able to function.
The prerequisite required to use the POWERServer module is the Advanced Security Administrator module. It must be installed and running. You cannot use “Standard Security” with the POWERServer. Instead, you must be able to specify a User ID to be assigned to handle the TCP/IP calls from the PRAnalysis Tool to the POWERServer, which passes along the specific users’ rights and permissions to access data from the various modules.
POWERSERVER CONFIGURATION
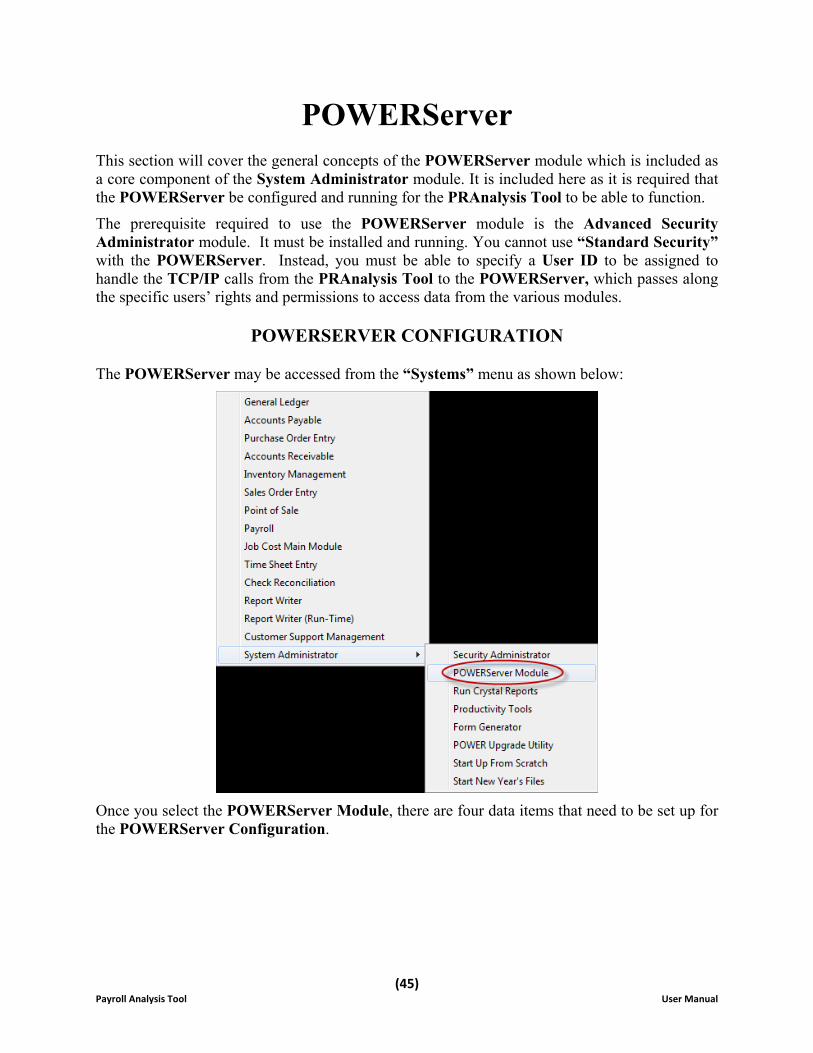
The POWERServer may be accessed from the “Systems” menu as shown below:
Once you select the POWERServer Module, there are four data items that need to be set up for the POWERServer Configuration.

(46) Payroll Analysis Tool User Manual
LOGIN USER NAME The Login User Name is the User ID set up in the Advanced Security Administrator module for the specific user to be called to communicate between the client and the POWERServer. “Web” is a common User ID used for defining web servers and other automated communications.
LOGIN USER PASSWORD
The Login User Password is the password that was assigned to the specific User ID in the Advanced Security Administrator that corresponds with the Login User Name.
IP SOCKET PORT The IP Socket Port is the port number that is defined to use to communicate through the TCP/IP protocol. This port number should match the port number, used by the client application when initializing the TCP/IP connection to the POWERServer. Commonly, Port 9500 is used by Data Pro applications.
ACTIVITY LOGGING
The POWERServer module can create a log file, which contains information about user logins and their activity (requests and responses made to and from the POWERServer). There are three choices for logging the POWERServer activity.
Disable Log
Log Connections Only
Log All Activity
NOTE: When you choose to log “All Activity” the POWERServer log file can become very large in size. It is suggested that this should only be done during a testing or debugging phase of the client application.

(47) Payroll Analysis Tool User Manual
START POWERSERVER PROCESS
Once the configuration section is completed and saved you may then start the POWERServer process. The system will display a box on your screen and ask “Do you wish to start it now?” Click on the “Yes” button and a new application window will appear on your desktop.
This window must be kept open as it is waiting to receive requests from the client. That is why it is generally better to set up POWERServer as a “Windows Service,” which allows it to run in the background all of the time, even if you should have to reboot your computer.

(48) Payroll Analysis Tool User Manual
SETUP POWERSERVER AS A WIN32 SERVICE
One of the servers or workstations on your network must now be chosen as the POWERServer “server.” This is the server that runs the POWERServer process in the background, listening for connection requests from the client application (like the PRAnalysis Tool) and then accessing the accounting system. It is recommended that you choose the same network server that the accounting system is installed on.
SETTING UP POWERSERVICE:
1. From the Accounting Server, <click> the Start button and select the Run menu option or “Search Programs and Files” from your desktop as shown below.
Or
2. Type “cmd” in the Open text box.
3. <Click> the OK button or Magnifying Glass. The Command Prompt window displays.
(49) Payroll Analysis Tool User Manual
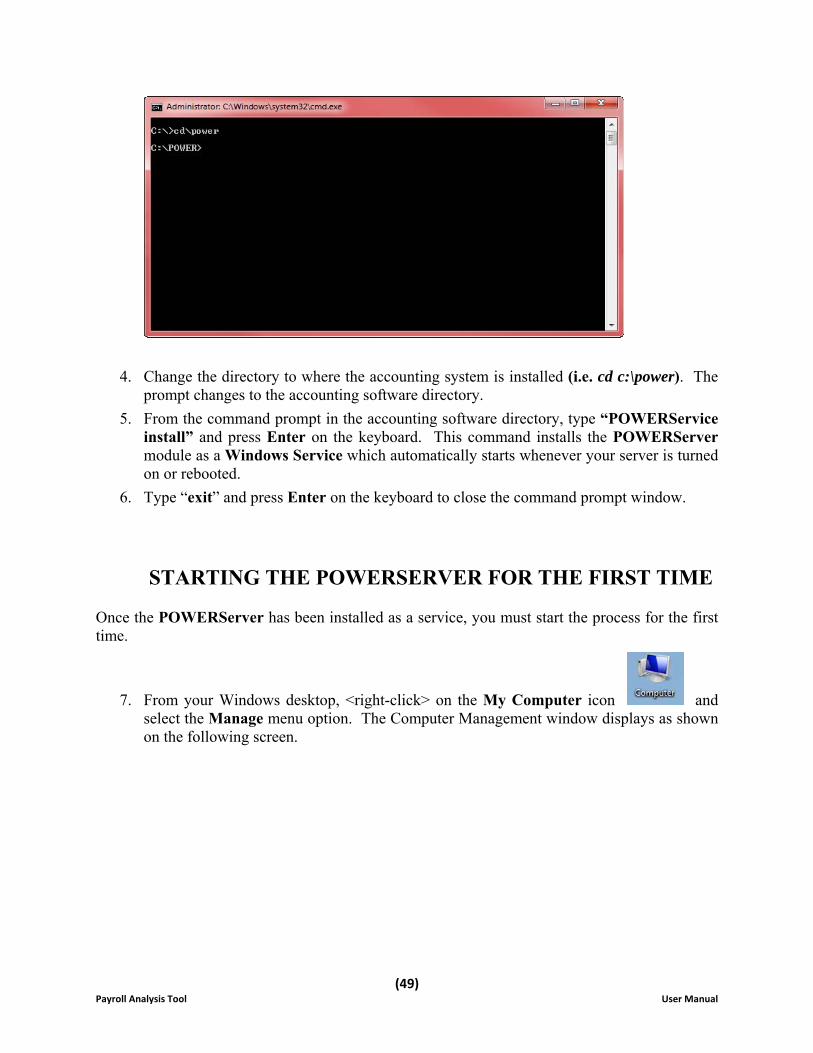
4. Change the directory to where the accounting system is installed (i.e. cd c:\power). The prompt changes to the accounting software directory.
5. From the command prompt in the accounting software directory, type “POWERService install” and press Enter on the keyboard. This command installs the POWERServer module as a Windows Service which automatically starts whenever your server is turned on or rebooted.
6. Type “exit” and press Enter on the keyboard to close the command prompt window.
STARTING THE POWERSERVER FOR THE FIRST TIME
Once the POWERServer has been installed as a service, you must start the process for the first time.
7. From your Windows desktop, <right-click> on the My Computer icon and select the Manage menu option. The Computer Management window displays as shown on the following screen.

(50) Payroll Analysis Tool User Manual
8. From the menu on the left, <click> the Services and Applications option and then select the Services sub-option. A list of services installed on your system displays in the right window.
9. Scroll down to the POWERServer service, <right-click> and then select the Start menu option. The POWERServer utility starts and returns to the Computer Management window.
(51) Payroll Analysis Tool User Manual
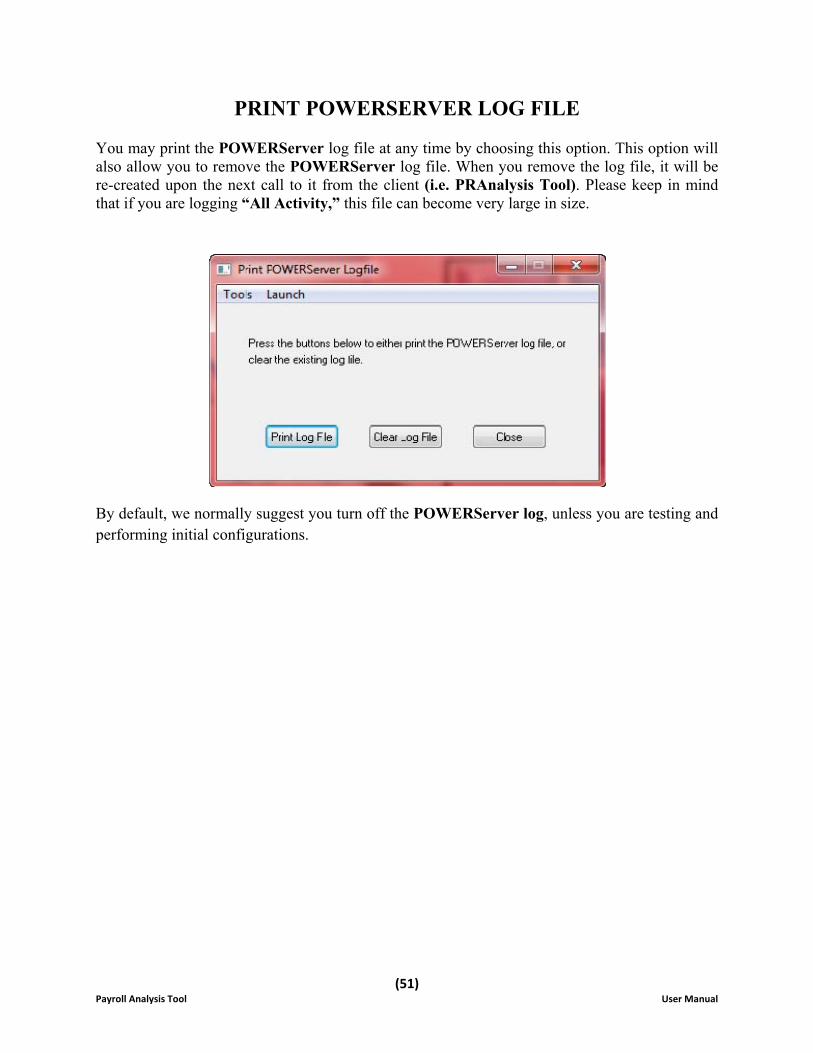
PRINT POWERSERVER LOG FILE
You may print the POWERServer log file at any time by choosing this option. This option will also allow you to remove the POWERServer log file. When you remove the log file, it will be re-created upon the next call to it from the client (i.e. PRAnalysis Tool). Please keep in mind that if you are logging “All Activity,” this file can become very large in size.
By default, we normally suggest you turn off the POWERServer log, unless you are testing and performing initial configurations.