parts identification - m.media-amazon.com
TRANSCRIPT
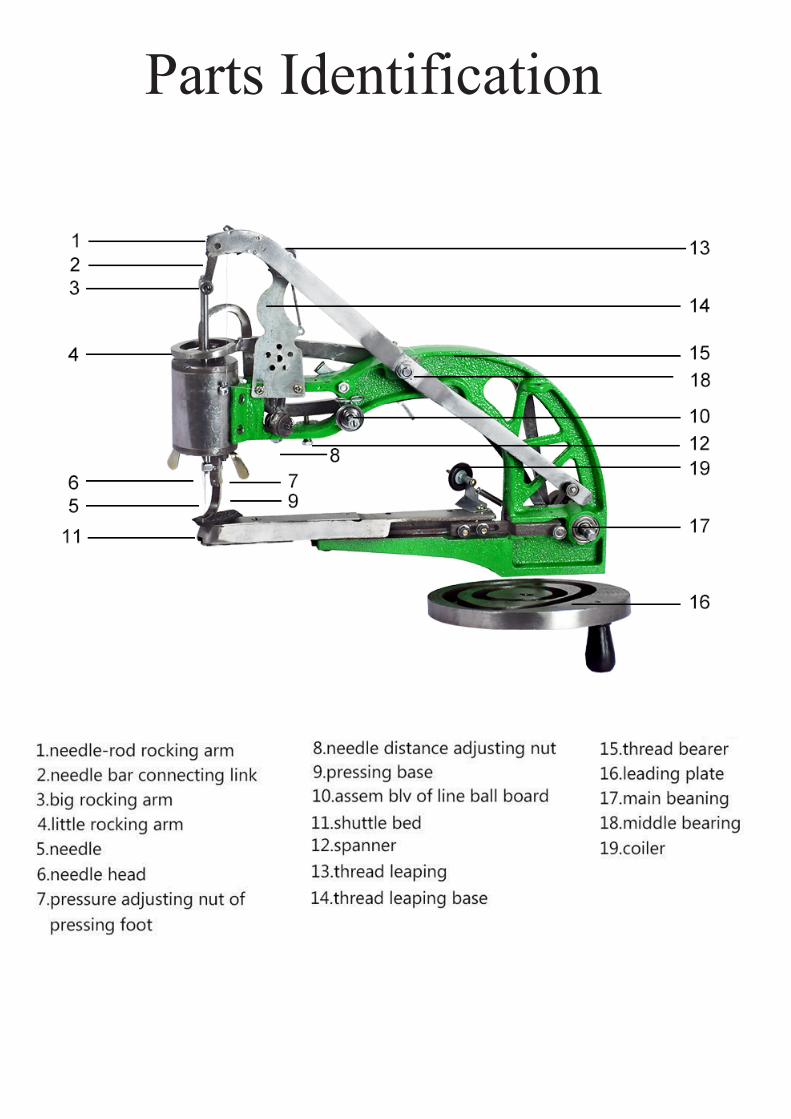
Parts Identification
I. Precautions II. Preparations for OperationIII. Threading ProcessIV. FAQs
V. Cleanup Manner
Parts Identification
1. How to make sure the upper and lower (bobbin) thread tension are equal to give you a good quality stitch.2. How to adjust the number of stitches per inch or stitch length3. How to adjust the Pressure foot downward pressure4. How to install or remove sewing machine needle for the type of material you are working with.5. Adjusting the needle travel distance 6. How to unjam your machine7. How to start out using the patcher after taking it apart for cleaning8. How do I keep from breaking thread or needles after only a few stitches9. How can I easily remove the bobbin from my sewing arm10. How to keep the thread twisting when it comes off the spool and jamming my machine11. How to mount your big spools of thread12. How do I clean and shine all the parts in your Bobbin area13. How do I keep my machine stable while sewing14. How do I keep from snagging or fraying my thread while sewing15. How to wind these Patcher wind bobbins more easily16. How do I keep the thread from unwinding off the bobbins while storing them17. How can I make a bigger crank handle for my crank plate18. How could I create a better knob for adjusting the upper thread tension19. How could I get better lighting or mount a light on this machine20. How could I mount on material sewing guide21. How could I attach a binding attachment to my machine
All turning, rocking, or moving parts of the shoe patcher sewing machine should be oiled every day prior to use to guarantee the machine is working smoothly and without noise. In this way, the working efficiency can be raised and the life of the machine can be increased. Note that many users lubricate the rear cams, Shuttle drive rod gears, and rollers behind drive plate with high-grade lithium instrument grease.
Use the proper thread:Most of the issues can be corrected by the proper thread. The lightest thread the user can use is like #46 / T45. Many people normally use #69/T70 thread for most projects, but you may want to go to a heavier thread for leather projects. The cheap thread will just shred and jam the machine. Get good quality thread at Bantamsaddletack.com, sailrite.com. Some people prefer thread that is supplied by Mandala Crafts out of Austin TX bought through Amazon.comThe Needles:Factory stock machines use standard home domestic sewing machine needles with a flat side shank. Look for standard Singer 15X1 standard style needles at any fabric store. These standard needles do not come in the larger sizes above #22 normally used in heavy fabrics or leathers. Also, the eye of the Domestic needles can not support the larger threads well.There are Modifications you can do to the needle bar so you can use 134X5,135X5, 135X16, or 135X17 Industrial needles, but will not be covered here.
1.Do not turn Hand Crank Handle to the left or counterclockwise, it will jam up your sewing machine quickly. Always turn the turn crank handle to theright or clockwise. 2.Things you should know about the machine, small magnets work really well for pulling out the bobbins and carrier from the shuttle driver area. Some folks use tweezers or needle-nose pliers to remove the bobbins and carrier. Be careful as you can throw the machine out of alignment if you pull out the carrier driver plate.3.Please use a proper thread stand when using big thread cones. These big cones must have the thread pulled from the top, not the side. Placing the big spools on the factory-supplied spool pin is the largest reason these machines break the thread, break needles or will not sew at all.
Important Hint
I. Precautions
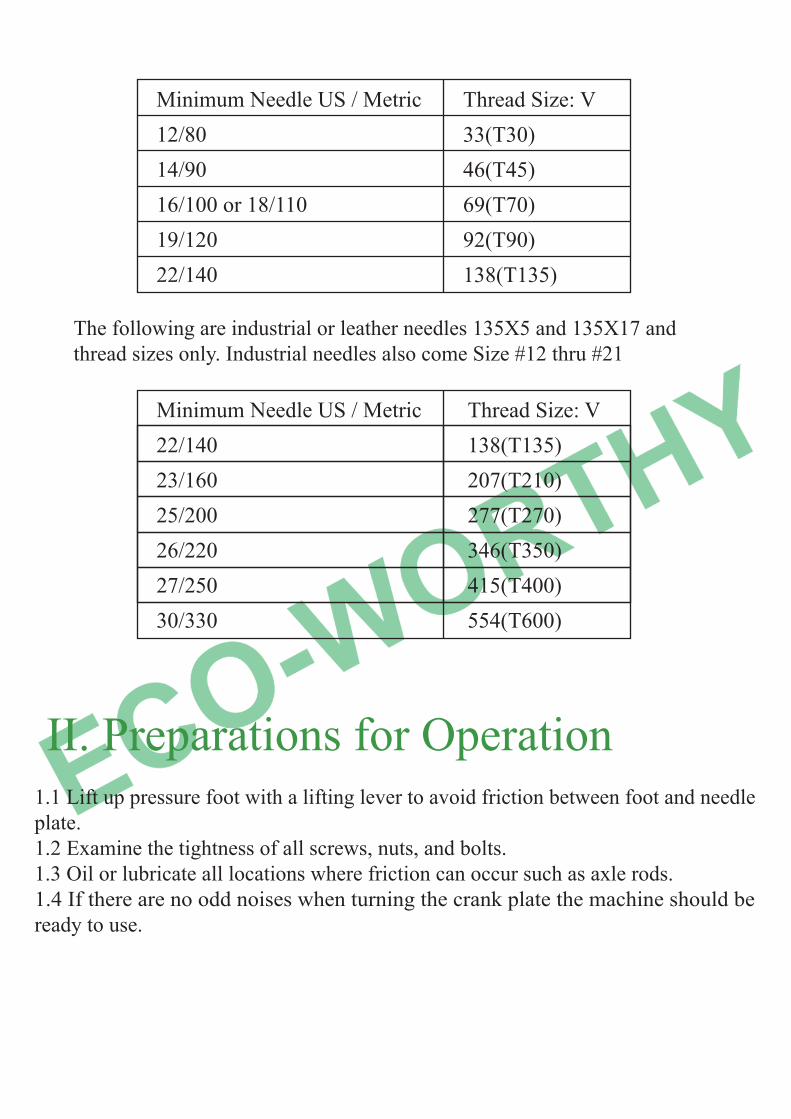
Minimum Needle US / Metric12/8014/9016/100 or 18/11019/12022/140
Minimum Needle US / Metric22/14023/16025/20026/22027/25030/330
Thread Size: V138(T135)207(T210)277(T270)346(T350)415(T400)554(T600)
Thread Size: V33(T30)46(T45)69(T70)92(T90)138(T135)
1.1 Lift up pressure foot with a lifting lever to avoid friction between foot and needle plate.1.2 Examine the tightness of all screws, nuts, and bolts.1.3 Oil or lubricate all locations where friction can occur such as axle rods.1.4 If there are no odd noises when turning the crank plate the machine should be ready to use.
The following are industrial or leather needles 135X5 and 135X17 andthread sizes only. Industrial needles also come Size #12 thru #21
II. Preparations for Operation

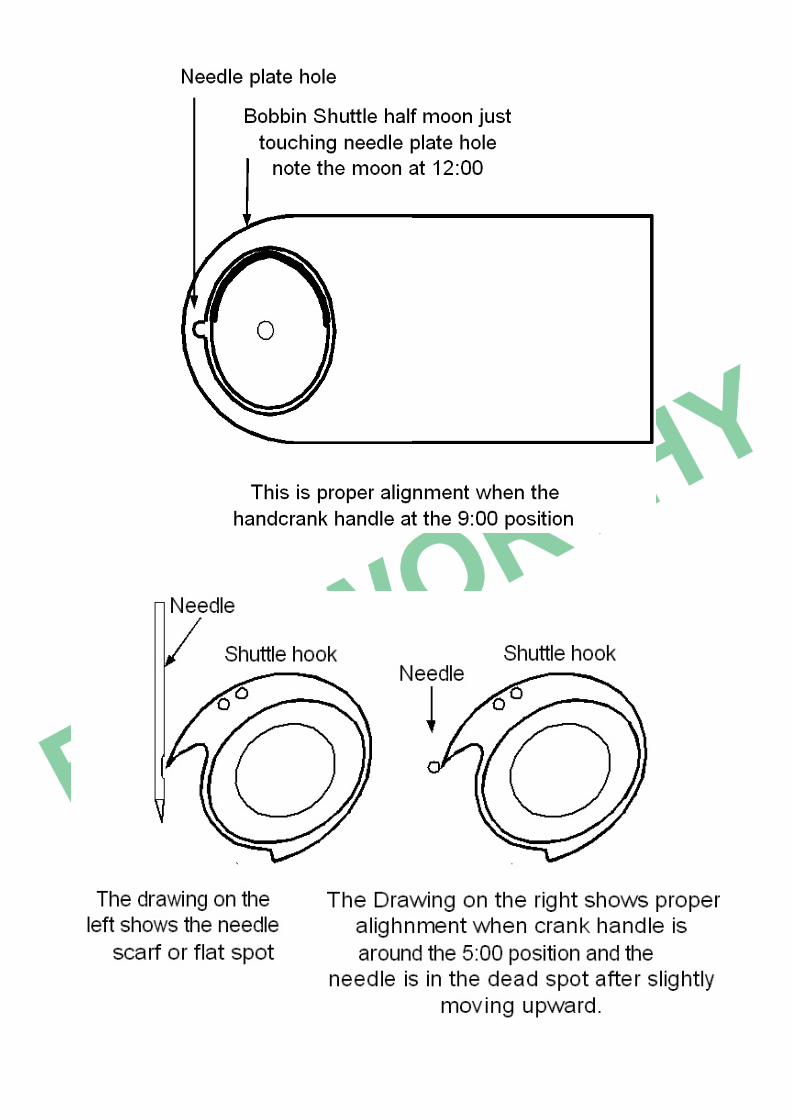
2.1.1 Turn the crank plate in the clockwise direction until the needle is at the highest position and then lift up the pressure foot.2.1.2 Push up under the backside of the needle plate or cover and rotate it out of the way.2.1.3 Pull out the bobbin and shuttle hook/bobbin carrier ( a magnet or small needle-nose pliers works for this. The hand crank handle should be at 12:00 position during the removal and replacement of Bobbin.If the Shuttle Drive plate comes out during the above operation, try to put it back in the correct orientation. The half-moon shape Shuttle drive should be at 3:00 when the hand crank handle is at 12:00. You can confirm the Shuttle drive plate is properly in place by rotating the crank handle to 9:00, the left edge of the half-moon shaped drive plate should be next to the Needle Groove.See the picture below in the troubleshooting section.
2.2.1 Pull thread through the upper thread path goes only halfway around the large tension starting from the left side. You may need to add thread tension with fingers.2.2.2 Flip bobbin winder against the crank plate and press bobbin on to the tapered pin.2.2.3 Wrap several turns of thread around bobbin until it stays in place without slipping.2.2.4 Turn the crank plate clockwise until the bobbin seems full then remove the bobbin.
2.1 Take out the shuttle hook and bobbin, try to leave the shuttle driver in machine arm.
2.2 How to wind a bobbin with original bobbin winder
2.2 How to wind bobbin using an upgrade kit bobbin winder with an upper thread guide.
III. Threading Process
2.2.1 Run the thread through a large ring near the top of sewing head #1(see picture) from back to front then down behind the needle driver bar.2.2.2 Pass the thread through the right side of the tension assembly thread guide #2(see picture).2.2.3 Run thread up and over the left thread guide of tension disk #3(see picture) and around the tension disk then up and over the right thread guide.2.2.4 Now run thread over to the new bobbin thread guide and downhole #4(see picture).2.2.5 Lastly run the thread to the bobbin to be wound #5 in the bobbin winding area.2.2.6 Now slide bobbin with the thread securing hole facing you.2.2.7 Then screw on the wing nut. You do not need to over tighten this wing nut it will self tighten during the bobbin winding process.2.2.8 Trim any excess thread ends.2.2.9 Press the bobbin winder against the hand crank wheel and start turning the wheel clockwise.Note: Just as on several other bobbin winders on domestic sewing machines you may have to add a slight finger pressure to the winder bracket to get it to spin properly.Once the bobbin is near full then stop winding remove wing nut and hold bobbin so it will not unwind. Snip the thread and trim off most of the thread ends sticking out the center hole.Place the bobbin into the Bobbin carrier / Shuttle hook assembly with the notch in the center hole facing down. You will note your bobbin thread now unwinds in the correct direction as it should.

2.3.1 Note there are two thread holes in the Shuttle hook/bobbin carrier. The hole on the left is for light thread and the right for the heavy thread.2.3.2 Feed the thread from the inside of the carrier into one of the two bottom holes.2.3.3 As you pull on the thread from the outside of bottom hole ease the bobbin into the carrier so it will turn counterclockwise2.3.4 Now feed the end of the thread sticking out the side of the carrier into the corresponding upper hole from bottom to top from the outside of the carrier.2.3.5 Work the thread under the tension spring as it passes from the bottom hole to the top hole in the bobbin Shuttle hook/carrier
2.3 How to install the bobbin into carrier and place in sewing arm
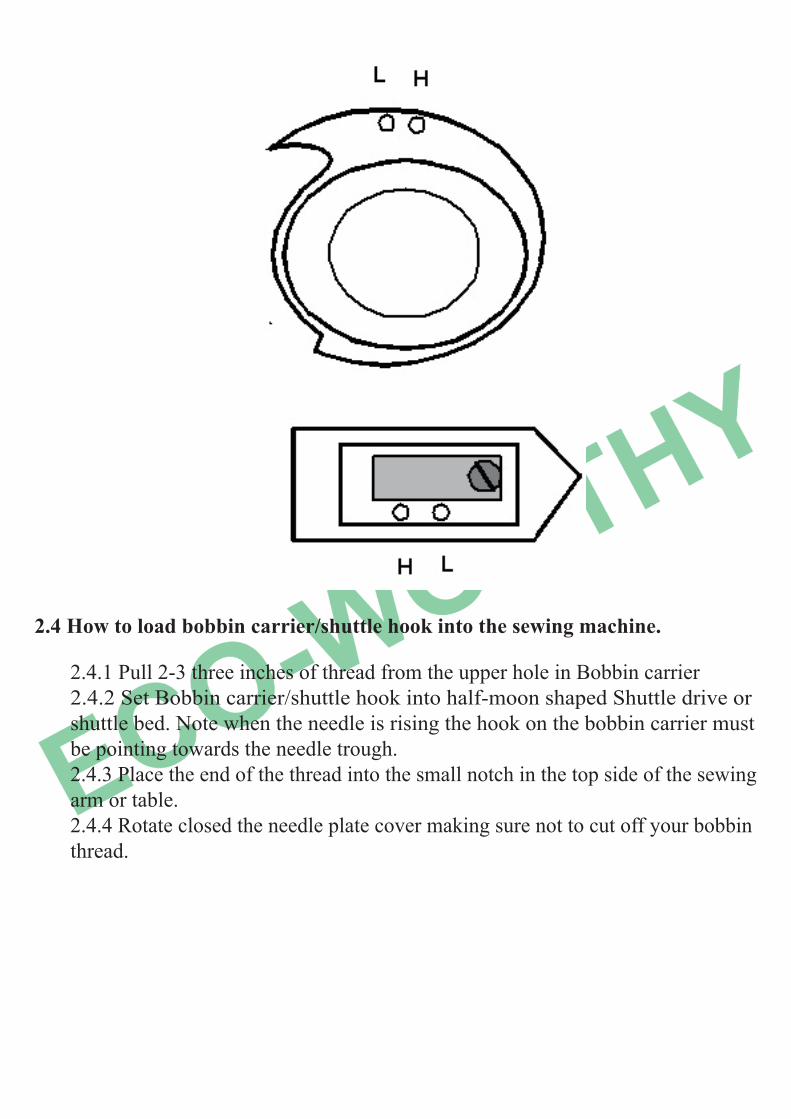
2.4.1 Pull 2-3 three inches of thread from the upper hole in Bobbin carrier2.4.2 Set Bobbin carrier/shuttle hook into half-moon shaped Shuttle drive or shuttle bed. Note when the needle is rising the hook on the bobbin carrier must be pointing towards the needle trough.2.4.3 Place the end of the thread into the small notch in the top side of the sewing arm or table.2.4.4 Rotate closed the needle plate cover making sure not to cut off your bobbin thread.
2.4 How to load bobbin carrier/shuttle hook into the sewing machine.

Most users find that the bobbin carrier shuttle hook comes out easier with less friction when the hand crank handle is in the 9:00 position.To use this option you must first crank handle to the 12:00 to be able to open the access cover because the needle is down in needle hole. You then crank handle to the 9:00 position to remove the bobbin. If a refrigerator magnet is used both ways seem to work OK. If you use tweezers or needle-nose pliers this may not be the case.

2.5.1 Turn crank plate clockwise until the needle is in the highest position and lower pressure foot to needle plate.2.5.2 Pull some thread off of your spool or thread stand and feed it down through the front top hole in the needle rocker arm near the axle shaft.2.5.3 Run the thread down through the right loop of the light or the heavy thread tension disk and go clockwise down under tension disk and up through the loop on the left side of the disk. Make sure thread goes up between the tension disks.
Note: some people use both tension discs or thread their sewing machines differently. If your machine works well doing it a different way then do it that way.2.5.4 Run thread up through the thread loop/spring mounted on the side of sewing head (#24) from bottom to top, give yourself plenty of slack thread for later in this process.2.5.5 run thread straight up behind the needle rocker arm and through the eye in the thread take-up arm.2.5.6 Feed thread down the needle push rod center. Note a small wire hook seems to help for this process.2.5.7 Feed thread through the needle from left to right or from the needle plate towards the crank plate.2.5.8 Make sure you have least 3 inches of thread beside the needle2.5.9 Lower the walking foot to down position
2.5 How to thread the upper thread

3.1 It is best done with two different colored threads for top thread and bobbin thread.3.2 Sew a short line of threads on a folded over contrasting color material and examine to see if you can see the bottom thread showing on the top side of material or vis versa.3.3 If the bottom thread shows on top of material then decrease tension on your upper tension disk. If your top thread show on the bottom of the material then increase tension on the upper thread tension disk. To adjust the tension on the upper thread tension disks tighten (rotate clockwise) the nut or nuts to squeeze the thread. Loosen (rotate counter-clockwise) the nut or nuts to decrease tension or squeezing on the thread.If this does not work then the tension on the Bobbin carrier may need to be adjusted. It is done by adjusting the screw on that tiny spring on the bobbin carrier.
3. How to make sure the upper and lower (bobbin) thread tension are equal to give you a good quality stitch.
4.1 Different materials may require a different number of stitches per inch. Fine material normally has a tighter stitch pattern but in the course material, the stitches are spread out.4.2 Loosen or slightly unscrew the thread length screw (#8 on picture) to decrease the number of stitches per inch (nice long Stitches). To get more stitches per inch ( tiny short stitches), tighten or screw in the stitch length screw.Note: the screw should not compress the spring very much, you do not need to screw in the screw all the way. In fact, unscrewing the screw most all the way and you should get stitches 5/16“ long, then start screw in the screw until you get the desired length.Also, note #26 on above picture this bar can sometimes get jammed in the up or down position affecting the stitch length.
4. How to adjust the number of stitches per inch or stitch length
IV. FAQs
5.1 Tighten the nut on the pressure regulator screw (#20 on picture) to increase the two springs tension on the pressure foot rocker arm.
5. How to adjust the Pressure foot downward pressure
The needle must travel below the needle plate the correct distance to pickup bottom thread and form a stitch. Make sure your walking foot is in the down position when trying to pick up the lower bobbin thread.7.1 This should only be adjusted if it gets knocked out of adjustment.7.2 It has been determined that the needle must pass through the needle plate and just barely stick out the bottom of the sewing arm. Adjust needle bar so that is the case. 7.3 You can move the needle plate cover out of the way then rotate the crank plate clockwise slowly and watch your threads. Does the Shuttle hook catch the needle thread just as the needle starts heading back upward? Then that is good, no more adjustment needed. Does the shuttle hook point come even with the needle just as the needle starts heading upward? If not your needle bar may be fine, it may be the Shuttle drive may not be timed right or out of adjustment. This is explained in detail in the timing and adjustment document.Check everything before you start adjusting things. Does your sewing machine sew Just fine and does not skip stitches? Then you do not need any alignments or adjustments at this time.The sewing machine is skipping stitches? First, try changing your needle as it may be slightly bent. Check thread tensions or look for thread issues.When all else fails then do alignments or adjustments. Note: Skipping stitches is one sign that the needle scarf to shuttle hook gap is incorrect, a bent needle can cause that.
7. Adjusting the needle travel distance
6.1 Rotate hand crank to raise the needle to a high position6.2 Loosen the screw on the needle tightening collar (#6 on picture above)6.3 Slide needle downward6.4 Side new needle upward into position noticing that the flat shank of the needle is to the right and the long groove on the needle is to the left6.4 If you are using industrial needles (135X17) they have no flat shank so just make sure the long groove is to the left.6.5 Tighten the needle collar
6. How to install or remove sewing machine needle for the type of material you are working with.
If your sewing project gets stuck due to a thread jam in the bobbin area, DO NOT force it with the hand crank. Lift up the pressure walking foot, get some slack in the upper thread path, pull the sewing project out as much as possible and cut the thread from under side of material. Then open the bobbin compartment and try to remove any extra threads. Sometimes you have to gently rock the hand crank back and forth to pull out any threads.There is the possibility that the needle is stuck down in the fabric. If this happens you must first loosen the needle retaining screw and try to remove the needle.Above all things you DO NOT want to damage your shuttle drive assembly by forcing the hand crank (The Shuttle drive assembly is the half moon part that has the little gear welded on the bottom).
8. How to unjam your machine
If you have done any sewing that you know how and when to adjust the tension. On these sewing machines, you only have to pick the proper hole in the Bobbin carrier and do all adjustments to tension on the upper thread tension disks. It has been found that when running extra large thread while sewing leather that the bobbin will be pulled upward out of the carrier slightly. This can causes issues. It was found that placing a small machine screw with a shaved head in the center hole of the bobbin it will prevent the bobbin from ridding upward. You do need just a little bit of upward play in order for the thread to slide under the carrier to make the stitch. But you also need to be careful the screw does not catch on the thread while it is creating the stitch.
Thread tension adjustments:
You will see a thin metal plate that looks sort of like a bird (maybe a peacock). Item #14 in the users manual. There will be a Screw in a slot on the bottom left hand side of that plate. For initial setting place the screw in the center of that slot. If you slide the screw closer to the top of the slot you will increase the thread take-up arm swing. Of course if you go towards the bottom of the slot you will decrease the take-up arm swing.The purpose of the thread take-up arm is to provide slack in the thread to complete a stitch. You need a little slack so the thread can slide under the bobbin carrier.
Take up arm swing adjustment:

It is assumed that this sewing machine was assembled correctly and has worked properly in the past but got knocked out of alignment.Please test that your upper thread will pick up the lower thread before and after each alignment. You do not want to do adjustments you do not need.The walking foot must be in the down position to be able to pick up the lower(Bobbin) thread. Also see drawings below:First we will check the Shuttle driver alignment: Remove the Bobbin carrier /shuttle hook, but leave the Shuttle drive in the machine. Crank the handwheeluntil the handle is aligned with the sewing arm and pointed towards the bobbin case area (9:00) position. Now the shuttle driver half moon arch should be located on the back side of the bobbin area. The left edge of the arch should be even with or just past the needle path slot. You can relocate the Shuttle driver by removing it and replacing it. If you can not get it anywhere even close then we will have to do a more complex adjustment.Second adjustment is the needle height adjustment: This is factory set andseldom gets out of adjustment unless the upper screw came loose or theneedle slammed hard into the needle plate when it missed the needle platehole. This adjustment must also be done if you have modified your needlebar to use industrial needles. There is a separate document that goes in tothe industrial mod details.Lets first check to see if the needle height is pretty close. Place your fingerunder the sewing arm, you should feel a small hole. Place your finger therelightly and slowly rotate the hand-crank, you should just feel the end of theneedle. If you do not feel it then an Alignment is in order. Do this alignmentwith the needle in its lowest position, loosen the the needle bar crank screwat the top of the needle bar and slide the bar downward or upward as neededand then tighten the screw. Please note that you must also make sure theneedle bar does not rotate clockwise or counter clockwise. The groove in theneedle and needle bar must face to the left.
Bobbin shuttle and needle bar alignments:
Too much slack could cause a loose stitch, but you cannot spot it. If there is not enough slack in the thread as we are creating the stitch the thread will get hung up as it tries to pass under the carrier. Not enough slack could break the thread or stall the machine. Too much slack could possibly cause a thread jam in the bobbin area.
There is another alignment that can be critical in order for the sewing machine to pick up the bottom thread and make a stitch. That is the gap or space between the needle scarf and the shuttle hook point. This can sometimes be corrected by installing a fresh new needle. To do this adjustment you set it up just like the advanced needle bar adjustment. Where the needle scarf lines up with the shuttle hook point when the hand crank handle is around the 3:00 - 5:00 position. You will see the hook point turning towards the needle. This gap should be about the thickness of a piece of paper .030 -.050 of an inch.This gap is adjusted in one of three ways. 1. Moving the sewing arm slightlyin or out by loosening the three retaining bolts on the underside. 2. Movingthe sewing head sightly out and shimming it. 3. You can shave a little metalfrom the needle holding slot in the needle bar to bring the needle closer tothe shuttle hook point.Note if you use industrial needles but did not modify the needle bar to use said needles, then the needle scarf could be too far away from the shuttle hook point by around .010 of an inch. Sometimes it will cause sewing machine to skip stitches.
Needle scarf Gap alignment
For an advanced needle bar height adjustment do as follows: See drawings below: Make sure your Bobbin carrier / Shuttle hook is properly adjusted and in place. Rotate the sewing arm cover plate open and turn hand crank so the needle travel is in the dead position. This dead position is just after the needle travels down then starts back up and sort of stops. The crank plate handle will be near the 3:00 to 5:00 position. Note the Shuttlehook point is rotating towards the needle. Also note that the flat needle scarfshould be centered on the Shuttle hook point. Adjust needle bar height asneeded.Test your sewing machine to see if the needle will pickup the bottom thread. If your sewing machine sews just fine and does not skip stitches the alignments or adjustments are not needed.
If your bobbin shuttle driver edge does not align properly with the needle slot then you will need to do the shuttle driver rod alignment.First lets check to see if it is close. Crank the handle so it is aligned with thesewing arm but facing the farthest away from the bobbin area. (The 3:00 position.) Now look at the front left side of the sewing arm close to the needle plate hole but lower on the arm, there is a square hole and a small square rod. The rod should be even with the edge or fairly close. If not then the shuttle driver rod may need adjustment. But if your machine has been sewing well in the past then this adjustment is most likely good or OK.Always test that your needle can pick up the bobbin thread before makingadjustments of any kind.For the Advanced Shuttle driver rod adjustment: Caution before doing this adjustment know what you are doing, it can mess things up and take you a while to get it working right again.You will note two bolts that secure the drive rod to the hand-crank bearingassembly. Loosen those two bolts sightly and move the shuttle drive rod inor out slightly then re-tighten the bolts.Note you can also do this driver rod adjust adjustment with the hand crankhandle facing the other way at the 9:00 position. You will note that the Shuttle driver in the bobbin area will rotate left or right and it does not take much hand crank turning to move it.Just move the rod slightly to make the half moon shuttle driver left edge line up with the needle slot in the sewing arm or just past the slot when hand crank is at the (9:00) position. Messing with this rod is an advanced adjustment, you can mess things up and spend lots of time trying to get it back right again.
Shuttle driver rod alignment:
9.1 Loosen your stitch length screw nearly all the way and remove your needle.9.2 Place heavy material like a pair of jeans under walking foot and verify that the walking foot moves the material through the machine when cranking the handle wheel clockwise.9.3 Remove the material install the needle and fully thread the machine. Hold the end of the top thread and crank the hand wheel clockwise one time to pull the bottom thread up.9.4 Put the heavy material under the walking foot. Hold onto the top and bottom threads with your left hand or somehow to prevent them from pulling out. Crank the hand wheel clockwise 2 turns then release thethread ends. You should now be ready to practice sewing.
Note: If using big spools the spool must be on a proper thread stand thatallows the thread to pull from the top, Not the side.
9. How to start out using the patcher after taking it apart for cleaning
10.1 Make sure when using big thread spool cones that the thread pulls from the top and is mounted on a proper thread stand.10.2 Make sure thread does not twist or get wrapped up in the thread path.
10. How do I keep from breaking thread or needles after only a few stitches
11.1 Use a small refrigerator magnet, it need not be a very strong magnet.11.2 Use a small pair of angled tweezers. Note this will sometimes pull out the drive plate. You will then need to put it back in proper timing alignment.
11. How can I easily remove the bobbin from my sewing arm
12.1 Put your big spool of thread in a big plastic jar and have a fairly small hole drilled in the jar lid.12.2 Wrap the thread one time around the thread stand rod after the thread has gone through the eye towards the patcher thread path.12.3 Epoxy glue a bead or button into the thread stand rod eye. Then run thethread through the smaller opening in the bead or button.
12. How to keep the thread twisting when it comes off the spool and jamming my machine

Note: big spools of thread should not be just set on the factory thread spoo pin. Big spools of thread must the pulled from the top not the side. A proper thread stand will increase your sewing pleasure . . . no more braking thread every three stitches.13.1 Put the tread in a big plastic jar with a hole in the lid. Then make a arm out of a rod or stiff wire to get the thread up towards the machine thread path.13.2 Build a thread stand similar to those you can buy or see on line.
13. How to mount your big spools of thread
14.1 Scrape all the black scale off your bobbin carrier / shuttle hook. Then polish inside and out with #300 or #400 grit sandpaper. Note a dremal tool should work OK too. Be careful not to damage the Shuttle hook point.14.2 Shine the top side of the bobbin carrier drive plate.14.3 Shine and smooth any sharp edges on all the bobbins with a jewelers fileand or #300 -#400 grit sandpaper.Note that the center hole is smaller on one side than the other, this is a burrcreated during manufacture. a #6-32 or 3mm screw should be able to slidethrough this center hole.
14. How do I clean and shine all the parts in your Bobbin area
15.1 Build a wood or metal stand that is stable and allows you to turn the hand crank. The factory supplied stand is unstable and your machine could fall over a break off parts.15.2 Buy a stand used for shop equipment from a supplier such as Harbor Freight.
15. How do I keep my machine stable while sewing
16.1 Smooth every surface the thread may come in contact with while sewing.The hole in the rocker arm, Tension Discs, thread guides, needle bar slot just above where needle mounts.16.2 Slightly enlarge and smooth the needle plate hole.16.3 Make sure you are using quality BONDED thread. Cotton and yarn willnot work well.16.4 Make sure you use a needle with an eye that is big enough for your thread.
16. How do I keep from snagging or fraying my thread while sewing
You will see a thin metal plate that looks sort of like a bird (maybe a peacock). Item #14 in the users manual. There will be a Screw in a slot on the bottom left hand side of that plate. For initial setting place the screw in the center of that slot. If you slide the screw closer to the top of the slot you will increase the thread take-up arm swing. Of course if you go towards the bottom of the slot you will decrease the take-up arm swing.The purpose of the thread take-up arm is to provide slack in the thread to complete a stitch. You need a little slack so the thread can slide under the bobbin carrier.
17.1 Drill a small hole near the center hole so you can feed the thread out the side. This way you can hold the thread in place as you start to wind on the thread.17.2 Mount a #6 -32tpi or 3mm screw in an electric drill slide the bobbin on the screw and secure it with a wing nut. Then power the drill and wind on the thread into the bobbin spool.17.3 Smooth out and remove the bur in the center hole of the bobbins. You will note that during manufacture the hole becomes slightly smaller on one side.17.4 Buy a bobbin winder upgrade Kit or make a new bushing and shaft for the factory bobbin winder out of a 3mm or #6-32 screw and nut.17.5 Make a thread guide so when winding bobbins the thread comes downcentered over the bobbin with proper tension.
17. How to wind these Patcher wind bobbins more easily
19.1 Find a wooden broom or tool handle the length you are comfortable with.19.2 Drill a hole down the center big enough for a 6mm screw to easily roll in.19.3 Purchase a 3mm screw that is long enough to mount your new handle.install a washer between your new handle and the machine crank plate.
19. How can I make a bigger crank handle for my crank plate
20.1 Purchase a 6mm coupler nut from a hardware store. unscrew the factorysupplied nut from the tension disc and screw the long coupler nut in its place. Note: count the number of turns as you unscrew the factory nut.screw the new nut on the same number of turns. this way you won’t mess up your tension adjustments.
20. How could I create a better knob for adjusting the upper thread tension
18.1 Put a piece of clear magic cellophane tape on the thread.18.2 Use a rubber band to hold it in place.18.3 Use those small cloth cover bands used to make pony tails in hair.
18. How do I keep the thread from unwinding off the bobbins while storing them
There is another alignment that can be critical in order for the sewing machine to pick up the bottom thread and make a stitch. That is the gap or space between the needle scarf and the shuttle hook point. This can sometimes be corrected by installing a fresh new needle. To do this adjustment you set it up just like the advanced needle bar adjustment. Where the needle scarf lines up with the shuttle hook point when the hand crank handle is around the 3:00 - 5:00 position. You will see the hook point turning towards the needle. This gap should be about the thickness of a piece of paper .030 -.050 of an inch.This gap is adjusted in one of three ways. 1. Moving the sewing arm slightlyin or out by loosening the three retaining bolts on the underside. 2. Movingthe sewing head sightly out and shimming it. 3. You can shave a little metalfrom the needle holding slot in the needle bar to bring the needle closer tothe shuttle hook point.Note if you use industrial needles but did not modify the needle bar to use said needles, then the needle scarf could be too far away from the shuttle hook point by around .010 of an inch. Sometimes it will cause sewing machine to skip stitches.
21.1 There are several after market reading lights and lights with magnetic bases that can be secured to the machine sewing head. The LED lights with the goose necks or flexible necks are pretty good.
21. How could I get better lighting or mount a light on this machine
22.1 You can make one out of angle iron and clamp it to your sewing arm. acouple different versions have been mentioned on the face book page.22.2 Purchase a heavy duty magnet for welding or picking up nails and screwsfrom the driveway. Then stick it on the top of your sewing arm.CAUTION It has been found that strong magnets cause the bobbin to pull up out of the bobbin carrier / Shuttle hook while sewing. This will cause you trouble while sewing unless the magnet is way back on the sewing arm.
22. How could I mount on material sewing guide
23.1 Make up a clamping system to hold the binding attachment to the Patcher arm.23.2 Epoxy or JB weld the binding attachment to a strong magnet, then set themagnet on your patcher sewing arm. Note you could modify the magnet you are using as your material sewing guide so that the binder attachment screws onto it. CAUTION It has been found that strong magnets cause the bobbin to pull up out of the bobbin carrier / Shuttle hook while sewing. Thiswill cause you trouble while sewing unless the magnet is way back on thesewing arm.
23. How could I attach a binding attachment to my machine
20.2 Turn some aluminum, steel, or Brass rod to a nice diameter. Knurl the parts. Drill and tap the parts to 6mm. install the part in place of the factory nuts.

There is a sticky oil that all the machines are covered in when they are shipped to you. This is oily on purpose. The factory coats these machines to help prevent them from rusting while in transit. You will want to remove as much of this oil as you can using any cleaner of your choice.Using a Dremal tool, File, or sand paper remove as much sharp edges and burs as you find necessary. You can also paint your machine just take care to not paint the surfaces that must rub together. These surfaces are bearings, bushings, cams, and shafts. These rubbing surfaces will need to be cleaned and oiled.We will first briefly go over the thread path. This path is anywhere the thread will rub against. We will start at the top remove metal burs or sharp edges where the thread runs through the rocker arm. Then remove any burs or sharp edges on your tension discs and related guides.Now over to the little loop on the side of the sewing head. You will note that this loop seems to be made out of a spring and it does have a sharp edge. You must try to smooth that pointy sharp edge. The next place of interest is the eye in the take-up arm. This eye is normally pretty smooth already. The top edge of the needle bar could have a sharp edge that may need to be smoothed a little.
We will now cover the parts in the Sewing head itself. These parts being the walking foot, walking foot control rod, and the lower needle bar. See attached drawing:First remove any sharp edges on the needle bar in the area (A) on the drawing.Second clean up the rough sliding surface of the ramp of the walking foot control bar, item (B) on the drawing. To do a real good job you may have to take the sewing head apart. This of course will require you to remove the head from the sewing machine with four screws. Then removing the two screws holding the top plate on the sewing head. It may look scary but it is really not that bad, just remember how it comes apart and put it back together the same way.
The third item you may want to slightly cleanup is the sharp edges on the bottom of the walking foot. Item (C) on the drawing. This is so it will not cut or mark any material you will be running under the foot. Don’t get too carried away on smoothing this foot it needs to be able to grip and pull you material under the needle. You can later on coat your walking foot with rubber if you find that it still too rough for your material.
V. Cleanup Manner

We will now cover the topic of cleaning up the areas on the sewing arm.
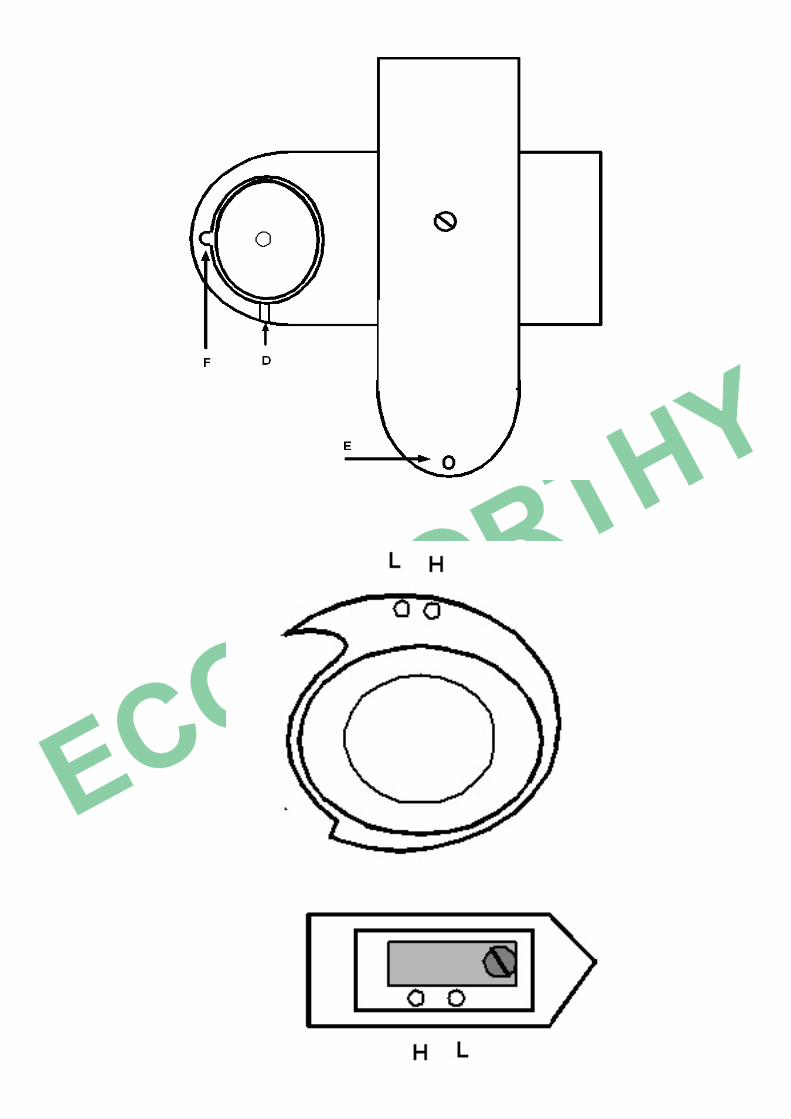
See drawing below:First off make sure to smooth any sharp edges on the cover plate and the center holding screw.Open the cover plate and remove the Bobbin Carrier / Shuttle Hook assembly. You may find a small magnet works good here. You may want to remove the bobbin carrier driver plate too.
Don’t worry about the alignment, there is document on how to do the alignment of the driver plate. Anyway this driver plate could and will come out may times while removing bobbins.You really need to know how to do this alignment by heart.
With the cover open we will need to slightly deepen the groove (D) in theside of the arm that the bobbin thread will stick out of. Just use a three corner file and make a slight groove then smooth the edges.With the cover open you should enlarge the needle plate hole (E) slightly and smooth the edges. You do not need to make the hole much larger just a little tiny bit larger. Doing this will decrease the odds of snagging or cutting your thread while sewing with larger thread and needles.The last step in this phase of the cleanup is the groove the needle slides up and down in on the sewing arm. That would be (F) on the drawing. Here you want to square up the right edge making it 90 degrees with top edge.Smooth any sharp edges you may feel. This step helps prevent side flexin of the needle and giving you more room for bigger needles and thread.You will want to remove as much of the black scale off your Bobbin Carrier / Shuttle Hook. See drawing of this item below:You can use a sharp edge to scrape most of the black off. Then use 400 grit sand paper or a fine stone on a dremal tool to shine up this bobbin carrier.DO NOT DAMAGE THE SHARP POINT on the bobbin carrier / shuttle hook.This sharp point must catch the upper thread near the needle scarf during sewing operation.