paper sas5642-2016 a ringside seat: the ods excel ... · 1 paper sas5642-2016 a ringside seat: the...
TRANSCRIPT
1
Paper SAS5642-2016
A Ringside Seat: The ODS Excel Destination versus the ODS ExcelXP Tagset
Chevell Parker, SAS Institute Inc.
ABSTRACT
The new and highly anticipated SAS® Output Delivery System (ODS) destination for Microsoft Excel is finally here! Available as a production feature in the third maintenance release of SAS® 9.4 (TS1M3), this new destination generates native Excel (XLSX) files that are compatible with Microsoft Office 2010 or later. This paper is written for anyone, from entry-level programmers to business analysts, who uses the SAS® System and Microsoft Excel to create reports.
The discussion covers features and benefits of the new Excel destination, differences between the Excel destination and the older ExcelXP tagset, and functionality that exists in the ExcelXP tagset that is not available in the Excel destination. These topics are all illustrated with meaningful examples.
The paper also explains how you can bridge the gap that exists as a result of differences in the functionality between the destination and the tagset. In addition, the discussion outlines when it is beneficial for you to use the Excel destination versus the ExcelXP tagset, and vice versa. After reading this paper, you should be able to make an informed decision about which tool best meets your needs.
INTRODUCTION
The term ringside seat indicates having a seat right outside of the ring for some competitive event. Although the term might not have existed centuries ago, it could apply to any competitive match from watching the ancient Roman gladiators facing off in the coliseum to a chess match to a current-day sporting event such as boxing. In a similar way, you can think of this paper as a ringside seat to a match-up between the ODS Excel destination and the ODS ExcelXP tagset. So get ready for a ringside seat to the main bout: the Excel destination versus the ExcelXP tagset! The bout consists of three rounds:
Round 1: Features and benefits unique to the ODS Excel destination
Round 2: Differences between the ODS Excel and ExcelXP tagset
Round 3: Features unique to the ExcelXP tagset
ROUND 1: FEATURES AND BENEFITS OF THE ODS EXCEL DESTINATION
The new Excel destination is rendered from C code rather than from ODS Markup Language, which the ExcelXP tagset uses. Use of the destination should be familiar if you have used the ExcelXP tagset because many of the tagset options and functionality have been included in destination. You should not expect the destination and tagset functionality to be exactly the same, however, because the destination and the tagset do not share any of the same code.
This section covers the capabilities that are available in the new Excel destination:
inserting graphics into a worksheet inserting images into a worksheet adding text to a Microsoft Excel worksheet using SAS formats with the Excel destination to control cell formatting exploring functionality that is available with the ODS EXCEL statement and destination options generating portable files using the Excel destination extending the functionality of formulas generating smaller files
2
INSERTING GRAPHICS INTO A WORKSHEET
One of the benefits of the ODS Excel destination is its ability to display graphics in a worksheet. With the Excel destination, you can add graphics by using either SAS/GRAPH® procedures or SAS ODS Graphics, which includes the powerful Graph Template Language (GTL), and Base SAS® statistical graphics procedures. SAS/GRAPH procedures, along with ODS Graphics, generate industry-standard image formats. Images that are generated and displayed within an Excel worksheet are static on the worksheet (that is, you cannot change them in any way as you can with Excel graphics).
One common modification you might want to make to an image in a worksheet is to change the image size. For example, you can modify a graph using the HEIGHT= and WIDTH= options in the ODS GRAPHICS statement (if you use ODS Graphics) or using the HSIZE= or VSIZE= options in the GOPTIONS statement (if you use SAS/GRAPH software). In addition, there is a series of options in both ODS Graphics and SAS/GRAPH software that enable you to control aspects of a graph.
You can also control other features of an image (for example, a title or footnote) by using options in the ODS EXCEL statement. For example, you can use the NOGTITLE and NOGFOOTNOTE options to control whether a title or footnote remains with the graph or whether they are moved to the actual worksheet. These options work for the SGPLOT, SGPANEL, and SGSCATTER procedures, whereas other procedures simply remove the title or footnote from the image. You can also modify the image format to supported formats (EMF, JPG, or PNG) by using the OUTPUTFMT= ODS Graphics option, or you can use the DEVICE= option in the GOPTIONS statement for SAS/GRAPH procedures.
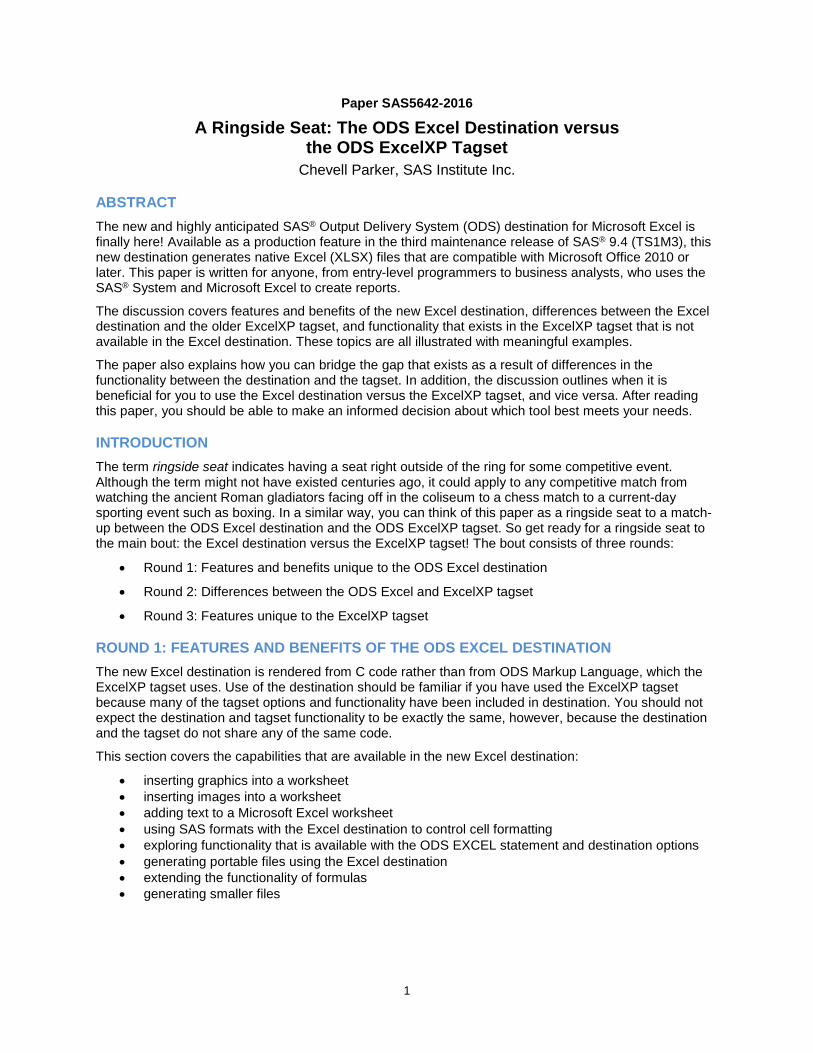
The following example illustrates the use of various options and procedures to create a vertical-bar graph that shows profit margin.
In this example:
A DATA step creates the annotate data set LINE. The NOGTITLE option is used in the ODS EXCEL statement to move the title to the worksheet
rather than having the title appear on the image. After the data set is created, the information it contains is added to the graph with the SGPLOT
procedure. PROC SGPLOT uses the VBAR statement to generate a bar chart for the Product_Line variable.
The WIDTH= and HEIGHT= options in the ODS GRAPHICS statement modify the image size, and the OUTPUTFMT= option changes the image format to JPG.
Example 1
data line; infile datalines dlm='#'; length label $ 27 textcolor $ 9 linecolor $ 9; input function $ x1 y1 label x2 y2 textcolor linecolor; datalines;
text # 20 # 85 # Goal # . # . # gray # line # 16 # 80 # # 100 # 80 # # gray
; run; ods excel file="c:\temp.xlsx" options(embedded_titles="yes") nogtitle; ods graphics / reset width=6in height=3in outputfmt=jpg; proc sgplot data=sashelp.orsales sganno=line;
title "Profit Report"; vbar product_line / response=profit dataskin=pressed datalabel; format profit dollar.;
run;
ods excel close;
3
Output 1. Using PROC SGPLOT with the ODS Excel Destination to Generate a Profit Graph
INSERTING IMAGES INTO A WORKSHEET
If you have a cover page for a worksheet or if you want to brand the worksheet, you might want to add images. While you cannot add background images with the ExcelXP tagset, you can add them with the Excel destination. Currently, the destination enables you to add an image only to the background of the worksheet. It does not support images on a per cell basis (as is possible using the PREIMAGE= and POSTIMAGE= attributes in other ODS destinations).
However, if you need to add an image within a cell, there are several methods of placing graphics within a particular cell using VBScript or using the EXCEL_ENHANCE macro (which automates the use of VBScript) in Microsoft Windows operating environments. The EXCEL_ENHANCE macro is available as a downloadable file from a link that is available in the Resources section. In UNIX operating environments, you can use the Java object in the DATA step to post-process a worksheet to which you are adding an image.
The following example uses the Excel destination, the TEMPLATE procedure, the ODSTEXT procedure, the EXCEL_ENHANCE macro, and the INSERT_IMAGE= parameter to add background images, foreground images, and logos on the cover page of a study of blood pressure based on gender.
In this example:
PROC TEMPLATE includes the BACKGROUND= style attribute, which adds an image to the background of the worksheet.
PROC ODSTEXT adds text to the worksheet. The INSERT_IMAGE= parameter in the EXCEL_ENHANCE macro adds a SAS logo and a series of
other images (icons for gender and social media, as well as a blood-pressure monitor image).This parameter enables you to designate where on a worksheet (and on which worksheet) you want to place an image. The sample code lists multiple images, each separated by a comma, in the INSERT_IMAGE=%STR parameter. The syntax for this parameter is INSERT_IMAGE=%STR(name.PNG#worksheet-name!position).
Example 2
proc template; define style styles.background; parent=styles.excel; class body / backgroundimage="C:\temp\back5.jpg"
background=_undef_ end; run; ods escapechar="^"; ods excel file="c:\temp.xlsx" options(start_at="4,4" sheet_name="sheet1")
style=styles.background; (code continued)
proc odstext;

4
p "^S={fontsize=30pt color=black} Study of Blood Pressure Across Gender"; p "^S={fontsize=20pt color=red} Study of Blood Pressure of Women"; p "^S={fontsize=20pt color=blue} Study of Blood Pressure of Men";
run; ods excel close;
/* The following code uses the %EXCEL_ENHANCE macro, which you */ /* download. This macro post-processes the file to add the */ /* images that appear in the output. */
%include "c:\enhanced_macro.sas"; %excel_enhance(open_workbook=c:\temp.xlsx,
insert_image=%str(c:\sas.png#sheet1!a1, c:\malex.png#sheet1!c5, c:\femalex.png#sheet1!c6, c:\tester.jpg#sheet1!f10, c:\twitter.jpg#sheet1!b25),
create_workbook=c:\temp_update1.xlsx, file_format=xlsx); This code creates the following output:
Output 2. Using PROC ODSTEXT and the INSERT_IMAGE= Parameter to Add Images and a Logo.
ADDING TEXT TO AN EXCEL WORKSHEET
Another benefit of the Excel destination is its capability for adding text to a worksheet, a task that is not possible with the ExcelXP tagset. You can add text with the destination by using either the ODS TEXT= statement or the ODSTEXT and ODSLIST procedures. The ODS TEXT= statement, which has been available since SAS® 9.2, enables you to add a text string before or after a table, a graph, or a value within a cell. Because it does not create an output object, the ODS TEXT= statement does not generate a new worksheet with the text. Text that you add before a table or graph in the code is displayed in the worksheet before the table or graph. However, text that you add after a table or graph remains with the table or graph in the worksheet.
Similar to the ODS TEXT= statement, PROC ODSTEXT enables you to add text to a worksheet. The difference, however, is that PROC ODSTEXT contains more functionality (for example, the ability to add variables as well as text). PROC ODSTEXT also creates an output object that contains your text and formatting. This output object creates, by default, a new worksheet. However, creation of a new worksheet depends on where you add the text. That is, if you add text before a table or graph (or just alone), a new worksheet is created. Text that you add after a table or graph is displayed after the table or
SAS logo
Background image
Other images
Social-media icons
5
graph within the worksheet. Like the ODS TEXT= statement, PROC ODSTEXT does not have a method of advancing to a new worksheet when text is added after a table or graph.
In the latest release of SAS 9.4 (TS1M3), you can force text that appears after a table or graph to a new worksheet by using the Report Writing Interface with the Excel destination. The interface adds text using the FORMAT_CELL() method within a table as shown in the example below. Other methods of adding text include using the PRETEXT= and the POSTTEXT= style attributes in the table or the data cell.
The following example uses the ODS TEXT= statement and the PRETEXT= style attribute, along with the Excel destination, to generate a graph that shows company profit for 2016.
In this example:
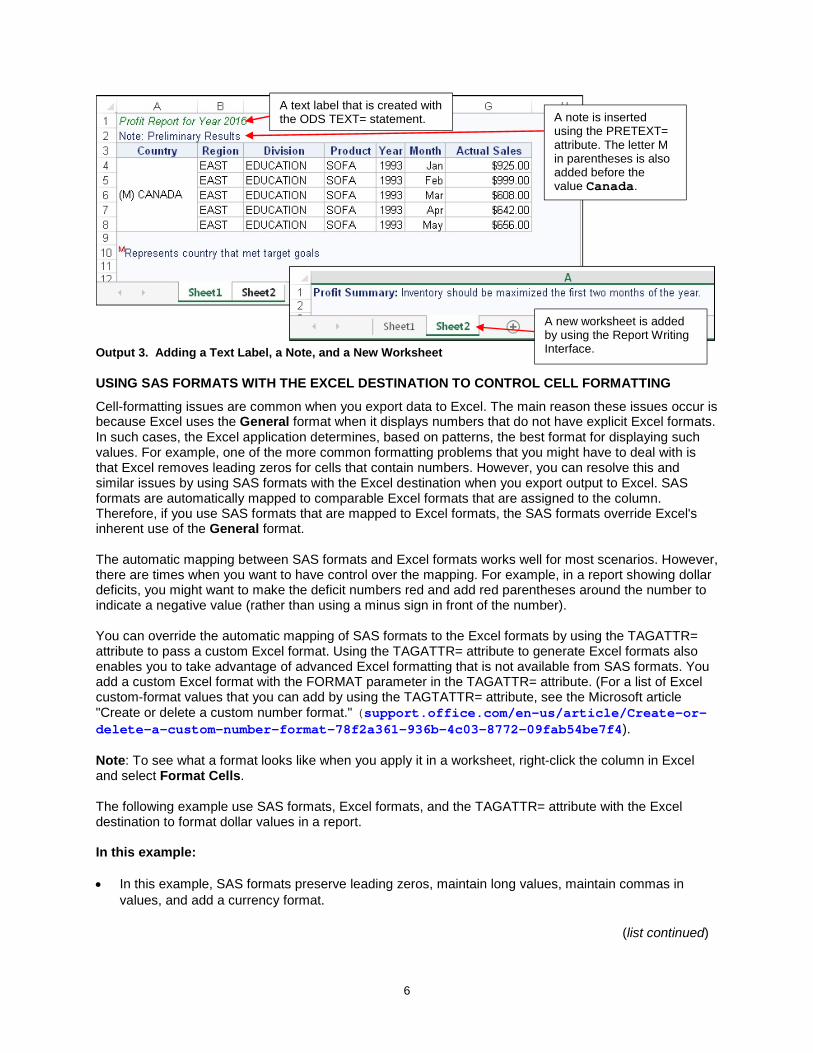
The ODS TEXT= statement adds text before a table that is generated with the REPORT procedure. The PRETEXT= style attribute in the DEFINE statement adds text before the cell value. However,
when you add this attribute to the PROC REPORT statement, the text is included above the table. A second ODS TEXT= statement adds a superscript letter (M) to a cell in the table. The explanation
for that letter appears below the table.
Example 3
ods escapechar="~"; ods excel file="C:\temp.xlsx" options(sheet_name="Sheet1"); ods text="~{style[color=green fontstyle=italic] Profit Report for Year 2016}"; proc report data=sashelp.prdsale(obs=5) spanrows
style(report)={pretext="Note: Preliminary Results"}; column Country Region Division Product Year Month Actual; define country / order style(column)={vjust=middle pretext="(M) "};
run; ods text="~{style[color=red]~{super M}} Represents country that met target
goals"; ods excel options(sheet_name="Sheet2"); data _null_ ;
dcl odsout trt(); trt.table_start();
trt.row_start(); trt.format_text(data:"~{style [fontweight=bold] Profit Summary:} The first two months of the year we should maximize inventory to match the demand");
trt.row_end(); trt.table_end();
run; ods excel close;
6
Output 3. Adding a Text Label, a Note, and a New Worksheet
USING SAS FORMATS WITH THE EXCEL DESTINATION TO CONTROL CELL FORMATTING
Cell-formatting issues are common when you export data to Excel. The main reason these issues occur is because Excel uses the General format when it displays numbers that do not have explicit Excel formats. In such cases, the Excel application determines, based on patterns, the best format for displaying such values. For example, one of the more common formatting problems that you might have to deal with is that Excel removes leading zeros for cells that contain numbers. However, you can resolve this and similar issues by using SAS formats with the Excel destination when you export output to Excel. SAS formats are automatically mapped to comparable Excel formats that are assigned to the column. Therefore, if you use SAS formats that are mapped to Excel formats, the SAS formats override Excel's inherent use of the General format. The automatic mapping between SAS formats and Excel formats works well for most scenarios. However, there are times when you want to have control over the mapping. For example, in a report showing dollar deficits, you might want to make the deficit numbers red and add red parentheses around the number to indicate a negative value (rather than using a minus sign in front of the number). You can override the automatic mapping of SAS formats to the Excel formats by using the TAGATTR= attribute to pass a custom Excel format. Using the TAGATTR= attribute to generate Excel formats also enables you to take advantage of advanced Excel formatting that is not available from SAS formats. You add a custom Excel format with the FORMAT parameter in the TAGATTR= attribute. (For a list of Excel custom-format values that you can add by using the TAGTATTR= attribute, see the Microsoft article "Create or delete a custom number format." (support.office.com/en-us/article/Create-or-delete-a-custom-number-format-78f2a361-936b-4c03-8772-09fab54be7f4). Note: To see what a format looks like when you apply it in a worksheet, right-click the column in Excel and select Format Cells. The following example use SAS formats, Excel formats, and the TAGATTR= attribute with the Excel destination to format dollar values in a report. In this example: In this example, SAS formats preserve leading zeros, maintain long values, maintain commas in
values, and add a currency format.
(list continued)
A text label that is created with the ODS TEXT= statement. A note is inserted
using the PRETEXT= attribute. The letter M in parentheses is also added before the value Canada.
A new worksheet is added by using the Report Writing Interface.
7
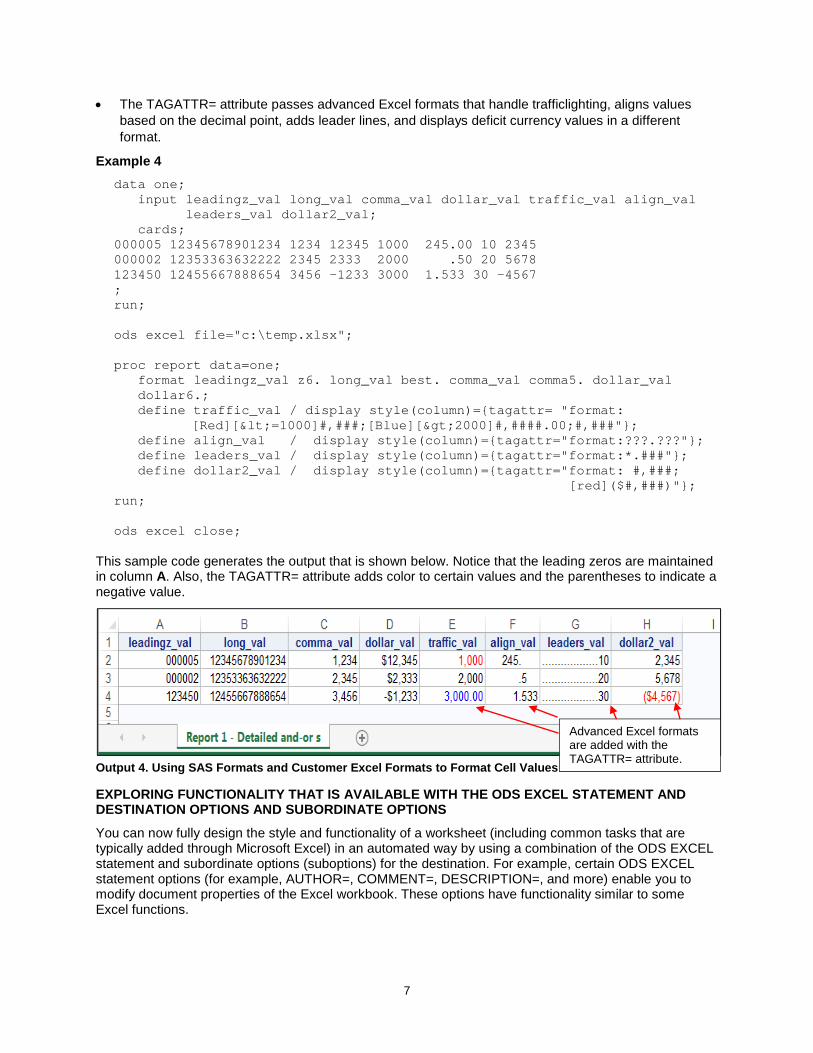
The TAGATTR= attribute passes advanced Excel formats that handle trafficlighting, aligns values based on the decimal point, adds leader lines, and displays deficit currency values in a different format.
Example 4
data one; input leadingz_val long_val comma_val dollar_val traffic_val align_val
leaders_val dollar2_val; cards;
000005 12345678901234 1234 12345 1000 245.00 10 2345 000002 12353363632222 2345 2333 2000 .50 20 5678 123450 12455667888654 3456 -1233 3000 1.533 30 -4567 ; run; ods excel file="c:\temp.xlsx"; proc report data=one;
format leadingz_val z6. long_val best. comma_val comma5. dollar_val dollar6.; define traffic_val / display style(column)={tagattr= "format:
[Red][<=1000]#,###;[Blue][>2000]#,####.00;#,###"}; define align_val / display style(column)={tagattr="format:???.???"}; define leaders_val / display style(column)={tagattr="format:*.###"}; define dollar2_val / display style(column)={tagattr="format: #,###;
[red]($#,###)"}; run; ods excel close;
This sample code generates the output that is shown below. Notice that the leading zeros are maintained in column A. Also, the TAGATTR= attribute adds color to certain values and the parentheses to indicate a negative value.
Output 4. Using SAS Formats and Customer Excel Formats to Format Cell Values
EXPLORING FUNCTIONALITY THAT IS AVAILABLE WITH THE ODS EXCEL STATEMENT AND DESTINATION OPTIONS AND SUBORDINATE OPTIONS
You can now fully design the style and functionality of a worksheet (including common tasks that are typically added through Microsoft Excel) in an automated way by using a combination of the ODS EXCEL statement and subordinate options (suboptions) for the destination. For example, certain ODS EXCEL statement options (for example, AUTHOR=, COMMENT=, DESCRIPTION=, and more) enable you to modify document properties of the Excel workbook. These options have functionality similar to some Excel functions.
Advanced Excel formats are added with the TAGATTR= attribute.
8
The options in the ODS EXCEL statement also contain a number of suboptions that enable you to improve the functionality of the worksheet. For example, the START_AT= suboption takes two arguments that define the row and column starting points for writing output in a worksheet. The following example uses this option and others, as explained below, to include various elements on the output layout.
In this example:
The PROC TEMPLATE step imports the example.css file, which has the following, single style rule that generates alternating row colors:
.table tbody tr:nth-child(even) td {background:#b0b0b0}
The ODS EXCEL statement uses the following options:
o The AUTHOR= option notes the author of the report in the document properties. o The COMMENT= option adds a comment to the document properties. o The OPTIONS option contains the following suboptions that direct the design and
functionality of the worksheet: The START_AT= option defines the row and column starting points to begin
writing output. The TAB_COLOR= option modifies the color of the worksheet tabs. The TITLE_FOOTNOTE_NOBREAK= option determines whether a title or
footnote line wraps. The FROZEN_HEADERS= option locks (maintains) the column headings across
worksheets. The FROZEN_ROWHEADERS= option locks (maintains) row headings across
worksheets. The HIDDEN_COLUMNS= option enables you to control which columns are
hidden. The AUTOFILTER= option adds filters for all or a range headings. The ROWBREAKS_INTERVAL= option determines where a page break should
occur. The PRINT_AREA= option indicates that Microsoft Excel should print only the
area that the option specifies. Example 5
proc template; define style styles.test; parent=styles.excel; import "c:\temp\example.css";
end; run; ods excel file="c:\temp.xlsx" comments="Report for Q4" author="Chevell" options( /* Display options */
start_at="2,2" tab_color="green" title_footnote_nobreak="yes" frozen_headers="7" frozen_rowheaders="5" hidden_colums="0" autofilter="all" sheet_name="Options_Example" embedded_titles="yes"
/* Print options */ rowbreaks_interval="output" print_area="a,2,g,20" orientation="landscape" dpi="600" scale="90") style=styles.test;
(code continued)
9
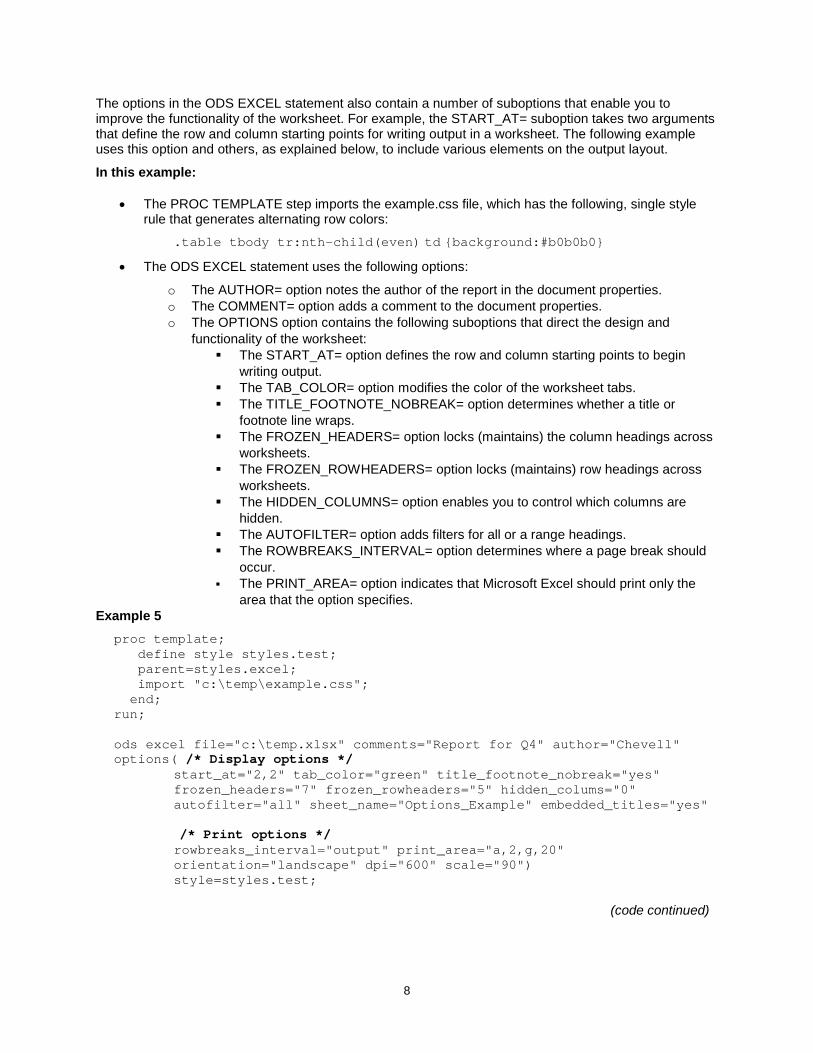
proc print data=sashelp.prdsale noobs; title j=l "The Cost Report for Products for the Year 2015 over All
Product Lines and Product Categories"; var country region division quarter year month actual predict;
run; ods excel close;
Output 5. Using ODS EXCEL Statement and Tagset Options to Design the Elements and Layout of a Worksheet
Generating Portable Files Using the ODS Excel Destination
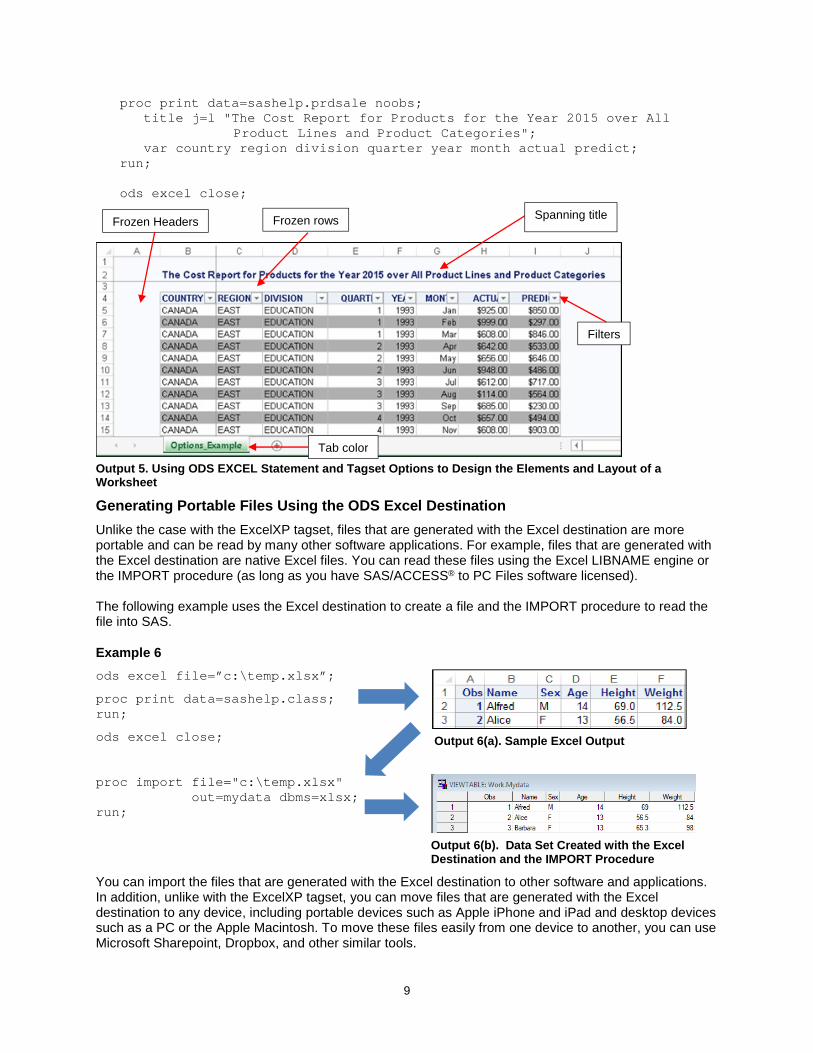
Unlike the case with the ExcelXP tagset, files that are generated with the Excel destination are more portable and can be read by many other software applications. For example, files that are generated with the Excel destination are native Excel files. You can read these files using the Excel LIBNAME engine or the IMPORT procedure (as long as you have SAS/ACCESS® to PC Files software licensed). The following example uses the Excel destination to create a file and the IMPORT procedure to read the file into SAS.
Example 6
ods excel file=”c:\temp.xlsx”;
proc print data=sashelp.class; run;
ods excel close;
Output 6(a). Sample Excel Output
proc import file="c:\temp.xlsx" out=mydata dbms=xlsx;
run;
Output 6(b). Data Set Created with the Excel Destination and the IMPORT Procedure
You can import the files that are generated with the Excel destination to other software and applications. In addition, unlike with the ExcelXP tagset, you can move files that are generated with the Excel destination to any device, including portable devices such as Apple iPhone and iPad and desktop devices such as a PC or the Apple Macintosh. To move these files easily from one device to another, you can use Microsoft Sharepoint, Dropbox, and other similar tools.
Tab color
Frozen Headers
Filters
Frozen rows Spanning title
10
USING THE EXCEL DESTINATION TO EXTEND THE FUNCTIONALITY OF MICROSOFT EXCEL FORMULAS
Excel formulas enable you to add an equation (rather than a hardcoded value) to a cell. The equation enables the cell value to change as the detail within the range changes. Excel uses two types of formulas: A1 notation and R1C1 notation. A1 notation is the default method for creating cell references to other cells, and it is the most commonly used notation.
The A1 notation uses a letter that is followed by a number (for example, =C2). In the example, C2 refers to the intersection of column C and row 2. This format (a letter followed by a number) indicates a relative reference. This formula can also contain a dollar sign ($), which indicates an absolute reference. For details about relative and absolute references, see the Microsoft article, "Overview of formulas," available at support.office.com/en-us/article/Overview-of-formulas-7abfda78-eff3-4cc6-b4a7-6350d512d2dc.
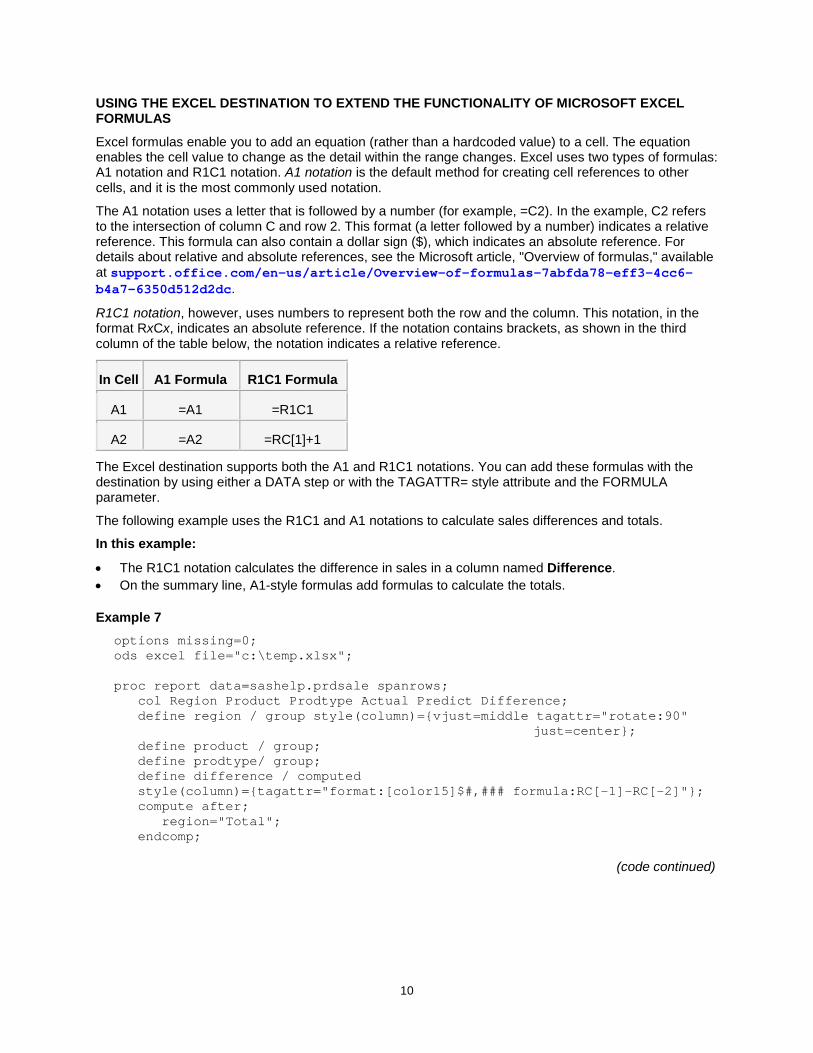
R1C1 notation, however, uses numbers to represent both the row and the column. This notation, in the format RxCx, indicates an absolute reference. If the notation contains brackets, as shown in the third column of the table below, the notation indicates a relative reference.
In Cell A1 Formula R1C1 Formula
A1 =A1 =R1C1
A2 =A2 =RC[1]+1
The Excel destination supports both the A1 and R1C1 notations. You can add these formulas with the destination by using either a DATA step or with the TAGATTR= style attribute and the FORMULA parameter.
The following example uses the R1C1 and A1 notations to calculate sales differences and totals.
In this example:
The R1C1 notation calculates the difference in sales in a column named Difference. On the summary line, A1-style formulas add formulas to calculate the totals.
Example 7
options missing=0; ods excel file="c:\temp.xlsx"; proc report data=sashelp.prdsale spanrows;
col Region Product Prodtype Actual Predict Difference; define region / group style(column)={vjust=middle tagattr="rotate:90"
just=center}; define product / group; define prodtype/ group; define difference / computed style(column)={tagattr="format:[color15]$#,### formula:RC[-1]-RC[-2]"}; compute after;
region="Total"; endcomp;
(code continued)

11
compute predict;
if upcase(_break_)='_RBREAK_' then do; call define(_col_,"style","style={tagattr=""formula:=
sum($E$2:$E11""}"); call define('actual.sum',"style","style={tagattr=""formula:=sum($D$2:$D
11)""}"); call define('region',"style","style={color=red tagattr=""rotate:0
""}"); end;
endcomp; rbreak after / summarize;
run; ods excel close;
Output 7. Using the A1 and R1C1 Formulas to Calculate Difference and Total
USING THE EXCEL DESTINATION TO GENERATE SMALLER FILES
The Excel destination generates files in the Microsoft Office Open XML format. This format uses the ZIP file format and compression technology to store documents. As a result, files that are generated in this manner are much smaller than the XML files that are generated with the ExcelXP tagset. This is one of the most important features about the Excel destination because of its effect on performance when you open large files. This feature is particularly useful when you have to store files on disk or transport files using email or other transport methods.
ROUND 2: DIFFERENCES BETWEEN THE EXCEL DESTINATION AND THE EXCELXP TAGSET The Excel destination is a completely new destination with a different underlying architecture than the ExcelXP tagset, which means that there are differences between the two. You add an ODS destination by using the ODS statement. For the ExcelXP tagset, the ODS statement is in the form ODS TAGSETS.EXCELXP. For the Excel destination, the statement does not use the TAGSET prefix. The form is simply ODS EXCEL. You also cannot modify a destination. Tagsets, on the other hand, can be modified.
There are a number of other differences between the two destinations. However, if you are familiar with the ExcelXP tagset, much of the functionality in the Excel destination will be familiar. The ExcelXP tagset options were scrutinized to determine which ones should be carried over to the Excel destination. In
Relative R1C1 formula is applied
A1 notation formulas are applied
12
addition, some functionality was added by the use of ODS styles whenever possible. One general difference between the Excel destination and the ExcelXP tagset, for example, is in their presentation styles. The Excel destination's overall presentation is a soft blue on white (the SAS Excel style), while the tagset uses the SAS default style (styles.default), which is gray on gray. The output layout has a better appearance in the Excel destination, too, because cells are passed to a routine that measures and resizes columns for optimal display. The following sections highlight other differences between the Excel destination and the ExcelXP tagset.
THE ODS STATEMENT AND TAGSET OPTIONS
There are ODS statement options that are available with the ExcelXP tagset that are not included in the Excel destination. For example, the PATH= option is one of the more commonly used tagset statement options, and it is used mainly for web-page support to help with locating files. The option is not used in the Excel destination because all files are local to the workbook when you use the destination. Other common tagset options include CODE=, ENCODING=, FRAME=, RECORD_SEPARATOR=, and TRANTAB=. If you try to use any of these options with the Excel destination, a syntax error is generated. In addition to the ODS statement options mentioned above, a number of other options (for example, SKIP_SPACE= and CONFIGURATION_FILE=) are available in the ExcelXP tagset that are not currently available with the Excel destination. If you add any of these tagset options in code when you use the Excel destination (or if you forget to change the tagset options in any programs before you use Excel destination), a note in the SAS log similar to the following informs you that those options are not supported:
Tagset Option: merge_titles_footnotes Not recognized. NOTE: The EXCELXP option merge_titles_footnotes is not supported in this Excel tagset.
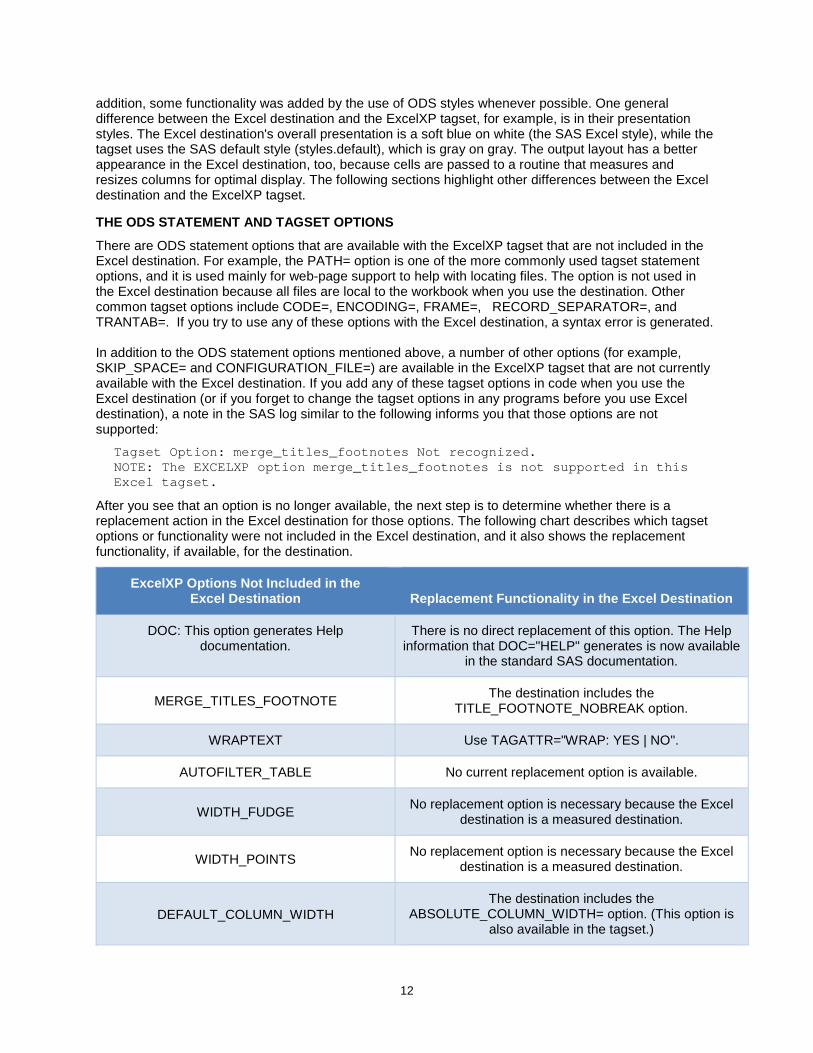
After you see that an option is no longer available, the next step is to determine whether there is a replacement action in the Excel destination for those options. The following chart describes which tagset options or functionality were not included in the Excel destination, and it also shows the replacement functionality, if available, for the destination.
ExcelXP Options Not Included in the Excel Destination
Replacement Functionality in the Excel Destination
DOC: This option generates Help documentation.
There is no direct replacement of this option. The Help information that DOC="HELP" generates is now available
in the standard SAS documentation.
MERGE_TITLES_FOOTNOTE The destination includes the
TITLE_FOOTNOTE_NOBREAK option.
WRAPTEXT Use TAGATTR="WRAP: YES | NO".
AUTOFILTER_TABLE No current replacement option is available.
WIDTH_FUDGE No replacement option is necessary because the Excel
destination is a measured destination.
WIDTH_POINTS No replacement option is necessary because the Excel
destination is a measured destination.
DEFAULT_COLUMN_WIDTH The destination includes the
ABSOLUTE_COLUMN_WIDTH= option. (This option is also available in the tagset.)
13
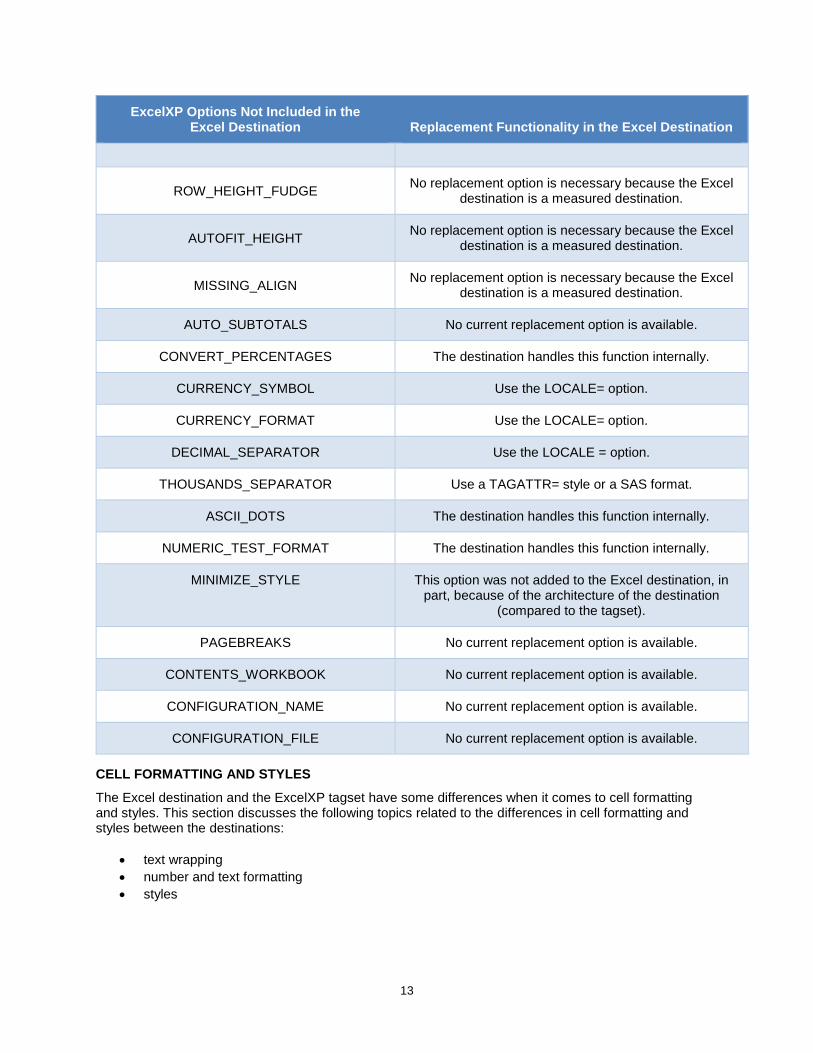
ExcelXP Options Not Included in the Excel Destination
Replacement Functionality in the Excel Destination
ROW_HEIGHT_FUDGE No replacement option is necessary because the Excel
destination is a measured destination.
AUTOFIT_HEIGHT No replacement option is necessary because the Excel
destination is a measured destination.
MISSING_ALIGN No replacement option is necessary because the Excel
destination is a measured destination.
AUTO_SUBTOTALS No current replacement option is available.
CONVERT_PERCENTAGES The destination handles this function internally.
CURRENCY_SYMBOL Use the LOCALE= option.
CURRENCY_FORMAT Use the LOCALE= option.
DECIMAL_SEPARATOR Use the LOCALE = option.
THOUSANDS_SEPARATOR Use a TAGATTR= style or a SAS format.
ASCII_DOTS The destination handles this function internally.
NUMERIC_TEST_FORMAT The destination handles this function internally.
MINIMIZE_STYLE This option was not added to the Excel destination, in part, because of the architecture of the destination
(compared to the tagset).
PAGEBREAKS No current replacement option is available.
CONTENTS_WORKBOOK No current replacement option is available.
CONFIGURATION_NAME No current replacement option is available.
CONFIGURATION_FILE No current replacement option is available.
CELL FORMATTING AND STYLES
The Excel destination and the ExcelXP tagset have some differences when it comes to cell formatting and styles. This section discusses the following topics related to the differences in cell formatting and styles between the destinations:
text wrapping number and text formatting styles
14
Text Wrapping
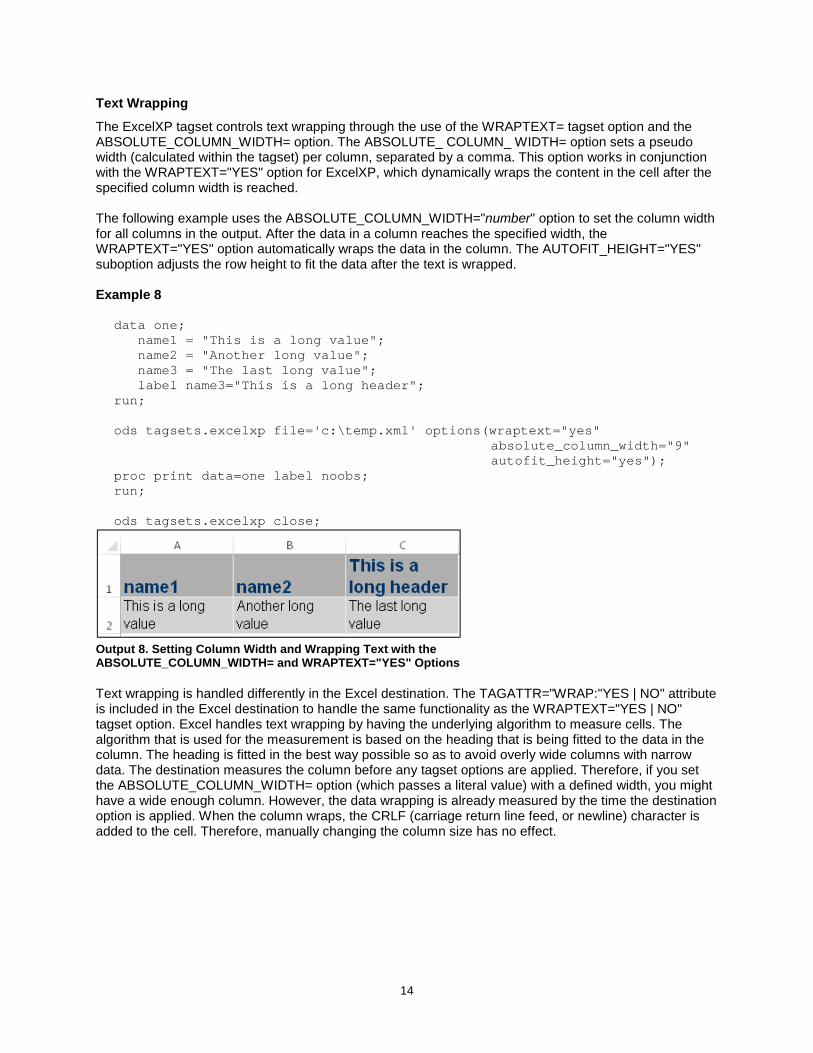
The ExcelXP tagset controls text wrapping through the use of the WRAPTEXT= tagset option and the ABSOLUTE_COLUMN_WIDTH= option. The ABSOLUTE_ COLUMN_ WIDTH= option sets a pseudo width (calculated within the tagset) per column, separated by a comma. This option works in conjunction with the WRAPTEXT="YES" option for ExcelXP, which dynamically wraps the content in the cell after the specified column width is reached. The following example uses the ABSOLUTE_COLUMN_WIDTH="number" option to set the column width for all columns in the output. After the data in a column reaches the specified width, the WRAPTEXT="YES" option automatically wraps the data in the column. The AUTOFIT_HEIGHT="YES" suboption adjusts the row height to fit the data after the text is wrapped. Example 8
data one; name1 = "This is a long value"; name2 = "Another long value"; name3 = "The last long value"; label name3="This is a long header";
run; ods tagsets.excelxp file='c:\temp.xml' options(wraptext="yes"
absolute_column_width="9" autofit_height="yes");
proc print data=one label noobs; run; ods tagsets.excelxp close;
Output 8. Setting Column Width and Wrapping Text with the ABSOLUTE_COLUMN_WIDTH= and WRAPTEXT="YES" Options
Text wrapping is handled differently in the Excel destination. The TAGATTR="WRAP:"YES | NO" attribute is included in the Excel destination to handle the same functionality as the WRAPTEXT="YES | NO" tagset option. Excel handles text wrapping by having the underlying algorithm to measure cells. The algorithm that is used for the measurement is based on the heading that is being fitted to the data in the column. The heading is fitted in the best way possible so as to avoid overly wide columns with narrow data. The destination measures the column before any tagset options are applied. Therefore, if you set the ABSOLUTE_COLUMN_WIDTH= option (which passes a literal value) with a defined width, you might have a wide enough column. However, the data wrapping is already measured by the time the destination option is applied. When the column wraps, the CRLF (carriage return line feed, or newline) character is added to the cell. Therefore, manually changing the column size has no effect.
15
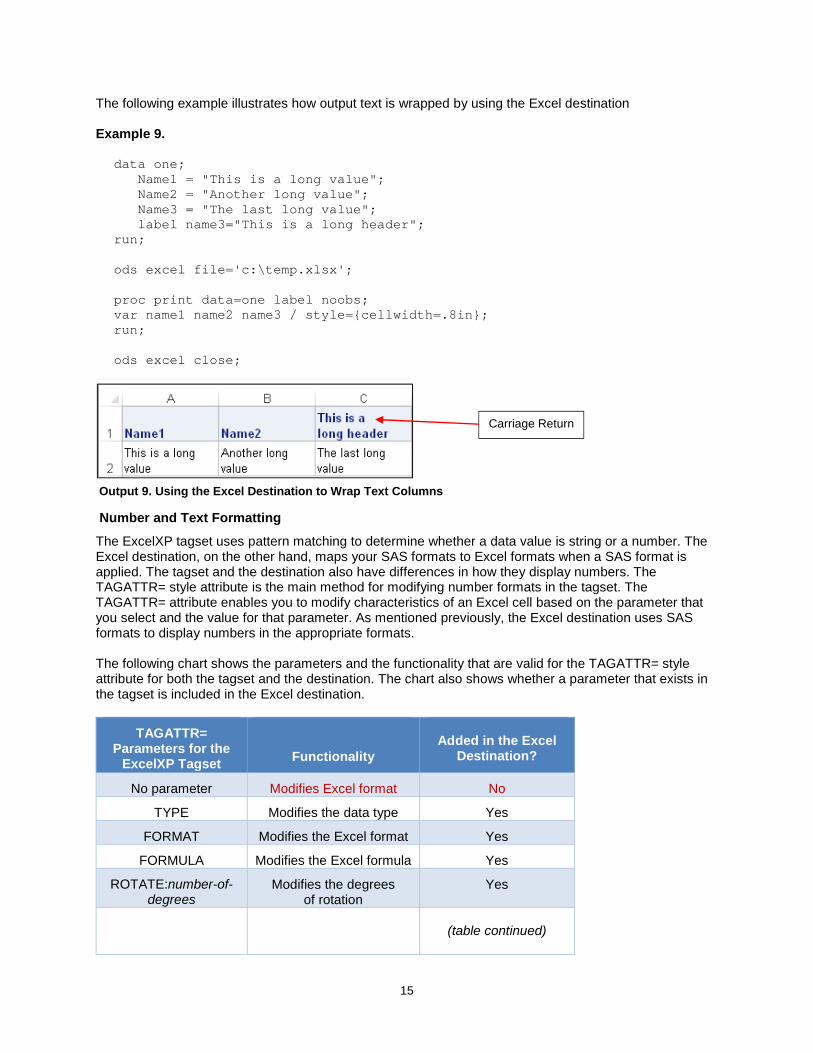
The following example illustrates how output text is wrapped by using the Excel destination Example 9.
data one; Name1 = "This is a long value"; Name2 = "Another long value"; Name3 = "The last long value"; label name3="This is a long header";
run; ods excel file='c:\temp.xlsx'; proc print data=one label noobs; var name1 name2 name3 / style={cellwidth=.8in}; run; ods excel close;
Output 9. Using the Excel Destination to Wrap Text Columns
Number and Text Formatting
The ExcelXP tagset uses pattern matching to determine whether a data value is string or a number. The Excel destination, on the other hand, maps your SAS formats to Excel formats when a SAS format is applied. The tagset and the destination also have differences in how they display numbers. The TAGATTR= style attribute is the main method for modifying number formats in the tagset. The TAGATTR= attribute enables you to modify characteristics of an Excel cell based on the parameter that you select and the value for that parameter. As mentioned previously, the Excel destination uses SAS formats to display numbers in the appropriate formats. The following chart shows the parameters and the functionality that are valid for the TAGATTR= style attribute for both the tagset and the destination. The chart also shows whether a parameter that exists in the tagset is included in the Excel destination.
TAGATTR= Parameters for the
ExcelXP Tagset
Functionality
Added in the Excel
Destination?
No parameter Modifies Excel format No
TYPE Modifies the data type Yes
FORMAT Modifies the Excel format Yes
FORMULA Modifies the Excel formula Yes
ROTATE:number-of-degrees
Modifies the degrees of rotation
Yes
(table continued)
Carriage Return
16
TAGATTR= Parameters for the
ExcelXP Tagset
Functionality
Added in the Excel
Destination?
HIDDEN:YES | NO Determines whether a
column is hidden
No (HIDDEN_COLUMNS=
option is used)
WRAP:YES | NO Determines whether column text wraps
Yes
MERGEACROSS:YES | NO | number
Determines whether text merges across columns
Yes
TYPE Parameter
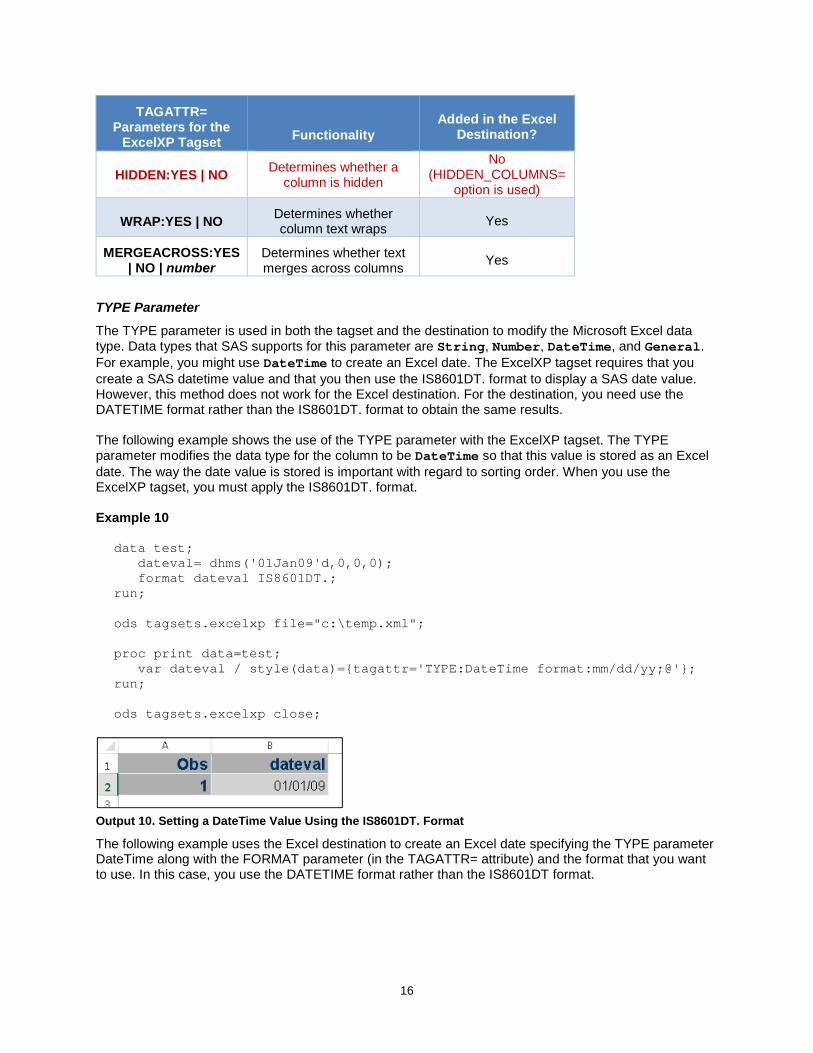
The TYPE parameter is used in both the tagset and the destination to modify the Microsoft Excel data type. Data types that SAS supports for this parameter are String, Number, DateTime, and General. For example, you might use DateTime to create an Excel date. The ExcelXP tagset requires that you create a SAS datetime value and that you then use the IS8601DT. format to display a SAS date value. However, this method does not work for the Excel destination. For the destination, you need use the DATETIME format rather than the IS8601DT. format to obtain the same results. The following example shows the use of the TYPE parameter with the ExcelXP tagset. The TYPE parameter modifies the data type for the column to be DateTime so that this value is stored as an Excel date. The way the date value is stored is important with regard to sorting order. When you use the ExcelXP tagset, you must apply the IS8601DT. format. Example 10
data test; dateval= dhms('01Jan09'd,0,0,0); format dateval IS8601DT.;
run; ods tagsets.excelxp file="c:\temp.xml"; proc print data=test;
var dateval / style(data)={tagattr='TYPE:DateTime format:mm/dd/yy;@'}; run; ods tagsets.excelxp close;
Output 10. Setting a DateTime Value Using the IS8601DT. Format
The following example uses the Excel destination to create an Excel date specifying the TYPE parameter DateTime along with the FORMAT parameter (in the TAGATTR= attribute) and the format that you want to use. In this case, you use the DATETIME format rather than the IS8601DT format.
17
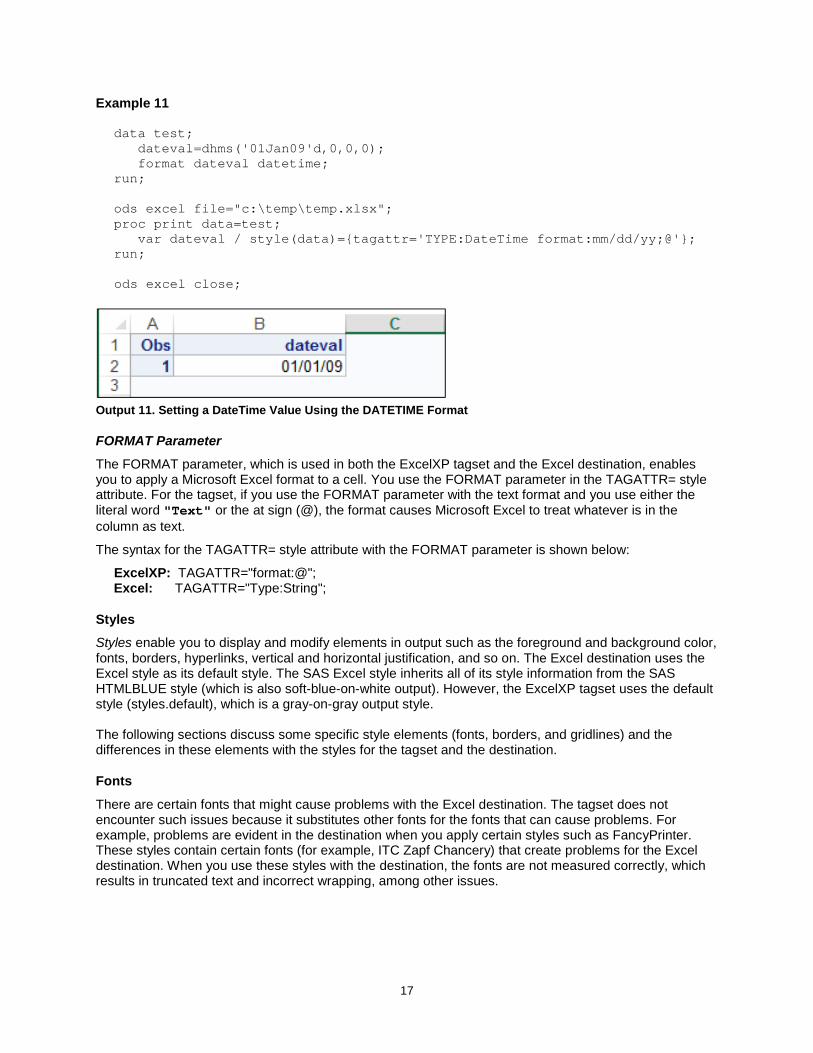
Example 11 data test;
dateval=dhms('01Jan09'd,0,0,0); format dateval datetime;
run; ods excel file="c:\temp\temp.xlsx"; proc print data=test;
var dateval / style(data)={tagattr='TYPE:DateTime format:mm/dd/yy;@'}; run; ods excel close;
Output 11. Setting a DateTime Value Using the DATETIME Format
FORMAT Parameter
The FORMAT parameter, which is used in both the ExcelXP tagset and the Excel destination, enables you to apply a Microsoft Excel format to a cell. You use the FORMAT parameter in the TAGATTR= style attribute. For the tagset, if you use the FORMAT parameter with the text format and you use either the literal word "Text" or the at sign (@), the format causes Microsoft Excel to treat whatever is in the column as text.
The syntax for the TAGATTR= style attribute with the FORMAT parameter is shown below:
ExcelXP: TAGATTR="format:@"; Excel: TAGATTR="Type:String";
Styles
Styles enable you to display and modify elements in output such as the foreground and background color, fonts, borders, hyperlinks, vertical and horizontal justification, and so on. The Excel destination uses the Excel style as its default style. The SAS Excel style inherits all of its style information from the SAS HTMLBLUE style (which is also soft-blue-on-white output). However, the ExcelXP tagset uses the default style (styles.default), which is a gray-on-gray output style. The following sections discuss some specific style elements (fonts, borders, and gridlines) and the differences in these elements with the styles for the tagset and the destination.
Fonts
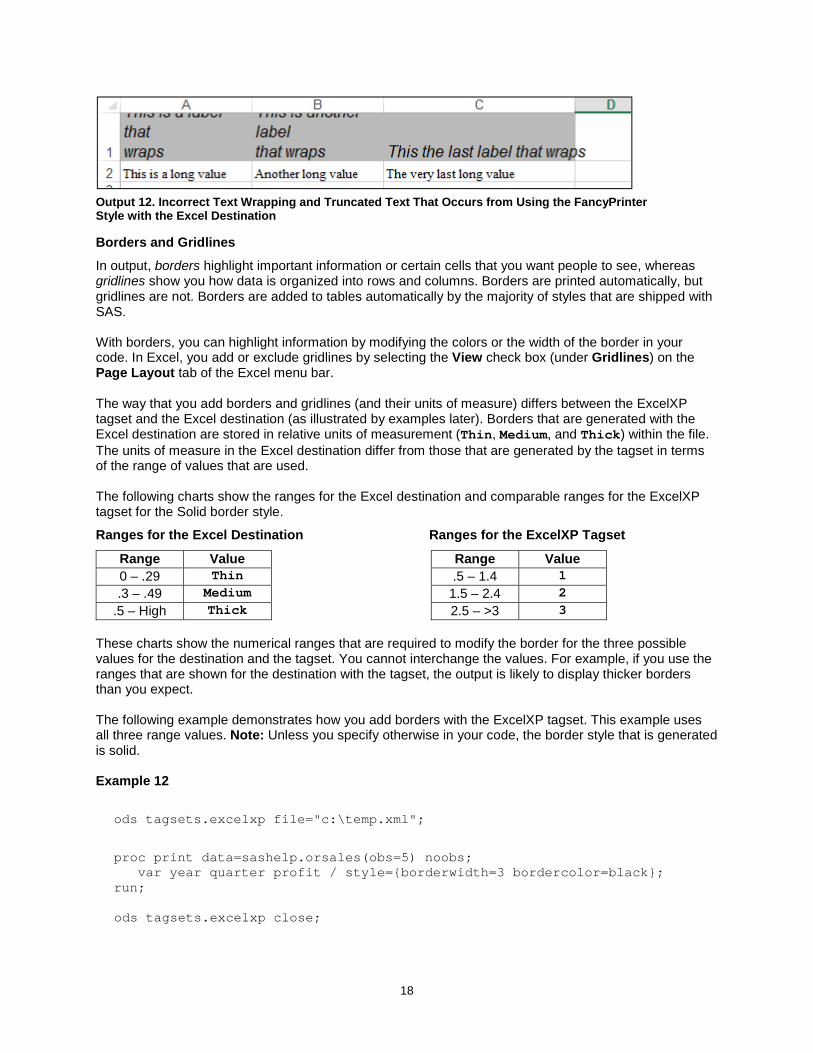
There are certain fonts that might cause problems with the Excel destination. The tagset does not encounter such issues because it substitutes other fonts for the fonts that can cause problems. For example, problems are evident in the destination when you apply certain styles such as FancyPrinter. These styles contain certain fonts (for example, ITC Zapf Chancery) that create problems for the Excel destination. When you use these styles with the destination, the fonts are not measured correctly, which results in truncated text and incorrect wrapping, among other issues.
18
Output 12. Incorrect Text Wrapping and Truncated Text That Occurs from Using the FancyPrinter Style with the Excel Destination
Borders and Gridlines
In output, borders highlight important information or certain cells that you want people to see, whereas gridlines show you how data is organized into rows and columns. Borders are printed automatically, but gridlines are not. Borders are added to tables automatically by the majority of styles that are shipped with SAS. With borders, you can highlight information by modifying the colors or the width of the border in your code. In Excel, you add or exclude gridlines by selecting the View check box (under Gridlines) on the Page Layout tab of the Excel menu bar. The way that you add borders and gridlines (and their units of measure) differs between the ExcelXP tagset and the Excel destination (as illustrated by examples later). Borders that are generated with the Excel destination are stored in relative units of measurement (Thin, Medium, and Thick) within the file. The units of measure in the Excel destination differ from those that are generated by the tagset in terms of the range of values that are used. The following charts show the ranges for the Excel destination and comparable ranges for the ExcelXP tagset for the Solid border style.
Ranges for the Excel Destination Ranges for the ExcelXP Tagset
Range Value 0 – .29 Thin .3 – .49 Medium
.5 – High Thick
Range Value .5 – 1.4 1 1.5 – 2.4 2 2.5 – >3 3
These charts show the numerical ranges that are required to modify the border for the three possible values for the destination and the tagset. You cannot interchange the values. For example, if you use the ranges that are shown for the destination with the tagset, the output is likely to display thicker borders than you expect. The following example demonstrates how you add borders with the ExcelXP tagset. This example uses all three range values. Note: Unless you specify otherwise in your code, the border style that is generated is solid. Example 12
ods tagsets.excelxp file="c:\temp.xml";
proc print data=sashelp.orsales(obs=5) noobs;
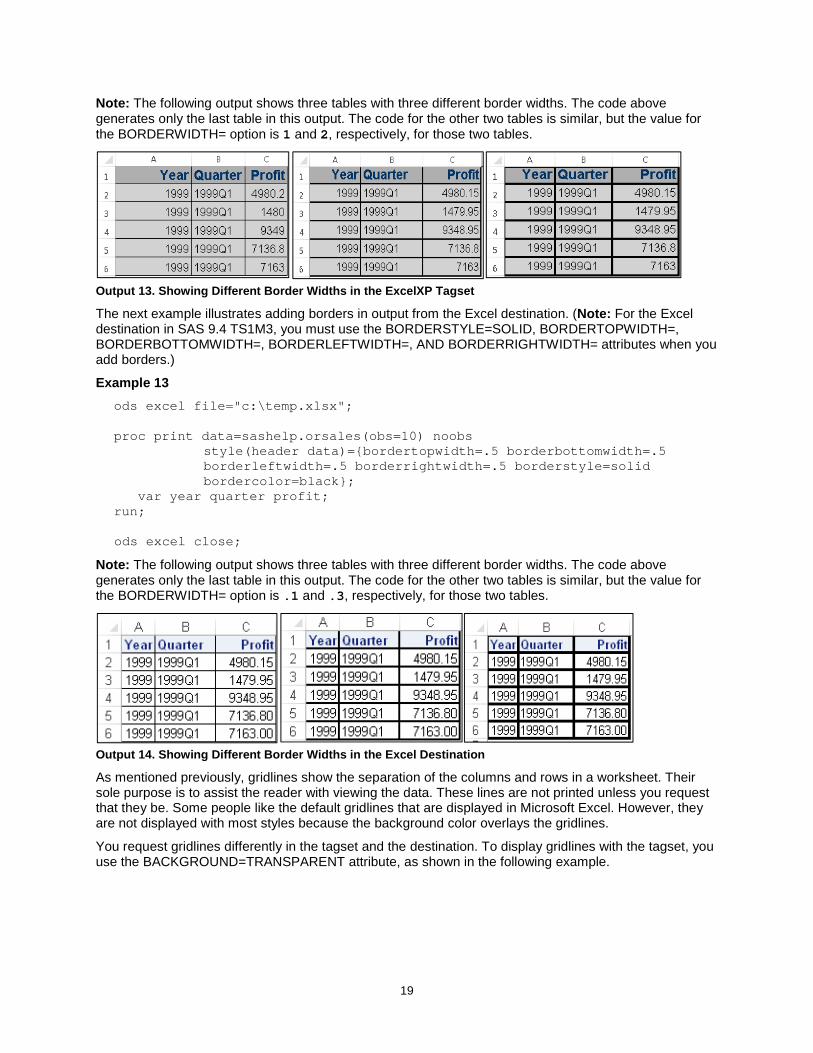
var year quarter profit / style={borderwidth=3 bordercolor=black}; run; ods tagsets.excelxp close;
19
Note: The following output shows three tables with three different border widths. The code above generates only the last table in this output. The code for the other two tables is similar, but the value for the BORDERWIDTH= option is 1 and 2, respectively, for those two tables.
Output 13. Showing Different Border Widths in the ExcelXP Tagset
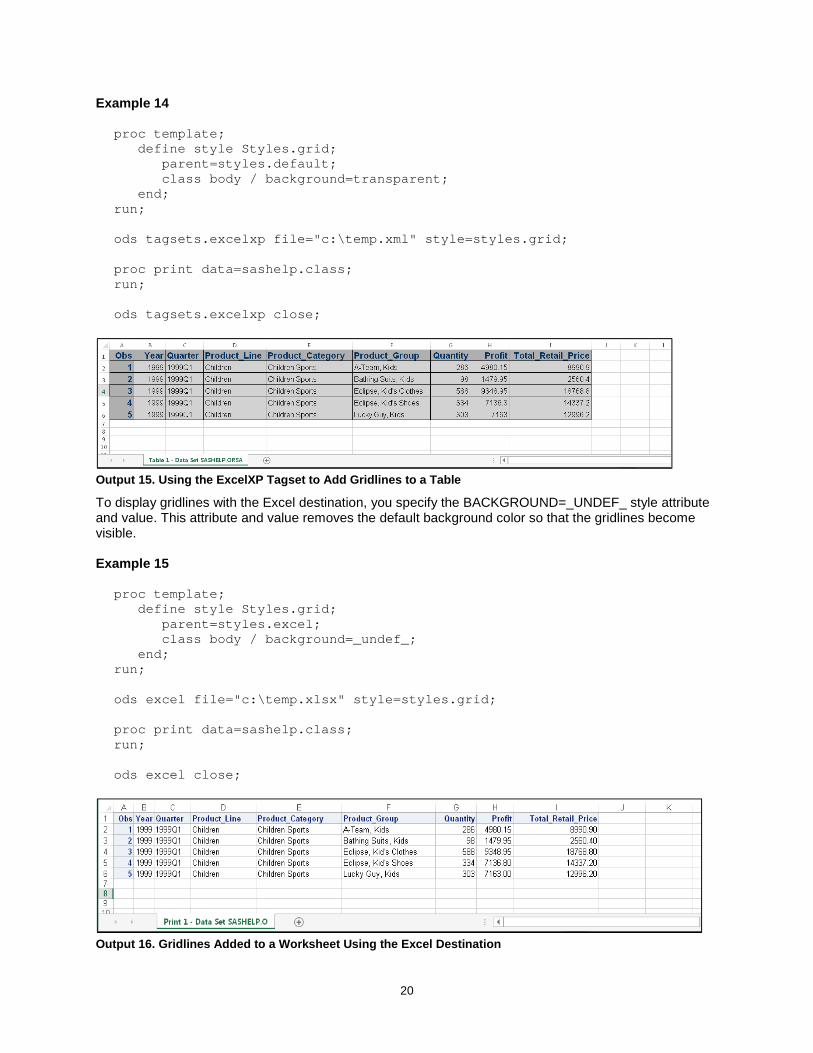
The next example illustrates adding borders in output from the Excel destination. (Note: For the Excel destination in SAS 9.4 TS1M3, you must use the BORDERSTYLE=SOLID, BORDERTOPWIDTH=, BORDERBOTTOMWIDTH=, BORDERLEFTWIDTH=, AND BORDERRIGHTWIDTH= attributes when you add borders.)
Example 13
ods excel file="c:\temp.xlsx"; proc print data=sashelp.orsales(obs=10) noobs
style(header data)={bordertopwidth=.5 borderbottomwidth=.5 borderleftwidth=.5 borderrightwidth=.5 borderstyle=solid bordercolor=black};
var year quarter profit; run; ods excel close;
Note: The following output shows three tables with three different border widths. The code above generates only the last table in this output. The code for the other two tables is similar, but the value for the BORDERWIDTH= option is .1 and .3, respectively, for those two tables.
Output 14. Showing Different Border Widths in the Excel Destination
As mentioned previously, gridlines show the separation of the columns and rows in a worksheet. Their sole purpose is to assist the reader with viewing the data. These lines are not printed unless you request that they be. Some people like the default gridlines that are displayed in Microsoft Excel. However, they are not displayed with most styles because the background color overlays the gridlines.
You request gridlines differently in the tagset and the destination. To display gridlines with the tagset, you use the BACKGROUND=TRANSPARENT attribute, as shown in the following example.
20
Example 14
proc template; define style Styles.grid;
parent=styles.default; class body / background=transparent;
end; run; ods tagsets.excelxp file="c:\temp.xml" style=styles.grid; proc print data=sashelp.class; run; ods tagsets.excelxp close;
Output 15. Using the ExcelXP Tagset to Add Gridlines to a Table
To display gridlines with the Excel destination, you specify the BACKGROUND=_UNDEF_ style attribute and value. This attribute and value removes the default background color so that the gridlines become visible. Example 15
proc template; define style Styles.grid;
parent=styles.excel; class body / background=_undef_;
end; run; ods excel file="c:\temp.xlsx" style=styles.grid; proc print data=sashelp.class; run; ods excel close;
Output 16. Gridlines Added to a Worksheet Using the Excel Destination
21
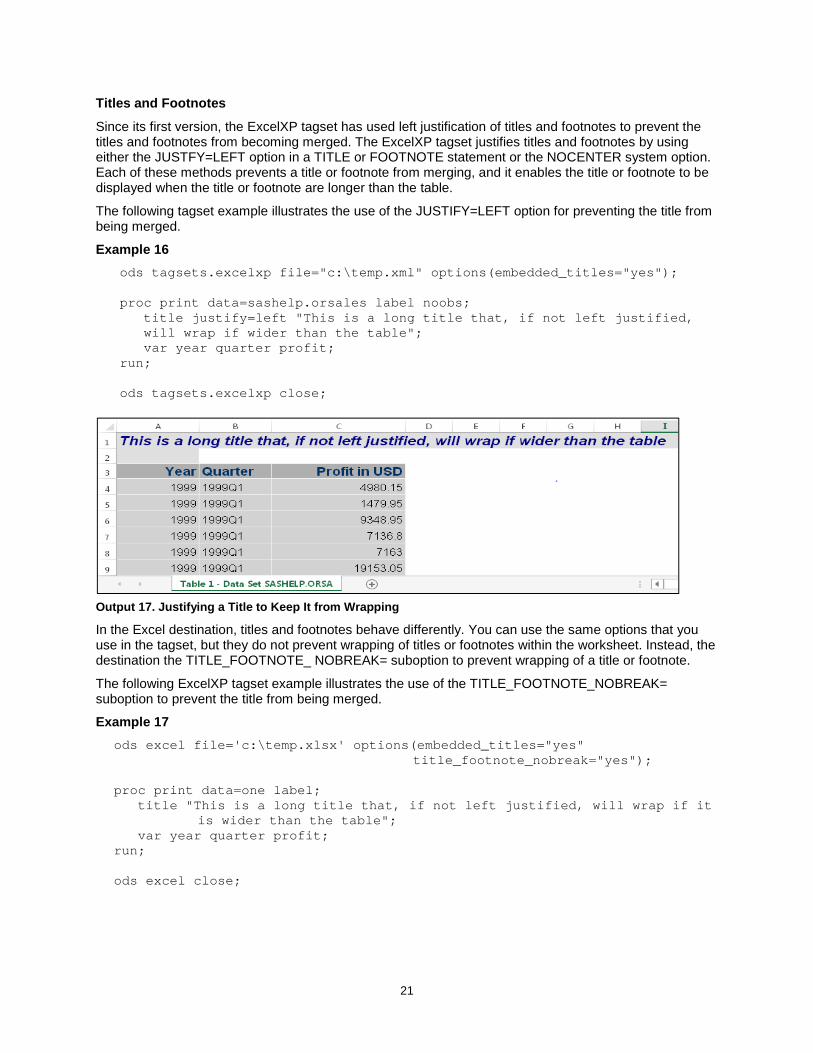
Titles and Footnotes
Since its first version, the ExcelXP tagset has used left justification of titles and footnotes to prevent the titles and footnotes from becoming merged. The ExcelXP tagset justifies titles and footnotes by using either the JUSTFY=LEFT option in a TITLE or FOOTNOTE statement or the NOCENTER system option. Each of these methods prevents a title or footnote from merging, and it enables the title or footnote to be displayed when the title or footnote are longer than the table.
The following tagset example illustrates the use of the JUSTIFY=LEFT option for preventing the title from being merged.
Example 16
ods tagsets.excelxp file="c:\temp.xml" options(embedded_titles="yes"); proc print data=sashelp.orsales label noobs;
title justify=left "This is a long title that, if not left justified, will wrap if wider than the table"; var year quarter profit;
run; ods tagsets.excelxp close;
Output 17. Justifying a Title to Keep It from Wrapping
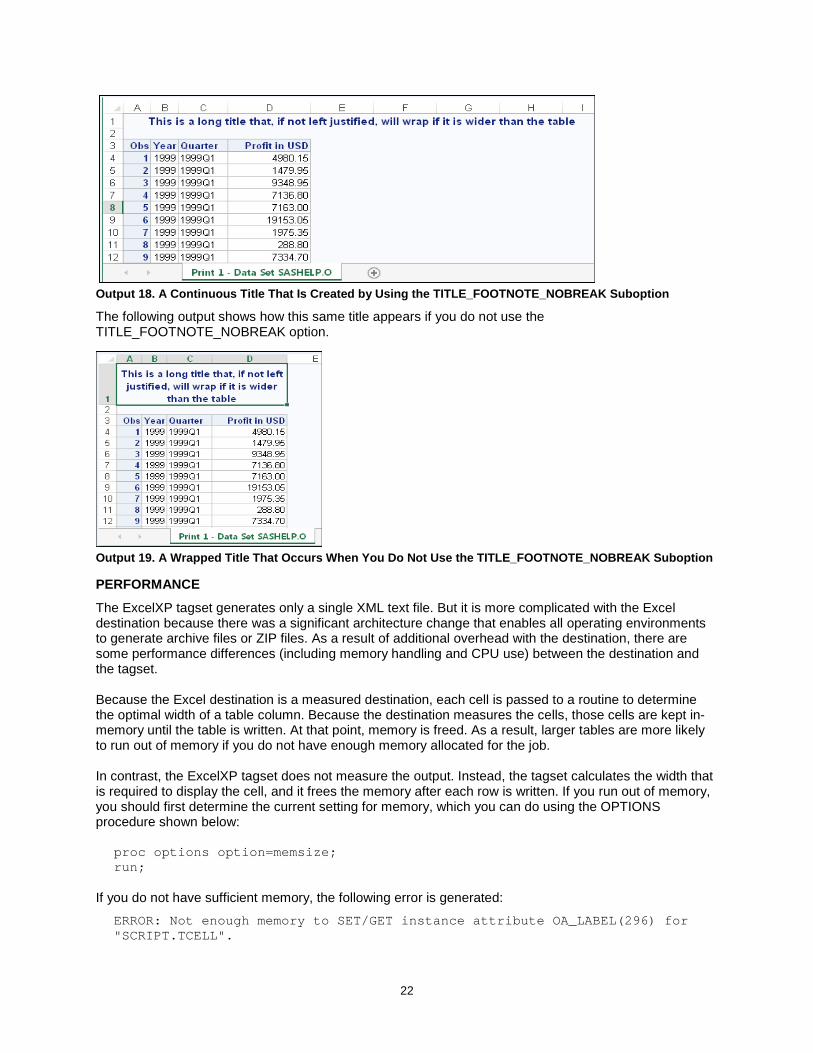
In the Excel destination, titles and footnotes behave differently. You can use the same options that you use in the tagset, but they do not prevent wrapping of titles or footnotes within the worksheet. Instead, the destination the TITLE_FOOTNOTE_ NOBREAK= suboption to prevent wrapping of a title or footnote.
The following ExcelXP tagset example illustrates the use of the TITLE_FOOTNOTE_NOBREAK= suboption to prevent the title from being merged.
Example 17
ods excel file='c:\temp.xlsx' options(embedded_titles="yes" title_footnote_nobreak="yes");
proc print data=one label;
title "This is a long title that, if not left justified, will wrap if it is wider than the table";
var year quarter profit; run; ods excel close;
22
Output 18. A Continuous Title That Is Created by Using the TITLE_FOOTNOTE_NOBREAK Suboption
The following output shows how this same title appears if you do not use the TITLE_FOOTNOTE_NOBREAK option.
Output 19. A Wrapped Title That Occurs When You Do Not Use the TITLE_FOOTNOTE_NOBREAK Suboption
PERFORMANCE
The ExcelXP tagset generates only a single XML text file. But it is more complicated with the Excel destination because there was a significant architecture change that enables all operating environments to generate archive files or ZIP files. As a result of additional overhead with the destination, there are some performance differences (including memory handling and CPU use) between the destination and the tagset. Because the Excel destination is a measured destination, each cell is passed to a routine to determine the optimal width of a table column. Because the destination measures the cells, those cells are kept in-memory until the table is written. At that point, memory is freed. As a result, larger tables are more likely to run out of memory if you do not have enough memory allocated for the job. In contrast, the ExcelXP tagset does not measure the output. Instead, the tagset calculates the width that is required to display the cell, and it frees the memory after each row is written. If you run out of memory, you should first determine the current setting for memory, which you can do using the OPTIONS procedure shown below:
proc options option=memsize; run;
If you do not have sufficient memory, the following error is generated:
ERROR: Not enough memory to SET/GET instance attribute OA_LABEL(296) for "SCRIPT.TCELL".
23
Note: Under Windows, the default memory size is set to 2 GB. Also, on 32-bit systems, the maximum amount of memory that can be accessed is 4 GB for the SAS application.
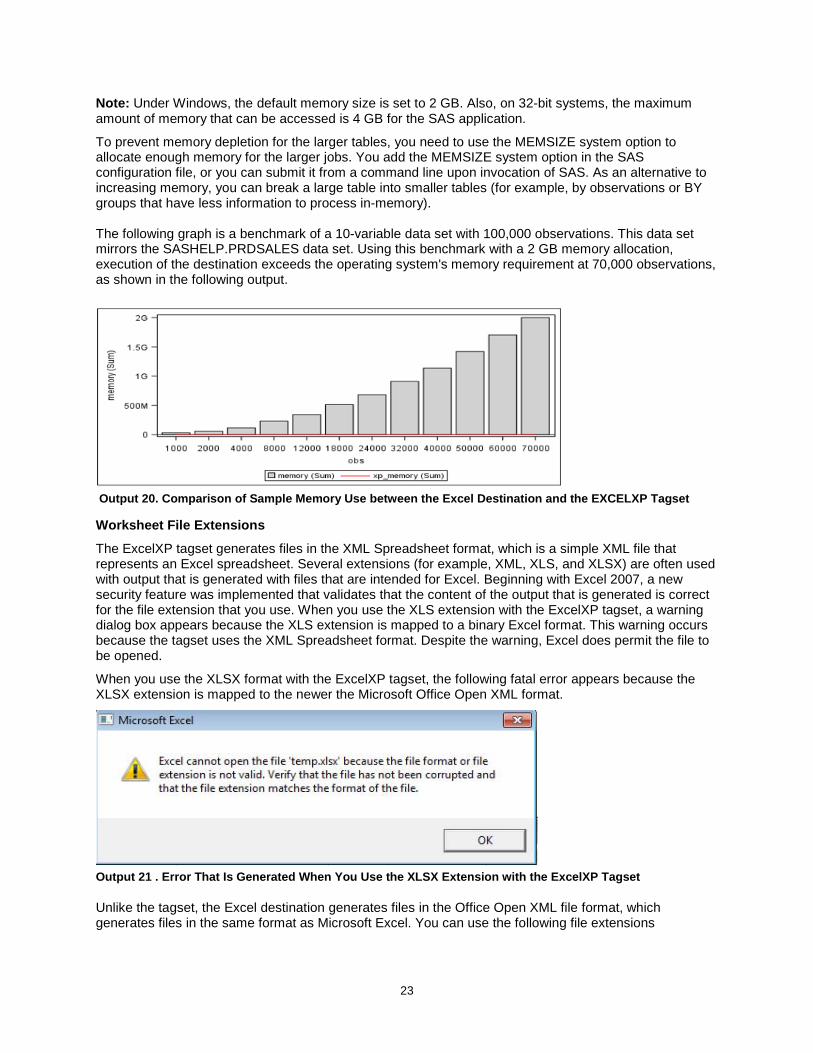
To prevent memory depletion for the larger tables, you need to use the MEMSIZE system option to allocate enough memory for the larger jobs. You add the MEMSIZE system option in the SAS configuration file, or you can submit it from a command line upon invocation of SAS. As an alternative to increasing memory, you can break a large table into smaller tables (for example, by observations or BY groups that have less information to process in-memory). The following graph is a benchmark of a 10-variable data set with 100,000 observations. This data set mirrors the SASHELP.PRDSALES data set. Using this benchmark with a 2 GB memory allocation, execution of the destination exceeds the operating system's memory requirement at 70,000 observations, as shown in the following output.
Output 20. Comparison of Sample Memory Use between the Excel Destination and the EXCELXP Tagset
Worksheet File Extensions
The ExcelXP tagset generates files in the XML Spreadsheet format, which is a simple XML file that represents an Excel spreadsheet. Several extensions (for example, XML, XLS, and XLSX) are often used with output that is generated with files that are intended for Excel. Beginning with Excel 2007, a new security feature was implemented that validates that the content of the output that is generated is correct for the file extension that you use. When you use the XLS extension with the ExcelXP tagset, a warning dialog box appears because the XLS extension is mapped to a binary Excel format. This warning occurs because the tagset uses the XML Spreadsheet format. Despite the warning, Excel does permit the file to be opened.
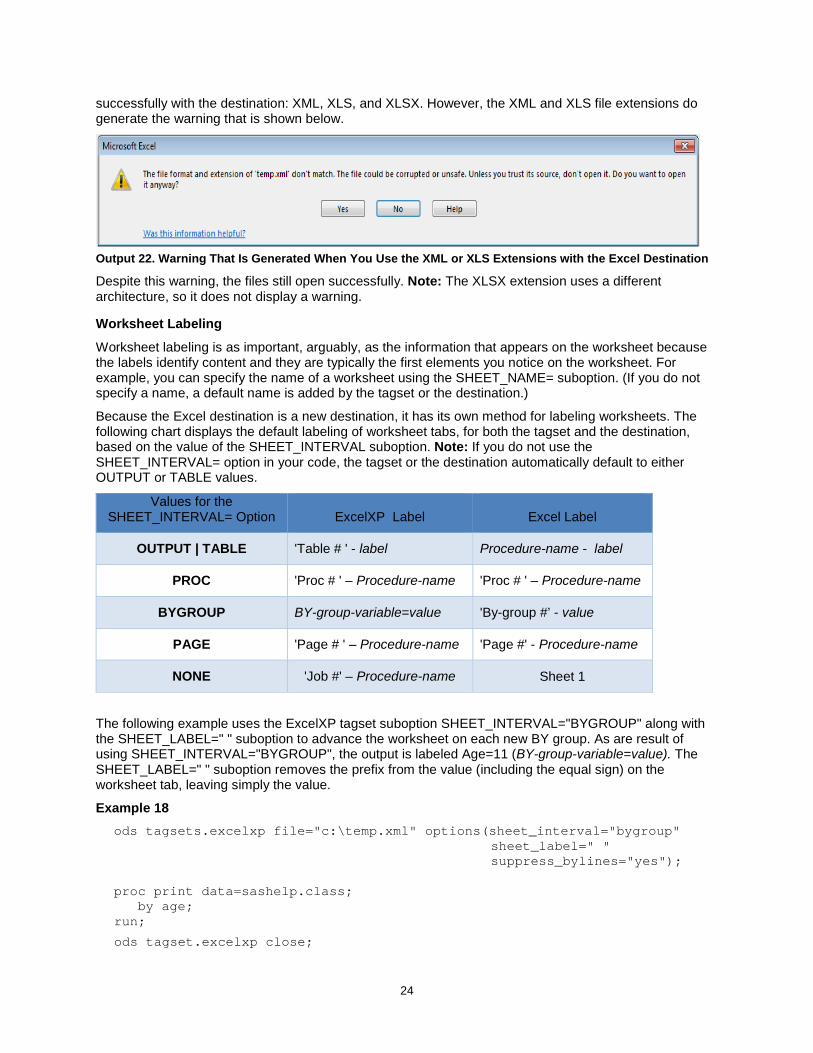
When you use the XLSX format with the ExcelXP tagset, the following fatal error appears because the XLSX extension is mapped to the newer the Microsoft Office Open XML format.
Output 21 . Error That Is Generated When You Use the XLSX Extension with the ExcelXP Tagset
Unlike the tagset, the Excel destination generates files in the Office Open XML file format, which generates files in the same format as Microsoft Excel. You can use the following file extensions
24
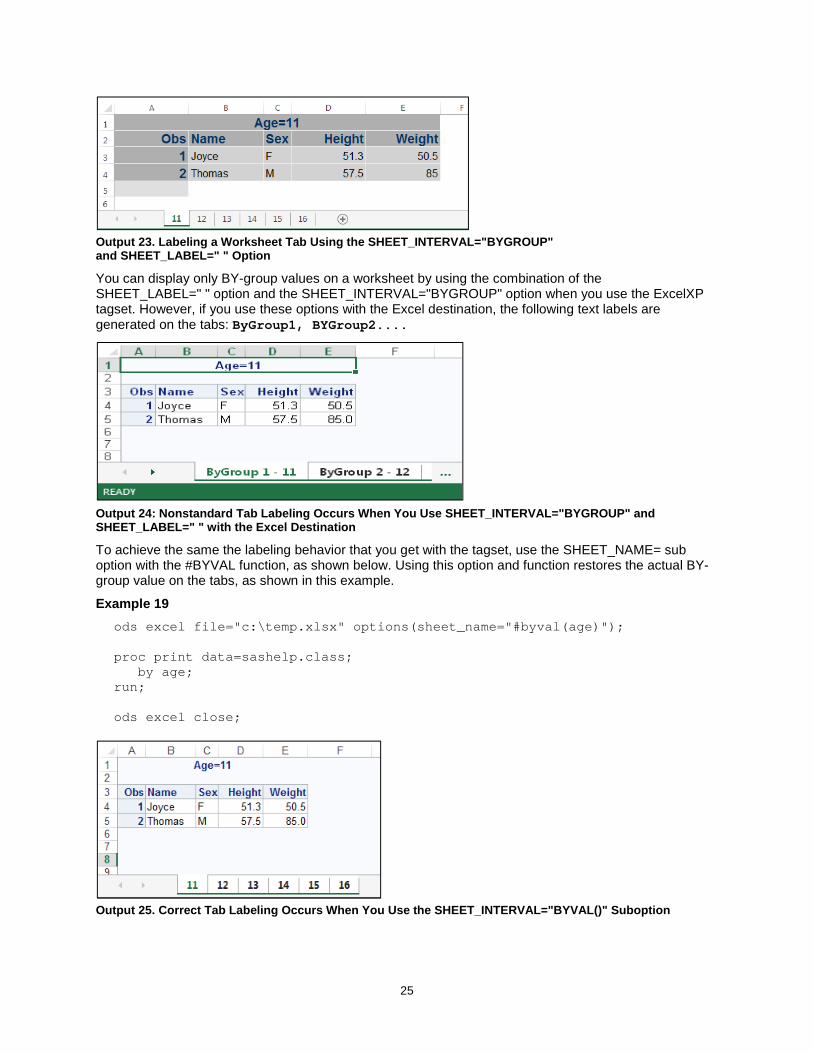
successfully with the destination: XML, XLS, and XLSX. However, the XML and XLS file extensions do generate the warning that is shown below.
Output 22. Warning That Is Generated When You Use the XML or XLS Extensions with the Excel Destination
Despite this warning, the files still open successfully. Note: The XLSX extension uses a different architecture, so it does not display a warning.
Worksheet Labeling
Worksheet labeling is as important, arguably, as the information that appears on the worksheet because the labels identify content and they are typically the first elements you notice on the worksheet. For example, you can specify the name of a worksheet using the SHEET_NAME= suboption. (If you do not specify a name, a default name is added by the tagset or the destination.)
Because the Excel destination is a new destination, it has its own method for labeling worksheets. The following chart displays the default labeling of worksheet tabs, for both the tagset and the destination, based on the value of the SHEET_INTERVAL suboption. Note: If you do not use the SHEET_INTERVAL= option in your code, the tagset or the destination automatically default to either OUTPUT or TABLE values.
The following example uses the ExcelXP tagset suboption SHEET_INTERVAL="BYGROUP" along with the SHEET_LABEL=" " suboption to advance the worksheet on each new BY group. As are result of using SHEET_INTERVAL="BYGROUP", the output is labeled Age=11 (BY-group-variable=value). The SHEET_LABEL=" " suboption removes the prefix from the value (including the equal sign) on the worksheet tab, leaving simply the value.
Example 18
ods tagsets.excelxp file="c:\temp.xml" options(sheet_interval="bygroup" sheet_label=" " suppress_bylines="yes");
proc print data=sashelp.class;
by age; run;
ods tagset.excelxp close;
Values for the SHEET_INTERVAL= Option
ExcelXP Label
Excel Label
OUTPUT | TABLE 'Table # ' - label Procedure-name - label
PROC 'Proc # ' – Procedure-name 'Proc # ' – Procedure-name
BYGROUP BY-group-variable=value 'By-group #’ - value
PAGE 'Page # ' – Procedure-name 'Page #' - Procedure-name
NONE 'Job #' – Procedure-name Sheet 1
25
Output 23. Labeling a Worksheet Tab Using the SHEET_INTERVAL="BYGROUP" and SHEET_LABEL=" " Option
You can display only BY-group values on a worksheet by using the combination of the SHEET_LABEL=" " option and the SHEET_INTERVAL="BYGROUP" option when you use the ExcelXP tagset. However, if you use these options with the Excel destination, the following text labels are generated on the tabs: ByGroup1, BYGroup2....
Output 24: Nonstandard Tab Labeling Occurs When You Use SHEET_INTERVAL="BYGROUP" and SHEET_LABEL=" " with the Excel Destination
To achieve the same the labeling behavior that you get with the tagset, use the SHEET_NAME= sub option with the #BYVAL function, as shown below. Using this option and function restores the actual BY-group value on the tabs, as shown in this example.
Example 19
ods excel file="c:\temp.xlsx" options(sheet_name="#byval(age)"); proc print data=sashelp.class;
by age; run; ods excel close;
Output 25. Correct Tab Labeling Occurs When You Use the SHEET_INTERVAL="BYVAL()" Suboption
26
SHEET INTERVAL: ADDING MULTIPLE PROCEDURES ON A WORKSHEET
For the ExcelXP tagset, you can direct output to a new worksheet by using the SHEET_INTERVAL= suboption. For example, you might want to add multiple procedures on a worksheet and then begin writing other output to a second worksheet. You can advance output to a new worksheet by modifying the values of SHEET_INTERVAL=. If you specify SHEET_INTERVAL="NONE" with the tagset, the output is written to the current worksheet. The worksheet will not change unless you then specify SHEET_INTERVAL="TABLE", which begins writing output on the next worksheet.
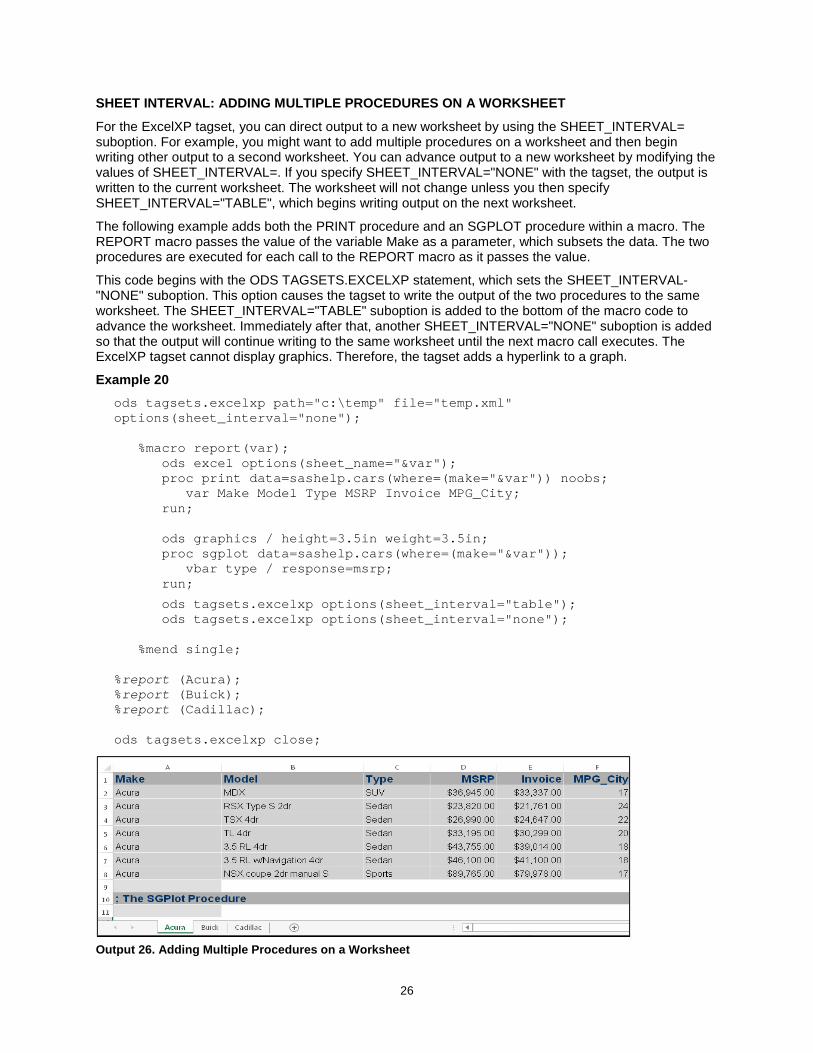
The following example adds both the PRINT procedure and an SGPLOT procedure within a macro. The REPORT macro passes the value of the variable Make as a parameter, which subsets the data. The two procedures are executed for each call to the REPORT macro as it passes the value.
This code begins with the ODS TAGSETS.EXCELXP statement, which sets the SHEET_INTERVAL-"NONE" suboption. This option causes the tagset to write the output of the two procedures to the same worksheet. The SHEET_INTERVAL="TABLE" suboption is added to the bottom of the macro code to advance the worksheet. Immediately after that, another SHEET_INTERVAL="NONE" suboption is added so that the output will continue writing to the same worksheet until the next macro call executes. The ExcelXP tagset cannot display graphics. Therefore, the tagset adds a hyperlink to a graph.
Example 20
ods tagsets.excelxp path="c:\temp" file="temp.xml" options(sheet_interval="none");
%macro report(var); ods excel options(sheet_name="&var"); proc print data=sashelp.cars(where=(make="&var")) noobs;
var Make Model Type MSRP Invoice MPG_City; run;
ods graphics / height=3.5in weight=3.5in; proc sgplot data=sashelp.cars(where=(make="&var"));
vbar type / response=msrp; run;
ods tagsets.excelxp options(sheet_interval="table"); ods tagsets.excelxp options(sheet_interval="none");
%mend single;
%report (Acura); %report (Buick); %report (Cadillac); ods tagsets.excelxp close;
Output 26. Adding Multiple Procedures on a Worksheet
27
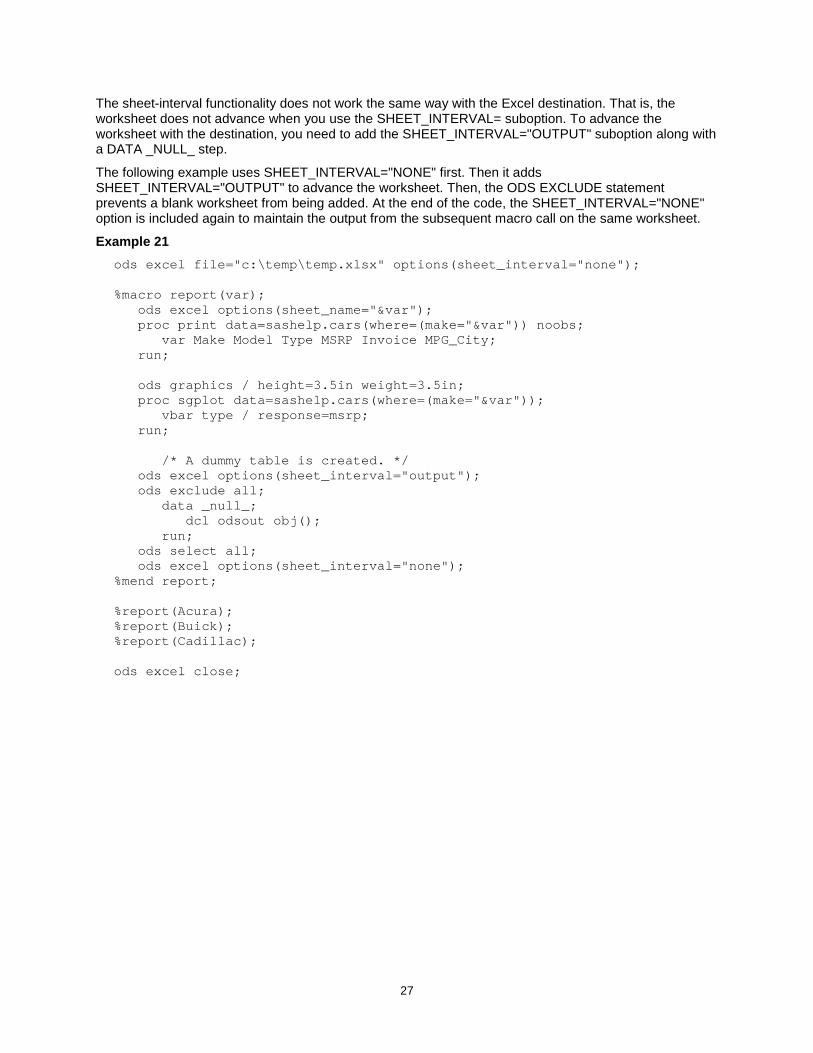
The sheet-interval functionality does not work the same way with the Excel destination. That is, the worksheet does not advance when you use the SHEET_INTERVAL= suboption. To advance the worksheet with the destination, you need to add the SHEET_INTERVAL="OUTPUT" suboption along with a DATA _NULL_ step.
The following example uses SHEET_INTERVAL="NONE" first. Then it adds SHEET_INTERVAL="OUTPUT" to advance the worksheet. Then, the ODS EXCLUDE statement prevents a blank worksheet from being added. At the end of the code, the SHEET_INTERVAL="NONE" option is included again to maintain the output from the subsequent macro call on the same worksheet.
Example 21
ods excel file="c:\temp\temp.xlsx" options(sheet_interval="none"); %macro report(var);
ods excel options(sheet_name="&var"); proc print data=sashelp.cars(where=(make="&var")) noobs;
var Make Model Type MSRP Invoice MPG_City; run;
ods graphics / height=3.5in weight=3.5in; proc sgplot data=sashelp.cars(where=(make="&var"));
vbar type / response=msrp; run;
/* A dummy table is created. */
ods excel options(sheet_interval="output"); ods exclude all;
data _null_; dcl odsout obj();
run; ods select all; ods excel options(sheet_interval="none");
%mend report; %report(Acura); %report(Buick); %report(Cadillac); ods excel close;
28
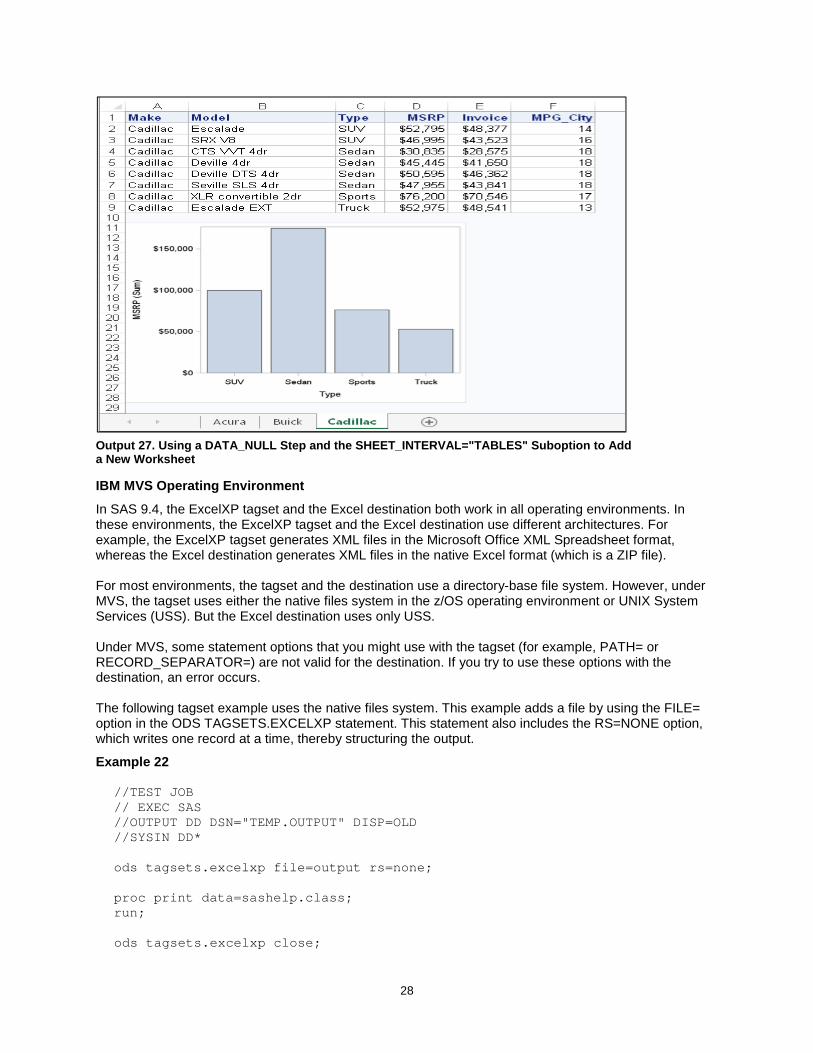
Output 27. Using a DATA_NULL Step and the SHEET_INTERVAL="TABLES" Suboption to Add a New Worksheet
IBM MVS Operating Environment
In SAS 9.4, the ExcelXP tagset and the Excel destination both work in all operating environments. In these environments, the ExcelXP tagset and the Excel destination use different architectures. For example, the ExcelXP tagset generates XML files in the Microsoft Office XML Spreadsheet format, whereas the Excel destination generates XML files in the native Excel format (which is a ZIP file). For most environments, the tagset and the destination use a directory-base file system. However, under MVS, the tagset uses either the native files system in the z/OS operating environment or UNIX System Services (USS). But the Excel destination uses only USS. Under MVS, some statement options that you might use with the tagset (for example, PATH= or RECORD_SEPARATOR=) are not valid for the destination. If you try to use these options with the destination, an error occurs. The following tagset example uses the native files system. This example adds a file by using the FILE= option in the ODS TAGSETS.EXCELXP statement. This statement also includes the RS=NONE option, which writes one record at a time, thereby structuring the output.
Example 22
//TEST JOB // EXEC SAS //OUTPUT DD DSN="TEMP.OUTPUT" DISP=OLD //SYSIN DD* ods tagsets.excelxp file=output rs=none; proc print data=sashelp.class; run; ods tagsets.excelxp close;

29
To generate files using USS with the Excel destination's hierarchical file system (HFS), you simply add the SAS option FILESYSTEM=HFS, as shown in the following example.
Example 23
//TEST JOB // EXEC SAS //OUTPUT DD DSN="/u/user-ID/output.xlsx" DISP=OLD //SYSIN DD*
options filesystem=hfs; ods excel file=output;
proc print data=sashelp.class; run;
ods excel close;
ROUND 3: FUNCTIONALITY THAT IS SPECIFIC TO THE EXCELXP TAGSET
In the third maintenance release of SAS 9.4 (TS1M3), the ExcelXP tagset contains some features and functionality that are not included in the Excel destination. For example, the AUTOFIT_HEIGHT= and MISSING_ALIGN= suboptions are not included in the destination. Some of those options are omitted because the destination handles that functionality automatically or because the destination uses styles to accomplish the same functionality. For example, the Excel destination uses a style to perform the same function as the MISSING_ALIGN= suboptions in the tagset. A few other tagset options (for example, SKIP_SPACE=) do not have an equivalent in the Excel destination.
The following sections discuss some of this functionality that is available only in the ExcelXP tagset. In particular, the sections discuss controlling worksheets using macro variables, setting options using a configuration file, and adding new functionality by modifying the ExcelXP tagset.
USING MACRO VARIABLES TO CONTROL WORKSHEETS
The ExcelXP tagset sets a series of macro variables that you can override in a program to control such characteristics as the worksheet name or the inclusion of titles. The following macro variables are available for you to use. These macro variables correspond to the options that you set with the MVAR statement in the ExcelXP tagset.
EMBEDDED_TITLES EMBEDDED_FOOTERS FROZEN_HEADERS FROZEN_ROWHEADERS AUTOFILTER WIDTH_POINTS
WIDTH_FUDGE DEFAULT_COLUMN_WIDTH FORMULAS CONVERT_PERCENTAGES ORIENTATION OVERRIDE_SHEETNAME
The following example demonstrates how to use macro variables with the tagset to lock column headings, to include a title, and to modify the worksheet name.
Example 24
%let frozen_headers=yes; %let frozen_rowheaders=1; %let embedded_titles=yes; %let override_sheetname=Macro_test;
(code continued)
30
ods tagsets.excelcp file="c:\temp.xml" style=sasweb; proc print data=sashelp.orsales;
var Year Quarter Product_Line Profit; title "Using macro variables to add functionality";
run; ods tagsets.excelxp close;
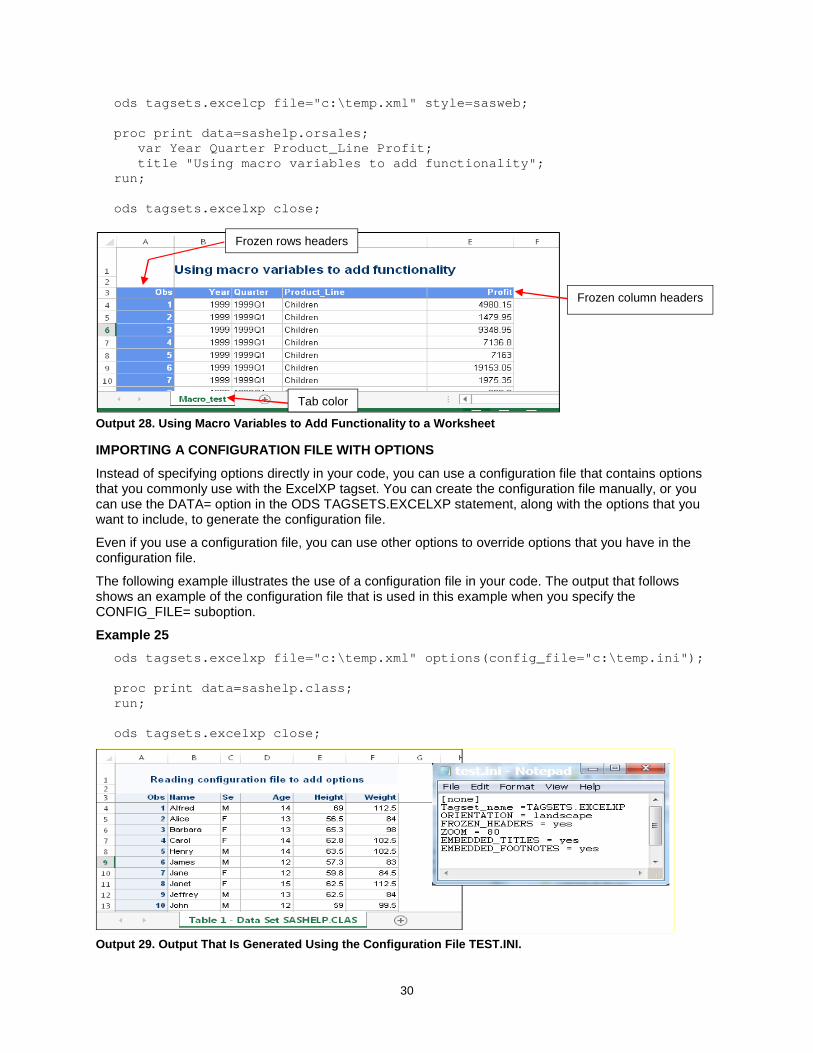
Output 28. Using Macro Variables to Add Functionality to a Worksheet
IMPORTING A CONFIGURATION FILE WITH OPTIONS
Instead of specifying options directly in your code, you can use a configuration file that contains options that you commonly use with the ExcelXP tagset. You can create the configuration file manually, or you can use the DATA= option in the ODS TAGSETS.EXCELXP statement, along with the options that you want to include, to generate the configuration file.
Even if you use a configuration file, you can use other options to override options that you have in the configuration file.
The following example illustrates the use of a configuration file in your code. The output that follows shows an example of the configuration file that is used in this example when you specify the CONFIG_FILE= suboption.
Example 25
ods tagsets.excelxp file="c:\temp.xml" options(config_file="c:\temp.ini"); proc print data=sashelp.class; run; ods tagsets.excelxp close;
Output 29. Output That Is Generated Using the Configuration File TEST.INI.
Frozen rows headers
Tab color
Frozen column headers
31
MODIFYING THE EXCELXP TAGSET
The ExcelXP tagset was created using the ODS Markup destination. ODS Markup language enables you to create the XML code that is required for the XML Spreadsheet specification. Then, you can customize the tagset to add new functionality or options using elements from the XML Spreadsheet specification. (An example of the tagset is available in the Resources section at the end of this paper.
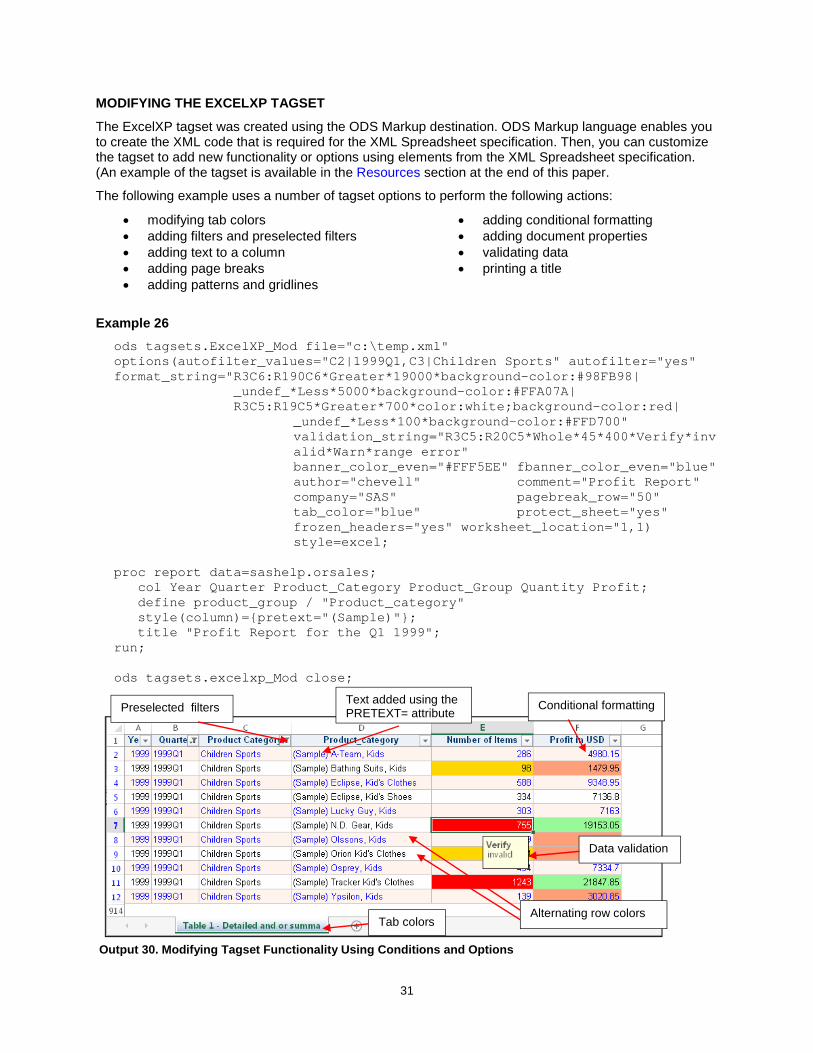
The following example uses a number of tagset options to perform the following actions:
modifying tab colors adding filters and preselected filters adding text to a column adding page breaks adding patterns and gridlines
adding conditional formatting adding document properties validating data printing a title
Example 26
ods tagsets.ExcelXP_Mod file="c:\temp.xml" options(autofilter_values="C2|1999Q1,C3|Children Sports" autofilter="yes" format_string="R3C6:R190C6*Greater*19000*background-color:#98FB98|
_undef_*Less*5000*background-color:#FFA07A| R3C5:R19C5*Greater*700*color:white;background-color:red|
_undef_*Less*100*background-color:#FFD700" validation_string="R3C5:R20C5*Whole*45*400*Verify*invalid*Warn*range error" banner_color_even="#FFF5EE" fbanner_color_even="blue" author="chevell" comment="Profit Report" company="SAS" pagebreak_row="50" tab_color="blue" protect_sheet="yes" frozen_headers="yes" worksheet_location="1,1) style=excel;
proc report data=sashelp.orsales;
col Year Quarter Product_Category Product_Group Quantity Profit; define product_group / "Product_category" style(column)={pretext="(Sample)"}; title "Profit Report for the Q1 1999";
run;
ods tagsets.excelxp_Mod close;
Output 30. Modifying Tagset Functionality Using Conditions and Options
Preselected filters Text added using the PRETEXT= attribute
Conditional formatting
Data validation
Tab colors Alternating row colors

32
CONCLUSION
With your ringside seat, you have witnessed the powerful features of the new Excel destination, considered the differences between the Excel destination and the ExcelXP tagset, and examined functionality that exists only in the tagset. As you can see, the Excel destination is a powerful and convenient tool, and it is the destination that SAS will continue to develop in the future. The Excel destination's ability to add graphics, map formats to Excel formats, and more make it a winner in all regards. However, the ExcelXP tagset is still a winner, too, with its power and flexibility that enable you to modify or update the tagset according to your needs. But no matter which method you choose, the real winner in this bout is you because you can take full advantage of the capabilities of both the tagset and the destination.
RESOURCES
Downloadable files discussed in this paper: ftp.sas.com/techsup/download/base/SGF2016-_SAS177.ZIP. Microsoft Corporation. 2016. "Create or delete a custom number format." Microsoft Office Online. Available at support.office.com/en-us/article/Create-or-delete-a-custom-number-format-78f2a361-936b-4c03-8772-09fab54be7f4. Accessed on March 4, 2016. Microsoft Corporation. 2016. "Overview of formulas." Microsoft Office Online. Available at support.office.com/en-us/article/Overview-of-formulas-7abfda78-eff3-4cc6-b4a7-6350d512d2dc. Accessed March 4, 2016. Parker, Chevell. 2015. "Staying Relevant in a Competitive World: Using the SAS® Output Delivery System to Enhance, Customize, and Render Reports." Proceedings of the SAS Global Forum 2015 Conference. Cary, NC: SAS Institute Inc. Available at support.sas.com/resources/papers/proceedings15/SAS1880-2015.pdf. Parker, Chevell. 2014. "Secrets from a SAS Technical Support Guy: Combining the Power of the SAS® Output Delivery System with Microsoft Excel Worksheets." Proceedings of the SAS Global Forum 2014 Conference. Cary, NC: SAS Institute Inc. Available at support.sas.com/resources/papers/proceedings14/SAS177-2014.pdf.
ACKNOWLEDGMENTS I would like to thank Susan Berry and Jane Eslinger for their assistance with this paper.
CONTACT INFORMATION
Your comments and questions are valued and encouraged. Contact the author at: Chevell Parker SAS Institute Inc. SAS Campus Drive Cary, NC 27513 Email: [email protected] Web: support.sas.com