panasonic dmp bd75
DESCRIPTION
User Manual Multi LanguageTRANSCRIPT

VQT3A95
Model No. DMP-BD75
Basic Operating InstructionsBlu-ray DiscTM Player
Mode d’emploi de baseLecteur de Blu-ray DiscTM
Istruzioni per l’uso di baseLettore Blu-ray DiscTM
Instrucciones básicas de funcionamientoReproductor de Blu-ray DiscTM
Beknopte gebruiksaanwijzingBlu-ray DiscTM speler
Grundläggande bruksanvisningBlu-rayTM -skivspelare
Vejledning i den grundlæggende betjeningBlu-rayTM -diskafspiller
Základní Návod k použitíPřehrávač disků Blu-rayTM
Kezelési utasítás kezdőknekBlu-rayTM lemez lejátszó
Skrócona instrukcja obsługiOdtwarzacz płyt Blu-rayTM
Perusasetukset KäyttöohjeetBlu-rayTM levysoitin
until 2011/2/8
EG
Français
Italiano
Español
Nederlands
Svenska
Dansk
Česky
Magyar
Polski
Suomi
English
DMP-BD75EG-VQT3A95.book 1 ページ 2010年12月28日 火曜日 午前10時3分
2 VQT3A95
Dear customerThank you for purchasing this product.For optimum performance and safety, please read these instructions carefully.Before connecting, operating or adjusting this product, please read the instructions completely. Please keep this manual for future reference.
Table of contentsGetting started
Reading the Operating Instructions (PDF format) . . . . . . . . . . . . . . . . . . . . . . . . . . . . . 2Safety precautions. . . . . . . . . . . . . . . . . . . . . . . . . 3Accessories . . . . . . . . . . . . . . . . . . . . . . . . . . . . . . 3Playable discs/USB devices . . . . . . . . . . . . . . . . . 4
Connections and settings
STEP 1 : Connecting to a TV . . . . . . . . . . . . . . . . 6STEP 2 : Connecting to an amplifier/receiver . . . . 6STEP 3 : Connecting to a broadband network . . . 7STEP 4 : Settings . . . . . . . . . . . . . . . . . . . . . . . . . 7
Playback
Inserting or removing media . . . . . . . . . . . . . . . . . 8HOME menu . . . . . . . . . . . . . . . . . . . . . . . . . . . . . 8Playing video contents. . . . . . . . . . . . . . . . . . . . . . 9Linked operations with the TV (VIERA Link “HDAVI Control™”) . . . . . . . . . . . . . 10Specifications . . . . . . . . . . . . . . . . . . . . . . . . . . . 10
d
Getting started
Reading the Operating Instructions (PDF format)∫ For Windows1 Turn the PC on and insert the CD-ROM containing the
Operating Instructions (supplied).2 Select the desired language and then click [Operating
Instructions] to install.3 Double click the “BD75EG Operating Instructions”
shortcut icon on the desktop.When the Operating Instructions (PDF format) will not openYou will need Adobe Acrobat Reader 5.0 or later or Adobe Reader 7.0 or later to browse or print the Operating Instructions (PDF format).Download and install a version of Adobe Reader that you can use with your OS from the following Web Site.http://get.adobe.com/reader/otherversions
If using the following OS– Windows 2000 SP4– Windows XP SP3– Windows Vista SP2– Windows 7
Insert the CD-ROM containing the Operating Instructions (supplied), click [Adobe(R) Reader(R)] and then follow the messages on the screen to install.
To uninstall the Operating Instructions (PDF format)Delete the PDF file from the “Program Files\Panasonic\DMP\” folder.≥When the contents in the Program Files folder cannot be
displayed, click the [Show the contents of this folder] to display them.
∫ For Macintosh1 Turn the PC on and insert the CD-ROM containing the
Operating Instructions (supplied).2 Open the “Manual” folder in “VFF0703” and then copy
the PDF file with the desired language inside the folder.3 Double click the PDF file to open it.
Please also refer to Operating Instructions (PDF format) recorded on the CD-ROM containing the Operating Instructions (supplied).Operating Instructions (PDF format) cannot be played back on the player itself.You can learn about advanced operation methods and check the Troubleshooting.
To dispose or transfer this unitThe unit may keep the user settings information in the unit. If you discard this unit either by disposal or transfer, then follow the procedure to return all the settings to the factory presets to delete the user settings.≥ The operation history may be recorded in the memory of
this unit.
About descriptions in these operating instructions≥ Instructions for operations are generally described using
the remote control.
(2)
DMP-BD75EG-VQT3A95.book 2 ページ 2011年1月12日 水曜日 午前11時15分
3VQT3A95
English
Safety precautions
Unit≥ To reduce the risk of fire, electric shock or product
damage,– Do not expose this unit to rain, moisture, dripping or
splashing.– Do not place objects filled with liquids, such as vases,
on this unit.– Use only the recommended accessories.– Do not remove covers.– Do not repair this unit by yourself. Refer servicing to
qualified service personnel.– Do not let metal objects fall inside this unit.– Do not place heavy items on this unit.
AC mains lead≥ To reduce the risk of fire, electric shock or product
damage,– Ensure that the power supply voltage corresponds to the
voltage printed on this unit.– Insert the mains plug fully into the socket outlet.– Do not pull, bend, or place heavy items on the lead.– Do not handle the plug with wet hands.– Hold onto the mains plug body when disconnecting the
plug.– Do not use a damaged mains plug or socket outlet.≥ Install this unit so that the AC mains lead can be
unplugged from the socket outlet immediately if any problem occurs.
Unit≥ This unit utilizes a laser. Use of controls or adjustments or
performance of procedures other than those specified herein may result in hazardous radiation exposure.≥Do not place sources of naked flames, such as lighted
candles, on this unit.≥ This unit may receive radio interference caused by mobile
telephones during use. If such interference occurs, please increase separation between this unit and the mobile telephone.≥ This unit is intended for use in moderate climates.
Placement≥ Place this unit on an even surface.≥ To reduce the risk of fire, electric shock or product
damage,– Do not install or place this unit in a bookcase, built-in
cabinet or in another confined space. Ensure this unit is well ventilated.
– Do not obstruct this unit’s ventilation openings with newspapers, tablecloths, curtains, and similar items.
– Do not expose this unit to direct sunlight, high temperatures, high humidity, and excessive vibration.
Batteries≥ Danger of explosion if battery is incorrectly replaced.
Replace only with the type recommended by the manufacturer.≥Mishandling of batteries can cause electrolyte leakage
and may cause a fire.– Do not mix old and new batteries or different types at the
same time.– Do not heat or expose to flame.– Do not leave the battery(ies) in a car exposed to direct
sunlight for a long period of time with doors and windows closed.
– Do not take apart or short circuit.– Do not recharge alkaline or manganese batteries.– Do not use batteries if the covering has been peeled off.– Remove batteries if you do not intend to use the remote
control for a long period of time. Store in a cool, dark place.
≥When disposing the batteries, please contact your local authorities or dealer and ask for the correct method of disposal.
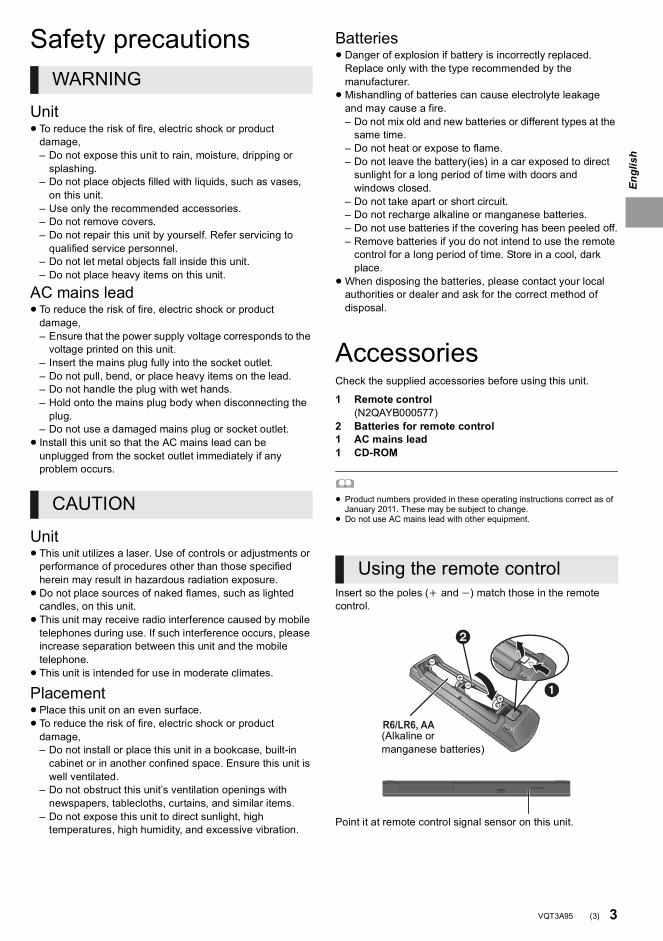
AccessoriesCheck the supplied accessories before using this unit.
≥ Product numbers provided in these operating instructions correct as of January 2011. These may be subject to change.
≥ Do not use AC mains lead with other equipment.
Insert so the poles (i and j) match those in the remote control.
Point it at remote control signal sensor on this unit.
WARNING
CAUTION
1 Remote control(N2QAYB000577)
2 Batteries for remote control1 AC mains lead1 CD-ROM
Using the remote control
R6/LR6, AA
(Alkaline or manganese batteries)
(3)
DMP-BD75EG-VQT3A95.book 3 ページ 2011年1月12日 水曜日 午前11時15分

4 VQT3A95
Playable discs/USB devicesDevice Disc markings Device types Contents format
BD-Video Video
BD-RE VideoJPEG
BD-RVideoDivX®
MKV
DVD-Video Video
DVD-R VideoAVCHDDivX®
MKVMP3JPEG
DVD-R DL
DVD-RW VideoAVCHD
— +R/+RW/+R DL
Music CD Music [CD-DA]
—CD-R
CD-RW
DivX®
MKVMusic [CD-DA]MP3JPEG
—USB devices(up to 2 TB)
DivX®
MKVMP3JPEG
BD
DVD
CD
USB
(4)
DMP-BD75EG-VQT3A95.book 4 ページ 2010年12月28日 火曜日 午前10時3分
5VQT3A95
English
∫ Discs that cannot be played by this unit
≥DVD-RAM≥ Super Audio CD≥ Photo CD≥DVD-Audio≥WMA discs≥DivX Plus HD discs≥HD DVD
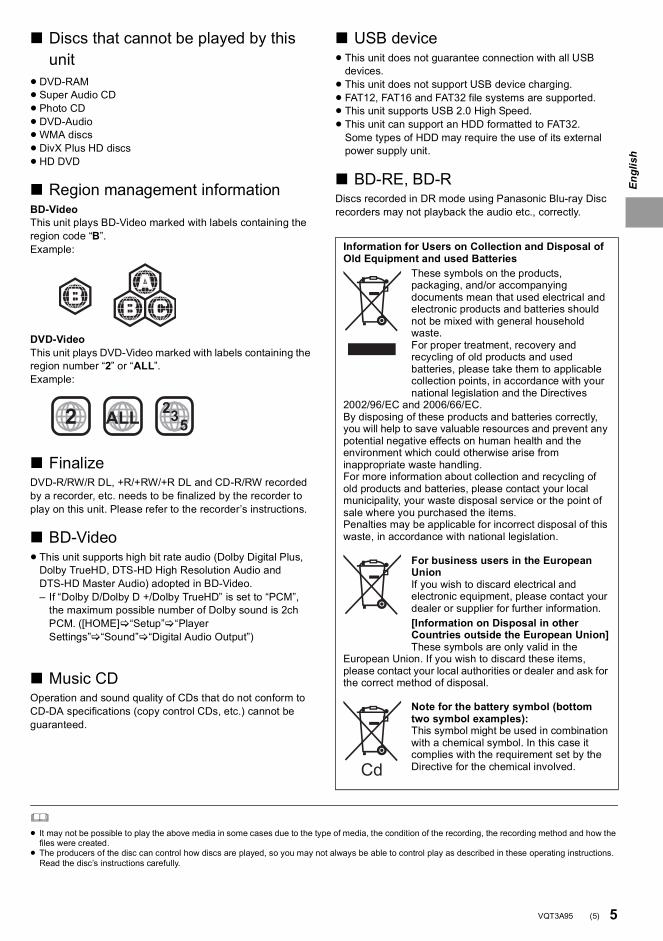
∫ Region management informationBD-VideoThis unit plays BD-Video marked with labels containing the region code “B”.Example:
DVD-VideoThis unit plays DVD-Video marked with labels containing the region number “2” or “ALL”.Example:
∫ FinalizeDVD-R/RW/R DL, +R/+RW/+R DL and CD-R/RW recorded by a recorder, etc. needs to be finalized by the recorder to play on this unit. Please refer to the recorder’s instructions.
∫ BD-Video≥ This unit supports high bit rate audio (Dolby Digital Plus,
Dolby TrueHD, DTS-HD High Resolution Audio and DTS-HD Master Audio) adopted in BD-Video. – If “Dolby D/Dolby D +/Dolby TrueHD” is set to “PCM”,
the maximum possible number of Dolby sound is 2ch PCM. ([HOME] “Setup” “Player Settings” “Sound” “Digital Audio Output”)
∫ Music CDOperation and sound quality of CDs that do not conform to CD-DA specifications (copy control CDs, etc.) cannot be guaranteed.
∫ USB device≥ This unit does not guarantee connection with all USB
devices.≥ This unit does not support USB device charging.≥ FAT12, FAT16 and FAT32 file systems are supported.≥ This unit supports USB 2.0 High Speed.≥ This unit can support an HDD formatted to FAT32.
Some types of HDD may require the use of its external power supply unit.
∫ BD-RE, BD-RDiscs recorded in DR mode using Panasonic Blu-ray Disc recorders may not playback the audio etc., correctly.
≥ It may not be possible to play the above media in some cases due to the type of media, the condition of the recording, the recording method and how the files were created.
≥ The producers of the disc can control how discs are played, so you may not always be able to control play as described in these operating instructions. Read the disc’s instructions carefully.
2 ALL 352
Information for Users on Collection and Disposal of Old Equipment and used Batteries
These symbols on the products, packaging, and/or accompanying documents mean that used electrical and electronic products and batteries should not be mixed with general household waste.For proper treatment, recovery and recycling of old products and used batteries, please take them to applicable collection points, in accordance with your national legislation and the Directives
2002/96/EC and 2006/66/EC.By disposing of these products and batteries correctly, you will help to save valuable resources and prevent any potential negative effects on human health and the environment which could otherwise arise from inappropriate waste handling.For more information about collection and recycling of old products and batteries, please contact your local municipality, your waste disposal service or the point of sale where you purchased the items.Penalties may be applicable for incorrect disposal of this waste, in accordance with national legislation.
For business users in the European UnionIf you wish to discard electrical and electronic equipment, please contact your dealer or supplier for further information.[Information on Disposal in other Countries outside the European Union]These symbols are only valid in the
European Union. If you wish to discard these items, please contact your local authorities or dealer and ask for the correct method of disposal.
Note for the battery symbol (bottom two symbol examples):This symbol might be used in combination with a chemical symbol. In this case it complies with the requirement set by the Directive for the chemical involved.Cd
(5)
DMP-BD75EG-VQT3A95.book 5 ページ 2010年12月28日 火曜日 午前10時3分

6 VQT3A95
C onnections and settin gsSTEP 1 : Connecting to a TV≥Do not place the unit on amplifiers/receivers or equipment
that may become hot. The heat can damage the unit.≥ Before making any connections we suggest you
temporarily disconnect all the units from AC power.≥Do not connect video signals through a video recorder.
Due to copy guard protection the picture may not be displayed properly.≥ Please use High Speed HDMI Cables that have the HDMI
logo (as shown on the cover). It is recommended that you use Panasonic’s HDMI cable. When outputting 1080p signal, please use HDMI cables 5.0 meters or less.
Recommended part number (High Speed HDMI Cable):RP-CDHS15 (1.5 m), RP-CDHS30 (3.0 m), RP-CDHS50 (5.0 m), etc.
STEP 2 : Connecting to an amplifier/receiver
∫ Via an HDMI AV OUT terminal(High quality)
≥ Set “HDMI Audio Output” to “On” ([HOME] “Setup” “Player Settings” “TV / Device Connection” “HDMI Connection”).≥ The HDMI connection supports VIERA Link “HDAVI
Control” ( 10).
HDMI IN
HDMI cable
≥ Set “HDMI Audio Output” to “On” ([HOME] “Setup” “Player Settings” “TV / Device Connection” “HDMI Connection”).≥ Set “Digital Audio Output” depending on the connected
amplifier/receiver ([HOME] “Setup” “Player Settings” “Sound”).≥ The HDMI connection supports VIERA Link “HDAVI
Control” ( 10).≥When using the TV or amplifier/receiver that does not
have the indication of “(ARC)” (non-ARC-compatible) on the HDMI terminal, in order to enjoy TV’s sound by amplifier/receiver it is also required to connect the amplifier/receiver and TV using an optical digital cable.
HDMI IN
HDMI IN
HDMI IN(ARC)
HDMI OUT(ARC)
Multi channel speakers
Amplifier/receiver
HDMI cable
HDMI cable
(6)
VQT3A95 ~Body_mst.fm 6 ページ 2011年1月7日 金曜日 午後3時10分
7VQT3A95
English
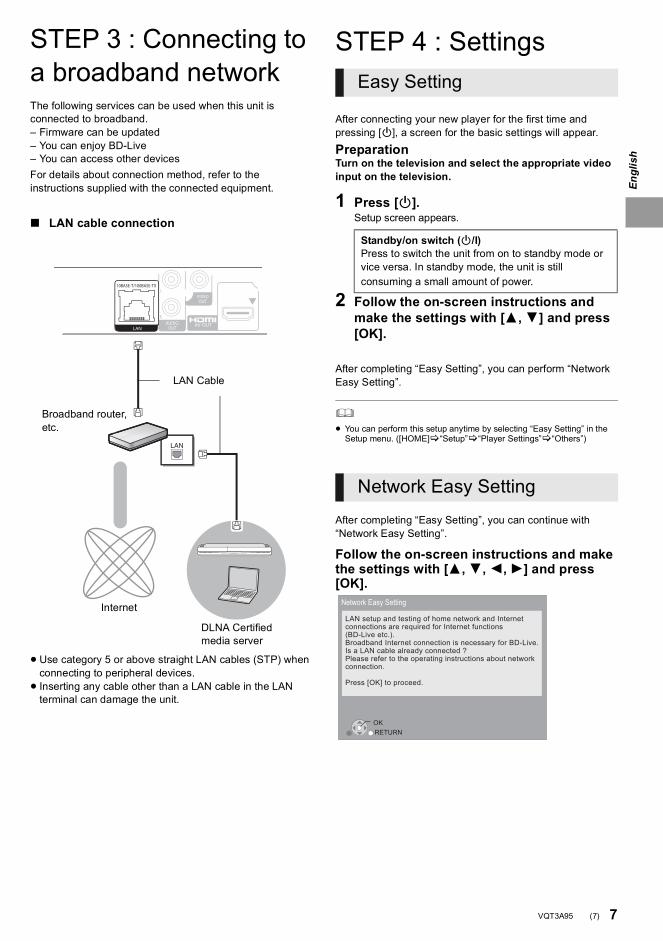
STEP 3 : Connecting to a broadband networkThe following services can be used when this unit is connected to broadband.– Firmware can be updated– You can enjoy BD-Live– You can access other devicesFor details about connection method, refer to the instructions supplied with the connected equipment.
STEP 4 : Settings
After connecting your new player for the first time and pressing [Í], a screen for the basic settings will appear.
PreparationTurn on the television and select the appropriate video input on the television.
1 Press [Í].Setup screen appears.
2 Follow the on-screen instructions and make the settings with [3,4] and press [OK].
After completing “Easy Setting”, you can perform “Network Easy Setting”.
≥ You can perform this setup anytime by selecting “Easy Setting” in the Setup menu. ([HOME] “Setup” “Player Settings” “Others”)
After completing “Easy Setting”, you can continue with “Network Easy Setting”.
Follow the on-screen instructions and make the settings with [3,4,2,1] and press [OK].
∫ LAN cable connection
≥Use category 5 or above straight LAN cables (STP) when connecting to peripheral devices.≥ Inserting any cable other than a LAN cable in the LAN
terminal can damage the unit.
Broadband router, etc.
Internet
LAN Cable
DLNA Certified media server
Easy Setting
Standby/on switch (Í/I)Press to switch the unit from on to standby mode or vice versa. In standby mode, the unit is still consuming a small amount of power.
Network Easy Setting
OKRETURN
Network Easy Setting
LAN setup and testing of home network and Internetconnections are required for Internet functions(BD-Live etc.). Broadband Internet connection is necessary for BD-Live.Is a LAN cable already connected ?Please refer to the operating instructions about networkconnection.
Press [OK] to proceed.
(7)
VQT3A95 ~Body_mst.fm 7 ページ 2011年1月7日 金曜日 午後3時10分

8 VQT3A95
PlaybackInserting or removing media
≥When inserting a media item, ensure that it is facing the right way up.≥ If you connect a Panasonic product with a USB
connection cable, the setup screen may be displayed on the connected equipment. For details, refer to the instructions for the connected equipment.
HOME menuMajor functions of this unit can be operated from the HOME menu.
PreparationTurn on the television and select the appropriate video input on the television.
1 Press [Í] to turn on the unit.2 Press [OK] or [3,4,2,1] to select the
item.
≥When a media is inserted, contents selection screen for that media is displayed.≥ If there are any other items, repeat this step.≥ To return to HOME menu, select “HOME” or press
[RETURN] several times.
To show the HOME menuPress [HOME].
≥ Items to be displayed may vary with the media.≥ Where necessary, set “Mixed Data Disc Option” when using a disc with
both data files (MP3, JPEG, DivX, MKV) and Video. ([HOME] “Setup” “Player Settings” “Disc”)
1
MusicPhotos
Videos
Blu-ray Disc Player
HOME
Setup
MEDIASERVER
(8)
VQT3A95 ~Body_mst.fm 8 ページ 2011年1月7日 金曜日 午後3時10分

9VQT3A95
English
Playing video contents
1 Insert the media.When the contents menu is displayed, press [3,4,2,1] to select the item. ( 8)
2 Press [3,4] to select the title and press [OK].
∫ To show menusYou can display Top Menu, DIRECT NAVIGATOR or Pop-up Menu.Press [TOP MENU] or [POP-UP MENU].≥ Press [3,4,2,1] to select the item and press [OK].
≥ Signal from PAL discs is output as PAL. Signal from NTSC discs is output as “NTSC” or “PAL60”. You can select “NTSC” or “PAL60” in “NTSC Contents Output” for NTSC discs. ([HOME] “Setup” “Player Settings” “Picture”)
≥ DISCS CONTINUE TO ROTATE WHILE MENUS ARE DISPLAYED. Press [∫STOP] when you have finished playback to protect the unit’s motor, your television screen and so on.
≥ Depending on media and contents, the display may change or may not appear.
≥ DivX and MKV: Successive play is not possible.≥ It is not possible to playback AVCHD and MPEG2 video which have
been dragged and dropped, copied and pasted to the media.≥ To save on electricity, the unit is turned off automatically if there is no
button operation for about 30 minutes when not playing back (such as when paused, displaying the menu, displaying still pictures, etc.).
These functions may not work depending on the media and contents.
Press [∫STOP].The stopped position is memorized.Resume play functionPress [1PLAY] to restart from this position.≥ The position is cleared if the tray is opened or you press
[∫STOP] several times to display “StOP” on the unit’s display.≥ On BD-Video discs including BD-J, the resume play
function does not work.
Press [;PAUSE].≥ Press [;PAUSE] again or [1PLAY] to restart play.
SearchWhile playing, press [SEARCH6] or [SEARCH5].≥Music and MP3: The speed is fixed to a single step.Slow-motionWhile paused, press [SEARCH5].
The speed increases up to 5 steps.≥ Press [1PLAY] to revert to normal playback speed.
While playing or paused, press [:] or [9].Skip to the title, chapter or track you want to play.≥ Each press increases the number of skips.
While paused, press [1] (;1).
≥ Press and hold to change in succession forward.≥ Press [1PLAY] to revert to normal playback speed.
Press [AUDIO].You can change the audio channel number or soundtrack language, etc.
BD DVD CD USB
Other operations during play
Stop
Pause
Search/Slow-motion
Skip
Frame-by-frame
Changing audio
(9)
DMP-BD75EG-VQT3A95.book 9 ページ 2010年12月28日 火曜日 午前10時3分

10 VQT3A95
Linked operations with the TV (VIERA Link “HDAVI Control™”)
Preparation1 Set “VIERA Link” to “On” ([HOME] “Setup” “Player
Settings” “TV / Device Connection” “HDMI Connection”). (The default setting is “On”.)
2 Set the “HDAVI Control” operations on the connected equipment (e.g., TV).
3 Turn on all “HDAVI Control” compatible equipment and select this unit’s input channel on the connected TV so that the “HDAVI Control” function works properly.Also when the connection or settings are changed, repeat this procedure.
When play starts on the unit, the TV will automatically switch the input channel and display the corresponding action.Additionally when the TV is off, the TV will automatically turn on.
All connected equipment compatible with “HDAVI Control”, including this unit, automatically turns off when you switch the television off.
≥ This unit supports “HDAVI Control 1” function.This standard is compatible with Panasonic’s conventional HDAVI equipment.
≥ VIERA Link “HDAVI Control”, based on the control functions provided by HDMI which is an industry standard known as HDMI CEC (Consumer Electronics Control), is a unique function that we have developed and added. As such, its operation with other manufacturers’ equipment that supports HDMI CEC cannot be guaranteed.
≥ Please refer to individual manuals for other manufacturers’ equipment supporting VIERA Link function.
SpecificationsSignal system: PAL/NTSCOperating temperature range:
i5 oC to i35 oCOperating humidity range:
10 % to 80 % RH (no condensation)Video output: 1.0 Vp-p (75 ≠)/Pin jack:1 systemAudio output: 2 Vrms (1 kHz, 0 dB)/Pin jack
Number of connectors : 2 channel:1 systemHDMI AV output: Type A (19 pin) : 1 system
This unit supports “HDAVI Control 1” function.USB slot: USB2.0 : 1 systemEthernet: 10BASE-T/100BASE-TX : 1 systemLASER SpecificationClass 1 LASER Product:
Wave length: 790 nm (CDs)/655 nm (DVDs)/405 nm (BDs)Laser power:No hazardous radiation is emitted with the
safety protectionPower supply: AC 220 to 240 V, 50 HzPower consumption: Approx. 12 WPower consumption in standby mode: Approx. 0.2 WPower consumption in quick start standby mode:
Approx. 3.6 WDimensions (WkDkH) Including the projecting parts:
430 mmk185 mmk35 mmMass: Approx. 1.6 kg
Specifications are subject to change without notice.
What is VIERA Link “HDAVI Control”?
VIERA Link “HDAVI Control” is a convenient function that offers linked operations of this unit, and a Panasonic TV (VIERA) or other device under “HDAVI Control”.You can use this function by connecting the equipment with an HDMI cable. See the operating instructions for connected equipment for operational details.
Automatic input switchingPower on link
Power off link
(10)
VQT3A95 ~Body_mst.fm 10 ページ 2011年1月7日 金曜日 午後3時10分

11VQT3A95
English
This product incorporates the following software:
For the software categorized as (3) and (4), please refer to the terms and conditions of GPL v2 and LGPL v2.1, as the case may be at http://www.gnu.org/licenses/old-licenses/gpl-2.0.html and http://www.gnu.org/licenses/old-licenses/lgpl-2.1.html.In addition, the software categorized as (3) and (4) are copyrighted by several individuals. Please refer to the copyright notice of those individuals at http://www.am-linux.jp/dl/AWBP11
The GPL/LGPL software is distributed in the hope that it will be useful, but WITHOUT ANY WARRANTY, without even the implied warranty of MERCHANTABILITY or FITNESS FOR A PARTICULAR PURPOSE.
At least three (3) years from delivery of products, Panasonic will give to any third party who contacts us at the contact information provided below, for a charge no more than our cost of physically performing source code distribution, a complete machine-readable copy of the corresponding source code covered under GPL v2/LGPL v2.1.
Contact [email protected]
Source code is also freely available to you and any other member of the public via our website below.http://www.am-linux.jp/dl/AWBP11
the software developed independently by or for Panasonic Corporation,the software owned by third party and licensed to Panasonic Corporation,the software licensed under the GNU General Public License, Version 2 (GPL v2),the software licensed under the GNU LESSER General Public License, Version 2.1 (LGPL v2.1) and/or,open sourced software licensed under its applicable license terms including but not limited toICU License, c-arse license.
(1)
(2)
(3)
(4)
(5)
For Open Source Software Programs categorized as (5), please refer to the applicable license terms listed below and/or included in the “License” menu on Product.
ICU License - ICU 1.8.1 and later
COPYRIGHT AND PERMISSION NOTICE
Copyright (c) 1995-2010 International Business Machines Corporation and others
All rights reserved.
Permission is hereby granted, free of charge, to any person obtaining a copy of this software and associated documentation files (the “Software”), to deal in the Software without restriction, including without limitation the rights to use, copy, modify, merge, publish, distribute, and/or sell copies of the Software, and to permit persons to whom the Software is furnished to do so, provided that the above copyright notice(s) and this permission notice appear in all copies of the Software and that both the above copyright notice(s) and this permission notice appear in supporting documentation.
THE SOFTWARE IS PROVIDED “AS IS”, WITHOUT WARRANTY OF ANY KIND, EXPRESS OR IMPLIED, INCLUDING BUT NOT LIMITED TO THE WARRANTIES OF MERCHANTABILITY, FITNESS FOR A PARTICULAR PURPOSE AND NONINFRINGEMENT OF THIRD PARTY RIGHTS. IN NO EVENT SHALL THE COPYRIGHT HOLDER OR HOLDERS INCLUDED IN THIS NOTICE BE LIABLE FOR ANY CLAIM, OR ANY SPECIAL INDIRECT OR CONSEQUENTIAL DAMAGES, OR ANY DAMAGES WHATSOEVER RESULTING FROM LOSS OF USE, DATA OR PROFITS, WHETHER IN AN ACTION OF CONTRACT, NEGLIGENCE OR OTHER TORTIOUS ACTION, ARISING OUT OF OR IN CONNECTION WITH THE USE OR PERFORMANCE OF THIS SOFTWARE.
Except as contained in this notice, the name of a copyright holder shall not be used in advertising or otherwise to promote the sale, use or other dealings in this Software without prior written authorization of the copyright holder.
All trademarks and registered trademarks mentioned herein are the property of their respective owners.
c-arse license
Copyright 1998 by the Massachusetts Institute of Technology.
Permission to use, copy, modify, and distribute this software and itsdocumentation for any purpose and without fee is hereby granted, provided that the above copyright notice appear in all copies and that both that copyright notice and this permission notice appear in supporting documentation, and that the name of M.I.T. not be used in advertising or publicity pertaining to distribution of the software without specific, written prior permission.M.I.T. makes no representations about the suitability of this software for any purpose. It is provided “as is” without express or implied warranty.
Java and all Java-based trademarks and logos are trademarks or registered trademarks of Sun Microsystems, Inc. in the United States and other countries.
Manufactured under license from Dolby Laboratories.Dolby and the double-D symbol are trademarks of Dolby Laboratories.
Manufactured under license under U.S. Patent #’s: 5,451,942; 5,956,674; 5,974,380; 5,978,762; 6,226,616; 6,487,535; 7,392,195; 7,272,567; 7,333,929; 7,212,872 & other U.S. and worldwide patents issued & pending. DTS and the Symbol are registered trademarks, & DTS-HD, DTS-HD Master Audio | Essential and the DTS logos are trademarks of DTS, Inc. Product includes software. © DTS, Inc. All Rights Reserved.
This item incorporates copy protection technology that is protected by U.S. patents and other intellectual property rights of Rovi Corporation. Reverse engineering and disassembly are prohibited.
HDMI, the HDMI Logo, and High-Definition Multimedia Interface are trademarks or registered trademarks of HDMI Licensing LLC in the United States and other countries.
This product is licensed under the AVC patent portfolio license and VC-1 patent portfolio license for the personal and non-commercial use of a consumer to (i) encode video in compliance with the AVC Standard and VC-1 Standard (“AVC/VC-1 Video”) and/or (ii) decode AVC/VC-1 Video that was encoded by a consumer engaged in a personal and non-commercial activity and/or was obtained from a video provider licensed to provide AVC/VC-1 Video. No license is granted or shall be implied for any other use. Additional information may be obtained from MPEG LA, LLC.See http://www.mpegla.com.
HDAVI Control™ is a trademark of Panasonic Corporation.
“AVCHD” and the “AVCHD” logo are trademarks of Panasonic Corporation and Sony Corporation.
“DVD Logo” is a trademark of DVD Format/Logo Licensing Corporation.
MPEG Layer-3 audio coding technology licensed from Fraunhofer IIS and Thomson.
DivX®, DivX Certified® and associated logos are trademarks of DivX, Inc. and are used under license.
Windows is a trademark or a registered trademark of Microsoft Corporation in the United States and other countries.
DLNA, the DLNA Logo and DLNA CERTIFIED are trademarks, service marks, or certification marks of the Digital Living Network Alliance.
(11)
VQT3A95 ~Body_mst.fm 11 ページ 2011年1月7日 金曜日 午後3時10分

2 VQT3A95
Cher clientMerci d’avoir fait l’achat de cet appareil.Pour des performances et une sécurité optimales, lire attentivement ces instructions.Avant de brancher, de faire fonctionner ou de régler l’appareil, lire attentivement la totalité de ce mode d’emploi.Veuillez conserver ce mode d’emploi pour une consultation ultérieure.
Table des matièresPrise en main
Lire le Mode d’emploi (format PDF). . . . . . . . . . . . 2Mesures de précaution . . . . . . . . . . . . . . . . . . . . . 3Accessoires . . . . . . . . . . . . . . . . . . . . . . . . . . . . . . 3Disques/clés USB utilisables . . . . . . . . . . . . . . . . . 4
Connexion et réglage
ÉTAPE 1: Connexion à un téléviseur . . . . . . . . . . 6ÉTAPE 2: Connexion à un
amplificateur/récepteur . . . . . . . . . . . . . 6ÉTAPE 3: Connexion à un réseau
à large bande passante . . . . . . . . . . . . 7ÉTAPE 4: Réglage . . . . . . . . . . . . . . . . . . . . . . . . 7
Lecture
Insérer ou enlever un support . . . . . . . . . . . . . . . . 8Menu ACCUEIL . . . . . . . . . . . . . . . . . . . . . . . . . . . 8Lire des contenus vidéo. . . . . . . . . . . . . . . . . . . . . 9Opérations liées avec le téléviseur (VIERA Link “HDAVI Control™”). . . . . . . . . . . . . . 10Caractéristiques. . . . . . . . . . . . . . . . . . . . . . . . . . 10
Prise en main
Lire le Mode d’emploi (format PDF)∫ Pour Windows1 Allumez l’ordinateur et introduisez le CD-ROM
contenant le mode d’emploi (fourni).2 Sélectionnez la langue désirée et cliquez sur [Mode
d’emploi] pour l’installer.3 Double-cliquez sur l’icône de raccourcis du “BD75EG
Mode d’emploi” située sur le bureau.
Si le mode d’emploi (format PDF) ne s’ouvre pasVous aurez besoin d’Adobe Acrobat Reader 5.0 ou supérieur ou d’Adobe Reader 7.0 ou supérieur pour afficher ou imprimer le mode d’emploi (format PDF).Téléchargez et installez une version d’Adobe Reader qui peut être utilisée avec votre SE à partir du site web suivant.http://get.adobe.com/reader/otherversions
En utilisant les SE suivants– Windows 2000 SP4– Windows XP SP3– Windows Vista SP2– Windows 7
Introduisez le CD-ROM contenant le mode d’emploi (fourni), cliquez sur [Adobe(R) Reader(R)] puis suivez les instructions des messages à l’écran pour l’installer.
Pour désinstaller le mode d’emploi (format PDF)Supprimez le fichier PDF du dossier “Program Files\Panasonic\DMP\”.≥ Si le contenu du dossier Program Files ne s’affiche pas,
cliquez sur [Show the contents of this folder] pour l’afficher.
∫ Pour Macintosh1 Allumez l’ordinateur et introduisez le CD-ROM
contenant le mode d’emploi (fourni).2 Ouvrez le dossier “Manual” dans “VFF0703” puis copiez
le fichier PDF de la langue désirée dans le dossier.3 Double-cliquez sur le fichier PDF pour l’ouvrir.
Veuillez vous référer également au mode d’emploi (format PDF) enregistré sur le CD-ROM contenant le mode d’emploi (fourni).Le Mode d’emploi (format PDF) ne peut être relu sur le lecteur.Vous pouvez y trouver les méthodes d’utilisation avancées et contrôler les instructions de dépannage.
En cas d’élimination ou de cession de cet appareilCet appareil peut conserver les informations de réglage d’utilisateur. Si vous vous débarrassez de cet appareil en le jetant ou en le cédant, suivez la procédure du retour de tous les réglages de préréglage en usine pour effacer les réglages d’utilisateur.≥ L’historique de l’exploitation peut être enregistré dans la
mémoire de cet appareil.
Les instructions pour l’exploitation font en général référence aux commandes de la télécommande.≥ Les instructions pour l’exploitation font en général
référence aux commandes de la télécommande.
(12)
DMP-BD75EG-VQT3A95TOC.fm 2 ページ 2011年1月13日 木曜日 午後6時43分

3VQT3A95
Français
Mesures de précaution
Appareil≥ Pour réduire les risques d’incendie, d’électrocution ou de
dommages au produit,– N’exposez pas cet appareil à la pluie, l’humidité,
l’égouttement ou l’éclaboussement.– Ne placez pas d’objets remplis d’eau, tels que des
vases, sur l’appareil.– Utiliser exclusivement les accessoires préconises.– Ne retirez pas les caches.– Ne réparez pas l’appareil vous-même. Confiez
l’entretien a un personnel qualifié.– Ne laissez pas d’objets métalliques tomber dans cet
appareil.– Ne pas placer d’objets lourds sur cet appareil.
Cordon d’alimentation secteur≥ Pour réduire les risques d’incendie, d’électrocution ou de
dommages au produit,– Assurez-vous que la puissance du voltage fourni
correspond au voltage inscrit sur l’appareil.– Branchez la prise secteur dans la prise électrique.– Ne pas tirer, plier ou placer des objets lourds sur le cordon.– Ne manipulez pas la prise avec les mains mouillées.– Tenez le corps de la prise secteur en la débranchant.– N’utilisez pas de prise secteur ni de prise de courant
endommagée.≥ Installez l’appareil de manière à ce que le câble secteur
puisse être immédiatement débranché de la prise de courant si un problème survient.
Appareil≥Cet appareil utilise un laser. L’utilisation de commandes
ou de réglages ou l’exécution de procédures autres que celles spécifiées ici peuvent provoquer une exposition à des radiations dangereuses.≥Ne placez pas de sources de flammes vives telles que
bougies allumées sur cet appareil.≥Cet appareil peut être perturbé par des interférences
causées par des téléphones mobiles pendant l’utilisation. En présence de telles interférences, éloignez le téléphone mobile de cet appareil.≥Cet appareil est destiné aux climats tempérés.
Emplacement≥ Placez cet appareil sur une surface plane.≥ Pour réduire les risques d’incendie, d’électrocution ou de
dommages au produit,– N’installez pas et ne placez pas cet appareil dans une
bibliothèque, un placard ni dans aucun autre espace réduit. Assurez-vous que l’appareil est bien ventilé.
– Ne bouchez pas les ouvertures d’aération de cet appareil avec des journaux, nappes, rideaux ou objets similaires.
– N’exposez pas cet appareil directement aux rayons du soleil, à des températures élevées, à une humidité élevée ni à des vibrations excessives.
Piles≥ Il y a un danger d’explosion si la pile n’est pas
correctement remplacée. Remplacez uniquement par le type recommandé par le fabricant.≥Manipuler de façon incorrecte les piles peut causer une
fuite d’électrolyte ainsi qu’un incendie.– Ne mélangez pas d'anciennes et de nouvelles piles ou
des piles de différents types.– Ne chauffez pas et n’exposez pas les piles à une
flamme.– Ne laissez pas la (les) pile(s) dans un véhicule exposé
directement aux rayons du soleil pendant un long moment avec fenêtres et portières fermées.
– Ne pas démonter ou court-circuiter les piles.– Ne rechargez pas des piles alcalines ou au manganèse.– Ne pas utiliser des piles dont le revêtement a été
enlevé.– Retirez les piles si vous n’avez plus l’intention d’utiliser
la télécommande pendant une longue période. Rangez-les dans un endroit sombre et frais.
≥ Pour jeter les piles, veuillez contacter les autorités locales ou votre revendeur afin de connaître la procédure d’élimination à suivre.
AccessoiresContrôlez les accessoires fournis avant d’utiliser cet appareil.
≥ Les numéros de produits fournis dans ce manuel d’utilisation sont corrects à partir de janvier 2011. Cela peut être soumis à des changements.
≥ N’utilisez pas de cordon d’alimentation avec d’autres appareils.
Insérez-les de telle sorte que les pôles (i et j) correspondent à ceux de la télécommande.
Pointez-le vers la cellule de réception du signal de commande à distance sur cet appareil.
AVERTISSEMENT
ATTENTION
1 Télécommande(N2QAYB000577)
2 Piles pour la télécommande1 Cordon d’alimentation secteur1 CD-ROM
Utiliser la télécommande
R6/LR6, AA
(Piles alcalines ou au manganèse)
(13)
DMP-BD75EG-VQT3A95.book 3 ページ 2011年1月11日 火曜日 午後8時56分

4 VQT3A95
Disques/clés USB utilisablesAppareil Marquage sur
disque Types d’appareil Format des contenus
BD-Vidéo Vidéo
BD-RE VidéoJPEG
BD-RVidéoDivX®
MKV
DVD-Vidéo Vidéo
DVD-R VidéoAVCHDDivX®
MKVMP3JPEGDVD-R DL
DVD-RW VidéoAVCHD
— +R/+RW/+R DL
CD musicaux [CD-DA] musicaux
— CD-RCD-RW
DivX®
MKV[CD-DA] musicauxMP3JPEG
— Dispositif USB(jusqu’à 2 To)
DivX®
MKVMP3JPEG
BD
DVD
CD
USB
(14)
DMP-BD75EG-VQT3A95.book 4 ページ 2011年1月7日 金曜日 午後2時16分

5VQT3A95
Français
∫ Impossible de lire les disques≥DVD-RAM≥CD Super Audio≥CD de Photos≥DVD-Audio≥Disques WMA≥Disques DivX Plus HD≥HD DVD
∫ Information de gestion de régionBD-VidéoCet appareil peut reproduire les disques BD-Vidéo portant une étiquette avec le code de région “B”.Exemple:
DVD-VidéoCet appareil peut reproduire les disques DVD-Vidéo portant une étiquette avec le numéro de région “2” ou “ALL”.Exemple:
∫ FinalisationLes DVD-R/RW/R DL, +R/+RW/+R DL et CD-R/RW enregistrés par un graveur, etc. doivent être finalisés par le graveur pour être lus sur cet appareil. Veuillez consulter les instructions du graveur.
∫ BD-Vidéo≥Cet appareil peut décoder un audio à débit binaire élevé
(Dolby Digital Plus, Dolby TrueHD, DTS-HD High Resolution Audio et DTS-HD Master Audio) adopté par le BD-Vidéo. – Si “Dolby D/Dolby D +/Dolby TrueHD” est réglé sur
“PCM”, le nombre maximum possible de son Dolby est 2c. PCM. ([HOME] “Configuration” “Réglages lecteur” “Audio” “Sortie audio numérique”)
∫ CD musicauxLe fonctionnement et la qualité sonore des CD qui n'obéissent pas aux caractéristiques CD-DA (contrôle de copie des CD, etc.) ne peuvent être garantis.
∫ Clé USB≥ Cet appareil ne garantit pas la connexion avec tous les
dispositifs USB.≥ Cet appareil ne prend pas en charge le chargement des
dispositifs USB.≥ Les systèmes fichiers FAT12, FAT16 et FAT32 ne sont pas
pris en charge.≥ Cet appareil supporte une clé USB 2.0 à Haute Vitesse.≥ Cet appareil prend en charge un DD formaté en FAT32.
Certains types de DD peuvent nécessiter l’utilisation de leur bloc d’alimentation externe.
∫ BD-RE, BD-RLes disques enregistrés en mode DR avec des graveurs de disques Blu-ray Panasonic ne peuvent pas lire convenablement l’audio, etc.
≥ Dans certains cas, la lecture du support ci-dessus pourrait être impossible en raison du type de support, de la condition de l’enregistrement, de la méthode d’enregistrement et de la manière selon laquelle les fichiers ont été créés.
≥ Les producteurs du disque peuvent contrôler la manière dont les disques sont lus. Ainsi, vous pouvez ne pas toujours être en mesure de contrôler la lecture tel que décrite dans les présentes consignes d'utilisation. Veuillez lire attentivement les instructions relatives à l'utilisation du disque.
2 ALL 352
Avis aux utilisateurs concernant la collecte et l’élimination des piles et des appareils électriques et électroniques usagés
Apposé sur le produit lui-même, sur son emballage, ou figurant dans la documentation qui l’accompagne, ce pictogramme indique que les piles et appareils électriques et électroniques usagés doivent être séparés des ordures ménagères.Afin de permettre le traitement, la valorisation et le recyclage adéquats des
piles et des appareils usagés, veuillez les porter à l’un des points de collecte prévus, conformément à la législation nationale en vigueur ainsi qu’aux directives 2002/96/CE et 2006/66/CE.En éliminant piles et appareils usagés conformément à la réglementation en vigueur, vous contribuez à prévenir le gaspillage de ressources précieuses ainsi qu’à protéger la santé humaine et l’environnement contre les effets potentiellement nocifs d’une manipulation inappropriée des déchets.Pour de plus amples renseignements sur la collecte et le recyclage des piles et appareils usagés, veuillez vous renseigner auprès de votre mairie, du service municipal d’enlèvement des déchets ou du point de vente où vous avez acheté les articles concernés.Le non-respect de la réglementation relative à l’élimination des déchets est passible d’une peine d’amende.
Pour les utilisateurs professionnels au sein de l’Union européenneSi vous souhaitez vous défaire de pièces d’équipement électrique ou électronique, veuillez vous renseigner directement auprès de votre détaillant ou de votre fournisseur.
[Information relative à l’élimination des déchets dans les pays extérieurs à l’Union européenne]Ce pictogramme n’est valide qu’à l’intérieur de l’Union européenne. Pour connaître la procédure applicable dans les pays hors Union Européenne, veuillez vous renseigner auprès des autorités locales compétentes ou de votre distributeur.
Note relative au pictogramme à apposer sur les piles (voir les 2 exemples ci-contre)Le pictogramme représentant une poubelle sur roues barrée d’une croix est conforme à la réglementation. Si ce pictogramme est combiné avec un symbole chimique, il remplit également les exigences posées par
la Directive relative au produit chimique concerné.
Cd
(15)
DMP-BD75EG-VQT3A95.book 5 ページ 2011年1月7日 金曜日 午後2時16分
6 VQT3A95
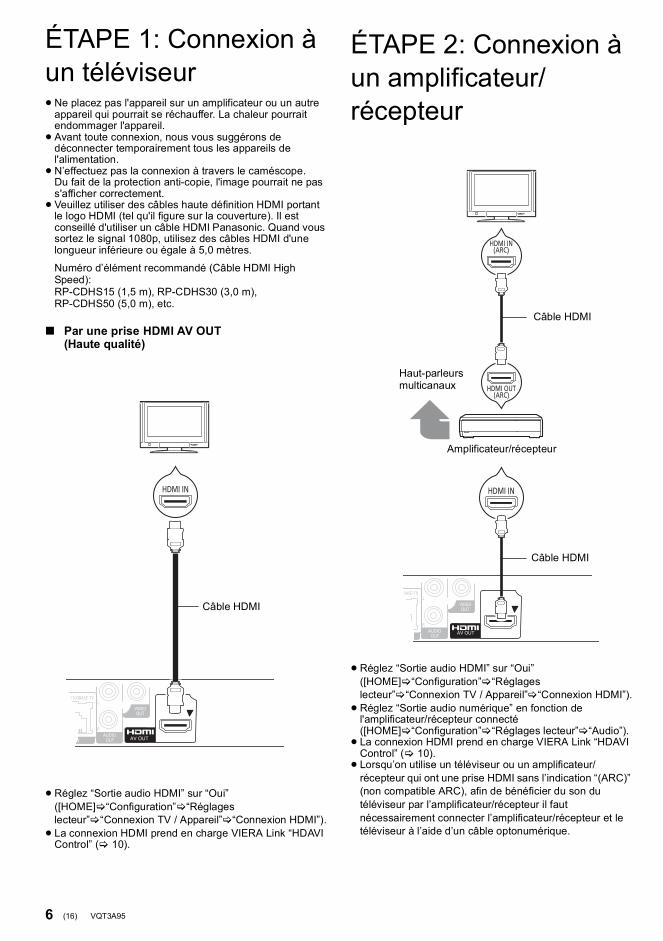
C onnexion et rég lag eConnexion et réglageÉTAPE 1: Connexion à un téléviseur≥Ne placez pas l'appareil sur un amplificateur ou un autre
appareil qui pourrait se réchauffer. La chaleur pourrait endommager l'appareil.≥ Avant toute connexion, nous vous suggérons de
déconnecter temporairement tous les appareils de l'alimentation.≥N’effectuez pas la connexion à travers le caméscope.
Du fait de la protection anti-copie, l'image pourrait ne pas s'afficher correctement.≥ Veuillez utiliser des câbles haute définition HDMI portant
le logo HDMI (tel qu'il figure sur la couverture). Il est conseillé d'utiliser un câble HDMI Panasonic. Quand vous sortez le signal 1080p, utilisez des câbles HDMI d'une longueur inférieure ou égale à 5,0 mètres.
Numéro d’élément recommandé (Câble HDMI High Speed):RP-CDHS15 (1,5 m), RP-CDHS30 (3,0 m), RP-CDHS50 (5,0 m), etc.
ÉTAPE 2: Connexion à un amplificateur/récepteur
∫ Par une prise HDMI AV OUT(Haute qualité)
≥Réglez “Sortie audio HDMI” sur “Oui” ([HOME] “Configuration” “Réglages lecteur” “Connexion TV / Appareil” “Connexion HDMI”).≥ La connexion HDMI prend en charge VIERA Link “HDAVI
Control” ( 10).
HDMI IN
Câble HDMI
≥Réglez “Sortie audio HDMI” sur “Oui” ([HOME] “Configuration” “Réglages lecteur” “Connexion TV / Appareil” “Connexion HDMI”).≥Réglez “Sortie audio numérique” en fonction de
l'amplificateur/récepteur connecté ([HOME] “Configuration” “Réglages lecteur” “Audio”).≥ La connexion HDMI prend en charge VIERA Link “HDAVI
Control” ( 10).≥ Lorsqu’on utilise un téléviseur ou un amplificateur/
récepteur qui ont une prise HDMI sans l’indication “(ARC)” (non compatible ARC), afin de bénéficier du son du téléviseur par l’amplificateur/récepteur il faut nécessairement connecter l’amplificateur/récepteur et le téléviseur à l’aide d’un câble optonumérique.
HDMI IN
HDMI IN
HDMI IN(ARC)
HDMI OUT(ARC)
Haut-parleurs multicanaux
Amplificateur/récepteur
Câble HDMI
Câble HDMI
(16)
DMP-BD75EG-VQT3A95.book 6 ページ 2011年1月7日 金曜日 午後2時16分
7VQT3A95
Français
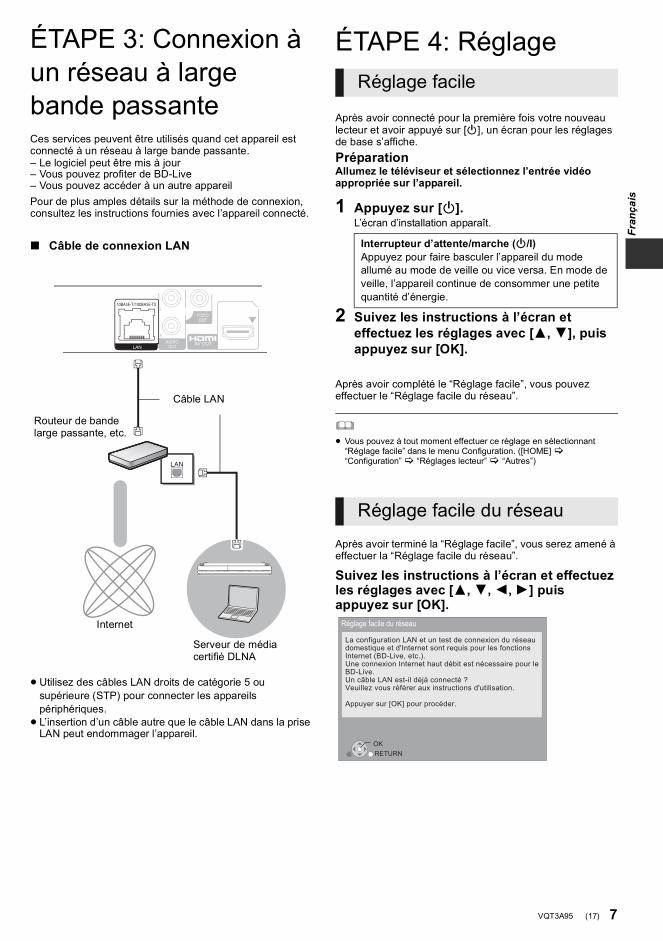
ÉTAPE 3: Connexion à un réseau à large bande passanteCes services peuvent être utilisés quand cet appareil est connecté à un réseau à large bande passante.– Le logiciel peut être mis à jour– Vous pouvez profiter de BD-Live– Vous pouvez accéder à un autre appareilPour de plus amples détails sur la méthode de connexion, consultez les instructions fournies avec l’appareil connecté.
ÉTAPE 4: Réglage
Après avoir connecté pour la première fois votre nouveau lecteur et avoir appuyé sur [Í], un écran pour les réglages de base s’affiche.PréparationAllumez le téléviseur et sélectionnez l’entrée vidéo appropriée sur l’appareil.
1 Appuyez sur [Í].L’écran d’installation apparaît.
2 Suivez les instructions à l’écran et effectuez les réglages avec [3, 4], puis appuyez sur [OK].
Après avoir complété le “Réglage facile”, vous pouvez effectuer le “Réglage facile du réseau”.
≥ Vous pouvez à tout moment effectuer ce réglage en sélectionnant “Réglage facile” dans le menu Configuration. ([HOME] “Configuration” “Réglages lecteur” “Autres”)
Après avoir terminé la “Réglage facile”, vous serez amené à effectuer la “Réglage facile du réseau”.
Suivez les instructions à l’écran et effectuez les réglages avec [3, 4,2,1] puis appuyez sur [OK].
∫ Câble de connexion LAN
≥Utilisez des câbles LAN droits de catégorie 5 ou supérieure (STP) pour connecter les appareils périphériques.≥ L’insertion d’un câble autre que le câble LAN dans la prise
LAN peut endommager l’appareil.
Routeur de bande large passante, etc.
Internet
Câble LAN
Serveur de média certifié DLNA
Réglage facile
Interrupteur d’attente/marche (Í/I)Appuyez pour faire basculer l’appareil du mode allumé au mode de veille ou vice versa. En mode de veille, l’appareil continue de consommer une petite quantité d’énergie.
Réglage facile du réseau
OKRETURN
Réglage facile du réseau
La configuration LAN et un test de connexion du réseaudomestique et d'Internet sont requis pour les fonctionsInternet (BD-Live, etc.).Une connexion Internet haut débit est nécessaire pour leBD-Live.Un câble LAN est-il déjà connecté ?Veuillez vous référer aux instructions d'utilisation.
Appuyer sur [OK] pour procéder.
(17)
DMP-BD75EG-VQT3A95.book 7 ページ 2011年1月7日 金曜日 午後2時16分

8 VQT3A95
L ectureInsérer ou enlever un support
≥ Lorsque vous introduisez un support, assurez-vous que le bon côté est dirigé vers le haut.≥ Si vous connectez un produit Panasonic avec un câble de
connexion USB, l’écran de réglage peut s’afficher sur l’équipement connecté. Pour de plus amples détails, consultez les instructions de l’équipement connecté.
Menu ACCUEILLes fonctions principales de cet appareil peuvent être gérées du menu ACCUEIL.
PréparationAllumez le téléviseur et sélectionnez l’entrée vidéo appropriée sur l’appareil.
1 Appuyez [Í] pour allumer l’appareil.2 Appuyez sur [OK] ou [3,4,2, 1] pour
sélectionner l’option.
≥ Si un support est en place, l’écran de sélection des contenus pour ce support s’affiche.≥ S’il y a d’autres éléments, répétez cette étape.≥ Pour revenir au menu ACCUEIL, sélectionnez
“ACCUEIL” ou appuyez sur [RETURN] plusieurs fois.
Pour afficher le menu ACCUEILAppuyez sur [HOME].
≥ Les éléments à afficher peuvent varier en fonction du support.≥ Lorsque nécessaire, réglez “Disque mixte” pour utiliser un disque avec
des fichiers de données (MP3, JPEG, DivX, MKV) ainsi que Vidéo. ([HOME] “Configuration” “Réglages lecteur” “Disque”)
1
MusiquePhotos
Vidéos
RéseauLecteur de Blu-Ray Disc
ACCUEIL
Configuration
MEDIASERVER
(18)
VQT3A95 ~Body_fre.fm 8 ページ 2011年1月13日 木曜日 午前11時40分

9VQT3A95
Français
Lire des contenus vidéo
1 Insérez le support.Lorsque le menu des contenus s’affiche, appuyez sur [3,4,2,1] pour sélectionner l’élément. ( 8)
2 Appuyez sur [3,4] pour sélectionner le titre puis appuyez sur [OK].
∫ Pour afficher des menusVous pouvez afficher Menu principal, DIRECT NAVIGATOR ou Menu Pop-up.Appuyez sur [TOP MENU] ou [POP-UP MENU].≥ Appuyez sur [3,4,2,1] pour sélectionner l'élément et
appuyez sur [OK].
≥ Le signal provenant des disques PAL sort comme PAL. Le signal provenant des disques NTSC sort comme “NTSC” ou “PAL60”. Vous pouvez sélectionner “NTSC” ou “PAL60” sous “Sortie Contenu NTSC” pour les disques NTSC. ([HOME] “Configuration” “Réglages lecteur” “Vidéo”)
≥ LES DISQUES CONTINUENT DE TOURNER PENDANT QUE LES ELEMENTS DU MENU S’AFFICHENT. Appuyez sur [∫STOP] une fois que vous avez terminé la lecture, afin de protéger le moteur de l'appareil, l'écran de votre téléviseur, etc.
≥ En fonction du support et des contenus, l’écran peut changer ou peut ne pas apparaître.
≥ DivX et MKV: Les lectures successives ne sont pas possibles.≥ Il n’est pas possible de lire des vidéos AVCHD et MPEG2 qui ont été
extrait et supprimé, copié et collé sur le support.≥ Pour économiser de l’électricité, l’alimentation s’éteint automatiquement
si aucune touche n‘est utilisée pendant environ 30 minutes lorsqu’aucune lecture n’est effectuée (par exemple pendant la pause, l’affichage du menu, l’affichage des photos, etc.).
Ces fonctions pourraient ne pas fonctionner en fonction du support et des contenus.
Appuyez sur [∫STOP].La position d'arrêt est mémorisée.Reprendre la fonction de lectureAppuyez sur [1PLAY] pour reprendre la lecture à partir de cette position.≥ L'effacement de la position survient si le tiroir est ouvert ou
si vous appuyez sur [∫STOP] plusieurs fois pour afficher “StOP” sur l'appareil.≥ Sur les disques BD-Vidéo, y compris BD-J, la fonction
de reprise lecture ne fonctionne pas.
Appuyez sur [;PAUSE].≥ Appuyez sur [;PAUSE] à nouveau ou sur [1PLAY] pour
reprendre la lecture.
RechercherLors de la lecture, appuyez sur [SEARCH6] ou [SEARCH5].≥Musique et MP3: la vitesse est fixée à une simple étape.RalentiPendant une pause, appuyez sur [SEARCH5].
La vitesse augmente jusqu'à 5 étapes.≥ Appuyez sur [1PLAY] pour revenir à la vitesse de lecture
normale.
Pendant la lecture ou en cours de pause, appuyez sur [:] ou [9].Passez au titre, chapitre, ou piste que vous voulez lire.≥ Chaque appui augmente le nombre de sauts.
Pendant une pause, appuyez sur [1] (;1).≥Maintenez la touche pour avancer image par image.≥ Appuyez sur [1PLAY] pour revenir à la vitesse de lecture
normale.
Appuyez sur [AUDIO].Vous pouvez modifier le numéro de canal audio ou la langue de la bande-son, etc.
BD DVD CD USB
Autres opérations pendant la lecture
Arrêt
Pause
Rechercher/Ralenti
Sauter
Image par image
Changement d’audio
(19)
DMP-BD75EG-VQT3A95.book 9 ページ 2011年1月7日 金曜日 午後2時16分

10 VQT3A95
Opérations liées avec le téléviseur (VIERA Link “HDAVI Control™”)
Préparation1 Réglez “VIERA Link” sur “Oui” ([HOME]
“Configuration” “Réglages lecteur” “Connexion TV / Appareil” “Connexion HDMI”). (Le réglage par défaut est “Oui”.)
2 Réglez les “HDAVI Control” opérations sur l’équipement branché (le téléviseur par exemple).
3 Allumez tous les “HDAVI Control” appareils compatibles et sélectionnez le canal d’entrée de cette unité sur le téléviseur branché de sorte que la fonction “HDAVI Control” marche correctement.De plus, lorsque le branchement ou les réglages sont modifiés, reprenez ce procédé.
Lorsque la lecture démarre sur l’appareil, le téléviseur commute automatiquement le canal d’entrée et affiche l’action correspondante.De plus, lorsque le téléviseur est éteint, il se rallumera automatiquement.
Tous les équipements compatibles connectés avec “HDAVI Control”, y compris cette unité, s’éteignent automatiquement lorsque vous éteignez le téléviseur.
≥ Cet appareil prend en charge la fonction “HDAVI Control 1”.Cette norme est compatible avec un appareil Panasonic HDAVI habituel.
≥ VIERA Link “HDAVI Control”, sous la base des fonctions de commande fournies par HDMI qui est une norme industrielle connue sous le nom de HDMI CEC (Consumer Electronics Control), est une fonction unique que nous avons mis au point et ajouté. Ainsi, son fonctionnement avec l'appareil des autres fabricants qui prennent en charge HDMI CEC ne peut être garanti.
≥ Veuillez consulter les manuels individuels pour la fonction de prise en charge de l'appareil commercialisé par les autres fabricants VIERA Link.
CaractéristiquesSystème du signal: PAL/NTSCPlage de température de fonctionnement:
i5 oC à i35 oCPlage d’humidité de fonctionnement:
10 % à 80 % d’humidité relative (sans condensation)Sortie vidéo: 1,0 Vp-p (75 ≠)/Broche:1 systèmeSortie audio: 2 Vrms (1 kHz, 0 dB)/Broche
Nombre de connecteurs: 2 canaux:1 systèmeSortie AV HDMI: Type A (19 broches) : 1 systèmeCet appareil prend en charge la fonction “HDAVI Control 1”.Port USB: USB2.0: 1 systèmeEthernet: 10BASE-T/100BASE-TX:1 systèmeCaractéristique LASERProduit LASER de Classe 1:
Longueur d’onde: 790 nm (CDs)/655 nm (DVDs)/405 nm (BDs)Energie laser: Aucune radiation dangereuse n’est émise
avec la protection de sécuritéAlimentation: Secteur 220 à 240 V, 50 HzConsommation électrique: Environ 12 WConsommation électrique en mode veille: Environ 0,2 WConsommation électrique en mode veille du démarrage rapide:
Environ 3,6 WDimensions (LkPkH) y compris les parties en saillie:
430 mmk185 mmk35 mmMasse: Environ 1,6 kg
Les spécifications sont sujettes à modifications sans préavis.
Qu’est-ce que VIERA Link “HDAVI Control”?
Le VIERA Link “HDAVI Control” est une fonction pratique qui offre les opérations liées entre cet appareil, et un téléviseur Panasonic (VIERA) ou un autre appareil sous “HDAVI Control”.Vous pouvez utiliser cette fonction en branchant l’équipement à l’aide d’un câble HDMI. Se reporter aux consignes d’utilisation de l’appareil branché pour les détails relatifs au fonctionnement.
Basculement de l’entrée automatiqueAllumer le lien
Eteindre le lien
(20)
DMP-BD75EG-VQT3A95.book 10 ページ 2011年1月7日 金曜日 午後2時16分
11VQT3A95
Français
This product incorporates the following software:
For the software categorized as (3) and (4), please refer to the terms and conditions of GPL v2 and LGPL v2.1, as the case may be at http://www.gnu.org/licenses/old-licenses/gpl-2.0.html and http://www.gnu.org/licenses/old-licenses/lgpl-2.1.html.In addition, the software categorized as (3) and (4) are copyrighted by several individuals. Please refer to the copyright notice of those individuals at http://www.am-linux.jp/dl/AWBP11
The GPL/LGPL software is distributed in the hope that it will be useful, but WITHOUT ANY WARRANTY, without even the implied warranty of MERCHANTABILITY or FITNESS FOR A PARTICULAR PURPOSE.
At least three (3) years from delivery of products, Panasonic will give to any third party who contacts us at the contact information provided below, for a charge no more than our cost of physically performing source code distribution, a complete machine-readable copy of the corresponding source code covered under GPL v2/LGPL v2.1.
Contact [email protected]
Source code is also freely available to you and any other member of the public via our website below.http://www.am-linux.jp/dl/AWBP11
the software developed independently by or for Panasonic Corporation,the software owned by third party and licensed to Panasonic Corporation,the software licensed under the GNU General Public License, Version 2 (GPL v2),the software licensed under the GNU LESSER General Public License, Version 2.1 (LGPL v2.1) and/or,open sourced software licensed under its applicable license terms including but not limited toICU License, c-arse license.
(1)
(2)
(3)
(4)
(5)
For Open Source Software Programs categorized as (5), please refer to the applicable license terms listed below and/or included in the “License” menu on Product.
ICU License - ICU 1.8.1 and later
COPYRIGHT AND PERMISSION NOTICE
Copyright (c) 1995-2010 International Business Machines Corporation and others
All rights reserved.
Permission is hereby granted, free of charge, to any person obtaining a copy of this software and associated documentation files (the “Software”), to deal in the Software without restriction, including without limitation the rights to use, copy, modify, merge, publish, distribute, and/or sell copies of the Software, and to permit persons to whom the Software is furnished to do so, provided that the above copyright notice(s) and this permission notice appear in all copies of the Software and that both the above copyright notice(s) and this permission notice appear in supporting documentation.
THE SOFTWARE IS PROVIDED “AS IS”, WITHOUT WARRANTY OF ANY KIND, EXPRESS OR IMPLIED, INCLUDING BUT NOT LIMITED TO THE WARRANTIES OF MERCHANTABILITY, FITNESS FOR A PARTICULAR PURPOSE AND NONINFRINGEMENT OF THIRD PARTY RIGHTS. IN NO EVENT SHALL THE COPYRIGHT HOLDER OR HOLDERS INCLUDED IN THIS NOTICE BE LIABLE FOR ANY CLAIM, OR ANY SPECIAL INDIRECT OR CONSEQUENTIAL DAMAGES, OR ANY DAMAGES WHATSOEVER RESULTING FROM LOSS OF USE, DATA OR PROFITS, WHETHER IN AN ACTION OF CONTRACT, NEGLIGENCE OR OTHER TORTIOUS ACTION, ARISING OUT OF OR IN CONNECTION WITH THE USE OR PERFORMANCE OF THIS SOFTWARE.
Except as contained in this notice, the name of a copyright holder shall not be used in advertising or otherwise to promote the sale, use or other dealings in this Software without prior written authorization of the copyright holder.
All trademarks and registered trademarks mentioned herein are the property of their respective owners.
DivX®, DivX Certified® et les logos associés sont des marques commerciales de DivX, Inc. et sont utilisés sous licence.DivX®, DivX Certified® and associated logos are trademarks of DivX, Inc. and are used under license.
Windows est une marque commerciale ou une marque déposée de Microsoft Corporation aux Etats-Unis et dans les autres pays.
c-arse license
Copyright 1998 by the Massachusetts Institute of Technology.
Permission to use, copy, modify, and distribute this software and itsdocumentation for any purpose and without fee is hereby granted, provided that the above copyright notice appear in all copies and that both that copyright notice and this permission notice appear in supporting documentation, and that the name of M.I.T. not be used in advertising or publicity pertaining to distribution of the software without specific, written prior permission.M.I.T. makes no representations about the suitability of this software for any purpose. It is provided “as is” without express or implied warranty.
Java toutes les marques de commerce et les logos basés sur Java sont des marques déposées de Sun Microsystems, Inc. aux États-Unis et dans les autres pays.
Fabriqué sous licence de Dolby Laboratories. Le terme Dolby et le sigle double D sont des marques commerciales de Dolby Laboratories.
Fabriqués sous licence couverte par brevet américain n°: 5,451,942; 5,956,674; 5,974,380; 5,978,762; 6,226,616; 6,487,535; 7,392,195; 7,272,567; 7,333,929; 7,212,872 et autres brevets américains et mondiaux délivrés et en cours de délivrance.Le DTS et le symbole sont des marques déposées et DTS-HD, DTS-HD Master Audio | Essential et les logos DTS sont des marques de commerce de DTS, Inc. Ce produit comprend un logiciel.© DTS, Inc. Tous droits réservés.
Cet élément intègre une technologie de protection contre la copie qui est protégée par des brevets des États-Unis et par les droits de propriété intellectuelle de Rovi Corporation. Le démontage et le désassemblage sont interdits.
HDMI, le logo HDMI et High-Definition Multimedia Interface sont des marques déposées ou enregistrées de HDMI Licensing LLC aux Etats-Unis et dans d’autres pays.
Ce produit est commercialisé dans le cadre de la licence de portefeuille de brevet AVC et de la licence de portefeuille de brevet VC-1 pour une utilisation personnelle et non commerciale par un consommateur, en vue (i) d’encoder une vidéo conformément à la norme AVC et à la norme VC-1 (“AVC/VC-1 Video”) et/ou (ii) de décoder une vidéo AVC/VC-1 précédemment encodée par un consommateur dans le cadre d’une activité personnelle et non commerciale et/ou obtenue auprès d’un fournisseur vidéo autorisé à commercialiser des vidéos AVC/VC-1. Aucune licence n’est accordée ni implicite pour toute autre utilisation. Pour plus d’informations, veuillez contacter MPEG LA, LLC. Consultez le site http://www.mpegla.com.
HDAVI Control™ est une marque de commerce de Panasonic Corporation.
“AVCHD” et le logo “AVCHD” sont des marques commerciales de Panasonic Corporation et Sony Corporation.
“DVD Logo” est une marque commerciale de DVD Format/Logo Licensing Corporation.
Technologie d’encodage du son MPEG Layer-3 brevetée par Fraunhofer IIS et Thomson.
DLNA, the DLNA Logo and DLNA CERTIFIED are trademarks, service marks, or certification marks of the Digital Living Network Alliance.
(21)
DMP-BD75EG-VQT3A95.book 11 ページ 2011年1月7日 金曜日 午後2時16分

2 VQT3A95
Caro ClienteGrazie per l’acquisto di questo prodotto.Per ottenere prestazioni ottimali e per ragioni di sicurezza, consigliamo di leggere con attenzione le istruzioni.Prima di collegare, far funzionare o regolare l’apparecchio, leggere completamente queste istruzioni. Conservare poi questo manuale per riferimenti futuri.
IndicePer cominciare
Lettura delle istruzioni per l’uso (formato PDF) . . . 2Precauzioni di sicurezza . . . . . . . . . . . . . . . . . . . . 3Accessori . . . . . . . . . . . . . . . . . . . . . . . . . . . . . . . . 3Dischi/Dispositivi USB riproducibili . . . . . . . . . . . . 4
Connessione e impostazione
FASE 1: Collegamento alla TV . . . . . . . . . . . . . . . 6FASE 2: Collegamento ad un
amplificatore/ricevitore . . . . . . . . . . . . . . 6FASE 3: Collegamento ad una rete
a banda larga . . . . . . . . . . . . . . . . . . . . . 7FASE 4: Impostazioni . . . . . . . . . . . . . . . . . . . . . . 7
Riproduzione
Inserimento o rimozione di un supporto . . . . . . . . 8Menu HOME . . . . . . . . . . . . . . . . . . . . . . . . . . . . . 8Riproduzione di contenuti video . . . . . . . . . . . . . . 9Operazioni collegate con la TV (VIERA Link “HDAVI Control™”) . . . . . . . . . . . . . 10Specifiche tecniche . . . . . . . . . . . . . . . . . . . . . . . 10
Per cominciare
Lettura delle istruzioni per l’uso (formato PDF)∫ Per Windows1 Accendere il PC e inserire il CD-ROM contenente le
istruzioni per l’uso (in dotazione).2 Selezionare la lingua desiderata, quindi fare clic su
[Istruzioni d’uso] per installare.3 Fare doppio clic sull’icona del collegamento “BD75EG
Istruzioni d’uso” sul desktop.
Quando le istruzioni per l’uso (in formato PDF) non si apronoPer leggere o stampare le istruzioni per l’uso in formato PDF è necessario Adobe Acrobat Reader 5.0 o versioni successive o Adobe Reader 7.0 o versioni successive.Scaricare e installare una versione di Adobe Reader utilizzabile con il proprio sistema operativo dal seguente sito Web.http://get.adobe.com/reader/otherversions
Se si utilizza il seguente sistema operativo– Windows 2000 SP4– Windows XP SP3– Windows Vista SP2– Windows 7
Inserire il CD-ROM contenente le istruzioni per l’uso (in dotazione), fare clic su [Adobe(R) Reader(R)], quindi seguire i messaggi su schermo per l’installazione.
Per disinstallare le istruzioni per l’uso (in formato PDF)Eliminare il file PDF dalla cartella “Program Files\Panasonic\DMP\”.≥Quando non è possibile visualizzare il contenuto della
cartella Program Files, fare clic su [Show the contents of this folder] per visualizzarli.
∫ Per Macintosh1 Accendere il PC e inserire il CD-ROM contenente le
istruzioni per l’uso (in dotazione).2 Aprire la cartella “Manual” in “VFF0703”, quindi copiare
il file PDF con la lingua desiderata all’interno della cartella.
3 Fare doppio clic sul file PDF per aprirlo.Consultare anche le Istruzioni d’uso (in formato PDF) registrate sul CD-ROM contenente le istruzioni d’uso (in dotazione).Le istruzioni per l’uso (formato PDF) non possono essere riprodotte sul lettore stesso.Qui è possibile ottenere informazioni sulle metodologie operative avanzate e controllare la sezione Ricerca guasti.
Per lo smaltimento o trasferimento di questa unitàQuesta unità può mantenere le informazioni delle impostazioni dell'utente. In caso di smaltimento o trasferimento di questa unità, è consigliabile seguire la procedura per ripristinare tutte le impostazioni di fabbrica cancellando le impostazioni dell'utente.≥ Nella memoria di questa unità può essere registrata la
storia delle operazioni.
Descrizioni contenute in queste istruzioni operative≥ Le istruzioni per le varie operazioni sono in generale per
il telecomando.
(22)
DMP-BD75EG-VQT3A95.book 2 ページ 2011年1月11日 火曜日 午後9時11分
3VQT3A95
Italiano
Precauzioni di sicurezza
Unità≥ Per ridurre il rischio d’incendio, folgorazioni o danni
all’unità,– Non esporre questa unità alla pioggia, umidità,
gocciolamenti o spruzzi.– Non posare oggetti contenenti liquidi, come un vaso di
fiori, su questa unità.– Utilizzare solo gli accessori consigliati.– Non rimuovere le coperture.– Non riparare quest’unità da soli. Per qualsiasi
riparazione rivolgersi a un tecnico qualificato.– Non introdurre oggetti metallici all’interno di questa
unità.– Non appoggiare oggetti pesanti su questa unità.
Cavo di alimentazione CA≥ Per ridurre il rischio d’incendio, folgorazioni o danni
all’unità,– Accertarsi che la tensione di alimentazione corrisponda
a quella indicata su questa unità.– Inserire fino in fondo la spina del cavo di alimentazione
nella presa.– Non tirare, piegare, o appoggiare oggetti pesanti sul
cavo di alimentazione.– Non maneggiare la spina con le mani bagnate.– Tenere la spina del cavo di alimentazione tra le dita
quando la si scollega.– Non utilizzare una spina o una presa di rete
danneggiate.≥ Installare l'unità in modo che sia possibile scollegare
immediatamente il cavo dell'alimentatore CA dalla presa di rete in caso di problemi.
Unità≥Questa unità utilizza un laser. L’uso di apparecchi di
controllo o di regolazione, o procedure di utilizzazione diverse da quelle indicate in questo manuale di istruzioni, possono causare l’esposizione a radiazioni pericolose.≥Non mettere sull’unità sorgenti di fiamme nude, come
candele accese.≥Durante l’uso, questa unità potrebbe essere soggetta
all’interferenza radio causata dal cellulare. Se si dovesse verificare tale interferenza, aumentare la distanza tra questa unità e il cellulare.≥Questa unità è progettata per l’uso nei paesi con clima
mite.
Collocazione≥Collocare questa unità su una superficie piana.≥ Per ridurre il rischio d’incendio, folgorazioni o danni
all’unità,– Per mantenere una buona ventilazione, non installare o
sistemare questa unità in uno scaffale dei libri, armadietto incorporato od altro spazio ristretto.
– Non ostruire le aperture di ventilazione di questa unità con giornali, tovaglie, tende ed altri oggetti simili.
– Non esporre questa unità alla luce diretta del sole, a temperature elevate, a eccessiva umidità e a forti vibrazioni.
Batterie≥ Se la batteria viene sostituita in modo non corretto esiste il
rischio che esploda. Sostituirla esclusivamente con una del tipo consigliato dal produttore.≥ L’uso scorretto delle batterie può causare perdite di
elettrolito e causare incendi.– Non utilizzare batterie nuove e vecchie o batterie di tipi
diversi insieme.– Non riscaldare o esporre a fiamme le batterie.– Non lasciare la batteria/le batterie per lungo tempo
all'interno dell'auto, esposte alla luce solare diretta e con le porte e i finestrini chiusi.
– Non aprire o mettere in corto le batteria.– Non ricaricare batterie alcaline o al manganese.– Non usare batterie la cui guaina non è intatta.– Rimuovere le batterie se si prevede di non utilizzare il
telecomando per lungo tempo. Conservarle in un luogo fresco ed asciutto.
≥ Quando si smaltiscono le batterie, contattare le autorità locali o il rivenditore e chiedere informazioni sul metodo corretto di smaltimento.
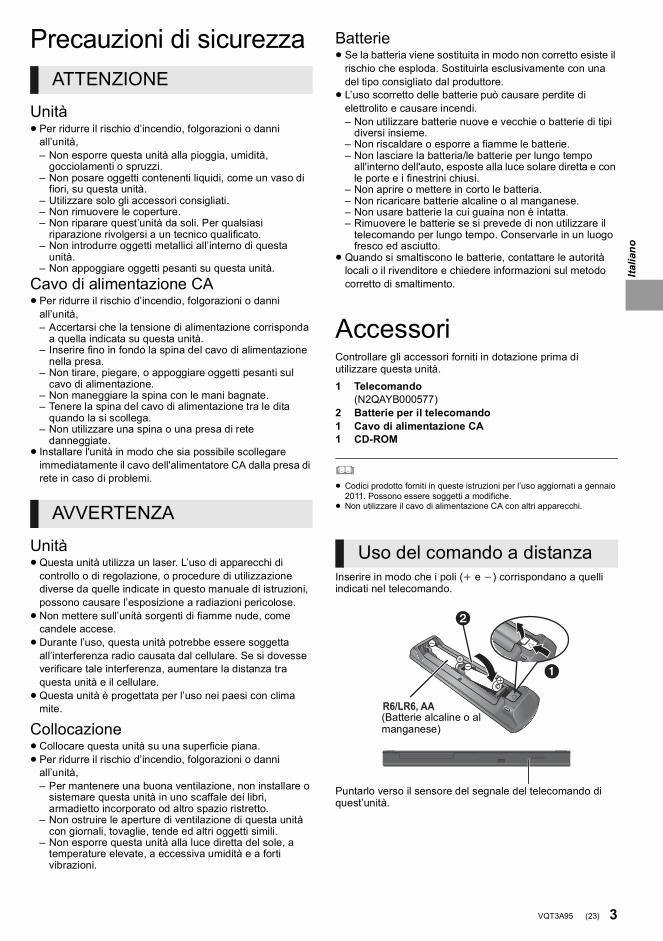
AccessoriControllare gli accessori forniti in dotazione prima di utilizzare questa unità.
≥ Codici prodotto forniti in queste istruzioni per l’uso aggiornati a gennaio 2011. Possono essere soggetti a modifiche.
≥ Non utilizzare il cavo di alimentazione CA con altri apparecchi.
Inserire in modo che i poli (i e j) corrispondano a quelli indicati nel telecomando.
Puntarlo verso il sensore del segnale del telecomando di quest’unità.
ATTENZIONE
AVVERTENZA
1 Telecomando(N2QAYB000577)
2 Batterie per il telecomando1 Cavo di alimentazione CA1 CD-ROM
Uso del comando a distanza
R6/LR6, AA
(Batterie alcaline o al manganese)
(23)
DMP-BD75EG-VQT3A95.book 3 ページ 2011年1月11日 火曜日 午後9時11分

4 VQT3A95
Dischi/Dispositivi USB riproducibiliDispositivo Marchi sul
disco Tipi di dispositivo Formato contenuti
BD-Video Video
BD-RE VideoJPEG
BD-RVideoDivX®
MKV
DVD-Video Video
DVD-R VideoAVCHDDivX®
MKVMP3JPEGDVD-R DL
DVD-RW VideoAVCHD
— +R/+RW/+R DL
CD musicale Musica [CD-DA]
— CD-RCD-RW
DivX®
MKVMusica [CD-DA]MP3JPEG
— Dispositivo USB(fino a 2 TB)
DivX®
MKVMP3JPEG
BD
DVD
CD
USB
(24)
DMP-BD75EG-VQT3A95.book 4 ページ 2011年1月7日 金曜日 午後2時28分

5VQT3A95
Italiano
∫ Dischi che non possono essere riprodotti
≥DVD-RAM≥ Super Audio CD≥ Foto CD≥DVD-Audio≥Dischi WMA≥Dischi DivX Plus HD≥HD DVD
∫ Informazioni sulla gestione delle regioni
BD-VideoQuesta unità può riprodurre BD-Video contrassegnati con etichette contenenti il codice di regione “B”.Esempio:
DVD-VideoQuesta unità può riprodurre DVD-Video contrassegnati con etichette contenenti il numero di regione “2” o “ALL”.Esempio:
∫ FinalizzazioneDVD-R/RW/R DL, +R/+RW/+R DL e CD-R/RW registrati da un masterizzatore, ecc. devono essere finalizzati dal masterizzatore stesso per essere riprodotti su questa unità. Consultare le istruzioni del produttore del masterizzatore.
∫ BD-Video≥Questa unità supporta l’audio ad alto bit rate (Dolby Digital
Plus, Dolby TrueHD, DTS-HD High Resolution Audio e DTS-HD Master Audio) adottato nei BD-Video. – Se “Dolby D/Dolby D +/Dolby TrueHD” è impostato su
“PCM”, il numero massimo di canali possibile per il suono in formato Dolby è 2ch PCM. ([HOME] “Impostazioni” “Impostazioni Lettore” “Audio” “Uscita Audio Digitale”)
∫ CD musicalell funzionamento e la qualità audio del CD non conformi alle specifiche CD-DA (CD copia controllo, ecc) non possono essere garantiti.
∫ Dispositivo USB≥ Non è garantito che questa unità possa essere collegata a
tutti i dispositivi USB.≥ Questa unità non supporta la messa in carica dei
dispositivi USB.≥ Sono supportati i file system FAT12, FAT16 e FAT32.≥ Questa unità supporta USB 2.0 ad Alta Velocità.≥ Questa unità è in grado di supportare un HDD formattato
con il FAT32. Alcuni tipi di HDD possono richiedere l'utilizzo di un'unità di alimentazione esterna.
∫ BD-RE, BD-RQuando si riproducono dischi registrati in modalità DR utilizzando dei masterizzatori per dischi Blu-ray Panasonic, è possibile che l'audio non venga riprodotto correttamente, o che si verifichino problemi analoghi.
≥ Potrebbe non essere possibile riprodurre i supporti di cui sopra in alcuni casi a causa del tipo di supporto stesso, delle condizioni della registrazione, del metodo di registrazione e del modo in cui i file sono stati creati.
≥ I produttori dei dischi possono verificare in che modo vengono riprodotti i dischi. Potrebbe quindi non essere sempre possibile controllare la riproduzione come descritto in queste istruzioni. Leggere le istruzioni con attenzione.
2 ALL 352
Informazioni per gli utenti sulla raccolta e l’eliminazione di vecchie apparecchiature e batterie usate
Questi simboli sui prodotti, sull’imballaggio, e/o sulle documentazioni o manuali accompagnanti i prodotti indicano che i prodotti elettrici, elettronici e le batterie usate non devono essere buttati nei rifiuti domestici generici.Per un trattamento adeguato, recupero e riciclaggio di vecchi prodotti e batterie usate,
vi preghiamo di portarli negli appositi punti di raccolta, secondo la legislazione vigente nel vostro Paese e le Direttive 2002/96/EC e 2006/66/EC.Smaltendo correttamente questi prodotti e le batterie, contribuirete a salvare importanti risorse e ad evitare i potenziali effetti negativi sulla salute umana e sull’ambiente che altrimenti potrebbero verificarsi in seguito ad un trattamento inappropriato dei rifiuti.Per ulteriori informazioni sulla raccolta e sul riciclaggio di vecchi prodotti e batterie, vi preghiamo di contattare il vostro comune, i vostri operatori per lo smaltimento dei rifiuti o il punto vendita dove avete acquistato gli articoli.Sono previste e potrebbero essere applicate sanzioni qualora questi rifiuti non siano stati smaltiti in modo corretto ed in accordo con la legislazione nazionale.
Per utenti commerciali nell’Unione EuropeaSe desiderate eliminare apparecchiature elettriche ed elettroniche, vi preghiamo di contattare il vostro commerciante od il fornitore per maggiori informazioni.
[Informazioni sullo smaltimento rifiuti in altri Paesi fuori dall’Unione Europea]Questi simboli sono validi solo all’interno dell’Unione Europea. Se desiderate smaltire questi articoli, vi preghiamo di contattare le autorità locali od il rivenditore ed informarvi sulle modalità per un corretto smaltimento.
Nota per il simbolo delle batterie (esempio con simbolo chimico riportato sotto il simbolo principale):Questo simbolo può essere usato in combinazione con un simbolo chimico; in questo caso è conforme ai requisiti indicati dalla Direttiva per il prodotto chimico in questione.Cd
(25)
DMP-BD75EG-VQT3A95.book 5 ページ 2011年1月7日 金曜日 午後2時28分
6 VQT3A95
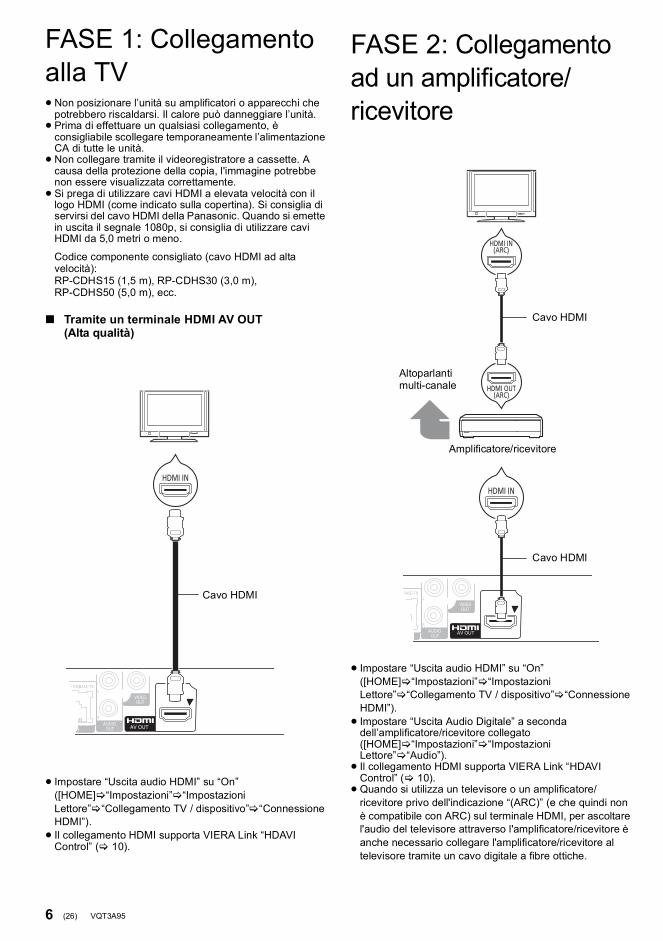
C onnessione e impostazioneFASE 1: Collegamento alla TV≥Non posizionare l’unità su amplificatori o apparecchi che
potrebbero riscaldarsi. Il calore può danneggiare l’unità.≥ Prima di effettuare un qualsiasi collegamento, è
consigliabile scollegare temporaneamente l’alimentazione CA di tutte le unità.≥Non collegare tramite il videoregistratore a cassette. A
causa della protezione della copia, l'immagine potrebbe non essere visualizzata correttamente.≥ Si prega di utilizzare cavi HDMI a elevata velocità con il
logo HDMI (come indicato sulla copertina). Si consiglia di servirsi del cavo HDMI della Panasonic. Quando si emette in uscita il segnale 1080p, si consiglia di utilizzare cavi HDMI da 5,0 metri o meno.
Codice componente consigliato (cavo HDMI ad alta velocità):RP-CDHS15 (1,5 m), RP-CDHS30 (3,0 m), RP-CDHS50 (5,0 m), ecc.
FASE 2: Collegamento ad un amplificatore/ricevitore
∫ Tramite un terminale HDMI AV OUT(Alta qualità)
≥ Impostare “Uscita audio HDMI” su “On” ([HOME] “Impostazioni” “Impostazioni Lettore” “Collegamento TV / dispositivo” “Connessione HDMI”).≥ Il collegamento HDMI supporta VIERA Link “HDAVI
Control” ( 10).
HDMI IN
Cavo HDMI
≥ Impostare “Uscita audio HDMI” su “On” ([HOME] “Impostazioni” “Impostazioni Lettore” “Collegamento TV / dispositivo” “Connessione HDMI”).≥ Impostare “Uscita Audio Digitale” a seconda
dell’amplificatore/ricevitore collegato ([HOME] “Impostazioni” “Impostazioni Lettore” “Audio”).≥ Il collegamento HDMI supporta VIERA Link “HDAVI
Control” ( 10).≥Quando si utilizza un televisore o un amplificatore/
ricevitore privo dell'indicazione “(ARC)” (e che quindi non è compatibile con ARC) sul terminale HDMI, per ascoltare l'audio del televisore attraverso l'amplificatore/ricevitore è anche necessario collegare l'amplificatore/ricevitore al televisore tramite un cavo digitale a fibre ottiche.
HDMI IN
HDMI IN
HDMI IN(ARC)
HDMI OUT(ARC)
Altoparlanti multi-canale
Amplificatore/ricevitore
Cavo HDMI
Cavo HDMI
(26)
VQT3A95 ~Body_ita.fm 6 ページ 2011年1月11日 火曜日 午後9時21分

7VQT3A95
Italiano
FASE 3: Collegamento ad una rete a banda largaQuando questa unità è collegata ad una banda larga, possono essere utilizzati i servizi seguenti.– È possibile aggiornare il firmware– È possibile utilizzare BD-Live– È possibile accedere a un altro dispositivoPer maggiori dettagli sui metodi di collegamento, consultare le istruzioni fornite con gli apparecchi collegati.
FASE 4: Impostazioni
Dopo che si è collegato per la prima volta il nuovo lettore e si è premuto [Í], verrà visualizzata una schermata per le impostazioni di base.PreparazioneAccendere il televisore e selezionare l’entrata video adatta sul televisore.
1 Premere [Í].Viene visualizzata la schermata di installazione.
2 Seguire le istruzioni sullo schermo ed effettuare le impostazioni con [3,4], quindi premere [OK].
Dopo aver completato l’operazione “Impostazione rapida”, è possibile effettuare l’operazione “Impostazione Rapida Rete”.
≥ È possibile eseguire questa installazione in qualsiasi momento scegliendo “Impostazione rapida” dal Menu di installazione. ([HOME] “Impostazioni” “Impostazioni Lettore” “Altro”)
Dopo aver completato “Impostazione rapida”, verrà chiesto di effettuare “Impostazione Rapida Rete”.
Seguire le istruzioni sullo schermo ed effettuare le impostazioni con [3,4,2,1], quindi premere [OK].
∫ Cavo di collegamento LAN
≥Utilizzare soltanto cavi LAN diretti di categoria 5 o superiore (STP) per collegarsi alle periferiche.≥ L’inserimento di un cavo che non sia il cavo della LAN nel
terminale della LAN può danneggiare l'unità.
Router a banda larga, ecc.
Internet
Cavo LAN
Media server certificato DLNA
Impostazione rapida
Interruttore standby/accensione (Í/I)Premere per passare dalla modalità on a standby o viceversa. Nella modalità standby l'unità consuma un piccolo quantitativo di energia.
Impostazione Rapida Rete
OKRETURN
Impostazione Rapida Rete
Le funzioni Internet ( BD-Live ecc. ) richiedono laconfigurazione LAN e il test della rete domestica e delleconnessioni internet.Per BD-Live è necessaria una connessione Internet a bandalarga.Il cavo LAN è già connesso ?Far riferimento alle istruzioni d'uso per quanto riguardala connessione di rete.Premi [OK] per procedere.
(27)
DMP-BD75EG-VQT3A95.book 7 ページ 2011年1月7日 金曜日 午後2時28分

8 VQT3A95
R iproduz ioneInserimento o rimozione di un supporto
≥Quando si inserisce un supporto, assicurarsi che non sia messo sottosopra.≥ Se si collega un prodotto Panasonic con un cavo di
collegamento USB, si potrebbe visualizzare la schermata di setup sull'apparecchio collegato. Per maggiori dettagli, consultare le istruzioni dell'apparecchio collegato.
Menu HOMELe principali funzioni di questa unità possono essere controllate dal menu HOME.
PreparazioneAccendere il televisore e selezionare l'entrata video adatta sul televisore.
1 Premere [Í] per accendere l'unità.2 Premere [OK] o [3,4,2,1] per
selezionare una voce.
≥Quando si inserisce un supporto, verrà visualizzata una schermata per la selezione dei contenuti di tale supporto.≥ Se vi sono altre voci, ripetere questo passaggio.≥ Per tornare al menu HOME, selezionare “HOME”
oppure premere più volte [RETURN].
Per visualizzare il menu HOMEPremere [HOME].
≥ Gli oggetti da visualizzare possono variare a seconda del file multimediale.
≥ Se necessario, attivare “Opzione Disco Dati Misti” quando si utilizza un disco contenente sia file di dati (MP3, JPEG, DivX, MKV) che video. ([HOME] “Impostazioni” “Impostazioni Lettore” “Disco”)
1
MusicaImmagini
Video
ReteLettore Blu-ray Disc
HOME
Impostazioni
MEDIASERVER
(28)
DMP-BD75EG-VQT3A95.book 8 ページ 2011年1月7日 金曜日 午後2時28分

9VQT3A95
Italiano
Riproduzione di contenuti video
1 Inserire il supporto.Quando viene visualizzato il menu dei contenuti, premere [3,4,2,1] per selezionare la voce. ( 8)
2 Premere [3, 4] per selezionare il titolo, quindi premere [OK].
∫ Per visualizzare i menuE’ possibile visualizzare Menu principale, DIRECT NAVIGATOR o Menu a comparsa.Premere [TOP MENU] o [POP-UP MENU].≥ Premere [3,4,2,1] per selezionare l'elemento e
premere [OK].
≥ Il segnale dai dischi PAL viene visualizzato come PAL. Il segnale dai dischi NTSC viene visualizzato come “NTSC” o “PAL60”. È possibile selezionare “NTSC” o “PAL60” in “Output contenuti NTSC” per i dischi NTSC. ([HOME] “Impostazioni” “Impostazioni Lettore” “Immagine”)
≥ I DISCHI CONTINUANO A GIRARE MENTRE VENGONO VISUALIZZATI I MENU. Premere [∫STOP] quando la riproduzione è terminata per proteggere il motore dell'unità, lo schermo del televisore e così via.
≥ A seconda del supporto e dei contenuti, il display può cambiare o non apparire.
≥ DivX e MKV: La riproduzione successiva non è possibile.≥ Non è possibile riprodurre video MPEG2 e AVCHD che siano stati
copiati mediante trascinamento, o copiati e incollati sul supporto.≥ Per risparmiare corrente, l'unità si spegne automaticamente se non
vengono premuti tasti per circa 30 minuti quando non è in corso una riproduzione (ad esempio quando l'unità è in pausa, quando viene visualizzato il menu, quando vengono visualizzate delle immagini fisse, ecc.).
Queste funzioni potrebbero non essere disponibili a seconda del supporto e dei contenuti.
Premere [∫STOP].La posizione di arresto è stata memorizzata.Riprendere la riproduzionePremere [1PLAY] per ripartire da questa posizione.≥ La posizione viene cancellata se si apre il vassoio o se si
preme [∫STOP] diverse volte per visualizzare “StOP” sul display dell'unità.≥ Sui dischi BD-Video compresi i BD-J, la funzione di
ripristino della riproduzione non funziona.
Premere [;PAUSE].≥ Premere nuovamente [;PAUSE] o [1PLAY] per
riprendere la riproduzione.
RicercaIn fase di riproduzione, premere [SEARCH6] o [SEARCH5].≥Musica e MP3: La velocità è fissa.MoviolaIn pausa, premere [SEARCH5].
La velocità aumenta fino a 5 volte.≥ Premere [1PLAY] per tornare alla velocità di riproduzione
normale.
Durante la riproduzione o la pausa, premere [:] o [9].Saltare al titolo, capitolo o traccia che si vuole riprodurre.≥ Ogni pressione aumenta il numero di salti.
In pausa, premere [1] (;1).
≥ Tenere premuto per cambiare in successione in avanti.≥ Premere [1PLAY] per tornare alla velocità di riproduzione
normale.
Premere [AUDIO].È possibile cambiare il numero del canale audio o la lingua della traccia audio, ecc.
BD DVD CD USB
Altre operazioni durante la riproduzione
Stop
Pausa
Ricerca/Moviola
Salta
Frame dopo frame
Cambio dell’audio
(29)
DMP-BD75EG-VQT3A95.book 9 ページ 2011年1月7日 金曜日 午後2時28分

10 VQT3A95
Operazioni collegate con la TV (VIERA Link “HDAVI Control™”)
Preparazione1 Impostare “VIERA Link” su “On” ([HOME]
“Impostazioni” “Impostazioni Lettore” “Collegamento TV / dispositivo” “Connessione HDMI”). (L’impostazione predefinita è “On”.)
2 Impostare le operazioni “HDAVI Control” sulla strumentazione collegata (ad esempio TV).
3 Accendere tutta la strumentazione “HDAVI Control” compatibile e selezionare il canale di entrata di questa unità sulla TV collegata di modo che la funzione “HDAVI Control” funzioni correttamente.Ripetere questa procedura anche quando il collegamento o le impostazioni vengono modificate.
Quando ha inizio la riproduzione sull'unità, il televisore passerà automaticamente al canale di ingresso appropriato e visualizzerà l'azione corrispondente.Se il televisore è spento, inoltre, si accenderà automaticamente.
Tutti i dispositivi compatibili collegati con “HDAVI Control”, compresa questa unità, si spengono quando viene spento il televisore.
≥ Questa unità supporta la funzione “HDAVI Control 1”.Questo standard è compatibile con gli apparecchi HDAVI convenzionali di Panasonic.
≥ VIERA Link “HDAVI Control”, basato sulle condizioni di controllo fornite da HDMI, standard industriale noto sotto il nome di HDMI CEC (Consumer Electronics Control), è una funzione unica che abbiamo sviluppato e aggiunto. In quanto tale, il suo funzionamento con dispositivi realizzati da altri produttori HDMI CEC non può essere garantito.
≥ Si prega di consultare i singoli manuali per le funzioni supportate da dispositivi realizzati da altri VIERA Link produttori.
Specifiche tecnicheSistema di segnali: PAL/NTSCRange temperatura di funzionamento:
i5 oC a i35 oCRange umidità di funzionamento:
da 10 % a 80 % UR (senza condensa)Uscita video: 1,0 Vp-p (75 ≠)/Jack:1 sistemaUscita audio: 2 Vrms (1 kHz, 0 dB)/Jack
Numero di connettori: 2 canali:1 sistemaUscita HDMI AV: Tipo A (19 pin): 1 sistema
Questa unità supporta la funzione “HDAVI Control 1”.Slot USB: USB2.0: 1 sistemaEthernet: 10BASE-T/100BASE-TX:1 sistemaSpecifiche tecniche LASERProdotto LASER di Classe 1:
Lunghezza d’onda:790 nm (CDs)/655 nm (DVDs)/405 nm (BDs)
Potenza laser: Con la protezione di sicurezza non vengono emesse radiazioni pericolose
Alimentazione: CA da 220 a 240 V, 50 HzConsumo: Circa 12 WConsumo in modalità di attesa (standby): Circa 0,2 WConsumo in modalità di attesa avvio rapido: Circa 3,6 WDimensioni (LkPkA) Incluse le parti sporgenti:
430 mmk185 mmk35 mmMassa: Circa 1,6 kg
Le specifiche sono soggette a variazioni senza preavviso.
Cos’è VIERA Link “HDAVI Control”?
VIERA Link “HDAVI Control” è una comoda funzione che offre operazioni sincronizzate tra questa unità ed un televisore Panasonic (VIERA) o altro dispositivo sottoposto a “HDAVI Control”.È possibile utilizzare questa funzione collegando la strumentazione con un cavo HDMI. Consultare le istruzioni di funzionamento dei dispositivi collegati per le istruzioni di funzionamento.
Cambio automatico di inputCollegamento accensione
Collegamento spegnimento
(30)
DMP-BD75EG-VQT3A95.book 10 ページ 2011年1月11日 火曜日 午後9時11分
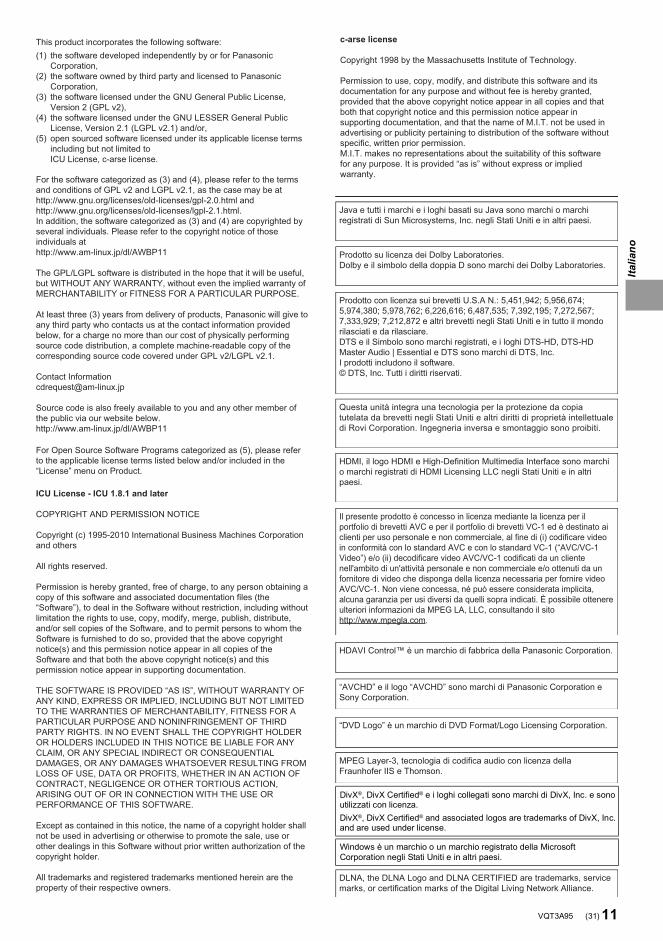
11VQT3A95
Italiano
This product incorporates the following software:
For the software categorized as (3) and (4), please refer to the terms and conditions of GPL v2 and LGPL v2.1, as the case may be at http://www.gnu.org/licenses/old-licenses/gpl-2.0.html and http://www.gnu.org/licenses/old-licenses/lgpl-2.1.html.In addition, the software categorized as (3) and (4) are copyrighted by several individuals. Please refer to the copyright notice of those individuals at http://www.am-linux.jp/dl/AWBP11
The GPL/LGPL software is distributed in the hope that it will be useful, but WITHOUT ANY WARRANTY, without even the implied warranty of MERCHANTABILITY or FITNESS FOR A PARTICULAR PURPOSE.
At least three (3) years from delivery of products, Panasonic will give to any third party who contacts us at the contact information provided below, for a charge no more than our cost of physically performing source code distribution, a complete machine-readable copy of the corresponding source code covered under GPL v2/LGPL v2.1.
Contact [email protected]
Source code is also freely available to you and any other member of the public via our website below.http://www.am-linux.jp/dl/AWBP11
the software developed independently by or for Panasonic Corporation,the software owned by third party and licensed to Panasonic Corporation,the software licensed under the GNU General Public License, Version 2 (GPL v2),the software licensed under the GNU LESSER General Public License, Version 2.1 (LGPL v2.1) and/or,open sourced software licensed under its applicable license terms including but not limited toICU License, c-arse license.
(1)
(2)
(3)
(4)
(5)
For Open Source Software Programs categorized as (5), please refer to the applicable license terms listed below and/or included in the “License” menu on Product.
ICU License - ICU 1.8.1 and later
COPYRIGHT AND PERMISSION NOTICE
Copyright (c) 1995-2010 International Business Machines Corporation and others
All rights reserved.
Permission is hereby granted, free of charge, to any person obtaining a copy of this software and associated documentation files (the “Software”), to deal in the Software without restriction, including without limitation the rights to use, copy, modify, merge, publish, distribute, and/or sell copies of the Software, and to permit persons to whom the Software is furnished to do so, provided that the above copyright notice(s) and this permission notice appear in all copies of the Software and that both the above copyright notice(s) and this permission notice appear in supporting documentation.
THE SOFTWARE IS PROVIDED “AS IS”, WITHOUT WARRANTY OF ANY KIND, EXPRESS OR IMPLIED, INCLUDING BUT NOT LIMITED TO THE WARRANTIES OF MERCHANTABILITY, FITNESS FOR A PARTICULAR PURPOSE AND NONINFRINGEMENT OF THIRD PARTY RIGHTS. IN NO EVENT SHALL THE COPYRIGHT HOLDER OR HOLDERS INCLUDED IN THIS NOTICE BE LIABLE FOR ANY CLAIM, OR ANY SPECIAL INDIRECT OR CONSEQUENTIAL DAMAGES, OR ANY DAMAGES WHATSOEVER RESULTING FROM LOSS OF USE, DATA OR PROFITS, WHETHER IN AN ACTION OF CONTRACT, NEGLIGENCE OR OTHER TORTIOUS ACTION, ARISING OUT OF OR IN CONNECTION WITH THE USE OR PERFORMANCE OF THIS SOFTWARE.
Except as contained in this notice, the name of a copyright holder shall not be used in advertising or otherwise to promote the sale, use or other dealings in this Software without prior written authorization of the copyright holder.
All trademarks and registered trademarks mentioned herein are the property of their respective owners.
DivX®, DivX Certified® e i loghi collegati sono marchi di DivX, Inc. e sono utilizzati con licenza.DivX®, DivX Certified® and associated logos are trademarks of DivX, Inc. and are used under license.
Windows è un marchio o un marchio registrato della Microsoft Corporation negli Stati Uniti e in altri paesi.
c-arse license
Copyright 1998 by the Massachusetts Institute of Technology.
Permission to use, copy, modify, and distribute this software and itsdocumentation for any purpose and without fee is hereby granted, provided that the above copyright notice appear in all copies and that both that copyright notice and this permission notice appear in supporting documentation, and that the name of M.I.T. not be used in advertising or publicity pertaining to distribution of the software without specific, written prior permission.M.I.T. makes no representations about the suitability of this software for any purpose. It is provided “as is” without express or implied warranty.
Java e tutti i marchi e i loghi basati su Java sono marchi o marchi registrati di Sun Microsystems, Inc. negli Stati Uniti e in altri paesi.
Prodotto su licenza dei Dolby Laboratories.Dolby e il simbolo della doppia D sono marchi dei Dolby Laboratories.
Prodotto con licenza sui brevetti U.S.A N.: 5,451,942; 5,956,674; 5,974,380; 5,978,762; 6,226,616; 6,487,535; 7,392,195; 7,272,567; 7,333,929; 7,212,872 e altri brevetti negli Stati Uniti e in tutto il mondo rilasciati e da rilasciare. DTS e il Simbolo sono marchi registrati, e i loghi DTS-HD, DTS-HD Master Audio | Essential e DTS sono marchi di DTS, Inc. I prodotti includono il software.© DTS, Inc. Tutti i diritti riservati.
Questa unità integra una tecnologia per la protezione da copia tutelata da brevetti negli Stati Uniti e altri diritti di proprietà intellettuale di Rovi Corporation. Ingegneria inversa e smontaggio sono proibiti.
HDMI, il logo HDMI e High-Definition Multimedia Interface sono marchi o marchi registrati di HDMI Licensing LLC negli Stati Uniti e in altri paesi.
Il presente prodotto è concesso in licenza mediante la licenza per il portfolio di brevetti AVC e per il portfolio di brevetti VC-1 ed è destinato ai clienti per uso personale e non commerciale, al fine di (i) codificare video in conformità con lo standard AVC e con lo standard VC-1 (“AVC/VC-1 Video”) e/o (ii) decodificare video AVC/VC-1 codificati da un cliente nell'ambito di un'attività personale e non commerciale e/o ottenuti da un fornitore di video che disponga della licenza necessaria per fornire video AVC/VC-1. Non viene concessa, né può essere considerata implicita, alcuna garanzia per usi diversi da quelli sopra indicati. È possibile ottenere ulteriori informazioni da MPEG LA, LLC, consultando il sito http://www.mpegla.com.
HDAVI Control™ è un marchio di fabbrica della Panasonic Corporation.
“AVCHD” e il logo “AVCHD” sono marchi di Panasonic Corporation e Sony Corporation.
“DVD Logo” è un marchio di DVD Format/Logo Licensing Corporation.
MPEG Layer-3, tecnologia di codifica audio con licenza della Fraunhofer IIS e Thomson.
DLNA, the DLNA Logo and DLNA CERTIFIED are trademarks, service marks, or certification marks of the Digital Living Network Alliance.
(31)
DMP-BD75EG-VQT3A95.book 11 ページ 2011年1月7日 金曜日 午後2時28分

2 VQT3A95
Estimado clienteGracias por haber adquirido este producto.Lea con atención estas instrucciones para obtener las máximas prestaciones con la mayor seguridad.Antes de conectar, operar o ajustar este producto, sírvase leer estas instrucciones completamente.Guarde este manual para consultarlo en el futuro en caso de ser necesario.
ContenidosPreparativos
Lectura de las instrucciones de funcionamiento (en formato PDF). . . . . . . . . . . . . . . . . . . . . . . . . . 2Precauciones de seguridad . . . . . . . . . . . . . . . . . . 3Accesorios . . . . . . . . . . . . . . . . . . . . . . . . . . . . . . . 3Discos reproducibles /dispositivos USB . . . . . . . . 4
Conexión y configuración
PASO 1: Conexión a un televisor . . . . . . . . . . . . . 6PASO 2: Conexión a un amplificador/receptor . . . 6PASO 3: Conexión a una red de banda ancha . . . 7PASO 4: Ajustes . . . . . . . . . . . . . . . . . . . . . . . . . . 7
Reproducción
Inserción o extracción de un medio . . . . . . . . . . . . 8Menú INICIO . . . . . . . . . . . . . . . . . . . . . . . . . . . . . 8Reproducción del contenido del vídeo . . . . . . . . . 9Operaciones enlazadas con el televisor (VIERA Link “HDAVI Control™”) . . . . . . . . . . . . . 10Especificaciones . . . . . . . . . . . . . . . . . . . . . . . . . 10
Preparativos
Lectura de las instrucciones de funcionamiento (en formato PDF)∫ Para Windows1 Encienda el ordenador e introduzca el CD-ROM
conteniendo las instrucciones de funcionamiento (suministrado).
2 Seleccione el idioma deseado, luego haga clic en [Instrucciones de funcionamiento] para instalar.
3 Haga doble clic en el icono del método abreviado “BD75EG Instrucciones de funcionamiento” en el escritorio.
Cuando no se abren las instrucciones de funcionamiento (en formato PDF)Necesita Adobe Acrobat Reader 5.0 o posterior o Adobe Reader 7.0 o posterior para leer o imprimir las instrucciones de funcionamiento (en formato PDF).Desde el sitio web a continuación descargue e instale la versión de Adobe Reader que puede usar con su sistema operativo.http://get.adobe.com/reader/otherversions
Si usa el sistema operativo a continuación– Windows 2000 SP4– Windows XP SP3– Windows Vista SP2– Windows 7
Introduzca el CD-ROM conteniendo las instrucciones de funcionamiento (suministrado), haga clic en [Adobe(R) Reader(R)] y, luego, siga los mensajes proporcionados en la pantalla para instalar.
Para desinstalar las instrucciones de funcionamiento (en formato PDF)Borre el archivo PDF de la carpeta “Program Files\Panasonic\DMP\”.≥Cuando no puede visualizarse el contenido de la carpeta
de los archivos de programa, haga clic en [Show the contents of this folder] para visualizarlos.
∫ Para Macintosh1 Encienda el ordenador e introduzca el CD-ROM
conteniendo las instrucciones de funcionamiento (suministrado).
2 Abra la carpeta “Manual” en “VFF0703”, luego copie dentro de la carpeta el archivo PDF con el idioma deseado.
3 Haga doble clic en el archivo PDF para abrirlo.
Refiérase también a las Instrucciones de funcionamiento (formato PDF) grabadas en el CD-ROM (suministrado).Las instrucciones de funcionamiento (formato PDF) no se pueden reproducir en el reproductor.Puede enterarse de los métodos avanzados de funcionamiento y controlar la Búsqueda de averías.
Para eliminar o transferir esta unidadEsta unidad puede guardar información de la configuración del usuario. Si decide deshacerse de esta unidad ya sea eliminándola o transfiriéndola, siga los procedimientos para restituir todas las configuraciones a los ajustes de fábrica para así borrar la configuración del usuario.≥ Se puede grabar el historial de funcionamiento en la
memoria de esta unidad.
Acerca de las descripciones en estas instrucciones de funcionamiento≥ Las instrucciones para la utilización se describen
generalmente utilizando el mando a distancia.
(32)
DMP-BD75EG-VQT3A95.book 2 ページ 2011年1月11日 火曜日 午後9時25分
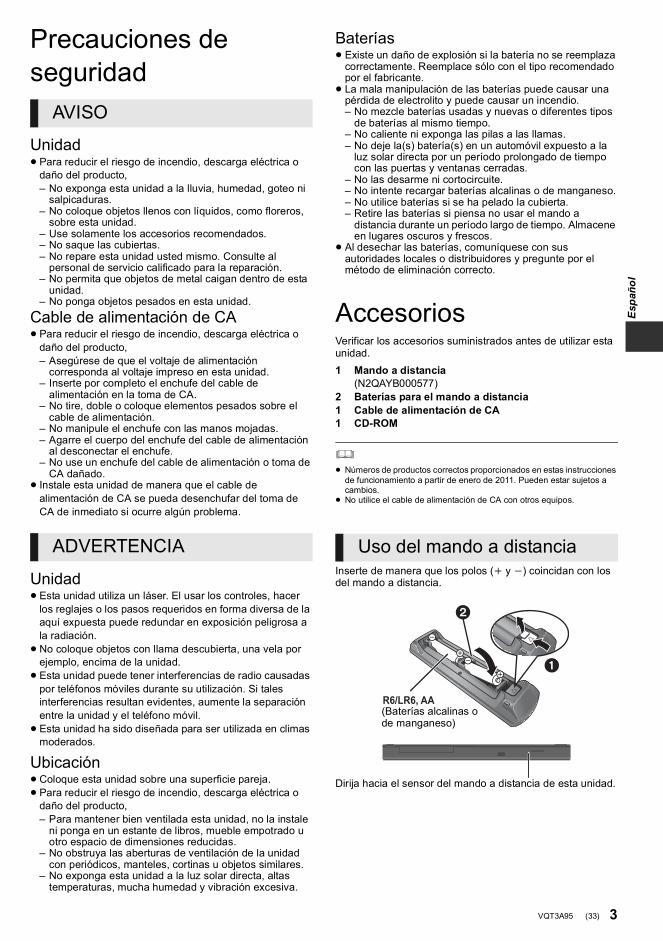
3VQT3A95
Español
Precauciones de seguridad
Unidad≥ Para reducir el riesgo de incendio, descarga eléctrica o
daño del producto,– No exponga esta unidad a la lluvia, humedad, goteo ni
salpicaduras.– No coloque objetos llenos con líquidos, como floreros,
sobre esta unidad.– Use solamente los accesorios recomendados.– No saque las cubiertas.– No repare esta unidad usted mismo. Consulte al
personal de servicio calificado para la reparación.– No permita que objetos de metal caigan dentro de esta
unidad.– No ponga objetos pesados en esta unidad.
Cable de alimentación de CA≥ Para reducir el riesgo de incendio, descarga eléctrica o
daño del producto,– Asegúrese de que el voltaje de alimentación
corresponda al voltaje impreso en esta unidad.– Inserte por completo el enchufe del cable de
alimentación en la toma de CA.– No tire, doble o coloque elementos pesados sobre el
cable de alimentación.– No manipule el enchufe con las manos mojadas.– Agarre el cuerpo del enchufe del cable de alimentación
al desconectar el enchufe.– No use un enchufe del cable de alimentación o toma de
CA dañado.≥ Instale esta unidad de manera que el cable de
alimentación de CA se pueda desenchufar del toma de CA de inmediato si ocurre algún problema.
Unidad≥ Esta unidad utiliza un láser. El usar los controles, hacer
los reglajes o los pasos requeridos en forma diversa de la aquí expuesta puede redundar en exposición peligrosa a la radiación.≥No coloque objetos con llama descubierta, una vela por
ejemplo, encima de la unidad.≥ Esta unidad puede tener interferencias de radio causadas
por teléfonos móviles durante su utilización. Si tales interferencias resultan evidentes, aumente la separación entre la unidad y el teléfono móvil.≥ Esta unidad ha sido diseñada para ser utilizada en climas
moderados.
Ubicación≥Coloque esta unidad sobre una superficie pareja.≥ Para reducir el riesgo de incendio, descarga eléctrica o
daño del producto,– Para mantener bien ventilada esta unidad, no la instale
ni ponga en un estante de libros, mueble empotrado u otro espacio de dimensiones reducidas.
– No obstruya las aberturas de ventilación de la unidad con periódicos, manteles, cortinas u objetos similares.
– No exponga esta unidad a la luz solar directa, altas temperaturas, mucha humedad y vibración excesiva.
Baterías≥ Existe un daño de explosión si la batería no se reemplaza
correctamente. Reemplace sólo con el tipo recomendado por el fabricante.≥ La mala manipulación de las baterías puede causar una
pérdida de electrolito y puede causar un incendio.– No mezcle baterías usadas y nuevas o diferentes tipos
de baterías al mismo tiempo.– No caliente ni exponga las pilas a las llamas.– No deje la(s) batería(s) en un automóvil expuesto a la
luz solar directa por un período prolongado de tiempo con las puertas y ventanas cerradas.
– No las desarme ni cortocircuite.– No intente recargar baterías alcalinas o de manganeso.– No utilice baterías si se ha pelado la cubierta.– Retire las baterías si piensa no usar el mando a
distancia durante un período largo de tiempo. Almacene en lugares oscuros y frescos.
≥ Al desechar las baterías, comuníquese con sus autoridades locales o distribuidores y pregunte por el método de eliminación correcto.
AccesoriosVerificar los accesorios suministrados antes de utilizar esta unidad.
≥ Números de productos correctos proporcionados en estas instrucciones de funcionamiento a partir de enero de 2011. Pueden estar sujetos a cambios.
≥ No utilice el cable de alimentación de CA con otros equipos.
Inserte de manera que los polos (i y j) coincidan con los del mando a distancia.
Dirija hacia el sensor del mando a distancia de esta unidad.
AVISO
ADVERTENCIA
1 Mando a distancia(N2QAYB000577)
2 Baterías para el mando a distancia1 Cable de alimentación de CA1 CD-ROM
Uso del mando a distancia
R6/LR6, AA
(Baterías alcalinas o de manganeso)
(33)
DMP-BD75EG-VQT3A95.book 3 ページ 2011年1月11日 火曜日 午後9時25分

4 VQT3A95
Discos reproducibles /dispositivos USBDispositivo Marcas de
disco Tipos de dispositivo Formato de contenidos
BD-Vídeo Vídeo
BD-RE VídeoJPEG
BD-RVídeoDivX®
MKV
DVD-Vídeo Vídeo
DVD-R VídeoAVCHDDivX®
MKVMP3JPEGDVD-R DL
DVD-RW VídeoAVCHD
— +R/+RW/+R DL
CD de música Música [CD-DA]
— CD-RCD-RW
DivX®
MKVMúsica [CD-DA]MP3JPEG
— Dispositivo USB(hasta 2 TB)
DivX®
MKVMP3JPEG
BD
DVD
CD
USB
(34)
DMP-BD75EG-VQT3A95.book 4 ページ 2011年1月7日 金曜日 午後2時38分

5VQT3A95
Español
∫ Discos que no se pueden reproducir≥DVD-RAM≥ SACD≥CD de fotos≥DVD de audio≥Discos WMA≥Discos DivX Plus HD≥HD DVD
∫ Información sobre la gestión de regiones
BD-VideoEsta unidad puede reproducir BD-Video en cuyas etiquetas esté presente el código de región “B”.Ejemplo:
DVD-VideoEsta unidad puede reproducir DVD-Video en cuyas etiquetas esté presente el número de región “2” o bien “ALL”.Ejemplo:
∫ FinalizadoLos DVD-R/RW/R DL, +R/+RW/+R DL y CD-R/RW grabados con una grabadora, etc. deben ser finalizados por la grabadora para que se puedan reproducir en esta unidad. Consulte las instrucciones del funcionamiento de su grabadora.
∫ BD-Vídeo≥ Esta unidad es compatible con el audio de alta de
velocidad de transmisión de bits (Dolby Digital Plus, Dolby TrueHD, DTS-HD High Resolution Audio y DTS-HD Master Audio) adoptado en vídeo BD. – Si se fija “Dolby D/Dolby D +/Dolby TrueHD” en “PCM”,
el número máximo posible de sonido Dolby es 2c PCM. ([HOME] “Configuración” “Ajustes Reproductor” “Audio” “Salida Audio Digital”)
∫ CD de músicaNo se puede garantizar el funcionamiento y la calidad del sonido de los CD que no se ajuste a las especificaciones de CD-DA (control de copia de CD, etc.).
∫ Dispositivo USB≥ Esta unidad no garantiza la conexión con todos los
dispositivos USB.≥ Esta unidad no es compatible con los dispositivos de
carga USB.≥ Los sistemas de archivos FAT12, FAT16 y FAT32 son
compatibles.≥ Esta unidad es compatible con dispositivos USB 2.0 de
alta velocidad.≥ Esta unidad puede admitir un disco duro formateado a
FAT32. Algunos tipos de discos duro pueden requerir el uso de su unidad de alimentación externa.
∫ BD-RE, BD-RLos discos grabados en el modo DR usando los grabadores de disco Blu-ray de Panasonic no pueden reproducir correctamente el audio, etc.
≥ Existe la posibilidad de que no se puedan reproducir los medios mencionados en algunos casos debido al tipo de medio, las condiciones de grabación, el método de grabación y a la forma en que se crearon los archivos.
≥ Los fabricantes del disco pueden controlar el modo de reproducción de los mismos. Por tanto, puede que no pueda controlar siempre su reproducción tal y como se describe en estas instrucciones de funcionamiento. Lea detenidamente las instrucciones del disco.
2 ALL 352
Información para Usuarios sobre la Recolección y Eliminación de aparatos viejos y baterías usadas
Estos símbolos en los productos, embalajes y/o documentos adjuntos, significan que los aparatos eléctricos y electrónicos y las baterías no deberían ser mezclados con los desechos domésticos.Para el tratamiento apropiado, la recuperación y el reciclado de aparatos viejos y baterías usadas, por favor, observe las normas de recolección aplicables, de
acuerdo a su legislación nacional y a las Directivas 2002/96/CE y 2006/66/CE.Al desechar estos aparatos y baterías correctamente, Usted estará ayudando a preservar recursos valiosos y a prevenir cualquier potencial efecto negativo sobre la salud de la humanidad y el medio ambiente que, de lo contrario, podría surgir de un manejo inapropiado de los residuos.Para mayor información sobre la recolección y el reciclado de aparatos y baterías viejos, por favor, contacte a su comunidad local, su servicio de eliminación de residuos o al comercio donde adquirió estos aparatos.Podrán aplicarse penas por la eliminación incorrecta de estos residuos, de acuerdo a la legislación nacional.
Para usuarios empresariales en la Unión EuropeaSi usted desea descartar aparatos eléctricos y electrónicos, por favor contacte a su distribuidor o proveedor a fin de obtener mayor información.
[Informacion sobre la Eliminación en otros Países fuera de la Unión Europea]Estos símbolos sólo son válidos dentro de la Unión Europea. Si desea desechar estos objetos, por favor contacte con sus autoridades locales o distribuidor y consulte por el método correcto de eliminación.
Nota sobre el símbolo de la bateria (abajo, dos ejemplos de símbolos):Este símbolo puede ser usado en combinación con un símbolo químico. En este caso, el mismo cumple con los requerimientos establecidos por la Directiva para los químicos involucrados.Cd
(35)
DMP-BD75EG-VQT3A95.book 5 ページ 2011年1月7日 金曜日 午後2時38分
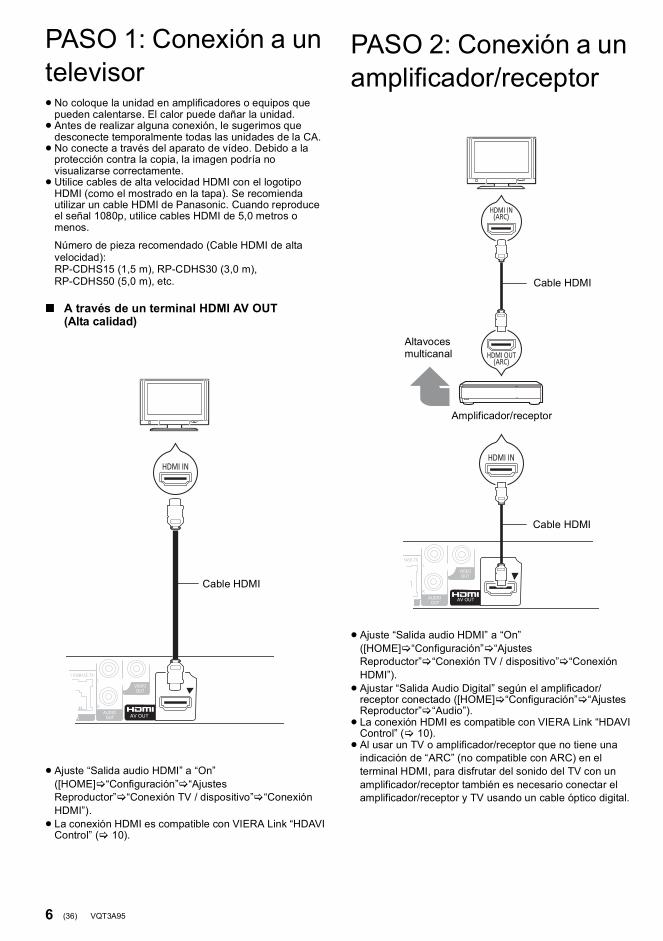
6 VQT3A95
C onexión y con figuraciónPASO 1: Conexión a un televisor≥No coloque la unidad en amplificadores o equipos que
pueden calentarse. El calor puede dañar la unidad.≥ Antes de realizar alguna conexión, le sugerimos que
desconecte temporalmente todas las unidades de la CA.≥No conecte a través del aparato de vídeo. Debido a la
protección contra la copia, la imagen podría no visualizarse correctamente.≥Utilice cables de alta velocidad HDMI con el logotipo
HDMI (como el mostrado en la tapa). Se recomienda utilizar un cable HDMI de Panasonic. Cuando reproduce el señal 1080p, utilice cables HDMI de 5,0 metros o menos.
Número de pieza recomendado (Cable HDMI de alta velocidad):RP-CDHS15 (1,5 m), RP-CDHS30 (3,0 m), RP-CDHS50 (5,0 m), etc.
PASO 2: Conexión a un amplificador/receptor
∫ A través de un terminal HDMI AV OUT(Alta calidad)
≥ Ajuste “Salida audio HDMI” a “On” ([HOME] “Configuración” “Ajustes Reproductor” “Conexión TV / dispositivo” “Conexión HDMI”).≥ La conexión HDMI es compatible con VIERA Link “HDAVI
Control” ( 10).
HDMI IN
Cable HDMI
≥ Ajuste “Salida audio HDMI” a “On” ([HOME] “Configuración” “Ajustes Reproductor” “Conexión TV / dispositivo” “Conexión HDMI”).≥ Ajustar “Salida Audio Digital” según el amplificador/
receptor conectado ([HOME] “Configuración” “Ajustes Reproductor” “Audio”).≥ La conexión HDMI es compatible con VIERA Link “HDAVI
Control” ( 10).≥ Al usar un TV o amplificador/receptor que no tiene una
indicación de “ARC” (no compatible con ARC) en el terminal HDMI, para disfrutar del sonido del TV con un amplificador/receptor también es necesario conectar el amplificador/receptor y TV usando un cable óptico digital.
HDMI IN
HDMI IN
HDMI IN(ARC)
HDMI OUT(ARC)
Altavoces multicanal
Amplificador/receptor
Cable HDMI
Cable HDMI
(36)
DMP-BD75EG-VQT3A95.book 6 ページ 2011年1月7日 金曜日 午後2時38分

7VQT3A95
Español
PASO 3: Conexión a una red de banda anchaSe pueden utilizar los siguientes servicios si conecta esta unidad a una red de banda ancha.– Puede actualizar los siguientes softwares inalterables
(Firmware)– Puede disfrutar de BD-Live– Puede acceder a otro dispositivoPara conocer detalles sobre el método de conexión, consulte las instrucciones proporcionadas con el equipo conectado.
PASO 4: Ajustes
Después de conectar un nuevo reproductor por primera vez y de presionar [Í], aparecerá una pantalla para las configuraciones básicas.PreparativosEncienda el televisor y seleccione la entrada de vídeo apropiada en el mismo.
1 Pulse [Í].Aperece la pantalla de instalación.
2 Siga las instrucciones que aparecen en pantalla y realice los ajustes con [3,4] y pulse [OK].
Después de completar “Ajuste rápido”, puede realizar “Ajuste Rápido de Red”.
≥ Puede realizar esta instalación en cualquier momento seleccionando “Ajuste rápido” en el menú de Instalación. ([HOME] “Configuración”
“Ajustes Reproductor” “Otros”)
Después de completar “Ajuste rápido”, se le pedirá que realice “Ajuste Rápido de Red”.
Siga las instrucciones en pantalla y realice los ajustes con [3,4,2,1] y pulse [OK].
∫ Conexión del cable LAN
≥Use la categoría 5 o superior de cables LAN derechos (STP) al conectar a dispositivos periféricos.≥ Si inserta cualquier otro cable distinto del cable LAN en el
terminal LAN, puede dañar la unidad.
Router de banda ancha, etc.
Internet
Cable de red LAN
Servidor de medios certificado por DLNA
Ajuste rápido
Interruptor de alimentación en espera/conectada (Í/I)Púlselo para cambiar la unidad de modo conectado a modo en espera o viceversa. En modo en espera, la unidad sigue consumiendo una pequeña cantidad de energía.
Ajuste Rápido de Red
OKRETURN
Ajuste Rápido de Red
Se requiere la configuración de LAN y probar lasconexiones de Internet y la red doméstica para lasfunciones Internet (BD-Live, etc.). Para BD-Live se necesitaconexión a Internet de banda ancha. ¿ Se ha conectado yaun cable LAN ? Por favor consulte las instrucciones defuncionamiento sobre la conexión a red.
Pulse [OK] para continuar.
(37)
DMP-BD75EG-VQT3A95.book 7 ページ 2011年1月7日 金曜日 午後2時38分
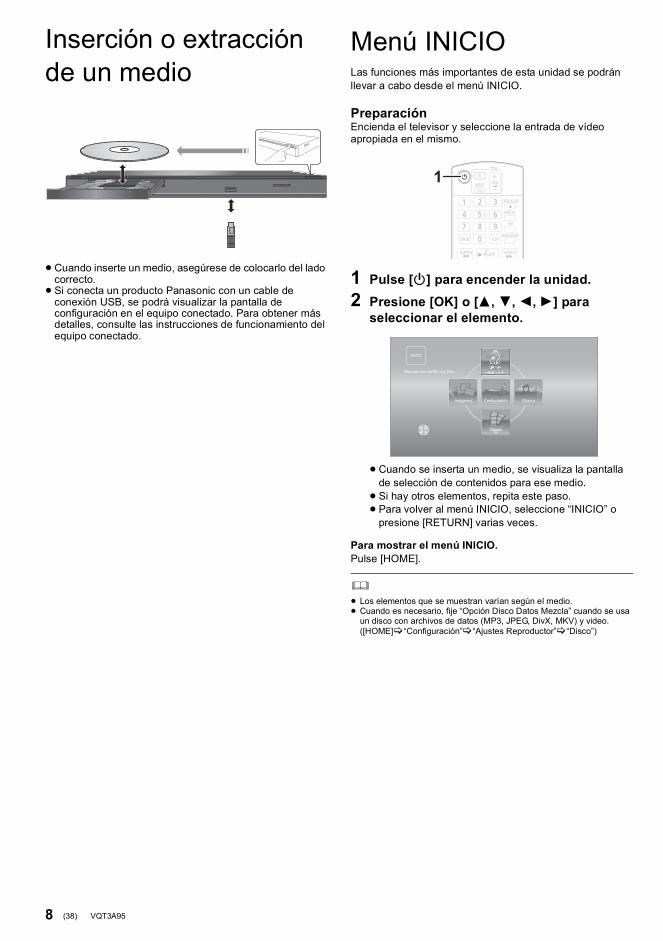
8 VQT3A95
R epro ducciónInserción o extracción de un medio
≥Cuando inserte un medio, asegúrese de colocarlo del lado correcto.≥ Si conecta un producto Panasonic con un cable de
conexión USB, se podrá visualizar la pantalla de configuración en el equipo conectado. Para obtener más detalles, consulte las instrucciones de funcionamiento del equipo conectado.
Menú INICIOLas funciones más importantes de esta unidad se podrán llevar a cabo desde el menú INICIO.
PreparaciónEncienda el televisor y seleccione la entrada de vídeo apropiada en el mismo.
1 Pulse [Í] para encender la unidad.2 Presione [OK] o [3, 4,2,1] para
seleccionar el elemento.
≥Cuando se inserta un medio, se visualiza la pantalla de selección de contenidos para ese medio.≥ Si hay otros elementos, repita este paso.≥ Para volver al menú INICIO, seleccione “INICIO” o
presione [RETURN] varias veces.
Para mostrar el menú INICIO.Pulse [HOME].
≥ Los elementos que se muestran varían según el medio.≥ Cuando es necesario, fije “Opción Disco Datos Mezcla” cuando se usa
un disco con archivos de datos (MP3, JPEG, DivX, MKV) y video. ([HOME] “Configuración” “Ajustes Reproductor” “Disco”)
1
MúsicaImágenes
Vídeos
RedReproductor de Blu-ray Disc
INCIO
Configuratión
MEDIASERVER
(38)
DMP-BD75EG-VQT3A95.book 8 ページ 2011年1月7日 金曜日 午後2時38分
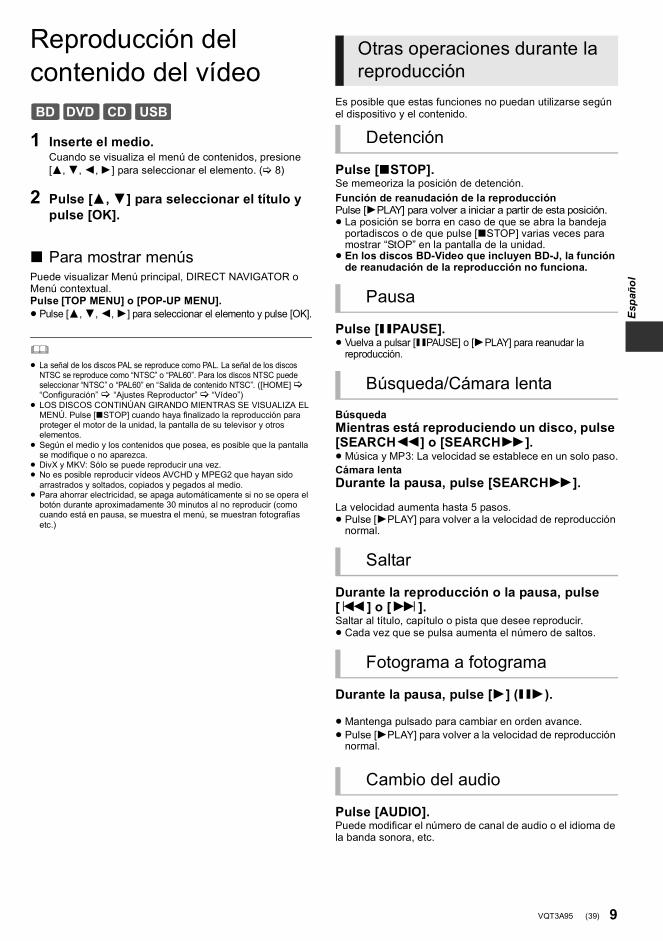
9VQT3A95
Español
Reproducción del contenido del vídeo
1 Inserte el medio.Cuando se visualiza el menú de contenidos, presione [3,4,2,1] para seleccionar el elemento. ( 8)
2 Pulse [3,4] para seleccionar el título y pulse [OK].
∫ Para mostrar menúsPuede visualizar Menú principal, DIRECT NAVIGATOR o Menú contextual.Pulse [TOP MENU] o [POP-UP MENU].≥ Pulse [3,4,2,1] para seleccionar el elemento y pulse [OK].
≥ La señal de los discos PAL se reproduce como PAL. La señal de los discos NTSC se reproduce como “NTSC” o “PAL60”. Para los discos NTSC puede seleccionar “NTSC” o “PAL60” en “Salida de contenido NTSC”. ([HOME] “Configuración” “Ajustes Reproductor” “Vídeo”)
≥ LOS DISCOS CONTINÚAN GIRANDO MIENTRAS SE VISUALIZA EL MENÚ. Pulse [∫STOP] cuando haya finalizado la reproducción para proteger el motor de la unidad, la pantalla de su televisor y otros elementos.
≥ Según el medio y los contenidos que posea, es posible que la pantalla se modifique o no aparezca.
≥ DivX y MKV: Sólo se puede reproducir una vez.≥ No es posible reproducir vídeos AVCHD y MPEG2 que hayan sido
arrastrados y soltados, copiados y pegados al medio.≥ Para ahorrar electricidad, se apaga automáticamente si no se opera el
botón durante aproximadamente 30 minutos al no reproducir (como cuando está en pausa, se muestra el menú, se muestran fotografías etc.)
Es posible que estas funciones no puedan utilizarse según el dispositivo y el contenido.
Pulse [∫STOP].Se memeoriza la posición de detención.Función de reanudación de la reproducciónPulse [1PLAY] para volver a iniciar a partir de esta posición.≥ La posición se borra en caso de que se abra la bandeja
portadiscos o de que pulse [∫STOP] varias veces para mostrar “StOP” en la pantalla de la unidad.≥ En los discos BD-Video que incluyen BD-J, la función
de reanudación de la reproducción no funciona.
Pulse [;PAUSE].≥ Vuelva a pulsar [;PAUSE] o [1PLAY] para reanudar la
reproducción.
BúsquedaMientras está reproduciendo un disco, pulse [SEARCH6] o [SEARCH5].≥Música y MP3: La velocidad se establece en un solo paso.Cámara lentaDurante la pausa, pulse [SEARCH5].
La velocidad aumenta hasta 5 pasos.≥ Pulse [1PLAY] para volver a la velocidad de reproducción
normal.
Durante la reproducción o la pausa, pulse [:] o [9].Saltar al título, capítulo o pista que desee reproducir.≥ Cada vez que se pulsa aumenta el número de saltos.
Durante la pausa, pulse [1] (;1).
≥Mantenga pulsado para cambiar en orden avance.≥ Pulse [1PLAY] para volver a la velocidad de reproducción
normal.
Pulse [AUDIO].Puede modificar el número de canal de audio o el idioma de la banda sonora, etc.
BD DVD CD USB
Otras operaciones durante la reproducción
Detención
Pausa
Búsqueda/Cámara lenta
Saltar
Fotograma a fotograma
Cambio del audio
(39)
DMP-BD75EG-VQT3A95.book 9 ページ 2011年1月7日 金曜日 午後2時38分
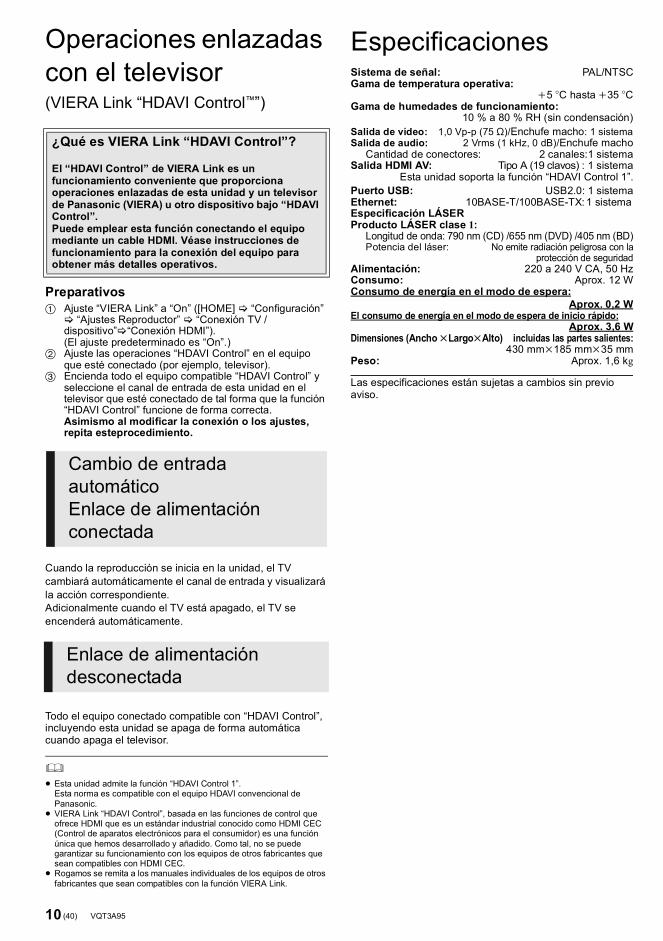
10 VQT3A95
Operaciones enlazadas con el televisor (VIERA Link “HDAVI Control™”)
Preparativos1 Ajuste “VIERA Link” a “On” ([HOME] “Configuración”
“Ajustes Reproductor” “Conexión TV / dispositivo” “Conexión HDMI”). (El ajuste predeterminado es “On”.)
2 Ajuste las operaciones “HDAVI Control” en el equipo que esté conectado (por ejemplo, televisor).
3 Encienda todo el equipo compatible “HDAVI Control” y seleccione el canal de entrada de esta unidad en el televisor que esté conectado de tal forma que la función “HDAVI Control” funcione de forma correcta.Asimismo al modificar la conexión o los ajustes, repita esteprocedimiento.
Cuando la reproducción se inicia en la unidad, el TV cambiará automáticamente el canal de entrada y visualizará la acción correspondiente.Adicionalmente cuando el TV está apagado, el TV se encenderá automáticamente.
Todo el equipo conectado compatible con “HDAVI Control”, incluyendo esta unidad se apaga de forma automática cuando apaga el televisor.
≥ Esta unidad admite la función “HDAVI Control 1”.Esta norma es compatible con el equipo HDAVI convencional de Panasonic.
≥ VIERA Link “HDAVI Control”, basada en las funciones de control que ofrece HDMI que es un estándar industrial conocido como HDMI CEC (Control de aparatos electrónicos para el consumidor) es una función única que hemos desarrollado y añadido. Como tal, no se puede garantizar su funcionamiento con los equipos de otros fabricantes que sean compatibles con HDMI CEC.
≥ Rogamos se remita a los manuales individuales de los equipos de otros fabricantes que sean compatibles con la función VIERA Link.
EspecificacionesSistema de señal: PAL/NTSCGama de temperatura operativa:
i5 oC hasta i35 oCGama de humedades de funcionamiento:
10 % a 80 % RH (sin condensación)Salida de vídeo: 1,0 Vp-p (75 ≠)/Enchufe macho: 1 sistemaSalida de audio: 2 Vrms (1 kHz, 0 dB)/Enchufe macho
Cantidad de conectores: 2 canales:1 sistemaSalida HDMI AV: Tipo A (19 clavos) : 1 sistema
Esta unidad soporta la función “HDAVI Control 1”.Puerto USB: USB2.0: 1 sistemaEthernet: 10BASE-T/100BASE-TX: 1 sistema Especificación LÁSERProducto LÁSER clase 1:
Longitud de onda: 790 nm (CD) /655 nm (DVD) /405 nm (BD)Potencia del láser: No emite radiación peligrosa con la
protección de seguridadAlimentación: 220 a 240 V CA, 50 HzConsumo: Aprox. 12 WConsumo de energía en el modo de espera:
Aprox. 0,2 WEl consumo de energía en el modo de espera de inicio rápido:
Aprox. 3,6 WDimensiones (Ancho kLargokAlto) incluidas las partes salientes:
430 mmk185 mmk35 mmPeso: Aprox. 1,6 kg
Las especificaciones están sujetas a cambios sin previo aviso.
¿Qué es VIERA Link “HDAVI Control”?
El “HDAVI Control” de VIERA Link es un funcionamiento conveniente que proporciona operaciones enlazadas de esta unidad y un televisor de Panasonic (VIERA) u otro dispositivo bajo “HDAVI Control”.Puede emplear esta función conectando el equipo mediante un cable HDMI. Véase instrucciones de funcionamiento para la conexión del equipo para obtener más detalles operativos.
Cambio de entrada automáticoEnlace de alimentación conectada
Enlace de alimentación desconectada
(40)
DMP-BD75EG-VQT3A95.book 10 ページ 2011年1月11日 火曜日 午後9時25分

11VQT3A95
Español
This product incorporates the following software:
For the software categorized as (3) and (4), please refer to the terms and conditions of GPL v2 and LGPL v2.1, as the case may be at http://www.gnu.org/licenses/old-licenses/gpl-2.0.html and http://www.gnu.org/licenses/old-licenses/lgpl-2.1.html.In addition, the software categorized as (3) and (4) are copyrighted by several individuals. Please refer to the copyright notice of those individuals at http://www.am-linux.jp/dl/AWBP11
The GPL/LGPL software is distributed in the hope that it will be useful, but WITHOUT ANY WARRANTY, without even the implied warranty of MERCHANTABILITY or FITNESS FOR A PARTICULAR PURPOSE.
At least three (3) years from delivery of products, Panasonic will give to any third party who contacts us at the contact information provided below, for a charge no more than our cost of physically performing source code distribution, a complete machine-readable copy of the corresponding source code covered under GPL v2/LGPL v2.1.
Contact [email protected]
Source code is also freely available to you and any other member of the public via our website below.http://www.am-linux.jp/dl/AWBP11
the software developed independently by or for Panasonic Corporation,the software owned by third party and licensed to Panasonic Corporation,the software licensed under the GNU General Public License, Version 2 (GPL v2),the software licensed under the GNU LESSER General Public License, Version 2.1 (LGPL v2.1) and/or,open sourced software licensed under its applicable license terms including but not limited toICU License, c-arse license.
(1)
(2)
(3)
(4)
(5)
For Open Source Software Programs categorized as (5), please refer to the applicable license terms listed below and/or included in the “License” menu on Product.
ICU License - ICU 1.8.1 and later
COPYRIGHT AND PERMISSION NOTICE
Copyright (c) 1995-2010 International Business Machines Corporation and others
All rights reserved.
Permission is hereby granted, free of charge, to any person obtaining a copy of this software and associated documentation files (the “Software”), to deal in the Software without restriction, including without limitation the rights to use, copy, modify, merge, publish, distribute, and/or sell copies of the Software, and to permit persons to whom the Software is furnished to do so, provided that the above copyright notice(s) and this permission notice appear in all copies of the Software and that both the above copyright notice(s) and this permission notice appear in supporting documentation.
THE SOFTWARE IS PROVIDED “AS IS”, WITHOUT WARRANTY OF ANY KIND, EXPRESS OR IMPLIED, INCLUDING BUT NOT LIMITED TO THE WARRANTIES OF MERCHANTABILITY, FITNESS FOR A PARTICULAR PURPOSE AND NONINFRINGEMENT OF THIRD PARTY RIGHTS. IN NO EVENT SHALL THE COPYRIGHT HOLDER OR HOLDERS INCLUDED IN THIS NOTICE BE LIABLE FOR ANY CLAIM, OR ANY SPECIAL INDIRECT OR CONSEQUENTIAL DAMAGES, OR ANY DAMAGES WHATSOEVER RESULTING FROM LOSS OF USE, DATA OR PROFITS, WHETHER IN AN ACTION OF CONTRACT, NEGLIGENCE OR OTHER TORTIOUS ACTION, ARISING OUT OF OR IN CONNECTION WITH THE USE OR PERFORMANCE OF THIS SOFTWARE.
Except as contained in this notice, the name of a copyright holder shall not be used in advertising or otherwise to promote the sale, use or other dealings in this Software without prior written authorization of the copyright holder.
All trademarks and registered trademarks mentioned herein are the property of their respective owners.
DivX®, DivX Certified® y los logotipos asociados son marcas comerciales de DivX, Inc. y se usan bajo licencia.DivX®, DivX Certified® and associated logos are trademarks of DivX, Inc. and are used under license.
Windows es una marca comercial o una marca registrada de Microsoft Corporation en Estados Unidos y otros países.
c-arse license
Copyright 1998 by the Massachusetts Institute of Technology.
Permission to use, copy, modify, and distribute this software and itsdocumentation for any purpose and without fee is hereby granted, provided that the above copyright notice appear in all copies and that both that copyright notice and this permission notice appear in supporting documentation, and that the name of M.I.T. not be used in advertising or publicity pertaining to distribution of the software without specific, written prior permission.M.I.T. makes no representations about the suitability of this software for any purpose. It is provided “as is” without express or implied warranty.
Java y todas las marcas registradas y logotipos basados en Java son marcas registradas o marcas comerciales de Sun Microsystems, Inc. en los Estados Unidos y otros países.
Fabricado bajo licencia de Dolby Laboratories.Dolby y el símbolo de la doble D son marcas comerciales de Dolby Laboratories.
Fabricado bajo licencia bajo los números de patente de Estados Unidos: 5.451.942; 5.956.674; 5.974.380; 5.978.762; 6.226.616; 6.487.535; 7.392.195; 7.272.567; 7.333.929; 7.212.872 y otras patentes mundiales y de los EE.UU. emitidas y próximamente en vigor.DTS y Symbol son marcas comerciales registradas, y DTS-HD, DTS-HD Master Audio | Essential y los logotipos de DTS son marcas comerciales de DTS, Inc. El producto incluye software.© DTS, Inc. Todos los derechos reservados.
Este elemento incorpora una tecnología de protección contra copia que está protegida por las patentes de EE.UU. y otros derechos de propiedad intelectual de Rovi Corporation. Se prohíbe la ingeniería inversa y el desarmado.
HDMI, el logotipo HDMI y High-Definition Multimedia Interface son marcas comerciales o marcas comerciales registradas de HDMI Licensing LLC en Estados Unidos y otros países.
La licencia de este producto se otorga bajo las licencias de patentes de AVC y las licencias de patentes de VC-1 para un uso personal y no comercial de un cliente para (i) codificar vídeo conforme al estándar AVC y el estándar VC-1 (“AVC/VC-1 Video”) y/o para (ii) descodificar AVC/VC-1 Vídeo codificado por un cliente que realice una actividad personal y no comercial, y/u obtenido de un proveedor de vídeo con licencia para suministrar AVC/VC-1 Video. No se concede licencia expresa o implícita para otro uso. Podrá obtener información adicional en MPEG LA, LLC.Visite http://www.mpegla.com.
HDAVI Control™ es una marca de fábrica de Panasonic Corporation.
“AVCHD” y el logotipo “AVCHD” son marcas comerciales de Panasonic Corporation y Sony Corporation.
“DVD Logo” es una marca comercial de DVD Format/Logo Licensing Corporation.
La tecnología de decodificación de audio MPEG Layer-3 autorizada por Fraunhofer IIS y Thomson.
DLNA, the DLNA Logo and DLNA CERTIFIED are trademarks, service marks, or certification marks of the Digital Living Network Alliance.
(41)
DMP-BD75EG-VQT3A95.book 11 ページ 2011年1月7日 金曜日 午後2時38分
2 VQT3A95
Geachte klantDank u voor de aanschaf van dit product.Lees voor optimale prestaties en veiligheid deze handleiding grondig door.Gelieve de instructies volledig door te lezen alvorens dit product aan te sluiten, te bedienen of af te stellen.Bewaar deze gebruiksaanwijzing voor latere naslag.
InhoudsopgaveVan start gaan
Het bestand Bedieningshandleiding (PDF-formaat) lezen . . . . . . . . . . . . . . . . . . . . . . . 2Veiligheidsmaatregelen . . . . . . . . . . . . . . . . . . . . . 3Accessoires . . . . . . . . . . . . . . . . . . . . . . . . . . . . . . 3Afspeelbare discs/USB-inrichtingen . . . . . . . . . . . 4
Verbindingen en instellingen
STAP 1: Aansluiten op een TV . . . . . . . . . . . . . . . 6STAP 2: Aansluiten op een
versterker/ontvanger. . . . . . . . . . . . . . . . 6STAP 3: Aansluiten op een
breedbandnetwerk . . . . . . . . . . . . . . . . . 7STAP 4: Instelling . . . . . . . . . . . . . . . . . . . . . . . . . 7
Afspelen
Een medium invoeren of verwijderen . . . . . . . . . . 8HOME menu . . . . . . . . . . . . . . . . . . . . . . . . . . . . . 8Video-inhoud afspelen. . . . . . . . . . . . . . . . . . . . . . 9Gecombineerde bediening met de tv (VIERA Link “HDAVI Control™”). . . . . . . . . . . . . . 10Technische gegevens . . . . . . . . . . . . . . . . . . . . . 10
Van start gaan
Het bestand Bedieningshandleiding (PDF-formaat) lezen∫ Voor Windows1 Schakel de computer in en plaats de CD-ROM
(meegeleverd) waarop het bestand. Bedieningshandleiding staat.
2 Selecteer de gewenste taal en klik vervolgens op [Gebruiksaanwijzing] om het te installeren.
3 Dubbelklik op het snelkoppelingspictogram “BD75EG Gebruiksaanwijzing” op het bureaublad.
Als het bestand Bedieningshandleiding (PDF-formaat) niet open gaatU hebt Adobe Acrobat Reader 5.0 of hoger of Adobe Reader 7.0 of hoger nodig om het bestand Bedieningshandleiding (PDF-formaat) te kunnen lezen of afdrukken.Download en installeer een versie van Adobe Reader die u kunt gebruiken met uw besturingssysteem vanaf de volgende website.http://get.adobe.com/reader/otherversions
Bij gebruik van het volgende besturingssysteem– Windows 2000 SP4– Windows XP SP3– Windows Vista SP2– Windows 7
Plaats de CD-ROM (meegeleverd) waarop het bestand Bedieningshandleiding staat, klik op [Adobe(R) Reader(R)] en volg de aanwijzingen op het scherm om het te installeren.
Het bestand Bedieningshandleiding (PDF-formaat) verwijderenWis het pdf-bestand uit de map “Program Files\Panasonic\DMP\”.≥ Als de inhoud van de map Programma’s niet kan worden
afgebeeld, klikt u op [Show the contents of this folder] om deze af te beelden.
∫ Voor Macintosh1 Schakel de computer in en plaats de CD-ROM
(meegeleverd) waarop het bestand Bedieningshandleiding staat.
2 Open de map “Manual” in “VFF0703” en kopieer daarna het pdf-bestand van de gewenste taal in de map.
3 Dubbelklik op het pdf-bestand om het te openen.
Lees ook de Gebruiksaanwijzing (PDF-formaat) op de CD-ROM met de Gebruiksaanwijzing (meegeleverd).Gebruiksaanwijzing (PDF-formaat) kan niet afgespeeld worden op de speler zelf.U vindt er informatie in over gevordere opnamemethodes en de lijst met problemen en oplossingen.
Dit toestel wegwerpen of aan iemand anders overdoenHet apparaat kan de informatie van de gebruikersinstellingen in het apparaat behouden. Als u dit apparaat wegdoet ofwel omdat u het weggooit of wel omdat u het aan iemand anders geeft, de procedure volgen voor het terugzetten van alle instellingen naar de fabrieksinstellingen om de gebruikerinstellingen te wissen.≥ De bedieningsgeschiedenis kan opgenomen worden op
het geheugen van dit apparaat.
Over de beschrijvingen in deze gebruiksaanwijzing≥ De bedieningsaanwijzingen zijn gewoonlijk bedoeld voor
het gebruik van de afstandsbediening.
(42)
DMP-BD75EG-VQT3A95TOC.fm 2 ページ 2011年1月12日 水曜日 午後6時37分

3VQT3A95
Nederlands
Veiligheidsmaatregelen
Toestel≥Om het risico op brand, elektrische schokken of
productschade te verkleinen– Stel dit toestel niet bloot aan regen, vocht, druppels of
spetters.– Plaats geen met vloeistof gevulde objecten, zoals
vazen, op dit toestel.– Gebruik alleen de aanbevolen accessoires.– Verwijder de afdekking niet.– Repareer dit toestel niet zelf. Laat onderhoud over aan
gekwalificeerd onderhoudspersoneel.– Laat geen metalen voorwerpen in dit toestel vallen.– Plaats geen zware voorwerpen op dit toestel.
Netsnoer≥Om het risico op brand, elektrische schokken of
productschade te verkleinen– Controleer of de voedingsspanning overeenkomt met de
spanning die op dit toestel afgedrukt is.– Steek de stekker volledig in het stopcontact.– Trek niet aan de voedingskabel, buig hem niet en plaats
er geen zware voorwerpen op.– Hanteer de stekker niet met natte handen.– Houd het hoofddeel van de stekker vast als u deze uit
het stopcontact neemt.– Gebruik geen beschadigde stekker of stopcontact.≥ Installeer het toestel zo dat de netvoedingskabel
onmiddellijk uit het stopcontact genomen kan worden als een probleem optreedt.
Toestel≥Dit toestel maakt gebruik van een laser. Het gebruik van
bedieningsorganen, of het uitvoeren van bijstellingen of procedures die anders zijn dan hier vermeld wordt, kan een gevaarlijke blootstelling aan straling tot gevolg hebben.≥ Plaats geen bronnen van open vuur, zoals brandende
kaarsen, op dit toestel.≥Dit toestel kan tijdens het gebruik de interferentie van
radio’s ontvangen die veroorzaakt wordt door mobiele telefoons. In dat geval dient u de afstand tussen dit toestel en de mobiele telefoon te vergroten. ≥Dit toestel is bestemd voor gebruik in een mild klimaat.
Opstelling≥ Plaats dit toestel op een vlakke ondergrond.≥Om het risico op brand, elektrische schokken of
productschade te verkleinen– Installeer of plaats dit toestel niet in een boekenkast,
een muurkast of in een andere omsloten ruimte. Controleer of het toestel goed geventileerd wordt.
– Blokkeer de ventilatieopening van dit toestel niet met kranten, tafelkleden, gordijnen, enzovoorts.
– Stel dit toestel niet bloot aan rechtstreeks zonlicht, hoge temperaturen, hoge vochtigheid en overmatige trillingen.
Batterijen≥ Er bestaat explosiegevaar als de batterij niet correct
geplaatst wordt. Vervang de batterij alleen door één van het type dat door de fabrikant aanbevolen wordt. ≥ Het verkeerd hanteren van batterijen kan het lekken van
elektrolyt tot gevolg hebben waardoor brand kan ontstaan.– Geen nieuwe met oude batterijen of verschillende
soorten batterijen tegelijkertijd gebruiken.– Verwarm de batterijen niet en stel deze niet bloot aan
vuur.– Laat de batterij(en) niet lange tijd in een auto in direct
zonlicht liggen terwijl de portieren en de raampjes gesloten zijn.
– Probeer de batterijen nooit open te maken of kort te sluiten.
– Laad geen alkaline of mangaanbatterijen op.– Gebruik geen batterijen waarvan de buitenlaag is
afgehaald.– Neem de batterijen uit als u denkt dat u de
afstandsbediening lange tijd niet zult gebruiken. Bewaar ze in een koele, donkere plaats.
≥ Neem voor het weggooien van de batterijen contact op met de plaatselijke autoriteiten of uw verkoper en vraag wat de juiste weggooimethode is.
AccessoiresControleer de meegeleverde accessoires voordat u dit apparaat gebruikt.
≥ De productnummers die in deze handleiding gegeven worden zijn correct met ingang van januari 2011. Ze kunnen aan wijzigingen onderhevig zijn.
≥ Het netsnoer niet met andere apparatuur gebruiken.
Voer de batterijen zo in dat de polen (i en j) overeenkomen met die in de afstandsbediening.
Richt deze op de signaalsensor van de afstandsbediening op dit apparaat.
WAARSCHUWING
VOORZICHTIG
1 Afstandsbediening(N2QAYB000577)
2 Batterijen voor de afstandsbediening1 Netsnoer1 Cd-rom
De afstandsbediening gebruiken
R6/LR6, AA
(Alkali- of mangaanbatterijen)
(43)
DMP-BD75EG-VQT3A95.book 3 ページ 2011年1月11日 火曜日 午後9時37分

4 VQT3A95
Afspeelbare discs/USB-inrichtingenApparaat Diskmerken Type apparaat Formaat inhouden
BD-Video Video
BD-RE VideoJPEG
BD-RVideoDivX®
MKV
DVD-Video Video
DVD-R VideoAVCHDDivX®
MKVMP3JPEGDVD-R DL
DVD-RW VideoAVCHD
— +R/+RW/+R DL
Muziek-CD Muziek [CD-DA]
— CD-RCD-RW
DivX®
MKVMuziek [CD-DA]MP3JPEG
— USB-apparaat(tot 2 TB)
DivX®
MKVMP3JPEG
BD
DVD
CD
USB
(44)
DMP-BD75EG-VQT3A95.book 4 ページ 2011年1月7日 金曜日 午後3時1分

5VQT3A95
Nederlands
∫ Schijfjes die u niet kunt afspelen≥DVD-RAM≥ Superaudio-CD≥ Foto-CD≥DVD-Audio≥WMA-schijfjes≥DivX Plus HD-disks≥HD DVD
∫ Informatie regiobeheerBD-VideoDit toestel speelt BD-Video af die gemarkeerd is met labels die regiocode “B” bevatten.Voorbeeld:
DVD-VideoDit toestel speelt DVD-Video af die gemarkeerd is met labels die het regionummer “2” of “ALL” bevatten.Voorbeeld:
∫ FinaliserenDVD-R/RW/R DL, +R/+RW/+R DL en CD-R/RW die opgenomen zijn door een recorder, etc. moeten gefinaliseerd worden door de recorder om afgespeeld te worden op dit apparaat. Gelieve de instructies van de recorder raadplegen.
∫ BD-Video≥Dit apparaat ondersteunt hoge bit rate audio (Dolby Digital
Plus, Dolby TrueHD, DTS-HD High Resolution Audio en DTS-HD Master Audio) gebruikt in BD-Video. – Als “Dolby D/Dolby D +/Dolby TrueHD” op “PCM” staat,
is het maximumnummer van het Dolby-sound dat mogelijk is, 2ch PCM. ([HOME] “Setup” “Spelerinstellingen” “Geluid”“Digitale geluidsoutput”)
∫ Muziek-CDDe werking en geluidskwaliteit van CDs die niet aan de CD-DA-specificaties (Kopieerbeveiligde CDs, enz.) beantwoorden kan niet gegarandeerd worden.
∫ USB-inrichting≥ Dit apparaat garandeert niet dat alle USB-apparaten
aangesloten kunnen worden.≥ Dit apparaat ondersteunt niet het opladen van een
USB-apparaat.≥ De bestandssystemen FAT12, FAT16 en FAT32 worden
ondersteund.≥ Dit apparaat ondersteunt USB 2.0 High Speed.≥ Dit toestel kan een HDD ondersteunen die tot FAT32
geformatteerd is. Sommige soorten HDD kunnen het gebruik van een externe stroomtoevoereenheid vereisen.
∫ BD-RE, BD-RDiscs die opgenomen worden in DR-stand m.b.v. Panasonic Blu-ray Discspelers zouden de audio, etc. niet correct kunnen afspelen.
≥ Het zou niet mogelijk kunnen zijn de bovenstaande media af te spelen in bepaalde gevallen, afhankelijk van het type media, de staat van de opname, de opnamemethode en hoe de bestanden gecreëerd zijn.
≥ De producenten van de schijf kunnen bepalen hoe de schijven worden afgespeeld. U kunt dus niet altijd het afspelen besturen zoals beschreven in deze bedieningsinstructies. Neem de instructies van de schijf zorgvuldig door.
2 ALL 352
Informatie voor gebruikers betreffende het verzamelen en verwijderen van oude uitrustingen en lege batterijen
Deze symbolen op de producten, verpakkingen, en/of begeleidende documenten betekenen dat gebruikte elektrische en elektronische producten en batterijen niet met het algemene huishoudelijke afval gemengd mogen worden.Voor een correcte behandeling, recuperatie en recyclage van oude producten en lege batterijen moeten zij naar de bevoegde
verzamelpunten gebracht worden in overeenstemming met uw nationale wetgeving en de Richtlijnen 2002/96/EC en 2006/66/EC.Door deze producten en batterijen correct te verwijderen draagt u uw steentje bij tot het beschermen van waardevolle middelen en tot de preventie van potentiële negatieve effecten op de gezondheid van de mens en op het milieu die anders door een onvakkundige afvalverwerking zouden kunnen ontstaan.Voor meer informatie over het verzamelen en recycleren van oude producten en batterijen, gelieve contact op te nemen met uw plaatselijke gemeente, uw afvalverwijderingsdiensten of de winkel waar u de goederen gekocht hebt.Voor een niet-correcte verwijdering van dit afval kunnen boetes opgelegd worden in overeenstemming met de nationale wetgeving.
Voor zakengebruikers in de Europese UnieIndien u elektrische en elektronische uitrusting wilt vewijderen, neem dan contact op met uw dealer voor meer informatie.
[Informatie over de verwijdering in andere landen buiten de Europese Unie]Deze symbolen zijn enkel geldig in de Europese Unie. Indien u wenst deze producten te verwijderen, neem dan contact op met uw plaatselijke autoriteiten of dealer, en vraag informatie over de correcte wijze om deze producten te verwijderen.
Opmerking over het batterijensymbool (beneden twee voorbeelden):Dit symbool kan gebruikt worden in verbinding met een chemisch symbool. In dat geval wordt de eis, vastgelegd door de Richtlijn voor de betrokken chemische producten vervuld.Cd
(45)
DMP-BD75EG-VQT3A95.book 5 ページ 2011年1月11日 火曜日 午後9時37分

6 VQT3A95
Verb inding en en instell ingenSTAP 1: Aansluiten op een TV≥ Plaats het apparaat niet op versterkers/ontvanger of
apparatuur die mogelijk heet wordt. Het apparaat kan beschadigd raken door de hitte.≥ Voordat u een aansluiting maakt, raden we aan dat u alle
apparaten tijdelijk loskoppelt van de stroom.≥Niet aansluiten via de videocassetterecorder. Het beeld
wordt mogelijk niet goed weergegeven als gevolg van kopieerbeveiliging.≥Gebruik High Speed HDMI-kabels die zijn voorzien van
het HDMI-logo (zie omslag). Aangeraden wordt een Panasonic HDMI-kabel te gebruiken. Gebruik HDMI-kabels die niet langer zijn dan 5,0 meter voor het uitvoeren van 1080p-signaal.
Aanbevolen onderdeelnummer (High Speed HDMI-snoer):RP-CDHS15 (1,5 m), RP-CDHS30 (3,0 m), RP-CDHS50 (5,0 m), enz.
STAP 2: Aansluiten op een versterker/ontvanger
∫ Via een HDMI AV OUT aansluiting(Hoge kwaliteit)
≥ Stel “HDMI-audio-uitgang” in op “Aan” ([HOME] “Setup” “Spelerinstellingen” “Verbinding TV / randapparatuur” “HDMI-verbinding”).≥HDMI-aansluiting ondersteunt VIERA Link “HDAVI
Control” ( 10).
HDMI IN
HDMI-kabel
≥ Stel “HDMI-audio-uitgang” in op “Aan” ([HOME] “Setup” “Spelerinstellingen” “Verbinding TV / randapparatuur” “HDMI-verbinding”).≥ Stel “Digitale geluidsoutput” in afhankelijk van de
aangesloten versterker/ontvanger ([HOME] “Setup” “Spelerinstellingen” “Geluid”).≥HDMI-aansluiting ondersteunt VIERA Link “HDAVI
Control” ( 10).≥Wanneer u de TV of de versterker/ontvanger gebruikt,
waarvan de HDMI-aansluiting niet de aanduiding “(ARC)” (dus niet compatibel is met ARC) heeft, moeten ook de versterker/ontvanger en de TV aangesloten worden met een optische digitale kabel om via de versterker/ontvanger naar de audio van de TV te kunnen luisteren.
HDMI IN
HDMI IN
HDMI IN(ARC)
HDMI OUT(ARC)
Meerkanaals luidsprekers
Versterker/ontvanger
HDMI-kabel
HDMI-kabel
(46)
DMP-BD75EG-VQT3A95.book 6 ページ 2011年1月7日 金曜日 午後3時1分

7VQT3A95
Nederlands
STAP 3: Aansluiten op een breedbandnetwerkDe volgende services kunnen gebruikt worden wanneer dit apparaat aangesloten is op breedband.– Harde programmatuur kan worden bijgewerkt– U kunt genieten van de BD-Live– U kunt zich met een ander apparaat in verbinding stellenVoor details over de aansluitingsmethode, raadpleeg de instructies die meegeleverd worden met de aangesloten apparatuur.
STAP 4: Instelling
Nadat u uw nieuwe speler voor het eerst aangesloten heeft en op [Í] gedrukt heeft, zal een beeldscherm voor de basisinstellingen verschijnen.VoorbereidingSchakel de televisie in en selecteer de gepaste videoingang op de televisie.
1 Druk op [Í].Het set-up-scherm verschijnt.
2 Volg de instructies die op het beeldscherm afgebeeld worden en maak de instellingen met [3,4] en druk op [OK].
Na het voltooien van “Eenvoudige Instelling”, kunt u “Eenvoudige Netwerkinstelling” uitvoeren.
≥ U kunt deze set-up om het even wanneer uitvoeren door op “Eenvoudige Instelling” in het set-up-menu te drukken. ([HOME] “Setup” “Spelerinstellingen” “Andere”)
Nadat de “Eenvoudige Instelling” uitgevoerd is, zult u gevraagd worden om de “Eenvoudige Netwerkinstelling” uit te voeren.
Volg de instructies die op het beeldscherm afgebeeld worden en maak de instellingen met [3, 4,2,1] en druk op [OK].
∫ LAN-kabelverbinding
≥Gebruik rechte LAN-kabels van categorie 5 of hoger (STP) als u een aansluiting op randapparatuur tot stand brengt.≥Het toestel kan beschadigd raken als u een andere kabel
dan een LAN-kabel in de LAN-aansluiting steekt.
Breedband router, etc.
Internet
LAN-kabel
Mediaserver met DLNA-certificaat
Eenvoudige Instelling
Schakelaar Stand-by/On (Í/I)Druk op deze toets om het toestel aan of in stand-by te zetten. Het toestel blijft nog altijd een kleine hoeveelheid energie verbruiken in de stand-by-modus.
Eenvoudige Netwerkinstelling
OKRETURN
Eenvoudige Netwerkinstelling
LAN-setup en testen van thuisnetwerk- en Internetverbindingen zijn nodig voor Internetfuncties( BD-Live etc. ).Breedband Internetverbinding is nodig voor BD-Live.Is er al een LAN-kabel verbonden ?Raadpleeg de bedieningsinstructies over netwerk-verbinding.
Druk op [OK] om verder te gaan.
(47)
DMP-BD75EG-VQT3A95.book 7 ページ 2011年1月7日 金曜日 午後3時1分
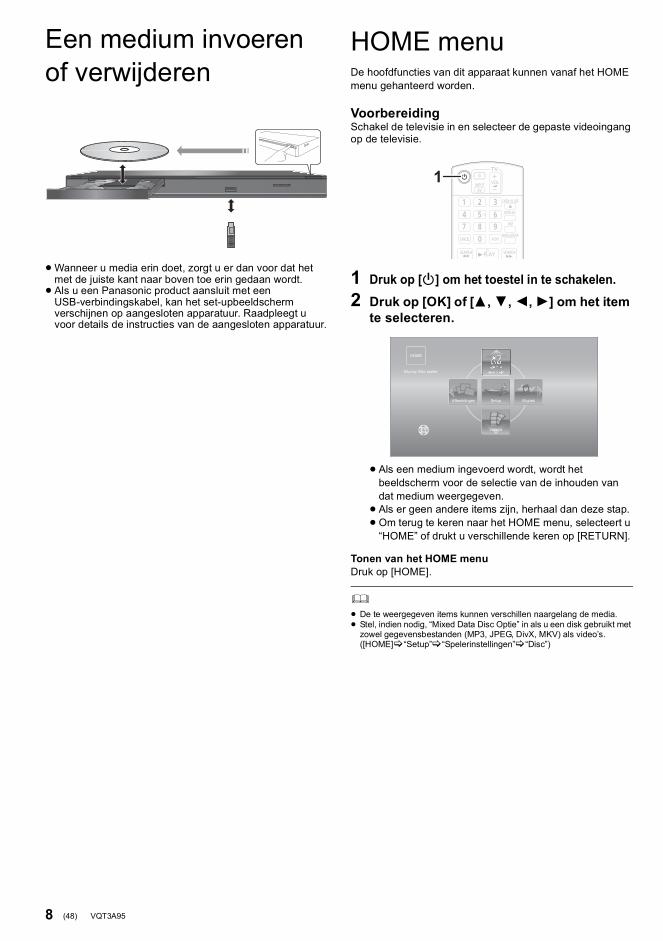
8 VQT3A95
A fspelenEen medium invoeren of verwijderen
≥Wanneer u media erin doet, zorgt u er dan voor dat het met de juiste kant naar boven toe erin gedaan wordt.≥ Als u een Panasonic product aansluit met een
USB-verbindingskabel, kan het set-upbeeldscherm verschijnen op aangesloten apparatuur. Raadpleegt u voor details de instructies van de aangesloten apparatuur.
HOME menuDe hoofdfuncties van dit apparaat kunnen vanaf het HOME menu gehanteerd worden.
VoorbereidingSchakel de televisie in en selecteer de gepaste videoingang op de televisie.
1 Druk op [Í] om het toestel in te schakelen.2 Druk op [OK] of [3,4,2,1] om het item
te selecteren.
≥ Als een medium ingevoerd wordt, wordt het beeldscherm voor de selectie van de inhouden van dat medium weergegeven.≥ Als er geen andere items zijn, herhaal dan deze stap.≥Om terug te keren naar het HOME menu, selecteert u
“HOME” of drukt u verschillende keren op [RETURN].
Tonen van het HOME menuDruk op [HOME].
≥ De te weergegeven items kunnen verschillen naargelang de media.≥ Stel, indien nodig, “Mixed Data Disc Optie” in als u een disk gebruikt met
zowel gegevensbestanden (MP3, JPEG, DivX, MKV) als video’s. ([HOME] “Setup” “Spelerinstellingen” “Disc”)
1
MuziekAfbeeldingen
Video’s
NetwerkBlu-ray Disc speler
HOME
Setup
MEDIASERVER
(48)
VQT3A95 ~Body_dut.fm 8 ページ 2011年1月13日 木曜日 午前11時42分
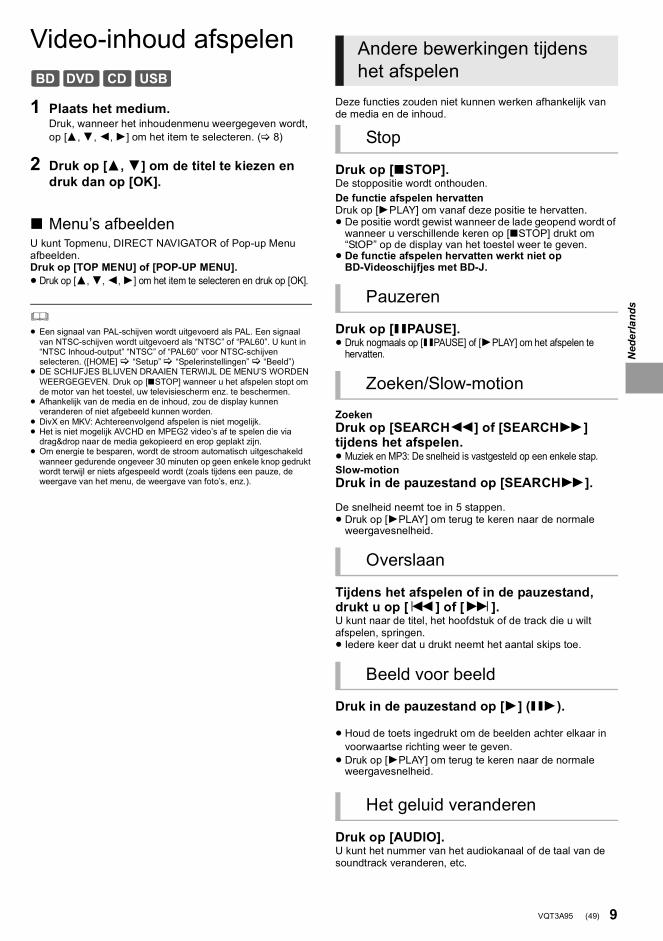
9VQT3A95
Nederlands
Video-inhoud afspelen
1 Plaats het medium.Druk, wanneer het inhoudenmenu weergegeven wordt, op [3,4,2,1] om het item te selecteren. ( 8)
2 Druk op [3,4] om de titel te kiezen en druk dan op [OK].
∫ Menu’s afbeeldenU kunt Topmenu, DIRECT NAVIGATOR of Pop-up Menu afbeelden.Druk op [TOP MENU] of [POP-UP MENU].≥ Druk op [3,4,2,1] om het item te selecteren en druk op [OK].
≥ Een signaal van PAL-schijven wordt uitgevoerd als PAL. Een signaal van NTSC-schijven wordt uitgevoerd als “NTSC” of “PAL60”. U kunt in “NTSC Inhoud-output” “NTSC” of “PAL60” voor NTSC-schijven selecteren. ([HOME] “Setup” “Spelerinstellingen” “Beeld”)
≥ DE SCHIJFJES BLIJVEN DRAAIEN TERWIJL DE MENU’S WORDEN WEERGEGEVEN. Druk op [∫STOP] wanneer u het afspelen stopt om de motor van het toestel, uw televisiescherm enz. te beschermen.
≥ Afhankelijk van de media en de inhoud, zou de display kunnen veranderen of niet afgebeeld kunnen worden.
≥ DivX en MKV: Achtereenvolgend afspelen is niet mogelijk.≥ Het is niet mogelijk AVCHD en MPEG2 video’s af te spelen die via
drag&drop naar de media gekopieerd en erop geplakt zijn.≥ Om energie te besparen, wordt de stroom automatisch uitgeschakeld
wanneer gedurende ongeveer 30 minuten op geen enkele knop gedrukt wordt terwijl er niets afgespeeld wordt (zoals tijdens een pauze, de weergave van het menu, de weergave van foto’s, enz.).
Deze functies zouden niet kunnen werken afhankelijk van de media en de inhoud.
Druk op [∫STOP].De stoppositie wordt onthouden.De functie afspelen hervattenDruk op [1PLAY] om vanaf deze positie te hervatten.≥ De positie wordt gewist wanneer de lade geopend wordt of
wanneer u verschillende keren op [∫STOP] drukt om “StOP” op de display van het toestel weer te geven.≥ De functie afspelen hervatten werkt niet op
BD-Videoschijfjes met BD-J.
Druk op [;PAUSE].≥ Druk nogmaals op [;PAUSE] of [1PLAY] om het afspelen te
hervatten.
ZoekenDruk op [SEARCH6] of [SEARCH5] tijdens het afspelen.≥ Muziek en MP3: De snelheid is vastgesteld op een enkele stap.Slow-motionDruk in de pauzestand op [SEARCH5].
De snelheid neemt toe in 5 stappen.≥ Druk op [1PLAY] om terug te keren naar de normale
weergavesnelheid.
Tijdens het afspelen of in de pauzestand, drukt u op [:] of [9].U kunt naar de titel, het hoofdstuk of de track die u wilt afspelen, springen.≥ Iedere keer dat u drukt neemt het aantal skips toe.
Druk in de pauzestand op [1] (;1).
≥ Houd de toets ingedrukt om de beelden achter elkaar in voorwaartse richting weer te geven.≥ Druk op [1PLAY] om terug te keren naar de normale
weergavesnelheid.
Druk op [AUDIO].U kunt het nummer van het audiokanaal of de taal van de soundtrack veranderen, etc.
BD DVD CD USB
Andere bewerkingen tijdens het afspelen
Stop
Pauzeren
Zoeken/Slow-motion
Overslaan
Beeld voor beeld
Het geluid veranderen
(49)
VQT3A95 ~Body_dut.fm 9 ページ 2011年1月11日 火曜日 午後9時53分

10 VQT3A95
Gecombineerde bediening met de tv (VIERA Link “HDAVI Control™”)
Voorbereiding1 Stel “VIERA Link” in op “Aan” ([HOME] “Setup”
“Spelerinstellingen” “Verbinding TV / randapparatuur” “HDMI-verbinding”). (De standaardinstelling is “Aan”.)
2 Stel de “HDAVI Control” bediening op de aangesloten apparaten (bijv. tv) in.
3 Schakel alle compatibel “HDAVI Control” apparaten in en selecteer het ingangskanaal van dit apparaat op de aangesloten tv zodat de functie “HDAVI Control” goed werkt.Herhaal deze procedure als de aansluiting of instellingen worden gewijzigd.
Als het afspelen op het toestel van start gaat, zal de TV automatisch naar het ingangskanaal schakelen en de overeenkomstige actie weergeven.Als de TV bovendien uit staat, zal hij automatisch worden ingeschakeld.
Alle aangesloten apparatuur die compatibel is met “HDAVI Control”, inclusief deze spelers, wordt automatisch ingesteld in standby wanneer u de televisie in standby zet.
≥ Dit toestel ondersteunt de “HDAVI Control 1” functie.Deze standaard is compatibel met de conventionele HDAVI-apparatuur van Panasonic.
≥ VIERA Link “HDAVI Control”, op basis van de besturingsfuncties die HDMI industriestandaard bekend onder de naam HDMI CEC (Consumer Electronics Control) biedt, is een unieke door ons ontwikkelde en toegevoegde functie. Daarom kan de werking met apparatuur van andere fabrikanten die HDMI CEC ondersteunen niet worden gegarandeerd.
≥ Zie de bedieningsinstructies voor het aansluiten van apparatuur die de functie VIERA Link ondersteunen.
Technische gegevensSignaalsysteem: PAL/NTSCBereik bedieningstemperatuur:
i5 oC tot i35 oCToegestaan luchtvochtigheidsbereik:
10% tot 80% RH (geen condensatie)Video-uitgang: 1,0 Vp-p (75≠)/Tulpstekkerbus:1 systeemAudio-uitvoer: 2 Vrms (1 kHz, 0 dB)/Tulpstekkerbus
Aantal connectoren: 2-kanaals:1 systeemHDMI AV output: Type A (19-pens aansluiting) : 1 systeem
Dit apparaat ondersteunt de functie “HDAVI Control 1”.USB-slot: USB2.0: 1 systeemEthernet: 10BASE-T/100BASE-TX:1 systeemTechnische gegevens van de LASERKlasse 1 LASER Product:
Golflengte: 790 nm (CDs)/655 nm (DVDs)/405 nm (BDs)Laservermogen: Bij ingeschakelde beveiliging is er geen
gevaarlijke stralingStroomvoorziening: AC 220 tot 240 V, 50 HzStroomverbruik: Ong. 12 WStroomverbruik op stand-by-modus: Ong. 0,2 WStroomverbruik op snelle start stand-by-modus:
Ong. 3,6 WAfmetingen (BkDkH) Inclusief de uitstekende onderdelen:
430 mmk185 mmk35 mmMassa: Ong. 1,6 kg
De technische gegevens kunnen zonder voorafgaande mededeling worden gewijzigd.
Wat is VIERA Link “HDAVI Control”?
VIERA Link “HDAVI Control” is een handige functie die verbonden handelingen van deze eenheid en een TV van Panasonic (VIERA) of andere inrichting onder “HDAVI Control” biedt. U kunt deze functie gebruiken door de apparatuur met de HDMI-kabel te verbinden. Zie de bedieningsinstructies voor het aansluiten van apparatuur voor bedieningsdetails.
De ingang automatisch schakelenInschakelkoppeling
Uitschakelkoppeling
(50)
DMP-BD75EG-VQT3A95.book 10 ページ 2011年1月11日 火曜日 午後9時37分
11VQT3A95
Nederlands
This product incorporates the following software:
For the software categorized as (3) and (4), please refer to the terms and conditions of GPL v2 and LGPL v2.1, as the case may be at http://www.gnu.org/licenses/old-licenses/gpl-2.0.html and http://www.gnu.org/licenses/old-licenses/lgpl-2.1.html.In addition, the software categorized as (3) and (4) are copyrighted by several individuals. Please refer to the copyright notice of those individuals at http://www.am-linux.jp/dl/AWBP11
The GPL/LGPL software is distributed in the hope that it will be useful, but WITHOUT ANY WARRANTY, without even the implied warranty of MERCHANTABILITY or FITNESS FOR A PARTICULAR PURPOSE.
At least three (3) years from delivery of products, Panasonic will give to any third party who contacts us at the contact information provided below, for a charge no more than our cost of physically performing source code distribution, a complete machine-readable copy of the corresponding source code covered under GPL v2/LGPL v2.1.
Contact [email protected]
Source code is also freely available to you and any other member of the public via our website below.http://www.am-linux.jp/dl/AWBP11
the software developed independently by or for Panasonic Corporation,the software owned by third party and licensed to Panasonic Corporation,the software licensed under the GNU General Public License, Version 2 (GPL v2),the software licensed under the GNU LESSER General Public License, Version 2.1 (LGPL v2.1) and/or,open sourced software licensed under its applicable license terms including but not limited toICU License, c-arse license.
(1)
(2)
(3)
(4)
(5)
For Open Source Software Programs categorized as (5), please refer to the applicable license terms listed below and/or included in the “License” menu on Product.
ICU License - ICU 1.8.1 and later
COPYRIGHT AND PERMISSION NOTICE
Copyright (c) 1995-2010 International Business Machines Corporation and others
All rights reserved.
Permission is hereby granted, free of charge, to any person obtaining a copy of this software and associated documentation files (the “Software”), to deal in the Software without restriction, including without limitation the rights to use, copy, modify, merge, publish, distribute, and/or sell copies of the Software, and to permit persons to whom the Software is furnished to do so, provided that the above copyright notice(s) and this permission notice appear in all copies of the Software and that both the above copyright notice(s) and this permission notice appear in supporting documentation.
THE SOFTWARE IS PROVIDED “AS IS”, WITHOUT WARRANTY OF ANY KIND, EXPRESS OR IMPLIED, INCLUDING BUT NOT LIMITED TO THE WARRANTIES OF MERCHANTABILITY, FITNESS FOR A PARTICULAR PURPOSE AND NONINFRINGEMENT OF THIRD PARTY RIGHTS. IN NO EVENT SHALL THE COPYRIGHT HOLDER OR HOLDERS INCLUDED IN THIS NOTICE BE LIABLE FOR ANY CLAIM, OR ANY SPECIAL INDIRECT OR CONSEQUENTIAL DAMAGES, OR ANY DAMAGES WHATSOEVER RESULTING FROM LOSS OF USE, DATA OR PROFITS, WHETHER IN AN ACTION OF CONTRACT, NEGLIGENCE OR OTHER TORTIOUS ACTION, ARISING OUT OF OR IN CONNECTION WITH THE USE OR PERFORMANCE OF THIS SOFTWARE.
Except as contained in this notice, the name of a copyright holder shall not be used in advertising or otherwise to promote the sale, use or other dealings in this Software without prior written authorization of the copyright holder.
All trademarks and registered trademarks mentioned herein are the property of their respective owners.
DivX®, DivX Certified® en bijbehorende logo’s zijn handelsmerken van DivX, Inc. en worden onder licentie gebruikt.DivX®, DivX Certified® and associated logos are trademarks of DivX, Inc. and are used under license.
Windows is een handelsmerk of een gedeponeerd handelsmerk van Microsoft Corporation in de Verenigde Staten en andere landen.
c-arse license
Copyright 1998 by the Massachusetts Institute of Technology.
Permission to use, copy, modify, and distribute this software and itsdocumentation for any purpose and without fee is hereby granted, provided that the above copyright notice appear in all copies and that both that copyright notice and this permission notice appear in supporting documentation, and that the name of M.I.T. not be used in advertising or publicity pertaining to distribution of the software without specific, written prior permission.M.I.T. makes no representations about the suitability of this software for any purpose. It is provided “as is” without express or implied warranty.
Java en alle op Java gebaseerde handelsmerken en beeldmerken zijn handelsmerken of gedeponeerde handelsmerken van Sun Microsystems, Inc. in de Verenigde Staten en andere landen.
Gefabriceerd onder licentie van Dolby Laboratories.Dolby en het symbool double-D zijn handelsmerken van Dolby Laboratories.
Gefabriceerd onder licentie onder Amerikaanse (VS) patent #’s: 5.451.942; 5.956.674; 5.974.380; 5.978.762; 6.226.616; 6.487.535; 7.392.195; 7.272.567; 7.333.929; 7.212.872 & andere Amerikaanse (VS) en wereldwijde verstrekte & uitstaande patenten.DTS en het Symbool zijn gedeponeerde handelsmerken, & DTS-HD, DTS-HD Master Audio | Essential en de DTS-logo’s zijn handelsmerken van DTS, Inc. Product wordt inclusief software geleverd.© DTS, Inc. Alle rechten voorbehouden.
Dit item bevat kopiebeveiligingstechnologie die beschermd is door Amerikaanse (VS) octrooien en andere intellectuele eigendomsrechten van Rovi Corporation. Reverse engineering en het ongedaan maken van de assemblage zijn verboden.
HDMI, het HDMI logo en High-Definition Multimedia Interface zijn handelsmerken of gedeponeerde handelsmerken van HDMI Licensing LLC in de Verenigde Staten en andere landen.
Dit product is gelicentieerd volgens de patentenportfoliolicenties AVC en VC-1 voor persoonlijk en nietcommercieel gebruik door een consument om (i) video’s te coderen in overeenkomst met de standaarden AVC en VC-1 (“AVC/VC-1 Video”) en/of (ii) AVC/VC-1-video’s te decoderen die werden gecodeerd door een consument tijdens een persoonlijke en niet-commerciële activiteit en/of zijn aangeschaft bij een videoleverancier die de licentie heeft om AVC/VC-1-video’s te leveren. Er wordt geen licentie verleend of geïmpliceerd voor enig ander gebruik. U kunt aanvullende informatie aanvragen bij MPEG LA, LLC.Zie http://www.mpegla.com.
HDAVI Control™ is een handelsmerk van Panasonic Corporation.
“AVCHD” en het “AVCHD” Logo zijn handelsmerken van Panasonic Corporation en Sony Corporation.
“DVD Logo” is een handelsmerk van DVD Format/Logo Licensing Corporation.
MPEG Layer-3 audio coding technologie onder licentie van Fraunhofer IIS en Thomson.
DLNA, the DLNA Logo and DLNA CERTIFIED are trademarks, service marks, or certification marks of the Digital Living Network Alliance.
(51)
DMP-BD75EG-VQT3A95.book 11 ページ 2011年1月7日 金曜日 午後3時1分
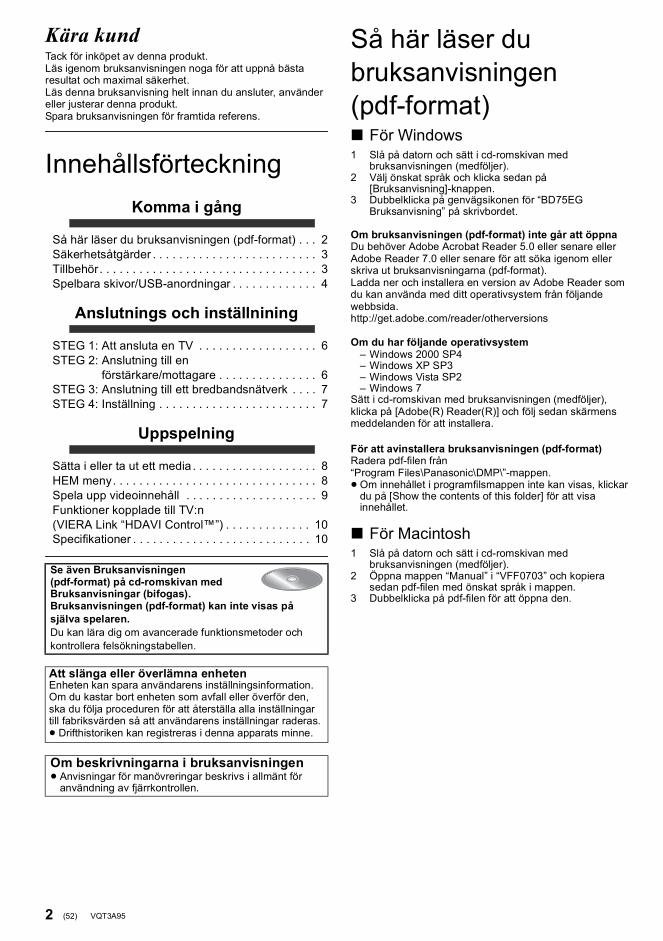
2 VQT3A95
Kära kundTack för inköpet av denna produkt.Läs igenom bruksanvisningen noga för att uppnå bästa resultat och maximal säkerhet.Läs denna bruksanvisning helt innan du ansluter, använder eller justerar denna produkt.Spara bruksanvisningen för framtida referens.
InnehållsförteckningKomma i gång
Så här läser du bruksanvisningen (pdf-format) . . . 2Säkerhetsåtgärder . . . . . . . . . . . . . . . . . . . . . . . . . 3Tillbehör. . . . . . . . . . . . . . . . . . . . . . . . . . . . . . . . . 3Spelbara skivor/USB-anordningar . . . . . . . . . . . . . 4
Anslutnings och inställnining
STEG 1: Att ansluta en TV . . . . . . . . . . . . . . . . . . 6STEG 2: Anslutning till en
förstärkare/mottagare . . . . . . . . . . . . . . . 6STEG 3: Anslutning till ett bredbandsnätverk . . . . 7STEG 4: Inställning . . . . . . . . . . . . . . . . . . . . . . . . 7
Uppspelning
Sätta i eller ta ut ett media . . . . . . . . . . . . . . . . . . . 8HEM meny. . . . . . . . . . . . . . . . . . . . . . . . . . . . . . . 8Spela upp videoinnehåll . . . . . . . . . . . . . . . . . . . . 9Funktioner kopplade till TV:n (VIERA Link “HDAVI Control™”) . . . . . . . . . . . . . 10Specifikationer . . . . . . . . . . . . . . . . . . . . . . . . . . . 10
K omma i gång
Så här läser du bruksanvisningen (pdf-format)∫ För Windows1 Slå på datorn och sätt i cd-romskivan med
bruksanvisningen (medföljer).2 Välj önskat språk och klicka sedan på
[Bruksanvisning]-knappen.3 Dubbelklicka på genvägsikonen för “BD75EG
Bruksanvisning” på skrivbordet.
Om bruksanvisningen (pdf-format) inte går att öppnaDu behöver Adobe Acrobat Reader 5.0 eller senare eller Adobe Reader 7.0 eller senare för att söka igenom eller skriva ut bruksanvisningarna (pdf-format).Ladda ner och installera en version av Adobe Reader som du kan använda med ditt operativsystem från följande webbsida.http://get.adobe.com/reader/otherversions
Om du har följande operativsystem– Windows 2000 SP4– Windows XP SP3– Windows Vista SP2– Windows 7
Sätt i cd-romskivan med bruksanvisningen (medföljer), klicka på [Adobe(R) Reader(R)] och följ sedan skärmens meddelanden för att installera.
För att avinstallera bruksanvisningen (pdf-format)Radera pdf-filen från “Program Files\Panasonic\DMP\”-mappen.≥Om innehållet i programfilsmappen inte kan visas, klickar
du på [Show the contents of this folder] för att visa innehållet.
∫ För Macintosh1 Slå på datorn och sätt i cd-romskivan med
bruksanvisningen (medföljer).2 Öppna mappen “Manual” i “VFF0703” och kopiera
sedan pdf-filen med önskat språk i mappen.3 Dubbelklicka på pdf-filen för att öppna den.
Se även Bruksanvisningen (pdf-format) på cd-romskivan med Bruksanvisningar (bifogas).Bruksanvisningen (pdf-format) kan inte visas på själva spelaren.Du kan lära dig om avancerade funktionsmetoder och kontrollera felsökningstabellen.
Att slänga eller överlämna enhetenEnheten kan spara användarens inställningsinformation. Om du kastar bort enheten som avfall eller överför den, ska du följa proceduren för att återställa alla inställningar till fabriksvärden så att användarens inställningar raderas.≥ Drifthistoriken kan registreras i denna apparats minne.
Om beskrivningarna i bruksanvisningen≥ Anvisningar för manövreringar beskrivs i allmänt för
användning av fjärrkontrollen.
(52)
DMP-BD75EG-VQT3A95.book 2 ページ 2011年1月11日 火曜日 午後9時56分

3VQT3A95
Svenska
Säkerhetsåtgärder
Enhet≥ För att minska risken för brand, elstöt eller produktskada,
– Utsätt inte enheten för regn, fukt, droppar eller stänk. – Placera inte några föremål med vätska, till exempel
vaser, på enheten. – Använd endast rekommenderade tillbehör.– Avlägsna inte skyddslock.– Försök inte att reparera själv. Kontakta kvalificerade
fackmän för service.– Låt inte metallföremål falla inuti enheten.– Placera inga tunga föremål ovanpå.
Nätsladd≥ För att minska risken för brand, elstöt eller produktskada,
– Kontrollera att spänningen motsvarar den som står tryckt på apparaten.
– Sätt i elkontakten helt i elnätet.– Dra eller böj inte och placera inga tunga föremål på
sladden.– Hantera inte kontakten med fuktiga händer.– Håll i själva kontakten när du ska lossa den ur elnätet.– Använd inte stickkontakter eller eluttag som är skadade.≥ Installera den här enheten så att AC-sladden kan lossas
ur eluttaget omedelbart, om problem uppstår.
Enhet≥Den här enheten använder laser. Användning av kontroller
eller justeringar eller utförande av procedurer andra än de som specificeras i bruksanvisningen kan leda till exponering för farlig strålning. ≥ Ställ inga föremål med öppen låga, så som ett tänt
stearinljus, ovanpå enheten.≥Den här enheten kan ta emot radiostörningar orsakade av
mobiltelefoner under användning. Om sådana störningar uppstår, öka avståndet mellan enheten och mobiltelefonen. ≥Denna enhet är avsedd för användning på platser med
moderat klimat.
Placering≥ Placera den här enheten på en jämn yta.≥ För att minska risken för brand, elstöt eller produktskada,
– Installera eller placera den inte i en bokhylla, inbyggt skåp eller annat begränsat utrymme. Se till att luftcirkulationen är tillräcklig kring enheten.
– Se till att enhetens ventilationsöppningar inte är förtäppta av tidningar, bordsdukar, gardiner eller liknande föremål.
– Utsätt inte enheten för direkt solljus, hög temperatur eller fuktighet och alltför mycket vibrationer.
Batterier≥ Fara för explosion förekommer, om batteriet placeras
felaktigt. Byt endast ut mot den typ som tillverkaren rekommenderar. ≥Misshantering av batterierna kan orsaka att
elektrolytvätska läcker ut och leda till brand. – Blanda inte gamla och nya batterier eller olika
batterityper.– Får inte värmas upp eller utsättas för lågor.– Lämna inte batteriet (ierna) i en bil som står i direkt
solljus någon längre tid med dörrar och fönster stängda.– Får inte tas isär eller kortslutas.– Ladda inte om alkaliska eller manganbatterier.– Använd inte batterier vars skyddshölje har dragits av.– Ta ur batterierna om du inte tänker använda
fjärrkontrollen på en längre tid. Förvara på sval och mörk plats.
≥ När du kasserar batterierna, kontakta lokala myndigheter eller din återförsäljare och fråga om rätt avfallsstation.
TillbehörKontrollera de levererade tillbehören innan du använder den här enheten.
≥ De produktnummer som ges i den här bruksanvisningen gäller från januari 2011. Numren kan komma att ändras.
≥ Använd inte nätkabeln tillsammans med annan utrustning.
För in batteriet så att polerna (i och j) matchar de för fjärrkontrollen.
Peka på fjärrkontrollens signalsensor på den här enheten.
VARNING
FÖRSIKTIGHET
1 Fjärrkontroll(N2QAYB000577)
2 Batterier till fjärrkontrollen1 Nätsladd1 CD-ROM
Att använda fjärrkontrollen
R6/LR6, AA
(Alkaliska batterier eller manganbatterier)
(53)
DMP-BD75EG-VQT3A95.book 3 ページ 2011年1月11日 火曜日 午後9時56分

4 VQT3A95
Spelbara skivor/USB-anordningarAnordning Skivmarkeringar Typer av anordningar Innehållsformat
BD-Video Video
BD-RE VideoJPEG
BD-RVideoDivX®
MKV
DVD-Video Video
DVD-R VideoAVCHDDivX®
MKVMP3JPEGDVD-R DL
DVD-RW VideoAVCHD
— +R/+RW/+R DL
Musik-CD Musik [CD-DA]
— CD-RCD-RW
DivX®
MKVMusik [CD-DA]MP3JPEG
— USB-anordning(upp till 2 TB)
DivX®
MKVMP3JPEG
BD
DVD
CD
USB
(54)
DMP-BD75EG-VQT3A95.book 4 ページ 2011年1月7日 金曜日 午後3時9分

5VQT3A95
Svenska
∫ Skivor som inte går att spela upp≥DVD-RAM≥ Super ljud-CD≥ Foto-CD≥DVD-Audio≥WMA-skivor≥DivX Plus HD-skivor≥HD DVD
∫ Information om regionhanteringBD-VideoDen här enheten spelar BD-Video som är märkta med etiketter med regionkoden “B”.Exempel:
DVD-VideoDen här enheten spelar DVD-Video som är märkta med etiketter med siffran “2” eller “ALL”.Exempel:
∫ Stänga (finalize)DVD-R/RW/R DL, +R/+RW/+R DL och CD-R/RW som spelats in på en inspelare etc. måste finaliseras av inspelaren för att kunna spelas på den här enheten. Se bruksanvisningen till inspelaren.
∫ BD-Video≥Denna enhet stöder ljud med en hög bithastighet (Dolby
Digital Plus, Dolby TrueHD, DTS-HD High Resolution Audio och DTS-HD Master Audio) som används i BD-Video. – Om “Dolby D/Dolby D +/Dolby TrueHD” står på “PCM”,
är det maximala möjliga antalet Dolby-ljud 2ch PCM. ([HOME] “Inställningar” “Spelarinställningar” “Ljud”
“Digital ljudutgång”)
∫ Musik-CDAnvändning och ljudkvalitet av CD-skivor som inte överensstämmer med CD-DA-specifikationerna (CD-skivor med kopieringskontroll osv.) kan inte garanteras.
∫ USB-anordning≥ Den här apparaten garanterar inte anslutning med alla
USB-anordningar.≥ Denna enhet stöder inte laddning av USB-anordning.≥ FAT12, FAT16 och FAT32 filsystem stöds.≥ Denna enhet stöder USB 2.0 höghastighet.≥ Den här enheten kan stödja en hårddisk formaterad till
FAT32. Vissa typer av hårddiskar kan kräva att en extern strömtillförselsenhet används.
∫ BD-RE, BD-RSkivor som spelats in i DR-läget med Blu-ray-skivspelare från Panasonic kanske inte kan spela upp ljudet korrekt.
≥ Det kanske inte är möjligt att spela upp ovanstående media i vissa fall beroende på mediatyp, inspelningens tillstånd, inspelningsmetod och hur filerna har skapats.
≥ Skivornas tillverkare kan kontrollera hur skivorna spelas. Därför har du inte alltid möjlighet att styra uppspelningen enligt beskrivningen häri. Läs noggrant skivans instruktioner.
2 ALL 352
Information för användare om hopsamling och avfallshantering av gammalt material och använda batterier
Dessa symboler på produkter, förpackningar och/eller medföljande dokument betyder att man inte ska blanda elektriska och elektroniska produkter eller batterier med vanliga hushållssopor.För att gamla produkter och använda batterier ska hanteras och återvinnas på rätt sätt ska man ta dem till passande uppsamlingsställe i enlighet med
nationella bestämmelser och direktiven 2002/96/EC och 2006/66/EC.När du kasserar dessa produkter och batterier på rätt sätt hjälper du till att spara på värdefulla resurser och förebygga en potentiell negativ inverkan på människors hälsa och på miljön som annars skulle kunna uppstå p.g.a. otillbörlig avfallshantering.För mer information om uppsamling och återvinning av gamla produkter och batterier, var god kontakta din kommun, din avfallshanterare eller det försäljningsställe där du köpte din artikel.Olämplig avfallshantering kan beläggas med straff i enlighet med nationella bestämmelser.
För affärsanvändare inom den Europeiska UnionenOm du vill kassera elektrisk eller elektronisk utrustning, var god kontakta din återförsäljare eller leverantör för ytterligare information.
[Information om avfallshantering i länder utanför den Europeiska unionen]Dessa symboler är endast giltiga inom den Europeiska Unionen. Om du vill kassera dessa föremål, var god kontakta dina lokala myndigheter eller din lokala återförsäljare och fråga efter rätt metod för avfallshantering.
Notering till batterisymbolen (nedtill, två symbolexempel):Denna symbol kan användas i kombination med en kemisk symbol. I detta fall iakttar den de krav som ställs upp i direktivet för den aktuella kemikalien.Cd
(55)
DMP-BD75EG-VQT3A95.book 5 ページ 2011年1月7日 金曜日 午後3時9分

6 VQT3A95
A nslutnings och inställniningSTEG 1: Att ansluta en TV≥ Placera inte enheten på förstärkare eller utrustning som
kan bli varm. Hettan kan skada enheten.≥ Innan du utför anslutningarna, rekommenderar vi att du
tillfälligt kopplar bort alla enheterna från nätet.≥ Anslut inte via videobandspelaren. På grund av
upphovsrättskydd kanske inte bilden visas korrekt.≥ Använd High Speed HDMI-kablar med HDMI-logo (som
visas på omslaget). Du rekommenderas att använda Panasonic’s HDMI-kabel. När du sänder ut 1080p-signal, var god använd HDMI-kablar som är 5,0 meter eller kortare.
Rekommenderat artikelnummer (HDMI-kabel med hög hastighet):RP-CDHS15 (1,5 m), RP-CDHS30 (3,0 m), RP-CDHS50 (5,0 m), etc.
STEG 2: Anslutning till en förstärkare/mottagare
∫ Via en HDMI AV OUT-terminal(Hög kvalitet)
≥ Ställ “Digital ljudutgång” till “På” ([HOME] “Inställningar” “Spelarinställningar” “TV / övr. anslutningar” “HDMI anslutning”).≥HDMI-anslutningen stödjer VIERA Link “HDAVI Control”
( 10).
HDMI IN
HDMI-kabel
≥ Ställ “Digital ljudutgång” till “På” ([HOME] “Inställningar” “Spelarinställningar” “TV / övr. anslutningar” “HDMI anslutning”).≥ Ställ in “Digital ljudutgång” beroende på den anslutna
förstärkaren/mottagaren ([HOME] “Inställningar” “Spelarinställningar” “Ljud”).≥HDMI-anslutningen stödjer VIERA Link “HDAVI Control”
( 10).≥När du använder TV eller förstärkare/mottagare som inte
har indikationen “(ARC)” (inte-ARC-kompatibel) på HDMI-utgången, behöver du också ansluta förstärkaren/mottagaren och TV via en optiska digital kabel för att kunna höra TV-ljudet med förstärkare/mottagare.
HDMI IN
HDMI IN
HDMI IN(ARC)
HDMI OUT(ARC)
Högtalare med flera kanaler
Förstärkare/mottagare
HDMI-kabel
HDMI-kabel
(56)
DMP-BD75EG-VQT3A95.book 6 ページ 2011年1月7日 金曜日 午後3時9分
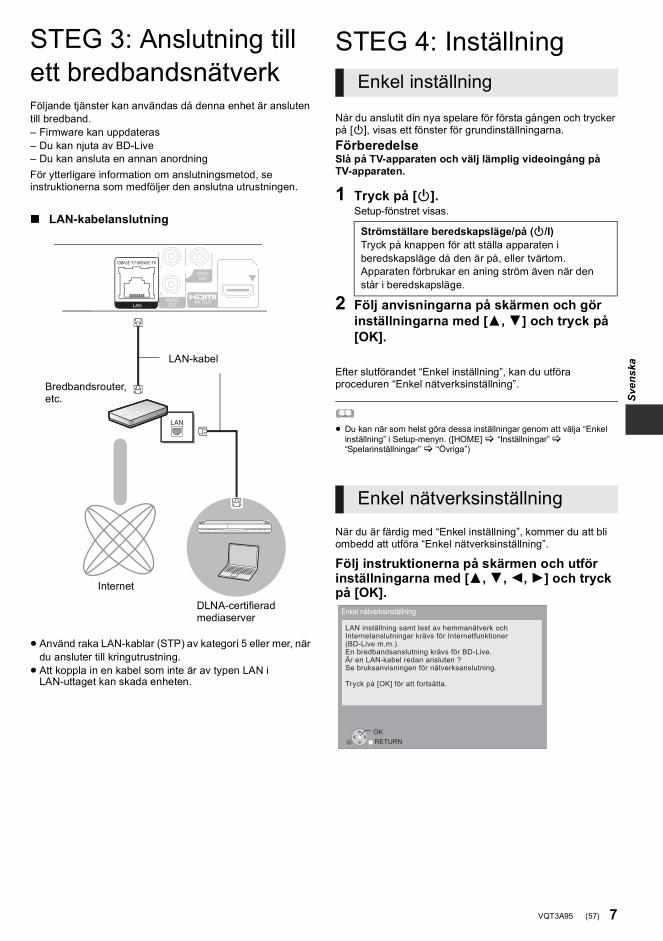
7VQT3A95
Svenska
STEG 3: Anslutning till ett bredbandsnätverkFöljande tjänster kan användas då denna enhet är ansluten till bredband.– Firmware kan uppdateras– Du kan njuta av BD-Live– Du kan ansluta en annan anordningFör ytterligare information om anslutningsmetod, se instruktionerna som medföljer den anslutna utrustningen.
STEG 4: Inställning
Nàr du anslutit din nya spelare för första gången och trycker på [Í], visas ett fönster för grundinställningarna.FörberedelseSlå på TV-apparaten och välj lämplig videoingång på TV-apparaten.
1 Tryck på [Í].Setup-fönstret visas.
2 Följ anvisningarna på skärmen och gör inställningarna med [3,4] och tryck på [OK].
Efter slutförandet “Enkel inställning”, kan du utföra proceduren “Enkel nätverksinställning”.
≥ Du kan när som helst göra dessa inställningar genom att välja “Enkel inställning” i Setup-menyn. ([HOME] “Inställningar” “Spelarinställningar” “Övriga”)
När du är färdig med “Enkel inställning”, kommer du att bli ombedd att utföra “Enkel nätverksinställning”.
Följ instruktionerna på skärmen och utför inställningarna med [3,4,2, 1] och tryck på [OK].
∫ LAN-kabelanslutning
≥ Använd raka LAN-kablar (STP) av kategori 5 eller mer, när du ansluter till kringutrustning.≥ Att koppla in en kabel som inte är av typen LAN i
LAN-uttaget kan skada enheten.
Bredbandsrouter, etc.
Internet
LAN-kabel
DLNA-certifierad mediaserver
Enkel inställning
Strömställare beredskapsläge/på (Í/I)Tryck på knappen för att ställa apparaten i beredskapsläge då den är på, eller tvärtom. Apparaten förbrukar en aning ström även när den står i beredskapsläge.
Enkel nätverksinställning
OKRETURN
Enkel nätverksinställning
LAN inställning samt test av hemmanätverk ochInternetanslutningar krävs för Internetfunktioner(BD-Live m.m.). En bredbandsanslutning krävs för BD-Live.Är en LAN-kabel redan ansluten ?Se bruksanvisningen för nätverksanslutning.
Tryck på [OK] för att fortsätta.
(57)
DMP-BD75EG-VQT3A95.book 7 ページ 2011年1月7日 金曜日 午後3時9分
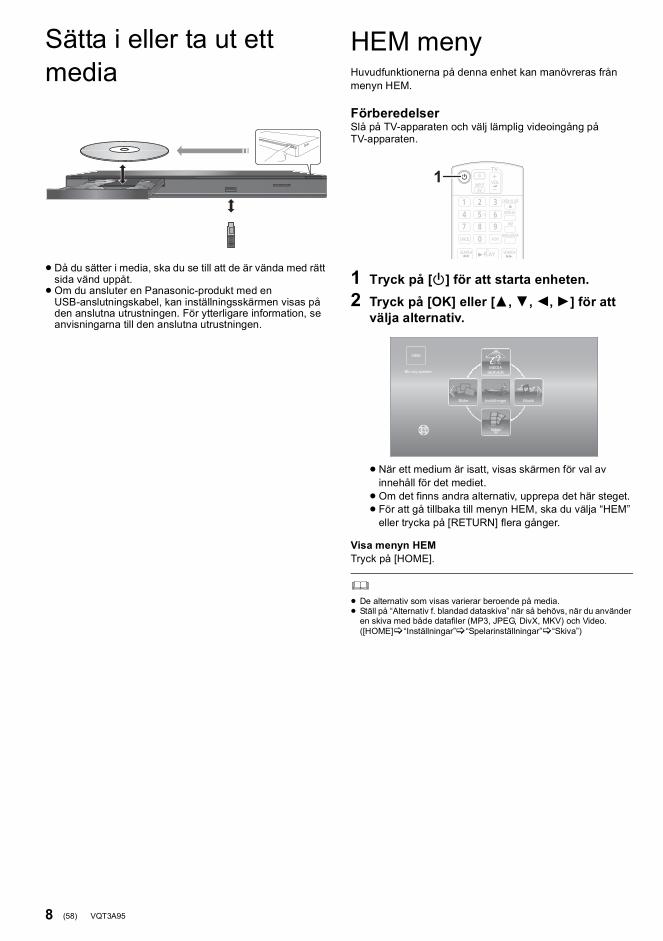
8 VQT3A95
U ppspelningSätta i eller ta ut ett media
≥Då du sätter i media, ska du se till att de är vända med rätt sida vänd uppåt.≥Om du ansluter en Panasonic-produkt med en
USB-anslutningskabel, kan inställningsskärmen visas på den anslutna utrustningen. För ytterligare information, se anvisningarna till den anslutna utrustningen.
HEM menyHuvudfunktionerna på denna enhet kan manövreras från menyn HEM.
FörberedelserSlå på TV-apparaten och välj lämplig videoingång på TV-apparaten.
1 Tryck på [Í] för att starta enheten.2 Tryck på [OK] eller [3,4,2,1] för att
välja alternativ.
≥När ett medium är isatt, visas skärmen för val av innehåll för det mediet. ≥Om det finns andra alternativ, upprepa det här steget.≥ För att gå tillbaka till menyn HEM, ska du välja “HEM”
eller trycka på [RETURN] flera gånger.
Visa menyn HEMTryck på [HOME].
≥ De alternativ som visas varierar beroende på media.≥ Ställ på “Alternativ f. blandad dataskiva” när så behövs, när du använder
en skiva med både datafiler (MP3, JPEG, DivX, MKV) och Video. ([HOME] “Inställningar” “Spelarinställningar” “Skiva”)
1
MusikBilder
Video
Blu-ray spelare
HEM
Inställninger
MEDIASERVER
(58)
VQT3A95 ~Body_swe.fm 8 ページ 2011年1月13日 木曜日 午前11時45分

9VQT3A95
Svenska
Spela upp videoinnehåll
1 Sätt i mediet.När innehållsmenyn visas, tryck på [3,4,2,1] för att välja alternativ. ( 8)
2 Tryck på [3,4] för att välja en titel och tryck på [OK].
∫ För att visa menyerDu kan visa Top Menu, DIRECT NAVIGATOR eller Popup-meny.Tryck på [TOP MENU] eller [POP-UP MENU].≥ Tryck [3,4,2,1] för att välja alternativet och tryck
[OK].
≥ Signal från PAL-skivor sänds ut som PAL. Signal från NTSC-skivor sänds ut som “NTSC” eller “PAL60”. Du kan välja “NTSC” eller “PAL60” i “Utmatning av NTSC innehåll” för NTSC-skivor. ([HOME] “Inställningar” “Spelarinställningar” “Video”)
≥ SKIVAN FORTSÄTTER ATT ROTERA NÄR MENYER VISAS. Tryck på [∫STOP] när du har slutat spela upp för att skydda enhetens motor, TV-skärmen osv.
≥ Enligt media och innehåll, kan visningen ändras eller inte visas alls.≥ DivX och MKV: Vidare spelning är inte möjlig.≥ Det går inte att spela upp AVCHD- och MPEG2-video som har dragits
och släppts, kopierats och klistrats in i mediet.≥ För att spara elektricitet, stängs störmmen av automatiskt om ingen
knapp trycks in på cirka 30 minuter när du inte spelar upp (som vid pausning, visning av menyn eller av stillbilder etc.).
Dessa funktioner kanske inte är tillgängliga beroende på media och innehåll.
Tryck på [∫STOP].Positionen där stoppet gjordes sparas.Återuppta uppspelningenTryck på [1PLAY] för att fortsätta spela upp från denna position.≥ Positionen på skivan rensas om facket öppnas eller om du
trycker på [∫STOP] flera gånger för att visa “StOP” på enhetens display.≥ På BD-videoskivor som innehåller BD-J, fungerar inte
funktionen för att fortsätta uppspelning.
Tryck på [;PAUSE].≥ Tryck på [;PAUSE] igen eller [1PLAY] för att återta
uppspelningen.
Sökning (Search)Tryck på [SEARCH6] eller [SEARCH5] under uppspelningen.≥Musik och MP3: hastigheten är fast på ett enkelt steg.Långsam uppspelningI pausläge, tryck på [SEARCH5].
Hastigheten ökar upp till 5 steg.≥ Tryck på [1PLAY]-knappen för att återgå till normal
uppspelningshastighet.
Medan du spelar upp och pausar materialet, ska du trycka på [:] eller [9].Gå till den titel, det kapitel eller det spår som du vill spela upp.≥ Varje nedtryckning motsvarar antalet steg att hoppa över.
I pausläge, tryck på [1] (;1).
≥ Tryck in och håll kvar för att ändra i följd framåt.≥ Tryck på [1PLAY]-knappen för att återgå till normal
uppspelningshastighet.
Tryck på [AUDIO].Du kan ändra ljudkanalnummer eller språk för ljudspåret, etc.
BD DVD CD USB
Andra funktioner under avspelningen
Stop
Paus
Sök/Långsam uppspelning
Hoppa över
Bildruta-för-bildruta
Ändra ljud
(59)
DMP-BD75EG-VQT3A95.book 9 ページ 2011年1月7日 金曜日 午後3時9分
10 VQT3A95
Funktioner kopplade till TV:n (VIERA Link “HDAVI Control™”)
Förberedelse1 Ställ “VIERA Link” på “På” ([HOME] “Inställningar”
“Spelarinställningar” “TV / övr. anslutningar” “HDMI anslutning”). (Standardinställningen är “På”.)
2 Ställ in “HDAVI Control”-funktionerna på den anslutna utrustningen (till exempel TV).
3 Sätt på all “HDAVI Control”-kompatibel utrustning och välj denna enhets ingångskanal på den anslutna TV:n så att funktionen “HDAVI Control” fungerar tillförlitligt.Upprepa denna procedur när anslutningen eller inställningarna ändras.
När spelningen startar på enheten kopplar TV automatiskt om ingångskanal och visar motsvarande aktivitet.Därutöver sätts TV på automatiskt när den är avstängd.
All ansluten utrustning som är kompatibel med “HDAVI Control” inklusive den här enheten stängs automatisk av när du stänger av TV-apparaten.
≥ Enheten stöder funktionen “HDAVI Control 1”.Den här standarden är kompatibel med Panasonics normala HDAVI-utrustning.
≥ VIERA Link “HDAVI Control”, som grundar sig på kontrollfunktionerna som förses av HDMI, vilket är en industristandard känd som HDMI CEC (Consumer Electronics Control), är en unik funktion som vi har utvecklat och lagt till. Som sådan, kan dess funktion med andra tillverkares utrustning som stöder HDMI CEC inte garanteras.
≥ Läs de enskilda bruksanvisningarna av andra tillverkares utrustning med stöd för VIERA Link-funktionen.
SpecifikationerSignalsystem: PAL/NTSCDrifttemperaturomfång:
i5 oC till i35 oCRelativ luftfuktighet, drift:
10% till 80% RH (icke kondenserande)Videoutgång: 1,0 Vp-p (75 ≠)/stiftjack:1 systemLjudutgång: 2 Vrms (1 kHz, 0 dB)/stiftjack
Antal kontaktdon: 2-kanaligt:1 systemHDMI AV-utmatning: Typ A (19-stifts) : 1 system
Denna apparat stöder funktionen “HDAVI Control 1”.USB-öppning: USB2.0: 1 systemEthernet: 10BASE-T/100BASE-TX:1 systemLASER-specifikationKlass 1 LASER-produkt:
Våglängd: 790 nm (CD)/655 nm (DVD)/405 nm (BD)Laserstyrka: Ingen farlig strålning
Strömförsörjning: 220 till 240 V växelström, 50 HzEffektförbrukning: Cirka 12 WEffektförbrukning i beredskapsläge: Cirka 0,2 WStrömförbrukning i beredskapsläge för snabbstart:
Cirka 3,6 WMått (BkDkH) inklusive framskjutande delar:
430 mmk185 mmk35 mmVikt: Cirka 1,6 kg
Specifikationer kan vara föremål för ändringar utan förvarning.
Vad är VIERA Link “HDAVI Control”?
VIERA Link “HDAVI Control” är en praktisk funktion som erbjuder länkade funktioner för denna enhet och en Panasonic TV (VIERA) eller annan anordning under “HDAVI Control”.Du kan använda denna funktion genom att ansluta utrustningen med HDMI-kabel. Se bruksanvisningen för all ansluten utrustning för mer detaljer.
Automatisk växling av ingångLänkat påslag
Länkad avstängning
(60)
DMP-BD75EG-VQT3A95.book 10 ページ 2011年1月11日 火曜日 午後9時56分

11VQT3A95
Svenska
This product incorporates the following software:
For the software categorized as (3) and (4), please refer to the terms and conditions of GPL v2 and LGPL v2.1, as the case may be at http://www.gnu.org/licenses/old-licenses/gpl-2.0.html and http://www.gnu.org/licenses/old-licenses/lgpl-2.1.html.In addition, the software categorized as (3) and (4) are copyrighted by several individuals. Please refer to the copyright notice of those individuals at http://www.am-linux.jp/dl/AWBP11
The GPL/LGPL software is distributed in the hope that it will be useful, but WITHOUT ANY WARRANTY, without even the implied warranty of MERCHANTABILITY or FITNESS FOR A PARTICULAR PURPOSE.
At least three (3) years from delivery of products, Panasonic will give to any third party who contacts us at the contact information provided below, for a charge no more than our cost of physically performing source code distribution, a complete machine-readable copy of the corresponding source code covered under GPL v2/LGPL v2.1.
Contact [email protected]
Source code is also freely available to you and any other member of the public via our website below.http://www.am-linux.jp/dl/AWBP11
the software developed independently by or for Panasonic Corporation,the software owned by third party and licensed to Panasonic Corporation,the software licensed under the GNU General Public License, Version 2 (GPL v2),the software licensed under the GNU LESSER General Public License, Version 2.1 (LGPL v2.1) and/or,open sourced software licensed under its applicable license terms including but not limited toICU License, c-arse license.
(1)
(2)
(3)
(4)
(5)
For Open Source Software Programs categorized as (5), please refer to the applicable license terms listed below and/or included in the “License” menu on Product.
ICU License - ICU 1.8.1 and later
COPYRIGHT AND PERMISSION NOTICE
Copyright (c) 1995-2010 International Business Machines Corporation and others
All rights reserved.
Permission is hereby granted, free of charge, to any person obtaining a copy of this software and associated documentation files (the “Software”), to deal in the Software without restriction, including without limitation the rights to use, copy, modify, merge, publish, distribute, and/or sell copies of the Software, and to permit persons to whom the Software is furnished to do so, provided that the above copyright notice(s) and this permission notice appear in all copies of the Software and that both the above copyright notice(s) and this permission notice appear in supporting documentation.
THE SOFTWARE IS PROVIDED “AS IS”, WITHOUT WARRANTY OF ANY KIND, EXPRESS OR IMPLIED, INCLUDING BUT NOT LIMITED TO THE WARRANTIES OF MERCHANTABILITY, FITNESS FOR A PARTICULAR PURPOSE AND NONINFRINGEMENT OF THIRD PARTY RIGHTS. IN NO EVENT SHALL THE COPYRIGHT HOLDER OR HOLDERS INCLUDED IN THIS NOTICE BE LIABLE FOR ANY CLAIM, OR ANY SPECIAL INDIRECT OR CONSEQUENTIAL DAMAGES, OR ANY DAMAGES WHATSOEVER RESULTING FROM LOSS OF USE, DATA OR PROFITS, WHETHER IN AN ACTION OF CONTRACT, NEGLIGENCE OR OTHER TORTIOUS ACTION, ARISING OUT OF OR IN CONNECTION WITH THE USE OR PERFORMANCE OF THIS SOFTWARE.
Except as contained in this notice, the name of a copyright holder shall not be used in advertising or otherwise to promote the sale, use or other dealings in this Software without prior written authorization of the copyright holder.
All trademarks and registered trademarks mentioned herein are the property of their respective owners.
DivX®, DivX Certified® och associerade logotyper är varumärken för DivX, Inc. och används under licens.DivX®, DivX Certified® and associated logos are trademarks of DivX, Inc. and are used under license.
Windows är ett varumärke eller registrerat varumärke för Microsoft Corporation i USA och andra länder.
c-arse license
Copyright 1998 by the Massachusetts Institute of Technology.
Permission to use, copy, modify, and distribute this software and itsdocumentation for any purpose and without fee is hereby granted, provided that the above copyright notice appear in all copies and that both that copyright notice and this permission notice appear in supporting documentation, and that the name of M.I.T. not be used in advertising or publicity pertaining to distribution of the software without specific, written prior permission.M.I.T. makes no representations about the suitability of this software for any purpose. It is provided “as is” without express or implied warranty.
Java och alla Java-baserade varumärken och logotyper är varumärken eller registrerade varumärken som tillhör Sun Microsystems, Inc. i USA och andra länder.
Tillverkad under licens från Dolby Laboratories.Dolby och symbolen med dubbla D:n är varumärken som tillhör Dolby Laboratories.
Tillverkad på licens under USA patent #’s: 5,451,942; 5,956,674; 5,974,380; 5,978,762; 6,226,616; 6,487,535; 7,392,195; 7,272,567; 7,333,929; 7,212,872 & andra patent från USA och hela världen som har registrerats eller håller på att registreras.DTS och symbolen är registrerade varumärken, & DTS-HD, DTS-HD Master Audio | Essential och DTS logotyper är varumärken som tillhör DTS Inc. Produkten inkluderar programvara.© DTS, Inc. Ensamrätt.
Den här produkten innehåller upphovsrättsskyddad teknik som omfattas av amerikanska patent och andra immateriella rättigheter för Rovi Corporation. Ändring av maskinkonstruktion och isärtagning är förbjuden.
HDMI, HDMI-logon och High-Definition Multimedia Interface är varumärken eller registrerade varumärken som tillhör HDMI Licensing LLC i USA och andra länder.
Denna produkt är licenserad under AVC och VC-1 patentportföljlicenser för personligt och icke-kommersiellt bruk av en konsument för att (i) koda video i överensstämmelse med AVC-standarden och VC-1-standarden (“AVC/VC-1-Video”) och/eller (ii) avkoda AVC/VC-1-video som kodats av en konsument för personligt och ickekommersiellt bruk och/eller anskaffats från en videoleverantör licenserad att leverera AVC/VC-1-video. Ingen licens beviljas eller underförstås för något annat syfte. Ytterligare information finns att hämta hos MPEG LA, LLC.Se http://www.mpegla.com.
HDAVI Control™ är ett varumärke för Panasonic Corporation.
“AVCHD” och “AVCHD” logotyperna är varumärken som tillhör Panasonic Corporation och Sony Corporation.
“DVD Logo” är ett varumärke som tillhör DVD Format/Logo Licensing Corporation.
MPEG Layer-3-ljudkodningsteknik med licens från Fraunhofer IIS och Thomson.
DLNA, the DLNA Logo and DLNA CERTIFIED are trademarks, service marks, or certification marks of the Digital Living Network Alliance.
(61)
DMP-BD75EG-VQT3A95.book 11 ページ 2011年1月7日 金曜日 午後3時9分
2 VQT3A95
Kære kundeTak, fordi du har købt dette produkt.Læs venligst denne betjeningsvejledning for at opnå den bedst mulige ydeevne og optimal sikkerhed.Læs venligst hele denne betjeningsvejledning, før du tilslutter, betjener eller indstiller dette apparat.Gem denne betjeningsvejledning til fremtidig brug.
IndholdsfortegnelseIntroduktion
Sådan læses betjeningsvejledningen (PDF-format) . . . . . . . . . . . . . . . . . . . . . . . . . . . . . 2Sikkerhedsforholdsregler. . . . . . . . . . . . . . . . . . . . 3Tilbehør . . . . . . . . . . . . . . . . . . . . . . . . . . . . . . . . . 3Spilbare diske/USB-anordninger . . . . . . . . . . . . . . 4
Tilslutninger og indstillinger
TRIN 1: Tilslutning til et fjernsyn . . . . . . . . . . . . . . 6TRIN 2: Tilslutning til en forstærker/receiver . . . . . 6TRIN 3: Tilslutning til et bredbåndsnetværk . . . . . 7TRIN 4: Indstilling . . . . . . . . . . . . . . . . . . . . . . . . . 7
Afspilning
Isætning eller udtagning af medier . . . . . . . . . . . . 8HOME-menu . . . . . . . . . . . . . . . . . . . . . . . . . . . . . 8Afspilning af videoindhold . . . . . . . . . . . . . . . . . . . 9Sammenkædede handlinger med TV’et (VIERA Link “HDAVI Control™”) . . . . . . . . . . . . . . 10Specifikationer . . . . . . . . . . . . . . . . . . . . . . . . . . . 10
Introduktion
Sådan læses betjeningsvejledningen (PDF-format)∫ Til Windows1 Tænd pc’en og isæt cd-rommen med
betjeningsvejledningen (medfølgende).2 Vælg det ønskede sprog, og klik på
[Betjeningsvejledning] for at udføre installationen.3 Dobbeltklik på “BD75EG Betjeningsvejledninger”
genvejsikonet på skrivebordet.
Når betjeningsvejledningen (PDF-format) ikke vil åbneDu skal have Adobe Acrobat Reader 5.0 eller senere eller Adobe Reader 7.0 eller en senere version for at kunne læse betjeningsvejledningen (PDF-format).Download og installér en version af Adobe Reader, som du kan bruge sammen med dit operativsystem fra følgende websted.http://get.adobe.com/reader/otherversions
Hvis du anvender følgende operativsystem– Windows 2000 SP4– Windows XP SP3– Windows Vista SP2– Windows 7
Isæt cd-rommen med betjeningsvejledningen (medfølgende), klik på [Adobe(R) Reader(R)], og følg derefter meddelelserne på skærmen for at udføre installationen.
Sådan afinstalleres betjeningsvejledningen (PDF-format)Slet PDF-filen fra mappen “Program Files\Panasonic\DMP\”.≥Når indholdet i mappen Programfiler ikke kan vises, skal
du klikke på [Show the contents of this folder] for at få dem vist.
∫ Til Macintosh1 Tænd pc’en og isæt cd-rommen med
betjeningsvejledningen (medfølgende).2 Åbn mappen “Manual” i “VFF0703”, og kopiér derefter
PDF-filen med det ønskede sprog i mappen.3 Dobbeltklik på PDF-filen for at åbne den.
Der henvises ligeledes til brugervejleningen (PDF-format), som også findes på medfølgende CD-ROM.Betjeningsvejledningen (PDF-format) kan ikke afspilles på selve afspilleren.Her kan du bl.a. lære om avancerede betjeningsmetoder og søg hjælp i Fejlfinding.
Ved bortskaffelse eller overdragelse af dette apparatEnheden kan fortsat indeholde brugerindstillingerne. Hvis du skiller dig af med denne enhed ved afhændelse eller overdragelse, følg da proceduren for gendannelse af alle fabriksindstillingerne for at slette brugerindstillingerne.≥ Dine betjeningsprocedurer kan være optaget i denne
enheds hukommelse.
Om beskrivelser i denne brugervejledning≥ Vejledning for betjeninger er generelt beskrevet for brug
af fjernbetjeningen.
(62)
DMP-BD75EG-VQT3A95.book 2 ページ 2011年1月11日 火曜日 午後10時3分

3VQT3A95
Dansk
Sikkerhedsforholdsregler
Apparat≥ For at mindske risikoen for brand, elektrisk stød eller
produktskade,– Dette apparat må ikke udsættes for regn, fugt, dryp eller
sprøjt.– Genstande, der indeholder væsker, såsom vaser, må
ikke placeres oven på apparatet.– Brug kun anbefalet tilbehør.– Dæksler må ikke fjernes.– Du må ikke selv reparere dette apparat. Vedligeholdelse
må udelukkende udføres af kvalificerede teknikere.– Pas på, at der ikke falder metalgenstande ned i
apparatet.– Anbring ikke tunge genstande på dette apparat.
Strømforsyningsledning (vekselstrøm)≥ For at mindske risikoen for brand, elektrisk stød eller
produktskade,– Sørg for, at strømforsyningsspændingen svarer til den
spænding, der er angivet på apparatet.– Indsæt stikproppen helt ind i stikdåsen eller elkontakten.– Lad være med at bøje eller trække i ledningen eller stille
tunge genstande på den.– Rør ikke stikket med våde hænder.– Hold fast på stikproppen, når du trækker ledningen ud.– Brug aldrig en ødelagt stikprop eller stikdåse.≥ Installér dette apparat, så netledningen straks kan taget
ud af stikkontakten, hvis der opstår et problem.
Apparat≥Dette apparat anvender laser. Brug af betjeningsknapper
eller reguleringer eller fremgangsmåder, udover de i denne brugervejledning angivne, kan medføre fare for bestråling.≥ Kilder til åben ild, såsom tændte stearinlys, må ikke
anbringes oven på enheden.≥Dette apparat kan modtage radiointerferens under brug
pga. af tændte mobiltelefoner. Hvis der forekommer interferens, skal du øge afstanden mellem dette apparat og mobiltelefonen.≥Denne enhed er beregnet til brug i moderate temperaturer.
Placering≥ Anbring dette apparat på en plan, vandret overflade.≥ For at mindske risikoen for brand, elektrisk stød eller
produktskade,– Dette apparat må ikke installeres eller anbringes i en
reol, et indbygget skab eller et andet aflukket område. Sørg for god ventilation til apparatet.
– Ventilationshullerne må ikke tilstoppes med aviser, duge, gardiner og lignende genstande.
– Dette apparat må ikke udsættes for direkte sollys, høje temperaturer, høj luftfugtighed eller kraftige vibrationer.
Batterier≥ Fare for eksplosion, hvis batteriet ikke udskiftes korrekt.
Udskift kun med den type, der anbefales af fabrikanten.≥ En forkert håndtering af batterier kan forårsage lækage fra
elektrolyten, og dette kan udløse en brand.– Brug ikke gamle og nye batterier eller forskellige slags
på samme tid.– Udsæt dem ikke for varme eller direkte ild.– Batteriet eller batterierne må ikke udsættes for direkte
sollys i en bil i en længere periode, hvor døre eller vinduer er lukket.
– Skil dem ikke ad, og lad være med at kortslutte dem.– Alkalin- eller manganbatterier må ikke genoplades.– Brug ikke batterier, hvis beklædning er taget af.– Fjern batterierne, hvis fjernbetjeningen ikke skal
anvendes i længere tid. Opbevar batterierne køligt og mørkt.
≥ Kontakt de lokale myndigheder eller din forhandler for at spørge om den korrekte bortskaffelsesmetode for batterierne.
TilbehørUndersøg det medfølgende tilbehør før brug af dette apparat.
≥ Korrekte produktnumre angivet i denne betjeningsvejledning gælder fra og med januar 2011. Ændringer kan ske.
≥ Brug ikke AC-strømforsyningskabel med andet udstyr.
Indsæt, så polerne (i og j) passer sammen med polerne i fjernbetjeningen.
Peg den mod fjernbetjeningens signalsensor på dette apparat.
ADVARSEL
FORSIGTIG!
1 Fjernbetjening(N2QAYB000577)
2 Batterier til fjernbetjeningen1 Netledning1 CD-ROM
Brug af fjernbetjeningen
R6/LR6, AA
(Alkaline- eller mangan-batterier)
(63)
VQT3A95 ~Body_dan.fm 3 ページ 2011年1月12日 水曜日 午前11時33分
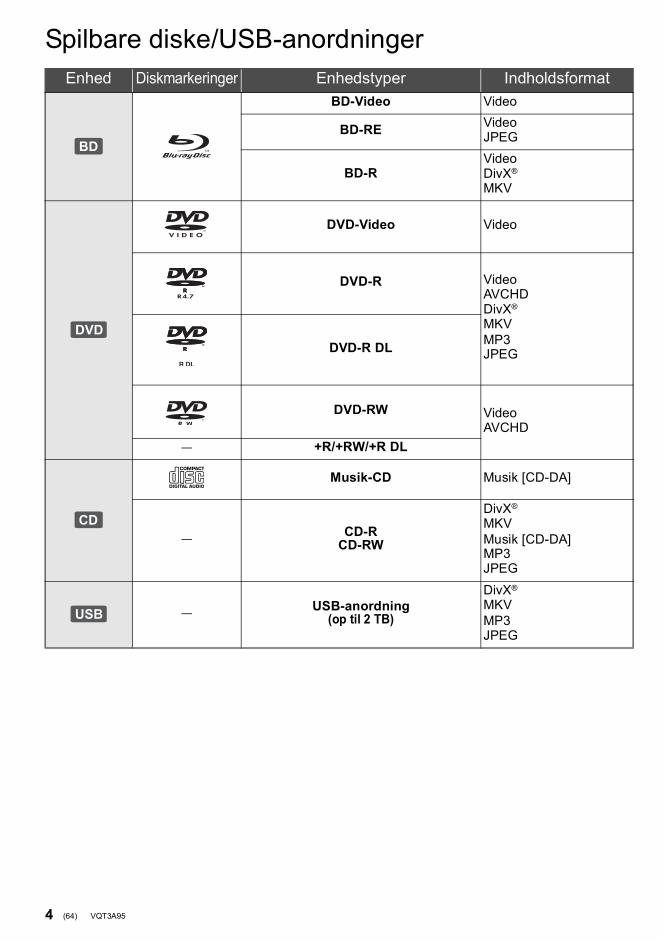
4 VQT3A95
Spilbare diske/USB-anordningerEnhed Diskmarkeringer Enhedstyper Indholdsformat
BD-Video Video
BD-RE VideoJPEG
BD-RVideoDivX®
MKV
DVD-Video Video
DVD-R VideoAVCHDDivX®
MKVMP3JPEGDVD-R DL
DVD-RW VideoAVCHD
— +R/+RW/+R DL
Musik-CD Musik [CD-DA]
— CD-RCD-RW
DivX®
MKVMusik [CD-DA]MP3JPEG
— USB-anordning(op til 2 TB)
DivX®
MKVMP3JPEG
BD
DVD
CD
USB
(64)
DMP-BD75EG-VQT3A95.book 4 ページ 2011年1月7日 金曜日 午後3時35分
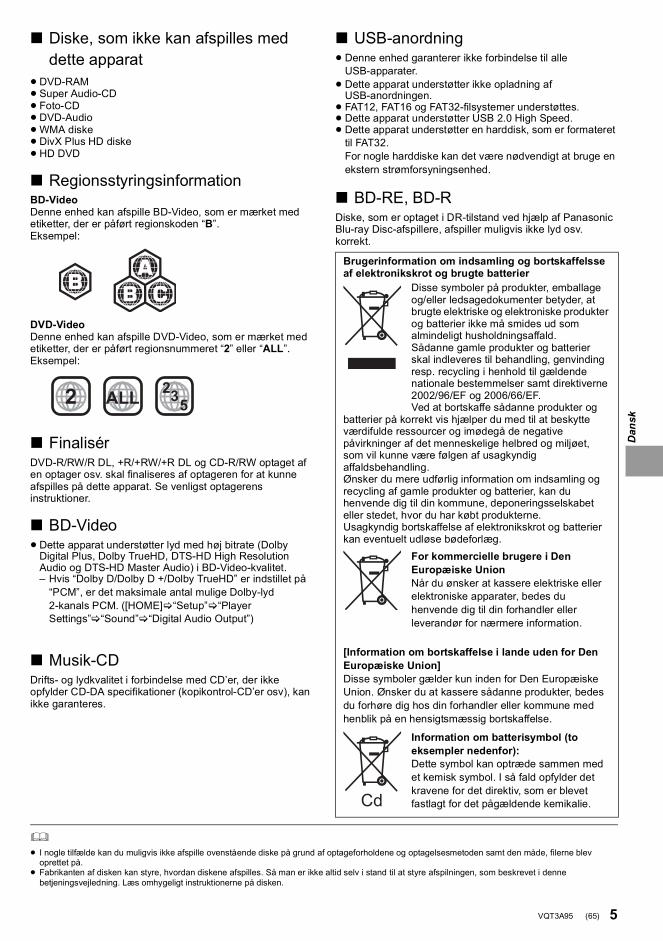
5VQT3A95
Dansk
∫ Diske, som ikke kan afspilles med dette apparat
≥DVD-RAM≥ Super Audio-CD≥ Foto-CD≥DVD-Audio≥WMA diske≥DivX Plus HD diske≥HD DVD
∫ RegionsstyringsinformationBD-VideoDenne enhed kan afspille BD-Video, som er mærket med etiketter, der er påført regionskoden “B”.Eksempel:
DVD-VideoDenne enhed kan afspille DVD-Video, som er mærket med etiketter, der er påført regionsnummeret “2” eller “ALL”.Eksempel:
∫ FinalisérDVD-R/RW/R DL, +R/+RW/+R DL og CD-R/RW optaget af en optager osv. skal finaliseres af optageren for at kunne afspilles på dette apparat. Se venligst optagerens instruktioner.
∫ BD-Video≥Dette apparat understøtter lyd med høj bitrate (Dolby
Digital Plus, Dolby TrueHD, DTS-HD High Resolution Audio og DTS-HD Master Audio) i BD-Video-kvalitet. – Hvis “Dolby D/Dolby D +/Dolby TrueHD” er indstillet på
“PCM”, er det maksimale antal mulige Dolby-lyd 2-kanals PCM. ([HOME] “Setup” “Player Settings” “Sound” “Digital Audio Output”)
∫ Musik-CDDrifts- og lydkvalitet i forbindelse med CD’er, der ikke opfylder CD-DA specifikationer (kopikontrol-CD’er osv), kan ikke garanteres.
∫ USB-anordning≥ Denne enhed garanterer ikke forbindelse til alle
USB-apparater.≥ Dette apparat understøtter ikke opladning af
USB-anordningen.≥ FAT12, FAT16 og FAT32-filsystemer understøttes.≥ Dette apparat understøtter USB 2.0 High Speed.≥ Dette apparat understøtter en harddisk, som er formateret
til FAT32. For nogle harddiske kan det være nødvendigt at bruge en ekstern strømforsyningsenhed.
∫ BD-RE, BD-RDiske, som er optaget i DR-tilstand ved hjælp af Panasonic Blu-ray Disc-afspillere, afspiller muligvis ikke lyd osv. korrekt.
≥ I nogle tilfælde kan du muligvis ikke afspille ovenstående diske på grund af optageforholdene og optagelsesmetoden samt den måde, filerne blev oprettet på.
≥ Fabrikanten af disken kan styre, hvordan diskene afspilles. Så man er ikke altid selv i stand til at styre afspilningen, som beskrevet i denne betjeningsvejledning. Læs omhygeligt instruktionerne på disken.
2 ALL 352
Brugerinformation om indsamling og bortskaffelsse af elektronikskrot og brugte batterier
Disse symboler på produkter, emballage og/eller ledsagedokumenter betyder, at brugte elektriske og elektroniske produkter og batterier ikke må smides ud som almindeligt husholdningsaffald.Sådanne gamle produkter og batterier skal indleveres til behandling, genvinding resp. recycling i henhold til gældende nationale bestemmelser samt direktiverne 2002/96/EF og 2006/66/EF.Ved at bortskaffe sådanne produkter og
batterier på korrekt vis hjælper du med til at beskytte værdifulde ressourcer og imødegå de negative påvirkninger af det menneskelige helbred og miljøet, som vil kunne være følgen af usagkyndig affaldsbehandling.Ønsker du mere udførlig information om indsamling og recycling af gamle produkter og batterier, kan du henvende dig til din kommune, deponeringsselskabet eller stedet, hvor du har købt produkterne.Usagkyndig bortskaffelse af elektronikskrot og batterier kan eventuelt udløse bødeforlæg.
For kommercielle brugere i Den Europæiske UnionNår du ønsker at kassere elektriske eller elektroniske apparater, bedes du henvende dig til din forhandler eller leverandør for nærmere information.
[Information om bortskaffelse i lande uden for Den Europæiske Union]Disse symboler gælder kun inden for Den Europæiske Union. Ønsker du at kassere sådanne produkter, bedes du forhøre dig hos din forhandler eller kommune med henblik på en hensigtsmæssig bortskaffelse.
Information om batterisymbol (to eksempler nedenfor):Dette symbol kan optræde sammen med et kemisk symbol. I så fald opfylder det kravene for det direktiv, som er blevet fastlagt for det pågældende kemikalie.Cd
(65)
DMP-BD75EG-VQT3A95.book 5 ページ 2011年1月7日 金曜日 午後3時35分

6 VQT3A95
Tilslutninger og in dstil lingerTRIN 1: Tilslutning til et fjernsyn≥ Anbring ikke apparatet oven på en forstærker/receiver
eller udstyr, som kan blive varmt. Varmen kan bevirke, at apparatet lider skade.≥ Før noget tilsluttes anbefaler vi, at du midlertidigt frakobler
alle apparater fra strømstik.≥ Tilslut ikke videosignaler via videooptageren. Pga.
beskyttelse mod kopiering vises billedet muligvis ikke korrekt.≥ Anvend de High Speed HDMI-kabler, som har et
HDMI-logo (som vist på dækslet). Det anbefales, at du bruger Panasonics HDMI-kabel. Ved udlæsning af et 1080p-signal brug da HDMI-kabler på 5,0 meter eller derunder.
Anbefalet reservedelsnummer (højhastigheds HDMI-kabel):RP-CDHS15 (1,5 m), RP-CDHS30 (3,0 m), RP-CDHS50 (5,0 m), etc.
TRIN 2: Tilslutning til en forstærker/receiver
∫ Via en HDMI AV OUT-terminal(Høj kvalitet)
≥ Sæt “HDMI Audio Output” til “On” ([HOME] “Setup” “Player Settings” “TV / Device Connection” “HDMI Connection”).≥HDMI-forbindelsen understøtter VIERA Link “HDAVI
Control” ( 10).
HDMI IN
HDMI-kabel
≥ Sæt “HDMI Audio Output” til “On” ([HOME] “Setup” “Player Settings” “TV / Device Connection” “HDMI Connection”).≥ Indstil “Digital Audio Output” afhængigt af den tilsluttede
forstærker/receiver ([HOME] “Setup” “Player Settings” “Sound”).≥HDMI-forbindelsen understøtter VIERA Link “HDAVI
Control” ( 10).≥ Ved brug af TV eller forstærker/modtager, som ikke har en
angivelse af “(ARC)” (ikke-ARC-kompatibelt) på HDMI-terminalen, skal man tilslutte forstærkeren/modtageren til TV’et ved hjælp af et optisk digitalt kabel for at få glæde af TV’ets lyd gennem forstærkeren/modtageren.
HDMI IN
HDMI IN
HDMI IN(ARC)
HDMI OUT(ARC)
Multikanalhøjtalere
Forstærker/receiver
HDMI-kabel
HDMI-kabel
(66)
DMP-BD75EG-VQT3A95.book 6 ページ 2011年1月7日 金曜日 午後3時35分

7VQT3A95
Dansk
TRIN 3: Tilslutning til et bredbåndsnetværkDe følgende funktioner kan benyttes, når dette apparat er tilsluttet til bredbånd.– Firmware kan opdateres– Du kan nyde BD-Live– Du kan få adgang til en anden enhedSe det tilsluttede udstyrs medfølgende instruktioner for detaljer om tilslutningsmetode.
TRIN 4: Indstilling
Når du trykker på strømknappen, efter at du har tilsluttet den nye afspiller første gang, vises et skærmbillede til de grundlæggende indstillinger.KlargøringTænd for fjernsynet og vælg det passende video-input på fjernsynet.
1 Tryk på [Í].Installationsskærmen vises.
2 Følg instruktionerne på skærmen, og foretag indstillingerne med [3,4] og tryk på [OK].
Efter fuldførelse af “Easy Setting” kan du gennemgå “Network Easy Setting”.
≥ Du kan når som helst udføre denne installation ved at vælge “Easy Setting” i indstillingsmenuen. ([HOME] “Setup” “Player Settings”
“Others”)
Efter fuldførelse af “Easy Setting” kan du fortsætte med “Network Easy Setting”.
Følg instruktionerne på skærmen, og foretag indstillingerne med [3,4,2,1] og tryk på [OK].
∫ Tilslutning af LAN-kabel
≥ Brug kategori 5 eller højere, lige LAN-kabler (STP) for tilslutning til perifere enheder.≥ Isætning af andre kabler end LAN-kabler i
LAN-tilslutningspunktet kan skade enheden.
Bredbånds-router, osv.
Internet
LAN-kabel
DLNA-certificeret medieserver
Nem indstilling
Standby/Tænd afbryder (Í/I)Tryk for at tænde/slukke for apparatet. Der bruges en smule strøm når apparatet står i standby.
Nem netværksindstilling
OKRETURN
Network Easy Setting
LAN setup and testing of home network and Internetconnections are required for Internet functions(BD-Live etc.). Broadband Internet connection is necessary for BD-Live.Is a LAN cable already connected ?Please refer to the operating instructions about networkconnection.
Press [OK] to proceed.
(67)
DMP-BD75EG-VQT3A95.book 7 ページ 2011年1月7日 金曜日 午後3時35分

8 VQT3A95
A fspilningIsætning eller udtagning af medier
≥Når du isætter et medieelement, skal du sørge for, at det har den rigtige side opad.≥Hvis du tilslutter et Panasonic-produkt med et USB-kabel,
vil opsætningsskærmen i visse tilfælde blive vist på det tilsluttede udstyr. Se det tilsluttede udstyrs instruktionsvejledning for detaljer.
HOME-menuDette apparats vigtige funktioner kan betjenes fra HOME-menuen.
KlargøringTænd for TV’et og vælg den ønskede video-indgang på TV’et.
1 Tryk på [Í], for at tænde for apparatet.2 Tryk på [OK] eller [3,4, 2,1] for at
vælge elementet.
≥Når du isætter et medie, vises menuskærmen for det pågældende medie.≥Gentag dette trin, hvis der er andre elementer.≥ For at gå tilbage til menuen HOME skal du vælge
“HOME” eller trykke på [RETURN] flere gange.
Sådan får du vist startmenuen HOMETryk på [HOME].
≥ De elementer, der ikke vises, kan variere afhængigt af mediet.≥ Indstil evt. “Mixed Data Disc Option”, hvis du bruger en disk med begge
datafiler (MP3, JPEG, DivX, MKV) og video. ([HOME] “Setup” “Player Settings” “Disc”)
1
MusicPhotos
Videos
Blu-ray Disc Player
HOME
Setup
MEDIASERVER
(68)
DMP-BD75EG-VQT3A95.book 8 ページ 2011年1月7日 金曜日 午後3時35分

9VQT3A95
Dansk
Afspilning af videoindhold
1 Indsæt mediet.Hvis indholdsmenuen vises, skal du trykke på [3,4,2,1] for at vælge elementet. ( 8)
2 Tryk på [3,4] for at vælge titlen, og tryk på [OK].
∫ For at vise menuerDu kan vise Top Menu, DIRECT NAVIGATOR eller Pop-up Menu.Tryk på [TOP MENU] eller [POP-UP MENU].≥ Tryk på [3,4,2,1] for at vælge elementet, og tryk på
[OK].
≥ Signal fra PAL-diske læses som PAL. Signal fra NTSC-diske læses som “NTSC” eller “PAL60”. Du kan vælge “NTSC” eller “PAL60” i “NTSC Contents Output” for NTSC diske. ([HOME] “Setup” “Player Settings” “Picture”)
≥ DISKENE FORTSÆTTER MED AT ROTERE, MENS MENUERNE VISES. Tryk på [∫STOP], når du er færdig med at afspille for at beskytte enhedens motor, fjernsynsskærmen osv.
≥ Afhængigt af medier og indhold kan displayet ændre sig eller ikke forekomme.
≥ DivX og MKV: Efterfølgende afspilning er ikke mulig.≥ Det er ikke muligt at afspille AVCHD- og MPEG2-video, som er blevet
trukket til, kopieret og indsat til mediet.≥ For at spare på strømmen slukkes strømmen automatisk, hvis der ikke
trykkes på knapperne i ca. 30 minutter, når der ikke afspilles (såsom under en pause, ved visning af en menu, visning af billeder osv.).
Disse funktioner er måske ikke tilgængelige afhængigt af mediet og indhold.
Tryk på [∫STOP].Stedet, hvor der blev stoppet, “huskes”.Genoptag afspilningsfunktionTryk på [1PLAY] for at genoptage afspilningen fra dette sted.≥ Stedet slettes, hvis bakken åbnes, eller der trykkes på
[∫STOP] flere gange for at se “StOP” på enhedens skærm.≥ På BD-Video-diske, deriblandt BD-J, er funktionen
genoptag afspilning ikke tilgængelig.
Tryk på [;PAUSE].≥ Tryk igen på [;PAUSE] eller [1PLAY] for at genoptage
afspilningen.
SøgTryk under afspilning på [SEARCH6] eller [SEARCH5].≥Musik og MP3: Hastigheden er fastsat til ét niveau.Langsom gengivelse (slowmotion)Tryk i under pausestop på [SEARCH5].
Hastigheden kan øges i fem trin.≥ Tryk på [1PLAY] for at vende tilbage til normal
afspilningshastighed.
Under afspilning eller på pause, tryk på [:] eller [9].Spring til titel, kapitel eller spor, du ønsker at afspille.≥ Hvert tryk øger antallet af spring.
Tryk i under pausestop på [1] (;1).
≥ Tryk på og hold inde for at skifte fortløbende frem.≥ Tryk på [1PLAY] for at vende tilbage til normal
afspilningshastighed.
Tryk på [AUDIO].Du kan ændre nummeret for lydkanalen eller soundtrackets sprog, osv.
BD DVD CD USB
Andre funktioner under afspilning
Stop
Pause
Søgning/“Slow-motion”
Spring
Ramme-for-ramme
Ændring af lyd
(69)
DMP-BD75EG-VQT3A95.book 9 ページ 2011年1月7日 金曜日 午後3時35分

10 VQT3A95
Sammenkædede handlinger med TV’et (VIERA Link “HDAVI Control™”)
Klargøring1 Sæt “VIERA Link” til “On” ([HOME] “Setup” “Player
Settings” “TV / Device Connection” “HDMI Connection”). (Standardindstilling er “On”.)
2 Indstil betjeningen af “HDAVI Control” på det tilsluttede udstyr (f.eks. fjernsyn).
3 Tænd for alt udstyret, der er kompatibelt med “HDAVI Control”, og markér dette apparats inputkanal på det tilsluttede fjernsyn, så funktionen “HDAVI Control” virker korrekt.Gentag også denne procedure hvis tilslutningen eller indstillingerne ændres.
Når afspilningen starter på apparatet, skifter TV’et automatisk indgangskanal og viser den tilhørende handling.Hvis TV’et er slukket, tændes TV’et desuden automatisk.
Alt tilsluttet udstyr, der er kompatibelt med “HDAVI Control”, dette apparat indbefattet, slukker automatisk når man slukker for fjernsynet.
≥ Dette apparat understøtter funktionen “HDAVI Control 1”.Denne standard er kompatibel med Panasonics traditionelle HDAVI-udstyr.
≥ VIERA Link “HDAVI Control”, baseret på de betjeningsfunktioner, der formidles af HDMI, som er en industristandard kendt som HDMI CEC (Consumer Electronics Control), er en unik funktion, som vi har udviklet og tilføjet. Af samme årsag kan betjening heraf med udstyr fra andre fabrikanter, der understøtter HDMI CEC, ikke garanteres.
≥ Indhent venligst yderligere oplysninger i de individuelle vejledninger til udstyr fra andre fabrikanter, der understøtter funktionen VIERA Link.
SpecifikationerSignalsystem: PAL/NTSCDriftstemperaturområde:
i5 oC til i35 oCDriftsfugtighedsområde:
10 % til 80 % RH (ingen kondens)Videoudgang: 1,0 Vp-p (75 ≠)/Pindstik:1 systemLyd-output: 2 Vrms (1 kHz, 0 dB)/Pindstik
Antal forbindere: 2-kanals:1 systemHDMI AV-output: Type A (19 pin): 1 system
Dette apparat understøtter funktionen “HDAVI Control 1”.USB-indgang: USB2.0: 1 systemEthernet: 10BASE-T/100BASE-TX:1 systemLASER-specifikationKlasse 1 LASER-produkt:
Bølgelængde: 790 nm (CD’er)/655 nm (DVD’er)/405 nm (BD’er)Lasereffekt: Ingen farlig stråling
Strømforsyning: AC 220 til 240 V, 50 HzStrømforbrug: Ca. 12 WStrømforbrug i standby: Ca. 0,2 WStrømforbrug i hurtigstart-standby-mode: Ca. 3,6 WDimensioner (VkDkH) Herunder de udadvendte dele:
430 mmk185 mmk35 mmMasse: Ca. 1,6 kg
Specifikationer kan ændres uden varsel.
Hvad er VIERA Link “HDAVI Control”?
VIERA Link “HDAVI Control” er en praktisk funktion, som muliggør sammenkædet betjening af dette apparat og et Panasonic-tv (VIERA) eller andre enheder under “HDAVI Control”.Man kan anvende denne funktion ved at tilslutte udstyret med et HDMI-kabel. Indhent oplysninger om betjening af tilsluttet udstyr i dettes betjeningsvejledninger.
Automatisk skift af indgangTænk forbindelsen
Sluk forbindelsen
(70)
VQT3A95 ~Body_dan.fm 10 ページ 2011年1月12日 水曜日 午後3時54分

11VQT3A95
Dansk
This product incorporates the following software:
For the software categorized as (3) and (4), please refer to the terms and conditions of GPL v2 and LGPL v2.1, as the case may be at http://www.gnu.org/licenses/old-licenses/gpl-2.0.html and http://www.gnu.org/licenses/old-licenses/lgpl-2.1.html.In addition, the software categorized as (3) and (4) are copyrighted by several individuals. Please refer to the copyright notice of those individuals at http://www.am-linux.jp/dl/AWBP11
The GPL/LGPL software is distributed in the hope that it will be useful, but WITHOUT ANY WARRANTY, without even the implied warranty of MERCHANTABILITY or FITNESS FOR A PARTICULAR PURPOSE.
At least three (3) years from delivery of products, Panasonic will give to any third party who contacts us at the contact information provided below, for a charge no more than our cost of physically performing source code distribution, a complete machine-readable copy of the corresponding source code covered under GPL v2/LGPL v2.1.
Contact [email protected]
Source code is also freely available to you and any other member of the public via our website below.http://www.am-linux.jp/dl/AWBP11
the software developed independently by or for Panasonic Corporation,the software owned by third party and licensed to Panasonic Corporation,the software licensed under the GNU General Public License, Version 2 (GPL v2),the software licensed under the GNU LESSER General Public License, Version 2.1 (LGPL v2.1) and/or,open sourced software licensed under its applicable license terms including but not limited toICU License, c-arse license.
(1)
(2)
(3)
(4)
(5)
For Open Source Software Programs categorized as (5), please refer to the applicable license terms listed below and/or included in the “License” menu on Product.
ICU License - ICU 1.8.1 and later
COPYRIGHT AND PERMISSION NOTICE
Copyright (c) 1995-2010 International Business Machines Corporation and others
All rights reserved.
Permission is hereby granted, free of charge, to any person obtaining a copy of this software and associated documentation files (the “Software”), to deal in the Software without restriction, including without limitation the rights to use, copy, modify, merge, publish, distribute, and/or sell copies of the Software, and to permit persons to whom the Software is furnished to do so, provided that the above copyright notice(s) and this permission notice appear in all copies of the Software and that both the above copyright notice(s) and this permission notice appear in supporting documentation.
THE SOFTWARE IS PROVIDED “AS IS”, WITHOUT WARRANTY OF ANY KIND, EXPRESS OR IMPLIED, INCLUDING BUT NOT LIMITED TO THE WARRANTIES OF MERCHANTABILITY, FITNESS FOR A PARTICULAR PURPOSE AND NONINFRINGEMENT OF THIRD PARTY RIGHTS. IN NO EVENT SHALL THE COPYRIGHT HOLDER OR HOLDERS INCLUDED IN THIS NOTICE BE LIABLE FOR ANY CLAIM, OR ANY SPECIAL INDIRECT OR CONSEQUENTIAL DAMAGES, OR ANY DAMAGES WHATSOEVER RESULTING FROM LOSS OF USE, DATA OR PROFITS, WHETHER IN AN ACTION OF CONTRACT, NEGLIGENCE OR OTHER TORTIOUS ACTION, ARISING OUT OF OR IN CONNECTION WITH THE USE OR PERFORMANCE OF THIS SOFTWARE.
Except as contained in this notice, the name of a copyright holder shall not be used in advertising or otherwise to promote the sale, use or other dealings in this Software without prior written authorization of the copyright holder.
All trademarks and registered trademarks mentioned herein are the property of their respective owners.
DivX®, DivX Certified® og dermed tilknyttede logoer er varemærker tilhørende DivX, Inc. og anvendes under licens.DivX®, DivX Certified® and associated logos are trademarks of DivX, Inc. and are used under license.
Windows er et varemærke eller registreret varemærke tilhørende Microsoft Corporation i USA og i andre lande.
c-arse license
Copyright 1998 by the Massachusetts Institute of Technology.
Permission to use, copy, modify, and distribute this software and itsdocumentation for any purpose and without fee is hereby granted, provided that the above copyright notice appear in all copies and that both that copyright notice and this permission notice appear in supporting documentation, and that the name of M.I.T. not be used in advertising or publicity pertaining to distribution of the software without specific, written prior permission.M.I.T. makes no representations about the suitability of this software for any purpose. It is provided “as is” without express or implied warranty.
Java og alle Java-baserede varemærker og logoer er varemærker eller registrerede varemærker tilhørende Sun Microsystems, Inc. i USA eller andre lande.
Fremstillet på licens fra Dolby Laboratories.Dolby og det dobbelte D-symbol er varemærker tilhørende Dolby Laboratories.
Fremstillet under licens i henhold til US-patent: 5.451.942; 5.956.674; 5.974.380; 5.978.762; 6.226.616; 6.487.535; 7.392.195; 7.272.567; 7.333.929; 7.212.872 og andre US-patenter eller patenter fra andre lande, som er udstedt eller afventer godkendelse.DTS og symbolet er registrerede varemærker, og DTS-HD, DTS-HD Master Audio | Essential og DTS-logoerne er varemærker tilhørende DTS, Inc. Produktet indeholder software.© DTS, Inc. Alle rettigheder forbeholdes.
Dette produkt omfatter kopibeskyttelsesteknologi, der er beskyttet af US-patenter og andre immaterielle rettigheder for Rovi Corporation. Reverse engineering og demontering er forbudt.
HDMI, HDMI-logoet og High-Definition Multimedia Interface er varemærker eller registrerede varemærker tilhørende HDMI Licensing LLC i USA og i andre lande.
Der er brugerlicens på dette produkt under AVC-patentportfoliolicensen og VC-1 patentportfoliolicensen til en forbrugers personlige og ikke-kommercielle brug til at (i) kode video i overensstemmelse med AVC-standarden og VC-1 standarden (“AVC/VC-1 Video”) og/eller (ii) afkode AVC/VC-1 video, som har været kodet af en forbruger som en personlig og ikke-kommerciel aktivitet og/eller som er købt hos en videoleverandør der har licens til at levere AVC/VC-1 video. Der ydes ikke eller er ikke underforstået nogen licens der dækker noget andet brugsformål. Yderligere information kan indhentes hos MPEG LA, LLC.Se http://www.mpegla.com.
HDAVI Control™ er et varemærke tilhørende Panasonic Corporation.
“AVCHD” og “AVCHD” Logo er varemærker tilhørende Panasonic Corporation og Sony Corporation.
“DVD Logo” er et varemærke for DVD Format/Logo Licensing Corporation.
MPEG Layer-3 lydkodningsteknologi er givet i licens fra Fraunhofer IIS og Thomson.
DLNA, the DLNA Logo and DLNA CERTIFIED are trademarks, service marks, or certification marks of the Digital Living Network Alliance.
(71)
DMP-BD75EG-VQT3A95.book 11 ページ 2011年1月7日 金曜日 午後3時35分

2 VQT3A95
Vážený zákazníkuDěkujeme Vám za zakoupení tohoto výrobku.Pro dosažení jeho optimálního a bezpečného výkonu si přečtěte tyto pokyny.Předtím, než tento výrobek zapojíte a budete jej provozovat či nastavovat, přečtěte si prosím celý tento návod.Tento návod si uložte pro další použití.
ObsahSeznámení s výrobkem
Přečtení návodu k použití (ve formátu PDF) . . . . . 2Bezpečnostní opatření. . . . . . . . . . . . . . . . . . . . . . 3Příslušenství . . . . . . . . . . . . . . . . . . . . . . . . . . . . . 3Disky s možností přehrávání/USB zařízení . . . . . . 4
Zapojení a nastavení
1. KROK: Připojení k TV . . . . . . . . . . . . . . . . . . . . 62. KROK: Připojení k zesilovači/přijímači . . . . . . . 63. KROK: Připojení k širokopásmové síti. . . . . . . . 74. KROK: Nastavení . . . . . . . . . . . . . . . . . . . . . . . 7
Přehrávání
Vložení nebo vyjmutí média . . . . . . . . . . . . . . . . . 8HOME menu . . . . . . . . . . . . . . . . . . . . . . . . . . . . . 8Přehrávání obsahu videa. . . . . . . . . . . . . . . . . . . . 9Činnosti propojené s televizorem (VIERA Link “HDAVI Control™”). . . . . . . . . . . . . . 10Technické údaje . . . . . . . . . . . . . . . . . . . . . . . . . 10
Seznámení s výrobkem
Přečtení návodu k použití (ve formátu PDF)∫ Pro Windows1 Zapněte PC a vložte CD-ROM s návodem k použití
(dodaný).2 Zvolte požadovaný jazyk a zahajte instalaci kliknutím na
[Návod k použit].3 Dvakrát klikněte na ikonu spojení “BD75EG Návod k
použit” na ploše.Když nedochází k otevření návodu k použití (ve formátu PDF)Pro prohlížení nebo tisk návodu k použití (ve formátu PDF) potřebujete Adobe Acrobat Reader 5.0 nebo vyšší verzi nebo Adobe Reader 7.0 nebo vyšší verzi.Stáhněte a nainstalujte si verzi programu Adobe Reader, kterou můžete používat s vaším OS, z následující internetové stránky.http://get.adobe.com/reader/otherversions
Při použití jednoho z následujících OS– Windows 2000 SP4– Windows XP SP3– Windows Vista SP2– Windows 7
Vložte CD-ROM s návodem k použití (dodaný), klikněte na [Adobe(R) Reader(R)] a poté postupujte podle pokynů pro instalaci, které se zobrazují na displeji.
Odinstalování návodu k použití (ve formátu PDF)Vymažte soubor PDF z adresáře “Program Files\Panasonic\DMP\”≥ Když nelze zobrazit obsah adresáře Program Files,
zobrazte jej kliknutím na [Show the contents of this folder].
∫ Pro Macintosh1 Zapněte PC a vložte CD-ROM s návodem k použití
(dodaný).2 Otevřete adresář “Manual” v “VFF0703” a poté do něj
zkopírujte soubor PDF s požadovaným jazykem.3 Otevřete soubor PDF tak, že na něj dvakrát kliknete.
V situacích tohoto druhu vycházejte z Návodu k použití (ve formátu PDF) zaznamenaném na CD-ROM (dodaném).Návod k použití (ve formátu PDF) nemůže být přehráván na samotném přehrávači.Umožní vám seznámit se s režimy pro pokročilé a konzultovat Návod na odstranění závad.
Likvidace zařízení nebo jeho postoupení jinému majiteliV zařízení mohou být uchovány informace uživatelského nastavení. Při vyřazení, likvidaci nebo postoupení zařízení jinému majiteli proveďte postup pro nastavení přednastavených hodnot z výrobního závodu za účelem vymazání uživatelských nastavení.≥ V paměti tohoto zařízení může být zaznamenán přehled
o jeho činnosti.
Popisy uvedené v tomto návodu k použití≥ Pokyny k obsluze přístroje jsou obecně popsány pomocí
dálkového ovladače.
(72)
DMP-BD75EG-VQT3A95.book 2 ページ 2011年1月12日 水曜日 午前9時50分
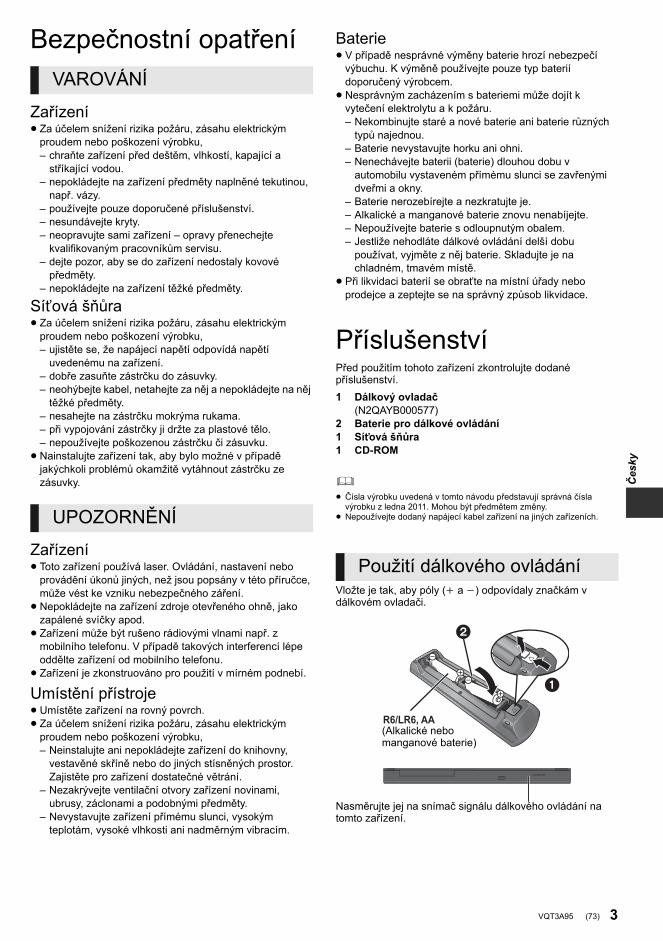
3VQT3A95
Česky
Bezpečnostní opatření
Zařízení≥ Za účelem snížení rizika požáru, zásahu elektrickým
proudem nebo poškození výrobku,– chraňte zařízení před deštěm, vlhkostí, kapající a
stříkající vodou.– nepokládejte na zařízení předměty naplněné tekutinou,
např. vázy.– používejte pouze doporučené příslušenství.– nesundávejte kryty.– neopravujte sami zařízení – opravy přenechejte
kvalifikovaným pracovníkům servisu.– dejte pozor, aby se do zařízení nedostaly kovové
předměty.– nepokládejte na zařízení těžké předměty.
Síťová šňůra≥ Za účelem snížení rizika požáru, zásahu elektrickým
proudem nebo poškození výrobku,– ujistěte se, že napájecí napětí odpovídá napětí
uvedenému na zařízení.– dobře zasuňte zástrčku do zásuvky.– neohýbejte kabel, netahejte za něj a nepokládejte na něj
těžké předměty.– nesahejte na zástrčku mokrýma rukama.– při vypojování zástrčky ji držte za plastové tělo.– nepoužívejte poškozenou zástrčku či zásuvku.≥ Nainstalujte zařízení tak, aby bylo možné v případě
jakýchkoli problémů okamžitě vytáhnout zástrčku ze zásuvky.
Zařízení≥ Toto zařízení používá laser. Ovládání, nastavení nebo
provádění úkonů jiných, než jsou popsány v této příručce, může vést ke vzniku nebezpečného záření.≥ Nepokládejte na zařízení zdroje otevřeného ohně, jako
zapálené svíčky apod.≥ Zařízení může být rušeno rádiovými vlnami např. z
mobilního telefonu. V případě takových interferencí lépe oddělte zařízení od mobilního telefonu.≥ Zařízení je zkonstruováno pro použití v mírném podnebí.
Umístění přístroje≥ Umístěte zařízení na rovný povrch.≥ Za účelem snížení rizika požáru, zásahu elektrickým
proudem nebo poškození výrobku,– Neinstalujte ani nepokládejte zařízení do knihovny,
vestavěné skříně nebo do jiných stísněných prostor. Zajistěte pro zařízení dostatečné větrání.
– Nezakrývejte ventilační otvory zařízení novinami, ubrusy, záclonami a podobnými předměty.
– Nevystavujte zařízení přímému slunci, vysokým teplotám, vysoké vlhkosti ani nadměrným vibracím.
Baterie≥ V případě nesprávné výměny baterie hrozí nebezpečí
výbuchu. K výměně používejte pouze typ baterií doporučený výrobcem.≥ Nesprávným zacházením s bateriemi může dojít k
vytečení elektrolytu a k požáru.– Nekombinujte staré a nové baterie ani baterie různých
typů najednou.– Baterie nevystavujte horku ani ohni.– Nenechávejte baterii (baterie) dlouhou dobu v
automobilu vystaveném přímému slunci se zavřenými dveřmi a okny.
– Baterie nerozebírejte a nezkratujte je.– Alkalické a manganové baterie znovu nenabíjejte.– Nepoužívejte baterie s odloupnutým obalem.– Jestliže nehodláte dálkové ovládání delší dobu
používat, vyjměte z něj baterie. Skladujte je na chladném, tmavém místě.
≥ Při likvidaci baterií se obraťte na místní úřady nebo prodejce a zeptejte se na správný způsob likvidace.
PříslušenstvíPřed použitím tohoto zařízení zkontrolujte dodané příslušenství.
≥ Čísla výrobku uvedená v tomto návodu představují správná čísla výrobku z ledna 2011. Mohou být předmětem změny.
≥ Nepoužívejte dodaný napájecí kabel zařízení na jiných zařízeních.
Vložte je tak, aby póly (i a j) odpovídaly značkám v dálkovém ovladači.
Nasměrujte jej na snímač signálu dálkového ovládání na tomto zařízení.
VAROVÁNÍ
UPOZORNĚNÍ
1 Dálkový ovladač(N2QAYB000577)
2 Baterie pro dálkové ovládání1 Síťová šňůra1 CD-ROM
Použití dálkového ovládání
R6/LR6, AA
(Alkalické nebo manganové baterie)
(73)
DMP-BD75EG-VQT3A95.book 3 ページ 2011年1月12日 水曜日 午前9時50分

4 VQT3A95
Disky s možností přehrávání/USB zařízeníZařízení Označení
disků Typy zařízení Formát obsahu
BD-Video Video
BD-RE VideoJPEG
BD-RVideoDivX®
MKV
DVD-Video Video
DVD-R VideoAVCHDDivX®
MKVMP3JPEGDVD-R DL
DVD-RW VideoAVCHD
— +R/+RW/+R DL
Hudba na CD Hudební [CD-DA]
— CD-RCD-RW
DivX®
MKVHudební [CD-DA]MP3JPEG
— USB zařízení(až 2 TB)
DivX®
MKVMP3JPEG
BD
DVD
CD
USB
(74)
DMP-BD75EG-VQT3A95.book 4 ページ 2011年1月7日 金曜日 午後3時30分

5VQT3A95
Česky
∫ Disky, které nelze přehrávat v tomto zařízení
≥ DVD-RAM≥ Super Audio CD≥ Photo CD≥ DVD-Audio≥WMA disky≥ Disky DivX Plus HD≥ HD DVD
∫ Informace o správě regionuBD-VideoToto zařízení přehrává BD-Video s označením kódu regionu “B”.Příklad:
DVD-VideoToto zařízení přehrává DVD-Video s označením čísla regionu “2” nebo “ALL”.Příklad:
∫ UzavřítDVD-R/RW/R DL, +R/+RW/+R DL a CD-R/RW zaznamenané na rekordéru apod. se musí před přehráváním na tomto zařízení uzavřít na tomto zařízení. Ohledně uvedeného si, prosím, přečtěte návod k použití rekordéru.
∫ BD-Video≥ Toto zařízení podporuje audio s vysokým datovým tokem
(Dolby Digital Plus, Dolby TrueHD, DTS-HD High Resolution Audio a DTS-HD Master Audio) používané v BD-Video.– Je-li “Dolby D/Dolby D +/Dolby TrueHD” nastaveno na
hodnotu “PCM”, maximální možný zvuk Dolby je 2kanálový PCM. ([HOME] “Setup” “Player Settings” “Sound” “Digital Audio Output”)
∫ Hudba na CDObsluhu a zvukovou kvalitu CD disků, které nesplňují specifikace CD-DA (CD disky s ochranou proti kopírování atd.), nelze zaručit.
∫ USB zařízení≥ Toto zařízení nezaručuje spojení se všemi USB
zařízeními.≥ Toto zařízení nepodporuje nabíjení USB zařízení.≥ Je podporován systém souborů FAT12, FAT16 a FAT32.≥ Toto zařízení podporuje USB 2.0 High Speed
(vysokorychlostní USB 2.0).≥ Zařízení může podporovat pevný disk formátovaný jako
FAT32. Některé typy pevných disků mohou vyžadovat použití vlastní externí napájecí jednotky.
∫ BD-RE, BD-RMůže se stát, že audio apod. na discích zaznamenaných v režimu DR s použitím rekordérů disků Blu-ray od firmy Panasonic nebude přehráváno správně.
≥ Může se stát, že v některých případech nebude možné přehrávat výše uvedená média kvůli typu média, podmínkám záznamu, použité metodě záznamu a způsobu vytvoření souborů.
≥ Výrobci disků mohou určit, jak mají být disky přehrávány. Protože se může stát, že nebudete vždy moci ovládat přehrávání způsobem popsaným v tomto návodu k použití. Pozorně si přečtěte pokyny týkající se disku.
2 ALL 352
Informace pro spotřebitele o sběru a likvidaci odpadu z elektrických a elektronických zařízení a použitých baterií z domácností
Tyto symboly na výrobcích, obalech nebo v průvodní dokumentaci znamenají, že použitá elektrická a elektronická zařízení a baterie nepatří do běžného domácího odpadu.Správná likvidace, recyklace a opětovné použití jsou možné jen pokud odevzdáte tato zařízení a použité baterie na místech k tomu určených, za což neplatíte žádné poplatky, v
souladu s platnými národnímu předpisy a se Směrnicemi 2002/96/EU a 2006/66/EU.Správnou likvidací přístrojů a baterií pomůžete šetřit cenné suroviny a předcházet možným negativním účinkům na lidské zdraví a na přírodní prostředí, které jinak mohou vzniknout při nesprávném zacházení s odpady.Další informace o sběru, likvidaci a recyklaci starých přístrojů a použitých baterií Vám poskytnou místní úřady, provozovny sběrných dvorů nebo prodejna, ve které jste toto zboží zakoupili.Při nesprávné likvidaci odpadu vám hrozí pokuta v souladu s národní legislativou a místními předpisy.
Informace pro právnické osoby se sídlem v zemích Evropské Unie (EU)Pokud chcete likvidovat elektrická nebo elektronická zařízení, obraťte se na prodejce nebo dodavatele s žádostí o další informace.
[Informace o likvidaci v zemích mimo Evropskou Unii (EU)]Tyto symboly platí jen v zemích Evropské unie. Pokud chcete likvidovat tento produkt, obraťte se na místní úřady nebo prodejce a informujte se o správném způsobu likvidace.
Poznámka k symbolu baterie (symboly uprostřed a dole):Tento symbol může být použit v kombinaci s chemickým symbolem. V tomto případě splňuje tento symbol legislativní požadavky, které jsou předepsány pro chemickou látku obsaženou v baterii.
Cd
(75)
DMP-BD75EG-VQT3A95.book 5 ページ 2011年1月7日 金曜日 午後3時30分

6 VQT3A95
Zapojení a nastavení1. KROK: Připojení k TV≥ Nepokládejte zařízení na zesilovače/přijímač nebo jiná
zařízení, která se mohou zahřát. Produkované teplo může toto zařízení poškodit.≥ Před realizací jakéhokoli zapojení vám doporučujeme
dočasně odpojit všechna zařízení od elektrické sítě.≥ Nepřipojujte signály videa prostřednictvím videorekordéru.
V důsledku ochrany proti kopírování by se mohlo stát, že obraz nebude zobrazen správně.≥ Použijte, prosím, kabely pro High Speed HDMI
(vysokorychlostní multimediální rozhraní), které jsou označené logem HDMI (zobrazeným na obalu). Doporučuje se, abyste používali kabely HDMI od firmy Panasonic. Při použití výstupního signálu 1080p použijte, prosím, kabely HDMI o délce maximálně 5,0 metrů.
Doporučené číslo dílu (vysokorychlostní HDMI kabel):RP-CDHS15 (1,5 m), RP-CDHS30 (3,0 m), RP-CDHS50 (5,0 m), atd.
2. KROK: Připojení k zesilovači/přijímači
∫ Prostřednictvím zásuvky HDMI AV OUT(vysoká kvalita)
≥ Nastavte “HDMI Audio Output” na “On” ([HOME] “Setup” “Player Settings” “TV / Device Connection” “HDMI Connection”).≥ Připojení HDMI podporuje VIERA Link “HDAVI Control”
( 10).
HDMI IN
Kabel HDMI
≥ Nastavte “HDMI Audio Output” na “On” ([HOME] “Setup” “Player Settings” “TV / Device Connection” “HDMI Connection”).≥ Nastavte “Digital Audio Output” v závislosti na připojeném
zesilovači/přijímači ([HOME] “Setup” “Player Settings” “Sound”).≥ Připojení HDMI podporuje VIERA Link “HDAVI Control”
( 10).≥ Pokud používáte televizor nebo zesilovač/přijímač bez
označení “(ARC)” (tzn. nekompatibilní s ARC) v zásuvce HDMI, abyste si vychutnali zvuk televizoru přes zesilovač/přijímač, je třeba propojit zesilovač/přijímač a televizor pomocí optického digitálního kabelu.
HDMI IN
HDMI IN
HDMI IN(ARC)
HDMI OUT(ARC)
Multikanálové reproduktory
Zesilovač/přijímač
Kabel HDMI
Kabel HDMI
(76)
DMP-BD75EG-VQT3A95.book 6 ページ 2011年1月7日 金曜日 午後3時30分
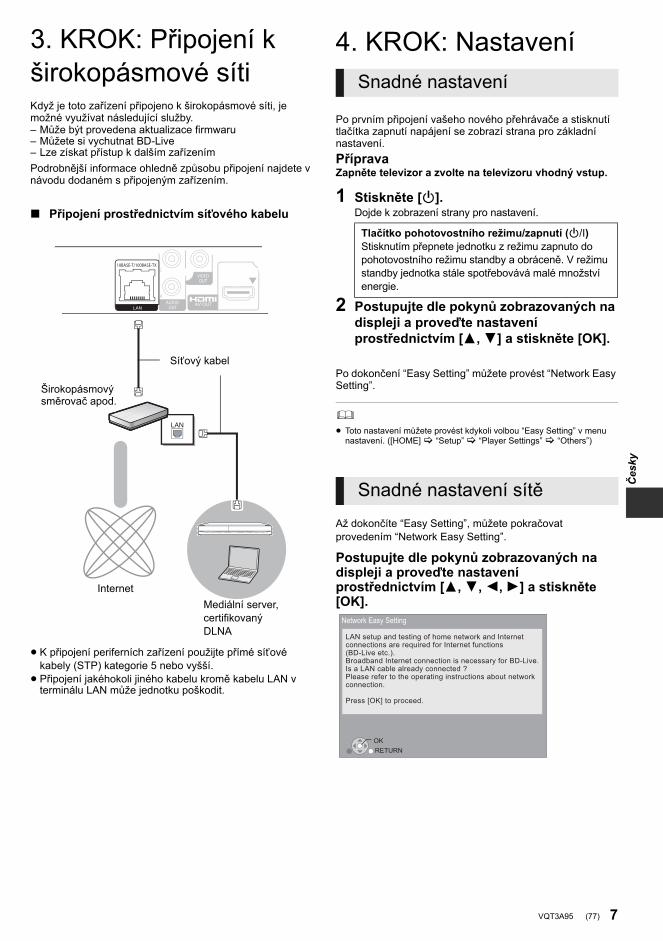
7VQT3A95
Česky
3. KROK: Připojení k širokopásmové sítiKdyž je toto zařízení připojeno k širokopásmové síti, je možné využívat následující služby.– Může být provedena aktualizace firmwaru– Můžete si vychutnat BD-Live– Lze získat přístup k dalším zařízenímPodrobnější informace ohledně způsobu připojení najdete v návodu dodaném s připojeným zařízením.
4. KROK: Nastavení
Po prvním připojení vašeho nového přehrávače a stisknutí tlačítka zapnutí napájení se zobrazí strana pro základní nastavení.PřípravaZapněte televizor a zvolte na televizoru vhodný vstup.
1 Stiskněte [Í].Dojde k zobrazení strany pro nastavení.
2 Postupujte dle pokynů zobrazovaných na displeji a proveďte nastavení prostřednictvím [3,4] a stiskněte [OK].
Po dokončení “Easy Setting” můžete provést “Network Easy Setting”.
≥ Toto nastavení můžete provést kdykoli volbou “Easy Setting” v menu nastavení. ([HOME] “Setup” “Player Settings” “Others”)
Až dokončíte “Easy Setting”, můžete pokračovat provedením “Network Easy Setting”.
Postupujte dle pokynů zobrazovaných na displeji a proveďte nastavení prostřednictvím [3,4,2,1] a stiskněte [OK].
∫ Připojení prostřednictvím síťového kabelu
≥ K připojení periferních zařízení použijte přímé síťové kabely (STP) kategorie 5 nebo vyšší.≥ Připojení jakéhokoli jiného kabelu kromě kabelu LAN v
terminálu LAN může jednotku poškodit.
Širokopásmový směrovač apod.
Internet
Síťový kabel
Mediální server, certifikovaný DLNA
Snadné nastavení
Tlačítko pohotovostního režimu/zapnutí (Í/I)Stisknutím přepnete jednotku z režimu zapnuto do pohotovostního režimu standby a obráceně. V režimu standby jednotka stále spotřebovává malé množství energie.
Snadné nastavení sítě
OKRETURN
Network Easy Setting
LAN setup and testing of home network and Internetconnections are required for Internet functions(BD-Live etc.). Broadband Internet connection is necessary for BD-Live.Is a LAN cable already connected ?Please refer to the operating instructions about networkconnection.
Press [OK] to proceed.
(77)
DMP-BD75EG-VQT3A95.book 7 ページ 2011年1月7日 金曜日 午後3時30分

8 VQT3A95
PřehráváníVložení nebo vyjmutí média
≥ Vkládáte-li médium, ujistěte se, že je otočeno správnou stranou nahoru.≥ Když připojíte výrobek firmy Panasonic prostřednictvím
USB spojovacího kabelu, na připojeném zařízení se může zobrazit strana pro nastavení. Podrobnější informace najdete v návodu k použití připojeného zařízení.
HOME menuNejdůležitější funkce tohoto zařízení lze použít prostřednictvím menu HOME.
PřípravaZapněte televizi a zvolte na ní příslušný video vstup.
1 Stiskněte [Í] pro zapnutí jednotky.2 Stiskněte tlačítko [OK] nebo pomocí
tlačítek [3,4,2,1] vyberte jinou položku.
≥ Po vložení média se objeví obrazovka pro výběr jeho obsahu.≥ Jsou-li k dispozici další položky, opakujte tento krok.≥ Pro návrat do menu HOME vyberte “HOME” nebo
několikrát stiskněte [RETURN].
Chcete-li zobrazit menu HOMEStiskněte [HOME].
≥ Zobrazované položky se mohou měnit v závislosti na konkrétním médiu.≥ Při použití disku s datovými soubory (MP3, JPEG, DivX, MKV) a videem
nastavte podle potřeby možnost “Mixed Data Disc Option”. ([HOME] “Setup” “Player Settings” “Disc”)
1
MusicPhotos
Videos
Blu-ray Disc Player
HOME
Setup
MEDIASERVER
(78)
DMP-BD75EG-VQT3A95.book 8 ページ 2011年1月7日 金曜日 午後3時30分

9VQT3A95
Česky
Přehrávání obsahu videa
1 Vložte médium.Když se zobrazí obsah, stisknutím [3,4,2,1] vyberte položku. ( 8)
2 Stisknutím [3,4] vyberte titul a stiskněte [OK].
∫ Zobrazení menuMůžete zobrazit Top Menu, DIRECT NAVIGATOR nebo Pop-up Menu.Stiskněte [TOP MENU] nebo [POP-UP MENU].≥ Stisknutím [3,4,2,1] vyberte položku a stiskněte
[OK].
≥ Signál z disků PAL se přivádí na výstup jako PAL. Signál z disků NTSC se přivádí na výstup jako “NTSC” nebo “PAL60”. Pro disky NTSC můžete zvolit “NTSC” nebo “PAL60” v “NTSC Contents Output”. ([HOME] “Setup” “Player Settings” “Picture”)
≥ KDYŽ JE ZOBRAZENÉ MENU, DISK SE NEPŘESTANE OTÁČET. Po ukončení přehrávání stiskněte [∫STOP], abyste šetřili motor přístroje, obrazovku televizoru atd.
≥ V závislosti na médiu nebo na jeho obsahu se zobrazení na displeji může měnit nebo nemusí být vůbec zobrazeno.
≥ DivX a MKV: Postupné přehrávání není možné.≥ Není možné přehrávat video AVCHD a MPEG2, které bylo uchopeno a
přetaženo, zkopírováno a přilepeno na médium.≥ V rámci úspory energie se automaticky vypne napájení, jestliže se
právě nepřehrává (např. pozastaveno přehrávání, zobrazení menu, zobrazení statických snímků apod.) a po dobu asi 30 minut nebylo stisknuto žádné tlačítko.
V závislosti na médiu a jeho obsahu se může stát, že tyto funkce nebudou pracovat.
Stiskněte [∫STOP].Pozice stop (zastavení) se uloží do paměti.Funkce obnovení přehráváníStiskněte [1PLAY] pro restart (nové spuštění) z této pozice.≥ Pozice se smaže, když se otevře přihrádka nebo stisknete
několikrát [∫STOP] pro zobrazení “StOP” na displeji jednotky.≥ Na discích BD-Video včetně BD-J se může stát, že
funkce obnovení přehrávání nebude pracovat.
Stiskněte [;PAUSE].≥ Pro obnovení přehrávání stiskněte znovu [;PAUSE] nebo
[1PLAY].
VyhledáváníBěhem přehrávání stiskněte [SEARCH6] nebo [SEARCH5].≥ Hudba a MP3: Rychlost je nastavena pro samostatný
krok.Pomalé přehráváníBěhem pauzy stiskněte [SEARCH5].Rychlost se zvýší až na 5 kroků.≥ Stiskněte [1PLAY] pro návrat k rychlosti normálního
přehrávání.
Během přehrávání nebo pauzy stiskněte [:] nebo [9].Přeskočit na titul, kapitolu nebo stopu, které chcete přehrát.≥ Každé stisknutí zvyšuje počet přeskočení.
Během pauzy stiskněte [1] (;1).≥ Stiskněte a držte stisknuto za účelem změny na postupný
posun dopředu.≥ Stiskněte [1PLAY] pro návrat k rychlosti normálního
přehrávání.
Stiskněte [AUDIO].Můžete změnit číslo kanálu audia nebo jazyk zvukové stopy apod.
BD DVD CD USB
Další operace během přehrávání
Stop
Pause/Zastavit
Vyhledat/Pomalé přehrávání
Přeskočit
Snímek po snímku/po jednotlivých okénkách
Změna audia
(79)
VQT3A95 ~Body_cze.fm 9 ページ 2011年1月12日 水曜日 午前10時3分

10 VQT3A95
Činnosti propojené s televizorem (VIERA Link “HDAVI Control™”)
Příprava1 Nastavte “VIERA Link” na “On”
([HOME] “Setup” “Player Settings” “TV / Device Connection” “HDMI Connection”). (Výchozí nastavení je “On”.)
2 Nastavte operace “HDAVI Control” na připojeném zařízení (např. televizi).
3 Zapněte všechna zařízení kompatibilní s “HDAVI Control” a na připojené televizi zvolte vstupní kanál této jednotky tak, aby funkce “HDAVI Control” řádně fungovala.Opakujte tento postup také tehdy, jsou-li změněna připojení nebo nastavení.
Je-li na zařízení zahájeno přehrávání, televizor automaticky přepne vstupní kanál a zobrazí příslušnou akci.Pokud je televizor vypnutý, automaticky se zapne.
Všechna připojená zařízení kompatibilní s “HDAVI Control” včetně této jednotky se automaticky vypnou, když vypnete televizi.
≥ Zařízení podporuje funkci “HDAVI Control 1”.Tento standard je kompatibilní s konvenčním vybavením HDAVI společnosti Panasonic.
≥ VIERA Link “HDAVI Control”, na základě ovládacích funkcí poskytovaných HDMI, což je průmyslová norma nazvaná HDMI CEC (Consumer Electronics Control/Ovládání spotřební elektroniky), je jedinečnou funkcí, kterou jsme vyvinuli a začlenili do našeho produktu. Vzhledem k tomu nemůže být garantováno její fungování s přístroji jiných výrobců, které podporují HDMI CEC.
≥ Podívejte se prosím do příruček k přístrojům jiných výrobců podporujících funkci VIERA Link.
Technické údajeSystém signálu: PAL/NTSCRozsah provozních teplot:
i5 oC až i35 oCRozsah provozní vlhkosti:
10 % až 80 % RH (bez kondenzace)Výstup videa: 1,0 Vp-p (75 ≠)/koncovka typu jack: 1 systémVýstup zvuku: 2 Vrms (1 kHz, 0 dB)/koncovka typu jack
Počet konektorů: 2 kanály: 1 systémHDMI AV výstup: typ A (19 pólový): 1 systém
Toto zařízení podporuje funkci “HDAVI Control 1”.USB slot: USB2.0: 1 systémEthernet: 10 BASE-T/100BASE-TX: 1 systémSpecifikace LASERTřída 1 LASER ový výrobek:
Vlnová délka: 790 nm (CD)/655 nm (DVD)/405 nm (BD)Výkon laseru: Při použití ochranných krytů nedochází k
emisi žádného nebezpečného zářeníNapájení: 220 až 240 V~, 50 HzPříkon: Přibl. 12 WSpotřeba energie v pohotovostním režimu: Přibl. 0,2 WSpotřeba energie v režimu pohotovostního režimu rychlého startu: Přibl. 3,6 WRozměry (ŠkHkV) Včetně vyčnívajících částí:
430 mmk185 mmk35 mmHmotnost: Přibl. 1,6 kg
Technické údaje podléhají změnám bez předchozího upozornění.
Co to je VIERA Link “HDAVI Control”?
VIERA Link “HDAVI Control” je praktická funkce, která nabízí propojené operace tohoto zařízení a televizoru od firmy Panasonic (VIERA) nebo jiného zařízení v “HDAVI Control”.Tuto funkci můžete využívat, když připojíte zařízení kabelem HDMI. V návodu k obsluze připojeného zařízení se seznamte s detaily provozu.
Automatické přepínaní zdrojePropojení zapnutí
Propojení vypnutí
(80)
VQT3A95 ~Body_cze.fm 10 ページ 2011年1月12日 水曜日 午前10時3分

11VQT3A95
Česky
This product incorporates the following software:
For the software categorized as (3) and (4), please refer to the terms and conditions of GPL v2 and LGPL v2.1, as the case may be at http://www.gnu.org/licenses/old-licenses/gpl-2.0.html and http://www.gnu.org/licenses/old-licenses/lgpl-2.1.html.In addition, the software categorized as (3) and (4) are copyrighted by several individuals. Please refer to the copyright notice of those individuals at http://www.am-linux.jp/dl/AWBP11
The GPL/LGPL software is distributed in the hope that it will be useful, but WITHOUT ANY WARRANTY, without even the implied warranty of MERCHANTABILITY or FITNESS FOR A PARTICULAR PURPOSE.
At least three (3) years from delivery of products, Panasonic will give to any third party who contacts us at the contact information provided below, for a charge no more than our cost of physically performing source code distribution, a complete machine-readable copy of the corresponding source code covered under GPL v2/LGPL v2.1.
Contact [email protected]
Source code is also freely available to you and any other member of the public via our website below.http://www.am-linux.jp/dl/AWBP11
the software developed independently by or for Panasonic Corporation,the software owned by third party and licensed to Panasonic Corporation,the software licensed under the GNU General Public License, Version 2 (GPL v2),the software licensed under the GNU LESSER General Public License, Version 2.1 (LGPL v2.1) and/or,open sourced software licensed under its applicable license terms including but not limited toICU License, c-arse license.
(1)
(2)
(3)
(4)
(5)
For Open Source Software Programs categorized as (5), please refer to the applicable license terms listed below and/or included in the “License” menu on Product.
ICU License - ICU 1.8.1 and later
COPYRIGHT AND PERMISSION NOTICE
Copyright (c) 1995-2010 International Business Machines Corporation and others
All rights reserved.
Permission is hereby granted, free of charge, to any person obtaining a copy of this software and associated documentation files (the “Software”), to deal in the Software without restriction, including without limitation the rights to use, copy, modify, merge, publish, distribute, and/or sell copies of the Software, and to permit persons to whom the Software is furnished to do so, provided that the above copyright notice(s) and this permission notice appear in all copies of the Software and that both the above copyright notice(s) and this permission notice appear in supporting documentation.
THE SOFTWARE IS PROVIDED “AS IS”, WITHOUT WARRANTY OF ANY KIND, EXPRESS OR IMPLIED, INCLUDING BUT NOT LIMITED TO THE WARRANTIES OF MERCHANTABILITY, FITNESS FOR A PARTICULAR PURPOSE AND NONINFRINGEMENT OF THIRD PARTY RIGHTS. IN NO EVENT SHALL THE COPYRIGHT HOLDER OR HOLDERS INCLUDED IN THIS NOTICE BE LIABLE FOR ANY CLAIM, OR ANY SPECIAL INDIRECT OR CONSEQUENTIAL DAMAGES, OR ANY DAMAGES WHATSOEVER RESULTING FROM LOSS OF USE, DATA OR PROFITS, WHETHER IN AN ACTION OF CONTRACT, NEGLIGENCE OR OTHER TORTIOUS ACTION, ARISING OUT OF OR IN CONNECTION WITH THE USE OR PERFORMANCE OF THIS SOFTWARE.
Except as contained in this notice, the name of a copyright holder shall not be used in advertising or otherwise to promote the sale, use or other dealings in this Software without prior written authorization of the copyright holder.
All trademarks and registered trademarks mentioned herein are the property of their respective owners.
Tato položka obsahuje technologii ochrany proti kopírování, která je chráněna patenty U.S. a dalšími právy na intelektuální vlastnictví společnosti Rovi Corporation. Opětovná konstrukce a demontáž jsou zakázány.
“DVD Logo” je obchodní známka formátu DVD/Logo Licensing Corporation.
DivX®, DivX Certified® a související loga jsou ochrannými známkami společnosti DivX, Inc. a jsou licencovány.DivX®, DivX Certified® and associated logos are trademarks of DivX, Inc. and are used under license.
Windows je ochrannou známkou nebo registrovanou ochrannou známkou společnosti Microsoft Corporation ve Spojených státech a v jiných zemích.
c-arse license
Copyright 1998 by the Massachusetts Institute of Technology.
Permission to use, copy, modify, and distribute this software and itsdocumentation for any purpose and without fee is hereby granted, provided that the above copyright notice appear in all copies and that both that copyright notice and this permission notice appear in supporting documentation, and that the name of M.I.T. not be used in advertising or publicity pertaining to distribution of the software without specific, written prior permission.M.I.T. makes no representations about the suitability of this software for any purpose. It is provided “as is” without express or implied warranty.
Java a všechny obchodní značky a loga na bázi Java jsou obchodníznačky nebo registrované obchodní značky společnosti SunMicrosystems, Inc., ve Spojených státech a dalších zemích.
Vyrobeno podle licence společnosti Dolby Laboratories.Dolby a symbol dvojitého písmene D jsou ochranné známky společnosti Dolby Laboratories.
Vyrobeno v licenci podle patentů U.S.A. č.: 5,451,942; 5,956,674; 5,974,380; 5,978,762; 6,226,616; 6,487,535; 7,392,195; 7,272,567;7,333,929; 7,212,872 a dalších patentů USA i světových patentů ve stadiu schvalování i patentů již vydaných.DTS a symbol jsou registrovanými ochrannými známkami, & DTS-HD,DTS-HD Master Audio | Essential a loga DTS jsou ochrannými známkami společnosti DTS, Inc.Součástí výrobku je i software.© DTS, Inc. Všechna práva vyhrazena.
HDMI, logo HDMI, a High-Definition Multimedia Interface (Multimediální rozhraní s vysokým rozlišením) jsou ochrannými známkami nebo registrovanými ochrannými známkami firmy HDMI Licensing LLC ve Spojených státech a jiných zemích.
Tento výrobek má udělenou licenci v rámci licence patentového portfoliaAVC a licence patentového portfolia VC-1 pro soukromé a nekomerčníspotřebitele pro účely (i) zakódování videa v souladu s normami AVCStandard a VC-1 Standard (“AVC/VC-1 Video”) a/nebo (ii) zakódováníAVC/VC-1 Videa, které bylo zakódováno spotřebitelem zapojeným vsoukromé a nekomerční činnosti a/nebo byla licence získána odposkytovatele videa s licencí na poskytování AVC/VC-1 Videa. Žádnálicence není udělena ani zahrnuta v souvislosti s jakýmkoli jiným využitím.Další informace lze získat od MPEG LA, LLC.Navštivte http://www.mpegla.com.
HDAVI Control™ je ochranná známka společnosti Panasonic Corporation.
“AVCHD” a logo “AVCHD” jsou obchodní značky Panasonic Corporation a Sony Corporation.
Technologie kódování zvuku MPEG Layer-3 licencovaná společnostmi Fraunhofer IIS a Thomson.
DLNA, the DLNA Logo and DLNA CERTIFIED are trademarks, service marks, or certification marks of the Digital Living Network Alliance.
(81)
DMP-BD75EG-VQT3A95.book 11 ページ 2011年1月12日 水曜日 午前9時50分

2 VQT3A95
Kedves Vásárló!Köszönjük, hogy ezt a terméket választotta.A legjobb teljesítmény és biztonság érdekében kérjük, figyelmesen olvassa el a jelen utasításokat.A termék csatlakoztatása, működtetése vagy beállítása előtt kérjük, olvassa végig az utasításokat.Kérjük, őrizze meg ezt a kézikönyvet későbbi használata céljából.
TartalomjegyzékKezdeti lépések
A (PDF formátumú) kezelési útmutató elolvasása . . . . . . . . . . . . . . . . . . . . . . . . . . . . . . . 2Biztonsági óvintézkedések . . . . . . . . . . . . . . . . . . 3Tartozék. . . . . . . . . . . . . . . . . . . . . . . . . . . . . . . . . 3Lejátszható lemezek/USB eszközök . . . . . . . . . . . 4
Csatlakoztatások és beállítások
1. LÉPÉS: TV csatlakoztatása. . . . . . . . . . . . . . . . 62. LÉPÉS: Erősítő/vevőkészülék
csatlakoztatása . . . . . . . . . . . . . . . . . . 63. LÉPÉS: Szélessávú hálózat
csatlakoztatása . . . . . . . . . . . . . . . . . . 74. LÉPÉS: Beállítás . . . . . . . . . . . . . . . . . . . . . . . . 7
Lejátszás
Hordozó behelyezése vagy eltávolítása . . . . . . . . 8Menü HOME . . . . . . . . . . . . . . . . . . . . . . . . . . . . . 8Videótartalmak lejátszása . . . . . . . . . . . . . . . . . . . 9Kapcsolt műveletek a TV-vel (VIERA Link “HDAVI Control™”) . . . . . . . . . . . . . 10Specifikációk . . . . . . . . . . . . . . . . . . . . . . . . . . . . 10
Kezdeti lépések
A (PDF formátumú) kezelési útmutató elolvasása∫ Windows esetén1 Kapcsolja be a számítógépet és helyezze be a kezelési
útmutatót tartalmazó (mellékelt) CD-ROM lemezt.2 Válassza ki a kívánt nyelvet, majd a telepítéshez
kattintson a [Kezelési útmutat] pontra.3 Kattintson duplán a tálcán található “BD75EG Kezelési
útmutat” ikonra.
Amikor nem sikerül megnyitni a (PDF formátumú) kezelési útmutatótA (PDF formátumú) kezelési útmutató böngészéséhez vagy kinyomtatásához az Adobe Acrobat Reader 5.0 vagy újabb változata, illetve az Adobe Reader 7.0 vagy újabb változata szükséges.Az alábbi webhelyről töltse le és telepítse az Adobe Reader azon változatát, amely az Ön operációs rendszerével használható.http://get.adobe.com/reader/otherversions
Az alábbi operációs rendszer esetén– Windows 2000 SP4– Windows XP SP3– Windows Vista SP2– Windows 7
Helyezze be a kezelési útmutatót tartalmazó (mellékelt) CD-ROM lemezt, majd a telepítéshez kattintson az [Adobe(R) Reader(R)] pontra és kövesse a képernyőn megjelenő üzeneteket.
A (PDF formátumú) kezelési útmutató eltávolításáhozTörölje a PDF fájlt a “Program Files\Panasonic\DMP\” mappából.≥ Amennyiben a Program Files mappa tartalma nem
látható, úgy a megjelenítéshez kattintson ide [Show the contents of this folder].
∫ Macintosh esetén1 Kapcsolja be a számítógépet és helyezze be a kezelési
útmutatót tartalmazó (mellékelt) CD-ROM lemezt.2 Nyissa meg a “VFF0703” tétel “Manual” mappáját, majd
másolja át a mappán belüli található kívánt nyelvű PDF fájlt.
3 A megnyitáshoz kattintson duplán a PDF fájlra.
Emellett tanulmányozza a (mellékelt) CD-ROM lemezen található (PDF formátumú) kezelési útmutatót is.A használati útmutató (PDF formátum) nem játszható le magán a lejátszón.Ott megtalálhatja a haladóknak szóló üzemeltetési leírásokat és megnézheti a Hibaelhárítás részt is.
A készülék leselejtezése vagy továbbadásaElőfordulhat, hogy a készülék megőrzi a felhasználói beállítások információit. Ha Ön leselejtezés vagy továbbadás útján kíván megválni a készüléktől, akkor a felhasználói beállítások törlése érdekében állítson vissza mindent a gyári előbeállításokra.≥ Lehet, hogy a készülék memóriája megőrizte a
működési előzményeket.
Tudnivalók a használati útmutatóban levő leírásokról≥ A műveletekhez tartozó leírások a távvezérlővel
jeleníthetők meg.
(82)
DMP-BD75EG-VQT3A95.book 2 ページ 2011年1月17日 月曜日 午後9時5分

3VQT3A95
Magyar
Biztonsági óvintézkedések
Készülék≥ A tűzveszély, áramütés vagy a terméksérülés
kockázatának csökkentése érdekében– Ügyeljen arra, hogy a készüléket ne érje eső,
nedvesség, csepegő vagy felfröccsenő folyadék.– Ügyeljen arra, hogy ne kerüljön folyadékkal teli tárgy (pl.
váza) a készülék tetejére.– Csak a javasolt tartozékokat alkalmazza.– Ne távolítsa el a burkolatokat.– Ne próbálja meg a készülék javítását maga elvégezni.
Bízza a javítást megfelelő szakszervizre.– Ügyeljen arra, hogy ne kerüljenek fémtárgyak a
készülék belsejébe.– Ne tegyen nehéz tárgyakat a készülékre.
Hálózati csatlakozókábel≥ A tűzveszély, áramütés vagy a terméksérülés
kockázatának csökkentése érdekében– Ügyeljen arra, hogy a hálózati feszültség megfeleljen a
készüléken feltüntetett feszültség értékének.– Teljesen dugja be a hálózati csatlakozót a konnektorba.– Tilos a hálózati zsinórt meghúzni, meghajlítani vagy
nehéz tárgyakkal terhelni.– Tilos nedves kézzel nyúlni a hálózati csatlakozóhoz.– A konnektorból való kihúzásakor határozottan fogja meg
a hálózati csatlakozót.– Ne használjon sérült hálózati csatlakozót vagy
konnektort.≥ Úgy telepítse a készüléket, hogy probléma esetén
azonnal ki lehessen húzni a hálózati csatlakozó kábelt a konnektorból.
Készülék≥ A készülék lézersugarat használ. Ha a készüléket
másképpen használja és kezeli, mint ahogy az a használati útmutatóban le van írva, veszélyes sugárzás léphet fel.≥ Ne tegyen a készülékre nyílt lángú tűzforrást (pl. égő gyertyát).≥ A mobiltelefonok miatt használat közben a készüléknél
rádióinterferenciás zavar léphet fel. Ilyen interferencia előfordulása esetén jobban el kell különíteni egymástól a készüléket és a mobiltelefont.≥ A készülék használata mérsékelt égövi időjárási
viszonyokra van tervezve.
Elhelyezés≥ Helyezze a készüléket sima felületre.≥ A tűzveszély, áramütés vagy a terméksérülés
kockázatának csökkentése érdekében– Tilos a készüléket könyvespolcon, beépített szekrényben
vagy más zárt térben felállítani vagy elhelyezni. Gondoskodjon a készülék megfelelő szellőzéséről.
– Ne zárja el a készülék szellőzőnyílásait újsággal, asztalterítővel, függönnyel vagy hasonló tárgyakkal.
– Tilos a készüléket közvetlen napfény, magas hőmérséklet, nagy páratartalom vagy erős rázkódás hatásának kitenni.
Elemek≥ Helytelen behelyezése esetén az elem felrobbanhat. A
cseréhez csak a gyártó által ajánlott típusú elemet szabad használni.≥ Az elemek helytelen kezelése az elektrolit kifolyását
eredményezheti és tüzet okozhat.– Soha ne használjon egyszerre régi és új, illetve
különböző típusú elemeket.– Ne hevítse vagy tegye ki nyílt lángnak.– Ne hagyja sokáig autóban közvetlen napfénynek kitett
helyen az elem(eke)t akkor, ha az ajtók és ablakok zárva vannak.
– Ne szerelje szét és ne zárja rövidre.– Tilos az alkáli vagy mangán elemek feltöltése.– Ne használja az elemeket, ha a borításuk levált.– Vegye ki az elemeket, ha hosszabb időn át nem akarja
használni a távvezérlőt. Hűvös, sötét helyen tárolja az elemeket.
≥ Az elemek leselejtezése előtt forduljon a helyi hatóságokhoz vagy kereskedőjéhez, és érdeklődjön az ártalmatlanítás megfelelő módjáról.
TartozékA készülék használatba vétele előtt ellenőrizze a mellékelt tartozékokat.
≥ Az itt közölt termékszámok a 2011 januárjában állapotot tükrözik. Ezek módosulhatnak.
≥ Más berendezéshez ne használja a hálózati csatlakozókábelt.
A behelyezést úgy végezze, hogy a (i és j) pólus megegyezzen a távvezérlő jelzéseivel.
Irányítsa a készüléken levő távvezérlőjel-érzékelőre.
FIGYELEM
VIGYÁZAT
1 Távvezérlő(N2QAYB000577)
2 Távvezérlő elemek1 Hálózati csatlakozókábel1 CD-ROM
A távvezérlő használata
R6/LR6, AA
(Alkáli-mangán elemek)
(83)
DMP-BD75EG-VQT3A95.book 3 ページ 2011年1月17日 月曜日 午後9時5分
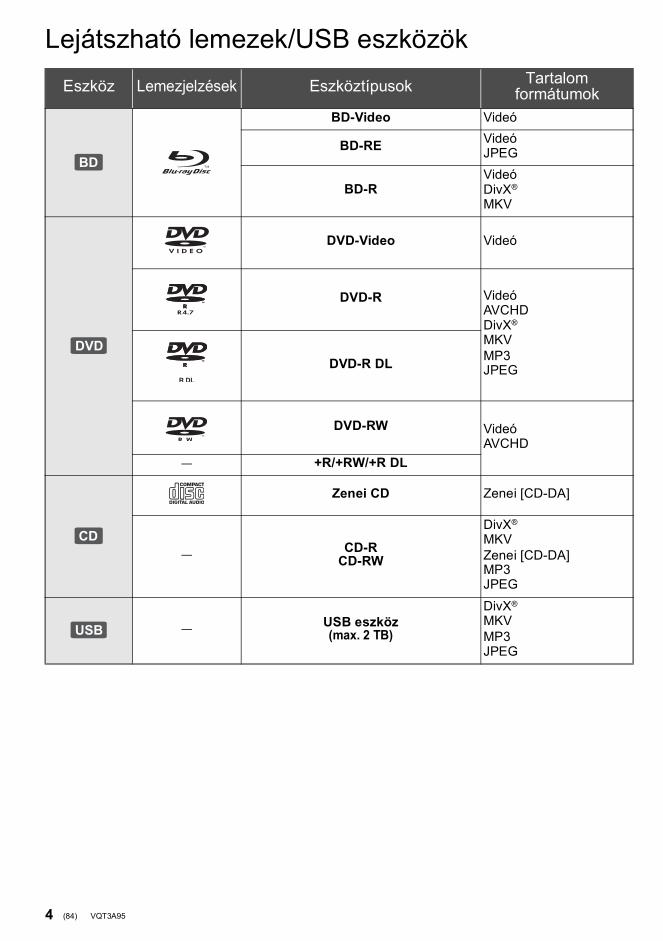
4 VQT3A95
Lejátszható lemezek/USB eszközökEszköz Lemezjelzések Eszköztípusok Tartalom
formátumokBD-Video Videó
BD-RE VideóJPEG
BD-RVideóDivX®
MKV
DVD-Video Videó
DVD-R VideóAVCHDDivX®
MKVMP3JPEGDVD-R DL
DVD-RW VideóAVCHD
— +R/+RW/+R DL
Zenei CD Zenei [CD-DA]
— CD-RCD-RW
DivX®
MKVZenei [CD-DA]MP3JPEG
— USB eszköz(max. 2 TB)
DivX®
MKVMP3JPEG
BD
DVD
CD
USB
(84)
DMP-BD75EG-VQT3A95.book 4 ページ 2011年1月7日 金曜日 午後3時40分

5VQT3A95
Magyar
∫ A készülékkel nem lejátszható lemezek
≥DVD-RAM≥ Super Audio CD≥ Photo CD≥DVD-Audio≥WMA lemezek≥DivX Plus HD lemezek≥HD DVD
∫ Régiókezelési információkBD-VideoA készülék a “B” régiókódot tartalmazó címkékkel megjelölt BD-Video lemezeket játssza le.Példa:
DVD-VideoA készülék a “2” régiószámot vagy “ALL” jelölést tartalmazó címkékkel megjelölt DVD-Video lemezeket játssza le.Példa:
∫ LezárásA felvevővel stb. rögzített DVD-R/RW/R DL, +R/+RW/+R DL és CD-R/RW lemezek csak akkor játszhatók le ezen a készüléken, ha azokat a felvevővel előbb lezárták. Olvassa el a felvevő útmutatóját.
∫ BD-Video≥ A készülék támogatja a BD-Video lemezeknél alkalmazott
magas bitrátájú hangot (Dolby Digital Plus, Dolby TrueHD, DTS-HD High Resolution Audio és DTS-HD Master Audio).– Ha a “Dolby D/Dolby D +/Dolby TrueHD” beállítása
“PCM”, a Dolby hang maximális lehetséges száma 2ch PCM. ([HOME] “Setup” “Player Settings” “Sound” “Digital Audio Output”)
∫ Zenei CDA CD-DA specifikációkat nem kielégítő CD-k (másolásvédett CD-k, stb.) működése és hangminősége nem garantálható.
∫ USB eszköz≥ A készülék nem garantálja az összes USB eszköz
csatlakoztathatóságát.≥ A készülék nem támogatja az USB eszközök töltését.≥ A készülék támogatja a FAT12, FAT16 és FAT32
fájlrendszereket.≥ A készülék támogatja az USB 2.0 High Speed eszközt.≥ Ez a készülék FAT32 rendszerben formattált
merevlemezeket támogat. Egyes merevlemez típusokhoz szükség lehet a külső áramforrásra.
∫ BD-RE, BD-RElőfordulhat, hogy a Panasonic Blu-ray lemez felvevőkkel DR módban rögzített lemezeknél nem játszható le rendesen a hang stb.
≥ A hordozó típusától, a rögzítési körülményektől, a rögzítési módszertől és a fájlok létrehozásától függően egyes esetekben előfordulhat, hogy nem lehet lejátszani a fenti hordozókat.
≥ A lemez gyártója képes szabályozni a lemez lejátszhatóságát. Így előfordulhat, hogy Ön nem mindig a jelen útmutató szerint tudja szabályozni a lejátszást. Olvasse el figyelmesen a lemez útmutatóját.
2 ALL 352
Tájékoztatás felhasználók számára az elhasználódott készülékek, szárazelemek és akkumulátorok begyűjtéséről és ártalmatlanításáról
A termékeken, a csomagoláson és/vagy a kísérő dokumentumokon szereplő szimbólumok azt jelentik, hogy az elhasználódott elektromos és elektronikus termékeket, szárazelemeket és akkumulátorokat az általános háztartási hulladéktól külön kell kezelni.Az elhasználódott készülékek, szárazelemek és akkumulátorok megfelelő kezelése, hasznosítása és újrafelhasználása céljából, kérjük, hogy az
ország törvényeinek, valamint a 2002/96/EK és a 2006/66/EK irányelveknek megfelelően juttassa el azokat a kijelölt gyűjtőhelyekre.E termékek, szárazelemek és akkumulátorok előírásszerű ártalmatlanításával Ön hozzájárul az értékes erőforrások megóvásához, és megakadályozza az emberi egészség és a környezet károsodását, amit egyébként a hulladékok nem megfelelő kezelése okozhat.Az elhasználódott termékek, szárazelemek és akkumulátorok begyűjtésével és újrafelhasználásával kapcsolatban, kérjük, érdeklődjön a helyi közösségénél, a területi hulladékártalmatlanító szolgálatnál vagy abban az üzletben, ahol a termékeket vásárolta.E hulladékok szabálytalan elhelyezését a nemzeti jogszabályok büntethetik.
Az Európai Unió üzleti felhasználói számáraHa az elektromos vagy elektronikus berendezésétől meg kíván szabadulni, kérjük, további tájékoztatásért forduljon a forgalmazójához vagy a szállítójához.
[Hulladékkezelési tájékoztató az Európai Unión kívüli egyéb országokban]Ezek a szimbólumok csak az Európai Unióban érvényesek. Ha meg kíván szabadulni a termékektől, kérjük, lépjen kapcsolatba a helyi hatóságokkal vagy a kereskedővel, és kérdezze meg őket a hulladékelhelyezés megfelelő módjáról.
Megjegyzés a szárazelem- és akkumulátor-szimbólummal kapcsolatban (a két alsó szimbólumpélda):Ezek a szimbólumok kémiai szimbólummal együtt alkalmazhatók. Ebben az esetben teljesíti az EU irányelvnek vegyi anyagra vonatkozó követelményét.
Cd
(85)
DMP-BD75EG-VQT3A95.book 5 ページ 2011年1月7日 金曜日 午後3時40分
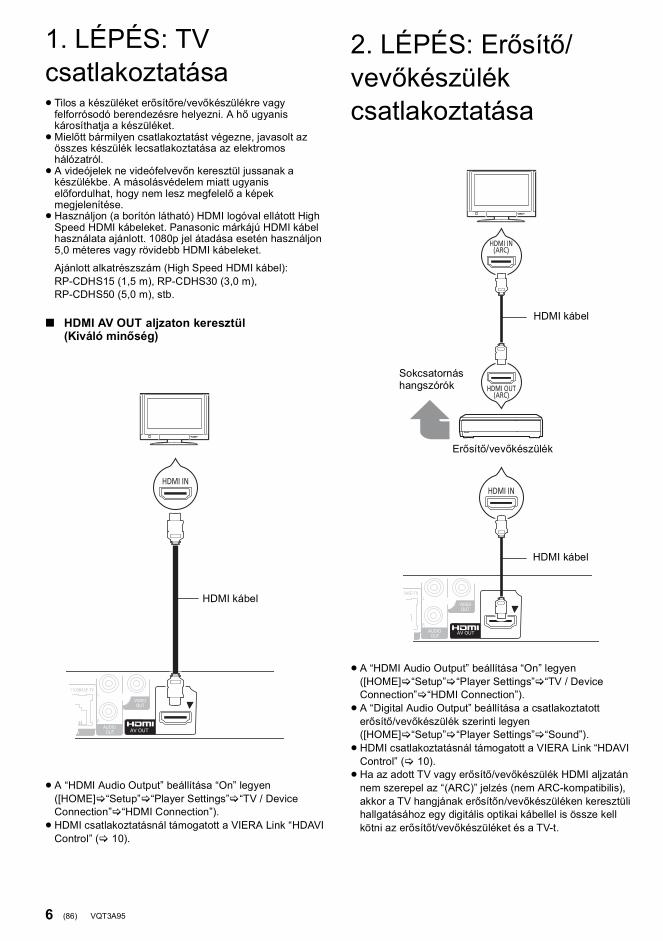
6 VQT3A95
C satlakoztatások és beállí tások1. LÉPÉS: TV csatlakoztatása≥ Tilos a készüléket erősítőre/vevőkészülékre vagy
felforrósodó berendezésre helyezni. A hő ugyanis károsíthatja a készüléket.≥Mielőtt bármilyen csatlakoztatást végezne, javasolt az
összes készülék lecsatlakoztatása az elektromos hálózatról.≥ A videójelek ne videófelvevőn keresztül jussanak a
készülékbe. A másolásvédelem miatt ugyanis előfordulhat, hogy nem lesz megfelelő a képek megjelenítése.≥Használjon (a borítón látható) HDMI logóval ellátott High
Speed HDMI kábeleket. Panasonic márkájú HDMI kábel használata ajánlott. 1080p jel átadása esetén használjon 5,0 méteres vagy rövidebb HDMI kábeleket.
Ajánlott alkatrészszám (High Speed HDMI kábel):RP-CDHS15 (1,5 m), RP-CDHS30 (3,0 m), RP-CDHS50 (5,0 m), stb.
2. LÉPÉS: Erősítő/vevőkészülék csatlakoztatása
∫ HDMI AV OUT aljzaton keresztül(Kiváló minőség)
≥ A “HDMI Audio Output” beállítása “On” legyen ([HOME] “Setup” “Player Settings” “TV / Device Connection” “HDMI Connection”).≥HDMI csatlakoztatásnál támogatott a VIERA Link “HDAVI
Control” ( 10).
HDMI IN
HDMI kábel
≥ A “HDMI Audio Output” beállítása “On” legyen ([HOME] “Setup” “Player Settings” “TV / Device Connection” “HDMI Connection”).≥ A “Digital Audio Output” beállítása a csatlakoztatott
erősítő/vevőkészülék szerinti legyen ([HOME] “Setup” “Player Settings” “Sound”).≥HDMI csatlakoztatásnál támogatott a VIERA Link “HDAVI
Control” ( 10).≥Ha az adott TV vagy erősítő/vevőkészülék HDMI aljzatán
nem szerepel az “(ARC)” jelzés (nem ARC-kompatibilis), akkor a TV hangjának erősítőn/vevőkészüléken keresztüli hallgatásához egy digitális optikai kábellel is össze kell kötni az erősítőt/vevőkészüléket és a TV-t.
HDMI IN
HDMI IN
HDMI IN(ARC)
HDMI OUT(ARC)
Sokcsatornás hangszórók
Erősítő/vevőkészülék
HDMI kábel
HDMI kábel
(86)
DMP-BD75EG-VQT3A95.book 6 ページ 2011年1月7日 金曜日 午後3時40分

7VQT3A95
Magyar
3. LÉPÉS: Szélessávú hálózat csatlakoztatásaAz alábbi szolgáltatások csak szélessávú csatlakozás esetén használhatók.– Firmware frissítés végezhető– Élvezhető a BD-Live– Elérhetővé válik egy másik eszközA csatlakoztatás módját illetően tanulmányozza át a csatlakoztatott berendezéshez mellékelt útmutatót.
4. LÉPÉS: Beállítás
Az új lejátszó első csatlakoztatása és a bekapcsoló gomb megnyomása után megjelenik az alapbeállítások képernyő.ElőkészületekKapcsolja be a televíziót és válassza ki azon a megfelelő videó bemenetet.
1 Nyomja meg a [Í] gombot.Megjelenik a beállítási képernyő.
2 Kövesse a képernyőn megjelenő utasításokat és végezze el a beállításokat a [3, 4] gombokkal, majd nyomja meg az [OK] gombot.
Az “Easy Setting” után elvégezhető az “Network Easy Setting”.
≥ Ezt a beállítást bármikor elvégezheti, ha kiválasztja az “Easy Setting” pontot a Setup menüben. ([HOME] “Setup” “Player Settings” “Others”)
Az “Easy Setting” befejezése után következhet a “Network Easy Setting”.
Kövesse a képernyőn megjelenő utasításokat és végezze el a beállításokat a [3,4,2, 1] gombokkal, majd nyomja meg az [OK] gombot.
∫ LAN kábel csatlakoztatás
≥ A perifériás eszközök csatlakoztatásához használjon legalább 5. kategóriájú egyenes LAN kábeleket (STP).≥Ha a LAN csatlakozóba a LAN kábeltől eltérő kábelt
csatlakoztat, azzal károsíthatja az egységet.
Szélessávú router stb.
Internet
LAN kábel
DLNA tanúsítású médiaszerver
Egyszerű beállítás
Készenlét/be kapcsoló (Í/I)Nyomja meg ezt a gombot, hogy az egységet bekapcsolt állapotról készenléti állapotra kapcsolja vagy fordítva. Az egység még készenléti üzemmódban is fogyaszt kisebb mennyiségű energiát.
Egyszerű hálózati beállítás
OKRETURN
Network Easy Setting
LAN setup and testing of home network and Internetconnections are required for Internet functions(BD-Live etc.). Broadband Internet connection is necessary for BD-Live.Is a LAN cable already connected ?Please refer to the operating instructions about networkconnection.
Press [OK] to proceed.
(87)
DMP-BD75EG-VQT3A95.book 7 ページ 2011年1月7日 金曜日 午後3時40分

8 VQT3A95
LejátszásHordozó behelyezése vagy eltávolítása
≥ A hordozó behelyezésekor fontos, hogy a megfelelő oldal nézzen felfelé.≥ Ha Ön egy Panasonic terméket USB-kábellel csatlakoztat,
a csatlakoztatott berendezésen megjelenhet a beállítási képernyő. A részletekért olvassa el a csatlakoztatott berendezés útmutatóját.
Menü HOMEA készülék főbb funkciói a HOME menüből kezelhetők.
ElőkészületekKapcsolja be a televíziót és válassza ki a TV készüléken a megfelelő video bemenetet.
1 Az egység bekapcsolásához nyomja meg a [Í] gombot.
2 Nyomja meg az [OK] vagy [3,4,2,1] gombot a tétel kiválasztásához.
≥ A hordozó behelyezésekor megjelenik az adott hordozóra vonatkozó tartalomválasztó képernyő.≥ További tételek esetén ismételje meg ezt a lépést.≥ A HOME menühöz a “HOME” kiválasztásával vagy a
[RETURN] többszöri megnyomásával térhet vissza.
A HOME menü megjelenítéséhezNyomja meg a [HOME] gombot.
≥ A megjelenített pontok hordozótól függően változhatnak.≥ Szükség esetén végezze el a “Mixed Data Disc Option” beállítását, ha
olyan lemezt használ, amelyen adatfájlok (MP3, JPEG, DivX, MKV) és videó is találhatók. ([HOME] “Setup” “Player Settings” “Disc”)
1
MusicPhotos
Videos
Blu-ray Disc Player
HOME
Setup
MEDIASERVER
(88)
DMP-BD75EG-VQT3A95.book 8 ページ 2011年1月17日 月曜日 午後9時5分

9VQT3A95
Magyar
Videótartalmak lejátszása
1 Helyezze be a hordozót.A tartalom menü megjelenítésekor nyomja meg az [3,4,2,1] gombot a tétel kiválasztásához. ( 8)
2 Nyomja meg a [3,4] gombot a cím kiválasztásához, majd nyomja meg az [OK] gombot.
∫ Menük mutatásaMegjeleníthető a Top Menu, DIRECT NAVIGATOR vagy Pop-up Menu.Nyomja meg a [TOP MENU] vagy [POP-UP MENU] gombot.≥Nyomja meg a [3,4,2,1] gombot a tétel
kiválasztásához, majd nyomja meg az [OK] gombot.
≥ A PAL lemezek kijelzése PAL. Az NTSC lemezek kijelzése “NTSC” vagy “PAL60”. Az NTSC lemezekhez “NTSC” vagy “PAL60” választható ki az “NTSC Contents Output” pontnál. ([HOME] “Setup” “Player Settings” “Picture”)
≥ A MENÜK KIJELZÉSE ALATT A LEMEZEK TOVÁBBFOROGNAK. Ha befejezte a lejátszást, nyomja meg a [∫STOP] gombot a készülék motorjának, a televízió képernyőjének stb. kímélése érdekében.
≥ Hordozótól és tartalomtól függően előfordulhat, hogy a kijelzés módosul vagy nem jelenik meg.
≥ DivX és MKV: További lejátszás nem lehetséges.≥ Nem lehetséges az olyan AVCHD és MPEG2 videók lejátszása,
amelyek húzd és ejtsd, vagy másolás és beillesztés útján kerültek a hordozóra.
≥ Energiatakarékossági okból az áramellátás automatikusan kikapcsol, amikor nincs lejátszás és már kb. 30 perce egyik gombot sem használták (vagyis szüneteltetés, menü megjelenítése, állóképek megjelenítése stb. esetén).
Hordozótól és tartalomtól függően előfordulhat, hogy ezek a funkciók nem működnek.
Nyomja meg a [∫STOP] gombot.A leállított pozíciót memorizálja.Lejátszás folytatása funkcióNyomja meg a [1PLAY] gombot az ettől a pozíciótól történő újraindításhoz.≥ A pozíció törlődik, ha a tálcát kinyitja, vagy annyiszor megnyomja
a [∫STOP] gombot, hogy az egység kijelzőjén megjelenik a “StOP” szó.≥ A lejátszás folytatása funkció nem működik a
BD-Video lemezeknél, így a BD-J esetében sem.
Nyomja meg a [;PAUSE] gombot.≥ A lejátszás újraindításához nyomja meg a [;PAUSE]
gombot újra, vagy a [1PLAY] gombot.
KeresésLejátszás közben nyomja meg a [SEARCH6] vagy [SEARCH5] gombot.≥ Zene és MP3: A sebesség egy lépésben rögzített.LassításSzüneteltetés közben nyomja meg a [SEARCH5] gombot.A sebesség 5 lépésben növekszik.≥ Nyomja meg a [1PLAY] gombot, hogy visszaállítsa a
normál lejátszási sebességet.
Lejátszás vagy szüneteltetés közben nyomja meg a [:] vagy [9] gombot.Ugorjon arra a címre, fejezetre vagy sávra, amit le szeretne játszani.≥Minden egyes gombnyomással növeli az átugrások
számát.
Szüneteltetés közben nyomja meg a [1] (;1) gombot.≥ Tartsa lenyomva az egymás utáni előreléptetéshez.≥ Nyomja meg a [1PLAY] gombot, hogy visszaállítsa a
normál lejátszási sebességet.
Nyomja meg a [AUDIO] gombot.Módosíthatja a hangcsatorna számát vagy a soundtrack nyelvét stb.
BD DVD CD USB
Egyéb műveletek lejátszás közben
Leállítás
Szünet
Keresés/Lassított lejátszás
Átugrás
Képkockáról képkockára
Hangváltás
(89)
VQT3A95 ~Body_hun.fm 9 ページ 2011年1月12日 水曜日 午後7時56分
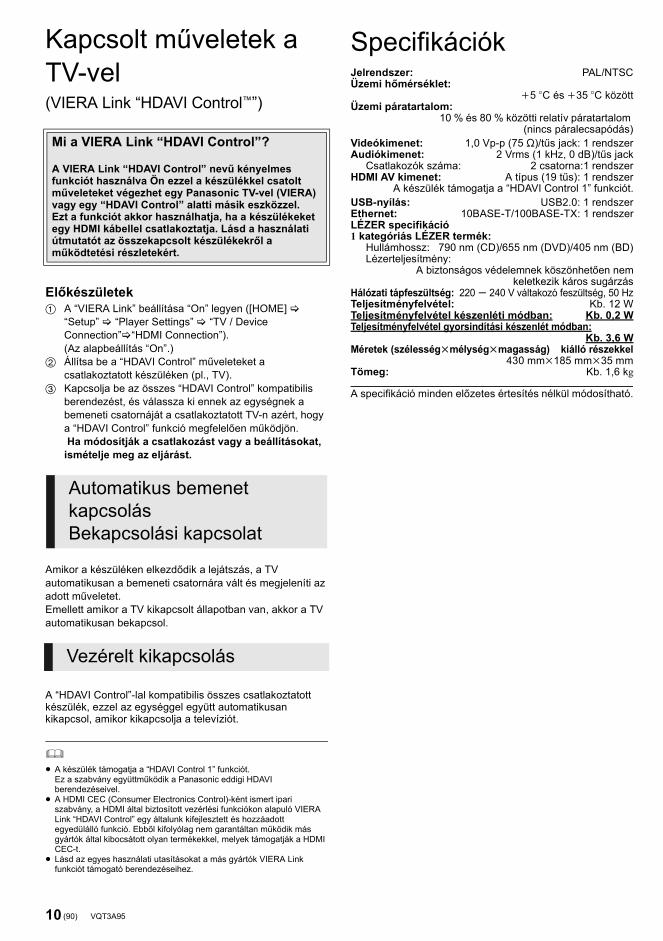
10 VQT3A95
Kapcsolt műveletek a TV-vel (VIERA Link “HDAVI Control™”)
Előkészületek1 A “VIERA Link” beállítása “On” legyen ([HOME]
“Setup” “Player Settings” “TV / Device Connection” “HDMI Connection”). (Az alapbeállítás “On”.)
2 Állítsa be a “HDAVI Control” műveleteket a csatlakoztatott készüléken (pl., TV).
3 Kapcsolja be az összes “HDAVI Control” kompatibilis berendezést, és válassza ki ennek az egységnek a bemeneti csatornáját a csatlakoztatott TV-n azért, hogy a “HDAVI Control” funkció megfelelően működjön. Ha módosítják a csatlakozást vagy a beállításokat, ismételje meg az eljárást.
Amikor a készüléken elkezdődik a lejátszás, a TV automatikusan a bemeneti csatornára vált és megjeleníti az adott műveletet.Emellett amikor a TV kikapcsolt állapotban van, akkor a TV automatikusan bekapcsol.
A “HDAVI Control”-lal kompatibilis összes csatlakoztatott készülék, ezzel az egységgel együtt automatikusan kikapcsol, amikor kikapcsolja a televíziót.
≥ A készülék támogatja a “HDAVI Control 1” funkciót.Ez a szabvány együttműködik a Panasonic eddigi HDAVI berendezéseivel.
≥ A HDMI CEC (Consumer Electronics Control)-ként ismert ipari szabvány, a HDMI által biztosított vezérlési funkciókon alapuló VIERA Link “HDAVI Control” egy általunk kifejlesztett és hozzáadott egyedülálló funkció. Ebből kifolyólag nem garantáltan működik más gyártók által kibocsátott olyan termékekkel, melyek támogatják a HDMI CEC-t.
≥ Lásd az egyes használati utasításokat a más gyártók VIERA Link funkciót támogató berendezéseihez.
SpecifikációkJelrendszer: PAL/NTSCÜzemi hőmérséklet:
i5 oC és i35 oC közöttÜzemi páratartalom:
10 % és 80 % közötti relatív páratartalom (nincs páralecsapódás)
Videókimenet: 1,0 Vp-p (75 ≠)/tűs jack: 1 rendszerAudiókimenet: 2 Vrms (1 kHz, 0 dB)/tűs jack
Csatlakozók száma: 2 csatorna:1 rendszerHDMI AV kimenet: A típus (19 tűs): 1 rendszer
A készülék támogatja a “HDAVI Control 1” funkciót.USB-nyílás: USB2.0: 1 rendszerEthernet: 10BASE-T/100BASE-TX: 1 rendszerLÉZER specifikáció1 kategóriás LÉZER termék:
Hullámhossz: 790 nm (CD)/655 nm (DVD)/405 nm (BD)Lézerteljesítmény:
A biztonságos védelemnek köszönhetően nemkeletkezik káros sugárzás
Hálózati tápfeszültség: 220 s 240 V váltakozó feszültség, 50 HzTeljesítményfelvétel: Kb. 12 WTeljesítményfelvétel készenléti módban: Kb. 0,2 WTeljesítményfelvétel gyorsindítási készenlét módban:
Kb. 3,6 WMéretek (szélességkmélységkmagasság) kiálló részekkel
430 mmk185 mmk35 mmTömeg: Kb. 1,6 kg
A specifikáció minden előzetes értesítés nélkül módosítható.
Mi a VIERA Link “HDAVI Control”?
A VIERA Link “HDAVI Control” nevű kényelmes funkciót használva Ön ezzel a készülékkel csatolt műveleteket végezhet egy Panasonic TV-vel (VIERA) vagy egy “HDAVI Control” alatti másik eszközzel.Ezt a funkciót akkor használhatja, ha a készülékeket egy HDMI kábellel csatlakoztatja. Lásd a használati útmutatót az összekapcsolt készülékekről a működtetési részletekért.
Automatikus bemenet kapcsolásBekapcsolási kapcsolat
Vezérelt kikapcsolás
(90)
DMP-BD75EG-VQT3A95.book 10 ページ 2011年1月17日 月曜日 午後9時5分

11VQT3A95
Magyar
This product incorporates the following software:
For the software categorized as (3) and (4), please refer to the terms and conditions of GPL v2 and LGPL v2.1, as the case may be at http://www.gnu.org/licenses/old-licenses/gpl-2.0.html and http://www.gnu.org/licenses/old-licenses/lgpl-2.1.html.In addition, the software categorized as (3) and (4) are copyrighted by several individuals. Please refer to the copyright notice of those individuals at http://www.am-linux.jp/dl/AWBP11
The GPL/LGPL software is distributed in the hope that it will be useful, but WITHOUT ANY WARRANTY, without even the implied warranty of MERCHANTABILITY or FITNESS FOR A PARTICULAR PURPOSE.
At least three (3) years from delivery of products, Panasonic will give to any third party who contacts us at the contact information provided below, for a charge no more than our cost of physically performing source code distribution, a complete machine-readable copy of the corresponding source code covered under GPL v2/LGPL v2.1.
Contact [email protected]
Source code is also freely available to you and any other member of the public via our website below.http://www.am-linux.jp/dl/AWBP11
the software developed independently by or for Panasonic Corporation,the software owned by third party and licensed to Panasonic Corporation,the software licensed under the GNU General Public License, Version 2 (GPL v2),the software licensed under the GNU LESSER General Public License, Version 2.1 (LGPL v2.1) and/or,open sourced software licensed under its applicable license terms including but not limited toICU License, c-arse license.
(1)
(2)
(3)
(4)
(5)
For Open Source Software Programs categorized as (5), please refer to the applicable license terms listed below and/or included in the “License” menu on Product.
ICU License - ICU 1.8.1 and later
COPYRIGHT AND PERMISSION NOTICE
Copyright (c) 1995-2010 International Business Machines Corporation and others
All rights reserved.
Permission is hereby granted, free of charge, to any person obtaining a copy of this software and associated documentation files (the “Software”), to deal in the Software without restriction, including without limitation the rights to use, copy, modify, merge, publish, distribute, and/or sell copies of the Software, and to permit persons to whom the Software is furnished to do so, provided that the above copyright notice(s) and this permission notice appear in all copies of the Software and that both the above copyright notice(s) and this permission notice appear in supporting documentation.
THE SOFTWARE IS PROVIDED “AS IS”, WITHOUT WARRANTY OF ANY KIND, EXPRESS OR IMPLIED, INCLUDING BUT NOT LIMITED TO THE WARRANTIES OF MERCHANTABILITY, FITNESS FOR A PARTICULAR PURPOSE AND NONINFRINGEMENT OF THIRD PARTY RIGHTS. IN NO EVENT SHALL THE COPYRIGHT HOLDER OR HOLDERS INCLUDED IN THIS NOTICE BE LIABLE FOR ANY CLAIM, OR ANY SPECIAL INDIRECT OR CONSEQUENTIAL DAMAGES, OR ANY DAMAGES WHATSOEVER RESULTING FROM LOSS OF USE, DATA OR PROFITS, WHETHER IN AN ACTION OF CONTRACT, NEGLIGENCE OR OTHER TORTIOUS ACTION, ARISING OUT OF OR IN CONNECTION WITH THE USE OR PERFORMANCE OF THIS SOFTWARE.
Except as contained in this notice, the name of a copyright holder shall not be used in advertising or otherwise to promote the sale, use or other dealings in this Software without prior written authorization of the copyright holder.
All trademarks and registered trademarks mentioned herein are the property of their respective owners.
A készülék másolás elleni védelmet biztosító technológiát tartalmaz, amit a Rovi Corporation birtokában levő USA szabadalmi oltalmak és más szellemi termékjogok védenek. Visszafejtése vagy szétbontása tilos.
A “DVD Logo” a DVD Format/Logo Licensing Corporation védjegye.
A DivX®, a DivX Certified® és a kapcsolódó logók a DivX, Inc. védjegyei és használatuk licenc alapján történik.DivX®, DivX Certified® and associated logos are trademarks of DivX, Inc. and are used under license.
A Windows a Microsoft Corporation védjegye vagy bejegyzett védjegye az Egyesült Államokban és más országokban.
c-arse license
Copyright 1998 by the Massachusetts Institute of Technology.
Permission to use, copy, modify, and distribute this software and itsdocumentation for any purpose and without fee is hereby granted, provided that the above copyright notice appear in all copies and that both that copyright notice and this permission notice appear in supporting documentation, and that the name of M.I.T. not be used in advertising or publicity pertaining to distribution of the software without specific, written prior permission.M.I.T. makes no representations about the suitability of this software for any purpose. It is provided “as is” without express or implied warranty.
A Java és az összes Java-alapú védjegy és logó a Sun Microsystems, Inc. védjegyei vagy bejegyzett védjegyei az Amerikai Egyesült Államokban és más országokban.
Készült a Dolby Laboratories licence alapján.A Dolby és a két D betű alkotta jel a Dolby Laboratories védjegye.
Készült licenc alapján a #’s: 5,451,942; 5,956,674; 5,974,380; 5,978,762; 6,226,616; 6,487,535; 7,392,195; 7,272,567; 7,333,929; 7,212,872 számú USA szabadalom, valamint egyéb megadott és függőben levő USA és nemzetközi szabadalmak alapján.A DTS és a szimbólum a DTS, Inc. bejegyzett védjegyei, míg a & DTS-HD, DTS-HD Master Audio | Essential és a DTS logók a DTS, Inc. védjegyei. A termék a szoftvert is magában foglalja. © DTS, Inc. Minden jog fenntartva.
A HDMI, a HDMI logó és a High-Definition Multimedia Interface a HDMI Licensing LLC védjegye, illetve az Egyesült Államokban és másországokban bejegyzett védjegye.
Ez a termék az AVC és a VC-1 szabadalmi portfoliók szerinti engedéllyel rendelkezik ahhoz, hogy vele a felhasználó személyes és nem kereskedelmi célból (i) az AVC és a VC-1 Szabványok szerint végezze videók kódolását (“AVC/VC-1 Videó”) és/vagy (ii) olyan AVC/VC-1 Videók dekódolását, amelyet személyes és nem kereskedelmi célú tevékenysége során egy másik felhasználó kódolt, és/vagy amely egy AVC/VC-1 Videók szolgáltatására jogosult videószolgáltatótól származik. Semmilyen más felhasználás nem engedélyezett vagy beleértett. További információkkal szolgál az MPEG LA, LLC. Lásd a http://www.mpegla.com weboldalt.
A HDAVI Control™ a Panasonic Corporation védjegye.
Az “AVCHD” és az “AVCHD” logó a Panasonic Corporation és a SonyCorporation védjegyei.
Az MPEG Layer-3 hangkódolási technológia licencadója a Fraunhofer IIS és a Thomson.
DLNA, the DLNA Logo and DLNA CERTIFIED are trademarks, service marks, or certification marks of the Digital Living Network Alliance.
(91)
DMP-BD75EG-VQT3A95.book 11 ページ 2011年1月7日 金曜日 午後3時40分

2 VQT3A95
Drogi KliencieDziękujemy za nabycie tego produktu.Aby optymalnie i bezpiecznie korzystać z tego urządzenia, przeczytaj dokładnie instrukcję obsługi.Przed podłączeniem, używaniem lub ustawianiem tego produktu przeczytaj całą instrukcję obsługi.Zachowaj tę instrukcję do wykorzystania w przyszłości.
Spis treściPierwsze kroki
Korzystanie z instrukcji obsługi (format PDF) . . . . . . . . . . . . . . . . . . . . . . . . . . . . . 2Zasady bezpieczeństwa . . . . . . . . . . . . . . . . . . . . 3Akcesoria. . . . . . . . . . . . . . . . . . . . . . . . . . . . . . . . 3Kompatybilne płyty/urządzenia USB . . . . . . . . . . . 4
Podłączenies i ustawienies
KROK 1: Podłączenie do telewizora . . . . . . . . . . . 6KROK 2: Podłączanie wzmacniacza/
odbiornika . . . . . . . . . . . . . . . . . . . . . . . . 6KROK 3: Podłączanie do sieci
szerokopasmowej . . . . . . . . . . . . . . . . . . 7KROK 4: Konfiguracja . . . . . . . . . . . . . . . . . . . . . . 7
Odtwarzanie
Wkładanie lub usuwanie nośników . . . . . . . . . . . . 8Menu HOME . . . . . . . . . . . . . . . . . . . . . . . . . . . . . 8Odtwarzanie zawartości video. . . . . . . . . . . . . . . . 9Powiązane funkcje odbiornika TV (VIERA Link “HDAVI Control™”). . . . . . . . . . . . . . 10Dane techniczne . . . . . . . . . . . . . . . . . . . . . . . . . 10
Pierwsze kroki
Korzystanie z instrukcji obsługi (format PDF)∫ Windows1 Włącz komputer i włóż płytę CD-ROM zawierającą
instrukcję obsługi (w zestawie).2 Wybierz żądany język i kliknij [Instrukcja obsługi], aby
zainstalować.3 Dwukrotnie kliknij ikonę skrótu “BD75EG Instrukcja
obsługi” na pulpicie.
Gdy instrukcja obsługi (format PDF) się nie otwieraW celu przeglądania lub drukowania instrukcji obsługi (format PDF) niezbędny jest program Adobe Acrobat Reader 5.0 lub nowszy bądź Adobe Reader 7.0 lub nowszy.Należy pobrać i zainstalować wersję programu Adobe Reader odpowiednią do systemu operacyjnego ze strony podanej poniżej.http://get.adobe.com/reader/otherversions
W przypadku poniższych systemów operacyjnych– Windows 2000 SP4– Windows XP SP3– Windows Vista SP2– Windows 7
Należy włożyć płytę CD-ROM zawierającą instrukcję obsługi (w zestawie), kliknąć [Adobe(R) Reader(R)], a następnie postępować zgodnie z instrukcjami wyświetlanymi na ekranie, aby zainstalować.
Odinstalowanie instrukcji obsługi (format PDF)Należy usunąć plik PDF z folderu “Program Files\Panasonic\DMP\”.≥ Jeżeli nie można wyświetlić zawartości folderu Program
Files, należy kliknąć [Show the contents of this folder], aby ją wyświetlić.
∫ Macintosh1 Włącz komputer i włóż płytę CD-ROM zawierającą
instrukcję obsługi (w zestawie).2 Otwórz folder “Manual” w “VFF0703”, a następnie
przekopiuj plik PDF w żądanym języku do folderu.3 Dwukrotnie kliknij plik PDF, aby go otworzyć.
Należy zapoznać się również z instrukcją obsługi (dokument PDF) znajdującą się na płycie CD-ROM (w zestawie).Instrukcja obsługi (format PDF) nie może zostać odtworzona na odtwarzaczu.Zawiera ona informacje na temat czynności zaawansowanych oraz rozwiązywania problemów.
Pozbywanie się lub oddawanie urządzeniaW urządzeniu mogą być zachowane ustawienia użytkownika. W przypadku pozbywania się urządzenia należy wykonać procedurę przywracania ustawień fabrycznych dla wszystkich funkcji.≥W pamięci urządzenia może być zachowana historia
operacji.
Opisy w niniejszej instrukcji obsługi≥W opisach poszczególnych operacji generalnie przyjęte
jest użycie pilota.
(92)
DMP-BD75EG-VQT3A95.book 2 ページ 2011年1月12日 水曜日 午前10時26分
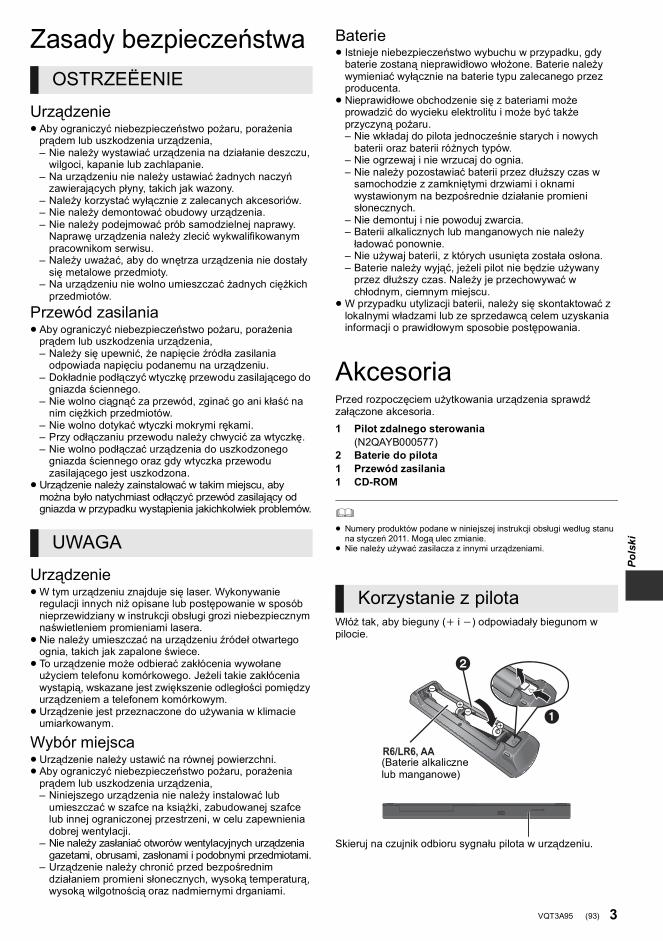
3VQT3A95
Polski
Zasady bezpieczeństwa
Urządzenie≥ Aby ograniczyć niebezpieczeństwo pożaru, porażenia
prądem lub uszkodzenia urządzenia,– Nie należy wystawiać urządzenia na działanie deszczu,
wilgoci, kapanie lub zachlapanie.– Na urządzeniu nie należy ustawiać żadnych naczyń
zawierających płyny, takich jak wazony.– Należy korzystać wyłącznie z zalecanych akcesoriów.– Nie należy demontować obudowy urządzenia.– Nie należy podejmować prób samodzielnej naprawy.
Naprawę urządzenia należy zlecić wykwalifikowanym pracownikom serwisu.
– Należy uważać, aby do wnętrza urządzenia nie dostały się metalowe przedmioty.
– Na urządzeniu nie wolno umieszczać żadnych ciężkich przedmiotów.
Przewód zasilania≥ Aby ograniczyć niebezpieczeństwo pożaru, porażenia
prądem lub uszkodzenia urządzenia,– Należy się upewnić, że napięcie źródła zasilania
odpowiada napięciu podanemu na urządzeniu.– Dokładnie podłączyć wtyczkę przewodu zasilającego do
gniazda ściennego.– Nie wolno ciągnąć za przewód, zginać go ani kłaść na
nim ciężkich przedmiotów.– Nie wolno dotykać wtyczki mokrymi rękami.– Przy odłączaniu przewodu należy chwycić za wtyczkę.– Nie wolno podłączać urządzenia do uszkodzonego
gniazda ściennego oraz gdy wtyczka przewodu zasilającego jest uszkodzona.
≥Urządzenie należy zainstalować w takim miejscu, aby można było natychmiast odłączyć przewód zasilający od gniazda w przypadku wystąpienia jakichkolwiek problemów.
Urządzenie≥W tym urządzeniu znajduje się laser. Wykonywanie
regulacji innych niż opisane lub postępowanie w sposób nieprzewidziany w instrukcji obsługi grozi niebezpiecznym naświetleniem promieniami lasera.≥Nie należy umieszczać na urządzeniu źródeł otwartego
ognia, takich jak zapalone świece.≥ To urządzenie może odbierać zakłócenia wywołane
użyciem telefonu komórkowego. Jeżeli takie zakłócenia wystąpią, wskazane jest zwiększenie odległości pomiędzy urządzeniem a telefonem komórkowym.≥Urządzenie jest przeznaczone do używania w klimacie
umiarkowanym.
Wybór miejsca≥Urządzenie należy ustawić na równej powierzchni.≥ Aby ograniczyć niebezpieczeństwo pożaru, porażenia
prądem lub uszkodzenia urządzenia,– Niniejszego urządzenia nie należy instalować lub
umieszczać w szafce na książki, zabudowanej szafce lub innej ograniczonej przestrzeni, w celu zapewnienia dobrej wentylacji.
– Nie należy zasłaniać otworów wentylacyjnych urządzenia gazetami, obrusami, zasłonami i podobnymi przedmiotami.
– Urządzenie należy chronić przed bezpośrednim działaniem promieni słonecznych, wysoką temperaturą, wysoką wilgotnością oraz nadmiernymi drganiami.
Baterie≥ Istnieje niebezpieczeństwo wybuchu w przypadku, gdy
baterie zostaną nieprawidłowo włożone. Baterie należy wymieniać wyłącznie na baterie typu zalecanego przez producenta.≥ Nieprawidłowe obchodzenie się z bateriami może
prowadzić do wycieku elektrolitu i może być także przyczyną pożaru.– Nie wkładaj do pilota jednocześnie starych i nowych
baterii oraz baterii różnych typów.– Nie ogrzewaj i nie wrzucaj do ognia.– Nie należy pozostawiać baterii przez dłuższy czas w
samochodzie z zamkniętymi drzwiami i oknami wystawionym na bezpośrednie działanie promieni słonecznych.
– Nie demontuj i nie powoduj zwarcia.– Baterii alkalicznych lub manganowych nie należy ładować ponownie.
– Nie używaj baterii, z których usunięta została osłona.– Baterie należy wyjąć, jeżeli pilot nie będzie używany
przez dłuższy czas. Należy je przechowywać w chłodnym, ciemnym miejscu.
≥W przypadku utylizacji baterii, należy się skontaktować z lokalnymi władzami lub ze sprzedawcą celem uzyskania informacji o prawidłowym sposobie postępowania.
AkcesoriaPrzed rozpoczęciem użytkowania urządzenia sprawdź załączone akcesoria.
≥ Numery produktów podane w niniejszej instrukcji obsługi według stanu na styczeń 2011. Mogą ulec zmianie.
≥ Nie należy używać zasilacza z innymi urządzeniami.
Włóż tak, aby bieguny (i i j) odpowiadały biegunom w pilocie.
Skieruj na czujnik odbioru sygnału pilota w urządzeniu.
OSTRZEËENIE
UWAGA
1 Pilot zdalnego sterowania(N2QAYB000577)
2 Baterie do pilota1 Przewód zasilania1 CD-ROM
Korzystanie z pilota
R6/LR6, AA
(Baterie alkaliczne lub manganowe)
(93)
DMP-BD75EG-VQT3A95.book 3 ページ 2011年1月12日 水曜日 午前10時26分
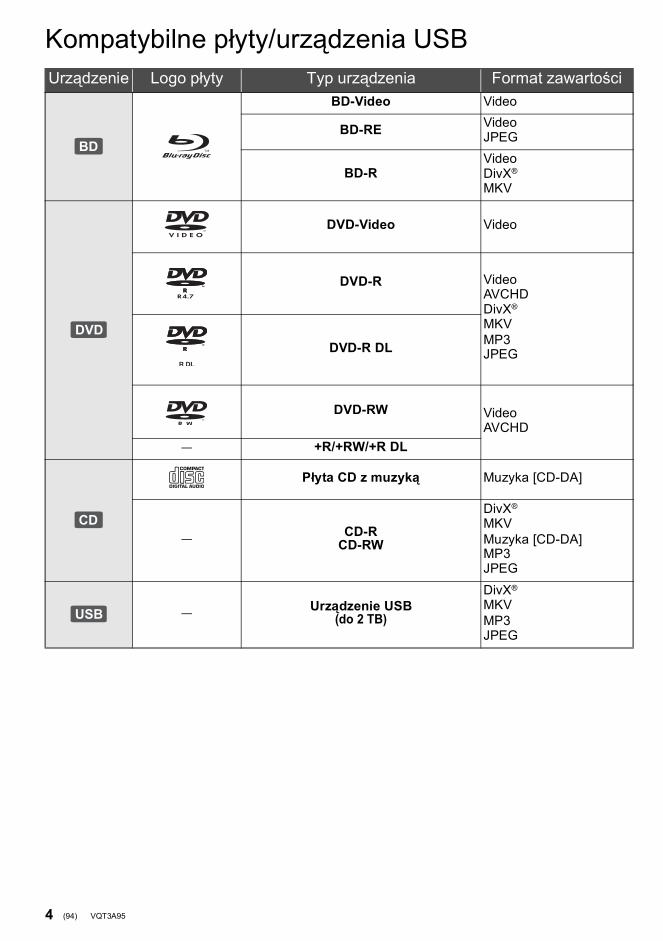
4 VQT3A95
Kompatybilne płyty/urządzenia USBUrządzenie Logo płyty Typ urządzenia Format zawartości
BD-Video Video
BD-RE VideoJPEG
BD-RVideoDivX®
MKV
DVD-Video Video
DVD-R VideoAVCHDDivX®
MKVMP3JPEGDVD-R DL
DVD-RW VideoAVCHD
— +R/+RW/+R DL
Płyta CD z muzyką Muzyka [CD-DA]
— CD-RCD-RW
DivX®
MKVMuzyka [CD-DA]MP3JPEG
— Urządzenie USB(do 2 TB)
DivX®
MKVMP3JPEG
BD
DVD
CD
USB
(94)
DMP-BD75EG-VQT3A95.book 4 ページ 2011年1月7日 金曜日 午後3時45分

5VQT3A95
Polski
∫ Płyty, których nie można użyć w tym urządzeniu
≥DVD-RAM≥ Super Audio CD≥ Photo CD≥DVD-Audio≥ Płyty WMA ≥ Płyty DivX Plus HD≥HD DVD
∫ Informacja dotycząca regionówBD-VideoNiniejsze urządzenie odtwarza płyty BD-Video przeznaczone dla regionu “B”.Przykład:
DVD-VideoNiniejsze urządzenie odtwarza płyty DVD-Video przeznaczone dla regionu “2” lub “ALL”.Przykład:
∫ FinalizacjaPłyty DVD-R/RW/R DL, +R/+RW/+R DL i CD-R/RW nagrane przez nagrywarkę itp. należy zamknąć przez nagrywarkę, aby odtworzyć na tym urządzeniu. Przeczytaj instrukcję obsługi nagrywarki.
∫ BD-Video≥Niniejsze urządzenie obsługuje dźwięk o wysokiej
szybkości transmisji (Dolby Digital Plus, Dolby TrueHD, DTS-HD High Resolution Audio i DTS-HD Master Audio) stosowany w formacie BD-Video. – Jeśli element “Dolby D/Dolby D +/Dolby TrueHD” jest
ustawiony na wartość “PCM”, maksymalna liczba kanałów dźwięku Dolby to 2 kanałów PCM. ([HOME] “Ustawienia” “Ustawienia odtwarzacza” “Dźwięk” “Cyfr. wyprow. dźwięku”)
∫ Płyta CD z muzykąDziałanie i jakość dźwięku płyt CD nieodpowiadających specyfikacjom CD-DA (CD z ochroną od kopiowania, itp.) nie może być gwarantowana.
∫ Urządzenie USB≥ To urządzenie nie gwarantuje połączenia ze wszystkimi
urządzeniami USB.≥ Niniejsze urządzenie nie obsługuje ładowania urządzeń USB.≥ Obsługiwane systemy plików to FAT12, FAT16 i FAT32.≥ Niniejsze urządzenie obsługuje specyfikację USB 2.0 High
Speed.≥ Urządzenie obsługuje dyski twarde sformatowane w
systemie plików FAT32. Dyski twarde niektórych typów mogą wymagać zastosowania własnego zewnętrznego zasilacza.
∫ BD-RE, BD-RPłyty nagrane w trybie DR przy użyciu nagrywarek Blu-ray firmy Panasonic mogą nie odtwarzać we właściwy sposób dźwięku itp.
≥ W niektórych przypadkach nie będzie można odtworzyć powyższych nośników z powodu rodzaju nośnika, stanu nagrania, metody nagrywania i sposobu utworzenia plików.
≥ Producent płyty może kontrolować sposób odtwarzania płyt. Dlatego nie zawsze możliwe jest sterowanie odtwarzaniem tak, jak opisano w niniejszej instrukcji obsługi. Dokładnie przeczytaj instrukcje dotyczące płyty.
2 ALL 352
Informacja dla użytkowników o gromadzeniu i pozbywaniu się zużytych urządzeń i baterii
Niniejsze symbole umieszczane na produktach, opakowaniach i/lub w dokumentacji towarzyszącej oznaczają, że nie wolno mieszać zużytych urządzeń elektrycznych i elektronicznych oraz baterii z innymi odpadami domowymi.W celu zapewnienia właściwego przetwarzania, utylizacji oraz recyklingu zużytych produktów i baterii, należy oddawać
je do wyznaczonych punktów gromadzenia odpadów zgodnie z przepisami prawa krajowego oraz postanowieniami Dyrektyw 2002/96/WE i 2006/66/WE.Prawidłowe pozbywanie się w/w produktów i baterii pomaga oszczędzać cenne zasoby naturalne i zapobiegać potencjalnemu negatywnemu wpływowi na zdrowie człowieka oraz stan środowiska naturalnego, który towarzyszy niewłaściwej gospodarce odpadami.Więcej informacji o zbiórce oraz recyklingu zużytych produktów i baterii można otrzymać od władz lokalnych, miejscowego przedsiębiorstwa oczyszczania lub w punkcie sprzedaży, w którym użytkownik nabył przedmiotowe towary.Za niewłaściwe pozbywanie się powyższych odpadów mogą grozić kary przewidziane przepisami prawa krajowego.
Dotyczy użytkowników firmowych działających na terenie Unii EuropejskiejChcąc w odpowiedni sposób pozbyć się urządzeń elektrycznych lub elektronicznych, należy skontaktować się ze sprzedawcą lub dostawcą, który udzieli dalszych informacji.
[Informacje o pozbywaniu się w/w urządzeń w państwach trzecich]Niniejsze symbole obowiązują wyłącznie na terenie Unii Europejskiej. Chcąc pozbyć się w/w urządzeń elektrycznych lub elektronicznych, należy skontaktować się z władzami lokalnymi lub sprzedawcą w sprawie właściwego sposobu wyrzucania tego rodzaju przedmiotów.
Dotyczy symbolu baterii (symbole przykładowe):Ten symbol może występować wraz z symbolem pierwiastka chemicznego. W takim przypadku spełnia on wymagania Dyrektywy w sprawie określonego środka chemicznego.Cd
(95)
DMP-BD75EG-VQT3A95.book 5 ページ 2011年1月12日 水曜日 午前10時26分

6 VQT3A95
Podłączenies i ustawieniesKROK 1: Podłączenie do telewizora≥Nie umieszczaj urządzenia na wzmacniaczu/odbiorniku
lub nagrzewających się urządzeniach. Wysoka temperatura może uszkodzić to urządzenie.≥ Przed połączeniem urządzeń zalecamy tymczasowe
odłączenie wszystkich urządzeń z gniazdka elektrycznego.≥Nie należy podłączać sygnału video przez nagrywarkę
video. Z powodu zabezpieczenia przed kopiowaniem obraz może być wyświetlany nieprawidłowo.≥Należy używać kabli High Speed HDMI z logo HDMI
(widocznym na okładce). Zaleca się korzystanie z kabla HDMI marki Panasonic. W przypadku używania sygnału 1080p należy używać kabli HDMI o długości maksimum 5,0 m.
Numer zalecanej części (kabel High Speed HDMI):RP-CDHS15 (1,5 m), RP-CDHS30 (3,0 m), RP-CDHS50 (5,0 m), itp.
KROK 2: Podłączanie wzmacniacza/odbiornika
∫ Przez gniazdo HDMI AV OUT(wysoka jakość)
≥Ustaw “Wyprowadzenie dźwięku HDMI” na “Wł.” ([HOME] “Ustawienia” “Ustawienia odtwarzacza” “Połączenie TV/urządzenie” “Połączenie HDMI”).≥ Połączenie HDMI obsługuje VIERA Link “HDAVI Control”
( 10).
HDMI IN
Kabel HDMI
≥Ustaw “Wyprowadzenie dźwięku HDMI” na “Wł.” ([HOME] “Ustawienia” “Ustawienia odtwarzacza” “Połączenie TV/urządzenie” “Połączenie HDMI”).≥Ustaw “Cyfr. wyprow. dźwięku” w zależności od
podłączonego wzmacniacza/odbiornika ([HOME] “Ustawienia” “Ustawienia odtwarzacza” “Dźwięk”).≥ Połączenie HDMI obsługuje VIERA Link “HDAVI Control”
( 10).≥ Jeśli złącze HDMI telewizora lub wzmacniacza/odbiornika
nie ma oznaczenia “(ARC)” (urządzenie nie jest zgodne z ARC), w celu odtwarzania dźwięku z telewizora za pośrednictwem wzmacniacza/odbiornika, wymagane jest połączenie wzmacniacza/odbiornika i telewizora przy użyciu cyfrowego kabla optycznego audio.
HDMI IN
HDMI IN
HDMI IN(ARC)
HDMI OUT(ARC)
Wielokanałowe głośniki
Wzmacniacz/odbiornik
Kabel HDMI
Kabel HDMI
(96)
DMP-BD75EG-VQT3A95.book 6 ページ 2011年1月7日 金曜日 午後3時45分

7VQT3A95
Polski
KROK 3: Podłączanie do sieci szerokopasmowejPo podłączeniu urządzenia do sieci szerokopasmowej można używać następujących usług.– Oprogramowanie układowe można aktualizować– Można oglądać BD-Live– Można uzyskać dostęp do innego urządzeniaAby uzyskać więcej informacji o metodzie połączenia, przeczytaj instrukcję obsługi podłączonego sprzętu.
KROK 4: Konfiguracja
Po podłączeniu nowego odtwarzacza po raz pierwszy i po wciśnięciu przycisku zasilania, pojawi się okno z podstawowymi ustawieniami.PrzygotowanieWłącz telewizor i wybierz odpowiednie źródło odbioru sygnału w telewizorze.
1 Naciśnij [Í].Wyświetlony zostanie ekran konfiguracji.
2 Wykonuj instrukcje wyświetlane na ekranie i zmień ustawienia używając [3,4] i naciśnij [OK].
Po zakończeniu “Łatwe ustawienie”, można wykonać “Łatwe ustawienie sieci”.
≥ Można kiedykolwiek przeprowadzić tę konfigurację wybierając “Łatwe ustawienie” w menu Ustawienia. ([HOME] “Ustawienia” “Ustawienia odtwarzacza” “Inne”)
Po zakończeniu “Łatwe ustawienie”, można wykonać “Łatwe ustawienie sieci”.
Wykonuj instrukcje wyświetlane na ekranie i zmień ustawienia używając [3, 4,2,1] i naciśnij [OK].
∫ Połączenie kabla sieciowego
≥Do podłączania urządzeń peryferyjnych należy używać prostych kabli sieciowych (STP) kategorii 5 lub wyższej.≥Włożenie do złącza LAN jakichkolwiek innych kabli,
oprócz kabla LAN może uszkodzić urządzenie.
Router sieci szerokopasmowej, itp.
Internet
Kabel LAN
Atestowany serwer multimedialny DLNA
£atwe ustawienie
Przełącznik gotowości/włączania (Í/I)Naciśnij, aby przełączyć urządzenie z trybu gotowości na tryb pracy lub odwrotnie. W trybie gotowości urządzenie nadal zużywa niewielką ilość mocy.
Łatwe ustawienie sieci
OKRETURN
Łatwe ustawienie sieci
Ustawienie LAN, test sieci domowej oraz połączeńinternetowych są wymagane przy funkcjach internetowych(BD-Live itp.).Szerokopasmowe połączenie internetowe jest niezbędnedla BD-Live.Czy kabel LAN jest już podłączony ?Informacje na temat połączenia z siecią znajdziesz w instrukcjach operacyjnych.Naciśnij [OK], aby przejść dalej.
(97)
DMP-BD75EG-VQT3A95.book 7 ページ 2011年1月7日 金曜日 午後3時45分
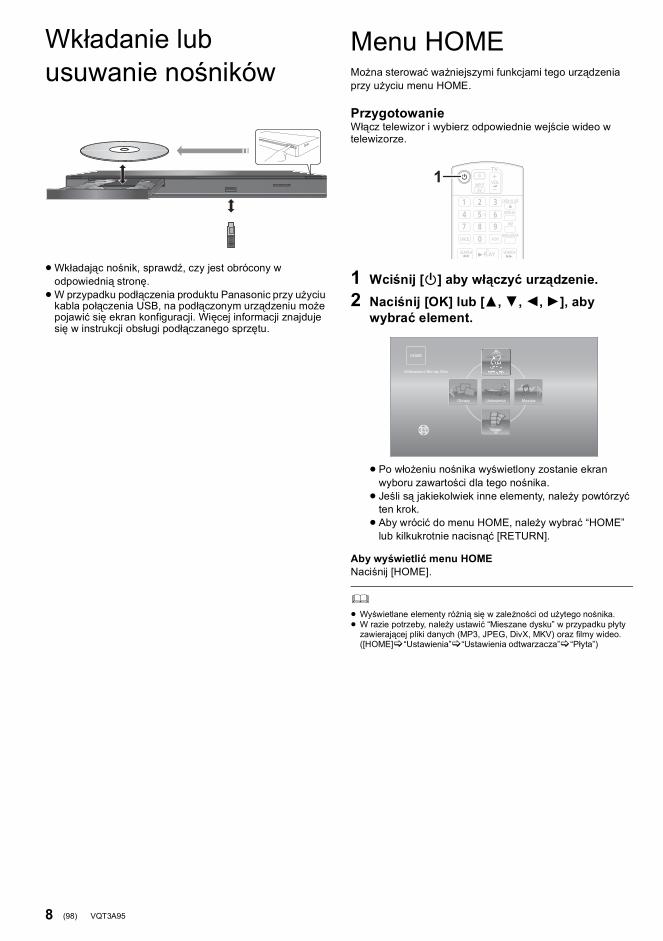
8 VQT3A95
OdtwarzanieWkładanie lub usuwanie nośników
≥Wkładając nośnik, sprawdź, czy jest obrócony w odpowiednią stronę.≥W przypadku podłączenia produktu Panasonic przy użyciu
kabla połączenia USB, na podłączonym urządzeniu może pojawić się ekran konfiguracji. Więcej informacji znajduje się w instrukcji obsługi podłączanego sprzętu.
Menu HOMEMożna sterować ważniejszymi funkcjami tego urządzenia przy użyciu menu HOME.
PrzygotowanieWłącz telewizor i wybierz odpowiednie wejście wideo w telewizorze.
1 Wciśnij [Í] aby włączyć urządzenie.2 Naciśnij [OK] lub [3,4,2,1], aby
wybrać element.
≥ Po włożeniu nośnika wyświetlony zostanie ekran wyboru zawartości dla tego nośnika.≥ Jeśli są jakiekolwiek inne elementy, należy powtórzyć
ten krok.≥ Aby wrócić do menu HOME, należy wybrać “HOME”
lub kilkukrotnie nacisnąć [RETURN].
Aby wyświetlić menu HOMENaciśnij [HOME].
≥ Wyświetlane elementy różnią się w zależności od użytego nośnika.≥ W razie potrzeby, należy ustawić “Mieszane dysku” w przypadku płyty
zawierającej pliki danych (MP3, JPEG, DivX, MKV) oraz filmy wideo. ([HOME] “Ustawienia” “Ustawienia odtwarzacza” “Płyta”)
1
MusykaObrazy
Wideo
SiećOdtwarzacz Blu-ray Disc
HOME
Ustawienia
MEDIASERVER
(98)
VQT3A95 ~Body_pol.fm 8 ページ 2011年1月13日 木曜日 午後1時34分

9VQT3A95
Polski
Odtwarzanie zawartości video
1 Włóż nośnik.Jeśli wyświetlone jest menu, naciśnij [3,4,2,1], aby wybrać element. ( 8)
2 Naciśnij [3, 4], aby wybrać tytuł i naciśnij [OK].
∫ Wyświetlanie menuMożna wyświetlić Główne menu, DIRECT NAVIGATOR lub Menu wywoływane.Naciśnij [TOP MENU] lub [POP-UP MENU].≥Naciśnij [3,4,2,1], aby wybrać pozycję i naciśnij
[OK].
≥ Sygnał z płyt PAL jest odtwarzany w PAL. Sygnał z płyt NTSC jest odtwarzany w “NTSC” lub “PAL60”. Można wybrać “NTSC” lub “PAL60” w “Wyprowadzenie treści NTSC” dla płyt NTSC. ([HOME] “Ustawienia” “Ustawienia odtwarzacza” “Obraz”)
≥ PŁYTY KONTYNUUJĄ OBROTY PODCZAS GDY WYŚWIETLANE SĄ MENU. Naciśnij [∫STOP] po zakończeniu odtwarzania, aby chronić silnik urządzenia, ekran odbiornika TV i tym podobne.
≥ W zależności od nośników i zawartości, ekran może się zmienić lub może się nie pojawić.
≥ DivX i MKV: Odtwarzanie sekwencyjne nie jest możliwe.≥ Nie można odtwarzać video AVCHD i MPEG2, które były skopiowane
metodą “przeciągnij i upuść”, skopiowane i wklejone na nośnik.≥ W celu oszczędności energii, zasilanie zostaje wyłączone
automatycznie po około 30 minutach bezczynności, jeżeli urządzenie nie znajduje się w trybie odtwarzania (np. w trybie pauzy, podczas wyświetlania menu, wyświetlania zdjęć itp.).
Funkcje te mogą nie działać w zależności od nośników i zawartości.
Naciśnij [∫STOP].Zostaje zapamiętana pozycja zatrzymana.Powrót do funkcji odtwarzaniaWciśnij [1PLAY], aby wystartować ponownie z tej pozycji.≥ Pozycja zostaje skasowana po otwarciu tacki, lub gdy
wciśniesz kilkakrotnie [∫STOP], aby wyświetlić “StOP” na wyświetlaczu urządzenia.≥ Na płytach BD-Video włącznie z BD-J, funkcja
wznawiania odtwarzania nie działa.
Naciśnij [;PAUSE].≥ Naciśnij ponownie [;PAUSE] lub [1PLAY], aby powrócić
do odtwarzania.
SzukaniePodczas odtwarzania naciśnij [SEARCH6] lub [SEARCH5].≥ Muzyka i MP3: Szybkość jest ustawiona na pojedynczy krok.Ruch zwolnionyPodczas pauzy naciśnij [SEARCH5].Prędkość wzrasta do 5 kroków.≥Wciśnij [1PLAY], aby powrócić do normalnej prędkości
odtwarzania.
Podczas odtwarzania lub wstrzymania odtwarzania naciśnij [:] lub [9].Przeskocz do tytułu, rozdziału lub ścieżki, którą chcesz odtwarzać.≥ Każde wciśnięcie zwiększa ilość przeskoków.
Podczas pauzy naciśnij [1] (;1).≥ Naciśnij i przytrzymaj, aby zmienić kolejno w przód.≥Wciśnij [1PLAY], aby powrócić do normalnej prędkości
odtwarzania.
Naciśnij [AUDIO].Można zmienić numer kanału audio lub ścieżki dźwiękowej itd.
BD DVD CD USB
Inne operacje podczas odtwarzania
Stop
Pauza
Wyszukiwanie/Przewijanie powolne
Przeskocz
Klatka po klatce
Zmiana dźwięku
(99)
VQT3A95 ~Body_pol.fm 9 ページ 2011年1月12日 水曜日 午前10時37分

10 VQT3A95
Powiązane funkcje odbiornika TV (VIERA Link “HDAVI Control™”)
Przygotowanie1 Ustaw “VIERA Link” na “Wł.”
([HOME] “Ustawienia” “Ustawienia odtwarzacza” “Połączenie TV/urządzenie” “Połączenie HDMI”). (Domyślne ustawienie to “Wł.”.)
2 Ustaw działanie “HDAVI Control” na podłączonych aparatach (np., TV).
3 Włącz wszystkie aparaty kompatybilne z “HDAVI Control” i wybierz kanał wejściowy tego urządzenia na podłączonym telewizorze, aby funkcja “HDAVI Control” działała prawidłowo. Gdyby zostały zmienione podłączenie lub ustawienia, powtórz tę procedurę.
Gdy rozpoczyna się odtwarzanie w urządzeniu, telewizor zostanie automatycznie przełączony na kanał wejścia i będzie wyświetlał odpowiednią czynność.Gdy telewizor jest wyłączony, zostanie automatycznie włączony.
Wszystkie podłączone urządzenia zgodne z “HDAVI Control”, włącznie z tym urządzeniem, automatycznie wyłączają się, po wyłączeniu telewizora.
≥ To urządzenie obsługuje funkcję “HDAVI Control 1”.Ten standard jest kompatybilny z konwencjonalnymi urządzeniami HDAVI firmy Panasonic.
≥ VIERA Link “HDAVI Control”, oparty o funkcje sterowania dostarczone przez HDMI , przemysłowy standard znany pod nazwą HDMI CEC (Consumer Electronics Control), jest unikalną funkcją, opracowaną i dodaną przez naszą firmę. W związku z tym, nie może być zagwarantowane jej współdziałanie z urządzeniami innych producentów, obsługujących HDMI CEC.
≥ Patrz indywidualne książki instrukcji urządzeń innych producentów, obsługujących funkcję VIERA Link.
Dane techniczneSystem sygnału: PAL/NTSCZakres temperatury roboczej:
i5 oC do i35 oCDopuszczalna wilgotność podczas pracy:
10 % do 80 % RH (bez kondensacji)Wyjście wideo: 1,0 Vp-p (75 ≠)/Pin jack: 1 systemWyjście audio: 2 Vrms (1 kHz, 0 dB)/Pin jack
Liczba złączy: 2 kanały:1 systemWyjście HDMI AV: Typ A (19-pinowe): 1 system
To urządzenie obsługuje funkcję “HDAVI Control 1”.Gniazdo USB: USB2.0: 1 systemEthernet: 10BASE-T/100BASE-TX: 1 systemDane techniczne LASERAProdukt LASEROWY klasy 1:
Długość fali: 790 nm (CDs)/655 nm (DVDs)/405 nm (BDs)Moc lasera: Brak szkodliwego promieniowania przy
stosowanych zabezpieczeniachZasilanie: AC 220 do 240 V, 50 HzPobór mocy: W przybliż. 12 WPobór mocy w trybie gotowości: W przybliż. 0,2 WPobór mocy w trybie gotowości z przyspieszonym uruchamianiem:
W przybliż. 3,6 WRozmiary (Szer.kGłęb.kWys.) Włącznie z wystającymi częściami:
430 mmk185 mmk35 mmMasa: W przybliż. 1,6 kg
Dane techniczne mogą się zmienić bez uprzedzenia.
Co to jest VIERA Link “HDAVI Control”?
VIERA Link “HDAVI Control” to wygodna funkcja oferująca połączone operacje tego urządzenia i telewizora marki Panasonic (VIERA) lub innego urządzenia pod “HDAVI Control”.Funkcji tej można używać, łącząc aparaturę kablem HDMI. Odnośnie szczegółów działania, patrz instrukcje obsługi dla podłączonych urządzeń.
Automatyczne przełączanie wejściaWspólne włączanie zasilania
Wspólne wyłączanie zasilania
(100)
VQT3A95 ~Body_pol.fm 10 ページ 2011年1月12日 水曜日 午前10時36分
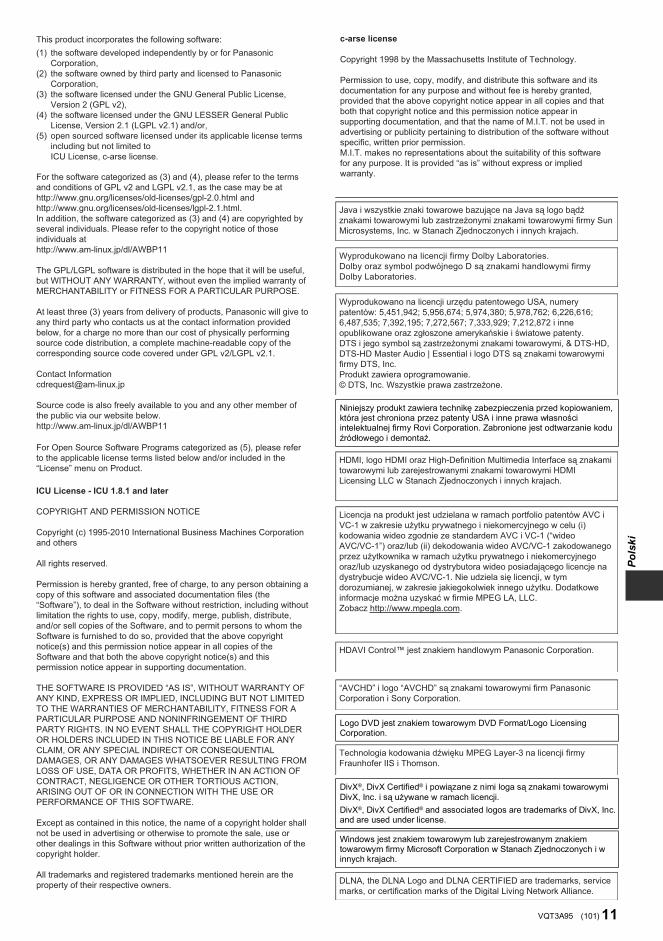
11VQT3A95
Polski
This product incorporates the following software:
For the software categorized as (3) and (4), please refer to the terms and conditions of GPL v2 and LGPL v2.1, as the case may be at http://www.gnu.org/licenses/old-licenses/gpl-2.0.html and http://www.gnu.org/licenses/old-licenses/lgpl-2.1.html.In addition, the software categorized as (3) and (4) are copyrighted by several individuals. Please refer to the copyright notice of those individuals at http://www.am-linux.jp/dl/AWBP11
The GPL/LGPL software is distributed in the hope that it will be useful, but WITHOUT ANY WARRANTY, without even the implied warranty of MERCHANTABILITY or FITNESS FOR A PARTICULAR PURPOSE.
At least three (3) years from delivery of products, Panasonic will give to any third party who contacts us at the contact information provided below, for a charge no more than our cost of physically performing source code distribution, a complete machine-readable copy of the corresponding source code covered under GPL v2/LGPL v2.1.
Contact [email protected]
Source code is also freely available to you and any other member of the public via our website below.http://www.am-linux.jp/dl/AWBP11
the software developed independently by or for Panasonic Corporation,the software owned by third party and licensed to Panasonic Corporation,the software licensed under the GNU General Public License, Version 2 (GPL v2),the software licensed under the GNU LESSER General Public License, Version 2.1 (LGPL v2.1) and/or,open sourced software licensed under its applicable license terms including but not limited toICU License, c-arse license.
(1)
(2)
(3)
(4)
(5)
For Open Source Software Programs categorized as (5), please refer to the applicable license terms listed below and/or included in the “License” menu on Product.
ICU License - ICU 1.8.1 and later
COPYRIGHT AND PERMISSION NOTICE
Copyright (c) 1995-2010 International Business Machines Corporation and others
All rights reserved.
Permission is hereby granted, free of charge, to any person obtaining a copy of this software and associated documentation files (the “Software”), to deal in the Software without restriction, including without limitation the rights to use, copy, modify, merge, publish, distribute, and/or sell copies of the Software, and to permit persons to whom the Software is furnished to do so, provided that the above copyright notice(s) and this permission notice appear in all copies of the Software and that both the above copyright notice(s) and this permission notice appear in supporting documentation.
THE SOFTWARE IS PROVIDED “AS IS”, WITHOUT WARRANTY OF ANY KIND, EXPRESS OR IMPLIED, INCLUDING BUT NOT LIMITED TO THE WARRANTIES OF MERCHANTABILITY, FITNESS FOR A PARTICULAR PURPOSE AND NONINFRINGEMENT OF THIRD PARTY RIGHTS. IN NO EVENT SHALL THE COPYRIGHT HOLDER OR HOLDERS INCLUDED IN THIS NOTICE BE LIABLE FOR ANY CLAIM, OR ANY SPECIAL INDIRECT OR CONSEQUENTIAL DAMAGES, OR ANY DAMAGES WHATSOEVER RESULTING FROM LOSS OF USE, DATA OR PROFITS, WHETHER IN AN ACTION OF CONTRACT, NEGLIGENCE OR OTHER TORTIOUS ACTION, ARISING OUT OF OR IN CONNECTION WITH THE USE OR PERFORMANCE OF THIS SOFTWARE.
Except as contained in this notice, the name of a copyright holder shall not be used in advertising or otherwise to promote the sale, use or other dealings in this Software without prior written authorization of the copyright holder.
All trademarks and registered trademarks mentioned herein are the property of their respective owners.
Niniejszy produkt zawiera technikę zabezpieczenia przed kopiowaniem, która jest chroniona przez patenty USA i inne prawa własności intelektualnej firmy Rovi Corporation. Zabronione jest odtwarzanie kodu źródłowego i demontaż.
Logo DVD jest znakiem towarowym DVD Format/Logo Licensing Corporation.
DivX®, DivX Certified® i powiązane z nimi loga są znakami towarowymi DivX, Inc. i są używane w ramach licencji.DivX®, DivX Certified® and associated logos are trademarks of DivX, Inc. and are used under license.
Windows jest znakiem towarowym lub zarejestrowanym znakiem towarowym firmy Microsoft Corporation w Stanach Zjednoczonych i w innych krajach.
c-arse license
Copyright 1998 by the Massachusetts Institute of Technology.
Permission to use, copy, modify, and distribute this software and itsdocumentation for any purpose and without fee is hereby granted, provided that the above copyright notice appear in all copies and that both that copyright notice and this permission notice appear in supporting documentation, and that the name of M.I.T. not be used in advertising or publicity pertaining to distribution of the software without specific, written prior permission.M.I.T. makes no representations about the suitability of this software for any purpose. It is provided “as is” without express or implied warranty.
Java i wszystkie znaki towarowe bazujące na Java są logo bądź znakami towarowymi lub zastrzeżonymi znakami towarowymi firmy SunMicrosystems, Inc. w Stanach Zjednoczonych i innych krajach.
Wyprodukowano na licencji firmy Dolby Laboratories.Dolby oraz symbol podwójnego D są znakami handlowymi firmy Dolby Laboratories.
Wyprodukowano na licencji urzędu patentowego USA, numery patentów: 5,451,942; 5,956,674; 5,974,380; 5,978,762; 6,226,616; 6,487,535; 7,392,195; 7,272,567; 7,333,929; 7,212,872 i inne opublikowane oraz zgłoszone amerykańskie i światowe patenty.DTS i jego symbol są zastrzeżonymi znakami towarowymi, & DTS-HD,DTS-HD Master Audio | Essential i logo DTS są znakami towarowymi firmy DTS, Inc.Produkt zawiera oprogramowanie.© DTS, Inc. Wszystkie prawa zastrzeżone.
HDMI, logo HDMI oraz High-Definition Multimedia Interface są znakamitowarowymi lub zarejestrowanymi znakami towarowymi HDMI Licensing LLC w Stanach Zjednoczonych i innych krajach.
Licencja na produkt jest udzielana w ramach portfolio patentów AVC i VC-1 w zakresie użytku prywatnego i niekomercyjnego w celu (i) kodowania wideo zgodnie ze standardem AVC i VC-1 (“wideo AVC/VC-1”) oraz/lub (ii) dekodowania wideo AVC/VC-1 zakodowanego przez użytkownika w ramach użytku prywatnego i niekomercyjnego oraz/lub uzyskanego od dystrybutora wideo posiadającego licencje na dystrybucje wideo AVC/VC-1. Nie udziela się licencji, w tym dorozumianej, w zakresie jakiegokolwiek innego użytku. Dodatkowe informacje można uzyskać w firmie MPEG LA, LLC.Zobacz http://www.mpegla.com.
HDAVI Control™ jest znakiem handlowym Panasonic Corporation.
“AVCHD” i logo “AVCHD” są znakami towarowymi firm PanasonicCorporation i Sony Corporation.
Technologia kodowania dźwięku MPEG Layer-3 na licencji firmy Fraunhofer IIS i Thomson.
DLNA, the DLNA Logo and DLNA CERTIFIED are trademarks, service marks, or certification marks of the Digital Living Network Alliance.
(101)
DMP-BD75EG-VQT3A95.book 11 ページ 2011年1月7日 金曜日 午後3時45分

2 VQT3A95
Hyvä asiakasKiitos, että ostit tämän tuotteen.Lue nämä ohjeet huolellisesti, jotta takaat parhaan mahdollisen toiminnan ja turvallisuuden.Ennen kuin suoritat liitännän, käytät tai säädät tätä tuotetta, muista lukea ohjeet kokonaan.Säilytä tämä opas tulevaa tarvetta varten.
SisällysluetteloAlkuohjeet
Käyttöohjeiden lukeminen (PDF-formaatti) . . . . . . 2Varotoimet turvallisuuden takaamiseksi . . . . . . . . 3Varusteet . . . . . . . . . . . . . . . . . . . . . . . . . . . . . . . . 3Toistettavat levyt/USB-laitteet . . . . . . . . . . . . . . . . 4
Yhteydet ja asetukset
VAIHE 1 : Liittäminen televisioon . . . . . . . . . . . . . 6VAIHE 2 : Liittäminen vahvistimeen
/vastaanottimeen. . . . . . . . . . . . . . . . . . 6VAIHE 3 : Liittäminen laajakaistaverkkoon . . . . . . 7VAIHE 4 : Asetus. . . . . . . . . . . . . . . . . . . . . . . . . . 7
Toistoto
Tietovälineen laittaminen tai poistaminen . . . . . . . 8HOME valikko . . . . . . . . . . . . . . . . . . . . . . . . . . . . 8Videosisältöjen toisto . . . . . . . . . . . . . . . . . . . . . . . 9Linkitetyt toimenpiteet television kanssa (VIERA Link “HDAVI Control™”). . . . . . . . . . . . . . 10Tekniset tiedot . . . . . . . . . . . . . . . . . . . . . . . . . . . 10
A lku ohjeet
Käyttöohjeiden lukeminen (PDF-formaatti)∫ Käyttöjärjestelmälle Windows1 Kytke tietokone päälle ja laita sen levyasemaan
käyttöohjeet sisältävä CD-ROM-levy (sisältyy toimitukseen).
2 Valitse haluttu kieli ja napsauta sitten [Käyttöohjeet] asennuksen suorittamiseksi.
3 Kaksoisnapsauta pikakuvaketta “BD75EG Käyttöohjeet” työpöydällä.
Kun käyttöohjeet (PDF-formaatti) eivät aukeaTarvitset ohjelman Adobe Acrobat Reader 5.0 tai uudemman tai ohjelman Adobe Reader 7.0 tai uudemman, jotta voit selata käyttöohjeita PDF-formaatissa tai tulostaa ne.Lataa ja asenna seuraavalta verkkosivustolta ohjelman Adobe Reader versio, jota voit käyttää käyttöjärjestelmäsi kanssa.http://get.adobe.com/reader/otherversions
Jos käytetään seuraavaa käyttöjärjestelmää– Windows 2000 SP4– Windows XP SP3– Windows Vista SP2– Windows 7
Laita levyasemaan käyttöohjeet sisältävä CD-ROM-levy (sisältyy toimitukseen), napsauta [Adobe(R) Reader(R)] ja noudata sitten näytön ohjeita asennuksen suorittamiseksi.
Käyttöohjeiden (PDF-formaatti) poistaminenPoista PDF-tiedosto kansiosta “Program Files\Panasonic\DMP\”.≥ Kun ohjelmatiedostojen kansion sisältöä ei voida näyttää,
napsauta kohtaa [Show the contents of this folder] niiden näyttämiseksi.
∫ Käyttöjärjestelmälle Macintosh1 Kytke tietokone päälle ja laita sen levyasemaan
käyttöohjeet sisältävä CD-ROM-levy (sisältyy toimitukseen).
2 Avaa kansio “Manual” kohdassa “VFF0703” ja kopioi sitten PDF-tiedosto halutulla kielellä kansion sisälle.
3 Kaksoisnapsauta PDF-tiedostoa sen avaamiseksi.
Katso myös käyttöohjeet (PDF-formaatissa), jotka on tallennettu käyttöohjeet sisältävälle CD-ROM-levylle (toimitettu).Käyttöohjeita (PDF-muodossa) ei voida toistaa itse soittimessa.Voit tutustua lisäasetuksiin ja eri käyttötapoihin sekä vianetsintäosaan.
Laitteen hävittäminen tai luovuttaminenLaitteessa saattaa olla käyttäjän asetustietoja. Jos luovut laitteesta hävittämällä tai antamalla sen pois, toimi seuraavasti palauttaaksesi kaikki asetukset tehtaan esiasetuksiin, jotta poistetaan käyttäjän asetukset.≥ Käyttöhistoria saatetaan tallentaa tämän laitteen
muistiin.
Tietoja kuvauksista näissä käyttöohjeissa≥ Toimenpideohjeet kuvataan yleensä kaukosäädintä
käyttäen.
(102)
DMP-BD75EG-VQT3A95.book 2 ページ 2011年1月12日 水曜日 午前10時40分

3VQT3A95
Suomi
Varotoimet turvallisuuden takaamiseksi
Laite≥ Tulipalo-, sähköisku- tai vahinkovaaran välttämiseksi,
– Älä anna tämän laitteen altistua sateelle, kosteudelle, pisaroille tai roiskeille.
– Älä laita laitteen päälle mitään nesteitä sisältäviä esineitä kuten maljakot.
– Käytä ainoastaan suositeltuja varusteita.– Älä poista suojuksia.– Älä korjaa tätä laitetta itse. Anna huoltopalvelut
tehtäväksi pätevälle henkilöstölle.– Älä anna metalliesineiden pudota laitteen sisälle.– Älä laita painavia esineitä laitteen päälle.
Verkkokaapeli≥ Tulipalo-, sähköisku- tai vahinkovaaran välttämiseksi,
– Varmista, että virtalähteen jännite vastaa laitteeseen merkittyä jännitettä.
– Työnnä verkkovirtapistoke kunnollisesti pistorasiaan.– Älä vedä tai taivuta kaapelia tai aseta sen päälle
painavia esineitä.– Älä käsittele pistoketta märillä käsillä.– Pidä kiinni verkkovirtapistokkeen rungosta, kun irrotat
pistokkeen.– Älä käytä vahingoittunutta verkkovirtapistoketta tai
pistorasiaa.≥ Asenna tämä laite siten, että verkkokaapeli voidaan
irrottaa pistorasiasta välittömästi, jos ilmenee ongelmia.
Laite≥ Tämä tuote käyttää laseria. Laitteen käyttäminen muulla
kuin näissä käyttöohjeissa mainitulla tavalla saattaa altistaa käyttäjän vaaralliselle säteilylle.≥ Älä laita avotulisia esineitä kuten kynttilöitä laitteen päälle.≥ Laite saattaa kärsiä radiotaajuisista häiriöistä, jotka
aiheutuvat matkapuhelimista käytön aikana. Jos kyseisiä häiriöitä tapahtuu, lisää matkapuhelimen ja tuotteen välistä etäisyyttä.≥ Laite on tarkoitettu käytettäväksi leudoissa ilmastoissa.
Sijoitus≥ Sijoita laite tasaiselle pinnalle.≥ Tulipalo-, sähköisku- tai vahinkovaaran välttämiseksi,
– Älä asenna tai sijoita tätä laitetta kirjahyllyyn, suljettuun kaappiin tai muuhun rajalliseen tilaan. Varmista laitteen riittävä tuuletus.
– Älä tuki laitteen tuuletusaukkoja lehdillä, pöytäliinalla, verhoilla tai vastaavilla esineillä.
– Älä anna tämän laitteen altistua suoralle auringonvalolle, korkeille lämpötiloille, runsaalle kosteudelle tai liialliselle tärinälle.
Paristot≥ On olemassa räjähdysvaara, jos akkua ei vaihdeta oikein.
Käytä ainoastaan valmistajan suosittelemaa tyyppiä.≥ Paristojen väärä käsittely voi aiheuttaa elektrolyyttivuodon
sekä tulipalon.– Älä sekoita keskenään vanhoja ja uusia paristoja tai
käytä erityyppisiä paristoja samanaikaisesti.– Älä altista sitä kuumalle tai liekeille.– Älä jätä paristoa(paristoja) autoon suoraan
auringonvaloon pitkäksi aikaa, kun auton ovet ja ikkunat ovat kiinni.
– Älä pura osiin tai aiheuta oikosulkua.– Älä lataa uudelleen alkali- tai mangaaniparistoja.– Älä käytä paristoja, joiden suojakuori on rikkoutunut.– Poista paristot, jos et aio käyttää kaukosäädintä pitkään
aikaa. Varastoi viileään, pimeään paikkaan.≥ Kun hävität paristot, ota yhteyttä paikallisiin viranomaisiin
tai jälleenmyyjään oikean hävitysmenetelmän selvittämiseksi.
VarusteetTarkista toimitetut varusteet ennen tämän laitteen käyttöä.
≥ Näiden käyttöohjeiden tuotenumerot ovat tammikuun 2011 mukaisia. Niihin voi tulla muutoksia.
≥ Älä käytä verkkokaapelia muiden laitteiden kanssa.
Aseta siten, että navat (i ja j) täsmäävät kaukosäätimen napojen kanssa.
Suuntaa se tämän laitteen kaukosäätimen signaalianturia kohti.
VAROITUS
VAARA
1 Kaukosäädin(N2QAYB000577)
2 Kaukosäätimen paristot1 Verkkokaapeli1 CD-ROM
Kaukosäätimen käyttö
R6/LR6, AA
(Alkali- tai mangaaniparistot)
(103)
DMP-BD75EG-VQT3A95.book 3 ページ 2011年1月12日 水曜日 午前10時40分

4 VQT3A95
Toistettavat levyt/USB-laitteetLaite Levyn
merkinnät Laitetyypit Sisällön muoto
BD-Video Video
BD-RE VideoJPEG
BD-RVideoDivX®
MKV
DVD-Video Video
DVD-R VideoAVCHDDivX®
MKVMP3JPEGDVD-R DL
DVD-RW VideoAVCHD
— +R/+RW/+R DL
Musiikki-CD Musiikki [CD-DA]
— CD-RCD-RW
DivX®
MKVMusiikki [CD-DA]MP3JPEG
— USB-laite(jopa 2 Tt)
DivX®
MKVMP3JPEG
BD
DVD
CD
USB
(104)
DMP-BD75EG-VQT3A95.book 4 ページ 2011年1月7日 金曜日 午後3時55分

5VQT3A95
Suomi
∫ Levyt, joita ei voida toistaa tällä laitteella
≥DVD-RAM≥ SuperAudio-CD≥ Photo-CD≥DVD-Audio≥WMA-levyt≥DivX Plus HD -levyt≥HD DVD
∫ Alueen hallintatiedotBD-VideoTämä laite toistaa BD-videota, jonka merkintä sisältää aluekoodin “B”.Esimerkki:
DVD-VideoTämä laite toistaa DVD-videota, jonka merkintä sisältää aluenumeron “2” tai “ALL”.Esimerkki:
∫ ViimeisteleTallentimella jne. tallennettu DVD-R/RW/R DL, +R/+RW/+R DL ja CD-R/RW -levy tulee viimeistellä tallentimella, jotta se voidaan toistaa tällä laitteella. Jos haluat lisätietoja, katso tallentimen käyttöohjeita.
∫ BD-Video≥ Tämä laite tukee ääntä korkealla bittinopeudella (Dolby
Digital Plus, Dolby TrueHD, DTS-HD High Resolution Audio ja DTS-HD Master Audio), jota käytetään BD-videossa. – Jos “Dolby D/Dolby D +/Dolby TrueHD” asetetaan
asentoon “PCM”, Dolby-äänien enimmäismäärä on 2-kanavainen PCM. ([HOME] “Setup” “Player Settings” “Sound” “Digital Audio Output”)
∫ Musiikki-CDToimintaa ja äänen laatua ei taata CD-levyille, jotka eivät ole yhteensopivia määritelmän CD-DA kanssa (kopiointirajoitetut CD-levyt, jne.).
∫ USB-laite≥ Tämä laite ei takaa yhteyttä kaikkiin USB-laitteisiin.≥ Tämä laite ei tue USB-laitteen latausta.≥ Tuetaan tiedostojärjestelmiä FAT12, FAT16 ja FAT32.≥ Tämä laite tukee tekniikkaa USB 2.0 High Speed.≥ Tämä laite voi tukea kiintolevyä, joka on alustettu
FAT32-muotoon. Jotkut kiintolevytyypit voivat vaatia ulkoisen virtalähdeyksikön käyttöä.
∫ BD-RE, BD-RPanasonicin Blu-ray-tallentimella muodossa DR tallennetut levyt eivät mahdollisesti toista ääntä jne. kunnolla.
≥ Ei mahdollisesti voida toistaa yllä mainittuja tietovälineitä joissain tapauksissa tietovälineen tyypin, tallennusolosuhteiden, tallennusmenetelmän tai tiedostojen luontitavan vuoksi.
≥ Levyn valmistajat voivat säätää sitä, kuinka levyt toistetaan. Siten et mahdollisesti voi aina ohjata toistoa kuten kuvattu näissä käyttöohjeissa. Lue levyn ohjeet huolellisesti.
2 ALL 352
Tietoja vanhojen laitteiden ja käytettyjen paristojen keräyksestä ja hävittämisestä
Nämä merkinnät tuotteissa, pakkauksissa ja/tai niihin liitetyissä dokumenteissa tarkoittavat, että käytettyjä sähkö- ja elektroniikkalaitteita sekä paristoja ei tule sekoittaa tavalliseen kotitalousjätteeseen.Vanhojen tuotteiden ja käytettyjen paristojen asianmukainen käsittely, talteen ottaminen ja kierrätys edellyttävät niiden
viemistä tarjolla oleviin keräyspisteisiin kansallisten määräysten sekä direktiivien 2002/96/EC ja 2006/66/EC mukaisesti.Kun hävität tuotteet ja paristot asianmukaisesti, autat säilyttämään arvokkaita luonnonvaroja sekä ehkäisemään ihmisen terveydelle ja ympäristölle haitallisia vaikutuksia, joita vääränlainen jätteenkäsittely voi aiheuttaa.Ota yhteys asuinkuntasi viranomaisiin, jätteenkäsittelystä vastaavaan tahoon tai tuotteiden ostopaikkaan saadaksesi lisätietoja vanhojen tuotteiden ja paristojen keräyksestä ja kierrätyksestä.Tuotteiden epäasianmukaisesta hävittämisestä saattaa seurata kansallisessa lainsäädännössä määrätty rangaistus.
Yrityksille Euroopan unionissaLisätietoja sähkö- ja elektroniikkalaitteiden hävittämisestä saat jälleenmyyjältä tai tavarantoimittajalta.
[Tietoja hävittämisestä Euroopan unionin ulkopuolella]Nämä merkinnät ovat voimassa ainoastaan Euroopan unionin alueella. Ota yhteys paikallisiin viranomaisiin tai jälleenmyyjään saadaksesi tietoja oikeasta jätteenkäsittelymenetelmästä.
Paristomerkintää koskeva huomautus (alla kaksi esimerkkiä merkinnöistä):Tämä merkki voi olla käytössä yhdessä kemiallisen merkinnän kanssa. Siinä tapauksessa merkki noudattaa kyseistä kemikaalia koskevan direktiivin vaatimuksia.
Cd
(105)
DMP-BD75EG-VQT3A95.book 5 ページ 2011年1月7日 金曜日 午後3時55分

6 VQT3A95
Yhteydet ja asetuksetLiitäntä ja asetuksetVAIHE 1 : Liittäminen televisioon≥ Älä laita tätä laitetta vahvistimen/vastaanottimen tai muun
mahdollisesti kuumenevan laitteiston päälle. Kuumuus voi vahingoittaa laitetta.≥ Ennen minkään liitännän suorittamista suosittelemme, että
irrotat kaikki laitteet verkkovirrasta.≥ Älä liitä videosignaalia videotallentimen kautta.
Kopiosuojauksen vuoksi kuvaa ei mahdollisesti näytetä kunnolla.≥Ole hyvä ja käytä High Speed HDMI -kaapelia, jossa on
HDMI-logo (kuten kannen kuvassa). Suositellaan, että käytät Panasonic in HDMI-kaapelia. Kun lähetetään signaalia 1080p, käytä HDMI-kaapelia, jonka pituus on enintään 5,0 metriä.
Suositeltu osanumero (High Speed HDMI -kaapeli):RP-CDHS15 (1,5 m), RP-CDHS30 (3,0 m), RP-CDHS50 (5,0 m), jne.
VAIHE 2 : Liittäminen vahvistimeen/vastaanottimeen
∫ HDMI AV OUT-liitäntä:(Korkea laatu)
≥ Aseta “HDMI Audio Output” asentoon “On” ([HOME] “Setup” “Player Settings” “TV / Device Connection” “HDMI Connection”).≥HDMI-liitäntä tukee toimintoa VIERA Link “HDAVI Control”
( 10).
HDMI IN
HDMI-kaapeli
≥ Aseta “HDMI Audio Output” asentoon “On” ([HOME] “Setup” “Player Settings” “TV / Device Connection” “HDMI Connection”).≥ Aseta “Digital Audio Output” liitetyn vahvistimen/
vastaanottimen mukaan ([HOME] “Setup” “Player Settings” “Sound”).≥HDMI-liitäntä tukee toimintoa VIERA Link “HDAVI Control”
( 10).≥ Kun käytetään televisiota tai vahvistinta/vastaanotinta,
jonka HDMI-liittimessä ei ole merkintää “(ARC)” (ei-ARC-yhteensopiva), jotta voidaan nauttia television äänestä vahvistimen/vastaanottimen avulla, myös vahvistin/vastaanotin ja televisio tulee liittää optisen digitaalikaapelin kanssa.
HDMI IN
HDMI IN
HDMI IN(ARC)
HDMI OUT(ARC)
Monikanavaiset kaiuttimet
Vahvistin/vastaanotin
HDMI-kaapeli
HDMI-kaapeli
(106)
DMP-BD75EG-VQT3A95.book 6 ページ 2011年1月12日 水曜日 午前10時40分
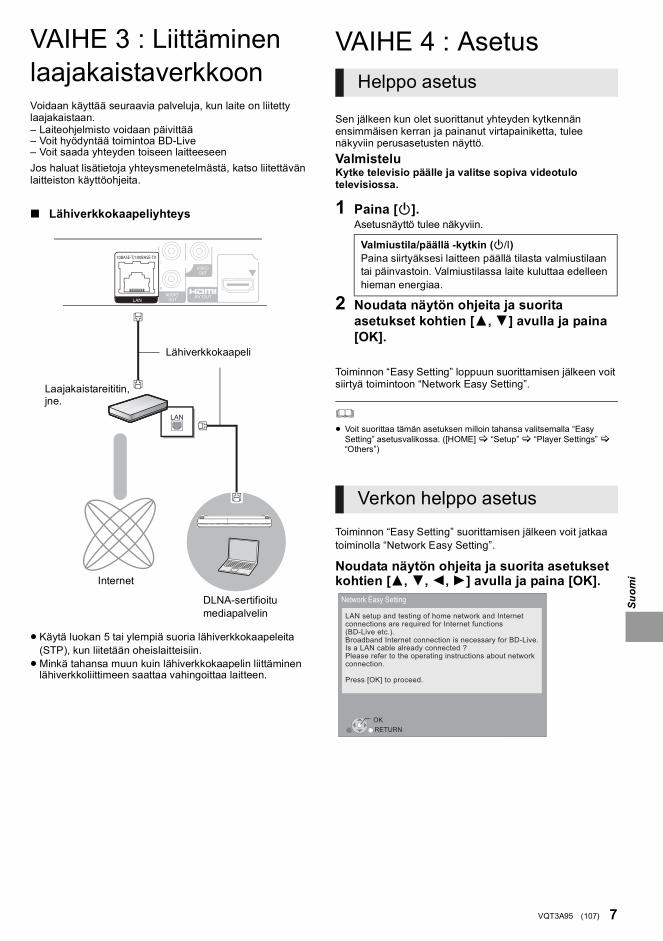
7VQT3A95
Suomi
VAIHE 3 : Liittäminen laajakaistaverkkoonVoidaan käyttää seuraavia palveluja, kun laite on liitetty laajakaistaan.– Laiteohjelmisto voidaan päivittää– Voit hyödyntää toimintoa BD-Live– Voit saada yhteyden toiseen laitteeseenJos haluat lisätietoja yhteysmenetelmästä, katso liitettävän laitteiston käyttöohjeita.
VAIHE 4 : Asetus
Sen jälkeen kun olet suorittanut yhteyden kytkennän ensimmäisen kerran ja painanut virtapainiketta, tulee näkyviin perusasetusten näyttö.ValmisteluKytke televisio päälle ja valitse sopiva videotulo televisiossa.
1 Paina [Í].Asetusnäyttö tulee näkyviin.
2 Noudata näytön ohjeita ja suorita asetukset kohtien [3,4] avulla ja paina [OK].
Toiminnon “Easy Setting” loppuun suorittamisen jälkeen voit siirtyä toimintoon “Network Easy Setting”.
≥ Voit suorittaa tämän asetuksen milloin tahansa valitsemalla “Easy Setting” asetusvalikossa. ([HOME] “Setup” “Player Settings” “Others”)
Toiminnon “Easy Setting” suorittamisen jälkeen voit jatkaa toiminolla “Network Easy Setting”.
Noudata näytön ohjeita ja suorita asetukset kohtien [3, 4,2,1] avulla ja paina [OK].
∫ Lähiverkkokaapeliyhteys
≥ Käytä luokan 5 tai ylempiä suoria lähiverkkokaapeleita (STP), kun liitetään oheislaitteisiin.≥Minkä tahansa muun kuin lähiverkkokaapelin liittäminen
lähiverkkoliittimeen saattaa vahingoittaa laitteen.
Laajakaistareititin, jne.
Internet
Lähiverkkokaapeli
DLNA-sertifioitu mediapalvelin
Helppo asetus
Valmiustila/päällä -kytkin (Í/I)Paina siirtyäksesi laitteen päällä tilasta valmiustilaan tai päinvastoin. Valmiustilassa laite kuluttaa edelleen hieman energiaa.
Verkon helppo asetus
OKRETURN
Network Easy Setting
LAN setup and testing of home network and Internetconnections are required for Internet functions(BD-Live etc.). Broadband Internet connection is necessary for BD-Live.Is a LAN cable already connected ?Please refer to the operating instructions about networkconnection.
Press [OK] to proceed.
(107)
DMP-BD75EG-VQT3A95.book 7 ページ 2011年1月7日 金曜日 午後3時55分

8 VQT3A95
ToistotoTietovälineen laittaminen tai poistaminen
≥ Kun laitetaan tietoväline, varmista, että se on oikein päin.≥ Jos liität Panasonicin tuotteen USB-liitäntäkaapelilla,
liitetyssä laitteessa saatetaan näyttää asetusnäyttö. Jos haluat lisätietoja, katso liitetyn laitteen käyttöohjeita.
HOME valikkoTämän laitteen päätoimintoja voidaan käyttää valikosta HOME.
ValmisteluKytke televisio päälle ja valitse sopiva videotulo televisiossa.
1 Paina [Í] kytkeäksesi laite päälle.2 Paina [OK] tai [3,4, 2,1] valitaksesi
kohta.
≥ Kun tietoväline laitetaan, näytetään kyseisen tietovälineen sisällön valintaruutu.≥ Jos tulee näkyviin muita kohtia, toista tämä vaihe.≥ Palataksesi valikkoon HOME, valitse “HOME” tai
paina [RETURN] useita kertoja.
Valikon HOME näyttämiseksiPaina [HOME].
≥ Näytettävät kohdat saattavat vaihdella tietovälineen mukaan.≥ Tarvittaessa aseta “Mixed Data Disc Option”, kun käytetään levyä, jossa
on sekä datatiedostoja (MP3, JPEG, DivX, MKV) että videoita. ([HOME] “Setup” “Player Settings” “Disc”)
1
MusicPhotos
Videos
Blu-ray Disc Player
HOME
Setup
MEDIASERVER
(108)
DMP-BD75EG-VQT3A95.book 8 ページ 2011年1月7日 金曜日 午後3時55分

9VQT3A95
Suomi
Videosisältöjen toisto
1 Laita tietoväline.Kun näytetään sisältövalikko, paina [3,4,2,1] valitaksesi kohta. ( 8)
2 Paina [3,4] valitaksesi nimike ja paina sitten [OK].
∫ Valikoiden näyttämiseksiVoit näyttää valikon Top Menu, DIRECT NAVIGATOR tai Pop-up Menu.Paina [TOP MENU] tai [POP-UP MENU].≥ Paina [3,4,2,1] kohdan valitsemiseksi ja paina sitten
[OK].
≥ Signaali PAL-levyiltä lähetetään muodossa PAL. Signaali NTSC-levyiltä lähetetään muodossa “NTSC” tai “PAL60”. Voit valita “NTSC” tai “PAL60” kohdassa “NTSC Contents Output” NTSC-levyille. ([HOME] “Setup” “Player Settings” “Picture”)
≥ LEVYT JATKAVAT PYÖRIMISTÄÄN VALIKOIDEN NÄYTÖN AIKANA. Paina [∫STOP], kun olet lopettanut toiston suojataksesi laitteen moottoria, television näyttöä, jne.
≥ Tietovälineestä ja sisällöistä riippuen näyttö voi muuttua tai se ei tule näkyviin.
≥ DivX ja MKV: Peräkkäinen toisto ei ole mahdollista.≥ Ei voida toistaa AVCHD- ja MPEG2-videoita, jotka on vedetty ja
pudotettu, kopioitu ja liimattu tietovälineeseen.≥ Sähkön säästämiseksi virta kytketään pois päältä automaattisesti, jos ei
suoriteta mitään painiketoimintoja 30 minuuttiin silloin, kun ei toisteta (taukotilassa, valikkonäytössä, kiintokuvia katsottaessa, jne.).
Nämä toiminnot eivät mahdollisesti toimi tietovälineestä ja sisällöistä riippuen.
Paina [∫STOP].Pysäytysasento laitetaan muistiin.Toiston jatkamistoimintoPaina [1PLAY] käynnistääksesi uudelleen tästä asennosta.≥ Asento poistetaan, jos kelkka avataan tai painat [∫STOP]
useita kertoja näyttääksesi “StOP” laitteen näytöllä.≥ BD-videolevyillä mukaan lukien levyt BD-J toiston
jatkamistoiminto ei toimi.
Paina [;PAUSE].≥ Paina [;PAUSE] uudelleen tai [1PLAY] aloittaaksesi
toisto uudelleen.
HakuToiston aikana paina [SEARCH6] tai [SEARCH5].≥Musiikki ja MP3: Nopeus kiinnitetään yhteen vaiheeseen.HidastusTauon aikana paina [SEARCH5].
Nopeus lisääntyy jopa 5 vaihetta.≥ Paina [1PLAY] palataksesi normaaliin toistonopeuteen.
Toiston tai tauon aikana paina [:] tai [9].Ohita nimikkeeseen, kappaleeseen tai raitaan, jonka haluat toistaa.≥ Jokainen painallus lisää ohitusten määrää.
Tauon aikana paina [1] (;1).
≥ Paina ja pidä painettuna siirtyäksesi peräkkäin eteenpäin.≥ Paina [1PLAY] palataksesi normaaliin toistonopeuteen.
Paina [AUDIO].Voit muuttaa äänikanavan numeron tai ääniraidan kielen, jne.
BD DVD CD USB
Muut toimenpiteet toiston aikana
Stop
Tauko
Haku/Hidastus
Ohitus
Kuva-kuvalta
Äänen muuttaminen
(109)
DMP-BD75EG-VQT3A95.book 9 ページ 2011年1月7日 金曜日 午後3時55分
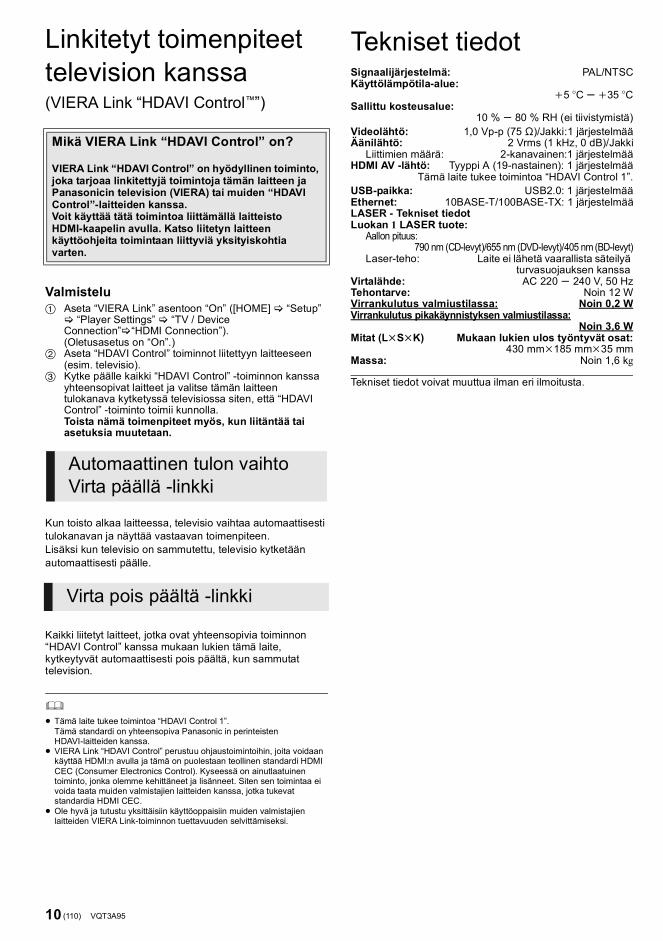
10 VQT3A95
Linkitetyt toimenpiteet television kanssa (VIERA Link “HDAVI Control™”)
Valmistelu1 Aseta “VIERA Link” asentoon “On” ([HOME] “Setup”
“Player Settings” “TV / Device Connection” “HDMI Connection”). (Oletusasetus on “On”.)
2 Aseta “HDAVI Control” toiminnot liitettyyn laitteeseen (esim. televisio).
3 Kytke päälle kaikki “HDAVI Control” -toiminnon kanssa yhteensopivat laitteet ja valitse tämän laitteen tulokanava kytketyssä televisiossa siten, että “HDAVI Control” -toiminto toimii kunnolla.Toista nämä toimenpiteet myös, kun liitäntää tai asetuksia muutetaan.
Kun toisto alkaa laitteessa, televisio vaihtaa automaattisesti tulokanavan ja näyttää vastaavan toimenpiteen.Lisäksi kun televisio on sammutettu, televisio kytketään automaattisesti päälle.
Kaikki liitetyt laitteet, jotka ovat yhteensopivia toiminnon “HDAVI Control” kanssa mukaan lukien tämä laite, kytkeytyvät automaattisesti pois päältä, kun sammutat television.
≥ Tämä laite tukee toimintoa “HDAVI Control 1”.Tämä standardi on yhteensopiva Panasonic in perinteisten HDAVI-laitteiden kanssa.
≥ VIERA Link “HDAVI Control” perustuu ohjaustoimintoihin, joita voidaan käyttää HDMI:n avulla ja tämä on puolestaan teollinen standardi HDMI CEC (Consumer Electronics Control). Kyseessä on ainutlaatuinen toiminto, jonka olemme kehittäneet ja lisänneet. Siten sen toimintaa ei voida taata muiden valmistajien laitteiden kanssa, jotka tukevat standardia HDMI CEC.
≥ Ole hyvä ja tutustu yksittäisiin käyttöoppaisiin muiden valmistajien laitteiden VIERA Link-toiminnon tuettavuuden selvittämiseksi.
Tekniset tiedotSignaalijärjestelmä: PAL/NTSCKäyttölämpötila-alue:
i5 oC s i35 oCSallittu kosteusalue:
10 % s 80 % RH (ei tiivistymistä)Videolähtö: 1,0 Vp-p (75 ≠)/Jakki:1 järjestelmääÄänilähtö: 2 Vrms (1 kHz, 0 dB)/Jakki
Liittimien määrä: 2-kanavainen:1 järjestelmääHDMI AV -lähtö: Tyyppi A (19-nastainen): 1 järjestelmää
Tämä laite tukee toimintoa “HDAVI Control 1”.USB-paikka: USB2.0: 1 järjestelmääEthernet: 10BASE-T/100BASE-TX: 1 järjestelmääLASER - Tekniset tiedotLuokan 1 LASER tuote:
Aallon pituus:790 nm (CD-levyt)/655 nm (DVD-levyt)/405 nm (BD-levyt)
Laser-teho: Laite ei lähetä vaarallista säteilyä turvasuojauksen kanssa
Virtalähde: AC 220 s 240 V, 50 HzTehontarve: Noin 12 WVirrankulutus valmiustilassa: Noin 0,2 WVirrankulutus pikakäynnistyksen valmiustilassa:
Noin 3,6 WMitat (LkSkK) Mukaan lukien ulos työntyvät osat:
430 mmk185 mmk35 mmMassa: Noin 1,6 kg
Tekniset tiedot voivat muuttua ilman eri ilmoitusta.
Mikä VIERA Link “HDAVI Control” on?
VIERA Link “HDAVI Control” on hyödyllinen toiminto, joka tarjoaa linkitettyjä toimintoja tämän laitteen ja Panasonicin television (VIERA) tai muiden “HDAVI Control”-laitteiden kanssa.Voit käyttää tätä toimintoa liittämällä laitteisto HDMI-kaapelin avulla. Katso liitetyn laitteen käyttöohjeita toimintaan liittyviä yksityiskohtia varten.
Automaattinen tulon vaihtoVirta päällä -linkki
Virta pois päältä -linkki
(110)
DMP-BD75EG-VQT3A95.book 10 ページ 2011年1月12日 水曜日 午前10時40分

11VQT3A95
Suomi
This product incorporates the following software:
For the software categorized as (3) and (4), please refer to the terms and conditions of GPL v2 and LGPL v2.1, as the case may be at http://www.gnu.org/licenses/old-licenses/gpl-2.0.html and http://www.gnu.org/licenses/old-licenses/lgpl-2.1.html.In addition, the software categorized as (3) and (4) are copyrighted by several individuals. Please refer to the copyright notice of those individuals at http://www.am-linux.jp/dl/AWBP11
The GPL/LGPL software is distributed in the hope that it will be useful, but WITHOUT ANY WARRANTY, without even the implied warranty of MERCHANTABILITY or FITNESS FOR A PARTICULAR PURPOSE.
At least three (3) years from delivery of products, Panasonic will give to any third party who contacts us at the contact information provided below, for a charge no more than our cost of physically performing source code distribution, a complete machine-readable copy of the corresponding source code covered under GPL v2/LGPL v2.1.
Contact [email protected]
Source code is also freely available to you and any other member of the public via our website below.http://www.am-linux.jp/dl/AWBP11
the software developed independently by or for Panasonic Corporation,the software owned by third party and licensed to Panasonic Corporation,the software licensed under the GNU General Public License, Version 2 (GPL v2),the software licensed under the GNU LESSER General Public License, Version 2.1 (LGPL v2.1) and/or,open sourced software licensed under its applicable license terms including but not limited toICU License, c-arse license.
(1)
(2)
(3)
(4)
(5)
For Open Source Software Programs categorized as (5), please refer to the applicable license terms listed below and/or included in the “License” menu on Product.
ICU License - ICU 1.8.1 and later
COPYRIGHT AND PERMISSION NOTICE
Copyright (c) 1995-2010 International Business Machines Corporation and others
All rights reserved.
Permission is hereby granted, free of charge, to any person obtaining a copy of this software and associated documentation files (the “Software”), to deal in the Software without restriction, including without limitation the rights to use, copy, modify, merge, publish, distribute, and/or sell copies of the Software, and to permit persons to whom the Software is furnished to do so, provided that the above copyright notice(s) and this permission notice appear in all copies of the Software and that both the above copyright notice(s) and this permission notice appear in supporting documentation.
THE SOFTWARE IS PROVIDED “AS IS”, WITHOUT WARRANTY OF ANY KIND, EXPRESS OR IMPLIED, INCLUDING BUT NOT LIMITED TO THE WARRANTIES OF MERCHANTABILITY, FITNESS FOR A PARTICULAR PURPOSE AND NONINFRINGEMENT OF THIRD PARTY RIGHTS. IN NO EVENT SHALL THE COPYRIGHT HOLDER OR HOLDERS INCLUDED IN THIS NOTICE BE LIABLE FOR ANY CLAIM, OR ANY SPECIAL INDIRECT OR CONSEQUENTIAL DAMAGES, OR ANY DAMAGES WHATSOEVER RESULTING FROM LOSS OF USE, DATA OR PROFITS, WHETHER IN AN ACTION OF CONTRACT, NEGLIGENCE OR OTHER TORTIOUS ACTION, ARISING OUT OF OR IN CONNECTION WITH THE USE OR PERFORMANCE OF THIS SOFTWARE.
Except as contained in this notice, the name of a copyright holder shall not be used in advertising or otherwise to promote the sale, use or other dealings in this Software without prior written authorization of the copyright holder.
All trademarks and registered trademarks mentioned herein are the property of their respective owners.
Tämä kohta sisältää kopioinnin suojaustekniikkaa, joka on suojattu Yhdysvaltain patentti- ja muilla immateriaalioikeuksilla, jotka omistaa Rovi Corporation. Aukikoodaus ja purkaminen on kielletty.
“DVD Logo” on tavaramerkki, jonka omistaa DVD Format/Logo Licensing Corporation.
DivX®, DivX Certified® ja liittyvät logot ovat tavaramerkkejä, jotka omistaa DivX, Inc. ja joita käytetään käyttöoikeussopimuksella.DivX®, DivX Certified® and associated logos are trademarks of DivX, Inc. and are used under license.
Windows on tavaramerkki tai rekisteröity tavaramerkki, jonka omistaa Microsoft Corporation Yhdysvalloissa ja muissa maissa.
c-arse license
Copyright 1998 by the Massachusetts Institute of Technology.
Permission to use, copy, modify, and distribute this software and itsdocumentation for any purpose and without fee is hereby granted, provided that the above copyright notice appear in all copies and that both that copyright notice and this permission notice appear in supporting documentation, and that the name of M.I.T. not be used in advertising or publicity pertaining to distribution of the software without specific, written prior permission.M.I.T. makes no representations about the suitability of this software for any purpose. It is provided “as is” without express or implied warranty.
Java ja kaikki Java-pohjaiset tavaramerkit ja logot ovat tavaramerkkejä tai rekisteröityjä tavaramerkkejä, jotka omistaa Sun Microsystems, Inc. Yhdysvalloissa ja muissa maissa.
Valmistettu Dolby Laboratoriesin lisenssillä.Dolby ja kaksois-D-symboli ovat Dolby Laboratoriesin tavaramerkkejä.
Valmistettu lisenssillä seuraavien Yhdysvaltain patenttien mukaisesti:5.451.942; 5.956.674; 5.974.380; 5.978.762; 6.226.616; 6.487.535;7.392.195; 7.272.567; 7.333.929; 7.212.872 & muut myönnetyt sekähakemuksen alaiset Yhdysvaltain sekä maailmanlaajuiset patentit.DTS ja tunnus on rekisteröityjä tavaramerkkejä, & DTS-HD, DTS-HDMaster Audio | Essential ja DTS-logot ovat tavaramerkkejä, jotka omistaa DTS, Inc.Tuote sisältää ohjelmiston. © DTS, Inc. Kaikki oikeudet pidätetään.
HDMI, HDMI-logo ja High-Definition Multimedia Interface ovattavaramerkkejä tai rekisteröityjä tavaramerkkejä, jotka omistaa HDMILicensing LLC Yhdysvalloissa ja muissa maissa.
Tämän tuotteen AVC Patent Portfolio ja VC-1 -käyttöoikeudet antavatkäyttäjälle henkilökohtaisen ja ei-kaupallisen oikeuden (i) koodata videoita standardien AVC ja VC-1 (“AVC/VC-1 Video”) mukaisesti ja/tai (ii) dekoodata AVC/VC-1 -videoita, jotka toinen kuluttaja on koodannut henkilökohtaisessa ja ei-kaupallisessa toiminnassa ja/tai jotka on saatu sellaiselta videoiden toimittajalta, jolla on oikeus toimittaa AVC/VC-1 -videoita. Käyttöoikeutta ei myönnetä suoraan tai epäsuorasti mitään muuta käyttöä varten. Lisätietoja antaa MPEG LA, LLC. Katso http://www.mpegla.com.
HDAVI Control™ on tavaramerkki, jonka omistaa Panasonic Corporation.
“AVCHD” ja “AVCHD”-logo ovat tavaramerkkejä, jotka omistavatPanasonic Corporation ja Sony Corporation.
MPEG Layer-3 äänen pakkausmenetelmän käyttöoikeudet omistaa Fraunhofer IIS ja Thomson.
DLNA, the DLNA Logo and DLNA CERTIFIED are trademarks, service marks, or certification marks of the Digital Living Network Alliance.
(111)
DMP-BD75EG-VQT3A95.book 11 ページ 2011年1月7日 金曜日 午後3時55分
NORSK
Produkt≥ For å redusere faren for brann, elektrisk støt eller skade
på apparatet:– Utsett ikke produktet for regn, fukt, drypping eller sprut.– Ikke plasser objekter som er fylt med væske, som vaser,
på apparatet.– Bruk kun anbefalt tilbehør.– Fjern ikke deksler.– Reparer ikke denne enheten selv, overlat service til
kvalifisert servicepersonell.
Vekselstrømnett≥ Strømuttaket må befinne seg i nærheten slik at den lett
kan kobles fra uttaketumiddelbart om det oppstår problemer.
Produkt≥Dette produktet anvender en laser. Betjening av kontroller
eller justering eller andre inngrep enn de beskrevet i denne bruksanvisning kan føre til farlig bestråling.≥ Plasser ikke åpen ild, slik som levende lys, oppå
apparatet.≥Dette apparatet er beregnet for bruk under moderate
klimaforhold.
Plassering≥ For å redusere faren for brann, elektrisk støt eller skade
på apparatet:– Ikke plasser apparatet i en bokhylle, et innebygget
kabinett eller et annet lukket sted. Pass på at produktet er godt ventilert.
– Apparatets ventilasjonsåpninger må ikke dekkes til med aviser, duker, gardiner eller lignende.
(Inside of product)(À l’intérieur de l’appareil)
(All’interno del prodotto)(Parte interior del aparato)
(Binnenin het apparaat)(Apparatens insida)
(Indersiden af apparatet)(Uvnitř přehrávače)
(A termék belsejében)(Wewnątrz urządzenia)
(Tuotteen sisällä)(Produktets innside)
ADVARSEL FORSIKTIG
LASER-spesifikasjonKlasse 1 LASER-produkt:Bølgelengde:790 nm (CD)/655 nm (DVD)/405 nm (BD)Laserstyrke: Ingen farlig stråling sendes ut
Environment friendly printed on chlorine free bleached paper.
Pursuant to at the directive 2004/108/EC, article 9(2)Panasonic Testing CentrePanasonic Marketing Europe GmbHWinsbergring 15, 22525 Hamburg, Germany
Panasonic Corporation
Web Site: http://panasonic.net
C Panasonic Corporation 2011VQT3A95
F0111SK0
EU
pvurwsxz { Fi
VQT3A95 ~Bcover.fm 112 ページ 2011年1月12日 水曜日 午後1時45分