p345 ms model manual -...
TRANSCRIPT

INSTRUCTIONMANUAL
FOR
POLYMERALUMINUM STEEL
CALIBER22 Long Rifle
© 2016 Sturm, Ruger & Co., Inc.
This manual may not be reproduced in whole or in part without the express writtenpermission of Sturm, Ruger & Co., Inc.
For Service on This Model Please Call:(336) 949-5200 (See p. 34)
THIS INSTRUCTION MANUAL SHOULD ALWAYS ACCOMPANY THIS FIREARM AND BETRANSFERRED WITH IT UPON CHANGE OF OWNERSHIP, OR WHEN THE FIREARM IS LOANED
OR PRESENTED TO ANOTHER PERSON
www.ruger.comAX 6/16 R7
READ THE INSTRUCTIONS AND WARNINGS IN THIS MANUAL CAREFULLY BEFORE USING THIS FIREARM
RUGER®
SR22®
MANUAL SAFETY MODEL PISTOL
S
– Rugged, Reliable Firearms® –
PM521

2
State-By-State WarningsCertain states require by law that their own specified warningnotices in larger-than-normal type be conspicuously included bythe manufacturer, distributor or retailer with firearms sold in thatstate. Sturm, Ruger & Co., Inc. sells its products in compliancewith applicable laws and regulations. Because our products maybe sold in these states, we include the following:California:
Connecticut:“UNLAWFUL STORAGE OF A LOADED FIREARM MAYRESULT IN IMPRISONMENT OR FINE.”Florida:“IT IS UNLAWFUL, AND PUNISHABLE BYIMPRISONMENT AND FINE, FOR ANY ADULT TOSTORE OR LEAVE A FIREARM IN ANY PLACE WITHINTHE REACH OR EASY ACCESS OF A MINOR UNDER 18YEARS OF AGE OR TO KNOWINGLY SELL OROTHERWISE TRANSFER OWNERSHIP OR POSSESSIONOF A FIREARM TO A MINOR OR A PERSON OFUNSOUND MIND.”
WARNING
“Children are attracted to andcan operate firearms that cancause severe injuries or death.Prevent child access by alwayskeeping guns locked away andunloaded when not in use. If youkeep a loaded firearm where achild obtains and improperly usesit, you may be fined or sent toprison.”
ADVERTENCIA“A los niños los atraen las armasde fuego y las pueden hacerfuncionar. Ellos pueden causarseslesions graves y la muerte. Eviteque los niños tengan accesso a lasarmas de fuego guardándolassiempre con llave y descargadascuando no las esté utilizando. Siusted tiene un arma de fuegocargada en un lugar en que unniño tiene acceso a ella y la usaindebidamente, le pueden dar unamulta o enviarlo a la carcel.”

Maine:“ENDANGERING THE WELFARE OF A CHILD IS ACRIME. IF YOU LEAVE A FIREARM AND AMMUNITIONWITHIN EASY ACCESS OF A CHILD, YOU MAY BESUBJECT TO FINE, IMPRISONMENT OR BOTH. KEEPFIREARMS AND AMMUNITION SEPARATE. KEEPFIREARMS AND AMMUNITION LOCKED UP. USETRIGGER LOCKS.”Maryland:“WARNING: Children can operate firearms which may causedeath or serious injury. It is a crime to store or leave a loadedfirearm in any location where an individual knew or shouldhave known that an unsupervised minor would gain access tothe firearm. Store your firearm responsibly!”Massachusetts:“WARNING FROM THE MASSACHUSETTS ATTORNEYGENERAL: This handgun is not equipped with a device thatfully blocks use by unauthorized users. More than 200,000firearms like this one are stolen from their owners every yearin the United States. In addition, there are more than athousand suicides each year by younger children andteenagers who get access to firearms. Hundreds more die fromaccidental discharge. It is likely that many more childrensustain serious wounds, or inflict such wounds accidentally onothers. In order to limit the chance of such misuse, it isimperative that you keep this weapon locked in a secure placeand take other steps necessary to limit the possibility of theftor accident. Failure to take reasonable preventive steps mayresult in innocent lives being lost, and in some circumstancesmay result in your liability for these deaths.”“IT IS UNLAWFUL TO STORE OR KEEP A FIREARM,RIFLE, SHOTGUN OR MACHINE GUN IN ANY PLACEUNLESS THAT WEAPON IS EQUIPPED WITH ATAMPER-RESISTANT SAFETY DEVICE OR IS STOREDOR KEPT IN A SECURELY LOCKED CONTAINER.”
3

New Jersey:“IT IS A CRIMINAL OFFENSE TO LEAVE A LOADEDFIREARM WITHIN EASY ACCESS OF A MINOR.”New York City:“THE USE OF A LOCKING DEVICE OR SAFETY LOCK ISONLY ONE ASPECT OF RESPONSIBLE FIREARMSTORAGE. FOR INCREASED SAFETY, FIREARMSSHOULD BE STORED UNLOADED AND LOCKED IN ALOCATION THAT IS BOTH SEPARATE FROM THEIRAMMUNITION AND INACCESSIBLE TO CHILDREN ANDOTHER UNAUTHORIZED PERSONS.”North Carolina:“IT IS UNLAWFUL TO STORE OR LEAVE A FIREARMTHAT CAN BE DISCHARGED IN A MANNER THAT AREASONABLE PERSON SHOULD KNOW IS ACCESSIBLETO A MINOR.”Texas:“IT IS UNLAWFUL TO STORE, TRANSPORT, ORABANDON AN UNSECURED FIREARM IN A PLACEWHERE CHILDREN ARE LIKELY TO BE AND CANOBTAIN ACCESS TO THE FIREARM.”Wisconsin:“IF YOU LEAVE A LOADED FIREARM WITHIN THEREACH OR EASY ACCESS OF A CHILD YOU MAY BEFINED OR IMPRISONED OR BOTH IF THE CHILDIMPROPERLY DISCHARGES, POSSESSES, OR EXHIBITSTHE FIREARM.”
* * * * * * * * * * * * * * * * * * * * * * Please check with your licensed retailer or state police foradditional warnings which may be required by local law orregulation. Such regulations change constantly, and localauthorities are in the best position to advise you on such legalmatters.
4
5
FIREARMS SAFETY IS YOUR RESPONSIBILITY
SAFETY MUST BE THE FIRST AND CONSTANTCONSIDERATION OF EVERY PERSON WHO HANDLES
FIREARMS AND AMMUNITION.
This Instruction Manual is designed to assist you in learning how to useand care for your RUGER® SR22® pistol properly. Please contact us ifyou have any questions.
Only when you are certain you fully understand the manual and canproperly carry out its instructions should you practice loading, unloading,etc. with live ammunition. If you have any doubts about your ability tohandle or use a particular type of gun safely, you should seek supervisedinstruction. Such personalized instruction often is available from localgun retailers, gun clubs or police departments. If none of these sourcescan help, visit www.nra.org or write to the following address:
National Rifle Association11250 Waples Mill RoadFairfax, VA 22030-7400
The person possessing a gun has a full-time job. You cannot guess; youcannot forget. You must know how to use your firearm safely. Do not useany firearm without having a complete understanding of its particularcharacteristics and safe use. Remember: There is no such thing as afoolproof gun.

TABLE OF CONTENTS
State-By-State Warnings . . . . . . . . . . . . . . . . . . . . . . . . . . . . . . . . . . . . . . . . . . . . . . . . . .2Nomenclature . . . . . . . . . . . . . . . . . . . . . . . . . . . . . . . . . . . . . . . . . . . . . . . . . . . . . . . . . .7Locking Device Installation Instructions . . . . . . . . . . . . . . . . . . . . . . . . . . . . . . . . . . . .8General Information and Mechanical Characteristics . . . . . . . . . . . . . . . . . . . . . . . . .10Operation of Manual Safety . . . . . . . . . . . . . . . . . . . . . . . . . . . . . . . . . . . . . . . . . . . . . .11Ammunition . . . . . . . . . . . . . . . . . . . . . . . . . . . . . . . . . . . . . . . . . . . . . . . . . . . . . . . . . .12To Load and Fire . . . . . . . . . . . . . . . . . . . . . . . . . . . . . . . . . . . . . . . . . . . . . . . . . . . . . . .13Visual Inspection Port . . . . . . . . . . . . . . . . . . . . . . . . . . . . . . . . . . . . . . . . . . . . . . . . . . .16Operation of Magazine Disconnect . . . . . . . . . . . . . . . . . . . . . . . . . . . . . . . . . . . . . . . .17Dry Firing . . . . . . . . . . . . . . . . . . . . . . . . . . . . . . . . . . . . . . . . . . . . . . . . . . . . . . . . . . . .17To Uncock (Decock) The Pistol . . . . . . . . . . . . . . . . . . . . . . . . . . . . . . . . . . . . . . . . . . .18To Unload . . . . . . . . . . . . . . . . . . . . . . . . . . . . . . . . . . . . . . . . . . . . . . . . . . . . . . . . . . . . .18To Reload The Pistol . . . . . . . . . . . . . . . . . . . . . . . . . . . . . . . . . . . . . . . . . . . . . . . . . . . .20To Extract and Eject a Chambered Cartridge . . . . . . . . . . . . . . . . . . . . . . . . . . . . . . . .20To Clear a Malfunction (“Jam”) . . . . . . . . . . . . . . . . . . . . . . . . . . . . . . . . . . . . . . . . . . .21To Minimize Malfunctions (“Jams”) . . . . . . . . . . . . . . . . . . . . . . . . . . . . . . . . . . . . . . . .22To Disassemble . . . . . . . . . . . . . . . . . . . . . . . . . . . . . . . . . . . . . . . . . . . . . . . . . . . . . . . .22Removing the Barrel . . . . . . . . . . . . . . . . . . . . . . . . . . . . . . . . . . . . . . . . . . . . . . . . . . . .24To Reassemble . . . . . . . . . . . . . . . . . . . . . . . . . . . . . . . . . . . . . . . . . . . . . . . . . . . . . . . . .25Interchangeable Grip Sleeves . . . . . . . . . . . . . . . . . . . . . . . . . . . . . . . . . . . . . . . . . . . . .28Sight Adjustment . . . . . . . . . . . . . . . . . . . . . . . . . . . . . . . . . . . . . . . . . . . . . . . . . . . . . .29Adapter/Barrel Cap Removal and Installation . . . . . . . . . . . . . . . . . . . . . . . . . . . . . . . .30Magazine Inspection and Care . . . . . . . . . . . . . . . . . . . . . . . . . . . . . . . . . . . . . . . . . . . .31Care and Cleaning . . . . . . . . . . . . . . . . . . . . . . . . . . . . . . . . . . . . . . . . . . . . . . . . . . . . . .32Storage . . . . . . . . . . . . . . . . . . . . . . . . . . . . . . . . . . . . . . . . . . . . . . . . . . . . . . . . . . . . . .33Service and Parts Policy . . . . . . . . . . . . . . . . . . . . . . . . . . . . . . . . . . . . . . . . . . . . . . . . .34Shipping Firearms for Repair . . . . . . . . . . . . . . . . . . . . . . . . . . . . . . . . . . . . . . . . . . . . .34Ordering Parts . . . . . . . . . . . . . . . . . . . . . . . . . . . . . . . . . . . . . . . . . . . . . . . . . . . . . . . . .35Parts List . . . . . . . . . . . . . . . . . . . . . . . . . . . . . . . . . . . . . . . . . . . . . . . . . . . . . . . . . . . . .36Exploded View . . . . . . . . . . . . . . . . . . . . . . . . . . . . . . . . . . . . . . . . . . . . . . . . . . . . . . . . .38The Basic Rules of Safe Firearms Handling . . . . . . . . . . . . . . . . . . . . . . . . . . . . . . . . .39Warranty Information . . . . . . . . . . . . . . . . . . . . . . . . . . . . . . . . . . . . . . . . . . . . . . . . . . .44
“Ruger” is a registered U.S. trademark.
6
Locking Devices 8 Unloading 18Alterations 10 Malfunctions 21Manual Safety 12 Disassembly 24Ammunition 12 Lubrication 32Lead Exposure 13 Storage 33Slide Retraction 15 Shipping 34Firing 15 Parts Purchasers 35Handling 17
WARNINGS OF GREAT IMPORTANCE AREFOUND ON THE FOLLOWING PAGES:
OTHER CAUTIONS AND WARNINGS APPEARTHROUGHOUT THE MANUAL.

NOMENCLATURE
Sights have high-visibilitywhite dots both front andrear.
Double-action mechanism and strongly curvedtrigger allow cocking and firing to beaccomplished with a single pull of the trigger.
Oversize trigger guard permitsshooting with gloved hand.
The ambidextrous magazinelatch permits positiveretention and quick removalof magazine.
Slide’s open-top design minimizespossibility of jamming and allows shooterto clear any malfunction by hand.
Grooved, exposed hammerspur enables the shooter tocock the hammer easily foraccurate, single-actionfiring if desired.
When ambidextrousmanual safety is in “safe”position, the firing pin isblocked so that it cannotmake contact with thecartridge. Additionally, ifthe hammer is decockedusing the safety, thehammer is held awayfrom the firing pin. If thedecock is not used, thehammer can be thumbcocked slightly so thatthe hammer rests on thedecock hammer stop.
7
Magazine Disconnect is designed to preventthe pistol from being fired when themagazine is removed, even if a live roundremains in the firing chamber.
Visual inspection port providesvisual indication that chamber isloaded.
Rear sight is adjustable forwindage and elevation.
Manual Safety
Magazine Latch
Accessory Rail accepts mostlights and sighting devicesdesigned to fit the M1913Picatinny Standard Rail.
Rigid one-piece polyurethanegrip frame reinforced with longglass fiber.
Slide stop holds theslide open and isactivated automaticallywhen last shot is fired,or can be manuallyoperated.
8
LOCKING DEVICEINSTALLATION INSTRUCTIONS
WARNING – USE OF LOCKING DEVICES
• Always keep your firearm pointed in a safe direction,including when you are installing or removing yourlocking device.
• Always verify that your firearm is completely unloadedbefore installing your locking device.
• Do not install locking devices in the trigger guard;always keep your fingers and locking device outside thetrigger guard during device installation and removal.
• Store firearms, ammunition and keys separately andsecurely, away from children and careless adults; do notstore your firearm with the keys in the locking device.
• Do not attempt to work the action of your firearm withthe locking device in place; this may damage yourfirearm.
• While locking devices are an important aid to securitymeasures, they are not a substitute for safe firearmhandling and proper storage. Remember that anymechanical device can be bypassed with enough time,knowledge, determination and equipment.
LOCKING DEVICES MUST BE USEDSAFELY AND RESPONSIBLY
Do not store keysin lock.
It is important to use the locking device on your Ruger® firearm!
Keep the muzzle pointed in a safe direction and your fingers outside thetrigger guard at all times!
To Install the Factory-Supplied Locking Device:1. Be sure the firearm is completely unloaded and contains no cartridges
or cartridge cases!2. Remove the magazine from your pistol.3. Open the action completely. Use the slide stop to keep the action open
during installation of the locking device.

9
Correct Installationof Lock For the
Ruger® SR22®
4. Insert the cable directly to your pistol as shown in Figure 1.5. To lock: With the key turned to the farthest clockwise position, insert
the loose end of the cable into the lock. Turn the key counterclockwiseand remove the key.
6. Once the lock is securely closed, pull firmly on the lock to test theconnection and be sure it is locked. Do not leave or store your firearmwith the key in the lock! Store your locked unloaded firearm and thekey in secure, separate locations, away from ammunition, children orunauthorized adults.
Figure 1
WARNING - ALTERATIONS
DO NOT ALTER ANY GUN
FIREARMS ARE DANGEROUS WEAPONSREAD THE INSTRUCTIONS AND WARNINGS
IN THIS MANUAL THOROUGHLY ANDCAREFULLY BEFORE USING.
This product was designed to functionproperly in its original condition.Alterations can make it unsafe. Do notalter any part or add or substitute parts oraccessories not made by Sturm, Ruger &Co., Inc.
GENERAL INFORMATIONAND MECHANICAL CHARACTERISTICS
The RUGER® SR22® pistol is a rimfire, traditional double-action (double-action first shot followed by single action) magazine-fed, autoloading, blowbackpistol chambered in 22 Long Rifle (22LR) cartridge. This pistol incorporates afixed barrel and features an aircraft-grade aluminum alloy slide and glass fillednylon, polymer frame construction. Other features with which users should bethoroughly familiar include:
Action: The action of the RUGER® SR22® pistol is of the straight blowbacktype that utilizes a fixed barrel design in which the slide is held closed by therecoil spring at the moment of firing. After firing, the slide recoils to the rearpermitting the extraction and ejection of the spent cartridge case. Upon return ofthe slide to its forward position by the recoil spring, a fresh cartridge is pickedup from the magazine and loaded into the barrel chamber.
The user of this or any autoloading pistol must always remember that whenfired, it automatically reloads and recocks itself, so that simply pulling thetrigger will fire the pistol again. Therefore, an autoloading pistol user must beparticularly conscious to always keep the pistol pointed in a safe direction.
Slide Stop: When the last shot has been fired and the magazine is empty, theslide stop automatically holds the slide open. When there is an empty magazinein the pistol and the slide is retracted manually, the slide stop will alsoautomatically hold the slide open. If a loaded magazine is inserted in the pistolwhen the slide is closed and the slide is then retracted fully, the slide stop willnot automatically hold open the slide. The user can actuate the slide stopmechanism to hold the slide open at any time by retracting the slide andpushing the slide stop up.
10

11
The slide stop can be released by drawing back slightly on the slide anddepressing the slide stop thumbpiece. When the slide is released, it will moveforward under pressure from the recoil spring.
The slide stop is spring loaded downward. Therefore, when there is a loadedmagazine in place and the pistol is jarred, the slide can fly forward and chambera cartridge. For this reason and as an essential safety practice, the user shouldalways be careful to keep fingers away from the trigger, keep the safety on, andalways keep the pistol pointed in a safe direction.
Magazines: The RUGER® SR22® pistol (22 Long Rifle) magazines are notinterchangeable with Ruger pistol magazines of any other pistol or caliber eventhough they may appear similar and may hold other cartridges. Use of incorrectmagazines in any pistol will result in malfunctions.
OPERATION OF MANUAL SAFETYThe model you have selected is equipped with special, manual, ambidextroussafety levers that also allow you to decock (uncock) a cocked pistol withoutmanipulating the trigger. Conventional thumb decocking procedures aretherefore not necessary and should not be employed with this pistol.
To apply the manual safety and decock the pistol, point the pistol in a safedirection. Move either the right- or left-hand safety lever downward and fully tothe “safe” position (see Figure 2). When the safety is moved fully downward tothe “safe” position, the red area is covered by the safety lever. At this point thehammer will fall to the decocked position and rest on the hammer blocker. Withthe safety in the “safe” position the trigger is disconnected from the hammer sothat the hammer cannot be actuated even though the trigger can be pulled. Thetrigger is also disconnected from the firing pin blocker so that the firing pinblocker will not allow the firing pin to move forward and contact the primereven though the trigger is pulled. Last of all, when the hammer is decocked inthis manner, it rests on a hammer blocker, which prevents the hammer fromcontacting the firing pin.
“SAFE” POSITION “FIRE” POSITIONFigure 2 Figure 3
DAMAGED, NON-STANDARD, OR IMPROPERLYASSEMBLED MAGAZINES SHOULD NOT BE USED.THEY CAN CAUSE THE PISTOL TO MALFUNCTION.

12
WARNING - MANUAL SAFETYPlacing the safety in an intermediateposition between “safe” and “fire” can resultin the user thinking the pistol is in a safe orfire position when it is not. Pulling thetrigger with the safety in an intermediateposition may cause the pistol to fire.Therefore, always move the safety fully to itsintended position and then check to be sureit is where you want it to be. Unless the redarea is completely covered, the safety is not“ON.” Unless the red area is fully visible, thepistol is not absolutely ready to fire.
NEVER PUT SAFETY 1/2 ON
AMMUNITION
The RUGER® SR22® pistols are chambered for the 22 Long Rifle cartridge.Do not attempt to load any other 22 caliber cartridges into the magazine orchamber of the pistol.
The RUGER® SR22® pistols are compatible with all factory ammunition ofthe correct caliber loaded to U.S. Industry Standards, including high-velocity andhollow-point loads. However, sub-sonic or match-grade ammunition may nothave sufficient energy to cycle the slide. If you find that the slide does not cyclefully, try another brand of ammunition.
WARNING–AMMUNITION
IMPROPER AMMUNITIONDESTROYS GUNS
Death, serious injury, and damage canresult from the wrong ammunition, boreobstructions, powder overloads orincorrect cartridge components.
Always wear shooting glasses and hearingprotection.

13
TO LOAD AND FIREPractice this important aspect of safe gun handling with an unloaded pistoluntil you can perform each of the steps described below with skill andconfidence. But before you do anything with the pistol, first read completelythrough this manual.
1. Be certain the muzzle is pointed in a safe direction. (See “The Basic Rules ofSafe Firearms Handling,” page 39.)
2. Move either the right- or left-hand safety lever fully downward to its “safe”position so that the red area is fully covered. (See Figures 2 and 3 on page11.)
3. Press the magazine latch inward from either the left or right side and removethe magazine from the frame. NOTE: The magazine is designed to fall free ofthe frame of its own weight when unloaded, the slide is locked open and thepistol is held in the normal firing position, but you should always preventpossible damage to the magazine by not letting it drop to the ground unlessrapid reloading is absolutely necessary.
4. Place ten (10) or fewer 22 Long Rifle cartridges into the magazine from thetop.
5. Insert the magazine into the frame, taking care that the magazine is lockedin place by the magazine latch. Slamming the magazine into the frameforcibly is not necessary, though the magazine may require a light tap to seat.
AMMUNITION (CARTRIDGES) NOTICEWE SPECIFICALLY DISCLAIM RESPONSIBILITY FOR ANY DAMAGE
OR INJURY WHATSOEVER OCCURRING IN CONNECTION WITH, OR ASA RESULT OF, THE USE IN RUGER FIREARMS OF FAULTY, OR NON-
STANDARD, OR “RE-MANUFACTURED”, OR HAND-LOADED(RELOADED) AMMUNITION, OR OF CARTRIDGES OTHER THAN THOSE
FOR WHICH THE FIREARM WAS ORIGINALLY CHAMBERED.
WARNING - LEAD EXPOSUREDischarging firearms in poorlyventilated areas, cleaning firearms, orhandling ammunition may result inexposure to lead and other substancesknown to the State of California tocause birth defects, reproductive harm,and other serious physical injury. Haveadequate ventilation at all times. Washhands thoroughly after exposure.
SHOOTING OR CLEANING GUNSMAY EXPOSE YOU TO LEAD

6. Hold the pistol firmly in the shooting hand but do not touch the trigger.Keep the pistol pointed in a safe direction and the safety “on.” With thethumb and forefinger of the other hand grasp the rear of the slide and pullthe slide to the rear as far as it will go (see Figure 4, below and “SlideRetraction Warning,” p. 15). When released, the slide will fly forward to stripthe top cartridge from the magazine and chamber it. The safety mechanismdrops the hammer automatically as the slide moves forward.
The trigger is inoperable when the safety is fully engaged in its “safe” position(lever fully down and red dot covered; see Figure 2 on page 11). WARNING:The pistol is ready for instant use in the single-action mode once the slidemoves forward if the safety is in the “fire” position. Be careful!
14
Figure 4Slide in Retracted Position
7. If the pistol is not to be fired immediately, the safety should remain in its “safe”position (see Figure 2, p. 11).
8. If the pistol is to be fired immediately, the manual safety can be rotated upwardto its “fire” position (see Figure 3, p. 11). The firing pin is still blocked at alltimes by the internal firing pin block unless the trigger is pulled all the way tothe rear.
9. The pistol is ready for instant use once the safety is disengaged. When thepistol is in the “uncocked” mode (hammer forward), the first shot can be fireddouble-action by pulling the trigger all the way to the rear, which cocks thehammer and then fires the pistol. Subsequent shots are fired single-actionuntil the magazine is empty, the hammer being cocked by the slide as it recoilsfrom each shot. Note that the trigger pull is much lighter for these subsequentshots.
10. For greater accuracy and consistent trigger pull, the hammer may be manuallycocked by the shooter before the first shot is fired once the safety is “off.” Keepyour finger off the trigger while cocking the hammer! The hammer will beautomatically cocked as described above for subsequent shots.

15
WARNING - FIRING
SLIDE OPENS FAST -HOT BRASS EJECTED
The slide automatically opens and shutsquickly while firing. Keep face and handsaway from rear. Hot brass is ejected quickly and can burn you. Always wearshooting glasses and hearing protection.
11. Immediately following the firing of a shot, and if a subsequent shot is not tobe fired at once, put the safety in its “safe” position (lever fully down and redarea covered) while the pistol is still pointing in a safe direction downrange.This will also uncock (decock) the pistol.
12.When the last cartridge loaded into the pistol has been fired, the magazinefollower presses the slide stop upward to engage the slide, automaticallyholding the action open. If the slide is shut, the shooter should alwaysassume that there is a cartridge in the chamber!
Don’t rely on your memory to know if a gun or magazine is loaded. With thepistol pointed in a safe direction, visually inspect the magazine and chamber.
WARNING - SLIDE RETRACTION
The slide should always be pulledrearward (“retracted”) by pulling therear portion of the slide in the vicinityof the safety, the decock-only lever,or the serrations (depending upon model). Always keep fingers awayfrom trigger!
Never put any part of your hands or body over the muzzle while retractingthe slide for loading, unloading,inspection, or clearing a malfunction.
KEEP HANDSAWAY FROM MUZZLE AND
FINGER OFF TRIGGER
16
VISUAL INSPECTION PORTYou should always treat every gun as though it is loaded and always keep themuzzle pointed in a safe direction. Never rely upon any safety or mechanicaldevice to justify unsafe or careless gun handling. In order to assist you indetermining the presence of a cartridge in the chamber of your RUGER®
SR22® pistol, it is equipped with a loaded chamber indicator. The indicator isa hole in the top of the barrel and the slide at the back of the barrel. (See Figure5.) This is a view port that allows the user to look in and see the presence of acartridge in the chamber.
NEVER RELY ON YOUR MEMORY OR ANY LOADED CHAMBERINDICATOR TO KNOW IF A GUN IS LOADED. ANY MECHANICALDEVICE CAN FAIL. ALWAYS VISUALLY CHECK THE CHAMBER BY
RETRACTING THE SLIDE AND EXAMINING THE CHAMBER TO BE SUREWHETHER IT IS EMPTY OR LOADED.
Figure 5Visual Inspection Port Muzzle

17
Do not load the pistol until you are ready to use it, andunload it immediately when you have completed shooting.(See “Warning - Unloading” on page 18.)
If dropped or struck, the pistol may fire. Keep chamberempty unless actually firing! Use the safety lever to decockpistol before moving with pistol or when not actuallyfiring.
For maximum safety when carrying the pistol with a loaded magazine in place, the chamber should be empty,the slide should be closed, and the pistol should bedecocked. Never carry it cocked! If placed into a holster,check it to be sure that the slide is not retracted farenough to either chamber a cartridge from the magazineor cock the pistol.
The user should never depend on any mechanical deviceto justify careless handling or permit the pistol topoint in an unsafe direction. The shooter should always bealert to the possibility of accidental discharge. Theonly absolutely safe pistol is one in which the slide isopen, the chamber is empty, and there is no magazinein the gun.
WARNING - HANDLING
ANY GUN MAY FIRE IF DROPPED
DRY FIRINGGoing through the actions of cocking, aiming and pulling the trigger on an unloadedgun is known as “dry firing.” Dry firing can be useful to learn the “feel” of yourpistol. Be certain that the pistol is fully unloaded (both the chamber and magazineare empty) and that the pistol is pointing in a safe direction at all times, even whenyou are practicing dry firing. The RUGER® SR22® pistols can be dry-firedwithout damage to the firing pin or other components as long as the magazine isinserted.
CAUTION: The RUGER® SR22® pistols cannot fire with the magazine removed.
OPERATION OF MAGAZINE DISCONNECTYour RUGER® SR22® pistol is equipped with a magazine disconnect. Thisdevice prevents firing if the magazine is removed from the pistol. You will not beable to use your SR22® pistol as a single loader or to fire the pistol with themagazine out of the pistol.
REMEMBER THAT A ROUND MAY STILL BE IN THE CHAMBER ANDTHAT THE PISTOL MAY STILL BE LOADED EVEN IF THE MAGAZINE ISREMOVED. AS SOON AS AN EMPTY MAGAZINE IS INSERTED, AROUND IN THE CHAMBER CAN BE FIRED BY PULLING THE TRIGGER.
BE CAREFUL! AS ALWAYS, YOU SHOULD NOT RELY UPON THE MAGAZINEDISCONNECT OR ANY OTHER MECHANICAL DEVICE OR SAFETY TO JUSTIFYCARELESS OR UNSAFE HANDLING OF ANY FIREARM.
Don’t rely on your memory to know if a gun or magazine is loaded. With thepistol pointed in a safe direction, visually inspect the magazine and the chamber.

WARNING - UNLOADING
18
REMOVING MAGAZINEDOES NOT UNLOAD CHAMBER
Removing magazine does not unload pistol! Tounload, first remove magazine, then pull slide torear, eject chambered cartridge, and visually inspectchamber to be sure it is empty. The safety shouldalways be in its “Safe” position when loading orunloading the pistol. Always point the pistol in a safedirection when loading or unloading.
TO UNLOAD
WARNING: This sequence must be followed exactly as outlined. Failure to do socan result in the chamber being unintentionally loaded with a live cartridge!
1. The muzzle of the pistol must be pointing in a safe direction at all times, andfingers should be outside of the trigger guard. Put the safety in its “safe”position (see Figure 2 on page 11) by rotating the safety fully downward untilthe red area is covered by the left safety lever. The safety can be engagedwhether the pistol is cocked or not.
TO UNCOCK (DECOCK) THE PISTOLWith the muzzle pointed in a safe direction, engage the safety fully (see Figures6a & 6b). The hammer will drop near the end of the safety’s travel. Although thismay appear startling, it is important to note that the firing pin is blocked, thuspreventing forward movement toward the cartridge; therefore, the pistol will notfire when the safety is applied. Manually decocking the hammer with the thumbis neither necessary nor recommended. Always use either the right- or left-handsafety lever. Remember that when you return the manual safety to the firingposition, the pistol can fire when the trigger is pulled if a cartridge is in thechamber and the magazine is in the gun.
Figure 6a Figure 6bSafety Fully Engaged

19
CORRECT UNLOADING SEQUENCE
SAFETY “ON”
3
1
2
4
2. Remove the magazine from the pistol by pushing in on either the left or rightmagazine latch button. REMEMBER that even though the magazine has beenremoved, a live round may remain in the chamber. (See “Warning -Unloading,” page 18.)
3. Hold the pistol firmly and grasp the slide. Retract the slide to its rearmostposition briskly to extract and eject any chambered cartridge. Always doublecheck visually that the chamber, breech-face, and the interior of the frame areclear of any live rounds. When the slide is fully retracted, push upward on theslide stop, then allow the slide to move forward until it comes to rest with therear projection of the slide stop resting in the notch on the lower left side ofthe slide.
4. To close the slide, again check to be sure the chamber and breech-face areempty. Pull the slide to its rearmost postion and release it. The slide will snapforward. Keep fingers out of ejection port on top of slide!
5. If the magazine contains cartridges, they can be removed by sliding eachcartridge forward and out of magazine, one at a time, until the magazine isempty.
6. Push empty (unloaded) magazine into frame until magazine latch locks it inplace.

20
TO RELOAD THE PISTOL
1. Firing all cartridges in the magazine and the chamber will cause the slide toautomatically lock open. Keep the pistol pointed in a safe direction. Reloadingcan be accomplished by moving either the right- or left-hand safety lever fullydownward to the “safe” position (lever fully down and red area covered) andthen pressing in on the magazine latch with the thumb or forefinger. Themagazine will fall free of the pistol of its own weight if the slide is lockedopen. To avoid the possibility of damage to the magazine, do not let it fall tothe ground unless rapid reloading is absolutely necessary.
2. Insert a loaded magazine. WARNING: The slide stop is held in place by theslide pressing against the rear of the slide stop. Therefore, when there is aloaded magazine in place and the pistol is jarred, the slide can fly forward andchamber a cartridge. For this reason and as an essential safety practice, thesafety of the pistol should always be fully “on” except when the user ispositioned to fire the gun at a selected target.
3. Release the slide to move forward by pulling the slide fully to the rear andreleasing it. A cartridge will be chambered when the slide shuts. If you areready to fire immediately, move the manual safety fully upward to its “Fire”position. WARNING: The pistol is ready to fire in the “double-action” modeonce manual safety is disengaged. It can also be recocked to fire in the single-action mode.
4. If the pistol is not to be fired immediately, depress the manual safety fullyuntil the hammer drops and keep the safety “on” at all times except whenactually firing. When you are finished firing the pistol, unload it completely(see pages 18 - 19).
TO EXTRACT ANDEJECT A CHAMBERED CARTRIDGE
When the pistol is fired, the same gas pressure that drives the bullet forward alsoacts through the cartridge case to push the slide to the rear. The action causesextraction and ejection of the fired cartridge case. If a cartridge fails to fire or ifthe shooter wishes to eject the chambered cartridge manually, follow theprocedure “To Unload” step 3, p. 19. When the slide is operated by hand, therecan be a failure to extract the cartridge from the chamber, or a failure to ejectthe cartridge clear of the pistol. These failures usually are the result of the slidenot being pulled rearward vigorously. From the foregoing, it is clear that the gunuser must:
1. Always visually check the chamber and the breech-face after opening the slideto eject a chambered cartridge. If the slide is not vigorously retracted whenbeing operated by hand, the extracted cartridge can be “ejected” into themagazine-well of the grip frame or remain held to the breech-face by theextractor.

Any autoloading pistol may occasionallymalfunction. If a cartridge hangs up, jams, orbinds when being chambered, do not attempt toforce it into the chamber by pushing or strikingthe slide. Carefully remove it.Most failures of a cartridge to feed or to chamber properly are caused by a damaged magazine,incorrect gun handling, insufficient lubrication,or improper ammunition.Whatever the cause, the user of the pistol must,above all, recognize that any cartridge jam canresult in the potentially very dangerous situationof a cartridge discharging before it is properlychambered. If this happens, the cartridge casemay rupture and its fragments fly out of theejection port of the pistol with sufficient force tocause serious injury. Always wear shootingglasses!
WARNING - MALFUNCTIONS
2. Also, if an empty magazine is in the pistol when the slide is being handretracted to extract a cartridge, the cartridge may drop on top of themagazine or remain held to the breech-face by the extractor. Then when theslide goes forward, the cartridge will be chambered again! Remember —always remove the magazine before clearing the chamber, and visually ensurethat no cartridges remain in the gun.
3. Thoroughly clean the chamber and the extractor as often as necessary.
HITTING PRIMERCAN BURST CARTRIDGE
21
TO CLEAR A MALFUNCTION (“JAM”)
1. Be certain the muzzle is continually pointed in a safe direction and that thesafety lever is in the “safe” position (lever fully down).
2. If possible, remove the magazine. It may be necessary to manually remove ajammed cartridge that has only been partially stripped from the magazine. Ifso, use extreme care. Lock the slide open with the slide stop beforeattempting to clear the jam. Drawing the slide fully to the rear may bring thejammed cartridge along. Keep your face away from the ejection port duringthis operation. When attempting to clear a jam, use only wood “tools” so thatthe cartridge will not be damaged or the primer ignited.
3. Visually check to make sure that all cartridges have been removed from thepistol. Safely dispose of any cartridges involved in a malfunction incident. Donot use damaged ammunition in any firearm.

TO MINIMIZE MALFUNCTIONS (“JAMS”)1. If it appears that the jam was caused by the type of ammunition being used,
try another brand, type, or lot number. Remember — use only factoryammunition of the correct caliber.
2. If changing ammunition does not at once eliminate malfunctions, then thefollowing steps should be taken:
a. Thoroughly clean the pistol, paying particular attention to the removal ofany accumulated grease and dirt. Use a bristle brush and solvent toremove grease and fouling from the breech-face, extractor, chamber, andfeed ramp area immediately behind the chamber.
b. Check to be sure that the magazine spring firmly returns the magazinefollower to the top of the magazine.
c. Check the magazine lips to be certain that they are free of nicks and burrsand that they are not deformed or cracked.
d. Remove excess oil and solvent from all cleaned components, load themagazine, and try the pistol again. Make sure you are following thecorrect loading and firing sequence as described in this manual.
e. If none of the above steps is effective, try a different magazine of Ruger®manufacture. If a new magazine does not function correctly, return thepistol and magazines to the Ruger Customer Service Department. (See“Shipping Firearms For Repair” on page 34.)
f. Alterations to the pistol or use of non-Ruger magazines and accessoriesmay cause malfunctions. (See “Warning - Alterations” on page 10.)
TO DISASSEMBLEBe sure pistol is unloaded!
An on-line video demonstrating the disassembly and reassembly of the SR22®pistol can be viewed by going to Ruger.com/TechTips.
1. Keep pistol pointed in a safedirection and place safety lever inthe “safe” position (lever fullydown and red area covered). Pressdown on the left or rightmagazine latch and withdraw themagazine from the butt of pistol.
2. Pull the slide to rear and lock inopen position by pressing upwardon the slide stop (See Figure 7.)Visually check to be sure thechamber is empty!
3. Close the slide by gripping therear of the slide with the thumband index finger, pulling rearward and releasing the slide.
22
Figure 7

23
4. Rotate the takedown lever downuntil it is fully dropped. (SeeFigure 8.)
5. Grasp the rearward portion of theslide, pull it all the way to therear, and lift upward. (See Figures9a & 9b.)
6. Holding the rear of the slideupward, move the slide forwardand remove it off the front end ofthe barrel. (See Figure 9b.)
Figure 8
Takedown Lever
Figure 9a
1
2
Figure 9b
7. Remove the guide rod andrecoil spring from the slide.(See Figure 10.)
Figure 10

24
8. This completes normal field stripping for routine cleaning and lubricationpurposes. (See Figure 11.) Further disassembly of the slide or framecomponents is not recommended and should only be undertaken by thefactory.
Figure 11
Always unload a firearmbefore cleaning, lubrication,disassembly or assembly.
UNLOAD BEFORE DISASSEMBLY
WARNING - DISASSEMBLY
SAFETY “ON”
3
1
2
4
REMOVING THE BARREL
The RUGER® RUGER® SR22® pistol barrel, although fixed, can bechanged out.
Be sure the pistol is unloaded.
1. Disassemble to the field strip level asdescribed on pages 22 - 24.
2. Using a 9/64” Allen wrench, loosen (butdo not remove) the screw in front of thetrigger until the barrel can be lifted offof the frame. (See Figure 12.)
Figure 12
Loosen Screw

TO REASSEMBLE1. Be certain chamber is empty and the magazine is removed from the gun.
2. To install thebarrel, align thecut out in thebottom of thebarrel with thebarrel location pin(see Figure 14)and set the barrelonto the frameinsert.
3. Remove the barrel fromthe frame by liftingupward. See Figure 13.
25
Figure 16
Take DownLever FullyDownward
Figure 13
BarrelLocation Pin
3. While holding thebarrel in place, turnthe barrel screw untilyou feel it makecontact with the barrel.From this point, rotatethe Allen wrenchanother 45 - 90 degreesto fully tighten thebarrel screw.(See Figure 15.)
4. Verify that the takedown lever isrotated fully downward.(See Figure 16.)
Figure 14
Figure 15

26
Cock theHammer
DisengageSafety
2
1
5. Disengage the safetyby pushing the safetylever up (red areaexposed) and cock thehammer using yourthumb.(See Figure 17.)
7. Line the recoil spring up withthe hole in the chin of the slide.(See Figure 20.)
6. Install the recoil spring (smalldiameter end first as shown inFigure 18) onto the guide rod.Insert the guide rod/recoilspring assembly into the hole inthe frame insert. (See Figures19a and 19b.) NOTE: Properalignment shown in Figure 20.
Small DiameterEnd of Spring
Hole in FrameInsert
Line Up Recoil SpringWith Chin of Slide
Figure 18
Figure 19a Figure 19b
Figure 20
Figure 17

Figure 23
9. Guide the slide forwardon the frame rails until itis completely closed.(See Figure 23.)
27
Figure 21
Figure 22
8. Keeping the rear of the slide pointed upward, move the slide completelyrearward and down onto the frame. (See Figure 21.) Note that lightdownward pressure will be required to depress the hammer slightly so thatthe slide can engage the frame rails. (See Figure 22.)
12
Slide RailsEngaged
28
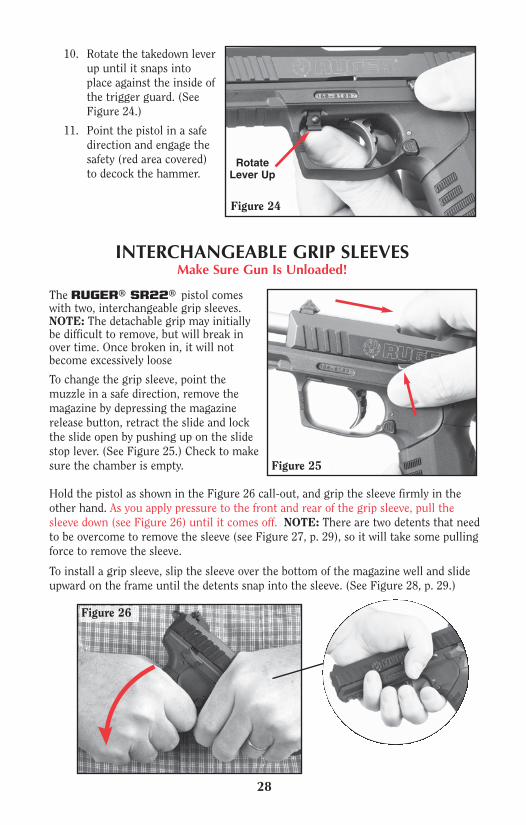
Hold the pistol as shown in the Figure 26 call-out, and grip the sleeve firmly in theother hand. As you apply pressure to the front and rear of the grip sleeve, pull thesleeve down (see Figure 26) until it comes off. NOTE: There are two detents that needto be overcome to remove the sleeve (see Figure 27, p. 29), so it will take some pullingforce to remove the sleeve.
To install a grip sleeve, slip the sleeve over the bottom of the magazine well and slideupward on the frame until the detents snap into the sleeve. (See Figure 28, p. 29.)
Figure 26
INTERCHANGEABLE GRIP SLEEVESMake Sure Gun Is Unloaded!
The RUGER® SR22® pistol comeswith two, interchangeable grip sleeves.NOTE: The detachable grip may initiallybe difficult to remove, but will break inover time. Once broken in, it will notbecome excessively loose
To change the grip sleeve, point themuzzle in a safe direction, remove themagazine by depressing the magazinerelease button, retract the slide and lockthe slide open by pushing up on the slidestop lever. (See Figure 25.) Check to makesure the chamber is empty. Figure 25
10. Rotate the takedown leverup until it snaps intoplace against the inside ofthe trigger guard. (SeeFigure 24.)
11. Point the pistol in a safedirection and engage thesafety (red area covered)to decock the hammer.
Figure 24
RotateLever Up

29
The rear sight blade can be reversed for a solid black rear sight if preferred.
1. To reverse the rear sight blade, first remove the windage screw.
2. Lift the sight blade up and out of the housing, rotate it to the desired sight,and reinstall it.
3. Be sure that the windage spring is compressed so that it pushes the sightblade to the left hand side of the pistol. A small punch installed through thewindage screw hole makes this easier.
4. Reinstall the windage screw.
Figure 30
DownUpTo move the group down, turn theelevation screw clockwise using a slottedscrewdriver. To move the group up, turnthe elevation screw counter-clockwise.(See Figure 30.)
Both front and rear sights are providedwith white-dot inserts for rapid targetacquisition and easy alignment of thesights to obtain a correct sight picture.
SIGHT ADJUSTMENTThe RUGER® SR22® pistols areequipped with a rear sight which isadjustable for windage and elevation. Toadjust the rear sight, move the sight inthe direction you want the shot to moveon the target (point of impact).
To move the group to the left, turn thewindage screw clockwise using a slottedscrewdriver. To move the group right,turn the windage screw counter-clockwise. (See Figure 29.)
Figure 29
Point ofImpactRight
Point ofImpactLeft
Figure 27
Figure 28
Detent

Figure 33 Figure 34
Install the adapter by carefully screwing it onto the threaded portion of the barrel byhand. (See Figure 33.) Next, use the supplied adapter/cap wrench to hand-tighten theadapter firmly in place by turning it counter-clockwise with the pistol pointed away fromyou and in a safe direction. (See Figure 34.) Note: Do not use a cheater bar on thesupplied adapter/cap wrench as damage can occur to either the adapter, cap or barrel.
WARNING: THE ADAPTER IS INTERNALLY THREADEDCOMPLETELY THROUGH THE ENTIRE BODY. IT ISIMPERATIVE THAT THE 1/2-28 EXTERNAL THREADS BE
FACING AWAY FROM THE SLIDE. FAILURE TO DO THISCOULD RESULT IN DAMAGE TO THE SLIDE.
Figure 31 Figure 32
ADAPTER/BARREL CAP REMOVAL AND INSTALLATION(ON PISTOLS SO EQUIPPED)
Some RUGER® SR22 TM pistols come equipped with a threaded barrel which isprotected by a removable barrel cap. The cap protects the threads at the end of thebarrel which are designed to accommodate a 22 Long Rifle sound suppressor.
To remove the barrel cap, keep your finger off the trigger, point the pistol in a safedirection, and remove the magazine. Using your non-shooting hand, retract the slideand lock it to the rear by pushing up on the slide release. Verify that the chamber isempty.
With the gun pointed away from you and in a safe direction, use the suppliedadapter/cap wrench to turn the barrel cap clockwise to loosen it. (See Figure 31.)Remove the cap from the barrel (see Figure 32) and store it in a safe place forreinstallation when the suppressor is removed.
30

MAGAZINE INSPECTION AND CARECheck the magazine frequently. The magazine follower must move freely andhave adequate tension so that each cartridge is quickly raised to the feedingposition. The magazine lips should be clean and free of cracks, dents, or nicks, sothat cartridges are held in their proper feeding position.
If the magazine becomes dirty, it should be disassembled and thoroughlycleaned. All RUGER® SR22® pistol magazines are manufactured with asnap-on base. The following disassembly instructions apply:
Snap-On Base - Use a punch to press in on the magazine spring seat where itprotrudes into the hole in the magazine floorplate. Slide the magazine floorplatetoward the front of the magazine, be careful to prevent the forcible ejection ofthe magazine spring seat and compressed magazine spring. Withdraw themagazine spring seat and magazine spring from the magazine body. Turn themagazine upside down and slide the magazine button to the bottom of the slot,and slide the button out of the magazine follower. The magazine follower cannow be removed. Reassemble in reverse order. Be certain that the magazinefollower and magazine button are reinstalled in the correct orientation.
The magazine button can be installed on either side of the magazine to suit theshooter’s preference. To switch the magazine button, disassemble the magazineas described above. Reassemble the magazine installing the magazine buttonfrom the preferred side.
When cleaning is necessary, use a solvent that will not rust the metalcomponents or adversely affect the magazine body. After the magazine has beensoaked to loosen foreign matter, be certain to shake it vigorously (with theloading opening away from you) to remove solvent or residue from within themagazine. Penetrating oils and solvents inside a magazine can “kill” or weakencartridge primers or powder which can result in failures to fire or other possiblydangerous malfunctions, such as leaving a bullet in the bore!
After cleaning, always check to be certain that the magazine follower movementand tension are correct, and that no solvent or debris remain. Improperreassembly of the magazine can cause failure to feed, which is a potentiallydangerous malfunction. If cleaning does not restore proper tension, or if youexperience a problem with the magazine, don’t use it. Get a new one.
31
With the adapter installed, hand-tighten the suppressor onto the adapter. The gunis now ready to shoot.
We recommend using standard-velocity or subsonic ammunition with thesuppressor installed. We do not recommend using hyper-velocity ammunitionwith the suppressor installed.
Note: The suppressor adapter must be removed before the slide can be removedfrom the gun.

32
CARE AND CLEANINGMake Sure Gun Is Unloaded!
BEFORE CLEANING, BE CERTAIN THE PISTOL AND ITS MAGAZINE AREUNLOADED. (See “Warning - Unloading,” p. 18.)
At regular intervals, or whenever the pistol has been exposed to sand, dust,extreme humidity, condensation, immersion in water, or other adverseconditions, disassemble, clean, and oil it. Proper periodic maintenance isessential to the reliable functioning of any firearm.
An on-line video demonstrating the proper cleaning procedure of the SR22 pistolcan be viewed by going to Ruger.com/TechTips. The proper cleaning procedure isdiscussed in the Disassembly/Reassembly video.
To clean the pistol, proceed as follows:
1. Disassemble (fieldstrip) the pistol to the extent described on pages 22 - 24.
2. Using a cleaning rod, run a properly sized, solvent-wetted patch through thebore several times. Then attach a solvent-wetted bristle brush to a cleaningrod and run it back and forth the full length of the bore as many times asnecessary to remove grease and dirt from the bore and chamber. Clean borewith dry patches and examine. Bore fouling can contribute to reducedaccuracy, and grease accumulation in the chamber can interfere with properfeeding of cartridges from the magazine.
3. Using powder solvent on a clean patch or bristle brush, remove powderresidue from all components of the mechanism. After cleaning, run a drypatch through the bore, then follow with a patch that is very lightly oiled.Wipe all surfaces clean with cloth, then wipe all surfaces with a patch or cloththat has been very lightly oiled.
4. NOTE: Only a light application of oil is needed to provide adequatelubrication of moving parts and to prevent rust. Excess accumulations of oiltend to attract particles of dust and dirt and may congeal in cold weather,which can interfere with the safe and reliable function of the pistol.
5. Before firing, remove all oil and grease from the bore.
WARNING - LUBRICATION
IMPROPER LUBRICATIONDESTROYS GUNS
Firing a pistol with oil, grease, or any other materialeven partially obstructing the bore may result in damageto the pistol and serious injury to the shooter and thosenearby. Do not spray or apply lubricants directly onammunition. If the powder of a cartridge is affected bythe lubricant, it may not be ignited, but the primerfiring may push the bullet into the bore where it may belodged. Firing a subsequent bullet into the obstructedbore may damage the pistol and cause serious injury ordeath to the shooter and those nearby. Use lubricantsproperly. You are responsible for the proper care andmaintenance of your firearms.
33
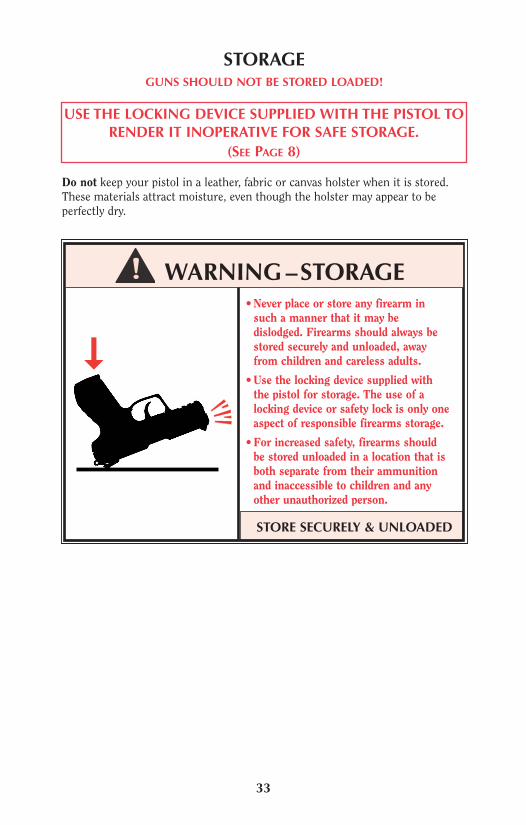
STORAGEGUNS SHOULD NOT BE STORED LOADED!
USE THE LOCKING DEVICE SUPPLIED WITH THE PISTOL TORENDER IT INOPERATIVE FOR SAFE STORAGE.
(SEE PAGE 8)
•Never place or store any firearm insuch a manner that it may bedislodged. Firearms should always bestored securely and unloaded, awayfrom children and careless adults.
•Use the locking device supplied withthe pistol for storage. The use of alocking device or safety lock is only oneaspect of responsible firearms storage.
•For increased safety, firearms shouldbe stored unloaded in a location that isboth separate from their ammunitionand inaccessible to children and anyother unauthorized person.
STORE SECURELY & UNLOADED
WARNING–STORAGE
Do not keep your pistol in a leather, fabric or canvas holster when it is stored.These materials attract moisture, even though the holster may appear to beperfectly dry.

SHIPPING FIREARMS FOR REPAIR:
RUGER® SR22® pistols returned to the factory for service or repair shouldbe sent to: Sturm, Ruger & Company, Inc., Customer Service Department, 271Cardwell Rd., Mayodan, NC 27027. NOTE: You must obtain a RepairAuthorization Number before returning your firearm. An authorization numbercan be obtained by contacting Customer Service online at www.ruger.com orcalling the Customer Service Dept. at 336-949-5200. Guns should be sentprepaid. We will not accept collect shipments.
The Federal Gun Control Act, as well as the laws of most states and localities, donot prohibit an individual (who is not otherwise barred from purchasing orpossessing a firearm) from shipping a firearm directly to the manufacturer forrepair. However, before you ship your pistol to us, be certain that your state orlocality does not have a law or regulation which will prohibit you from receivingthe pistol from us after it has been repaired. If such receiving is prohibited, thenplease have a federally licensed firearms dealer ship the gun to us. If your pistolis sent to us by a dealer, it will be returned to that dealer after being repaired. If ahandgun (pistol or revolver) is shipped by an individual who does not hold aFederal Firearms License, it must be shipped for overnight delivery via U.P.S.,Federal Express or other, similar private overnight service. NOTE: Handgunsmay not be shipped via U.S. Mail. Persons who do not hold a Federal FirearmsLicense are prohibited by Federal law from shipping a handgun by Mail.Handguns mailed in violation of the law are impounded by the Post Office.
Please do not include holster, custom grip panels, or accessories with a firearmbeing shipped to the factory for service. DO NOT SEND GUN BOXES ORLITERATURE THAT YOU CONSIDER TO BE COLLECTOR’S ITEMS –THESE ARE INVARIABLY DAMAGED OR DESTROYED IN SHIPMENT.Always insure your shipment.
Enclose a letter which includes your name, address, telephone number, serialnumber, model of the firearm, and your repair authorization number. Describein detail the trouble you have experienced with your firearm, or the work youwish to have done. Merely stating that the firearm “needs repair” is inadequateinformation. Please enclose copies of any previous correspondence.
34
WARNING—BEFORE SHIPPING ANY FIREARM, BE ABSOLUTELY CERTAIN THAT IT AND ITS MAGAZINE ARE UNLOADED. DO NOT SHIP CARTRIDGES WITH A FIREARM.
SERVICE AND PARTS POLICYIf you have any questions with regard to the performance of your RUGER®
SR22® pistol, please write or call (336-949-5200) our Customer ServiceDepartment in Mayodan, North Carolina, fully describing all circumstances andconditions involved. If you should return your pistol to the factory for repair, ororder parts for it, please comply with the following suggestions for prompt service:

ORDERING PARTSPlease contact our Prescott, Arizona Customer Service Department for partsavailability and current prices. All parts orders for the RUGER® SR22® pistolshould be sent to: Sturm, Ruger & Company, Inc., Parts Department, 271Cardwell Rd., Mayodan, NC 27027, 336-949-5200. We cannot comply with openaccount or C.O.D. requests. Payment in full via credit card (Visa, MasterCard orDiscover only), money order or certified bank check (no personal checks or cash,please) is required before any service will be performed. Please provide your creditcard number, your name as it appears on the credit card, the expiration date, andthe 3-digit security code. All parts orders are subject to a minimum charge andcharges for shipping and handling. Order parts by Part Name and specify themodel and entire serial number of the firearm for which the parts are beingordered. There is a minimum labor charge plus a shipping and handling charge ifthe parts are factory fitted. All factory fitted parts are fit on an exchange basisonly. We will not return the replaced parts. Please contact the Customer ServiceDepartment for pricing information.
Because it is a serial numbered component, the RUGER® SR22® pistol frameis defined as a “firearm” by Federal law and is not sold as a separate component.
*Parts designated by an asterisk must be factory fitted. These parts are fitted on anexchange basis only. We will not return the replaced parts. We will not return anypart that is broken, malfunctioning, badly worn or has been modified. See“Warning - Parts Purchasers,” above.
35
• It is the purchaser’s responsibility to beabsolutely certain that any parts ordered fromthe factory are correctly fitted and installed.
• Firearms are complicated mechanisms andIMPROPER FITTING OF PARTS MAY RESULTIN A DANGEROUS MALFUNCTION, DAMAGETO THE FIREARM, AND SERIOUS INJURY TOTHE SHOOTER AND OTHER PERSONS.
• The purchaser and installer of parts mustaccept full responsibility for the correctadjustment and functioning of the firearmafter such installation.
PARTS MUST FIT CORRECTLY
WARNING–PARTS PURCHASERS
WARNING: A gun containing broken, malfunctioning,or badly worn parts should not be fired.
All work performed is subject to a minimum labor charge and charges forshipping and handling. Most models can be reblued, but custom gunsmithingservice or nonstandard alterations are NOT AVAILABLE from Ruger CustomerService Departments. Please contact the Customer Service Department forpricing information.

36
Key No. Part Name Guide Rod Assembly - includes Key Nos. 1 - 2 1 Recoil Spring Guide 2 Recoil Spring Frame Insert Assembly - includes Key Nos. 3 - 31† 3 Frame Insert - Left Side* 4 Frame Insert - Right* 5 Hammer* 6 Trigger* 7 Trigger Spring* 8 Trigger Bar* 9 Safety Assembly Forward Pin* 10 Safety Lever - Right Side* 11 Safety Lever - Left Side* 12 Frame Insert Spacer * 13 Single Action Sear Pivot Pin* 14 Decock Hammer Stop* 15 Sear* 16 Ejector* 17 Magazine Disconnect Spring* 18 Magazine Disconnect* 19 Single Action Spring* 20 Trigger Pivot Pin* 21 Hammer Spring Guide Stop* 22 Hammer Spring - Inner* 23 Hammer Spring - Outer* 24 Hammer Spring Guide* 25 Barrel Location Pin* 26 Blocker Lever 27 Take Down Lever Detent Pivot Pin 28 Socket Cap Screw 29 Socket Cap Screw* 30 Safety Detent* 31 Safety Detent Spring 32 Trigger Bar Return Plunger 33 Slide Stop Spring 34 Slide Stop 35 Barrel
RUGER® SR22 ®
PARTS LISTDesign, prices and specifications subject to change without notice.
SPECIFY MODEL, CALIBER AND SERIAL NO. WHEN ORDERING(See Exploded View on Page 38)
† The frame is a serial-numbered part and is not offered for sale.
* PARTS SO MARKED MUST BE FACTORY FIT.

37
Key No. Part Name Take Down Lever Assembly - includes Key Nos. 36 - 39 36 Take Down Lever 37 Take Down Lever Detent Plunger 38 Take Down Lever Detent Spring 39 Take Down Lever Retaining Pin 40 Trigger Bar Spring 41 Barrel Screw Lock Washer Slide Assembly - includes Key Nos. 42 - 51 42 Slide 43 Breech Block 44 Firing Pin Blocker 45 Blocker Spring 46 Extractor 47 Firing Pin Spring 48 Extractor Spring 49 Firing Pin 50 Slide Cross Pin* 51 Dowel Pin for Slide Stop Rear Sight Assembly - includes Key Nos. 52 - 59 52 Rear Sight Base 53 Rear Sight Blade 54 Rear Sight Windage Spring 55 Rear Sight Elevation Spring 56 Rear Sight Windage Screw 57 Rear Sight Pivot Pin 58 Rear Sight Arm 59 Rear Sight Elevation Screw 60 Front Sight Frame Assembly - includes Key Nos. 61 - 67 61 Grip Frame 62 Grip - Small 63 Grip Insert Pin 64 Magazine Latch 65 Magazine Latch Thumbpiece 66 Magazine Latch Spring 67 Magazine Latch Pivot 68 Barrel Screw 69 Magazine Assembly
* PARTS SO MARKED MUST BE FACTORY FIT.

38
RUGER
®SR22
®
EXPL
ODED
VIEW

THE BASIC RULES OF SAFE FIREARMS HANDLINGWe believe that Americans have a right to purchase and use firearms for lawfulpurposes. The private ownership of firearms in America is traditional, but thatownership imposes the responsibility on the gun owner to use his firearms in away which will ensure his own safety and that of others. When firearms are usedin a safe and responsible manner, they are a great source of pleasure andsatisfaction, and represent a fundamental part of our personal liberty.
Firearms do not cause accidents! Firearms accidents are almost always found tohave been the result of carelessness or ignorance on the part of the shooter ofthe basic rules of safe gun handling.
The following rules must be observed by gun users at all times. Safe gunhandling is not just desirable, it is absolutely essential to your safety, the safety ofothers, and the continuation of gun ownership and sport shooting as we know ittoday.
1. LEARN THE MECHANICAL AND HANDLINGCHARACTERISTICS OF THE FIREARM YOU ARE USING.
Not all firearms are the same. Themethod of carrying and handlingfirearms varies in accordance with themechanical provisions for avoidingaccidental discharge and the variousproper procedures for loading andunloading. No person should handleany firearm without first havingthoroughly familiarized himself withthe particular type of firearms he isusing, and with safe gun handling ingeneral.
2. ALWAYS KEEP THEMUZZLE POINTED IN ASAFE DIRECTION.Be sure of the bullet stop behind yourtarget, even when dry-firing. Never letthe muzzle of a firearm point at anypart of your body or at another person.This is particularly important whenloading or unloading a firearm. In theevent of an accidental discharge, noinjury can occur as long as the muzzleis pointing in safe direction. A safedirection means a direction that willnot permit a discharged bullet tostrike a person, or to strike an objectfrom which the bullet may ricochet.
39
A safe direction must take into account the fact that a bullet may penetrate awall, ceiling, floor, window, etc., and strike a person or damage property. Makeit a habit to know exactly where the muzzle of your gun is pointing wheneveryou handle it, and be sure that you are always in control of the direction inwhich the muzzle is pointing, even if you fall or stumble. Keep your finger offthe trigger until you are ready to shoot.
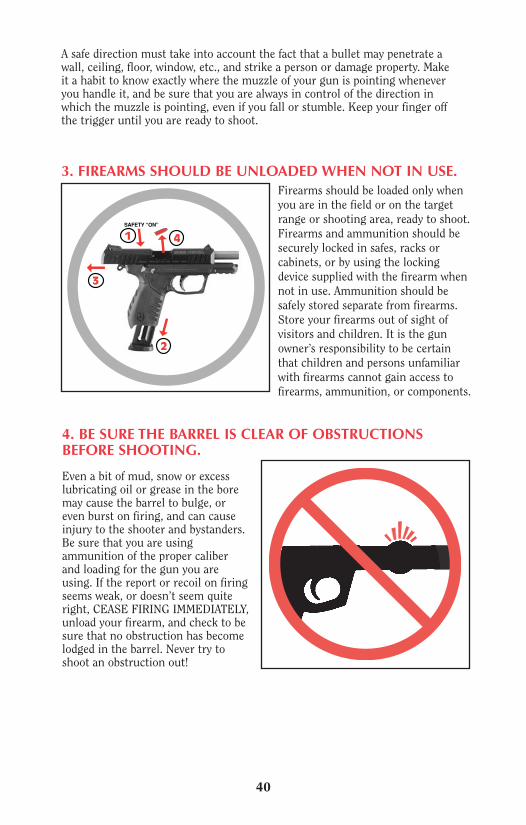
3. FIREARMS SHOULD BE UNLOADED WHEN NOT IN USE.Firearms should be loaded only whenyou are in the field or on the targetrange or shooting area, ready to shoot.Firearms and ammunition should besecurely locked in safes, racks orcabinets, or by using the lockingdevice supplied with the firearm whennot in use. Ammunition should besafely stored separate from firearms.Store your firearms out of sight ofvisitors and children. It is the gunowner’s responsibility to be certainthat children and persons unfamiliarwith firearms cannot gain access tofirearms, ammunition, or components.
4. BE SURE THE BARREL IS CLEAR OF OBSTRUCTIONSBEFORE SHOOTING.
Even a bit of mud, snow or excesslubricating oil or grease in the boremay cause the barrel to bulge, oreven burst on firing, and can causeinjury to the shooter and bystanders.Be sure that you are usingammunition of the proper caliberand loading for the gun you are using. If the report or recoil on firingseems weak, or doesn’t seem quite right, CEASE FIRING IMMEDIATELY,unload your firearm, and check to be sure that no obstruction has becomelodged in the barrel. Never try to shoot an obstruction out!
40
SAFETY “ON”
3
1
2
4

5. BE SURE OF YOUR TARGET BEFORE YOUSHOOT.
Don’t shoot unless you know exactlywhere your bullet is going to strike.Be sure of the bullet stop behindyour target, even when dry-firing withan unloaded gun. If you are in the field hunting, do not fire at amovement or noise. Take the time to be absolutely certain of your targetbefore you pull the trigger.
6. WEAR SHOOTINGGLASSES AND HEARING PROTECTION WHEN YOUSHOOT.
All shooters should wear protectiveshooting glasses and adequate hearing protection when shooting.Exposure to shooting noise candamage hearing, and wearing adequate eye protection when shooting isessential.
7. NEVER CLIMB A TREE ORFENCE WITH A LOADED FIREARM.
Put the firearm down carefully before climbing a fence, and unload it before climbing or descending atree or jumping over a ditch or otherobstruction. Never pull or push a loaded firearm toward yourself oranother person. When in doubt, orwhenever you are about to do any-thing awkward, unload your gun!
41

8. DON,T SHOOT AT A
HARD SURFACE OR ATWATER.
Bullets can glance off many surfaceslike rocks or the surface of water andtravel in unpredictable directionswith considerable velocity.
9. NEVER TRANSPORT A LOADED FIREARM.
Firearms should always be unloadedbefore being moved or placed in avehicle. A suitable carrying case or scabbard should be used to carry anunloaded firearm to and from theshooting area.
10. AVOID ALCOHOLICBEVERAGES WHEN SHOOTING.
Don’t drink until the day’s shooting is over. Handling firearms while under the influence of alcohol in anyform, or medications that could affectyour judgement or coordination,constitutes a criminal disregard for thesafety of others.
42

A BRIEF ACCOUNT OF AN EXTRAORDINARYACHIEVEMENT: RUGER® FIREARMS
Sturm, Ruger & Company, Inc., had its beginning in a small machineshop occupying a rented frame building in Southport, Connecticut. InJanuary, 1949, with an initial investment of only $50,000 and an idea,William B. Ruger and Alexander M. Sturm started production of a .22caliber autoloading pistol–a design which was so successful that itbecame the cornerstone upon which one of the most comprehensivelines of sporting firearms ever made in America was established. AfterAlex Sturm’s death in 1951, William B. Ruger continued to direct theCompany until his death in 2002. William B. Ruger, Jr. continued toprovide guidance, which helped make this Company a sound andsuccessful enterprise, until his retirement in 2006. The Company hascontinued to prosper, under new management and guidance from ourBoard, with new products and fresh perspectives.
Ruger, in this relatively short time, has established itself as a leadingsmall arms design organization, developing a unique and broad line offine quality sporting, military and police firearms to become one of theworld’s most famous producers of revolvers, pistols, rifles and shotguns.Since 1949, Ruger craftsmen have built many millions of firearms.
During its five decades of growth and progress under the leadership ofWilliam B. Ruger, the Company developed a business philosophy andimplemented policies which represent a constructive influence in the lifeof modern America. From the beginning, Ruger played a positive role inconservation efforts and has supported the interests of shooters throughsuch groups as the National Rifle Association, National Shooting SportsFoundation, and many regional sportsmen’s organizations.
The Company has always endeavored to market its firearms forconstructive and recreational purposes, to emphasize the traditional andresponsible aspects of shooting, to render meaningful public services,and to encourage shooters in constructive, responsible, and safeparticipation in the shooting sports. Its motto, “Arms Makers ForResponsible Citizens®,” exemplifies this Company philosophy.
Today, Ruger® is particularly mindful of those elements which havecontributed to the creation of its success, and extends heartfelt thanks toits many loyal employees and customers.
The firearms catalog, and instruction manuals for all Ruger® firearms,can be downloaded from our website at:
www.ruger.com
43

WHY NO WARRANTY CARD HAS BEENPACKED WITH THIS NEW RUGER® FIREARM
The Magnuson-Moss Act (Public Law 93-637) does not require anyseller or manufacturer of a consumer product to give a writtenwarranty. It does provide that if a written warranty is given, it must bedesignated as “limited” or as “full” and sets minimum standards for a“full” warranty. Sturm, Ruger & Company, Inc. has elected not toprovide any written warranty, either “limited” or “full”, rather than toattempt to comply with the provisions of the Magnuson-Moss Act andthe regulations issued thereunder. There are certain implied warrantiesunder state law with respect to sales of consumer goods. As the extentand interpretation of these implied warranties varies from state tostate, you should refer to your state statutes. Sturm, Ruger &Company wishes to assure its customers of its continued interest inproviding service to owners of Ruger® firearms.
The Following are Sturm, Ruger & Co., Inc. Trademarks: “BX-Trigger,” “Bisley,” Eagle Hard “R” logo holding gun,Eagle “SR,” “Elite 452,” “Gold Label,” “I’m a Ruger American,” “LC6,” “LCR-357,” “LC380CA,” “Mark II,” “Mark III,”“Match Champion,” “Model 96,” “P345,” “P345D,” “P345PR,” “P85,” “P90,” “P91,” “P93,” “P94,” “P95,” “P97,”“Ruger American Pistol,” “R.I.O.S.,” “Ruger Marksman Adjustable,” “Ruger 77/50,” “Ruger 10/17,” “77/357,” “Silent-SR,” “Single-Seven,” “SR45,” “SR-556C,” “SR-556 Takedown,” “SR-556VT,” “SR-762,” “10/22-FS,” “This is Ruger.This is America.,” “Tri-Flex,” “22 Charger,” “22/45,” and “22/45 RP.”
The Following are Registered U.S. Trademarks Belonging to Sturm, Ruger & Co., Inc.: Sturm,Ruger Logo,” “AC-556,” “AR-556,” “Arms Makers For Responsible Citizens,” “All-Weather,” “Bearcat,” “Blackhawk,” “BX-15,” “BX-25,”Eagle ‘R’ - soft ‘R’ & hard ‘R’,” Eagle ‘SR’,” “Everything you need and nothing you don’t.,” “GP100,” Hard “R” Logo,“Hawkeye,” “It’s Mine and It’s American,” “It’s Mine. And It’s American,” “LC380,” “LC9,” “LC9s,” “LC9s Pro,” “LCP,”“LCR,” “LCRx,” “M77,” “Mini Thirty,” “Mini-14,” “9E,” “Old Army,” “Power Bedding,” “Redhawk,” “RUGER,” “RugerAmerican Rifle,” “Ruger American Rimfire,” “Ruger Hunting” - phrase & logo design, “Ruger Inside & Out” - phrase& logo design, “Ruger Precision Rifle,” “Ruger 77/17,” “Ruger 77/22,” “Ruger 77/44,” “Ruger SP101,” “Ruger 10/22Takedown” phrase & logo design, “Ruger Titanium,” “Ruger 22/45 Lite,” “Ruger Vaquero,” “Rugged, ReliableFirearms,” “Security-Six,” “Service-Six,” “Single-Nine,” “Single-Six,” “Single-Ten,” “Speed-Six,” the “SR” Design,“SR9,” “SR9c,” “SR40,” “SR40c,” “SR-22,” “SR22,” “SR-556,” “SR-556E,” “SR1911,” “Super Redhawk Alaskan,”“Target Grey,”and “10/22.”
STURM, RUGER & COMPANY, INC.271 Cardwell Road
Mayodan, North Carolina 27027 U.S.A.www.ruger.com
Arms Makers For Responsible Citizens®
A COPY OF THE INSTRUCTION MANUAL FOR ANY RUGER®
FIREARM IS AVAILABLE FROM THE FACTORY FREE ON REQUEST, OR IT MAY BEDOWNLOADED FROM OUR WEBSITE AT WWW.RUGER.COM.
THESE INSTRUCTION MANUALS CONTAIN IMPORTANTWARNINGS WHICH MUST BE UNDERSTOOD
BEFORE USING THESE FIREARMS.