owner’s manual for the vehicle. with a quick reference ... · owner’s manual for the vehicle....
TRANSCRIPT

Owner’s Manual for the Vehicle.With a quick reference guidefor your convenience.


323Ci328Ci

2n

Congratulations, and thank you for choosing a BMW.
Thorough familiarity with your vehicle will provide you with enhanced control and security when you drive it. We therefore have this request:
Please take the time to read this Owner's Manual and familiarize yourself with the information that we have compiled for you before starting off in your new car. It contains important data and instructions intended to assist you in gaining maximum use and satisfaction from the unique range of technical features on your BMW. The manual also contains information on care and maintenance designed to enhance operating safety and contribute to maintaining the value of your BMW throughout an extended service life.
This Owner's Manual should be considered a permanent part of this vehicle. It should stay with the vehicle when sold to provide the next owner with important operating, safety and maintenance information.
This manual is supplemented by a Service and Warranty Information Booklet (US models) or a Warranty and Service Guide Booklet (Canada models). We recom-mend that you read these publications thoroughly.
Your BMW is covered by the following warranties:
– New Vehicle Limited Warranty
– Limited Warranty Rust Perforation
– Emissions System Defect Warranty
– Emissions Performance Warranty
– California Emissions Control System Limited Warranty
Detailed information about these warranties is listed in the Service and Warranty Information Booklet (US models) and the Warranty and Service Guide Booklet (Canada models).
We wish you an enjoyable driving experience.
BMW AG

4n
Notes on the Owne
We have made every ethat you are able to finin this Owner's Manuapossible. The fastest wtopics is by using the the end. If you wish totial overview of your vfind this in the first chaThe detailed table of cately following the indarouse your curiosity aand stimulate you to r
Should you wish to sesome time in the futur
The individual vehicle
On buying your BMW, you have de-cided in favor of a model with individu-alized equipment and features. This Owner's Manual describes all models and equipment that BMW offers within the same range.
We hope you will understand that equipment and features are included which you might not have chosen for your vehicle. Any differences can easily be identified, as all optional accessories and special equipment are marked with an asterisk
*
.
If your BMW features equipment which
r's Manualffort to ensure d what you need l as quickly as ay to find certain
detailed index at gain only an ini-ehicle, you will pter. ontents immedi-ex is intended to bout your BMW
ead about it.
ll your BMW at e, please remem-wner's Manual to
Symbols usedThese sections contain vital infor-mation – please read the accom-
panying text passages carefully, for your safety, the safety of others and to prevent damage to your BMW.<
These passages contain informa-tion on special and unique fea-
tures of your vehicle.<
Special information on recycling.<
< Indicates the end of a note.
is not described in this Owner's Manual (e.g., car radio or telephone), (Supple-mentary) Owner's Manuals are en-closed. We ask you to read these man-uals as well.
© 1999 BMW AGMunich, GermanyReprinting, including excerpts, only with the written consent of BMW AG, Munich. Part number 01 41 0 155 026US VI/99Printed in GermanyPrinted on environmentally friendly paper (bleached without chlorine, suitable for recycling).
ber to hand over the Othe new owner; it is part of the vehicle.
Should you have any further questions, your BMW center will be glad to assist at any time.
* Indicates special equipment, country-specific equipment and optional extras.
Denotes vehicle parts for which you should consult this Owner's
Manual.
Alerts you to functions that can be adjusted for individual drivers
by your authorized BMW center ("Car Memory" or "Key Memory"). Refer to page 54.<

5n
Status at time of printingBMW pursues a policy of continuous, ongoing development that is conceived to ensure that our vehicles continue to embody the highest quality and safety standards combined with advanced, state-of-the-art technology. For this reason, it is possible that the features described in this Owner's Manual could differ from those on your vehicle. Nor can errors and omissions be entirely ruled out. You are therefore asked to appreciate that no legal claims can be entertained on the basis of the data, illustrations or descriptions in this manual.

6n
lation and operation of non-BMW ved accessories such as alarms, , amplifiers, radar detectors,
ls, suspension components, brake hields, telephones (including op-n of any portable cellular phone ithin the vehicle without using an ally mounted antenna) or trans-
r equipment (such as C.B., walkie-, ham radio or similar) may cause sive damage to the vehicle, com-se its safety, interfere with the le's electrical system or affect the y of the BMW Limited Warranty. our authorized BMW center for onal information.
For your own safetyUse unleaded gasoline only. Fuels containing up to 10% etha-
nol or other oxygenates with up to 2.8% oxygen by weight (i.e. 15% MTBE or 3% methanol plus an equivalent amount of co-solvent) will not void the applicable warranties with respect to defects in materials or workmanship. Field experience has indicated signifi-cant differences in fuel quality (i.e. vola-tility, composition, additives, etc.) among gasolines offered for sale in the United States and Canada. The use of poor-quality fuels may result in drive-ability, starting and stalling problems
Important safety information!For your own safety, use genuine
parts and accessories approved by BMW.When you purchase accessories tested and approved by BMW and Original BMW Parts, you simultaneously acquire the assurance that they have been thor-oughly tested by BMW to ensure opti-mum performance when installed on your vehicle.BMW warrants these parts to be free from defects in material and workman-ship.BMW will not accept any liability for damage resulting from installation of
t use key or remote to lock doors gage compartment lid with any-side the car. See page 34 for details.tenance, replacement, or repair of ission control devices and sys-
may be performed by any automo-pair establishment or individual
any certified automotive part".c
especially under certain environmental conditions, such as high ambient tem-perature and high altitude.Should you encounter driveability prob-lems that you suspect could be related to the fuel you are using, we recom-mend that you respond by switching to a recognized high-quality brand.Failure to comply with these recom-mendations may result in unscheduled maintenance.Follow the relevant safety rules when you are handling gasoline.c
parts and accessories not approved by BMW.BMW cannot test every product from other manufacturers to verify if it can be used on a BMW safely and without risk to either the vehicle, its operation, or its occupants.Original BMW Parts, BMW Accessories and other products approved by BMW, together with professional advice on using these items, are available from all BMW centers.
Instalapproradioswheedust seratiofrom wexternceivetalkieextenpromivehicvaliditSee yadditi
Do noor lugone inmore "Mainthe emtems tive reusing
7n
ould cause injury or death, you should HTSA) in addition to notifying BMW of , Telephone (201) 307-4000.
it finds that a safety defect exists in a
The following only applies to vehicles owned and operated in the US.
REPORTING SAFETY DEFECTS
If you believe that your vehicle has a defect that could cause a crash or cimmediately inform the National Highway Traffic Safety Administration (NNorth America, Inc., P.O. Box 1227, Westwood, New Jersey 07675-1227
If NHTSA receives similar complaints, it may open an investigation, and if
NHTSA cannot become involved in indi-.t 1-800-424-9393 (or 202-366-0123 in tation, Washington, DC 20590. You can .
group of vehicles, it may order a recall and remedy campaign. However, vidual problems between you, your dealer, or BMW of North America, Inc
To contact NHTSA, you may either call the Auto Safety Hotline toll-free aWashington, D.C. area) or write to: NHTSA, U.S. Department of Transporalso obtain other information about motor vehicle safety from the Hotline

8n

Overview
Controls and features
Operation, careand maintenance
Owner service procedures
Technical data
Index
Advanced technology
9n
Repa
irs
Inde
xOv
ervi
ewCo
ntro
lsCa
r ca
reTe
chno
logy
Data
Contents
Ove
rvie
w
Cockpit 16Instrument clIndicator andMulti-functionHazard warniWarning trianFirst-aid kitRefueling 26Fuel specificaTire inflation
ssion 65mission with
6dlamp flasher 69ystem/Rain
efroster 7172
er control:
74
uge 75
Electric power windows 44Sliding/tilt sunroof 45
Energy controlFuel gauge 75Temperature ga
Co
ntr
ols
an
d f
eat
ure
s
uster 18 warning lamps 20 steering wheel 24
ng system 25gle 2525
tions 26pressure 27
Locks and security systems:Keys 32Electronic vehicle
immobilizer 33Central locking system 34Door locks – from outside 34Using the key 34Using the remote control 35Door locks – from inside 38Luggage compartment lid 39Luggage compartment 41Alarm system 42
Manual transmiAutomatic trans
Steptronic 6Turn signal/HeaWiper/washer s
sensor 69Rear window dCruise control
Everything undOdometer 74Tachometer 74
Display 7677
uter 77
safety and
ontrol (PDC) 80ity Control
ontrol (RDC) 82
Adjustments:Seats 47Seat and mirror memory 50Steering wheel 51Mirrors 52Car Memory, Key Memory 54
Passenger safety systems:Safety belts 55Child restraint systems 56Airbags 57
Driving:Steering/ignition lock 62Starting the engine 62
Service IntervalCheck ControlClock 77Onboard comp
Technology forconvenience:Park Distance CDynamic Stabil
(DSC) 81Tire Pressure C
Switching off the engine 63Parking brake 64

11n
Under the hood:
Hood 119
ure
s
anc
eLamps:Parking lamps/Headlamps 84
Special operating instructions:Break-in procedures 104
Engine compartment 120Washer fluids 122Washer nozzles 122Engine oil 123Coolant 126Brake fluid 127Vehicle Identification
Number 128
Care and maintenance:The BMW Maintenance
System 129Caring for your car 130Airbags 135Vehicle storage 136
Laws and regulations:Technical modifications
Storage compartments 95Cellular phones 95Ashtray 96
Tire replacement 114Tire rotation 114Wheel and tire
combinations 115
to the vehicle 136OBD connector 137
Co
ntr
ols
an
d f
eat
Op
era
tio
n, c
are
an
d m
ain
tenInstrument panel rheostat 84
High beams/Parking lamps 85Fog lamps 85Interior lamps 85Reading lamps 86
Controlling the climate for pleasant driving:Automatic climate control 88Heated seats 93Roller sun blind 93
Cabin convenience:HiFi System 94Glove compartment 94
Driving notes 104Catalytic converter 105Antilock Brake System
(ABS) 106Disc brakes 108Brake system 109Winter operation 110Power steering 112Cellular phones 112Radio reception 112
Wheels and tires:Tire inflation pressures 113Tire condition 113
Cigarette lighter 96Clothes hooks 97
Loading and transporting:Through-loading facility 98Ski bag 99Cargo loading 100Roof-mounted luggage rack 101
Winter tires 116Snow chains 116Approved wheel and tire
specifications 117

Contents
ata
Engine data 170
res
gyReplacement procedures: Adaptive Transmission Control
Te
ch
nic
al d
Dimensions 171Weights 172Capacities 173Electrical system 174Ribbed V-belt 174
receiving:Jump-starting 156Towing the vehicle 157
Ow
ne
r se
rvic
e p
roc
ed
u
Ad
van
ce
d t
ec
hn
oloOnboard tool kit 140
Windshield wiper blades 140Lamps and bulbs 140Remote control 147Changing tires 148Battery 151Fuses 153Microfilter 154
In case of electricalmalfunction:Fuel filler door 155Sliding/tilt sunroof 155
Assistance, giving and
(ATC) 160Airbags 161Dynamic Stability Control
(DSC) 161Radio reception 162Safety belt tensioner 162Inside rearview mirror with
automatic dimmer 163Tire Pressure Control (RDC) 164Rain sensor 165Self-diagnostics 166Xenon lamp 167

13n
nd
ex Everything from A to Z 178
Owner service procedures
I from A to Z 184
14n

Overview
Controls and features
Operation, careand maintenance
Owner service procedures
Technical data
Index
Advanced technology
15n
Repa
irs
Inde
xOv
ervi
ewCo
ntro
lsCa
r ca
reTe
chno
logy
Data
Cockpit 16Instrument cluster 18Indicator and warning lamps 20Multi-function steering wheel 24Hazard warning flashers 25Warning triangle 25First-aid kit 25Refueling 26Fuel specifications 26Tire inflation pressure 27

16n
Cockpit
462us0
01

17n
airs
Over
view
Cont
rols
Car
care
Cockpit
Rep
Inde
xTe
chno
logy
Data
1 Headlamp switch 84
2 d Turn signal 69> Parking lamp 85> High beam 85> Headlamp flasher 69> Onboard computer* 77
3 Wiper/washer system 69
4 Shift lever/Selector lever* 65 For vehicles equipped with manual transmission: Press the lever to the left to overcome the slight resis-tance to engage reverse gear
5 Central locking system 34
6 Hazard warning flashers 25
7 Rear window defroster 71
8 Horn: The entire surface
9 Adjusting steering wheel 51
10 Fog lamps* 85

18n
Instrument cluster
462us0
02

19n
airs
Over
view
Cont
rols
Car
care
Instrument cluster
Indicator and warning lamps (clockwise) for
>
Fog lamps
*
23
>
Add washer fluid 22
>
Coolant level 23
>
Electronic Engine Power Control (EML)
*
23
>
Engine Management system 22
You can display the outside tem-perature and distance driven in
rent units of measurement.
<
ity
er,
14
diffe
Rep
Inde
xTe
chno
logy
Data
1 Fuel gauge with indicator lamp forfuel reserve 75
2 Turn signal indicator 23
3 Speedometer
4 Indicator lamp for > Battery charge current 20> High beam 23> Engine oil pressure/
Engine oil level 20, 22
5 Tachometer andEnergy control 74
6 Engine coolant thermometer with"Coolant temperature toohigh" indicator 75
7 Indicator and warning lamps
9 Program display for automatic transmission* 68Indicator lamp for automatic transmission* 22, 68
10 Indicator lamp for Dynamic StabilControl (DSC) 22
11 Indicator for> Odometer 74> Trip odometer 74> Clock 77> Service Interval 76
Indicator for onboard computer,for operation via the turn signal levrefer to page 77:
> Clock> Outside temperature
(clockwise) for> Parking brake/
Brake hydraulic system/Cornering Brake Control (CBC) 20
> ABS 22 > Brake pads 22> Tire Pressure Control
(RDC)* 20, 22> Airbags 21> Please fasten safety belts 21> Cruise control* 23
8 Clock reset> Clock 77> Service Interval 76
> Average fuel consumption> Range > Average speed
12 Indicator for Check Control 77
13 Trip odometer, reset to zero 74

20n
Indicator and warning lamps
Tire Pressure Control (RDC)* ●In addition, there is an acousti-cal warning signal: A tire failure
ccurred. Reduce vehicle speed diately and stop the vehicle. Avoid rake applications. Do not over-
ditional information: Refer to
82.
Brake hydraulic system ●If the lamp comes on when the parking brake is not engaged:
k the brake fluid level. Before driv-rther, be sure to read the notes on 109 and 127.
Brake-warning lamp for Cana-dian models.
f
has oimmehard bsteer.For adpage
Checing fupages
Technology that monitors itself Many of the systems of your BMW mon-itor themselves automatically, both dur-ing engine starts and while you are driv-ing. Indicator and warning lamps that are identified by "●" are tested for proper functioning whenever the igni-tion key is turned. They each light up once for different periods of time.
If a fault should occur in one of these systems, the corresponding lamp does not go out after the engine is started or it lights up while the vehicle is moving. You will see how to react to this below.
Red: Stop immediatelyBattery charge current ● The battery is no longer being charged. There is a malfunction
of the alternator ribbed V-belt or in the charging circuit of the alternator. Pleasecontact the nearest BMW center.
If the ribbed V-belt is defective, donot continue driving. The engine
could be damaged due to overheating.If the ribbed V-belt is defective, in-creased steering effort is also re-quired.<
Engine oil pressure ●
Stop vehicle and switch off en-gine immediately. Check level ooil in engine, top up as required. If oil level is correct: Please contact the nearest BMW center.
Do not continue driving. The en-gine could be damaged because
of inadequate lubrication.<

21n
Repa
irs
Over
view
Cont
rols
Car
care
Tech
nolo
gy
Indicator and warning lamps
: An important reminderParking brake Comes on when the parking brake is applied – an additional
ustical signal sounds when starting
additional information: Refer to e 64.
Parking brake lamp for Cana-dian models.
Please fasten safety belts ● An acoustical warning signal sounds simultaneously. Lights
or a few seconds or until the safety is fastened. additional information on safety s: Refer to page 55.
Airbags ● Please have the system in-spected by your authorized
W center. additional information: Refer to
g
) ●el-nd
C . d
n-
Red
acooff. Forpag
up fbeltForbelt
BMFor
Inde
xDa
ta
e 57, 161.
pagYellow: Stop immediatelyEngine oil level Comes on while driving: Stop vehicle and switch off engine
immediately. The oil level is at the abso-lute minimum.
Do not continue driving. The en-gine could be damaged because
of inadequate lubrication.<
Red and yellow: Continue drivincautiously
Cornering Brake Control (CBCComes on together with the ylow indicator lamps for ABS aDSC: The entire ABS, CBC and DSsystem has been deactivatedContinue driving cautiously andefensively. Avoid hard brake
applications. Please have the systemchecked by your authorized BMW ceter as soon as possible. For additional information: Refer to page 81, 107.
Warning lamps CBC, ABS and
DSC for Canadian models.
22nIndicator and warning lamps
Dynamic Stability Control (DSC) ●The DSC has been switched off
been deactivated because of a nction. In the event of a malfunc-ave the system checked by your rized BMW center. ditional information: Refer to
81.
Add washer fluidThe washer fluid is too low. Top off the fluid at the earliest op-
nity. ditional information: Refer to
122.
Service engine soon ● There is a defect in the Engine Management system. It is im-
t to note that an illuminated lamp
-
-
or hasmalfution, hauthoFor adpage
portuFor adpage
portan
nded to inform the driver of the for service, not of the need to he vehicle! also be an indication that the filler as not properly tightened after ing. Please have the system in-ed by your authorized BMW r. ditional information: Refer to137.
Engine Management warning lamp for Canadian models.
is inteneed stop tIt cancap wrefuelspectcenteFor adpage
Orange: For the nearest BMW center
Automatic transmission*Because of a malfunction, the automatic transmission shifts
only in the emergency program. Please consult the nearest authorized BMW center. For additional information: Refer to page 68.
Yellow: Check as soon as possibleAntilock Brake System (ABS) ●ABS has been deactivated in response to system malfunction.
Conventional braking efficiency is available without limitations. Please have the system inspected by your autho-rized BMW center. For additional information: Refer to page 107.
ABS warning lamp for Canadian models.
Engine oil levelComes on after the engine has
been turned off: Check the en-gine oil level. For additional information: Refer to page 123.
Brake pads ● Have the brake pads checked. For additional information:
Refer to page 109.
Tire Pressure Control (RDC)* ●Check the tire pressure. Refer topage 27, 82.

23n
Repa
irs
Over
view
Cont
rols
Car
care
Tech
nolo
gy
Indicator and warning lamps
e: For your informationHigh beamLights up when the high beams are on or the headlamp flasher
ctuated. additional information: Refer to e 69, 85.
is -
n-
ng
h
Blu
is aForpag
Inde
xDa
ta
Electronic Engine output-adjust-ment (EML)* ● Malfunction in engine timing.
Higher brake application pressure may be necessary and brake pedal travel may be significantly longer.Please have the system inspected by your authorized BMW center.
Add coolantThe coolant level is too low. Top up the coolant at the earliest
opportunity. For additional information: Refer to page 126.
Green: For your informationTurn signalFlashes when the turn signal switched on. Rapid flashing in
dicates a system malfunction. For additional information: Refer to page 69.
Cruise control*Comes on when the cruise cotrol is activated. Available for
operation via the multi-function steeriwheel. For additional information: Refer to page 72.
Fog lamps*Lights up whenever you switc
on the fog lamps.For additional information: Refer to page 85.

24nMulti-function steering wheel (MFL)
n: The entire surface
ise control: Resume stored ing
ise control: Store and accelerate decelerate and store (–)
ise control: Activate/Interrupt/cel.
t6 Hor
7 Crusett
8 Cru(+);
9 CruCan
The controls integrated in the multi-function steering wheel are provided so that you can operate a number of ac-cessories quickly and without being distracted from traffic conditions. You may operate:
> selected radio functions> the cruise control and> selected cellular phone functions.
In order to operate a system via the MFL, the corresponding sys-
tem controls must be switched on.<
The illustration shows the maximum possible number of controls, corre-
1 Switch between the radio and the cellular phone
2 Cellular phone: Receive a call, start dialing, terminate a call
463d
e057
sponding to a full range of optional equipment. Refer to the individual accessory manuals for more detailed descriptions.
3 Radio/Cellular phone volume
4 Radio/Cellular phone: Search in re-verse or station keys (or browse in lisof names)
5 Radio/Cellular phone: Search for-wards or station keys (or browse in list of names)

25n
airs
Over
view
Cont
rols
Car
care
Hazard warning flashers Warning triangle* First aid kit*
first aid kit is located under the senger seat.
pen: Pull the handle and fold the er down.
e
Thepas
To ocov
462d
e196
Rep
Inde
xTe
chno
logy
Data
lose: Fold the cover up.
Some of the articles in the first aid kit may be used within a limited
only. For this reason, check the ex-tion dates of each of the items regu-, and replace any whose expiration s have passed. You can get re-ements in any drugstore or phar-y. Comply with legal requirements
ch cover availability of a first aid kit e car.<
To c
timepiralarlydateplacmacwhiin th
The push button flashes rhythmically when the hazard flashers are on.
To help you locate the switch in an emergency, the button is also illumi-nated whenever the car lamps are on.
460us0
02
The hazard warning triangle is storedin a recess on the left-hand side of thluggage compartment where it is quickly available.
460d
e071
Comply with legal requirementsthat cover the availability of a
hazard warning triangle in the car.<

26nRefueling Fuel specifications
nleaded gasoline only.
mended fuel: premium with a um octane rating of 91 AKI.
engines are equipped with knock rs and will adapt automatically to nt octane ratings, provided that
inimum octane requirement I) is met.
with higher octane ratings will pro-nhanced performance and lower onsumption, while the use of fuels ower octane ratings will have the ite effect.
Do not use leaded fuels. The use of
Use u
Recomminim
BMWsensodifferethe m(87 AK
Fuelsvide efuel cwith loppos
leaded fuels will cause permanent ge to the system's oxygen sensor e catalytic convertor.<
Anti Knock Index
-
r
damaand th
AKI =
Fuel filler doorPress on the rear edge of the fuel filler door to open and close it.
To unlock the fuel filler door if the cen-
462d
e275
Simple and environmentally friendly
Carefully open the fuel filler cap, 460d
e005
tral locking system malfunctions, refer to page 155.
When handling fuels, comply with all of the applicable safety precau-
tions and regulations pertaining to fuels. Never carry spare fuel containers in your vehicle. Whether empty or full, these containers can leak, cause an ex-plosion, or lead to fire in the event of a collision.<
as otherwise fuel could spray out.Fuel spray may cause injury.<
Keep the filler cap in the bracket attached to the fuel filler door.
When refueling, insert the filler nozzle completely into the filler pipe. Pulling the nozzle out of the pipe during refueling
> results in premature pump shutoff> and will reduce the effect of the vapo
recovery system on the pump.
Close the fuel filler cap carefully after refueling. A loose or missing
cap will activate the Check Engine
lamp.<
27n
airs
Over
view
Cont
rols
Car
care
Tire inflation pressure
mply with tire approval cifications inflation pressures in the table apply ires from BMW-approved manufac-rs. Your BMW center is familiar with e pressures. Higher pressures may pecified for tires from other manu-urers. You will find a list of approved beginning on page 117.
g- -ad
he
CospeTheto tturethesbe sfacttires
Rep
Inde
xTe
chno
logy
Data
The inflation pressures are indicated on a sticker attached to the B-pillar behind the driver's door (visible with door open).
462d
e197
Check tire inflation pressures reularly – at least every two weeks
and before beginning a longer trip. Incorrect tire pressure can otherwise leto tire damage and accidents.Also check the inflation pressure of tspace-saver tire or spare tire*. Inflatethe spare tire to the highest inflation specified for your vehicle.<
Check tire pressuresAll pressure specifications are stated in psi (kilopascal) with cold tires (cold = ambient temperature). Refer to the next page as well.
For trailer towing, the inflation pressure for heavier loads always applies.
For vehicles with RDC (Tire Pressure Control)*:After a correction of the tire inflation pressure, reactivate the system. Refer to page 82.

28nTire inflation pressure
BMW TiresInflation pressures in psi (kilopascal)
323CiSummer tires 29 (200) 33 (230) 33 (230) 41 (280)Winter tires 32 (220) 36 (250) 36 (250) 44 (300)
328CiSummer tires 29 (200) 33 (230) 33 (230) 41 (280)Winter tires 32 (220) 36 (250) 36 (250) 44 (300)
All Space-saver spare tire 61 (420) 61 (420) 61 (420) 61 (420)For all-season tires, use the same tire inflation pressure as for summer tires.

29n
airs
Over
view
Cont
rols
Car
care
Rep
Inde
xTe
chno
logy
Data

30n
Locks and security systems:Keys 32Electronic vehicle
immobilizer 33Central locking system 34Door locks – from outside 34Using the key 34Using the remote control 35Door locks – from inside 38Luggage compartment lid 39Luggage compartment 41Alarm system 42Electric power windows 44Sliding/tilt sunroof 45
Adjustments:Seats 47Seat and mirror memory 50Steering wheel 51Mirrors 52Car Memory, Key Memory 54
Passenger safety systems:Safety belts 55Child restraint systems 56Airbags 57
Driving:Steering/ignition lock 62Starting the engine 62Switching off the engine 63Parking brake 64
Overview
Controls and features
Operation, careand maintenance
Owner service procedures
31n
Over
view
Cont
rols
Car
care
Manual transmission 65Automatic transmission with
Steptronic 66Turn signal/Headlamp flasher 69Wiper/washer system/Rain
sensor 69Rear window defroster 71Cruise control 72
Everything under control:Odometer 74Tachometer 74Energy control 74Fuel gauge 75Temperature gauge 75Service Interval Display 76
Lamps:Parking lamps/Headlamps 84Instrument panel rheostat 84High beams/Parking lamps 85Fog lamps 85Interior lamps 85Reading lamps 86
Controlling the climate for pleasant driving:Automatic climate control 88Heated seats 93Roller sun blind 93
Cabin convenience:HiFi System 94
Technical data
Index
Advanced technology
Repa
irs
ndex
Tech
nolo
gyDa
ta
Check Control 77Clock 77
Glove compartment 94Storage compartments 95
Onboard computer 77
Technology for safety and convenience:Park Distance Control (PDC) 80Dynamic Stability Control
(DSC) 81Tire Pressure Control (RDC) 82
Cellular phones 95Ashtray 96Cigarette lighter 96Clothes hooks 97
Loading and transporting:Through-loading facility 98Ski bag 99Cargo loading 100Roof-mounted luggage rack 101
I

32nKeys
acement keysailable exclusively through your rized BMW center. Your BMW r is obligated to ensure that a per-questing a key is authorized to do
nce the keys belong to a security (refer to "Electronic vehicle im-
izer" on page 33).
Whenever you have been handed a replacement key, insert it into nition lock and turn it once to on 2 (ignition switched on), then to the home position, so that the onic immobiliser "accepts" the ey.<
-
Replare avauthocenteson reso, sisystemmobil
the igpositiback electrnew k
lso "New transmitter", page 147.
See a1 Master key with transmitter for the remote control determines the Key Memory functions, see page 54.
463d
e023
3 Door and ignition keyThe locks for the luggage compart-ment lid and glove compartment cannot be operated with this key – this may be beneficial for valet parking, for instance.
Every key contains a long-life re-chargeable battery which is auto-
matically recharged from the ignition lock, while the car is being driven.If you have spare master keys which are not otherwise in regular service, it is ad-visable to use them about once a year for a journey of some distance, so that their batteries are recharged. Also see page 35.<
2 Spare key for storage in a safe place, such as in your wallet. This key is not intended for continuous use.

33n
Repa
irs
Over
view
Cont
rols
Car
care
Tech
nolo
gyat
a
Electronic vehicle immobilizer
u-
ity m ith el
m--be
Inde
xD
The key to securityYour BMW is equipped with a passive anti-theft system. This electronic immo-bilization system is designed to reduce the susceptibility of the vehicle to theft
B
M
W
LOC K
463d
e042
How the electronics workAt the heart of this system is an elec-tronic chip that is integrated into the key. The lock mechanism itself is actally a dual-function device, simulta-neously serving as a communicationsinterface designed to allow the secursystem to maintain a continuous streaof variable, vehicle-specific signals wthe electronic circuitry in the key. Thesystem will not release the ignition, fuinjection and starter unless it recog-nizes an "authorized" key.
Force applied to the key can daage the integrated electronic cir
cuitry. A damaged key can no longer
by making it impossible to start the en-gine using any means other than the special keys furnished with the vehicle. Your BMW center can cancel the elec-tronic system authorization for individ-ual keys (in the event of loss, for in-stance). A deactivated key can no longer be used to start the engine.used to start the engine.<

34nCentral locking system Door locks – from outside
enience operating modean also operate the electric win- and sliding/tilt sunroof via the ock.
open: With the door closed, turn key to the "Unlock" position and it.
close: With the door closed, turn key to the "Lock" position and it.
Watch during the closing process to make sure that nobody is in-accidentally. Letting go of the key the operation.<
ConvYou cdowsdoor l
> To thehold
> To thehold
jured stops
al operation event of electrical failure)
he key all the way to the extreme right to unlock/lock the door.
-
Manu(in the
Turn tleft or
The conceptThe central locking system is ready for operation whenever the driver's door is closed. The system engages and re-leases the locks on the
> doors> luggage compartment lid> fuel filler door.
The central locking system can be operated
> from outside via the door lock and using the remote control
> from inside by pressing a button.
Activating it from inside does not lock the fuel filler door (see page 38).
Using the keyOne turn of the key in the door lock opens only the driver's door, a second turn of the key opens the passenger
460d
e006
When the system is actuated from the outside, the anti-theft system is acti-vated simultaneously. Both the door locks and release handles remain locked. The alarm system* is also armed or disarmed.
In the event of an accident, the central locking system unlocks automatically. In addition, the hazard warning flashers and interior lamps come on.
door, the luggage compartment lid andthe fuel filler door.
You can have a confirmation message set to inform you that the car
has been properly locked.<
You will find additional information on the alarm system on page 42.

35n
Repa
irs
Over
view
Cont
rols
Car
care
Tech
nolo
gyDa
ta
Door locks – from outside
Transmitters that are in regular use will always be operational, as the
argeable battery in the transmitter tomatically recharged in the ignition while the car is being driven.should prove impossible to lock the with a particular transmitter via the ote control, the battery is in need of arging. Use this transmitter for a thy journey, to recharge its battery. see page 32.<
n-2.
he ea-h d
rechis aulockIf it car remrechlengAlso
Inde
x
Using the remote control The remote control makes opening and locking the doors of your vehicle very convenient. Furthermore, it provides two additional functions that can only be executed by means of the remote control:
> To switch on interior lamps With this function, you can also "search for" your vehicle, when parked in an underground garage, for instance.
> To open luggage compartmentThe luggage compartment lid will open slightly, regardless of whether the lid was previously locked or un-
Master keysKeys with a transmitter for remote cotrol are master keys. Refer to page 3
Children might be able to lock t463d
e024
locked.
The anti-theft system is also deacti-vated/activated simultaneously with the unlocking or locking of the vehicle, and the alarm system* is disarmed/armed, and the interior lamps are turned on/off.
You can have a confirmation mes-sage set to inform you that the car
has been properly locked.<
doors from the inside. For this rson, always take the vehicle keys wityou so that the vehicle can be openeagain from the outside at any time.<

36nDoor locks – from outside
ck and secure k and secure: Press button 2.
hing off tilt alarm* and ior motion sensor* button 2 again directly after lock-
ditional information: Refer to 43
itch on interior lamps locking the car, press button 2 .
To loTo loc
SwitcinterPressing.For adpage
To swAfter again
463d
e027
Unlocking and convenience opening modeUnlock driver's door: Press button 1.
463d
e025
Convenience opening mode: Press andhold button 1. The windows and the sliding/tilt sunroof are opened.
Unlock and lower the driver's win-dow: Press button 1 twice. If you
wish, you can have this special feature adjusted. If the car is in a tight parking space, lowering the driver's-side win-dow helps you when entering the car. After the door is closed, the driver's-side window closes automatically.<
After unlocking the driver's door, press button 1 again to unlock the entire vehi-cle.
If you wish, you can have this spe-cial feature adjusted to be key-
specific.<

37n
Repa
irs
Over
view
Cont
rols
Car
care
Tech
nolo
gyDa
ta
Door locks – from outside
US owners only transmitter and receiver units com-with part 15 of the FCC (Federal munications Commission) regula-
s. Operation is governed by the fol-ing:
ID: LX8EWSLX8FZVSLX8FZVE
pliance statement: device complies with part 15 of the Rules. Operation is subject to the wing two conditions:
his device may not cause harmful terference, andis device must accept any interfer-
nce received, including interference at may cause undesired operation.
Any unauthorized modifications or changes to these devices could
the user's authority to operate this ipment.<
s, t
p
- e
r -
ForTheply Comtionlow
FCC
ComThisFCCfollo
> Tin
> theth
voidequ
Inde
x
To open luggage compartmentPress button 3.
The luggage compartment lid will open slightly, regardless of whether the lid
463d
e026
Panic-Mode (trigger alarm)By pressing button 3 for 2 to 5 secondthe alarm can be sounded in the evenof danger, if it is armed*.Pressing button 1 will deactivate the alarm.The LED (light-emitting diode) lights uwhen individual buttons are pressed.
Non-BMW systemsThe remote control system's functioning may be affected by other units orequipment operating in the immediatvicinity of your car. Should this occur, you can still open and close the vehicle using the maste
was previously locked or unlocked.
Before and after a trip, be sure that the luggage compartment lid
was not opened unintentionally.<
key in both the door and luggage compartment locks.
38nDoor locks – from inside
gage lockser use the central locking button
ock all doors at once, orss down the individual door lock tons. The fuel filler door then re-ins unlocked. As an added design ture to prevent the driver from be-inadvertently locked out of the ve-e, the driver's door lock button not engage as long as the door pen.
Children might be able to lock the doors from the inside. For this rea-ake the vehicle's keys with you so e vehicle can be opened again he outside at any time.<
-
,
To en> Eith
to l> pre
butmafeaing hiclwillis o
son, tthat thfrom t
Use this button to operate the central locking system when the doors are closed. The doors and luggage com-partment lid are unlocked or locked
460us0
07
To unlock and open the doors> Either unlock the doors together with
the button for the central locking system and then pull each of the releasehandles above the armrests or
> pull the release handle for each doortwice: The first pull unlocks the doorand the second one opens it.
Doors locked from outside can beopened from inside by first press-
ing the button and then pulling a re-lease handle twice.<
only. The anti-theft alarm system is not activated.
After opening the driver's door by acti-vating the remote control once, the front passenger door can also be opened by pressing the button. When the driver's door is closed, it is auto-matically locked.
If you desire, the central locking system will secure the locks as
soon as you start to drive. This can be adjusted to be key-specific.<

39n
Repa
irs
Over
view
Cont
rols
Car
care
logy
Luggage compartment lid
open from outsidess the button in the handle recess ow): The luggage compartment lid ns slightly.
luggage compartment is lit when luggage compartment lid is opened.
nual operation
he
l
to
To Pre(arrope
Thethe
Ma
460d
e010
Inde
xTe
chno
Data
(in the event of electrical failure)
n the master key to the left to the – the luggage compartment lid
open slightly.
luggage compartment is locked in as soon as you close the lid.
for Tur
stopwill
Theaga
The lock Only the master key (refer to page 32) fits in the lock of the luggage compart-ment.
462d
e273
Secure separatelyTurn the master key to the right past tresistance point and then pull it out inthe horizontal position.
462d
e274
This locks the luggage compartmentlid and disconnects it from the centralocking system. This feature can be used to prevent unauthorized accessthe luggage compartment when you surrender the door and ignition key(refer to page 32) for valet parking, instance.

40nLuggage compartment lid
Do not drive with the luggage compartment lid open, since st fumes could penetrate the inte- the vehicle. Should it be abso- necessary to operate the vehicle he luggage compartment lid open:se all windows. Shut the sliding/unroofease the airflow of the automatic ate control to a high level. Refer age 88.<
exhaurior oflutelywith t> Clo
tilt s> Incr
climto p
Opening from the inside If the luggage compartment lid has not been locked separately, you can open it with this button in the footwell on the
460d
e011
To closeThe handle recesses in the interior trimpanel of the luggage compartment lid (arrows) make it easier to pull the lid
460d
e067
driver's side when the vehicle is station-ary.
down.
To avoid injuries, be sure that thetravel path of the luggage com-
partment lid is clear when it is closed, as with all closing procedures.<

41n
airs
Over
view
Cont
rols
Car
care
Luggage compartment
fittings at the inner corners of the age compartment provide you with nvenient means of attaching lug-e nets* and flexible straps for uring suitcases and luggage.
er also to "Cargo loading" on e 100.
y
Thelugga cogagsec
Refpag
Rep
Inde
xTe
chno
logy
Data
Floor panelTo raise and secure the floor panel, lift it by the ring and hook it into the rubber seal of the run-off gutter with the hanger (arrow).
460d
e106
Floor matYou can turn the floor mat over if re-quired (for transporting soiled objectsfor instance). The rubberized side mabe washed. It reduces movement of
460d
e180
objects placed on it.

42nAlarm system*
ator lamp displaysdicator lamp is located under the rearview mirror.
en the indicator lamp flashes
IndicThe ininside
>Wh
460d
e105
tinuously: The system is armed indicator lamp flashes when it is ed: The door(s), the hood or lug-e compartment lid are not com-
tely closed. Even if you do not e the alerted area, the system be- to monitor the remaining areas, the indicator lamp flashes contin-sly after 10 seconds. However, interior motion sensor is not ivatede indicator lamp goes out when
system is disarmed: No manipula- or attempted intrusions have n detected in the period since the tem was armed
-,
con> The
armgagpleclosginsanduoutheact
> If ththetionbeesys
The conceptThe vehicle's alarm system responds:
>When a door, the hood or the lug-gage compartment lid is opened
> To motion within the passenger com-partment (interior motion sensor)
> To a change in the inclination of the vehicle, e.g. during an attempted wheel theft of unauthorized towing
> To interruption of battery voltage.
The alarm system signals unauthorized access to the vehicle or an attempted theft in different ways:
> Sounding an acoustical alarm for 30 seconds
To activate and deactivate the alarm systemWhen the vehicle is locked or unlockedby using a key or with the remote con-trol, the alarm system is also simulta-neously armed or disarmed.The interior motion sensor is activated approx. 30 seconds after you have fin-ished locking the car.
If the alarm system has been armed correctly, the hazard warning flashers cycle once. An acoustic warning signalsounds at the same time.
You can have various confirmationmessages set to inform you that
> Activating the hazard warning flash-ers for approx. five minutes*.
the alarm system has been armed or disarmed.<
You can also open the luggage com-partment lid when the system is armedby pressing button 3 of the remote control (refer to page 37). When it is closedthe lid is once again secured.

43n
airs
Over
view
Cont
rols
Car
care
Alarm system*
The tilt sensor and interior motion sensor are deactivated if the con-
ience closing mode for the windows the sliding/tilt sunroof is interrupted in the first 10 seconds and then itiated. If this happens, you must rm the system and then re-arm it.<
te-m
venandwithreindisa
Rep
Inde
xTe
chno
logy
Data
to
ly
,
t
> If the indicator lamp flashes for 10 seconds when the system is dis-armed: An attempted entry has been detected in the period since the sys-tem was armed.
Following triggering of an alarm, the indicator lamp will flash continuously.
Avoiding unwanted alarm The tilt alarm sensor and interior motion sensor may be switched off at the same time. You can prevent triggering false alarms in high-rise garages or if the vehicle is transported on a car-carrier train, for instance, by doing the following:
Interior motion sensorThe transmitter and receiver of the inrior motion sensor are located in a tripanel in the vehicle's headliner.
460d
e159
Lock the vehicle twice (= arm the sys-tem). Press button 2 on the remote con-trol twice in succession or lock the vehi-cle twice with the key (refer to page 36).The indicator lamp lights up briefly and then flashes continuously. The tilt alarm sensor and the interior motion sensor are deactivated as long as the system is armed.
In order for the interior motion sensorfunction properly, the windows and sliding/tilt sunroof must be completeclosed.
But make sure to turn off the interior motion sensor (see previous column)if
> children or animals are left in the vehicle
> the windows and/or sunroof are lefopen.

44nElectric power windows
y feature tact strip is located on the inside frame of each of the windows. If ure is exerted against this contact hile a window is being raised, the will respond by stopping the
w and then retracting it a small ce.
In spite of this safety feature, always make sure that the win- path is clear. Otherwise in some (e.g. with thin objects) proper ct with the contact strip is not en-.an disable this safety feature by
f:
SafetA conupperpressstrip wsystemwindodistan
dow'scasescontasuredYou c
ing the switch beyond the resis- point and holding it.<
presstance
Open and close windowsIn ignition key position 1 or 2:
> Press the switch up to but not past
463d
e200
After the ignition has been switched of
You can still operate the electric win-dows for up to 15 minutes, provided that no door has been opened and thenclosed.
Remove the key from the ignition key and close the doors when you
leave the vehicle, so that children can-not operate the power windows and possibly injure themselves.<
For the convenience operating mode with the door lock or the remote con-trol, refer to page 34 or 35.
the pressure point:The window moves downward or the rear vent window moves outward as long as the switch is pressed.
> Press the switch briefly past the pressure point:The window moves automatically. Pressing the switch again briefly stops the opening cycle.
You can close windows in the same manner by pulling the switch. The rear vent window does not close automati-cally.

45n
airs
Over
view
Cont
rols
Car
care
Sliding/tilt sunroof*
omatic opening and closingress the switch past the resistance oint briefly: The sunroof travels to ither the fully-closed or fully-open ositionith the sunroof open, press the
witch briefly toward "Lift": The sun-of automatically extends to its fully ised position.
ssing the switch again briefly stops motion immediately.
he on
Aut> P
pep
>Wsrora
Prethe
Rep
Inde
xTe
chno
logy
Data
ff, p
he n
To prevent injuries, exercise care when closing the sliding/tilt sun-
roof and keep it in your field of vision until it is completely closed.Remove the key from the ignition and close the doors when you leave the vehicle, so that children cannot operate the sunroof and possibly injure them-selves.<
To avoid pressure or drafts in the pas-senger compartment when the sunroof is open or raised, keep the air vents in the dashboard open and increase the air supply if necessary. Refer to page 91.
When competely opened, the sunroof may cause unpleasant vibrations in the
Lifting – opening – closingIn ignition key position 1 or 2, press tswitch or slide it to the desired directiuntil you feel resistance.
460d
e015
vehicle interior. To eliminate these vibrations, close the sunroof until this natural effect disappears.
For the convenience operating mode with the door lock or the remote con-trol, refer to page 34 or 35.
When lifting, the headliner retracts several inches.
After the ignition has been switched oyou can still operate the sunroof for uto 15 minutes, as long as neither of tfront doors has been opened and theclosed.

46nSliding/tilt sunroof*
-
Safety featureIf the sliding/tilt sunroof encounters resistance at a point roughly past the middle of its travel when it is closing, the closing cycle is interrupted and the sunroof will open again slightly.In spite of this safety feature, always make sure that the sun-
roof's path is clear. Otherwise in some cases (e.g. with thin objects) proper contact with the contact strip is not en-sured.You can disable this safety feature by pressing the switch beyond the resis-tance point and holding it.<
Power loss or malfunctionIn the event of an electrical system malfunction, the sliding/tilt sunroof can be manually operated. Refer to page 155.

47n
airs
Over
view
Cont
rols
Car
care
ackrest angleull the lever and apply weight to or move weight from the backrest to ach the desired position.
Seat adjustment Mechanical seat
For maximum safety when adjusting the seat position, please observe the fol-lowing:
Never try to adjust your seat while operating the vehicle. The seat
could respond with an unexpected movement, and the ensuing loss of ve-hicle control could lead to an accident. Be sure that the safety belt remains firmly against your body at all times. In the event of a frontal impact, a loose lap belt could slide over the hips, leading to abdominal injury. In addition, the safety belt's restraint effectiveness is reduced if the belt is worn loosely.Never ride with the backrest reclined to
1 Longitudinal adjustmentPull the lever and slide the seat to thedesired position.After releasing the lever, apply pres-sure to the cushion to ensure that the
460d
e109
Rep
Inde
xTe
chno
logy
Data
an extreme horizontal angle (especially important for front passengers to re-member). Keep the backrest relatively upright to minimize the risk of "sliding under" the safety belt and sustaining in-jury in a crash.<
latch engages securely.
2 Cushion heightPull the lever and apply weight to or remove weight from the seat to reachthe desired position.
3 BPrere
460d
e068

48nMechanical seat Head restraints
ovall the head restraint upward to the p.ss the button (arrow) and remove
Rem> Pul
sto> Pre
460d
e137
head restraint.
llationss the button (arrow) and insert head restraint into the openings.ust the head restraint.
-
the
Insta> Pre
the> Adj
Correct sitting postureTo reduce strain on the spinal column, sit all the way back in the seat and rest your back fully against the backrest.Ideal sitting posture is achieved with your head extending from your spine in a straight line.For long-distance driving, you may wish to to increase the backrest angle slightly to reduce muscular tension. You should be able to grab the steering wheel at its highest point with your arms slightly bent.
After a seat adjustment, adjust the height of the safety belt also. Refer to page 55.
Adjustments Height: Adjust by pulling up or pushingdown.
462d
e202
In order to move to the lowest positions, press button 1.<
Tilting the front head restraints: By swiveling.
Head restraints reduce the risk ofneck and spinal injuries in acci-
dents.Adjust the head restraint so that its center is approximately at the height of theear.<

49n
airs
Over
view
Cont
rols
Car
care
Entering rear BMW Sports Seat* Lumbar support*
can adjust the backrest's contour additional support in the curvature our spine's lumbar region.
upper hips and spinal column ive supplementary support to help
e
Youfor of y
Therece
460d
e103
Rep
Inde
xTe
chno
logy
Data
maintain a relaxed, upright posture.
ress front/rear of switch: crease/decrease curvature.ress the upper/lower end of the witch: crease the upper/lower curvature.
ry
n
you
> PIn
> PsIn
Pull up on the lever and push the back-rest toward the front.
The outside stalks hold the safety belt in order to make it easier to reach.
462d
e276
With this seat, you can also adjust thtilt angle and the thigh support:
1 To adjust the tilt angle upward:Pull the lever as often as necessaryto reach the desired angle.
460d
e122
Lock both backrests while driv-ing, otherwise there is a danger of
an unexpected movement causing an accident.<
2 To adjust the tilt angle downward:Push the lever as often as necessato reach the desired angle.
3 Thigh support area:Pull the lever and adjust the positioof the cushion for thigh support asdesired.
50nElectric power seat* Seat and mirror memory*
an store and recall three different 's seat and outside mirror posi-
You cdrivertions.
460d
e017
The adjustment setting of the lum-bar support is not saved in the ry.<
oren the key to ignition key position r 2ust your seat and outside mirrors he desired positionss the MEMORY button: the indi-or lamp in the button lights upss memory button 1, 2 or 3 as ired: the indicator lamp goes out.
memo
To st1 Tur
1 o2 Adj
to t3 Pre
cat4 Pre
des
1 Longitudinal adjustment
2 Cushion height
3 Backrest angle
460d
e016
BMW Sports Seat1 Tilt angle
2 Longitudinal adjustment
460d
e025
The head restraint is adjusted manually.
Please refer to the adjustment in-structions on page 47 to reduce
the risk of personal injury.<
3 Cushion height
4 Backrest angle
Adjust the head restraints (page 48) andthe thigh support (page 49) manually.
Please refer to the adjustment in-structions on page 47 to reduce
the risk of personal injury.<

51n
airs
Over
view
Cont
rols
Car
care
Seat and mirror memory* Adjusting steering wheel
ush the locking lever downwarddjust the steering wheel (fore/aft nd up/down) to the desired positionull the lever back in to clamp the teering wheel in the new position.
gs
ck te
re r's i-ld
at
1 P2 A
a3 P
s
460d
e073
Rep
Inde
xTe
chno
logy
Data
Do not adjust the steering wheel while the vehicle is moving. There
risk of accident from unexpected ement. See pages 48 and 58 for in-ation on correct seating/steering el position.<
is amovformwhe
To select a stored setting:Automatic:
1 Open driver's door after unlocking or ignition key in position 1
2 Briefly press memory button 1, 2 or 3 as desired.The adjustment cycle is canceled im-mediately if you press a seat adjust-ment switch or one of the memory buttons.
Manual:
1 With driver's door closed and ignition key either removed or in position 0 or 2
2 Maintain pressure on desired mem-ory button 1, 2 or 3 until the adjust-
You can adapt the vehicle settinso that your own personalized
seat setting is initiated when you unlothe car using your personalized remocontrol key.<
When this setting is used, be suthat the footwell behind the drive
seat is clear before unlocking the vehcle. Otherwise, persons or objects coube injured or damaged should the semove backward.<
ment process is completed.
If you press the MEMORY button acci-dentally: Press the button a second time, the indicator lamp goes out.
Do not select a memory position while the vehicle is moving. There
is a risk of accident from unexpected seat movement.<

52nMirrors
e rearview mirror uce glare from behind when driv-
night, tilt the small lever forward.
InsidTo reding at
460d
e019
ed vanity mirror*own the sun visor and slide the
panel to the side as required.
irror lamps come on in ignition osition 1 or 2.
isors can be folded down toward the hield or swiveled out against the indows.
LightFold dcover
The mkey p
Sun vThesewindsside w
Exterior mirrors1 Switch for 4-way adjustment
2 Selection switch for changing between mirrors.
462us0
16
You can also adjust the mirrors manu-ally by pressing against the outer edgesof their lenses.
The mirror on the passenger's side features a lens with a more
convex surface than the mirror installedon the driver's side. When estimating the distance between yourself and other traffic, bear in mind that the ob-jects reflected in the mirror are closer than they appear. Estimations of the distance to following traffic should therefore not be regarded as precise.<
Electric heaters
Both mirrors are automatically heated with the ignition key in position 2.
53n
airs
Over
view
Cont
rols
Car
care
Mirrors
Rep
Inde
xTe
chno
logy
Data
Inside rearview mirror with automatic dimming feature*This mirror automatically dims with infi-nitely-variable settings, depending on light intensity due to ambient lighting
460d
e020
and headlamp glare from the rear.
The mirror switches to its clear, un-dimmed mode whenever the transmis-sion is placed in reverse gear (selector lever in "Reverse").
To ensure that the mirror continues to operate properly, keep the two photo-cells clean and unobstructed. One pho-tocell (arrow) is in the mirror glass, while the other is offset somewhat on the other side of the mirror.
For an explanation of the electrochro-mic technology used in this mirror, refer to page 163.
54nCar Memory, Key Memory
-
-
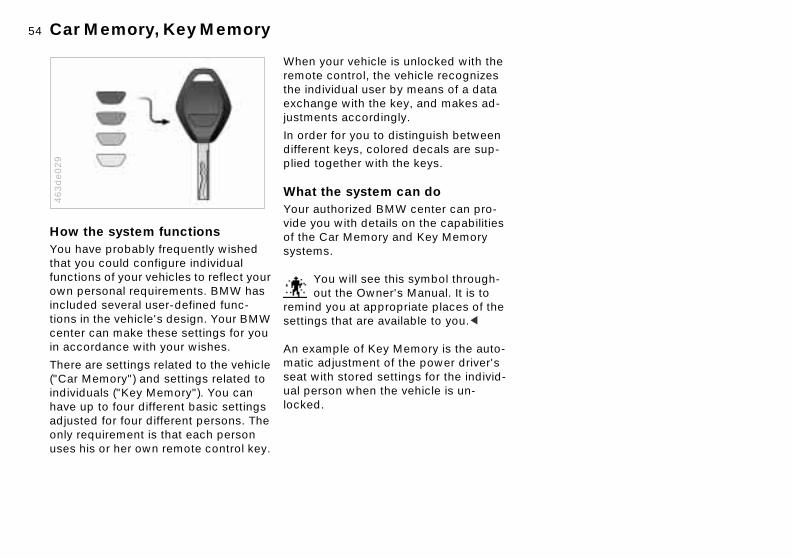
How the system functionsYou have probably frequently wished that you could configure individual functions of your vehicles to reflect your
463d
e029
When your vehicle is unlocked with theremote control, the vehicle recognizes the individual user by means of a data exchange with the key, and makes ad-justments accordingly.
In order for you to distinguish betweendifferent keys, colored decals are sup-plied together with the keys.
What the system can doYour authorized BMW center can pro-vide you with details on the capabilitiesof the Car Memory and Key Memory systems.
You will see this symbol through-
own personal requirements. BMW has included several user-defined func-tions in the vehicle's design. Your BMW center can make these settings for you in accordance with your wishes.There are settings related to the vehicle ("Car Memory") and settings related to individuals ("Key Memory"). You can have up to four different basic settings adjusted for four different persons. The only requirement is that each person uses his or her own remote control key.
out the Owner's Manual. It is to remind you at appropriate places of thesettings that are available to you.<
An example of Key Memory is the automatic adjustment of the power driver's seat with stored settings for the individual person when the vehicle is un-locked.

55n
airs
Over
view
Cont
rols
Car
care
e rear, the belt buckle with the word NTER" is provided exclusively for passenger sitting in the middle.
For your safety, please comply with the following instruction for wear-
safety belts. If you do not, the safety s may not be able to provide their imum protection. following information also applies our passengers:er allow more than one person to r a single safety belt. Never allow nts or small children to ride in a pas-ger's lap.id twisting the belt while routing it ly across the hips and shoulder. Do
Safety belts
Fasten your safety belt before starting off.
To fasten: Make sure you hear the catch engage in the belt buckle.
462d
e205
Safety belt height adjustmentYou can adjust the safety belts to fit youown physical dimensions by using the safety belt height adjustment.
462d
e206
Rep
Inde
xTe
chno
logy
Data
allow the belt to rest against hard agile objects in your pockets. Never e the belt across your neck, do not
it across sharp edges and ensure the belt does not become caught mmed.
sure that the safety belt fits snugly inst your body at all times, and avoid ring clothing that prevents the belt fitting properly. Pull on the belt pe-
ically to readjust the tension across r shoulder. In the event of a frontal act, a loose lap belt could slide over r hips, leading to abdominal injury. In ition, the safety belt's restraint effec-ness is reduced if the belt is worn ely.
To release: Press the red button in the buckle. Hold the belt and guide it back into its reel.
Slide the button downward or upward.
r
In th"CEthe
ing beltmaxTheto yNevweainfasenAvofirm
not or frroutrunthator jaBe agaweafromriodyouimpyouaddtiveloos
56nSafety belts Child restraint systems*
Expectant mothers should always wear the safety belt, taking special care to position the lap belt over the lower hips, where it will not exert pressure against the abdominal area.<
For child restraint system installation, refer to page 60.
For care instructions, refer to "Caring for your car" page 133.
If the safety belt system has been subjected to the stresses involved
in an accident or otherwise damaged: Replace the entire safety belt mecha-nism through you BMW center, includ-
Never install a rear-facing child restraint device on the front pas-
senger seat. Injuries could occur if the airbag is triggered in the event of an accident.Children should always ride in the rear.Do not modify the child restraint systemin any way, or it will not provide your child with maximum protection.<
ing the safety belt tensioner and any child restraint systems* that are in-stalled. In addition, have your BMW center inspect the safety belt anchors.<

57n
Repa
irs
Over
view
Cont
rols
Car
care
logy
Airbags
icator lampThe indicator lamp shows that the airbag system is operational in ignition key positions 1 and 2.
tem operational:
he indicator lamp comes on briefly en goes out.
tem malfunction:
he indicator lamp fails to come onhe indicator lamp comes on briefly efore going out and then lighting up gain.
ere is a system malfunction, there risk that the airbags will not be trig-ed in their normal response range in event of an accident, even though impact is severe.
se have your authorized BMW cen-inspect and repair the system as
ct
Ind
Sys
> Tth
Sys
> T> T
ba
If this agerthe the
Pleater
Inde
xTe
chno
Data
n as possible.
The airbag indicator lamp also comes on if the safety belt ten-
ers have been triggered.<
soo
sion
1 Front airbag for driver and passenger2 Side impact Head Protection System
(front)3 Side airbags (front and rear side*)
462d
e207
The illustration schematically depictsthe primary directions of vehicle impathat initiate airbag deployment.
462d
e208
Protective effectThe front airbags supplement the three-point safety belts by providing addi-tional protection for the front-seat oc-cupants, in the event of a severe frontal collision in which the protection af-forded by the belts alone may no longer be sufficient. The head and side airbags help provide protection in the event of a side impact. Each of the side airbags is designed to help support the upper body.

58nAirbags
ent research shows that the saf-ace for children in an automobile he rear seat. However, a child in the rear seat and not properly ined may place his or her head on r the side airbag, if so equipped. ample, a child – even though – may fall asleep with his or her
against the side airbag. It may be lt for a driver to ensure that chil-n the rear seat will remain prop-ositioned at all times and not their heads on or near the side . Therefore, we recommend that ar seat side airbags, if provided, activated if you plan to transport
t
-
Accidest plis in tsittingrestraor neaFor exbeltedhead difficudren ierly pplaceairbagthe rebe de
en in the rear seat.ar seat side airbags may already
been deactivated, either at the f manufacture or by a BMW cen-bels in the rear door opening
d indicate the status of your rear ide airbags. If you are uncertain of tatus, or wish to have the airbags ted or deactivated, please contact MW center.<
childrThe rehave time oter. Lashoulseat stheir sactivayour B
For your own safety, please ob-serve the following precautions
concerning airbags, as otherwise their protective function may be impaired and your personal safety endangered. The following information pertains to all occupants: The airbags are supplemental restraint devices designed to provide extra pro-tection; they are not a substitute for safety belts. Wear your safety belt at all times. The airbags will not be triggered in the event of a minor accident, a vehi-cle roll-over, or collisions from the rear. In this case, the safety belt offers the best protection.
Do not use the cover panel above the front passenger airbag as a storage area. Never tape the airbag cover panels, cover them over or alter them in any other way.Never install a rear-facing child restraindevice on the front passenger seat. Children under 13 years of age and children who are smaller than 5 feet (150 cm), should only travel in the rear seat. If your vehicle is equipped with side airbags in the rear, be sure that child seatsare installed correctly and with the greatest possible distance from the side
Airbags are located under the cover panels in the steering wheel, in the in-strument panel, in the side trim panels in the front and rear*, in the roof panels, and in the sides of the inside roof lining.Select a seat position that is comfort-able and allows the greatest possible distance from each of the applicable airbags. Hold the steering wheel at the rim (hands at the "9 o'clock and 3 o'clock" positions) in order to avoid injuries to the hands or arms if the air-bag is triggered. Never allow any objects to obstruct the area between the airbag and an occu-pant.
trim panels. Do not allow children to lean out of the child's seat in the direc-tion of the side trim panels. Otherwise,serious injuries could occur if the airbagis triggered.At all times, occupants should sit up-right and be properly restrained (infantsand small children in appropriate child restraint systems; larger children and adults using the safety belts). Never letan occupant's head rest near or on a side airbag because the inflating airbagcould cause a serious or fatal injury. Please note that the word "Airbag" im-printed on the door trim panel indicatesthe airbag's location.

59n
airs
Over
view
Cont
rols
Car
care
Airbags
is the right way a larger child uld sit wearing the safety belt when side airbags (arrow) are provided.
in s
Thisshorear
462u
s013
Rep
Inde
xTe
chno
logy
Data
Even when all these guidelines are ob-served, there is still a small residual risk of injuries to the face, hands and arms occurring in isolated instances. The ig-nition and inflation noise may induce a mild temporary hearing loss in sensitive individuals.
For additional information concerning the airbag system, refer to page 135 and 161.
This is the right way a child should sita child restraint when rear side airbag(arrow) are provided.
462us0
12

60nChild restraints*
the passenger seat as far away he dashboard as possible. This tant precaution is intended to ize the distance between the air-
nd the child. Older children should htly secured with the safety belt. er children should be secured in
propriate forward-facing child re-t system that has first been prop-ecured with a safety belt. install a rear-facing child restraint in the front passenger seat.
rongly urge you to carefully read omply with the instructions for in-ion and use provided by the child int's manufacturer whenever you
t
movefrom timpormaximbag abe tigYoungan apstrainerly sNeversystemWe stand cstallatrestra
uch a device.re that all occupants (of all ages) n properly and securely restrained times.c
r seating positions in your vehicle the recommendations of SAE , an industry recommended prac-r securing child restraint systems
tor vehicles.
use sBe suremaiat all
All reameet J1819tice foin mo
All occupants and especially children should be restrained whenever riding in a motor vehicle.
Infants or small children should never
380u
s123
Improperly or inadequately installed re-straint systems can increase the risk ofinjury to children. Always read and fol-low the instructions that come with thesystem.
If the child restraint of your choice re-quires the use of a tether strap, three fastening points (see arrows) have beenprovided on the rear shelf for attach-ment. Ask your BMW center to performthe necessary work.
Before installing any child restraindevice or child seat, please read
the following:Never install a rearward-facing child
be held on the lap of a passenger.
Children should always sit in the rear and, depending on age, use either a child restraint system or the existing safety belts. Accident statistics have shown that children are safer when properly restrained in the rear seats than in the front seating positions.
Infants or toddlers should be secured with a child restraint system appropri-ate for their size.
Commercially available child seats complying with the legal standard are designed to be secured with a lap belt or with the lap belt portion of a combi-nation lap/shoulder belt.
restraint system in the front passenger seat of this car.Your car is equipped with an airbag supplemental restraint system for the front passenger. Because the backreston any rear-facing child restraint sys-tem (of the kind designed for infants under 1 year and 20 lbs.) would be within the airbag's deployment range, you should never mount such a devicein the front passenger seat, as the im-pact of the airbag against the child re-straint's backrest could lead to seriousor fatal injuries.If it is necessary for a child (not an infant) to ride in the front seat, certain precautions should be taken. First,

61n
Repa
irs
Over
view
Cont
rols
Car
care
Tech
nolo
gyDa
ta
Child restraint installation
to
Inde
x
All of the rear belt retractors and the front passenger's safety belt can be locked for mounting and securing child restraint systems.
462u
s014
Release the safety beltRelease the safety belt, remove the child's seat and retract the safety beltits end position on the belt retractor.
A label with the appropriate instructions for this is located in the immediate vi-cinity of the buckle latch of each safety belt.
Lock the safety beltExtract the entire length of the belt from the inertia reel mechanism. Allow the reel to retract the belt somewhat and engage the buckle, then tighten the belt against the child restraint system. The retraction mechanism is now locked. The belt cannot be extracted further. Always observe the installation instruc-tions provided by the manufacturer of the child restraint system.

62n
re startingage parking brakeure that the transmission selector "Neutral" (or "Park" if vehicle is ipped with automatic transmis-)
nual transmission: Depress the ch pedalomatic transmission: Depress the tbrake.
Never allow the engine to run with the vehicle standing in an en-d area. The exhaust gases contain n monoxide, an odorless and col-, but highly toxic gas. Breathing
Steering/ignition lock Starting the engine
0 Steering lock engaged The key can only be inserted and removed in this position.
After removing the key, turn the steer-
462d
e195
1 Steering lock disengaged Turning the steering wheel slightly to the right or left often makes it easier to turn the key from 0 to 1.Individual electrical devices are ready for operation.
2 Ignition onAll electrical equipment and accesso-ries are available for use.
3 Starting the engine
Vehicles with manual transmission:
Step on the clutch when starting the
haust gases poses an extreme risk, and can lead to uncon-sness and death.t leave the car unattended with gine running. An unattended ve-ith a running engine represents a
tial safety hazard.<
rt the engine. Do not press the elerator pedal.
ing wheel slightly to the left or right until you hear the lock engage.
If the key is not removed, an acoustic signal chimes after the driver's door has been opened.
Vehicles with automatic transmission:
Move the selector lever from position P only after the engine is running (ignition key in position 2).In order to turn the key back to position 0 or to remove it, move the selector lever into position P first (Interlock).<
vehicle. A lockout prevents the engine from starting if the clutch is not de-pressed.c
Befo> Eng> Ens
is inequsion
>Maclut
> Autfoo
closecarboorless
the exhealthsciouDo nothe enhicle wpoten> Staacc

63n
airs
Over
view
Cont
rols
Car
care
Starting the engine Switching off the engine
0.
f a i-
si-
he
en
or -
:
Rep
Inde
xTe
chno
logy
Data
Do not operate the starter too briefly, but not longer than
approx. 20 seconds. Release the igni-tion key immediately as soon as the engine starts.Do not allow the engine to warm up by leaving it running while the vehicle re-mains stationary. Instead, drive off immediately at a moderate engine speed.<
Should the engine fail to start on the first attempt, e.g. if it is very hot or cold:
> Press the accelerator pedal halfway down while engaging the starter.
Cold start at extremely low tempera-
Turn the ignition key to position 1 or
Do not pull the ignition key out orolling vehicle, otherwise the ign
tion switch could lock and it is imposble to steer the vehicle.When you leave the vehicle, always remove the ignition key and engage tsteering lock.Vehicles with manual transmission:Always engage the parking brake whparking on slopes and inclined sur-faces, as placing the lever in 1st gearreverse may not provide adequate resistance to rolling.Vehicles with automatic transmissionPlace the selector lever in "Park".<
tures, from approx. + 57 (– 156) and at elevations above 3300 feet (1000 meters):
> On the first start attempt, engage the starter for a longer period (approx. 10 seconds)
> Press the accelerator pedal halfway down while engaging the starter.

64nParking brake
t
r
To engageThe lock engages automatically when you lift the lever, and the indicator lamp in the instrument cluster will light up in
460d
e024
If, in exceptional circumstances, ishould be necessary to engage
the parking brake while the vehicle is inmotion, do not pull it with excessive pressure. Keep your thumb pressed against the release button while care-fully pulling up the lever to apply mod-erate pressure.Excessive pressure can lead to over-braking and loss of traction (fishtailing)at the rear.The brake lamps do not come on whenthe parking brake is engaged.Vehicles with manual transmission:Always engage the parking brake whenparking on slopes and inclined sur-
ignition key position 2. See page 21.
To releasePull up slightly on the lever, press the button (arrow) and lower the lever.
The parking brake is primarily designed to prevent the vehicle from rolling while parked, and operates against the rear wheels.
faces, as placing the lever in 1st gear oreverse may not provide adequate re-sistance to rolling.Vehicles with automatic transmission: Place the selector lever in "Park".<
To avoid corrosion, apply the parking brake lightly from time to time when coasting to a standstill (at a traffic sig-nal, for instance), provided that it is safeto do so.

65n
airs
Over
view
Cont
rols
Car
care
Manual transmission
y. r-
l n
on e .
Rep
Inde
xTe
chno
logy
Data
The shift lever's neutral plane (dot in the illustration) is located between 3rd and 4th gears.
When shifting from each gear into "Neutral," the shift lever returns auto-
360d
e044
Reverse Select only with the vehicle stationarPress the shift lever to the left to ovecome the slight resistance.
As you do this, the backup lamps wilturn on automatically when the ignitiokey is in position 2.
Do not hold the vehicle in place slopes by slipping or "riding" th
clutch. Use the parking brake insteadA slipping clutch increases clutch wear.<
matically to this neutral position be-cause of its spring loading.

66nAutomatic transmission with Steptronic*
While the vehicle is stationary and before shifting out of "Park" or ral," depress the footbrake in or- disengage the selector lever's echanism (Shiftlock).
the footbrake down until starting therwise the vehicle will "creep" a drive position is engaged.<
Before leaving the vehicle with the engine running, shift the selector to the "Park" or "Neutral" position pply the parking brake. The vehi-ill move if this is not done. Do not the car unattended with the en-unning. An unattended vehicle running engine represents a po-l safety hazard.<
rkt only with the vehicle stationary. mission locks to prevent rear ls from turning.
verset only with the vehicle stationary.
utralt only if your journey is interrupted ong period.
"Neutder tolock mHold off. Owhen
lever and acle wleavegine rwith atentia
P PaSelecTranswhee
R ReSelec
N NeSelecfor a l
You have the option of driving a normal automatic transmission or switching to manual.
Whenever you shift the selector lever out of position D toward the left and into the M/S gate, the automatic trans-mission's sports-emphasized shift pro-gram activates. As soon as you even begin to move the selector lever in the direction "+" or "–", Steptronic shifts the gear and manual operation becomes active. Whenever you want to use auto-matic again, just shift the selector lever toward the right to position D.
The Steptronic automatic transmission is equipped with ATC (Adaptive Trans-
Selector lever positionsP R N D M/S + –
Starting the engine462d
e209
mission Control). ATC reacts with preci-sion to your individual driving style and the current driving conditions. This is the reason why various shift programs are used.
For details concerning ATC, please refer to the chapter "Advanced Tech-nology" on page 160.
The engine can only be started in selector lever positions P ("Park") or N ("Neutral").
Range selectionA lock prevents inadvertent shifts into some selector lever positions. To re-lease the shift-lock mechanism, press the button on the front of the shift knob(arrow).

67n
Repa
irs
Inde
xOv
ervi
ewCo
ntro
lsCa
r ca
reTe
chno
logy
Data
Automatic transmission with Steptronic*
ATC will carry out upshifting and/or nshifting only at the appropriate ber of RPMs and speed, e.g. nshifting will not occur if the engine
ed is too high. The desired, then the al gear, briefly show up in the in-ment cluster.
To accelerate quickly in the man-ual mode, e.g. to pass, downshift
anual or kickdown.<
ting from M/S to the selector lever itions P, R and N is possible only by g through D.
e -
ro-
tor -
ar
Thedownumdowspeactustru
to m
Shifposgoin
D Drive (automatic shift program)This position is designed for driving un-der all normal operating conditions. All forward gears are available, the Adap-tive Transmission Control (ATC) is fully operational.
"Kickdown" (automatic downshift)In the "Kickdown" mode, you achieve maximum performance.To activate this mode, depress the ac-celerator pedal beyond the full-throttle position, at which a resistance point must be overcome.
M/S Manual operation andSport programShifting from D into M/S activates theSport program and indicates SD in th
462d
e210
gear indicator. This position is recommended in the event a performance-oriented driving style is desired.
At the slightest touch, the automatic transmission shifts out of the Sport pgram into manual operation.Whenever you start to move the seleclever forward in the "+" direction, thetransmission upshifts; moving it backward in the direction of "–", shifts it downward. M1 to M5 appear in the geindicator.

68nAutomatic transmission with Steptronic*
ronic transmission control leIf the indicator lamp comes on, there is a malfunction in the transmission system.
the vehicle to a stop, select trans-n position "P", set the parking
and turn the engine off (ignition position 0).
few seconds, then start the engine.indicator lamp goes out after a few ds, normal transmission perfor-e has been restored. Drive off lly.
indicator lamp does not go out, all tor lever positions can still be se-; however in the forward positions hicle has limited performance as es only in 3rd and 4th gear.
happens, avoid extreme engine and consult the nearest authorized center.
Do not carry out any work on the car in the engine compartment ut first making sure that the selector is in position P or N, and that rking brake has been set.<
wing, tow-starting or jump-start-e vehicle, refer to the information ning on page 156.
Electmodu
Bringmissiobrakekey to
Wait aIf the seconmancnormaIf the seleclectedthe veit driv
If thisloadsBMW
witholever the pa
For toing thbegin
The Steptronic will "think" for you in the following situations:
> In order to keep the engine from overrevving, it will automatically shift into the next higher gear shortly be-fore the governed speed.
> If you do not do anything to interfere, it will automatically downshift at lower speeds.
> In kickdown, it will downshift into the lowest gear possible, depending on the engine speed.
Available displays P R N D SD M1 M2 M3 M4 M5
462us0
19

69n
Repa
irs
Over
view
Cont
rols
Car
care
Tech
nolo
gyDa
ta
Turn signal/Headlamp flasher Wiper/washer system
ipers retracted
termittent wipe or rain sensor*ormal wipe
ast wipe
rief wipe
utomatic windshield washer
otary dial for control of the interval me or the sensitivity of the rain sen-or
er
0 W
1 In
2 N
3 F
4 B
5 A
6 Rtis
462d
e213
Inde
x
1 High beam (blue indicator)
2 Headlamp flasher (blue indicator)
3 Turn signal (green indicator accom-panied by periodic clicking sound
462d
e212
To signal brieflyPress the lever up to but not beyondthe detent. It then returns to the centposition when released.
from the relay).
If the turn indicator lamp blinks and the blinker relay clicks faster than normal, then one of the turning indicators has burned out.

70nWiper/washer system
rmal wiper speed the vehicle is stationary, the wip-itch automatically to intermittent
(not on vehicles with rain sensor).
st wiper speed the vehicle is stationary, the wip-erate at normal speed (not on
les with rain sensor).
tomatic windshield washer ystem sprays washer fluid against indshield and activates the wipers rief period.
only pull the lever briefly, the sys-
l
2 NoWheners swwipe
3 FaWheners opvehic
5 AuThe sthe wfor a b
If you
prays washer fluid onto the wind- without activating the wipers.r
tem sshield
1 Intermittent wipe or rain sensor*
Intermittent wipe:
462d
e213
To activate the rain sensor:In ignition key positions 1 or 2, move the lever to position 1. The wipers traveonce across the windshield under all circumstances.
You can leave the lever permanently inposition 1, and then activate the rain sensor in ignition key positions 1 or 2. To do this,
> turn rotary dial 6 briefly or> use the automatic windshield
washer 5.
To modify the sensitivity of the rain sensor:Turn rotary dial 6.
You can use rotary dial 6 to select from four wipe intervals. In addition, the wipe interval automatically adapts to varia-tions in road speed.
Rain sensor:
When the rain sensor is activated, the windshield wiper is controlled automati-cally, depending on the degree of wet-ness of the windshield (in both snow and rain). You do not have to be con-cerned with switching the windshield wiper on or off or adjusting the wipe interval between intermittent and full wipe. Instead, you can concentrate fully on the traffic conditions. This is espe-cially important under adverse weather conditions.
Switch the rain sensor off when the vehicle passes through the ca
wash. Failure to do so could result in damage caused by undesired wiper activation.<

71n
airs
Over
view
Cont
rols
Car
care
Wiper/washer system Rear window defroster
deactivatess the button if the indicator lamp is
a-
To Preon.
Rep
Inde
xTe
chno
logy
Data
re
Headlamp washers* When the vehicle's lighting system is switched on, the headlamps will also be cleaned every fifth time the automatic windshield washer is activated.
Do not use the washers if there is any danger that the fluid will freeze
on the windshield, otherwise vision could be obscured. Use an antifreeze agent. Refer to page 122.Do not use the washers when the reser-voir is empty, otherwise damage to the washer pump could result.<
Windshield washer jets
To activatePress the button: As long as the indictor lamp remains on, the rear windowdefroster continues at high-output
460d
e026
The windshield washer jets are heated automatically when the ignition key is in position 2*.
(rapid thaw).
After the indicator lamp goes out, thedefroster continues operating at re-duced power for a limited period befodeactivating automatically.

72nCruise control
celerate button 2 briefly: the cruise control is active, vehicle is reduced by approx. 0.6 mph x. 1 km/h) every time you briefly
the button.
and hold button 2:he cruise control active, the sys-utomatically reduces the throttle ng to slow the vehicle. When you e the button, the system records aintains the current speed.
ncel the cruise control the system is activated, press
To dePressWhenspeed(appropress
PressWith ttem aopenireleasand m
To caWhen
1. The indicator lamp stays on. an use the cruise control again as ed.
buttonYou crequir
You can store and automatically main-tain any desired vehicle speed above approx. 20 mph (30 km/h).
463d
e058
To store and maintain speed/to acceleratePress button 3 briefly:The system records and maintains the current vehicle speed. The speed will now be increased by approx. 0.6 mph (approx. 1 km/h) every time you briefly press the button.
Press and hold button 3:The vehicle accelerates without pres-sure on the accelerator pedal. When you release the button, the system records and maintains the current speed.
If, on a downhill gradient, the
To activate the system In ignition key positions 1 or 2.Press button 1. The indicator lamp in the instrument cluster comes on. You can now use the cruise control.engine braking effect is not suffi-cient, the controlled speed may be exceeded. Speed may drop on uphill grades if the engine output is insuffi-cient.<
73n
airs
Over
view
Cont
rols
Car
care
Cruise control
Do not use cruise control on twist-ing roads, when high traffic density
vents driving at a constant speed, n the road surface is slick (snow, , ice), or when the road surface is e (rocks, sand).<
u
-cti-
n-ca-ed
prewherainloos
Rep
Inde
xTe
chno
logy
Data
In addition, cruise control is canceled automatically:
> if the brakes are applied > if the clutch is depressed or the auto-
matic transmission selector lever is moved from "Drive" to "Neutral"
> if the cruise speed is either exceeded or not met for an extended length of time, e.g., when you step on the accelerator pedal.
To resume the stored settingPress button 4:The vehicle accelerates to and main-tains the last speed stored. When yoturn the ignition key to position 0, thestored speed is deleted from the system's memory and the system is deavated.
To deactivate the system When the cruise control has been caceled, press button 1 again. The inditor lamp goes out and the stored speis deleted.

74n
tes the current fuel consumption in on Canadian models in l/100 km). strument clearly shows whether urrent driving style is conducive to
Odometer Tachometer Energy control
1 Odometer You can activate the displays shown in the illustration with the ignition key in position 0 by pressing the button in the
462us0
05
Avoid engine speeds in the red warning zone of the gauge.
To protect the engine, the engine man-agement system automatically inter-
462us0
17
my and minimum exhaust emis-
eedle goes back to zero when the stationary.
instrument cluster (arrow).
2 Trip odometerTo reset the trip odometer to zero, press the button (arrow) with the igni-tion key in position 1 or 2.
rupts the fuel supply in this range; the resulting effect resembles that associ-ated with a sudden loss of power.
Indicampg (This inyour c
462us0
18
econosions.
The ncar is

75n
airs
Over
view
Cont
rols
Car
care
Fuel gauge Temperature gauge
ween the blue and red zonesmal operating range. It is not un-al for the needle to rise as far as the e of the red zone in response to high ide temperatures or severe operat-
conditions.
cking coolant level: page 126.
r-
BetNorusuedgoutsing
Che
Rep
Inde
xTe
chno
logy
Data
n-
. d
When you switch on the ignition, the indicator lamp comes on briefly to con-firm that the system is operational.
Once the indicator lamp begins to light
462us0
20
BlueThe engine is still cold. Drive at modeate engine and vehicle speeds.
Red460d
e082
up continuously, there are still approx. 2.1 gallons (8 liters) of fuel in the fuel tank.
Tank capacity: page 173.
If the tilt of the vehicle varies, e.g., when you are driving in mountainous areas, this may cause the needle to fluctuate slightly.
Please refuel early, as driving to the last drop of fuel can result in
damage to the engine and/or catalytic converter.<
When you switch on the ignition, the indicator lamp comes on briefly to cofirm that the system is operational.
If the lamp comes on while operatingthe vehicle, the engine is overheatedSwitch the engine off immediately anallow it to cool down.

76nService Interval Display
Remaining distance for serviceThe displays shown in the diagram appear for a few seconds with the ignition key in position 1 and 2 or for
462us0
22
a few seconds after starting the engine.
The next service due appears with the message OILSERVICE or INSPECTION, together with the remaining distance before scheduled service.The computer bases its calculations of the remaining distance on the rate of fuel consumption in the period immedi-ately preceding your data request.
A flashing message and a "–" in front of the number mean that the service inter-val has already been exceeded by the distance shown on the display. Please contact your authorized BMW center for an appointment.

77n
airs
Over
view
Cont
rols
Car
care
the clocknition key position 1 and 2
et ahead: Turn the button to the t.
Check Control Onboard computer
Graphic display The following information and/or condi-tions are indicated using symbols, start-ing with the ignition key position 2, until the interference has been fixed:
462d
e272
Mode selectionIn ignition key positions 1 and 2, you can call up information from the on-board computer using the button in the
462d
e222
Rep
Inde
xTe
chno
logy
Data
et back: Turn the button to the left. adjustment speed will increase the er you continue to hold the button.
hange the display mode: Press the b briefly. ry time you press the knob, the k display alternates between the
hour or 24-hour mode.
nition key position 0
time is displayed for a few seconds r you press the left button (refer to ometer", page 74).
1 Inspect the low-beam and high-beam headlamps, as well as the side marker lamps
2 Door open
3 Luggage compartment lid open
4 Check brake and taillamps.
After the completion of a trip and when the driver's door is opened, an acousti-cal signal is given for "Lamps on" if the lamps have not been switched off.
turn signal lever. By pressing the buttonbriefly in the direction of the steering column, you can call up a new functionfor display.
The displays appear in the following order:Time, outside temperature, average fueconsumption, cruising range, average vehicle speed.
The function that was last selected willbe indicated when the ignition is switched on.
SetIn ig
To srigh
462us0
21
l
To sThelong
To cknoEvecloc12-
In ig
Theafte"od

78nOnboard computer
age fuel consumption continue to hold the button on the ignal lever, the average fuel con-tion last displayed is recalculated
AverIf youturn ssump
462us0
07
hat point in time.
from tOutside temperature You can change the units of measure (6/7) for the outside temperature dis-play by pressing the right-hand reset
462us0
23
Ice warning If the outside temperature sinks to approx. 37.57 (+ 36), a warning sig-nal sounds and the display flashes briefly.
The warning is repeated whenever the temperature goes to at least 437 (+ 66) and then drops again to 37.57(+ 36).
The ice warning does not alter thefact that surface ice can form at
temperatures above 37.57 (+ 36), e.g. on bridges or shaded road sur-faces.<
button in the instrument cluster when the temperature display is active.
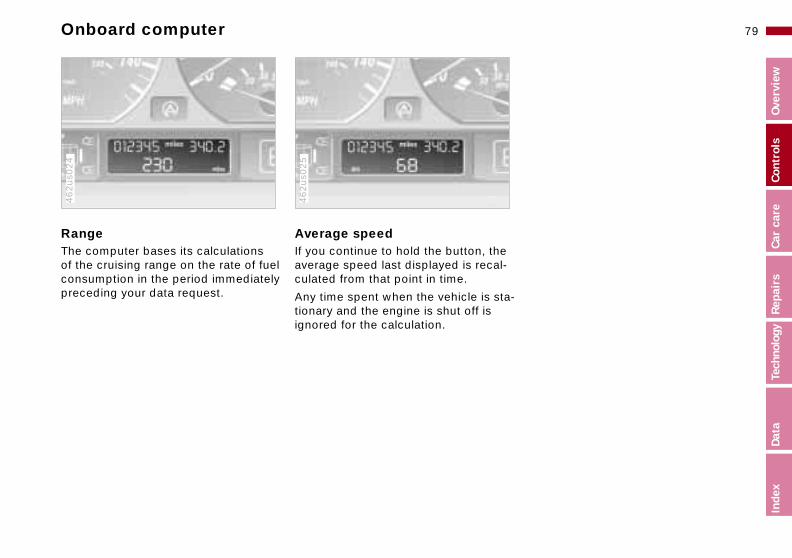
79n
airs
Over
view
Cont
rols
Car
care
Onboard computer
-
Rep
Inde
xTe
chno
logy
Data
a-
Range The computer bases its calculations of the cruising range on the rate of fuel consumption in the period immediately
462us0
24
Average speed If you continue to hold the button, theaverage speed last displayed is recalculated from that point in time.
462us0
25
preceding your data request. Any time spent when the vehicle is sttionary and the engine is shut off is ignored for the calculation.

80n
The PDC does not remove the driver's personal responsibility for ating the distance between the le and any obstacles. Even when rs are involved, there is a blind n which objects cannot be de-. This applies especially in those where the system approaches ysical limits of ultrasonic mea-ent, as occurs with tow bars and couplings, and in the vicinity of nd painted objects. in sources of sound, such as a adio, could drown out the PDC l tone.<
Park Distance Control (PDC)*
The PDC assists you when you back into a parking space. A signal warns you of the distance to an obstacle. To do this, four ultrasonic sensors in the rear bumper measure the distance to the nearest object. The monitoring range of the two corner sensors ex-tends to approx. 2 feet (60 cm) behind the bumper. The two center sensors cover a distance of approx. 4.9 feet (1.50 meters).
The system starts to operate automati-cally about one second after you se-lect reverse with the ignition key in po-sition 2. PDC is deactivated when you shift back out of reverse.
Acoustical signalsThe distance to the nearest object is in-dicated by a tone sounding at various intervals. As the distance between vehi-cle and object decreases, the intervals between the tones become shorter. A continuous warning tone sounds if the distance to a recognized object is less than 1 foot (30 cm).
The warning signal is canceled after approx. three seconds if the distance to the obstacle remains constant during this time (if you are moving parallel to a wall, for instance).
System malfunctions will be indicated
Keep the sensors clean and free of ice or snow in order to ensure ey continue to operate effec-t apply high-pressure spray to the rs for a prolonged period of time. ain an adequate distance of more pprox. 4 inches (10 cm).<
by a continuous high-pitched tone when the system is activated the first time. Please have your BMW center resolve the problem.
evaluvehicsensospot itectedcasesthe phsuremtrailerthin aCertaloud rsigna
that thtively.Do nosensoMaintthan a

81n
airs
Over
view
Cont
rols
Car
care
DSC
en the DSC is deactivated, you are rating with conventional torque sfer.
xceptional instances, it is effective eactivate the system:
hen rocking the vehicle or starting ff in deep snow or on loose surfacesr when driving with snow chains.efer also to page 110.
reactivate the systemss the button again; the indicator p goes out.
The laws of physics cannot be re-pealed, even with DSC. Any con-
u-
n.
e le
ter r-a-
d, hi-
Whopetran
In eto d
> wo
> oR
To Prelam
Rep
Inde
xTe
chno
logy
Data
uences arising from traction loss to excessive vehicle speed remain responsibility of the driver. We efore urge you to avoid using the itional safety margin of the system n excuse for taking risks.<
additional details concerning DSC, se refer to the chapter "Advanced nology" on page 161.
nt
on
seqduethe theraddas a
Forpleatech
Dynamic Stability Control (DSC) This system provides enhanced driving stability, especially when you are just starting off or accelerating, and provide
462us0
26
Indicator lampThe indicator lamp in the instrment cluster goes out shortly after you switch on the ignitio
Refer to pages 21 and 22.
Indicator lamp flashes:The system is actively regulating drivtorque in response to monitored vehicoperating conditions.
If the indicator lamp fails to go out afthe engine is started, or comes on duing the course of normal vehicle opertion:If the system has not been deactivatethere is a system malfunction. The vecle remains operational, but without
increased traction on curves.
In addition to optimizing road traction and vehicle stability when the vehicle is accelerating or starting, the system also provides enhanced stability when cor-nering within physically feasible limits.
The system starts up automatically each time you start the engine.
DSC. Please consult your authorized BMWcenter for repairs.
To deactivate the systemPress the button. The indicator lamp will come on.
The illustration depicts the arrangemeof the buttons if the vehicle is fully equipped. This may vary, depending the equipment actually installed.

82nTire Pressure Control (RDC)*
of tire pressureinflation pressure has dropped too over a period of time (which is l for any tire), the indicator lamp me on with a yellow lamp.
lerts you to have the tires inflated specified pressures as soon as ble.
If you are prompted to check the tire pressure shortly after a cor-n has been made, this indicates e corrected values were not ac-. Please check the inflation pres-gain and make corrections ac-g to the inflation pressure table.
activate the system once again.<
s
-
LossIf the muchnormawill co
This ato thepossi
rectiothat thcuratesure acordinThen
The conceptThe RDC monitors the tire pressures at all four wheels, even when the vehicle is moving. The system provides an alert whenever the inflation pressure drops significantly below the specified pres-sure in one or more tires.
In order for the RDC to "learn" the cor-rect tire inflation pressure, first check the tire inflation pressure in all tires. Then compare these pressures with the tire inflation pressure chart (page 28) and adjust if necessary. Then activate the system.
This indicator lamp in the instru-
Activate the system1 Turn ignition key to position 2 2 Press the switch long enough for the
indicator lamp in the instrument clus-462d
e228
ment cluster informs you when-ever the tire pressure is not nor-mal.
ter to light up yellow for a few second3 After a few minutes of driving, the
RDC sets the current inflation pres-sure in the tires as the target value tobe monitored.
You will only have to repeat this proce-dure if the tire inflation pressure must be corrected. Otherwise, the RDC functions automatically when the ignition key is in position 2, and thus operates whenever the vehicle is driven.

83n
Repa
irs
Over
view
Cont
rols
Car
care
Tech
nolo
gyDa
ta
Tire Pressure Control (RDC)*
tem interference RDC can be subjected to interfer-e locally by outside equipment or ices which use the same radio fre-ncy.
indicator lamp will come on with llow lamp during the malfunction.
indicator lamp also comes on
the event of a system fault a wheel is mounted without the ppropriate electronics , in addition to the spare tire*, addi-onal wheels with RDC electronics re on board.
se contact your authorized BMW ter for additional information.
n
SysTheencdevque
Thea ye
The
> in> if
a> if
tia
Pleacen
Inde
x
Flat tireIf there is a tire failure with loss of pres-sure, the indicator lamp comes on with a red lamp. In addition, there is an acoustical warning signal.
If this occurs, reduce vehicle speed im-mediately and stop the vehicle in a save location. Avoid hard brake applications. Do not oversteer. Replace the wheel and flat tire.
The space-saver spare tire* is provided for temporary use only in
the case of a tire failure. It does not have RDC electronics and is not moni-tored. A full-size spare tire* that has the
The RDC cannot alert you to severe and sudden tire damage
caused by external factors.<
Have the tires changed by yourauthorized BMW center.
Your authorized BMW center has beetrained to work with the RDC systemand is equipped with the necessary special tools.<
same dimensions as the tires already mounted on the vehicle is equipped with the necessary RDC electronics, and will also be monitored once the tires have been mounted and the sys-tem activated.<

84n
he rotary dial to adjust the illumi- intensity.
Parking lamps/Headlamps Instrument panel rheostat
Parking lampsWith the switch in this position, vehicle lighting is illuminated on both sides. For lighting on one
460us0
35
LAMPS ON warningWhen you open the driver's door after turning the ignition key to position 0, a warning signal sounds for a few sec-onds to remind you that the headlamps have not been switched off.
Daytime-driving lamps*If desired, the lamp switch can be left in the second position: When the ignition is switched off, the external lighting is also switched off.
side for parking, see page 85.
Low beam headlamps When you switch the ignition off with the low beam headlamps on, only the parking lamps will
remain on.
"Follow-Me-Home" lamps: If you activate the headlamp
flasher after parking the car, then the low-beam headlamps will come on for a short time. You can also have this func-tion deactivated.<
Turn tnation
460us0
36
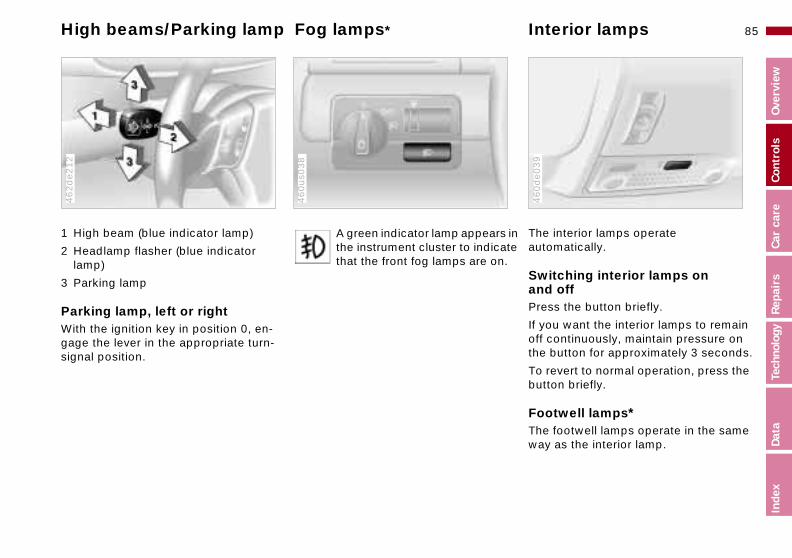
85n
airs
Over
view
Cont
rols
Car
care
High beams/Parking lamp Fog lamps* Interior lamps
interior lamps operate matically.
itching interior lamps on off
in te .
Theauto
Swand
460d
e039
Rep
Inde
xTe
chno
logy
Data
ss the button briefly.
u want the interior lamps to remain ontinuously, maintain pressure on
button for approximately 3 seconds.
evert to normal operation, press the on briefly.
twell lamps* footwell lamps operate in the same as the interior lamp.
Pre
If yooff cthe
To rbutt
FooTheway
1 High beam (blue indicator lamp)
2 Headlamp flasher (blue indicator lamp)
3 Parking lamp
462d
e212
A green indicator lamp appearsthe instrument cluster to indicathat the front fog lamps are on
460us0
38
Parking lamp, left or rightWith the ignition key in position 0, en-gage the lever in the appropriate turn-signal position.

86nReading lamps
The reading lamps are located in the front near the interior lamp and in the rear of the vehicle (illustration). They can be switched on and off with the
460d
e155
switch adjacent to each lamp.
In order to keep the battery from draining, all of the lamps in the
vehicle are switched off automatically approx. 15 minutes after the ignition key is turned to position 0.<

87n
airs
Over
view
Cont
rols
Car
care
Rep
Inde
xTe
chno
logy
Data

88nAutomatic climate control
462us0
08

89n
Repa
irs
Over
view
Cont
rols
Car
care
nolo
gy
Automatic climate control
Inde
xTe
chDa
ta
1 Air on the windshield and on the side windows
2 Air flow toward upper bodyThe side rotary dials provide infi-nitely-variable regulation of the air supply, while the levers change the air-flow direction. The center rotary dial adjusts the temperature of the air as it flows out, see page 92
3 Front footwell ventilationThere are corresponding air vents in the rear footwell as well
4 Recirculated air mode/Automatic recirculated-air control (AUC)* 91, 92
5 Air supply 91
6 Temperature 90
7 Automatic air distribution 90
8 Individual air distribution 90
9 Air grill for interior temperature sensor – please keep clear and unobstructed
10 Display for temperature and air supply 90
11 Defrost the windows and remove condensation 91
12 Air conditioner 91
13 Rear window defroster 71, 92

90nAutomatic climate control
erature The figures in the display provide a general indication of interior
rature. We recommend 707 ) as a comfortable setting, whether r conditioner is operating or not. you start the vehicle, the system es that the selected temperature is ed as quickly as possible. It then ains this temperature, regardless season.
tary dial 3 (refer to "Draft-free ation" on page 92) to a medium g, since air that is somewhat r promotes driving without fatigue. an use this setting for mixing air to
r t
-
Temp
tempe(226the aiWhenensurreachmaintof the
Set roventilsettincooleYou c
minor comfort modifications.
The full, uncontrolled heater out-put is available starting at an inte-mperature setting of 907 (326). etting of 607 (166), the full cool-tput is available when the air con-er is activated.<
-
make
rior teAt a sing oudition
Tips for pleasant drivingUse the automatic system; switch on AUTO-button 7. Select an interior tem-perature that is comfortable for you – we recommend 707 (226) as a comfortable setting. When the outside temperature is above 407 (+ 56), you can also use the air conditioning system (12). This system dries the air and pre-vents condensation on the windows (e.g. if persons are wearing damp cloth-ing). Set the outlets (2) so that the air flows past you and is not directed straight at you. Set the rotary dial be-tween the air outlets (2) for the upper body to a medium position, since air
Automatic air distributionThe AUTO program assumes the adjustment of the air distri-
bution and the air supply for you and inaddition adapts the temperature to external influences (summer, winter) tomeet preferences you can specify. Thisprogram maintains a comfortable in-caclimate regardless of the season. Selecan interior temperature that is comfort-able for you – we recommend 707 (226). The temperature selected and the word AUTO for the air supply appear in display (10) (refer to the overview on page 88). Open the air outlets for the upper body area. Switch on the
that is somewhat cooler promotes driv-ing without fatigue.
Detailed setting options are described for you in the following section.
You can make the settings of your vehicle in such a manner that,
when you unlock the car with your per-sonalized remote control, your own per-sonalized setting of the automatic cli-mate control is initiated.<
air conditioner in warm weather. The maximum cooling capacity is achievedwhen you set rotary dial (3) (refer to page 92) to cold.
Individual air distributionYou can cancel the AUTO pro-gram by selecting specific distribution patterns to suit your ownindividual requirements. You
can direct air to flow onto the windows, toward the upper body , and into
the footwell .

91n
airs
Over
view
Cont
rols
Car
care
Automatic climate control
irculated-air modeYou can respond to unpleasant external odors by temporarily
king outside air. The system then rculates the air already within the icle.
If the windows fog over in the re-circulated air mode, switch this
e off and increase the air supply as uired.<
i-
n
n-w to . g
on.
n-
Rec
blocreciveh
modreq
Rep
Inde
xTe
chno
logy
Data
n, es us
Air supply
By pressing the left or right half of the button, you can vary the
air supply. By doing this, you switch off the automatic control of the air supply. Nevertheless, the automatic air distribu-tion remains unchanged.
When you set the lowest blower speed by pressing the left half of the button, all of the displays are canceled: The blower, heating and air conditioner are switched off, and the air supply is stopped. You can reactivate the system by pressing any button of the automatic climate control.
Air conditionerThe air is cooled and dehumidfied and – depending on the
temperature setting – rewarmed whethe air conditioner system is switchedon.Depending on the weather, the wind-shield may fog over briefly when the engine is started.Use the button to switch off the air coditioner at outside temperatures beloapprox. + 407 (+ 56). This will helpprevent the windows from fogging upIf the windows fog over after switchinthe air conditioner off, switch it back
Condensation forms in the air co
To defrost windshield and side windowsThis program quickly removes ice and condensation from the
windshield and the side windows.
ditioner system during operatiothat then exits under the vehicle. Tracof condensed water of this kind are thnormal.<

92nAutomatic climate control
-free ventilation ir outlets for the upper body may justed to meet your personal re-ents:
r
DraftThe abe adquirem
460d
e040
he rotary dials (1) for an infinitely-le opening and closing of the
. You can use the levers (2) to t the flow direction.
e outlets so that the air flows past nd is not directed straight at you.
tary dial (3) allows you to mix the m the outlets for your upper body rming or cooling it as desired.
Use tvariabventsadjus
Set thyou a
The roair froby wa
Automatic recirculated-air control (AUC)*
You can respond to unpleasant external odors by temporarily
blocking outside air. The system then recirculates the air already within the vehicle. By repeated actuations of the button, you can select one of three dif-ferent operation modes.
> Indicator lamps off: Fresh air flows into the vehicle
> Left-hand indicator lamp on – AUC mode: The system detects pollutants in the outside air and responds by deactivating the outside air flow as required. The system then recircu-
Rear window defrosterWhen the rear window defrosteis activated, the indicator lamp
comes on. The rear window defroster switches off automatically. Refer to page 71.
lates the air already within the vehi-cle. Depending on air quality require-ments, the system automatically switches between outside air supply and recirculation of the air already within the vehicle.
> Right-hand indicator lamp on: The flow of outside air into the vehicle is permanently blocked. The system re-circulates the air already within the vehicle.
If the windows fog over in the re-circulated air mode, switch this
mode off and increase the air supply as required.<

93n
airs
Over
view
Cont
rols
Car
care
Automatic climate control Heated seats* Roller sun blind*
ctuate, press the button briefly with tion key in position 2.
illustration depicts the arrangement he buttons if the vehicle is fully ipped. This may vary, depending
e .
u a-
To aigni
Theof tequ
462us0
28
Rep
Inde
xTe
chno
logy
Data
he equipment actually installed.
aa
e-
on t
Microfilter, activated charcoal filter*A microfilter traps dust and pollen from the outside air. The activated-charcoal filter provides additional protection by filtering gaseous pollutants from the outside air. Your BMW center replaces this combined filter* as a standard part of your scheduled maintenance. A sub-stantial reduction in air flow indicates that the filter needs to be replaced early.
For additional details on the filter change, please refer to page 154.
The seat cushion and backrest can bheated with ignition key in position 2
By repeated actuation of a button, yocan select one of three different opertion modes.
462us0
27
> Two indicator lamps on: Heating athigh temperature
> One indicator lamp on: Heating at low temperature
> Indicator lamps off: Seat heating dactivated.

94n
To prevent injury in the event of a crash, close the glove compart-immediately after use.<
argeable flashlight*ed on the left-hand side of the compartment.res integral overload-protection, an be left in its holder continu-
Be sure that the flashlight is switched off when it is inserted s holder. Failure to comply with recaution could lead to overcharg-d damage.<
HiFi System* Glove compartment
HiFi System – harman kardonEvery time you press the button, the feature is switched on or off.
462us0
29
To openPull the handle and the lamp comes on.
To close462d
e235
When the system is switched on, the sensation of a significantly larger pas-senger area is created (spatial en-hancement), with an improvement of the stereo effect throughout the seating area.
When reception is weak, the radio fre-quently switches between stereo and mono operation. Switch this feature off if this occurs.
Fold up cover.
To lockUse one of the master keys. A master key is also required for unlocking.
For example, if you turn over only your door and ignition keys for va-
let parking (refer to page 32), access to the glove compartment is not possi-ble.<
ment
RechLocatgloveFeatuso it cously.
into itthis ping an

95n
Repa
irs
Over
view
Cont
rols
Car
care
Tech
nolo
gy
Storage compartments Cellular phones*
ds-free systemehicles with a telephone prep* or munications package*, the trim e for the hands-free microphone is ted in the headliner near the interior p.
additional information concerning cellular phone, please refer to the ufacturer's operating instructions.
HanIn vcompieclocalam
Forthe man
460d
e253
Inde
xDa
ta
To open the storage shelf in the front center armrest*:Press the button (arrow) and lift up-ward.
460d
e043
Coin holder, cup holder> A coin holder and two cup holders
are provided in the center console.
460us2
51
Other compartments are located on the front doors as well as on the center console over the ashtray*. Storage nets* are located on the back of the front seats.
Storage packet*(Not released at this time)
For your comfort, there are:
> the rear center armrest with the pull-out cup/can holder and a clip for a trash bag,
> two flip-out sockets on the rear cen-ter console,
> an eyeglass storage compartment* in the center console in front over the
ashtray.
96nAshtray, front* Cigarette lighter*
in. Remove as soon as the lighter back out.
Hold or touch the hot cigarette
Pressjumps
462us0
32
lighter by the knob only. Holding ching it in other areas could result ns. igarette lighter remains operational the ignition key has been removed. is reason, children should never t in the car unattended.<
ette lighter socketle for attaching power supplies for
ghts, car vacuum cleaners, etc., up ting of approx. 200 watts at 12 volts. damaging the socket due to insert-ugs of different shapes or sizes.
hicles equipped for non-smokers, cket is provided at the same location.
or touin burThe cwhenFor thbe lef
CigarSuitabflashlito a raAvoiding pl
On vethe so
To openPress briefly in direction indicated by arrow.
462us0
30
To emptyOpen the lid and press down (arrow): You can now pull the ashtray upward for removal.
462us0
31
To extinguish a cigarette, tap off the ash and gently press the tip into the funnel. On vehicles equipped for non-smok-
ers, the insert is removed in the same way.

97n
airs
Over
view
Cont
rols
Car
care
Ashtray, rear* Clothes hooks
To openPush the cover
460d
e104
.
Rep
Inde
xTe
chno
logy
Data
open.
Press on the upper edge to fold it upAdditional notes: Refer to page 105
462d
e265
To emptyPress on the edge of the raised cover in the opening direction (arrow). You can now pull the ashtray upward for re-moval.
On vehicles equipped for non-smokers, the insert is removed in the same way.

98nThrough-loading facility
ttings at the corners of the lug-compartment provide you with a nient means of attaching luggage and flexible straps for securing ses and luggage.
also to "Cargo loading" on 100.
- .
The figage convenets*suitca
Referpage
-
The rear backrest is divided into two sections, one-third and two-thirds of the seat respectively. For carrying longer objects, you can fold down either
460d
e154
The rear backrest section will move forward slightly when it is unlocked. Reachinto the gap and pull the backrest down
462d
e240
section of the backrest separately.
To unlock, pull the lever corresponding to the section (arrow).
When you close the backrest, be sure that the retainer engages cor
rectly. If it is not correctly engaged, transported cargo could enter the pas-senger compartment from the luggage compartment during brake applicationsor evasive maneuvers and endanger thevehicle occupants.<

99n
airs
Over
view
Cont
rols
Car
care
Ski bag*
Secure the skis or other objects in the bag by tightening the strap at
buckle.<
se ensure that the skis are clean
en the
Plea
380d
e070
Rep
Inde
xTe
chno
logy
Data
re loading them into the bag. e care to avoid damage from sharp es.
tore the ski bag, perform the above s in reverse sequence.
g
nt
nd ry-
befoTakedg
To sstep
The ski bag allows the safe and clean transport of four pairs of skis or two snowboards.
The length of the ski bag and the addi-tional space provided in the luggage compartment make it possible to carry skis with a length of up to 6.8 feet (2.1 meters). The ski bag can only accommodate two pairs of skis with a length of 6.8 feet (2.1 meters), because of the tapered shape of the bag.
Loading1 Pull down the center armrest. Loos
the trim from the upper Velcro fas-tener and place it on the armrest
394d
e119
2 Press button 1 downward and swinthe cover forward
3 Press knob 2: The cover in the lug-gage compartment is unlocked
4 Extend the ski bag between the froseats. The zipper provides conve-nient access to the stored items, acan also be left open to promote ding.

100nCargo loading
ring the load small, light items, use the rubber-d non-skid side of the floor mat ecure with a luggage compart-
).
Secu> For
lineor s
460d
e161
nt net* or elastic straps (refer to e 41) large, heavy pieces, see your W center for load-securing de-s*. Lashing eyes (arrow) are pro-d at the corners of the luggage partment for attaching these -securing devicesply with the information en-
ed with the load-securing de-s.
mepag
> ForBMvicevidecomload
> Comclosvice
Stowing cargo If you are transporting a load in your BMW:
> Load heavy cargo as far forward as
462d
e241
>When transporting heavy cargo whilethe rear seat is unoccupied, secure each of the outside safety belts in theopposite lock (refer to the illustration
460d
e185
possible – directly behind the back-rests or the luggage compartment partition – and as low as possible
> Cover sharp edges and corners> Do not pile objects higher than the
top edge of the backrest

101n
airs
Over
view
Cont
rols
Car
care
Cargo loading Roof-mounted luggage rack*
e sure that the load is not too heavy, attempt to distribute it evenly. ays load the heaviest pieces first the bottom). Be sure that adequate rance is maintained for raising the
ing/tilt sunroof, and that objects do project into the opening path of the age compartment lid.
ure the roof luggage correctly and urely to prevent it from shifting or g lost during driving (danger to fol-
ing traffic).
e smoothly and avoid sudden ac-ration or braking. Do not corner at speeds.
roof load increases the aerody-
s-
MakandAlw(on cleaslidnot lugg
Secsecbeinlow
Drivcelehigh
The
Rep
Inde
xTe
chno
logy
Data
ic resistance. Increased fuel con-ption and additional strain on the
icle's body result from this.
as lye
y g
er ht, k.
namsumveh
Always position and secure the load correctly, otherwise it can en-
danger the passengers in the event of braking or swerving.Do not exceed the permissible gross weight and axle load (refer to page 172), otherwise the vehicle's operating safety is no longer assured and you are in vio-lation of the law.Do not stow heavy or hard objects in the passenger compartment without first securing them. Otherwise they would be thrown around during braking and evasive maneuvers and endanger the occupants.<
AnchorsAccess to the anchors:To open the cover (arrow) please usethe tool included with the luggage sytem.
462d
e271
A special luggage system is availablean option for your BMW. Please compwith the precautions included with thinstallation instructions.
Because roof racks raise the center of gravity of the car when loaded, theexercise a major effect on its handlinand steering response.You should therefore always remembnot to exceed the approved roof weigthe approved gross vehicle weight orthe axle weights when loading the racYou will find the specifications under"Technical Data" on page 172.

102n

Overview
Controls and features
Operation, careand maintenance
Owner service procedures
103n
Over
view
Cont
rols
Car
care
Special operating instructions:Break-in procedures 104Driving notes 104Catalytic converter 105Antilock Brake System
(ABS) 106Disc brakes 108Brake system 109Winter operation 110Power steering 112Cellular phones 112Radio reception 112
Wheels and tires:Tire inflation pressures 113Tire condition 113
Under the hood:Hood 119Engine compartment 120Washer fluids 122Washer nozzles 122Engine oil 123Coolant 126Brake fluid 127Vehicle Identification
Number 128
Care and maintenance:The BMW Maintenance
System 129Caring for your car 130Airbags 135
Technical data
Index
Advanced technology
Repa
irs
ndex
Tech
nolo
gyDa
ta
Tire replacement 114Tire rotation 114
Vehicle storage 136
Wheel and tire combinations 115
Winter tires 116Snow chains 116Approved wheel and tire
specifications 117
Laws and regulations:Technical modifications to the
vehicle 136OBD connector 137
I

104n
Brakes:Do not drive with your foot resting brake pedal. Even light but con-t pedal pressure can lead to high ratures, brake wear, and possibly ke failure.laning:ge of water can form between the nd the road surface when you op-the vehicle on wet or slushy roads. henomenon is referred to as laning or hydroplaning. It is char-
zed by a partial or complete loss tact between the tires and the urface. The ultimate results are f steering and braking control.
Break-in procedures Driving notes
To ensure that your vehicle provides maximum economy throughout a long service life, we request that you ob-serve the following:
Engine and differentialUp to 1,200 miles (2,000 km):Drive at varying engine speeds and road speeds, but do not exceed the fol-lowing engine or road speeds at this time: 4,500/min or 100 mph (160 km/h).
Refrain from using full throttle and avoid pressing the accelerator beyond the kickdown point.
After 1,200 miles (2,000 km), you can
TiresDue to technical factors associated with their manufacture, tires do not achieve their full traction potential until an initial break-in period has elapsed. For this reason, drive cautiously during the first 200 miles (300 km).
Brake systemBrake pads and disks do not attain their optimal wear patterns until after approx. 300 miles (500 km).
To break-in the separate parking brake drums, apply the parking brake lightly when coasting to a standstill (at a traffic
g through water: t drive through water more than 0 cm) deep. Drive only at walking , otherwise damage to the engine,
ectrical system and the transmis-an occur.
parcel tray: use the rear parcel tray to store or bulky objects. They could pose ger to the occupants when the car ked heavily.
gradually increase the engine speed or road speed.
You should also observe these break-in procedures if the engine or differential is replaced later in the course of the vehicle service life.
signal, for instance), provided that traf-fic conditions allow you to do so.To avoid corrosion, repeat this proce-dure from time to time.
The brake lamps do not come on when the parking brake is set.
Vacuum for the brake system servo unit on your BMW is available only when the engine is running. When you move the car with the engine off – when towing, for example – substantially higher levels of pedal force will be required to brake the vehicle.<
on thesistentempeto braAquapA wedtires aerate This paquapacteriof conroad sloss o
DrivinDo no1 ft (3speedthe elsion cRear Neverheavya danis bra
105n
airs
Over
view
Cont
rols
Car
care
Be sure to comply with the in-structions above to prevent un-
ned fuel from reaching the catalytic verter. Otherwise, the catalytic con-er could respond by overheating, ing to serious damage.eme temperatures occur at the cat-ic converter. Heat shields are in-led adjacent to some sections of the aust system. Never remove these lds; do not apply undercoating to r surfaces. When driving, standing le, and parking the vehicle, take to avoid contact between the ex-
st system and flammable materials ss, hay, leaves, etc.). Such contact ld lead to a fire, resulting in serious
Driving notes Catalytic converter
Clothes hooks:When suspending clothing from the hooks, ensure that they will not obstruct the driver's vision. In order to avoid per-sonal injuries during braking maneu-vers, do not hang heavy objects on the hooks.<
The catalytic converter reduces harmfuexhaust emissions, and is designed foruse with unleaded fuel only.Even minute quantities of lead would beenough to permanently damage both the catalytic converter and the system oxygen sensor.
To ensure efficient, trouble-free engineoperation and avoid potential damage:
> Be sure to comply with the scheduledmaintenance requirements
> Do not drive until the fuel tank is empty
> Tow-start only when the engine is cold, otherwise unburned, residual fuel in the catalytic converter could
Rep
Inde
xTe
chno
logy
Data
ry and property damage.<
ignite and cause damage. It is betterto start the vehicle with an outside starting aid> Avoid other situations in which the fuel is not burned, or burns incom-pletely, such as engaging the starter frequently or for extended periods, orrepeated start attempts in which the engine does not start (stopping and restarting an engine that is running properly does not present a problem)Never let the engine run with any of the spark plug cables disconnected.
l
burconvertleadExtralytstalexhshietheiat idcarehau(gracou
.
inju

106nAntilock Brake System (ABS)
avel or snow, for instance), or with chains, the braking distance may e longer than when the wheels cked. However, ABS continues to e enhanced vehicle stability and
ng response under these condi-
mation for your safetyven ABS can suspend the laws sics. ABS cannot prevent the quences of brake applications
nadequate clearances for safety en vehicles, when exceeding the limit in curves, or the risks in- when aquaplaning occurs. Re-ibility for these types of situations ns in the hands (and at the feet) of iver. hould never allow the added of ABS to lull you into a false of security, or mislead you into increased risks that could affect wn safety and that of others.
.
r
l
-
.
(on grsnowalso bare loprovidsteeritions.
InforNot eof phyconsewith ibetwespeedvolvedsponsremaithe drYou ssafetysensetakingyour o
Do not make any modifications to the ABS system.e procedures on ABS are to be med by authorized technicians
Servicperforonly.<
The concept ABS enhances active safety by helping to prevent the wheels from locking dur-ing brake applications. Locked wheels are dangerous. When the front wheels slide, the driver loses steering control over the vehicle. Traction loss at the rear wheels can cause the rear end to break into an uncontrolled skid.
The system can achieve the shortest braking distances possible under most conditions (on straight-aways and in curves, on asphalt, ice, wet road sur-faces, etc.).
ABS is designed to meet two essential
Braking with ABSThe system becomes operative once the vehicle exceeds a speed of approx6 mph (10 km/h). Below approx. 3 mph(6 km/h), it is once again deactivated. This means that the wheels can lock inthe final phase of a panic stop – a factoof no significance in actual use.
If you are in a situation that requires fulbraking, you will exploit the full benefitsof the ABS system if you apply maxi-mum brake pressure ("panic stop"). Since the vehicle maintains steering responsiveness, you can avoid possible obstacles with a minimum of steering effort, despite the full brake application
requirements during every brake appli-cation:
> To help provide vehicle stability> To help maintain steering control and
maneuverability – on all types of road surfaces (asphalt, concrete, mud, wet, snow, ice).
The ABS system closed-loop control circuit cycles in fractions of a second. A pulsation at the brake pedal indicatesto the driver that ABS is active, that is, that the vehicle is within its maximum braking range. In addition, a pulsation –a result of the control function cycles –indicates to the driver that vehicle speed should be reduced to adapt to road surface conditions when there is reduced traction and grip between tiresand road surface (slippery road sur-face).
In driving conditions where there is a loose upper surface together with a subsurface that provides good traction

107n
Repa
irs
Over
view
Cont
rols
Car
care
Tech
nolo
gy
Antilock Brake System (ABS)
Warning lamps CBC, ABS and DSC for Canadian models.
es-ra--by e. u-ng to ar-
an
es ys--
rn-
d p-
Inde
xDa
ta
le er
n-
Antilock Brake System (ABS)/Cornering Brake Control (CBC) CBC is an advanced engineering devel-opment of ABS. When braking while cornering at high speed or braking dur-ing high lateral acceleration, or when braking during a lane change, vehicle stability is improved and steering response is enhanced.
In the event of a fault If the ABS warning lamp in thinstrument cluster lights up, refer to page 22. The brake sy
tem then reverts to conventional opetion as on vehicles without ABS. However, have the brake system checked your BMW center as soon as possiblTo prevent undetected defects and cmulative faults from adversely affectithe brake system, refer any problemsyour authorized BMW center at the eliest opportunity.
ABS warning lamp for Canadimodel.
If the brake warning lamp comon together with the indicatorlamps for the ABS and DSC stems, refer to page 21. The entire ABS, CBC and DSC goveing system has deactivated. Continue driving cautiously andefensively. Avoid full brake a
plications. This could cause the vehicto lose stability and you might no longbe able to control it.Have the system checked as soon aspossible by your authorized BMW ceter.
108nDisc brakes
d engine braking prove inade-, you should still avoid extended, uous braking. Instead of main-
g low to moderate pressure over tended period of time, you should erate the vehicle by applying more antial force on the pedal (watch lowing traffic!) and then pausing repeating the application. This
ered braking technique allows the s to cool in the intervals between braking phases, preventing over-g and ensuring that full braking ity remains available at all times.
Do not coast with the clutch de-
Shoulquatecontintaininan exdecelsubstfor folbeforestaggbrakeactiveheatincapac
pressed or with the transmission ector lever in neutral. Do not drive he engine shut off. The engine es no braking effect when the pedal is depressed or the trans-n is in neutral, and there is no
r-assist for brakes and steering the engine is not running. allow floor mats, carpets or any objects to protrude into the area d the accelerator, clutch and pedals and obstruct their move-<
-
, -
or selwith tprovidclutchmissiopowewhenNeverother arounbrakement.
Disc brakes furnish optimum decelera-tion and braking control and greater fade resistance under heavy use.
When the vehicle is driven only occa-sionally, during extended periods when the vehicle is not used at all, and in op-erating conditions where brakes appli-cations are less frequent, there is an in-creased tendency for corrosion of the rotors and accumulation of contamina-tion on the brake pads. This occurs be-cause the minimal pressure that must be exerted by the pads to clean the rotors by brake applications is not reached.
If the brake rotors are corroded, they
Driving notesWhile driving in wet conditions and in heavy rain, it is effective to apply light pressure to the brake pedal every few miles (kilometers). Watch traffic condi-tions to ensure that this maneuver doesnot endanger other road users. The heat that is generated by the brake ap-plications helps to dry the brake pads and rotors.
Maximum braking force is obtained while the wheels continue to rotate, peaking when the wheels remain on theverge of locking without actually doingso. ABS maintains this state automati-cally. If the ABS fails, you should revert
will tend to respond to braking with a pulsating effect that even extended brake applications will fail to cure.
For your own safety: Only use brake linings that BMW has re-
leased for your particular vehicle model. BMW cannot vouch for driving safety or the suitability of brake linings other than those they have released.<
to the staggered braking technique described on page 110.
Long or steep mountain descents do not necessarily lead to reduced brakingefficiency if you drive downhill with thetransmission in a gear that allows mini-mal brake applications (or, with an automatic transmission, in an appropriate lower range).
You can further increase the engine's braking effect by selecting a lower geardownshifting as far as first gear or placing the selector lever in position (1).

109n
airs
Over
view
Cont
rols
Car
care
Brake system
ke
d r
el. or an
Rep
Inde
xTe
chno
logy
Data
Brake fluid level If the brake-warning lamp comes on with the parking brake released:
The brake fluid level is too low in the reservoir (refer to page 127).
If the brake fluid level is too low and brake pedal travel has become notice-ably longer, there may be a defect in one of the brake system's hydraulic circuits.
Brake-warning lamp for Cana-dian model.
Proceed to the nearest authorized
Brake padsIf the warning lamp for the brapads lights up:The brake pads have reached
their minimum pad thickness. Proceeto the nearest authorized BMW centeas soon as possible to have the padsreplaced.
For your own safety: Only use brake linings that BMW has re-
leased for your particular vehicle modBMW cannot vouch for driving safetythe suitability of brake linings other ththose they have released.<
BMW center. Higher brake appli-cation pressure may be necessary un-der these conditions, and brake pedal travel may be significantly longer. Please remember to adapt your driving style accordingly.<

110nWinter operation
esr road conditions substantially e the traction available between es and the road surface. mber that braking distances will nificantly longer as a result.
s intended to prevent the wheels ocking during brake applications, elping to maintain vehicle stability teering response.
ABS does not respond in a critical g situation and the wheels lock:
ce the pressure on the brake until the wheels just start to roll while still maintaining enough
,
BrakWintereducthe tirRemebe sig
ABS ifrom lthus hand s
If the brakinRedupedalagain
to continue braking. Then in-e the pressure, reduce the pres-hen the wheels lock, reapply
ure etc.taggered braking procedure will e stopping distances while help-u maintain steering control. an then attempt to steer around ds after you have reduced pres-n the brake pedal.
l
f
force creassure wpressThis sreducing yoYou chazarsure o
The onset of winter is often accompa-nied by rapid changes in weather. Adap-tations in driving style should be accom-panied by preparations on the vehicle itself to ensure that your progress through the winter remains safe and trouble-free.
CoolantBe sure that the coolant mixture is kept at the year-round ratio of 50:50 of water and antifreeze/corrosion protection. This mixture provides protection against freezing down to approx. – 347 (– 376). Replace the coolant every four years.
Snow chains BMW snow chains* can be mounted onboth summer and winter tires. Mount them in pairs on the rear wheels only and comply with the manufacturer's safety precautions. Do not exceed a maximum speed of 30 mph (50 km/h). In this situation (snow chains mounted)deactivate the DSC. Refer to page 81.
Starting offWe recommend that you use the man-ual control switch to deactivate DSC when starting off in deep snow or whenrocking the car to free it (refer to page 81).
LocksBMW door lock deicer can be used to free them if frozen. This deicer also contains lubricant.After using deicer, treatment with BMW lock barrel grease is recommended.
Rubber seals and components To prevent the weather-stripping from freezing, apply a spray-on rubber treat-ment or silicone spray to the door, hood and luggage compartment lid seals.
A full range of car-care products is available from your BMW center.<
Driving on low-traction road surfacesUse smooth, gentle pressure to controthe accelerator pedal. Avoid excessiveengine speeds and shift to the next higher gear at an early point. Adapt your speed and driving style when ap-proaching grades or slopes. Maintain an adequate distance between yourseland the car ahead.

111n
airs
Over
view
Cont
rols
Car
care
Winter operation
r is-". ,
to
is
Rep
Inde
xTe
chno
logy
Data
Do not shift down on slick road surfaces. Doing so could cause
the rear wheels to lose traction and skid, that could result in the loss of vehicle control.<
Depress the clutch during hard braking on road surfaces that pro-
vide only poor or uneven traction.<
Skid control Depress the clutch and release the accelerator pedal, or place the selector lever of the automatic transmission into the "Neutral" position. Countersteer carefully and attempt to regain control of the vehicle.
ParkingEngage 1st or reverse gear. If your cais equipped with an automatic transmsion, place the selector lever in "ParkOn vehicles with manual transmissionalso apply the parking brake when parking on inclined surfaces. In orderprevent the parking brake linings fromlocking due to frost or corrosion, dry them by gently applying the parking brake as the vehicle is coming to a stop. Make sure that following traffic not endangered.
The brake lamps do not light upwhen the parking brake is ap-
plied.<

112nPower steering Cellular phones* Radio reception
ception and sound quality ob- from mobile radios varies ac-g to a variety of factors, including oadcast range of the transmitter e directional orientation of the
na. Interference factors such as ension power lines, buildings and l obstructions can all lead to un-
able reception interference, re-ss of how well the vehicle's sound is operating.
tic factors such as intense solar ion, fog, rain and snow can also re with reception.
lephones or cellular phones not ved by BMW can also cause in-
.
--
-
The retainedcordinthe brand thantenhigh-tnaturaavoidgardlesystemClimaradiatinterfe
Car teappro
ence in the radio during a tele- call. This phenomenon assumes rm of a low-pitched hum emanat-m the speaker system.
e refer to the supplementary oper-instructions provided with your system for detailed information
use.
terferphonethe foing fro
Pleasating soundon its
High steering effort:Please contact a BMW center.
High steering effort during sudden tran-sitions: Have your authorized BMW center in-spect this system as soon as possible.
If the power steering fails, in-creased effort will be required to
steer the vehicle.<
Mobile communications systems (cellu-lar phone, two-way radios, etc.) are onlyallowed a power output of up to 10 WattMobile communications devices not specifically designed for use in your carmay trigger malfunctions while operat-ing your vehicle. BMW can neither test nor assume responsibility for every individual product being offered on the market. We recommend that you consult your BMW center before purchasing anydevice of this kind.
To ensure that your BMW continues toprovide reliable and trouble-free operation, refrain from using a mobile phoneor other radio device with an antenna
located inside the passenger compart-ment. The antenna should always be fitted on the outside of the vehicle.Before loading the vehicle on a car-carrier train or driving it
through a car-wash, remove the an-tenna.<

113n
airs
Over
view
Cont
rols
Car
care
Do not drive on a deflated (flat) tire. A flat tire greatly impairs steering
braking response, and can lead to plete loss of control over the
icle.id overloading the vehicle so that permitted load on the tires is not eeded. Overloading can lead to rheating and increases the rate at ch damage develops inside the tires. ultimate result can assume the form sudden air loss.sual vibrations encountered during
mal vehicle operation can indicate failure or some other vehicle defect, an variations in normal vehicle onse, such as a pronounced ten-
Tire inflation pressures Tire condition
Information for your safetyThe factory-approved radial tires are matched to the car and have been se-lected to provide optimum safety and driving comfort on your car.
It is not merely the tire's service life, but also driving comfort and – above all else – driving safety that depend on the condition of the tires and the mainte-nance of the specified tire pressure.
Incorrect inflation pressure is a frequent cause of tire damage. It also signifi-cantly influences the roadholding ability of your BMW.
Check tire inflation pressure regu-
Tire tread – Tire damageInspect your tires frequently for tread wear, signs of damage and for foreign objects lodged in the tread. Check the
390d
e331
Rep
Inde
xTe
chno
logy
Data
cy to pull to the left or right. Should occur, respond by immediately ucing your speed and carefully pro-ding to the nearest BMW center or fessional tire center, or having the icle towed in to have it and its tires ected. damage (up to and including blow-) can endanger the lives of both the
icle occupants and other road rs.<
larly — including the space-saver and/or the spare tire — at least twice a month and before beginning a longer road trip. Incorrect tire pressure can otherwise lead to tire damage and acci-dents.<
tread depth.
The tread depth should not be any shallower than 0.12 in (3 mm).Otherwise there is an increased risk of aquaplaning, even at relatively moder-ate speeds and with only small amountsof water on the road.
We recommend that you always replacethe tires once the tread wears to 0.12 in(3 mm). If you continue to use the tires,wear indicators appear in the tread at 0.063 in (1.6 mm).
andcomvehAvothe excovewhiTheof aUnunortire as cresp
-
denthisredceeprovehinspTireoutsvehuse
114n
een the axlesead wear patterns at the front end from those at the rear – the actual ns will vary according to individ-iving conditions. In the interests of and maintaining optimal handling cteristics, tire rotation is not rec-nded.
oposed interaxle rotation of tires ed on economic considerations, hould consider whether the costs rotation are likely to be recap-by any increase in the service life tires which might be realized.ciple, interaxle rotation should be med in short intervals, with a
Tire replacement Tire rotation
To maintain good handling and vehicle response, use only tires of a single tread configuration from a single manu-facturer. BMW tests and approves wheel/tire combinations. Refer to page 117.
Do not use retreaded tires, since driving safety may be impaired by
their use. This due to the possible varia-tions in casing structures and, in some cases, to their extreme age, that can lead to a decrease in their durability.<
Tire ageThe date on which the tire was manu-factured is indicated by the code on the sidewall:DOT ... 129 indicates that the tire was manufactured in Week 12 of 1999.
BMW recommends the replacement of all tires when the tires are no more than 6 years old, even if a tire life of 10 years is possible.
Spare tires over 6 years old should be used only in case of emergency. Such a tire should be replaced by a new tire immediately, and should not be fitted together with new tires.
um of 3,000 miles (5,000 km). lt your authorized BMW center re information.
d you decide to rotate the tires, it ential to comply with the following:e tires on the same side only, since g characteristics and road grip otherwise be adversely affected.
ing rotation, correct the tire infla-ressure.
If different tire sizes are mounted on the front and rear axles (refer to 117), the wheels may not be ro-from one axle to the other.<
BetwThe trdiffer patterual drsafetycharaomme
If a pris basone sfor thetured of theIn prinperfor
maximConsufor moShoulis essRotatbrakincould
Followtion p
page tated

115n
Repa
irs
Over
view
Cont
rols
Car
care
Tech
nolo
gyDa
ta
Wheel and tire combinations
ter tires:
+S = up to 100 mph (160 km/h)+S = up to 118 mph (190 km/h)+S = up to 130 mph (210 km/h)
es stamped on light-alloy wheels:
tect valve inserts against dirt using w-on valve stem caps. Dirt in the es frequently leads to slow leaks.
mple:
width chese letter forge typebol for full-drop
ter rim diameter in inchesp on the 2 rim shoulders
7 x 16 H 2J
g
W
Win
Q MT MH M
Cod
Proscrevalv
Exa
Rimin inCodflanSymcenRimHum
Inde
x
The right choice Use only BMW-approved tires, refer to page 117.
Due to the high speeds this vehicle can achieve, the use of specific tire brands, specifications and dimensions is man-datory.Consult any BMW center for details. Comply with local/national regulations.
The correct wheel/tire combinaton affects different sytems, such as
ABS, ATC, DSC. The function of these systems can be impaired if the correct combinaton is not used.Therefore, only use tires of the same
Codes on the tires and wheels The tire codes will aid you in selectinthe correct tire.
Codes on radial tires:
The speed rating indicates the ap-
Example:
Nominal width in mmAspect ratio in % Radial tire codeRim diameter in inchesLoad rating(not on ZR tires)Speed rating(before R on ZR tires)
225/50 R 16 92
brand and tread pattern. Replace a flat tire with an approved wheel/tire combi-nation as soon as possible.<
proved maximum speed for the tire.
Summer tires:
S = up to 112 mph (180 km/h)T = up to 118 mph (190 km/h)H = up to 130 mph (210 km/h)V = up to 150 mph (240 km/h)W = up to 167 mph (270 km/h)Y = above 167 mph (270 km/h)ZR = above 150 mph (240 km/h)

116nWinter tires
ge tires in a cool, dry place, away ight whenever possible. Protect es against contact with oil, grease el.
chains*arrow-link BMW snow chains on er or winter tires only in pairs and n the rear wheels. Comply with all facturer's safety precautions when ting the chains.
StoraStorefrom lthe tirand fu
SnowUse nsummonly omanumoun
Choosing the right tireBMW recommends winter tires (M+S radial tires) for driving in adverse winter road conditions. Although all-season M+S tires provide better winter traction than standard summer tires with H, V, W, Y and ZR speed ratings, they gener-ally fail to provide the same levels of performance as standard snow tires in winter driving.
For of safe tracking and steering re-sponse, install winter tires made by the same manufacturer having the same tread configuration on all four wheels.
Mount only winter tires approved by
Never exceed the maximum speedfor that the tires are rated.
Unprofessional attempts by laymen to service tires can lead to damage and accidents.Have this work performed by skilled professionals only. Your BMW center will be glad to assist you with both theirexpertise and the proper equipment foryour vehicle.<
Tire condition, tire pressureWinter tires display a perceptible loss intheir ability to cope with winter driving conditions once the tread wears to be-low 0.16 in (4 mm), and should thus be
BMW. Any BMW center will be glad to provide you with information on the best winter tires for your particular driv-ing conditions.
replaced.
Comply with the specified tire inflation pressures – and be sure to have the wheel and tire assemblies balanced every time you change the tires.

117n
Repa
irs
Over
view
Cont
rols
Car
care
Tech
nolo
gyDa
ta
Approved wheel and tire specifications
w chains* w chains cannot be mounted on the wing tires:/50 R 16 92 W/50 ZR 16/45 R 17 91 W/50 R 16 92 Q/T/H/45 R 17 91 Q/T/H
ed tires details concerning tire manufactur-for mixed tires, refer to the original-ipment specifications.
SnoSnofollo225225225225225
MixForers equ
Inde
x
Tire specifications Steel rim (wheel rim) Light-alloy wheel
BMW 323Ci
All-Season
195/65 R 15 91 H – 6.5Jx15
Summer tires
195/65 R 15 91 H – 6.5Jx15
205/60 R 15 91 H – 6.5Jx157Jx15
205/55 R 16 91 H225/50 R 16 92 W225/50 ZR 16
– 7Jx16
225/45 R 17 91 W – 8Jx17
Front: 225/45 ZR 17 – 7.5Jx17
Rear: 245/40 ZR 17 – 8.5Jx17
Winter tires
195/65 R 15 91 Q M+S 6.5Jx15 6.5Jx15
205/60 R 15 91 Q M+S 6.5Jx15 6.5Jx157Jx15
205/55 R 16 91 Q M + S225/50 R 16 92 Q M + S
7Jx16 7Jx16
225/45 R 17 91 Q M + S – 8Jx17
Space-saver spare tire
T 125/90 R 15 96 M 3.5Bx15 –
T 125/90 R 16 98 M 3.5Bx16 –
Pay attention to the specifications for tires and wheels in the vehicle's manuals. If you install tire sizes not approved by the manufacturer, you are required to enter this in the vehicle documents.

118nApproved wheel and tire specifications
205/55 R 16 91 Q M + S225/50 R 16 92 Q M + S
7Jx16 7Jx16
225/45 R 17 91 Q M + S – 8Jx17
Space-saver spare tire
T 125/90 R 16 98 M 3.5Bx16 –
Pay attention to the specifications for tires and wheels in the vehicle's manuals. If you install tire sizes not approved by the manufacturer, you are required to enter this in the vehicle documents.
chains* chains cannot be mounted on the ing tires: 0 R 16 92 W0 ZR 165 R 17 91 W0 R 16 92 Q/T/H5 R 17 91 Q/T/H
d tiresetails concerning tire manufactur-r mixed tires, refer to the original-ment specifications.
SnowSnowfollow225/5225/5225/4225/5225/4
MixeFor ders foequip
Tire specifications Steel rim (wheel rim) Light-alloy wheel
BMW 328Ci
All-Season
205/55 R 16 91 H – 7Jx16
Summer tires
205/55 R 16 91 H225/50 R 16 92 H225/50 ZR 16
– 7Jx16
225/45 R 17 91 H – 8Jx17
Front: 225/45 ZR 17 – 7.5Jx17
Rear: 245/40 ZR 17 – 8.5Jx17
Winter tires

119n
airs
Over
view
Cont
rols
Car
care
closethe engine hood drop from about m (about 12 inches) up, so that it ibly engages.
Hood
To unlock Pull the lever located under the left-hand side of the instrument panel.
460us0
12
To openPull the release handle and open the hood.
462d
e269
Rep
Inde
xTe
chno
logy
Data
To avoid injuries, be sure that the travel path of the hood is clear
n it is closed, as with all closing cedures. is determined that the hood is not pletely closed while driving, stop ediately and close it securely.<
Do not work on your vehicle with-out appropriate skills. Always
switch off the engine and allow it to cool down before working in the engine compartment. Always disconnect the battery before working on any electrical systems or equipment, especially when these are located within the engine compartment. Comply with all applica-ble instructions and warnings. Have your vehicle serviced by an authorized BMW service center if you are not famil-iar with the guidelines that need to be followed. Improper parts and materials servicing could create a safety hazard not only for passengers, but also for fel-low drivers on the road.<
To Let 30 caud
462d
e270
wheproIf it comimm

120nEngine compartment
462d
e281

121n
Repa
irs
ndex
Over
view
Cont
rols
Car
care
Tech
nolo
gyDa
ta
Engine compartment
I
1 Brake fluid reservoir 127
2 Engine oil dipstick 123
3 Coolant expansion tank 126
4 Engine oil filler neck 123
5 Reservoir for the windshield and headlamp washer system* 122
6 Auxiliary terminal for jump starting 156

122nWasher fluids Washer nozzles
shield washer pray from the nozzles should be ed so as to ensure effective ing, even at high speeds. Use a e to adjust the nozzles as re-, or have them adjusted by your
center.
lamp washer system*these adjusted by your BMW r as required.
--
WindThe sdirectcleanneedlquiredBMW
HeadHave cente
Headlamps* and windshield washerFilling capacity: approx. 5.6 US quarts (5.3 liters).
462d
e243
Antifreeze agent for the washer systems is inflammable. For this
reason, keep it away from sources of flame and store it only in its original container. Store it so that it is inaccessible to children. Comply with the instructions on the containers.<
Fill with water and – if required – with a washer antifreeze (according to manu-facturer's recommendations).
We recommend that you mix the washer fluid before adding it to
the reservoir.<
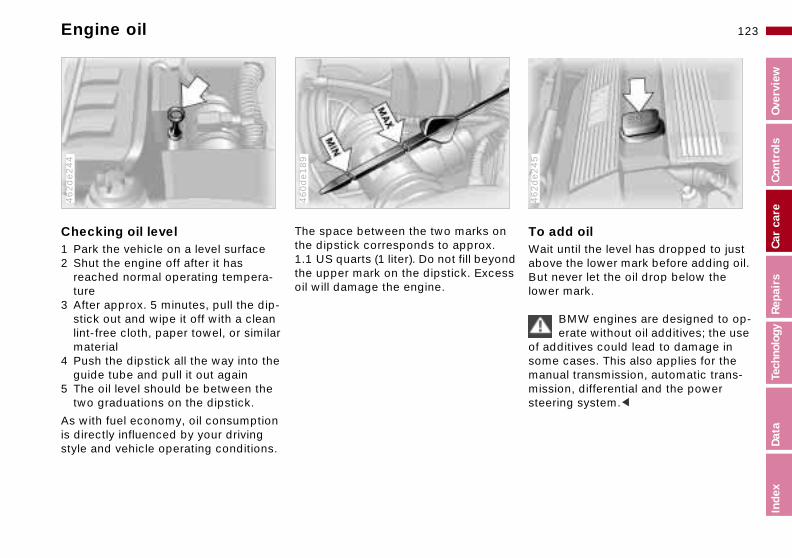
123n
airs
Over
view
Cont
rols
Car
care
Engine oil
add oil it until the level has dropped to just ve the lower mark before adding oil. never let the oil drop below the er mark.
nd ss
To WaaboButlow
462d
e245
Rep
Inde
xTe
chno
logy
Data
BMW engines are designed to op-erate without oil additives; the use
dditives could lead to damage in e cases. This also applies for the ual transmission, automatic trans-
sion, differential and the power ring system.<
of asommanmisstee
Checking oil level 1 Park the vehicle on a level surface 2 Shut the engine off after it has
reached normal operating tempera-ture
462d
e244
The space between the two marks onthe dipstick corresponds to approx. 1.1 US quarts (1 liter). Do not fill beyothe upper mark on the dipstick. Exceoil will damage the engine.
460d
e189
3 After approx. 5 minutes, pull the dip-stick out and wipe it off with a clean lint-free cloth, paper towel, or similar material
4 Push the dipstick all the way into the guide tube and pull it out again
5 The oil level should be between the two graduations on the dipstick.
As with fuel economy, oil consumption is directly influenced by your driving style and vehicle operating conditions.

124nEngine oil
.
l
530us0
50
Prescribed engine oilThe quality of the engine oil is extremely important for the function and life of an engine. Based on extensive testing, BMW has approved only certain kinds of engine oil.
Use only approved "BMW High Perfor-mance Synthetic Oil".
If you are unable to obtain "BMW High Performance Synthetic Oil", you can add small amounts of synthetic oil in between oil changes. Only use oils with the API SH specification or higher.
Ask your authorized BMW center
Viscosity ratings Viscosity is the oil flow rating as estab-lished in SAE classes.
The selection of the correct SAE class depends on the climatic conditions in the area where you drive your BMW.
BMW recommends the use of oils in SAE classes SAE 5W-30 or SAE 5W-40
These oils may be used for driving in alambient temperatures.
for details concerning the specific "BMW High Performance Synthetic Oil" or synthetic oils that have been ap-proved.<
You can also call BMW of North America at 1-800-831-1117 or visit this website: www.bmwusa.com to obtain this infor-mation.

125n
airs
Over
view
Cont
rols
Car
care
Engine oil
Rep
Inde
xTe
chno
logy
Data
Always observe all environmental protection laws when disposing of
used oil.<
Recommendation: Have the oil changed by your BMW center only.
Continuous exposure to used oil has caused cancer in laboratory
testing. Any skin areas that come in contact with oil should be thoroughly washed with soap and water.Always store oil, grease, etc., out of reach of children. Comply with all warn-ing labels and information on lubricant containers.<

126nCoolant
coolant ntil the engine cools before ing the cap from the expansion
The coolant gauge needle in the ment cluster must be located in ue field; otherwise, otherwise, you be scalded.
n the cap slightly counterclock-e in order to allow accumulated ssure to escape. Then open.e coolant is low, slowly add lant until the correct level is ched – do not overfill.
oolant is a mixture of water and ded-duty antifreeze with corrosion
Add Wait uremovtank. instruthe blcould
1 Turwispre
2 If thcoorea
The cexten
tor. Always maintain the pre-d all-season 50:50 mixture ratio ar-round protection against inter-rrosion. No other additives are re-.
ce the coolant every four years.
inhibiscribefor yenal coquired
Repla
Do not add coolant to the cooling system when the engine is hot,
since escaping coolant can cause burns.To avoid the possibility of damage later on, never use anything other than fac-tory-approved, nitrite- and amino-free extended-duty antifreeze with corrosion inhibitor. Your authorized BMW center is familiar with the official specifica-tions.Antifreeze and anticorrosion agents are hazardous to health. Store antifreeze and anticorrosion agents in their origi-nal containers and inaccessible to chil-dren. Extended-duty antifreeze with
Checking coolant levelCorrect coolant level when the engine is cold (approx. 687 or 206):
Unscrew the cap from the expansion 460d
e053
corrosion inhibitor contains the flamma-ble substance ethyleneglycol. Do not spill antifreeze containing corrosion inhibitor on hot engine components, since it could catch fire and cause seri-ous burns.<
Comply with the applicable envi-ronmental laws regulating the dis-
posal of extended-duty antifreeze with corrosion inhibitor.<
tank.
The coolant level is correct when the end of the red float is aligned with the upper edge of the filler opening (refer tothe arrow in the illustration or the sche-matic diagram next to the cap).

127n
airs
Over
view
Cont
rols
Car
care
Brake fluid
is,
ra-
by fer ar-)
let
ve- it
on
e X"
Rep
Inde
xTe
chno
logy
Data
on se
i-is-
If the warning lamp for the brake hy-draulic system lights up and the parking brake is released:Check the brake fluid level and, if nec-essary, refill it to the top mark.
460d
e128
Brake fluid is hygroscopic, that it absorbs moisture from the air
over time.In order to safeguard the proper opetion of your brake system, have the brake fluid changed every two years your authorized BMW center; also reto page 153 and to the Service and Wranty Information Booklet (US modelsor Warranty and Service Guide Book(Canadian models).Brake fluid is toxic and damages the hicle's paint. You should always storein its original container and in a locatithat is out of reach of children.Do not spill the fluid and do not fill thbrake fluid reservoir beyond the "MA
Should you determine that the brake fluid is low, refer the problem to your BMW center, who can trace and rectify any sources of leakage when refilling the reservoir.Your BMW center is familiar with the specifications for approved brake fluids (DOT 4).
Brake fluid loss can result in extended pedal travel. Comply with the informa-tion provided on page 109.
mark. The brake fluid could ignite upcontact with hot engine parts and causerious burns.<
Comply with the applicable envronmental laws regulating the d
posal of brake fluid.<

128nVehicle Identification Number
In the engine compartment, on the right-hand strut dome (arrow).
462d
e247

129n
airs
Over
view
Cont
rols
Car
care
vice and Warranty Information klet (US models)
rranty and Service Guide klet (Canadian models)se refer to the Service and War-y Information Booklet (US models) arranty and Service Guide Booklet
nadian models) for additional infor-ion on maintenance intervals and cedures.
precaution against rust, it might be od idea to have the body checked
damage from rocks or gravel at the e time, depending upon operating ditions.
The BMW Maintenance System
The BMW Maintenance System has been designed as a reliable means of providing maximum driving and operat-ing safety – and as cost-effectively as possible for you. With respect to the
462us0
22
Service Interval DisplayAdvanced technology is employed to calculate the optimal maintenance in-tervals. These are then indicated in theService Interval Display. While conven-tional systems rely on distance traveledalone to determine when service is duethe BMW Maintenance System has for years considered the actual conditionsunder that the vehicle operates, be-cause miles can be traveled in many different manners:From the point of view of maintenance,62,000 miles (100,000 km) accumulatedin short-distance urban driving are not the equivalent of the same distance covered at moderate speeds in long-
Rep
Inde
xTe
chno
logy
Data
Have your BMW center do the maintenance and repair.
r BMW center is always informed on latest maintenance work and repair niques and equipped with the re-ed special tools. In addition, check-parts known from experience to be ject to wear is a permanent part of maintenance specifications.sure that all maintenance work is firmed in the Service and Warranty rmation Booklet or the Warranty and
Service Guide Booklet (Canadian mod-. These entries are your proof that vehicle has received regular mainte-ce. They are also a prerequisite for ranty claims.<
previous version, maintenance costs can clearly be reduced due to technical innovations.
Please keep in mind that regular main-tenance is not only necessary for the safety of your vehicle, but also plays a significant role in maintaining the resale value of the vehicle.
distance highway travel.
The BMW Maintenance System in-cludes the Engine Oil Service and Inspections I and II.
Determining the maintenance intervals according to the actual loads on the carcovers every kind of operating situationMinimal use drivers – those who drive significantly less than 6,000 miles (10,000 km) per year – should nevertheless have the oil changed at least everytwo years, since engine oil ages regardless of the load.
,
.
-
SerBooWaBooPlearantor W(Camatpro
As aa gofor samcon
Youthe techquiring subthe Be conInfo
-els)the nanwar

130n
When cleaning the headlamps, please observe the following: not rub dry. Never use abrasives trong cleaning agents to clean the ersove dirt and contamination h as insects) by soaking with
W Car Shampoo and then rinsing plenty of waterays use a deicer spray to remove umulated ice and snow – never a scraper.<
After washing the car, apply the brakes briefly to dry them. Braking ncy might otherwise be reduced
Caring for your car
Washing your car Right from the start, you can wash your new BMW in an automatic car wash. Car wash systems that do not employ brushes are preferable.
Wipe away tough dirt and loosen and remove dead insects before washing the car.
To prevent spots, avoid washing when the hood is still warm, or immediately after and during exposure to strong sunlight.
When using an automatic car wash, be sure that:
> The car wash system is suited for the
Vehicles with rain sensor:Clean the windshield regularly. Wax from car washes or the presence of dead insects can cause rain sensor malfunctions.
Switch the rain sensor off when the vehicle passes through the car
wash (refer to page 70). Damage could occur by an undesired actuation of the wipers if the system is not deacti-vated.<
Parts of the car that are inaccessible to the automatic washer – such as door sills, door and hood edges, etc. –
moisture and the brake rotors also be corroded.<
dimensions of your vehicle> No damage will occur on vehicles
with attached body accessories (such as spoilers or antennas). Consult the car wash operator if necessary
> The wheels and tires of your vehicle cannot be damaged by the convey-ance devices of the car wash system
> The vehicle is cleaned with minimum brush pressure, and that ample water is available for washing and rinsing.
should be cleaned by hand.
In the winter months, it is especially im-portant to ensure that the car is washed on a regular basis. Large quantities of dirt and road salt are difficult to remove, and they also cause damage to the ve-hicle.
If spray wands or high-pressure washers are used, be sure to
maintain an adequate distance between the spray source and the vehicle's sur-face. Inadequate distance and exces-sive pressure can damage or weaken the finish, making it more susceptible to subsequent attack. In addition, mois-ture could penetrate to vehicle compo-
nents, leading to long-term damage.<> Do or scov
> Rem(sucBMwith
> Alwaccuse
efficie
by thecould
131n
airs
Over
view
Cont
rols
Car
care
Caring for your car
ing for the vehicle finish ular washing is a preventive mea- against long-term effects from
stances that are harmful to the vehi-s finish, especially if you drive your icle in areas with high levels of air ution or aggressive natural sub-ces (tree resins, pollen).
ertheless, you should immediately ove especially aggressive sub-ces. Failure to do so can lead to nges in the paint's chemical struc- or to discoloration. Gasoline spilled ing refueling, oil, grease and brake should always be cleaned away ediately, as should bird droppings.
i-a-
e re- ,
st, g vi- ro--
s.
o-
CarRegsuresubcle'vehpollstan
Nevremstanchaturedurfluidimm
Rep
Inde
xTe
chno
logy
Data
f these substances cause damage he finish.
contamination remaining on the ace of the vehicle will be especially spicuous after washing. Use clean-fluid or alcohol with a clean cloth or on pad to remove. Remove tar ts with tar remover. After cleaning, affected areas should be waxed to ure continued protection.
A full range of car-care products is available from your BMW center.<
r-
r m-
-
All oto t
Anysurfconing cottspothe ens
Exterior finish To provide effective corrosion protec-tion, multilayer paintwork is applied at the factory. Cataphoretic immersion priming techniques are supplemented using special body-cavity protectants, with the application of specially-devel-oped and extensively tested materials.A layer of flexible PVC is first applied to the undercarriage. Following this, a comprehensive undercoating treatment with a wax-based protectant is applied. Regular maintenance makes an impor-tant contribution to maintaining the safety and resale value of your vehicle.
Increasing awareness of the effects of
Road dirt, tar spots, dead insects, anmal droppings (strong alkali concentrtion) and tree excretions (resins and pollen) all contain substances capablof causing damage when allowed to main on the finish of your car for anyperiod of time (spots, etching, flakingseparation in the top coat).
In industrial areas, deposits of flue dulime, oily soot, precipitation containinsulfur-dioxide (acid rain) and other enronmental pollutants will damage thecar's finish unless adequate care is pvided – even though this generally limited to the outside horizontal surface
In coastal regions, high levels of atm
harmful environmental factors on vehi-cle finishes have led paint and vehicle manufacturers to initiate ongoing pro-grams designed to further improve the durability of their finishes. Despite this, environmental factors that occur locally or regionally can have negative effects on the finish of your vehicle. These should guide you in determining the fre-quency and extent of your efforts to maintain the vehicle finish.Depending upon material and type of impact (perforation of paint layer), physical stresses from sand, road salt, gravel, etc., can cause corrosion to start extending beneath the finish, start-ing at the point of impact.
spheric salt and humidity promote corosion.
In tropical zones temperatures of ove1007 (406) in the shade prevail, inaddition to heavy ultraviolet radiationand high humidity. Under those circustances light colored paints reach temperatures of up to 1807 (806) anddark paints up to 2507 (1206).

132nCaring for your car
g for other vehicle onents and materials
alloy wheels should be treated lloy wheel cleaner, especially dur-e winter months. However, do not ggressive products containing ac-trong alkalis or abrasives. Do not team cleaners operating at tem-res above 1407 (606). Follow
anufacturer's instructions.
r vehicle has chrome parts* such window frames and door handles, pecially careful about cleaning with plenty of water and possibly a poo supplement as well after the have been salted. Use chrome
-
-
t
CarincompLight-with aing thuse aids, suse speratuthe m
If youas thebe esthem shamroads
as an additional treatment.
an use window and glass cleaner an inside window surfaces and s without smearing and streaking. use polishing pastes or abrasive z) cleansers on mirror lenses.
polish
You cto clemirrorNever(quart
Waxing your car Protect the finish using carnauba or synthetic-based waxes only.
The best way to determine when the finish needs to be waxed is by noting when water stops beading on the sur-face.
You can use a glass cleaner to remove any wax or silicone that may have been left on the windows during waxing.
A full range of car-care products is available from your BMW center.<
Paint damageYou can touch up small areas of paint damage with a BMW spray paint or a BMW touch-up stick.
The paint color code for your car is provided on a sticker located next to the type plate and on the first page of yourService and Warranty Information Booklet.
Damage caused by flying stones, scratches, etc., must be touched up without delay to prevent rust from forming.
If corrosion has started to form in an area with paint damage, remove all rus
and clean the area. Then prime the areawith a BMW Primer Stick. Finally, applythe finish coat. Wait a few days, then polish the repaired area. Finish by ap-plying a wax preservative.More extensive paint damage should beprofessionally repaired in accordance with the manufacturer's instructions. Your BMW center uses original BMW finish materials in accordance with offi-cial repair procedures.
133n
airs
Over
view
Cont
rols
Car
care
Caring for your car
e of upholstery materials ressions in the upholstered materi-
resulting from everyday use can be shed up by brushing "against the " with a lightly dampened brush.
tendency of the pile to lie in a par-lar direction on velour upholstery is a quality defect, and, just as on e textiles or clothing, cannot be
ided.
on upholstery materials, textile or her remnants that have been worn the upholstery may be removed a lint brush or a Velcroâ brush. A ning glove is available for particu- "stubborn" lint. Stains and fairly
- s
* er. he
n ts.
is r.<
CarDepals brunap
Theticunot homavo
Lintleatintowithclealarly
Rep
Inde
xTe
chno
logy
Data
e areas of dirt should be cleaned off out delay, using lukewarm water an interior cleaner, stain remover or ning-grade benzene. Brush the fab-fterwards to restore its appearance.
e vehicle will be stored for an ex-ed period, or if it is exposed to in-e sunlight, cover all seats or the
dows to prevent fading.
A full range of car-care products is available from your BMW center.<
largwithandclearic a
If thtendtenswin
Plastic components, vinyl upholstery, headliners, lamp lenses, the clear cover of the instrument panel and compo-nents with a sprayed dull black surface can be cleaned with water (add plastic shampoo as required). Do not allow moisture to soak through the seats or headliner. Never use solvents such as lacquer thinner, heavy-duty grease re-mover, fuels, etc.
Rubber components should be cleaned with water only; a rubber treatment or silicone spray may also be applied.
Clean the wiper blades with soapy wa-ter. The wiper blades should be re-placed twice a year, before and after
After cleaning, never allow the inertiareel to retract the belts until they are completely dry. Dirty safety belts prevent the inertia reel mechanism fromretracting the strap properly, and thuconstitute a safety hazard.
Heavily soiled floor carpets and matscan be cleaned with an interior cleanThe floor mats can be removed from tvehicle for cleaning.
Please use only a damp cloth to cleawooden fascia panels and componenFollow up by drying with a soft cloth.
A full range of car-care productsavailable from your BMW cente
the cold season. This especially impor-tant for vehicles with a rain sensor.
Use only wiper blades approved by BMW.<
The safety belts should be cleaned with a mild soap and water solution without removing them from the car. Never at-tempt chemical or dry cleaning, as damage to the belt fabric could result.

134nCaring for your car
dirt and grease gradually attack otective layer of the leather, the ed surfaces should be treated with leather care agent. This also acts antistatic agent.
tect against moisture and water he leather with BMW Impregnat-ent.
commend that you perform this dure twice a year on leather ex- to normal use.
should be wiped up immediately. ve grease and oil stains without g, but rather by dabbing with emover.
-
Sincethe prcleanBMWas an
To protreat ting Ag
We reproceposed
SpillsRemorubbinspot r
upholstery is to be exposed to in- sunlight or if the vehicle is to be for an extended period, cover all r surfaces (or, better yet, the win-
) to prevent fading.
A full range of car-care products is available from your BMW center.<
If the tensestoredleathedows
The buildup of an electrostatic charge on the seat covers, particularly if atmo-spheric humidity is low, can give the occupants an unpleasant electric shock if they touch metal body parts after leav-ing the vehicle. Although this not dan-gerous in any way, it can be avoided by touching a bare or polished metal part of the car while getting out.
Leather care The leather upholstery* used by BMW is a natural product of the highest quality, processed using state-of-the-art methods to ensure that it will maintain its high quality for years to come, pro-vided that it is properly cared for.
Because this product is manufactured using natural materials, you must makeallowance for its special characteristicsand for the peculiarities of its use and care.
Regular periodic cleaning and care areessential, as dust and road dirt act as abrasives in the pores and creases of
the material. This leads to wear spots and premature brittleness on the sur-face of the leather. We therefore sug-gest that you clean the leather with a vacuum cleaner or dust cloth at fre-quent intervals.For cleaning use BMW leather cleaningfoam.

135n
airs
Over
view
Cont
rols
Car
care
Caring for your car Airbags
not modify or tamper with either the ng or the individual components in airbag system. These include the ded steering wheel hub, the instru-t panel, the side trim panels of the t or rear doors and the roof pillars or sides of the headliner. Never tape air bag cover panels, cover them r or alter them in any other way. Do remove or dismantle the steering el.nsure compliance with official ty regulations, have an authorized
W center dispose of airbag genera-.rofessional attempts to service the
tem could lead to failure in an emer-
er
m
Do wirithe padmenfronthe the ovenot wheTo esafeBMtorsUnpsys
Rep
Inde
xTe
chno
logy
Data
cy or undesired airbag activation, er of which could result in personal ry.<
as-i-re
nt
m, for
geneithinju
Cleaning agents can contain sub-stances that are dangerous or
pose health risks. Therefore always comply with the warnings and danger notices on the package.Open the doors or windows on your vehicle when cleaning the interior. Never clean your vehicle with solvents or other materials not specifically in-tended for this application.<
1 Front airbag for driver and passeng
2 Side impact Head Protection Syste(front)
3 Side airbags (front and rear* side)
462d
e207
Important safety notices Do not attempt to remove the ggenerators of the airbag supple
mental restraint system from the vehcle. Testing and service procedures ato be performed exclusively by spe-cially-qualified technicians. In the eveof a malfunction, deactivation or trig-gered actuation (as a response to anaccident) of the airbag restraint systeconsult your authorized BMW center repairs or service operations.

136nVehicle storage Technical modifications to the vehicle
-Emitting Diodes (LEDs)emitting diodes installed behind ucent lenses serve as the light e for many of the controls and ys in your vehicle. These LEDs ble conventional lasers and are fied by law as "Class 1 light-ng diodes".
Do not remove the protective lens and avoid staring directly at the red beam for extended periods al hours), as inflammation of the uld result.<
--r
LightLight-translsourcdisplaresemclassiemitti
unfilte(severiris co
Consult your authorized BMW center regarding special procedures if you in-tend to store the vehicle for more than three months.
Any BMW center will gladly provide information on the value of technical modifications to the car, the legal posi-tion and the manufacturer's recommendations. For this purpose, the center requires the Vehicle Identification Numbeand, in some cases, also the engine number.

137n
Repa
irs
Over
view
Cont
rols
Car
care
Tech
nolo
gyDa
ta
OBD connector
f d ld
e. - d n
at-
y t
ld
Inde
x
The Onboard Diagnostic (OBD) connec-tor is on the driver's side, underneath the left-hand side of the instrument panel, under a cover. The cover has the letters "OBD" on it.
460us2
50
An illuminated indicator informs you othe need for service, not that you neeto stop the vehicle. Your system shoube checked, however, at the earliest possible opportunity.
If the indicator blinks or flashes, this indicates a high level of engine misfirReduce speed and contact your nearest BMW center immediately. Severeengine misfire over only a short perioof time can seriously damage emissiocontrol components, especially the calytic converter.
When the fuel filler cap is not properltightened, the OBD system can detecthe vapor leak and the indicator will
The purpose of the OBD system is to assure proper emission control system operation for the vehicle's lifetime by monitoring emission-related compo-nents and systems for deterioration and malfunction.
light up. If the fuel filler cap is subse-quently tightened, the indicator shouextinguish after a short time.

138n

Overview
Controls and features
Operation, careand maintenance
Owner service procedures
Technical data
Index
Advanced technology
139n
Repa
irs
ndex
Over
view
Cont
rols
Car
care
Tech
nolo
gyDa
ta
Replacement procedures:Onboard tool kit 140Windshield wiper blades 140Lamps and bulbs 140Remote control 147Changing tires 148Battery 151Fuses 153Microfilter 154
In case of electrical malfunction:Fuel filler door 155Sliding/tilt sunroof 155
Assistance, giving and receiving:Jump-starting 156
Towing the vehicle 157I

140n
mps and bulbs make essential butions to the safety of your vehi-bserve the following instructions bulb replacement carefully. If
re not familiar with any of the pro-es, consult your authorized BMW r.
Do not touch the glass portion of a new bulb with your bare hands even small amounts of impurities n to the surface and reduce the e life of the bulb. Use a clean paper napkin, or a similar mate-r hold the bulb by its metallic <
Onboard tool kit Windshield wiper blades Lamps and bulbs
The onboard tool kit is located in the luggage compartment lid.
Loosen the wingnut to open.
460d
e066
1 Rotate the wiper arm completely out from the windshield
2 Position the wiper blade at an angle and pull the release spring (arrow)
460d
e56
lacement bulb set is available from MW center.
Whenever working on the electri-cal system, switch off the electri-cessory you are working on or nnect the cable from the negative al of the battery. Failure to do this
result in short circuits.vent injuries and damage, comply ny instructions provided by the anufacturer.<
3 Fold the wiper blade down and un-hook it toward the windshield
4 Pull the wiper blade past the wiper arm toward the top
5 Insert a new wiper blade and apply pressure until you hear it engage.
Use only wiper blades approved by BMW.<
The lacontricle. Oduringyou acedurcente
sinceburn iserviccloth,rial, obase.
A repyour B
cal acdiscotermincouldTo prewith abulb m
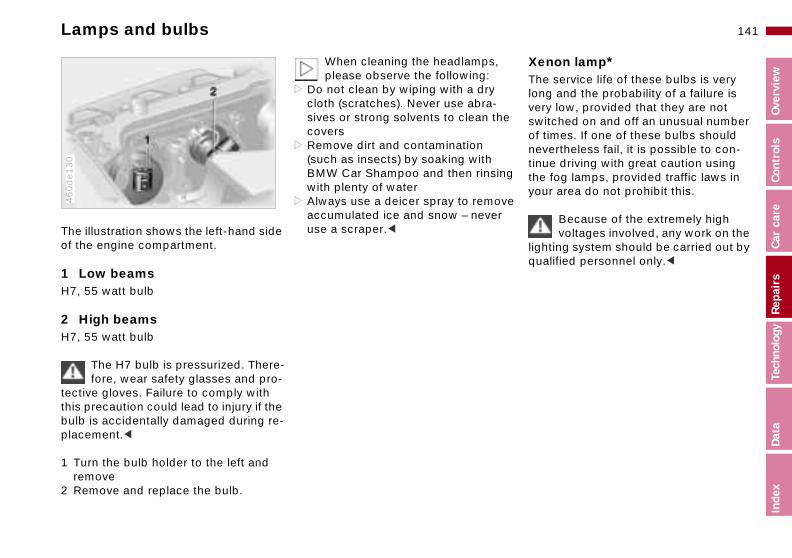
141n
airs
Over
view
Cont
rols
Car
care
Lamps and bulbs
on lamp* service life of these bulbs is very and the probability of a failure is low, provided that they are not
tched on and off an unusual number imes. If one of these bulbs should ertheless fail, it is possible to con-e driving with great caution using fog lamps, provided traffic laws in r area do not prohibit this.
Because of the extremely high voltages involved, any work on the
ting system should be carried out by lified personnel only.<
e
g
ve
XenThelongveryswiof tnevtinuthe you
lighqua
Rep
Inde
xTe
chno
logy
Data
The illustration shows the left-hand side of the engine compartment.
1 Low beams H7, 55 watt bulb
460d
e130
When cleaning the headlamps, please observe the following:
> Do not clean by wiping with a dry cloth (scratches). Never use abra-sives or strong solvents to clean thcovers
> Remove dirt and contamination (such as insects) by soaking with BMW Car Shampoo and then rinsinwith plenty of water
> Always use a deicer spray to remoaccumulated ice and snow – neveruse a scraper.<
2 High beamsH7, 55 watt bulb
The H7 bulb is pressurized. There-fore, wear safety glasses and pro-
tective gloves. Failure to comply with this precaution could lead to injury if the bulb is accidentally damaged during re-placement.<
1 Turn the bulb holder to the left and remove
2 Remove and replace the bulb.

142nLamps and bulbs
rt the 2 pins on the lamp into the es on the vehicleh the lamp in. Carefully apply ssure until you hear it engage.
r4 Inseguid
5 Puspre
462d
e262
The illustration shows the left-hand side of the engine compartment.
Parking lamp
460d
e171
Front turn signals 21 watt bulb
1 Using a screwdriver, release the innehook through the upper opening
462d
e261
5 watt bulb
1 Turn the bulb holder to the left (arrow) and remove
2 Remove and replace the bulb.
2 Pull out the lamp toward the front3 Applying light pressure, turn the bulb
to the left. Remove and exchange thebulb

143n
airs
Over
view
Cont
rols
Car
care
Lamps and bulbs
l lamps lamps (4): Bulbs 21/4 wattaining bulbs: 21 watt
urn signal yellow
ro-TaiTailRem
1 T
462us0
10
Rep
Inde
xTe
chno
logy
Data
ackup lamp white
ail lamp red
ail lamp/Brake lamp red
he re-
of
2 B
3 T
4 T
Side turn signals*5 watt bulb
1 Use finger pressure against the rear end of the lens (arrow) to press it for-
462d
e250
Fog lamps HB4, 55 watt bulb
The bulb is pressurized. There-fore, wear safety glasses and p
462d
e229
ward for removal2 Apply gentle pressure to the bulb
while turning it to the left to remove.
tective gloves. Failure to comply withthis precaution could lead to injury if tbulb is accidentally damaged during placement.<
Please contact a BMW center in casea malfunction.

144nLamps and bulbs
ate the trim downward (arrow 1). ease the bulb holder (arrow 2) and ove itlying light pressure, turn the bulb
2 RotRelrem
3 App
462us0
33
he left. Remove and exchange the bss the bulb holder into position il you hear it engagenstall the trim with the clip.
to tbul
4 Preunt
5 Rei
The illustration shows the right-hand luggage compartment opening.
Bulbs in the fender:
All of the bulbs are integrated in a
460d
e057
Bulbs in the luggage compartment lid:
1 Using a screwdriver, loosen the clip
462d
e263
central bulb holder.
1 Release the bulb holder (arrow, par-tial view) and remove
2 Pull the power supply receptacle off and set the bulb holder aside (on the luggage compartment floor, for in-stance)
3 Applying light pressure, turn the bulb to the left. Remove and exchange the bulb
4 Plug in the power supply receptacle5 Position the bulb holder for reinstalla-
tion. Apply gentle pressure on the button (arrow, partial view) until you hear it engage.

145n
airs
Over
view
Cont
rols
Car
care
Lamps and bulbs
rior lamps nt
rior lamps (6 watt bulb) with reading ps (2 x 6 watt bulbs)
InteFro
Intelam
460d
e182
Rep
Inde
xTe
chno
logy
Data
sing a screwdriver, press the lamp ut toward the fronturn the bulb holder to the left and moveemove and replace the bulb.
1 Uo
2 Tre
3 R
Center (high-mount) brake lamp LED light bar on the rear window.
Please contact a BMW center in the case of a malfunction.
462d
e268
License plate lamps5 watt bulb
1 Place a screwdriver in the slot andpress toward the left (arrow) to re-
460d
e047
lease the lens2 Replace the bulb.

146nLamps and bulbs
well lamps t bulb
the lamp out using a screwdriverlace the bulb.
compartment lamp t bulb
the lamp out using a screwdriverlace the bulb.
age compartment lamps amp each in the bulb holder of the mps: 10 watt bulb.
ly a screwdriver to the recess and ove the lens
Foot5 wat
1 Pry2 Rep
Glove5 wat
1 Pry2 Rep
LuggOne ltail la
1 Apprem
lace the bulb.
2 RepRear
Interior lamp (6 watt bulb) with reading lamp (6 watt bulb)
460d
e179
Lighted make-up mirror10 watt bulb
1 Remove the bulb housing – use a
460d
e181
1 Pry the lamp out using a screwdriver2 Turn the bulb holder to the left and
remove3 Remove and replace the bulb.
screwdriver if necessary2 Replace the bulb.

147n
airs
Over
view
Cont
rols
Car
care
Remote control
Whenever you take receipt of a new transmitter, always turn it to
ition 2 (ignition switched on) in the tion lock and then back to the home ition, so that the electronic immobil- (see page 33) "accepts" the new .tect the transmitters against unau-ized use, e.g. by handing in only r and ignition key 3 or the spare key page 32) at a hotel reception.<
e-on
se
e- of ry
in
posigniposiserkeyProthordoo(see
Rep
Inde
xTe
chno
logy
Data
h
New transmitter If you place a new transmitter into ser-vice (either a replacement or an addi-tional transmitter), it must be initialized:
463d
e028
If the central locking system fails to rspond, you must repeat the initializatiprocedure.
If you possess additional transmittersfor your vehicle (up to a maximum of four units), you must now initialize theas well. Be sure that no more than 30 seconds is allowed to elapse be-tween the individual initialization procdures. Repeat steps 3 and 4 for eachthe transmitters when doing this. Thecentral locking system will confirm eveinitialization procedure as described step 5.
In the event of a system malfunction,please contact your authorized BMW
1 Enter the vehicle and close the doors2 Turn the ignition key briefly (max.
5 seconds) to position 1 in the steer-ing lock and then turn it back to posi-tion 0. Remove the key
3 Press button 1 (refer to the illustra-tion) and hold it. Maintain pressure on button 1 while rapidly pressing button 2 three times in succession within a period of 10 seconds
4 Release button 15 The central locking system activates
and releases all lock mechanisms in rapid succession to indicate that the initialization procedure has been suc-cessfully completed.
center, who can also provide you witreplacement transmitters.

148nChanging tires
ill the need the followinger to avoid rattling noises later, he position of the tools when you e them and return them to their
You wIn ordnote tremov
460d
e058
al position when you are through them.
ck (1)se the floor panel in the luggage partment (refer to page 41) and
crew the red wing nut (arrow).en you have completed work, ew the jack all the way back down. d the handle back and insert it in older
dge (2) wedge, or wheel chock, is lo-
ed behind the jack on the luggage partment's rear wall. Loosen the
g nut to remove it
originusing
> A jaRaicomunsWhscrFolits h
>WeThecatcomwin
Take these precautionary mea-sures if you have either a flat tire
or are changing the tire:Park the vehicle as far from the flow of traffic as possible and on firm ground. Switch on the hazard flashers. Turn the steering wheel to the straight-ahead position, remove the key and engage the steering lock. Shift into 1st or re-verse (selector lever in "Park" with auto-matic) and engage the parking brake.All passengers should be outside the car and well away from your immediate working area (behind the guardrail, for instance).If a warning triangle or portable hazard
Do not lie under the vehicle or start theengine when the vehicle is supported by the jack – risk of fatal injury.<
Your BMW has either a spare* or space-saver tire* for temporary use andto ensure your mobility.
Take the luggage compartment floor panel completely out to
remove the spare tire* (refer to page 41).<
warning lamp is available, set it up on the roadside at an appropriate distance from the rear of the vehicle. Comply with all safety guidelines and regula-tions.Change the wheel only on a level, firm surface that is not slippery. Avoid jack-ing the car on a soft or slippery support surface (snow, ice, loose gravel, etc.), as it could slide sideways.Ensure that the jack is positioned on a solid support surface.Do not place wooden blocks or similar objects under the jack. If this done, the jack might not be able to reach its full support capacity because of the limited height.

149n
airs
Over
view
Cont
rols
Car
care
Changing tires
Loosen the lug bolts 1/2 turn Place the jack under the jacking point nearest the wheel you are changing (refer to the illustration at the left) in such a way that the base
s-
:
45
462d
e252
Rep
Inde
xTe
chno
logy
Data
of the jack is positioned vertically under the jacking point relative to the entire surface, and that the jack head fits securely into the square recess of the jacking point (refer to illustration detail) when the jack is crankedCrank the car up until the wheel in question is raised from the groundUnscrew the lug bolts and remove the wheelRemove accumulations of mud or dirt from the mounting surfaces of the wheel and hub; clean the lug bolts
e
ke he
gs
6
7
8
> Spare tire* or space-saver spare tire*Located next to the jack.Loosen the wing nut (arrow) by hand, remove the storage tray and take out the spare wheel
460d
e059
Procedure1 Please observe the safety precau
tions stated on the previous page2 Secure the vehicle against rolling
Place the wedge against the rear462d
e251
> Lug wrench – is in the onboard tool kit on the underside of the luggage compartment lid (refer to page 140).
surface of the front tire on the sidopposite the side being raised. If the vehicle is parked on a down-ward slope, place the wedge se-curely in front of the tire. If the wheel must be changed on a sur-face with a more severe slope, taadditional precautions to secure tvehicle from rolling
3 Wheels with full wheel covers: Reach into the ventilation openinand pull the cover off

150nChanging tires
The vehicle jack is designed for changing tires only. Never use it to another vehicle model or any load kind, as this could lead to acci- and personal injury.the lug bolts checked for proper ess with a calibrated torque h at the earliest possibility [torque
fication: 72 lb.ft. (100 Nm)].<
storing the wheel, take care to e that you do not damage the re-g pin in the spare tire recess.
t-alloy wheels other than Original light-alloy wheels have been ted, it may be necessary to use
l
raise of anydentsHave tightnwrencspeci
Whenensurtainin
If lighBMWmoun
nt lug bolts for those wheels.
ce the defective tire as quickly as ble and have the new wheel bal-.
lack-painted aluminum wheels*, nly those balancing weights ap-d by BMW for use with light alloy ls. Never attempt to balance these ls using standard balance weights.
differe
Replapossianced
For buse oprovewheewhee
9 Position the new wheel or the space-saver spare tire* on the hub and screw at least two lug bolts finger-tight into opposite bolt holes
462d
e266
13 If your wheels are equipped with fulwheel covers*: Position the wheel cover with the valve opening over the valve (arrow) and press it onto
462d
e279
10 Screw in the remaining lug bolts. Tighten all the bolts securely
11 Lower the jack and remove it from beneath the car
12 Tighten the lug bolts, alternating between bolts positioned opposite one another
the wheel with both hands14 Inflate tire to the proper pressure as
soon as possible.For vehicles with RDC Tire PressureControl*:Reactivate the system after mount-ing either the spare tire or after in-flating tire to proper pressure. (Refer to page 82).
Only use original BMW full wheel covers, otherwise, the trim piece
may not fit securely. The full wheel cover may not be installed on the space-saver spare tire*, since this could damage the cover.<

151n
airs
Over
view
Cont
rols
Car
care
Changing tires Battery
bols will find the following symbols on r car battery. To avoid injury, please ply with the corresponding precau-s whenever you work with or near battery.
Before handling the battery, please read the following infor-mation.
Wear eye protection. Do not al-low particles containing battery acid or lead to come into con-
with your eyes, your skin, or your hing.
Battery acid is extremely corro-sive. Wear eye protection and
r he er r a
SymYouyoucomtionthe
tactclot
Rep
Inde
xTe
chno
logy
Data
protective gloves. Do not tip the ery. Battery acid can leak from the tilation openings.
Ensure that children keep well away from batteries and battery acid.
Fire, sparks, an open flame and/or smoking are not allowed in the vicinity of the battery. Avoid
rks from electrical cables or electri-equipment. Turn the key to position the steering lock when the battery isconnected or connected. Never rt-circuit the battery terminal, other-e you could be injured by electrical rks.
i-e r-
battven
spacal 0 inis dshowisspa
Driving with the space-saver spare tire*Drive cautiously and do not exceed a speed of 45 mph (80 km/h).
Be aware that vehicle handling will be altered. Slower brake response time, longer braking distances and changed steering characteristics may be antici-pated when approaching limit condi-tions.
The changes in handling characteristics will be even more pronounced in con-junction with winter tires.
Only one space-saver spare tire may be mounted. Mount a wheel
Battery location The battery is located at the right-reaof the luggage compartment. Raise tluggage compartment floor panel (refto page 41), and give a screwdriver o
460d
e176
and tire with the same size and specifi-cations as the others at the earliest possible opportunity. Maintain correct tire pressures. Refer to page 28.<
coin a 1/4-turn counterclockwise to release the two fasteners plus an addtional fastener in the upper-center sidtrim panel. In order to remove the stoage tray, slide the side trim panel slightly upward.

152nBattery
oval and installation
Do not disconnect the battery cables when the engine is run-otherwise the ensuing voltage will damage the vehicle's on- electronics. t alter the positive terminal wiring way, otherwise the safety battery al's safety function will no longer
aranteed. Repair and disposal are performed exclusively by trained icians.<
removing the battery, disconnect ble on the negative terminal first,
Rem
ning, surgeboardDo noin anyterminbe guto be techn
Whenthe ca
he cable on the positive terminal. n the center adjusting screw on ttery retaining strap (use the driver included with the onboard it) and disconnect the strap.
installing a battery, connect the ve terminal first, then connect the ive terminal.
When installing a battery, be sure that it is mounted properly and e retaining bracket is installed
he center adjustment screw. If this done, the battery will not be ade-ly secured in case of an acci-
then tLoosethe bascrewtool k
Whenpositinegat
that thwith tis notquatedent.<
A highly-explosive gas is gener-ated when the battery is charged.
If you happen to get acid in your eyes, rinse thoroughly for 15 min-utes with clear water. Consult a
physician immediately. Rinse your skin or clothing with plenty of water if you get acid spray on them. If electrolyte is acci-dentally ingested, consult a physician immediately.
In order to protect the battery case from ultraviolet radiation, do not place it in direct sunlight.
A discharged battery can freeze. Store the battery in areas where temperature
Charge conditionWith the help of the "Magic Eye", a hydrometer, you can read the battery'scharge state:
460d
e252
remains above freezing.
Battery careThe battery is completely maintenance-free, as per DIN 43 539/2; that is, the amount of acid put in the battery origi-nally will normally last for the service life of the battery.
> Green: Adequate charge.> Black: Not adequately charged. The
battery must be recharged. Please contact your authorized BMW centerfor additional information.
> Yellow: Replace the battery.
The service life specified for the battery can be achieved only if it is
always kept adequately charged. If thevehicle is primarily used for stop-and-go traffic, be sure to check the charge state often.<

153n
airs
Over
view
Cont
rols
Car
care
Battery Fuses
electrical accessory should fail, tch it off and check the fuse.
love compartmentpen the glove compartment and
e
ce e
e -
If answi
In g1 O
460d
e062
Rep
Inde
xTe
chno
logy
Data
rn the two white quick-release steners outward. Spare fuses and lastic tweezers are located on the se holderse the plastic tweezers to remove e fuse for the accessory or equip-ent that has stopped working the fuse is burned through (the etal strip is melted and separated), place it with a new fuse of the same
mpere rating (color code).
tufapfu
2 Uthm
3 Ifmrea
Charging the battery Charge the battery in the vehicle only when the engine is not running.
Before doing any work on the electrical system, be sure to
unclamp the cable from the battery's negative terminal, or it could cause short-circuiting, a fire or personal injury.<
If the vehicle is to be parked longer than 4 weeks, disconnect the battery from the vehicle's electrical system by dis-connecting the negative terminal cable.
If you intend to store your car for longer
Storage periods during which thbattery is disconnected are not
taken into consideration by the ServiInterval Display for changing the brakfluid.Therefore, make sure that the brake fluid is changed every two years at thlatest, regardless of the display. Comply with the information provided on page 127.<
than six weeks: Remove the battery, charge it and store it in a cool (but frost-free) room. Recharge the battery every 6 months at the latest, at the very least before each installation, or else it will be unusable. Every time the battery is dis-charged, especially over extended peri-ods, its service life is reduced.
Return used batteries to a recy-cling point or your authorized
BMW center. Maintain the battery in an upright position for transport and stor-age. Secure the battery against tilting in transit.<

154nFuses Microfilter
ove the filter by pulling toward front and install a new oneition the filter cover and secure it the three fasteners.
4 Remthe
5 Poswith
460d
e157
The fuses, their respective ampere rat-ings and the equipment in their circuits are all indicated below the fuse holder.
To close the fuse holder, snap it into position at the top and turn the two fas-teners inward.
Do not attempt to repair a burned fuse or replace it with a fuse hav-
ing a different color or amperage rating. To do this could cause a fire in the vehi-cle resulting from a circuit overload.<
If a fuse blows repeatedly, refer the problem to your authorized BMW center for repair.
1 Open the hood2 Release the three fasteners (arrow)
with a 1/4-turn3 Remove the filter cover
460d
e156

155n
airs
Over
view
Cont
rols
Car
care
Fuel filler door Sliding/tilt sunroof*
Manual release Pull the knob with the fuel pump symbol (arrow) on the right trim panel of theluggage compartment.
460d
e178
Manual operation 1 Remove the interior lamp (refer to
page 145), reach into the opening and push out the panel
2 Turn the sunroof's steel crank with 460d
e183
Rep
Inde
xTe
chno
logy
Data
the Allen key from the onboard tool kit (refer to page 140) in the desired direction.

156n
N
Ifcjuobte
e
Csd
e battery on the support vehicle is k, start the engine and let it run
rt the engine on the vehicle need-the jump-start, and allow it to run sual. If the first start attempt is
successful, wait a few minutes ore another attempt in order to w the discharged battery to re-rge ore disconnecting the jumper ca-s from your BMW, turn on the rear dow defroster and set the blower he highest speed; allow the en- to run approx. 10 seconds. This
prevent a voltage surge from the age regulator to the electrical
Jump-starting
ever use spray starter fluids.
the battery is discharged the engine an be started with the use of two mper cables and the battery of an-ther vehicle. Always use jumper ca-les with fully insulated handles on the rminal clamps.
Contact with parts conducting electrical current on a running
ngine can be harmful or fatal.<
arefully comply with the following in-tructions to avoid personal injury and amage to one or both vehicles:
Ensure that the battery on the sup-
The cover of the positive terminal connector is marked with a "+" sign. Refer to the illustration. Remove by pulling the tab (arrow 1)
462d
e253
essories n disconnect the jumper cables in
erse sequence.
nding on the cause of the fault, rge the battery.
1port vehicle is also rated at 12 volts, and that the capacities of the two batteries (Ah) are roughly comparable (printed on casing)
2 Leave your battery connected to the car electrical system
3 Make sure that there is no contact between the bodywork of the two vehicles – short circuit risk!
4 Start by connecting the jumper cable from the positive terminal of the sup-port vehicle to the positive terminal connector located in your BMW's engine compartment.
5 Then connect the negative terminals. Attach the cable to either the support vehicle's negative battery terminal (–), or to a suitable ground on its engine or bodywork. Then connect the other end of the cable to a ground on the engine or on the bodywork of the ve-hicle that is to be started. This a spe-cial nut that is provided on the BMW (arrow 2)
Observe the same sequence for connecting the jumper cables
when helping other vehicles, otherwise there is the risk of injury if sparks gener-ate at the battery.<
6 If thwea
7 Staing as unotbefallocha
8 Befblewinto tginewillvolt
acc9 Therev
Deperecha

157n
airs
Over
view
Cont
rols
Car
care
Towing the vehicle
ing with a commercial trucko not tow with sling-type quipment.
w-
all
Towtow> D
e
380u
s124
Rep
Inde
xTe
chno
logy
Data
se wheel lift or flat bed equipment.lease comply with applicable towing ws.
Never allow passengers to ride in a towed vehicle for any reason.
er attach tie-down hooks, chains, ps, or tow hooks to tie rods, control s, or any other part of the vehicle pension, as severe damage to these ponents will occur.c
, d
> U> P
la
Nevstraarmsuscom
Tow fittingThe screw-in tow fitting is stored in the onboard tool kit; be sure that it remains in the vehicle at all times. This fitting is designed for installation in the tow
462d
e254
RearPress out the cover panel with a scredriver above on the recess.
Tightly screw in the tow fittings 462d
e255
sockets located at the front and rear of the vehicle, and is intended for towing on proper road surfaces only. This fit-ting should not be used to pull a vehicle out of deep snow, mud, sand, etc.Allways observe all applicable towing laws and regulations.
Access to tow socketsFrontPress out the cover panel with a screw-driver above on the recess.
the way, otherwise the threads could be damaged.Do not tow the vehicle by the chassisas otherwise it could be damaged analso lead to an accident.<

158n

Overview
Controls and features
Operation, careand maintenance
Owner service procedures
Technical data
Index
Advanced technology
159n
Repa
irs
ndex
Over
view
Cont
rols
Car
care
Tech
nolo
gyDa
ta
Adaptive Transmission Control (ATC) 160
Airbags 161Dynamic Stability Control
(DSC) 161Radio reception 162Safety belt tensioner 162Rearview mirror with automatic
dimmer 163Tire Pressure Control (RDC) 164Rain sensor 165Self-diagnostics 166Xenon lamp 167
I

160nATC*
On vehicles with automatic transmis-sion, the ATC (Adaptive Transmission Control) uses a number of factors to calculate the maximally efficient gear. In
462uso
11
In order to include driving conditions in its calculations, ATC registers curves and both uphill and downhill gradients. For example, if you maintain speed through a curve, it does not upshift. On uphill gradients, it shifts up only when the engine speed increases in order to make more efficient use of power re-serves. On downhill gradients, ATC shifts down when the speed of the vehi-cle increases and the driver must apply the brakes.
this process, it considers your individ-ual driving style as well as current driv-ing conditions.
ATC recognizes your personal driving style from the positions and movements of the accelerator pedal, deceleration when braking and lateral acceleration through curves. Based on different shift characteristics – from comfort-oriented to performance-oriented – ATC will se-lect the appropriate gear.

161n
airs
Over
view
Cont
rols
Car
care
hly sensitive sensors monitor the ber of revolutions of the wheels, ring angle, lateral acceleration,
ke pressure and the movement of vehicle around its vertical axis.
fferences in the wheel speeds oc- the system counteracts the danger heelspin by reducing engine torque. cessary, the system also responds additional application of the brakes e rear wheels.
e system detects an instability in the icle's condition, the braking action also be directed to the front wheels he DSC in order to help stabilize the icle.
Airbags DSC
Deceleration sensors continuously monitor the physical forces acting upon the vehicle. If, as the result of a frontal collision, a deceleration is reached at which the protection of the safety belts
390d
e319
The airbags located under the markedcovers inflate and unfold in a matter of afew milliseconds. In this process they tear through the rated breaking points of the upholstered covers or press themout.
Because the inflation process must be virtually instantaneous, it is necessarilyaccompanied by a certain amount of ignition and inflation noise. The gas required to inflate the airbags is not dangerous, and the associated smoke then dissipates.
The entire process is completed withinfractions of a second.
Rep
Inde
xTe
chno
logy
Data
may need some time to become ustomed to this system's interven-. However, it provides optimum pro-ive force and driving stability.
braking intervention may be ac-panied by a certain degree of e.
alone is no longer adequate, the gas generators of the driver and passenger-front airbags are ignited. However, the passenger-side airbag is only triggered if an additional sensor has recognized that the passenger seat is occupied.
In the event of a side collision, the Head Protection and side airbags in the front or rear* are triggered if necessary.
Hignumsteebrathe
If dicur,of wIf newithat th
If thvehcanby tveh
Youacctionpuls
Thecomnois

162nRadio reception Safety belt tensioner
afety belt tensioner responds to ons by tightening the belts to en-hat occupants remain firmly posi- in their seats. A gas-pressure
-
The scollisisure ttioned
390d
e330
retracts the buckle assembly sion the shoulder and lap belts fractions of a second. This re- the tendency to slide under the lt.
systemto tenwithinduceslap be
The radio waves — medium-wave, long-wave and short-wave — offer a wide range of reception, because the broad-cast signals travel not only along the
360d
e084
The limitations inherent to radio recep-tion in a moving vehicle have been minimized by a number of innovative sys-tem designs:
The "Radio Data System" (RDS) makessure that, for broadcast stations trans-mitting on several frequencies, the ra-dio automatically tunes to the frequencywith the best reception quality.
The Diversity Antenna system employsseveral FM antennas integrated within the rear window to provide three sepa-rate sources for receiving broadcast waves. An integral processor automati-cally selects the antenna with the best FM reception quality at any given time.
ground as surface waves, but also as atmospheric waves bounced back to earth from the ionosphere.Frequency-modulation (FM) provides substantially better sound quality than AM. However, because FM transmis-sions rely on line-of-sight broadcast waves, their effective reception range is limited.
The selection of the antenna takes place within milliseconds, and is there-fore not noticed by the radio listener.
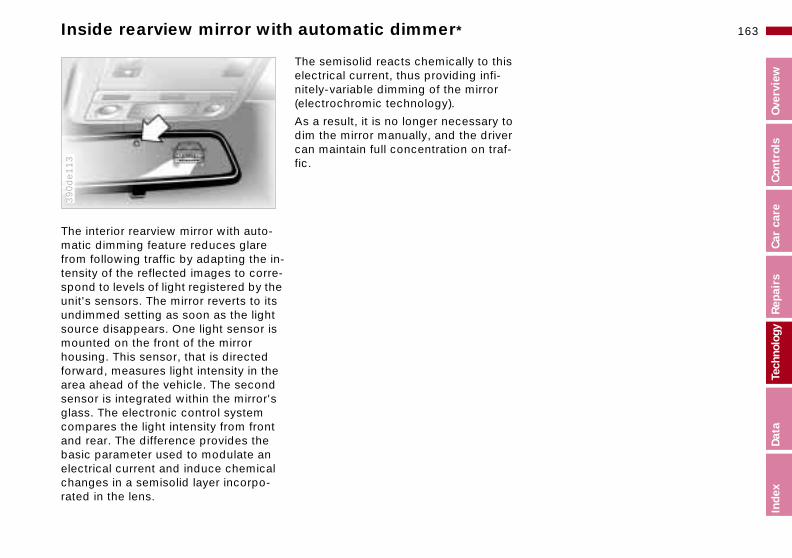
163n
Repa
irs
Inde
xOv
ervi
ewCo
ntro
lsCa
r ca
reTe
chno
logy
Data
Inside rearview mirror with automatic dimmer*
is
to er f-
The interior rearview mirror with auto-matic dimming feature reduces glare from following traffic by adapting the in-tensity of the reflected images to corre-spond to levels of light registered by the
390d
e113
The semisolid reacts chemically to thelectrical current, thus providing infi-nitely-variable dimming of the mirror (electrochromic technology).
As a result, it is no longer necessary dim the mirror manually, and the drivcan maintain full concentration on trafic.
unit's sensors. The mirror reverts to its undimmed setting as soon as the light source disappears. One light sensor is mounted on the front of the mirror housing. This sensor, that is directed forward, measures light intensity in the area ahead of the vehicle. The second sensor is integrated within the mirror's glass. The electronic control system compares the light intensity from front and rear. The difference provides the basic parameter used to modulate an electrical current and induce chemical changes in a semisolid layer incorpo-rated in the lens.

164nTire Pressure Control (RDC)*
.
This system regularly checks tire pres-sures and monitors all four tires even while driving, so you don't have to.
Behind the valve stem in every wheel,
462d
e257
Near every wheel there is an antenna inthe body that receives the signals fromall four wheels. A central electronics system evaluates the quadruple signalsand forwards any changes. The RDC plays an important part in driving safety
there is an extended-life electronic chip that has a pressure sensor, a transmit-ter and a battery. The pressure is mea-sured in extremely short time intervals and then transmitted by a radio signal. If an irregularity is detected, the trans-mission rate is increased.

165n
irs
Over
view
Cont
rols
Car
care
Rain sensor*
in -
Repa
Inde
xTe
chno
logy
Data
Depending on the degree of wetness on the windshield, the rain sensor con-trols the operation of the windshield wipers.
Infrared light is carried along the sur-
390d
e133
When the "Intermittent" wiper speed position is selected, the wiper reactsimmediately if water is splashed ontothe windshield from vehicles travelingahead, for example. As a result, the rasensor provides a contribution to driving safety and comfort.
face of the windshield in an optical con-ductor in such a manner that it is reflected completely when the wind-shield is dry. The quantity of reflected light is measured.
If there is moisture on the glass, the amount of light reflected is reduced since the infrared light at the surface of the windshield can escape. The quan-tity of reflected light is thus a means of gauging the degree wetness on the windshield.

166nSelf-diagnostics
ill hear the sounds of the air flaps heater/ventilation system carries self-diagnostic functions after nition is shut off. All of the other iagnostics functions operate si- in the background.
ults detected during these self-ostics can be read out by your rized BMW center during the next rly-scheduled maintenance and ted with a minimum of time.
-
t -
l
You was theout itsthe igself-dlently
Any fadiagnauthoregulacorrec
,
t
All of the important electrical and elec-tronic systems in the vehicle are tested regularly and automatically – the driver does not have to perform any extra op-
462d
e258
In the same manner, the electrical resistance of the airbag ignition generators and all of the remaining airbag compo-nents is measured at all times. Any faulin this system would be detected immediately by a current fluctuation that would necessarily accompany it. The fault would be indicated immediately bythe airbag warning lamp.
Even after you shut off the engine, the overall functional status of your vehicleis monitored. For example, all of the flaps of the heating and ventilation sys-tem travel to the nearest limit position. This action ensures that the system wilbe able to provide defrosting, regard-
erations or adjustments.
The indicator lamps also come on briefly after the ignition has been turned on.
While you are driving, the functional status of the actuator motors (for the windshield wipers, power windows, seats, sunroof, etc.) is constantly ana-lyzed by current measurements in their relays.
less of other circumstances (if a mal-function in the heating or ventilation system should occur during the night while the vehicle is parked, for in-stance).
A calibration cycle runs every tenth timethe engine is shut off. During this cyclethe actuator motors of all the heating and ventilation flaps travel to their limitstops in both directions. The limit posi-tions and the return travel paths are checked in this manner in order to en-sure that appropriate adjustments for the operating elements can be made aany time.

167n
airs
Over
view
Cont
rols
Car
care
Xenon lamp*
ng in
e).
ri-
y-s
Rep
Inde
xTe
chno
logy
Data
The xenon lamp provides forward illu-mination with significantly more bright-ness and uniformity than the traditional halogen lamp.
In a xenon lamp, an electric arc re-
390d
e134
Xenon lamps provide significantly-improved visibility, especially during adverse weather conditions and drivisituations (driving at night in heavy raor through road repair areas where there are no lane markers, for instanc
Xenon lamps make a significant contbution to highway safety since other highway users, bicyclists and motorcclists in the right lane, and pedestrianare more easily detected.
places the filament in order to generate intense illumination. A gas mixture in a quartz glass tube with metal vapor is ignited by a high electric voltage. The arc that is generated is then sustained by a lower voltage. When the lamp is turned on there is a brief period of high intensity. Maximum brightness is at-tained in approx. 15 seconds.

168n

Overview
Controls and features
Operation, careand maintenance
Owner service procedures
Technical data
Index
Advanced technology
169n
Repa
irs
ndex
Over
view
Cont
rols
Car
care
Tech
nolo
gyDa
ta
Engine data 170Dimensions 171Weights 172Capacities 173Electrical system 174Ribbed V-belt 174
I

170n
8Ci
,793)
)
))
ME)
Engine data
BMW 323Ci BM
DisplacementNumber of cylinders
cu in (cmm) 152.2 (2,494)6
176
Max. outputat engine speed
hp RPM
170 5,500
195,
Maximum torqueat engine speed
lb-ft (Nm)rpm
181 (245)3,500
203,
Compression ratio e 10.5 10
StrokeBore
in (mm)in (mm)
2.95 (75)3.31 (84)
3.3.
Fuel-injection system Digital Engine Electron
W 32
0.4 (2
3 500
6 (280500
.2
31 (8431 (84
ics (D

171n
Repa
irs
Inde
xOv
ervi
ewCo
ntro
lsCa
r ca
reTe
chno
logy
Data
Dimensions
462us0
15
Minimum turning circle Ø 34.4 feet (10.5 m
).
172nWeights
328Ci
cluded) (1,450) (1,477)
(1,937) (1,957)
(895)
(1,075)
5)
410)
BMW 323Ci BMW
Curb weight (with one person, ready for operation, full tank of fuel, options not inwith manual transmissionwith automatic transmission
lbs (kg)lbs (kg)
3,153 (1,430)3,213 (1,457)
3,1973,256
Approved gross vehicle weightwith manual transmissionwith automatic transmission
lbs (kg)lbs (kg)
4,211 (1,910)4,255 (1,930)
4,2704,314
Approved front axle weight lbs (kg) 1,962 (890) 1,973
Approved rear axle weight lbs (kg) 2,348 (1,065) 2,370
Approved roof load capacity lbs (kg) 165 (75) 165 (7
Luggage compartment capacity cu ft (liters) 14.5 (410) 14.5 (
Never exceed either the approved axle weights or the gross vehicle weight.

173n
Repa
irs
Inde
xOv
ervi
ewCo
ntro
lsCa
r ca
reTe
chno
logy
Data
Capacities
Notes
63))
Fuel specification: Page 26
.3) For details: Page 122
.4) For details: Page 126
.5) BMW High Performance Synthetic Oil Specifications: Page 124
Lifetime fluid, no fluid change required
approx. pprox. 8
pprox. 5
pprox. 8
pprox. 6
Fuel tank reserve
gal. (liters)gal. (liters)
approx. 16.6 (approx. 2.1 (a
Windshield washer system/Headlamp washer system*
quarts (liters) approx. 5.6 (a
Cooling system including heater circuit quarts (liters) approx. 8.9 (a
Engine oil and filter change quarts (liters) approx. 6.9 (a
Manual transmission, automatic transmission and differential
–

174nElectrical system Ribbed V-belt
You can obtain Original BMW Parts and Accessories, as well as sional advice from your autho-
BMW center.<
profesrizedBattery 12 V, 80 Ah
Spark plugs NGK BKR 6 EQUPBosch FGR 7 DQP (under development)
Water pump – AC generator – Power steeringRibbed V-belt 6 PK x 1538
A/C compressorRibbed V-belt 5 PK x 863

175n
Repa
irs
Inde
xOv
ervi
ewCo
ntro
lsCa
r ca
reTe
chno
logy
Data

176n

Overview
Controls and features
Operation, careand maintenance
Owner service procedures
177n
Over
view
Cont
rols
Car
care
Everything from A to Z 178
Owner service procedures from A to Z 184
Technical data
Index
Advanced technology
Repa
irs
ndex
Tech
nolo
gyDa
ta
I
Everything from A to Z
nce
9
m 20
143
104
Care of wool velour 133Cargo loading 100Caring for the vehicle
finish 131Cassette operation, refer to
the radio operating instructions
Catalytic converter 105CBC (Cornering Brake
Control) 21, 107CD mode, refer to the radio
operating instructions
AABS (Antilock BrakeSystem) 22, 106Accessories 6Activated charcoal
filter 93, 154Adaptive Transmission
Control (ATC) 66, 160Adding engine oil 123Adding washer fluid 173Adjust the backrest 47Adjust the temperature 90
AUC (Automatic recirculated-air control) 91
Automatic car washes 130Automatic climate
control 88remove window condensation 91
Automatic recirculated-air control (AUC) 91
Automatic speed control 72Automatic transmission with
Blower 91BMW High Performa
Synthetic Oil 124BMW Sports Seat 4Bore 170Brake fluid 127Brake hydraulic systeBrake lamps
bulb replacementBrake pads 22Brake-in procedureBrakes 108
109le 104
40
fer to ns
2r radio
Cellular phones 95, 112Center (high-mount) brake
lamp 145Center armrest 95Central locking system 34
key 38Changing tires 148Check air pressure 27Check Control 77Child restraint
systems 56, 60Child seat 56, 60
Adjust the thigh support area 49
Adjusting steering wheel 51Air distribution 90Air outlets 88Air pressure 113Air supply 91Airbags 21, 57, 135, 161Alarm system 42Antenna 112Antenna, Diversity 162Antifreeze 126
Steptronic 22, 66Average consumption 78Average speed 79Avoiding unwanted
alarm 43Axle loads 172
BBackrest
release 49Backup lamps 65
bulb replacement 143
Brakes, brake faultsBreaking in the vehicBulb replacement 1
CCar Memory 54Car phone, please re
the manufacturer'soperating instructio
Car radio 112reception 112, 16refer also to the ca
ns
33
Cigarette lighter 96Clock 77
refer also to the onboard computer operating instructions
Clothes hooks 97Cockpit 16
Antifreeze, radiator 110Antilock Brake System
(ABS) 22, 106Anti-theft alarm system 42Aquaplaning 104, 113Armrest 95Ashtray 96Assisted rear entry 49
Battery 151, 174capacity 174charge 153discharged 156removal and installation 152
Battery charge current 20Belts 55
operating instructioCar vacuum cleaner,
connecting 96Car wash 130Care
exterior 131interior 132
Care of upholstery 1

Everything from A to Z 179n
Over
view
Cont
rols
car
e
ion 16on
nt 1206, 173
Filler cap cover 26Filling capacities 173Filling the washer
reservoir 173First aid 25First aid kit 25Fittings, towing 157Flashlight 94Flat tire 113, 148Fog lamps 85
bulb replacement 143Fog lights 85Folding rear backrest 98
Code, refer to the radio operating instructions
Coin holder, cup holder 95Combination switch 69Compression 170Computer 77Configure settings 54Consumption 78Consumption display 75Coolant 110, 126, 173Coolant thermometer 75Coolant, antifreeze 110Cooling system 173
Digital clock 77Dimensions 171Dipstick 123Disc brakes 108Displacement 170Display lighting 84Displays 18Distance warning 80Diversity, antenna 162Divided rear backrest 98Door key 32Door locks, care 110Doors
Electronic vehicle immobilizer 33
Elements of operatEmergency actuati
doors 34tank cover 155
Energy Control 74Engage 62Engine
engage 62Engine compartmeEngine coolant 12Engine data 170
Repa
irs
Car
Tech
nolo
gy
73
ption 123
20
24
49
Follow-Me-Home lamps 84Footbrake 108Footwell lamps 85
bulb replacement 146Front seat adjustment 47Frost protection,
radiator 126Fuel 26
preparation 170Fuel consumption 78Fuel consumption
display 75
Cornering Brake Control (CBC) 21, 107
Cruise control 72Cruising range 79Curb weight 172Current check indicator 20
DDashboard 16Data
dimensions 171engine 170
emergency actuation 34remote control 35unlocking and locking 34
Drawbar load 172Drive belts 174Driving hints 104Driving lamps 84DSC (Dynamic Stability
Control) 22, 81, 161Dynamic Stability Control
(DSC) 22, 81, 161
Engine oilfilling capacity 1quality 124viscosity 124
Engine oil consumEngine oil level 21
check 123Engine oil pressureEngine oil
specifications 1Engine speed 170Entry from the rear
Inde
xDa
ta
77
Fuel gauge 75Fuel quality 26Fuel tank capacity 173Fuel tank gauge 75Functional status 166Fuses 153
technical 170weights 172
Daytime-driving light switch 84
Defrost setting 91Defrost windows 91Defroster, rear window 92
EElectric power seat 50Electric power windows 44Electrical accessories,
failure 153Electrical system 174
Exterior mirrors 52
FFailure messagesFault
ABS 107Fault displays 77

Everything from A to Z
4
Luggage compartment lampsbulb replacement 146
Luggage compartment lid 39emergency release 39
Luggage compartment lighting 39
Luggage rack 101Lumbar support 49
M
GGasoline 26Gasoline gauge 75Glove compartment 94Glove compartment lamp
bulb replacement 146Grills 88Gross weight 172
HHandbrake 64
IIce warning 78Icy roads 78Identification, tires 115Ignition key 32Ignition lock 62Indicator lamps 20Inflation pressure 27, 113Inflation pressure
monitoring 82, 164Inside rearview mirror,
automatically set for low-
JJack 148Jump-starting 156
KKey 32Key Memory 54
LLamp switch 84Lamps on warning 8
14517
es 100s 84
141e
M+S tires 116Maintenance 76, 129Malfunction displays 77Manual transmission 65Manually controlled
recirculated-air 91Memory 51MFL (Multi-function steering
wheel) 24Microfilter 93, 154Microphone 95Mirror memory 51
Hands-free system 95Hazard warning system 25Hazard warning triangle 25Head restraint 48Headlamp covers,
care 130, 141Headlamp flasher 85Headlamp washer
system 122, 173Headlamp washers 71Heated mirrors 52Heated seats 93Heater and ventilation 88
beam lights 53INSPECTION 76Installing child restraint
system 61Instrument cluster 18Instrument lighting 84Instrument panel lighting 84Interaxle tire rotation 114Interface socket 96Interface socket for On-
Board-Diagnostics 137Interference
Lashing eyes 100Leather care 134Length 171License plate lamp
bulb replacementLight-alloy wheels 1Lighter 96Load-securing devicLow beam headlampLow beams
bulb replacementLow-beam light insid
rearview mirror 53
nt 39
39
Mirrors 52Mobile phones 112Modifications,
technical 6, 136Multi-function steering wheel
(MFL) 24
Heavy loads 100Height 171HiFi System – harman
kardon 94High beams 23, 69, 85
bulb replacement 141Hood release 119Horn 17Hubcap 149
cellular phones 112Interior lamp 36, 85
bulb replacement 145remote control 36
Interior mirror 52automatic dim 163
Interior motion sensor 42Interlock 62Intermittent wipe 69
Lug bolts 149Luggage compartme
capacity 172emergency releasefloor mat 41floor panel 41remote control 37
Everything from A to Z 181n
Over
view
Cont
rols
car
e
g,
, 113
12, 162rol, new
Replenish washer fluid 122Reporting safety defects 7Reserve control lamp 75Restraint system 56, 60Reverse 17, 65Roller blind, sun
protection 93Roof load 172Roof luggage rack 101Rubber parts 110
S
NNavigation system, refer to
the radio operating instructions
Neckrest 48New transmitter, radio
remote control 147Non-smokers package 96Nozzles 122
OOBD connector 137
Onboard computer 77Onboard computer, refer to
the radio operating instructions
Onboard tool kit 140Opening and closing
from inside 38from outside 34
Outlets, ventilation 88Outside temperature
display 78
Preheat 62Pressure monitorin
tires 82, 164Pressure, tires 27
RRadiator 173Radio Data System
(RDS) 162Radio reception 1Radio remote cont
transmitter 147
Repa
irs
Car
Tech
nolo
gy
the radio tions5
ing 98
2
Safety belt height adjustment 55
Safety belt tensioner 162Safety belts 55
safety belt height adjustment 55
Safety buttons 38Safety feature 44Seat
electric power 50mechanical 47
Seat adjustment 47Seat heating 93
Obstruction protection 44Odometer 74Oil
filling capacity 173quality 124viscosity 124
Oil additives 123Oil change intervals, see the
Service and Warranty Information Booklet
Oil consumption 123Oil dipstick 123Oil filter change 173
PPaint blemishes 131Paint, care 131Paintwork
minor repairs 132waxing 132
Park Distance Control (PDC) 80
Parking brake 64Parking help 80Parking lamps 84, 85
bulb replacement 142Parking, winter 111
Radio, refer also tooperating instruc
Rain sensor 70, 16RDC (Tire Pressure
Control) 82, 164RDS (Radio Data
System) 162Reading lamps 86Rear backrest, foldRear lamps 143Rear window
defroster 71, 92Rear-view mirror 5
Inde
xDa
ta
icle from
tion,
Seat memory 51Securing cargo 100Securing loads 100Selector lever, automatic
transmission 66Self-diagnostics 166
Oil levelcheck 123indicator lamp 21
Oil pressure, indicator lamp 20
Oil specifications 124OILSERVICE 76
PDC (Park Distance Control) 80
Performance 170Pocket lamp 94Pollen 93Power steering 112Power windows 44
Reclining seat 47Refueling 26Remote control 35Removal of the veh
service 136Remove condensa
windows 91

Everything from A to Z
lity 98
l
4
Trunk lampsbulb replacement 146
Trunk lid, refer to luggage compartment lid 39
Turn signal 23bulb replacement 142
Turn signals 69Turning radius 171Two-way radios 112
U
Service and Warranty Information Booklet 129
Service Interval Display 76, 129
Shiftlock 66Side airbags 57Side impact Head Protection
System 57Ski bag 99Sliding 111Sliding/tilt sunroof 45
closing after electrical
Steptronic 66Stopping the vehicle 63Storage shelf 95Stroke 170Summer tires 115Sun roller blind 93Sun visors 52Switching off the engine 63Symbols 4, 151
T
Through-loading faciTilt alarm 36Tilt sensor alarm
system 36, 43Tire codes 115Tire damages 113Tire inflation
pressure 27, 113Tire Pressure Contro
(RDC) 82, 164Tire pressure
monitoring 82, 16
417asher
Used batteries 153
VVacuum cleaner,
connecting 96Vanity mirror 52
bulb replacement 146Vehicle
engage 62Vehicle battery 151, 174Vehicle care
exterior 131interior 132
fault 155ease of use actuation 34remote control 35
Slippery roads 110Snow chains 110, 117Space-saver spare tire 148Spare key 32Spare key with radio remote
control 32Spare tire 148Spark plugs 174Special oils 124
Tachometer 74Tail lamps 143
bulb replacement 143Tank capacity 173Tank cover
unlock in case of electrical fault 155
Technical data 170Technical
modifications 6, 136Telephone prep 95Telephone, please refer to
the manufacturer's
Tire replacement 11Tire specifications 1Tire tread 113Tools 140Top off washer fluid
reservoir 122Top off windshield w
fluid reservoir 122Torque 170Tow fittings 157Tow starting 157Towing 157
13
39
Vehicle identification 128Vehicle Identification
Number (VIN) 128Vehicle immobilizer 33Vehicle painting 131Vehicle removal from
service 136Vehicle weight 172
Speed control 72Speedometer 18Sports Seat 49Start 62Starting problems 105, 156Steel wheels 117Steering 112Steering wheel lock 62
operating instructionsTemperature display
outside temperature 78Temperature gauge
engine coolant 75Temperature
stratification 92Third brake lamp 145
Track 171Trailer loads 172Transmission 65Tread depth, tires 1Trip odometer 74Trunk 39
capacity 172locking separately

Everything from A to Z 183n
Over
view
Cont
rols
car
e
Ventilation 88draft-free 92
Vinyl care 133
WWarning lamp "Please fasten
safety belts" 21Warning lamps 20Warning messages 77Warranty and Service Guide
Booklet 129Washer nozzles 122
Windshield wiper blade replacement 140
Winter driving 110Winter operation 110Winter tires 115, 116Wiper blade
replacement 140Wiper system 69Work in the engine
compartment 119
X
Repa
irs
Car
Tech
nolo
gy
Washing your car 130Water on roadways
deep water 104Waxing, paintwork 132Weights 172Wheel lug wrench 148Wheel rims 115Wheelbase 171Wheels and tires 115, 117Width 171Windows
ease of use actuation 34remote control 35
Xenon lamp 141, 167
Inde
xDa
ta
Windshield cleaningautomatic program 70
Windshield washer nozzle adjustment 122
Windshield washer reservoir, filling 173
Windshield wiper 69

Owner service procedures from A to Z
AAct
cAdAdAdAdAvoAvo
a
143
146
er
3
LLicense plate light
bulb replacement 145Low beams, bulb
replacement 141Luggage compartment
emergency release 39Luggage compartment
lampsbulb replacement 146
Luggage compartment lidemergency release 39
ivated charcoal filter, hanging 154d brake fluid 127d coolant 126d engine coolant 126just washer nozzles 122iding a false alarm 43iding unwanted
larm 43
DDefrost windshields 91Difficult steering 112Doors
emergency actuation 34
EElectrical accessories,
failure 153Electrical failure
fuel filler door 155
Fittings, towing 157Flat tire 148Fog lamps
bulb replacementFootwell lamps
bulb replacementFuel filler door
manual release aftelectrical fault 155
Fuses, replacing 15
G
lamp146ers 25gle 25e 141
MMaintenance 129Malfunction displays 77Microfilter, changing 154
NNew transmitter, radio
remote control 147
O
BBackup lamps
bulb replacement 143Battery
add distilled water 152charging 153
Brake lampsbulb replacement 143
Brakes, brake faults 109
CChanging tires 148Check air pressure 27
Electrical faultsliding/tilt sunroof 155
Emergency actuationdoors 34
Emergency closingsliding/tilt sunroof 155
Emergency releasefuel filler door 155
Engine oiladd 123quality 124specifications 124viscosity 124
Glove compartment bulb replacement
HHazard warning flashHazard warning trianHeadlamp cover, carHigh beams, bulb
replacement 141
I
145
Oilquality 124specifications 124viscosity 124
Onboard tool kit 140
Check Control 77Check engine oil level 123Check oil level 123
FFailure messages 77Fault displays 77First aid 25First aid kit 25
Indicator lamps 20Inflated pressure 27Interior lamps
bulb replacement
JJack 148

Owner service procedures from A to Z 185n
Over
view
Cont
rols
car
e
PParking lamps
bulb replacement 142Pressure, tires 27
RRadio remote control
new transmitter 147Release the hood 119Remove condensation from
windshields 91Replace bulbs 140
TTail lamps
bulb replacement 143Tire damage 113Tools 140Tow fittings 157Tow starting 157Towing 157Turn signal
bulb replacement 142
U
Repa
irs
Car
Tech
nolo
gy
Replace windshield wiper blades 140
Replenish washer reservoir 122
Replenish windshield washer 122
Return used batteries 153
SSliding/tilt sunroof
closing after electrical fault 155
Use anti-freeze 126radiator 126
VVanity mirror
bulb replacement 146
WWarning lamps 20Warning messages 77Washer fluid
replenish 122
Inde
xDa
ta
Space-saver tire 148Spare tire 148Starting problems 63, 105Switching off the interior
motion sensor 43Switching off the tilt sensor
alarm system 43
Wheel lug wrench 148Working in the engine
compartment 119

Refueling
So that you will have important specifi-cations available when you stop to re-fuel, we recommend that you supple-ment this table with data that apply toyour vehicle.
Fuel For a description, refer to page 26
Engine oil For a description, refer to page 124
Designation
AKI: minimum
AKI: for rated performance
AKI: for enhanced perfor-mance
Quality
mmer Winter
Rear Front Rear
The space between the two marks on the dipstick corresponds to approx.1.1 US quarts (1 liter).
Tire inflation pressures For a description, refer to page 27
4 persons
5 persons or 4 plus luggage
Su
Front

The Ultimate Driving Machine
01
41
01
55
02
6 U
S-E
n
We wish you an enjoyabledriving experience.