outlook web access (owa) - algonquin college
TRANSCRIPT

OUTLOOK WEB
ACCESS (OWA)

CREATE, SEND, READ, AND RESPOND
TO E-MAIL MESSAGES
• An e-mail address consists of a user ID and
a host name, separated by the @ symbol
– (userID@host name).
• You can SEND AND RECEIVE e-mail in
Outlook in 2 formats:
– HTML (Hypertext Markup Language)
– Plain Text Format

E-MAILING ME
• MY email address will be:
• EACH time you e-mail me, the following must be in the BODY
OF THE E-MAIL:
1.Your FIRST and LAST NAME
• in the SUBJECT LINE OF THE E-MAIL:
1. The word: "SECTION" AND
2. Your SECTION NUMBER
3. A descriptive subject

E-MAILING ME
• You must use your ALGONQUIN COLLEGE e-mail
address
– This is Algonquin College policy
– Any other e-mail addresses will not be accepted
(Hotmail accounts, etc.)
• Even though my name/email may appear in
Algonquin Live NEVER use it. The Algonquin
Live professor accounts are for demos only and not
checked for communications.
– The username in these accounts is username-l (an “L”)
• CREATE an e-mail message
• Hit Send – A copy of the message is stored in the Sent folder
– Don’t delete emails you send to professors, it is your professors of having contacted them
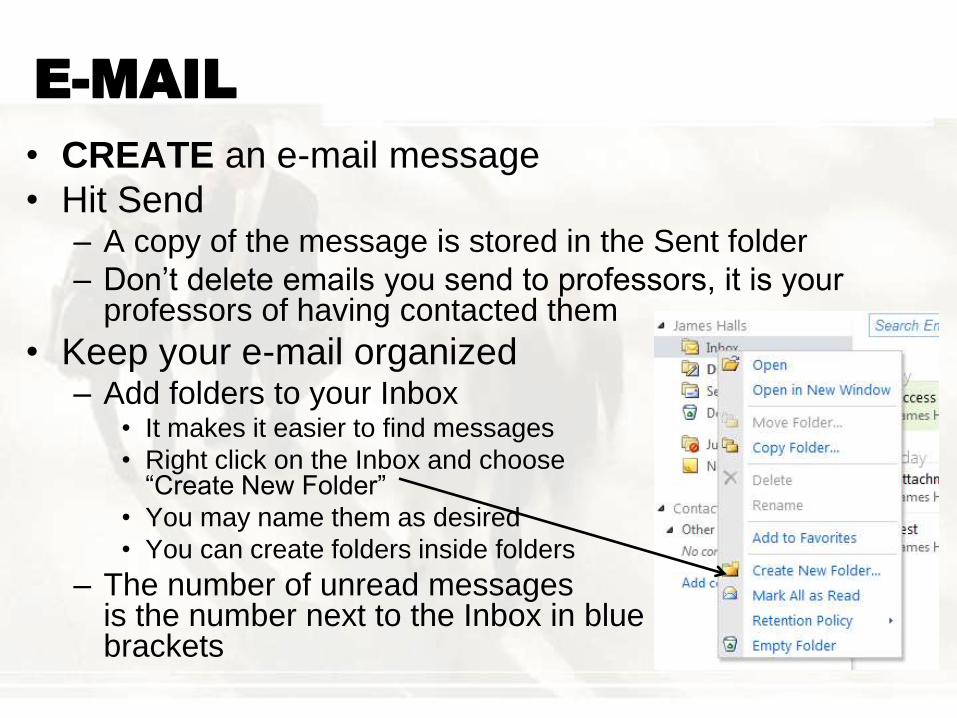
• Keep your e-mail organized – Add folders to your Inbox
• It makes it easier to find messages
• Right click on the Inbox and choose “Create New Folder”
• You may name them as desired
• You can create folders inside folders
– The number of unread messages is the number next to the Inbox in blue brackets

E-MAIL CONT.
• Use Rules to direct email to correct folders as
they arrive
• Click “Options”, then “See All Options”
• In the new screen click “Organize E-Mail”
– To create a new
rule click “New”

E-MAIL CONT.
• Rules
– First create a Condition
– Second choose what to do
– Click “More Options” for
Exceptions and to name
rules
• Finally, delete unneeded
messages

LAYOUT
• Title Area
– Links to
• Mail, Office (reduced version of MS Office online good for viewing and elementary
editing), More (Skydrive, Devices, etc), and LiveAC (links to Blackboard, ACSIS,
Student Association, etc)
• Navigation Pane
– On the left of the screen
• Contains links to Mail, Contacts, Calendar, and Tasks
• top of pane will show choices for currently selected item, eg mail

LAYOUT (CONT.)
• Task Pane
– On the right of the screen
– Shows details of current item, eg in Mail you will see messages
in the Message Pane (center column) and message body in the
Reading Pane (right column)

CREATING E-MAIL MESSAGES
• To CREATE an e-mail message: – Click the New button
– Enter the header information • TO: the main audience
• CC: (Carbon Copy) people who need to be kept informed
• BCC: (Blind Carbon Copy) reduces the message header, and manages privacy if recipients don’t need to know who else the email is sent to
– The TO, CC, and BCC recipients are separated by semi-colons
• SUBJECT: – Make sure your subject line is informative
– Type your message
– Click the SEND button

CREATING E-MAIL
MESSAGES CONT.
• To add additional message options click
“Options…” in the mail message
– E.g. add BCC, change importance, etc

ADDING “HIGH IMPORTANCE”
AND “READ RECEIPTS”
• Create a new Message
• Click the Options button to see Message Options
• Change Importance to “High”
• Change Sensitivity to
“Confidential”
• Under Tracking Options choose
either or both of “delivery”
or “read” receipts

HOW TO SEND AN ATTACHMENT
• To SEND an ATTACHMENT : – Click the ATTACH FILE button (looks like a paper clip) and from
the dialogue select the file you wish to attach. Multiple files can be selected by holding the Ctrl button while selecting each file
• Outlook DOES NOT impose any size limit on attachments.
– However, most Internet service providers (ISPs) do set limits on the
overall message size, which is the sum of all attachments plus the
content of the message itself.
• Good practice: If you are attaching a very large file, you should first compress the file by using a zip program (built into Windows 7)
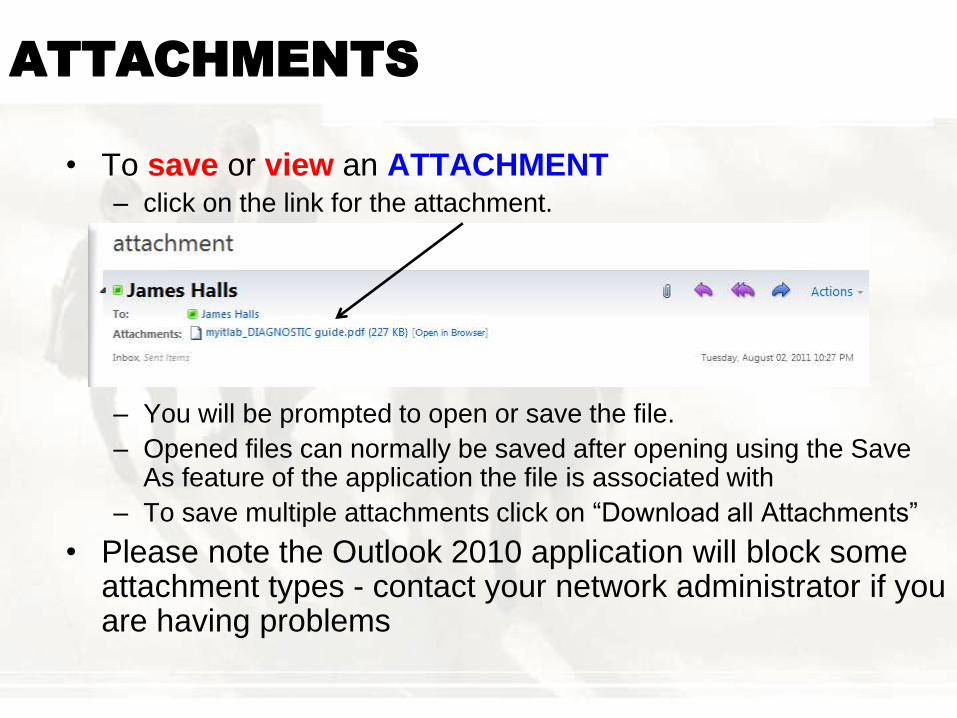
ATTACHMENTS
• To save or view an ATTACHMENT – click on the link for the attachment.
– You will be prompted to open or save the file.
– Opened files can normally be saved after opening using the Save As feature of the application the file is associated with
– To save multiple attachments click on “Download all Attachments”
• Please note the Outlook 2010 application will block some attachment types - contact your network administrator if you are having problems

ATTACHMENTS - SAFETY TIPS
• To help protect your computer, Microsoft Outlook does not
allow you to receive files of certain types (such as .exe files)
as attachments, because of their potential for introducing a
virus into your computer.
• Outlook blocks these files by default. If your organization
uses Microsoft Exchange, only the e-mail server
administrator can unblock these file types. End users of
Outlook cannot unblock these file types.

SIGNATURES
– Signatures are files automatically attached to the end of an
email message and allow you to insert information you always
want to appear at the bottom of an email, e.g., contact info
– In AlgonquinLive click on Options, See All Options, Settings
– Type and format your
signature as desired
• Don’t forget to check
“Automatically include
my signature…”
• You may also add
hyperlinks
– You may only have
one signature

TASKS
• Tasks are simply to-do lists. They can be
– Sorted
– Categorized
• Categories may be changed
or added by clicking on
“Manage”
– Emailed
– Completed
– Or have reminders set
• Click the Tasks button in the lower left of the screen

TASKS CONT.
• Add a new task by clicking “Type a new task”
• Add a Due Date by clicking on “No due date”
– Tasks that are past the due date are overdue, not re-dated
Click here
to add task
to your list

TASKS CONT.
• When the task is added you will see this
• Note that you may search for tasks, or arrange by Due
Date
• Right click on the task and choose “Forward” to send as
an email

TASKS CONT.
• When you create or edit a task you must
click “Save and Close” to save the
changes

CONTACTS
• CONTACTS is an electronic address book in which you can store
information about individuals or businesses
• Contacts may be imported from other applications
• Click Contacts in
the lower left of the
screen
• To create a new
Contact click New
• Or click on an email address in a
received message
• Fill out as required, then make
sure to click “Save and Close”

CONTACTS CONT.
• After a contact has been added
you can look them up from an
new email message by clicking
on “To…”
• You may also
– create appointments/meetings
from Contacts, or
– Send an email from Contacts

FILTER AND SORT CONTACT LISTS
• A FILTER, which always applies only to the current
view, displays items that match specific a category.
• It hides, rather than removes, items that don't match.
• You can also use different criteria to sort
CONTACTS in ascending or descending order.
Category toggle
Sort Button
Showing Criteria

CONTACTS AND GROUPS
• Groups are individuals that you combine
because you email them as a group on a
regular basis
– To create a group
• click on Contacts in the navigation pane
• Click the new button dropdown and click Group
• Give the group a descriptive name
• Click on Members to open the Contact list

CONTACTS AND GROUPS
CONT.
• Group Creation Cont.
1. Choose an address book
2. Select names from the address
book, or type them in

CONTACTS AND GROUPS
CONT.
• Group Creation Cont.
3. Click Members
4. Repeat 2 and 3
until your group is complete
5. Click ok and the member selection dialogue closes
6. Click Save and Close to save the group and close
the dialogue
CALENDAR
• The CALENDAR is a scheduling tool you can use to plan appointments, events, and meetings.
– An appointment is an activity you can schedule, but it does not involve other participants, items, or locations
– A meeting is an activity that involves other participants, items, or locations
– An event is an activity that does have a set time or location, e.g. a birthday.
– Automatic reminder time is 15 minutes. However, it is possible to change this
• Date Navigator:
– A view of the calendar that you can use to display specific days in a month

CALENDAR
• You can change the calendar options by going to Options, See All Options…, Settings, and click Calendar – This screen allows you to change Calendar wide
• Reminder times
• Time zones
• Time increments (15 or 30)
• Creating Events – Double click on the date you want for the event dialogue
– To enable meeting times remove the check from the “All day event” checkbox
– You may add images and attachments to events

SCHEDULE APPOINTMENTS/
EVENTS IN THE CALENDAR
• You can give other people access to your CALENDAR (NOT to any additional calendars) by so they can see when you are available for meetings. – Click Share to share a calendar
– Different people may have different permissions
• Depending on the level of access that you permit, other people can schedule appointments in your calendar. – Click “Change Sharing Permissions…”
• You can allow free/busy, or free/busy and locations, or all event/appt details
• Use the same methods to schedule a recurring appointment, but click the REPEAT button to enter information in the Appointment Repetition dialog box.

REPEATING CALENDAR ITEMS
• Change a recurring calendar entry by double-clicking it.
You have two options:
– This occurrence Choose this option when you want to see or
change one instance, not the entire series.
• You may delete or change only one occurrence (you will be prompted to
confirm the change)
– The series Choose this option when you want to see or change
the entire series

SCHEDULE APPOINTMENTS/
EVENTS IN THE CALENDAR
• The Repetition Dialogue

SCHEDULE A MEETING
• Scheduling Assistant – helps to find the best time for your meeting.
• When you click on the: Address Book , you can select if the recipient is Required, or Optional, or a Resource – Required and Optional attendees appear in the To box on the Meeting
tab, and Resources appear in the Location box.
Required
Optional
Resource
(Note Icon Differences)