outlook module 1
TRANSCRIPT

8/7/2019 outlook module 1
http://slidepdf.com/reader/full/outlook-module-1 1/19
1
Real Estate Agent’s guide to:
E-Mail and Basic Contact
Management using Outlook
Presented by: Sean Biggins
Wells Fargo Home Mortgage
Outlook 2003Introductory Conceptsand Techniques
M i c r o s o f t®

8/7/2019 outlook module 1
http://slidepdf.com/reader/full/outlook-module-1 2/19
2
Objective
• The objective of this training program is to
enhance your knowledge of Microsoft Outlook
for the purposes of implementing a basic contact
management program.
• Through this program you will be able to solidify
relationships with your client base through
regular planned contact and increase capture
rates to build your business.
Outlook 2003Introductory Conceptsand Techniques
M i c r o s o f t®

8/7/2019 outlook module 1
http://slidepdf.com/reader/full/outlook-module-1 3/19
3
Part 1 – Email
• Setting up Spell Check
• Using AutoCorrect
• Using Signatures
• Attaching you vCard to email• Working with Distribution Lists
Outlook 2003Introductory Conceptsand Techniques
M i c r o s o f t®

8/7/2019 outlook module 1
http://slidepdf.com/reader/full/outlook-module-1 4/19
4
Part 1 – Email (continued)
• Sending Email to Groups
• Using Search Folders• Flagging Messages
• Understanding Message Rules
• Creating an Out of the Office auto-responder
Outlook 2003Introductory Conceptsand Techniques
M i c r o s o f t®

8/7/2019 outlook module 1
http://slidepdf.com/reader/full/outlook-module-1 5/19
5
Setting up Spell Check - The Spelling tab lets you specify how spelling should be
checked in Outlook. The following sections summarize by function the settings available
on this tab.
The General Options section of the Spelling taballows you to set general guidelines for thespell checker. Select: Tools>Options>Spelling Tab
• Always Suggest Replacements For Misspelled
Words: When you select this option, the spellchecker will display suggested changes for anymisspelled words it finds.
• Always Check Spelling Before Sending: Selectthis option to have Outlook automatically checkspelling before you send a message. You also cancheck spelling manually.
• Ignore Words In UPPERCASE: You can instructthe spell checker to skip words that appear in all
uppercase letters. This option is useful, for example, if your document contains numerousacronyms and you don’t want the spell checker towaste time checking them.
• Ignore Words With Numbers: When you selectthis option, the spell checker will not attempt tocheck the spelling of words that include numbers.
• Ignore Original Message Text In Reply Or Forward: Selecting this option specifies that
Outlook will check spelling only in your messagetext, not in the original message text included in areply or forward.
• Use AutoCorrect When Word Isn’t The E-MailEditor: Selecting this option allows Outlook to useAutoCorrect in rich-text and plain-text messages toautomatically correct certain common errors. Seethe following section for details.

8/7/2019 outlook module 1
http://slidepdf.com/reader/full/outlook-module-1 6/19
6
Using AutoCorrect - Outlook, like other Office applications, supports
AutoCorrect, a feature that allows Outlook to correct common spelling andtyping errors and to replace characters with symbols.
You also can use AutoCorrect as a shortcut, which
means you can type a small string of charactersand have those characters replaced by a longer string.
Clicking AutoCorrect Options on the Spelling tabdisplays the AutoCorrect dialog box. You can usethis dialog box to add new AutoCorrect entries or change existing entries. Click Exceptions to specifyexceptions to AutoCorrect rules.

8/7/2019 outlook module 1
http://slidepdf.com/reader/full/outlook-module-1 7/19
7
Using Signatures - Outlook can add a signature automatically to your outgoing
messages. You can specify different signatures for new messages and for replies or
forwards. Signatures can include both text and graphics as well as vCard attachments.Signatures create a consistent, professional email format.
Follow these steps to create a signature:
1 In Outlook, choose Tools, Options and click the
Mail Format tab.
2 Click Signatures to open the Signatures dialog
box, and then click New to open the Create New
Signature Wizard.
3 Specify a name for the signature as it will appear
in Outlook. Select the option to start a new
signature or select one to use as a template, and
then click Next to open the Edit Signature dialog
box.4 In the Signature Text box, type the text you want
to include in the signature, and use the Font and
Paragraph buttons to format the text. (These two
buttons aren’t available if you have specified Plain
Text as the default format on the Mail Format tab.)
5 To attach a vCard from an Outlook contact item,
click New vCard From Contact. Select the contactitem, click Add, and click OK. You also can select
existing vCards from the Attach This Business Card
(vCard) To This Signature drop-down list.
6 Create other signatures, and then click OK in the
Create Signature dialog box.

8/7/2019 outlook module 1
http://slidepdf.com/reader/full/outlook-module-1 8/19
8
Attaching your vCard or “Business Card” to Messages - With Outlook, you
can send a copy of a contact item in vCard format, a standard format for exchanging
contact information. This allows the recipient to import the contact data into a contactmanagement program, assuming that the recipient’s program supports the vCard
standard (as most do).
Here’s how to share your contact informationwith others using a vCard:
1 In Outlook, choose Tools, Options and click theMail Format tab.
2 Click Signatures to open the Signatures dialog
box.3 To attach a vCard from an Outlook contact item,click New vCard From Contact.
4 Select the contact item (yours), click Add, andclick OK.

8/7/2019 outlook module 1
http://slidepdf.com/reader/full/outlook-module-1 9/19
9
Working with Distribution Lists - A distribution list is a collection of contacts. It provides
an easy way to send messages to a group of people. For example, if you frequently send
messages to a group of investors, you can create a distribution list called Investors that
contains the names of this group. A message sent to this distribution list goes to allrecipients who belong to the list.
Follow these steps to create a new distribution
list in the Contacts folder:
1 In Outlook, choose File, New, Distribution List to
open a distribution list form similar one shown.2 Type the name of the list in the Name box. This is
the name by which the list will appear in your
Contacts folder. If you’re creating a distribution list for
people buying second home’s, use the name Second
Home Buyers.
3 Click Select Members to open the Select Members
dialog box.
4 In the Show Names From The drop-down list,
select the location from which you want to select
addresses (the Global Address List or the Contacts
folder, for example).
5 In the Type Name Or Select From List box, type a
name you want to include, which locates the name in
the list. Or select the name in the Name list. Then
click Members. (Ctrl + Click with mouse to selectindividual names)
6 Repeat step 4 to add all addresses to the list and
click OK when finished.
7 If you want to add a longer description of the
distribution list, click the Notes tab and type the text.
8 Click Save And Close.

8/7/2019 outlook module 1
http://slidepdf.com/reader/full/outlook-module-1 10/19
10
Sending email to a Group – You can send email to a group of contacts simply. This
is an easier method of sending to more than one contact than using a distribution list.
Distribution lists require you to update them each time you add a new contact. By usingthis method, you simply enter a new contact and assign them to a category.
To send to a group of contacts you must first have your
contacts in categories which will be covered in more detail in
the next module.
To send to a group you must follow these steps:
1 Select the header of the group of contacts you want to send the
email to.
2 Drag & Drop the group onto the email icon in the lower left hand
of the screen.
3 You will see a dialogue box appear asking “Creating a new item
for the selected items could take some time. Are you sure you wantto create a new item from these (number) items?” Select Yes and
the email will be created with all recipients in the “To” box.
4 If you don’t want the email addresses for all recipients to be
seen, click on any email address in the “To” box and hit Control A.
This will select all email addresses so you can move them into the
“BCC” or Blind Carbon Copy” field.
5 Once you have selected all of the names hit Control X to cut
them out of the “Send” box. Go to the “BCC” field and hit Control V.
This will paste them into the “BCC” box.
6 Now you are ready to create the text of your message and send.
8/7/2019 outlook module 1
http://slidepdf.com/reader/full/outlook-module-1 11/19
11
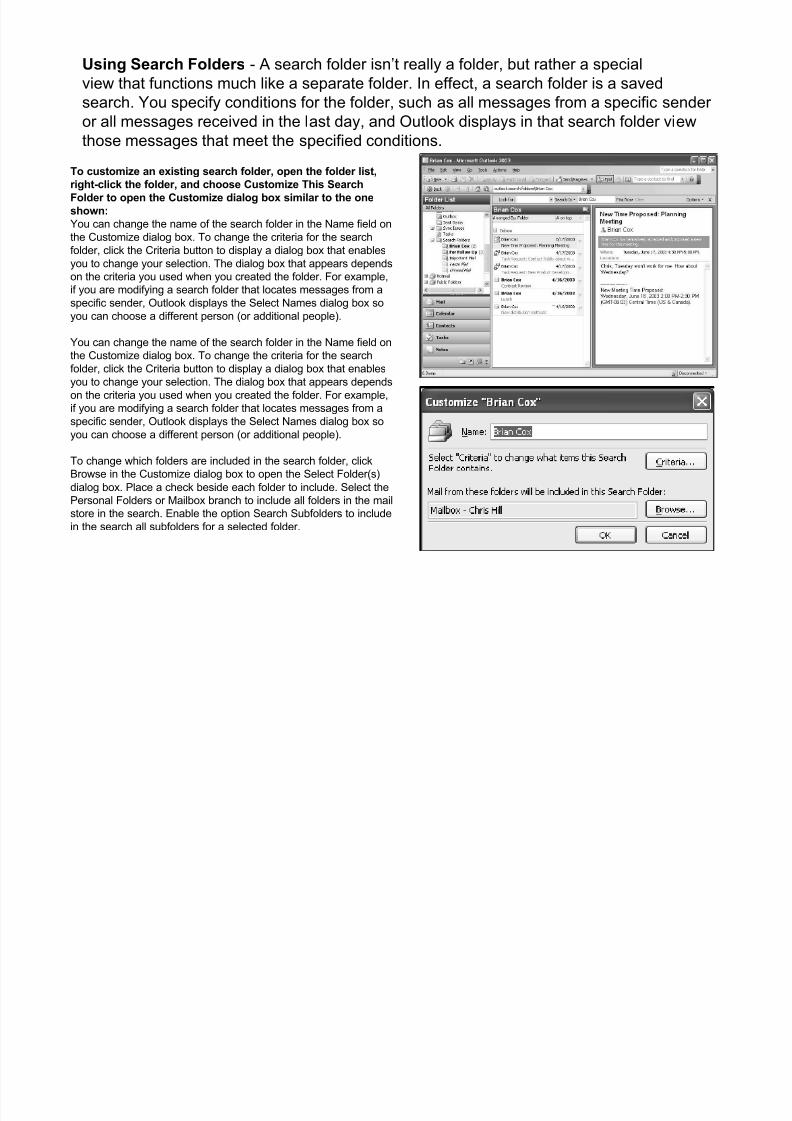
Using Search Folders - A search folder isn’t really a folder, but rather a special
view that functions much like a separate folder. In effect, a search folder is a saved
search. You specify conditions for the folder, such as all messages from a specific sender or all messages received in the last day, and Outlook displays in that search folder view
those messages that meet the specified conditions.
To customize an existing search folder, open the folder list,
right-click the folder, and choose Customize This Search
Folder to open the Customize dialog box similar to the one
shown:You can change the name of the search folder in the Name field on
the Customize dialog box. To change the criteria for the search
folder, click the Criteria button to display a dialog box that enables
you to change your selection. The dialog box that appears depends
on the criteria you used when you created the folder. For example,
if you are modifying a search folder that locates messages from a
specific sender, Outlook displays the Select Names dialog box so
you can choose a different person (or additional people).
You can change the name of the search folder in the Name field on
the Customize dialog box. To change the criteria for the search
folder, click the Criteria button to display a dialog box that enables
you to change your selection. The dialog box that appears depends
on the criteria you used when you created the folder. For example,
if you are modifying a search folder that locates messages from a
specific sender, Outlook displays the Select Names dialog box so
you can choose a different person (or additional people).
To change which folders are included in the search folder, click
Browse in the Customize dialog box to open the Select Folder(s)
dialog box. Place a check beside each folder to include. Select the
Personal Folders or Mailbox branch to include all folders in the mail
store in the search. Enable the option Search Subfolders to include
in the search all subfolders for a selected folder.

8/7/2019 outlook module 1
http://slidepdf.com/reader/full/outlook-module-1 12/19
12
Creating a New Search Folder - If the default search folders don’t suit your needs,
you can create your own with the criteria and included folders that locate the messages
you want. To create a search folder, right-click the Search Folder branch and chooseNew Search Folder to open the New Search Folder dialog box.
There are several predefined search folders, and you can
easily create a custom search folder by choosing one from
the list. If the search folder you select requires specifying
additional criteria, click the Choose button to open a dialog
box in which you specify the criteria. Then, in the New Search
Folder dialog box, select an account from the Search Mail In
drop-down list to search that account.
If the predefined search folders won’t do the trick, choose
Create a Custom Search Folder and then click Choose to
open the Custom Search Folder dialog box to specify a
custom criteria for the search folder, search folder name, and
folders to include.

8/7/2019 outlook module 1
http://slidepdf.com/reader/full/outlook-module-1 13/19
13
Flagging Outgoing Messages - A flag gives you a means of including additional
information or instructions with a message. The information stands out more if you
include the flag text in the header rather than in the body of the message, where it mightbe overlooked.
Perhaps most important, the flag can set a reminder on the
recipient’s system to help ensure that your instructions,
whatever they are, are carried out. For example, if you want
the recipient to phone you by a specific date regardingthe message, the reminder will appear on the recipient’s
system at the appropriate time (assuming that he or she uses
Outlook). Outlook provides several predefined flag messages,
or you can create your own message.
Use the following steps to flag a message you send:
1 With the message form open, choose Actions, Follow Up,
Add Reminder or click the Follow Up button on the form’s
Standard toolbar. Either action displays the Flag For
Follow Up dialog box, shown.
2 From the Flag To drop-down list, select the text you want to
include with the flag, or type your own text in this box.
3 If you want to include a due date and a subsequent
reminder, select the date in the Due By drop-down list, whichopens a calendar you can refer to. Alternatively, you can
enter a date, day, time, or other information as text in the Due
By box.
4 Click OK and then send the message as you normally
would.

8/7/2019 outlook module 1
http://slidepdf.com/reader/full/outlook-module-1 14/19
14
Flagging Sent and Other Messages - In addition to flagging your outgoing
messages, you also can flag messages that you’ve already sent. Although this action
can’t display a flag after the fact on the recipient’s system, it does give you a way to flagand follow-up messages from your end.
You can flag messages in any message folder, including the Sent Items folder. You can work with these flags and
flagged messages the same way you work with the flagged messages you receive from others.
Note When you send a flagged message, Outlook also flags the copy of the message that it saves in the Sent Items
folder (assuming that you have configured Outlook to save a copy of sent messages).
In addition to flagging items that you send, you might also want to flag messages you have received from others that
didn’t originally include flags. For example, you might flag a message that you need to follow up, or you might use the
flag text to indicate other tasks you must perform in connection with the message or its subject.
Tip: Add notes to received messages. You can use flags to add notes to messages you receive from others, giving
yourself a quick reminder of pending tasks or other pertinent information. If the messages reside in your Inbox folder,
Outlook can generate a reminder for you concerning the flagged item. To set up Outlook to do so, right-click the
message, choose Follow Up, Add Reminder, and then set a due date and time.

8/7/2019 outlook module 1
http://slidepdf.com/reader/full/outlook-module-1 15/19
15
Understanding Message Rules - A message rule defines the actions Outlook takes
for a sent or received message if the message meets certain conditions specified by the
rule. For example, you might create a rule that tells Outlook to move all messages from aspecific mail account into a specified folder rather than leaving them in your default Inbox.
The following steps guide you through the more specific
process of creating a message rule:1 In Outlook, choose Tools, Rules And Alerts to display the Rules
And Alerts dialog box.2 In the Apply Changes To This Folder drop-down list, select the
folder to which you want to apply the rule. If you have only one
Inbox, you don’t need to make a selection.
3 Click New Rule to display the wizard page shown.
4 If you want to use a template to create the rule, select the
template from the list and click Next. To create a rule from scratch,
choose Start From A Blank Rule and continue with step 5.
5 If you’re starting a rule from scratch, Outlook prompts you toselect when you want the rule to execute. Select Check Messages
When They Arrive to apply the rule to incoming messages, or
select Check Messages After Sending to apply the rule to sent
messages. If you’re creating the rule from a template, Outlook
skips this step, because the processing event is already defined by
the template.
6 In the conditions list in the top half of the wizard page shown in
this figure, select the conditions that define the messages to which
the rule should apply. For template based rules, a condition is
already selected, but you can change the condition and add others
as necessary.
7 In the rule description area of the wizard page, click the
underlined words that specify the data for the conditions. For
example, if you’re creating a rule to process messages from a
specific account, click the word specified , which is underlined, and
then select the account from the Account dialog box. Click OK and
then click Next.

8/7/2019 outlook module 1
http://slidepdf.com/reader/full/outlook-module-1 16/19
16
Understanding Message Rules - Continued
Select the conditions to define the messages to which the
rule will apply.
8 In the upper half of the new wizard page, select the
actions you want Outlook to apply to messages that
satisfy the specified conditions9 In the lower half of the wizard page, click each
underlined value needed to define the action and
specify the data in the resulting dialog box. Click OK
to close the dialog box and then click Next.

8/7/2019 outlook module 1
http://slidepdf.com/reader/full/outlook-module-1 17/19
17
Understanding Message Rules - Continued
10 Select exceptions to the rule if needed, and specify the
data for exception conditions. Click Next.
11 On the final page of the Rules Wizard, specify a
name for the rule as you want it to appear in Outlook.
12 Select options according to the following list, andclick Finish:
■ Run This Rule Now On Messages Already In
“Inbox” Select this check box if you want Outlook to
apply the rule to messages that you have already
received and that currently reside in the Inbox folder
in which the rule applies.

8/7/2019 outlook module 1
http://slidepdf.com/reader/full/outlook-module-1 18/19
18
How to emulate the Out of Office Assistant in Microsoft Outlook:The Out of Office Assistant feature in Microsoft Outlook is a Microsoft Exchange Server
service. It is available only when the Exchange Server transport service is included in anOutlook user's profile. You can emulate this feature by creating an e-mail template and
defining a rule in the Rules Wizard to automatically reply with the template.
How to define an automatic reply template
Note The following steps can be applied in all versions of Outlook.
1.Open a new Outlook message formatted as plain text.NOTE: Do not use Microsoft Word as your e-mail editor.
2.Type the information that you want to have in your reply message.
3.On the File menu, click Save As.
4.In the Save As dialog box, click to select the Outlook Template check box in the Save As Type list.
5.Type a name for your reply template in the File Name box, and then click Save.
How to define a rule to send an automatic reply in Outlook 20031.On the Tools menu, click Rules and Alerts.
2.In the Rules and Alerts dialog box, click the New Rule button on the E-mail Rules tab.
3.In the Rules Wizard, click the Start from a blank rule button, click Check messages when they arrive, and then clickNext.
4.Under Which condition(s) do you want to check?, click to select the Sent Only To Me check box or any other checkbox that you want, and then click Next.
5.Under What do you want to do with the message?, click to select the Reply using a specific template check box.6.On the Step 2: Edit the Rule Description page of the wizard, click the underlined phrase a specific template.
7.In the Select A Reply Template dialog box, click the template that you saved in step 5 of the "How to Define anAutomatic Reply Template" section, and then click Open.
8.Complete the Rules Wizard instructions, click Finish, and then click OK.

8/7/2019 outlook module 1
http://slidepdf.com/reader/full/outlook-module-1 19/19
19
Contact Information
Sean Biggins
Home Mortgage Consultant
Wells Fargo Home Mortgage
843-842-0615 office866-395-4383 toll free fax
www.wfhm.com/sean-biggins