oracle® thesaurus management system · oracle® thesaurus management system installation guide...
TRANSCRIPT
Oracle® Thesaurus Management SystemInstallation Guide
Release 4.6.2
E18826-03
December 2011
This guide describes how to install, configure, and upgrade Oracle Thesaurus Management System. It has been updated to include information on installing the database tier on Windows.

Oracle Thesaurus Management System Installation Guide, Release 4.6.2
E18826-03
Copyright © 2000, 2011, Oracle and/or its affiliates. All rights reserved.
This software and related documentation are provided under a license agreement containing restrictions on use and disclosure and are protected by intellectual property laws. Except as expressly permitted in your license agreement or allowed by law, you may not use, copy, reproduce, translate, broadcast, modify, license, transmit, distribute, exhibit, perform, publish, or display any part, in any form, or by any means. Reverse engineering, disassembly, or decompilation of this software, unless required by law for interoperability, is prohibited.
The information contained herein is subject to change without notice and is not warranted to be error-free. If you find any errors, please report them to us in writing.
If this is software or related documentation that is delivered to the U.S. Government or anyone licensing it on behalf of the U.S. Government, the following notice is applicable:
U.S. GOVERNMENT RIGHTS Programs, software, databases, and related documentation and technical data delivered to U.S. Government customers are "commercial computer software" or "commercial technical data" pursuant to the applicable Federal Acquisition Regulation and agency-specific supplemental regulations. As such, the use, duplication, disclosure, modification, and adaptation shall be subject to the restrictions and license terms set forth in the applicable Government contract, and, to the extent applicable by the terms of the Government contract, the additional rights set forth in FAR 52.227-19, Commercial Computer Software License (December 2007). Oracle America, Inc., 500 Oracle Parkway, Redwood City, CA 94065.
This software or hardware is developed for general use in a variety of information management applications. It is not developed or intended for use in any inherently dangerous applications, including applications that may create a risk of personal injury. If you use this software or hardware in dangerous applications, then you shall be responsible to take all appropriate fail-safe, backup, redundancy, and other measures to ensure its safe use. Oracle Corporation and its affiliates disclaim any liability for any damages caused by use of this software or hardware in dangerous applications.
Oracle and Java are registered trademarks of Oracle and/or its affiliates. Other names may be trademarks of their respective owners.
Intel and Intel Xeon are trademarks or registered trademarks of Intel Corporation. All SPARC trademarks are used under license and are trademarks or registered trademarks of SPARC International, Inc. AMD, Opteron, the AMD logo, and the AMD Opteron logo are trademarks or registered trademarks of Advanced Micro Devices. UNIX is a registered trademark of The Open Group.
This software or hardware and documentation may provide access to or information on content, products, and services from third parties. Oracle Corporation and its affiliates are not responsible for and expressly disclaim all warranties of any kind with respect to third-party content, products, and services. Oracle Corporation and its affiliates will not be responsible for any loss, costs, or damages incurred due to your access to or use of third-party content, products, or services.

iii
Contents
Preface ................................................................................................................................................................ vii
Audience...................................................................................................................................................... viiDocumentation Accessibility ................................................................................................................... viiiFinding Information and Patches on My Oracle Support ................................................................... viiiFinding Oracle Documentation................................................................................................................. ixRelated Documents ..................................................................................................................................... xConventions ................................................................................................................................................. x
1 Preparing to Install Oracle Thesaurus Management System
1.1 TMS Architecture ........................................................................................................................ 1-11.2 TMS Technology Stack ............................................................................................................... 1-21.3 Product Organization and Related Installation Documentation ......................................... 1-31.4 Choosing a Character Set .......................................................................................................... 1-41.5 Planning a TMS Database Tier Installation............................................................................. 1-41.5.1 Database Tier Operating System Requirements ............................................................ 1-41.5.2 Database Tier Character Set Requirements ..................................................................... 1-51.5.3 Database Tier System Requirements ................................................................................ 1-51.5.4 Oracle Database 11g Release 2 (11.2.0.2) Patch Set 1 Requirements and Options .... 1-51.6 Planning a TMS Application Tier Installation ........................................................................ 1-51.6.1 Application Tier Operating System Requirements......................................................... 1-61.6.2 Forms Server and Reports Server Requirements ............................................................ 1-61.6.3 Installing TMS with Oracle Clinical .................................................................................. 1-61.7 Planning a TMS Client Installation ......................................................................................... 1-61.7.1 Client Tier Operating System Requirements ................................................................... 1-61.7.2 Client Tier Application Requirements.............................................................................. 1-71.8 Applying Oracle Critical Patch Updates ................................................................................. 1-71.9 Applying the Latest TMS Patch Set.......................................................................................... 1-7
2 Installing Oracle Database 11g Release 2 (11.2.0.2) Patch Set 1 on UNIX
2.1 Performing Prerequisite Tasks for Installing Oracle Database 11g Release 2 (11.2.0.2) Patch Set 1 2-1
2.1.1 Create Owners, Groups, and Mount Points..................................................................... 2-12.1.2 Configure Kernel Resources and Adjust Operating System Environment................. 2-22.1.3 Install Latest Operating System Patches .......................................................................... 2-22.2 Installing Oracle Database 11g Release 2 (11.2.0.2) Patch Set 1........................................... 2-2
iv
2.2.1 Install Oracle Database 11g Release 2 (11.2.0.2) Patch Set 1 ........................................ 2-22.2.2 Install Oracle Database 11g Release 2 (11.2.0.2) Patch Set 1 Examples ...................... 2-32.2.3 Install Patch 10213073 to Oracle Database 11g Release 2 (11.2.0.2) Patch Set 1 ......... 2-32.2.4 Install CPU/PSU 10248523 ................................................................................................ 2-42.3 Changing Permissions for Running oraenv Script................................................................. 2-4
3 Installing Oracle Database 11g Release 2 (11.2.0.2) Patch Set 1 on Windows
3.1 Install Oracle Database 11g Release 2 (11.2.0.2) Patch Set 1 ................................................ 3-13.2 Install Oracle Database 11g Release 2 (11.2.0.2) Patch Set 1 Examples .............................. 3-23.3 Apply Patch Bundle 12767726................................................................................................... 3-23.4 Install CPU/PSU 10248523 ....................................................................................................... 3-2
4 Installing and Configuring Oracle Application Server
4.1 Installing the Oracle Application Server Technology Stack ................................................. 4-14.1.1 Set the Windows Compatibility Mode for the setup.exe File........................................ 4-14.1.2 Install Oracle Application Server 10g Release 2 (10.1.2.0.2) .......................................... 4-24.1.3 Install Oracle Application Server 10g Release 3 (10.1.3.1.0) .......................................... 4-54.2 Setting Up Oracle Application Server 10g Release 3 for SSL................................................ 4-84.3 Modifying the Oracle Process Manager Service..................................................................... 4-84.4 Applying Critical Patch Updates.............................................................................................. 4-94.5 Setting Up the SQL*Net Connections for Existing Databases.............................................. 4-94.5.1 Test the Connection from the Application Servers to the Database............................. 4-94.5.2 Troubleshoot Network Connection Issues.................................................................... 4-10
5 Installing the TMS Front End Components
5.1 Options for Installing the TMS Front End Components ....................................................... 5-15.2 Installing the TMS Front End .................................................................................................... 5-25.2.1 Attend to the TMS Front End Installation Screens ......................................................... 5-25.2.2 Update the Mandatory System Registry Values for TMS Front End........................... 5-55.3 Installing the TMS Reports Server............................................................................................ 5-55.3.1 Attend to the TMS Reports Server Installation Screens ................................................. 5-65.3.2 Change to namingServices if Reports and Forms Server Use Different Subnets ....... 5-75.4 Installing the TMS Database Server Code............................................................................... 5-85.4.1 Attend to the TMS Database Server Code Installation Screens .................................... 5-8
6 Creating a TMS Database
6.1 Review Database Requirements and Recommendations (All Databases).......................... 6-26.1.1 Start with a New Database Instance ................................................................................. 6-26.1.2 Use Lowercase SID Name with Oracle Clinical .............................................................. 6-26.1.3 Check Required Tablespaces.............................................................................................. 6-26.1.4 Use the Database Configuration Assistant ...................................................................... 6-26.1.5 Select Required Components ............................................................................................. 6-26.1.6 Use Automatic Memory Management ............................................................................. 6-36.1.7 Set Initialization Parameters ............................................................................................. 6-36.1.8 Modify tnsnames.ora........................................................................................................... 6-46.2 Install TMS Database Objects (Single or Master Database) .................................................. 6-5
v
6.2.1 Unlock Accounts Before Installing the TMS Database................................................... 6-56.2.2 Start Installing the TMS Database ..................................................................................... 6-56.2.3 Attend to the TMS Database Installation Screens ........................................................... 6-66.2.4 Check the Database Log File .............................................................................................. 6-86.3 Install TMS Database Objects (Slave Databases Only) .......................................................... 6-86.3.1 Check the Database Log File .............................................................................................. 6-96.4 Load the TMS Jar File (All Databases) ..................................................................................... 6-96.5 Load Reports (All Databases).................................................................................................... 6-96.6 Create a TMS Administrator User Account (All Databases) ................................................ 6-96.7 Register Databases Integrated with Oracle Clinical ........................................................... 6-106.7.1 Start the Installer to Register Databases ........................................................................ 6-106.7.2 Attend to the TMS Database Registration Screens ...................................................... 6-106.8 Load Dictionaries (Single or Master Database) .................................................................. 6-126.9 Complete Distributed Environment Setup .......................................................................... 6-126.9.1 Export Data from the Master Database ......................................................................... 6-126.9.2 Import Data to the Slave Database................................................................................. 6-136.9.3 Clean Up after Export and Import ................................................................................. 6-146.9.4 Complete the Creation of the Slave Database .............................................................. 6-146.9.5 Setting Up and Starting Symmetric Replication .......................................................... 6-146.9.6 Register Slave Databases Integrated with Oracle Clinical.......................................... 6-18
7 Upgrading Oracle Thesaurus Management System to Release 4.6.2
7.1 Upgrade to Oracle Database 11g Release 2 (11.2.0.2) Patch Set 1 ....................................... 7-17.2 Upgrade Cloned Databases ....................................................................................................... 7-17.3 Install the Application Tier........................................................................................................ 7-27.4 Install the TMS Front End.......................................................................................................... 7-27.5 Repair TMS Data ......................................................................................................................... 7-27.5.1 Repairing TMS 4.6.1 Data ................................................................................................... 7-27.5.2 Repairing TMS 4.6.0 Data ................................................................................................... 7-27.6 Upgrade a Single or Master TMS Database ............................................................................ 7-37.6.1 Suspend Symmetric Replication (Distributed Environment Only).............................. 7-37.6.2 Start the Database Upgrade................................................................................................ 7-47.6.3 Attend to the TMS Database Upgrade Installation Screens .......................................... 7-57.6.4 Check Installation Log for Errors ...................................................................................... 7-77.6.5 Upgrade TMS Reports ........................................................................................................ 7-77.6.6 Configure DSI Import ......................................................................................................... 7-77.6.7 Load Dictionaries ................................................................................................................ 7-87.6.8 Create an Export File (Distributed Environments Only) ............................................... 7-87.7 Upgrade Slave TMS Databases (Distributed Environments Only) ..................................... 7-87.7.1 Upgrade Slave Databases ................................................................................................... 7-87.7.2 Upgrade TMS Reports ........................................................................................................ 7-97.7.3 Configure DSI Import ......................................................................................................... 7-97.7.4 Start Symmetric Replication............................................................................................ 7-107.8 Applying the Latest Patch Set ................................................................................................ 7-10

vi
8 Completing a New TMS Installation or Upgrade
8.1 Patch TMS .................................................................................................................................... 8-18.2 Change the Password for the opaconfig User ....................................................................... 8-18.3 Set Up Database Connections ................................................................................................... 8-28.4 Update HTML Browser and Web Search Engine Bookmarks ............................................. 8-28.5 Test the TMS Forms Server........................................................................................................ 8-38.6 Download the Java Virtual Machine to Client Computers................................................... 8-48.7 Add a Link to the TMS Launch Page for the HTML Browser.............................................. 8-48.8 Configure the Document Repository ....................................................................................... 8-58.9 Define and Load Dictionaries.................................................................................................... 8-5
vii
Preface
This guide describes how to install Oracle Thesaurus Management System (TMS) Release 4.6.2 both as an initial installation and as an upgrade from a previous release.
This preface contains the following topics:
■ Audience on page x
■ Documentation Accessibility on page viii
■ Finding Information and Patches on My Oracle Support on page viii
■ Finding Oracle Documentation on page ix
■ Related Documents on page x
■ Conventions on page x
AudienceThe audience for this installation guide is database administrators (DBAs) and system administrators. Installing TMS requires the skills listed below. If you want assistance with your installation, engage Oracle Consulting.
Database AdministratorsInstalling TMS requires a level of knowledge equivalent to having mastered the material in the Oracle Architecture and Administration course for DBAs. You must be able to read and edit SQL*Plus scripts, run SQL scripts, and review logs for Oracle errors. For ongoing administration, additional training as a DBA is essential.
System AdministratorsInstalling and maintaining a TMS network requires expertise in the following skill areas:
■ UNIX operating systems
■ Creating and managing user accounts and groups
■ Installing Oracle database software and patches
■ Identifying space on a file system for Oracle database tablespaces
■ Setting and using environment variables
■ Microsoft Windows operating systems
■ Creating and managing user accounts and groups
■ Installing Oracle software

viii
■ Managing settings through the Control Panel and Administrative Tools
■ Managing network printers
■ Creating services
Documentation AccessibilityFor information about Oracle's commitment to accessibility, visit the Oracle Accessibility Program website at http://www.oracle.com/pls/topic/lookup?ctx=acc&id=docacc.
Access to Oracle SupportOracle customers have access to electronic support through My Oracle Support. For information, visit http://www.oracle.com/pls/topic/lookup?ctx=acc&id=info or visit http://www.oracle.com/pls/topic/lookup?ctx=acc&id=trs if you are hearing impaired.
Finding Information and Patches on My Oracle SupportYour source for the latest information about Oracle Thesaurus Management System is Oracle Support's self-service Web site My Oracle Support (formerly MetaLink).
Before you install and use Oracle Thesaurus Management System, always visit the My Oracle Support Web site for the latest information, including alerts, White Papers, installation verification (smoke) tests, bulletins, and patches.
Creating a My Oracle Support AccountYou must register at My Oracle Support to obtain a user name and password account before you can enter the Web site.
To register for My Oracle Support:
1. Open a Web browser to https://support.oracle.com.
2. Click the Register link to create a My Oracle Support account. The registration page opens.
3. Follow the instructions on the registration page.
Signing In to My Oracle SupportTo sign in to My Oracle Support:
1. Open a Web browser to https://support.oracle.com.
2. Click Sign In.
3. Enter your user name and password.
4. Click Go to open the My Oracle Support home page.
Finding Information on My Oracle SupportThere are many ways to find information on My Oracle Support.
Searching by Article IDThe fastest way to search for information, including alerts, White Papers, installation verification (smoke) tests, and bulletins is by the article ID number, if you know it.
ix
To search by article ID:
1. Sign in to My Oracle Support at https://support.oracle.com.
2. Locate the Search box in the upper right corner of the My Oracle Support page.
3. Click the sources icon to the left of the search box, and then select Article ID from the list.
4. Enter the article ID number in the text box.
5. Click the magnifying glass icon to the right of the search box (or press the Enter key) to execute your search.
The Knowledge page displays the results of your search. If the article is found, click the link to view the abstract, text, attachments, and related products.
Searching by Product and TopicYou can use the following My Oracle Support tools to browse and search the knowledge base:
■ Product Focus — On the Knowledge page under Select Product, type part of the product name and the system immediately filters the product list by the letters you have typed. (You do not need to type "Oracle.") Select the product you want from the filtered list and then use other search or browse tools to find the information you need.
■ Advanced Search — You can specify one or more search criteria, such as source, exact phrase, and related product, to find information. This option is available from the Advanced link on almost all pages.
Finding Patches on My Oracle SupportBe sure to check My Oracle Support for the latest patches, if any, for your product. You can search for patches by patch ID or number, or by product or family.
To locate and download a patch:
1. Sign in to My Oracle Support at https://support.oracle.com.
2. Click the Patches & Updates tab. The Patches & Updates page opens and displays the Patch Search region. You have the following options:
■ In the Patch ID or Number field, enter the number of the patch you want. (This number is the same as the primary bug number fixed by the patch.) This option is useful if you already know the patch number.
■ To find a patch by product name, release, and platform, click the Product or Family link to enter one or more search criteria.
3. Click Search to execute your query. The Patch Search Results page opens.
4. Click the patch ID number. The system displays details about the patch. In addition, you can view the Read Me file before downloading the patch.
5. Click Download. Follow the instructions on the screen to download, save, and install the patch files.
Finding Oracle DocumentationThe Oracle Web site contains links to all Oracle user and reference documentation. You can view or download a single document or an entire product library.
x
Finding Oracle Health Sciences DocumentationTo get user documentation for Oracle Health Sciences applications, go to the Oracle Health Sciences documentation page at:
http://www.oracle.com/technetwork/documentation/hsgbu-clinical-407519.html
Finding Other Oracle DocumentationTo get user documentation for other Oracle products:
1. Go to the following Web page:
http://www.oracle.com/technology/documentation/index.html
Alternatively, you can go to http://www.oracle.com, point to the Support tab, and then click Documentation.
2. Scroll to the product you need and click the link.
3. Click the link for the documentation you need.
Related DocumentsThis section lists the documents in the Oracle Thesaurus Management System documentation set, followed by their part number. The most recent version of each guide is posted on the Oracle Web site; see "Finding Oracle Health Sciences Documentation" on page x.
■ Oracle Thesaurus Management System Installation Guide (Part E18826)
■ Oracle Thesaurus Management System User's Guide (Part E18827)
The release notes and the release content document are also posted in the Oracle Health Sciences documentation library.
In addition, Oracle Thesaurus Management System customers can request a copy of the Oracle Thesaurus Management System Technical Reference Manual from Oracle Support.
ConventionsThe following text conventions are used in this document:
Note: Always check the Oracle Health Sciences Documentation page to ensure you have the latest updates to the documentation.
Convention Meaning
boldface Boldface type indicates graphical user interface elements associated with an action, or terms defined in text or the glossary.
italic Italic type indicates book titles, emphasis, or placeholder variables for which you supply particular values.
monospace Monospace type indicates commands within a paragraph, URLs, code in examples, text that appears on the screen, or text that you enter.
1
Preparing to Install Oracle Thesaurus Management System 1-1
1 Preparing to Install Oracle Thesaurus Management System
This chapter describes Oracle Thesaurus Management System's architecture, the hardware and software requirements, and the dependencies among the components. Before you begin installing or upgrading Oracle Thesaurus Management System (TMS), check that your environment meets the requirements.
This chapter includes the following topics:
■ Section 1.1, "TMS Architecture"
■ Section 1.2, "TMS Technology Stack"
■ Section 1.3, "Product Organization and Related Installation Documentation"
■ Section 1.4, "Choosing a Character Set"
■ Section 1.5, "Planning a TMS Database Tier Installation"
■ Section 1.6, "Planning a TMS Application Tier Installation"
■ Section 1.7, "Planning a TMS Client Installation"
■ Section 1.8, "Applying Oracle Critical Patch Updates"
■ Section 1.9, "Applying the Latest TMS Patch Set"
1.1 TMS ArchitectureThe architecture for TMS consists of three tiers: the database tier, the application tier, and the client tier.
Figure 1–1 illustrates the architecture and technology stack for TMS.

TMS Technology Stack
1-2 Oracle Thesaurus Management System Installation Guide
Figure 1–1 TMS Architecture and Technology Stack
The database tier in a TMS environment includes the Oracle Database 11g Release 2 (11.2.0.2) Patch Set 1 software and the TMS database(s). In past releases, the database tier was called the back end.
The application tier includes:
■ TMS Forms Server — The Forms Server performs all forms processing, communicates the display changes to the client, and calls forms to query, update, select, and delete data from the Database Server.
■ TMS Reports Server — The Reports Server runs most batch reports, schedules all jobs, and creates PDF output for reports. Most TMS reports interface with the TMS Reports Server.
The client tier includes one or more clients, which communicate users' keystrokes and mouse movements to the application tier.
1.2 TMS Technology StackTable 1–1 lists the technology stack requirements for the database tier, the application tier, and the client tier for Release 4.6.2 of TMS.
For information about updates to the technology stack, see the following document on My Oracle Support:
Oracle Life Sciences Applications Supported Technology Stacks Article ID 180430.1

Product Organization and Related Installation Documentation
Preparing to Install Oracle Thesaurus Management System 1-3
1.3 Product Organization and Related Installation DocumentationThis section describes the name changes to the organizational unit that includes the TMS product and the additional documentation to review for important installation topics.
Oracle Health Sciences Global Business UnitThe Oracle TMS product is now part of the Oracle Health Sciences Global Business Unit (HSGBU). TMS was formerly part of the Oracle Life Sciences Applications (OLSA) and the Oracle Pharmaceutical Applications (OPA) organizations. During the installation, you will see references to OLSA and OPA in the software (such as in directory names, file names, and screen text) that have not been changed.
Release Notes, Bulletins, and White PapersVisit the My Oracle Support Web site for the most up-to-date installation information, including alerts, release notes, bulletins, White Papers, and patches; see "Finding Information and Patches on My Oracle Support" on page viii.
The My Oracle Support Web site includes these important installation topics:
■ Oracle Life Sciences Applications Supported Technology Stacks (Article ID 180430.1)
■ Oracle Thesaurus Management System Release Notes (Part E18825-01)
Table 1–1 TMS Technology Stack
Database Tier
Operating System Oracle Enterprise Linux 5 Update 5 x86-64; 64-bit architecture (US English)
Oracle Solaris SPARC 10; 64-bit architecture (US English)
HP-UX Itanium 11i v3 (11.31); 64-bit architecture (US English)
Windows Server 2008 Release 2, Service Pack 1; 64-bit architecture (US English)
Oracle Database 11g Release 2 (11.2.0.2.0) Enterprise Edition 64-bit
Application Tier
Operating System Microsoft Windows Server 2008; Release 2; Service Pack 1; 64-bit architecture
Oracle Application Server
Oracle Application Server 10g Release 2 (10.1.2.0.2)
Oracle Application Server 10g Release 2 Patch Set 3 (10.1.2.3.0)
Oracle Application Server 10g Release 3 (10.1.3.1.0)
Oracle Application Server 10g Release 3 Patch Set 5 (10.1.3.5.0)
Client Tier
Operating System Microsoft Windows XP; Service Pack 1, 2, or 3; 32-bit architecture (US English)
Microsoft Windows Vista; Service Pack 1; 32-bit architecture (US English)
Microsoft Windows 7; Service Pack 1; 32-bit or 64-bit architecture (US English)
Microsoft Windows Server 2008; Release 2; Service Pack 1; 64-bit architecture (US English)
Microsoft Internet Explorer
Supported version depends on operating system:
Microsoft Windows XP: Internet Explorer 7 or 8
Microsoft Windows Vista: Internet Explorer 7 or 8
Microsoft Windows 7: Internet Explorer 8 or 9
Microsoft Windows Server 2008: Internet Explorer 8
Oracle Java Runtime Environment (JRE)
Java SE 6 Update 24 (Standard Edition, Version 1.6.0.24) or later

Choosing a Character Set
1-4 Oracle Thesaurus Management System Installation Guide
■ OLSA 4.6.x and 4.7.x Known Install and Configuration Issues (Article ID 386941.1)
■ Oracle Thesaurus Management System Installation Verification Test (Article ID 398443.1)
■ Oracle Thesaurus Management System Patches (Article ID 132626.1)
■ Oracle Clinical, Oracle Clinical Remote Data Capture Onsite, and Oracle Thesaurus Management System Security Configuration Guide (Article ID 1300836.1)
1.4 Choosing a Character Set Oracle Health Sciences supports certain character sets for each product or each combination of integrated products.
For TMS, Oracle strongly recommends that you use the UTF8 character set (default). TMS supports UTF8, US7ASCII, WE8ISO8859P1, or any single byte character set.
TMS uses the NLS_LANG environment variable to control the language, territory, and character set used for database connections. The NLS_LANG variable concatenates the three components as follows:
LANGUAGE_TERRITORY.CHARSET
The default installation configures the TMS application to use the following character set:
AMERICAN_AMERICA.UTF8
You must set the CHARSET component of the NLS_LANG variable to match the character set of the database.
Make sure you use the same character set on the database tier and the application tier. If you select US7ASCII for the database tier and UTF8 for the application tier, TMS stores some special characters incorrectly in the database.
1.5 Planning a TMS Database Tier InstallationThis section describes the hardware and software requirements for the TMS database tier.
1.5.1 Database Tier Operating System Requirements The database tier for TMS supports these operating systems:
■ Oracle Enterprise Linux 5 Update 5 x86-64 (64-bit versions only, US English)
■ Oracle Solaris SPARC 10 (64-bit versions only, US English)
■ HP-UX Itanium 11.31 (64-bit versions only, US English)
■ Windows Server 2008 Release 2, Service Pack 1 (64-bit architecture, US English)
To verify the operating system details, enter the following command:
uname -a
In addition, to verify the update version for Linux, enter the following command:
cat /etc/issue
To verify Windows operating system details, navigate to the Control Panel, then System and Security, then System.

Planning a TMS Application Tier Installation
Preparing to Install Oracle Thesaurus Management System 1-5
1.5.2 Database Tier Character Set Requirements For information about the guidelines and requirements for character sets, see Section 1.4, "Choosing a Character Set."
1.5.3 Database Tier System RequirementsFor database tier system requirements, see the Oracle Database 11g Release 2 (11.2) Installation Guide for your respective operating system.
1.5.3.1 Compatibility with Oracle9i Database on Windows Database ServersA Windows Database Server does not support multiple TMS code environments. Therefore, you cannot have Oracle9i Database and Oracle Database 11g on the same Windows computer.
1.5.3.2 Access on Windows PlatformsYou must have the Windows Administrator user ID and password for the operating system.
1.5.3.3 Processors on Windows PlatformsTMS supports only Database Server computers with Intel processors.
1.5.3.4 Windows Database Server Requires Separate Oracle HomeA Windows Database Server cannot share a computer with the Forms Server or Reports Server components. The Database Server DLLs are incompatible with the Forms and Reports Servers DLLs.
1.5.4 Oracle Database 11g Release 2 (11.2.0.2) Patch Set 1 Requirements and Options TMS requires Oracle Database 11g Release 2 (11.2.0.2) Patch Set 1, Enterprise Edition.
1.5.4.1 Required ReadingInstalling Oracle Database 11g Release 2 (11.2.0.2) Patch Set 1 to be compatible with your operating system and TMS requires information from different sources. Before you start the TMS installation, review the following documents:
■ Oracle Database 11g Release 2 (11.2.0.2) Patch Set 1 installation documentation
■ Latest platform-specific Oracle Database 11g Release 2 (11.2.0.2) Patch Set 1 installation bulletin that is available on My Oracle Support
■ Latest supported component versions and alerts related to Oracle Database 11g Release 2 (11.2.0.2) Patch Set 1 and Oracle Health Sciences applications that are available on My Oracle Support
1.5.4.2 Oracle Text OptionChoose to install the Oracle Database 11g Release 2 (11.2.0.2) Patch Set 1 Text Option. Oracle Database 11g Release 2 (11.2.0.2) Patch Set 1 includes the Oracle Text Option, but note that installing and using it requires purchasing a separate license.
1.6 Planning a TMS Application Tier InstallationThe application tier includes the Forms Server and Reports Server components. Oracle Application Server 10g Release 2 includes the Forms Server and Reports Server

Planning a TMS Client Installation
1-6 Oracle Thesaurus Management System Installation Guide
components in the same installation. You can add extra Reports Servers by installing Oracle Application Server 10g Release 2 on additional computers.
1.6.1 Application Tier Operating System RequirementsFor TMS, the Forms Server and Reports Server support the following operating system only:
Microsoft Windows Server 2008 Release 2 Service Pack 1 US English
1.6.2 Forms Server and Reports Server RequirementsThe Forms Server, which is the TMS forms application, brokers transactions between clients and the Database Server. The Reports Server schedules TMS jobs and outputs to screen or printers.
The Forms Server and the Reports Server components have the same platform requirements. For installation instructions, see Chapter 5, "Installing the TMS Front End Components."
1.6.2.1 Permanent IP AddressEach server computer must have a permanent IP address.
1.6.2.2 Oracle Application ServersTMS requires Oracle Application Server 10g Release 3 (Oracle AS10gR3) and Oracle Application Server 10g Release 2 Forms and Reports Services (Oracle AS10gR2).
1.6.2.3 Java Runtime EnvironmentThe Java Runtime Environment, or JRE (also known as Java Virtual Machine or JVM), is the Java applet required to run a TMS session.
TMS supports Java SE 6 Update 24 (Standard Edition, Version 1.6.0.24) or later.
1.6.3 Installing TMS with Oracle ClinicalFor installing and integrating Oracle Thesaurus Management System (TMS) with Oracle Clinical, you can install TMS and Oracle Clinical on the same application tier or on different application tiers. To integrate Oracle Clinical and TMS, both products must be installed on the same database.
1.7 Planning a TMS Client Installation A client is the browser interface to the Forms Server. It displays data and transmits user actions to and from the Forms Server.
This section describes the requirements for a client.
1.7.1 Client Tier Operating System RequirementsTMS supports the following Microsoft operating systems for the client:
■ Windows XP; Service Pack 1, 2, or 3; 32-bit architecture (US English)

Applying the Latest TMS Patch Set
Preparing to Install Oracle Thesaurus Management System 1-7
■ Windows Vista; Service Pack 1; 32-bit architecture (US English)
■ Windows 7; Service Pack 1; 32-bit or 64-bit architecture (US English)
■ Windows Server 2008; Release 2; Service Pack 1; 64-bit architecture (US English)
1.7.2 Client Tier Application RequirementsTo access TMS, clients must have these applications installed:
■ Microsoft Windows Internet Explorer.
– For Windows XP: Internet Explorer 7 or 8
– For Windows Vista: Internet Explorer 7 or 8
– For Windows 7: Internet Explorer 8 or 9
– For Windows Server 2008: Internet Explorer 8
■ Java Runtime Environment (JRE). TMS supports Java SE 6 Update 24 (Standard Edition, Version 1.6.0.24) or later.
In addition, each client requires an intranet or internet connection.
1.8 Applying Oracle Critical Patch UpdatesEvery quarter, Oracle provides Critical Patch Updates (CPUs) to address security vulnerabilities. Install these patches on every computer with an Oracle Home. Check My Oracle Support for information about the latest patch tested with Oracle Health Sciences applications. Article ID 180430.1, Oracle Health Sciences Supported Technology Stacks, lists the latest CPUs supported and contains a link to the separate article about each one.
1.9 Applying the Latest TMS Patch SetCheck My Oracle Support article Oracle Thesaurus Management System Patches (Article ID 132626.1) for the latest patch set (4.6.4 or its successor) and apply it. See the patch set release notes for more information.
If you are installing your database on Windows, you must apply the latest patch set. TMS is not supported on Windows without Patch Set 4.6.4 or later.]

Applying the Latest TMS Patch Set
1-8 Oracle Thesaurus Management System Installation Guide

2
Installing Oracle Database 11g Release 2 (11.2.0.2) Patch Set 1 on UNIX 2-1
2 Installing Oracle Database 11g Release 2 (11.2.0.2) Patch Set 1 on UNIX
This chapter describes how to install Oracle Database 11g Release 2 (11.2.0.2) Patch Set 1 on a UNIX computer.
This chapter includes the following topics:
■ Section 2.1, "Performing Prerequisite Tasks for Installing Oracle Database 11g Release 2 (11.2.0.2) Patch Set 1"
■ Section 2.2, "Installing Oracle Database 11g Release 2 (11.2.0.2) Patch Set 1"
■ Section 2.3, "Changing Permissions for Running oraenv Script"
You install the TMS database server code as part of your application tier installation. For instructions, see Chapter 5, "Installing the TMS Front End Components."
If you are upgrading to TMS 4.6.2, see Chapter 7.
2.1 Performing Prerequisite Tasks for Installing Oracle Database 11g Release 2 (11.2.0.2) Patch Set 1
To ensure that your platform meets the minimum requirements for installing the Oracle Database 11g Release 2 (11.2.0.2) Patch Set 1 product, you must perform the following preparatory tasks:
■ Create Owners, Groups, and Mount Points
■ Configure Kernel Resources and Adjust Operating System Environment
■ Install Latest Operating System Patches
2.1.1 Create Owners, Groups, and Mount PointsTo create the software owner, required groups, and mount points:
1. Create the software owner and groups:
■ Create a UNIX user to own the Oracle software. Typically, the user name is oracle.
■ Create two groups: one is the Oracle Inventory group; the other is the operating system DBA group. Typically, the group names are oinstall and dba, respectively.
2. Create mount points owned by the oracle user:
■ Create a software mount point of at least 10 GB.

Installing Oracle Database 11g Release 2 (11.2.0.2) Patch Set 1
2-2 Oracle Thesaurus Management System Installation Guide
■ Create mount points to hold the database files, control files, and log files, respectively.
3. Test permissions. Ensure that the oracle user can write to the new mount points and all subdirectories.
2.1.2 Configure Kernel Resources and Adjust Operating System EnvironmentThe performance of Oracle Database 11g Release 2 (11.2.0.2) Patch Set 1 relies on proper tuning of operating system parameters. In addition, if you are creating several Oracle instances, you might have to increase the amount of shared memory and semaphores on the system by setting kernel parameters.
For details, see the "Configure Kernel Parameters" section of the Oracle Database 11g Release 2 Installation Guide for your operating system.
2.1.3 Install Latest Operating System PatchesDownload and install the latest operating system patches required for Oracle, if necessary. Review the latest platform-specific install bulletins for Oracle Database 11g Release 2 (11.2.0.2) Patch Set 1.
2.2 Installing Oracle Database 11g Release 2 (11.2.0.2) Patch Set 1To support TMS Database Server, a UNIX computer requires the following version of Oracle Database software:
Oracle Database 11g Release 2 (11.2.0.2) Patch Set 1 Enterprise Edition
However, this requirement might change during the life of this document. Before you begin, check My Oracle Support for the latest requirement.
This section describes the following tasks required to install Oracle Database 11g Release 2 (11.2.0.2) Patch Set 1:
■ Install Oracle Database 11g Release 2 (11.2.0.2) Patch Set 1
■ Install Oracle Database 11g Release 2 (11.2.0.2) Patch Set 1 Examples
■ Install Patch 10213073 to Oracle Database 11g Release 2 (11.2.0.2) Patch Set 1
■ Install CPU/PSU 10248523
2.2.1 Install Oracle Database 11g Release 2 (11.2.0.2) Patch Set 1 To install Oracle Database 11g Release 2 (11.2.0.2) Patch Set 1:
1. Locate the Oracle Database 11g Release 2 (11.2.0.2) Patch Set 1 software for your operating system on the Oracle Clinical 4.6.2 and Oracle Thesaurus Management System 4.6.2 operating_system Tech Stack Patches disk in the media pack:
Operating System Zip Files
Oracle Enterprise Linux x86-64 p10098816_112020_Linux-x86-64_xof7.zip
Oracle Solaris SPARC p10098816_112020_SOLARIS64_xof7.zip
HP-UX Itanium p10098816_112020_HPUX-IA64_xof7.zip

Installing Oracle Database 11g Release 2 (11.2.0.2) Patch Set 1
Installing Oracle Database 11g Release 2 (11.2.0.2) Patch Set 1 on UNIX 2-3
2. Follow the instructions in the Oracle Database 11g Release 2 (11.2) Installation Guide for your respective operating system to install Oracle Database 11g Release 2 (11.2.0.2) Patch Set 1.
3. Choose to install the Enterprise Edition option.
2.2.2 Install Oracle Database 11g Release 2 (11.2.0.2) Patch Set 1 Examples Oracle Database Examples, which is required for Oracle Thesaurus Management System, includes the following items:
■ Oracle JDBC Development Drivers
■ Oracle Database Examples
■ Oracle Product Demonstrations (optional)
To install Oracle Database Examples:
1. Navigate to the folder where you extracted the Oracle Database 11g Release 2 (11.2.0.2) Patch Set 1 software.
2. Change to the examples directory.
3. Start Oracle Universal Installer from the examples directory and install Oracle Database Examples.
4. Accept all the default values during the installation.
For more information about installing software and various Oracle product demonstrations from the Oracle Database Examples media, see the Oracle Database Examples Installation Guide.
2.2.3 Install Patch 10213073 to Oracle Database 11g Release 2 (11.2.0.2) Patch Set 1To install patch 10213073 to the Oracle Database 11g Release 2 (11.2.0.2) Patch Set 1 installation:
1. Locate the appropriate Oracle Database 11g Release 2 (11.2.0.2) Patch Set 1 patch for your operating system on the Oracle Clinical 4.6.2 and Oracle Thesaurus Management System 4.6.2 operating_system Tech Stack Patches disk in the media pack:
2. Extract the patch zip file to a location that is accessible to the Database Server.
3. Follow the operating system-specific instructions in the ReadMe file to apply patch 10213073 to the Oracle Database 11g Release 2 (11.2.0.2) Patch Set 1 installation. The ReadMe file is located at the top level of the patch set extraction location.
Operating System Path Zip File
Oracle Enterprise Linux x86-64 /patches p10213073_112020_Linux-x86-64.zip
Oracle Solaris SPARC /patches p10213073_112020_SOLARIS64.zip
HP-UX Itanium /patches p10213073_112020_HPUX-IA64.zip

Changing Permissions for Running oraenv Script
2-4 Oracle Thesaurus Management System Installation Guide
2.2.4 Install CPU/PSU 10248523 Every quarter, Oracle provides Critical Patch Updates (CPUs) to address security vulnerabilities, and Patch Set Updates (PSUs) to address proactive, critical fixes and security vulnerabilities.
CPU/PSU 10248523 is current as of this document release and current with the information in the Oracle Health Sciences Applications Critical Patch Update for January 2011 note on My Oracle Support. Be sure to check My Oracle Support for the latest version of CPUs and PSUs, and then apply the latest patch approved for the Oracle Health Sciences applications.
To install CPU/PSU 10248523 to the Oracle Database 11g Release 2 (11.2.0.2) Patch Set 1 installation:
1. Locate the appropriate Oracle Database 11g Release 2 (11.2.0.2) Patch Set 1 patch for your operating system on the Oracle Clinical Oracle Thesaurus Management System 4.6.2 operating_system Tech Stack Patches disk in the media pack:
2. Extract the patch zip file to a location that is accessible to the Database Server.
3. Follow the operating system-specific instructions in the ReadMe file to apply patch 10248523 to the Oracle Database 11g Release 2 (11.2.0.2) Patch Set 1 installation. The ReadMe file is located at the top level of the patch set extraction location.
2.3 Changing Permissions for Running oraenv ScriptWith the Bourne shell, you use the Oracle environment-setting script (oraenv) when granting write access to the ORACLE_HOME directory.
However, the oraenv script gives an error if run by a non-Oracle user. To avoid this error, set the following directory and file permissions:
drwxrwxr-x 18 oracle oinstall 1024 Apr 11 19:11 inventorydrwxrwxr-x 3 oracle oinstall 1024 Apr 11 18:29 ContentsXML-rwxrwxrwx 1 oracle oinstall 492 Apr 11 13:15 oraclehomeproperties.xml
Operating System Path Zip File
Oracle Enterprise Linux x86-64 /patches p10248523_112020_Linux-x86-64.zip
Oracle Solaris SPARC /patches p10248523_112020_SOLARIS64.zip
HP-UX Itanium /patches p10248523_112020_HPUX-IA64.zip
3
Installing Oracle Database 11g Release 2 (11.2.0.2) Patch Set 1 on Windows 3-1
3Installing Oracle Database 11g Release 2 (11.2.0.2) Patch Set 1 on Windows
This chapter describes how to set up a new Oracle Database Server on a Windows computer.
Installing the Oracle Database Server on a Windows computer requires you to complete the following tasks:
■ Section 3.1, "Install Oracle Database 11g Release 2 (11.2.0.2) Patch Set 1"
■ Section 3.2, "Install Oracle Database 11g Release 2 (11.2.0.2) Patch Set 1 Examples"
■ Section 3.3, "Apply Patch Bundle 12767726"
■ Section 3.4, "Install CPU/PSU 10248523"
You install the TMS database server code as part of your application tier installation. For instructions, see Chapter 5, "Installing the TMS Front End Components."
If you are upgrading to TMS 4.6.2, see Chapter 7.
3.1 Install Oracle Database 11g Release 2 (11.2.0.2) Patch Set 1 To support Oracle Database Server, a Windows computer requires the following version of Oracle Database software:
Oracle Database 11g Release 2 (11.2.0.2) Patch Set 1 Enterprise Edition
However, this requirement might change during the life of this document. Before you begin, check My Oracle Support for the latest requirement.
To install Oracle Database 11g Release 2 (11.2.0.2) Patch Set 1:
1. Insert the Oracle Clinical and Oracle Thesaurus Management System 4.6.2 Windows Tech Stack Patches disk.
2. Locate the Oracle Database 11g Release 2 (11.2.0.2) Patch Set 1 software for Microsoft Windows (64-bit).
3. Follow the included instructions for installing Oracle Database 11g Release 2 (11.2.0.2) Patch Set 1.
Note: The Oracle Thesaurus Management System (TMS) 4.6.2 database tier is supported on Windows only with Patch Set 4.6.4 or its successor.
Install Oracle Database 11g Release 2 (11.2.0.2) Patch Set 1 Examples
3-2 Oracle Thesaurus Management System Installation Guide
4. Choose to install the Enterprise Edition option.
3.2 Install Oracle Database 11g Release 2 (11.2.0.2) Patch Set 1 Examples
Oracle Database Examples, which is required for TMS, includes the following items:
■ Oracle JDBC Development Drivers
■ Oracle Database Examples
■ Oracle Product Demonstrations (optional)
To install Oracle Database Examples:
1. Locate the Oracle Database 11g Release 2 (11.2.0.2) Patch Set 1 Examples software for Windows on the media pack. It is file win64_11gR2_examples.zip in the patches directory.
2. Install the software according to the Oracle Database Examples Installation Guide, which is also included on the media pack.
3. Accept all the default values during the installation.
3.3 Apply Patch Bundle 12767726To apply Patch Bundle 12767726 to the Oracle Database 11g Release 2 (11.2.0.2) Patch Set 1 installation:
1. Locate the Patch Bundle 12767726 software for Windows on the media pack. It is file p12767726_112020_Win64.zip in the patches directory.
2. Extract the patch zip file to a location that is accessible to the Database Server.
3. Follow the instructions in the ReadMe file to apply the patch bundle to the Oracle Database 11g Release 2 (11.2.0.2) Patch Set 1 installation. The ReadMe file is located at the top level of the patch set extraction location.
3.4 Install CPU/PSU 10248523 Every quarter, Oracle provides Critical Patch Updates (CPUs) to address security vulnerabilities, and Patch Set Updates (PSUs) to address proactive, critical fixes and security vulnerabilities.
CPU/PSU 10248523 is current as of this document release and current with the information in the Oracle Health Sciences Applications Critical Patch Update for January 2011 note on My Oracle Support. Be sure to check My Oracle Support for the latest version of CPUs and PSUs, and then apply the latest patch approved for the Oracle Health Sciences applications.
To install CPU/PSU 10248523 to the Oracle Database 11g Release 2 (11.2.0.2) Patch Set 1 installation:
Note: You do not need to install any of the sample schemas. They are not required for either Oracle TMS or Oracle Clinical. You can add them later if you change your mind.

Install CPU/PSU 10248523
Installing Oracle Database 11g Release 2 (11.2.0.2) Patch Set 1 on Windows 3-3
1. Locate the patch on the Oracle Clinical Oracle Thesaurus Management System 4.6.2 WINNT Tech Stack Patches disk in the media pack.
2. Extract the patch zip file to a location that is accessible to the Database Server.
3. Follow the operating system-specific instructions in the ReadMe file to apply patch 10248523 to the Oracle Database 11g Release 2 (11.2.0.2) Patch Set 1 installation. The ReadMe file is located at the top level of the patch set extraction location.

Install CPU/PSU 10248523
3-4 Oracle Thesaurus Management System Installation Guide
4
Installing and Configuring Oracle Application Server 4-1
4 Installing and Configuring Oracle Application Server
For Oracle Thesaurus Management System (TMS) 4.6.2, the required Oracle Application Server technology stack includes Oracle Application Server 10g Release 3 and its Patch Set 5, and Oracle Application Server 10g Release 2 and its Patch Set 3.
This chapter describes how to install and configure these components. It includes the following topics:
■ Section 4.1, "Installing the Oracle Application Server Technology Stack"
■ Section 4.2, "Setting Up Oracle Application Server 10g Release 3 for SSL"
■ Section 4.3, "Modifying the Oracle Process Manager Service"
■ Section 4.4, "Applying Critical Patch Updates"
■ Section 4.5, "Setting Up the SQL*Net Connections for Existing Databases"
4.1 Installing the Oracle Application Server Technology StackTo install the Oracle Application Server technology stack, you complete the following tasks:
■ Set the Windows Compatibility Mode for the setup.exe File
■ Install Oracle Application Server 10g Release 2 (10.1.2.0.2)
■ Apply Oracle Application Server 10g Release 2 Patch Set 3 (10.1.2.3.0)
■ Install Oracle Application Server 10g Release 3 (10.1.3.1.0)
■ Apply Oracle Application Server 10g Release 3 Patch Set 5 (10.1.3.5.0)
4.1.1 Set the Windows Compatibility Mode for the setup.exe FileBefore installing the Oracle Application Server technology stack on Windows 2008 server, you must set the compatibility mode for the setup.exe file for each component in the technology stack.
To set the Windows compatibility mode:
1. Right-click on a setup.exe file, and then select Properties.
2. Select the Compatibility tab.
3. Select Run this program in compatibility mode for check box, and then select Windows Server 2008 (Service Pack 1) from the list.

Installing the Oracle Application Server Technology Stack
4-2 Oracle Thesaurus Management System Installation Guide
4. Click OK to save your changes.
5. Continue with the software installation.
4.1.2 Install Oracle Application Server 10g Release 2 (10.1.2.0.2)Oracle Application Server 10g Release 2 provides forms and reports services.
To install Oracle Application Server 10g Release 2:
1. Close all running applications on the computer.
2. Log in to the application server using an account with system administrator privileges.
3. Insert the Oracle Clinical 4.6.2 and Oracle Thesaurus Management System 4.6.2 disk.
4. Copy and extract the p5983622_10123_WINNT.zip file, which is Patch Set 3 (10.1.2.3.0) for Oracle Application Server 10g Release 2 Forms and Reports Services onto your application server.
5. Insert the Oracle Application Server Forms and Reports Services (10.1.2.0.2) Microsoft Windows (32-bit) disk. (This disk is included in the Oracle Clinical and Oracle Thesaurus Management System 4.6.2 Media Pack.)
6. Navigate to the setup.exe file for the Patch Set 3 software that you previously copied and extracted.
7. Set the Windows Compatibility mode for this setup.exe file. (See Section 4.1.1, "Set the Windows Compatibility Mode for the setup.exe File" for details.)
8. Use Windows Explorer or the command line to run the setup.exe file for the Patch Set 3 software.
The system briefly displays a DOS window while it checks your computer's compatibility, and then opens the Welcome screen.
9. Follow the instructions on the installation screens. For additional information about each screen, see Section 4.1.2.1, "Attend to the Oracle Application Server 10g Release 2 Installation Screens."
4.1.2.1 Attend to the Oracle Application Server 10g Release 2 Installation ScreensThe Oracle Universal Installer guides you through the installation and configuration of Oracle Application Server.
Caution: You cannot run the setup.exe file for Oracle Application Server 10g Release 2 on Microsoft Windows 2008. Oracle Universal Installer fails on start up because of compatibility issues with the operating system. Note that setting the Compatibility mode for the AS10gR2 setup.exe file does not resolve this known issue.
To work around this issue, you must start Oracle Universal Installer by running the setup.exe file for Patch Set 3 (10.1.2.3.0) for Oracle Application Server 10g Release 2. Once the Installer starts, you must change the source directory to the location of the Oracle Application Server 10g Release 2 installation files. The steps that follow provide detailed instructions.

Installing the Oracle Application Server Technology Stack
Installing and Configuring Oracle Application Server 4-3
WelcomeClick Next to continue the installation.
Specify File LocationsDefine where to install Oracle Application Server 10g Release 2 (10.1.2.0.2). The directory into which you install this instance of Oracle Application Server is called the ORACLE_AS10gR2_HOME.
■ Source Path
■ Destination Name: Enter the home name of the application tier. For example, AS10gR2.
■ Destination Path: Enter the complete directory path where this instance of Oracle Application Server will be installed. You can change the path to another location, or you can keep the default path. For example, D:\oracle\AS10gR2.
Click Next.
Available Product Components Oracle Application Server Forms and Reports Services 10gSelect the Oracle Application Server Forms and Reports Services 10g 10.1.2.0.2 check box to install all components. Click Next.
Specify Port Configuration OptionsSelect Automatic, and then click Next.
Provide Outgoing Mail Server InformationThe mail server is optional. It is not needed to run TMS.
Click Next.
Specify Instance Name and ias_admin PasswordComplete this screen as follows:
■ Enter a name for the Oracle Application Server 10g Release 2 instance you are installing. The suggested name for this instance is AS10gR2.
Oracle Application Server appends the host name and the domain name to the instance name you specify to form a complete instance name. For example, if you install an instance on a host computer named comp1, and you name the instance AS10gR2, then the full name of the instance is as follows:
AS10gR2.comp1.domain_name.com
■ Enter and confirm a valid ias_admin password to use for the administration of this instance of Oracle Application Server.
Caution: Do not accept the default value. Because you had to start Oracle Universal Installer by running the setup.exe file for Patch Set 3 (10.1.2.3.0) for Oracle Application Server 10g Release 2, the default value specifies the location of the source files for Patch Set 3.
Instead, click Browse to specify the location of the source files for the Oracle Application Server 10g Release 2 installation. For example, D:\Disk xxxxxx-01\stage\products.xml.
Installing the Oracle Application Server Technology Stack
4-4 Oracle Thesaurus Management System Installation Guide
Click Next.
Summary Oracle Application Server Forms and Reports Services 10g 10.1.2.0.2Review the installation details to verify that they are correct. To revisit earlier installation screens and make changes, click Back.
When you are ready to continue, click Install.
InstallThe Install screen displays the progress of the installation. Oracle Universal Installer configures this instance of Oracle Application Server 10g Release 2. The configuration process can take several minutes. Do not interrupt the automated configuration.
You can view a log of this installation session at:
\Program Files (x86)\Oracle\Inventory\logs\installActionstimestamp.log
End of InstallationScroll through and review the information on the End of Installation screen. Oracle Application Server 10g Release 2 saves this information in the following file:
setupinfo.txt
Oracle Universal Installer displays the location of the setupinfo.txt file near the top of the End of Installation section. Make note of this location in case you want to reference the file in the future.
When you have finished reviewing the installation information, click Exit. At the confirmation prompt, click Yes to exit from Oracle Universal Installer.
4.1.2.2 Apply Oracle Application Server 10g Release 2 Patch Set 3 (10.1.2.3.0)To apply Patch Set 3 (10.1.2.3.0) to Oracle Application Server 10g Release 2 Forms and Reports Services:
1. Navigate to the location where you already copied and extracted the Patch Set 3 software.
(Patch Set 3 is the p5983622_10123_WINNT.zip file on the Oracle Clinical 4.6.2 and Oracle Thesaurus Management System 4.6.2 disk.)
2. Locate the setup.exe file for the Patch Set 3 software.
3. Set the Windows Compatibility mode for this setup.exe file. (See Section 4.1.1, "Set the Windows Compatibility Mode for the setup.exe File" for details.)
4. Execute setup.exe to start the Installer and follow the instructions on screen.
Note: During the installation, the system may display the following error message:
The procedure entry point GetProcessImageFileNameW could not be located in the dynamic link library PSAPI.DLL.
You can safely ignore this error message, and click OK to continue.
Note: Do not do any of the configuration steps described in the patch release notes.

Installing the Oracle Application Server Technology Stack
Installing and Configuring Oracle Application Server 4-5
4.1.2.3 Restart the ComputerTo ensure that all configuration changes for Oracle Application Server 10g Release 2 and Patch Set 3 (10.1.2.3.0) are initialized, you must restart the computer before you continue with the next task in the installation process.
4.1.3 Install Oracle Application Server 10g Release 3 (10.1.3.1.0)Oracle Application Server 10g Release 3 provides the latest Java environment for an TMS installation.
To install Oracle Application Server 10g Release 3:
1. Close all running applications on the computer.
2. Log in to the application server using an account with system administrator privileges.
3. Insert the Oracle Clinical 4.6.2 and Oracle Thesaurus Management System 4.6.2 disk.
4. Copy the following two folders and extract the files, which are Patch Set 5 (10.1.3.5.0) for Oracle Application Server 10g Release 3:
■ V17522-01_1of2.zip
■ V17522-01_2of2.zip
5. Insert the Oracle SOA Suite 10g (10.1.3.1.0) for Microsoft Windows (32-bit) disk. (This disk is included in the Oracle Clinical and Oracle Thesaurus Management System 4.6.2 Media Pack.)
6. Navigate to the setup.exe file for the Patch Set 5 software that you previously copied and extracted.
7. Set the Windows Compatibility mode for this setup.exe file. (See Section 4.1.1, "Set the Windows Compatibility Mode for the setup.exe File" for details.)
8. Use Windows Explorer or the command line to run the setup.exe file for the Patch Set 5 software.
The system briefly displays a DOS window while it checks your computer's compatibility, and then opens the Welcome screen.
9. Follow the instructions on the installation screens. For additional information about each screen, see Section 4.1.3.1, "Attend to the Oracle Application Server 10g Release 3 Installation Screens."
Caution: You cannot run the setup.exe file for Oracle Application Server 10g Release 3 on Microsoft Windows 2008. Oracle Universal Installer fails on start up because of compatibility issues with the operating system. Note that setting the Compatibility mode for the AS10gR3 setup.exe file does not resolve this known issue.
To work around this issue, you must start Oracle Universal Installer by running the setup.exe file for Patch Set 5 (10.1.3.5.0) for Oracle Application Server 10g Release 3. Once the Installer starts, you must change the source directory to the location of the Oracle Application Server 10g Release 3 installation files. The steps that follow provide detailed instructions.

Installing the Oracle Application Server Technology Stack
4-6 Oracle Thesaurus Management System Installation Guide
4.1.3.1 Attend to the Oracle Application Server 10g Release 3 Installation ScreensThe Oracle Universal Installer guides you through the installation of Oracle Application Server.
WelcomeClick Next to continue the installation.
Specify File LocationsDefine where to install Oracle Application Server 10g Release 3. The directory into which you install this instance of Oracle Application Server is called the ORACLE_ AS10gR3_HOME. You specify the full path to this directory.
■ Source Path
■ Destination Name: Enter the home name of the application tier. For example, AS10gR3.
■ Destination Path: Enter the complete directory path where this instance of Oracle Application Server will be installed. You can change the path to another location, or you can keep the default path. For example: D:\oracle\AS10gR3.
Click Next.
Select a Product to Install Select Oracle Application Server SOA Suite 10.1.3.1.0.
Click Next.
Select Installation Type Oracle Application Server SOA Suite 10.1.3.1.0 Select J2EE Server and Web Server (586MB), and then click Next.
Selecting this option installs and configures Oracle Container for J2EE (OC4J), including HTTP Server with SSL support, Oracle Enterprise Manager Application Server Control, and Oracle Process Manager and Notification Server (OPMN).
Specify Port Configuration OptionsSelect Automatic, and then click Next.
Administration SettingsYou need to specify the following administration settings for this instance of Oracle Application Server 10g Release 3:
■ Enter a unique name for this instance of Oracle Application Server 10g Release 3 you are installing.
Caution: Do not accept the default value. Because you had to start Oracle Universal Installer by running the setup.exe file for Patch Set 5 (10.1.3.5.0) for Oracle Application Server 10g Release 3, the default value specifies the location of the source files for Patch Set 5.
Instead, click Browse to specify the location of the source files for the Oracle Application Server 10g Release 3 installation. For example, D:\Disk xxxxxx-01\stage\products.xml.
Installing the Oracle Application Server Technology Stack
Installing and Configuring Oracle Application Server 4-7
■ Enter and confirm an administrator password for this instance of Oracle Application Server 10g Release 3. Note that the administrator user name is oc4jadmin.
■ Select the Configure this as an Administration OC4J instance check box.
In addition, specify the name of the default OC4J instance that is created by the Oracle Universal Installer.
Click Next.
Cluster Topology ConfigurationYou can ignore all settings on this screen. TMS does not use cluster topology. Click Next.
Summary Oracle Application Server SOA Suite 10.1.3.1.0Review the installation details to verify that they are correct. To revisit earlier installation screens and make changes, click Back.
When you are ready to continue, click Install.
InstallThe Install screen displays the progress of the installation. Oracle Universal Installer configures this instance of Oracle Application Server 10g Release 3. The configuration process can take several minutes. Do not interrupt the automated configuration.
You can view a log of this installation session at:
\Program Files (x86)\Oracle\Inventory\logs\installActionstimestamp.log
End of InstallationThe End of Installation screen reports whether the software installed successfully.
Scroll through and review the information, which includes the command for viewing the status of the server and the URL for accessing the Welcome page of the server.
In addition, you can view all this information in the readme.txt file located at:
\ORACLE_AS10gR3_HOME\install\readme.txt
When you have finished reviewing the installation information, click Exit. At the confirmation prompt, click Yes to exit from Oracle Universal Installer.
4.1.3.2 Apply Oracle Application Server 10g Release 3 Patch Set 5 (10.1.3.5.0)To apply Patch Set 5 (10.1.3.5.0) to Oracle Application Server 10g Release 3:
1. Navigate to the location where you already copied and extracted the Patch Set 5 software.
(Patch Set 5 is the V17522-01_1of2.zip and V17522-01_2of2.zip folders on the Oracle Clinical 4.6.2 and Oracle Thesaurus Management System 4.6.2 disk.)
2. Locate the setup.exe file for the Patch Set 5 software.
3. Set the Windows Compatibility mode for this setup.exe file. (See Section 4.1.1, "Set the Windows Compatibility Mode for the setup.exe File" for details.)
4. Execute setup.exe to start the Installer and follow the instructions on screen.
Setting Up Oracle Application Server 10g Release 3 for SSL
4-8 Oracle Thesaurus Management System Installation Guide
4.1.3.3 Configure the Oracle AS10gR3 Process ManagerGo to the Oracle Application Server 10g Release 3 Process Manager.
Change the startup type to Automatic.
4.1.3.4 Restart the ComputerTo ensure that all configuration changes for Oracle Application Server 10g Release 3 and Patch Set 5 (10.1.3.5.0) are initialized, you must restart the computer before you continue with the next task in the installation process.
4.2 Setting Up Oracle Application Server 10g Release 3 for SSLBy default, TMS is set up to work with HTTPS, which combines the Hypertext Transfer Protocol with a Secure Sockets Layer (SSL) / Transport Layer Security (TLS) protocol. The SSL/TLS protocol provides encrypted communication, secure identification of a network Web server, and communications security over the Internet.
Therefore, you must ensure that the default URL for Oracle Application Server 10g Release 3 uses HTTPS. For example:
https://server1.company_name.com.
TMS will not run if the security certificate is not configured properly.
4.3 Modifying the Oracle Process Manager ServiceTo change the login properties of the Oracle AS10gR2 Process Manager Service to use the administrator account:
1. Log in as a user with system administrator privileges.
2. Open the Windows Control Panel.
3. Double-click Administrative Tools.
4. Double-click Services.
5. Select Oracle AS10gR2 Process Manager Service.
6. Open the Action menu, and then click Properties.
7. Click the Log On tab.
a. Set the account to a user with system administrator privileges.
b. Click OK to save your changes.
8. Close the Services dialog box.
Repeat the procedure to change the login properties of the Oracle AS10gR3 Process Manager Service to use the administrator account. Be sure to select the Oracle AS10gR3 Process Manager Service.
Note: Do not do any of the configuration steps described in the patch release notes.
Setting Up the SQL*Net Connections for Existing Databases
Installing and Configuring Oracle Application Server 4-9
4.4 Applying Critical Patch UpdatesEvery quarter, Oracle provides Critical Patch Updates (CPUs) to address security vulnerabilities, and Patch Set Updates (PSUs) to address proactive, critical fixes and security vulnerabilities.
Table 4–1 lists the CPUs that are included on the Oracle Clinical 4.6.2 and Oracle Thesaurus Management System 4.6.2 disk in the media pack. These CPUs are current as of this document release and current with the information in the Oracle Health Sciences Applications Critical Patch Update for January 2011 note on My Oracle Support. Be sure to check My Oracle Support for the latest version of CPUs and PSUs, and then apply the latest patch approved for the Oracle Health Sciences applications.
Before you run the OPatch utility to apply the October 2010 CPUs, set the OPatch compatibility as follows:
set OPATCH_PLATFORM_ID=215
Follow the instructions in the ReadMe file to apply these CPUs.
4.5 Setting Up the SQL*Net Connections for Existing DatabasesTo establish that SQL*Net connections can be created to connect the application server to all databases:
■ Modify ORACLE_AS10gR3_HOME\network\admin\tnsnames.ora. Ensure that it contains an entry for each database.
■ Modify ORACLE_AS10gR2_HOME\network\admin\tnsnames.ora. Ensure that it contains an entry for each database.
4.5.1 Test the Connection from the Application Servers to the DatabaseFor the TMS application to work properly, the database must be able to communicate with the application servers.
To ensure that you can connect to the database from each application server:
1. Open a Microsoft DOS command window.
2. Test the connection from Oracle Application Server 10g Release 2:
a. Define the ORACLE_HOME environment variable:
set ORACLE_HOME=ORACLE_AS10gR2_HOME
For example:
set ORACLE_HOME=D:\oracle\as10gr2
b. Use SQL*Plus to verify that you can connect to the database:
sqlplus system/password
Table 4–1 Critical Patch Updates Included on the Media Pack
Patch Purpose Apply the Patch To… Zip File
6640838 Oracle Universal Installer CPU Oracle Application Server 10g Release 2
p6640838_10106_WINNT.zip
10031950 CPU Oracle Application Server 10g Release 2
p10031950_10123_WINNT.zip
10031963 CPU Oracle Application Server 10g Release 3
p10031963_101350_WINNT.zip
Setting Up the SQL*Net Connections for Existing Databases
4-10 Oracle Thesaurus Management System Installation Guide
3. Test the connection from Oracle Application Server 10g Release 3:
a. Define the ORACLE_HOME environment variable:
set ORACLE_HOME=ORACLE_AS10gR3_HOME
For example:
set ORACLE_HOME=D:\oracle\as10gr3
b. Use SQL*Plus to verify that you can connect to the database:
sqlplus system/password
4.5.2 Troubleshoot Network Connection IssuesIf the system returns a connection error, you must resolve this problem before continuing with the installation of TMS.
Possible causes of errors include:
■ The computer is not physically connected to the network.
■ One of the databases does not exist.
■ The network protocol software is not loaded on the computer. Try a remote login to check.
■ The database or SQL*Net listener process is not started on the server.
■ An incorrect connect string, user ID, or password was entered.
■ The tnsnames.ora file is not present in the correct directory or does not contain the correct entries.
5
Installing the TMS Front End Components 5-1
5 Installing the TMS Front End Components
The TMS Front End includes the TMS Forms Server component, the TMS Reports Server component, and the TMS Server (database server code) component.
This chapter includes the following topics:
■ Section 5.1, "Options for Installing the TMS Front End Components"
■ Section 5.2, "Installing the TMS Front End"
■ Section 5.3, "Installing the TMS Reports Server"
■ Section 5.4, "Installing the TMS Database Server Code"
5.1 Options for Installing the TMS Front End ComponentsWhen you run Oracle Universal Installer to install TMS, you select the product to install. As shown in Figure 5–1, you can select to install the TMS Front End, the TMS Reports Server, or the TMS Server (database server code).
Installing the TMS Front End installs the TMS Forms Server component. In addition, when you select to install the TMS Front End, you can optionally install the TMS Reports Server and the TMS Server at the same time. See Figure 5–1. Choose to include the Reports Server if you want to install the Reports Server on the same computer. For TMS, you always install the TMS Server (database server code) on the same computer as the TMS Front End.
For information about installing these components, see the following sections:
■ Section 5.2, "Installing the TMS Front End," which includes the TMS Forms Server.
■ Section 5.3, "Installing the TMS Reports Server."
■ Section 5.4, "Installing the TMS Database Server Code," which is also called the TMS Server.
In addition to installing the TMS Front End components, you can select to install a new TMS database, upgrade existing TMS databases, and register TMS databases integrated with Oracle Clinical. See Chapter 6, "Creating a TMS Database" and Chapter 7, "Upgrading Oracle Thesaurus Management System to Release 4.6.2" for details.
Note: You do not need to have an installed Oracle database to create a Forms Server. However, you need a supported Oracle database to verify the installation.

Installing the TMS Front End
5-2 Oracle Thesaurus Management System Installation Guide
Figure 5–1 Selecting a TMS Product to Install
5.2 Installing the TMS Front EndTo install the TMS Front End:
1. Log in as a user with system administrator privileges.
2. Insert the Oracle Clinical 4.6.2 and Oracle Thesaurus Management System 4.6.2 disk.
3. Locate and run the following file:
tms\install\setup.exe
The Installer opens to the Welcome screen.
4. Follow the instructions on the installation screens. For additional information about each screen, see Section 5.2.1, "Attend to the TMS Front End Installation Screens."
5.2.1 Attend to the TMS Front End Installation ScreensThe Oracle Universal Installer guides you through the installation and configuration of the TMS Front End.
WelcomeClick Next to continue the installation.
Select a Product to InstallSelect Oracle Thesaurus Management System Front End 4.6.2.0.XX (where XX is the build number).
Click Next.

Installing the TMS Front End
Installing the TMS Front End Components 5-3
Specify Home DetailsEnter values for the Oracle Home location you created when you installed Oracle Application Server 10g Release 2. This installation guide refers to this location as ORACLE_AS10gR2_HOME.
■ Name: Select the name of the correct Oracle Home; for example, AS10gR2.
■ Path: Browse for the path to the correct Oracle Home; for example, D:\Oracle\AS10gR2.
Click Next.
Available Product Components Oracle Thesaurus Management System Front EndSelect the components that you want to install as part of the TMS Front End.
The Oracle Thesaurus Management System Front End 4.6.2.0.XX component is automatically selected. You can simultaneously install the TMS Reports Server and the TMS Server (database server code) on the same computer. To do so, select one or both of the following check boxes:
■ Oracle Thesaurus Management System Report Server 4.6.2.0.XX
■ Oracle Thesaurus Management System Server 4.6.2.0.XX
Oracle Thesaurus Management System Front End Choose the Oracle AS10gR3 Home DirectorySelect the Oracle Home location you created when you installed Oracle Application Server 10g Release 3. This installation guide refers to this location as ORACLE_AS10gR3_HOME.
Oracle Thesaurus Management System Front End Choose OPA Home DirectorySpecify the directory that is the root directory for installations of Oracle Health Sciences products. Typically, you respond with the path to the opapps46 directory.
The recommended installation directory for Release 4.6.x is:
drive:\opapps46
This installation guide refers to this location as OPA_HOME.
Click Next.
Oracle Thesaurus Management System Front End Enter OC4J Admin PasswordWhen you installed Oracle Application Server 10g Release 3, you created a password for the OC4J administrator. You must enter and confirm that password.
Oracle Thesaurus Management System Front End Enter OPMN Port NumberEnter the port number that the Oracle Process Manager and Notification Server (OPMN Server) uses. The default port number is 6004.
Note: If you choose to install the TMS Reports Server, additional screens appear in the Installer. Follow instructions in Section 5.3, "Installing the TMS Reports Server."
Installing the TMS Front End
5-4 Oracle Thesaurus Management System Installation Guide
If you modified the default installation, you can check the following configuration file for the OPMN port number:
\ORACLE_AS10gR3_HOME\opmn\conf\opmn.xml
Oracle Thesaurus Management System Front End Choose NLS LanguageEnter the NLS language setting that is appropriate for your database character set. The default value is AMERICAN_AMERICA.UTF8.
For information about the guidelines and requirements for character sets, see Section 1.4, "Choosing a Character Set."
Click Next.
Oracle Thesaurus Management System Front End Choose NLS Date Format All Oracle Health Sciences applications require a date format with a four-digit year. For example, DD-MON-RRRR.
If the NLS_DATE_FORMAT entry in the system registry is configured, Oracle Universal Installer displays that value by default. Adjust or enter the date format.
Click Next.
Oracle Thesaurus Management System Front End Enter Report Queue Manager MachineBy default, the Oracle Universal Installer displays the IP address or the name of the computer that has the Report Queue Manager installed. Accept the default value. Click Next.
Oracle Thesaurus Management System Front End Enter URL for the Report Queue ManagerAccept the default value. Click Next.
Oracle Thesaurus Management System Front End Reports Server MachineEnter the name of the application-tier computer you want to use as the Reports Server, in computer_name.domain_name format. Click Next.
Oracle Thesaurus Management System Front End Enter the URL location of your custom documentationIf you have a directory for custom help, enter the URL location. Use the following syntax:
http://computer.domain:port/opa46/xhelp
Summary Oracle Thesaurus Management System Front End 4.6.2.0.XXThe Summary screen provides information about the global settings, languages, space requirements, and products for this installation.
Note: The following screens do not appear if you already installed Oracle Clinical. In that case, the next screen is the Summary screen.
Installing the TMS Reports Server
Installing the TMS Front End Components 5-5
Review the installation details to verify that they are correct. To revisit earlier installation screens and make changes, click Back.
When you are ready to continue, click Install.
5.2.2 Update the Mandatory System Registry Values for TMS Front EndAfter you install Oracle Thesaurus Management System Front End, you need to add or update the following variables in the Windows System Registry for TMS reports to work:
■ OPA_HTTPS_ENABLED
■ OPA_XDO_PORT
■ OPA_LOCAL_MT_URL
To update the Windows System Registry:
1. Open the Windows System Registry Editor.
2. Navigate to the following key:
\HKEY_LOCAL_MACHINE\SOFTWARE\Wow6432Node\ORACLE\ORACLE_AS10gR2_HOME
3. Add the following entries to the registry:
OPA_HTTPS_ENABLED=1
OPA_XDO_PORT=HTTPS_PORT_NUMBER
where HTTPS_PORT_NUMBER specifies the port where SSL is installed for the Oracle Application Server 10g Release 3 server. For example, port 443.
4. Update the OPA_LOCAL_MT_URL value to include the port number for the Oracle Application Server 10g Release 3 HTTP Server. For example:
OPA_LOCAL_MT_URL=http://127.0.0.1:7777
5.3 Installing the TMS Reports ServerThis section describes installing and configuring a Reports Server. The TMS Reports Server runs on Oracle Application Server 10g Release 2 Forms and Reports Services. It schedules batch jobs such as synchronization.
To install the TMS Reports Server:
1. Log in as a user with system administrator privileges.
2. Insert the Oracle Clinical 4.6.2 and Oracle Thesaurus Management System 4.6.2 disk.
3. Locate and run the following file:
tms\install\setup.exe
The Installer opens to the Welcome screen.
Note: If you install a Reports Server in a different gateway, or subnet, from the Forms Server, report outputs and log files are not created. There is a solution: see Section 5.3.2, "Change to namingServices if Reports and Forms Server Use Different Subnets."

Installing the TMS Reports Server
5-6 Oracle Thesaurus Management System Installation Guide
4. Follow the instructions on the installation screens. For additional information about each screen, see Section 5.3.1, "Attend to the TMS Reports Server Installation Screens."
5.3.1 Attend to the TMS Reports Server Installation ScreensThe Oracle Universal Installer guides you through the installation and configuration of the TMS Reports Server.
WelcomeClick Next to continue the installation.
Select a Product to InstallSelect Oracle Thesaurus Management System Report Server 4.6.2.0.XX (where XX is the build number).
Click Next.
Specify Home DetailsEnter values for the Oracle Home location you created when you installed Oracle Application Server 10g Release 2. This installation guide refers to this location as ORACLE_AS10gR2_HOME.
■ Name: Select the name of the correct Oracle Home; for example, AS10gR2.
■ Path: Browse for the path to the correct Oracle Home; for example, D:\Oracle\AS10gR2.
Click Next.
Oracle Thesaurus Management System Report Server Choose the Oracle AS10gR3 Home DirectorySelect the Oracle Home location you created when you installed Oracle Application Server 10g Release 3. This installation guide refers to this location as ORACLE_AS10gR3_HOME.
Click Next.
Oracle Thesaurus Management System Report Server Choose OPA Home DirectorySpecify the directory that is the root directory for installations of Oracle Health Sciences products. Typically, you respond with the path to the opapps46 directory.
The recommended installation directory for Release 4.6.x is:
drive:\opapps46
This installation guide refers to this location as OPA_HOME.
Click Next.
Oracle Thesaurus Management System Report Server Enter OC4J Admin PasswordWhen you installed Oracle Application Server 10g Release 3, you created a password for the OC4J administrator. You must enter and confirm that password.
Installing the TMS Reports Server
Installing the TMS Front End Components 5-7
Oracle Thesaurus Management System Report Server Enter OPMN Port NumberEnter the port number that the Oracle Process Manager and Notification Server (OPMN Server) uses. The default port number is 6004.
If you modified the default installation, you can check the following configuration file for the OPMN port number:
\ORACLE_AS10gR3_HOME\opmn\conf\opmn.xml
Oracle Thesaurus Management System Report Server Choose NLS LanguageEnter the NLS language setting that is appropriate for your database character set. The default value is AMERICAN_AMERICA.UTF8.
For information about the guidelines and requirements for character sets, see Section 1.4, "Choosing a Character Set."
Click Next.
Oracle Thesaurus Management System Report Server Choose NLS Date Format All Oracle Health Sciences applications require a date format with a four-digit year. For example, DD-MON-RRRR.
If the NLS_DATE_FORMAT entry in the system registry is configured, Oracle Universal Installer displays that value by default. Adjust or enter the date format.
Click Next.
Oracle Thesaurus Management System Report Server Enter Report Server NameBy default, the Installer displays the name of this computer. Accept this default value.
Click Next.
Summary Oracle Thesaurus Management System Report Server 4.6.2.0.XXThe Summary screen provides information about the global settings, languages, space requirements, and products for this installation.
Review the installation details to verify that they are correct. To revisit earlier installation screens and make changes, click Back.
When you are ready to continue, click Install.
5.3.2 Change to namingServices if Reports and Forms Server Use Different SubnetsIf you install a Reports Server in a different subnet, or gateway, from the Forms Server, report outputs and log files are not created.
The solution is to change the way Reports Servers discover other Reports Servers from the Multicast method, which is the default in Oracle Application Server 10g Release 2, to the namingService method. For instructions, download the following document from My Oracle Support:
Title: How to Switch Between Multicast and NamingService in Reports 10.1.2
Article ID: 337619.1
Installing the TMS Database Server Code
5-8 Oracle Thesaurus Management System Installation Guide
Related information is available in documents 336911.1 and 367567.1.
5.4 Installing the TMS Database Server CodeYou install the TMS database server code on the Forms Server.
To install the TMS database server code:
1. Log in as a user with system administrator privileges.
2. Insert the Oracle Clinical 4.6.2 and Oracle Thesaurus Management System 4.6.2 disk.
3. Locate and run the following file:
tms\install\setup.exe
The Installer opens to the Welcome screen.
4. Follow the instructions on the installation screens. For additional information about each screen, see Section 5.4.1, "Attend to the TMS Database Server Code Installation Screens."
5.4.1 Attend to the TMS Database Server Code Installation ScreensThe Oracle Universal Installer guides you through the installation and configuration of the TMS database code server.
WelcomeClick Next to continue the installation.
Select a Product to InstallSelect Oracle Thesaurus Management System Server 4.6.2.0.XX (where XX is the build number).
Click Next.
Specify Home DetailsEnter values for the Oracle Home location you created when you installed Oracle Application Server 10g Release 2. This installation guide refers to this location as ORACLE_AS10gR2_HOME.
■ Name: Select the name of the correct Oracle Home; for example, AS10gR2.
■ Path: Browse for the path to the correct Oracle Home; for example, D:\Oracle\AS10gR2.
Click Next.
Oracle Thesaurus Management System Server OPA Home DirectorySpecify the directory that is the root directory for installations of Oracle Health Sciences products. Typically, you respond with the path to the opapps46 directory.
The recommended installation directory for Release 4.6.x is:
drive:\opapps46
This installation guide refers to this location as OPA_HOME.
Click Next.
Installing the TMS Database Server Code
Installing the TMS Front End Components 5-9
SummaryThe Summary screen provides information about the global settings, languages, space requirements, and products for this installation.
Review the installation details to verify that they are correct. To revisit earlier installation screens and make changes, click Back.
When you are ready to continue, click Install.

Installing the TMS Database Server Code
5-10 Oracle Thesaurus Management System Installation Guide
6
Creating a TMS Database 6-1
6Creating a TMS Database
This chapter describes how to create a new Oracle database for use with Oracle Thesaurus Management System (TMS).
Your Oracle Database 11g Release 2 (11.2.0.2) Patch Set 1 installation must be complete before you can install the TMS database. In addition, you must first install the TMS database server code in the application tier; see Section 5.4, "Installing the TMS Database Server Code."
Single TMS Database or Master Database in a Distributed Environment If you plan to use only one TMS database, or if you are using replication to distribute data among multiple databases, perform the steps in the following sections on the single or master database:
■ Section 6.1, "Review Database Requirements and Recommendations (All Databases)"
■ Section 6.2, "Install TMS Database Objects (Single or Master Database)"
■ Section 6.4, "Load the TMS Jar File (All Databases)"
■ Section 6.5, "Load Reports (All Databases)"
■ Section 6.6, "Create a TMS Administrator User Account (All Databases)"
■ Section 6.7, "Register Databases Integrated with Oracle Clinical" (This step is required only if you are integrating TMS with Oracle Clinical.)
■ Section 6.8, "Load Dictionaries (Single or Master Database)"
Slave Databases If you are installing multiple databases in a distributed environment, perform the steps in the following sections on each slave database:
■ Section 6.1, "Review Database Requirements and Recommendations (All Databases)"
■ Section 6.3, "Install TMS Database Objects (Slave Databases Only)"
■ Section 6.4, "Load the TMS Jar File (All Databases)"
■ Section 6.9, "Complete Distributed Environment Setup" This section includes tasks to be done on both the master and slave databases.
■ Section 6.5, "Load Reports (All Databases)"
Note: For master databases, see also Section 6.9, "Complete Distributed Environment Setup."

Review Database Requirements and Recommendations (All Databases)
6-2 Oracle Thesaurus Management System Installation Guide
■ Section 6.6, "Create a TMS Administrator User Account (All Databases)"
6.1 Review Database Requirements and Recommendations (All Databases)
Before you install the TMS database component, review the following requirements and recommendations — such as SID names, tablespace sizes, memory management, and initialization parameters — for each TMS database you plan to install.
6.1.1 Start with a New Database InstanceOracle recommends that you set up a new database instance so that neither TMS nor its installation process interferes with other applications. However, you can install TMS on an existing database instance.
6.1.2 Use Lowercase SID Name with Oracle ClinicalIf you are integrating your TMS environment with Oracle Clinical, ensure that the SID name uses lowercase letters only. SIDs with uppercase letters cause conflicts in the Oracle Clinical Data Extract module.
6.1.3 Check Required TablespacesTable 6–1 lists the tablespaces, along with their minimum size, required for TMS. Make sure the database contains these tablespaces. The best practice is to create them with the Autoextend On option, to avoid running out of space.
In addition, you may need to increase the minimum sizes for your installation.
6.1.4 Use the Database Configuration AssistantTo create a new database, use the Database Configuration Assistant. For instructions about the Database Configuration Assistant, see the Oracle Database 11g Release 2 (11.2.0.2) Patch Set 1 documentation, including online help and the Oracle Database Installation Guide 11g Release 2 (11.2) for the appropriate operating system.
6.1.5 Select Required ComponentsWhen you create a TMS database, select the following mandatory components:
■ Oracle Text
■ Oracle JVM
Note: Repeat these requirements for each new database you create.
Table 6–1 Required Tablespaces and Sizes
Tablespace Minimum Size
SYSTEM 900 MB
TEMP 100 MB
UNDOTBS1 700 MB
USERS 500 MB
SYSAUX 600 MB

Review Database Requirements and Recommendations (All Databases)
Creating a TMS Database 6-3
■ Oracle XML DB
6.1.6 Use Automatic Memory ManagementOracle recommends that you use Oracle Database 11g Release 2 (11.2.0.2) Patch Set 1's Automatic Memory Management feature for a new or an upgraded TMS database.
6.1.7 Set Initialization Parameters Table 6–2 lists the required and recommended initialization parameters in the init.ora file for TMS. For those parameters that accept a value from within a range, the values in the table are minimum values.
Tip: Table 6–2 arranges the parameters in alphabetical order. In the Database Configuration Assistant, you can select the Parameter column to sequence the parameters in the same order.
Note: If you make any changes to the initialization parameters, be sure to stop and restart the database in order to acquire the new parameter settings.
Table 6–2 Required and Recommended Initialization Values in the init.ora File
Parameter Value Comments
COMPATIBLE 11.2.0.2.0 Specifies the release with which the Oracle server must maintain compatibility.
DB_BLOCK_SIZE 16384 bytes You cannot change this value after you create the database.
DB_CACHE_SIZE 150 MB Recommended value for 50 to 60 concurrent users. Adjust this value according to your organization's needs.
DB_DOMAIN company.com Make this value the same as your company domain name.
DB_FILES 200 Oracle adds needed space to the control files up to the number specified in the DB_FILES parameter.
EVENT 31151 trace name context forever, level 0x100
Required for HTML generation.
NOTE: Do not include the EVENT parameter when you create the database. Once the database is created, you can add the EVENT parameter to the init.ora file.
JAVA_POOL_SIZE 50 MB Recommended value for 50 to 60 concurrent users. You can change the value of this parameter after installation.
JOB_QUEUE_PROCESSES 10 Developer-specific parameter. You can change the value of this parameter after installation.
LARGE_POOL_SIZE 50 MB Recommended value for 50 to 60 concurrent users.
MEMORY_MAX_TARGET 1000 MB (minimum) Adjust this value according to your organization's needs.
MEMORY_TARGET 1000 MB (minimum) Adjust this value according to your organization's needs.
NLS_DATE_FORMAT DD-MON-RRRR (default value)
Determines the format in which client applications running on the Windows server transfer date information to and from the database. The format must specify the year as RRRR.
NLS_LENGTH_SEMANTICS
BYTE The CHAR value for this parameter is not supported.
OPEN_CURSORS 800 or greater You can change the value of this parameter after installation.
OPTIMIZER_FEATURES_ENABLE
9.2.0 Acts as an umbrella for enabling a series of optimizer features based on an Oracle release number. TMS uses the optimizing features of Oracle9i.
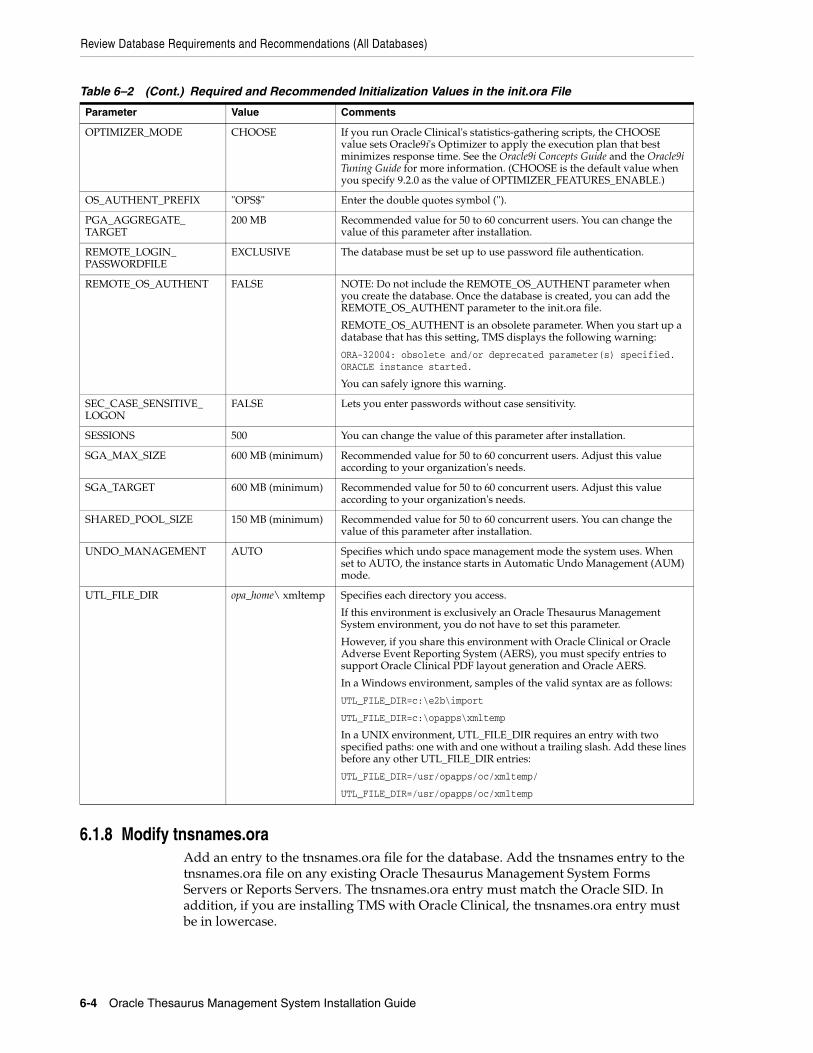
Review Database Requirements and Recommendations (All Databases)
6-4 Oracle Thesaurus Management System Installation Guide
6.1.8 Modify tnsnames.oraAdd an entry to the tnsnames.ora file for the database. Add the tnsnames entry to the tnsnames.ora file on any existing Oracle Thesaurus Management System Forms Servers or Reports Servers. The tnsnames.ora entry must match the Oracle SID. In addition, if you are installing TMS with Oracle Clinical, the tnsnames.ora entry must be in lowercase.
OPTIMIZER_MODE CHOOSE If you run Oracle Clinical's statistics-gathering scripts, the CHOOSE value sets Oracle9i's Optimizer to apply the execution plan that best minimizes response time. See the Oracle9i Concepts Guide and the Oracle9i Tuning Guide for more information. (CHOOSE is the default value when you specify 9.2.0 as the value of OPTIMIZER_FEATURES_ENABLE.)
OS_AUTHENT_PREFIX "OPS$" Enter the double quotes symbol (").
PGA_AGGREGATE_TARGET
200 MB Recommended value for 50 to 60 concurrent users. You can change the value of this parameter after installation.
REMOTE_LOGIN_PASSWORDFILE
EXCLUSIVE The database must be set up to use password file authentication.
REMOTE_OS_AUTHENT FALSE NOTE: Do not include the REMOTE_OS_AUTHENT parameter when you create the database. Once the database is created, you can add the REMOTE_OS_AUTHENT parameter to the init.ora file.
REMOTE_OS_AUTHENT is an obsolete parameter. When you start up a database that has this setting, TMS displays the following warning:
ORA-32004: obsolete and/or deprecated parameter(s) specified. ORACLE instance started.
You can safely ignore this warning.
SEC_CASE_SENSITIVE_LOGON
FALSE Lets you enter passwords without case sensitivity.
SESSIONS 500 You can change the value of this parameter after installation.
SGA_MAX_SIZE 600 MB (minimum) Recommended value for 50 to 60 concurrent users. Adjust this value according to your organization's needs.
SGA_TARGET 600 MB (minimum) Recommended value for 50 to 60 concurrent users. Adjust this value according to your organization's needs.
SHARED_POOL_SIZE 150 MB (minimum) Recommended value for 50 to 60 concurrent users. You can change the value of this parameter after installation.
UNDO_MANAGEMENT AUTO Specifies which undo space management mode the system uses. When set to AUTO, the instance starts in Automatic Undo Management (AUM) mode.
UTL_FILE_DIR opa_home\ xmltemp Specifies each directory you access.
If this environment is exclusively an Oracle Thesaurus Management System environment, you do not have to set this parameter.
However, if you share this environment with Oracle Clinical or Oracle Adverse Event Reporting System (AERS), you must specify entries to support Oracle Clinical PDF layout generation and Oracle AERS.
In a Windows environment, samples of the valid syntax are as follows:
UTL_FILE_DIR=c:\e2b\import
UTL_FILE_DIR=c:\opapps\xmltemp
In a UNIX environment, UTL_FILE_DIR requires an entry with two specified paths: one with and one without a trailing slash. Add these lines before any other UTL_FILE_DIR entries:
UTL_FILE_DIR=/usr/opapps/oc/xmltemp/
UTL_FILE_DIR=/usr/opapps/oc/xmltemp
Table 6–2 (Cont.) Required and Recommended Initialization Values in the init.ora File
Parameter Value Comments
Install TMS Database Objects (Single or Master Database)
Creating a TMS Database 6-5
6.2 Install TMS Database Objects (Single or Master Database)This section describes how to add TMS database objects to each Oracle database that you will use for TMS.
About the Master Database TerminologyThe procedures in this section describe how to install a database that you will use either as a single database in a non-distributed environment or as the master database in a distributed environment. These procedures and the Oracle Universal Installer screens use the term master database even when you are installing in a non-distributed environment.
About Installing New Databases in a Standalone EnvironmentIf you plan to run TMS in a distributed environment and if you install a new database in a TMS standalone environment — that is, one not integrated with Oracle Clinical — you must run the following replication scripts after completing the installation:
■ opasrc01.sql
■ opasrc02.sql
For information about running these scripts, see Section 6.9.5, "Setting Up and Starting Symmetric Replication."
You do not have to run these replication scripts for a non-distributed standalone TMS database, or when you add a new database to a replicated TMS installation that is integrated with Oracle Clinical.
6.2.1 Unlock Accounts Before Installing the TMS DatabaseThe Installer prompts you for passwords to several system accounts. In Oracle Database 11g Release 2 (11.2.0.2) Patch Set 1, some accounts are locked. Before you run the Installer, check these accounts. Unlock them if necessary. You will need to set their passwords when you run the Installer.
Make sure the following accounts are unlocked: SYSTEM, CTXSYS, XDB, and SYS.
When you have finished installing the database, relock any accounts that were locked except for SYSTEM and SYS, which should not be locked.
6.2.2 Start Installing the TMS DatabaseTo start to install the TMS database:
1. Log in to the server computer using an account with system administrator privileges.
2. Insert the Oracle Clinical 4.6.2 and Oracle Thesaurus Management System 4.6.2 disk.
3. Locate and run the setup.exe file:
tms\install\setup.exe
The Installer opens to the Welcome screen.
4. Follow the instructions on the installation screens. For additional information about each screen, see Section 6.2.3, "Attend to the TMS Database Installation Screens."

Install TMS Database Objects (Single or Master Database)
6-6 Oracle Thesaurus Management System Installation Guide
6.2.3 Attend to the TMS Database Installation ScreensThe Oracle Universal Installer guides you through the installation and configuration of a TMS database.
WelcomeClick Next to continue the installation.
Select a Product to InstallSelect TMS Database Install 4.6.2.0.XX (where XX is the build number).
Click Next.
Select Installation Type TMS Database Install 4.6.2.0.XXSelect Master and click Next.
Specify Home DetailsEnter values for the Oracle Home location you created when you installed Oracle Application Server 10g Release 2. This installation guide refers to this location as ORACLE_AS10gR2_HOME.
■ Name: Select the name of the correct Oracle Home; for example, AS10gR2.
■ Path: Browse for the path to the correct Oracle Home; for example, D:\Oracle\AS10gR2.
Click Next.
TMS Database Install TMS Server Code Home DirectoryAccept the default value for the directory path of the database server code. Click Next.
TMS Database Install Enter database connect stringEnter the database name. An alias must exist in tnsnames.ora for this database.
TMS Database Install NLS Settings■ NLS_LANG — Enter the NLS language setting that is appropriate for your
database character set. Oracle recommends the AMERICAN_AMERICA.UTF8 setting. For information about the guidelines and requirements for character sets, see Section 1.4, "Choosing a Character Set."
■ NLS_DATE_FORMAT — Enter a valid date value. All Oracle Health Sciences applications require a date format with a four-digit year. Oracle recommends DD-MON-RRRR.
Click Next.
Note: The Installer sets the LOCAL registry setting to default all connections to this database.
Install TMS Database Objects (Single or Master Database)
Creating a TMS Database 6-7
TMS Database Install Warning: Stop PSUB processIf you are integrating TMS with Oracle Clinical, stop the PSUB process on the database at this point, restarting it only after you have completely installed TMS.
TMS Database Install Directory for data tablespace datafilesEnter the directory for TMS data tablespace files in the appropriate syntax for your operating system, including a trailing slash. Use the same database name you entered as the connect string. For example, /u01/oradata/database_name/.
TMS Database Install Directory for index tablespace datafilesEnter the directory for TMS index tablespace files in the appropriate syntax for your operating system, including a trailing slash. The Installer enters the path you entered for tablespace datafiles as the default.
TMS Database Install Enter Password for schemaIn a series of Installer screens, enter the passwords for SYS, SYSTEM, CTXSYS, OPA, RXC, TMS, TDX, BC4J_INTERNAL, and OPS$TMSBROWSER. You will need these passwords later.
TMS Database Install Ignore Tablespace Creation ErrorsThis setting controls whether the Installer ignores errors that occur when creating the tablespaces. Tablespace creation can fail for several reasons.
The default value is No. In general, you do not want the Installer to ignore tablespace creation errors. For example, you want the Installer to report an error if there is not enough space to create the tablespace.
On the other hand, if you are reinstalling into an existing TMS database, the tablespace creation fails because the tablespace already exists. In this case, you do not need to know about the error.
Click Next.
InformationThe Information screen reports that the Installer will start a SQL*Plus session to complete the database installation. The screen confirms the name of the database installation, the location of the scripts used for the installation, and the location of the log file that you can view for the progress of the installation. Click Next.
Summary TMS Database Install 4.6.2.0.XXThe Summary screen provides information about the global settings, languages, space requirements, and products for this installation.
Click Install. The Installer starts an SQL*Plus session to complete the installation.
End of InstallationThe End of Installation screen provides information about the installation, including whether the processes completed without errors.
Install TMS Database Objects (Slave Databases Only)
6-8 Oracle Thesaurus Management System Installation Guide
When you have finished reviewing the installation information, click Exit. At the confirmation prompt, click Yes to exit from Oracle Universal Installer.
6.2.4 Check the Database Log FileFor each database installation you perform, the Installer creates the following log file in the INSTALL directory:
tmsinst_database_name.log
Always check the log file for status, messages, and errors.
6.3 Install TMS Database Objects (Slave Databases Only)If you are not using TMS in a distributed environment, skip this section. If you plan to use TMS in a distributed environment, use the instructions in this section to install each slave database in the environment.
As in the master database installation, you can modify the initial tablespace sizes. See Section 6.1.3, "Check Required Tablespaces" for information.
About Installing New Databases in a Standalone EnvironmentIf you plan to run TMS in a distributed environment and if you install a new database in a TMS standalone environment — that is, one not integrated with Oracle Clinical — you must run the following replication scripts after completing the installation:
■ opasrc01.sql
■ opasrc02.sql
For information about running these scripts, see Section 6.9.5, "Setting Up and Starting Symmetric Replication."
You do not have to run these replication scripts for a non-distributed standalone TMS database, or when you add a new database to a replicated TMS installation that is integrated with Oracle Clinical.
About Unlocking AccountsIn Oracle Database 11g Release 2 (11.2.0.2) Patch Set 1, some accounts are locked. You must unlock the accounts and verify their passwords before installing a database.
Locked accounts include the CTXSYS account, which is the database account that owns the interMedia context indexes.
To install the slave database objects:
1. Log in to the server computer using an account with system administrator privileges.
2. Insert the Oracle Clinical 4.6.2 and Oracle Thesaurus Management System 4.6.2 disk.
3. Locate and run the setup.exe file:
tms\install\setup.exe
The Installer opens to the Welcome screen.
4. Follow the instructions on the installation screens.
Create a TMS Administrator User Account (All Databases)
Creating a TMS Database 6-9
To install a slave database, follow the installation screens described for a master database installation in Section 6.2.3, "Attend to the TMS Database Installation Screens" with these exceptions:
■ In the Select Installation Type installer screen, select Slave.
■ In the Master Database installer screen, specify the master instance you installed.
6.3.1 Check the Database Log FileFor each database installation you perform, the Installer creates the following log file in the INSTALL directory:
tmsinst_database_name.log
Always check the log file for status, messages, and errors.
6.4 Load the TMS Jar File (All Databases)To load the TMS jar file into each database:
1. Connect to the TMS application server as the opareps user.
2. Point to the database by setting the environment variables.
3. Change to the following directory:
OPA_HOME\tms\install
4. Load the tms_http.jar file manually into each database:
ORACLE_AS10gR2_HOME\bin\loadjava -user tms/password -force -definer -verbose -resolve tms_http.jar
6.5 Load Reports (All Databases)If you installed TMS in the database using the full Oracle AS10gR2 installation then you can skip this manual procedure. You may verify the reports have been loaded successfully.
If you have installed TMS in the database using the Oracle AS10gR2 Forms and Reports Services, you must perform this manual procedure:
1. Transfer directory OPA_HOME\tms\install\reports to the database server.
2. Point to the database by setting the environment variables.
3. Change directories to the directory above the report folder.
4. Load the reports by entering the following command:
sqlldr opa/opa_password control=reports/tmsreports.ctl log=reports/tmsreports_database.log
6.6 Create a TMS Administrator User Account (All Databases)This section describes creating an administrator-level TMS user, which is defined as a user with the OPA_ADMIN role. Users with this role have access to the Define Users window in TMS, which enables them to create additional users in the database.

Register Databases Integrated with Oracle Clinical
6-10 Oracle Thesaurus Management System Installation Guide
To create a new Oracle account for a user:
1. Connect to SQL*Plus as system and run the following script:
OPA_HOME\tms\install\tmsadduser.sql
2. Enter a user ID. If the user account also accesses Oracle Clinical, enter the string OPS$ at the beginning of the user ID.
3. Enter a password for this user. Do not use the identified externally clause; explicitly assign a password.
4. Grant the user the OPA_ADMIN role:
grant OPA_ADMIN to user_id
6.7 Register Databases Integrated with Oracle ClinicalIf you are installing TMS in the same database as Oracle Clinical, you must register the database by running the TMS Installer.
6.7.1 Start the Installer to Register DatabasesTo register databases that are integrated with Oracle Clinical:
1. Log in to the server computer using an account with system administrator privileges.
2. Insert the Oracle Clinical 4.6.2 and Oracle Thesaurus Management System 4.6.2 disk.
3. Locate and run the setup.exe file:
tms\install\setup.exe
The Installer opens to the Welcome screen.
4. Follow the instructions on the installation screens. For additional information about each screen, see Section 6.7.2, "Attend to the TMS Database Registration Screens."
6.7.2 Attend to the TMS Database Registration ScreensThe Oracle Universal Installer guides you through registering a TMS database.
WelcomeClick Next to continue the installation.
Select a Product to InstallSelect TMS Database Registration 4.6.2.0.XX (where XX is the build number).
Note: If the user already has an Oracle Clinical OPS$ user account in the same database, you only need to grant the user the OPA_ADMIN role (see Step 4 only).
Note: Run TMS database registration on slave databases only after you have followed instructions in Section 6.9.5, "Setting Up and Starting Symmetric Replication."
Register Databases Integrated with Oracle Clinical
Creating a TMS Database 6-11
Click Next.
Specify Home DetailsEnter values for the Oracle Home location you created when you installed Oracle Application Server 10g Release 2. This installation guide refers to this location as ORACLE_AS10gR2_HOME.
■ Name: Select the name of the correct Oracle Home; for example, AS10gR2.
■ Path: Browse for the path to the correct Oracle Home; for example, D:\Oracle\AS10gR2.
Click Next.
TMS Database Registration TMS Server Code Home DirectoryAccept the default value for the directory path of the database server code. Click Next.
TMS Database Registration Enter Password for schemaIn a series of Installer screens, enter the passwords for the SYSTEM, RXC, and TMS accounts. You will need these passwords later.
TMS Database Registration Enter the global name of TMS databaseEnter the global name of the TMS database; for example, tms462.us.oracle.com. A SQL*Net TNS alias must exist with the same name; see Section 4.5, "Setting Up the SQL*Net Connections for Existing Databases."
To find the global name, connect to SQL*Plus and enter:
select * from global_name
TMS Database Registration Enter the global name of Oracle Clinical databaseEnter the global name of the Oracle Clinical database. A SQL*Net TNS alias must exist with the same name.
To find the global name, connect to SQL*Plus and enter:
select * from global_name
InformationThe Information screen reports that the Installer will start a SQL*Plus session to complete the database registration. The screen confirms the location of the scripts used and the location of the log file that you can view for the progress of the installation. Click Next.
Summary TMS Database Registration 4.6.2.0.XXThe Summary screen provides information about the global settings, languages, space requirements, and products for this installation.
Click Install. The Installer starts an SQL*Plus session to complete the installation.

Load Dictionaries (Single or Master Database)
6-12 Oracle Thesaurus Management System Installation Guide
End of InstallationThe End of Installation screen provides information about the installation, including whether the processes completed without errors.
When you have finished reviewing the installation information, click Exit. At the confirmation prompt, click Yes to exit from Oracle Universal Installer.
6.8 Load Dictionaries (Single or Master Database) See the Oracle Thesaurus Management System User's Guide for information about loading dictionaries.
If you are installing TMS with AERS in a distributed environment, you must load the AERS-TMS dictionaries onto the master database before creating an export file and importing it to the slave databases.
You can load dictionaries at any time. However, if you are installing TMS in a distributed environment, even without AERS, you may want to load dictionaries now so as to avoid doing another export/import later.
6.9 Complete Distributed Environment SetupThis section applies only if you are setting up a distributed environment. It includes the following topics:
■ Section 6.9.1, "Export Data from the Master Database"
■ Section 6.9.2, "Import Data to the Slave Database"
■ Section 6.9.3, "Clean Up after Export and Import"
■ Section 6.9.4, "Complete the Creation of the Slave Database"
■ Section 6.9.5, "Setting Up and Starting Symmetric Replication"
■ Section 6.9.6, "Register Slave Databases Integrated with Oracle Clinical"
6.9.1 Export Data from the Master DatabaseIf you are installing a distributed environment, you must create an export file of the master database, which you then import into the slave database.
To export data from the master database:
1. Log in to the master database server.
2. Set up a physical directory as follows:
a. Create a new directory. For example: /u01/app/dmp.
b. Grant read and write permission to the Oracle database.
c. Verify that the tmsrepexp.dmp file does not exist in the directory. The Data Pump export will fail with an error if the tmsrepexp.dmp file already exists.
3. Create directory object on the master database:
a. Connect to the master database as the SYS user:
sqlplus sys/password as sysdba
b. Create a directory object called TMS_REP_DIR and then map it to the physical directory you created in the previous step.

Complete Distributed Environment Setup
Creating a TMS Database 6-13
CREATE OR REPLACE DIRECTORY TMS_REP_DIR AS 'PHYSICAL_DIR_ON_MASTER';
For example:
CREATE OR REPLACE DIRECTORY TMS_REP_DIR AS '/u01/app/dmp';
c. Grant directory privilege to TMS:
GRANT READ, WRITE ON DIRECTORY TMS_REP_DIR TO TMS;
4. Place tms.par in your working directory.
5. Point local variables to the database.
6. Invoke the Data Pump Export utility:
expdp tms/password PARFILE=tms.par
By default, the Data Pump Export utility creates a log file named export.log. Note that you can use the LOGFILE parameter to customize the name of the log file. For example:
expdp tms/password PARFILE=tms.par LOGFILE=my_export.log
7. Verify that the tmsrepexp.dmp file and an export log file are created in the physical directory you created in Step 2.
8. Open the export log file and verify that no errors occurred.
6.9.2 Import Data to the Slave DatabaseAt every slave database, import the export file from the master database.
To import data to the slave database:
1. Log in to the slave database server.
2. Set up a physical directory as follows:
a. Create a new directory. For example: /u01/app/dmp.
b. Grant read and write permission to the Oracle database.
c. Transfer the tmsrepexp.dmp file from the master database server to this directory.
3. Create directory object on the slave database:
a. Connect to the slave database as the SYS user:
sqlplus sys/password as sysdba
b. Create a directory object called TMS_REP_DIR and then map it to the physical directory you created in the previous step.
CREATE OR REPLACE DIRECTORY TMS_REP_DIR AS 'PHYSICAL_DIR_ON_MASTER';
For example:
CREATE OR REPLACE DIRECTORY TMS_REP_DIR AS '/u01/app/dmp';
c. Grant directory privilege to TMS:
GRANT READ, WRITE ON DIRECTORY TMS_REP_DIR TO TMS;
4. Point local variables to the database.
5. Invoke the Data Pump Import utility:

Complete Distributed Environment Setup
6-14 Oracle Thesaurus Management System Installation Guide
impdp tms/password CONTENT=ALL DIRECTORY=TMS_REP_DIR DUMPFILE=tmsrepexp.dmp TABLE_EXISTS_ACTION=SKIP
By default, the Data Pump Import utility creates a log file named import.log. Note that you can use the LOGFILE parameter to customize the name of the log file. For example:
impdp tms/password CONTENT=ALL DIRECTORY=TMS_REP_DIR DUMPFILE=tmsrepexp.dmp TABLE_EXISTS_ACTION=SKIP LOGFILE=my_export.log
6. Open the import log file and verify that no errors occurred.
6.9.3 Clean Up after Export and ImportTo clean database objects and log files after you export and import data:
1. Drop directory object as SYS user:
REVOKE READ, WRITE ON DIRECTORY TMS_REP_DIR FROM tms; DROP DIRECTORY TMS_REP_DIR;
2. Delete the dump and log files from the physical directory.
3. Complete this procedure on each master database and each slave database.
For additional information about Oracle Data Pump, see the Oracle Database Utilities 11g Release 2 (11.2) documentation.
6.9.4 Complete the Creation of the Slave DatabaseOn the TMS application server for each slave database, set the local variable and run the TMSUPGSLAVE.SQL script. This script generates a log file in the install directory called tmsupgslave_database_name.log.
To set the local variable and run TMSUPGSLAVE.SQL, enter:
set LOCAL=database_name
cd OPA_HOME\tms\install
sqlplus system/password
start tmsupgslave.sql
6.9.5 Setting Up and Starting Symmetric ReplicationThis section describes how to set up symmetric replication for the first time (for new installations), and how to resume it (for upgrades). The steps required depend on your installation configuration.
■ If you do not plan to use TMS in a distributed environment, skip this section.
■ If you are creating a new installation, perform all the steps in this section.
■ If you are upgrading, proceed to Section 6.9.5.2, "Start Replication on the Master Database."
Note: Despite the "UPG" in its name, TMSUPGSLAVE.SQL is the correct script for initial TMS slave database installations.
Complete Distributed Environment Setup
Creating a TMS Database 6-15
If you choose to utilize symmetric replication, refer to the Oracle database manual that describes symmetric replication in detail. The instructions in this section provide the minimal list of the required tasks.
If you are establishing a distributed environment, you should enable symmetric replication for every TMS database.
Database Link and Privileges ChangesTMS users who use TMS for omission management and all users who perform replication must have a TMS database user account on either the master or local databases. In previous versions, TMS required that such users have accounts on both the master and local instances, but this is no longer necessary.
Integrated InstallationIf you plan to integrate TMS with Oracle Clinical in a replicated environment, you must delete the Oracle Clinical RXA_READ public database link. Make sure you suspend Oracle Clinical replication, and then delete the RXA_READ link.
TMS creates its own public database link that does not contain connection information such as user ID and password. Oracle Clinical replication will use the TMS public link instead of RXA_READ.
6.9.5.1 Preliminary Steps to Start ReplicationTo start replication following an initial installation of Release 4.6.2 (that is, you are not upgrading from a previous TMS release), complete the steps described in the following sections:
■ Section 6.9.5.1.1, "Check the initdbname.ora File"
■ Section 6.9.5.1.2, "Run the opasrc01.sql Script"
■ Section 6.9.5.1.3, "Run the opasrc02.sql Script"
6.9.5.1.1 Check the initdbname.ora File For every database in your TMS installation, check that the initdbname.ora file contains the following specifications:
■ JOB_QUEUE_PROCESSES — At least 1
■ GLOBAL_NAMES — TRUE
6.9.5.1.2 Run the opasrc01.sql Script The opasrc01.sql script sets up common symmetric replication components for one database. You run this script once for each database in your installation.
To run the opasrc01.sql script:
1. Connect to the database as the SYSTEM user.
2. Run opasrc01.sql:
@OPA_HOME/tms/install/opasrc01
3. Respond to the prompts as follows:
a. Enter the name for local database: Enter the name of the database to which you are connected.
b. Enter the name for remote database: Press Enter. This script does not require the name of the remote instance.
4. Repeat these steps for every database in your TMS installation.
Complete Distributed Environment Setup
6-16 Oracle Thesaurus Management System Installation Guide
6.9.5.1.3 Run the opasrc02.sql Script The opasrc02.sql script sets up common symmetric replication components. You run this script from each database location for each database location. For example, if you have three databases — A, B, and C — you must run the script six times: A for B, B for A, A for C, C for A, B for C, and C for B.
To run the opasrc02.sql script:
1. Connect to one of the databases as the SYSTEM user.
2. Run opasrc02.sql:
@OPA_HOME/tms/install/opasrc02
3. Respond to the prompts as follows:
a. Enter the name for local database: Enter the name of the database to which you are connected.
b. Enter the name for remote database: Enter the name of the remote database for which you want to create linkage.
c. Enter password: Enter the passwords for the SYSTEM and REPSYS schema on the local database, and the REPSYS schema on the remote database.
You may ignore errors indicating that database links already exist.
4. Repeat from each database location for each database location. Each time you run the script, enter the database to which you are connected at the "local database" prompt and the remote database at the "remote database" prompt.
6.9.5.2 Start Replication on the Master DatabaseThis section describes how to start replication on the master instance in a distributed environment. Complete this procedure when you are starting replication for the first time after an initial installation and when you are starting symmetric replication after upgrading to TMS 4.6.2.
To start replication on the master database:
1. Connect to the master site as the REPSYS user.
2. Create the master replication group, generate support, and resume symmetric replication activity on the master site:
start tmsmsrdefinestart tmsmsrgeneratesupportstart tmsmsrresumeactivity
3. Connect as the TMS user.
4. Create the materialized view logs on the master site:
start tmsmsrmvlog
6.9.5.3 Start Replication on Each Slave InstanceThis section describes how to start replication on a slave instance in a distributed environment. Complete this procedure on each slave instance when you are starting replication for the first time after an initial installation and when you are starting replication after the upgrade to TMS 4.6.2.
For setting up multiple slave instances, suspend the master replication group for setting up slave 2, and later resume the replication activity for both Oracle Clinical (if suspended) and TMS.
To start replication on a slave instance in a distributed environment:

Complete Distributed Environment Setup
Creating a TMS Database 6-17
1. On each Materialized View Site (slave site), connect to SQL*Plus as the REPSYS user and create the materialized view group:
start tmsssrdefine
When the system prompts for the master database, enter master_site.
2. On each slave site, connect as the TMS user and create the materialized views:
start tmsssrcmv
When the system prompts for the master database, enter master_site.
3. On each Materialized View Site (slave site), connect as the REPSYS user and add the materialized views to the Materialized View and Refresh Groups:
start tmsssrmvrepstart tmsssrmvref
4. On each Materialized View Site (slave site), connect as the SYSTEM user and compile all invalid:
start compile_all_invalid
5. On each Materialized View Site (slave site), connect as the REPSYS user and refresh the Materialized View Group:
exec dbms_refresh.refresh('TMS');
6. On each Materialized View Site (slave site), connect as the TMS user and run the following script to complete TMS processing:
start tmsscomplete
■ If you are completing an initial installation, this script populates the TMS_DEF_INSTANCES table.
■ If you are upgrading your installation, this script reports for which X_areas you need to run batch validation (or its equivalent). See Example 6–1, "Results of tmsscomplete Script" for more details.
Example 6–1 Results of tmsscomplete Script
For Oracle Clinical (System=OCL) Source Data, run batch validation for the following X_Areas. For non-Oracle Clinical Source Data, run the equivalent of Oracle Clinical's batch validation for the following X_areas
Based on these sample results, you need to run batch validation for the studies with a CLINICAL_STUDY_ID of 101 and 102, and the equivalent of batch validation for external systems ES1 and ES2.
SYSTEM X_AREA
ES1 0
ES2 1
OCL 101
OCL 102
Complete Distributed Environment Setup
6-18 Oracle Thesaurus Management System Installation Guide
6.9.6 Register Slave Databases Integrated with Oracle ClinicalThis step is required only if you are integrating TMS with Oracle Clinical. Follow instructions in Section 6.7, "Register Databases Integrated with Oracle Clinical."
7
Upgrading Oracle Thesaurus Management System to Release 4.6.2 7-1
7Upgrading Oracle Thesaurus Management System to Release 4.6.2
This chapter describes the recommended approach to upgrading an existing Oracle Thesaurus Management System (TMS) installation to Release 4.6.2. You can use the instructions in this chapter to upgrade from one of the following releases:
■ Release 4.5.2
■ Release 4.6.0
■ Release 4.6.1
This chapter includes the following topics:
■ Section 7.1, "Upgrade to Oracle Database 11g Release 2 (11.2.0.2) Patch Set 1"
■ Section 7.2, "Upgrade Cloned Databases"
■ Section 7.3, "Install the Application Tier"
■ Section 7.4, "Install the TMS Front End"
■ Section 7.5, "Repair TMS Data"
■ Section 7.6, "Upgrade a Single or Master TMS Database"
■ Section 7.7, "Upgrade Slave TMS Databases (Distributed Environments Only)"
■ Section 7.8, "Applying the Latest Patch Set"
7.1 Upgrade to Oracle Database 11g Release 2 (11.2.0.2) Patch Set 1Upgrade the database to Oracle Database 11g Release 2 (11.2.0.2) Patch Set 1. Install all the Enterprise Edition options. For details, see Chapter 2, "Installing Oracle Database 11g Release 2 (11.2.0.2) Patch Set 1 on UNIX."
7.2 Upgrade Cloned DatabasesIf you have cloned a database, access the following document on My Oracle Support:
Cloning Oracle Clinical and TMS 4.6.x Databases Article ID: 883213.1
Note: Even if you have TMS integrated with Oracle Clinical, re-registering databases for integration with Oracle Clinical is not required during an upgrade.
Install the Application Tier
7-2 Oracle Thesaurus Management System Installation Guide
Be sure to follow all the instructions in the document, including running the tmschown.sql script, the opachown.sql script, and if you are using Oracle Clinical with TMS, the chown.sql script, before doing the upgrade.
7.3 Install the Application TierInstall and configure the required Oracle Application Server technology stack, including Oracle Application Server 10g Release 2 and its Patch Set 3, and Oracle Application Server 10g Release 3 and its Patch Set 5. Follow instructions in Chapter 4, "Installing and Configuring Oracle Application Server."
7.4 Install the TMS Front EndInstall the TMS front end, including the server code; follow instructions in Chapter 5, "Installing the TMS Front End Components."
7.5 Repair TMS DataEnsure that you applied the data diagnostic and repair patches (or their successors) listed in this section to your TMS 4.6.1 or TMS 4.6.0 data.
7.5.1 Repairing TMS 4.6.1 DataFollow the patch instructions to apply the following patches to each TMS 4.6.1 database in your entire TMS installation:
■ Patch TMS_4.6.1.8 (or its successor). Includes scripts to find and fix the data affected by Bug 10131304. When VTA approval was required, omissions that matched a nonapproved VTA were not displayed in the Distinct Verbatim Term Omissions tab of the Classify VT Omissions window.
This error occurred, in part, because the system assigned such terms an internal DEF_SEARCH_ID of 2, which means it was manually classified, instead of an internal DEF_SEARCH_ID of 11, which means it matched an unapproved VTA. Terms with an internal DEF_SEARCH_ID of 2 are not displayed in the Distinct Verbatim Term Omissions tab. This patch corrects the processing of new terms. The Find script finds all existing affected terms and populates a Find table with these records. The Fix script updates the DEF_SEARCH_ID to 11 for the terms identified by the Find script.
■ Patch TMS_4.6.1.3 (or its successor). Includes scripts to find and fix the data affected by Bug 9171740. This patch fixes the following error that occurs when you import Oracle Clinical accounts into OPA accounts in the Define Users window:
ORA-0001: unique constraint (OPA.OPA_ACCOUNTS_UK1) violated
The error is due to duplicate records in the OPA_ACCOUNTS table. A duplicate record has a different account ID for the same account_name and instance_name. You use the Find and Fix scripts to identify and fix existing duplicate records.
7.5.2 Repairing TMS 4.6.0 DataFollow the patch instructions to apply the following patch to each TMS 4.6.0 database in your entire TMS installation:
■ Patch TMS_4.6.0.32 (or its successor). Includes scripts to find and fix the data affected by Bug 9408584.
Upgrade a Single or Master TMS Database
Upgrading Oracle Thesaurus Management System to Release 4.6.2 7-3
7.6 Upgrade a Single or Master TMS DatabaseFollow the instructions in this section when you are upgrading a single TMS database or, if you have a distributed environment, to upgrade the master TMS database. You must perform the tasks described in previous sections first.
To upgrade the TMS databases, complete the following tasks:
■ Section 7.6.1, "Suspend Symmetric Replication (Distributed Environment Only)"
■ Section 7.6.2, "Start the Database Upgrade"
■ Section 7.6.3, "Attend to the TMS Database Upgrade Installation Screens"
■ Section 7.6.4, "Check Installation Log for Errors"
■ Section 7.6.5, "Upgrade TMS Reports"
■ Section 7.6.6, "Configure DSI Import"
■ Section 7.6.7, "Load Dictionaries"
■ Section 7.6.8, "Create an Export File (Distributed Environments Only)"
7.6.1 Suspend Symmetric Replication (Distributed Environment Only)If you are running in a distributed environment, suspend symmetric replication and drop the replication group before you patch the Oracle Database 11g or the TMS databases by following the instructions in this section. Ensure that you use the suspend scripts that are in your TMS server code area.
To suspend replication:
1. Log in to the server using an account with system administrator privileges.
2. Open a MS-DOS command window.
3. Change to the OPA_HOME directory where the install scripts are located, for example:
cd c:\opapps46\tms\install
4. Set the local name for your master site:
set local=Master_Site
Table 7–1 Symmetric Replication Suspend Scripts and Instructions
Run Script Where?For Where? Parameters Purpose and Comments
tmsmupgsrsuspend.sql Master instance
Master instance
None Purpose: Suspends replication activity for all sites.
Comment: Wait until the dba_repgroup view has a status of QUIESCED on the master instance and all slave instances.
tmsmupgsrdrop.sql Master instance
Master instance
None Purpose: Drops replication group for all sites.
Comment: Wait until the dba_repcatlog view is empty on the master instance and on all slave instances.

Upgrade a Single or Master TMS Database
7-4 Oracle Thesaurus Management System Installation Guide
5. Issue these commands:
sqlplus repsys/passwordstart tmsmupgsrsuspend
6. Unschedule the push operation from each slave site to the master site and from the master to each slave. Unschedule as many jobs as necessary to ensure that no scheduled push jobs remain.
Connect to each site as REPSYS and issue this command:
exec dbms_defer_sys.unschedule_push('remote_site');
7. Connect as REPSYS at each slave site and run the following script. On each updateable snapshot site (slave site), this script drops the TMS Snapshot Replication and Refresh Groups.
start tmsssrdrop
8. Connect as TMS at each slave site and run the following script. This step drops the TMS replicated tables on all sites.
start tmsssrdroptables
9. Connect as TMS at the master site and run the following script, which drops the TMS Snapshot Logs at the master site.
start tmsmsrdropmvlog
10. Connect as REPSYS on the master site and issue the following command, which drops the TMS Master Replication Group.
start tmsmupgsrdrop
7.6.2 Start the Database UpgradeTo begin the database upgrade:
1. Log in as a user with system administrator privileges.
2. Insert the Oracle Clinical 4.6.2 and Oracle Thesaurus Management System 4.6.2 disk.
3. Locate and run the following file:
tms\install\setup.exe
The Installer opens to the Welcome screen.
Note: Ensure that you explicitly set the local name so that the system does not use the Oracle local registry variable by mistake. For this reason, it is best to run the upgrade scripts from the Command window, rather than from SQL*Plus.
Note: You must follow steps in Section 7.6 to upgrade the master database before proceeding to the next step.
Upgrade a Single or Master TMS Database
Upgrading Oracle Thesaurus Management System to Release 4.6.2 7-5
4. Follow the instructions on the installation screens. For more information about each screen, Section 7.6.3, "Attend to the TMS Database Upgrade Installation Screens."
7.6.3 Attend to the TMS Database Upgrade Installation ScreensThe Oracle Universal Installer guides you through the process of upgrading a TMS database.
WelcomeClick Next to continue the installation.
Select a Product to InstallSelect TMS Database Upgrade 4.6.2.0.XX (where XX is the build number).
Click Next.
Select Installation Type TMS Database Upgrade 4.6.2.0.XXSelect Master and click Next.
Specify Home DetailsEnter values for the Oracle Home location you created when you installed Oracle Application Server 10g Release 2. This installation guide refers to this location as ORACLE_AS10gR2_HOME.
■ Name: Select the name of the correct Oracle Home; for example, AS10gR2.
■ Path: Browse for the path to the correct Oracle Home; for example, D:\Oracle\AS10gR2.
Click Next.
TMS Database Upgrade TMS Server Code Home DirectoryAccept the default value for the directory path of the database server code. Click Next.
TMS Database Upgrade Enter database connect stringEnter the database name. An alias must exist in your tnsnames.ora file for this database.
TMS Database Upgrade NLS Settings■ NLS_LANG — Enter the NLS language setting that is appropriate for your
database character set. Oracle recommends the AMERICAN_AMERICA.UTF8 setting. For information about the guidelines and requirements for character sets, see Section 1.4, "Choosing a Character Set."
Note: The Installer sets the LOCAL registry setting to default all connections to this database.

Upgrade a Single or Master TMS Database
7-6 Oracle Thesaurus Management System Installation Guide
■ NLS_DATE_FORMAT — Enter a valid date value. All Oracle Health Sciences applications require a date format with a four-digit year. Oracle recommends DD-MON-RRRR.
Click Next.
TMS Database Upgrade Warning: Stop PSUB processIf you are integrating TMS with Oracle Clinical, stop the PSUB process on the database at this point, restarting it only after you have completely installed TMS.
TMS Database Upgrade Directory for data tablespace datafilesEnter the directory for TMS data tablespace files in the appropriate syntax for your operating system, including a trailing slash. Use the same database name you entered as the connect string. For example, /u01/oradata/database_name/.
TMS Database Upgrade Enter Password for schemaIn a series of Installer screens, enter the passwords for SYS, SYSTEM, CTXSYS, OPA, TMS, and RXC. You will need these passwords later.
TMS Database Upgrade Ignore Tablespace Creation ErrorsThis setting controls whether the Installer ignores errors that occur when creating the tablespaces. Tablespace creation can fail for several reasons.
The default value is No. In general, you do not want the Installer to ignore tablespace creation errors. For example, you want the Installer to report an error if there is not enough space to create the tablespace.
On the other hand, if you are reinstalling into an existing TMS database, the tablespace creation fails because the tablespace already exists. In this case, you do not need to know about the error.
Click Next.
InformationThe Information screen reports that the Installer will start a SQL*Plus session to complete the database upgrade. The screen confirms the name of the database installation and the location of the log file that you can view for the progress of the installation. Click Next.
Summary TMS Database Upgrade 4.6.2.0.XXThe Summary screen provides information about the global settings, languages, space requirements, and products for this installation.
Click Install. The Installer starts an SQL*Plus session to complete the installation.
End of InstallationThe End of Installation screen provides information about the installation, including whether the processes completed without errors.
When you have finished reviewing the installation information, click Exit. At the confirmation prompt, click Yes to exit from Oracle Universal Installer.

Upgrade a Single or Master TMS Database
Upgrading Oracle Thesaurus Management System to Release 4.6.2 7-7
7.6.4 Check Installation Log for ErrorsWhen you upgrade from TMS 4.6.1 to TMS 4.6.2, the installation log file may report the following error:
".....Connected.BEGIN tms_dsi_xml_schema.InstallSchemas; END
*ERROR at line 1:ORA-02303: cannot drop or replace a type with type or table dependents ORA-06512: at "XDB.DBMS_XMLSCHEMA_INT", line 3ORA-06512: at "XDB.DBMS_XMLSCHEMA", line 14 ORA-06512: at "TMS.TMS_DSI_XML_SCHEMA", line 35 ORA-06512: at line 1 finished TMSUPG TMS will now attempt to validate any invalidate objects... ...."
This error occurs because the tmsupg.sql upgrade script executes tms_dsi_xml_schema.InstallSchemas before attempting to validate any invalid objects. Execution of tms_dsi_xml_schema.InstallSchemas fails if the database has invalid objects.
If this error occurs, you need to:
1. Run compile invalid until all database objects have been made valid.
2. Run tms_dsi_xml_schema.InstallSchemas manually. See Section 7.6.6, "Configure DSI Import" for details.
7.6.5 Upgrade TMS ReportsFollow instruction in this section only if you are upgrading from TMS 4.6.1. If you are upgrading from 4.5.2 or 4.6, following instructions in Section 6.5, "Load Reports (All Databases)" instead.
To upgrade reports, run a script that deletes the existing seeded reports and then loads new ones:
1. In the MS-DOS command window, change directories to OPA_HOME\tms\install.
2. Log in to SQL*Plus as the opa user:
set LOCAL=database_name
sqlplus opa/opa_password
3. Define variables and run opa_xdo_seeddata.sql:
SQL> define product=TMS
SQL> define oracle_home=ORACLE_10GR2_HOME
SQL> start opa_xdo_seeddata.sql
4. Enter opa password when prompted. Press enter once if the script pauses.
5. Load the reports from the database server, following instructions in Section 6.5, "Load Reports (All Databases)".
7.6.6 Configure DSI ImportIf you plan to use disconnected system integration (DSI), enter following commands:

Upgrade Slave TMS Databases (Distributed Environments Only)
7-8 Oracle Thesaurus Management System Installation Guide
set LOCAL=databasenamesqlplus tms/passwordexec tms_dsi_xml_schema.InstallSchemas;
7.6.7 Load Dictionaries If you need to upgrade any dictionaries or load new dictionaries and are installing a distributed environment, this is a good time to do it since you have suspended replication and will next do an export/import. However, you can load dictionaries at any time; it does not need to be within the context of a TMS upgrade.
If you are installing TMS with AERS in a distributed environment, you must load the AERS-TMS dictionaries onto the master database before creating an export file and importing it to the slave databases.
See the Oracle Thesaurus Management System User's Guide for information about loading dictionaries.
7.6.8 Create an Export File (Distributed Environments Only)If you are upgrading a distributed environment, follow instructions in Section 6.9.1, "Export Data from the Master Database."
7.7 Upgrade Slave TMS Databases (Distributed Environments Only)Follow the instructions in this section to upgrade existing TMS 4.5.2 or TMS 4.6 slave databases to Release 4.6.2 in a distributed environment.
■ Section 7.7.1, "Upgrade Slave Databases"
■ Section 7.7.2, "Upgrade TMS Reports"
■ Section 7.7.3, "Configure DSI Import"
■ Section 7.7.4, "Start Symmetric Replication"
7.7.1 Upgrade Slave DatabasesTo upgrade each slave instance to TMS Release 4.6.2:
1. Start the Oracle Universal Installer on the TMS application server. (See Section 7.6, "Upgrade a Single or Master TMS Database" for details.) Choose the Slave Installation type from the Product Installer screen.
2. Import data from the master instance. Perform this task on the database server. At every slave database, import the export file you created in the previous task .
See Section 6.9.2, "Import Data to the Slave Database" for more information.
Note: TMS 4.6.1 does not support replication. If you are upgrading from TMS 4.6.1, you can skip this section.
Note: You must first create an export file of the master database; see Section 6.9.1, "Export Data from the Master Database."
Upgrade Slave TMS Databases (Distributed Environments Only)
Upgrading Oracle Thesaurus Management System to Release 4.6.2 7-9
3. On the TMS application server, set the LOCAL variable and run the tmsupgslave.sql script by entering the following commands in a MS-DOS window:
cd OPA_HOME\tms\installsqlplus system/passwordstart tmsupgslave.sql
The script generates a log file in the install directory named tmsupgslave_database_name.log.
7.7.2 Upgrade TMS ReportsFollow instruction in this section only if you are upgrading from TMS 4.6.1. If you are upgrading from 4.5.2 or 4.6, following instructions in Section 6.5, "Load Reports (All Databases)" instead.
To upgrade reports, run a script that deletes the existing seeded reports and then loads new ones:
1. In the MS-DOS command window, change directories to OPA_HOME\tms\install.
2. Log in to SQL*Plus as the opa user:
set LOCAL=database_name
sqlplus opa/opa_password
3. Define variables and run ops_xdo_seeddata.sql:
SQL> define product=TMS
SQL> define oracle_home=ORACLE_10GR2_HOME
SQL> start opa_xdo_seeddata.sql
4. Enter opa password when prompted. Press enter once if the script pauses.
5. Load the reports from the database server, following instructions in Section 6.5, "Load Reports (All Databases)".
7.7.3 Configure DSI ImportIf you plan to use disconnected system integration (DSI), enter following commands:
Note: When upgrading a slave database to release 4.6.2, the following types of errors occur in the tmsupg_database_name.sql log file:
Warning: Package created with compilation errors. (and appended PLSQL errors with line numbers) Warning: Package Body created with compilation errors. (and appended PLSQL errors with line numbers) ORA-00942: table or view does not exist ORA-01775: looping chain of synonyms ORA-04063: view "TMS.view_name" has errors
As long as there are no errors in the log file, tmsupgslave_database_name.sql, and there are no invalid OPA/TMS objects in the database after the ugprade, the upgrade can be considered successful and these errors can be ignored.
Applying the Latest Patch Set
7-10 Oracle Thesaurus Management System Installation Guide
set LOCAL=databasenamesqlplus tms/passwordexec tms_dsi_xml_schema.InstallSchemas;
7.7.4 Start Symmetric ReplicationStart replication, following instructions in Section 6.9.5.2, "Start Replication on the Master Database" and Section 6.9.5.3, "Start Replication on Each Slave Instance."
7.8 Applying the Latest Patch SetCheck My Oracle Support article Oracle Thesaurus Management System Patches (Article ID 132626.1) for the latest patch set (4.6.4 or its successor) and apply it. See the patch set release notes for more information.
If you are installing your database on Windows, you must apply the latest patch set. Oracle Thesaurus Management System 4.6.2 is not supported on Windows without Patch Set 4.6.4 or later.
8
Completing a New TMS Installation or Upgrade 8-1
8Completing a New TMS Installation or Upgrade
This chapter includes the following topics:
■ Section 8.1, "Patch TMS"
■ Section 8.2, "Change the Password for the opaconfig User"
■ Section 8.3, "Set Up Database Connections"
■ Section 8.4, "Update HTML Browser and Web Search Engine Bookmarks"
■ Section 8.5, "Test the TMS Forms Server"
■ Section 8.6, "Download the Java Virtual Machine to Client Computers"
■ Section 8.7, "Add a Link to the TMS Launch Page for the HTML Browser"
■ Section 8.8, "Configure the Document Repository"
■ Section 8.9, "Define and Load Dictionaries"
8.1 Patch TMSCheck My Oracle Support Article ID 132626.1, Oracle Thesaurus Management System Patches, for information about patches. See "Finding Information and Patches on My Oracle Support" on page viii.
8.2 Change the Password for the opaconfig User The Users page in Oracle Enterprise Manager 10g Application Server Control provides the options that let you change user passwords, add users, and delete users for the OPAAdmin application.
To change the password for the opaconfig user:
1. Open a Web browser and enter your URL to the Oracle Application Server Forms and Reports Services Welcome page:
computer-name.company-name.com
2. Click the Log on to Oracle Enterprise Manager 10g Application Server Control link to open the Application Server Home page.
3. Log in as user ias_admin with the password you set when you installed the Application Server.
4. Select the appropriate instance.

Set Up Database Connections
8-2 Oracle Thesaurus Management System Installation Guide
5. Click the opa OC4J instance.
6. Click the Applications tab.
7. Click the opaadmin link.
8. Click the Administration tab.
9. Expand the Security administration task, and then select the Go to Task icon for Security Provider.
10. Click the Realms tab.
11. Locate the jazn.com realm, and then click the number in its Users column.
12. Click the opaconfig user name.
a. Enter the old password, enter the new password, and then confirm your new password.
b. Click Apply. Note that the user name remains opaconfig.
13. Restart the opa OC4J instance.
8.3 Set Up Database ConnectionsUse the OPAAdmin application to set up the necessary database connections to be used with the TMS HTML Browser. The information that you enter for each database via the OPAAdmin application is saved in the OpaConfig.xml file on the application server.
For each database:
1. Enter the OPAAdmin application by opening a browser to the following URL:
http://server.domain/opaadmin/opaConfig.do
2. Enter your database values for the following fields:
■ Database Name = Name of your database
■ Host = Host name of your database
■ Port = Port number of your database
■ Sid = Database SID
■ Determine the existing BC4J password for your environment and specify it here.
■ Determine the existing TMS Browser password for your environment and specify it here.
■ Specify Default = true to identify the default database used by RDC Onsite users.
3. Select Save.
8.4 Update HTML Browser and Web Search Engine BookmarksThis section is applicable only if you are upgrading from a previous release. If you are performing a new installation, skip this section.
If you have saved bookmarks for the HTML Browser (called the "Dictionary Browser" or "Light Browser" in earlier releases) or the Web Search Engine on any clients in your

Test the TMS Forms Server
Completing a New TMS Installation or Upgrade 8-3
installation, you must update them to the TMS 4.5 locations by making the changes described in this section.
Update every bookmark on every client. Bookmarks are not replicated among clients.
Export Netscape BookmarksNetscape Navigator is not supported as a client for this release. If you have any bookmarks you want to carry forward into the new release, export them from Netscape to Internet Explorer.
Update HTML Browser BookmarksIn TMS 4.0 and later, the Dictionary Browser URL was:
http://server.domain:port/DAD/tms_user_browser.Home
where:
■ server.domain is the TMS application server through which you connect
■ port is the port used for connections to the Dictionary Browser
■ DAD is the Database Access Descriptor for the database you want to browse
Update these URLs to the following format:
http://server.domain:port/tms/tmsLogin.uix
Direct Old Web Search Engine Bookmarks to the HTML BrowserThe Web Search Engine became obsolete in TMS 4.5, and all of its functionality included in the Source Data and Document Repository searches in the updated HTML Browser.
The Web Search Engine URL was:
http://server.domain/DAD/tms_user_doc.home
where:
■ server.domain is the TMS application server
■ DAD is the Database Access Descriptor for the database to which you are connecting
Change the URL for Web Search Engine bookmark to the URL for the updated HTML Browser.
8.5 Test the TMS Forms ServerConfirm that you can start TMS from this Forms Server before you set up each TMS client.
To test the deployment:
1. Open a browser.
2. Connect to the Oracle Health Sciences URL to start TMS.
The URL has the following syntax:
http://computer_name.domain/opa46/launch.htm
3. Click the Launch hyperlink, which initiates the download of the Java Virtual Machine (JVM).

Download the Java Virtual Machine to Client Computers
8-4 Oracle Thesaurus Management System Installation Guide
8.6 Download the Java Virtual Machine to Client ComputersTo download the Java Virtual Machine (JVM) onto each client computer:
1. Open a browser.
2. Connect to the Oracle Health Sciences URL.
The URL includes the path variable you specified in Section 8.5, "Test the TMS Forms Server." For example, for the default path variable opa46, the URL is:
http://computer_name.domain/opa46/launch.htm
The first time you open TMS, the system prompts you to download JVM. This download is required. It is also available from a link on the Launch page.
8.7 Add a Link to the TMS Launch Page for the HTML BrowserIf you plan to use the HTML Browser from this TMS application server, add an HTML Browser link to the TMS Launch page.
You can create links for more than one database. The URLs you create here bypass the single machine/port/instance combination in the bc4j.xcfg file.
You can set up links for either autologin or the login page, where users are prompted for their user name and password.
■ The user and schema necessary for autologin (ops$tmsbrowser) is created automatically on each database during installation.
■ To set up a link to the TMS Login page, it is not necessary to have the same user name and password on each database. Users must log in using their own user names and passwords.
To add an HTML Browser link to the TMS Launch page:
1. Open the Launch Oracle Pharmaceutical Applications page in a text editor:
OPA_HOME/html/launch.htm
2. Search for the text "Oracle Health Sciences User Group."
3. Under the </tr> tag on the next line, add lines like those shown in Example 8–1, which shows links to two databases displayed on two separate lines. The information in the actual anchor tag must be as shown, with actual values substituted for the variables as described below. To set up an autologin link, use the anchor line in Example 8–2.
4. Save the Launch page. Verify the link connects to the HTML Browser login page.
Example 8–1 Sample HTML Lines for Adding an HTML Browser Link to the TMS Login Page
<tr><td><center><b><font face="Arial,Helvetica"><font size=+1><a href="http://server.domain/tms/tmsLogin.uix"> HTML Browser db1</a></font></font></b></center></td><td><font face="Arial,Helvetica">Launch HTML Browser</font></td></tr><tr><td><center><b><font face="Arial,Helvetica"><font size=+1><a href="http://server.domain:7881/tms/tmsLogin.uix?event=setDb&dbJDBCurl=machine:port:db2"> HTML Browser db2</a></font></font></b></center></td><td><font face="Arial,Helvetica">Launch HTML Browser</font></td></tr>
Define and Load Dictionaries
Completing a New TMS Installation or Upgrade 8-5
These lines add a new row for the HTML Browser under the "Oracle Health Sciences User Group" link. The variables in these lines mean the following:
server is the TMS application server to which you are connected
domain is the domain for your TMS application server; for example, us.oracle.com.
machine is the name of the database server on which your TMS database resides; for example, opasolaris5.
port is the port you use to connect to that database. The default value for Oracle databases is 1521.
db is the name of the database to which you want to connect; for example, sun5x12.
Example 8–2 HTML Anchor Line for an Autologin HTML Browser Link
"http://server.domain:7881/tms/tmsLogin.uix?event=doAutoLogin&dbJDBCurl=machine:port:db1"
Substitute the line above for the anchor line in the sample code shown in Example 8–1.
8.8 Configure the Document RepositoryThe Document Repository enables TMS users to search and customize a set of documents and, if Oracle Clinical is installed, patient data as well.
If you plan to use the Document Repository in the HTML Browser, follow instructions in the Oracle Thesaurus Management System User's Guide chapter on the HTML Browser for the following tasks:
■ Creating the Document Index
■ Choosing a Proxy Server and Configuring its Settings
■ Setting Categories for Web Document Groups
■ Defining Document Server Refresh Rules
■ Defining Document Servers
■ Generating a List of Accessible Documents
■ Populating the Document Index
8.9 Define and Load DictionariesSee the Oracle Thesaurus Management System User's Guide for information about defining TMS dictionaries in the user interface and loading dictionary data.
For sample load scripts, download the following document from My Oracle Support:
Title: Sample Maintenance Scripts for MedDRA, MedDRA Primary Path, MedDRA SMQ, WHO-Drug, and SNOMED
Article ID: 258975.1
Note: The default port value that TMS uses to connect to the application server is 7881.
Define and Load Dictionaries
8-6 Oracle Thesaurus Management System Installation Guide