operator’s manual - better water llc · better water, inc. 698 swan dr. smyrna, tn 37167 ph....
TRANSCRIPT

OPERATOR’S MANUAL
for
MEDI-PORT PB & PB II
PORTABLE R.O. UNIT
MODEL:_________________
SERIAL #:__________________
DATE:_______________
Manufactured By
Better Water, Inc
Part # SUM101780 PBManD
June 14, 2006

Better Water, Inc.
698 Swan Dr. Smyrna, TN 37167 Ph. (615) 355-6063

Better Water, Inc.
698 Swan Dr. Smyrna, TN 37167 Ph. (615) 355-6063
TABLE OF CONTENTS 1 Introduction
Warnings and Cautions Medi-Port PB & PBII R.O. Specification Sheets Service Assistance
2 Unpacking the Portable R.O. 3 Set-Up of the Portable R.O. 4 Start-Up of the Portable R.O. 5 Dialysis Start-Up Procedure 6 Disinfection Frequency
Disinfecting with Minncare or Formaldehyde Minncare Disinfection Procedure Formaldehyde Disinfection Procedure Rinsing Disinfectant from the Portable R.O.
7 Membrane Cleaning: Acid Cleaning – Acid Cleaner 1000 Alkaline Cleaning – Alkaline Cleaner 2000
Rinsing Acid & Alkaline Cleaners from the Portable R.O. 8 Flushing the Portable R.O. 9 Mediport P.B. R.O. Membrane Replacement
Mediport P.B. II R.O. Membrane Replacement 10 Carbon & Sediment Filters Replacement Frequency
How to Replace the Carbon Cartridge How to Replace the 5 Micron Cartridge
11 The .05 micron Bacteria/Endotoxin Filter The Deionization Cartridge Illustrations for Other Accessories
12 Calibrate the Portable R.O. Water Quality Monitor 13 AAMI Water Quality Standards 14 Trouble-Shooting Guide
R.O. Preventative Maintenance Checksheet Consumable Parts List
15 Limited Warranty

Better Water, Inc.
698 Swan Dr. Smyrna, TN 37167 Ph. (615) 355-6063
This page left blank

Better Water, Inc.
698 Swan Dr. Smyrna, TN 37167 Ph. (615) 355-6063
INTRODUCTION
Your Better Water Reverse Osmosis (R.O.) Machine is a computer-aided design, custom built, and of the highest quality. With proper operation, maintenance and care, this device should give you years of reliable service.
Before you start using this device, you must read and understand this manual in its entirety. This manual of Operator’s Instructions describes in considerable detail all of the steps and procedures required to safely operate this device.
It is unsafe to operate this device without a basic understanding of water treatment and a thorough understanding of the contents of this manual.
Your R.O. was designed and built to your specifications and consideration for the information that has been provided to us on the current tap water conditions at your site of operation.
There is not a Reverse Osmosis Machine on the market that is a cure-all for all water treatment requirements. The R.O. cannot do the job alone; therefore, one must understand the changing tap water conditions require monitoring.
Incoming tap water contaminants, temperature, pH, pressure and flow-rates have a direct impact on the quality and quantity of the Reverse Osmosis Machine output.
You must be aware of changing tap water conditions. This can be easily accomplished with good, two-way communications with your municipal drinking water supplier and with routine testing of the tap water provided to you.
To emphasize the importance of water treatment and proper use of water treatment equipment used for hemodialysis, the following is quoted from Health and Human Services Publication FDA 89-4234:

Better Water, Inc.
698 Swan Dr. Smyrna, TN 37167 Ph. (615) 355-6063
“Numerous reports have documented that use of inadequately treated water for hemodialysis poses a severe threat to the health and safety of the hemodialysis patient. Despite this, water treatment and water quality are often neglected areas of hemodialysis. A major reason for this neglect is that water treatment is a technically complex subject which is not generally a part of the education and training of clinical staff in hemodialysis facilities.”
We, at Better Water, Inc., highly recommend the use of this very informative and self-teaching publication in your training programs.
Once the device has been delivered to you, “it is the responsibility of the Medical Director to ensure that the [device] is operated, monitored, and maintained in such a manner so as to satisfy all applicable standards for which the water may be used.” (Quoted from HHS Publication FDA 89-4234).
Please keep this manual readily available for each of your operators to use.
CAUTION When used as a medical device, Federal law restricts this device to sale by
or on the order of a physician. Per CFR 801.109 (b) (1).

Better Water, Inc.
698 Swan Dr. Smyrna, TN 37167 Ph. (615) 355-6063
SAFETY SUMMARY
Words in BOLD CAPITAL letters are used to identify labels on the device and key safety or qualifying statements. This safety summary does not contain all of the safety statements in the manual. Other safety statements are included within the manual text and are enhanced and defined as follows:
READ THIS MANUAL: Prior to operating or servicing this device, this manual must be read and understood. Keep this manual and other associated manuals for future reference and for new operators or qualified service personnel.
SHOCK HAZARD The R.O. unit and accessories must be plugged into a hospital grade G.F.I. receptacle that is properly grounded. DO NOT under any circumstances remove the ground wire or ground prong from any power cord. The power cord is the primary means to disconnect the device on all poles simultaneously. WARNING: Misuse or improper operation of this device could result in
serious injury, death, or other serious reactions to a patient undergoing hemodialysis treatment.
WARNING: Misuse, improper use or handling of chemical disinfectants and chemical cleaning solutions could result in serious injury or even death. You must comply with the information contained in the Material Safety Data Sheet (MSDS) for the chemical being used and follow the procedural steps in this Operator’s Instruction Manual.
NOTE: Statements that provides further clarification.
CAUTION: Statements identifying conditions or practices that could result in equipment or other property damage.
WARNING: Statements identifying conditions or practices that could result in personal injury or loss of life.

Better Water, Inc.
698 Swan Dr. Smyrna, TN 37167 Ph. (615) 355-6063
CAUTION: Improper operation of this device could result in a low or no-flow alarm on the hemodialysis machine.
CAUTION: Never operate the R.O. unit on microbiologically unsafe water supplies, deionized water, or R.O. water. Use of another water supply other than properly treated municipal water supplies may result in biological contamination of the entire R.O. flow path or improper reading on water quality monitor.
CAUTION: Misuse or improper operation of this device will void any warranty.
CAUTION: Never clean or disinfect an R.O. unit with a D.I. Cartridge in place (if so equipped). Use a false cartridge tube throughout the duration of the R.O. cleaning and disinfect procedures, and their rinse outs.
NOTE: Better Water, Inc. recommends that a chlorine and chloramine test be run on the equipment before each treatment. The acceptable levels are shown in section 13 of this manual.
NOTE: In the event of a “Poor Water Quality” alarm, the medical director should immediately be notified. It is then the medical director’s responsibility to direct whether or not to discontinue the treatment immediately, or if it is acceptable to finish the current treatment. After the treatment has been discontinued or completed, the trouble-shooting section in this manual should be read and followed thoroughly to determine the problem. The problem must be corrected before any future treatments can begin.
NOTE: Make sure that the “CAUTION” label on the R.O. is removed after initial start-up of the unit.
NOTE: This manual covers the Mediport PB and the Mediport PBII. Make certain you know which model you have when reading this manual.
NOTE: This manual covers the 115vac/60hZ model of R.O. units. Always confirm voltages and power supplies before operating the unit.

Better Water, Inc.
698 Swan Dr. Smyrna, TN 37167 Ph. (615) 355-6063
ENVIRONMENTAL CONSIDERATIONS Prior to the installation of the RO unit, it will be necessary to provide utilities and an environment suitable for the proper operation of the RO unit and its accessories. POWER: The Better Water PBRO & PBII operate on 115 VAC single-phase
power. It is not recommended that the R.O. unit operate on an emergency electrical supply or any unstable power supply power supply that may over-voltage or under-voltage the R.O. unit. Protection against electrical surges is recommended.
WATER: RO units require a reliable water source. The PBRO & PBII require a
minimum of 10 PSI at a minimum of 1.5 GPM for the PBRO or 2.2 GPM for the PBII. It is important that water is flowing at the design flow rate when testing water pressure than reading static pressure.
If incoming water source is less than 10 PSI then a City Water Booster Pump Assembly will be required. (See accessories section)
DRAIN: A drain outlet is required for the PBRO & PBII units. The drain must
have a capacity of 2 gallons per minute per RO unit for as long and as often the RO unit is operating.
TEMPERATURE: The PBRO & PBII are normally connected to a cold water supply.
The performance specifications are based on 77 F (25 C) feed temperature. With each degree Fahrenheit the temperature falls, the RO product flow will decrease by approximately 1.5%, and each degree Celsius drop, the product flow can reduce as much as 3%. CAUTION: It is necessary to keep the RO unit from freezing to
prevent serious damage to the RO unit. NOISE: The RO unit does not generate much noise, but hard walls may reflect
sound and make the RO unit to appear louder.

Better Water, Inc.
698 Swan Dr. Smyrna, TN 37167 Ph. (615) 355-6063
MEDIPORT SERIES PORTABLE REVERSE OSMOSIS WATER SYSTEMS FOR ACUTE DIALYSIS
MODELS AND SPECIFICATIONS Mediport PB Mediport PB-II Capacity @ 77°F 1,577 cc’s/min.
600 GPD Minimum 2,600 cc’s/min.
1000 GPD Minimum Recovery Rate ≈33% ≈50% Membranes (TFC) 1) 3.2” X 20” 1) 4” X 21” Operating Weight 85 lbs. 110 lbs. Electrical 115 vac, 60 Hz, Single Phase, 6.5 amps
230 vac, 50 Hz available upon request Decibels ≈65 dB ≈55 dB Dimensions 24”H x 10”D x 25 ½”W 30 ¾”H x 12” D x 20 ½”WFlowmeters N/A Yes Incoming Water Requirements 1.5 gpm @ 10 psi 2.2 gpm @ 10 psi Total Chlorine <0.1ppm, Chloramines <0.1 ppm, SDI <5, Operating pH range: 3-11,
Optimum pH range: 5-8, Total Iron <0.1 ppm, Total Hardness <10 gpg, Temp. Range 50-85°F
Gauges Filter In: 20-40 psi; Filter Out: 10-40 psi;
RO Pump: 150-250 psi; Product: 0-70 psi.
Filter In: 20-40 psi; Filter Out: 10-40 psi;
RO Pump: 100-150 psi; Product: 0-70 psi.
Standard Alarms Poor Water Quality, Low Feed Pressure
Water Quality Monitor Digitally Displays: % Rejection, Feed TDS, Product TDS, Alarm Set-Point
Other Standard Features: Cleared 510(k) from the FDA √ √ Renalin/Minncare Compatible √ √ Product Water Recirculate √ √ 3 Lb. Carbon Block Pre-Filter √ √ 5 Micron Pre-Filter √ √ .05 Micron Absolute Final Filter √ Pre-Wired for City Booster Pump √ √ All Quick-Disconnect Connectors √ Easily Removable Electronics √ √ ** Product flow rates are based on 77°F. ** Carts are available for all models ** D.I. polishing cartridges and monitors are available for all models
MEDICAL EQUIPMENT WITH RESPECT TO ELECTRIC SHOCK, FIRE AND
MECHANICAL HAZARDS ONLY IN ACCORDANCE WITH UL 60601-1
85KS

Better Water, Inc.
698 Swan Dr. Smyrna, TN 37167 Ph. (615) 355-6063
ELECTROMAGNETIC INTERFERENCE
This equipment generates, uses and can radiate radio frequency energy and, if not installed and used in accordance with these instructions, may cause harmful interference to other devices in the vicinity. However, there is no guarantee that interference will not occur in a particular installation. If this equipment does cause harmful interference with other devices, which can be determined by turning the equipment off and on, the user is encouraged to try to correct the interference by one or more of the following measures:
• Reorient or relocate the receiving device. • Increase the separation between the equipment. • Connect the equipment into an outlet on a circuit different from that
to which the other device(s) is connected. • Consult the field service technician or manufacturer for help.

Better Water, Inc.
698 Swan Dr. Smyrna, TN 37167 Ph. (615) 355-6063
This page left blank

Better Water, Inc.
698 Swan Dr. Smyrna, TN 37167 Ph. (615) 355-6063
SERVICE ASSISTANCE
If service assistance is required, please take the following steps: Consult the “Troubleshooting” section of this manual. If the problem cannot be identified and corrected by any of the procedures found in that section, then... Contact your Facility Equipment Technician. If the technician is unable to help then… Call Better Water Technical Service Department at (615) 355-6063. Technicians are available for all calls between 7:30 a.m. and 4:00 p.m. CST, Monday through Friday. Technicians are also available at other times for emergency calls only. Product consultants will be on hand to discuss the problem with you and endeavor to rectify it over the phone. If the problem appears to be of a more serious nature, you will be given instructions regarding the action to be taken. Prior to making the phone call, you must be prepared to answer two questions:
1. What RO do you have, i.e. PBRO, PBII 2. What is the serial number of your RO?
RO SERIAL NUMBER: ______________________
RETURN GOODS AUTHORIZATION (RGA) PROCEDURE
If you wish to return goods for, warranty evaluation and/or credit please have your original sales order, invoice and device serial number available when you call Better Water. Call Better Water at (615) 355-6063 and request Customer Service. A Better Water Customer Service representative will provide instructions and a return authorization number, which needs to be clearly written on the outside of the box used to ship your materials. All equipment must be shipped to Better Water with the freight prepaid by the customer. Call our Customer Service Center with any questions or issues concerning freight claims and a representative will discuss your situation. All materials to be returned must be rendered into a non-hazardous condition prior to shipping.

Better Water, Inc.
698 Swan Dr. Smyrna, TN 37167 Ph. (615) 355-6063
This page left blank

Better Water, Inc.
698 Swan Dr. Smyrna, TN 37167 Ph. (615) 355-6063
UNPACKING THE PORTABLE R.O.
1. Inspect the shipping container for damage. If damaged, contact the carrier and request a damage survey report before proceeding. Notice on bill of lading the number of shipments to be received.
2. Remove the strapping from wooden skid.
3. With a box knife, carefully cut along one of the taped seams and/or remove necessary screws.
4. The Mediport-P.B. R.O. is foam packed to ensure safe delivery. Remove Mediport-P.B. R.O. and the control box from foam.

Better Water, Inc.
698 Swan Dr. Smyrna, TN 37167 Ph. (615) 355-6063
This page left blank

Better Water, Inc.
698 Swan Dr. Smyrna, TN 37167 Ph. (615) 355-6063
SET UP OF THE PORTABLE R.O.
1. Remove the cable ties that secure the power cord and wiring harness located on the back of the R.O. control box.
2. Connect the wiring harness to the cannon connector on the outside top of the R.O. unit, taking care that the male and female pins align properly and locking ring is secure. (For standard Mediport-P.B. R.O. only)
3. Locate the hose kit supplied with your portable R.O. Remove cable ties that secure the hose kits.
4. Locate "To Drain", "Water In", and "Product" ports on the left side of the R.O. Remove the shipping plugs from the 90° elbow fittings by depressing the dark gray collar at the end of the 90° elbow and at the same time remove the plugs. (For Mediport P.B. only) This is best accomplished by using one hand, depressing the gray collar with your thumbnail and with the other hand removing the plugs.
5. Connect the red line to the "To Drain" port by inserting tube in the end of the 90 degree elbow, and pushing it in until it seats.
6. Connect the clear braided hose to the "Water In" port by inserting the dark gray end into the end of the 90° elbow, and pushing it in until it seats.
7. Connect the blue product hose to the "Product" port by inserting tube end into the end of the 90° and pushing it in until it seats.
NOTE: For Mediport-P.B. II, steps 5-7 are the same except the tubing has male quick-connect fittings attached at one end.

Better Water, Inc.
698 Swan Dr. Smyrna, TN 37167 Ph. (615) 355-6063
This page left blank

Better Water, Inc.
698 Swan Dr. Smyrna, TN 37167 Ph. (615) 355-6063
START UP OF THE PORTABLE R.O.
1. Connect the female garden hose end of inlet water hose to the tap water source. (If a pretreatment cart is supplied, install the unit on the cart before you proceed.)
2. Turn COLD water on.
3. Open door of R.O. unit and locate the labcock on the carbon filter housing. A new carbon filter has been installed at the factory, as well as a 5 micron sediment filter. The carbon filter has a small amount of carbon dust and fines. The fines and dust must be flushed out before the R.O. is started up. This is done by opening the labcock and flushing approximately 2-3 quarts of water, or until water is clear. When water is clear, close the labcock.
NOTE: On the Mediport-P.B. II, this labcock is located on the inlet solenoid in the lower left-hand corner of the cabinet.
4. Plug the R.O. unit into a hospital-grade 115 volt grounded G.F.I. receptacle.
5. Place product and drain hose into a drain or sink.
6. Confirm the disinfect switch is in the OFF position and should remain in the OFF position until disinfection is required.
7. Place the operate switch in the OPERATE position.
8. After 30 seconds from placing the operate switch in the operate position, press the low pressure reset button. If the low pressure light comes on, press the low pressure button again. If problem persists, check Filter In pressure. If static pressure is not above 20 PSI, refer to the trouble shooting guide.
9. Check the R.O. and all connections for leaks.
10. Product water should be rinsed to drain, for a minimum of 2 hours. After 2 hours of rinsing product to drain, R.O. may be turned off and product line connected to dialysis machine.

Better Water, Inc.
698 Swan Dr. Smyrna, TN 37167 Ph. (615) 355-6063
NOTE: It is important to note that when the R.O. product line is connected to the dialysis machine and the R.O. is running, the dialysis machine must be pulling water in order for an accurate reading of the water quality monitor. It will take approximately 15-20 minutes before optimum water quality is reached. There will be no product pressure when the sample port valve is open, or when the product hose is not connected to the dialysis machine.
11. After rinsing R.O. and checking for leaks, a water sample may be taken and sent off to be analyzed for AAMI standards. Product water sample should be taken from product hose. The Mediport-P.B. R.O. is equipped with a product water sample port. DO NOT take microbiological samples from this port.
12. Check water quality. A minimum of 90% rejection should be maintained. If the R.O. unit does not maintain > 90% rejection, check tap water pH. If pH is above 8.5, this may impact the rejection of the R.O. A D.I. cartridge polishing unit may need to be installed. Consult the factory or your nearest dealer for suggestions. A low tap water TDS / conductivity may also result in a low percent rejection.
13. Check chlorine and chloramine in the product water of the R.O. Per AAMI Standards, a maximum of .1 mg/l chloramine and .5 Free chlorine should be maintained.
14. An in-service should be given to all necessary personnel.

Better Water, Inc.
698 Swan Dr. Smyrna, TN 37167 Ph. (615) 355-6063
DIALYSIS START-UP PROCEDURE
1. Connect inlet water hose to water source.
2. Place R.O. drain hose line to drain.
3. Connect product line to Dialysis Machine.
4. Turn COLD water on to the R.O. unit.
5. Plug unit into a hospital-grade 115 vac G.F.I. receptacle.
6. Place OPERATE switch in the OPERATE position.
7. Press LOW PRESSURE RESET button. If R.O. continues to go into low pressure alarm, there may not be enough water pressure or flow to operate the R.O. unit. Move to another location and repeat steps 1-7.
8. Locate the labcock on the instrument panel (Mediport PB). The water obtained from the labcock is Product Water, the same water used for Dialysis treatment. AAMI standards are .5 PPM maximum for Free chlorine and .1 PPM for chloramines.
NOTE: On the Mediport PBII, the labcock to be used for this test is located on the inside of the R.O. unit in the lower left hand corner, on the inlet solenoid valve. The water obtained from this location is PRE-TREATED water ONLY! DO NOT use this water for Bicarb make-up, or any other application where AAMI Standard quality water is required. This labcock should be used only for testing Chloramine/Chlorine levels.
9. Filter and Filter Out pressure should not exceed 15 PSI differential. If it does, change 5 micron filter located inside the unit.
10. Product pressure will vary as dialysis machine uses water.
11. Refer to the water quality monitor section to ensure water quality is adequate for dialysis.
12. You are ready for Dialysis Treatment. After dialysis is completed, the R.O. should be flushed. (Refer to the flushing procedure.)

Better Water, Inc.
698 Swan Dr. Smyrna, TN 37167 Ph. (615) 355-6063
This page left blank

Better Water, Inc.
698 Swan Dr. Smyrna, TN 37167 Ph. (615) 355-6063
DISINFECTION FREQUENCY
BETTER WATER, INC. recommends that any portable R.O. is disinfected when:
1. The R.O. unit has set unused for a period of, or exceeded 96 hours, or a minimum of one a month, whichever comes first.
2. If bacteria and/or endotoxins are present in product water of the R.O.
NOTE: If the R.O. unit has sat unused for a long period of time as mentioned above, and a standard disinfect as described in this manual will not bring the bacteria/endotoxins within AAMI Standards, an end-to-end disinfection may be required. The factory must be consulted if this is the case for the proper procedure and components needed.

Better Water, Inc.
698 Swan Dr. Smyrna, TN 37167 Ph. (615) 355-6063
DISINFECTING WITH MINNCARE OR FORMALDEHYDE
Minncare contains Hydrogen Peroxide, and must be used with caution, so as not to oxidize the Polyamide membrane.
The following are some precautions that should be observed.
1. Before disinfecting with Minncare, an acid cleaning is recommended to remove mineral deposits from the membrane surface. An acid cleaner such as Acid Cleaner 1000 may be used or a 2% by weight Citric Acid solution may be also used (.3 lb. of 100% Citric Acid to 2 gallons of R.O. water.) Pure white vinegar has also been used successfully. Whichever acid cleaner is used, be sure the cleaning solution does not fall below a pH of 2.0.
2. Dilute Minncare 75cc to 2 gallons of R.O. water.
3. The disinfect procedure that is used for Formaldehyde may be used by substituting a Minncare solution for the Formaldehyde solution.
NOTE: Oxidizers are not recommended to be used on polyamide membranes. Minncare contains Hydrogen Peroxide, which is an oxidizer. However, this disinfectant has, in many cases, been used successfully with little harm to the membrane. Follow the precautions listed in this article and the risk of damaging the membrane will be minimal. If a membrane fails during the R.O. unit’s warranty period, an autopsy of the membrane will be performed. If it is determined that the membrane has been oxidized, the membrane will NOT be replaced under warranty.

Better Water, Inc.
698 Swan Dr. Smyrna, TN 37167 Ph. (615) 355-6063
MINNCARE DISINFECTION PROCEDURE
1. Make a 1% Minncare solution by mixing 75cc of Minncare to 2 gallons of R.O. water.
2. Connect the supplied disinfect hose to the disinfect port located on the instrument panel.
3. Place disinfect hose in disinfect solution taking care that the suction fitting is completely submerged.
4. Place product hose in disinfect solution taking care that the product hose end is completely submerged.
5. Place drain hose in disinfect solution taking care that the drain hose end is completely submerged.
6. Make certain the OPERATE switch is in the OFF position, and place the DISINFECT switch in the DISINFECT position. (On Mediport-P.B. II the disinfect switch is located on back of the R.O.)
7. R.O. will start up and immediately should start pulling up the disinfectant through the disinfect and out through the product hose. If a loud pulsating noise occurs for more than 15 seconds, return DISINFECT switch to the OFF position. Repeat steps 6 and 7.
NOTE: Never run the R.O. in DISINFECT position without a solution being pulled up through the disinfect hose. This will cause the pump to run dry and damage it!
8. The R.O. should recirculate the disinfect solution for 15 minutes. After this period of time, return the DISINFECT switch to the OFF position.
9. Disconnect the disinfect hose from the disinfect port and remove it from the solution.
10. Remove product and drain hoses from solution and place into a drain.
11. Discard disinfect solution that you prepared.

Better Water, Inc.
698 Swan Dr. Smyrna, TN 37167 Ph. (615) 355-6063
12. Place a sign on the dialysis machine indicating that the R.O. is packed in a disinfectant and must NOT be used. Also inform the necessary personnel of this procedure.
13. When disinfecting with Minncare, a 30 minute to 2 hour dwell time is usually adequate.
Medi-Port P.B. Medi-Port P.B. II
Disinfect Tank Connections

Better Water, Inc.
698 Swan Dr. Smyrna, TN 37167 Ph. (615) 355-6063
FORMALDEHYDE DISINFECTION PROCEDURE
NOTE: This procedure is not recommended for home patient use.
1. Make a 4% Formaldehyde solution by mixing 2 gallons of R.O. water to 780cc (or ml) of 37% Formaldehyde.
2. Connect the supplied disinfect hose to the "Disinfect Port" located on the instrument panel.
3. Place disinfect hose in disinfect solution, taking care that the suction fitting is completely submerged.
4. Place product hose in disinfect solution, taking care that the product hose end is completely submerged.
5. Place drain hose in disinfect solution taking care that the drain hose end is completely submerged.
6. Make certain the OPERATE switch is in the OFF position, and place the DISINFECT switch in the DISINFECT position. (On Mediport-P.B. II the disinfect switch is located on back of the R.O.)
7. R.O. will start up and immediately should start pulling up the disinfectant through the disinfect and product hose. If a loud pulsating noise occurs for more than 15 seconds, return DISINFECT switch to the OFF position and repeat steps 6 & 7.
NOTE: Never run the R.O. in the DISINFECT position without a disinfectant being pulled through the unit. This will cause the pump to run dry and damage it!
8. The R.O. should recirculate the disinfectant for 15 minutes. After this period of time, return the DISINFECT switch to OFF position.
9. Disconnect the disinfect hose from the "Disinfect Port" and remove it from the solution.
10. Remove product and drain hoses from solution and place into a drain.
11. Discard the disinfect solution that you prepared.

Better Water, Inc.
698 Swan Dr. Smyrna, TN 37167 Ph. (615) 355-6063
12. Place a sign on the dialysis machine indicating the R.O. is packed in disinfectant and must not be used. Also, inform necessary personnel of this procedure.
13. Formaldehyde should remain in the R.O. for 12 to 24 hours.
NOTE: A new Mediport-P.B. R.O. or Mediport P.B. II R.O. should not be disinfected with Formaldehyde until after 36 hours of operation has occurred. Also, when replacing membranes, the new membranes should have 36 hours of operation before they are disinfected with Formaldehyde.
Medi-Port P.B. Medi-Port P.B. II
Disinfect Tank Connections

Better Water, Inc.
698 Swan Dr. Smyrna, TN 37167 Ph. (615) 355-6063
RINSING DISINFECTANT FROM THE PORTABLE R.O.
1. Inlet water hose should be connected to water source.
2. Turn COLD water on.
3. Make sure Product hose and drain hose are in the drain.
4. Place OPERATE switch in the OPERATE position.
5. Press Low Pressure Reset button – R.O. will then start up.
6. Product should run to drain until it is absolutely certain that no disinfectant is present in the product water.
7. After disinfectant is rinsed clear, the unit is ready for dialysis. Follow the dialysis start up procedure, or return operate switch to the OFF position and remove the caution sign from the dialysis machine, and connect the product hose of the R.O. to the dialysis machine.

Better Water, Inc.
698 Swan Dr. Smyrna, TN 37167 Ph. (615) 355-6063
This page left blank

Better Water, Inc.
698 Swan Dr. Smyrna, TN 37167 Ph. (615) 355-6063
MEMBRANE CLEANING PREFERRED - ACID CLEANER 1000
FOLLOW THESE DIRECTIONS FOR USE WITH ANY BETTER WATER PORTABLE R.O. UNITS
1. Mix 61 grams of Acid Cleaner 1000 to 2 gallons of R.O. or D.I. water.
2. Connect the supplied disinfect hose to the "Disinfect Port" located on instrument panel.
3. Place disinfect hose in cleaning solution, taking care that the suction fitting is completely submerged.
4. Place product hose in cleaning solution, taking care that the suction fitting is completely submerged.
5. Place drain hose in cleaning solution.
6. Place DISINFECT switch in the DISINFECT position. Operate switch must be in the OFF position. (On Mediport-P.B. II the disinfect switch is located in back of the R.O.)
7. R.O. will start up and immediately should start pulling up the cleaning solution through the disinfect and product hose. If a loud pulsating noise occurs for more than 15 seconds, return DISINFECT switch to the OFF position and repeat steps 6 & 7.
8. The R.O. should recirculate the cleaning solution for 15-20 minutes. After this period of time, return the DISINFECT switch to the OFF position.
9. Disconnect the disinfect hose from the "Disinfect Port" and remove it from the solution.
10. Remove product and drain hose from solution and place into drain.
11. Discard the cleaning solution that you prepared.

Better Water, Inc.
698 Swan Dr. Smyrna, TN 37167 Ph. (615) 355-6063
MEMBRANE CLEANING PREFERRED - ALKALINE CLEANER 2000
FOLLOW THESE DIRECTIONS FOR USE WITH ANY BETTER WATER PORTABLE R.O. UNITS
1. Mix 61 grams of Alkaline Cleaner 2000 to 2 gallons of R.O. or D.I. water.
2. Connect the supplied disinfect hose to the "Disinfect Port" located on instrument panel.
3. Place disinfect hose in cleaning solution, taking care that the suction fitting is completely submerged.
4. Place product hose in cleaning solution, taking care that the suction fitting is completely submerged.
5. Place drain hose in cleaning solution.
6. Make certain the OPERATE switch is in the OFF position, and place the DISINFECT switch in the DISINFECT position. (On Mediport-P.B. II the disinfect switch is located in back of the R.O.)
7. R.O. will start up and immediately should start pulling up the cleaning solution through the disinfect and product hose. If a loud pulsating noise occurs for more than 15 seconds, return DISINFECT switch to the OFF position and repeat steps 6 & 7.
8. The R.O. should recirculate the cleaning solution for 15-20 minutes. After this period of time, return the DISINFECT switch to the OFF position.
9. Disconnect the disinfect hose from the "Disinfect Port" and remove it from the solution.
10. Remove product and drain hose from solution and place into drain.
11. Discard the cleaning solution that you prepared.

Better Water, Inc.
698 Swan Dr. Smyrna, TN 37167 Ph. (615) 355-6063
TO RINSE ACID & ALKALINE CLEANERS OUT OF PORTABLE R.O. UNIT
1. Inlet water hose should be connected to the water source.
2. Turn COLD water on.
3. Make sure product hose and drain hose are in the drain.
4. Place OPERATE switch in the OPERATE position.
5. Press Low Pressure button. R.O. will then start up.
6. Product should run to drain 30-45 minutes.
7. After cleaning solution is rinsed clear, the unit is then ready for dialysis. Follow the dialysis start up procedure or return the OPERATE switch to the OFF position. Remove the caution sign from the machine, and connect the product hose to the dialysis machine.

Better Water, Inc.
698 Swan Dr. Smyrna, TN 37167 Ph. (615) 355-6063
This page left blank

Better Water, Inc.
698 Swan Dr. Smyrna, TN 37167 Ph. (615) 355-6063
FLUSHING THE PORTABLE R.O.
Your portable R.O. is equipped with a manual fast flush. This feature increases the life of the membrane by increasing the volume of water that passes over the membrane surface and helps remove suspended particles from the membrane surface.
The R.O. unit should be flushed after every treatment for 15 minutes. This will extend the membrane life.
FLUSHING PROCEDURE:
1. The cold water must be turned on to the R.O. unit.
2. Place the R.O. OPERATE switch in the OPERATE position and press the Low Pressure reset button. The flushing procedure must be performed while the dialysis machine is turned off.
3. On the standard Mediport PB RO, turn the black flush knob counter-clockwise until the pump pressure is at 50 PSI. The flush knob should remain in this position for 15 minutes. After 15 minutes, turn the flush knob clockwise until it stops. R.O. may then be turned off, or dialysis treatment may begin.
On the Mediport PBII, there is a small gray ball valve handle in place of the round black knob. Turn this handle counterclockwise, just like would be done for the standard Mediport PB RO.
NOTE: During the flush mode, the R.O. may shut off on Low Pressure. If this occurs, refer to the trouble-shooting guide.

Better Water, Inc.
698 Swan Dr. Smyrna, TN 37167 Ph. (615) 355-6063
This page left blank

Better Water, Inc.
698 Swan Dr. Smyrna, TN 37167 Ph. (615) 355-6063
MEDIPORT P.B. R.O. MEMBRANE REPLACEMENT
1. Confirm R.O. unit is in the OFF position.
2. Disconnect the red waste line on the bottom of the membrane housing.
3. Unscrew the bowl of the membrane housing by turning bowl counter-clockwise until the bowl is off the cap.
4. Remove old membrane from the bowl.
5. Discard all adapters.
6. Apply a small amount of lubricant to the O-rings of the new product end adapter attached to membrane.
7. Place the new membrane in the bowl, with the brine seal UP, and replace bowl onto the cap SLOWLY. Make sure that the bowl is hand tight.
NOTE: Be careful not to roll or cut the O-rings on the new product end adapter when installing.
8. Replace red drain line to the bottom of the membrane housing.
CAUTION: After a new membrane is installed, the product water must be rinsed to drain for a minimum of 2 hours. Also, the R.O. must not be disinfected before 36 hours of operation with Formaldehyde.

Better Water, Inc.
698 Swan Dr. Smyrna, TN 37167 Ph. (615) 355-6063
MEDIPORT P.B. R.O. MEMBRANE REPLACEMENT
Cap for Membrane Housing
O-Ring For Membrane Housing (Lubricate)
O-Rings For Membrane (Lubricate)
Brine Seal (Shown For Orientation Only)
SUMEM01343 3.2 x 18 MEMBRANE FOR P.B.R.O.
EQSUBMEMHOU01455 #20 – 3/4” MEMBRANE HOUSING

Better Water, Inc.
698 Swan Dr. Smyrna, TN 37167 Ph. (615) 355-6063
MEDIPORT P.B. II R.O. MEMBRANE REPLACEMENT
1. Confirm R.O. unit is in the OFF position, and that all of the pressure in the R.O. has been bled off.
2. Open the top of the R.O. unit to access the top of the membrane.
3. Remove the two pieces of blue tubing, and the clear tubing from the top of the membrane housing.
4. Remove U-Pin from the membrane housing.
5. Carefully remove the end cap from the membrane housing.
6. Remove the membrane from the housing.
7. Apply a small amount of lubricant to the O-rings on the outside and the inside of the top end cap, and on the bottom adapter on the membrane.
NOTE: Be careful not to roll or cut the O-rings on the new product end adapter when installing.
8. Place the new membrane in the housing, with the brine seal DOWN, and replace the end cap. After ensuring that the holes in the end cap and the membrane housing line up, re-install the U-Pin.
9. Replace the blue and clear tubing onto the membrane cap.
CAUTION: After a new membrane is installed, the product water must be rinsed to drain for a minimum of 2 hours. Also, the R.O. must not be disinfected before 36 hours of operation with Formaldehyde.

Better Water, Inc.
698 Swan Dr. Smyrna, TN 37167 Ph. (615) 355-6063
MEDIPORT P.B. II R.O. MEMBRANE REPLACEMENT
Cap for Membrane Housing
O-Ring For Membrane Housing (Lubricate)
O-Ring For Membrane (Inside Cap) (Lubricate)
Brine Seal (Shown For Orientation Only)
SUMEM01340 4.0 x 21 MEMBRANE FOR P.B. II R.O.
Bottom Adapter For Membrane (Lubricate)

Better Water, Inc.
698 Swan Dr. Smyrna, TN 37167 Ph. (615) 355-6063
CARBON AND SEDIMENT FILTERS FREQUENCY OF CHANGE
The carbon cartridge filter that is used in the portable R.O. is a large 3 lb. cartridge containing acid washed carbon, with a minimum iodine number of 900. This cartridge was chosen for maximum cartridge life with few replacements. The carbon cartridge should be replaced when chlorine and/or chloramine levels are, or exceed .1 mg/l, or a minimum of every 3 months whichever comes first. If the chlorine or chloramine levels are high in the feed water, additional pretreatment may be necessary.
The micron sediment filter is a 10" spun wound depth filter. This filter was chosen for maximum filtration to extend the membrane life. This filter should be changed when there is a 15 PSI pressure differential between the Filter In and Filter Out pressure gauges, or if it appears dirty, or a minimum of every 3 months, whichever comes first.
Better Water, Inc. carbon filter part # SUCAOO00547
Better Water, Inc. 5 micron part # SUCAOO00550

Better Water, Inc.
698 Swan Dr. Smyrna, TN 37167 Ph. (615) 355-6063
HOW TO REPLACE THE CARBON CARTRIDGE
1. The Operate and Disinfect switch must be in the OFF position.
2. Turn water supply to the R.O. unit off.
3. Open the door of the R.O. unit and locate the labcock on the carbon filter housing. On the P.B. II, this labcock is located on the inlet solenoid in the lower left corner of the inside of the unit.
4. Obtain a container approximately 1 quart in volume, hold under labcock. Open labcock until water stops.
5. Place the filter wrench on the bowl (the bright blue canister) and turn counter-clockwise until loose. Spin bowl off and remove it from the R.O. cabinet.
6. Remove old carbon cartridge.
7. Remove plastic wrap from new carbon filter and place into the bowl with writing facing up. Check the O-ring on the bowl to be sure it is in its groove.
8. Reinstall filter bowl to the cap (black part marked carbon) and turn clockwise until hand tightened.
9. Make sure labcock is closed on carbon filter housing; on the P.B. II this labcock is located on the inlet solenoid in the lower left corner inside the unit. Turn COLD water on to R.O. unit.
10. Place a quart container under the labcock and open labcock. Fill the container and shut off labcock. Empty the container. Repeat this procedure until water from labcock is clear.

Better Water, Inc.
698 Swan Dr. Smyrna, TN 37167 Ph. (615) 355-6063
HOW TO REPLACE THE 5 MICRON CARTRIDGE
1. The Operate and Disinfect switch must be in the OFF position.
2. Turn water supply to the R.O. unit off.
3. Open the door of the R.O. unit. Locate the labcock on the carbon filter housing. On the P.B. II, this labcock is located on the inlet solenoid in the lower left corner of the inside of the unit.
4. Obtain a container approximately 1 quart in volume and hold under labcock. Open labcock and hold container under labcock until water stops.
5. Place filter wrench on the bowl (the clear canister) and turn counter-clockwise until loose. Spin bowl off and remove it from the R.O. cabinet.
6. Remove old 5 micron cartridge.
7. Remove the wrapping from the new 5 micron cartridge, and place into the bowl. Check the O-ring to be sure it is in its groove.
8. Reinstall filter bowl to the bright blue cap, and turn clockwise until hand tightened.
9. Make sure labcock is closed on carbon filter housing; on the P.B. II this labcock is located on the inlet solenoid in the lower left corner inside the unit. Turn COLD water on to R.O. unit.
10. R.O. is ready for operation.

Better Water, Inc.
698 Swan Dr. Smyrna, TN 37167 Ph. (615) 355-6063
This page left blank

Better Water, Inc.
698 Swan Dr. Smyrna, TN 37167 Ph. (615) 355-6063
THE .05 MICRON BACTERIA/ENDOTOXIN FILTER
When do I need a .05 micron filter on my unit?
NOTE: This filter is standard on all Medi-Port PB II R.O. units.
1. If Total Chlorine in the tap water supply is not at a minimum of 1.0 mg/l (continuous). The lower the incoming level of Total Chlorine, the greater the chance for bacteria to be in the tap water.
2. If the Chlorine fluctuates so much that it is hard to maintain a minimum residual.
3. If the Reverse Osmosis unit sits idle for short periods of time, the filter can act as a buffer between the patient and the unit.
4. The .05 micron filter should be used any time bacteria is a constant problem with the Reverse Osmosis unit, even after disinfecting several times according to the procedures and recommendations.
When do I change the .05 micron capsule filter?
1. When bacteria and endotoxins are out of AAMI standards.
2. Since there are no pressure gauges on the .05 capsule filter, it can be suspected of being clogged when the dialysis machine goes into a “low flow” or “heater disable” alarm.
3. The filter should be replaced every 3 months as preventative maintenance.
To verify that the filter is clogged, perform the following:
Disconnect the dialysis machine inlet hose from the R.O. product hose. Start the R.O. and run the product water to drain. The “Product” pressure gauge should read “0” psi. If it doesn’t, then the filter should be replaced.
Can I run cleaners and disinfectants through the .05 capsule filter?
Yes. Unlike most filters, this filter is designed to handle all of the cleaners and disinfectants used on the Medi-Port PB Reverse Osmosis units. Addition of the filter will not alter the procedures for disinfecting or cleaning the R.O.

Better Water, Inc.
698 Swan Dr. Smyrna, TN 37167 Ph. (615) 355-6063
NOTE: Be sure that a residual test strip is used to verify that there is no disinfectant present in the water exiting the capsule filter before continuing on with a dialysis treatment.
Replacing the .05 micron capsule filter. (Medi-Port PB only)
1. Unscrew the male garden hose connector from the outlet side of the capsule filter.
2. Take the new .05 micron filter out of the bag.
NOTE: Handle with care, as this is a bacteria filter. A pair of surgical gloves should be worn while handling the filter
3. Wrap the outlet end of the new filter with 2-3 wraps of Teflon pipe thread tape, and then screw the male garden hose connector on the outlet side of the new filter.
CAUTION: Do NOT use thread sealant on these threads!
4. Remove the compression nut off of the tubing fitting on the inlet side of the old filter.
5. Re-attach the nut and tubing to the inlet side of the new filter.
6. The replacement of the filter is now complete.
NOTE: The dialysis machine inlet hose connects directly to the garden hose adapter on the outlet side of the .05 capsule filter.

Better Water, Inc.
698 Swan Dr. Smyrna, TN 37167 Ph. (615) 355-6063
THE DEIONIZATION CARTRIDGE
ABOUT THE D.I. POLISHING CARTRIDGE
The D.I. polishing cartridge polishes the product water of the R.O. unit. This is sometimes necessary when the tap water has a high pH, or when concentrations of contaminants are too high for the R.O. to remove the AAMI standards.
The cartridge is a FDA-grade mixed bed deionization cartridge. It has a capacity of 488 grains as NaCl at a 1 meg cut-off.
HOW TO MONITOR THE D.I. POLISHING CARTRIDGE
A resistivity monitor is located on the D.I. polishing unit. When the light is green, the water is above 1 megohm and suitable for dialysis. When the light is red and the audible alarm sounds, the water quality is below 1 megohm and is NOT suitable for dialysis.
NOTE: Water MUST be flowing through the D.I. cartridge for an accurate reading on the resistivity monitor.
Better Water recommends the dialysis machine to be on and using water (such as in a rinse mode) for at least 5 minutes before the resistivity monitor is considered to be accurate. The R.O. unit must be in the operate mode and running when rinsing up the D.I. cartridge.

Better Water, Inc.
698 Swan Dr. Smyrna, TN 37167 Ph. (615) 355-6063
DISINFECTING THE BETTER WATER PORTBALE R.O. WITH A D.I. POLISHING CARTRIDGE
When disinfecting the R.O. unit, the D.I. cartridge MUST be removed and a cartridge substitute tube (supplied with the unit) must be installed. This tube should remain in place during the entire disinfection and rinsing procedure.
After disinfectant is rinsed clear, replace the tube with a new D.I. cartridge (part # P.B.-D.I.-2). The R.O. unit must be in the OFF position and the
product pressure gauge must be at 0 psi when replacing the D.I. cartridge, or installing the cartridge substitute tube.
*** It is very important to be observant of the D.I. cartridge and always change the filter when the light turns red.
*** All samples for AAMI Standards should be collected from the product line that connects to the dialysis machine.
*** DO NOT take samples from the sample port. (Water from the sample port is R.O. water only and does not include the post D.I. water.)
Medi-Port PB Shown With D.I. Cartridge

Better Water, Inc.
698 Swan Dr. Smyrna, TN 37167 Ph. (615) 355-6063
HOW TO REPLACE THE D.I. CARTRIDGE
1. The “OPERATE” and “DISINFECT” switch must be in the “OFF” position.
2. Turn off water supply to the R.O.
3. Place a bucket / container underneath the D.I. bowl on the front (gauge panel) of the R.O. to catch water.
4. Place filter wrench on the bowl (clear canister) and turn counter-clockwise until loose. Spin bowl off and remove it from the R.O. cabinet.
5. Remove old D.I. cartridge.
6. Remove new D.I. cartridge from its plastic wrapper and place into the bowl tapered end up. Check the O-Ring on the bowl to be sure it is in its groove.
7. Install filter bowl onto the blue cap and turn clockwise until hand tightened.
8. Turn on cold water to the R.O.
9. Normal operation may now continue.

Better Water, Inc.
698 Swan Dr. Smyrna, TN 37167 Ph. (615) 355-6063
PROCEDURE FOR CALCULATING D.I. CARTRIDGE CAPACITY
1. Start up the R.O. and run it for 10-15 minutes with product diverted to a drain or connected to a dialysis machine with the dialysis machine on and using water.
2. After 10-15 minutes of running, note the product TDS.
3. The D.I. cartridge has a 488 grain capacity; however, this calculation may not be 100% exact due to factors such as CO2 content, pH, temperature, etc. Use the following formula to estimate the treatments per D.I. cartridge.
FORMULA TO FIND TREATMENTS PER D.I. CARTRIDGE
Product TDS 17.1 = Grains of TDS
Grains of TDS x dialysate flow x 60 x total hours of R.O. operation for a single treatment, then divide the sum by 3,785.
This gives you grains removal per dialysis treatment. Then grain capacity of D.I. cartridge (488) divided by grains removal per dialysis treatment equals approximately number of treatment per D.I. cartridge. (Note: this is only a rough estimate.)
EXAMPLE OF FORMULA ABOVE: PRODUCT TDS = 10 divided by 17.1 (converts TDS to grains per gallon) GRAINS PER GALLON OF TDS x DIALYSATE FLOW (650 cc’s per minute) x 60 (minutes) x 5 (total number of hours of R.O. operation per treatment). This equals 114,035 grains removal in cc’s per treatment. This, divided by 3,785, which converts grains removal in cc’s per treatment to grains removal in gallons per treatment, which equals 30.12. Divide the capacity of the D.I. cartridge (488 grains) by 30.12 to the approximate number of treatments per D.I. cartridge, 16.20.

Better Water, Inc.
698 Swan Dr. Smyrna, TN 37167 Ph. (615) 355-6063
ILLUSTRATIONS ON OTHER ACCESSORIES
BELOW ARE ILLUSTRATIONS OF OTHER ACCESSORIES FOR THE MEDI-PORT PB REVERSE OSMOSIS MACHINES.
Portable Exchange Carbon Filter
Water Softener

Better Water, Inc.
698 Swan Dr. Smyrna, TN 37167 Ph. (615) 355-6063
City Water Booster Pump (EQSUBPBBP01924)
City Water Booster Pump on Medi-Port PB
City Water Booster Pump on Medi-Port PB II ***
Booster Pump Electrical Connector
Booster Pump Electrical Connector

Better Water, Inc.
698 Swan Dr. Smyrna, TN 37167 Ph. (615) 355-6063
PRE-BOOSTER
POST-BOOSTER
WATER IN
WATER IN
Pressure Regulator
Plug Yellow Tubing
Pressure Regulator
Plug
Yellow Tubing
NORMAL OPERATION (Without City Water Booster
BOOSTER PUMP OPERATION
Pressure Switch
Pressure Switch
The City Water Booster Pump is a 115 vac, 1.0 amp, 60 hz pump used to ‘Boost’ the water supply to the R.O. unit when the city water supply pressure is below 10 psi. The pump is electrically connected to the back of the R.O. unit by means of a polarized, twist-lock connector. The pump will only operate when the R.O. is in use.
*** Before using a City Water Booster Pump on a Medi-Port PBII, the following modifications MUST be made to prevent damage to pump or unit: 1. Open cabinet door and locate the pressure regulator on the upper
left corner next to side wall. 2. Locate yellow tubing from pressure regulator and disconnect it at
the white block by pressing in on the grey locking ring and gently pull the tubing out.
3. Locate the grey plug in the fitting immediately above the one that had the yellow tubing in it and remove the plug in the same manner you removed the tubing.
4. Reverse positions of the plug and yellow tubing by placing the plug in the fitting you removed the yellow tubing from and place the yellow tubing into the fitting you removed the plug from. (See illustration below)
INSIDE P.B. II CABINET

Better Water, Inc.
698 Swan Dr. Smyrna, TN 37167 Ph. (615) 355-6063
This page left blank

Better Water, Inc.
698 Swan Dr. Smyrna, TN 37167 Ph. (615) 355-6063
CALIBRATE THE PORTABLE R.O. WATER QUALITY MONITOR
1. You must have a hand held TDS meter that reads in PPM.
2. Calibrate TDS meter with standard NACL solutions, per TDS meter manual.
3. Unplug R.O. unit from hospital-grade G.F.I. 115 VAC receptacle.
4. Open the control box: PBRO - Remove 4 screws from the top of control box, and remove top. PB II – Remove 2 screws from top of cabinet and swing open lid.
5. Plug R.O. unit back into hospital-grade G.F.I. 115 VAC receptacle.
6. Start up R.O. unit ( Note: Dialysis machine must be running if R.O. is connected to dialysis machine, or product line must be disconnected from the dialysis machine and run to drain)
7. At the sample port of the carbon cartridge filter, collect a sample in the hand-held meter (rinse meter cup 2-3 times). Note: On the P.B II R.O., this sample port is located on the inlet solenoid in the lower left corner of the inside of the unit.
8. Push mode button until FEED TDS light illuminates. Compare value from hand-held meter to mediport control/display PCB. If values differ, locate CAL-UP or CAL-DOWN buttons on back of board. Adjust value on board to match value on hand-held meter. Push mode button until % rejection light illuminates and "CAL" is displayed.
9. At the product sample port on side of R.O. unit below incoming water, collect a sample in the hand-held meter (rinse meter cup 2-3 times first).
NOTE: On the Mediport PB II, this sample port does not exist, and the sample should be taken from the blue product hose.

Better Water, Inc.
698 Swan Dr. Smyrna, TN 37167 Ph. (615) 355-6063
10. Push mode button until product TDS light illuminates. Compare value from hand-held meter to mediport control/display PCB. If values differ, adjust the board with the CAL-UP or CAL-DOWN buttons on the back of the board to match value on hand-held meter. Push mode button until % rejection light illuminates and "CAL" is displayed.
NOTE: The following mathematical formula will allow you to convert feed and product values into a % rejection.
Feed – Product = Rejected Sum (divided by) Feed x 100 = % rejection
11. Unplug R.O. unit from hospital grade voltage receptacle.
12. Close the control box in the reverse manner you opened it.
13. Water quality monitor is now calibrated.

Better Water, Inc.
698 Swan Dr. Smyrna, TN 37167 Ph. (615) 355-6063
AAMI WATER QUALITY STANDARD
Category Substance Maximum Concentration (mg/L*)
1. Substances normally included in dialysate
Calcium 2 (mg/l) or (0.1 mEq/L) Magnesium 4 (mg/l) or (0.3 mEq/L) Potassium 8 (mg/l) or (0.2 mEq/L) Sodium 70 (mg/l) or (3.0 mEq/L)
2. Toxic substances regulated by the Safe Drinking Water Act
Antimony 0.006 (mg/l) Arsenic 0.005 (mg/l) Barium 0.1 (mg/l)
Beryllium 0.0004 (mg/l) Cadmium 0.001 (mg/l) Chromium 0.014 (mg/l) Lead 0.005 (mg/l) Mercury 0.0002 (mg/l) Selenium 0.09 (mg/l) Silver 0.005 (mg/l)
3. Other substances identified as toxic in the hemodialysis setting
Aluminum 0.01 (mg/l) Chloramines 0.10 (mg/l) Free Chlorine 0.50 (mg/l) Copper 0.10 (mg/l) Fluoride 0.20 (mg/l) Nitrate (as N) 2.00 (mg/l) Sulfate 100.00 (mg/l)
Thallium 0.002 (mg/l) Zinc 0.10 (mg/l)
*Note that mg/L and ppm can be used interchangeably.

Better Water, Inc.
698 Swan Dr. Smyrna, TN 37167 Ph. (615) 355-6063
This page left blank

Better Water, Inc.
698 Swan Dr. Smyrna, TN 37167 Ph. (615) 355-6063
TROUBLE SHOOTING GUIDE
This Trouble Shooting Guide was written in order to help the user, service technician, or other determine the problem, cause, and solution to the problem. However, not all of the potential problems or solutions have been covered in this Trouble Shooting Guide. For more technical assistance, call one of the factory service technicians and they will be glad to help.

Better Water, Inc.
698 Swan Dr. Smyrna, TN 37167 Ph. (615) 355-6063
SYMPTOM CAUSE EXPLANATION OR SOLUTION Unit will not operate No Power 1. Check for 115 VAC GFI receptacle.
Confirm unit is plugged in securely
2. Confirm COLD water is turned on.
3. Confirm Filter In pressure is above 20 PSI.
4. Confirm low pressure light is not on. If light is on, press low pressure reset button and light should go out.
5. If light stays on and Filter In pressure remains above 20 PSI, call factory for technical assistance.
6. If Filter In pressure is below 20 PSI and COLD water is turned fully on, water pressure is too low to operate unit.
Breaker in back of control box is tripped.
1. Reset breaker. Breaker is tripped if it can be moved.
2. If breaker continues to trip, wait 15 minutes and reset breaker. Check to see if R.O. pump is running.
3. If pump is running, check to see if cooling fan is running. On standard P.B.R.O., the fan is located in bottom left hand former of the R.O. cabinet. On the P.B. II, the fan is located over the pump in the bottom compartment. Call if breaker continues to trip.
Cannon connector not aligned properly
1. Confirm that cannon connector is aligned properly and locking is secured. On the standard P.B. R.O., it is located on the outside top of the unit. On the P.B. II, it is located underneath the control box.

Better Water, Inc.
698 Swan Dr. Smyrna, TN 37167 Ph. (615) 355-6063
SYMPTOM CAUSE EXPLANATION OR SOLUTION Low pressure light remains on after low pressure reset button has been pushed.
Clogged inlet strainer 1. Turn feed water off and relieve pressure. Clean strainer and reinstall.
Insufficient incoming water pressure
1. Filter In pressure must be above 20 PSI before unit will reset. Confirm COLD water is turned fully on.
Low pressure light remains on with sufficient incoming water pressure.
Faulty low pressure switch, faulty reset button, faulty relay, or loose connection on electrical wiring
1. Contact factory for technical assistance.
Low pressure light continues to come on during operation.
Filter In pressure falling below minimum20 PSI
1. Press low pressure reset button If problem persists, you may need to increase water pressure, or you may need a city booster pump.
2. Contact maintenance dept. to see if work is being performed on plumbing system.
3. Feed water supply line may be too small to supply the R.O. unit.
Over maximum 15 PSI Filter In, Filter Out Pressure differential
Fouling of 5 micron filter, or carbon filter, or both
1. Replace cartridges
Poor Product Water Quality
Product Water degrading around product conductivity sensor.
1. Product Water must be diverted to drain, or dialysis machine must be pulling water to ensure accurate product water conductivity reading or percent rejection reading.

Better Water, Inc.
698 Swan Dr. Smyrna, TN 37167 Ph. (615) 355-6063
SYMPTOM CAUSE EXPLANATION OR SOLUTION Feed Water
temperature is below 55°F minimum
1. A reliable temperature blending valve should be installed. The pump pressure on the standard P.B. R.O. can be adjusted to a maximum of 250 PSI. On the P.B. II R.O., this maximum pressure is 150 PSI. This is done by: removing the acorn nut on the pump head, with R.O. unit in normal operate mode. Turn slotted screw clockwise until maximum pressure is reached. Replace acorn nut.
Product to waste ratio has altered from original factory setting.
1. On models that have an (N) in the model number or a PBII, this is unlikely to occur.
Poor Product Water Quality
Water quality monitor is giving inaccurate reading
1. Check percent rejection and product water conductivity with a recently calibrated hand held ppm TDS meter.
2. Dirty or defective sensor.
Feed Water chemistry has changed
1. Obtain a water analysis of the feed water and product water and contact the factory with results.
Membrane needs cleaning
1. Refer to Acid Cleaner 1000 and Alkaline Cleaner 2000 procedure for proper cleaning instructions.
Membrane needs replacing
1. Replace membrane
Loud pulsating noise R.O. pump cavitating 1. If filter In pressure is below 10 PSI, the low pressure switch should cut R.O. unit off. If not, replace low pressure switch.

Better Water, Inc.
698 Swan Dr. Smyrna, TN 37167 Ph. (615) 355-6063
SYMPTOM CAUSE EXPLANATION OR SOLUTION 2. During disinfect or cleaning
procedure, the water is cut off to the unit automatically. All fluid entering the pump’s inlet is pulled through the disinfect port. If the disinfect, product or drain hose is not completely submerged, air may enter the filter pump and damage it. Also, make sure the carbon and 5 micron filters remain in the bowls while recirculating the disinfect or cleaning solution. This keeps air from entering the system.
3. During the Flush mode, the flow across the membrane surface is increased. There-fore, there is a greater require-ment of feed water than during the normal operation mode. (Feed water flow during normal operation mode is a minimum of 1.5 gpm.) Because of the increase in feed water flow, the feed water pressure may fall below the minimum 10 PSI low pressure cut off. It may also be above, but may be noisy during flush mode. If this occurs, the feed water line may need increasing, or feed water pressure may need increasing.
4. Inlet pressure regulator may need adjusting (maximum 40 PSI Filter In pressure during operate mode.)
5. A loose plumbing connection to inlet of R.O. pump may also cause excessive noise.
Carbon cartridge is upside down
1. Slots in end cap should point down.

Better Water, Inc.
698 Swan Dr. Smyrna, TN 37167 Ph. (615) 355-6063
SYMPTOM CAUSE EXPLANATION OR SOLUTION Low pump pressure Pressure by-pass on
pump head needs adjusting.
1. To lower pump pressure, have R.O. unit in operate mode. Remove acorn nut from pump head. Turn slotted screw clockwise until desired pump pressure has reached. 180-250 PSI on the PB RO, and 100-150 PSI on the PBII RO. Replace acorn nut.
Oxidized membrane 1. If product flow is sufficiently higher than 1500 cc/min, P.B. II R.O. flow 2600 cc/min, and waste flow is sufficiently below 2800 cc/min and percent rejection is sufficiently low, this is a good indication that the membrane has been oxidized, and membrane must be replaced.
Defective pump head 1. Pump head must be replaced.
Pump pressure exceeds maximum 250 PSI on PB RO, or 150 PSI on the PBII.
Pressure bypass on pump head needs adjusting
1. To lower pressure, have R.O. in operate mode. Remove acorn nut from pump head. Turn slotted screw counter clockwise until desired pump pressure has reached 180-250 PSI on the standard P.B. R.O., and 100-150 PSI on the P.B. II R.O. Replace acorn nut.
Membrane may be fouled
1. If product flow and/or quality is low, this is a good indication that the membrane needs cleaning. Refer to Acid Cleaner 1000 and Alkaline Cleaner 2000 cleaning procedures.
High Filter In Pressure 1. If Filter In pressure is above 40 PSI, the Inlet pressure regulator needs adjusting. With R.O. in operate mode, loosen lock nut on inlet regulator (Inlet regulator is located between the two filter caps.) Turn "T" handle of inlet regulator counter clockwise until 40 PSI Filter In pressure is reached. Tighten lock nut on regulator.

Better Water, Inc.
698 Swan Dr. Smyrna, TN 37167 Ph. (615) 355-6063
SYMPTOM CAUSE EXPLANATION OR SOLUTION R.O. pump motor Will not operate
Motor overheated. 1. The pump will pull slightly higher amperage during disinfection or cleaning. If disinfection or cleaning recirculation time exceeds 30 minutes, the motor may stop running. This is caused by the thermal over-load protection of the motor. Confirm cooling fan and guards have a clear airway, and cooling fan is running when pump motor is running.
Breaker on control box tripped
1. See "Unit will not operate" in this section.
Loose wiring connec- tion on motor
1. Check connections and tighten.
Cannon connector not aligned properly or loose connection in cannon connector
1. Check alignment of pins in both connectors and connections at the male and female pins.
Carbon cartridge seems to have low capacity before chlorine break through
High concentrations of chlorine in feed water
1. Call factory and ask about portable exchange carbon filters for a Mediport-P.B.
Carbon cartridge or5 micron cartridge housing leak.
Pinched or flat O-ring 1. Replace O-ring
Poor Product Water quality after mem- brane has been changed
O-rings on membrane adapter have been cut or rolled out of place.
1. Remove red waste line from bottom of membrane housing. Unscrew housing and remove membrane. Inspect O-rings and replace if necessary.
Feed water chemistry has changed.
1. Obtain a water analysis of the feed water and product water and contact factory with results.
Bacteria or Endo- toxins are still present after disinfection
Inaccurate lab results or improper sampling technique.
1. Resubmit water samples and confirm proper sampling technique.

Better Water, Inc.
698 Swan Dr. Smyrna, TN 37167 Ph. (615) 355-6063
SYMPTOM CAUSE EXPLANATION OR SOLUTION Improper method of
disinfecting 1. Read disinfect procedure for the
disinfectant being used.
Cartridge filters are biologically contami- nated
1. Replace carbon and 5 micron filters. If your R.O. unit has a D.I. polishing filter, it should be replaced with each disinfection.
Membrane may be organically fouled.
1. Clean membrane with Acid Cleaner 1000 & Alkaline Cleaner 2000.
R.O. unit has been sitting for more than96 hours without being used.
1. Disinfect.
Feed water is biologi- cally contaminated.
1. Call factory for technical assistance.
Low Product Water flow
R.O. pump pressure is too low.
1. R.O. pump pressure should be a maximum of 250 PSI on the PB RO, and 150 PSI on the PBII RO. To adjust pump pressure, remove acorn nut on pump head with R.O. in operate mode. Turn slotted screw clockwise until desired pump pressure is reached.
Feed water temperature is below 55°F.
1. A reliable temperature blending valve should be installed.
Membrane is fouled. 1. Refer to Alkaline Cleaner 2000 and Acid Cleaner 1000 cleaning procedures.
Better Water, Inc.
698 Swan Dr. Smyrna, TN 37167 Ph. (615) 355-6063
SYMPTOM CAUSE EXPLANATION OR SOLUTION Product pressure exceeds maximum pressure of 70 PSI
Inlet/product regulator set above maximum40 PSI Filter In pressure.
1. Adjust inlet/product regulator so that the Filter In pressure is a maximum of 40 PSI while the R.O. is in the normal operate mode. To decrease Filter In pressure, loosen lock nut on inlet/product regulator, turn "T" handle counter clock-wise until40 PSI Filter In pressure is reached. Remember, this procedure must be done while the R.O. is in the operate mode.
Product pressure exceeds maximum pressure of 70 PSI
Defective Product Water check valve
1. Replace Product Water check valve. Check valve is S.S. and located on the hydro-block.

Better Water, Inc.
698 Swan Dr. Smyrna, TN 37167 Ph. (615) 355-6063
This page left blank

Better Water, Inc.
698 Swan Dr. Smyrna, TN 37167 Ph. (615) 355-6063
PREVENTATIVE MAINTENANCE SCHEDULE FOR THE BETTER WATER PORTABLE REVERSE OSMOSIS UNTIS
Each
Shift
Daily
Weekly
Monthly 3
Months 6
Months
Yearly
Check Filter In Press. X X
Check Filter Out Press. X X
Check Product Press. X X
Check Pump Press. X X Check Water Quality Monitor
X X
Chlorine / Chloramines X X
Hardness (if applicable) X X
Flush R.O. unit X X Check D.I. Cartridge / D.I Monitor
X
Change 5 Micron Filter X
Change Carbon Filter X
Change D.I. Cartridge X
Replace Bacteria Filter X Replace Carbon Exchange Tank (if applicable)
X
Acid Cleaner 1000 X
Alkaline Cleaner 2000 X
Disinfect X Test Amperage on R.O. Unit
X
Test Low Press. Switch X Replace O-ring on Carbon & 5 Micron Housing
X
Clean Lint From Fan And Motor Intake
X
Tighten Fittings On R.O. X Inspect Product Water Check Valve
X
Ground Leakage Test X Calibrate Water Quality Monitor
X
NOTE: Filters and carbon exchange tanks may require more frequent changes, depending on water quality. NOTE: The R.O. unit may require more frequent disinfecting and or cleaning depending on water quality. NOTE: Maintenance schedule was based on normal operating conditions.

Better Water, Inc.
698 Swan Dr. Smyrna, TN 37167 Ph. (615) 355-6063
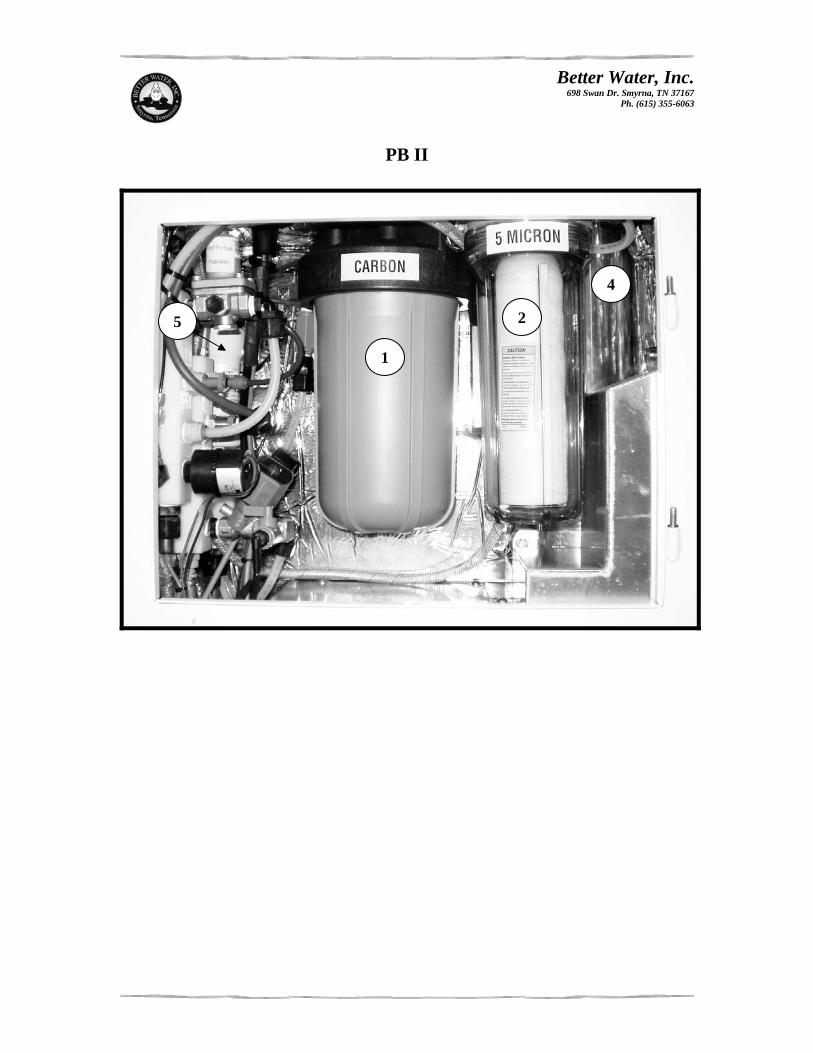
CONSUMABLE PARTS LIST
ITEM BETTER WATER PART NUMBER
FIGURE #
ALL Carbon Filter SUCAOO00547 1 ALL Big Blue Housing Wrench SUWROO00584 N o t S h o w nALL 5 Micron Filter SUCAOO00550 2 ALL Slimline Housing Wrench SUWROO00582 N o t S h o w n PBRO PBRO Membrane SUMEM01343 3 PBRO Membrane Housing Wrench SUWROO00583 N o t S h o w n PBII PBII Membrane SUMEM01340 4 PBII .05 Micron Bacteria Filter SUCAOO01934 5 ALL Acid Cleaner 1000 SUMCOO00572 N o t S h o w nALL Alkaline Cleaner 2000 SUMCOO00571 N o t S h o w nALL Minncare Membrane Disinfectant SUMCOO00575 N o t S h o w nALL Minncare 1% Test Strips SUMCOO00577 N o t S h o w nALL Minncare Residual Test Strips SUMCOO00576 N o t S h o w n

Better Water, Inc.
698 Swan Dr. Smyrna, TN 37167 Ph. (615) 355-6063
PBRO
1
3
2
Better Water, Inc.
698 Swan Dr. Smyrna, TN 37167 Ph. (615) 355-6063
PB II
1
4
25

Better Water, Inc.
698 Swan Dr. Smyrna, TN 37167 Ph. (615) 355-6063
LIMITED WARRANTY
Warranty Terms and Conditions
This warranty is given only to the original buyer and covers the Reverse Osmosis unit delivered with this warranty.
What is Warranted and For How Long
Labor is covered for 90 days from date of shipment.
All parts except membranes and cartridge filters are warranted for a period of 1 year from the date of shipment.
Membranes are covered for a period of 1 year. Warranty on membranes may be voided if membranes are exposed to chlorine or other oxidizers, or if operated out of Better Water guidelines.
Better Water reserves the right to inspect the membrane and other replacement parts before item may be covered under warranty.
This warranty does not cover damage from inadequate or defective wiring, improper voltage, improper connections or electrical service, inadequate or defective plumbing, water supply or water pressure, or in violation of applicable building, plumbing or electrical codes, laws, or ordinances or regulations.
How to Obtain a Replacement Part Under Warranty
Call for Customer Service or technical Support Departments and ask for a Return Goods Authorization number. Described part(s) will be sent at no charge with a purchase order.
What is Not Covered by This Warranty
This warranty does not cover damage to the external finish of the unit unless you notify us at the time of the installation that the finish is defective.
Should you request the distributor or any other person to remove or replace any defective part(s), contact Better Water for written authorization.

Better Water, Inc.
698 Swan Dr. Smyrna, TN 37167 Ph. (615) 355-6063
Proper Installation and Operation
This warranty does not cover damage from causes such as abuse, accident, neglect, improper maintenance, freezing and fires; does not apply to units subject to abnormal use; and does not apply if the serial number is removed or otherwise made illegible.
Proper Application
In the event your water supply contains hardness, chlorine, chloramines, sulfur, bacterial iron, tannin, algae, oil, organic matter or other unusual substances, other suitable equipment must be installed before this unit, and if such special equipment is not or has not been installed, we shall have no obligation to supply replacement parts under this warranty.
NOTE: THE IMPLIED WARRANTIES OF FITNESS FOR A PARTICULAR PURPOSE AND MERCHANTABILITY ARE LIMITED TO THE DURATION OF THIS WRITTEN WARRANTY. Some states do not allow limitations on how long an implied warranty lasts, so the above limitations may not apply to you. This warranty does not cover consequential or incidental damages, which are hereby expressly disclaimed by us and excluded from this limited warranty. Some states do not allow the exclusion or limitation of incidental or consequential damages, so the above limitation or exclusion may not apply. This warranty does not obligate us to supply an exact replacement of the part(s) found to be defective. We reserve the right to substitute new and improved part(s). However, we can make changes in our Reverse Osmosis units without being obligated to make the same or similar changes on equipment previously sold.