operator's manual - barbeques galore
TRANSCRIPT

NOTE TO ASSEMBLER / INSTALLER:Leave this manual with the consumer.
NOTE TO CONSUMER:Keep this manual for future reference.
RECORD YOUR SERIAL # __________________(see silver CSA label on main body of grill)
ü
ü
IMPORTANT:
ü
Failure to comply with these instructions couldresult in a fire or explosion that could causeserious bodily injury, death or property damage.Whether this grill was assembled by you orsomeone else, you must read this entire manualbefore using your grill to ensure the grill isproperly assembled, installed and maintained.Use your grill at least 3 feet away from anywall or surface. Use your grill at least 3 feetaway from combustible objects that can melt orcatch fire such as vinyl or wood siding, fences andoverhangs or sources of ignition including pilotlights on water heaters and live electrical appli-ances.THIS GAS APPLIANCE IS DESIGNED FOR OUT-DOOR USE ONLY.Never use your gas grill in a garage, porch,shed, breezeway or any other enclosed area.Never obstruct the flow of ventilation airaround your gas grill housing.Never disconnect the gas regulator or any gasfitting while your grill is lit. A lit grill can igniteleaking gas and cause a fire or explosion whichcould result in property damage, personal injuryor death.
ü
ü
ü
ü
ü
ü
WARNING! !
ü
Manual # P80151095C - Date:2010/01/14
Liquid Propane Gas (LPG) GrillModel OD3208SLPNatural Gas (NG ) GrillModel OD3208SNG
Model OD3208SLP/NG
Operator's Manual
FREE HELPFROM THE GRILL EXPERTS
Grand Hall is the expert on this product andtrained to help you with:
visit www.grandhall.com or call:
1-877-934-7455Monday - Friday 8:00am-4:30pm CST
Assembly QuestionsGrill OperationReplacement of Damaged or Missing parts
üüü

2
Table of Contents WARNING! !
• LPG models must be used with Liquid PropaneGas and the regulator assembly supplied. Natu-ral Gas models must be used with Natural Gasonly. Any attempt to convert the grill from one fueltype to another is extremely hazardous and willvoid the warranty.
Keep gas regulator hose away from hot grillsurfaces and dripping grease. Avoid unneces-sary twisting of hose. Visually inspect hose priorto each use for cuts, cracks, excessive wear orother damage. If the hose appears damaged donot use the gas grill. Call 1-877-934-7455 for acertified replacement hose.
California Proposition 65Combustion byproducts produced when using thisproduct contain chemicals known to the State ofCalifornia to cause cancer, birth defects, or otherreproductive harm.
Brass components on the grill, such as hose fit-tings, propane cylinder valves (sold separately) andburner valve stems, contain lead which is known tothe State of California to cause cancer, birth defects,or other reproductive harm.
Never use charcoal or lighter fluid in this gas grill.Failure to comply with these instructions couldresult in a grease fire or explosion that could causeserious bodily injury, death or property damage.
The Grease/Water Tray must be visually inspectedbefore each grill use. Remove any grease and washGrease/Water Tray with a mild soap and warmwater solution. Failure to comply with these in-structions could result in a grease fire or explo-sion that could cause serious bodily injury, deathor property damage.
•
•
•
•
Primary Safety Warnings ........................... 1-3Pre-Assembly Instructions .............................. 3Part Diagrams and Lists .......................... 4-7Assembly Instructions................................8-10LP Gas Tank Installation ...................... 11-13Natural Gas Connection..............................14Use & Care Instructions:• Lighting Instructions.................................15• Troubleshooting.........................................16Cleaning and Maintenance..........................17Cooking Guide ........................................ A1-A4Frequently Asked Questions ................ A5-A6Warranty Terms.............................Back Cover
DANGER! !1.2.3.4.
If you smell gas:Shut off gas to the appliance.Extinguish any open flame.Open lid.If odor continues, keep away fromthe appliance and immediately callyour gas supplier or your fire depart-ment.
Grand Hall and design®, DS Grill and design®,Crossray™ Lateral Infrared Burner Technology, Com-mand Flame®, Smooth Start® Electronic Ignition System,Ceramic Savor Plates®, Sear-zzler®, Stainless CladTherma-Core® Cooking Grids, Grand Café and design®,Grand Mark and design®, Grand Chef and design®,Grand Royale and design®, Globe Café and design®,Urban Café and design®, Smokeless Grill and design®.
The Crossray Burner System by Grand Hall is coveredby Australian Patent No. 2006100635, Chinese Patent No.960361, European Patent Pending, French Patent0607231, German Patent No. 20 2006 012 212.5, U.KPatent GB2440714, and U.S. Patent 7,475,632.
Registered and unregistered Trademarks held byGrand Hall include the following:
Patents held by Grand Hall include the following:
©2008 Grand Hall. All Rights Reserved.
Always keep the Grease/Water Tray 1/2 filledwith water during operation. Failure to fol-low this could result in a grease fire that couldcause serious bodily injury or property dam-age.
1.
2.
WARNING! !
Handle this Grease/Water tray with a flameretardant BBQ mitt.
Do not store or use gasoline or otherflammable liquids or vapors in the vi-cinity of this or any other appliances.
An LP cylinder not connected for useshall not be stored in the vicinity ofthis or any other appliance.
1.
2.
WARNING! !

3
Pre-Assembly Instructions For Your Safety
To begin your “restaurant quality” grilling, become familiarwith all of the cooking elements of your Grand Hall Grill light-ing and operating instructions.
IMPORTANT NOTE: Your infrared Grand Hall Grill is equippedwith an innovative Grease/Water Tray that is designed totrap excess grease drippings but also to moisturize yourfood. It is important to keep this tray half-filled with waterwhile grilling in order to get the best possible results.
WARNING: Grease and water can get very hot. Always handlethe Grease/Water Tray with a flame retardant BBQ mitt. Be-fore removing the Grease/Water Tray, always be sure thatthe grill has properly cooled. Be aware that the tray doescontain water and grease and be extremely careful whenremoving the tray to prevent spillage. Failure to follow theseinstructions could cause serious bodily injury or propertydamage.
MORE FLAVORFUL FOOD as the intense heat searsthe food and locks in the juices while also cooking itfaster which usually means more succulence.
FEWER FLAREUPS as the higher infrared heat vapor-izes more drippings which also adds natural flavoringto your food.
MORE EFFICIENCY AND CONVENIENCE as the higherheat means shorter cooking times, more fuel efficiencyand easier year round grilling.
Grill Installation CodesThe installation must conform with local codes or, in theabsence of local codes, with either the National Fuel GasCode, ANSI Z223.1/NFPA 54, Natural Gas and PropanceInstallation Code, CSA B149.1, or Propane Storage andHandling Code, B149.2.
•••
PRE-ASSEMBLYRead and perform the following pre-assembly instruc-tions:
Tools Required for Assembly:protective work glovesprotective eyewear
You will need assistance from another person tohandle the grill head and other large, heavy parts.
Open Lid of shipping carton. Remove top sheet ofcardboard and pack ing materials. Lay cardboardsheet on floor and use as a work surface to protectfloor and grill parts from scratches.
You may slice the carton front corners with a utilityknife to lay open the carton front panel. This allowsyou to raise the Lid and remove the componentspacked inside, making it easier to lift.
Use the Hardware and Part Diagrams to ensure allitems are included and free of damage.
Do not assemble or operate the grill if it appears dam-aged. If there are damaged or missing parts whenyou unpack the shipping box or you have questionsduring the assembly process call: 1-877-934-7455M-F 8AM-4:30PM CST for assistance.
Phillips Head screwdriver
US Patented No.: 7,475,632Europe Patent PendingAustralia Patent No.: 2006100635Germany Patent No.: 202006012212.5France Patent No.: 0607231UK Patent No.: GB2440714China Patent No.: 960361
CSA Labellocated on thebowl rear panel
Congratulations on your selection of one of the finest out-door kitchen appliances available. Your Grill is equipped withthe unique Crossray Infrared Cooking System® by GrandHall, which offers restaurant style grilling performance.
Infrared grilling technology cooks the food directly (and notthe air around it) which offers many advantages over conventional grilling systems:

4
Hardware Pack Parts List for Models OD3208SLP & OD3208SNG
* One Battery/AA and Four Batteries/AAA included in the Hardware Pack.
Pan Head Screw 3/16"x3/8"Qty. 3 (For OD3208SLP Model)Part # S182G0306A
Pan Head Screw 3/16"x3/8"Qty. 8 (For OD3208SLP Model)Qty. 6 (For OD3208SNG Model)Part # S182G03061
PART # PART DESCRIPTION QTY PURPOSE OF PARTP06030008A Hardware Pack 1 For use in assembly of Models OD3208SLP
P06030009A Hardware Pack 1 For use in assembly of Models OD3208SNG
S182G03061 Pan Head Screw 3/16"x3/8" 4 Install the Rear Trim Panel (For OD3208SLP/NG Models)
S182G03061 Pan Head Screw 3/16"x3/8" 2 Install the Control Box (For OD3208SLP/NG Models)
S182G03061 Pan Head Screw 3/16"x3/8" 2 Install the Regulator Bracket (For OD3208SLP Model)S182G0306A Pan Head Screw 3/16"x3/8" 3 Install Tank Tray Set (For OD3208SLP Model)
Hardware Pack Diagram List for Models OD3208SLP & OD3208SNG

Parts Diagram for Models OD3208SLP & OD3208SNG
5
38D
38C
23
16
7
3
2
5
12
13 1415
4
89
18
27
50
51
19
4241
4038A
39
38B37
3635
21
22
43
2524
33C
34C
2834D
33D
26
3033B
2033A
3234B
293134A
1
23
8
1011
44
46
45
B1
B3
B2
5452
55
53
48
21
17
49
6
47

Parts List for Models OD3208SLP & OD3208SNG
6
KEY DESCRIPTION PART# QTY1 Lid Assembly P0014734AA 12 Temperature Gauge P00601381A 13 Lid Handle Bracket, Left P00307028E 14 Lid Handle Bracket, Right P00308028E 15 Lid Handle P00215036H 16 Bowl Panel, Rear/Lower P0075803BC 17 Lid Assembly Bracket, Left P03320007C 18 Protective Pad P05518002I 49 Lid Assembly Bracket, Right P03320008C 110 Cooking Rack/Secondary P015160282 111 Cooking Grid P01615038H 512 Electric Wire Set P02627007A 113 Electric Wire Protector P055330043 114 Connection Hose - Long P03702037D 215 Connection Hose - Short P03702038D 216 Bowl Panel, Rear/Upper P0073738BC 117 Tank Tray Set (LPG) Y0340050 118 Bowl Side Panel, Left P0072094EC 119 Bowl Side Panel, Right P0072195EC 120 Bowl P0071367EC 121 Grease Shield, Upper P06902126C 222 Hose, 12 FT (NG), 3/8" ID P03703001A 123 Grease Shield, Lower P06902127C 224 Infrared Burner Assembly P02005024B 4
Extension Fitting for Manifold with Orifice (LPG) P06539032A 4Extension Fitting for Manifold with Orifice (NG) P06539033A 4
26 Cross Lighting Channel P02212377A 227 Lid Hinge with Nut P05501136L 228 Thermocouple Protector P03343017C 429 Thermocouple Bracket P03327082C 230 Thermocouple Bracket P03327083C 231 Thermocouple for Gas Valve P05305054B 232 Thermocouple for Gas Valve P05305055B 2
33A Thermocouple for LED Light, Left Front P05305056B 133B Thermocouple for LED Light, Left Rear P05305057B 133C Thermocouple for LED Light, Right Rear P05305058B 133D Thermocouple for LED Light, Right Front P05305059B 134A Electrode, Left Front P02618046A 134B Electrode, Left Rear P02618047A 134C Electrode, Right Front P02618048A 134D Electrode, Right Rear P02618049A 135 Control Panel Heat Shield Bracket P0300612FD 136 Control Panel Heat Shield P0300818AA 1
Gas Valve/Manifold Assembly (LPG) Y0060679 1Gas Valve/Manifold Assembly (NG) Y0060680 1
38A LED Light with Wire - A P02615155A 138B LED Light with Wire - B P02615156A 138C LED Light with Wire - C P02615157A 138D LED Light with Wire - D P02615158A 139 Bowl Front Trim Plate Assembly P02915341S 140 Control Panel P02915293X 141 Control Knob Seat P03439014A 442 Control Knob P03436053V 443 Grease Tray Heat Shield P06903069C 1
25
37

Parts List for Models OD3208SLP & OD3208SNG
7
Important: Use only Grand Hall replacement parts. The use of any part that is not a Grand Hall replace-ment part can be dangerous and will also void your product warranty. Keep this Operator's Manual forconvenient referral and for part replacement.
To obtain the correct replacement parts for your gas grill, please refer to the part numbers in this partslist. The following information is required to ensure you receive the correct parts:1. Model and Serial Number (see CSA label on grill)2. Part Number3. Part Description4. Quantity of parts needed
For the repair or replacement parts you need:Call 1-877-934-7455 M-F 8AM-4:30PM CST
KEY DESCRIPTION PART# QTY44 Grease Tray Slide Bracket - Left P03328069C 145 Grease Tray Slide Bracket - Right P03328070C 146 Grease Tray Slide Set P05516140M 147 Lid Trim Plate P0014735QJ 148 Grease Tray Y0270020 149 Regulator with Hose and Connector (LPG) Y0080036 150 Regulator (NG) P03614005C 151 Lighting Stick P05507140M 152 Control Box P05545005M 153 Control Box Bracket P03343022C 154 LED Light Controller P05357013B 155 Electric Ignitor, 4-Port P02502344C 1B1 Trim Panel, Left P07901033D 1B2 Trim Panel, Right P07901034D 1B3 Trim Panel, Rear P07901035D 1
Hardware Pack (LPG) P06030008A 1Hardware Pack (NG) P06030009A 1Operator's Manual P80151095C 1

Assembly InstructionsCAUTION : While it is possible for one person to assemble this grill, obtain assistance from another personwhen handling some of the larger, heavier pieces.
8
Pan Head Screw3/16"x3/8"Qty. 4Part # S182G03061
CAUTION: Build your grill island before installing the LP Gas Tank and Partition Panel (Not included in thisunit). Refer to the heights listed in Fig. 4 for constructing your grill island. Make sure a set of doors is installedin your Island so that the Control Box can be accessed. An island unit is not included with the purchaseof your Grill Head.
1 Install Trim Panel, Rear onto Grill Head and Grease TrayInstall the Trim Panel, Rear onto the Bowl Panel, Rear/Lower using 4 Pan Head Screws 3/16"x3/8"as shown in diagram.Slide the side tabs of the Grease Dranining Tray over the rails underneath the Grill Bowl as shown.
Note: Press the Switch Button to turn on the LED Light Controllerbefore using the grill. Press it again to turn off the LED LightController to save battery power when the grill is not in use.
Switch Button OFF Switch Button ON
Cap of LEDLight controller
Pan Head Screw3/16"x3/8"Qty. 2Part # S182G03061
Set Grill Head into the Island. Install Control Box and Batteries2Raise the Grill Head and put the Control Box to the inside of the Island, then set Grill Head intothe Island (not included in this unit) as shown.Open your Island Right Door, align the Control Box onto the right underside of the Grill Head (seediagram). Install 2 Pan Head Screws 3/16"x3/8" and tighten securely.Remove Caps from Control Box.Place 1 AA and 4 AAA batteries into the slots of the Control Box as shown below. (Note: The positivepole of the AA battery must face towards the cap. For the AAA batteries, 2 batteries must have the positivepole facing towards the cap and 2 batteries must have the negative poles facing away from the caps.)Position the caps onto the slots, and tighten them onto the Control Box.
AAA Battery
AA Battery
+ -
Slot
CapCap of LEDLight controller

9
Manifold
Swivel Nut
3 Install NG Regulator Assembly (For OD3208SNG Model)Install NG Regulator Assembly onto the Manifold.Connect the Swivel nut of the 12" Natural Gas Hose onto the vertical fitting of the NG Regulator.
Fig. 3
Island BottomPanel
Tank Tray Set
Pan Head Screw3/16"x3/8"Qty. 2 (For OD3208SLP Model)Part # S182G03061
Pan Head Screw3/16"x3/8"Qty. 3 (For OD3208SLP Model)Part # S182G0306A
1
1
Install LP Gas Tank (For OD3208SLP Model)Install the Bracket with Regulator onto the Island Side Panel using 2 Pan Head Screws 3/16"x3/8".Install the Stainless Steel Tube (not included in this unit) onto the manifold. Next, insert the other endof the Stainless Steel Tube through the hole on the Island Side Panel. Install the Stainless Steel Tubeonto the male fitting of the Bracket.Install the Tank Tray Set onto the Island Bottom Panel. Secure the Tank Tray set by installing 3 PanHead Screws 3/16"x3/8" as shown in Fig. 3. Place the LP Gas Tank into the Tank Tray. Make surethe Tank Valve faces the right corner of the cabinet. Tighten the Wing Bolt to secure the LP Gas Tank.Install the LP Regulator onto the LP Gas Tank.
4
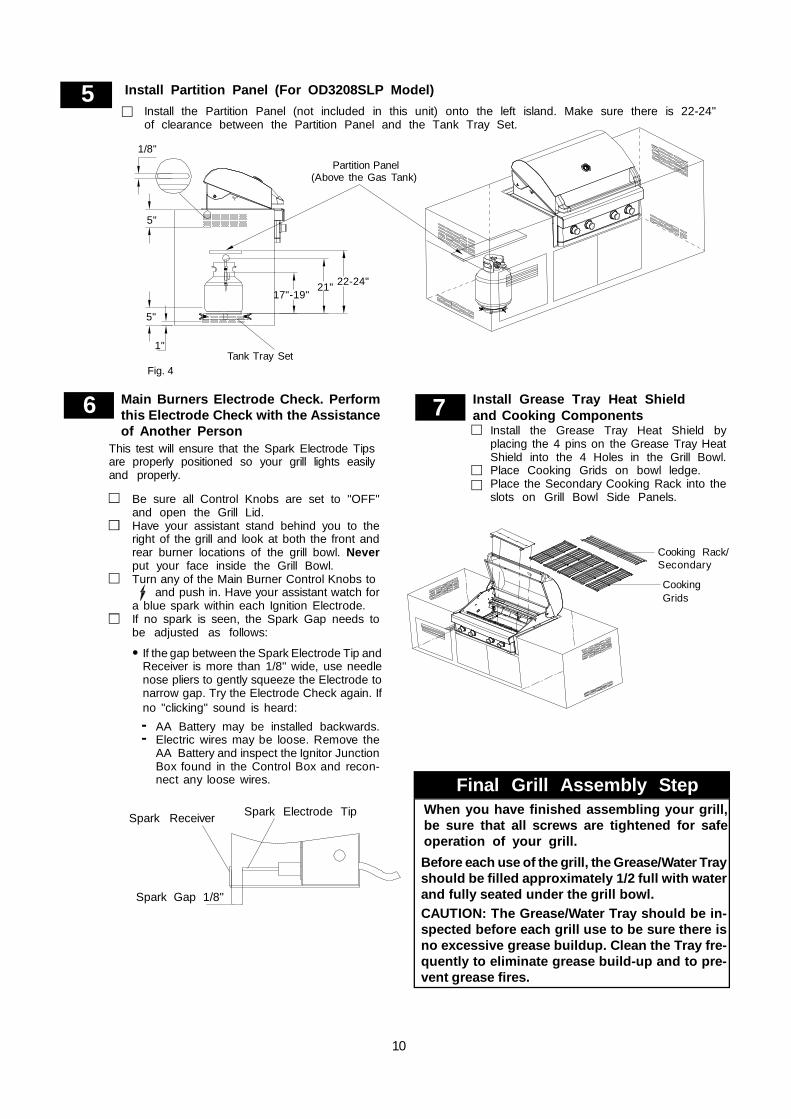
10
Install the Partition Panel (not included in this unit) onto the left island. Make sure there is 22-24"of clearance between the Partition Panel and the Tank Tray Set.
5 Install Partition Panel (For OD3208SLP Model)
Main Burners Electrode Check. Performthis Electrode Check with the Assistanceof Another Person
6 Install Grease Tray Heat Shieldand Cooking Components7
This test will ensure that the Spark Electrode Tipsare properly positioned so your grill lights easilyand properly.
Be sure all Control Knobs are set to "OFF"and open the Grill Lid.Have your assistant stand behind you to theright of the grill and look at both the front andrear burner locations of the grill bowl. Neverput your face inside the Grill Bowl.Turn any of the Main Burner Control Knobs to and push in. Have your assistant watch fora blue spark within each Ignition Electrode.If no spark is seen, the Spark Gap needs tobe adjusted as follows:
• If the gap between the Spark Electrode Tip andReceiver is more than 1/8" wide, use needlenose pliers to gently squeeze the Electrode tonarrow gap. Try the Electrode Check again. Ifno "clicking" sound is heard:
AA Battery may be installed backwards.Electric wires may be loose. Remove theAA Battery and inspect the Ignitor JunctionBox found in the Control Box and recon-nect any loose wires.
--
Install the Grease Tray Heat Shield byplacing the 4 pins on the Grease Tray HeatShield into the 4 Holes in the Grill Bowl.Place Cooking Grids on bowl ledge.Place the Secondary Cooking Rack into theslots on Grill Bowl Side Panels.
Spark Electrode TipSpark Receiver
Spark Gap 1/8"
Fig. 4Tank Tray Set
Partition Panel(Above the Gas Tank)
Cooking Rack/Secondary
CookingGrids
When you have finished assembling your grill,be sure that all screws are tightened for safeoperation of your grill.Before each use of the grill, the Grease/Water Trayshould be filled approximately 1/2 full with waterand fully seated under the grill bowl.CAUTION: The Grease/Water Tray should be in-spected before each grill use to be sure there isno excessive grease buildup. Clean the Tray fre-quently to eliminate grease build-up and to pre-vent grease fires.
Final Grill Assembly Step
1/8"
5"
17"-19"
5"
21" 22-24"
1"

LP Gas Tank Installation
11
!Do not store a spare LP-Gas tank under or nearthis appliance.Never fill the tank beyond 80 percent full; andIf the information in "(a)" and "(b)" is not followedexactly, a fire causing death or serious injury mayoccur.
A.
B.C.
WARNING !
CORRECT LP GAS TANK USE
Never connect an unregulated LP gas tank to your gasgrill. The gas regulator assembly supplied with yourgas grill is adjusted to have an outlet pressure of 11"water column (W.C.) for connection to an LP gas tank.Only use the regulator and hose assembly suppliedwith your gas grill. Replacement regulators and hoseassemblies must be those specified by Grand Hall.
Have your LP Gas dealer check the release valve afterevery filling to ensure it remains free of defects.
Always keep LP Gas tank in upright position.
Do not subject the LP Gas tank to excessive heat.
Never store an LP Gas tank indoors. If you store yourgas grill in the garage always disconnect the LP Gastank first and store it safely outside.
LP Gas tanks must be stored outdoors in a well-ventilated area and out of the reach of children.
Disconnected LP Gas tanks must not be stored in abuilding, garage or any other enclosed area.
The regulator and hose assembly can be seen afteropening the island doors and must be inspectedbefore each use of the grill. If your regulator and hoseare damaged in any way, they must be replaced priorto using the grill again.
Any attempt to convert the grill from one fuel type to anotheris extremely hazardous and will void your warranty.
Never light your gas grill with the lid closed or beforechecking to ensure the burners are fully seated overthe gas valve orifices.
The LP Gas tank must be constructed and markedin accordance with the Specifications for LP-GasCylinders of the U.S. Department of Transportation(D.O.T.) or the National Standard of Canada, CAN/CSA-B339, Cylinders, Spheres and Tubes for Trans-portation of Dangerous Goods; and Commission, asapplicable.
The LP Gas tank must have a shutoff valve, termi-nating in an LP Gas supply tank valve outlet, that iscompatible with a Type 1 tank connection device. TheLP Gas tank must also have a safety relief devicethat has a direct connection with the vapor space ofthe tank.
The tank supply system must be arranged for vaporwithdrawal.
The LP Gas tank must have a collar to protect thetank valve.
! WARNING !Refer to this table when designing the island unit forthe OD3208SLP/NG. Side* and Rear* show the mini-mum amount of distance the unit must be fromcombustibles (ex. Vinyl or wood siding, fences andoverhangs) or sources of ignition (ex. Pilot lights onwater heaters and live electrical appliances). Height*shows the minimum height the island unit must bestarting from the ground up.Model Height Width Depth Side* Rear* Height*
OD3208SLP/NG
10-3/4" 33-5/8" 21" 14" 24" 29"
Never allow children to operate your grill. Do not allowchildren or pets to play near your grill. Always supervisechildren and pets if they are in the vicinity of the unit.Use of alcohol, prescription or non-prescription drugscan impair your ability to properly assemble and safelyoperate your grill.Keep fire extinguisher readily accessible. In the eventof a oil/grease fire, do not attempt to extinguish withwater. Use type B extinguisher or smother with dirt,sand or baking soda.In the event of rain, turn off the burners and gas supply.Wait for the grill to cool, and then place a cover on it.Use your grill on a level, stable surface in an area clearof combustible materials.Do not leave grill unattended when in use.Do not move the appliance when in use.Allow the grill to cool before moving or storing.Do not use your grill as a heater.This grill is not intended to be installed in or onrecreational vehicles and/or boats.The grill is not intended for commercial use.Never use charcoal or lighter fluid in this gas grill.
LP Gas grill models are designed for use with a standard20 lb. Liquid Propane Gas (LP Gas) tank, not included withgrill. Never connect your gas grill to an LP Gas tank thatexceeds this capacity. A tank of approximately 12 inches indiameter by 18-1/2 inches high is the maximum size LP Gastank to use. You must use an "OPD" gas tank which offersa listed Overfill Prevention Device. This safety featureprevents the tank from being overfilled which can cause amalfunction of the LP Gas Tank, regulator, and/or grill.
Side*
Depth
Height
Width
Non-combustibleConstruction
Rear*
6" minimumclearance fromcutout (for lid)
Height*

USE AND CARE INSTRUCTIONS
12
If growing bubbles appear do not use or movethe LP Gas tank. Contact an LP Gas Supplieror your fire department!
WARNING! !
Secure a 20lb LP Gas Tank to Gas GrillNote: You can only use 20lb LP Gas Tank in this GasGrill.NOTE: When using Liquid Propane (LP), EXTREMECAUTION should be used to provide ample ventilationof vapor from the enclosure. LP gas vapor is heavierthan air and SERIOUS INJURY from a DANGEROUSEXPLOSION could occur if LP gas is allowed toaccumulate in an enclosure and then ignited. Both theBarbecue enclosure and LP cylinder enclosure re-quire venting that must be provided at the floor levelof the enclosure to allow any leaking LP gas vaporto escape (see Fig.6).NOTE: When installing a barbeque equipped for liquidpropane (LP) in an island, the LP tank must be ina separate enclosure that is completely isolated fromthe barbeque. It must be cross-ventilated in accor-dance with local codes. The LP tank MUST NEVERbe installed directly under the barbeque.NOTE: Each upper ventilation opening must be aminimum of 20 sq in. Each lower ventilation openingmust be a minimum of 10 sq. Upper and lowerventilation openings MUST BE PROVIDED on bothsides of built-in construction. The top of the upperventilations opening must be located within 5" fromthe top of the island. The bottom of the lower ven-tilation openings must at least 1" or less from the floorof the island. The top of the lower ventilation openingscannot be more than 5" from the floor of the island.Every ventilation opening must be a minimum of 1/8". (See Fig. 4 on page 9). Please ask a Grand Hallassociate for full details.
Note: The built-in appliance for use with a remote self-contained LP Gas supply system must use rigid pipe,semi-rigid tubing or a connector complying with theStandard for Connections for Gas Appliance, ZNSIZ21.24/CSA 6.10
The Wing Bolt holdsthe Tank Foot in place.
Fig. 6
NOTE about LP Gas Tank Exchange Programs
How to Leak Test your LP Gas Tank
All leak tests must be repeated each time your LP Gastank is exchanged or refilled.
When checking for gas leaks do not smoke.
Do not use an open flame to check for gas leaks.
Your grill must be leak tested outdoors in a well-venti-lated area, away from ignition sources such as gas firedor electrical appliances. During the leak test, keep yourgrill away from open flames or sparks.
Do not use household cleaning agents. Damage to gasassembly components can result.
For your safety:
Leak test new and exchanged LP Gas tanks BEFOREconnecting one to your grill.
Always keep new and exchanged LP Gas tanks in an up-right position during use, transit or storage.
Use a clean paintbrush and a 50/50 mild soap andwater solution.Brush soapy solution onto LP Gas tank in the areasindicated by the arrows. See diagram.If growing bubbles appear do not use or move theLP Gas tank. Call an LP Gas Supplier or your FireDepartment.
Many retailers that sell grills offer you the option of replac-ing your empty LP Gas tank through an exchange service.Use only those reputable exchange companies that in-spect, precision fill, test, and certify their tanks. Exchangeyour tank only for an OPD safety feature-equipped tank asdescribed in the LP Gas tank section of this Guide.
ü
ü
ü
Air Vents
Partition Panel
CSA ApprovedStainless Steel Tube
AirVents
Non-CombustibleConstruction, such asstone, marble, cement

13
WARNING!If you have a gas leak that cannot be repaired bytightening, turn off the gas at the source, disconnectfuel line from your grill and call 1-877-934-7455 oryour gas supplier for repair assistance.
LP Gas Model only:Connect Regulator with Hose to your LP Gas Tank
USE AND CARE INSTRUCTIONS
1.
WARNING!Do not store spare LP cylinder within10 feet (3m) of this appliance.Do not store or use gasoline or otherflammable liquids and vapors within 25feet (8m) of this appliance.When cooking with oil/grease, do notallow the oil/grease to get hotter 350°F(177°C)Do not leave oil/grease unattended.4.
2.
3.
CAUTION: When the appliance is not in use the gas mustbe turned off at the tank. Place dust cap on cylinder valveoutlet whenever the cylinder is not in use. Only install thetype of dust cap on the cylinder valve outlet that is providedwith the cylinder valve. Other types of caps or plugs mayresult in leakage of propane.
!
Disconnecting A Liquid Propane Gas (LPG)Tank From Your Grill
Make sure the Burner Valves and LP Gas tank valveare off. (Turn clockwise to close.)
Detach the hose and regulator assembly from theLP Gas tank valve by turning the Quick CouplingNut counterclockwise. Do not use a wrench or anytools when turning the Quick Coupling Nut.
!
Check all connections for LP Gas LeaksNever test for leaks with an open flame. Prior to firstuse, at the beginning of each season, or every timeyour LP Gas tank is changed, you must check for gasleaks. Follow these three steps:
Make a soap solution by mixing one part liquiddetergent and one part water.
Turn the grill Control Knobs to the full OFF position,then turn the gas ON at source.
Apply the soap solution to all gas connectionsindicated by the arrows. See diagram. If bubblesappear in the soap solution the connections arenot properly sealed. Check each fitting and tightenor repair as necessary.
QuickCoupling Nut
Turn all Burner Valves to the OFF position.Inspect the valve connection port and regulatorassembly for damage or debris. Remove any debris.Never use damaged or plugged equipment.Connect the regulator assembly to the tank valveand HAND TIGHTEN nut clockwise to a full stop.DO NOT use a wrench to tighten because it coulddamage the Quick Coupling Nut and result in a gasleak/fire hazard.Open the tank valve (counterclockwise) 1/4 to 1/2of a full turn, and use a soapy water solution tocheck all connections for leaks before attemptingto light your grill. See "Check all connections forLP Gas Leaks". If a leak is found, turn the tank valveoff and do not use your grill until the leak is repaired.
WARNING !Failure to read and follow the Use and CareInstructions could result in a fire or explosion thatcould cause serious bodily injury, death or prop-erty damage.
!
Gas Valve / ManifoldAssembly
LP Gas Tank
Regulator withHose (LPG)
Type 1 connection perANSI Z21.58A-2008/CSA1.6A-2008

14
Natural Gas ConnectionNatural Gas Model only:Connecting Natural Gas To Your Grill
Your natural gas grill is designed for use with naturalgas (NG) only. The gas pressure Regulator sup-plied with this appliance must be installed andused on your grill. The unit and Regulator are setto operate with an outlet pressure of 4" W.C.Install a Shutoff Valve at the gas supply source out-doors at a point after the gas pipe exits the outside walland before the quick-disconnect hose. Or install it atthe point before the gas line piping enters the ground.See Fig. 2.Pipe sealing compound or pipe thread tape resistantto the action of natural gas must be used on all malepipe thread connections.Disconnect your gas grill from fuel source when thegas supply is being tested at high pressures. This gasgrill and its individual shutoff valve must be discon-nected from the gas supply pipe system during anypressure testing of that system at pressure in excessof 1/2 psi (3.5kpa).Turn off your gas grill when the gas supply is beingtested at low pressures. The grill must be isolatedfrom the gas supply pipe system by closing its indi-vidual manual shutoff valve during any pressure test-ing of the gas supply pipe system at pressures equalto or less than 1/2 psi (3.5kpa).The Quick Disconnect connects to a 3/8 inch NPTthread from the gas source. The Quick Disconnectfitting is a hand operated device that automaticallyshuts off the flow of gas from the source when it isdisconnected.The Quick Disconnect fitting can be installed horizon-tally or pinpointing downward. DO NOT install thefitting with the opening pointing upward because thefitting could collect water and debris.The Dust Covers (plastic plugs) provided with theQuick Disconnect Hose help keep the open endsclean while disconnected.WARNING: Do not route the 12 Foot Quick DisconnectHose under a deck. The hose must be visible andinspected prior to each grill use.
Natural Gas Safety Instructions
Connect the Swivel nut of the 12' Natural GasHose to the horizontal fitting of NG Regulator asshown in Fig.1. Connect the other hose end (maleplug) to the gas supply line from your home. Readand follow the "Natural Gas Safety Instructions"below.
Gas SupplyInside Wall
Outside Wall
Male Fitting
To Grill
LockingShut Off
Shut Off
QuickDisconnect
Fig.2 Fig.3
Gas Valve / ManifoldAssembly
Hose, 12 ft./ NGNG Regulator
Check all connections for Natural Gas LeaksNever test for leaks with an open flame. Prior to first useand at the beginning of each season, you must checkfor gas leaks. Follow these three steps:
Make a soap solution by mixing one part liquiddetergent and one part water.
Turn the grill Control Knobs to their full OFFpositions. Next, turn the gas ON at the source.
Apply the soap solution to all gas connectionsindicated by the arrows. See Fig.3. If bubblesappear in the soap solution the connections arenot properly sealed. Check each fitting and tightenor repair as necessary.
Fig.1
Vertical fitting
Hose, 12 ft./ NGSwivel nut
If the length of line required does not exceed 50 feet,use a 5/8" O.D. tube. One size larger should be usedfor lengths greater than 50 feet.Gas piping must be copper tubing, type K or L; poly-ethylene plastic tube, with a minimum wall thickness of0.62 inch; or standard weight (schedule 40) steel orwrought iron pipe.Copper tubing must be tin-lined if the gas contains morethan 0.3 grams of hydrogen sulfide per 100 cubic feetof gas.Plastic tubing is suitable only for outdoor, undergrounduse.Gas piping in contact with earth, or any other materialwhich may corrode the piping, must be protected againstcorrosion in an approved manner.Underground piping must have a minimum of 18" cover.
Gas Line Piping:

15
USE AND CARE INSTRUCTIONSGrill Lighting Instructions
Failure to replace a faulty hose, secure gas supplyconnections or to open the Lid before proceeding tothe Lighting Procedures could result in a fire orexplosion that could cause serious bodily injury, death,or property damage.
WARNING! !
Set Control Knobs to OFF and open the LP Gas tankvalve SLOWLY 1/4 of a full turn. For Natural Gas openthe Shut Off Valve at the source.
Push and turn the control knob to and hold it in 3~5seconds to ignite the Burner. Once the burner is ignitedcontinue to depress the knob and rotate to . Hold theknob until burner indicator light turns on then release it.
5.
6.
8.
7. If ignition does not occur in 5 seconds, turn gas off atsource and turn Control Knobs OFF. Wait at least 5minutes for gas to clear, then retry. If your grill still failsto light turn the burner Control Knob(s) and gas sourceOFF and conduct a leak test of ALL gas connectionsand gas sources as explained in the Use and Caresection of this guide. If no leaks are detected, wait 5minutes for any gas to clear and repeat the lightingprocedure.
If the burner indicator light does not work, check the
After one Burner is lit, turn the tank valve SLOWLY onemore 1/4 of a turn.
To light more burners, turn each burner knob to , thenback to .
9.
Before each use, check all hoses for cracks, nicks, cuts,burns, or abrasions. If a hose is damaged in any way,do not use your grill before replacing the hose with anauthorized part from the Parts List. Also make sure allgas supply connections are securely tightened.Familiarize yourself with the Safety and Use and Careinstructions in this Guide. Do not smoke while lightinggrill or checking gas supply connections.Be sure the LP Gas tank is filled, and lock Casters toprevent movement during grill operation.Open the Grill Lid.
1.
4.
3.
2.Left RearBurner
Left FrontBurner
Right FrontBurner
Right RearBurner
OFF
•
Open LP Gas tankOFF•
batteries.
Manually Lighting Your Grill By Paper Match
To light your gas grill by match, insert a match into theLighting Stick and follow steps 1 through 5 of the GrillLighting Instructions. Then, light the match and placeLighting Stick through the Cooking Grid on the grill asshown below. Turn the nearest Control Knob to thesetting to release gas. The Burner should light immedi-ately.
10.
Note: Island is shown for illustrative purposes only.Island is not included with grill unit.
NOTE! !Replace the batteries when low battery as notedbelow:
1.
2.
If LED burner indicator light does not work whenburner is lit.If any of the LED indicator(s) is lit when its relatedburner is in "OFF" position.

16
USE AND CARE INSTRUCTIONS
GRILL INFORMATION CENTERCall 1-877-934-7455 Monday - Friday 8:00am-4:30pm CST
Troubleshooting
WARNING
Turn gas off at source and turn Control Knobs toOFF. Wait at least 5 minutes for gas to clear, thenretry.
If your grill still fails to light, check gas supplyand connections.
Repeat lighting procedure. If your grill still failsto operate, turn the gas off at source, turn theControl Knobs to OFF, then check the following:
If the grill fails to light :1.
2.
3.
Never lean over the grill cooking area while lightingyour gas grill. Keep your face and body a safe distance(at least 18 inches) from the front of grill when lightingyour grill by match.
WARNING! !
To purge air from your gas line and/or resetthe regulator excess gas flow device:
Turn Control Knobs to the OFF position.
Turn off the gas at the tank valve.
Disconnect regulator from LP Gas tank.For Natural Gas disconnect regulator from12 ft. Natural Gas Hose.
Let unit stand 5 minutes to allow air to purgefrom gas line.
Reconnect regulator to the LP Gas tank.For Natural Gas reconnect regulator to12 ft. Natural Gas Hose.
Turn tank valve on SLOWLY 1/4 of a turn.For Natural Gas open Shut Off valve.
Open the Grill Lid.
Push and turn the Control Knob to and holdit in 3-5 seconds to ignite the burner.
WARNING !Should a FLASHBACK fire occur in or around theBurners, follow the instructions below. Failure tocomply with these instructions could result in a fireor explosion that could cause serious bodily injury,death, or property damage.
!
Shut off gas supply to the gas grill.Turn the Control Knobs to OFF position.Open the Grill Lid.Put out any flame with a Class B fireextinguisher.
üüüü
Obstruction in gas lineCorrection: Remove regulator hose from grill. Do notsmoke! Open gas supply for one second to clear anyobstruction from fuel line. Close off gas supply atsource and reconnect fuel line to grill.
Disconnected Electric WiresCorrection: Inspect the Electric Ignitor (see Parts List)found in the Control Box. Connect loose Electric wiresto Junction Box and try to light the grill.
Weak AA or AAA BatteryCorrection: Remove the Ignitor Cap and replace thebattery.
If the grill still does not light you may need to purgeair from the gas line or reset the regulator excessgas flow device. Note: This procedure should bedone every time a new LP Gas tank is connectedto your grill.

CLEANING AND MAINTENANCE
17
Proper care and maintenance will keep your grill in top operat-ing condition and prolong its life. Follow these cleaning proce-dures on a timely basis and your grill will stay clean and operatewith minimum effort.CAUTION: Be sure your grill is OFF and cool before cleaning.
Cleaning Exterior Stainless Steel Surfaces:Routine care and maintenance is required to preservethe appearance and corrosion resistance of stainlesssteel. The fact is stainless steel can corrode, rust anddiscolor under certain conditions. Rust is caused whenregular steel particles in the atmosphere become at-tached to the stainless steel surface. Steel particles canalso become attached to your grill if you use steel woolor stiff wire brushes to clean the grill instead of non-abrasive cloth, sponge or nylon cleaning tools. In coastalareas rust pits can develop on stainless surfaces thatcannot be fully removed. Bleach and other chlorine basedsolutions used for household and pool cleaning canalso cause corrosion to stainless steel. Weathering,extreme heat, smoke from cooking and machine oilsused in the manufacturing process of stainless steelcan cause stainless steel to turn tan in color. Althoughthere are many factors which can affect the surface ap-pearance of stainless steel, they do not affect the integ-rity of the steel or the performance of the grill.
To help maintain the finish of stainless steel follow thesecleaning tips for the best results:
After every use (after your grill has cooled down), wipestainless surfaces with a soft, soapy cloth or spongethen rinse with water. Be sure to remove all food par-ticles, sauces or marinades from stainless steel becausethese can be highly acidic and damaging to stainlesssurfaces.Never use abrasive cleaners, scrubbers or stiff wirebrushes of any type on your grill.Use a heat resistant Stainless Steel Cleaner and rub orwipe in the direction of the stainless steel grain or polishlines. Do not polish against the grain.
1.
3.
2.
Failure to comply with these instructions couldresult in a fire or explosion that could cause seriousbodily injury, death or property damage.
Keep grill area clear and free from combustible ma-terials, gasoline and other flammable vapors andliquids.
Do not obstruct the flow of air for combustion andventilation.
Keep the ventilation openings of the tank enclosurecabinet free and clear of debris.
Visually check burner flames occasionally to ensureproper flame pattern as shown below.
MAGNIFIED VIEW OF INFRARED BURNER FLAME THROUGHOPEN LID.
WARNING! !
Cleaning The Cooking Grids
WARNING! !Do not leave the grill unattended during burn off. Emptyand clean the grease tray before doing burn-off.
Cleaning The Grease/Water TrayTo reduce the chance of fire, the Grease/Water Trayshould be visually inspected before each grill use.Remove any grease and wash Grease/Water Tray witha mild soap and warm water solution.
Cleaning the Inside of the Grill LidGrease can build up on the inside of the Grill lid overtime. This grease can drip onto your deck or patio whenthe lid is opened. Visually inspect the inside of the GrillLid before each grill use. Remove any grease and washwith a mild soap and warm water solution.
Routine Cleaning of The Grill InteriorBurning-off excess food after every cookout will keep itready for instant use. However, at least every 3 monthsyou must give the entire grill a thorough cleaning tominimize your risk of grease fire and keep the grill in topshape. Follow these steps:
Turn all Burner Knobs to the full OFF position.
Turn the LP gas tank valve to the full OFF position.
Disconnect the regulator from the gas tank. Inspect thehose with regulator assembly for cracking, cuts or anyother damage, and replace as neccessary. Refer to theParts List in this Operator's Manual.
Remove and clean the Cooking Grids and SecondaryCooking Rack.
Brush the inside and bottom of the grill with a fiber pador nylon brush and wash with a mild soap and warmwater solution. Rinse thoroughly and let dry.
Check each Spark Electrode, adjusting as needed. Thespace between the Spark Electrode Tip and SparkReceiver should be approximately 1/8" (3.2mm).
Replace the Cooking Grids and Secondary CookingRack.
Reconnect the gas source and observe the Burnerflame for correct operation.
1.
2.
3.
4.
7.
8.
5.
6.
Before initial use, and periodically thereafter, we suggestyou wash your grill using a mild soap and warm watersolution. You can use a wash cloth or sponge for thisprocess. Do not use a stiff wire or brass brush. These willscratch stainless steel and chip painted surfaces (variesby model) during the cleaning process.
Cleaning Exterior painted Surfaces:
Before initial use and periodically thereafter, wash yourCooking Grids in a mild soap and warm water solution.You can use a wash cloth or vegetable brush to cleanyour cooking grids.

A-1
Failure to comply with these instructions could resultin a fire or explosion that could cause serious bodilyinjury, death or property damage.Never cover the cooking grids, bottom of grill bowlor Grease/Water Tray with charcoal, aluminum foil,
Before each use of your grill: Pull out the Grease/Water Tray and remove all grease and food debris toprevent grease fire hazard. It is important to keep thisTray 1/2 filled with water while grilling to get the bestpossible results. Wear a flame retardant BBQ Mittwhen handling the Grease/Water Tray.Use your grill at least 3 feet away from any wallor surface. Use your grill at least 3 feet away fromcombustible objects that can melt or catch fire(such as vinyl or wood siding, fences and over-hangs) or sources of ignition including pilot lightson water heaters and live electrical appliances.Never use your gas grill in a garage, porch, shed,breezeway or any other enclosed area.Your grill will get very hot. Always wear a flameretardant BBQ Mitt when cooking on your grill andhandling the Grease/Water Tray. Never lean overcooking areas while using grill. Do not touch cookingsurfaces, Lid, grill housing or other parts while grill isin operation, or until the grill has cooled down afteruse. Be aware that the Tray does contain water andgrease and be extremely careful when removing toprevent spillage.
ü
ü
ü
ü
Greasing the cooking surface will help keep foodsfrom sticking during the cookout, produces beautifulsear marks and reduces the amount of cleanup re-quired. Use a brush to apply a thin layer of cooking oilor vegetable shortening onto each Cooking Grid beforeeach cookout. We do not suggest spray type oils unlessthey are specified for high-temperature cooking.
WARNING! !
ü
Fat and juice dripping from grilled food can cause flare-ups and smoke. To minimize this, cook your food in themid section of each cooking grid so drippings fallthrough the center of the grill into the Grease/WaterTray below.
ü
Infrared Grill Cooking Instructions
ü
Preheating
ü
ü
Direct Cooking
Infrared heat sears the food surface and cooks from theinside out. Infrared heat does not cook through alumi-num foil and reflective pans. For roasting and bakingyou'll find a cast-iron pan works beautifully as it absorbsand conducts the infrared heat very well.
The Secondary Cooking Rack offers less intense heatfor preparing breads and firm vegetables like potatoesand corn.
The heat from the front and rear infrared burners overlapin the mid section of each cooking grid. This area offersthe most intense heat for quickly locking in the naturaljuices and flavor of poultry and meats.
The suggested heat settings and cooking times shownin the following pages are approximate. Unlike thecontrolled environment inside your kitchen, variablesincluding outside temperatures, direction and condi-tions of wind, as well as grill location will affect your grill'sheat distribution. Because these conditions vary, and notwo backyards are alike, we offer these tips as generalguidelines for your reference. We recommend you moni-tor your grill closely and rotate foods often to preventovercooking and ensure the most delicious resultsevery time.
An Important Note About Infrared Heat Settings
Low setting : Most recipes specify the low setting forbaking, roasting, rotisserie cooking and grilling deli-cate foods such as fish, vegetables and bread.
CAUTION: Infrared cooking times will be much shorterthan traditional grilling so never operate this applianceunattended.
High setting: The Control Knob setting should onlybe used to pre-heat your grill the first 3-5 minutes, forsearing foods and for burning food residue off the grillfor 3-5 minutes after cooking is complete.
Control Knob Settings
For searing and high temperature cooking,preheat grill 3 to 5 minutes.
For low temperature cooking, preheat grill3 minutes.
To slow cook, preheating is not necessary.ü
ü
ü
To preheat, light your grill on , lower theLid and follow this timetable.
Before cooking on your gas grill for the first time, youshould "burn off" the grill to eliminate any odor or foreignmatter. Ignite the burners, lower the Lid, and operate grillon setting for 3 to 5 minutes.
Burn-Off
CAUTION: Infrared cooking times will be much shorterthan traditional grilling so never operate this applianceunattended.
The direct cooking method can be used with the foodplaced on the mid section of each cooking grid where theinfrared heat is most intense. Direct Cooking requiresthe Grill Lid to be open. This method is ideal for searingand grilling as well as deep frying in a cast-iron pan orstir-frying in a steel wok.
To Reduce Flare-Ups and Smoke
To cook indirectly, the food should be placed on theleft or right side of your grill (or Secondary Rack) with theBurners lit on the opposite side. Rotate the food asneeded to ensure even browning. This is the slowcooking method. A faster indirect method is to placeyour food in an optional cast-iron cooking pan and placeit in the center of the grill with all burners on LOW. Besure to add liquid if using a pan to keep food moist. Ifhigher heat is desired, turn Left Front (LF) and RightRear (RR) burners on HIGH with Left Rear (LR) andRight Front (RF) burners on LOW to create a crossraycooking pattern. Either way, indirect cooking must bedone with the Lid down.
Prepare Cooking Grids for Grilling
Indirect Cooking
and or any substance that can absorb grease.

A-2
For very firm vegetables—particularly potatoes and yams,we recommend that you partially boil until almost cooked,before placing them on the grill.
CAUTION: Infrared cooking times will be much shorterthan traditional grilling so never operate this applianceunattended.
NOTE: Do not use aluminum foil to wrap vegetables and fruit.Infrared heat does not cook through aluminum foil andreflective pans.
Guide to Infrared Grilling using the Direct Cooking Method
Grilling Poultry
Fill Grease/Water Tray half-full. Turn the grill Burners on ,close Lid and preheat your grill 2 to 3 minutes. Open Lid andplace food on the mid section of a Cooking Grid. Sear 2-3minutes on each side then adjust the Infrared Burners toLOW and continue cooking until desired doneness.
To minimize flare-ups, use skinless poultry or use theindirect method. Place the poultry on one side of the grill withthe opposing Burners on LOW heat, and lower the grill Lid.
Grilling Pork
Fill Grease/Water Tray half-full. Turn the grill Burners on ,close Lid and preheat your grill 3 to 5 minutes. Open Lid andplace food on the mid section of a Cooking Grid. Sear 2-3minutes on each side then adjust the Infrared Burners toLOW and continue cooking until desired doneness. Grillingtimes will vary according to meat thickness.
Whole Fish and Whole Fillets
Fill Grease/Water Tray half-full. Turn the grill Burners on ,close Lid and preheat your grill 3 to 5 minutes. Open Lid andplace food (skin down) on the mid section of a Cooking Grid.Sear 2 minutes on each side then adjust the InfraredBurners to LOW and continue cooking until fish is opaquebut still moist.
Vegetables and Fruit
Fill Grease/Water Tray half-full. Prepare your fruit or veg-etables and brush with butter or basting sauce if desired. Insome instances, you may want to grill vegetables and fruitdirectly over the heat, using the supplied Cooking Grids.Foods that work best with direct heat are relatively soft andrequire a short cooking time: mushrooms, zucchini, toma-toes and skewered fruit such as apricots, peaches, pine-apple, strawberries and kiwis. Remember the Grill Lid mustremain up when cooking directly.
To cook indirectly, the food should be placed on the left orright side of your grill (or Secondary Rack) with the Burnerslit on the opposite side. Either way, indirect cooking mustbe done with the Lid down.
Cut of Meat
T-bone steakSirloin steakBeef spare ribsPorterhouse SteakNew York strip steak
Approx. Total Cooking Times
Rare: 4-6 minutesMedium: 6-8 minutesWell done: 8-10 minutes
Fill Grease/Water Tray half-full. Turn the grill Burners on ,close the Lid and preheat your grill 3 to 5 minutes. Open Lidand place food on the mid section of a Cooking Grid. Sear2-3 minutes on each side then adjust the Infrared Burnersto LOW and continue cooking until desired doneness. Youcan also move the seared meat to the Secondary CookingRack to finish cooking. This method allows you to sear andprepare larger amounts of meat and keep cooked foodwarm. Grilling times will vary according to meat thickness.
Grilling Steak and Ribs
Grilling Hamburgers, Brats and Sausages
Fill Grease/Water Tray half-full. Turn the grill Burners on ,close Lid and preheat your grill 3 to 5 minutes. Open Lid andplace food on the mid section of a Cooking Grid. Sear 2-3minutes on each side then adjust the Infrared Burners toLOW and continue cooking until desired doneness. Grillingtimes will vary according to meat thickness.
Whole fishWhole fish fillets
Approx. 8 - 18 minutes oruntil fish is opaque
ChopsLoinsCutlets
Medium: 10-12 minutesWell done: 12-14 minutes
Chicken breast(cook with bone down)Chicken wingsDrumsticks
Whole bird(cook with breast up)
Direct method:approximately 6-8 minutes
Indirect method:up to 30 minutes
Indirect method:approximately 1 hour
HamburgersBratsSausages
Rare: 3-4 minutesMedium: 5-6 minutesWell done: 6-8 minutes

Type of Food
Beef
Lamb
VealPorkChickenDuckFishTurkey, under 16 poundsTurkey, over 16 pounds
How Cooked
RareMediumWell done
MediumWell done
Approximate Cooking Times
14 minutes per pound18 minutes per pound20 minutes per pound
14 minutes per pound18 minutes per pound
22 minutes per pound23-26 minutes per pound17-20 minutes per pound20 minutes per pound8 minutes per pound17-20 per pound + 20 minutes14-18 per pound + 10 minutes
Guide to Roasting & Baking using the Indirect Cooking MethodAn Important Note About Infrared Heat Settings
The suggested heat settings and cooking times shown areapproximate. Unlike the controlled environment inside yourkitchen, variables including outside temperatures, directionand conditions of wind, as well as grill location will affect yourgrill's heat distribution. Because these conditions vary, andno two backyards are alike, we offer these tips as generalguidelines for your reference. We recommend you monitoryour grill closely and rotate foods often to prevent overcookingand ensure the most delicious results every time.
Preparing to Roast
Roasting uses the indirect cooking method. Therefore, thefood should be placed on the left or right side of your grill withthe Burners lit on the opposite side. You can also use anoptional cast-iron pan underneath food allowing you to collectjuices for making gravies. Remember, indirect cooking re-quires the Lid of your grill to be down.
Fill Grease/Water Tray half-full. Preheating your grill is notrequired for slow cooking methods such as roasting. If you dochoose to preheat your grill before roasting, turn the Burners onHIGH and close Lid for approximately 2 minutes.
Food preparation
Trim meat of excess fat. Truss meat and poultry with cookingstring to retain shape if desired. Bacon strips can be used tocover the outside surface of lean meat and poultry to helpprevent it from drying out. To keep food moist during roastingbe sure to keep the Grease/Water Tray filled. If using anoptional cast-iron pan for cooking, you should also add liquidto prevent burning the bottom of your food.
Tips for roasting
Except when roasting with water in a roasting pan, the juicesthat collect in the pan can be used as the base for a tasty sauceor gravy. Place a cooking pan directly over the cooking grids,add extra butter if needed, then add several spoonfuls of flourto thicken sauce. Finally, add sufficient chicken or beef stockto obtain the desired consistency.
Once the meat is cooked, remove it from your grill and coverwith a piece of foil. Allow it to stand for 10-15 minutes whichallows the juices to settle. This will make carving easier andensure a tender, juicy roast.
Preparing to BakeTo bake in your new grill you'll need a baking dish or cast-ironcooking pan, and a pair of flame retardant BBQ Mitts. If thecooking pan is cast-iron be sure to season the pan before use.Fill Grease/Water Tray half-full. Preheat your grill 3 minutes,then lower heat as needed. Baking uses the indirect cookingmethod. To cook indirectly, the food should be placed on theleft or right side of your grill with the Burners lit on the oppositeside. This is the slow cooking method. A faster indirect methodis to place your food in an optional cast-iron cooking pan andplace it in the center of the grill with all burners on LOW. If higherheat is desired, turn Left Front (LF) and Right Rear (RR) burnerson HIGH with Left Rear (LR) and Right Front (RF) burners onLOW to create a crossray cooking pattern. Either way, indirectcooking must be done with the Lid down.
Tips for BakingPrepare your favorite recipe as you would in the kitchen. You willneed to stir the food several times as it bakes, and addadditional liquid as required. Watch the temperature, andadjust to cook according to your recipe directions.
Oven TemperatureSlow 300° - 340° FModerate 355° - 390° FHigh 410° - 480° F
Recommended Grill SettingLeft or right 2 burners on LOWAll 4 burners on LOWLF + RR burners on HIGH and LR + RF burners on LOW
Fish 145ºF/63ºCPork 160ºF/71ºCEgg Dishes 160ºF/71ºCSteaks and Roasts of Beef, Veal or Lamb 145ºF/63ºC
Ground Beef, Veal or Lamb 160ºF/71ºCWhole Poultry (Turkey, Chicken, Duck, etc.)
165ºF/74ºC
Ground or Pieces Poultry (Chicken Breast, etc.) 165ºF/74ºC
Safe Minimum Internal Temperatures
BAKING TECHNIQUES
A-3

A-4
DEEP-FRYING TECHNIQUES
A wide variety of foods can be deep-fried outdoors on yourgrill, from potatoes, to seafood and chicken. Deep-fryinguses a large portion of oil, preferably saturated. The outdoorlocation is ideal for deep-frying as smoke, grease andsmells disperse in the open air instead of collecting on theceiling of your kitchen.
Preparing to Deep-fry
Deep-fry on your grill using an optional cast-iron pan placedon a Cooking Grid in the path of direct infrared heat.
Fill a cooking pan no more than half full of vegetable or cornoil. Fill Grease/Water Tray half-full. Turn the grill Burnerson HI, close Lid and preheat your grill 3 to 5 minutes. OpenLid and place cast-iron pan on the mid section of a CookingGrid then adjust the Infrared Burners to LOW.
Check the temperature of the oil carefully with a fryingthermometer or test with a cube of bread. The cube of breadshould brown in about 30 seconds for most cooking needs.350°F(177°C) is the optimal temperature for preparing themajority of deep-fried foods.
Food Preparation
Foods being deep-fried taste better when coated with eitherbatter or breadcrumbs to add flavor and prevent moisturefrom escaping.
Tips for Deep-frying
Wear a flame retardant BBQ Mitt and slowly lower foodsinto the hot oil using a wire scoop, fry-basket or stain-less steel tongs. Add only a small quantity of food to theoil, allow it to cook, then repeat with another smallquantity. This ensures the oil doesn't drop in tempera-ture. Once the food is cooked, remove it carefully anddrain onto a paper towel. Turn the heat off as soon as youhave finished deep-frying and allow your pan to cool.When the oil is cool, remove all remnants of fried foodsby straining it through a fine metal sieve, and store it ina clean bottle for future use.
STIR-FRYING TECHNIQUES
This method of cooking is popular around the world and canbe easily accomplished outdoors on your gas grill. It's a quickand healthy way of preparing a complete meal using meat,poultry or seafood in infinite combinations with other interest-ing ingredients like vegetables, rice or noodles.
Preparing to Stir-fry
Although it is possible to stir fry in other dishes, a wok is yourbest tool. Its high sides enable the cook to stir food withoutspillage. Its construction allows you to cook quickly at hightemperatures, with instant control of heat which is essentialfor successful stir frying.
Food preparation
Slice meat and poultry into long thin strips and cube fish fillets.Remove all fat from meat and poultry and cut large vegetablesinto even slices or cubes.
Marinate foods for extra flavor and tenderness. Marinatingtimes will vary for red meat, fish and or various cuts. Lesstender cuts of meat should be marinated longer. Rememberto always chill marinating food in the refrigerator prior tocooking.
Stir-fry meats, poultry or fish first. Next, add hard vegetableslike carrots. Then continue with softer vegetables likesnowpeas and peppers. To ensure even cooking, continuallystir and toss the food in the wok using a wooden spoon orspatula.
Tips for Stir-frying
Place a wok on a Cooking Grid in the path of direct infrared heat.Add only a small amount of food at a time to ensure fastcooking and also to allow the wok to reheat between ingre-dients.
Vegetables are generally easy to cook on the grill. TheSecondary Cooking Rack makes it convenient because youcan still use the main cooking area while the vegetables aresuspended above the grids.
Pre-cook hard vegetables by briefly boiling or microwavingthem before cooking on the grill. Do not grill your vegetableswrapped in aluminum foil. Infrared heat does not cookthrough aluminum foil and reflective pans. To keep veg-etables moist, brush them with butter or oil often.
Guide to Using the Secondary Cooking RackThe Secondary Cooking Rack can be used for purposesother than just the obvious. Consider using the rack forwarming French bread, garlic bread, croissants or evenbagels.
Guide to Stir-Frying and Deep-Frying

A-5
FREQ
UEN
TLY
ASK
ED
QU
ESTI
ON
S (F
AQ
'S)
Answer:
Always light the Main Burner farthest from the fuel sourcefirst. This will draw gas across the manifold helping preventair pockets which obstruct gas-flow and prevent proper grilllighting. Also try this procedure:
Answer:
My grill will not light properly. Why?Question:
The serial and model numbers are listed on a silver CSAlabel placed on the grill. Depending on the grill model thesilver CSA label will be located on the left or right sidebowl panel underneath the side shelf, underneath theright side of the control panel, outside left or right of controlpanel or on the back of the grill cabinet.
Are the serial and model numbers of my grill listedsomewhere for reference?
Question:
No, your gas grill is manufactured to exact specificationsand is certified for LPG (Liquid Propane Gas) or NG(Natural Gas) use only. For your safety, conversion kits arenot available, nor will we sell or otherwise provide parts orinformation to be used to convert your grill. Any attempt toconvert your grill is dangerous and will void your warranty.
Answer:
Can I convert my grill from one fuel type to another inother words from LPG to NG or vice versa?
Question:
If my ignitor or battery is not working how can I light mygrill manually? And - Why would I need the silver lightingstick that hangs from the side of my grill?
Question:
Answer:
Turn gas off at source and turn Control Knobs OFF.Wait at least 5 minutes for gas to clear, then retry.If your grill still fails to light, turn the Burner ControlKnob(s) and gas source OFF and conduct a leak testof ALL gas connections and gas sources as explainedin the Use and Care section of this manual.If no leaks are detected, wait 5 minutes for any gas toclear and repeat the lighting procedure.
1.
2.
3.
Never lean over the grill cooking area while lightingyour gas grill. Keep your face and body a safedistance (at least 18 inches) from the front of grillwhen lighting your grill by match.
WARNING !!
Question:Sometimes I hear a humming sound coming from myregulator. What causes this? And - My grill has a lowflame and sometimes will not light. Why?
Where do I use my grill for safer operation and betterperformance?
Question:
Answer:Strong winds and low temperatures can affect theheating and performance of your gas grill so factorin these elements when positioning your grilloutdoors for cooking.
Use your grill at least 3 feet away from any wall orsurface.
Use your grill at least 3 feet away from combustibleobjects that can melt or catch fire (ex: vinyl or woodsiding, fences and overhangs) or sources of ignitionincluding pilot lights on water heaters and liveelectrical appliances.
In windy conditions, always position the front ofgrill to face oncoming wind to reduce smoke andheat blowing in your face and prevent potentialhazards to self and grill.
Never use your gas grill in a garage, porch, shed,breezeway or any other enclosed area.
Never obstruct the flow of ventilation air aroundyour gas grill housing.
Do not turn tank valve more than ½ of one turn onLPG models.
Turn all Control Knobs to the OFF position.
Turn off the LP Gas tank at the tank valve.For Natural Gas shut off NG valve.
Disconnect regulator from LP Gas tank.For Natural Gas disconnect regulator from 12 ft.Natural Gas Hose.Let unit stand for 5 minutes.
Reconnect regulator to the LP Gas tank.For Natural Gas reconnect regulator to 12 ft. NaturalGas Hose.
Open grill Lid.
Turn the tank valve slowly ¼ of one turn.For Natural Gas open Shut Off valve.
Light main Burner farthest from fuel source.
Turn the tank valve slowly one more ¼ of one turnfor ½ of one complete turn.
Continue to light Burners moving towards the fuelsource.
Answer:The humming sound is gas flowing through theregulator. A low volume of sound is normal and will notinterfere with the operation of your grill. Loud orexcessive regulator humming and/or low flow andintermittent lighting may be caused by the regulator'sexcess gas flow device. Opening the tank valve all theway or too quickly is what triggers the regulator's safetydevice to restrict gas flow, preventing excess gas flowto your grill. Lighting the main Burner farthest from thefuel source every time will help eliminate air pockets inthe manifold. Note: This procedure should be doneevery time a new LP Gas tank is connected to your grill.
If your ignition fails to work or if your battery needsreplacing, you can light your grill using the ManualLighting Stick. The Lighting Stick is designed to hold apaper match and allows you to safely insert a matchthrough the Cooking Grid without getting close to theBurner. To light your gas grill manually, insert a papermatch into the Manual Lighting Stick and follow steps 1through 5 of the Basic Lighting Procedures. Then, lightthe match and place the Lighting Stick through theCooking Grid. Turn the nearest main Burner ControlKnob to the setting to release gas. The Burner shouldlight immediately.

A-6
FREQ
UEN
TLY A
SKED
Q
UESTIO
NS
(FAQ
'S)
After every use (after your grill has cooled down), wipestainless surfaces with a soft, soapy cloth or spongethen rinse with water. Be sure to remove all food par-ticles, sauces or marinades from stainless steel becausethese can be highly acidic and damaging to stainlesssurfaces.
Never use abrasive cleaners, scrubbers or stiff wirebrushes of any type on your grill.Use a heat resistant Stainless Steel Cleaner and rub orwipe in the direction of the stainless steel grain or polishlines. Do not polish against the grain.
Rusting is a natural oxidation process and will not affectthe short term performance of your grill.
The Regulator and Hose supplied with my gas grilldoes not fit the older LP Gas tank I’ve used for years. Why not?
The U.S. Government regulates gas appliances and LPGas tanks. When regulations are changed the LP Gastank fittings are altered to insure compliance. If your LPGas tank does not fit the Regulator and Hose suppliedwith your new grill, the tank is outdated and must bereplaced. Note: Effective April 1, 2002 all LP Gas tankssold must include an “OPD” Overfill Prevention Device.The OPD tanks are identified by their triangular-shapedvalve wheel. This internal device prevents the LP Gastank from being overfilled. Tanks without an OPD valvecan not be refilled.
Question:What causes grill parts to rust and what effect does
it have on my grill?
Answer:
Routine care and maintenance is required to preserve theappearance and corrosion resistance of stainless steel.The fact is stainless steel can corrode, rust and discolorunder certain conditions. Rust is caused when regular steelparticles in the atmosphere become attached to the stain-less steel surface. Steel particles can also become attachedto your grill if you use steel wool or stiff wire brushes toclean the grill instead of non-abrasive cloth, sponge or ny-lon cleaning tools. In coastal areas rust pits can develop onstainless surfaces that cannot be fully removed. Bleachand other chlorine based solutions used for householdand pool cleaning can also cause corrosion to stainlesssteel.
Weathering, extreme heat, smoke from cooking and ma-chine oils used in the manufacturing process of stainlesssteel can cause stainless steel to turn tan in color. Althoughthere are many factors which can affect the surface appear-ance of stainless steel, they do not affect the integrity of thesteel or the performance of the grill. To help maintain thefinish of stainless steel follow these cleaning proceduresfor the best results:
To slow the rusting process on Cooking Grids werecommend greasing the grids before and after eachcookout. Use a brush to apply a thin layer of cooking oil orvegetable shortening onto each grid. We do not suggestspray type oils unless they are specified for high-temperature cooking. If your Cooking Grids are Porcelaincoated, be sure to coat the entire cooking surface includingedges and any areas with chipped porcelain.
Question:
Answer:

•
Grand Hall will warrant to the ORIGINAL PURCHASER of this product that it will be free of defects in materialand workmanship for set periods below from the date of purchase when used under normal outdoor useand correct assembly:
Full Warranty on Grill - 1 year (except for paint loss, rusting and ignitor battery)Infrared Burners - 5 Years
Grand Hall will require reasonable proof of your date of purchase. Therefore, you should send in the ownerregistration card or register online at www.grandhall.com. Save your receipt in case it is required as proofof purchase.
This Limited Warranty is limited to replacement of parts at Grand Hall's option that proved to be defectiveunder normal use and service.
Grand Hall may require the return of defective parts for examination before issuing replacement parts. If youare required to return defective parts, shipping charges must be prepaid. No returns will be accepted withoutprior authorization from Grand Hall.
Upon examination and to Grand Hall's satisfaction, if the original part is proven defective, Grand Hall mayapprove your claim and elect to replace such parts without charge. You will be charged for shipping andhandling of the replacement parts.
This Warranty does not cover any failures or operating difficulties due to accident, abuse, misuse, alteration,misapplication, vandalism, improper installation, maintenance, operation or service, as set out in the Operator'sManual.
This Warranty does not cover cosmetic wear and tear such as scratches, dents, corrosion or discolorationcaused by weather, heat, chemicals, paint loss, or surface rust. Deterioration or damage due to severe weatherconditions such as hail, hurricanes, earthquakes, tsunami, tornadoes, Act of God or terrorism is not coveredby this Limited Warranty.
To Obtain Warranty:Call 1-877-934-7455Monday-Friday 8AM-4:30PM CST
Warranty Restrictions:
This Warranty is non-transferable and is void if product is used for commercial or rental purposes.
This Warranty applies only when the product is used in the United States or Canada.
This Warranty gives you specific legal rights, and you may also have other rights which vary from state to state.
•
•
Grand Hall Limited Warranty
Manufacturer:Grand Hall Enterprise Co., Ltd.9th Fl., No. 298, Rueiguang Rd., Neihu,Taipei, Taiwan (114)