operation manual - umarex manuals/manual...1 operating instructions 2 - 15 mode d´emploi 16 - 29...
TRANSCRIPT

1
Operating instructions 2 - 15 Mode d´emploi 16 - 29 Instrucciones de operación 30 - 43
READ THIS OWNER’S MANUAL COMPLETELY. This airgun is not a toy. Treat it with the same respect you would a firearm. Always carefully follow the safety instructions found in this owner’s manual and keep this manual in a safe place for future use.
NOT A TOY. ADULT SUPERVISION REQUIRED. MISUSE OR CARELESS USE MAY CAUSE SERIOUS INJURY OR DEATH. MAY BE DANGEROUS UP TO 650 YARDS (594 METERS).THIS IS A HIGH POWERED AIRGUN FOR USE BY THOSE 16 YEARS OF AGE OR OLDER. READ ALL INSTRUCTIONS BEFORE USING. THE PURCHASER AND USER SHOULD CONFORM TO ALL LAWS GOVERNING THE PURCHASE, USE AND OWNERSHIP OF AIRGUNS.
WARNING:
Shoots Pellets Tire des projectiles Disparar balines
Break-Barrel Air Rifles Caliber Velocity Danger Distance350 N-Tec Magnum Classic .177/.22 1320/975 fps 650 yds350 Magnum Series .177/.22 1250/1000 fps 625 yds340 N-Tec Classic .177/.22 1100/900 fps 600 yds340 N-Tec Luxus .177/.22 1100/900 fps 600 yds34 Series .177/.22 1000/800 fps 575 yds
Side-Cocking Air Rifles Model 48 .177/.22 1100/900 fps 600 ydsModel 54 .177/.22 1100/900 fps 600 ydsModel 56 TH .177/.22/.25 1100/900/610 fps 600 yds
Under-Lever Air Rifles Model 460 Magnum .177/.22 1200/1000 fps 625 ydsModel 470 TH .177/.22 1100/900 fps 600 yds
Operation Manualfor Break-Barrel, Side-Lever,& Under-Lever Pellet Rifles

EN
2
DESCRIPTION
OPERATION
CARE
SAFETY INSTRUCTIONS
Operating Procedures1. Learning the Parts of Your Air Rifle2. Operating the Safety3. Cocking your Air Rifle4. Loading your Air Rifle 5. Closing the barrel6. Aiming at a safe target
Airguns differ in their operation and you are never ready to fire any gun until you are thoroughly familiar with it. Read the following operating instructions thoroughly prior to operating.
These symbols, , mark warnings and cautions in this operation manual. Carefully follow them for your own safety and the safety of others.
DO NOT BRANDISH OR DISPLAY THIS AIRGUN IN PUBLIC – IT MAY CONFUSE PEOPLE AND MAY BE A CRIME. POLICE AND OTHERS MAY THINK IT IS A FIREARM. DO NOT CHANGE THE COLORATION AND MARKINGS TO MAKE IT LOOK MORE LIKE A FIREARM. THAT IS DANGEROUS AND MAY BE A CRIME.
WARNING:
EN
3
SAFETY INSTRUCTIONS
Operating Procedures1. Learning the Parts of Your Air Rifle2. Operating the Safety3. Cocking your Air Rifle4. Loading your Air Rifle 5. Closing the barrel6. Aiming at a safe target
7. Firing your Air Rifle 8. Adjusting the Sights 9. Adjusting the Trigger10. Trouble Shooting11. Care and Maintenance12. Reviewing Safety13. Repair / Service / Warranty
Airguns differ in their operation and you are never ready to fire any gun until you are thoroughly familiar with it. Read the following operating instructions thoroughly prior to operating.
These symbols, , mark warnings and cautions in this operation manual. Carefully follow them for your own safety and the safety of others.
CAUTION:EYE PROTECTION
REQUIREDWEAR YOUR
SHOOTING GLASSES
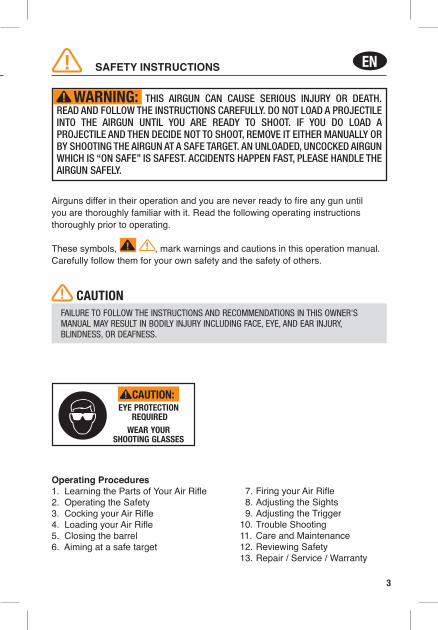
THIS AIRGUN CAN CAUSE SERIOUS INJURY OR DEATH. READ AND FOLLOW THE INSTRUCTIONS CAREFULLY. DO NOT LOAD A PROJECTILE INTO THE AIRGUN UNTIL YOU ARE READY TO SHOOT. IF YOU DO LOAD A PROJECTILE AND THEN DECIDE NOT TO SHOOT, REMOVE IT EITHER MANUALLY OR BY SHOOTING THE AIRGUN AT A SAFE TARGET. AN UNLOADED, UNCOCKED AIRGUN WHICH IS “ON SAFE” IS SAFEST. ACCIDENTS HAPPEN FAST, PLEASE HANDLE THE AIRGUN SAFELY.
WARNING:
FAILURE TO FOLLOW THE INSTRUCTIONS AND RECOMMENDATIONS IN THIS OWNER'S MANUAL MAY RESULT IN BODILY INJURY INCLUDING FACE, EYE, AND EAR INJURY, BLINDNESS, OR DEAFNESS.
CAUTION

EN
4
DESCRIPTION
1. Learning the Parts of Your Air Rifle
Your RWS® Air Rifle has an automatic safety. When the airgun is cocked it is automatically put “ON SAFE”. • To put “ON SAFE” pull the safety button out so that the white circle is showing. This can only be done if the air rifle has been cocked. (see illustration 2a)
• To put “OFF SAFE (on fire)”, push the safety button forward so that the white circle is not visible (see illustration 2b).
Illustration 1a Illustration 1b
Illustration 1c
Barrel
Muzzle
Front Sight
Rear Sight
Top Side Loading Port
Cocking Lever
Scope Mount Rail
Trigger
Safety
Stock
Trigger Guard
UNDER-LEVERBREAK-BARREL
SIDE-LEVER
EN
5
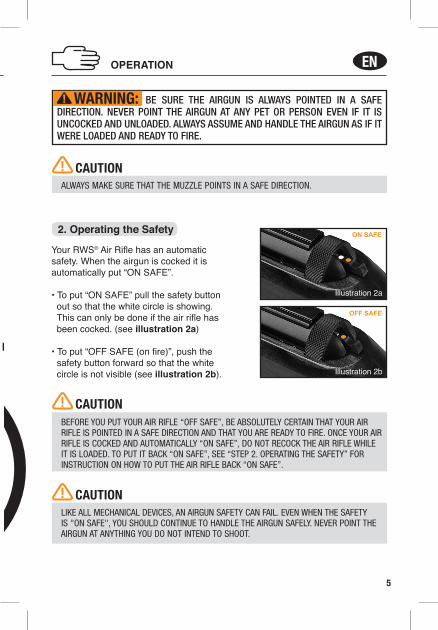
Your RWS® Air Rifle has an automatic safety. When the airgun is cocked it is automatically put “ON SAFE”. • To put “ON SAFE” pull the safety button out so that the white circle is showing. This can only be done if the air rifle has been cocked. (see illustration 2a)
• To put “OFF SAFE (on fire)”, push the safety button forward so that the white circle is not visible (see illustration 2b).
2. Operating the Safety
ALWAYS MAKE SURE THAT THE MUZZLE POINTS IN A SAFE DIRECTION.
CAUTION
BEFORE YOU PUT YOUR AIR RIFLE “OFF SAFE”, BE ABSOLUTELY CERTAIN THAT YOUR AIR RIFLE IS POINTED IN A SAFE DIRECTION AND THAT YOU ARE READY TO FIRE. ONCE YOUR AIR RIFLE IS COCKED AND AUTOMATICALLY “ON SAFE”, DO NOT RECOCK THE AIR RIFLE WHILE IT IS LOADED. TO PUT IT BACK “ON SAFE”, SEE “STEP 2. OPERATING THE SAFETY” FOR INSTRUCTION ON HOW TO PUT THE AIR RIFLE BACK “ON SAFE”.
CAUTION
LIKE ALL MECHANICAL DEVICES, AN AIRGUN SAFETY CAN FAIL. EVEN WHEN THE SAFETY IS "ON SAFE", YOU SHOULD CONTINUE TO HANDLE THE AIRGUN SAFELY. NEVER POINT THE AIRGUN AT ANYTHING YOU DO NOT INTEND TO SHOOT.
CAUTION
BE SURE THE AIRGUN IS ALWAYS POINTED IN A SAFE DIRECTION. NEVER POINT THE AIRGUN AT ANY PET OR PERSON EVEN IF IT IS UNCOCKED AND UNLOADED. ALWAYS ASSUME AND HANDLE THE AIRGUN AS IF IT WERE LOADED AND READY TO FIRE.
WARNING:
OPERATION
Illustration 2a
ON SAFE
Illustration 2b
OFF SAFE
SIDE-LEVER
EN
6
OPERATION
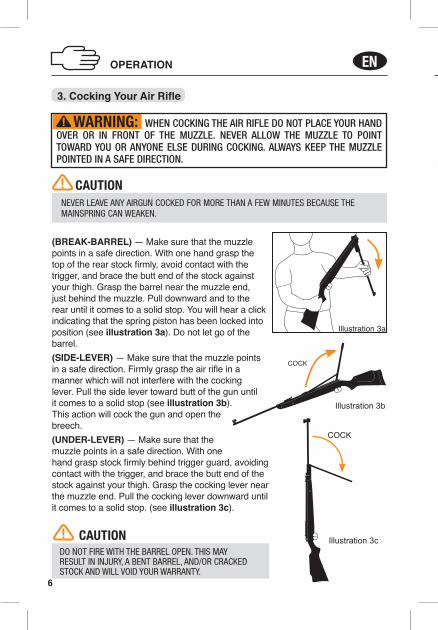
WHEN COCKING THE AIR RIFLE DO NOT PLACE YOUR HAND OVER OR IN FRONT OF THE MUZZLE. NEVER ALLOW THE MUZZLE TO POINT TOWARD YOU OR ANYONE ELSE DURING COCKING. ALWAYS KEEP THE MUZZLE POINTED IN A SAFE DIRECTION.
WARNING:
3. Cocking Your Air Rifle
NEVER LEAVE ANY AIRGUN COCKED FOR MORE THAN A FEW MINUTES BECAUSE THE MAINSPRING CAN WEAKEN.
CAUTION
(BREAK-BARREL) — Make sure that the muzzle points in a safe direction. With one hand grasp the top of the rear stock firmly, avoid contact with the trigger, and brace the butt end of the stock against your thigh. Grasp the barrel near the muzzle end, just behind the muzzle. Pull downward and to the rear until it comes to a solid stop. You will hear a click indicating that the spring piston has been locked into position (see illustration 3a). Do not let go of the barrel. (SIDE-LEVER) — Make sure that the muzzle points in a safe direction. Firmly grasp the air rifle in a manner which will not interfere with the cocking lever. Pull the side lever toward butt of the gun until it comes to a solid stop (see illustration 3b). This action will cock the gun and open the breech.(UNDER-LEVER) — Make sure that the muzzle points in a safe direction. With one hand grasp stock firmly behind trigger guard, avoiding contact with the trigger, and brace the butt end of the stock against your thigh. Grasp the cocking lever near the muzzle end. Pull the cocking lever downward until it comes to a solid stop. (see illustration 3c).
Illustration 3c
COCK
COCK
Illustration 3b
Illustration 3a
DO NOT FIRE WITH THE BARREL OPEN. THIS MAY RESULT IN INJURY, A BENT BARREL, AND/OR CRACKED STOCK AND WILL VOID YOUR WARRANTY.
CAUTION

EN
7
4. Loading Your Air RifleInsert a pellet carefully into the chamber of the breech end which is exposed when you cock the air rifle (Break barrel - see illustration 4a; Side lever - see illustration 4b; Under-lever - see illustration 4c). Be sure to seat the pellet flush with the breech. Avoid damaging the pellet skirt.
OPERATION
NEVER CARRY YOUR AIR RIFLE WHILE COCKED AND/OR WHILE LOADED. IT IS BEST TO COCK THE AIR RIFLE ONLY BEFORE SHOOTING. UNDER NO CIRCUMSTANCES SHOULD YOUR AIR RIFLE BE CARRIED COCKED AND LOADED.
WARNING:
USE ONLY THE CALIBER PELLET DESIGNATED FOR YOUR AIR RIFLE. THE CORRECT CALIBER IS CLEARLY MARKED ON THE AIRGUN. DO NOT ATTEMPT TO REUSE PELLETS THAT HAVE BEEN FIRED OR ARE DEFORMED. DO NOT USE BUCK SHOT, DARTS, BALL BEARINGS, OR OTHER FOREIGN OBJECTS BECAUSE THEY CAN CAUSE INJURY TO YOU OR SOMEONE ELSE OR MAY DAMAGE AND/OR JAM THE AIRGUN.
CAUTION
COCKINGSAFETY LEVER
Illustration 4b
Illustration 4a
COCKINGSAFETY LEVER
Illustration 4cPINCHPOINT 5. Closing the Barrel
BREAK-BARREL — Firmly grasp the barrel behind the front sight, return the barrel to its original closed and latched position.SIDE-LEVER — Before returning the side lever to its original position, depress the cocking safety lever (see illustration 4b) on the left side of the cylinder. Grasp the side-lever, close to its original position. NOTE: There should be NO pressure on cocking lever when returning it to original position. If there is pressure, the air rifle has not been fully cocked.UNDER-LEVER — IMPORTANT: Before returning the under-lever to its original position, firmly grasp the cocking lever and DEPRESS THE COCKING SAFETY LEVER (see illustration 4c) located on the right side of the cylinder. Close the cocking lever to its original position. NOTE: There should be NO pressure on cocking lever when returning it to original position. If there is pressure, the air rifle has not been fully cocked.

EN
8
OPERATION
BE CAREFUL TO KEEP FINGERS CLEAR OF COCKING MECHANISIM (SEE “PINCH POINTS”, ILLUSTRATION 4C, 5A AND 5B). GRASP THE BARREL FIRMLY AS YOU COCK IT AND CLOSE IT TO PREVENT IT FROM SNAPPING BACK AND POSSIBLY CAUSING INJURY.
CAUTION
PINCHPOINT
Illustration 5b
PINCHPOINTS
Illustration 5a
PINCHPOINT
PINCHPOINT
7. Firing Your Air Rifle
When you are absolutely sure your air rifle is aimed at a safe target and you are ready to fire, put your air rifle “OFF SAFE” (see STEP 2. OPERATING THE SAFETY). Squeeze the trigger.
6. Aiming at a Safe TargetAlways aim your air rifle in a SAFE DIRECTION. Always choose your target carefully. It is best to shoot at a paper bullseye target which is attached to a safe backstop. A heavy blanket should be hung behind the target backstop to prevent ricochet should you miss the backstop. Think about what you will hit if you miss the target.SOME RWS® AIR RIFLES have open sights. Air rifles with this type of sight are correctly aimed when the front sight blade is positioned exactly in the notch of the rear sight. The top of the front sight blade should be even with the top of the notch in the rear sight. The bullseye should appear to rest on the top of the front sight (see illustration 6).
UNDER-LEVER MODELS ONLY: To prevent the cocking lever from falling out of the lever holder underneath the front sight do the following: Make sure the air rifle is UNLOADED and UNCOCKED. Now, tighten the small screw underneath the muzzle to increase the tension on the cocking lever retaining ball. Look at the screw from an angle and never look directly into the muzzle of the air rifle. If this does not correct the problem then proceed in this sequence: Make certain the air rifle is UNLOADED and UNCOCKED. Disengage cocking lever from underneath front sight, loosen set screw on top side of front sight, place a piece of soft wood on muzzle end of front sight and then using a hammer VERY LIGHTLY tap the wood to seat the sight completely down on the barrel. Retighten the set screw on top side of front sight. If the cocking lever seats too tight after completing this process you may need to slightly loosen the small screw underneath the muzzle to decrease the tension on the cocking lever retaining ball.

EN
9
OPERATION
7. Firing Your Air Rifle
When you are absolutely sure your air rifle is aimed at a safe target and you are ready to fire, put your air rifle “OFF SAFE” (see STEP 2. OPERATING THE SAFETY). Squeeze the trigger.
IF A PELLET DOES NOT FIRE AFTER COMPLETING THE OPERATION STEPS, THE AIRGUN MAY BE JAMMED. AN UNFIRED PROJECTILE IN THE BARREL CAN BE A DANGEROUS SITUATION. KEEP THE AIRGUN POINTED IN A SAFE DIRECTION AND REPEAT ALL OPERATION STEPS EXCEPT STEP 3. IF A PROJECTILE STILL DOES NOT FIRE, DO THE FOLLOWING:
1. Make sure airgun is pointed in a safe direction.2. Cock the airgun and leave the barrel open with the safety in the “ON SAFE” position.3. Clear barrel by inserting a cleaning rod through the muzzle end.4. Repeat operation steps.
WARNING:
BEFORE YOU PUT YOUR AIR RIFLE “OFF SAFE”, BE ABSOLUTELY CERTAIN THAT YOUR AIR RIFLE IS POINTED IN A SAFE DIRECTION AND THAT YOU ARE READY TO FIRE. ONCE YOUR AIR RIFLE IS COCKED AND AUTOMATICALLY “ON SAFE”, YOU WILL NOT BE ABLE TO PUT IT BACK “ON SAFE” UNLESS YOU RE-COCK THE AIR RIFLE. DO NOT RECOCK THE AIR RIFLE WHILE IT IS LOADED TO PUT IT BACK “ON SAFE”.
WARNING:
6. Aiming at a Safe TargetAlways aim your air rifle in a SAFE DIRECTION. Always choose your target carefully. It is best to shoot at a paper bullseye target which is attached to a safe backstop. A heavy blanket should be hung behind the target backstop to prevent ricochet should you miss the backstop. Think about what you will hit if you miss the target.SOME RWS® AIR RIFLES have open sights. Air rifles with this type of sight are correctly aimed when the front sight blade is positioned exactly in the notch of the rear sight. The top of the front sight blade should be even with the top of the notch in the rear sight. The bullseye should appear to rest on the top of the front sight (see illustration 6).
YOUR BACKSTOP SHOULD BE INSPECTED FOR WEAR BEFORE AND AFTER EACH USE. DISCONTINUE USE IF THE BACKSTOP SURFACE SHOWS SIGNS OF FAILURE. ALWAYS PLACE THE BACKSTOP IN A LOCATION THAT WILL BE SAFE SHOULD THE BACKSTOP FAIL. DISCONTINUE THE USE OF A BACKSTOP IF THE PROJECTILE REBOUNDS OR RICOCHETS.
CAUTION
Illustration 6
NOTE: Many factors affect airgun performance and velocity, including brand of projectile, lubrication, barrel condition and temperature.

EN
10
OPERATION
8. Adjusting the SightsREAR SIGHTRWS Air Rifles are equipped with a micrometer rear sight, with vertical and horizontal adjustment at the rear.Elevation Settings — If the rifle shoots high: turn the screw A clockwise (see illustration. 7a). If the rifle shoots low: turn the screw A counterclockwise (see illustration 7a). Note: the numbers 0-9 are reference numbers only and are not calibrated to distances.Windage Settings — Windage settings are controlled by turning the knob B on the side (see illustration 7a). If the air rifle shoots to the right: adjust counterclockwise. If it shoots to the left: adjust clockwise.
FRONT SIGHTRWS Models 48, 52 and 54 are equipped with an adjustable front sight [(C)-See Illustration 7b]. It can be adjusted by loosening the screw (D), move it by sliding to a lower or higher position. Afterwards retighten the screw.
Illustration 7a
A
B
Illustration 7b
C
D
NEVER ASSUME THAT BECAUSE THE AIRGUN NO LONGER FIRES A PROJECTILE THAT A PROJECTILE IS NOT LODGED IN THE BARREL. ALWAYS TREAT THE AIRGUN AS THOUGH IT IS LOADED AND WITH THE SAME RESPECT YOU WOULD A FIREARM.
WARNING:
DO NOT ATTEMPT TO REUSE FIRED PELLETS OR PELLETS WHICH ARE DEFORMED. PROJECTILES SUCH AS STEEL SHOT (BBS) AND DARTS MAY DAMAGE YOUR AIR RIFLE AND CAUSE INJURY TO YOURSELF OR BYSTANDERS DUE TO RICOCHETING, AND WILL VOID THE WARRANTY.
CAUTION
LEAD PELLETS CONTAIN LEAD, A CHEMICAL KNOWN TO THE STATE OF CALIFORNIA TO CAUSE CANCER AND BIRTH DEFECTS OR OTHER REPRODUCTIVE HARM. DO NOT INHALE DUST OR PUT LEAD PELLETS IN MOUTH. WASH HANDS AFTER HANDLING. KEEP AWAY FROM CHILDREN.
WARNING:
First Stage Travel:The first stage travel is reduced to a minimum by factory. By turning the screw (1) the first stage travel will be extended.
Pull-off:When the first stage travel will be adjusted the pull-off must be adjusted also. This will be done by turning the screw (2).• Turn clockwise: Coarse pull-off• Turn counter-clockwise: Finely adjusted
pull-off
First Stage Weight and Trigger Weight:It is possible to regulate the first stage weight and trigger weight by turning the screw (3).• Turn clockwise: Weight will be increased• Turn counter clockwise: Weight will be reducedFirst stage weight ranges from .66 lbs / 300 g (at a minimum) to .84 lbs / 380 g (at a maximum). Trigger weight ranges from .88 lbs / 400 g (at a minimum) to 1.1 lbs / 500 g (at a maximum).

EN
11
OPERATION
10A. Unloading a Pellet Fire the pellet at a SAFE TARGET to unload the airgun. If this is not practical, put the air rifle “ON SAFE”, cock the airgun to open the barrel, and push the pellet from the chamber by running a cleaning rod through the muzzle end. Insert 2 RWS Cleaning Pellets and discharge into a safe target.
10B. Removing a Jammed Pellet If a pellet is jammed in the barrel, DO NOT reload the air rifle.1. Cock the air rifle (see STEP 3. COCKING YOUR AIR RIFLE), point the air rifle in a SAFE DIRECTION, put the air rifle in the “OFF SAFE” position and squeeze the trigger to fire.
10. Trouble Shooting
9. Adjusting the Trigger
Breech
Muzzle
Ramrod
Illustration 9
First Stage Travel:The first stage travel is reduced to a minimum by factory. By turning the screw (1) the first stage travel will be extended.
Pull-off:When the first stage travel will be adjusted the pull-off must be adjusted also. This will be done by turning the screw (2).• Turn clockwise: Coarse pull-off• Turn counter-clockwise: Finely adjusted
pull-off
First Stage Weight and Trigger Weight:It is possible to regulate the first stage weight and trigger weight by turning the screw (3).• Turn clockwise: Weight will be increased• Turn counter clockwise: Weight will be reducedFirst stage weight ranges from .66 lbs / 300 g (at a minimum) to .84 lbs / 380 g (at a maximum). Trigger weight ranges from .88 lbs / 400 g (at a minimum) to 1.1 lbs / 500 g (at a maximum).
TRIGGER FORCE IS CAPABLE OF ADJUSTMENT BELOW THE 3 LB (1.35 KG) LEVEL. WHEN ADJUSTED BELOW 3 LBS, THE AIRGUN COULD FIRE WHEN DROPPED.
CAUTION
1.
2.
3.
Illustration 8

EN
12
OPERATION CARE
NEVER STORE A LOADED OR COCKED AIRGUN. Unload pellet from the airgun. Keep air rifle away from children and untrained shooters. Store pellets separately from the air rifle to keep them from untrained shooters. Protect your air rifle from moisture and dirt; clean airgun and wrap it in a smooth, dry cloth. If you are going to store your airgun for an extended length of time be sure the barrel is protected. This can be accomplished by coating the bore with RWS Spring Cylinder Oil. Always use a soft cloth and insert the cleaning rod from the breech end on break barrel rifles. Remove the oil completely before the next use. REMEMBER: Always check to see that the airgun is unloaded when getting from storage or from another person. With care and routine inspections your airgun will provide many sessions of shooting enjoyment. Abuse, neglect and continued exposure to the elements will impair the performance of any airgun.Your RWS® Air Rifle is designed to fire caliber .177 or .22 pellets only. We recommend the use of RWS Pellets because of their superb accuracy and dimensional uniformity. The correct caliber is clearly indicated on the rifle.
11. Care and Maintenance
BEFORE ANY CARE, CLEANING OR MAINTENANCE, ALWAYS BE SURE YOUR AIRGUN IS UNLOADED. KEEP POINTED IN A SAFE DIRECTION. IT IS IMPORTANT TO PERFORM ROUTINE INSPECTIONS AND MAINTAIN YOUR AIRGUN PROPERLY.
CAUTION
NEVER DRY FIRE YOUR AIR RIFLE. IF THE AIR RIFLE IS FIRED WITHOUT A LEAD PELLET IT WILL CAUSE THE PISTON TO BOTTOM OUT IN THE CYLINDER WHICH CAN PERMANENTLY DAMAGE THE AIR RIFLE.
CAUTION
2. Break the barrel open slightly (without pulling the barrel all the way down to the point that it cocks) and look down the breech to see if the air rifle is jammed (see illustration 9). NEVER LOOK DOWN THE MUZZLE.3. If the air rifle is still jammed, with the barrel opened slightly, insert a correct caliber ramrod into the muzzle and push the jammed pellet out. Do not try to reuse that pellet. If you are not able to unjam your air rifle, contact Umarex USA’s Service Department.
CAUTION CHECK THE TIGHTNESS OF THE STOCK SCREWS BETWEEN, DURING, AND AFTER SHOOTING ACTIVITY. LOOSE SCREWS MAY CAUSE INJURY OR DEATH.
EN
13
OPERATION
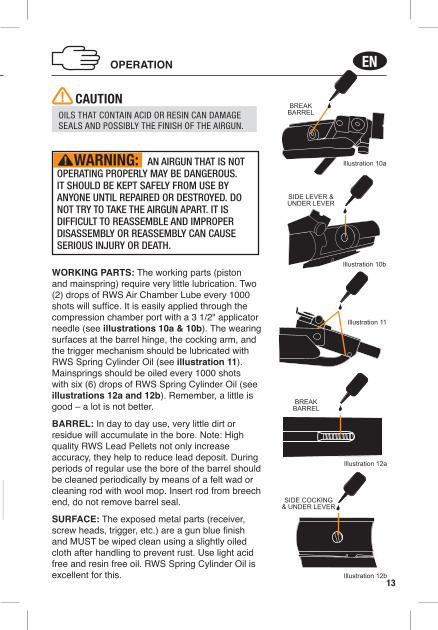
WORKING PARTS: The working parts (piston and mainspring) require very little lubrication. Two (2) drops of RWS Air Chamber Lube every 1000 shots will suffice. It is easily applied through the compression chamber port with a 3 1/2" applicator needle (see illustrations 10a & 10b). The wearing surfaces at the barrel hinge, the cocking arm, and the trigger mechanism should be lubricated with RWS Spring Cylinder Oil (see illustration 11). Mainsprings should be oiled every 1000 shots with six (6) drops of RWS Spring Cylinder Oil (see illustrations 12a and 12b). Remember, a little is good – a lot is not better.
BARREL: In day to day use, very little dirt or residue will accumulate in the bore. Note: High quality RWS Lead Pellets not only increase accuracy, they help to reduce lead deposit. During periods of regular use the bore of the barrel should be cleaned periodically by means of a felt wad or cleaning rod with wool mop. Insert rod from breech end, do not remove barrel seal.
SURFACE: The exposed metal parts (receiver, screw heads, trigger, etc.) are a gun blue finish and MUST be wiped clean using a slightly oiled cloth after handling to prevent rust. Use light acid free and resin free oil. RWS Spring Cylinder Oil is excellent for this.
AN AIRGUN THAT IS NOT OPERATING PROPERLY MAY BE DANGEROUS. IT SHOULD BE KEPT SAFELY FROM USE BY ANYONE UNTIL REPAIRED OR DESTROYED. DO NOT TRY TO TAKE THE AIRGUN APART. IT IS DIFFICULT TO REASSEMBLE AND IMPROPER DISASSEMBLY OR REASSEMBLY CAN CAUSE SERIOUS INJURY OR DEATH.
WARNING:
OILS THAT CONTAIN ACID OR RESIN CAN DAMAGE SEALS AND POSSIBLY THE FINISH OF THE AIRGUN.
CAUTION BREAK
BARREL
Illustration 10a
Illustration 10b
SIDE LEVER & UNDER LEVER
Illustration 11
Illustration 12a
BREAKBARREL
Illustration 12b
SIDE COCKING & UNDER LEVER

EN
14
12. Reviewing Safety
SAFETY INSTRUCTIONS CARE
• You and others with you MUST always wear shooting glasses to protect your eyes. If you wear reading glasses the lenses must be certified for impact resistance or you should wear safety glasses intended for use over normal optical reading glasses.• Always aim in a SAFE DIRECTION. Always keep the muzzle of the airgun pointed in a SAFE DIRECTION.• Always keep your finger off the trigger and out of the trigger guard until ready to shoot.• Never point the airgun at anything you do not intend to shoot.• Never point an airgun at people or pets.• Always treat the airgun as though it is loaded and with the same respect you would a firearm.• Never look down the barrel of an airgun.• Always keep the airgun uncocked and unloaded until you are ready to shoot.• Always check to see if the airgun is uncocked and unloaded when getting it from another person or from storage.• Never leave a loaded airgun unattended.• Use only the proper size and type of projectile as it is marked on the airgun.• Never reuse ammunition.• Do not shoot at hard surfaces or at the surface of water. The projectile may bounce off or ricochet and hit someone or something you had not intended to hit.• Do not shoot at fragile objects such as windows.• Place the backstop in a location that will be safe should the backstop fail.• Your backstop should be checked for wear before and after each use. All backstops are subject to wear and will eventually fail. Replace your backstop if the surface is worn or damaged or if a ricochet occurs.• Do not attempt to disassemble or tamper with your airgun. Unauthorized repairs or modifying the function of your airgun in any way may be unsafe and will void your warranty.• Before you store or transport your airgun, make sure it is unloaded and is uncocked.• Always store your airgun in a secure location away from unauthorized users and separate from ammunition.• Only persons who are thoroughly familiar with the airgun’s function and proper use and who are allowed by law should handle the airgun.• Always wear safety shooting glasses when shooting or performing maintenance on airguns.• Only shoot where permitted by law.
EN
15
• You and others with you MUST always wear shooting glasses to protect your eyes. If you wear reading glasses the lenses must be certified for impact resistance or you should wear safety glasses intended for use over normal optical reading glasses.• Always aim in a SAFE DIRECTION. Always keep the muzzle of the airgun pointed in a SAFE DIRECTION.• Always keep your finger off the trigger and out of the trigger guard until ready to shoot.• Never point the airgun at anything you do not intend to shoot.• Never point an airgun at people or pets.• Always treat the airgun as though it is loaded and with the same respect you would a firearm.• Never look down the barrel of an airgun.• Always keep the airgun uncocked and unloaded until you are ready to shoot.• Always check to see if the airgun is uncocked and unloaded when getting it from another person or from storage.• Never leave a loaded airgun unattended.• Use only the proper size and type of projectile as it is marked on the airgun.• Never reuse ammunition.• Do not shoot at hard surfaces or at the surface of water. The projectile may bounce off or ricochet and hit someone or something you had not intended to hit.• Do not shoot at fragile objects such as windows.• Place the backstop in a location that will be safe should the backstop fail.• Your backstop should be checked for wear before and after each use. All backstops are subject to wear and will eventually fail. Replace your backstop if the surface is worn or damaged or if a ricochet occurs.• Do not attempt to disassemble or tamper with your airgun. Unauthorized repairs or modifying the function of your airgun in any way may be unsafe and will void your warranty.• Before you store or transport your airgun, make sure it is unloaded and is uncocked.• Always store your airgun in a secure location away from unauthorized users and separate from ammunition.• Only persons who are thoroughly familiar with the airgun’s function and proper use and who are allowed by law should handle the airgun.• Always wear safety shooting glasses when shooting or performing maintenance on airguns.• Only shoot where permitted by law.
Do not return defective or damaged product to the dealer. If your airgun needs repair, call Umarex USA (479) 646-4210 and ask for the Service Department or visit www.umarexusa.com. DO NOT ATTEMPT TO DISASSEMBLE IT! Your airgun requires special tools and fixtures to repair it. Any disassembly or modification not performed by Umarex USA will void the warranty.
13. Repair / Service / Warranty
CAUTION THE COMPONENTS OF THIS AIRGUN WERE ENGINEERED AND MANUFACTURED TO DELIVER OPTIMUM PERFORMANCE. ANY MODIFICATION OR TAMPERING WITH AN AIRGUN MAY CAUSE A MALFUNCTION, VOID YOUR WARRANTY AND MAY MAKE IT UNSAFE TO USE. ANY CHANGE IN PERFORMANCE (SUCH AS A LOWERED TRIGGER PULL FORCE AND SHORTENED TRIGGER TRAVEL) INDICATES POSSIBLE MODIFICATION, TAMPERING AND/OR WEAR. SUCH AIRGUN SHOULD BE INSPECTED, REPLACED, OR PROPERLY REPAIRED BY ONLY QUALIFIED UMAREX USA PERSONNEL. ANY AIRGUN THAT HAS BEEN DROPPED SHOULD BE CHECKED BY QUALIFIED PERSONNEL TO ENSURE THAT ITS FUNCTION HAS NOT BEEN AFFECTED.
CARE
The RWS® warranty covers RWS® airguns (original owner) against any defect in workmanship and materials for the life of the airgun. Any RWS airgun covered by this warranty, which is found to have a defect in workmanship or materials, will be replaced or repaired, at the option of RWS®.Parts that can wear out, such as seals and mainsprings, will be warranted for the registered airgun for 18 months from the original retail purchase date.Repairs can only be made by our Authorized Service Center. This limited lifetime warranty becomes invalid for any gun, which is handled improperly, modified, or disassembled. Should any defect appear, call Umarex USA service dept, (479) 646-4210, to obtain an RA (Return Authorization) Number. Once you have received an RA Number, package the gun carefully in a solid shipping box and include a money order or check in the amount quoted by Umarex USA to cover the cost of shipping and handling. Write the RA Number boldly on the box and return, prepaid to:Umarex USA, 7700 Chad Colley Blvd., Fort Smith, Arkansas 72916.The name, address and phone number of the shipper must be included in the package, along with a note explaining the defect found.Under the warranty, you have our assurance of a lifetime of shooting pleasure with a RWS® airgun.
This warranty does not cover guns used for commercial purposes or by institutions. These guns are covered only by our regular five year policy.
RWS® LIMITED LIFETIME WARRANTY ONLY FOR GUNS SOLD IN THE USA

FR
16
DESIGNATION EMPLOI
ENTRETIENINSTRUCTIONS DE SÉCURITÉ
LISEZ COMPLÈTEMENT CE MANUEL DU PROPRIÉTAIRE. Traitez-le avec le même respect que celui attribué à une arme à feu. Suivez toujours avec soin les instructions concernant la sécurité contenues dans le manuel du propriétaire et conservez ce manuel dans un endroit sûr pour vous y référer dans l’avenir.
PAS UN JOUET. LA SUPERVISION D’UN ADULTE EST NÉCESSAIRE. UN MAUVAIS USAGE OU UN USAGE IMPRUDENT PEUVENT CAUSER DES BLESSURES GRAVES OU LA MORT. PEUT ÊTRE DANGEREUX JUSQU’À 650 VERGES (594 MÈTRES).DES PERSONNES ÂGÉES DE 16 ANS OU PLUS. LISEZ TOUTES LES INSTRUCTIONS AVANT D’UTILISER CETTE ARME. L'ACHETEUR ET L'UTILISATEUR DEVRAIENT SE CONFORMER À TOUTES LES LOIS CONCERNANT L'ACHAT, L'UTILISATION ET LA POSSESSION D'ARMES À AIR.
AVERTISSEMENT :
NE BRANDISSEZ PAS ET NE MONTREZ PAS VOTRE PISTOLET À AIR EN PUBLIC. LES GENS PEUVENT SE MÉPRENDRE ET CELA PEUT ÊTRE UN CRIME. LES POLICIERS ET D’AUTRES PERSONNES PEUVENT PENSER QUE C’EST UNE ARME À FEU. NE CHANGEZ PAS LA COULEUR ET LES PARTICULARITÉS DE VOTRE ARME POUR LA FAIRE RESSEMBLER À UNE ARME À FEU. CELA EST DANGEREUX ET PEUT ÊTRE UN CRIME.
AVERTISSEMENT :
Manuel de L’UTILISATEUR
Pour Carabines à Air de Canon Basculant, Levier Latéral,
et Sous le Levier

FRFR
17
INSTRUCTIONS DE SÉCURITÉ
Consignes d’utilisation1. Connaître les pièces de votre carabine à air2. Utiliser le cran de sûreté3. Armer votre carabine à Air4. Charger votre carabine à air5. Refermer le canon6. Viser une cible sécuritaire
7. Tirer avec votre carabine à air 8. Règler les mires 9. Règlage de la Détente10. Dépannage11. Entretien, Nettoyage et Remisage12. Révision des règles de sécurité13. Réparation / Service / Garantie
ATTENTION :PROTECTION OCULAIRE
NÉCESSAIREPORTEZ DES
LUNETTES DE TIR
Le fonctionnement de chaque type de pistolets est différent et vous n’êtes jamais prêt à faire feu si vous n’êtes pas familier avec le fonctionnement de l’arme utilisée. Lisez bien les instructions qui suivent concernant l’utilisation de cette arme avant de vous en servir.
Ces symboles indiquent des avertissements et des mises en garde dans le manuel du propriétaire. Tenez-en bien compte pour votre propre sécurité et celle des autres.
CE CARABINE À AIR PEUT CAUSER DES BLESSURES GRAVES OU LA MORT. LISEZ ET SUIVEZ BIEN LES INSTRUCTIONS. NE CHARGEZ PAS L’ARME AVANT D’ÊTRE PRÊT À TIRER. SI VOUS PLACEZ UN PROJECTILE DANS L’ARME PUIS DÉCIDEZ DE NE PAS TIRER, ENLEVEZ-LE DE L’ARME MANUELLEMENT OU EN TIRANT VERS UNE CIBLE SÉCURITAIRE. UN CARABINE À AIR DÉCHARGÉ ET NON ARMÉ, EN POSITION “ON SAFE”, EST LE PLUS SÉCURITAIRE. LES ACCIDENTS SE PRODUISENT RAPIDEMENT S.V.P.,TIREZ AVEC PRUDENCE.
AVERTISSEMENT :
SI VOUS NE SUIVEZ PAS LES INSTRUCTIONS ET LES RECOMMANDATIONS DE CE MANUEL DU PROPRIÉTAIRE, IL POURRAIT EN RÉSULTER DES DOMMAGES CORPORELS INCLUANT DES BLESSURES AU VISAGE, AUX YEUX ET AUX OREILLES, LA CÉCITÉ ET LA SURDITÉ.
ATTENTION

FR
18
DESIGNATION
1. Connaître Les Pièces De Votre Carabine À Air
Illustration 1a Illustration 1b
Illustration 1c
Canon
Bouche
Guidon
Hausse
Orifice de chargement
sur le dessus
Levier de armement
Rail pour le montage
d’une lunette
Détente
Sûreté
Crosse
Pontet
SOUS LE LEVIERCANON BASCULANT
LEVIER LATÉRAL

FRFR
19
EMPLOI
2. Utiliser le cran de sûreté
ASSUREZ-VOUS QUE L'ARME À AIR EST TOUJOURS POINTÉE DANS UNE DIRECTION SÉCURITAIRE. NE POINTEZ JAMAIS L'ARME VERS UNE PERSONNE MÊME SI LA CARABINE N’EST PAS ARMÉE ET PAS CHARGÉE. PRÉSUMEZ TOUJOURS QUE L'ARME À AIR EST CHARGÉE, PRÊTE À FAIRE FEU ET MANIPULEZ-LA EN CONSÉQUENCE.
AVERTISSEMENT :
ASSUREZ-VOUS QUE LE CANON POINTE TOUJOURS DANS UNE DIRECTION SÉCURITAIRE.
ATTENTION
AVANT DE PLACER VOTRE CARABINE À AIR DANS LA POSITION “OFF SAFE”, SOYEZ ABSOLUMENT SÛR QUE VOTRE CARABINE EST POINTÉE DANS UNE DIRECTION SÉCURITAIRE ET QUE VOUS ÊTES PRÊT À FAIRE FEU. UNE FOIS QUE VOTRE CARABINE EST ARMÉE ET AUTOMATIQUEMENT DANS LA POSITION “ON SAFE”, NE RÉARMEZ PAS LA CARABINE LORSQU’ELLE EST CHARGÉE POUR LA REPLACER DANS LA POSITION “ON SAFE”. VOIR “L’ÉTAPE 2. LE FONCTIONNEMENT DU CRAN DE SÛRETÉ” POUR DES INSTRUCTIONS CONCERNANT LA REMISE DU CARABINE À AIR DANS LA POSITION “ON SAFE”.
ATTENTION
COMME TOUS LES MÉCANISMES, LE CRAN DE SÛRETÉ D’UN CARABINE À AIR PEUT FAIRE DÉFAUT. MÊME LORSQUE LE CRAN DE SÛRETÉ EST DANS LA POSITION “ON SAFE”, VOUS DEVRIEZ CONTINUER À MANIPULER LE PISTOLET À AIR DE FAÇON SÉCURITAIRE. NE POINTEZ JAMAIS LA CARABINE À AIR VERS UNE CIBLE SUR LAQUELLE VOUS NE VOULEZ PAS FAIRE FEU.
Votre carabine à air RWS® possède un cran de sûreté automatique. Lorsque l’arme à air est armée, elle est automatiquement dans la position “ON SAFE”.
• Pour placer “ON SAFE”, tirez le bouton de sécurité vers l’extérieur pour que le cercle blanc soit visible. Cette opération peut être effectuée seulement si la carabine à air a été armée (voir illustration 2a).
• Pour placer “OFF SAFE” (prêt à faire feu), poussez le bouton de sécurité vers l’avant pour que le cercle blanc ne soit pas visible. (voir illustration 2b)
LEVIER LATÉRAL
Illustration 2a
ON SAFE
Illustration 2b
OFF SAFE
FR
20
NE LAISSEZ JAMAIS UNE ARME À AIR ARMÉE DURANT PLUS DE QUELQUES MINUTES, CAR LE MÉCANISME DU PISTON À GAZ PEUT S’AFFAIBLIR.
Illustration 3c
Illustration 3b
Illustration 3a
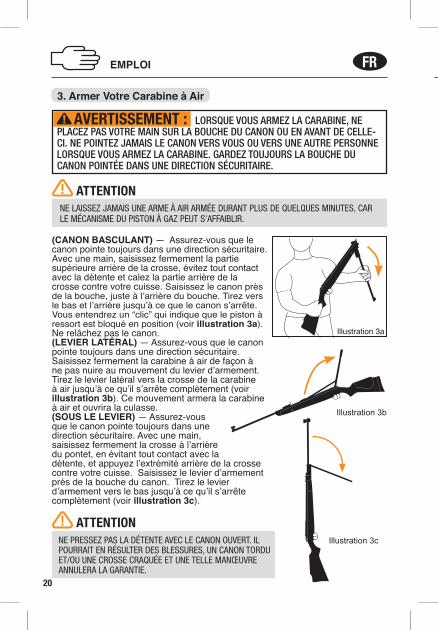
LORSQUE VOUS ARMEZ LA CARABINE, NE PLACEZ PAS VOTRE MAIN SUR LA BOUCHE DU CANON OU EN AVANT DE CELLE-CI. NE POINTEZ JAMAIS LE CANON VERS VOUS OU VERS UNE AUTRE PERSONNE LORSQUE VOUS ARMEZ LA CARABINE. GARDEZ TOUJOURS LA BOUCHE DU CANON POINTÉE DANS UNE DIRECTION SÉCURITAIRE.
AVERTISSEMENT :
3. Armer Votre Carabine à Air
EMPLOI
(CANON BASCULANT) — Assurez-vous que le canon pointe toujours dans une direction sécuritaire. Avec une main, saisissez fermement la partie supérieure arrière de la crosse, évitez tout contact avec la détente et calez la partie arrière de la crosse contre votre cuisse. Saisissez le canon près de la bouche, juste à l’arrière du bouche. Tirez vers le bas et l’arrière jusqu’à ce que le canon s’arrête. Vous entendrez un “clic” qui indique que le piston à ressort est bloqué en position (voir illustration 3a). Ne relâchez pas le canon. (LEVIER LATÉRAL) — Assurez-vous que le canon pointe toujours dans une direction sécuritaire. Saisissez fermement la carabine à air de façon à ne pas nuire au mouvement du levier d’armement. Tirez le levier latéral vers la crosse de la carabine à air jusqu’à ce qu’il s’arrête complètement (voir illustration 3b). Ce mouvement armera la carabine à air et ouvrira la culasse.(SOUS LE LEVIER) — Assurez-vous que le canon pointe toujours dans une direction sécuritaire. Avec une main, saisissez fermement la crosse à l’arrière du pontet, en évitant tout contact avec la détente, et appuyez l’extrémité arrière de la crosse contre votre cuisse. Saisissez le levier d’armement près de la bouche du canon. Tirez le levier d’armement vers le bas jusqu’à ce qu’il s’arrête complètement (voir illustration 3c).
NE PRESSEZ PAS LA DÉTENTE AVEC LE CANON OUVERT. IL POURRAIT EN RÉSULTER DES BLESSURES, UN CANON TORDU ET/OU UNE CROSSE CRAQUÉE ET UNE TELLE MANŒUVRE ANNULERA LA GARANTIE.
ATTENTION
ATTENTION

FRFR
21
Illustration 3b
CRAN DE SÛRETÉ D’ARMEMENT
Illustration 4b
Illustration 4a
CRAN DE SÛRETÉ D’ARMEMENT
Illustration 4cPOINTS DE PINCEMENTS
CANON BASCULANT — Saisissez fermement le canon à l’arrière du guidon, retournez le canon à sa position initiale, fermée et bloquée.LEVIER LATÉRAL — Avant de replacer le levier latéral dans sa position initiale, enfoncez le cran de sûreté d’armement (voir illustration 4b) situé sur le côté gauche du cylindre. Saisissez le levier latéral et replacez-le dans sa position initiale. NOTEZ BIEN : Il ne devrait y avoir AUCUNE pression sur le levier d’armement lorsque vous le replacez dans sa position initiale. Si vous sentez une pression, la carabine à air n’est pas complètement armée.SOUS LE LEVIER — IMPORTANT : Avant de retourner le levier sous l’arme à air dans sa position initiale, saisissez fermement le levier d’armement et ENFONCEZ LE CRAN DE SÛRETÉ D’ARMEMENT (voir illustration 4c) situé sur le côté droit du cylindre. Fermez le cran de sûreté en le plaçant dans sa position initiale.
EMPLOI
AVERTISSEMENT : NE TRANSPORTEZ JAMAIS VOTRE CARABINE À AIR LORSQU’ELLE EST ARMÉE ET/OU LORSQU’ELLE EST CHARGÉE. IL EST PRÉFÉRABLE D’ARMER LA CARABINE À AIR SEULEMENT AVANT DE TIRER. VOTRE CARABINE À AIR NE DEVRAIT JAMAIS ÊTRE TRANSPORTÉE CHARGÉE ET ARMÉE QUELLES QUE SOIENT LES CIRCONSTANCES.
4. Charger Votre Carabine à Air
Insérez avec prudence un projectile dans l’extrémité de la chambre de culasse qui est visible lorsque vous armez la carabine à air (Canon Basculant - voir illustration 4a; levier latéral - voir illustration 4b; sous le levier - voir illustration 4c). Assurez-vous de placer le projectile pour qu’il soit égal avec la culasse. Évitez d’endommager la jupe du projectile.
UTILISEZ UNIQUEMENT DES PLOMBS D’UN CALIBRE CONVENANT À VOTRE CARABINE À AIR. LE CALIBRE APPROPRIÉ EST INDIQUÉ SUR LA CARABINE À AIR. NE FAITES AUCUNE TENTATIVE DE RÉUTILISER DES PROJECTILES DÉJÀ UTILISÉS OU DÉFORMÉS. N’UTILISEZ PAS DES PROJECTILES DE PLOMB, DE LA CHEVROTINE, DES DARDS, DES ROULEMENTS À BILLES OU D’AUTRES OBJETS, CAR ILS PEUVENT VOUS CAUSER OU CAUSER À D’AUTRES PERSONNES DES BLESSURES OU ENDOMMAGER/ENRAYER L’ARME.
ATTENTION
5. Refermer le Canon

FR
22
EMPLOI
6. Viser une Cible SécuritaireVisez toujours dans une DIRECTION SÉCURITAIRE avec votre carabine. Choisissez toujours votre cible avec prudence. Il est préférable de tirer sur une cible de papier qui est fixée à un pare-balles sécuritaire. Une couverture épaisse devrait être tendue à l’arrière du pare-balles afin d’éviter les ricochets si vous manquez le pare-balles. Pensez à ce que vous frapperez si vous manquez la cible. CERTAINS CARABINES À AIR RWS® POSSÈDE DES MIRES OUVERTES. La visée des carabines à air, munies de ce genre de mire, est réglée correctement lorsque la lame du guidon est placée exactement dans l’encoche de la hausse. La partie supérieure de la lame du guidon devrait être égale à la partie supérieure de l’encoche de la hausse. Le centre de la cible devrait sembler reposer sur la partie supérieure du guidon (voir illustration 6).
NOTEZ BIEN : Il ne devrait y avoir AUCUNE pression sur le levier d’armement lorsque vous le replacez dans sa position initiale. Si vous sentez une pression, la carabine à air n’est pas complètement armée.SOUS LE LEVIER MODÈLES SEULEMENT - Pour empêcher le levier d’armement de sortir du support de levier situé sous le guidon, procédez de cette façon : Assurez-vous que le RSW 460 est DÉCHARGÉ et DÉSARMÉ. Ensuite, serrez la petite vis située sous la bouche du canon pour augmenter la tension sur la rotule de fixation du levier d’armement. Examinez la vis en la regardant de côté et ne regardez jamais directement dans la bouche du canon de la carabine à air. Si cette manœuvre ne règle pas le problème, procédez de cette façon :Assurez-vous que le RSW 460 est DÉCHARGÉ et DÉSARMÉ. Débloquez le levier d’armement sous le guidon, dévissez la vis de réglage sur le dessus du guidon, placez un morceau de bois mou sur la partie du guidon située au niveau de la bouche du canon et, à l’aide d’un marteau, frappez TRÈS LÉGÈREMENT la pièce de bois pour placer le guidon en bonne position, bien sur le canon. Revissez la vis de réglage sur le dessus du guidon. Si le levier d’armement se place dans une position trop élevée après avoir procédé de cette façon, vous pourriez devoir dévisser légèrement la petite vis située sous le canon pour diminuer la tension sur la rotule de fixation du levier d’armement.
SOYEZ PRUDENT ET GARDEZ VOS DOIGTS LOIN DU MÉ-CANISME D’ARMEMENT (VOIR LES « POINTS DE PINCEMENTS », ILLUSTRATION 4C, 5A AND 5B). SAISISSEZ FERMEMENT LE CANON LORSQUE VOUS ARMEZ LA CARABINE ET FERMEZ-LE POUR EMPÊCHER UN RETOUR EN ARRIÈRE BRUSQUE ET POSSIBLEMENT UNE BLESSURE.
ATTENTION
POINTS DE PINCEMENTS Illustration 5b
POINTS DE PINCEMENTS
Illustration 5a
POINTS DE PINCEMENTS
POINTS DE PINCEMENTS
FRFR
23
EMPLOI
6. Viser une Cible SécuritaireVisez toujours dans une DIRECTION SÉCURITAIRE avec votre carabine. Choisissez toujours votre cible avec prudence. Il est préférable de tirer sur une cible de papier qui est fixée à un pare-balles sécuritaire. Une couverture épaisse devrait être tendue à l’arrière du pare-balles afin d’éviter les ricochets si vous manquez le pare-balles. Pensez à ce que vous frapperez si vous manquez la cible. CERTAINS CARABINES À AIR RWS® POSSÈDE DES MIRES OUVERTES. La visée des carabines à air, munies de ce genre de mire, est réglée correctement lorsque la lame du guidon est placée exactement dans l’encoche de la hausse. La partie supérieure de la lame du guidon devrait être égale à la partie supérieure de l’encoche de la hausse. Le centre de la cible devrait sembler reposer sur la partie supérieure du guidon (voir illustration 6).
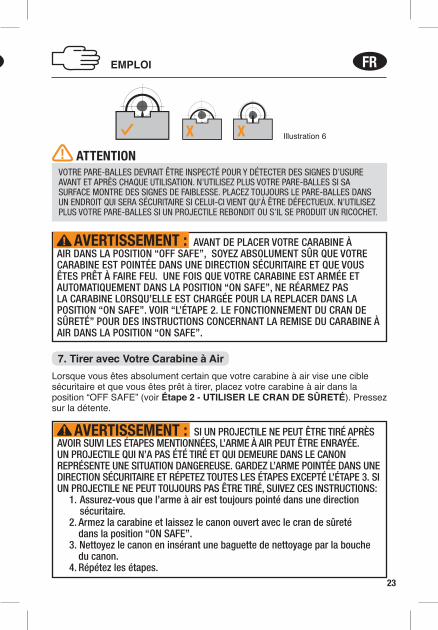
VOTRE PARE-BALLES DEVRAIT ÊTRE INSPECTÉ POUR Y DÉTECTER DES SIGNES D’USURE AVANT ET APRÈS CHAQUE UTILISATION. N’UTILISEZ PLUS VOTRE PARE-BALLES SI SA SURFACE MONTRE DES SIGNES DE FAIBLESSE. PLACEZ TOUJOURS LE PARE-BALLES DANS UN ENDROIT QUI SERA SÉCURITAIRE SI CELUI-CI VIENT QU’À ÊTRE DÉFECTUEUX. N’UTILISEZ PLUS VOTRE PARE-BALLES SI UN PROJECTILE REBONDIT OU S’IL SE PRODUIT UN RICOCHET.
ATTENTION
Illustration 6
AVANT DE PLACER VOTRE CARABINE À AIR DANS LA POSITION “OFF SAFE”, SOYEZ ABSOLUMENT SÛR QUE VOTRE CARABINE EST POINTÉE DANS UNE DIRECTION SÉCURITAIRE ET QUE VOUS ÊTES PRÊT À FAIRE FEU. UNE FOIS QUE VOTRE CARABINE EST ARMÉE ET AUTOMATIQUEMENT DANS LA POSITION “ON SAFE”, NE RÉARMEZ PAS LA CARABINE LORSQU’ELLE EST CHARGÉE POUR LA REPLACER DANS LA POSITION “ON SAFE”. VOIR “L’ÉTAPE 2. LE FONCTIONNEMENT DU CRAN DE SÛRETÉ” POUR DES INSTRUCTIONS CONCERNANT LA REMISE DU CARABINE À AIR DANS LA POSITION “ON SAFE”.
AVERTISSEMENT :
7. Tirer avec Votre Carabine à AirLorsque vous êtes absolument certain que votre carabine à air vise une cible sécuritaire et que vous êtes prêt à tirer, placez votre carabine à air dans la position “OFF SAFE” (voir Étape 2 - UTILISER LE CRAN DE SÛRETÉ). Pressez sur la détente.
SI UN PROJECTILE NE PEUT ÊTRE TIRÉ APRÈS AVOIR SUIVI LES ÉTAPES MENTIONNÉES, L’ARME À AIR PEUT ÊTRE ENRAYÉE. UN PROJECTILE QUI N’A PAS ÉTÉ TIRÉ ET QUI DEMEURE DANS LE CANON REPRÉSENTE UNE SITUATION DANGEREUSE. GARDEZ L’ARME POINTÉE DANS UNE DIRECTION SÉCURITAIRE ET RÉPETEZ TOUTES LES ÉTAPES EXCEPTÉ L’ÉTAPE 3. SI UN PROJECTILE NE PEUT TOUJOURS PAS ÊTRE TIRÉ, SUIVEZ CES INSTRUCTIONS:
1. Assurez-vous que l’arme à air est toujours pointé dans une direction sécuritaire.2. Armez la carabine et laissez le canon ouvert avec le cran de sûreté dans la position “ON SAFE”.3. Nettoyez le canon en insérant une baguette de nettoyage par la bouche du canon. 4. Répétez les étapes.
AVERTISSEMENT :

FR
24
EMPLOI
NOTEZ BIEN : Plusieurs facteurs peuvent influencer les performances d’une arme et la vélocité des projectiles, incluant la marque des projectiles, le type de projectiles, la lubrification, l’état du canon et la température.
NE PRENEZ JAMAIS POUR ACQUIS, PARCE QU’UNE ARME À AIR NE TIRE PLUS DE PROJECTILES, QU’IL N’Y A PLUS DE PROJEC-TILES DANS LE CANON. CONSIDÉREZ TOUJOURS LE PISTOLET À AIR COMME CHARGÉ ET TRAITEZ-LE AVEC LE MÊME RESPECT QUE VOUS ACCORDERIEZ À UNE ARME À FEU.
AVERTISSEMENT :
LE PLOMB ES RECONNU PAR L’ÉTAT DE LA CALIFORNIE COMME POUVANT CAUSER LA CANCER, DES DÉFORMATIONS À LA NAISSANCE OU D’AUTRES PROBLEMÉS CONNEXES A LA REPRODUCTION.
AVERTISSEMENT :
NE TENTEZ PAS DE RÉUTILISER LES PROJECTILES QUI ONT ÉTÉ TIRÉS OU LES PROJECTILE DÉFORMÉS. LES PROJECTILES, COMME LES PLOMBS D’ACIER (BB) ET LES DARDS, PEUVENT ENDOMMAGER VOTRE CARABINE À AIR ET VOUS CAUSER DES BLESSURES OU CAUSER DES BLESSURES AUX PERSONNES À PROXIMITÉ EN FAISANT DES RICOCHETS, ET ANNULERA VOTRE GARANTIE.
ATTENTION
9. Règlage de la Détente
8. Régler les Appareils de ViséeHAUSSECertains modèles d’arme à air RWS® sont munis d’une mire arrière (hausse) micrométrique avec des réglages verticaux et horizontaux à l’arrière.Réglage pour l’élévation - Si la carabine tire trop haut: tournez la vis A dans le sens des aiguilles d’une montre (voir illustration 7a). Si la carabine tire trop bas: tournez la vis A dans le sens contraire des aiguilles d’une montre (voir illustration 7a). Notez bien : les chiffres 0-9 sont uniquement des références et ne correspondent pas à des distances.Réglages pour la dérive horizontale—Les réglages pour la dérive horizontale sont faits en tournant la vis B sur le côté (voir illustration 7a). Si la carabine à air tire à droite: tournez la vis dans le sens des aiguilles d’une montre. Si elle tire vers la gauche: tournez la vis dans le sens contraire des aiguilles d’une montre.GUIDONLes modèles RSW 48, 52 et 54 sont munis d’un guidon avant réglable [(3) – Voir illustration 7b]. Cette mire peut être réglée en dévissant la vis (4) et en glissant la mire vers une position plus basse ou plus élevée. Ensuite, revissez la vis.
Illustration 7a
A
B
Illustration 7b
C
D

FRFR
25
LE POIDS DE DÉPART DE LA DÉTENTE PEUT ÊTRE RÉGLÉ SOUS LE SEUIL DE 1,35 KG (3 LB). LORSQUE CE POIDS EST RÉGLÉ SOUS LE SEUIL DE 1,35 KG, L’ARME À AIR PEUT FAIRE FEU SI ON L’ÉCHAPPE.
ATTENTION
EMPLOI
10A. Décharger un Projectile Tirez le projectile vers une CIBLE SÉCURITAIRE pour décharger l’arme à air. Si cela n’est pas possible, placez la carabine à air dans la position “ON SAFE”, armez la carabine à air pour avoir accès au canon et faites sortir le projectile de la chambre en insérant une baguette de nettoyage à partir de la bouche du canon. Insérez deux projectiles de nettoyage RWS Cleaning Pellets et tirez-les vers une cible sécuritaire.10B. Enlever un Projectile Bloqué Si un projectile se bloque dans le canon, NE RECHARGEZ PAS l’arme. 1. Armez la carabine à air (voir ÉTAPE 3. ARMER VOTRE CARABINE À AIR), pointez la carabine à air dans une DIRECTION SÉCURITAIRE, placez la carabine à air dans la position “OFF SAFE” et pressez la détente pour faire feu. 2. Faites basculer le canon légèrement (sans pousser le canon complètement vers le bas pour armer la carabine) et regardez dans la culasse pour voir si la carabine à air s’est enrayée (voir illustration 9). NE REGARDEZ JAMAIS DANS LA BOUCHE DU CANON.
10. Dépannage
9. Règlage de la Détente
Course avant bossette :c’est la plus petite course possible qui est réglée en usine. Pour augmenter cette course il faut tourner la vis (1) vers la gauche..Bossette :Lorsque la course avant à été modifiée il faut régler la bossette à l’aide de la vis (2).• En tournant la vis vers la droite : Bossette
plus longue.• en tournant la vis vers la gauche : Bossette
plus fine.Poids de détente :• En tournant la vis (3) vers la droite, on augmente le poids de la course et par
conséquent celui du départ.• En tournant la vis (3) vers la gauche le poids diminue.Fourcehette de réglage du poids de détente :Course avant bossette : de � 300 g à � 380 gPoids de départ : de � 400 g à � 500 g
1.
2.
3.
Illustration 8

FR
26
EMPLOI ENTRETIEN
AVANT DE PRODIGUER DES SOINS, D’ENTRETENIR OU DE NETTOYER VOTRE PISTOLET, ASSUREZ-VOUS TOUJOURS QU’IL N’EST PAS ARMÉ ET QU’IL EST DÉCHARGÉ. GARDEZ VOTRE ARME POINTÉE DANS UNE DIRECTION SÉCURITAIRE. IL EST IMPORTANT D’INSPECTER VOTRE ARME RÉGULIÈREMENT ET DE L’ENTRETENIR CORRECTEMENT.
ATTENTION
NE RANGEZ JAMAIS UNE ARME À AIR SI ELLE EST CHARGÉ OU ARMÉE. Enlevez les projectiles de votre arme. Gardez la carabine à air loin des enfants et des tireurs sans expérience. Rangez les projectiles dans un endroit différent de celui où vous rangez la carabine pour les garder loin des tireurs sans expérience. Protégez votre carabine à air de l’humidité et de la poussière; nettoyez l’arme et enroulez-la dans un chiffon doux et sec. Si vous rangez votre carabine à air pour une longue période de temps, assurez-vous que le canon est protégé. Vous pouvez y parvenir en recouvrant l’âme du canon d’huile “RWS Spring Cylinder Oil”. Utilisez toujours un chiffon doux et faites pénétrer la baguette par la culasse pour les carabines à canon basculant. Pour les carabines à levier, insérez la baguette par la bouche du canon. Enlevez l’huile complètement avant d’utiliser l’arme de nouveau. SOUVENEZ-VOUS DE : Toujours vous assurer que l’arme à air est déchargée lorsque vous la sortez du remisage ou l’obtenez d’une autre personne.Avec de bons soins et des inspections routinières, votre arme à air vous fournira de nombreuses sessions de tir agréables. Les mauvais traitements, la négligence et une exposition aux intempéries nuisent au fonctionnement de toute arme à air. Votre carabine à air RWS® est conçue pour tirer des projectiles de plomb de calibre 0,177 ou 0,22 seulement. Nous vous recommandons l’utilisation de projectiles RWS, car ils vous offrent une précision exceptionnelle et une dimension uniforme. Le calibre approprié est clairement indiqué sur la carabine.
11. Entretien, Nettoyage et Remisage
N’EFFECTUEZ PAS DE COUP À SEC AVEC VOTRE ARME À AIR. SI L’ARME À AIR EST TIRÉE SANS UN PROJECTILE EN PLOMB DANS LA CULASSE, LE PISTON PEUT FRAPPER LE FOND DU CYLINDRE ET ENDOMMAGER DE FAÇON PERMANENTE L’ARME À AIR.
ATTENTION
VÉRIFIEZ SI LE PONTET ET LES VIS QUI RETIENNENT LA CROSSE SONT BIEN SERRÉS DURANT ET APRÈS LE TIR. DES VIS QUI NE SONT PAS SERRÉES PEUVENT CAUSER DES BLESSURES OU LA MORT.
LES HUILES QUI CONTIENNENT DE L’ACIDE OU DE LA RÉSINE PEUVENT ENDOMMAGER LES JOINTS ET POSSIBLEMENT LE FINI DU CARABINE À AIR.
3. Si la carabine à air est toujours enrayée, avec le canon légèrement basculé, insérez une baguette de calibre corriger par la bouche du canon et poussez le projectile pour le faire sortir. Ne tentez pas de réutiliser ce projectile. Si vous ne pouvez pas débloquer votre carabine à air, entrez en communication avec le service à la clientèle de Umarex USA.
Culasse
Bouche du canon
Baguette Illustration 9

FRFR
27
EMPLOI
UNE ARME À AIR QUI NE FONCTIONNE PAS BIEN PEUT ÊTRE DAN-GEREUSE. ELLE DEVRAIT ÊTRE RANGÉE SÉCURI-TAIREMENT ET NE PAS ÊTRE UTILISÉE JUSQU’À CE QU’ELLE SOIT RÉPARÉE OU DÉTRUITE. NE TENTEZ PAS DE DÉMONTER CETTE ARME À AIR. ELLE EST DIFFICILE À REMONTER ET UN DÉMONTAGE OU UN MONTAGE FAUTIF PEUVENT CAUSER DES BLES-SURES GRAVES OU LA MORT.
AVERTISSEMENT :
PIÈCES ACTIVES: Les pièces actives (le piston et le ressort principal) nécessitent très peu de lubrification. Deux (2) gouttes d’huile “RWS Air Chamber Lube” à chaque 1000 coups suffisent. Cette huile est facile à appliquer en utilisant une aiguille d’injection de 3 1/2", insérée dans l’orifice de la chambre de compression (voir illustrations 10a et 10b). Les surfaces d’usure près de la charnière du canon, le levier d’armement et le mécanisme de la détente devraient être lubrifiés à l’aide de l’huile “RWS Spring Cylinder Oil” (voir illustration 11). Les ressorts principaux devraient être huilés à tous les 1000 coups à l’aide de six (6) gouttes d’huile “RWS Spring Cylinder Oil” (voir illustration 12a et 12b). Rappelez-vous qu’un peu d’huile est bon, que beaucoup d’huile n’est pas meilleur. CANON: Lors d’une utilisation quotidienne, très peu de poussière ou de résidus s’accumulent dans le canon. Notez bien : Les projectiles de plomb RWS de qualité supérieure n’augmentent pas seulement la précision de votre tir mais, diminuent aussi les possibilités de résidus de plomb. Lors de périodes régulières d’utilisation, l’âme du canon devrait être nettoyée régulièrement à l’aide d’une baguette et d’une pièce de feutre ou d’un écouvillon en laine. Les brosses en métal ne devraient pas être utilisées. Insérez la baguette dans la culasse, ne pas enlever joint de canon.SURFACE: Les pièces de métal visibles (hausse, boîtier de culasse, têtes de vis, œilleton, etc.) possèdent un fini bleuté et DOIVENT être essuyées à l’aide d’un chiffon légèrement imprégné d’huile après une manipulation pour éviter la rouille. Utilisez une huile légère sans acide et sans résine. L’huile “RWS Spring Cylinder Oil” est excellente pour ce type d’utilisation.
CANON BASCULANT
Illustration 10a
Illustration 10b
LEVIER LATÉRAL ET SOUS LE
LEVIER
Illustration 11
Illustration 12a
CANON BASCULANT
Illustration 12b
LEVIER LATÉRAL ET SOUS LE
LEVIER

FR
28
INSTRUCTIONS DE SÉCURITÉ
LES COMPOSANTES DE CETTE ARME À AIR ONT ÉTÉ CONÇUES ET FABRIQUÉES POUR VOUS OFFRIR DES PERFORMANCES OPTIMALES. TOUTE MODIFICATION OU ALTÉRATION D’UNE ARME À AIR PEUT CAUSER UN MAUVAIS FONCTIONNEMENT, ANNULER LA GARANTIE ET PEUT RENDRE SON UTILISATION DANGEREUSE. TOUT CHANGEMENT DES PERFORMANCES (COMME UN POIDS DE DÉPART PLUS BAS OU UNE COURSE MOINS LONGUE DE LA DÉTENTE) INDIQUE UNE MODIFICATION POSSIBLE, UNE ALTÉRATION ET/OU DE L’USURE. UNE TELLE ARME DEVRAIT ÊTRE INSPECTÉE, REMPLACÉE OU RÉPARÉE ADÉQUATEMENT PAR LE PERSONNEL QUALIFIÉ D’UMAREX USA UNIQUEMENT. TOUTE ARME À AIR QUI A ÉTÉ ÉCHAPPÉE DEVRAIT ÊTRE INSPECTÉE PAR DU PERSONNEL QUALIFIÉ POUR VOUS ASSURER QUE SON FONCTIONNEMENT N’EST PAS ALTÉRÉ.
ATTENTION
12. Révision des Règles de Sécurité• Vous et ceux qui vous accompagnent DEVEZ porter des lunettes de tir pour protéger vos
yeux. Si vous portez des lunettes pour lire, les lentilles doivent être conçues pour résister aux impacts ou vous devriez porter des verres de sécurité conçus pour une utilisation par-dessus vos lunettes de lecture.
• Visez toujours dans une DIRECTION SÉCURITAIRE. Gardez le canon pointé dans une DIRECTION SÉCURITAIRE.
• Gardez toujours votre doigt loin de la détente et en dehors du pontet jusqu’à ce que vous soyez prêt à faire feu.
• Ne pointez jamais votre carabine à air vers une personne ou vers un objet sur lequel vous n’avez pas l’intention de tirer.
• Ne pointez jamais une arme à air vers des gens ou des animaux domestiques.• Manipulez toujours votre carabine à air comme s’il était chargé et avec le même respect pour
la sécurité que si c’était une arme à feu.• Ne regardez jamais dans le canon d’un carabine à air.• Maintenez toujours désarmé et n’est pas chargé jusqu’à ce que vous soyez prêt à tirer.• Vérifiez toujours si le carabine à air est désarmé et déchargé lorsque vous le recevez d’une
autre personne ou le sortez du remisage.• Ne laissez jamais une arme à air chargée sans surveillance.• Utilisez des projectiles du bon format convenant à votre carabine à air.• Ne réutilisez jamais des munitions.• Ne tirez pas vers des surfaces dures ou vers la surface de l’eau. Le projectile peut rebondir
ou effectuer un ricochet et frapper une personne ou quelque chose que vous ne vouliez pas atteindre.
• Ni tirez pas vers les surfaces fragiles comme des fenêtres.• Placez toujours votre pare-balles dans une zone qui sera sécuritaire si le pare-balles est
défectueux.• Votre pare-balles devrait être inspecté pour y déceler de l’usure avant et après chaque
session de tir. Tous les pare-balles peuvent s’user et éventuellement devenir défectueux. Remplacez votre pare-balles si sa surface est usée ou endommagée ou s’il se produit un ricochet.
• Ne tentez pas de démonter ou de faire des altérations à votre carabine à air. Des réparations non autorisées ou des modifications quelles qu’elles soient au fonctionnement de votre carabine à air peuvent être non sécuritaires et annulent l a garantie.
• Avant de remiser ou de transporter votre arme à air, assurez-vous qu’elle est déchargée et est désarmé.
• Rangez toujours votre carabine à air dans un endroit sécuritaire loin des personnes non-autorisées à l’utiliser et à l’écart des munitions.
• Les personnes qui sont très familières avec le fonctionnement de l’arme à air et avec son utilisation sécuritaire et qui en ont le droit selon la loi devraient être les seules à manipuler cette arme à air.
• Portez toujours des lunettes de tir lorsque vous tirez avec une arme à air ou que vous procédez à son entretien.
• Tirez seulement là où la loi le permet.
ENTRETIEN
La garantie RWS® couvre les armes à air RWS® (premier acheteur) contre tout défaut de main-d’œuvre ou de matériaux pour la durée de vie de l’arme. Une arme à air RWS® protégée par cette garantie, qui est considérée comme ayant un défaut de main-d’œuvre ou de matériaux, sera remplacée ou réparée au choix de RWS®.Les pièces qui peuvent s’user, comme les joints et les ressorts principaux seront garanties pour 18 mois à partir de la date d’achat au détail lorsque l’arme est enregistrée.Les réparations peuvent être effectuées uniquement par notre centre de service mandaté. Cette garantie à vie limitée devient non valide pour toute arme qui est manipulée de la mauvaise façon, qui est modifiée ou démontée. Si un défaut survient, communiquez avec le service à la clientèle Umarex USA en composant le (479) 646-4210 afin d’obtenir un numéro RA (autorisation de retour). Une fois que vous avez un numéro RA, emballez bien l’arme dans une boîte de transport solide et incluez un mandat-poste ou un chèque au montant fixé par Umarex USA pour défrayer le transport et la manutention. Inscrivez le numéro d’autorisation RA en grosses lettres sur l’emballage et faites parvenir port payé à : Umarex USA, 7700 Chad Colley Blvd., Fort Smith, Arkansas 72916.Le nom, l’adresse et le numéro de téléphone de l’expéditeur doivent être inclus dans l’emballage, en plus d’une note expliquant le problème.À cause de cette garantie, vous êtes assuré d’avoir le plaisir de tirer à l’aide de votre arme à air RWS® durant toute sa durée de vie.
Cette garantie ne s’applique pas aux armes utilisées pour une utilisation commerciale ou par des organismes.Ces armes sont couvertes seulement par notre politique de garantie régulière de cinq ans.

FRFR
29
ENTRETIEN
Ne retournez pas un produit défectueux ou endommagé chez le détaillant. Si votre pistolet à air a besoin d’être réparé, appelez Umarex USA au (479) 646-4210 et demandez le service ou visitez le site: www.UmarexUSA.com. NE TENTEZ PAS DE DÉMONTER VOTRE PISTOLET! Des outils et des accessoires particuliers sont nécessaires pour réparer votre pistolet à air. Tout démontage ou toute modification qui n’est pas entrepris par Umarex USA annule la garantie.
13. Réparation / Service / Garantie
La garantie RWS® couvre les armes à air RWS® (premier acheteur) contre tout défaut de main-d’œuvre ou de matériaux pour la durée de vie de l’arme. Une arme à air RWS® protégée par cette garantie, qui est considérée comme ayant un défaut de main-d’œuvre ou de matériaux, sera remplacée ou réparée au choix de RWS®.Les pièces qui peuvent s’user, comme les joints et les ressorts principaux seront garanties pour 18 mois à partir de la date d’achat au détail lorsque l’arme est enregistrée.Les réparations peuvent être effectuées uniquement par notre centre de service mandaté. Cette garantie à vie limitée devient non valide pour toute arme qui est manipulée de la mauvaise façon, qui est modifiée ou démontée. Si un défaut survient, communiquez avec le service à la clientèle Umarex USA en composant le (479) 646-4210 afin d’obtenir un numéro RA (autorisation de retour). Une fois que vous avez un numéro RA, emballez bien l’arme dans une boîte de transport solide et incluez un mandat-poste ou un chèque au montant fixé par Umarex USA pour défrayer le transport et la manutention. Inscrivez le numéro d’autorisation RA en grosses lettres sur l’emballage et faites parvenir port payé à : Umarex USA, 7700 Chad Colley Blvd., Fort Smith, Arkansas 72916.Le nom, l’adresse et le numéro de téléphone de l’expéditeur doivent être inclus dans l’emballage, en plus d’une note expliquant le problème.À cause de cette garantie, vous êtes assuré d’avoir le plaisir de tirer à l’aide de votre arme à air RWS® durant toute sa durée de vie.
Cette garantie ne s’applique pas aux armes utilisées pour une utilisation commerciale ou par des organismes.Ces armes sont couvertes seulement par notre politique de garantie régulière de cinq ans.
GARANTIE LIMITÉE À VIE RWS® UNIQUEMENT POUR LES ARMES VENDUES AUX ÉTATS-UNIES

ES
30
LEA COMPLETAMENTE ESTE MANUAL DE OPERACIÓN DEL USUARIO. Esta arma de aire comprimido no es un juguete. Trátela con el mismo respeto que trataría un arma de fuego. Siempre siga las instrucciones de seguridad encontradas en este manual del usuario y mantenga este manual en un lugar seguro para uso futuro.
NO ES UN JUGUETE. SE REQUIERE LA SUPERVISIÓN DE UN ADULTO. EL MAL USO O USO DESCUIDADO PUEDE CAUSAR SERIAS LESIO-NES O LA MUERTE. PUEDE SER PELIGROSO HASTA 650 YARDAS (594 METROS).
ÈSTA ES UN ARMA DE AIRE COMPRIMIDO DE ALTO PODER PARA USO DE PERSO-NAS MAYORES DE 16 AÑOS O MÁS. LEA TODAS LAS INSTRUCCIONES ANTES DE USARSE. EL COMPRADOR O USUARIO DEBE DE AJUSTARSE A TODAS LAS LEYES QUE REGULAN LA COMPRA, USO Y POSESIÓN DE ARMAS DE AIRE COMPRIMIDO.
ADVERTENCIA:
DESCRIPCIÓN OPERACIÓN
CUIDADOINSTRUCCIONES DE SEGURIDAD
NO EMPUÑE O MUESTRE ESTE PRODUCTO EN PÚBLICO – PUEDE CONFUNDIR A LAS PERSONAS Y PUEDE SER UN CRIMEN. LA POLICÍA U OTROS PUEDEN PENSAR QUE ES UN ARMA DE FUEGO. NO CAMBIE LA COLORACIÓN Y MARCAS PARA HACERLA VER MÁS COMO UN ARMA DE FUEGO. ÉSO ES PELIGROSO Y PUEDE SER UN CRIMEN.
ADVERTENCIA:
Procedimientos de Operación1. Aprendiendo las Partes de Su Arma de Aire2. Operando bajo Seguridad3. Amartillando su Arma de Aire Comprimido4. Cargando su arma de Aire Comprimido 5. Cerrando el Cañon6. Apunte hacia un blanco seguro 7. Disparando su Arma de Aire Comprimido
Manual de OPERACÓN
para Rifle de Diabolos con Quiebre de Cañón, Palanca
Lateral, & Baja Lateral

ES
31
INSTRUCCIONES DE SEGURIDAD
Procedimientos de Operación1. Aprendiendo las Partes de Su Arma de Aire2. Operando bajo Seguridad3. Amartillando su Arma de Aire Comprimido4. Cargando su arma de Aire Comprimido 5. Cerrando el Cañon6. Apunte hacia un blanco seguro 7. Disparando su Arma de Aire Comprimido
8. Ajustando las Miras 9. Ajustando el Gatillo10. Solución de Problemas 11. Mantenimiento, Limpieza y Almacenamiento12. Revisando la Seguridad13. Reparación/Servicio/Garantía
Las armas de aire comprimido difieren en su operación y usted nunca está listo para disparar ningún arma de aire comprimido hasta que usted esté completamente familiarizado con ella. Lea las siguientes instrucciones de operación antes de operarlas.
Estos símbolos, , marcan advertencias y precauciones en el manual de operación. Cuidadosamente sígalas por su propia seguridad y por la seguridad de otros.
ADVERTENCIA:SE REQUIERE PROTECCIÓN
DE LOS OJOS. USE SUS LENTES
DE DISPARAR.
ESTA ARMA DE AIRE COMPRIMIDO PUEDE CAUSAR SERIAS LESIONES O LA MUERTE. LEA Y SIGA LAS INSTRUCCIONES CUIDADOSA-MENTE. NO CARGUE UN PROYECTIL EN EL ARMA DE AIRE HASTA QUE ESTÉ LISTO PARA DISPARAR. SI USTED CARGA EL PROYECTIL Y LUEGO DECIDE NO DISPARAR, QUÍTELO YA SEA MANUALMENTE O DISPARANDO EL ARMA HACIA UN BLANCO SE-GURO. UNA PISTOLA DE AIRE DESCARGADA Y DESARMADA QUE ESTÁ EN MODO SEGURO “ON SAFE”, ES LA MÁS SEGURA. LOS ACCIDENTES SUCEDEN RÁPIDO, POR FAVOR MANEJE CUIDADOSAMENTE EL ARMA DE AIRE.
ADVERTENCIA:
EL FALTAR A CUMPLIR LAS INSTRUCCIONES Y RECOMENDACIONES EN EL MANUAL DEL PROPIETARIO PUEDE RESULTAR EN LESIONES CORPORALES INCLUYENDO LA CARA, OJO Y LESIONES AL OÍDO, CEGUERA O SORDERA.
PRECAUCIÓN

ES
32 ilustración 1a ilustración 1b
ilustración 1c
Cañon
Boca
Punto de Mira
Alza
Cargar el Puerto en el
Lado Superior
Palanca de Amartillado
Riel de Montaje de
la Mira
Gatillo
Seguro
Culata
Guardamonte
PALANCA BAJAQUIEBRE DE CAÑÓN
PALANCA LATERAL
DESCRIPCIÓN
1. Aprendiendo las Partes de Su Arma de Aire

ES
33
OPERACIÓN
2. Operando la Seguridad
SIEMPRE ASEGÚRESE QUE EL CAÑÓN APUNTE HACIA UNA DIRECCIÓN SEGURA.
PRECAUCIÓN
COMO TODOS LOS ARTEFACTOS MECÁNICOS, EL SEGURO DE UN ARMA DE AIRE PUEDE FALLAR. AÚN CUANDO EL SEGURO ESTÉ “EN SEGURO,” – ON SAFE, DEBE DE CONTINUAR MANEJANDO EL ARMA DE AIRE CON SEGURIDAD. NUNCA APUNTE EL ARMA DE AIRE HACIA ALGO QUE NO INTENTE DISPARAR.
PRECAUCIÓNANTES DE PONER SU RIFLE DE AIRE COMPRIMIDO “SIN SEGURO” (OFF SAFE), ESTÉ COMPLETAMENTE SEGURO QUE SU RIFLE DE AIRE COMPRIMIDO ESTÉ AMARTILLADO Y AUTOMÁTICAMENTE “EN SEGURO” (ON SAFE), NO VUELVA A AMARTILLAR EL RIFLE DE AIRE COMPRIMIDO MIENTRAS ESTÉ CARGADO PARA VOLVERLO A PONER DE REGRESO “EN SEGURO”(ON SAFE), VEA EL “PASO 1. OPERANDO EL SEGURO” PARA INSTRUCCIONES EN CÓMO PONER EL RIFLE DE AIRE DE REGRESO “EN SEGURO”.
ASEGÚRESE QUE EL ARMA DE AIRE COMPRIMIDO ESTÉ SIEMPRE APUNTANDO HACIA UNA DIRECCIÓN SEGURA. NUNCA APUNTE SU PISTOLA DE AIRE A NINGUNA MASCOTA O PERSONA INCLUSO SI ESTÁ DESARMADA Y DESCARGADA. SIEMPRE SUPONGA Y MANEJE EL ARMA DE AIRE COMPRIMIDO COMO SI ESTUVIERA CARGADA Y LISTA PARA DISPARAR.
ADVERTENCIA:
Su rifle de aire RWS® tiene un seguro automático. Cuando el arma de aire comprimido está amartillada está automáticamente puesta “EN SEGURO”(ON SAFE). • Para colocar en MODO SEGURO “ON SAFE” tire del botón del seguro hacia afuera de forma que la letra círculo blanco se vea. Esto sólo puede hacerse si el rifle de aire ha sido amartillado (ilustración 2a).
• Para colocar en MODO NO SEGURO “OFF SAFE” (para disparar), empuje el botón del seguro hacia adelante para que la letra círculo blanco ya no se vea (ilustración 2b).
ilustración 2a
ON SAFE
ilustración 2b
OFF SAFE
ES
34
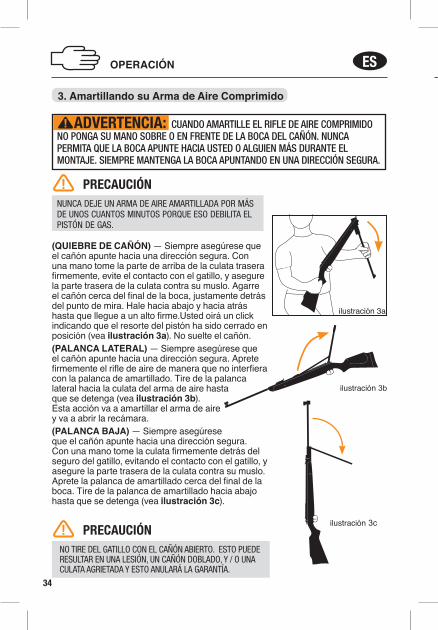
(QUIEBRE DE CAÑÓN) — Siempre asegúrese que el cañón apunte hacia una dirección segura. Con una mano tome la parte de arriba de la culata trasera firmemente, evite el contacto con el gatillo, y asegure la parte trasera de la culata contra su muslo. Agarre el cañón cerca del final de la boca, justamente detrás del punto de mira. Hale hacia abajo y hacia atrás hasta que llegue a un alto firme.Usted oirá un click indicando que el resorte del pistón ha sido cerrado en posición (vea ilustración 3a). No suelte el cañón. (PALANCA LATERAL) — Siempre asegúrese que el cañón apunte hacia una dirección segura. Aprete firmemente el rifle de aire de manera que no interfiera con la palanca de amartillado. Tire de la palanca lateral hacia la culata del arma de aire hasta que se detenga (vea ilustración 3b). Esta acción va a amartillar el arma de aire y va a abrir la recámara.(PALANCA BAJA) — Siempre asegúrese que el cañón apunte hacia una dirección segura. Con una mano tome la culata firmemente detrás del seguro del gatillo, evitando el contacto con el gatillo, y asegure la parte trasera de la culata contra su muslo. Aprete la palanca de amartillado cerca del final de la boca. Tire de la palanca de amartillado hacia abajo hasta que se detenga (vea ilustración 3c).
ilustración 3c
ilustración 3b
ilustración 3a
OPERACIÓN
3. Amartillando su Arma de Aire Comprimido
CUANDO AMARTILLE EL RIFLE DE AIRE COMPRIMIDO NO PONGA SU MANO SOBRE O EN FRENTE DE LA BOCA DEL CAÑÓN. NUNCA PERMITA QUE LA BOCA APUNTE HACIA USTED O ALGUIEN MÁS DURANTE EL MONTAJE. SIEMPRE MANTENGA LA BOCA APUNTANDO EN UNA DIRECCIÓN SEGURA.
ADVERTENCIA:
NO TIRE DEL GATILLO CON EL CAÑÓN ABIERTO. ESTO PUEDE RESULTAR EN UNA LESIÓN, UN CAÑÓN DOBLADO, Y / O UNA CULATA AGRIETADA Y ESTO ANULARÁ LA GARANTÍA.
NUNCA DEJE UN ARMA DE AIRE AMARTILLADA POR MÁS DE UNOS CUANTOS MINUTOS PORQUE ESO DEBILITA EL PISTÓN DE GAS.
PRECAUCIÓN
PRECAUCIÓN
ES
35
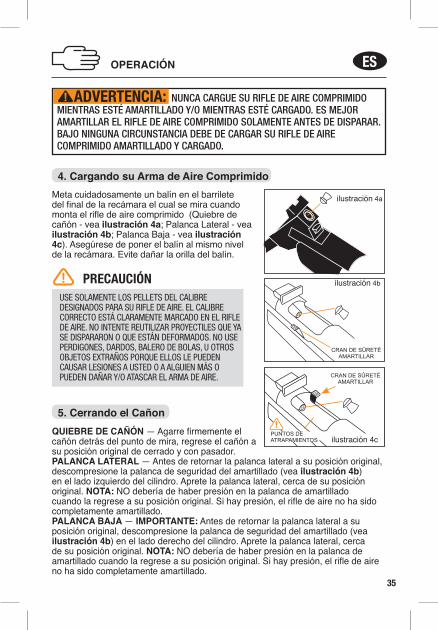
Meta cuidadosamente un balín en el barrilete del final de la recámara el cual se mira cuando monta el rifle de aire comprimido (Quiebre de cañón - vea ilustración 4a; Palanca Lateral - vea ilustración 4b; Palanca Baja - vea ilustración 4c). Asegúrese de poner el balín al mismo nivel de la recámara. Evite dañar la orilla del balín.
CRAN DE SÛRETÉ AMARTILLAR
ilustración 4b
CRAN DE SÛRETÉ AMARTILLAR
ilustración 4cPUNTOS DE ATRAPAMIENTOS
QUIEBRE DE CAÑÓN — Agarre firmemente el cañón detrás del punto de mira, regrese el cañón a su posición original de cerrado y con pasador.PALANCA LATERAL — Antes de retornar la palanca lateral a su posición original, descompresione la palanca de seguridad del amartillado (vea ilustración 4b) en el lado izquierdo del cilindro. Aprete la palanca lateral, cerca de su posición original. NOTA: NO debería de haber presión en la palanca de amartillado cuando la regrese a su posición original. Si hay presión, el rifle de aire no ha sido completamente amartillado.PALANCA BAJA — IMPORTANTE: Antes de retornar la palanca lateral a su posición original, descompresione la palanca de seguridad del amartillado (vea ilustración 4b) en el lado derecho del cilindro. Aprete la palanca lateral, cerca de su posición original. NOTA: NO debería de haber presión en la palanca de amartillado cuando la regrese a su posición original. Si hay presión, el rifle de aire no ha sido completamente amartillado.
3. Amartillando su Arma de Aire Comprimido
4. Cargando su Arma de Aire Comprimido
NUNCA CARGUE SU RIFLE DE AIRE COMPRIMIDO MIENTRAS ESTÉ AMARTILLADO Y/O MIENTRAS ESTÉ CARGADO. ES MEJOR AMARTILLAR EL RIFLE DE AIRE COMPRIMIDO SOLAMENTE ANTES DE DISPARAR. BAJO NINGUNA CIRCUNSTANCIA DEBE DE CARGAR SU RIFLE DE AIRE COMPRIMIDO AMARTILLADO Y CARGADO.
ADVERTENCIA:
OPERACIÓN
5. Cerrando el Cañon
USE SOLAMENTE LOS PELLETS DEL CALIBRE DESIGNADOS PARA SU RIFLE DE AIRE. EL CALIBRE CORRECTO ESTÁ CLARAMENTE MARCADO EN EL RIFLE DE AIRE. NO INTENTE REUTILIZAR PROYECTILES QUE YA SE DISPARARON O QUE ESTÁN DEFORMADOS. NO USE PERDIGONES, DARDOS, BALERO DE BOLAS, U OTROS OBJETOS EXTRAÑOS PORQUE ELLOS LE PUEDEN CAUSAR LESIONES A USTED O A ALGUIEN MÁS O PUEDEN DAÑAR Y/O ATASCAR EL ARMA DE AIRE.
PRECAUCIÓN
ilustración 4a

ES
36
TENGA CUIDADO DE MANTENER SUS DEDOS LIBRES DEL MECANISMO DE AMARTILLADO (VEA “PUNTOS DE ATRAPAMIENTOS” ILUSTRACIÓNS 4C, 5A AND 5B). AGARRE EL CAÑÓN FIRMEMENTE MIENTRAS LO AMARTILLA Y LO CIERRA PARA PREVENIR QUE SE REBOTE Y POSIBLEMENTE CAUSAR LESIONES.
PUNTOS DE ATRAPAMIENTOS
ilustración 5b
PUNTOS DE ATRAPAMIENTOS
ilustración 5a
PUNTOS DE ATRAPAMIENTOS
PUNTOS DE ATRAPAMIENTOS
SÓLO PALANCA BAJA MODELOS: Para prevenir que la palanca de amartillado se caiga del sostenedor de la palanca debajo de la mira frontal haga lo siguiente: Asegúrese de que el rifle RWS 460 está DESCARGADO y NO ESTÁ AMARTILLADO. Ahora, soque el tornillo pequeño debajo de la boca para incrementar la tensión en la bola del retenedor de la palanca de amartillado. Mire el tornillo desde un ángulo y nunca vea la boca del rifle de aire directamente. Si esto no corrige el problema entonces proceda con la siguiente secuencia: Cerciórese de que el rifle de aire está DESCARGADO y NO ESTÁ AMARTILLADO. Desenganche la palanca de amartillado que está debajo de la mira frontal, suelte el tornillo que está en la parte de arriba de la mira frontal, coloque una pieza de madera suave en el borde de la boca de la mira frontal y luego usando un martillo MUY SUAVEMENTE dé un golpecito a la madera para acomodar la mira completamente en el cañón. Ajuste de nuevo el tornillo que está en la parte de arriba de la mira frontal. Si la palanca de amartillado está muy apretada después de completar este proceso puede que necesite soltar levemente el tornillo pequeño que está debajo de la boca para soltar la tensión en la bola del retenedor de la palanca de amartillado.
OPERACIÓN
PRECAUCIÓN
6. Apunte hacia un Blanco SeguroSiempre apunte su rifle de aire comprimido en una DIRECCIÓN SEGURA.Siempre escoja cuidadosamente su blanco. Es mejor disparar al centro de un blanco de papel el cual esté adherido a un soporte seguro. Se debe colgar una colcha detrás del soporte del blanco para prevenir rebotes en caso de que no atine al soporte. Piense sobre que golpearía si falla en darle al blanco.
ALGUNOS RIFLES RWS® tiene miras abiertas. Los rifles de aire comprimido con este tipo de mira están correctamente apuntadas cuando la hoja del punto de mira está ubicada exactamente en la muesca de la mira. El centro del blanco debe parecer que descansa en la parte de arriba del frente de la mira (illustration 6).
ilustración 6

ES
37
TENGA CUIDADO DE MANTENER SUS DEDOS LIBRES DEL MECANISMO DE AMARTILLADO (VEA “PUNTOS DE ATRAPAMIENTOS” ILUSTRACIÓNS 4C, 5A AND 5B). AGARRE EL CAÑÓN FIRMEMENTE MIENTRAS LO AMARTILLA Y LO CIERRA PARA PREVENIR QUE SE REBOTE Y POSIBLEMENTE CAUSAR LESIONES.
Siempre apunte su rifle de aire comprimido en una DIRECCIÓN SEGURA.Siempre escoja cuidadosamente su blanco. Es mejor disparar al centro de un blanco de papel el cual esté adherido a un soporte seguro. Se debe colgar una colcha detrás del soporte del blanco para prevenir rebotes en caso de que no atine al soporte. Piense sobre que golpearía si falla en darle al blanco.
ALGUNOS RIFLES RWS® tiene miras abiertas. Los rifles de aire comprimido con este tipo de mira están correctamente apuntadas cuando la hoja del punto de mira está ubicada exactamente en la muesca de la mira. El centro del blanco debe parecer que descansa en la parte de arriba del frente de la mira (illustration 6).
SU SOPORTE DEBE DE SER INSPECCIONADO POR DESGASTE ANTES Y DESPUÉS DE CADA USO. DESCONTINÚE SU USO SI LA SUPERFICIE DEL SOPORTE MUESTRA SEÑALES DE FALLA. SIEMPRE PONGA EL SOPORTE EN UN LUGAR QUE SERÁ SEGURO SI EL SOPORTE FALLA. DESCONTINÚE EL USO DEL SOPORTE SI EL PROYECTIL REBOTA.
PRECAUCIÓN
ANTES DE PONER SU RIFLE DE AIRE COMPRIMIDO “SIN SEGURO” (OFF SAFE), ESTÉ COMPLETAMENTE SEGURO QUE SU RIFLE DE AIRE COMPRIMIDO ESTÉ AMARTILLADO Y AUTOMÁTICAMENTE “EN SEGURO” (ON SAFE), NO VUELVA A AMARTILLAR EL RIFLE DE AIRE COMPRIMIDO MIENTRAS ESTÉ CARGADO PARA VOLVERLO A PONER DE REGRESO “EN SEGURO”(ON SAFE), VEA EL “PASO 1. OPERANDO EL SEGURO” PARA INSTRUCCIONES EN CÓMO PONER EL RIFLE DE AIRE DE REGRESO “EN SEGURO”.
ADVERTENCIA:
7. Disparando su Arma de Aire ComprimidoCuando esté completamente seguro que su rifle de aire comprimido está apuntando a un blanco seguro y que usted está listo para disparar, ponga su rifle de aire comprimido-“SIN SEGURO” (vea PASO 2. OPERANDO EL SEGURO).Apriete el gatillo.
SÍ UN BALÍN NO SE DISPARA DESPUÉS DE COMPLETARSE LOS PASOS, EL ARMA DE AIRE COMPRIMIDO PUEDE ESTAR ATASCADA. UN PROYECTIL EN EL CAÑÓN SIN DISPARARSE PUEDE SER UNA SITUACIÓN PELIGROSA. MANTENGA EL ARMA DE AIRE COMPRIMIDO APUNTANDO EN UNA DIRECCIÓN SEGURA Y REPITA TODOS LOS PASOS DE OPERACIÓN EXCEPTO EL PASO 3. SI UN PROYECTIL TODAVÍA NO SE DISPARA, HAGA LO SIGUIENTE:
1. Asegúrese que el cañón apunte hacia una dirección segura.2. Abra el cañón ligeramente, pero NO amartille el rifle completamente. Deje el cañón abierto en la posición de “SEGURO” (ON SAFE).3. Despeje el cañón insertando una varilla de limpieza a través de la punta del cañón.4. Repita los pasos de operación.
ADVERTENCIA:
NOTA: Muchos factores afectan la función y velocidad del arma de aire, incluyendo la marca del proyectile, lubricación, condición del cañón y la temperatura.
OPERACIÓN
ilustración 6

ES
38
OPERACIÓN
NUNCA ASUMA QUE PORQUE EL ARMA DE AIRE NO DISPARA MÁS UN PROYECTIL Y/O EL CARGADOR SE HA QUITADO DE LA MONTURA DEL AGARRADOR QUE EL PROYECTIL NO ESTÁ METIDO EN EL CAÑÓN. SIEMPRE TRATE AL ARMA DE AIRE COMO SI ESTUVIERA CARGADA Y CON EL MISMO RESPETO QUE TRATARÍA A UN ARMA DE FUEGO.
ADVERTENCIA:
ESTE PRODUCTO CONTIENE PLOMO, UN QUÍMICO CONOCIDO EN EL ESTADO DE CALIFORNIA POR CAUSAR CÁNCER Y DEFECTOS DE NACIMIENTO (U OTROS PROBLEMAS REPRODUCTIVOS).
ADVERTENCIA:
NO INTENTE REUSAR LOS BALINES DISPARADOS O LOS BALINES QUE ESTÁN DEFORMADOS. LOS PROYECTILES TALES COMO LOS TIROS DE ACERO (BBS) Y LOS DARDOS PUEDEN DAÑARSE POR CAUSA DE REBOTE Y PUEDEN INVALIDAR SU GARANTÍA.
PRECAUCIÓN
8. Ajustando las Miras
9. Ajustando el Gatillo
ALZAAlgunos rifles de aire marca RWS® están equipados con un micrómetro en la mira trasera, con ajuste vertical y horizontal en la parte trasera.Ajustes de las Elevaciones- Si el rifle dispara muy hacia arriba: gire el tornillo A en dirección a las manecillas del reloj (vea ilustración 7a). Si el rifle dispara muy hacia abajo: gire el tornillo A en dirección contraria a las manecillas del reloj (vea ilustración 7a). Nota: los números 0-9 son solamente números de referencia y no están calibrados para distancias.Ajustes de las Holguras- Los ajustes de las holguras se controlan girando la perilla(2) de al lado (vea ilustración 7a). Si el rifle de aire comprimido dispara a la derecha: ajuste en sentido contrario de las agujas del reloj. Si dispara a la izquierda: ajuste en sentido de las agujas del reloj.
PUNTO DE MIRALos modelos RWS 48, 52 y 54 están equipado con un frente ajustable [(3) – vea ilustración 7b]. Puede ser ajustado soltando el tornillo (4), mueva deslizándolo hacia una posición más alta o más baja. Después vuelva a socar los tornillos.
ilustración 7a
A
B
ilustración 7b
C
D

ES
39
OPERACIÓN
10A. Descargando un Balín Dispare el balín hacia un BLANCO SEGURO para descargar el arma de aire comprimido. Si ésto no es práctico ponga el rifle de aire comprimido en “SEGURO” (ON SAFE), amartille el arma de aire comprimido para abrir el cañón y empuje el balín de la cámara atravezando una varilla de limpieza a través de la punta del cañón. Introduzca dos limpiadores de balín RWS y descárguelo en un blanco seguro.
10B. Sacando un Balín atoradoSí un balín está atorado en el cañón, NO recargar el rifle de aire comprimido.1. Amartille el rifle de aire comprimido (ver PASO 3. AMARTILLANDO SU RIFLE DE AIRE COMPRIMIDO), apunte el rifle de aire comprimido hacia una DIRECCIÓN SEGURA, ponga el rifle de aire comprimido en la posición “OFF SAFE” y apriete el gatillo para disparar.
10. Solución de Problemas
9. Ajustando el Gatillo
Recámara
Boca
Baqueta ilustración 9
Primer Etapa de Viaje:La primera etapa de viaje es reducida al mínimo por manufactura. Si usted gira el tornillo (1) la primera etapa de viaje va a extenderse.Soltura:Cuando la primera etapa de viaje va a ser ajustada la soltura debe ser ajustada también. Esto se hace girando el tornillo (2).• Gire en dirección a las manecillas del reloj:
Tosca soltura• Gire en dirección contraria a las manecillas
del reloj: Finamente ajustada la solturaPeso y peso del gatillo de la Primera etapa:Es posible regular el peso y el peso del gatillo de la primera etapa girando del tornillo (3).• Gire en dirección a las manecillas del reloj: El peso será incrementado• Gire en dirección contraria a las manecillas del reloj: el peso será reducidoEl peso de la primera etapa tiene rangos entre .66 lbs / 300g (como mínimo) hasta 84 lbs / 380 g (como máximo). El peso del gatillo tiene rangos entre 88 lbs / 400 g (como mínimo) hasta 1.1 lbs / 500 g (como máximo).
1.
2.
3.
ilustración 8
LA FUERZA DEL GATILLO SE PUEDE AJUSTAR POR DEBAJO DEL PESO O NIVEL DE 3 LIBRAS (1.35 KG). CUANDO USTED AJUSTA EL GATILLO POR DEBAJO DE LAS 3 LIBRAS, EL ARMA DE AIRE PUEDE DISPARARSE SOLA SI LA DEJA CAER.
PRECAUCIÓN

ES
40
OPERACIÓN CUIDADO
ANTES DE CUALQUIER CUIDADO O MANTENIMIENTO, SIEMPRE ASEGÚRESE QUE SU ARMA DE AIRE COMPRIMIDO ESTÉ “EN SEGURO” (ON SAFE) Y DESCARGADO. MANTÉNGALO APUNTANDO HACIA UNA DIRECCIÓN SEGURA. ES MUY IMPORTANTE MANTENER APROPIADAMENTE SU ARMA DE AIRE COMPRIMIDO.
PRECAUCIÓN
NUNCA GUARDE UN ARMA DE AIRE COMPRIMIDO CARGADA O AMARTILLADA. Mantenga el rifle de aire comprimido lejos de los niños y de los tiradores no entrenados. Almacene las municiones separadas del rifle de aire comprimido para mantenerlas lejos de los tiradores no entrenados. Proteja su rifle de aire comprimido de la humedad y polvo; limpie el arma de aire comprimido y envuélvala en un trapo liso y seco. Si va a guardar su arma de aire comprimido por un largo tiempo asegúrese que el cañón esté protegido. Ésto se puede lograr poniendo en el agujero una capa de Aceite RWS de Resortes y Cilindro (RWS Spring Cylinder Oil). Siempre use un trapo suave y meta la varilla para limpiar desde el final de la recámara del cañón del rifle de quiebre. Quite el aceite completamente antes del próximo uso. RECUERDE: Siempre revise para ver si su arma de aire comprimido está cargada cuando la agarre del lugar en donde la tiene guardada o de otra persona.Con cuidado y las retinas de inspección su pistola de aires puede proveerle de disfrute en muchas sesiones de disparo. Abuso, negligencia y exposición continua a elementos va a impedir el buen funcionamiento de cualquier pistola de aire.Su Rifle de Aire Comprimido RWS® está diseñado para disparar solamente balines de plomo de calibre .177 o .22. Recomendamos que use balines RWS debido a su espléndida exactitud y uniformidad dimensional. El calibre correcto está claramente sellado en el cañón cerca del bloque de la recámara o en el bloque de la recámara.
11. Mantenimiento, Limpieza y Almacenamiento
LOS ACEITES QUE CONTIENEN ÁCIDO O RESINA PUEDEN DAÑAR EL SELLO DE LA RECÁMARA, EL SELLO DE COMPRESIÓN, Y POSIBLEMENTE EL ACABADO DE ARMA DE AIRE COMPRIMIDO.
NUNCA DISPARE EN SECO SU RIFLE DE AIRE COMPRIMIDO. SI EL RIFLE DE AIRE COMPRIMIDO SE DISPARA SIN UN BALÍN DE PLOMO, ÉSO CAUSARÁ QUE EL PISTÓN LLEGUE AL FONDO DEL CILINDRO LO CUAL PUEDE DAÑAR PERMANENTEMENTE EL RIFLE DE AIRE COMPRIMIDO.
PRECAUCIÓN
2. Abra el cañón ligeramente (sin halar el cañón hasta el punto que se amartille) y mire la recámara para ver sí el rifle de aire comprimido está atascado (ver la ilustración 9) NUNCA MIRE LA BOCA DEL CAÑÓN.3. Sí el rifle de aire comprimido está todavía atorado, introduzca una baqueta de calibre correcto en la boca del cañón y empuje el balín atorado hacia afuera. No intente reusar el balín. Sí no puede desatorar el rifle de aire comprimido, contacte al Departamento de Servicio de Umarex EEUU.

ES
41
OPERACIÓN
REVISE SI LOS TORNILLOS DE LA CULATA ESTÁN BIEN SOCADOS, ENTRE, DURANTE Y DESPUÉS DE LA SESIÓN DE DISPARO. LOS TORNILLOS SUELTOS PUEDEN CAUSAR LESIONES E INCLUSO LA MUERTE.
PRECAUCIÓN 2. Abra el cañón ligeramente (sin halar el cañón hasta el punto que se amartille) y mire la recámara para ver sí el rifle de aire comprimido está atascado (ver la ilustración 9) NUNCA MIRE LA BOCA DEL CAÑÓN.3. Sí el rifle de aire comprimido está todavía atorado, introduzca una baqueta de calibre correcto en la boca del cañón y empuje el balín atorado hacia afuera. No intente reusar el balín. Sí no puede desatorar el rifle de aire comprimido, contacte al Departamento de Servicio de Umarex EEUU.
PARTES FUNCIONALES: El pistón de gas requiere muy poca lubricación. Dos (2) gotas de Lubricante RWS Cámara de Aire (RWS Air Chamber Lube) cada 1000 disparos serán suficientes. Se aplica fácilmente a través del Puerto de la cámara de compresión con una aguja aplicadora de 3 ½" (vea ilustración 10a y 10b). La superficie de las capas de rodamiento en la bisagra del cañón, arma cargada y el mecanismo del gatillo deben de estar lubricados con Aceite RWS de Resortes y Cilindro (RWS Spring Cylinder Oil) (vea la ilustración 11). Los resortes deben aceitarse cada 100 disparos con seis (6) gotas de Aceite para resortes de cilindro RWS (vea ilustración 12a y 12b). Recuerde, un poco es bueno – mucho no es mejor. CAÑÓN: Con el uso de día a día, se acomulará muy poco polvo o residuo en el alma del cañón. Nota: Los balines de plomo RWS de alta calidad no solamente incrementan la precisión, ellos ayudan a reducir el depósito de plomo. Durante períodos de uso regular, el alma del cañón se debe limpiar periódicamente por medio de un tapón de fieltro o varilla de limpieza con trapeador de lana. Los cepillos de alambre no se deben de usar. Meta la varilla de limpieza desde el final de la recámara, no retire sello de cañón.SUPERFICIE: Las partes metálicas expuestas (mira, caja del cerrojo, cabezas de los tornillos, capucha de mira, etc.) son el acabado de un arma y DEBEN de limpiarse usando un trapo levemente engrasado después de usarse y prevenir la oxidación. Utilice aceite suave y libre de ácido y aceite libre de resina. El aceite RWS de Resortes y Cilindro (RWS Spring Cylinder Oil) es excelente para ésto.
QUIEBRE DE CAÑÓN
ilustración 10a
ilustración 10b
PALANCA LATERAL Y PALANCA BAJA
ilustración 11
ilustración 12a
QUIEBRE DE CAÑÓN
ilustración 12b
PALANCA LATERAL Y PALANCA BAJA

ES
42
INSTRUCCIONES DE SEGURIDAD
12. Repasando la Seguridad• Usted y otras personas con usted, DEBEN utilizar anteojos de seguridad para
proteger sus ojos. Si usted utiliza anteojos de lectura, los lentes deben de estar certificados en resistencia a impactos o debe utilizar anteojos de seguridad hechos para colocar sobre los anteojos de lectura normales.
• Siempre apunte hacia una DIRECCIÓN SEGURA. Siempre mantenga la boca del arma de aire apuntando hacia una DIRECCIÓN SEGURA.
• Siempre mantenga su dedo fuera del gatillo y fuera del guardamonte hasta que esté listo para disparar.
• Nunca apunte el arma de aire a cualquier cosa que no intente disparar.• Nunca apunte la pistola de aire a personas ni a mascotas.• Siempre trate al arma de aire como si está cargada y con el mismo respeto que
una arma de fuego.• Nunca mire al cañón de un arma de aire.• Siempre mantenga el arma de aire sin amartillar y descargadas hasta que esté
listo para disparar.• Siempre esté listo para ver si el arma de aire está sin amartillar y descargada
cuando la agarre de otra persona o del lugar en donde estaba guardada.• Nunca deje la pistola de aire cargada y sin supervisión.• Use solamente el tamaño apropiado y tipo de proyectil como está marcado en el
arma de aire.• Nunca reutilice la munición.• No dispare a las superficies duras o a la superficie de agua. El BB puede rebotar
y golpear a alguien o a algo que no intentaba golpear.• No dispare a objetos frágiles como las ventanas.• Ponga el soporte en un lugar que será seguro si falla el soporte.• Su soporte debe de revisarse por desgaste antes y después de cada uso. Todos
los soportes están sujetos a desgastes y con el tiempo fallarán. Remplace su soporte si la superficie se desgasta o daña o si ocurre un rebote.
• No intente desarmar o modificar su arma de aire. Las reparaciones no autorizadas o las modificaciones de la función de su arma de aire en cualquier manera pueden ser inseguras y anularán su garantía.
• Antes de guardar o transportar la pistola de aire, asegúrese de que está descargada y es sin amartillar.
• Siempre guarde su arma de aire en un lugar seguro lejos de usuarios no autorizados y separadas de las municiones.
• Sólo personas que están familiarizadas con la función y uso apropiado de la pistola de aire y están amparadas por la ley deben manipular la pistola de aire.
• Siempre use los anteojos de seguridad cuando dispare o dé mantenimiento a la pistola de aire.
• Solamente dispare donde está permitido por la ley.
CUIDADO
UN ARMA DE AIRE COMPRIMIDO QUE NO SE MANEJE APROPIADAMENTE PUEDE SER PELIGROSA. DEBE DE MANTENERSE SEGURA DEL USO DE ALGUIEN HASTA QUE SE REPARE O DESTRUYA. NO TRATE DE DESARMAR EL ARMA DE AIRE COMPRIMIDO. ES DIFÍCIL DE REENSAMBLAR Y EL DESAMBLAJE Y REENSAMBLAJE INAPROPIADO PUEDE CAUSAR LESIONES O LA MUERTE.
ADVERTENCIA:

ES
43
PRECAUCIÓN LOS COMPONENTES DE SU ARMA DE AIRE COMPRIMIDO FUERON FABRICADOS Y CONFECCIONADOS PARA PROPORCIONAR ÓPTIMAS FUNCIONES. CUALQUIER MODIFICACIÓN O ALTERACIÓN PUEDE CAUSAR UN MALFUNCIONAMIENTO, INVALIDARÁ SU GARANTÍA Y PUEDE HACER QUE SEA INSEGURO SU USO. CUALQUIER CAMBIO EN SU FUNCIÓN (TALES COMO UNA FUERZA DE JALE BAJA DELGATILLO O UN RECORTAMIENTO DE RECORRIDO DEL GATILLO), INDICA POSIBLES MODIFICACIONES, ALTERACIONES Y/O USO. TALES ARMAS DE AIRE COMPRIMIDO DEBEN DE SER INSPECCIONADAS, REEMPLAZADAS O APROPIADAMENTE REPARADAS POR SOLAMENTE EL PERSONAL CALIFICADO DE UMAREX PARA ASEGURAR QUE SU FUNCIÓN NO HA SIDO AFECTADA.
No regrese producto defectuoso o dañado al vendedor. Si su arma de aire necesita reparación, llame a Umarex USA al (479) 646-4210 y pregunte por el Departamento de Servicio o visite www.umarexusa.com. ¡NO INTENTE DESARMARLA! Su arma de aire requiere herramientas y partes especiales para repararla. Cualquier desarme o modificación no hecha por Umarex USA invalidará la garantía.
13. Reparación/Servicio/Garantía
CUIDADO
GARANTÍA DE POR VIDA LIMITADA MARCA RWS® SÓLO PARA ARMAS VENDIDAS EN ESTADOS UNIDOS
La garantía de RWS® cubre a las armas de aire marca RWS® (dueño original) contra cualquier defecto de manufactura y materiales durante la vida del arma de aire. Cualquier arma de aire RWS® cubierta por esta garantía, la cual están fundamentada en defectos de manufactura o materiales, puede ser remplazada o reparada, a opción de la empresa RWS®.Las partes del arma pueden desgastarse, como lo sellos y resortes, estos tienen garantía en las armas de aire registradas por 18 meses desde la fecha de compra original.Las reparaciones solamente pueden hacerse por nuestro Centro de Servicio Autorizado. Esta garantía de vida limitada se invalida para cualquier arma, si se maneja de manera inapropiada, modificada o desensamblada. Si aparece cualquier defecto, llame al departamento de servicio de Umarex en Estados Unidos (479) 646-4210, para obtener (Autorización Aprobada) número. Una vez que usted haya recibido ese número de autorización, empaque el arma cuidadosamente en una caja de envío e incluya el dinero o el cheque con el monto dictado por Umarex Estados Unidos para cubrir los costos de manejo y envío. Escriba el número de autorización aprobado con fuerza en la caja y regrésela, prepaga a: Umarex USA, 7700 Chad Colley Blvd., Fort Smith, Arkansas 72916.El nombre, la dirección y el número de teléfono de quien envía debe de ir incluido en el paquete, junto con una nota explicando el defecto encontrado.Bajo la garantía, usted tiene la seguridad de por vida del placer de disparar con un arma marca RWS®.
Esta garantía no cubre las armas utilizadas para efectos comerciales o por instituciones. Estas armas sólo las cubre la garantía regular de 5 años.

© 2016 06R16
We reserve the right to make color and design changes and technical improvements. No responsibility is accepted for printing errors or incorrect information.
Sauf modifications de la couleur et du design ainsi que des améliorations techniques, erreurs d’impression et erreur. Toutes les données sont fournies sans garantie.
Nos reservamos el derecho para realizar cambios al color y diseño y mejoras técnicas. No se acepta responsabilidad por errores de impresión o información incorrecta.
© UMAREX USA
This OWNER'S OPERATION MANUAL should always accompany the airgun and be transferred with it upon change of ownership or when presented to another person.
Ce manuel d’UTILISATION DU PROPRIÉTAIRE devrait toujours accompagner l’arme à air et être donné avec celle-ci lorsqu’il y a changement de propriétaire ou lors de
l’utilisation par une autre personne.
Este MANUAL DE OPERACIONES DEL DUEÑO siempre debe acompañar a la pistola de aire y transferirlo con ella si se cambia el dueño o cuando se le presenta a otra persona.
sûre
té automatique
au t o m a t i c b a r r e l
canon rayé
. 177 ( 4 , 5 m m) .22 ( 5 , 5 m m)
Distributed by / Distribué par / Distribuido por: UMAREX USA, INC.
7700 Chad Colley BoulevardFort Smith, AR 72916
www.UmarexUSA.com
-or--ou--o-