operation manual sr5 february 2018 page 2
TRANSCRIPT


Operation manual SR5February 2018 Page 2
CERTIFICATE OF MANUFACTURE CONFORMITY
Coffed Private Limited Company, ul. Ceramiczna 28, 64-920 Piła PL
hereby confirms that the:
Coffee roasting line:
Type: SR5
is in conformity with the following European directives and standards::
Machinery directive MD 2006/42/EC,
Electromagnetic compatibility directive EMC 2004/108/EC
Gas appliance directive GAD 2009/142/EC
What is equivalent with fulfilling the following standards:
1. PN – EN ISO12100
2. PN – EN 349:1999
3. PN – EN 60204-1
4. PN-EN 125:2013
And that it has been manufactured according to the technical documentation stored by Coffed
Piła, Poland February 13th, 2018r.
…………………………………………………………………………(Damian Elcessor – Coffed Private Limited owner)

Operation manual SR5February 2018 Page 3
Table of contents
GENERAL INFORMATION 41.1 Information about the operation manual 41.2 Liability and warranty 41.3 Safety precautions while operating the equipment 41.4 Intended use 51.5 Hazard indication symbols on the machine 5INSTALLATION AND COMMISSIONING 52.1. General characteristics of the equipment 52.2. Technical description 62.2.1. Roaster with cooling bin 72.2.2. Chaff cyclone 82.2.3. Control panel 92.3. Commissioning and connecting to the installations 92.3.1. Electrical installation 92.3.2. Gas installation 92.3.3. Exhaust installation 102.3.4. Start-up 102.3.5. Drum gap setup 10WORKFLOW DESCRIPTION 113.1. Control panel screens 113.1.1. Operator’s password screen 113.1.2. Start screen 123.1.3. Roasting screen 133.1.4. Roast charts screen 143.1.5. Recipe selection and edition screen 163.1.5.1 Current recipe preview 173.1.5.2 Recipe edition 203.1.6. Maintenance screen 233.1.7. Faults and errors screen 253.2. Manual roasting mode 27SERVICE AND MAINTENANCE 282. TROUBLESHOOTING 283. REPAIRS 294. DISPOSAL AND NEUTRALIZATION 30

Operation manual SR5February 2018 Page 4
GENERAL INFORMATIONInformation about the operation manual
This manual is an integral part of the equipment and it needs to be stored in the place where the equipment is being used. The persons installing, providing maintenance, cleaning or using the equipment should have constant access to the manual. The manual should be used by qualified personnel only. The knowledge of and compliance with all safety and operating instructions is essential for safe and proper operation of the equipment. In addition, when using the equipment all the local regulations regarding healthand safety precautions should be observed.
Liability and warranty
Personal injury or property damage liabilities and warranty claims are void if they occur as a result of:
- misuse of the equipment- wrong installation, commissioning, start-up, maintenance or handling of the equipment- use of the equipment with damaged or faulty functioning of the protective and safety appliances- not abiding to the precautions in the manual- making unauthorized changes (including construction changes) in the equipment- installing additional parts that have not been tested and authorized by Coffed- making changes in the gas burner that modify the burner manufacturers - set creation of the flame- insufficient control of the elements, that can wear- unprofessional repairs- using the equipment despite being faulty- using inappropriate fuel- defects of the power cords that are not a part of the equipment- using parts that are not original parts supplied by Coffed
Safety precautions while operating the equipment
The data referring to the safety of operation are in relation to European Union legislation that was in effectat the date of the equipment’s production. If the equipment is used in industrial conditions, the user is obliged to check the accordance of the recommended safety measures with the current regulations and to comply to the newest rules.
If the equipment is used outside the European Union, the user should abide to the health and safety regulations of the place where the equipment is installed. The specific environmental guidelines also need to be respected.
Warning!• The equipment is not designed to be used by persons (including children) with manual, sensory or mental limitations and by persons without the necessary experience and knowledge.• The equipment can be used by the above-mentioned persons only under supervision of a qualified and trained person that is responsible for their safety, and has given them all the necessary guidelines how to use the equipment.• Children need to be under strict supervision, to ensure that they are not playing with the equipment• This manual needs to be carefully stored. In an event of sharing the machine with other people, the manual needs also to be shared.• All of the users must abide to the rules and information included in this manual and also to the occupational health and safety regulations.• The equipment is designed to be used in closed spaces only.

Operation manual SR5February 2018 Page 5
Intended use
The equipment is working safely only when it is used for its designed purpose.The SR5 coffee roasting line is designed for coffee roasting only and it is forbidden to use it to process other products. During the roasting process green coffee beans are roasted, the final product are roasted coffee beans.
Warning!• Using the equipment to process products other than green coffee beans is prohibited and it will be recognized as using the equipment not for its designed purpose.• Using the equipment not for its designed purpose excludes all the liability claims against the equipment manufacturer.• The user is solely responsible for the damages and injuries that occurred during the use of the equipment not for its designed purpose.
1.1 Hazard indication symbols on the machine
The following symbols are located on the device in the places where the hazard can occur:
No Symbol Descripton
1 High voltage – it is prohibited to open the marked door without disconnecting the machine from electricity.
2 Hot surface – it is prohibited to touch the marked surface, when the machine is working and immediately after switching off the machine.
3Automatic start – extreme caution is advised, as the marked elements might
start to move without prior warning.
INSTALLATION AND COMMISSIONING2.1. General characteristics of the equipment
The SR5 coffee roasting line has the following parameters:
Efficiency: up to 20kg of green coffee per hourRoasting time: 8 – 20 min per batchBatch size: 4 - 5kg of green coffee
The line needs gas, electric and compressed air supplies in order to work properly, the requirements for the lines:
Fuel: LPG/G-50 natural gasGas pressure: 50 – 80mbar
Operation manual SR5February 2018 Page 6
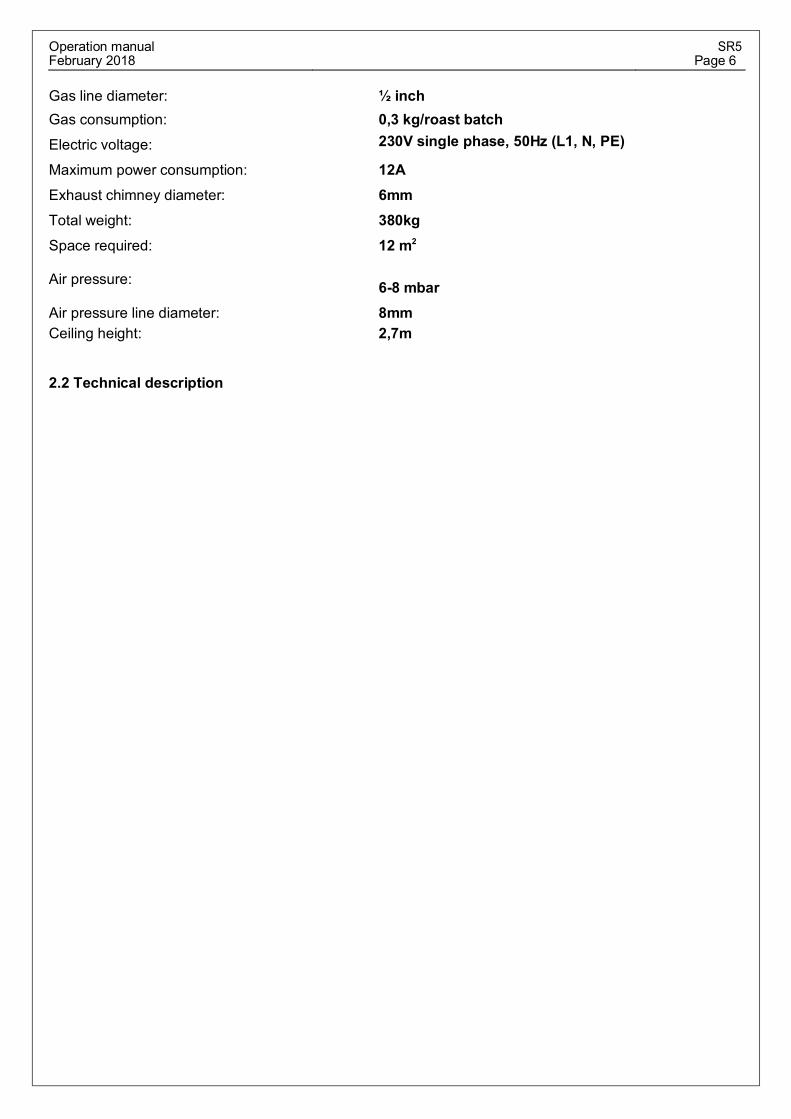
Gas line diameter: ½ inchGas consumption: 0,3 kg/roast batchElectric voltage: 230V single phase, 50Hz (L1, N, PE)
Maximum power consumption: 12AExhaust chimney diameter: 6mmTotal weight:
Space required:
Air pressure:
Air pressure line diameter:
380kg12 m2
6-8 mbar8mm
Ceiling height: 2,7m
2.2 Technical description
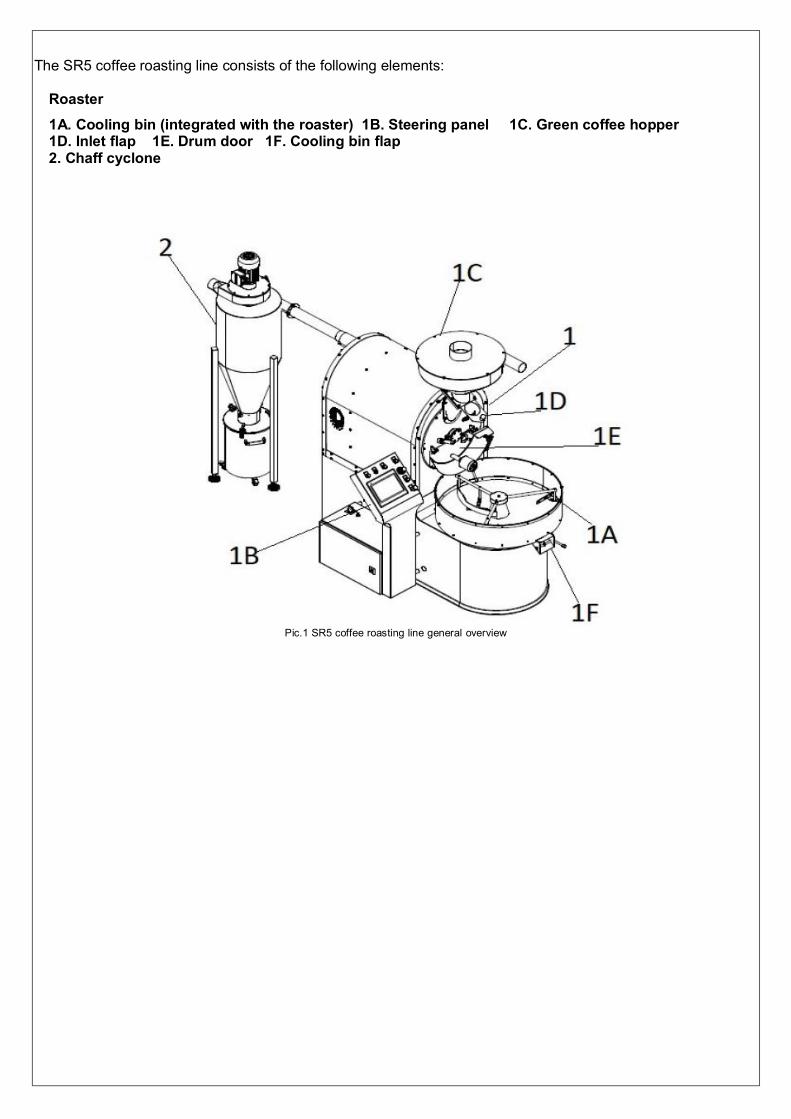
The SR5 coffee roasting line consists of the following elements:
Roaster1A. Cooling bin (integrated with the roaster) 1B. Steering panel 1C. Green coffee hopper1D. Inlet flap 1E. Drum door 1F. Cooling bin flap2. Chaff cyclone
Pic.1 SR5 coffee roasting line general overview

Operation manual SR5February 2018 Page 7
2.2.1 Roaster with cooling bin
Pic.2 Roaster with cooling bin overview
This is the main part of the SR5 coffee roasting line. Green (raw) coffee is processed inside of the roaster.The beans are poured into a metal drum revolving above a gas burner and heated to a certain temperature(ca. 200ºC). In the result of the process roasted coffee beans are produced (the main product), asignificant amount of coffee chaff is also released and drawn out of the drum through the exhaust system.
All the media connections (electricity, gas, compressed air) are located at the back of the roaster. The media need to be connected before starting to work with the machine.
The integrated cooling bin is used to rapidly cool down the coffee immediately after finishing the roasting process. The cooling bin is equipped with a separate fan to suck out the hot air and stirring arms, that ensure the coffee is evenly cooled.
Measurements:Height: 1658mm
Width: 810mmLength: 1428mmWeight: 330kg

Operation manual SR5February 2018 Page 8
Chaff cyclone
Pic.6 Chaff cyclone overview
The chaff cyclone which is connected with the roaster’s exhaust system, separates the chaff from the exhaust fumes and collects it into a wheeled bin underneath it. The chaff can be then disposed of, and the fumes are directed into the chimney duct.
Measurements:Height:
1847mmWidth: 413mm

Operation manual SR5February 2018 Page 9
Commissioning and connecting to the installationsThe commissioning of the SR5 coffee roasting line usually takes place at the customer’s premises, after COFFED technicians install and assemble the line. The coffee for the commissioning needs to be suppliedby the final user, unless stated otherwise in the purchase agreement. The commissioning test encompasses a mechanic test (that checks all the mechanical parts and their controls) and a technological test. The technological test covers roasting one batch of green coffee under production conditions.
Electrical installationThe SR5 coffee roasting line is equipped with a five-wire main power cable (three phases, neutral and ground). The voltage is 400V, 50Hz,If the local regulations require electric measurements to be made, they need to be performed by authorized personnel with the necessary qualifications.
Gas installationIn order for the SR5 coffee roasting line to work properly, LPG or natural gas source needs to be connected. The gas train diameter is ½ inch.
Exhaust installationThe final user is obliged to connect the SR5 coffee roasting line to an exhaust installation according to theguidelines provided by the line’s manufacturer. An additional COx detector needs to be installed if the localregulations require that. The chimney diameter is 123mm.Warning:Place, where roaster will be placed, should be supplied in air ventiation. For safety reason, place shouldbe also equipped in carbon dioxide sensor.
Start-upAfter all the above media (points 2.3.1. – 2.3.4. are connected) the SR5 coffee roasting line can be started. The main power switch is located on the left back side of the machine (when facing it).
Pic. 7 Main power switch Pic.8. Main power switch location

Operation manual SR5February 2018 Page 10
Drum gap setupThe delivered machine has the drum gap set up for roasting coffee.A wrench used for setting up the gap between the drum and the front cast iron mold is delivered with the roaster (turning it right widens the gap, turning it left closes it). When the roaster is cold, and green coffee is poured into the drum, particles smaller than 2mm may fall underneath it. This should stop after the roaster is warmed up.
Warning!The gap should not be smaller than 2mm when the roaster is cold, as it may result in damaging the transmission.
WORKFLOW DESCRIPTION
Control panel screensThe SR5 coffee roasting line is controlled via a control panel (pic.3). All of the control elements are locatedon the console (pic. 9). The functions and information regarding the operation and workflow of the machineare displayed on the 10 inch touch panel display using respective screens.
LEGEND:1.TOUCH PANEL DISPLAY2.EMERGENCY DRUM OPENING3.USB SLOT4.ERROR RESET5. BUZZER6.MAIN EMERGENCY SWITCH7.SAFETY CIRCUIT RESET8.COOLING BIN EMERGENCY SWITCH
PIc.3 Console
Operation manual SR5February 2018 Page 11
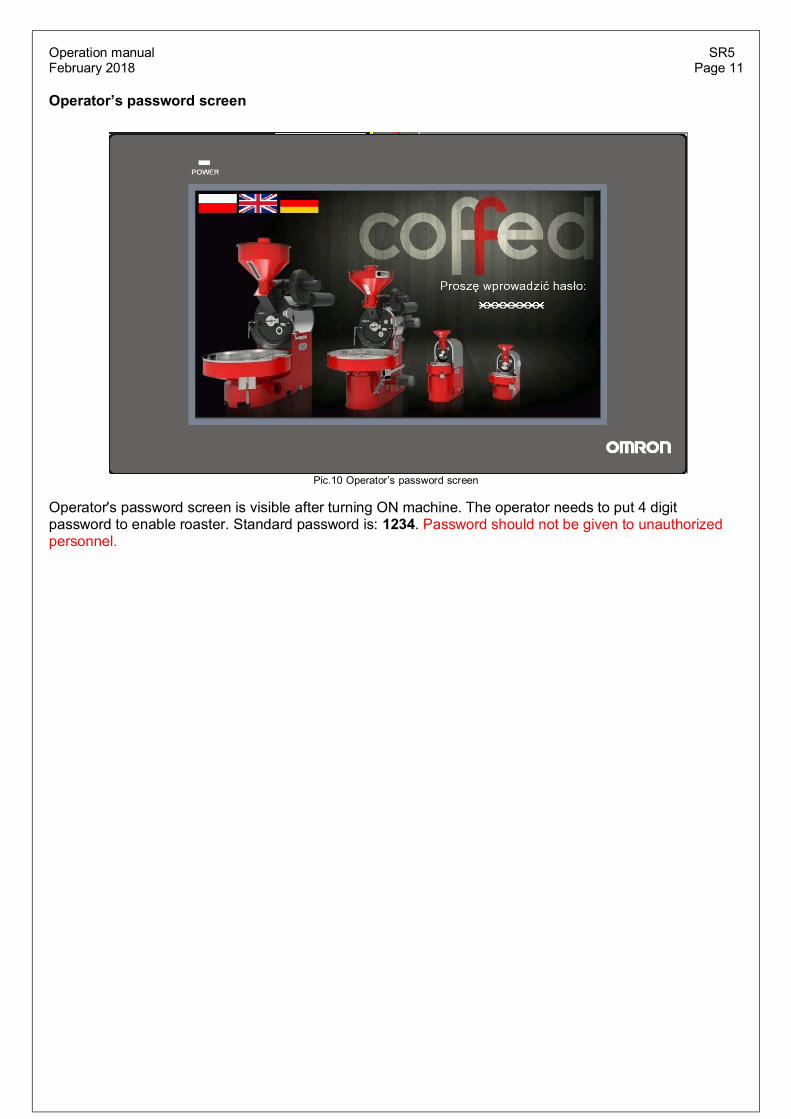
Operator’s password screen
Pic.10 Operator’s password screen
Operator's password screen is visible after turning ON machine. The operator needs to put 4 digit password to enable roaster. Standard password is: 1234. Password should not be given to unauthorized personnel.

Operation manual SR5February 2018 Page 12
Start screen
Pic.13 Start screen
The manufacturer’s details, name, type and serial number of the machine are visible on the startscreen. The number of workhours is displayed by the icon – it is the number of hours when theburner of the machine was working.
Eight buttons are visible on the right side of the screen. Their functions are the same for all of the screens, on which they are displayed:

Operation manual SR5February 2018 Page 13
– go to the start screen
– go to the roasting screen
– go to the roast charts screen
– go to the recipe selection and edition screen
– go to the service screen
– go to the faults and errors screen
– start roasting in automatic mode
– stop roasting in automatic mode (hold for one second)
Roasting screen
Pic.14 Roasting screen


Operation manual SR5February 2018 Page 15
9.
Colling bin arms on/off
Cooling fan on/off
10. Drum door open/closed
11.1. 2.
1. Save the current roast into the flash memory2. Roasting from the selected recipe/profile
12. Burner power (range 20%-100%)
13. Burner power controls
14. Burner on/off
15. Drum and exhaust fan on/off
16. Exhaust fan power (range 60%-100%)
17. Coffee temperature inside the drum (oC)
18. Current roast time (mm:ss)
19. Exhaust fumes temperature (oC)
Table.1 Roaster controls functions list

Operation manual SR5February 2018 Page 16
Roast charts screen
Pic.15 Roast charts screen
This screens enables to monitor the different parameters of the roasting process. The following dataabout the current roast is displayed in relation to the time that has passed since putting the green coffeeinto the drum:
No. Line color Parameter
1. white Coffee temperature
2. yellow Burner power
3. red Exhaust fumes temperature
4. blue Exhaust fan power
Table.2 Roast chart parameters list
The following buttons, that allow to control the roasting proces are also on this screen
No. Icon Description / function
1.Pressing this button for the first time, allows to indicate the start of the “firstcrack” phase on the chart, pressing it for the second time indicates the endof this phase.

2.Pressing this button for the first time, allows to indicate the start of the “second crack” phase on the chart, pressing it for the second time indicates the end of this phase.

Operation manual SR5February 2018 Page 17
3.Burner power controls:Pressing the „+” increases the power by 5%, pressing the „–” decreases it by 5%
4.Exhaust fan power controls:Pressing the „+” increases the power by 5%, pressing the „–” decreases it by 5%
Table 3. Roast chart screen buttons list
Recipe selection and edition screen
Pic.16 Recipe selection screen
The recipe selection screen allows the operator to select and view one of the previously saved recipes for the automatic roasting mode. The recipes are saved on the flash drive that needs to be connected to the control panel. The following buttons are on the screen:

Operation manual SR5February 2018 Page 18
No. Icon Description / function
1. View the current recipe
2. Edit the selected recipe
3. Save the recipes from the PLC to the flash drive
4. Load the recipes from the flash drive to the PLC
5. Edit the names of the recipes
Tablel 4. List of the recipe selection screen
Current recipe preview
Pressing the opens the recipe preview screens
Pic.17 Recipe preview screen 1

Operation manual SR5February 2018 Page 19
Pic.20 Recipe preview screen
The
allow the operator to switch between the screens
– opens the recipe selection screen
– saves the recipe under a selected name
Pic.21 Recipe saving screen
Operation manual SR5February 2018 Page 20
In order to change the power of the burner and exhaust fan for the selected temperature the operator needs to press the appropriate field and enter the requested value.
The Collective edition field, that is located on the Recipe preview screen 4 helps to speed up making of the changes.
Pic.22 Collective edition field
The Collective edition field allows the operator to make changes in the recipe in the selected range of temperatures. First the operator needs to input the range of the temperatures in which the changes should be made, than the desired values of the burner power and the exhaust fan power need to be input in the fields under the mentioned symbols. After that, the button needs to be pressed in order to save the changes.
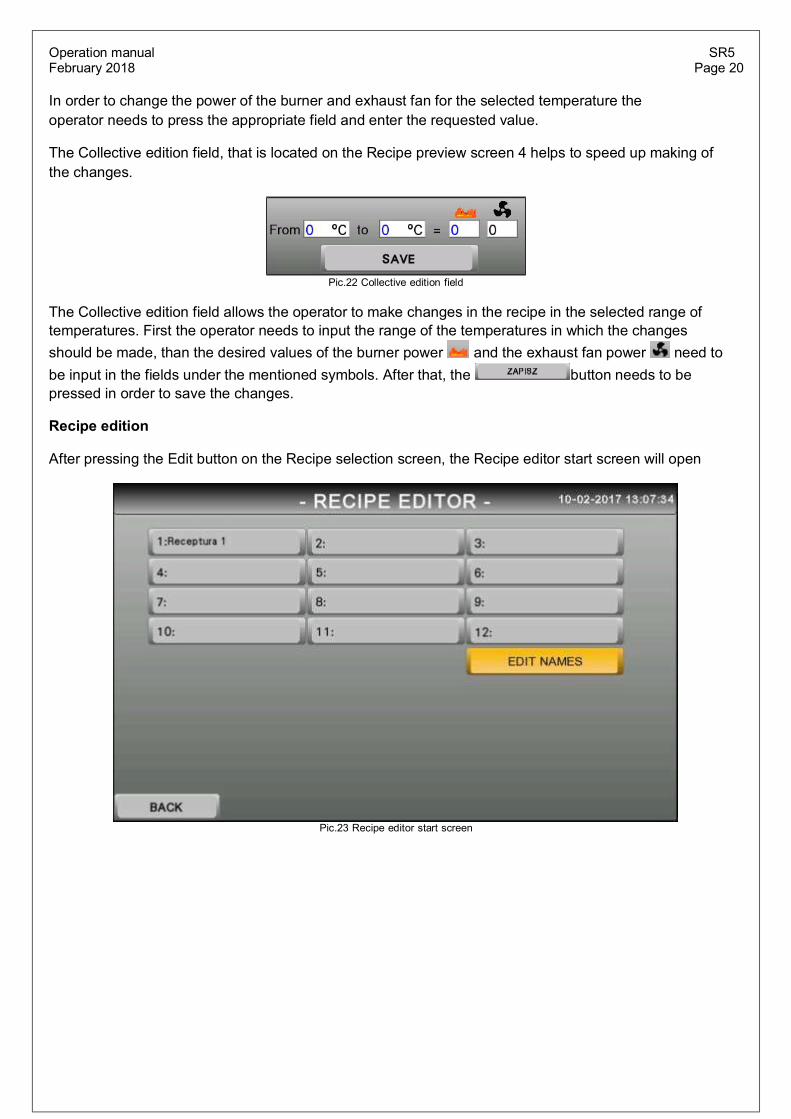
Recipe edition
After pressing the Edit button on the Recipe selection screen, the Recipe editor start screen will open
Pic.23 Recipe editor start screen

Operation manual SR5February 2018 Page 21
Pic.24 Recipe edition screen 1
Pic.25 Recipe edition screen 2

Operation manual SR5February 2018 Page 22
Pic.26 Recipe edition screen 3
Pic.27 Recipe edition screen 4
In order to change the power of the burner and exhaust fan for the selected temperature the operator needs to press the appropriate field and enter the requested value.

Operation manual SR5February 2018 Page 23
The Collective edition field, that is located on the Recipe preview screen 4 helps to speed up making of the changes.
Pic.28 Collective edition field
The Collective edition field allows the operator to make changes in the recipe in the selected range of temperatures. First the operator needs to input the range of the temperatures in which the changes should be made, than the desired values of the burner power and the exhaust fan power need to be input in the fields under the mentioned symbols. After that, the button needs to be pressed in order to save the changes.
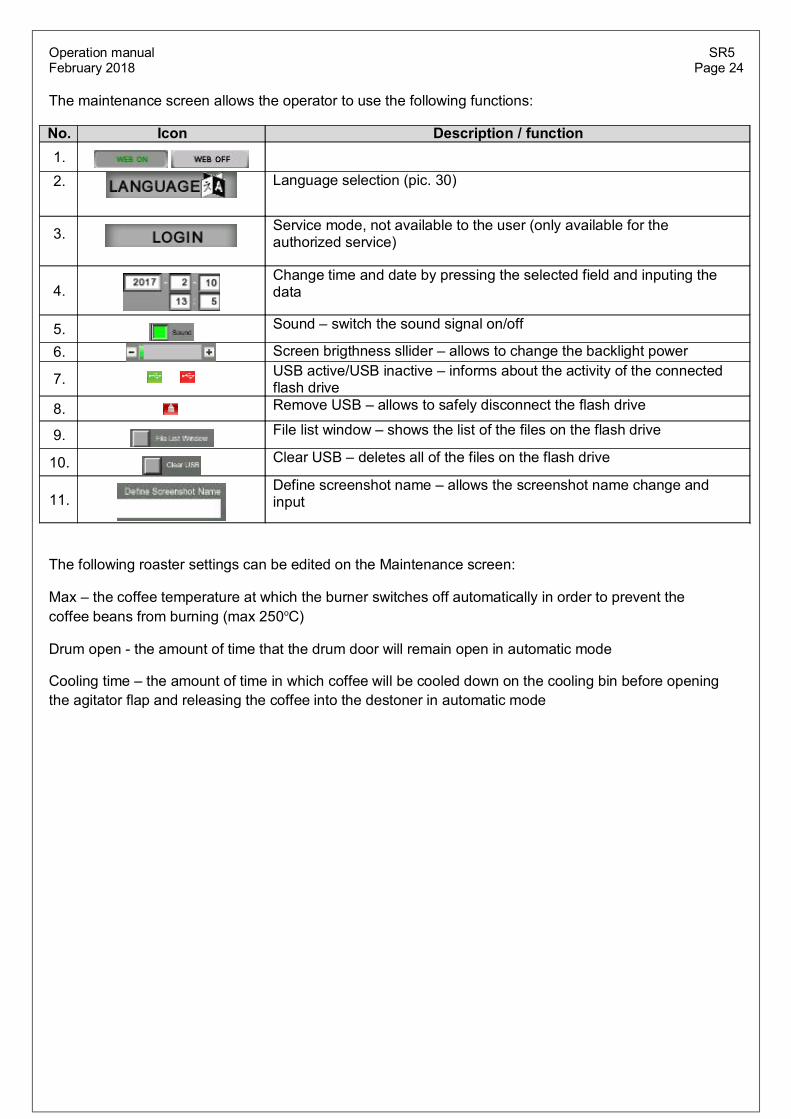
Maintenance screen
Pic.29 Maintenance screen
Operation manual SR5February 2018 Page 24
The maintenance screen allows the operator to use the following functions:
No. Icon Description / function1. 2. Language selection (pic. 30)
3. Service mode, not available to the user (only available for the authorized service)
4.Change time and date by pressing the selected field and inputing the data
5. Sound – switch the sound signal on/off
6. Screen brigthness sllider – allows to change the backlight power
7. USB active/USB inactive – informs about the activity of the connected flash drive
8. Remove USB – allows to safely disconnect the flash drive
9. File list window – shows the list of the files on the flash drive
10. Clear USB – deletes all of the files on the flash drive
11.Define screenshot name – allows the screenshot name change and input
The following roaster settings can be edited on the Maintenance screen:
Max – the coffee temperature at which the burner switches off automatically in order to prevent the coffee beans from burning (max 250oC)
Drum open - the amount of time that the drum door will remain open in automatic mode
Cooling time – the amount of time in which coffee will be cooled down on the cooling bin before opening the agitator flap and releasing the coffee into the destoner in automatic mode

Operation manual SR5February 2018 Page 25
Faults and errors screen
Pic..31 Faults and errors screen
The Faults and errors screen shows messages related with faults and errors, that cause the SR5 coffee roasting line to work incorrectly. On the screen there are the following buttons:


Operation manual SR5February 2018 Page 27
F24 "Escape" active! Press the error reset button on the control panel
F25 Inverter fault. Check the 4U1, 5U1, 6U1, 7U1 inverters
Manual roasting mode
Table 4. List of faults and errors
The SR5 coffee roasting line is operated using the the control panel. All the control elements are located on the Console (Pic.9).The following steps need to be undertaken in order to produce roasted coffee in manual mode:
1. Switch on the power by turning the main power switch into the “I” position.2. Switch the roaster’s drum and exhaust fan by pressing the button.
3. Start the burner by pressing the button.4. Heat up the roaster to the desired temperature of ca. 200 oC – the temperature of the drum is showed on the roasting screen. In order to speed up this process, the exhaust fan speed needs to be lowered.5. Weigh the desired amount of green coffee (2-5kg) and pour it into top hopper (the hopper needs to be closed).6. When the temperature inside of the drum reaches the desired level open inlet flap and release the green coffee into the roaster’s drum.7. Roast the coffee, the speed of the process is related with the burner power, drum speed and the exhaust fan speed – adjust them accordingly. The target temperature of the coffee should be ca. 180-215 oC depending on the green coffee beans type and the desired color level/taste of the coffee. Duringthe roasting phase the next batch of green coffee can be already transported to the top hopper (as in points 5- 6).8. When the coffee is close to the desired roast outcome, switch the cooling bin arms and fan on by pressing the button.9. Dump the coffee into the cooling bin by pressing the button.10. The cooling of the coffee takes up ca. 5 minutes. During the cooling phase the next batch can beput inside of the roaster’s drum to be roasted (as in points 7-8).11. Prepare a container and release the roasted coffee.

Operation manual SR5February 2018 Page 28
4. SERVICE AND MAINTENANCE
The following service and maintenance steps need to be undertaken, in order to ensure a fault free workflow of the SR5 coffee roasting line.
Every 80 hoursChecking the transmission elementsChecking if the flaps and other moving elements are working properly Cleaning and greasing the moving elements
Every 160 hoursChecking that the emergency stop buttons work properly Controlling the temperature indication elementsChecking and cleaning the green coffee loaderVisual control of the electrical cabinet
Installation checkActivities performed by persons with the required qualifications and if the regulations do not specify exactly the time period, not less often than once a year
Electrical installation - checking the short circuit loop and insulation resistance of the power cord
Gas installation - checking the gas system's tightness and correct functioning of the flame control and ignition system
Lubrication of moving partsMain bearing should be greased with special temperature resistant grease. After removing the front cover of the bearing the operator should grease the bearing and then put the cover back in its place.
Greas that should be used: HT2 - STATOIL (up to: 230st.C)
WARNING:
It is very important to remember about cleaning chaff cyclone container, placed under the cyclone.Cleaning should be made after 5-7 batches of roasted coffee (depends on quality of coffee beans). Burner chamber is supposed to be cleaned – operator getting access to this place by sliding the side latches with COFFED logo or customer logo.Place under drum is supposed to catch coffee particles, which fall into gap between drum and front body. In case of roasting broken coffee beans or very small coffee beans, this place should be cleaned more often.Cleaning lower body, under cooling bin should be done by sliding right side latch and collecting pollutions.Cleaning burner filter should be done by blowing compressed air. In cleaned, low-pollinated, places it should be done once per 3 month. In industrial halls, where pollination is higher, this should be done once per month.
All things connected with cleaning machine should be customized to amount of roasted coffee and working hours.
TROUBLESHOOTING
The SR5 coffee roasting line will not work due to the emergency switch being pressed, a defect or inappropriate regulation.
Operation manual SR5February 2018 Page 29
The machine has stoppedThe safety devices included are two EMERGENCY STOP buttons and a MAIN SWITCH. Each of them allows the machine to be shut down at any time during operation.If the machine has stopped, check if the EMERGENCY STOP button has not been pressed or that the power supply has not been interrupted.
Stopping of one of the motors and / or lack of response to the control systemAfter determining which motor has stopped or cannot be switched on, check the safety devices. They are located in the electrical cabinet.Check whether any of the overcurrent switches (Q) and / or the thermal triggers have tripped. If you have not noticed any problems with the above mentioned electrical devices, check the control system and diagnose the cause of the fault.
WARNING!All work carried out on components powered by 400V AC must be performed by a qualified person.
The burner does not igniteCheck if the gas flows into the system and then whether the ignition system is working properly or not.
The burner flame keeps fadingThis can be a sign of gas interruptions, insufficient pressure or malfunction of the flame control system. First check the gas supply of the burner.
Perceptible gas smellAs soon as the personnel handling the appliance smells the gas, immediately switch off the appliance with a main switch and ventilate the room. In the event that these actions do not work, close the main gas valve on the power supply of the device and call the person having the required authority and equipment to check the gas system tightness.
Abnormal sounds in the mechanical systemDetermine where the sounds come from during operation, and then check that there are no malfunctions requiring immediate intervention.
REPAIRS
Before any interference in the device, turn off the power. Repairs should be carried out by personnel of the appropriate knowledge and, if required authorisations. When replacing used items, new parts must be used. It is permissible to use alternatives of other manufacturers, where they are identical parts in principle of operation and dimensions.
WARNING!It is unacceptable to perform any modifications on the SR5 coffee roasting line.Any modification of the device will result in the loss of warranty and liability of Coffed Private Limited Company.

Operation manual SR5February 2018 Page 30
DISPOSAL AND NEUTRALIZATION
At the end of its service life, the old appliance must be disposed of in accordance with the applicable national regulations. We recommend contacting a specialist company or contacting the disposal unit in the municipality.
WARNING!
To prevent possible misuse and related hazards, ensure that the SR5 coffee roasting line can be used again before disposal. To do this, disconnect the device from the power supply and cut off the power cord.
TIP!
When disposing of the device, follow the appropriate national or regional regulations