operating manual - bauer-at.com · pdf filein compliance with the present operating manual. in...
TRANSCRIPT

OPERATING MANUAL
for
Submersible Motor Mixer
MSXH
Version: I - 2015

Operating Manual for BAUER Submersible Mixer/ Version I-2015 2
Introduction
Thank you very much for purchasing a BAUER submersible motor mixer!
We take pleasure in presenting to you a BAUER submersible motor mixer that features state-of-the-art
technology and top quality. This manual describes how to operate and maintain your BAUER submersible motor
mixer. For reasons of clarity and due to the many options, this manual does not contain everything down to the last detail. In particular, it cannot possibly deal with every conceivable aspect of operation and maintenance. If you need further information or if you are faced with any special problem for which this manual does not give
sufficient details, please do not hesitate to contact BAUER company at Kowaldstraße 2, A-8570 Voitsberg for the information you need. Please note that the contents of this operating manual do neither form part of nor alter in any way any previous or
existing agreement, promise or legal relationship. Commitments on the part of BAUER are based solely on the respective purchase contract, which also contains the complete and only valid warranty arrangement. Said contractual terms of warranty are neither extended nor limited by the contents of the present operating manual. All information contained in the present manual is based on the latest product details available at the time of printing.
BAUER reserves the right to change without notice, without assuming any liability!
BAUER submersible motor mixers are designed for safe and reliable performance provided they are operated in compliance with the present operating manual. In spite of the simplicity of the mixer we therefore request that
you read this manual carefully before putting your BAUER submersible motor mixer into operation! All instructions given for handling, operating and servicing the mixer must be strictly observed. On condition that these instructions are followed the mixer will operate trouble-free to your full satisfaction for many years! Non-observance of our instructions may cause personal injury or damage to the equipment!
Please make this manual available to your operating personnel. You are kindly requested to state the mixer type and serial number of the submersible motor mixer in all inquiries, correspondence, warranty problems or parts orders. These details are specified on the nameplate.
We hope you will enjoy working with your BAUER submersible motor mixer!
This operating manual is considered an integral part of the submersible motor mixer. Suppliers of new and used submersible motor mixers are advised to put down in writing that this manual was handed over together with the mixer.

Operating Manual for BAUER Submersible Motor Mixer / Version l-2015 3
PRODUCT DETAILS
Type designation: Submersible motor mixer
Type number: MSXH
Serial number1 :
Dealer: Name:
Address:
Tel./Fax:
Date of delivery:
Manufacturer: Röhren- und Pumpenwerk BAUER Ges.m.b.H. Kowaldstr. 2 A - 8570 Voitsberg Tel.: +43 3142 200 - 0 Fax: +43 3142 200 –320 /-340 e-mail: [email protected]
www.bauer-at.com
Owner or operator: Name:
Address:
Tel. / Fax:
Note: Please make a note of the type and serial number of your submersible motor mixer and its accessories! Be sure to specify these details every time you contact your dealer.
1 In all warranty claims and correspondence relating to this machine it is essential to specify the complete serial
number group including all letters. This applies to the machine itself and to any components involved. We cannot emphasise this point often enough.

Operating Manual for BAUER Submersible Mixer/ Version I-2015 4
General safety instructions
Symbols and terms
The CE symbol that has to be affixed on the machine by the manufacturer outwardly demonstrates compliance of the machine with the directives for machines and other relevant EU directives.
This “Warning” symbol refers to important safety instructions in this manual. Whenever you see this symbol be aware of possible injury hazards. Read the note following the symbol very carefully and inform the other operators accordingly.
CAUTION ! Non-observance of this instruction may cause damage to or destroy the machine or individual components.
It is important to observe this note or condition!
This symbol is a “WARNING from dangerous voltage“
NON-OBSERVANCE may cause electric shock with harmful or even fatal consequences for the operator.
Qualified operators are persons who on account of their training, experience and instruction as well as their
knowledge of relevant standards, rules, precautions to be taken for accident prevention and operating conditions,
have been authorised by the person in charge of plant safety to perform the individual tasks required, and in doing
so are able to recognise and avoid potential hazards. Among other things, knowledge of first-aid procedures is
also required.
WARNING!
NOTE

Operating Manual for BAUER Submersible Motor Mixer / Version l-2015 5
Product liability
As defined by the product liability law every farmer is also an entrepreneur!
According to §9 PHG (Product Liability Law), liability for damage to corporal things caused by defective products is expressly
excluded. This exclusion of liability also applies to parts not manufactured by BAUER itself but purchased from external
suppliers.
Non-conforming use will make expire the validity of the conformity certificate.
Duty to furnish information
Even if the customer passes on the machine later-on he is obliged to hand the operating manual on to the new
receiver too. The receiver of the machine must be instructed with reference to the mentioned regulations.
Intended Use
BAUER submersible motor mixers are built exclusively for normal use in agricultural applications, industrial
facilities and biogas plants (intended use).
Any use beyond such normal use is considered non-conforming. The manufacturer is not liable for damage
resulting from such non-conforming use, the sole liability for damage from non-conforming use lies with the
user.
Intended use also includes compliance with the manufacturer’s operating, maintenance and service
instructions.
The manufacturer’s operating and maintenance instructions do not regard local security provisions.
The BAUER submersible motor mixer may be used and operated only by persons who are familiar with the
device and aware of the hazards involved.
All rules relevant for accident prevention as well as any other generally valid specifications and regulations
relating to safety, work medicine and traffic law must be strictly observed.
Unauthorised modification of the machine releases the manufacturer from liability for damage resulting there
from.

Operating Manual for BAUER Submersible Mixer/ Version I-2015 6
Index
1 GENERAL INSTRUCTIONS FOR SAFETY AND ACCIDENT PREVENTION .......................................... 7
2 GENERAL ..................................................................................................................................................... 12
3 DESCRIPTION .............................................................................................................................................. 12
4 MOUNTING INSTRUCTIONS ....................................................................................................................... 13
4.1 MOUNTING OF GUIDE TUBE AND GUIDE TUBE BRACKET .............................................................. 13 4.1.1 Reinforced Lift Pole .......................................................................................................................................... 13
4.2 MOUNTING OF CANTILEVER ARM AND WINCH ................................................................................ 13 4.3 MOUNTING OF MIXER .......................................................................................................................... 14 4.4 MOUNTING OF ROPE ........................................................................................................................... 14
5 ELECTRICAL CONNECTION ....................................................................................................................... 15
6 PUTTING INTO OPERATION ....................................................................................................................... 16
6.1 MANUAL OPERATION ........................................................................................................................... 17 6.1.1 Control Box Components .................................................................................................................................. 17 6.1.2 Controls ............................................................................................................................................................. 17 6.1.3 Connections ....................................................................................................................................................... 17 6.1.4 Settings .............................................................................................................................................................. 17 6.1.5 Operation .......................................................................................................................................................... 17 6.1.6 Malfunctions ...................................................................................................................................................... 18 6.1.7 Safety instructions ............................................................................................................................................. 18
6.2 INTERVAL OPERATION ........................................................................................................................ 18 6.2.1 Control Box Components .................................................................................................................................. 18 6.2.2 Initial operation of timer logo ........................................................................................................................... 19
6.3 INTERVAL OPERATION AND LEVEL CONTROL FOR EXPLOSIVE ENVIRONMENT ....................... 25 6.3.1 Control Box Components .................................................................................................................................. 25 6.3.2 Control elements ............................................................................................................................................... 26 6.3.3 Connections ....................................................................................................................................................... 26 6.3.4 Settings .............................................................................................................................................................. 26 6.3.5 Start-up .............................................................................................................................................................. 26 6.3.6 Malfunctions ...................................................................................................................................................... 27 6.3.7 Safety instructions ............................................................................................................................................. 28
7 MAINTENANCE ............................................................................................................................................ 37
8 TROUBLE-SHOOTING ................................................................................................................................. 39
9 TECHNICAL DATA 400V/50 HZ ................................................................................................................... 40
10 TECHNICAL DATA USA 480 V/60HZ ........................................................................................................... 41
11 CONFORMITY CERTIFICATE ...................................................................................................................... 53

Operating Manual for BAUER Submersible Motor Mixer / Version l-2015 7
1 GENERAL INSTRUCTIONS FOR SAFETY AND
ACCIDENT PREVENTION
Check the machine for operational safety before every start-up.
1. In addition to the instructions contained in this manual, all specifications generally valid for safety and accident
prevention must be observed, for instance when working in biogas plants: safety regulations for biogas plants!
2. The warning and instruction signs affixed to the machine give very important instructions for safe operation.
Observing them serves your own personal safety!
3. Never put the machine into operation unless all guards and safety devices are completely mounted and in their
proper working position!
4. Acquaint yourself with all equipment components and controls as well as their respective functions before
starting to work. It is too late when the device is already running!
5. The operator’s clothes should fit tightly. Avoid wearing loose clothes!
6. When handling slurry always keep in mind that the gasses produced are highly toxic and extremely explosive in
combination with oxygen. Therefore, open fires, light tests, sparking and smoking are strictly forbidden!
7. Utmost care is required with regard to gasses in slurry and dung channels at open valves to the preliminary pit,
before the main pit, or at cross channels. The same applies to mixing and withdrawal points when mixers or
pumps are running!
8. When handling slurry always ensure sufficient ventilation!
9. Keep the machine clean to avoid fire hazards!
Tractor-driven machines
1. Before starting inspect the area around the machine (Children) ! Make sure your view is unrestricted!
2. Riding on the machine during transport is forbidden!
3. Couple the machine according to instructions and fasten it only at the specified points!
4. Be especially careful when coupling the machine to the tractor or uncoupling it!
5. Always adjust the supports in the proper position when coupling or uncoupling the machine (stability)!
6. Always mount balancing weights properly at the points provided!
7. Observe restrictions pertaining to axle load, total weight, and transport dimensions!
8. Inspect and mount all items required for transport such as lighting, warning signals and possible safety
devices!
Operating Manual for BAUER Submersible Mixer/ Version I-2015 8
9. Mounted or trailed machines as well as balancing weights influence road behaviour, steering and braking
capacity. Therefore make sure that proper steering and braking are possible!
10. Consider the projection and/or centrifugal mass of the machine when driving in curves!
11. It is forbidden to stay in the working range of the machine while it is operating !
12. Keep out of the turning and swivelling range of the machine!
13. Only operate hinged hydraulic frames when nobody is in the swivel range!
14. Externally powered machines (e.g. hydraulic) bear a crushing and shearing hazard!
15. Nobody is allowed between the tractor and the implement unless the tractor is secured by the parking brake
and /or by wheel chocks
16. Hinged supports must always be folded up and secured before driving away!
17. Secure the machine and the tractor against rolling!
Tractor-mounted machines:
1. Before a machine is linked to or detached from the three-point linkage, the control device must be shifted to a
position in which unintentional lifting or lowering is impossible!
2. When using the three-point linkage the linkage parameters of both tractor and attached machine must
correspond, if not, they have to be matched accordingly!
3. The three-point linkage bears crushing and shearing hazards!
4. When operating the external control of the three-point linkage never step in-between tractor and the machine!
5. When the machine is in the transport position always make sure that the tractor’s links are always properly
secured on the sides.
6. When driving on the road with the machine lifted the control lever must be locked against lowering!
Trailed machines
1. When a machine is coupled to the draw bar make sure that the coupling point provides sufficient flexibility!

Operating Manual for BAUER Submersible Motor Mixer / Version l-2015 9
Power take-off (applies only to PTO driven machines)
1. It is not allowed to use any other types of PTO drive shafts except those prescribed by the manufacturer!
2. Drive shaft guard tube and guard cone as well as the PTO guard – also on the machine side - must be
mounted and in good working order!
3. When using a PTO drive shaft always observe the specified overlap in transport and working position!
4. Never connect or disconnect the PTO drive shaft unless the PTO is stopped, the engine turned off, and the
ignition key pulled out!
5. Make sure the drive shaft is always connected and secured properly!
6. Attach safety chain to keep the drive shaft guard from rotating with the shaft!
7. Before you turn on the PTO make sure that the selected tractor PTO speed corresponds with the permissible
implement speed!
8. Before starting the PTO make sure that nobody is standing in the danger zone of the machine!
9. Never turn on the PTO when the engine is turned off or during a transport drive!
10. When working with the PTO nobody is allowed near the turning PTO or drive shaft!
11. Warning! The PTO shaft may continue turning due to its centrifugal mass after the PTO has been turned off!
Keep clear of the machine during this time and do not touch until the PTO shaft stands absolutely still!
12. For cleaning, greasing, or adjusting the PTO driven implement or drive shaft, PTO and engine must be
switched off and the ignition key pulled out!
13. Place the disconnected drive shaft on the provided support!
14. When drive shaft has been removed put the guard on the PTO shaft!
15. If a defect occurs repair it immediately before starting to work with the machine!

Operating Manual for BAUER Submersible Mixer/ Version I-2015 10
Hydraulic system
1. Hydraulic system is under high pressure!
2. When connecting hydraulic cylinders and motors, make sure the hydraulic hoses are connected as specified!
3. Before coupling the hydraulic hoses with the tractor’s hydraulic system make sure that the entire hydraulic
system is pressureless both on the tractor and implement side !
4. Inspect the hydraulic lines at regular intervals and replace them immediately in case of defects or aging.
Replaced hoses must comply with the technical specifications of the implement manufacturer!
5. When looking for leaks use only suitable equipment because of the injury hazard involved!
6. Liquids emerging under high pressure (hydraulic oil) may penetrate the skin and cause serious injuries! An
injured person must see a doctor immediately! Danger of infection!
7. Before working on the hydraulic system the machine must be lowered, the system depressurised and the
engine turned off!
Electric-driven implements
1. All work beyond normal maintenance of the implement should be performed only by a professional electrician!
2. Defective or broken plugs and sockets must be replaced by a professional electrician!
3. Never pull a plug out of the socket at the flexible electric cord!
4. Extension cables for power supply should be used only temporarily! Never use such lines permanently as a
substitute for the required fixed installations!
5. Flexible lines laid across traffic areas on the farm must have at least 5 m ground clearance!
6. Always turn off the power supply before you do any work on the machine!
7. Check all electric lines for visible defects before you put the machine into operation! Replace defective cables
and do not start the machine before that!
8. Never use electric-driven implements in damp locations or locations exposed to fire hazard unless the
machines have been adequately protected against moisture and dust!
9. Covering electric motors may cause heat concentration with high temperatures which could destroy the
operating equipment and cause fires!

Operating Manual for BAUER Submersible Motor Mixer / Version l-2015 11
Hand-operated devices (valves) 1. Because of the slurry gasses produced in the lines, no slurry is allowed to remain in closed pipelines – bursting
hazard!
2. Lay the pipelines with sufficient inclination and make sure that the selected closing order of valves allows all
lines to be drained completely!
3. Protect the valves against unauthorised handling!
4. If a valve gets jammed do not apply force! Use only the operating levers supplied with the implement!
5. Observe the permissible maximum operating pressure of valves and pipelines when pumps are operated!
6. Service only when the tanks are empty!
Maintenance
1. Never perform any maintenance, service, cleaning or repair work unless the drive is turned off and the engine
is standing still!
2. Check proper fit of all nuts and bolts regularly and tighten them, if necessary.
3. If maintenance work is required on the lifted machine always secure it by means of appropriate supports!
4. When exchanging tools with cutting edges always use proper tools and wear safe protective gloves.
5. Dispose of oil, grease and filters according to local laws and regulations!
6. Always turn off power before working on the electric system (safety regulations according to
ÖVE EN 50110-1).
7. Spare parts must meet manufacturer’s minimum technical specifications! This is the case for instance with
original spare parts!

Operating Manual for BAUER Submersible Mixer/ Version I-2015 12
2 GENERAL BAUER products are designed and manufactured carefully and subject to a system of continuous quality control. The submersible motor mixers fully meet the requirements of the agricultural practice and of biogas plants. They are best suited for homogenizing all kinds of slurries from thin liquid manure to viscous mixtures containing solids such as straw, fibres or clots. Short set-up times, easy handling and maximum performance reliability are further advantages of this mixer series. Mixer drive is electric by means of a three-phase submersible motor. Before turning on a submersible motor mixer make sure net voltage complies with the data on the nameplate. In order to be able to work efficiently with the maintenance-friendly submersible motor mixer it is helpful to operate it in connection with a hoisting device. Although the mixer is simple in design you should study this manual carefully and strictly observe all operating and service instructions contained. On this condition your motor mixer will operate to your full satisfaction for many years! Make this manual available to all operators handling the equipment. Serial number and mixer type are stamped into the nameplate. Please specify these data in your inquiries, correspondence, warranty matters and parts orders. We warrant for this pump according to our General Terms of Sale.
3 DESCRIPTION The submersible motor mixer consists of a three-phase submersible motor with connecting cable, oil chamber, the planetary gear drive and the propeller. The electric motor has an output of 7.5, 11 or 15 kW, depending on the respective model. The motor is equipped with PTC thermistor detectors to protect it from overheating. Yet the motor protection will only be effective if the motor connecting cable is linked up not only with a star-delta starter but also with a suitable thermistor tripping device. Thus the motor is protected from phase failure, undervoltage and high thermal load. The control box that is available as part of the motor accessories, includes not only the starting contactor but also the thermistor tripping device. The red warning light lights up when the thermistor tripping device has responded.
NOTE!
The motor cable should be mounted to the control box only by a qualified technician. Check-up must be performed according to the wiring diagram! The wiring diagram is placed inside the control box. The control box must be tightly screwed and should preferably be installed under a roof where it is protected from the weather.
When connecting the system to power supply ensure the connecting cable is amply dimensioned and the turning direction of the motor is correct.
The motor is sealed by two mechanical seals mounted in series which are lubricated by the oil contained in the oil chamber. The bearing of the THREE-PHASE SUBMERSIBLE MOTOR is life-lubricated. The submersible motor mixer MSXH is equipped with a leak detector which is only effective together with a relay mounted into the control box. (see chapter Accessories - Bauer Control Unit)
WARNING!
G
G
Operating Manual for BAUER Submersible Motor Mixer / Version l-2015 13
4 MOUNTING INSTRUCTIONS
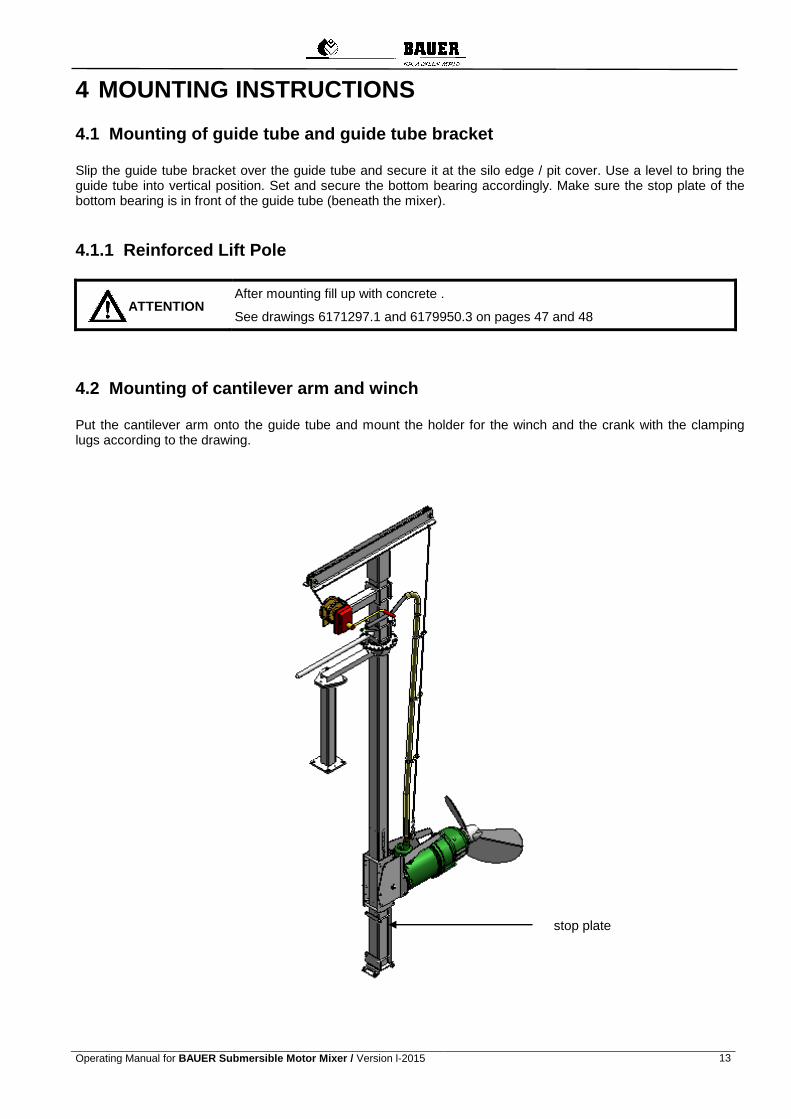
4.1 Mounting of guide tube and guide tube bracket Slip the guide tube bracket over the guide tube and secure it at the silo edge / pit cover. Use a level to bring the guide tube into vertical position. Set and secure the bottom bearing accordingly. Make sure the stop plate of the bottom bearing is in front of the guide tube (beneath the mixer).
4.1.1 Reinforced Lift Pole
After mounting fill up with concrete .
See drawings 6171297.1 and 6179950.3 on pages 47 and 48
4.2 Mounting of cantilever arm and winch Put the cantilever arm onto the guide tube and mount the holder for the winch and the crank with the clamping lugs according to the drawing.
stop plate
ATTENTION
!

Operating Manual for BAUER Submersible Mixer/ Version I-2015 14
4.3 Mounting of mixer Put the rope over the rope pulleys and attach its thimble at the mixer console. Use the winch to bring the mixer into a position under the guide tube bracket and secure the guide console at the bottom, behind the guide tube. By changing the position of the mixer holder the mixer can be brought into a horizontal position – or it may be slightly inclined (+/-15°). Lateral swivelling is limited by the two screw bolts affixed to the backing plate.
4.4 Mounting of rope
Wire rope clips Number of wire rope clips needed for rope diameter of 8 mm: 3 Where to fix the rope clips: First rope clip: Standard thimble: directly at the thimble Round thimble: twice the diameter of the thimble away from thimble Second and third wire rope clip: 6 times the rope diameter from clip to clip (i.e. for rope diameter of 8 mm spacing between
clips: about 48 mm) Tighten rope clips after putting rope under traction.
Make sure to mount the rope clamps correctly.
The bracket of the clip must always be put onto the end of the rope which is not under traction.
CAUTION!
thimble
6d 6d Rope end secured against ragging
richtig correct
richtig correct
max 8d
max 8d
min 6d
max 8d max 8d
min 6d
Gright fit
Gwrong fit

Operating Manual for BAUER Submersible Motor Mixer / Version l-2015 15
5 ELECTRICAL CONNECTION
The electrical connection must imperatively be carried through by an approved electrician. The three-
phase motor is protected from phase failure, low voltage and overloading by the thermal coil protection (PTC
thermistors) together with the tripping device. Upon request, Bauer supplies fully wired electrical control units
ready for connection. Weatherproof installation of the electrical control is recommended (inside a building or under
a weather-proof hood at the manure tank).
All mixers are equipped with an 8 m long electric cable (cable Ø 20 mm). The cable connection to the motor must
not be dismounted!
Fix the electric cable to the traction rope by means of a stainless bolt-snap, which enables the cable to follow
automatically lifting and lowering movements of the mixer. Attach the cable to the rope by means of the provided
rope strap about 1 m above the upper edge of the console (see drawing) in order to prevent the cable loops from
getting into the mixing propeller when lifting the mixer. Attach the upper-most bolt-snap to the backing plate.
Check cable length to make sure the cable is not under traction when the mixer is completely lowered! Take care
to place the cable in wide loops in order to prevent it from folding.
Operating Manual for BAUER Submersible Mixer/ Version I-2015 16
6 PUTTING INTO OPERATION
When the motor mixer is put into operation for the first time make sure the supply voltage complies with the
voltage specified on the motor nameplate.
Before connecting the motor check the phase sequence for the turning direction of the motor.
The motor mixer must work thrustwise.
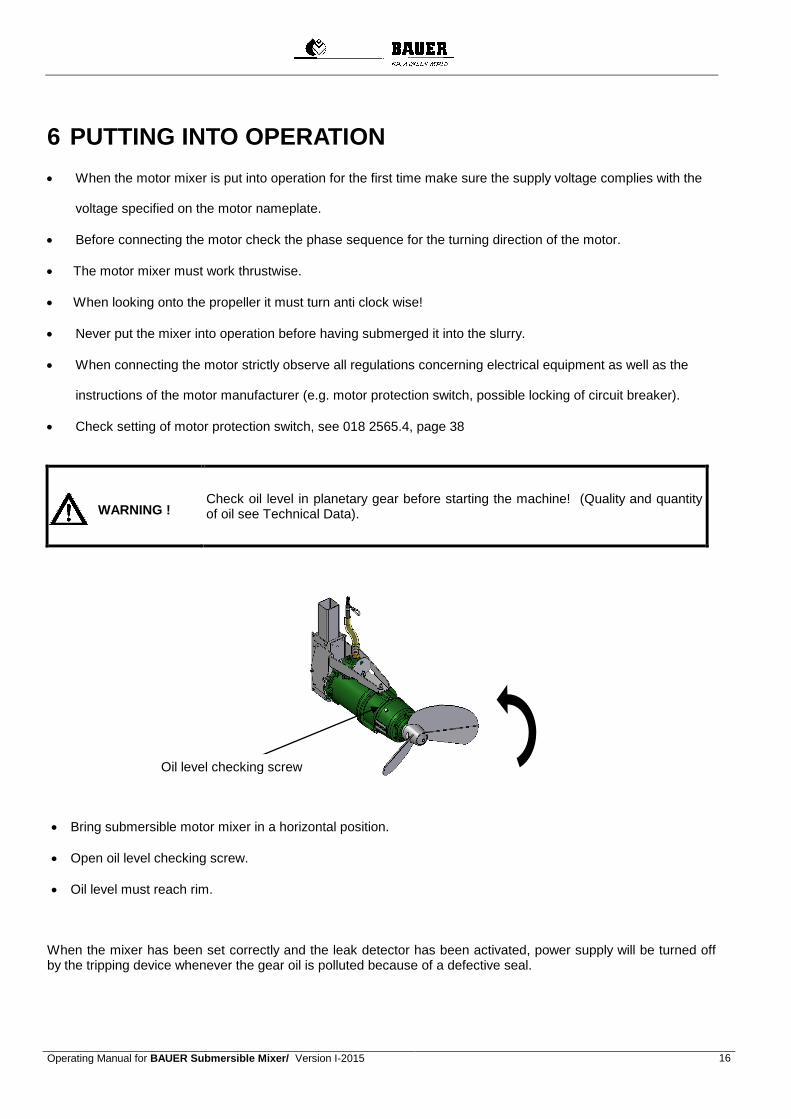
When looking onto the propeller it must turn anti clock wise!
Never put the mixer into operation before having submerged it into the slurry.
When connecting the motor strictly observe all regulations concerning electrical equipment as well as the
instructions of the motor manufacturer (e.g. motor protection switch, possible locking of circuit breaker).
Check setting of motor protection switch, see 018 2565.4, page 38
Check oil level in planetary gear before starting the machine! (Quality and quantity of oil see Technical Data).
Bring submersible motor mixer in a horizontal position.
Open oil level checking screw.
Oil level must reach rim.
When the mixer has been set correctly and the leak detector has been activated, power supply will be turned off by the tripping device whenever the gear oil is polluted because of a defective seal.
Oil level checking screw
WARNING !

Operating Manual for BAUER Submersible Motor Mixer / Version l-2015 17
6.1 Manual Operation
6.1.1 Control Box Components
Three contactors with timer for star-delta starting
Motor protection devices:
Motor protective relay for current monitoring
Thermistor tripping relay for temperature monitoring
6.1.2 Controls
Green key for motor start
Red key for motor shut-off
6.1.3 Connections
Power supply by means of 5-pole connecting cable directly attached to ingoing terminals. Motor connected to terminal strip in control box
Warning: Electrical connections to be made by approved eldctricians only! Before tunring power supply on check tight fit of all screws and terminals. Fuse protection of power supply see Technical Date page 36
6.1.4 Settings
Timer for star-delta changeover : approx. 3 seconds Motor protective relay: IN x 0.58 see drawing no. 018 2565.4 Automatic Reset
6.1.5 Operation
Press green key: the motor starts up and changes automatically from “star” to “delta” after about 3 seconds. The light of the green key is on.
Press red key: the motor stops.

Operating Manual for BAUER Submersible Mixer/ Version I-2015 18
6.1.6 Malfunctions
The red key is lighting up: The motor protection system has turned off the motor. Find the cause of the malfunction and remedy it. The light of the red key goes out.
The motor cannot be started: Check power supply: Is main switch in position “ON”? Check control voltage fuse “F3”.
6.1.7 Safety instructions
Always disconnect system from power supply before working on the starter.
6.2 INTERVAL OPERATION
6.2.1 Control Box Components
Three contactors with timer for star-delta start-up. Control unit LOGO for manual and interval operation. Motor protection devices:
Motor protecting relay
Thermistor tripping relay for temperature monitoring

Operating Manual for BAUER Submersible Motor Mixer / Version l-2015 19
BAUER Control unit LOGO with timer for interval operation
Logo programming
6.2.2 Initial operation of timer logo
Before the initial operation the control panel has to be connected correctly according to the connection diagram. Put switch „Hand 0 Intervall“ to 0. After putting on the main switch time and date are blinking on the display Date and time keep blinking until they are set.
Setting of time and date
Press key ESC The display is showing the following
Mo 15:30 2006-02-16
> Stop Set Parameter Set Prg Name

Operating Manual for BAUER Submersible Mixer/ Version I-2015 20
Confirm with key Cursor down ▼ ( 2 times ), then set Cursor > to Set Confirm with key OK (1 time ) The display is showing the following Confirm again with the key OK (1 time) The display is showing the following Confirm again with the key OK (1 time) The display is showing the following The Cursor stands blinking on weekdays
1.) Choose weekday: key ▼ or ▲ 2.) Move the Cursor: key ◄ or ► 3.) Change the value in place: key ▼ or ▲ 4.) Set the right time, repeat steps 2 and 3 5.) Set the correct date, repeat steps 2 and 3 6.) Confirm with key OK Press the key ESC for returning to the main window Date and time
> Clock Contrast Start Screen
> Set Clock S/W Time Sync
Set Clock M 10:00 YYYY-MM-DD 2005-12-31

Operating Manual for BAUER Submersible Motor Mixer / Version l-2015 21
B 9 Weekly clock timer Every weekly clock timer has three cams for adjusting (B9 / 1,2,3), where you can parameterize a time window. Set the switching point and the stop position with the cams. The weekly timer puts on the interval operation at the switching point and off at the stop position. Timing point:
Every time between 00:00 and 23:59 o´clock possible --:-- means week day not chosen
Parameterizing window
This is how the parameterizing window B9/1 looks like (factory setting) The letters behind the letter D (for day) refer to the weekdays M : Monday T : Tuesday W: Wednesday T : Thursday F : Friday S : Saturday S : Sunday The capital letter means: weekday chosen ON – means weekday not chosen
B 9 Setting of weekly timer This is how to enter timing points: Press key ESC
The display is showing the following Confirm with key ▼ and choose „Set Param“ and confirm with key OK
B9 1 D =MTWTFSS On = 22:00 Off = 04:00
>Stop Set Param Set Prg Name
Operating Manual for BAUER Submersible Mixer/ Version I-2015 22
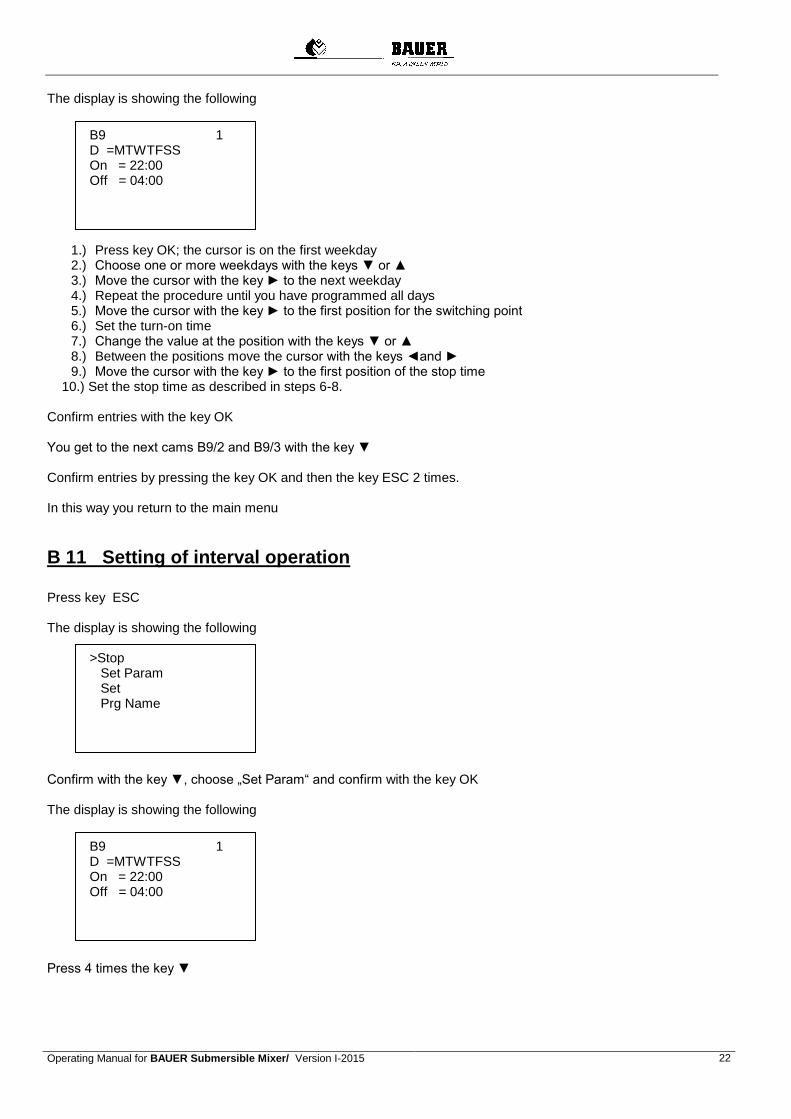
The display is showing the following
1.) Press key OK; the cursor is on the first weekday 2.) Choose one or more weekdays with the keys ▼ or ▲ 3.) Move the cursor with the key ► to the next weekday 4.) Repeat the procedure until you have programmed all days 5.) Move the cursor with the key ► to the first position for the switching point 6.) Set the turn-on time 7.) Change the value at the position with the keys ▼ or ▲ 8.) Between the positions move the cursor with the keys ◄and ► 9.) Move the cursor with the key ► to the first position of the stop time
10.) Set the stop time as described in steps 6-8. Confirm entries with the key OK You get to the next cams B9/2 and B9/3 with the key ▼ Confirm entries by pressing the key OK and then the key ESC 2 times. In this way you return to the main menu
B 11 Setting of interval operation
Press key ESC
The display is showing the following Confirm with the key ▼, choose „Set Param“ and confirm with the key OK The display is showing the following
Press 4 times the key ▼
B9 1 D =MTWTFSS On = 22:00 Off = 04:00
>Stop Set Param Set Prg Name
B9 1 D =MTWTFSS On = 22:00 Off = 04:00

Operating Manual for BAUER Submersible Motor Mixer / Version l-2015 23
The display is showing the following You can set the mixing times and pauses in the parameter B11 TH = mixing time TL = pause Ta = displays the present mixing times and pauses Factory setting TH = 10:00m TL = 05:00m Ta = 00:00m
Attention: if the weekly timer has not been programmed the interval tie is not working Press the key OK; the cursor moves to TH and stands there blinking Set the mixing time with the key ▼ or ▲ ( example 10 m ) Move the cursor to the next position with the key ► Set the mixing time with the key ▼ or ▲ ( example 00 s ) Change to time period with the key ► Set the time period with the key ▼ or ▲: s,m,h s seconds m minutes h hours Press the key ▼ and set duration of pause Set duration of pause with the keys ▼ or ▲ ( example: 05 m ) Move the cursor th the next position ► Set duration of pause with the keys ▼ or ▲ ( example: 00 s ) Confirm the entry with the key OK Press 2 times ESC for returning to the main menu
B11 TH = 10:00m TL = 05:00m Ta = 00:00m
B11 TH = 10:00m TL = 05:00m Ta = 00:00m

Operating Manual for BAUER Submersible Mixer/ Version I-2015 24
B 17 Operating hour meter
The current operating hours are shown on the display There is no need to set anything See operating hours :
Press key ESC
The display is showing the following Confirm with key ▼ , choose „Set Param“ and confirm with key OK The display is showing the following
Confirm 3 times with the key ▼
The display is showing the following
OT displays the consumed operating hours Do not change parameter MI and MN !! Press 2 times ESC for returning to the main menu
>Stop Set Param Set Prg Name
B9 1 D =MTWTFSS On = 22:00 Off = 04:00
B17 MI = 1h MN= 1h OT = 0h

Operating Manual for BAUER Submersible Motor Mixer / Version l-2015 25
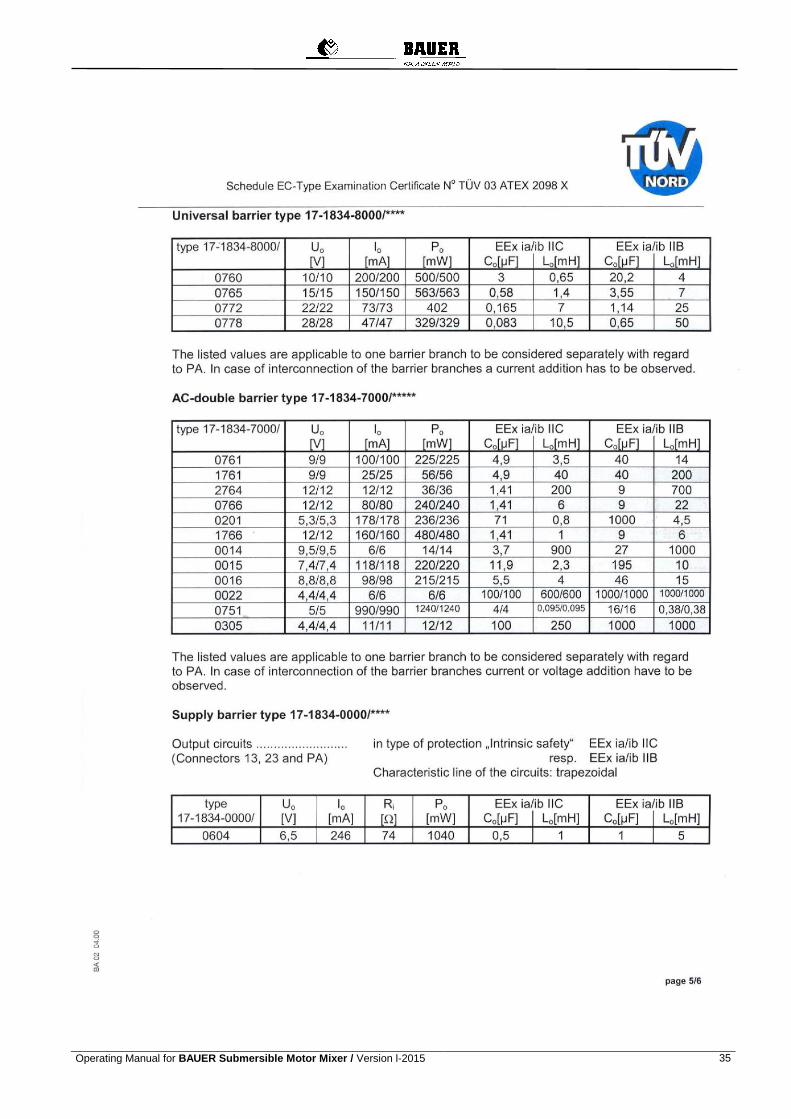
6.3 INTERVAL OPERATION AND LEVEL CONTROL for EXPLOSIVE
ENVIRONMENT Examinated according to Certificate TÜV 03 ATEX 2098 X
ATTENTION: Electrical equipment which is to be used in potentially explosive atmosphere must imperatively
be designed, executed and its installation carried through by approved and licensed firms.
Attention : Be sure to mount the control unit always outside the potentially explosive atmosphere.
6.3.1 Control Box Components
Three contactors for star-delta start-up. Control unit LOGO for interval operation. Motor protection devices:
Motor protective relay for current monitoring
Thermistor tripping relay for temperature monitoring Gear box protection devices
Leak detector for detecting leakages in planetary gear drive Safety devices for explosive environment
Electronic monitoring equipment for level control Interval operation
Siemens LOGO 230RC
Safe distance at least 5 cm for components used in potentially explosive atmosphere
Running mode switch
Reset key
Alarm probes
Leakage alarm probe Motor malfunction

Operating Manual for BAUER Submersible Mixer/ Version I-2015 26
6.3.2 Control elements
Main switch red for power supply Turn-switch black for manual or interval operation Reset key red for probe 1 Reset key red for probe 2
6.3.3 Connections
Power supply by means of 5-pole connecting cable directly attached to ingoing terminal. Mixer connected to terminal strip in control box.
Warning: Electrical connections must be carried through by approved eldctricians only! Before tunring power supply on check tight fit of all screws and terminals. Fuse protection of power supply see Technical Data
6.3.4 Settings
Motor protecting relay: see drawing no.: 018 2565.4 automatic reset (see page 38)
Interval operating: Programming by means of control unit LOGO see 6.2
6.3.5 Start-up
Main switch
Put main switch to position 1
Operating Manual for BAUER Submersible Motor Mixer / Version l-2015 27
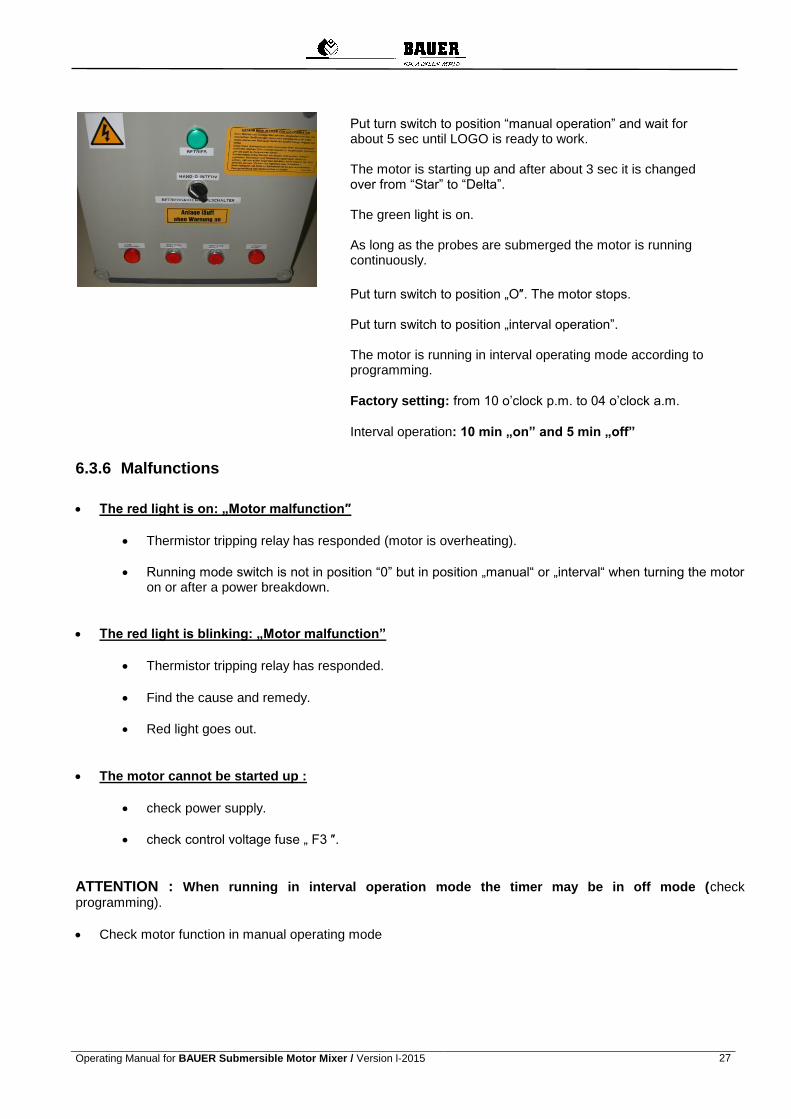
6.3.6 Malfunctions
The red light is on: „Motor malfunction″
Thermistor tripping relay has responded (motor is overheating).
Running mode switch is not in position “0” but in position „manual“ or „interval“ when turning the motor on or after a power breakdown.
The red light is blinking: „Motor malfunction”
Thermistor tripping relay has responded.
Find the cause and remedy.
Red light goes out.
The motor cannot be started up :
check power supply.
check control voltage fuse „ F3 ″.
ATTENTION : When running in interval operation mode the timer may be in off mode (check
programming).
Check motor function in manual operating mode
Put turn switch to position “manual operation” and wait for about 5 sec until LOGO is ready to work. The motor is starting up and after about 3 sec it is changed over from “Star” to “Delta”. The green light is on. As long as the probes are submerged the motor is running continuously.
Put turn switch to position „O″. The motor stops. Put turn switch to position „interval operation”. The motor is running in interval operating mode according to programming.
Factory setting: from 10 o’clock p.m. to 04 o’clock a.m.
Interval operation: 10 min „on” and 5 min „off”

Operating Manual for BAUER Submersible Mixer/ Version I-2015 28
The red light for probe 1 or 2 is on: (Note: tripping device RDA 02 has turned the motor off)
Turn the switch for mode of operation to 0
Press reset key for about 3 seconds
Red light goes out – put turn switch to the required position after 15 seconds
The motor is starting up again.
The red light „continues lightening“:
Check if
probes are really submerged
the mixer is not enough submerged
there is a loss of fluid inside the tank
Adjustment of the potentiometer for transmitting the medium not correct
Remedy the cause of the malfunction
Lower the mixer until the probes are below medium surface. Add medium. Tune the operating threshold of the potentiometer with the medium
Repeat start-up operation :
The red light of the leak detector lights up: (Note: tripping device RDA 01 has turned the motor off)
Turn the switch for mode of operation to 0
Put main switch into position „0“, wait for 5 seconds, put it back to position „1” (power supply on) (This operation comes up to a reset function of the tripping device).
If the light continues lightening check the mixer for leaks.
Adjust sensitivity
6.3.7 Safety instructions
Always shut down the power supply before working on the starter.
02

Operating Manual for BAUER Submersible Motor Mixer / Version l-2015 29

Operating Manual for BAUER Submersible Mixer/ Version I-2015 30

Operating Manual for BAUER Submersible Motor Mixer / Version l-2015 31

Operating Manual for BAUER Submersible Mixer/ Version I-2015 32

Operating Manual for BAUER Submersible Motor Mixer / Version l-2015 33

Operating Manual for BAUER Submersible Mixer/ Version I-2015 34
Operating Manual for BAUER Submersible Motor Mixer / Version l-2015 35

Operating Manual for BAUER Submersible Mixer/ Version I-2015 36

Operating Manual for BAUER Submersible Motor Mixer / Version l-2015 37
7 MAINTENANCE The wire rope is made from stainless V4A material. Nevertheless check the rope regularly and do replace it if it is worn. Incidental greasing or lubricating will increase its useful lifetime. Spray the entire rope winch (with casing) frequently with oil to protect it from corrosion. Check mixing propeller! Remove strings (cords and the like) which got entangled around the propeller. They may cause extreme vibrations thus making the motor run out of round. Whenever the mixer starts running joltingly it is absolutely necessary to clean the mixing propeller!
Before lifting, transporting or repairing the mixer always switch off power at the main switch and secure the control box from any unintentional switching. Do not touch the revolving parts of the mixer before having switched off power supply and secured the mixer from unintentional turning on. When the mixer is running it must always be fixed and engaged to the guide tube. The guide tube must be tightly clamped inside the guide tube bracket. When the mixer is running it must always be submerged in the medium for cooling the motor and gaskets. Always switch off and lock main switch when lifting the mixer. Never use the power cable in order to haul or lift the mixer!
CLEANING If the mixer will not be used for a longer time clean and rinse it thoroughly with water to prevent it from unnecessary corrosion. A crust of dried sludge on the mixer hinders cooling of the running mixer.
CABLE CHECK Check intactness of cable – is it damaged, twisted, squeezed or the like? With a damaged cable fluid may come into the mixer. Faulty parts must be replaced immediately.
CHECKING THE LIFTING DEVICE Check wear and corrosion of hoisting chains and wire ropes. Whenever there are traces of material fatigue replace affected parts immediately. Check rope winch, lifting hook and shackles as to wear or rupture and clean and lubricate at the same time. This should be done at least every six months.
!
!

Operating Manual for BAUER Submersible Mixer/ Version I-2015 38
LUBRICATION AND MAINTENANCE SCHEDULE Always turn power off when changing oil or lubricating, and secure the mixer from unintentional switching on.
Interval after 750 operating hours every six months after 2000 houres
OIL CHANGE /
OIL CHECK
First oil change: unscrew filling bolt too for complete draining. Tightening torque for filling and drain bolts: M16x1.5 = 34 NM
Remove level checking screw and check oil level and quality. (The colour of the oil must not be white!) Tightening torque for filling and drain bolts: M16x1.5 = 34 NM
Change oil Unscrew filling bolt to allow complete emptying at draining hole. Tightening torque for filling and drain bolts: M16x1.5 = 34 NM
Rope winch Clean, lubricate and check
wear
Electric cable
and general
overhauling
Tighten bolts and nuts Check wear, twisting and possible rupture. Tighten bolts and nuts.
Level control
probes
Tighten hose clips of connections
Clean and check hose connections of probes
Oil quality: SAE 90 gear oil; quantity: 6.5 l Shell Spirax S2 G 80W-90
Attention: An overpressure may be created inside the oil casing.
OIL CHANGE 1. Unscrew bolts 1, 2 and 3 2. Drain oil 3. Put back bolts 1 and 3 4. Fill in oil up to level checking screw 2 according to instructions.
5. Put back level checking screw 2.
Wrap thread of bolts and screws with teflon tape or muffle it with thread sealant before screwing to ensure absolute leak tightness.
2
1
3
1
CAUTION !

Operating Manual for BAUER Submersible Motor Mixer / Version l-2015 39
8 TROUBLE-SHOOTING Before lifting, moving or repairing the mixer always turn off main switch and secure the device from unintentional switching on.
The submersible motor mixer runs but works poorly Possible causes Check and repair
The submersible motor mixer runs backward
Check correct direction of rotation. Call electrician in case of wrong direction of rotation.
Propeller and hub are blocked up. Lift the machine. Clean propeller and hub.
The propeller is loose, worn or partly damaged.
Check tight seat and possible wear of propeller. Replace propeller if necessary.
The submersible motor mixer does not start Possible causes Check and repair
No voltage or failure in control box Check whether motor protection has responded. Check whether system voltage is available. If not, check system voltage fuse.
Rupture of motor cable Visual check. Check whether cable and other connections are faultless. Call electrician for further checks.
Propeller is blocked Check whether propeller is clean and easily moving. Clean propeller and check possible blockage inside gearbox.
If the above mentioned measures are not successful, please contact the BAUER after-sales service or a licensed workshop
The submersible motor mixer starts, but the motor protection shuts it down Possible causes Checking and repair
Faulty voltage Check voltage. L1-L2-L3 400V~ L1-N 230V~ Check feed cable fuses
Mechanical causes Check smooth working of motor, gear and propeller
Motor failure Inspection by BAUER after-sales service or by a licensed workshop

Operating Manual for BAUER Submersible Mixer/ Version I-2015 40
9 TECHNICAL DATA 400V/50 Hz
Power P [KW] 7,5 11 15
Voltage U [V] 400 400 400
Rated current I Nenn [A] 15,6 22 28,6
Speed n [min -1] 1450 1400 1450
Cosinus Phi Cos phi [1] 0,81 0,84 0,86
Frequency Frequency [Hz] 50 50 50
Protection Protection IP 68 68 68
Working temperature range +0 to +40 °C
Gearbox
Bearing of propeller shaft
Gear oil EP 680, EP 90 [lt.] 6,5 6,5 6,5
Oil name:
Transmission [i] 4,6 4,6 4,6
Propeller speed at 50 Hz [min -1] 315 304 315
Propeller Ø at 50 Hz [mm] 600 665 750
Weight [kg] 163 179 198
Feed cable fuse 25 A/C 32 A/C 50 A/C
Minimum cross section of
feed cable (depending on line
length etc.)
5X10mm² Cu5X4mm² Cu 5X6mm² Cu
taper roller bearing
Shell Spirax S2 G 80W-90
Gear Oil; conforming DIN 51517 Part3, ISO 12925-1 Type CKC, AGMA 9005-D94EP-5EP; ISO Viscosity Grade: 220

Operating Manual for BAUER Submersible Motor Mixer / Version l-2015 41
10 TECHNICAL DATA USA 480 V/60Hz
Power P [KW] 8,6 12,6 15
Voltage U [V] 480 480 480
Rated current I Nenn [A] 13 18,4 23,9
Speed n [min -1] 1740 1740 1740
Cosinus Phi Cos phi [1] 0,81 0,84 0,86
Frequency Frequency [Hz] 60 60 60
Protection Protection IP 68 68 68
Working temperature range +0 to +40 °C
Gearbox
Bearing of propeller shaft
Gear oil EP 680, EP 90 [lt.] 6,5 6,5 6,5
Oil name:
Transmission [i] 4,6 4,6 4,6
Propeller speed at 60 Hz [min -1] 378 378 378
Propeller Ø at 60 Hz [mm] 600 600 600
Weight [kg] 163 179 198
Feed cable fuse 25 A/C 32 A/C 50 A/C
Minimum cross section of
feed cable (depending on line
length etc.)
5X10mm² Cu5X4mm² Cu 5X6mm² Cu
taper roller bearing
Shell Spirax S2 G 80W-90
Gear Oil; conforming DIN 51517 Part3, ISO 12925-1 Type CKC, AGMA 9005-D94EP-5EP; ISO Viscosity Grade: 220

Operating Manual for BAUER Submersible Mixer/ Version I-2015 42
Wiring diagram 400 V 50 HZ star- delta start

Operating Manual for BAUER Submersible Motor Mixer / Version l-2015 43
Wiring diagram 400 V 50 HZ with 460 V 60HZ running delta start

Operating Manual for BAUER Submersible Mixer/ Version I-2015 44
Wiring diagram 480 V 60 HZ delta start

Operating Manual for BAUER Submersible Motor Mixer / Version l-2015 45
Lifting and lowering device
617 9916
30
°
15
°
499
180
80
100
1025
1154
29
330
44
5
69
8
44
3
300

Operating Manual for BAUER Submersible Mixer/ Version I-2015 46
617 1250

Operating Manual for BAUER Submersible Motor Mixer / Version l-2015 47

Operating Manual for BAUER Submersible Mixer/ Version I-2015 48
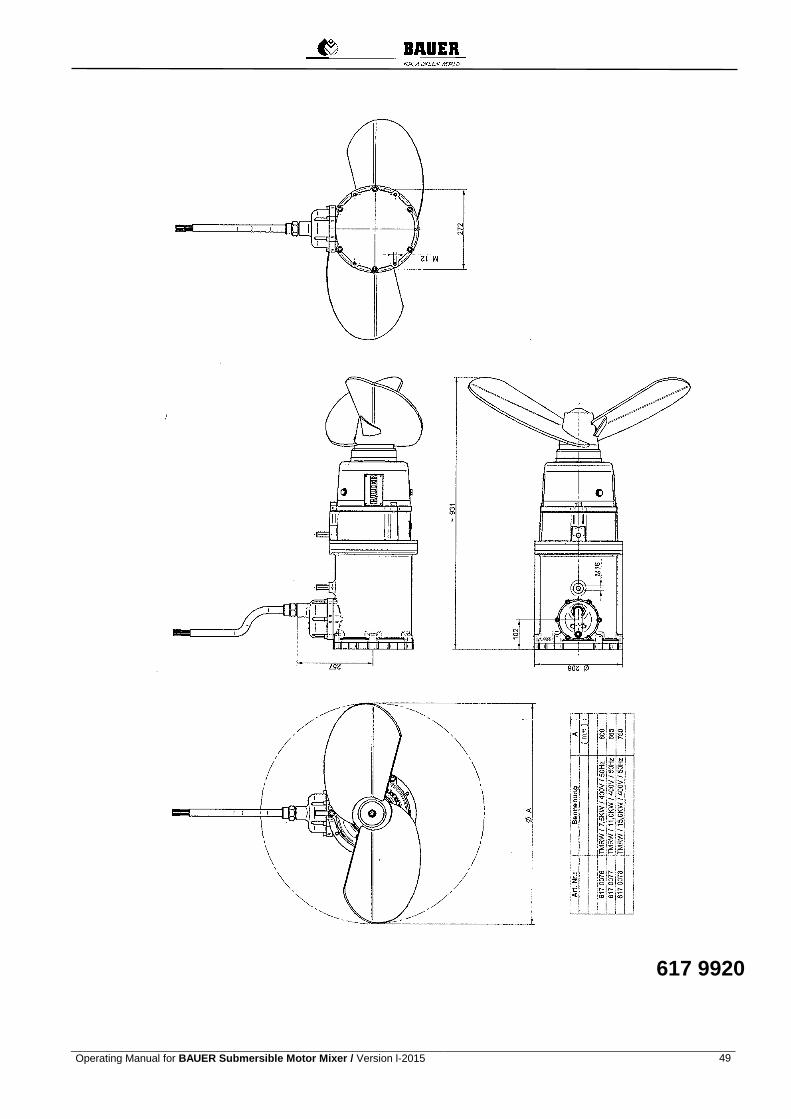
Operating Manual for BAUER Submersible Motor Mixer / Version l-2015 49
617 9920

Operating Manual for BAUER Submersible Mixer/ Version I-2015 50

Operating Manual for BAUER Submersible Motor Mixer / Version l-2015 51

Operating Manual for BAUER Submersible Mixer/ Version I-2015 52

Operating Manual for BAUER Submersible Motor Mixer / Version l-2015 53
11 CONFORMITY CERTIFICATE
EC Declaration of Conformity according to EC Directive 2006/42/EC
The manufacturer
Röhren- und Pumpenwerk BAUER Gesellschaft m.b.H. Kowaldstraße 2, 8570 Voitsberg, Austria phone +43 3142 200-0; fax: +43 3142 200-320/-340
herewith confirms that the machine component mentioned below
Designation of machine Submersible Motor Mixer MSXH
Machine type / basic units MSXH 5,5; 7,5; 11; 11 Eco; 15
Consists of Submersible Motor Mixer with Ex-Protection
corresponds analogously to the requirements of the Machinery Directive 2006/42/EC. In case of a modification of the machine not accorded with BAUER GmbH, this declaration will cease to be valid. The following standards as amended have been applied analogously:
DIN EN ISO 12100-1 Safety of machines – Basic concepts, general principles for design, Part 1: Basic terminology, metodology
DIN EN ISO 12100-2 Safety of machines – Basic concepts, general principles for design, Part 2: Technical principles and specfications
DIN EN 60204-1 Safety of machines - Electrical equipment of machines, Part 1: General requirements EN ISO 14121-1 Safety of machines – Risk assessment
Norms related to products EN ISO 13857 Safety of machines, safety clearance to secure no touching hazard area with
upper extremities. DIN EN 349 Safety of machine, minimum clearance to avoid crushing body parts DIN EN 809 Pumps and pump units for liquids - Common safety requirements The documents belonging to the machine according to annex VII, part B have been attached. The machine component must not be put into operation unless it has been proven that the machine where the machine component shall be installed, corresponds to the regulations of the EC Machinery Directive (2006/42/EC). The CE mark is applied by the operator as final manufacturer. Person in charge of documentation: Thomas Theissl, Kowaldstraße 2, 8570 Voitsberg, Austria, Technical Designer in Charge Commercial Manager