online, day 9, 10, 11, 12 observation portrait drawing
TRANSCRIPT

Art I eLearning Lesson Project
Art I – Online, Day 9, 10, 11, & 12
OBSERVATION PORTRAIT DRAWING AC Flora Grades: 9-12 Instructors: Conway, Swanson & Williams
Standard(s) Anchor Standard 1: I can use the elements and principles of art to create artwork. Anchor Standard 2: I can use different materials, techniques, and processes to make art. Anchor Standard 3: I can improve and complete an artistic artwork using the elements and principles. Anchor Standard 4: I can organize work for presentation and documentation to reflect specific content, ideas, skills, or media. Anchor Standard 5: I can interpret and evaluate the meaning of an artwork. Anchor Standard 6: I can identify and examine the role of the visual arts through history and world cultures.
Learning Targets/ I Can Statements
VA.CR.IH.1: I can analyze art through a critique and refine my artwork based on given criteria. VA.CR.IH.1.2: I can make revisions based on suggestions given. VA.CR.IH.2: I can select, and use a variety of art materials, techniques and processes to solve an artistic problem. VA.CR. IH. 2.2: I can explore art making techniques to solve and identify problems.
VA.P.IH. 3: I can use the artistic process of planning, reflecting, and revising to develop my artwork. VA.P.IH.3.2: I can make revisions based on given criteria using elements and principles of art. VA.R.IH.5: I can analyze the intention of the artist and explore how the artwork relates to other ideas. VA.R.IH.5.1: I can analyze and describe Symbols, Styles, or techniques in an artwork to suggest possible messages from a culture or group. VA.R.IH.5.2: I can interpret the artist’s intent in the organization of an artwork using the elements and principles of art.

Art I eLearning Lesson Project
VA.C.IH.6: I can research and revise my work by applying visual arts concepts and characteristics from a cultural and historical time period. VA.C.IH.6.1 I can make changes to my artwork using characteristics from a culture or time period.
Essential Question(s)
The goal of this major project(s), is for students to understand the difference between drawing from life and drawing from a photograph. Students will use LINE, SHAPE, VALUE, FORM, TEXTURE, and various measuring skills to create two proportional and realistic self-portraits. When finished, students will compare and contrast their two drawings. I can use the elements and principles of art to draw my self-portrait in proper proportion from life through direct observation. I can use the elements and principles of art to draw my self-portrait from a photograph in proper proportion and better understand the difference between drawing from a photo and life.
What are the proper techniques and procedures for drawing a proportioned face?
Resources Face Patterns Handout. General Proportions Handout. Drawing the Face Handout. Classical Proportions of Face Handout. Inspiration of Kehinde Wiley Handout. The reference of classical artwork and photo you created of yourself from previous assignment ONLINE Day 6/Portraiture and the Creative Process.
Vocabulary Value: lightness and darkness. Objects that have dimensions show a range of value steps from
light to dark.
Shading: Using a pencil, adding light and dark areas, adding more pencil for the darks and less
for the lights.
Proportion: Size relationships from one part to another.
Texture: Visual and tactile qualities of a surface.
Contrast: the large difference between elements within a composition.
Chiaroscuro: an effect of contrasted light and shadow created by light falling unevenly or
from a particular direction on something.
Portrait: Artwork involving the face of someone.
Side-view portrait: Portrait showing the side of a head.

Art I eLearning Lesson Project
Frontal-view portrait: Portrait showing the front of the head, so that it is completely
symmetrical.
Subtractive: Art method where material is removed from the surface.
Additive: Art method where material is added to the surface.
Byzantine: The name for the artistic products of the Eastern Roman (Byzantine) Empire, as
well as the nations and states that inherited culturally from the empire
Background: The area of an artwork that is furthest from the viewer.
Foreground: The area of an artwork that is closest to the viewer.
Learning Activities or Experiences
Connection – Through this lesson, students explore how artists are able to translate realistic proportions using two-dimensional media. Through the time and effort put forth in this lesson, students gain confidence in their abilities and further develop their skills of drawing portraits from observation and media techniques that show them they can make realistic portraits successfully. Students will draw themselves from observation looking in a mirror, and from photographs, they created from a historical perspective, and compare and contrast the two methods. They will learn how to self-analyze (critique) their own works for accuracy and use of Elements/Principles of Art to communicate their intent. Review – Students will review the previous online assignments handouts in preparation for this lesson, especially the proper proportions of the face, so they can use this knowledge as they draw from observation from life and working from the photo. Application of Assignment
This Lesson is in TWO PARTS. The first part is drawing from life doing your own frontal self-portrait while looking in the mirror.
The SECOND PART is drawing from the photograph you created from the previous assignment.
IMPORTANT: You are being graded for completing each day’s work (20% each day). You MUST upload your work while it is in progress for feedback, failure to do so will severely affect your score (60% of your grade).
Each day, Scan or take a picture of the finished drawing and/or answers to questions. Make sure the drawing is photographed from the front in good light and it is in focus. Upload to the Assignments section on Microsoft Teams and turn in the assignment.
1. This means today (4/20/20) you are uploading your work in progress for feedback.
2. By the end of next class (4/22/20), you are uploading the finished Self-portrait drawn from life while looking in the

Art I eLearning Lesson Project
mirror.
3. By the third class (4/24/20), you are uploading answers to review/reflection questions and your work in progress working from a photo.
4. And then on (4/28/20) you are uploading your finished drawing and the answers to your conclusion questions.
PART 1 - DRAWING FROM LIFE: Students will need:
Drawing paper
Drawing pencils
Eraser(s)
A Mirror
Students will draw in graphite pencil a frontal view self-portrait from life by observing themselves looking into a mirror. The drawing should take up a majority of their 8.5”x11” drawing paper and closely follow the principles of proportions students have learned in the previous lessons and detailed instructions in handouts.
Students have to simply look from direct observation in the mirror and draw what they see. Remember to catch yourselves if you start drawing your “symbols” of an eye, nose, or mouth. Try not to label what you are drawing, just see what you are looking at for what they are –The ELEMENTS of ART – The Lines, Shapes, Forms, Textures, and Values that you see in the mirror. When you combine these ELEMENTS of ART you see in proper relationship to each other they will make YOUR FACE.
Be sure to build up your drawing gradually, starting lightly as you place your guidelines (under drawing/block-in), then using your understanding of the movement of light (chiaroscuro) on an object that students have previously learned, describe accurate values in accord to the value scale and the forms as they are in space.
PART 2 - DRAWING FROM PHOTO: Students will need:
Drawing paper
Drawing pencils
Eraser(s)
Photo they created from the previous lesson (See Above)
Classical artwork they used as inspiration for their photo
Students will draw in graphite pencil a self-portrait from the photograph they created, and refine their concept through further reflection and creative choices.
Review/Reflection – Students will view the Handout:

Art I eLearning Lesson Project
INSPIRATION OF KEHINDE WILEY, of the various examples of portraits by a classical artist in history and contemporary artist Kehinde Wiley’s “re-interpretation” of these historical works.
Students will compare and contrast the images – The historical aspects of the artwork, and the symbolic significance of both works by answering the questions for each image focusing on Composition, Posing, Backgrounds, Elements edited out or added, use of Contrast, Texture, and other Element/Principles of Art.
Students will Upload and Turn into Microsoft TEAMs their answers to these compare and contrast questions.
Students will then reflect on their initial choices related to the photo they previously created as to their intent, and how they can modify and refine these initial ideas to improve on how to communicate these thoughts to their audience in their finished drawing. Students will:
Determine how Caravaggio and Wiley used chiaroscuro in their artworks.
Analyze and evaluate student’s own works for accuracy and use of chiaroscuro.
Determine how a background can add interest and meaning to a portrait composition, and reflect on this in their own art-making.
Determine how bringing the background into the foreground can impact an artwork.
Demonstrate the process of preparing artwork for an exhibition.
Using this reflection of intent, Students will draw their final drawing on paper in graphite from their photograph. Students will develop and refine this drawing based on their artistic goals for the work.
As working from life, gradually build up your drawing, working lightly to start (Block-in), and slowly building the whole drawing.
As you work - Think about your previous experience drawing from the grid and measuring techniques (relationships), principles of perspective (space), Movement of Light (Form), Contrast (Values).
Students are now bringing all their previous Art 1 experiences together to understand the importance of using the Elements of Art – Line, Shape, Form, Value, etc., during the creative process and how the Elements of Art and Principles of Art work together to communicate the artist’s intent to their audience.
Have fun!

Art I eLearning Lesson Project
Closure – Upon completion of both drawings, students will look at both of their drawings and compare and contrast the two drawing methods. They will self-critique their work by answering the following questions:
1. Did you meet the assignment requirements? Why or why not? 2. How did you work on developing your skills of observation? 3. Do you feel your skills of observation improved during the
project(s)? Why or why not? 4. How did you work on developing your technique (craft) in this
assignment? 5. What struggles did you have and how did you work to overcome
them? 6. Do you feel you could do better if you focus more and persist
when faced with challenges in the assignment? 7. Compare and contrast the two drawing methods. How were they
the same? How were they different? Did you enjoy one more than the other? Why?

Art I eLearning Lesson Project

138

Classic Facial Proportions how to start a portrait Copy a photograph of Apollo sculpture. Use the steps below. Keep all measurement and construction lines – they are a part of the grade. Proportion refers to the relationship in size and placement between one object and another. When creating realistic portraits, it is important to get the facial proportions correct. True, there is a formula for positioning facial features. This formula should be used to help you see and compare. Classic facial proportions are the "ideal" proportions, that were developed in antiquity. In real life these measurements vary from face to face -‐ that's what makes us all different -‐ these variations is the tool for "likeness" in a portrait.. A simple way to study classical proportions -‐ is to study antique statues.
3. Find the center point and draw a horizontal line through it. This is your “eye line”. Eyes’ corners will be placed on it.
1. Start with drawing a head shape. Please note: head is not a ball – it’s more like an egg.
2. Draw a line through the middle of the face. If the head is tilted – this axis should reflect it.
4. Face is defined by a hairline at the top and a chin at the bottom. Divide face into three equal parts.
1 -‐ hairline 2 -‐ eyebrows 3 -‐ nose base 4 -‐ chin
5. Place eyes onto the “eye line”. The space between the eyes equals the size of an eye. Think this: “you could fit another eye in between your eyes”. You can also fit an entire nose into this space. The inner corners of your eyes are aligned with the outer corners of the nose.

6. A nose has 3 sides: front, left, and right. They take equal space. Divide the nose area into 3 parts.
7. Placing a mouth line is easy. Divide the bottom third of the face into three equal parts. The mouth line will go through the upper third mark. The lower third – is your chin.
8. To position the mouth corners – draw straight lines from the middle of the “eyebrow” line through the corners of the nose. Mark the mouth corners where these lines cross the mouth line.
9. The ears fit precisely within the middle third of the face.
10. There are few areas in a face that are typically darker as they get less light: 1 & 2 – under the brows, especially in the corners 3 – under the nose 4 -‐ Upper lip 5 – under the bottom lip 6 – under the chin The rest of the values vary based on the light source.
11. Start working on details now. Use your pencil as a measuring tool for correct proportions. Draw facial features carefully -‐ pay attention to the forms and shadings. 12. Use a variety of values. Note where the lightest areas are (highlights) -‐ and leave then white. Note where the darkest shadows are. The rest of the values -‐ is a range of greys.

Drawing the Face (Head) in Proportion in 10 Easy Steps
Drawing an accurate portrait appears to be difficult, but it’s really easy if you follow these basic
steps. The key to drawing portraits well, is placing the facial features in the right place, and right
size, relative to the overall shape of the head.
Just like building a house, you have to start with a good foundation. If you simplify what you are
looking at by laying out (known as “Block-in”) the basic proportions of the human face as the
foundation of your drawing before you start drawing the face, you will place the facial features in
the right places and correct sizes and draw a realistic portrait.
By following these simple steps you will have a drawing in the correct basic proportions based
on the average human face and by using these tips to help you develop your skills of
observation and improve your portrait drawing from photos and life.
General Proportions of the Face
A square is a box with four equal sides, and the human face is basically divided into six
squares, that combined is a large rectangle. As seen in the Red Lines in Figure A., below.
Figure A. General Proportions of Face
The top of the face is approximately where the Hairline falls. The face itself, is 2 squares wide
by three squares high. In other words, the face is broken into two 1/2's from left to right, and
three 1/3’s from top to bottom.

The length of the forehead from the Hairline to just under Eyebrows, is the same distance from
the Eyebrows to just under the Nose, as is the distance from just under the bottom of Nose to
the bottom of Chin.
STEP ONE: Start your drawing by lightly indicating these six squares into the larger rectangle at
the approximate size you want the drawing to be in middle of your paper. Leave plenty of room
around the rectangle so you have “air” or space around the head. Extend the Mid-Line a little
beyond the rectangle edges so you are always aware of the two sides of the face.
Now that you have a good “block-in” of the General Proportions of the Face overall, we will
begin to lightly indicate the placement of the features (Eyes, nose, mouth, etc.) and to their
correct sizes in relation to the whole head.
Figure B. Placement of the Pupils of Eyes
Placement of Pupils of Eyes
STEP TWO: Now lightly draw a straight line down (Vertical) in the middle (1/2 way) of the
second row of boxes (squares) from the Eyebrow Line to the Chin Line as the (Green Line
Shows) in Figure B Above. This line is approximately where the outside edge of the Pupil of the
Eye typically falls in relationship to the overall dimensions of the face and other features.
Placement of Bottom of Lower Lip
STEP THREE: Now lightly draw a line in the middle (1/2 way) of the bottom row of squares
(boxes) at the Mid-Line of face as the (Yellow Line Shows) in Figure C Below. This marks the
placement of where the base of the bottom lip falls approximately on the average head. So far,
you are not drawing the face or head yet, you are just laying out the approximate placement of

where the features will be as a guide so your drawing will be in proper proportion as you draw
the features.
Figure C. Placement of the Bottom of the Lower Lip
Placement of the Sides of Nostrils of Nose
STEP FOUR: Typically, the outside of the nostrils of the nose fall in line with the inside corners
of the eyes. Now, divide in half (1/2) the space between the Mid-Line and the Green Line you
drew in step two, and lightly draw a line straight up and down (Vertical) as the (Blue Lines show)
in Figure D. Below. You will want to draw this guideline from the Eyebrow Line to about half
(1/2) way between the yellow line (Bottom of lower lip) and the Nose Line.
Now, without even drawing the features yet, you are well on your way to drawing an accurate
portrait in proper proportion because these guidelines show you exactly where things fall on the
face related to the other features and the head overall. Notice the sides of the nostrils not only
line up with the inside corner of the eye, but about half way between the middle of mouth and
the outside corners of the lips. Do you see – The corners of your lips fall ½ about way between
the Green and Blue Lines, and the Yellow and Red (Nose) Line.
The face is part of the head, so we now have to see their combined placement relative to the
proportions we have already indicated in the first four steps. In the fifth step we are going to use
two simple shapes (and Oval and a Circle) to bring it all together and complete our preliminary
“Block-in” of where things are in proper proportion as we draw the portrait.

Figure D. Placement of Nose
Placement of Head (Skull) Relative to Face
STEP FIVE: There is volume to the head because of the skull (Bone Structure) that is under the
surface of the face. The final step of the “Block-in” of your portrait drawing is indicating the
relationship of the skull to the face by using two simple shapes (Oval & Circle) together to
indicate the shape of the skull. First Draw and Oval shape as shown in the teal color in Figure
E. Below. Note the sides of the oval are about same width of face (Red Squares/Rectangle),
and goes a bit below the Chin Line, and about half (1/2) of a third (or square) above the Hairline.
Next, using the top row of (red) Squares between Hairline and Eyebrows Line - Draw a circle
from the corners as indicated in Orange in Figure E. Your circle should fall about the top of your
oval, and meet the oval at the sides approximately where the sides of the oval meets the lower
outside corners of the top row of squares (at Eyebrow Line).
This “Block-in”, also known as an under-drawing is drawn very lightly on your paper because
these lines are meant to be lost in your finished drawing because they are just guidelines to
ensure all the features are place in the right place, and at the right size relative to the whole
shape of face and head.
Remember, these are just general (average) proportions. Some people have a longer, shorter,
narrower, or wider nose. Some people the eyebrows are a little higher or lower, or the lips or
hairline is in a slightly different place. It’s “seeing” these subtle differences from the “average”
and drawing these variations from the general proportions that will give you the likeness in each
individual portrait. After you finish these five steps, your “Block-in” should look like Figure F.

Figure E. Blocking-in Skull
Figure F. “Block-in” Lines (Guidelines)

Finish Drawing Head, Face and the Features
Now that you have your general proportional guidelines in place you are ready to finish drawing
the head, face and the features. Refer to Figure G below for the rest of the steps in placing the
contour (outline) of the key features. I have the profile view as well to remind you that the head
is not flat, just like the earth. It occupies space which meant it has volume and mass, which you
need to keep I mind as you draw the head (portrait). Also, the values are simplified for you so
you can clearly see the planes of the head (front, sides and under planes).
Figure G. Completing Drawing
Placement of Eyes (One Eye Apart)
STEP SIX: The inside corners of the eyes are usually the width of One Eye Apart. Since we
already established where the inside corners of the eyes are based on the width of the nose
(outside edge of nostrils) we have the width (size) of each eye by using the distance between
the two Blue Lines as the size for each eye out from the inside corner of each eye.
We then can then establish the pupil (a circle), within a larger (circle) for the Iris, within a larger
(circle) for the eyeball that sits in the eye socket behind the upper and lower eyelids.
Remember, the length can vary a little depending upon the person, and this subtle variation is
what gives you a likeness from one portrait to another.
Placement of Nose
STEP SEVEN: We already established width of nose, now let’s place length of nose. The nose
sticks out from the face which is clearly visible from the profile view.

Keep this in mind when drawing the nose is that the nostrils are moving back in space and the
bottom of the nose is turning under, thus usually casting a shadow on the face. A good
landmark for where the nose falls is the base of the circle (Orange) you drew for the skull where
it meets the (red) line of the top of the bottom row of squares (Nose Line). It’s roughly 2/3 of
face when facing forward, but can appear longer or shorter depending on shape of the tip (front)
of nose.
Placement of Lips
STEP EIGHT: The middle of the lips typically fall half (1/2) way between the Bottom of lower lip
(Yellow Line) and the top of the lower row of squares (Red Nose Line). Remember to always
place the lips a little higher than the middle between the nose line and chin line (Red). And note
the corners of mouth typically turn down a little.
Placement of Ears
STEP NINE: Typically, the top of the ear align with the eyebrow line (red), and the bottom of the
ear aligns with the bottom of nose line (red). It varies a bit depending on your point of view
(Below, above, or ¾). In the example here, our point of view is slightly below.
Also, you will note that the outside edge of ears from a frontal view are typically one eye-width
from the outside corner of each eye. And, the hairline (sideburns) on the side of face is about
half this distance.
Finishing Drawing
STEP TEN: Congratulations! By following all the above steps you have been able to draw
freehand a face and head in proper proportion (portrait). Now in the last step is simply refining
your drawing with its full value range and your understanding of chiaroscuro (movement of light
on form) to show the full volume of the head. The head is not flat. It occupies space so now it’s
time to show its volume and mass using Figure H as your guide. Enjoy!
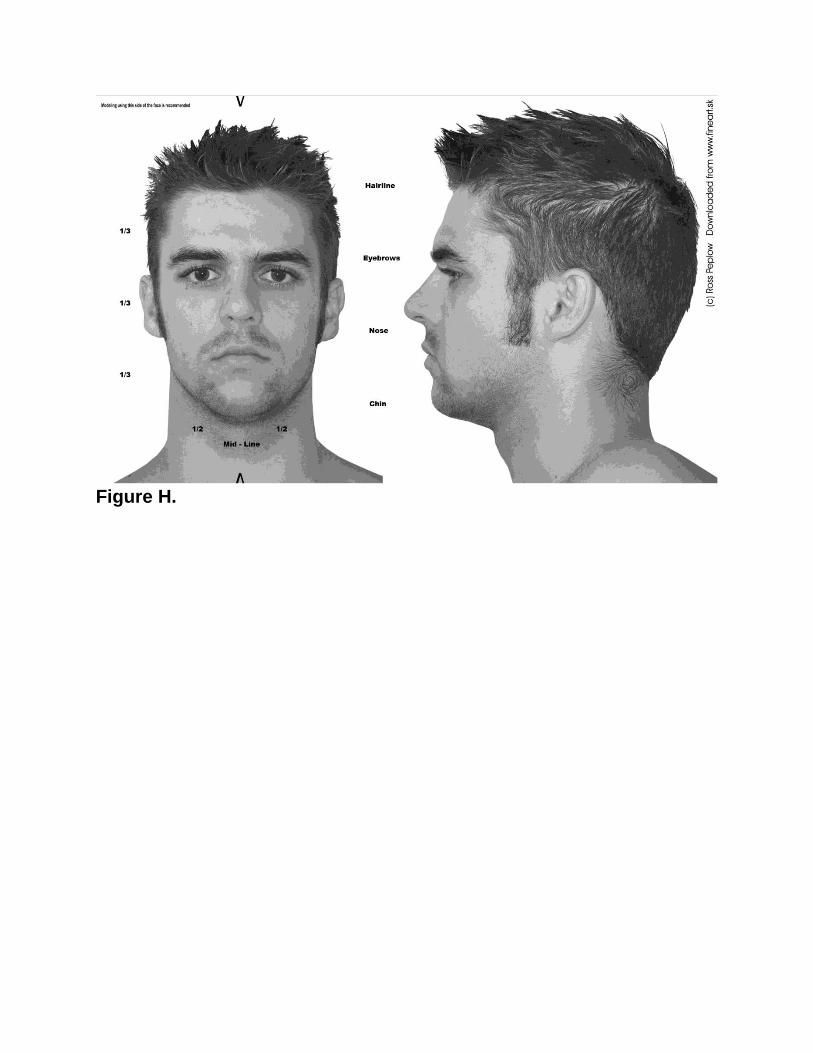
Figure H.

139
**Lesson developed and written by Jennifer Gorlewski, Dreher High School, 2018

INSPIRATION OF KEHINDE WILEY
Martha and Mary Magdalene by Caravaggio, 1598, Italy
Examine the picture thoroughly. Answer these
questions:
What do you see in the picture?
Who do you think this woman might be? Why?
What mood does this image emanate? Why do
you think this is? How and why did the artist
create this mood?
How did the artist use light and value? How does
this impact the image?
What was happening during the time of this
painting? How does that impact the image?
Mary Little by Kehinde Wiley, 2012, United States,
from the group of paintings “The New Republic”.
Examine the picture thoroughly. Answer these
questions:
What do you see in the picture?
Who do you think this woman might be? Why?
What mood does this image emanate? Why do
you think this is? How and why did the artist
create this mood?
How did the artist use light and value? How
does this impact the image?
What was happening during the time of this
painting? How does that impact the image?
How does this image compare to Caravaggio’s?
Why do you think Wiley emulated images from
history? What is the symbolic significance of
doing this?

Byzantine mosaic of the Hagia Sophia in Constantinople
Examine the picture thoroughly. Answer these
questions:
What do you see in the picture?
Who do you think this man might be? Why?
What mood does this image emanate? Why do you
think this is? How and why did the artist create this
mood?
Leviathan Zodiac by Kehinde Wiley, 2012
Examine the picture thoroughly. Answer these
questions:
What do you see in the picture?
Who do you think this man might be? Why?
What mood does this image emanate? Why do
you think this is? How and why did the artist
create this mood?
What was happening during the time of this
painting? How does that impact the image?
How does this image compare to the Byzantine
Art?
Compare and contrast the backgrounds of both
images. How are they similar? How are they
different?
Why do you think Wiley emulated images from
history? What is the symbolic significance of
doing this?

Napoleon Crossing the Alps by Jacques Louis-David
Examine the picture thoroughly. Answer these
questions:
What do you see in the picture?
Who do you think this man might be? Why?
What mood does this image emanate? Why do you
think this is? How and why did the artist create this
mood?
How did the artist use light and value? How does
this impact the image?
What was happening during the time of this
painting? How does that impact the image?
Why do you think Napoleon is painted on a horse?
Napoleon Leading the Army Over the Alps by
Kehinde Wiley, 2005
Examine the picture thoroughly. Answer these
questions:
What do you see in the picture?
Who do you think this man might be? Why?
What mood does this image emanate? Why do
you think this is? How and why did the artist
create this mood?
How did the artist use light and value? How does
this impact the image?
What was happening during the time of this
painting? How does that impact the image?
How does this image compare to Louis-David’s?
Why do you think Wiley emulated images from
history? What is the symbolic significance of
doing this?
Additional Activity: Students will review their photo they created from the previous Lesson: Portraiture and the
Creative Process – and reflect upon their initial choices to further develop their idea and refine their concept based
on the classical artwork that influenced them, and their artistic intent.