omnisuite 4.9 installation, set-up, first...
TRANSCRIPT

OmniSuite 4.9
OmniSuite 4.9Installation, Set-up, First Steps
© Globoccess 2013
1/44
OmniSuite 4.9
table of contentOmniSuite 4.x: Overview.....................................................................................................................4
Introduction......................................................................................................................................4Applications.....................................................................................................................................5
Installation of OmniSuite 4.x...............................................................................................................6Requirements...................................................................................................................................6
Links to the required files...........................................................................................................6Installation.......................................................................................................................................7configuration of OmniSuite via OmniSuite's Preferences...............................................................8
First Steps.............................................................................................................................................9using OmniSuite's Controller for playing global stories..................................................................9
Introduction.................................................................................................................................9Controls of the Controller.........................................................................................................10How-To change the playing story.............................................................................................10How-To Navigate in Time.........................................................................................................10How-To Show/Hide Layers.......................................................................................................10How-To rotate the globe............................................................................................................11How-To change the language....................................................................................................11How-To display a simple image on the globe...........................................................................11How to map a specific area of the desktop on the globe...........................................................12How To Quit the application.....................................................................................................12
Web-Catalog..................................................................................................................................13Log In........................................................................................................................................13Using Web-Catalog...................................................................................................................14
Customizing Controller......................................................................................................................16Handling Story-end........................................................................................................................16
Introduction...............................................................................................................................16How-To change the story-playing-mode...................................................................................16How-To adjust the Story-Transition..........................................................................................16
Controller's Startup........................................................................................................................17How-To Change the Story on Start-up......................................................................................17How to start automatically in a Collection................................................................................17
Language Selection........................................................................................................................20Visitor Mode..................................................................................................................................21
Introduction...............................................................................................................................21What is the Visitor Mode..........................................................................................................21How-To define the enabled Controls of the Visitor Mode........................................................21How-To Switch Into the Visitor Mode......................................................................................21Examples...................................................................................................................................22
customizing the visual appearance via Skins.................................................................................23Introduction...............................................................................................................................23Skins Reference.........................................................................................................................23Example: Creating a new skin...................................................................................................24Language-Selection...................................................................................................................27
System start-up and Error-Handling..............................................................................................29open Help Center......................................................................................................................29Restart Rendering Application..................................................................................................29
2/44

OmniSuite 4.9
Send error report.......................................................................................................................29Notify Staff................................................................................................................................29
Set up or adjust a projection...............................................................................................................30Step 0: set up Windows Display properties...................................................................................30
Overall considerations...............................................................................................................30How To use the Nvidia Mosaic Utility for dual projector globes.............................................30
Step 1: Start OmniSuite's Preferences...........................................................................................32Step 2a: Set up a new projection....................................................................................................32Step 2b: Adjust an existing projection...........................................................................................33Step 3: Adjusting the Projection....................................................................................................34
Environment..............................................................................................................................35Projection..................................................................................................................................37
Detailed information......................................................................................................................39Show the maps on an external display...........................................................................................40
Troubleshooting..................................................................................................................................41How To find the cause of slow rendering performance in OmniSuite and how to enhance the problem..........................................................................................................................................41Which version of DirectX is on your computer?...........................................................................43
To check which version of DirectX is on your computer.........................................................43Diagnosing basic problems with DirectX.................................................................................43
3/44

OmniSuite 4.x: Overview OmniSuite 4.9
OmniSuite 4.x: Overview
Introduction„Tactile hyperglobes have the big advantage that the user perceives the earth as it is, namely as a really available three-dimensional object. So the user has the same sight that is only given to astronauts.“Riedl in 2009
A tactile hyperglobe attracts the attention of the visitors because of the new presentation form and shows them fascinating phenomena of our earth. Therefore, a tactile hyperglobe is especially suited for schools and museums.
Beside the feature as an Eye-Catcher a tactile hyperglobe contains even more other positive features that are the basis of every globe. Contrary to maps, a globe allows the simple presentation of global themes without any distortions.
OmniSuite is responsible for projecting and rendering the content in real-time according to the user interactions and used globe-system.
As a result of our research, the feedback of visitors, customers and content creators, topics are presented best in form of short stories.
„The presentation of topics in the form of dynamic processes in combination with explanations packed in short stories makes it a lot easier for visitors to recognize, understand and interpret causal coherences, developments and processes.“ Riedl 2009
To meet the specific needs of the different globe-operators, the concept of a „global story“ was developed. OmniSuite’s StoryEditor provides tools for timeline based content creation. The primary components of these stories are images/image-sequences and their specific parameters (defined in the Material Editor).
Materials are based on plate carree image (aspect ratio 2:1) as well as further information like additional map layers, the combination of these layers, extension of the single layers etc.
The second essential part is the current orientation of the globe.
A story saves changes in the displayed material as well as the current rotation. Furthermore a story also saves information that will be displayed on a touch-screen, in form of HTML-files as well as an audio track to explain the displayed topic, if no presenter is available, or bookmarks to jump to specific and named points in time.
Although a given story could manage changes in orientation or material over time, there would be no possibility to react on questions from visitors. OmniSuite's interface named Controller makes it possible to show another part of the earth, jump forward/backward in time or show/hide a layer.
4/44
OmniSuite 4.x: Overview OmniSuite 4.9
ApplicationsThis will give you a quick overview about the applications included in OmniSuite:
used only in Presenting Environment
• Render Engine: renders and projects the images, that are displayed on the globe in real-time. You can specify the projection in the application preferences. The globe will be controlled through scripts called stories, that – in a nutshell defines the rotations and images to display during the time.
Presenting Environment, and Content Creation Environment
• Controller: Is the graphical user interface to control the Render-Engine. You can select stories and other properties with the following controls:
• Story Library lists all available stories and enables a selection of the current story.
• Time Line, Player-Buttons (Pause, Loop,...) as used in many media-players
• list of available bookmarks to jump in time and list of available layers to show/hide them
• virtual globe to control the rotation beside the story-rotation manually
• Information-browser to display additional information to the selected topic. Even a navigation to other stories is possible.
In all Installations available
• Preferences: to configure Render-Applications and Controller. The properties are listed in one of the following categories: Hardware Environment, projection, graphic-quality, Error Handling, Controller, Start-up, Rendering Application and Prerequisite. The most properties are only needed in a „Presenting Environment“. The properties in category Controller and especially the media directory is important in Authoring Environment too.
• Preview: has the same functionality as the Render-Engine, displays the output in form of a virtual globe on a monitor.
• Help Center: reports errors, shows help files, start OmniSuite in Debug Mode, report to the support team, validate and repair OmniSuite System
• Catalog: is used to easily copy stories and all the dependent files from the content-creation-PC to the PC that controls the spherical display. It can also be used to manage the media e.g. deleting stories,...
used only in Content Creation Environment
• Material Editor: themes, that are displayed on the globe are saved in material-scripts. Materials define, if there is only one image to display or if an animation is used, if there are more layers and how they are combined. Materials are the foundations of stories.
• Story Editor: is a GUI to help developing stories. You can define a rotation with a virtual globe, populate the timeline with already created materials, save bookmarks and much more.
5/44

OmniSuite 4.x: Overview OmniSuite 4.9
• Story Exporter: for pre-rendering stories as movies. Story Exporter is a separate application and not included in OmniSuite Pro. Please contact Globoccess if you are interested in Story Exporter application.
Installation of OmniSuite 4.x
RequirementsOmniSuite was developed for use with Windows 7 (english or german version). Make sure you have installed all service packs, patches and at least Internet Explorer 8 before installing OmniSuite as well as the Direct X 9c in the latest version (June 2010). An installed Microsoft Visual C++ Service Pack 1 Redistributable Package inclusive ATL Security Update is required.
Microsoft .net Framework V2.0 is required for using OmniSuite. It is recommended to install this first if it's not already installed.
Links to the required files
Microsoft Visual C++ 2005 SP1 Redistributable Package (x86):
http://www.microsoft.com/en-us/download/details.aspx?id=5638
Microsoft Visual C++ 2005 SP1 Redistributable Package ATL Security Update:
http://www.microsoft.com/en-us/download/details.aspx?id=14431
DirectX End-User Runtimes (June 2010)
http://www.microsoft.com/en-us/download/details.aspx?id=8109
6/44

Installation of OmniSuite 4.x OmniSuite 4.9
InstallationStart the installer of OmniSuite. It will guide you through the installation:
The installer will check if Direct X 9c as well as Microsoft Visual C++ Service Pack 1 Redistributable Package inclusive ATL Security Update is installed.
If you are installing a newer OmniSuite Version please consider to read the Porting Notes !
7/44

Installation of OmniSuite 4.x OmniSuite 4.9
configuration of OmniSuite via OmniSuite's PreferencesOmniSuite will be configured by Globoccess during installation of your spherical display. This installation instruction will explain how to install OmniSuite on another PC for creating content for use on your presenting PC.
After installation OmniSuite is set up in Content-Creation-Environment by default:
If you start OmniSuite's Preferences, you can see and edit this property.
Content-Creation-Environment means, that OmniSuite will start a “Preview” named application that shows a virtual globe on a monitor instead of a projection for your spherical display like in the Presenting-Environment. Also many properties in the Preferences application are disabled in Content-Creation-Environment if they are only needed in Presenting-Environment to make use of OmniSuite as easy as possible.
OmniSuite will install an useable configuration by default, so you can start working with the editors without knowledge about the Preferences.
Anyway you should know about the Media-Directory property after creating the first stories and where to change this property. Take a look at the content-creation tutorials for more information.
8/44

First Steps OmniSuite 4.9
First Steps
using OmniSuite's Controller for playing global stories
Introduction
OmniSuite's Controller is used for presenting all your content on a spherical display (e.g OmniGlobe). It lists all your stories, and functions as an interface, that you can adapt individually. The Controller is a player for global stories you created yourself or collected via internet. The screen-shot below shows the Controller application in action:
9/44
First Steps OmniSuite 4.9
Controls of the Controller
The Controller consists of several controls:
•Story-Library
•Collection-Library
•Player Buttons
•Time Line
•Virtual Globe
•Bookmarks Panel
•Layers Panel
•HTML Info Panel
•Quick Look (optional)
•Screen-Capturing-Control (optional)
•Language-Selection-Control (optional)
•Exit Button (optional)
How-To change the playing story
The Story-Library on the left of the Controller provides you with a list of all available stories of the active OmniSuite's media-directory. The stories are grouped in categories that are defined in the stories. You can click on a category to show or hide the stories of that category. A number beside the category-name shows how many stories are listed in this category. A click on a story-name will open this story.
How-To Navigate in Time
There is a Play/Pause-Button on top left of the Controller to stop/resume playing the story.
Via Time Line you can get information about the current position and the story-duration. On click into the Time Line you can jump to the selected position.
Another possibility to navigate in time is via Bookmark Panel on the right. All Bookmarks of the story are listed in this control. A story can contain no, one ore multiple Bookmark(s). Bookmarks relate to a specific second in the story and is named meaningful.
If the story is playing, a Bookmark will be selected when the second, that this Bookmark relates to, is reached. On click onto another Bookmark, the story will jump to the related second.
How-To Show/Hide Layers
All named Layers of the currently displayed material are listed in the Layers-Panel. They are shown by default. You can hide a layer through click onto the layer-name.
10/44

First Steps OmniSuite 4.9
How-To rotate the globe
The virtual globe gives you the possibility to rotate the globe-image individually. Just drag the virtual Globe in the desired direction. This is done independently from what is defined in a story.
If Allow Rotation Control property in a story is disabled, the virtual globe only gets enabled, when the story is paused.
The individual rotation made with the virtual globe will be added to the story rotation and the addition will last until another story was loaded or if you press the “reset individual rotation button”.
Click the “reset individual rotation button” (top left of the virtual globe) if you want to reset the additional rotation, so just the story-rotation remains. The story goes on, ignoring all individual rotation changes one made. In most cases this results in a jump of the globe-
image.
The sensitivity of the virtual globe is adjusted for best interaction with a mouse. To adjust the sensitivity for use with touch-functionality, you have to start OmniSuite's Preferenes application, go to Controller category and adjust Virtual Globe Sensitivity property.
How-To change the language
To change the language of the interface you have to select another language in the Language-Selection-Control.
If the Language-Selection-Control is not activated, see Fehler: Referenz nicht gefunden to enable it.
How-To display a simple image on the globe
To do this, you have to click onto the Quick Look control on the left. A file open dialog will appear, where you can select an image file (*.dds (recommended), *.jpg, *.png). After click on the open button, the image will be displayed onto the globe. This may last a few seconds depending on file format, image-resolution and computer-hardware.
If the Quick Look Control is not available, close the Controller, start OmniSuite's Preferences switch to the Controller-settings and enable Quick View option. Save and Close the Preferences and restart the Controller-application.
11/44

First Steps OmniSuite 4.9
How to map a specific area of the desktop on the globe
You can use the screen-capturing-control or start a story, which starts screen-capturing to map another application onto the globe.
The screen-capturing-control (you can enable/disable the control via Preferences application) provides input-controls to specify an area for mapping. You can type in a left, top, width and height value and press the left button to start the capturing. Or left-click onto the button with the crossline, keep the mouse-button pressed and choose a window you want to map. A black outline will show you the area, that would be mapped as long as you press the mouse-button. When the button is released, the current window will be mapped onto the globe.
As with textures, best performance will be achieved when the size of the mapping area is of 2n like 1024×512.
The left button will be replaced with a stop button, when screen-capturing was started. Press this button to stop screen-capturing. The story must be playing to update the mapping.
How To Quit the application
You have to press the Alt-F4 keys to quit the Controller. If you don't provide a public keyboard, it wouldn't be possible to quit the Controller. This may be intended in public exhibitions, when visitors shouldn't be allowed to quit the Interface.
There is also a possibility to show an exit button in the interface, when this security-feature is not needed. You can do this in OmniSuite's Preferences in the Controller settings: enable Exit Button.
12/44

First Steps OmniSuite 4.9
Web-CatalogWith OmniSuite's Web-Catalog you can download stories provided by Globoccess. There are over 250 stories available at the time of writing this and the number will increase over time.
Web-Catalog doesn't only allow easy downloading of stories, but provides updates to stories, if they got improved (e.g. if the borders in story “Political Globe” were updated, or the description of a story was improved,...).
And then, Web-Catalog serves as a backup for your media-directory (only for stories that are available in the Web-Catalog, not your custom media). You can download the stories as often as you need to.
Log In
To use Web-Catalog, you have to start OmniSuite's “Catalog”. You will have to log-in with user-name and password in the first screen to use the Web-Catalog as seen in the screen-shot below:
You will get username and password on purchase of OmniSuite. If you don' t have Username and password yet, please contact [email protected]
13/44

First Steps OmniSuite 4.9
Using Web-Catalog
After Log-in, all stories that are activated for your account will be listed showing the status of your local media-directory:
You can see in this screen-shot stories, that are up to date, stories, that are ready for download (doesn't exist in your current media-directory) as well as stories, where an update is available.
There is another status, not visible in the screen-shot, called “resume download”. This allows you to resume a download, if the operation was canceled.
To download, update or resume, just click onto the status-button of the story.
Detailed information: Web-Catalog will compare the story-version of your media-directory with that of Web-Catalog and update only the scripts, when there is a minor update or update also the textures and audio-files, when there is a major update available. If you made custom changes to a story, these will get overridden during updating the story.
You can also filter the stories by Category or by status – for example of you want to “display only stories, that need an update”.
14/44
First Steps OmniSuite 4.9
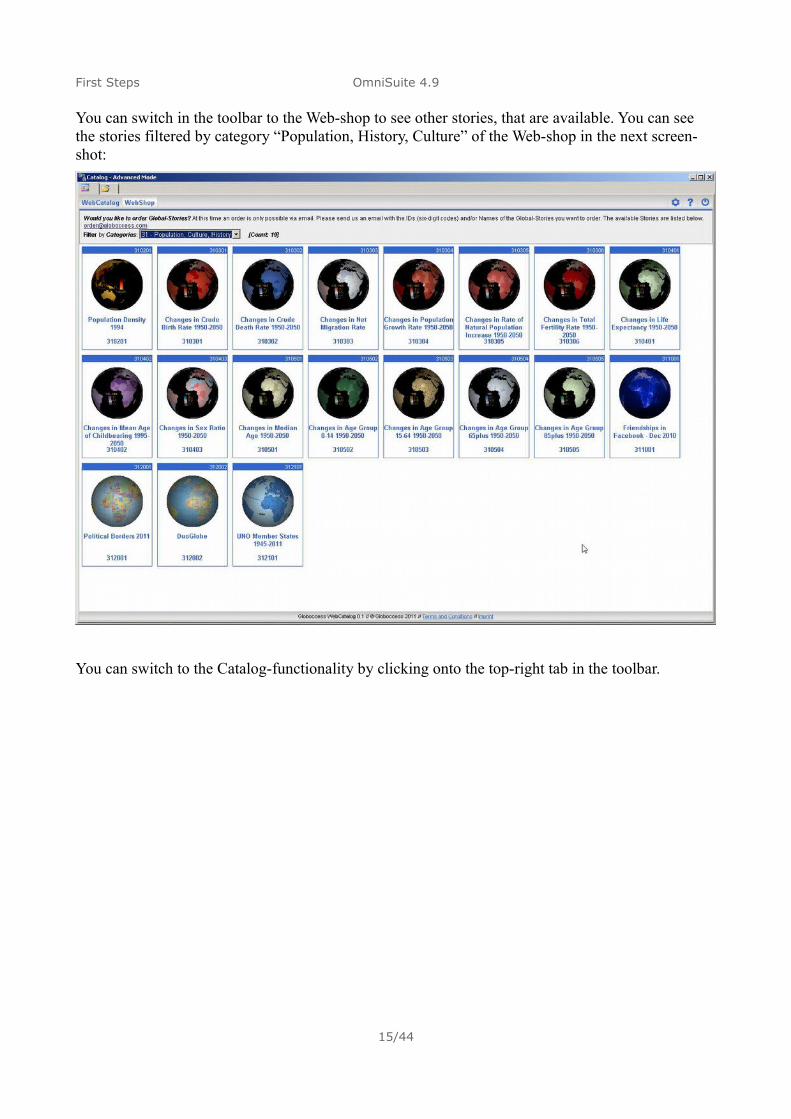
You can switch in the toolbar to the Web-shop to see other stories, that are available. You can see the stories filtered by category “Population, History, Culture” of the Web-shop in the next screen-shot:
You can switch to the Catalog-functionality by clicking onto the top-right tab in the toolbar.
15/44

Customizing Controller OmniSuite 4.9
Customizing Controller
Handling Story-end
Introduction
OmniSuite's Controller has to come up with many different situations and circumstances: The audience for example can reach from expert users to presenter knowing OmniSuite to visitors of exhibitions without knowledge of computer usage. So customization of Controller is crucial. This can be done in many ways. So have a look to the other tutorials on customizing Controller too. The properties “enable Exit Button” as well as “enable Quick View” were already explained.
How-To change the story-playing-mode
There are many possibilities, to define what happens on story-end. These options are available in OmniSuite's Preferences in the Render Application settings. Restart the Controller after changes:
• Play and Pause: the Story will be paused on Story-End, the virtual globe will get activated, when visible. The story will play again when Play Button is clicked.
• Loop Current: will loop the current story until another story is selected in Story-Library or via HTML Info Panel.
• Loop All: Will loop through all stories alphabetically or through all stories of a collection, if a collection is opened. You can select another story at any time via Story-Library or via HTML Info Panel.
• Back to default Story: at Story-end, the default story is loaded. This story could also be defined in OmniSuite's Preferences in the Render Application settings. You can select another story at any time via Story-Library or via HTML Info Panel.
How-To adjust the Story-Transition
On story-end the story loops or openes another story according to the story-playing-mode (see above). The orientation of the globe may be different on story-end than on start of the next story. This may cause a jump in the globe-image.
To prevent this, a Story Transition Duration value can be set in OmniSuite's Preferences in the Render Application settings. This value relates to the time in seconds that is used for a transition between the story-end situation and the story-start-situation. A Story Transition Duration of 0 will lead to a jump in globe orientation while a value of 3 will correspond to a smooth rotation between the orientations lasting 3 seconds.
16/44

Customizing Controller OmniSuite 4.9
Controller's Startup
How-To Change the Story on Start-up
This story is called default-Story and is defined in OmniSuite's Preferences in the Render Application settings. The first story that opens, when a collection is loaded is the first story specified in the Story-section of the collection-script.
How to start automatically in a Collection
What is a Collection
Collections gather – similar to play lists in popular media players – related stories of a selected category. Additionally, Collections enable a different layout for the story-interface representations while reusing texts and media-files at the same time. A story can be used in several collections and thereby represented in different ways (for example in a more colorful and less detailed collection for kids).The screen-shot below shows the description of Jupiter:
This interface was automatically created by Story-Editor and was designed for use in Controller's Expert Mode.
There are many reasons you may want to adapt the appearance of the interface. One situation might be the use of few stories for an exhibition.
The screen-shot below shows a Collection for an exhibition, where only 7 topics should be available in Visitor Mode only showing the HTML Info Panel:
17/44

Customizing Controller OmniSuite 4.9
There are three possibilities to create or add a collection:• Create a collection via Collection Editor
• Download a ready to use collection from Globoccess
• Create a collection manually
Please have a look into the content-creation tutorial for detailed instructions on creating a Collection.
After creation of or adding a Collection, this Collection is available in OmniSuite's Preferences in Controller properties:
18/44

Customizing Controller OmniSuite 4.9
When a Collection is selected, OmniSuite's Controller will start in this Collection. Take care to select a default story, that is included in this collection to start properly.
19/44

Customizing Controller OmniSuite 4.9
Language SelectionTo enable the Language-Selection-Control, start OmniSuite's Preferences application, switch to the Controller-settings and “enable Language-Selection” option. A new Preferences sub-category named “Language Selection” will be activated, where you can specify the language options you want to provide in the GUI of OmniSuite's Controller.
If the language is not listed, you can add a language. Please have a look at the content-creation tutorial for a detailed instruction.
With the second option you can specify, which language you want to start with (named “active language”).
Save and Close the Preferences and start OmniSuite's Controller application to see the effects of the settings:
You have to provide icons for the languages, not available in the currently used skin. For details see customizing the visual appearance via Skins - Language-Selection.
20/44

Customizing Controller OmniSuite 4.9
Visitor Mode
Introduction
OmniSuite's Controller has to come up with many different situations and circumstances: The audience for example can reach from expert users to presenter knowing OmniSuite to visitors of exhibitions without knowledge of computer usage. So customization of Controller is crucial. This tutorial will explain how to use the Visitor Mode of OmniSuite's Controller.
What is the Visitor Mode
As described in the introduction, the skills of the users of OmniSuite' s interface can vary from expert to novice. OmniSuite's Controller will start in the so called “Expert Mode”. In the Expert Mode all GUI controls are enabled and available to the user. So this mode should only be used by experienced users for example if a show master will guide the visitors through the global stories.
If there is no experienced user, that will control the spherical display, it is recommended to reduce the available user interface possibilities to the expected experience of the visitors/possible users. In most cases, when the control of the spherical display is left to the wider public, the best solution would be to only show the HTML Info Panel to the user and limit so the interaction to switching between the stories via HTML-links (and most of our customers do this).
So the Visitor Mode of OmniSuite's Controller is a way to customize the application by disabling controls of the Expert Mode according to the expected experience of the visitors/possible users.
How-To define the enabled Controls of the Visitor Mode
You can define the Position of the Controls in Visitor Mode in OmniSuite's Preferences application in the Controller properties. By doing this you can relocate the controls according to the Expert Mode or Hide (and therefore disable) the Controls in Visitor Mode.
How-To Switch Into the Visitor Mode
You can switch into Visitor Mode (and back) by pressing the F7 key. So if you don't make the keyboard public available, there would be no possibility to switch back in expert mode for the public.
You can configure to start the Controller application automatically in Visitor Mode in OmniSuite's Preferences in the Controller properties. This is only available in Presentation Environment.
21/44

Customizing Controller OmniSuite 4.9
Examples
22/44

Customizing Controller OmniSuite 4.9
customizing the visual appearance via SkinsSkins are defined as deprecated. You can use them with OmniSuite 4.9 but they may no longer be supported in future versions of OmniSuite. Use Collections instead.
Introduction
Maybe OmniSuite's visual appearance will not suite to the corporate design or visual guidelines of your exhibition. Skins are used in many other applications to adjust the visual appearance of the GUI and are available in OmniSuite's Controller too. Skins will customize the Controller through color-settings, font-sizes or background- and button-images.
Skins Reference
Available Skins are listed in OmniSuite's Preferences in the Controller properties for selection.
The properties
• Background Color background-color of the controls
• Title Font Color font-color of control's title
• Font Color font-color of list-items (bookmarks, layers,...)
• Active Item Color background-color of the active item
• Item Height height of list-items
• Font Size font-size of list-items
are available for customization in the Skin Editor.
These values are stored in a text file in “Documents and Settings/All Users/Application Data/Globoccess/OmniSuite/4.0/skins/[skinname].skin”.
All images are stored in “Documents and Settings/All Users/Application Data/Globoccess/OmniSuite/4.0/skins/[skinname]/”. The images of the default-skin will be copied to a new skin-image-folder if the new skin was created via OmniSuite's Preferences.
Below is a list of all images that are used in Controller:
Imagename Used in Control When no image defined
image-layout
layer_invisible.png Layer-item nothing center
layer_visible.png Layer-item nothing center
Languagesbackground.png Language transparent background
stretch
pause.png play-button Text added: pause center
play.png play-button Text added: play center
playerbuttonsbackgournd.png play-buttons-control stretch
progressbar.png progressbar DarkSlateGray tile
storyRotation.png reset-story-rotation-button
nothing center
23/44
Customizing Controller OmniSuite 4.9
Imagename Used in Control When no image defined
image-layout
timelinebackground.png timeline Beige stretch
title.png Story-library, collections-library, bookmarks-control, layers-control,calendar-control
DarkSlateGray tile
toppanelbackground.png Top-Panel LightSteelBlue tile
fileopen.png Quick-Look Text: open stretch
capturing.png Capturing Text: capturing center
stop.png Capturing Text: Stop center
find_window.png Capturing Text: find window center
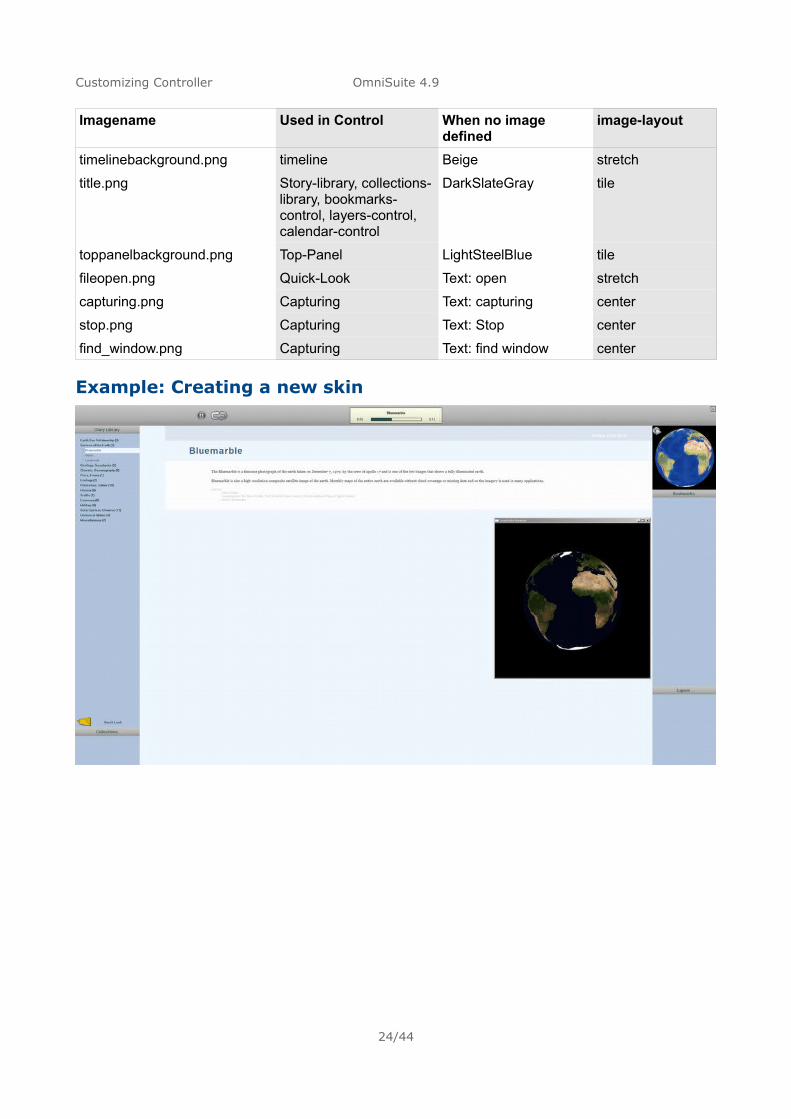
Example: Creating a new skin
24/44

Customizing Controller OmniSuite 4.9
By default, the default-skin is selected. You are not allowed to edit (1) or delete (2) this skin.
First, we will create a new skin named “simple-black”. To do this just type in a new skin-name (1) and click onto the new-button (2).The skin-editor will open. We will set the properties like in the screen-shot below:
25/44

Customizing Controller OmniSuite 4.9
Now, the Controller will look like this:
We can also exchange some images. You can use the example-images provided with this tutorial and copy them into the folder C:\Documents and Settings\All Users\Application Data\Globoccess\OmniSuite\4.0\skins\simple_black\ for example with Windows Explorer.
26/44

Customizing Controller OmniSuite 4.9
We have now a skin, that is ready to use and which will provide a completely different appearance than the default-skin. In this case you will have to edit the style-sheets of your HTML-files.
Language-Selection
To customize the appearance of the Language-Selection Control, you have to change the images called like the div-tags of the language (ISO-639-1 standard, see content-creation tutorials) as well as a file called [code]_selected.png. You have to provide only the images of that languages, that are used in the Language-Selection-Control.
27/44

Customizing Controller OmniSuite 4.9
All images are stored in
XP: Documents and Settings\All Users\Application Data\Globoccess\OmniSuite\4.0\skins\[skinname]\
Win7: C:\Program Data\Globoccess\OmniSuite\4.0\skins\[skinname]\
Below is an example list of language-selection images that are used in Controller:
Imagename When no image defined image-layout
de.png empty stretch
de_selected.png empty stretch
en.png empty stretch
en_selected.png empty stretch
fr.png empty stretch
fr_selected.png empty stretch
28/44

Customizing Controller OmniSuite 4.9
System start-up and Error-HandlingIn a presentation environment, you can define the behavior on an error of OmniSuite's Render-Engine as well as on system startup. The next chapters will explain the properties of OmniSuite's Preferences in detail:
open Help Center
If this property is checked, the Help Center application will open on an error to help you find the error-cause. Do use this option only during installation of OmniSuite or when importing new media.
Restart Rendering Application
If enabled, the Render-Engine will restart immediately after an error so that visitors won't notice much of an error.
Send error report
If enabled, the Render-Engine will send an error-report to Globoccess, so we can improve the software and can help you find a solution to fix the problem more easily.
Notify Staff
If an email-address is provided in this text box, OmniSuite will send an email to this address, when a crash occurred, so you can notify a responsible person of your organization that there was an error.
29/44

Set up or adjust a projection OmniSuite 4.9
Set up or adjust a projection
Step 0: set up Windows Display propertiesBefore you start, make sure, that all displays and projectors are connected to the PC that will do the rendering and power is on.
Windows display properties have to be configured properly before using OmniSuite.
This was done during installation of your globe. Until you didn't change the windows display properties or hardware configuration, you must not care about this step.
Overall considerations
Use your Touchscreen as primary-display
Position your projectors on the right to the touchscreen
Use the native display resolution for your displays
How To use the Nvidia Mosaic Utility for dual projector globes
1. Download the configureMosaic.exe from http://www.nvidia.com/object/mosaic-utility.html
2. Save it to your Desktop (or to any other location on your Harddrive)
3. Make sure all Projectors (Globe, (Touch)Screen, VideoWall, …) are connected to the GlobePCs GraphicCards (GC)
4. Be sure that both Globe Projectors are connected to the same GC (e.g. Quadro2000) and the (Touch)Screen and the VideoWall (if there is one) are connected with the OTHER GC! (A Maximum of 2 Projectors for every GC!)
5. Start > Command Promt (cmd.exe)
6. Navigate to the configureMosaic.exe
◦ C:\\Users\Username\>cd Desktop
◦ C:\\Users\Username\Desktop>
7. To see all possible Commands use the help Statement
◦ C:\\Users\Username\Desktop>configureMosaic.exe help
8. Get an overview – which Projector is connected to which GC
◦ [...]>configureMosaic.exe query gpu
30/44

Set up or adjust a projection OmniSuite 4.9
9. How to read the xml-Structure:
[...]<physgpu gpuid=”...”> => GPU = 0
<name>Quadro 2000</name><displays>
<display displayid=”...” outputid=”...”> => DISPLAY = 0[...] GLOBE PROJECTOR 1
</display><display displayid=”...” outputid=”...”> => DISPLAY = 1
[...] GLOBE PROJECTOR 2</display>
</displays></physgpu><physgpu gpuid=”...”> => GPU = 1
<name>Quadro 400</name><displays>
<display displayid=”...” outputid=”...”> => DISPLAY = 0[...] ELO TOUCH SCREEN
</display></displays>
</physgpu>[...]
10. You have to identify the GPUs and the DISPLAYs (see above)
11. Use the set Statement to Configure the Displays
◦ [...]>configureMosaic.exe set rows=1 cols=1 out=1,0 nextgrid rows=1 cols=2 out=0,0 out=0,1
12. Check the Resolutions of the Screens within the Windows Settings (right-click anywhere on the Desktop > Screen resolution)
Example 1:
[...]>configureMosaic.exe set rows=1 cols=1 out=0,0 nextgrid rows=1 cols=2 out=1,0 out=1,1
31/44
GPU = 0 (e.g. Quadro 400) GPU = 1 (e.g. Quadro 2000)
ELO TOUCHDISPLAY = 0
CANON 1DISPLAY = 0
CANON 2DISPLAY = 1
ELO TOUCHGRID 1
CANON 1 + 2GRID 2

Set up or adjust a projection OmniSuite 4.9
GRID 1 has 1 row and 1 col (it is 1 Display/Projector); with out you assign the Dispaly/Projector to the GRID; the first value is the GPU, the second is the DISPLAY (as you discovered within the steps 9 and 10 – see above)
use the nextgrid statement to add an other GRID
GRID 2 has 1 row and 2 cols (2 Displays are getting merged together – “horizontal span” - that is what we want for the DualBeamer GlobeSystems); for every Display within the Grid use an separate out – in the order you want to merge the two Displays!
Example 2:
[...]>configureMosaic.exe set rows=1 cols=1 out=1,1 nextgrid rows=1 cols=1 out=1,0 nextgrid rows=1 cols=2 out=0,0 out=0,1
Step 1: Start OmniSuite's PreferencesClick onto the Start-Button and choose Programs → Globoccess → OmniSuite 4.0.x to start OmniSuite's Preferences
Select Category Rendering Application
If you want to set up your globe with a new projection read on at step 2a. Otherwise, if you want to adjust an existing projection, go to step 2b
Step 2a: Set up a new projectionTo create a new configuration, fill in a new configuration-name in the Field Sperical Display Configuration. If no configuration exists with that name, the new button will be enabled. If you click onto this button a new configuration will be created.
32/44
GPU = 1 (e.g. Quadro 2000)
ELO TOUCHDISPLAY = 1
VIDEO WALLDISPLAY = 0
GPU = 0 (e.g. Quadro 2000)
CANON 1DISPLAY = 0
CANON 2DISPLAY = 1
CANON 1 + 2GRID 3
ELO TOUCHGRID 1
VIDEO WALLGRID 2

Set up or adjust a projection OmniSuite 4.9
Preferences will auto-detect the projection settings according to your windows display properties.
Step 2b: Adjust an existing projection
To adjust an existing configuration, select a configuration-name in the Field Sperical Display Configuration. The Edit button will be enabled. If you click onto this button that configuration will open.
33/44
Set up or adjust a projection OmniSuite 4.9
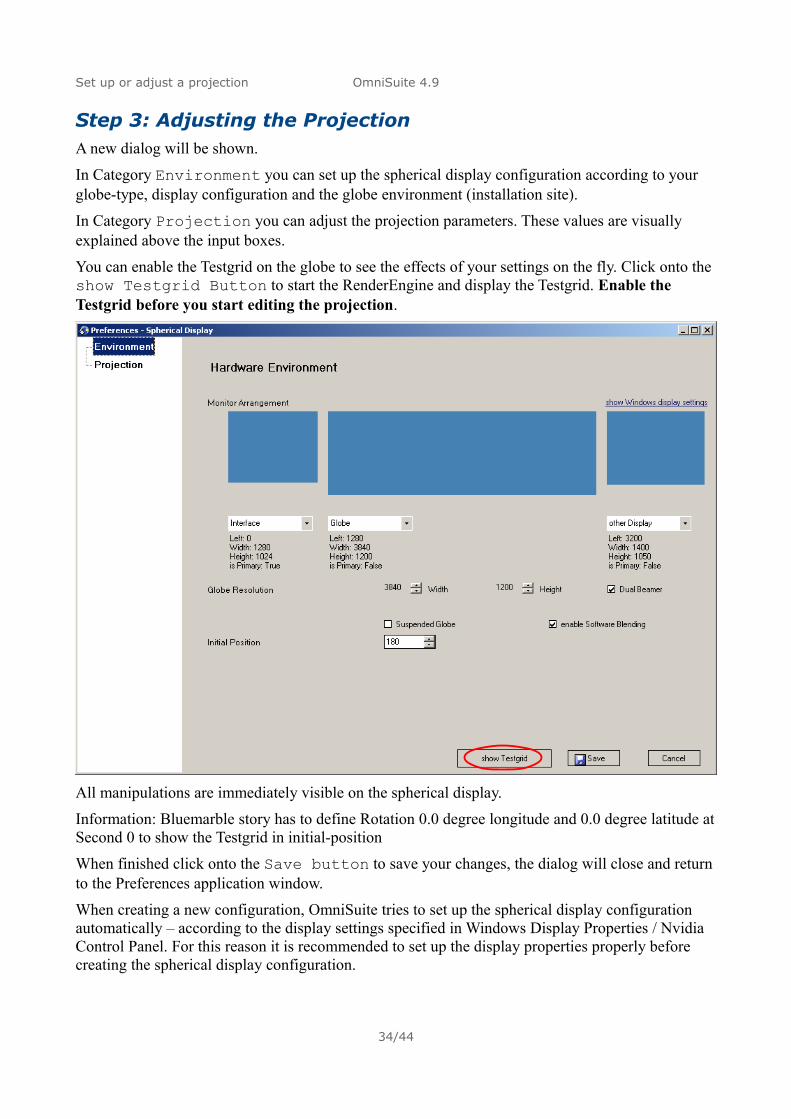
Step 3: Adjusting the ProjectionA new dialog will be shown.
In Category Environment you can set up the spherical display configuration according to your globe-type, display configuration and the globe environment (installation site).
In Category Projection you can adjust the projection parameters. These values are visually explained above the input boxes.
You can enable the Testgrid on the globe to see the effects of your settings on the fly. Click onto the show Testgrid Button to start the RenderEngine and display the Testgrid. Enable the Testgrid before you start editing the projection.
All manipulations are immediately visible on the spherical display.
Information: Bluemarble story has to define Rotation 0.0 degree longitude and 0.0 degree latitude at Second 0 to show the Testgrid in initial-position
When finished click onto the Save button to save your changes, the dialog will close and return to the Preferences application window.
When creating a new configuration, OmniSuite tries to set up the spherical display configuration automatically – according to the display settings specified in Windows Display Properties / Nvidia Control Panel. For this reason it is recommended to set up the display properties properly before creating the spherical display configuration.
34/44

Set up or adjust a projection OmniSuite 4.9
In some situations, you have to manually adjust some parameters of this configuration. The parameters are specified in more detail below.
Environment
Monitor Arrangement
You can see all displays connected to the PC and activated by Windows here with additional information about the display:
• left left value of the display-position in multi display configurations
• width width of the display
• height height of the display
• is Primary if the display is the primary display. When true, Windows puts the start-menu on this display, opens new windows here,...
The displays are arranged according due to their ID, not because of their position!
Below the display icon, you can specify the function of the display:
• Globe on this display, the globe-image will be displayed
• Interface the Interface will start on this display (usually on the primary display)
• other display displaying a video wall for example (see Show the maps on an external display for more information)
Globe Resolution
The Globe Resolution will change, if another display is specified for displaying the globe-image. But it is possible to change the resolution to a custom value. Change this only, if you have a good reason for this.
If the resolution changed, a message appears below the Globe Resolution settings. On Click, OmniSuite tries to automatically detect other values according to the new resolution of the “Globe” display.
Dual Beamer
Next to the Globe Resolution settings, you can specify if the globe is using two projectors to display the image onto the globe. If this is activated, the globe-image is split into two parts.
This property will be set up automatically by OmniSuite for common globe resolutions. Change this only, if you have a good reason for this.
Suspended Globe
When using suspended spherical displays (projectors are mounted in the ceiling) or mirror based spherical displays, the globe-image must be calculated upside-down. To do this, enable the property “suspended Globe”.
35/44

Set up or adjust a projection OmniSuite 4.9
Enable Software Blending
This property enables or disables blending between the two projectors (if there are two projectors) in OmniSuite. Although there are no spherical displays managing the blending until now, high-end Nvidia Quadro graphic cards could manage the blending too. In most cases, this property will be enabled, when using dual beamer spherical displays.
Initial Position
One of the main advantages of a globe is the spherical body. This allows viewing the earth and other celestial bodies in its original shape without any distortions. It also allows viewing the display from any direction.
Nevertheless, in most installations there will be a main viewing direction. This viewing direction is the result of:
• entrance
• seating-accomodations
• Touchscreen-Terminal providing the GUI
• different distances to the walls or other barriers
All Rotations defined in OmniSuite's Stories refer to this viewing-direction. You can change this main viewing-direction – the prime meridian of the globe – with the property “Initial Position” defined as integer value in degree.
Note: If the main viewing-direction does not align with the Touchscreen-Terminal, you can adjust the orientation of the virtual globe in the GUI of the Touchscreen-Terminal with the property “Initial Position (virtual globe)” in category “Rendering Application”.
36/44

Set up or adjust a projection OmniSuite 4.9
Projection
Projection Size
With Projection Size you can fit the globe-image to the screen-resolution. This property depends on your hardware-configuration. If you have a black gap at the top of the globe than you have to adjust this property to fit the image onto the globe.Recommended values (Position Mirror):
Display resolution (projectors) Recommended value1400×1050 107552800×10503840×1080 68373840×1200 7399
Offset
This property changes the offset of a globe-image. It is for compensating beamer-offsets via software.Single Beamer Systems: A change in the property will compensate a tilted globe-image.Dual-Beamer-Systems: You can adjust the images of the two video projectors so that the prime meridian of projector 1 is at the same position as the prime meridian of projector 2. If there is a gap between the images of the projectors, or if the images of the projectors overlap, than you have to adjust the offset property so that you have only one line as a result.The values are negative when “Suspended Version” is enabled.Recommended values:
37/44

Set up or adjust a projection OmniSuite 4.9
Display resolution (projectors) Recommended valueAll Single Beamer Versions 02800×10503840×1080 0.010863840×1200 0.0084
Fine Tuning
For the final adjustment of the projection.
In the first control, you can define for which region you want to specify the adjustments. Latitude 90 corresponds to the equator region. Regions near the poles don't correspond to the Latitude shown in “Fine Tuning”.
When a region is selected, you can adjust the position/scale of the region with the “Fine Tuning” property without affecting the regions below or above. Smaller values will reposition the region towards the south-pole, higher values towards the north-pole.
You can prepare a tape measure for fine tuning. You have to draw a marker for every 10° for example on this tape measure (to match the test-grid):
Radius (cm) of globe Mark every (cm)75 13,1
60,5 10,55
other r⋅ Π180
⋅10
Fix the tape measure on the hardware north pole and start adjusting the image via fine tuning property so that the lines on the testgrid match the markers on the tape measure.
38/44

Set up or adjust a projection OmniSuite 4.9
Detailed informationThe projection will be saved in
XP: C:\Documents and Settings/All Users/Application Data/Globoccess/OmniSuite/4.0/[PROJECTIONNAME].cfg
Win7: C:\Program Data\Globoccess\OmniSuite\4.0\[PROJECTIONNAME].cfg
You can read and edit this file via any text-editor.
It is recommended to make a copy before adjusting a projection.
39/44

Set up or adjust a projection OmniSuite 4.9
Show the maps on an external displayIf you want to show the globe-image in form of a map on an external monitor/projector, you have to create a configuration-file in the text-editor of your choice:
• Create video_wall.cfg in the “all Users Preferences” directory:
◦ XP: C:\Documents and Settings/All Users/Application Data/Globoccess/OmniSuite/4.0/video_wall.cfg
◦ Win7: C:\Program Data\Globoccess\OmniSuite\4.0\video_wall.cfg
• Type in the properties into the file:
◦ Example:VideoWall-Left: 2000VideoWall-Top: 0VideoWall-Width: 400VideoWall-Height: 400VideoWall-ScaleX: 100VideoWall-ScaleY: 50
◦ VideoWall-Left: Left-value of the video-wall window in pixel (= Left-value of the display in most cases)
◦ VideoWall-Top: Top-value of the video-wall window in pixel
◦ VideoWall-Width: Width of the video-wall window in pixel
◦ VideoWall-Height: Height of the video-wall window in pixel
◦ VideoWall-ScaleX: Scale the video-wall map horizontally in relation to the video-wall window. Value in percent. Map will be aligned centered
◦ VideoWall-ScaleY: Scale the video-wall map vertically in relation to the video-wall window. Value in percent. Map will be aligned centered
40/44

Troubleshooting OmniSuite 4.9
Troubleshooting
How To find the cause of slow rendering performance in OmniSuite and how to enhance the problemSlow rendering performance can result in various problems impairing the overall experience of a tactile Hyperglobe: Stuttering, slow response to user input, problems with audio synchronization. Below you can find instructions on how to enhance slow rendering performance:
1. Start the Rendering Application in Debug ModeI, choose a static storyII in OmniSuite's Controller application and check the framerate displayed on the globe
2. If the framerate displayed on the globe is around 30fps goto step 3, otherwise:
2.1. If the framerate is about 25fps, open render-application.cfgIII file in a text editor and add a line with „Win7Patch: True“
2.2. if there is more than one graphic card in your PC, check if the more powerful card is selected as rendering deviceIV
2.3. check the graphic quality settingsV, if they are appropriate for your PC configuration and try to set lower values to see if this changes the performance.
2.4. Check if your PC system matches the specification Globoccess suggests
3. If the framerate for static topics is around 30fps, start the Rendering Application in Debug Mode and choose an animated story in OmniSuite's Controller application. Start by choosing a story using only one animated layerVI.
I To start in Debug Mode, you have to start OmniSuite's Help Center application, click in the start screen onto the
“Debug Mode”-button, choose your Rendering application and click onto the start-button.
II By default, Bluemarble-story is a static story, but you can use any story showing only one map during the story.
III XP: C:\Documents and Settings\[User-name]\Local Settings\Application
Data\Globoccess\OmniSuite\4.0\rendering_application.cfg
Win7: C:\Users\[User-name]\AppData\Local\Globoccess\OmniSuite\4.0\rendering_application.cfg
With OmniSuite 4.6.1 or newer, there is a shortcut to the “User Config Files” when starting Help Center
IV To select a rendering device, you have to start OmniSuite's Preferences application and select the category
“Rendering Application” on the left. If your “Rendering Application” is set to “spherical display”, you can choose
your “Rendering Device”. All available devices are listed for this property.
V To change graphic quality settings, you have to start OmniSuite's Preferences application and select the category
“Graphic Quality” on the left. Especially the “intermediate Projection Resolution” property has a high impact on
performance.
VI If you can't tell how many layers are animated, you have to start Story Editor application, open the story and click
onto the material track. You can now see the material-name as well as additional information if there is an
animation. Open the specified material in Material-Editor to see, how many layers are used in the material and
switch to the textures tab to see, if the several layers are animated or static
41/44

Troubleshooting OmniSuite 4.9
4. If the framerate is around 30fps on stories with only one animated layer goto step 5 otherwise:
4.1. It is most likely that loading files from disc drive is too slow.
4.2. If you are using a HDD, you can think about upgrading to a SSD for the location of your media-directory
4.3. Do the steps suggested in 5 for all stories
4.4. optimize Windows for use with OmniSuite especially 7.11, 7.8, 7.7, 7.6
5. If the framerate is slow only on one or few stories, try to edit the story
5.1. check if you are using dds-textures for at least the opaque background layer
5.2. check if you can decrease the texture compression level (e.g. dxt5 → dxt3, dxt3 → dxt1a,...)
5.3. check if you can use a smaller extent for some layers
5.4. check if the framerate of animations is equal or lower 30fps and if you can lower the framerate of the animation (to 24ps?)
5.5. check if you can merge some layers into one layer
5.6. check if you can lower the resolution of one or some layers
6. If the framerate is around 30fps but the audio-synchronization is not perfect, or the image is stuttering
6.1. Open render-application.cfgIII in a text editor and add the line “SyncValue: 1.0” into this file. If no value is specified, 1.0 is used by the rendering-application. Start changing this value in small steps, save the file and check the framerate again in Debug Mode. Repeat this step as often as necessary to achieve exactly 30fps. Audio-image should now be in sync.
7. In any case you can optimize Windows. Please be aware you are changing Windows system on your own risk. Not all steps below suit to all systems, depending on various circumstances (connected to network, other uses of the PC beside OmniSuite, custom applications for interfaces,..). Do this only, if you know what you are doing.
7.1. install most recent graphic card driver
7.2. deinstall all applications not needed on this PC
7.3. deactivate automatic updates for all applications (when your PC is not connected to a network), or specify a certain time for updates
7.4. Control Panel – System+Security – WindowsUpdate – Change Settings: Never Check for Updates
7.5. Control Panel – System+Security – System – Advanced System Settings – Performance: Adjust for best Performance
7.6. Run: services.msc – Windows Search – disable
7.7. Run: services.msc – Indexing – disable
7.8. Windows Defender – Automatic scanning: disabled
42/44

Troubleshooting OmniSuite 4.9
7.9. Windows Defender – Realtime protection – Excluded files + folders: OmniSuite and Media folder
7.10. Command Prompt: fsutil behavior set disable8dot3 1
7.11. Command Prompt: fsutil behavior set disablelastaccess 1
7.12. Disable Content Indexing: Start – Computer – Right Click on the disk (say C:\) - properties – in General Tab: Uncheck „Allow Files on this drive to have contents indexed in addition to file properties” - Apply – OK
7.13. …
Which version of DirectX is on your computer?DirectX is a suite of multimedia technologies required by many Windows applications. If your computer doesn't have the right version of DirectX installed, OmniSuite might not work properly.
To check which version of DirectX is on your computer
1. Open DirectX Diagnostic Tool by clicking the Start button, typing dxdiag in the search box, and then pressing Enter.
2. Click the System tab, and then, under System Information, check the DirectX version number.
Note
If this is the first time you’ve used the DirectX Diagnostic Tool, you might be asked whether you want to check if your drivers are digitally signed. We recommend you click Yes to ensure that your drivers have been signed by a publisher that has verified their authenticity.
Diagnosing basic problems with DirectX
Once the Diagnostic Tool has finished, here are three key things to check:
• Check your video card.
Some programs run very slowly—or not at all—unless Microsoft DirectDraw or Direct3D hardware acceleration is turned on.
To determine this, click the Display tab, and then under DirectX Features, check to see whether DirectDraw, Direct3D, and AGP Texture Acceleration appear as Enabled. If not, try turning on hardware acceleration.
1. Open Screen Resolution by clicking the Start button, clicking Control Panel, and then, under Appearance and Personalization, clicking Adjust screen resolution.
2. Click Advanced settings.
3. Click the Troubleshoot tab, and then click Change settings. If you're prompted for an administrator password or confirmation, type the password or provide confirmation.
4. Move the Hardware Acceleration slider to Full.
If that fails, you might need to update the video driver or the card, itself. You can typically find the latest drivers for your hardware in the support section of the manufacturer's website.
43/44
Troubleshooting OmniSuite 4.9
• Check for "unsigned" drivers.
A driver that's been digitally signed has been tested by the Microsoft Windows Hardware Quality Lab for DirectX compatibility.
If the Diagnostic Tool flags an unsigned driver, updating the driver might solve your problem. You can typically find the latest driver for your hardware on the support section of the manufacturer's website.
• Check the version of DirectX that OmniSuite requires.
OmniSuite requires DirectX 9. However, Windows 7 is installed with a more recent version of DirectX. If you install an application or game that requires DirectX 9, you might receive an error message, such as: "The program can't start because d3dx9_35.dll is missing from your computer. Try reinstalling the program to fix this problem." The last two digits of the file name might vary. If you receive the same error message after reinstalling the application or game, go to the DirectX End-User Runtime Web Installer http://go.microsoft.com/fwlink/?LinkId=159853 webpage and follow the instructions to install DirectX 9 and receive updates to DirectX 9 and previous versions of DirectX.
These Help & How To pages are based on the following web-pages from http://windows.microsoft.com:
• http://windows.microsoft.com/en-US/Windows7/Diagnosing-basic-problems-with-DirectX
• http://windows.microsoft.com/en-us/windows7/Which-version-of-DirectX-is-on-your-computer
44/44