ocØ varioprint fi 2100/2110 - canon global · about the integrated booklet maker 153 ... convert...
TRANSCRIPT

Océ VarioPrint® 2100/2110User's Manual

Copyright
© 2005, Océ-Technologies B.V. Venlo, The Netherlands All rights reserved. No part of this work may be reproduced, copied, adapted, or transmitted in any form or by any means without written permission from Océ.
Océ-Technologies B.V. makes no representation or warranties with respect to the contents hereof and specifically disclaims any implied warranties of merchantability or fitness for any particular purpose. Further, Océ-Technologies B.V. reserves the right to revise this publication and to make changes from time to time in the content hereof without obligation to notify any person of such revision or changes.
Code number 1060025409Edition 2005-03
Océ-Technologies B.V.
US
3
Trademarks
List of Trademarks
Océ, Océ VarioPrint® 2100/2110 are registered trademarks of Océ-Technologies B.V..Adobe®, Acrobat®, Reader® and Distiller® are registered trademarks of Adobe® Systems Incorporated.PostScript® 3 is a registered trademark of Adobe® Systems Incorporated.Apple®, Mac® , Mac OS® and Macintosh® are registered trademarks of Apple® Computer, Inc.OpenVMS and HP-PCL are trademarks of Hewlett-Packard® Company.WIN-OS/2® , OS/2® Lotus Notes®, OS 390®, z/OS® are registered trademarks of International Business Machines Corporation in the United States, other countries, or both. Linux® is a registered trademark of Linus Torvalds.Microsoft®, Windows® , Windows NT®, Windows 98®, Windows 2000®, Windows XP®, Windows Server 2003® are either registered trademarks or trademarks of Microsoft® Corporation in the United States and/or other countries.UNIX® is a registered trademark of The Open Group in the United States and other countries.
Products in this publication are referred to by their general trade names. In most, if not all cases, these designations are claimed as trademarks or registered trademarks of their respective companies.

4 Océ VarioPrint® 2100/2110 User's Manual
Notes to the reader
Introduction
This manual helps you use the Océ VarioPrint® 2100/2110. The manual contains a description of the Océ VarioPrint® 2100/2110 and guidelines for its use and operation. There are also tips given to help you increase your knowledge of the Océ VarioPrint® 2100/2110 and to help you better manage the workflow.
Definition
Attention Getters
Parts of this manual require your special attention. These parts provide important, additional information or are about the prevention of damage to your properties.
Note, Attention and Caution
The words Note, Attention and Caution indicate these important parts.■ The word Note comes before additional information about the correct
operation of the Océ VarioPrint® 2100/2110 or before a hint.■ A part marked with Attention contains information to prevent damage to
items, for example the Océ VarioPrint® 2100/2110 or a file.■ A part marked with Caution contains information to prevent personal
injury.
Safety information
The safety information for this product is included in a separate manual with the title Safety manual. This manual is part of the documentation set that you received with your product.

Table of Contents 5
Table of Contents
Trademarks 3Notes to the reader 4
Chapter 1 IntroductionAbout Océ VarioPrint® 2100/2110 Users 10Available documentation 11Introduction to the Océ VarioPrint® 2100/2110 series 13Concepts and Philosophy 15The Power Modes 19
Chapter 2 Turning the System On and OffTurning the System On 24Shut down the system 26Restart the system 27
Chapter 3 Getting to Know the Océ VarioPrint® 2100/2110General Information 30
The Configuration 30About the paper trays 36The Main Screen 38The Icons of the Main Screen 41The information in the media section 45The on-line help on the operator panel 49The Signal Lamp (optional) 51The settings of the Océ VarioPrint® 2100/2110 Settings Editor 53
Media Concepts 57About the Media Catalog 57Set the needed media type 58About Temporary Media Names 61Custom size media 62Oversize media 63
Job Management 64About job management on the Océ VarioPrint® 2100/2110 64Overview of Actions in the Job Queue Manager 71Managing jobs on the Océ VarioPrint® 2100/2110 75Subsets in printing and copying 79
Using the Mailbox and the Memory 81About the 'Mailbox' and the 'Memory' 81

6 Océ VarioPrint® 2100/2110 User's Manual
Moving to Memory 84Editing a Job in the 'Mailbox' or 'Memory' 86Removing Jobs from the 'Mailbox' or 'Memory' 90
Chapter 4 Adapting the SystemControlling the Backlight of the Screen 94Setting the Operator Panel Language 96Install the dual paper tray (optional) 97
Chapter 5 The Print FunctionPrinting Concepts 102
Types of print jobs 102About automatic printing 105About Interactive Printing 107
The Printer Drivers 109About the Océ VarioPrint® 2100/2110 Printer Drivers 109About the Bidirectional Printer Driver 113About the page programmer 115About the templates 118
Printing on the Océ VarioPrint® 2100/2110 121Printing a Document 121Printing a Job from the 'Mailbox' or 'Memory' 122Bundle printing 125Combining Print Jobs and Copy Jobs into One Bundle 129Printing a Job With an Account ID 131Stop printing 133
Chapter 6 The Copy FunctionThe Copying Concepts 136
ID entry for copy jobs 136Types of Job Settings 139Concatenation and chapterization 147Create a custom template 150Use a custom template 152About the integrated booklet maker 153Disabling Double-sheet Detection 155
Copying on the Océ VarioPrint® 2100/2110 156Making a Copy 156Change the settings for a copy job 159Combining Subsets into One Document 160Deleting subsets 163

Table of Contents 7
Including Tab Sheets and Inserts 165Create a booklet 167Stop Scanning 169Stop printing 171
Chapter 7 The Scan Function (optional)Scanning Concepts 174
Introduction to the scan-to-file function 174Introduction to the scan-to-email function 177About the scan profiles file 179The Configuration of the Scan-to-file Function 180The configuration of the scan-to-email function 181
Scanning on the Océ VarioPrint® 2100/2110 185Original input on the glass plate or into the ADF 185Create a scan-to-file job 188Create a scan-to-email job 192Combining subsets into one file 194Change the zoom factor 196Optimize the scan quality 201Stop Scanning 203Error messages and possible solutions 205
Chapter 8 The Accounting FunctionGeneral Information 208
About the accounting function 208Accounting Settings on the Operator Panel 211Configure the accounting settings 214
The Accounting Log File 216About the accounting log file 216Downloading the Accounting Log File 221
The Account ID File 222Download the account ID file 222Edit the account ID file 223Uploading the Account ID File 225Restoring the Default Account ID File 226
Using the Accounting Function 227Entering a Fixed Account ID 227Making a Copy or Print with the Copy Card 229

8 Océ VarioPrint® 2100/2110 User's Manual
Chapter 9 Adding SuppliesAdding Toner 232
Adding the Toner 232Loading the Media 235
Load the standard media and media with special front 235Load oversize media 237Load custom size media 239Load the tab sheets 241Load a combination of tab sheets and media with special front 245
Replacing the Stapler Cartridges 248About the staplers 248Replacing Stapler Cartridges 1 and 2 (standard on-line staplers) 250Replacing Stapler Cartridge 3 (optional off-line stapler) 252Replacing Stapler Cartridges 4 and 5 (optional booklet maker) 254
Chapter 10 Error HandlingHandling Contradictions 256Handling Errors 260About Paper Jams 262About Staple Jams 264
Appendix A Overview and Tables 265Product specifications 266Media and paper tray specifications 267Originals that can be used 271
Appendix B Miscellaneous 273Reader's comment sheet 274Addresses of local Océ organisations 276

9
Océ VarioPrint® 2100/2110
User's Manual
Chapter 1 Introduction

10 Océ VarioPrint® 2100/2110 User's Manual
About Océ VarioPrint® 2100/2110 Users
Introduction
Information for operators, key operators, system administrators
For the purpose of this user manual, the following target groups are defined.■ Operators (including general users)■ Key operators■ System Administrators
The target group for the information or task in a section is indicated at the top of that section.
Tasks of the types of users[1] User Tasks
[1] User Tasks
Types of users Examples of tasks
Operators ■ Create print jobs, copy jobs and scan jobs■ Process print jobs, copy jobs and scan jobs■ Define settings for 'Paper manager' and 'System
manager' in the operator panel■ Handle errors
Key operators ■ Manage the key operator settings in the Océ Settings Editor
System Adminis-trators
■ Configure the Océ VarioPrint® 2100/2110 in the network
■ Manage the system administrator settings in the Océ Settings Editor
Introduction 11
Available documentation
The Océ VarioPrint® 2100/2110 documentation set
Information for operators, key operators, system administrators
Océ delivers the Océ VarioPrint® 2100/2110 with a documentation set.The documentation set for the Océ VarioPrint® 2100/2110 contains the following items:
[2] The Documentation Set
Item Description
User's Manual The user's manual describes the workflow of print jobs, copy jobs and scan jobs.■ Print from the mailbox■ Print directly to the Océ VarioPrint® 2100/2110■ Make simple and advanced copies■ Convert analog documents into digital documents
(scan-to-file)■ Adding Supplies■ Solving possible errors
The manual also contains general information about the system.■ Configuration, workflow and structure of the Océ
VarioPrint® 2100/2110■ Turn on, turn off and restart the system■ Product specifications, originals and copy materials
to use
Safety manual The multilingual safety manual provides information about safety issues.■ Instructions for safe use■ Safety data sheets■ EPA Energy Star®

12 Océ VarioPrint® 2100/2110 User's Manual
[2] The Documentation Set
Quick Reference Card
The Quick Reference Card contains information about the following tasks.■ Define the settings for the originals and the prints■ Combine the subsets■ Use the mailbox■ Use the memory■ Manage the jobs in the job queue
CD-ROM The CD-ROM contains a digital copy of the User manu-al, the Safety manual and the Quick Reference Card.
On-line help The Océ VarioPrint® 2100/2110 contains the following types of on-line helps.■ An on-line help on the operator panel.The on-line help on the operator panel contains information about how to load standard media, special-front sheets and tab sheets into the paper trays.The Help key on the operator panel gives access to this on-line help.■ An on-line help in the Océ Settings Editor application
on the Océ Smart Imager.The User manual sometimes refers to settings in the Océ Settings Editor.The Océ Settings Editor allows key operators and system administrators to change the default system settings.Key operators and system administrators can refer to the on-line help in the Océ Settings Editor for more information about the settings.■ An on-line help in the printer driver (PCL and
PostScript®) of the Océ VarioPrint® 2100/2110.
Item Description

Introduction 13
Introduction to the Océ VarioPrint® 2100/2110 series
Introduction
Information for operators, key operators, system administrators
The Océ VarioPrint® 2100/2110 is a series of productive printing systems that enable you to print, copy and scan your jobs.The Océ VarioPrint® 2100/2110 series is a modular system. The following table shows the main differences between the standard versions of the Océ VarioPrint® 2100 and the Océ VarioPrint® 2110.
Main differences between the Océ VarioPrint® 2100/2110[3] Main differences between the Océ VarioPrint® 2100/2110
[3] Main differences between the Océ VarioPrint® 2100/2110
Upgrade your Océ VarioPrint® 2100/2110
You can upgrade your Océ VarioPrint® 2100 with the following.■ A speed license for 105 prints/minute■ Support of custom size paper and oversize paper■ Support of streaming PS and PCL
Feature Océ VarioPrint® 2100
Océ VarioPrint® 2110
Print speed (A4/Letter) 91 prints/minute 105 prints/minute
Default support of custom size paper and oversize paper
No Yes
Default support of streaming PS and PCL
No Yes

14 Océ VarioPrint® 2100/2110 User's Manual
Furthermore, you can upgrade the Océ VarioPrint® 2100/2110 series with the following.
[4] Optional features for the Océ VarioPrint® 2100/2110 series
[4] Optional features for the Océ VarioPrint® 2100/2110 series
Optional feature Description
Dual paper trays The dual paper trays enable you to almost double the capacity of your paper input trays.
A booklet maker on top of your printer
The integrated booklet maker folds and staples your prints to create a booklet.
The scan function The scan function enables you to turn your analog originals into digital files.
An external finisher You can add various external finishers to your system, for example one of the following.■ The Océ DFS10 to bind your
documents (including a cover)■ A booklet maker to create folded
and stapled booklets■ A high-capacity stacker to stack
more sheets at a time, so you can remove the prints from the printer half as often as before.
A license for PS, PCL and NDPS The license enables you to use PS, PCL or NDPS

Introduction 15
Concepts and Philosophy
Introduction
Information for operators, key operators, system administrators
This section describes the main concepts of your Océ VarioPrint® 2100/2110.
Supported printing workflows
The Océ VarioPrint® 2100/2110 supports the following printing workflows.
[5] Supported workflows
[5] Supported workflows
Your system can automatically identify the type of job that arrives. Therefore, job types are assigned to the network ports. The system administrator can define the workflow for each input channel in the Océ VarioPrint® 2100/2110 Settings Editor.
Supported workflow Description
RIP then print When the system receives your job, the system first RIPs your whole job. After that, the job is available and visible on your system.
Print while RIP When the system receives your job, the job be-comes immediately available in the job queue. As soon as the RIP of the first page is ready, the system starts to print your job.Note: The operator panel only gives limited feedback about the job.
Streaming (requires a li-cense on the Océ Vario-Print® 2100)
Streaming is mainly used for large jobs. When the system receives your job, the job becomes immediately available in the job queue. As soon as the RIP of the first page is ready, the system starts to print your job.Streaming jobs are a continuous flow of data to your system. To prevent an overflow of your sys-tem, printed data are already cleaned while the rest of your job is printed.Note: The operator panel only gives limited feedback about the job.
16 Océ VarioPrint® 2100/2110 User's Manual
Automatic and interactive printing
Automatic printing and interactive printing usually relate to RIP then print.
The Océ VarioPrint® 2100/2110 allows you to send your print jobs through the network directly to the job queue. The jobs in the job queue are printed without operator intervention. This type of printing is called automatic printing (see �About automatic printing� on page 105).You can also send your print jobs to the mailbox. You must first select a job in the mailbox to print the job. You can also edit the settings of the jobs in the mailbox. This type of printing is called interactive printing (see �About Interactive Printing� on page 107).The key operator can define the default type of printing in the 'System manager'.
Memory and mailbox
The memory and mailbox are digital storage areas for scanned documents and print jobs from the network. These digital storage areas are on a hard disk in the Océ Smart Imager. You must remove the jobs from the mailbox and memory manually.
The 'Memory' is the location for scanned jobs and jobs that are moved from the job queue to the memory. The scanned jobs are copy jobs that were sent to the memory. When you use 'Scan to memory', you can print the jobs later. This function is called postponed copying (scan now, print later).
The 'Mailbox' is the location for print jobs. The jobs in the 'Mailbox' are displayed with the file name, the user name, the number of pages in the job, the number of sets to print, the media type of the first page and the date and time. The 'Memory' shows the same information but displays a job number instead of a name and there is no user name.
Next job
Whether it is an analog or digital job, the comprehensive job queue system (called the Factory) increases the daily production on the system. The job queue enables you to prepare jobs in advance. The jobs are created and sent to the job queue while other jobs are prepared to be printed.
Next job preparation is independent from print production. Scanning, printing and processing is done at the same time, which keeps the system active and enables the processing of a wide variety of jobs.

Introduction 17
Security
Customers with confidential jobs need the possibility to remove every trace of the information contained in a job. The recovery of this confidential information must not be possible.The Océ VarioPrint® 2100/2110 allows you to remove all the traces of all your jobs. This function is called E-shredding. E-shredding overwrites the data on magnetic-storage devices in such a way that the data become unreadable, even with special equipment.The system administrator can enable and disable E-shredding. When E-shredding is enabled, the system administrator can select the required level of E-shredding.Refer to the on-line help of the Océ Settings Editor for more information about the use of E-shredding.
Note: E-shredding requires a license.
Copy templates
The copy templates of the Océ VarioPrint® 2100/2110 enable you to easily create copy jobs. The templates contain default settings for various copy jobs. You can select one of the standard templates or you can define custom templates. You can define up to 5 custom templates that contain your custom-made settings (see �Create a custom template� on page 150).
Combine subsets
Océ Set Logic enables you to handle hardcopy originals on the Océ VarioPrint® 2100/2110 in an effective way. Océ Set Logic allows you to define subsets within the document (set-build) for copy jobs and scan jobs.
You can use the set-build function to combine different types of paper originals (for example different original sizes or 1-sided and 2-sided originals). You can use the automatic document feeder and the glass plate to combine subsets.

18 Océ VarioPrint® 2100/2110 User's Manual
Paper management
The paper management feature allows you to define what type of paper to use in a job. The media catalog in the Océ Settings Editor helps you define the paper types.Because of the possibility of large job queues, the paper level in the trays can change while your job is in the queue. The Océ VarioPrint® 2100/2110 will then notify you to load the paper type you defined for your job.The 'Paper manager' allows you to define the paper load of the paper trays exactly.

Introduction 19
The Power Modes
Introduction
Information for operators, key operators, system administrators
The main power modes of the Océ VarioPrint® 2100/2110 are the following.■ Off■ Low power mode■ Sleep mode.
The low power mode and the sleep mode are the energy save modes of the Océ VarioPrint® 2100/2110.
Note: The key operator can change the settings in the Océ Settings Editor. The on-line help in the Océ Settings Editor contains more information about how to change the settings.
OFF
The Océ VarioPrint® 2100/2110 is completely turned off.You can not reach the system through the network.You must press the power switch to turn on the system (see �Turning the System On� on page 24).
Low power mode
When the printer is in low power mode, the power consumption is decreased to a lower level.The operator panel on the printer displays a screen saver with the text 'Energy save mode' .You can not disable the low power mode.
20 Océ VarioPrint® 2100/2110 User's Manual
The system goes into low power mode in the following situation:
[6] System Goes into the Low Power Mode
[6] System Goes into the Low Power Mode
The system returns from the low power mode in the following situations:
[7] System Returns from the Low Power Mode
[7] System Returns from the Low Power Mode
Note: The system needs 30 seconds to warm up.
Sleep mode
When the system is in sleep mode, the power consumption is decreased to a very low level.The operator panel on the printer is off. The On/Off button on the printer is amber.
When
1 The job queue of the Océ VarioPrint® 2100/2110 has been empty for a defined time.Note: This time is defined in the Océ Settings Editor. The key operator can set a time between 1 and 240 minutes in increments of 1 minute. The factory default is 15 minutes.
When
1 You press a key on the operator panel
2 You send a print job.Sometimes the system remains in the low power mode when you send a print job. This event can occur when the print job is forced to the mailbox.

Introduction 21
The system goes into sleep mode in the following situations:
[8] System Goes into the Sleep Mode
[8] System Goes into the Sleep Mode
The system returns from the sleep mode in the following situations.
[9] System returns from the sleep mode
[9] System returns from the sleep mode
Note: The system needs a couple of minutes to warm up.
When
1 The job queue of the Océ VarioPrint® 2100/2110 has been empty for a defined time.Note: This time is defined in the Océ Settings Editor. The key operator can set a time between 1 and 240 minutes in increments of 1 minute. The factory default is 90 minutes.
2 You press the On/Off button on the printer
When
1 You press the On/Off button on the printer
2 An automatic print job (AP) arrives in the job queue.Note: When the automatic print job is forced to the mailbox (as defined in the Océ Settings Editor), the system remains in the sleep mode.
3 You send a print job (only when the setting 'Automatic wake-up' in the Océ Settings Editor is enabled)

22 Océ VarioPrint® 2100/2110 User's Manual

23
Océ VarioPrint® 2100/2110
User's Manual
Chapter 2 Turning the System On and Off

24 Océ VarioPrint® 2100/2110 User's Manual
Turning the System On
Introduction
Task for operators
The system has the following switches and buttons (see the illustration for the correct location). ■ Power switch
You can find the power switch at the left-hand side of the printer. The power switch cuts and connects the power to the complete system.
■ On/Off button with amber and green LED . The On/Off button allows you to toggle the status of the system between the stand-by mode and the sleep mode. This action is only possible if the power switch is in position '1' and the startup phase was done. After the startup phase, the operator panel displays 'Print' and 'Copy'. The operator panel also displays 'Scan' when the optional scan-to-file function is configured on your system.
[1] The Power Switches
[1] The Power Switches
Turning the System On and Off 25
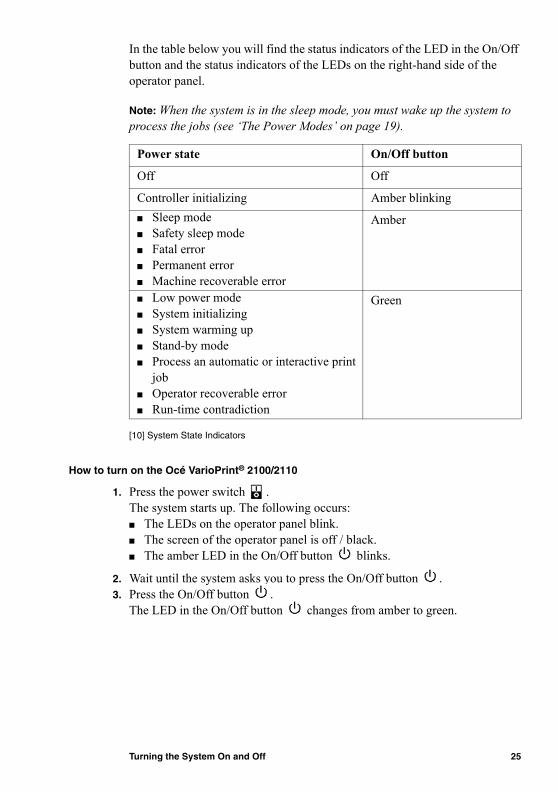
In the table below you will find the status indicators of the LED in the On/Off button and the status indicators of the LEDs on the right-hand side of the operator panel.
Note: When the system is in the sleep mode, you must wake up the system to process the jobs (see �The Power Modes� on page 19).[10] System State Indicators
[10] System State Indicators
How to turn on the Océ VarioPrint® 2100/2110
1. Press the power switch . The system starts up. The following occurs:■ The LEDs on the operator panel blink.■ The screen of the operator panel is off / black.■ The amber LED in the On/Off button blinks.
2. Wait until the system asks you to press the On/Off button .3. Press the On/Off button .
The LED in the On/Off button changes from amber to green.
Power state On/Off button
Off Off
Controller initializing Amber blinking■ Sleep mode■ Safety sleep mode■ Fatal error■ Permanent error■ Machine recoverable error
Amber
■ Low power mode■ System initializing■ System warming up■ Stand-by mode■ Process an automatic or interactive print
job■ Operator recoverable error■ Run-time contradiction
Green

26 Océ VarioPrint® 2100/2110 User's Manual
Shut down the system
Introduction
Task for operators
Follow the shut-down procedure described in this section before you use the power switch on the Océ VarioPrint® 2100/2110. This procedure makes the system shut down in a controlled way.
Note: To save energy, you can also put the Océ VarioPrint® 2100/2110 into sleep mode (see �The Power Modes� on page 19).
How to shut down the Océ VarioPrint® 2100/2110
1. Press the 'System manager' function key.2. Press the 'System' function key.3. Press the 'Shut down' function key.
The operator panel displays the message 'Are you sure you want to shut down?'.
4. Press the 'Yes' function key.The printer starts to shut down when the current jobs are ready.The LED on the operator panel changes from green to red.Wait for the message 'When the LED on the operator panel is off, you can turn off the system. Press Close to continue.'
5. Press the 'Close' function key to continue the shut-down procedure. The following occurs:■ The LED in the On/Off button changes from green to amber.■ The screen of the operator panel goes off.■ The LED on the operator panel goes off.
6. Press the power switch .

Turning the System On and Off 27
Restart the system
Introduction
Task for key operators, system administrators
When you change settings in the Océ Settings Editor, the software may ask you to restart the system. A restart activates the newly changed settings.
If you restart the system, the following occurs:■ The Océ Settings Editor changes become active■ The jobs in the mailbox are saved■ The job number of new copy jobs and scan jobs is set to 1.
You must restart the system in the Océ Settings Editor. Follow the procedure below to restart the system.
How to restart the system
1. Start the Océ Settings Editor in your web browser.2. Click 'Service'.3. Click 'Control'.4. Click 'Restart'.
The screen displays 'Restart the Océ Smart Imager'.5. Click 'OK'.
The system restarts.The screen of the operator panel displays the message 'When the LED on the operator panel is off, you can turn off the system. Press Close to continue.'.Note: The system waits until all active jobs are finished.
6. Press the 'Close' function key on the operator panel.The printer goes into the sleep mode.
7. Press the On/Off button on the printer to wake up the system.The LED in the On/Off button changes from amber to green.

28 Océ VarioPrint® 2100/2110 User's Manual

29
Océ VarioPrint® 2100/2110
User's Manual
Chapter 3 Getting to Know the Océ VarioPrint® 2100/2110
30 Océ VarioPrint® 2100/2110 User's Manual
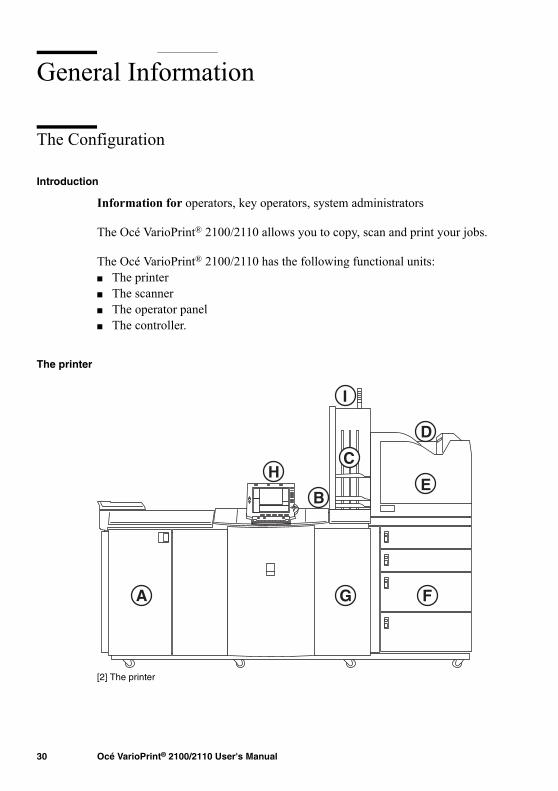
General Information
The Configuration
Introduction
Information for operators, key operators, system administrators
The Océ VarioPrint® 2100/2110 allows you to copy, scan and print your jobs.
The Océ VarioPrint® 2100/2110 has the following functional units:■ The printer■ The scanner■ The operator panel■ The controller.
The printer[2] The printer
[2] The printer
A G
H
B
C
E
D
I
F
Getting to Know the Océ VarioPrint® 2100/2110 31
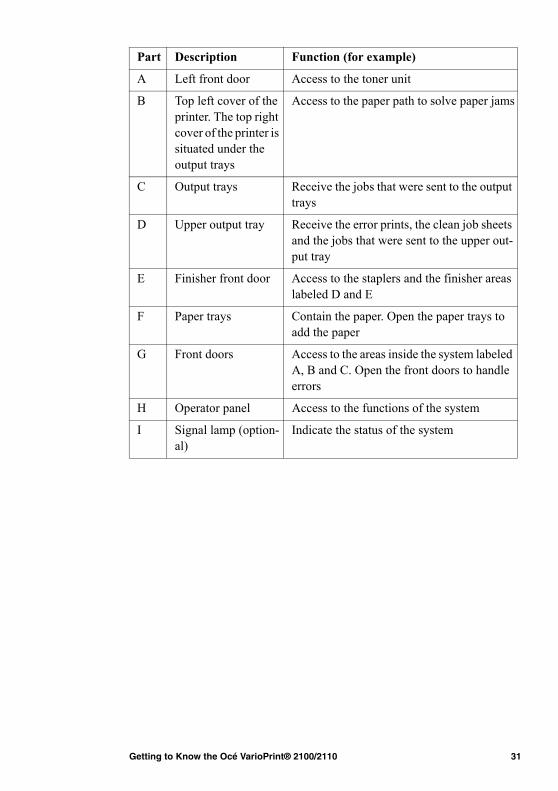
Part Description Function (for example)
A Left front door Access to the toner unit
B Top left cover of the printer. The top right cover of the printer is situated under the output trays
Access to the paper path to solve paper jams
C Output trays Receive the jobs that were sent to the output trays
D Upper output tray Receive the error prints, the clean job sheets and the jobs that were sent to the upper out-put tray
E Finisher front door Access to the staplers and the finisher areas labeled D and E
F Paper trays Contain the paper. Open the paper trays to add the paper
G Front doors Access to the areas inside the system labeled A, B and C. Open the front doors to handle errors
H Operator panel Access to the functions of the system
I Signal lamp (option-al)
Indicate the status of the system

32 Océ VarioPrint® 2100/2110 User's Manual
The scanner[3] The scanner
[3] The scanner
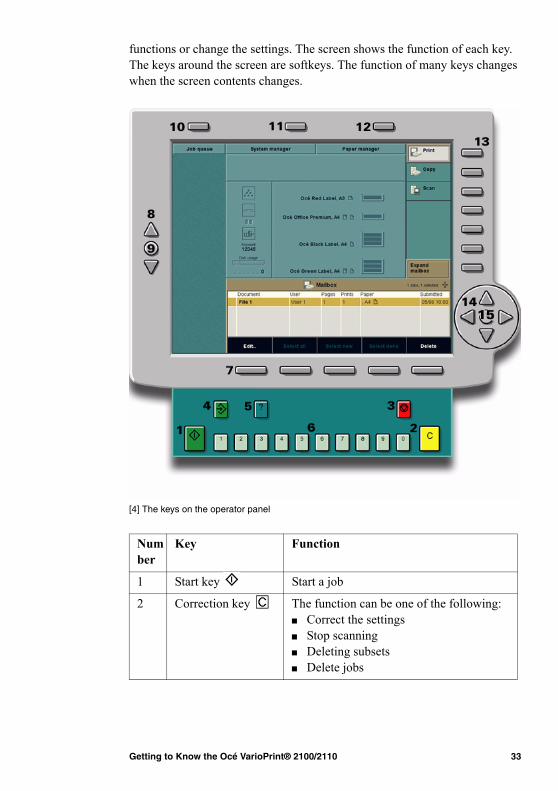
The keys on the operator panel
The keys on the operator panel provide access to the functions of the Océ VarioPrint® 2100/2110. Use the keys around the screen to move through the
Part Description Function (for example)
A Top left cover Access the original section to handle origi-nal errors
B Automatic document feeder
Feed the originals
C Original receiving tray
Hold the scanned originals
D Cover handle Access the glass plate. Open the scanner cover to copy or scan from the glass plate
A B C
D
Getting to Know the Océ VarioPrint® 2100/2110 33
functions or change the settings. The screen shows the function of each key. The keys around the screen are softkeys. The function of many keys changes when the screen contents changes.
[4] The keys on the operator panel
[4] The keys on the operator panel
[11] The keys on the operator panel
Number
Key Function
1 Start key Start a job
2 Correction key The function can be one of the following:■ Correct the settings■ Stop scanning■ Deleting subsets■ Delete jobs

34 Océ VarioPrint® 2100/2110 User's Manual
3 Stop key Stop a print jobNote: Press the key one time to stop after a set. Press the key two times to stop after a page.
4 Set-build key Combine subsets into one document
5 Help key Access the on-line help
6 Numeric keys Enter the number of prints, enter a PIN or en-ter an account ID
7 Function-related keys
The function depends on the screen contents.The function can be one of the following:■ Access the templates■ Define the settings
8 Arrow-up and ar-row-down keys
Scroll through the job queue
9 Selection key Open a job in the job queue
10 Job queue key Toggle between the extended and collapsed job queue view to inspect and manage the jobs in the job queue
11 Function-related key The function depends on the screen contents.The function can be one of the following:■ Open and close the 'System manager'■ Change the settings for 'Original'
12 Function-related key The function depends on the screen contents.The function can be one of the following:■ Open and close the 'Paper manager'■ Change the settings for 'Print'
13 Function-related keys
Access the functions displayed on the screen
Number
Key Function

Getting to Know the Océ VarioPrint® 2100/2110 35
[11] The keys on the operator panel
[12] Function of the star arrow keys
[12] Function of the star arrow keys
14 Star arrow keys The function depends on the screen contents.The function can be one of the following:■ Change the settings■ Scroll through the jobs in the mailbox or
memory■ Increase and decrease the values of the
settings in the job editor
15 Selection key Use the round key to select a job for bundle printing
Key Function
Star arrow-up key Increase the value in small steps
Star arrow-down key Decrease the value in small steps
Star arrow-right key Increase the value in large incre-ments
Star arrow-left key Decrease the value in large incre-ments
Star round key Select a job in the mailbox or memo-ry for bundle printing
Number
Key Function

36 Océ VarioPrint® 2100/2110 User's Manual
About the paper trays
Introduction
Information for operators, key operators
Depending on your configuration, the Océ VarioPrint® 2100/2110 has 3 or 4 front-loading paper trays. All the paper trays can handle the same variety of copy materials (see �Media and paper tray specifications� on page 267). You can add the media to the paper trays while the printer is running. When a paper tray is empty, the Océ VarioPrint® 2100/2110 automatically switches to another paper tray that contains the same media.All the paper trays of the Océ VarioPrint® 2100/2110 can process oversize formats (A3+ and R-Ledger). You must adapt the paper trays to use oversize paper (see �Load oversize media� on page 237).
The paper trays
You can check the status of the paper trays on the operator panel. The icons of the paper trays in the main screen show the paper level in the paper trays (see �The Icons of the Main Screen� on page 41).You can also check the LED on the paper tray to see which paper tray is empty. The LEDs on the paper trays are off when the trays are full. When a paper tray runs empty, the LED blinks.

Getting to Know the Océ VarioPrint® 2100/2110 37
How you must load the media, for example face down, depends on the media type and the destination of your print job.The following table shows where you can find more information about how to load the media.
[13] Loading the Media
[13] Loading the Media
The dual paper trays (optional)
You can replace the default bulk trays with dual paper trays. The dual paper trays can contain 2 stacks of paper and so almost double the capacity of the bulk trays (see �Install the dual paper tray (optional)� on page 97).
Media types More information
Standard mediaMedia with special front
(see �Load the standard media and media with special front� on page 235)
Oversize media (see �Load oversize media� on page 237)
Custom size media (see �Load custom size media� on page 239)
Tab sheets (see �Load the tab sheets� on page 241)
A combination of tab sheets and me-dia with special front
(see �Load a combination of tab sheets and media with special front� on page 245)
38 Océ VarioPrint® 2100/2110 User's Manual
The Main Screen
Introduction
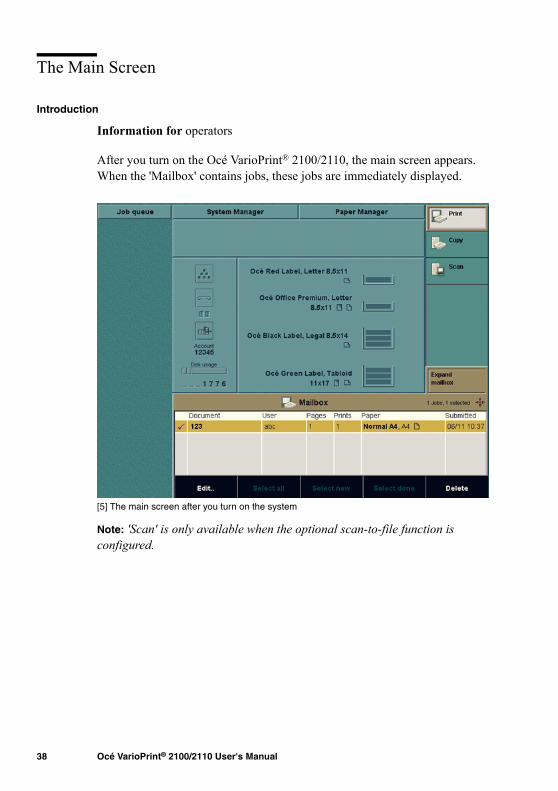
Information for operators
After you turn on the Océ VarioPrint® 2100/2110, the main screen appears. When the 'Mailbox' contains jobs, these jobs are immediately displayed.
[5] The main screen after you turn on the system
[5] The main screen after you turn on the system
Note: 'Scan' is only available when the optional scan-to-file function is configured.

Getting to Know the Océ VarioPrint® 2100/2110 39
The sections of the main screen[6] The sections of the main screen
[6] The sections of the main screen
[14] The sections of the main screen
Number Section Function
1 'Job queue' Show all the jobs in the job queue. Press the key for 'Job queue' to manage the jobs in the queue ('Move to memory', 'Stop after this', 'Delete', 'Move to top', 'Hold' or 'Release')
2 'System manag-er'
Access the 'System manager' to define the system settings or shut-down the system
3 'Paper manager' Access the 'Paper manager' to define the pa-per load of the paper trays
4 Message section Display text messages and status icons

40 Océ VarioPrint® 2100/2110 User's Manual
[14] The sections of the main screen
Note: The chapters The print function, The copy function and The scan function contain detailed information about all the settings for print jobs, copy jobs and scan jobs that you can edit in the so-called job editor.
5 Warning section Display information about the status of the toner, the staplers and the external finisher (if connected), as well as information about the current account, the amount of disk used and the day counter
6 Media section Display information about the status of the paper trays
7 Job type section Access the type of job that you need. You can select 'Print' (default after you turn on the system), 'Copy' or 'Scan' (if configured)
8 'Mailbox' or 'Memory'
Access the print jobs in the 'Mailbox' or 'Memory'.
Number Section Function

Getting to Know the Océ VarioPrint® 2100/2110 41
The Icons of the Main Screen
Introduction
Information for operators, key operators
The main screen of the operator panel is divided into 3 main sections. These sections are the message section, the warning section and the media section.
The message section is the upper part of the screen. The message section displays information about for example errors and contradictions.
The warning section is the left-hand side of the screen. The warning section displays information about for example the toner and stapler level.
The media section is the right-hand side of the screen. The media section displays information about the media types and the amount of paper in the paper trays.
Note: The number of paper trays on the main screen depends on your configuration. Your system can have 3 or 4 paper trays.
The icon of the message section[15] Double-sheet detection
[15] Double-sheet detection
Icon Description
The icon indicates that the double-sheet detection is dis-abled

42 Océ VarioPrint® 2100/2110 User's Manual
The icons of the warning section[16] The icons of the warning section
[16] The icons of the warning section
Note: 'Disk usage' shows the amount of disk space that is used for jobs in the memory and mailbox, and the jobs in the job queue. When 90% of the disk is used, the indication becomes orange. When 100% of the disk is used, the indication becomes red. The disk usage indication is updated every 5 minutes.
Icon Description
The toner level is OK
The toner icon is orange.The toner reservoir is almost empty. The toner reservoir contains toner for about 5,000 more pages
The toner icon and the border are orange.The toner reservoir is empty
The stapler level is OK
The staple icon is orange. One or more staplers are al-most empty.The number of the stapler that is almost empty is high-lighted in light orange
The staple icon and the border are orange. One of the sta-plers is empty.The number of the empty stapler is highlighted in dark orange
The external finisher is connected and ready
The external finisher is connected, but not ready (full or off-line)
Maintenance is required soon.The operator panel indicates the number of prints you can make, with an accuracy of 1,000 prints, for example "4,000".This indicates that preventive maintenance is required within the next 4,000 prints.
Maintenance is required within the next 1,000 prints.The system stops when service is required now (0 prints).

Getting to Know the Océ VarioPrint® 2100/2110 43
The media information icons
The media section displays information about the media in the paper trays and about the status of the paper trays. The operator panel displays different icons for standard paper trays and dual paper trays.
[17] The media information icons
[17] The media information icons
Icon Description
The paper tray contains paper with a special front, for ex-ample company paper.The front side and the back side of the paper are different
The paper tray contains inserts
The paper tray contains tab sheets of which the sheet must be printed
The paper tray contains tab sheets of which the tab must be printed
The paper tray contains tab sheets that must be processed as inserts
The paper tray contains paper that is fed over the long edge (LEF)
The paper tray contains paper that is fed over the short edge (SEF)
Paper from the indicated paper tray is used for the cur-rent job

44 Océ VarioPrint® 2100/2110 User's Manual
The icons for the standard paper trays[18] The icons for the standard paper trays
[18] The icons for the standard paper trays
The icons for the dual paper trays (optional)[19] The icons for the dual paper trays (optional)
[19] The icons for the dual paper trays (optional)
Icon Description
or The horizontal lines are an indication of the level of the media in the paper trays. Each horizontal line indicates approximately 100 sheets (normal paper of 80 g/m2, 20 lb bond)
or The paper tray is empty
or The plate inside the paper tray moves up or down.For example before or after you load the paper
or The paper tray contains more paper than the maximum allowed amount of paper.Remove the excess sheets
Icon Description
The paper tray is filledNote: The dual paper tray does not have a level detection. The horizontal lines do not indicate the amount of paper that is left in the dual paper tray.
The paper tray is empty
The right-hand section of the paper tray contains insuffi-cient paper to slide the right-hand paper stack to the left.
The plate inside the dual paper tray moves up or down.For example before or after you load the paper
The paper tray contains more paper than the maximum allowed amount of paper.Remove the excess sheets
Getting to Know the Océ VarioPrint® 2100/2110 45
The information in the media section
Introduction
Information for operators, key operators
The media section of the main screen displays information about the media in the paper trays. The information displayed is the programmed media name and the detected size and orientation in the paper trays. This information can be in two colors, orange and black.
The colors mean the following: ■ Black The size of the programmed media equals the size detected in the
paper tray■ Orange The size of the programmed media does not equal the size detected
in the paper tray.
You can set the media characteristics in the 'Media catalog'. Here you must enter the media names, sizes and orientations. The link between a certain media type and the paper tray is made in the 'Paper manager'. When you fill a paper tray, you can set the media type here (see �Set the needed media type� on page 58). The 'Paper manager' displays the list entered in the 'Media catalog'. Media that matches the size detected for a paper tray is displayed in black. The media types of the 'Media catalog' that do not match the size detected for that paper tray are displayed in orange. You can select a media type from the displayed list for each paper tray.
Note: When the programmed media does not match the detected size, a mismatch is displayed. The media name turns orange. There is one exception. If the programmed media is oversize media, the system does not display a mismatch.

46 Océ VarioPrint® 2100/2110 User's Manual
The media section[7] The information in the media section
[7] The information in the media section

Getting to Know the Océ VarioPrint® 2100/2110 47
Information in the media section[20] Media section information
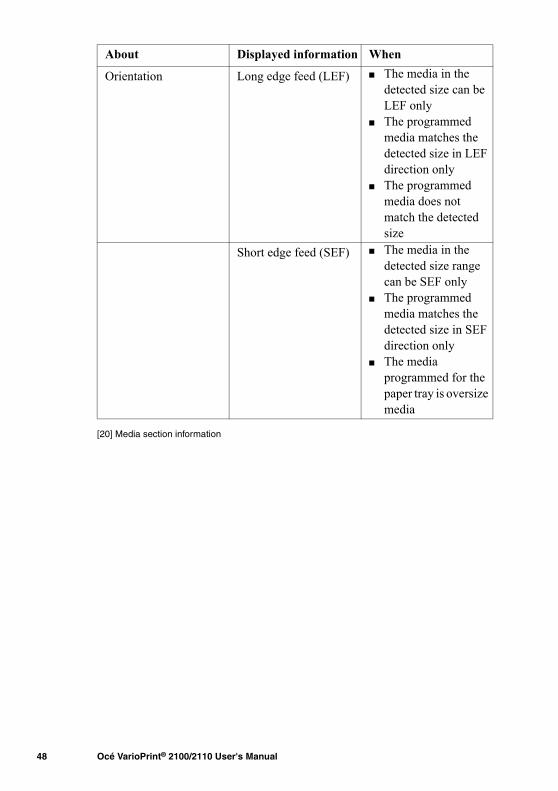
About Displayed information When
Size The size of the pro-grammed media
■ The size of the programmed media matches the detected size in the paper tray
■ The programmed media for that tray is oversize media
The default size that matches the detected size range in the paper tray
The size of the pro-grammed media does not match the detected size in the paper tray
'Undefined' 'Undefined' is displayed when the following two conditions apply. 1. The size of the pro-grammed media does not match the detected size in the paper tray2. There is no default size for the detected size
48 Océ VarioPrint® 2100/2110 User's Manual
[20] Media section information
Orientation Long edge feed (LEF) ■ The media in the detected size can be LEF only
■ The programmed media matches the detected size in LEF direction only
■ The programmed media does not match the detected size
Short edge feed (SEF) ■ The media in the detected size range can be SEF only
■ The programmed media matches the detected size in SEF direction only
■ The media programmed for the paper tray is oversize media
About Displayed information When
Getting to Know the Océ VarioPrint® 2100/2110 49
The on-line help on the operator panel
Introduction
Information for operators
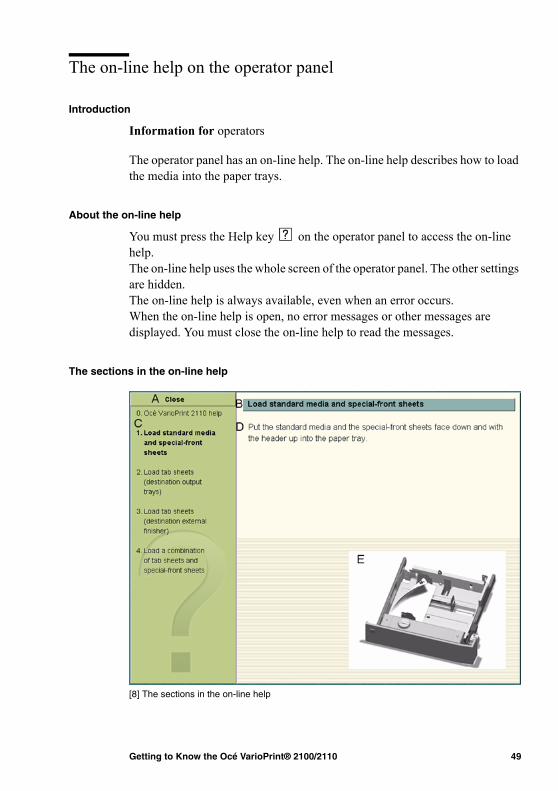
The operator panel has an on-line help. The on-line help describes how to load the media into the paper trays.
About the on-line help
You must press the Help key on the operator panel to access the on-line help.The on-line help uses the whole screen of the operator panel. The other settings are hidden.The on-line help is always available, even when an error occurs.When the on-line help is open, no error messages or other messages are displayed. You must close the on-line help to read the messages.
The sections in the on-line help[8] The sections in the on-line help
[8] The sections in the on-line help

50 Océ VarioPrint® 2100/2110 User's Manual
The following table describes the sections in the on-line help.
[21] The sections in the on-line help
[21] The sections in the on-line help
Navigatiing Through the On-line Help[22] Navigatiing Through the On-line Help
[22] Navigatiing Through the On-line Help
Section Description
A Press the function key 'Close' to quit the on-line help
B Displays the title of your current on-line help topic
C Displays a numbered list of the topics
D Displays the information for each topic
E Displays the information of the topic in the form of an illus-tration
Key Function
Help key Access and quit the on-line help.Note: You can also press the 'Close' function key to quit the on-line help.
Numeric keys The numbers in the left-hand pane of the on-line help match the numeric keys on the operator panel. Press the matching key on the operator panel to get more informa-tion about the topic.Note: Press the 0 numeric key to return to the start section.
Up and down ar-row key
■ Use the arrow-up key to select the previous topic in the left-hand pane.
■ Use the arrow-down key to select the next topic in the left-hand pane.
'Close' function key
Quit the on-line help. This key is available in all the top-ics.Note: You can also press the Help key to quit the on-line help.

Getting to Know the Océ VarioPrint® 2100/2110 51
The Signal Lamp (optional)
Introduction
The operator panel informs the operator when the system needs operator interaction. However, in most cases the operator takes care of more than one system.The signal lamp is used to inform the operator when they are not close to the system.
The system can be in different states. The table below shows the possible states in which the system needs operator interaction.
[23] System States
[23] System States
State Information
Idle No jobs in the job queue
System in error Machine Recoverable Error/Operator Recoverable Er-ror/Permanent Error etc.
Job stopped Due to a contradiction, stop after a page etc.
To improve productivity, the operator is warned some time before the system actually stops (warning).
Nearly out of toner
The system contains toner for about 5,000 more pages. The system stops when the toner reservoir is empty
Next job contra-diction
The system stops if the contradiction is not removed
Next job 'On hold'
The system stops if the 'On hold' indication is not re-moved

52 Océ VarioPrint® 2100/2110 User's Manual
State signal colors
The signal lamp contains three lights (green, yellow and red) to indicate the different states.
[24] State Signal Colors
[24] State Signal Colors
State No warning/no error
Warning/no er-ror
Error
Idle Lights off Yellow Red
System running Green Yellow Red
System running and next job con-tradiction (time to finish job < 5 minutes)
Yellow Yellow Red
Current job is stopping
Yellow Yellow Red
Current job stopped
Red Red Red
Getting to Know the Océ VarioPrint® 2100/2110 53
The settings of the Océ VarioPrint® 2100/2110 Settings Editor
Introduction
Information for key operators, system administrators
The Océ VarioPrint® 2100/2110 Settings Editor application contains settings that enable you to adapt the system to your needs. You can access the functions of the Océ VarioPrint® 2100/2110 Settings Editor in Key operator (KO) mode or in System administrator (SA) mode. The SA mode includes all the functions to configure and maintain your system. The KO mode gives access to a subset of these settings.This section shows an overview of the settings in the Océ VarioPrint® 2100/2110 Settings Editor. Please refer to the on-line help of the Océ VarioPrint® 2100/2110 Settings Editor for detailed information about the settings.

54 Océ VarioPrint® 2100/2110 User's Manual
Overview of the settings
The on-line help is divided in 3 main sections. The main sections are 'Service', 'Settings' and 'Media'. Each section contains subsections.The following tables shows where you can find which setting.
[25] The settings in the 'Service' section
[25] The settings in the 'Service' section
[26] The settings in the 'Settings' section
Subsection 1 Subsection 2
'Contact'
'Versions'
'Counters'
'Status' ■ 'Configuration report'■ 'System log file'■ 'Last 10 errors'■ 'Last 10 warnings'■ 'Trace level'■ 'Trace log file'■ 'Scan job export status'
'Control' ■ 'Restart'■ 'Sleep mode'■ 'Printing'
'Clean-up' ■ 'Mailbox'■ 'Queue'■ 'Spool queue'■ 'Scan job export buffer'
'Installation' ■ 'Upgrade software'■ 'Software options'■ 'Factory defaults'
Subsection 1 Subsection 2 Subsection 3
'System' ■ 'Key operator PIN'■ 'System
administrator PIN'■ 'Date and time'■ 'System location'
'Power management'
'Security' 'E-shredding'

Getting to Know the Océ VarioPrint® 2100/2110 55
[26] The settings in the 'Settings' section
'Paper' ■ 'Scanner'■ 'Printer'■ 'Finisher'
'Scanner':'Supported sizes'
'Job management' 'Mailbox'
'Protocols' ■ 'MAC address'■ 'Network adapter'■ 'TCP/IP'
'TCP/IP':■ 'TCP/IP'■ 'Test TCP/IP'■ 'LPD'■ 'Test LPR'■ 'SMB'■ 'SLP'■ 'eNDPS'■ 'eNDPS' diagnostics■ 'Socket printing'■ 'SNMP'
'Scan-to-file' ■ 'Scan server'■ 'Connection test'■ 'Scan profiles'
'Scan profiles':■ 'Download'■ 'Upload'■ 'Default'
'Scan to e-mail' ■ 'Mail server'■ 'Connection test'■ 'Address mapping'■ 'Address list'
'Interpreters' ■ 'PostScript'■ 'PCL5e'
'PCL5e':■ 'PCL5e'■ 'Default page
settings'■ 'Default font settings'■ 'Paper tray' mapping■ 'Tray to tray'
mapping■ 'Tray to media name'
mapping
'Accounting' ■ 'Configure'■ 'Log files'■ 'ID file'
'ID file':■ 'Upload'■ 'Download'■ 'Default'
Subsection 1 Subsection 2 Subsection 3

56 Océ VarioPrint® 2100/2110 User's Manual
The 'Media' section contains the following sections.■ 'Media catalog'■ 'Add' or 'Edit' the 'Media catalog'■ 'Import' or 'Export' the 'Media catalog'.

Getting to Know the Océ VarioPrint® 2100/2110 57
Media Concepts
About the Media Catalog
Introduction
Information for operators
The Océ Settings Editor contains a media catalog to improve your productivity.
Definition
The media catalog is a list of all the media types that your Océ VarioPrint® 2100/2110 can use.Océ filled the media catalog for you with the most commonly used media types. If you need media types that are not in the media catalog, you can add these media types to the media catalog. The on-line help of the Océ Settings Editor contains more information about how to configure the media catalog.You can export the media catalog on the Océ Settings Editor to other printers.
The content of the media catalog
The media catalog can contain up to 100 different media types. For each media type, the key operator can define the following media properties.■ A media name, for example Océ Red Label or Océ Tab Cards■ The paper size, for example A4 or A3■ The paper type, for example normal paper, tab sheets or inserts■ Whether the paper has a special front■ Whether the paper is used as default front cover or default back cover.
The operator panel and the printer driver automatically take over the list from the media catalog. This characteristic gives you the possibility to select the required media type for your job from a wide range of media.
Note: When a job requires a media type that is not in one of the paper trays, a contradiction occurs. You must load the required media type into one of the paper trays to print your job (see �Set the needed media type� on page 58).

58 Océ VarioPrint® 2100/2110 User's Manual
Set the needed media type
Introduction
Task for operators
When the correct paper for a job is not in one of the paper trays, the job is not printed. The setting 'Processing' in the 'System manager' determines what occurs next.■ If 'Processing' is set to 'Keep going', the system first prints all the jobs for
which the required media are available. The not correct job is skipped and gets an alarm bell icon . You must define the correct paper in the 'Paper manager'.
■ If 'Processing' is set to 'Keep sequence', the system stops. The operator panel displays the icon for your job in the job queue and a dialog box appears. There are 2 methods to continue your job. First, you can follow the instructions in the dialog box. Second, you can use the 'Paper manager'.
Note: If a waiting job in the job queue requires a media type that is not in the paper trays, you can already set the needed media type for that job. If a waiting job requires more than one media type that is not in the paper trays, you must set the needed media types one by one. Use the 'Paper manager' to set the needed media type.
Getting to Know the Océ VarioPrint® 2100/2110 59
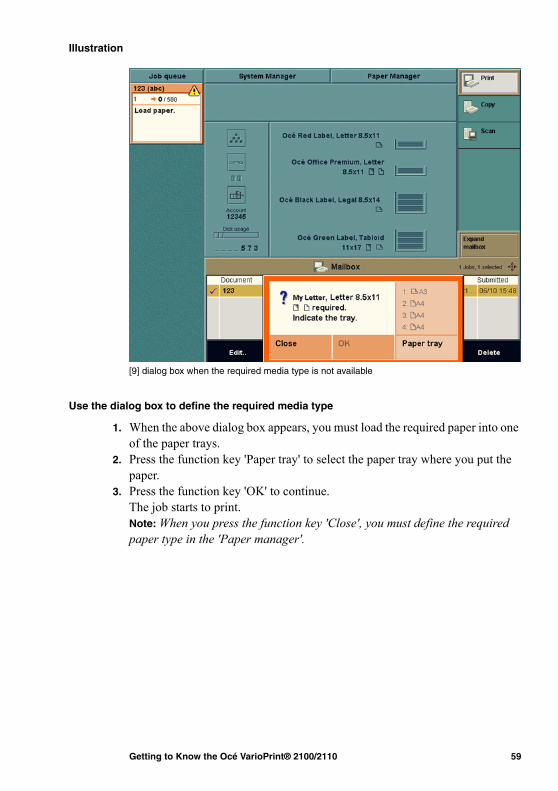
Illustration[9] dialog box when the required media type is not available
[9] dialog box when the required media type is not available
Use the dialog box to define the required media type
1. When the above dialog box appears, you must load the required paper into one of the paper trays.
2. Press the function key 'Paper tray' to select the paper tray where you put the paper.
3. Press the function key 'OK' to continue.The job starts to print.Note: When you press the function key 'Close', you must define the required paper type in the 'Paper manager'.

60 Océ VarioPrint® 2100/2110 User's Manual
Illustration[10] Use the 'Paper manager' to define the required media type
[10] Use the 'Paper manager' to define the required media type
Use the 'Paper manager' to define the required media type
1. Press the 'Paper manager' function key.2. Load the paper.3. Press the function key for the tray that contains the media type that you just
loaded.4. Press the 'Set needed type' function key.
This action makes the system use the media type that is indicated in the warning message.
5. Press the 'Close' function key.The Océ VarioPrint® 2100/2110 starts to print the job.
Getting to Know the Océ VarioPrint® 2100/2110 61
About Temporary Media Names
Use temporary media names
Information for operators
The Océ VarioPrint® 2100/2110 allows users to create print jobs with media types that are not in the media catalog. If such a media type is used in an exceptional case, like for one job only, you do not have to add this media type to the media catalog. Users can create a print job in the printer driver with a temporary media name. Such a temporary media name is the name of a media type that is not present in the media catalog. A temporary media name appears on top of the media list in the 'Basic settings' section under 'Paper'.
To use this temporary media, you must put the media into the paper trays. Then set the needed type (see �Set the needed media type� on page 58).

62 Océ VarioPrint® 2100/2110 User's Manual
Custom size media
Definition
Information for operators, key operators
The Océ VarioPrint® 2100/2110 allows you to use custom size media. Custom size media is any media that is not one of the standard media. The standard media on the Océ VarioPrint® 2100/2110 are A4, A3, B4, Letter, Legal and Tabloid.You must define the exact size of your custom size media in the 'Media catalog' of the Océ VarioPrint® 2100/2110 Settings Editor.
Note: If you want to use custom size media on an Océ VarioPrint® 2100, you need to upgrade your system with support for custom size media.
Attributes
■ The long edge of the custom size media must be in the range from 208 mm (8.2 inches) to 457 mm (18 inches).
■ The short edge must be in the range from 203 mm (8 inches) to 305 mm (12 inches).
■ You must define your custom media sizes in the 'Media catalog'.■ Custom size media must meet certain requirements (see �Load custom size
media� on page 239).

Getting to Know the Océ VarioPrint® 2100/2110 63
Oversize media
Definition
Information for operators, key operators
Oversize media is a special type of custom size media. Oversize media is media that only fits in the paper trays if you remove the slide from the paper tray, for example A3+ or R-Ledger. You must remove this slide for all media with long edges greater than 434 mm (17.1 inches). The paper trays can hold oversize media with long edges up to 457 mm (18 inches).
Note: If you want to use oversize media on an Océ VarioPrint® 2100, you need to upgrade your system with support for oversize media.
Attributes
■ You must remove the slide from the paper tray to use the oversize media■ The long edge ranges from 434 mm (17.1 inches) to 457 mm (18 inches)■ You must do the following two actions to use oversize media.
a. Configure the oversize media in the 'Media catalog' b. Program the media for a tray in the 'Paper manager'(see �Load oversize media� on page 237).

64 Océ VarioPrint® 2100/2110 User's Manual
Job Management
About job management on the Océ VarioPrint® 2100/2110
Introduction
Information for operators
The job queue offers you the possibility to view jobs in the job queue. When you are not in the job editor and the main screen is active, you can use the arrow-up and arrow-down keys at the left-hand side of the screen to scroll through the job queue.Press the round selection key to view the settings of a job in the job queue. Press the selection key again to close this view.
Note: You can not view the settings of streaming jobs and print-while-RIP jobs.You can also press the function key 'Job queue' to inspect and manage the jobs in the job queue. Use the arrow-up and arrow-down keys to select a job. You can do the following actions.■ Move a job to the memory.■ Stop after the selected job.■ Delete the job.■ Move a job to the top of the job queue.■ Hold or release the job.
The jobs in the job queue can be■ if 'Automatic printing' is set to continue, print jobs from the network■ copy jobs from scanned originals■ started jobs from the mailbox.
The jobs in the job queue are processed automatically from top to bottom. A job is removed from the job queue when the last sheet is printed and delivered to the destination.
Getting to Know the Océ VarioPrint® 2100/2110 65
The priority of print jobsRemember the following. Automatic print jobs from the network have the lowest priority. If you start local jobs (interactive jobs) on the operator panel, these local jobs are printed first.
Note: The streaming jobs and print-while-RIP jobs in the job queue are displayed in a different color.

66 Océ VarioPrint® 2100/2110 User's Manual
Job queue view area
The view on the job queue displays the following information.
[11] Job queue view area
[11] Job queue view area
[27] Job icon information
Information displayed with the job icon
Description
Job number In case of a copy job or a job started from the 'Memory', a job number is displayed. This job number is a number between 1 and 9999. This number is automatically gen-erated by the Océ VarioPrint® 2100/2110.
File name and user name
In case of an automatic print job or a job started from the 'Mailbox', the name of the job and the name of the sender are displayed.If the screen has not enough space for the text, a smart algorithm tries to present the most relevant part.
Status A job is marked in gray blue color if the job is being pro-cessed.A job is marked in orange color if the job is not pro-cessed. For example if the job is on hold or an error or a contradiction occurs.

Getting to Know the Océ VarioPrint® 2100/2110 67
Message The job queue view area has space for the following items.Text messages (for example 'Printing...', 'Ripping...', 'Busy...', 'Please wait...').
The 'Stop after this' bar graphic. This bar indicates that the Océ VarioPrint® 2100/2110 must stop its print activ-ities when it reaches this bar.
This graphic shows that the automatic printing setting is put on stop. All automatic print jobs are stored in a buffer (counter).
The triangle graphic. This graphic refers to a prob-lem with an active job.
The alarm bell graphic. This graphic refers to a wait-ing job.
Progress counter The semantics of the progress counter depends on the sorting method of the job.■ The job is set to sort 'By set'.The progress counter is the number of the printed set followed by the required number of sets. A slash (/) separates the two numbers.■ The job is set to sort 'By page'.The progress counter is the number of printed sheets followed by the required number of sheets for each original. A slash (/) separates the two numbers.Note: Streaming jobs do not have a progress counter. Only the total number of printed pages is displayed. For print-while-RIP jobs, the progress counter displays the number of printed sets.
Information displayed with the job icon
Description

68 Océ VarioPrint® 2100/2110 User's Manual
[27] Job icon information
Original counter The original counter shows the number of scanned pages in the job. When you scan a document, the counter shows the number of scans. When you use the Set-build key , the total number of scanned pages in the set is displayed. Note: Streaming jobs do not have an original counter. For Print-while-RIP jobs, the counter increases after a page is RIPped.
Time to finish es-timate
The time to finish estimate is the time that it will take to print the jobs if the process is not interrupted. This time is indicated in hours and minutes (hh:mm). The time is cumulative. The minimum time to finish that is dis-played is 1 minute.Scan jobs, jobs on hold and jobs that need operator ac-tion have no time to finish estimate displayed.Note: For streaming jobs and print-while-RIP jobs, the time to finish estimate is not indicated.
Information displayed with the job icon
Description

Getting to Know the Océ VarioPrint® 2100/2110 69
The job queue manager[12] The job queue manager view
[12] The job queue manager view
When you press the function key 'Job queue', you open the job queue manager. You can see information for each job. Press the function key 'Close' to close the job queue manager.

70 Océ VarioPrint® 2100/2110 User's Manual
Note: For streaming jobs and print-while-RIP jobs, only the file name, user name and messages are displayed.[28] Job information in the job queue manager
[28] Job information in the job queue manager
Part Description
Paper tray in-formation
The trays that are used for the job are indicated in 3 or 4 col-umns. The number of columns depends on the number of trays for your system.
Finishing The following icons can be displayed.■
The document gets 1 staple■
The document gets 2 staplesNote: When no icon is displayed, the job is not stapled and is sent to the output trays.
Output loca-tion
The following icons can be displayed.■
The document is sent to the output trays■
The document is sent to the upper output tray■
The document is sent to the optional booklet maker■
The document is sent to the optional external finisher
File name, user name, and messages
Display information about the jobs in the job queue

Getting to Know the Océ VarioPrint® 2100/2110 71
Overview of Actions in the Job Queue Manager
Introduction
Information for operatorsThe job queue manager always shows the job that is printing and the other jobs in the queue that wait to be printed. You can select a job in the job queue and perform different actions on the selected job.
Basically, the jobs are printed in the order in which they arrive in the job queue. If a job has an error, the setting 'Processing' in the 'System manager' defines what happens.When 'Processing' is set to 'Keep sequence', the system stops until you correct the error.When 'Processing' is set to 'Keep going', the system continues with the other jobs in the queue.
72 Océ VarioPrint® 2100/2110 User's Manual
Overview of the job queue functions[13] The job queue manager is active
[13] The job queue manager is active

Getting to Know the Océ VarioPrint® 2100/2110 73
[29] The job queue manager
Function Description
'Move to memo-ry'
This function takes the selected job out of the job queue. The job is moved to the memory.'Move to memory' offers 3 advantages.■ Automatic print jobs or copy jobs that were sent
directly to the job queue can be stored in the memory for reuse.
■ You can edit the jobs that you moved to the memory. The 'Edit...' function is not available in the job queue.
■ In combination with bundle printing, the 'Move to memory' function allows you to define or rearrange the chronological order of jobs in the memory that you want to print in a bundle.
Note: 'Move to memory' is not possible for streaming jobs and print-while-RIP jobs.
'Stop after this' The Océ VarioPrint® 2100/2110 does not print the jobs below the 'Stop after this' bar.You can put the 'Stop after this' bar at the following places.■ Between jobs in the job queue■ On top of an empty job queue.
Note: You have only one 'Stop after this' bar at your disposal. You can reposition the bar at another position in the job queue. To move the bar, press the arrow-up or arrow-down keys and press the key for 'Stop after this' again. To remove the bar, select the bar with the arrow-up and arrow-down keys and press the key for 'Delete'.
'Delete' You can delete a job in the job queue except a job that scans or prints. Press the Stop key or the Correction key to stop and cancel a job that prints or scans.
74 Océ VarioPrint® 2100/2110 User's Manual
[29] The job queue manager
'Move to top' The function allows you to give priority to a job. The se-lected job moves to the position below the job that is cur-rently printed. The selected job is printed when the current print job is ready.
'Hold''Release'
You can 'Hold' a job and 'Release' a job. A job on hold will not start to print.If 'Processing' in the 'System manager' is set to 'Keep se-quence', the Océ VarioPrint® 2100/2110 stops if the job on hold becomes the first in the job queue.If 'Processing' is set to 'Keep going', other jobs move over the job on hold.The color of the job icon changes to orange for a job on hold and to gray blue for a released job.
Function Description

Getting to Know the Océ VarioPrint® 2100/2110 75
Managing jobs on the Océ VarioPrint® 2100/2110
Introduction
The jobs on the Océ VarioPrint® 2100/2110 go to the job queue to print. This paragraph describes the actions in the job queue.■ Select a job and inspect the settings■ Move a job to the memory■ Stop the queue after a selected job■ Delete a job■ Move a job to the top of the queue■ Hold or release a job.
How to select and inspect a job in the job queue
1. Use the arrow-up and arrow-down keys to select a job.This action is executed in the job queue and in the job queue manager.
2. Press the selection key to open the job.The 'Basic settings' settings of the job appear.[14] Basic Settings
[14] Basic Settings
76 Océ VarioPrint® 2100/2110 User's Manual
3. You can view the 'Basic settings' settings or navigate to the 'Original' and 'Print ' settings in the appropriate menus.
4. Press the selection key again to close the view.
How to move a job to the mailbox
1. Press the 'Job queue' function key.The job queue manager opens.
2. Select a job in the job queue.3. Press the 'Move to memory' function key.
The job is removed from the job queue and placed at the top of the list in the memory.
Note: You cannot move a current print job to the memory.
How to move a job to the top of the job queue
1. Press the 'Job queue' function key.The job queue manager opens.
2. Select a job in the job queue.3. Press the 'Move to top' function key.
The selected job moves to the top of the queue below the current print job.
How to put a job in the job queue on hold
1. Press the 'Job queue' function key.The job queue manager opens.
2. Select a job in the job queue. 3. Press the 'Hold' function key.
Result
The selected job is put on hold. The Océ VarioPrint® 2100/2110 stops at the job on hold if the setting 'Processing' is set to 'Keep sequence'. If the setting 'Processing' is set to 'Keep going', the Océ VarioPrint® 2100/2110 does not stop for the job on hold. The other jobs can move over the job on hold.
Note: If the job is put on hold, the 'Hold' key changes into the 'Release' key.

Getting to Know the Océ VarioPrint® 2100/2110 77
How to stop the Océ VarioPrint® 2100/2110 after the selected job
1. Press the 'Job queue' function key. The job queue manager opens.
2. Select a job in the job queue.3. Press the 'Stop after this' function key.
The Océ VarioPrint® 2100/2110 does not start jobs after the 'Stop after this' bar. A 'Stop after this' indication appears.[15] Stop after this
[15] Stop after this

78 Océ VarioPrint® 2100/2110 User's Manual
How to delete a job from the job queue
1. Press the 'Job queue' function key.The job queue manager opens.
2. Select a job in the job queue.3. Press the 'Delete' function key.
The following dialog box appears.[16] Deleting a Job from the Job Queue
[16] Deleting a Job from the Job Queue
4. Select 'Yes'.
Getting to Know the Océ VarioPrint® 2100/2110 79
Subsets in printing and copying
Introduction
Information for operators
The term subset is used in copy jobs and print jobs. However, there is a major difference between subsets of copy jobs and subsets of print jobs.
What is a subset in copy jobs
A subset is a part of the document for which you can define certain settings. A document can contain various subsets which all have separate settings. For example, one subset contains only 1-sided copies, another subset contains 2-sided copies. The resulting full document has the same finishing. Finishing applies to the number of staples and the destination of the full document, for example the output trays or the external finisher. You can edit most of the other settings like the number of sides to print and the sort settings.
What is a subset in print jobs
A subset is a part of the job that has a different finishing than the rest of the job. For example, one subset is finished with one staple, while another subset is finished with 2 staples. You can also send one subset to the output trays and the next subset to the upper output tray.For subsets in print jobs, you can only edit a limited number of settings on the operator panel. When you define these subsets in the printer driver, you also define the settings in the printer driver. If you edit these defined settings on the operator panel, the settings can get contradictory values, which causes start contradictions.

80 Océ VarioPrint® 2100/2110 User's Manual
Overview of the different types of subsets[30] Subset characteristics
[30] Subset characteristics
Subset in Meaning Finishing Settings
Copy jobs A set of originals that is scanned and included into one digital docu-ment with other sets of originals.
One finishing method for all the different sub-sets that make the document.
You can edit most settings on the operator pan-el, except the me-dia setting.
Print jobs A part of a job that is finished in a different way than other parts of the same job.
Different subsets have different finishing. For ex-ample, one sub-set gets one staple, the next subset is not sta-pled and the last subset gets two staples.
Some settings have fixed val-ues. You cannot edit these set-tings on the oper-ator panel.

Getting to Know the Océ VarioPrint® 2100/2110 81
Using the Mailbox and the Memory
About the 'Mailbox' and the 'Memory'
'Mailbox' and 'Memory'
The 'Mailbox' and the 'Memory' are digital storage areas (not for archiving purposes) for scanned documents and print jobs from the network. These digital storage areas are on a hard disk in the Océ Smart Imager.
The 'Mailbox' is the location for print jobs. The jobs in the 'Mailbox' are displayed with the file name, the user name, the number of pages in the job, the number of sets to print, the media type of the first page and the date and time. The 'Memory' shows the same information but displays a job number instead of a name and there is no user name.
The 'Memory' is the location for scanned jobs and jobs that are moved from the job queue. The only location to which you can move the jobs from the job queue is the memory. The scanned jobs are copy jobs that were sent to the memory. When you use 'Scan to memory', the jobs are stored in the memory. Then you can print the jobs later.
Note: 'Scan to memory' does not create a file that you can physically use. For example, you cannot copy the file to another system or process the file in an application. For this you need the scan-to-file function, which is optional on the Océ VarioPrint® 2100/2110.[31] Options in the 'Mailbox' and in the 'Memory'
[31] Options in the 'Mailbox' and in the 'Memory'
Number
Description
1 You can select one or more jobs in the 'Mailbox' and 'Memory' and press the Start key
2 You can select a job in the 'Mailbox' and 'Memory', edit the job and then press the Start key .
3 You can select one or more jobs in the 'Mailbox' and 'Memory' and then delete the selection.

82 Océ VarioPrint® 2100/2110 User's Manual
The jobs started from the 'Mailbox' and 'Memory' are copies of the jobs in the 'Mailbox' and 'Memory'. You can start a job from the 'Mailbox' and 'Memory' as many times as required. Each time, you create a new copy in the job queue.
To delete a job from the 'Mailbox' and 'Memory', you must delete the job.
Job order in the 'Mailbox' and 'Memory'When you open the memory or mailbox view, the last job that arrived in the memory or mailbox is selected. New jobs are added at the top, above the jobs that are 'Done'.
If you press the Start key , copies of all the selected jobs are created and sent to the job queue.
Note: The jobs that were sent to the job queue are moved to the bottom of the list in the 'Mailbox' or 'Memory'.Use the star arrow keys to select a job in the memory or mailbox. Use the arrow-up key and the arrow-down key to select the jobs one by one. Use the arrow-left key and the arrow-right key to move through the jobs in the mailbox screen by screen. The arrow right key is equal to the Page down key and moves the screen down. The arrow left key is equal to the Page up key and moves the screen up.
'Mailbox' and 'Memory' informationThe 'Mailbox' and 'Memory' contain 2 types of jobs.Jobs that were not printed before (new jobs)Jobs that were sent to the job queue before (done jobs). A check mark indicates the done jobs.
Getting to Know the Océ VarioPrint® 2100/2110 83
The jobs in the 'Mailbox' and 'Memory' contain the following information.
[32] Presentation of the Jobs in the 'Mailbox' and 'Memory'
[32] Presentation of the Jobs in the 'Mailbox' and 'Memory'
'Move to memory'The option 'Move to memory' is available in the job queue manager. This option allows you to move a job that was not yet started from the job queue to the memory.A job that is moved to the 'Memory' is treated as if a new job is added to the 'Memory'. You can change the properties of the job.
You can use the move-to-memory function for example to save a job for later use or to use the extra editing options from the memory.
Description Job in the 'Mailbox' Job in the 'Memory'
Graphic information A check mark when the job is completed
A check mark when the job is completed
'Document' or 'Iden-tifier'
Document name to iden-tify the document
Number to identify the document
'User' Name of the user who sent the document to the mailbox
Not available
'Pages' The number of originals The number of originals
'Prints' The number of prints The number of prints
'Paper' A description of the me-dia type used for the job
A description of the me-dia type used for the job
'Submitted' The date and time of the job submission
The date and time of the job submission

84 Océ VarioPrint® 2100/2110 User's Manual
Moving to Memory
Introduction
The function 'Move to memory' is available in the job queue manager. The function allows you to move waiting jobs from the job queue to the memory. Waiting jobs are jobs that are not active (not in the state of being processed, defined or printed). Jobs with the status 'Hold' are also not active.
Note: You can only move one job at a time.
When to do
You can use 'Move to memory' in the following situations.■ To save automatic print jobs or copy jobs in the memory for reuse.
Automatic print jobs are print jobs that were sent directly to the job queue.■ To allow changes in the job settings. Jobs that are in the job queue cannot
be edited, because the 'Edit...' function is not available in the job queue. When you move a job to the memory, you can edit the job settings.
■ In combination with bundle printing, the 'Move to memory' function allows you to define or arrange differently the chronological order of jobs that you want to print in a bundle.
■ To combine digital print jobs and analog copy jobs. Print jobs that are sent to the job queue (AP jobs or jobs that were sent directly from the network) can be moved to the memory.
Getting to Know the Océ VarioPrint® 2100/2110 85
Illustration[17] Moving to Memory
[17] Moving to Memory
How to move a job to the mailbox
1. Press the 'Job queue' function key.The job queue opens.
2. Use the arrow-up and arrow-down keys to navigate to the job you want to move.
3. Press the 'Move to memory' function key.The job is removed from the job queue and placed at the top of the list in the memory.

86 Océ VarioPrint® 2100/2110 User's Manual
Editing a Job in the 'Mailbox' or 'Memory'
Introduction
When you start a job from the 'Mailbox' or 'Memory', a new job is created in the job queue. This new job is a copy of the job in the mailbox or memory. To edit the settings of a job in the 'Mailbox' or 'Memory', you must select the job and press the 'Edit...' key. You can then edit a copy of the selected job. This edited copy is sent to the job queue. The changes you make are not applied to the job in the 'Mailbox' or 'Memory'. The changes are only applied to the new job in the job queue.
Options
You can change the following settings for the jobs in the 'Mailbox' or 'Memory'.■ Number of prints■ 1-sided or 2-sided■ 'Sort' (by set or by page)■ Finishing, which is a booklet layout or the number of staples■ 'Offset stacked'■ 'Destination'■ 'Document type'
You can change the 'Document type' only for the position of a single staple (landscape and portrait). A change in the layout is not applied, but the feedback can suggest a rotation.
■ The covers for your job (no covers, front and back covers or a front cover only)
■ 'Margin shift'■ 'Type', but only for jobs in the 'Mailbox'. You cannot change the 'Type'
setting for jobs in the 'Memory'. The 'Type' setting is always set to 'Paper' for jobs in the 'Memory'.
Note: When you select more than one job in the 'Mailbox' or 'Memory', the 'Edit...' key is disabled. You cannot edit more than one job at a time.Fixed settings

Getting to Know the Océ VarioPrint® 2100/2110 87
You cannot edit the following settings at the operator panel, because changes in the values can cause start contradictions for jobs in the 'Memory' and the 'Mailbox'. ■ 'Paper'■ 'Layout'■ 'Shift to center'■ 'Zoom'■ 'Type' for jobs in the 'Memory'.
Note: The 'Paper' setting shows the media type that is used in the current job. This media type can also be tab sheets or inserts.Note: The icon for subsets shows only the subsets that have a different finishing. Subsets that share the same finishing settings are not shown.
88 Océ VarioPrint® 2100/2110 User's Manual
Illustration[18] Editing a Job in the Memory
[18] Editing a Job in the Memory
[19] Editing a Job in the Mailbox
[19] Editing a Job in the Mailbox
Getting to Know the Océ VarioPrint® 2100/2110 89
How to edit a job in the 'Mailbox' or 'Memory'[33] Editing a Job in the 'Mailbox' or 'Memory'
[33] Editing a Job in the 'Mailbox' or 'Memory'
Step Action Remarks
1 ■ For print jobs, press the 'Print' function key
■ For copy jobs, first press the 'Copy' function key and then the 'Memory'function key
2 Use the star arrow keys to se-lect one job in the 'Mailbox' or 'Memory'
3 Press the 'Edit...' function key to create a new job in the job queue. This job is a copy of the job in the memory or mailbox
The job editor opens with the current settings of the job. When you change the settings, the changes are only applied to the new job
4 Change the settings for the new job.
5 Press the Start key .

90 Océ VarioPrint® 2100/2110 User's Manual
Removing Jobs from the 'Mailbox' or 'Memory'
Introduction
The jobs in the 'Mailbox' and 'Memory' are not automatically deleted after they are started to the job queue. If a job is not needed anymore, you must manually remove the job.

Getting to Know the Océ VarioPrint® 2100/2110 91
Illustration[20] Removing a Document from the 'Mailbox'
[20] Removing a Document from the 'Mailbox'
[21] Removing a Document from the 'Memory'
[21] Removing a Document from the 'Memory'

92 Océ VarioPrint® 2100/2110 User's Manual
How to remove jobs from the 'Mailbox' or 'Memory'
1. Use the star arrow keys to select the job that you want to delete.You can use the ('Select all', 'Select new' or 'Select done') function keys to select more than one job.Note: Use 'Select done' if you want to delete all the jobs that were started to the job queue at least once.
2. Press the 'Delete' function key.The selected jobs are removed from the 'Mailbox' or 'Memory'.

93
Océ VarioPrint® 2100/2110
User's Manual
Chapter 4 Adapting the System

94 Océ VarioPrint® 2100/2110 User's Manual
Controlling the Backlight of the Screen
Introduction
At the rear side of the operator panel you will find the 2 keys used to adjust the backlight of the screen. You can adjust the backlight in the range 0 to 7. Default value is 4.
The keys are not repetitive (no repeat function).The system keeps the backlight setting in the memory. A restart of the system has no influence on this setting.
Before you begin
Wait until the machine has passed the initialisation phase. You will see the basic screen settings when the initialization phase is completed and the Océ VarioPrint® 2100/2110 is in Stand-by mode.
The figure below shows you where to find the keys for the backlight control. The keys to operate the backlight control are located at the rear of the monitor where the arrow marks the position.
Illustration[22] The Backlight Control
[22] The Backlight Control
Adapting the System 95
How to control the backlight of the screen
1. Press the right backlight key.The brightness level increases one step.
2. Press the right key again until you reach the needed level of brightness.3. If you want to decrease the brightness, follow steps 1 and 2 but use the left
backlight key instead.
96 Océ VarioPrint® 2100/2110 User's Manual
Setting the Operator Panel Language
Introduction
Task for operators
You can select the language of the operator panel. When you change the language of the operator panel, the language of the Océ Settings Editor also changes.
How to set the language of your system
1. Press the 'System manager' function key.2. Press the 'User interface' function key.3. Press the 'Language' function key.4. Use the star arrow keys to select your language.5. Press the 'Close' function key.
The language of the operator panel and the Océ Settings Editor is changed.
Note: When you select Chinese, you must restart the system.

Adapting the System 97
Install the dual paper tray (optional)
Introduction
Task for operators, key operators
The dual paper tray is an optional high-capacity paper tray. You can use a dual paper tray instead of a standard bulk tray. A standard bulk tray can contain up to 1,700 sheets. A dual paper tray can contain 2 stacks of paper (A4 LEF or Letter LEF). The total capacity of a dual paper tray is about 3,400 sheets.The following procedures describe how to replace the bulk trays with dual paper trays, and the other way round.
Note: Do not fill the dual paper tray above the maximum levels as indicated on the 2 stickers inside the paper tray. Put the left-hand paper stack fully against the left edge. Put the right-hand paper stack fully against the right edge.
Before you begin
Make sure that the paper tray you want to replace is empty.
Caution: The bulk trays and the dual paper trays are heavy. Always remove and install the bulk trays and the dual paper trays with 2 persons.

98 Océ VarioPrint® 2100/2110 User's Manual
How to remove a bulk tray or dual paper tray
1. Press the button on the front side of the paper tray to open the paper tray.The rails on both sides of the paper tray contain 2 red stickers with an arrow.
2. Slide the paper tray out until you see the first red sticker.A spring-lock is situated next to the sticker.
3. Press the spring-lock of the right-hand rail to release the spring-lock.[23] Release the first spring-lock
[23] Release the first spring-lock

Adapting the System 99
4. Slide the paper tray just a little bit from the spring-lock.5. Repeat the steps 3 and 4 for the left-hand rail.6. Slide the paper tray further out until you see the second red sticker.
A spring-lock is situated next to the sticker.7. Put a screwdriver into the rear hole of the right-hand rail to press the
spring-lock.[24] Release the second spring-lock
[24] Release the second spring-lock

100 Océ VarioPrint® 2100/2110 User's Manual
8. Slide the paper tray just a little bit from the spring-lock.9. Repeat the steps 7 and 8 for the left-hand rail.
10. Remove the paper tray.Remember that 2 persons are required to remove the paper tray.[25] Remove the paper tray with 2 persons
[25] Remove the paper tray with 2 persons
How to install a bulk tray or dual paper tray
1. Take the paper tray.Note: Remember that 2 persons are required to install a paper tray.
2. Slide the rails of the paper tray into the rails of the printer.Push the paper tray far enough into the rails to prevent that the paper tray can drop.
3. Close the paper tray.The rails of the paper tray are automatically locked in the spring-locks.You can now load the media into the paper tray.Note: Remember not to load more paper than indicated on the stickers inside the paper tray.

101
Océ VarioPrint® 2100/2110
User's Manual
Chapter 5 The Print Function

102 Océ VarioPrint® 2100/2110 User's Manual
Printing Concepts
Types of print jobs
Introduction
Information for operators, key operators, system administrators
The Océ VarioPrint® 2100/2110 supports three types of print jobs, based on the print and RIP workflow that the system follows. RIP stands for Raster Image Processing. RIP is the process in which a file that you send to a printer is translated or converted into an image that the printer can print. After the ripping process finishes, the printing starts. You can also send print jobs that start printing while the ripping process is not finished.The Océ VarioPrint® 2100/2110 can handle standard jobs, which are RIPped first. After the ripping process completes, the printing process starts. The Océ VarioPrint® 2110 can also handle jobs that are ripped and printed at the same time.
Note: If you want to use the streaming feature on an Océ VarioPrint® 2100, you need a license.Note: You can define a different input channel or port for each print job type. Access the Océ VarioPrint® 2100/2110 Settings Editor on the Océ Smart Imager in the system administrator mode to set the input channels.

The Print Function 103
The three types of print jobs[34] Supported workflows
[34] Supported workflows
The difference between the standard, RIP-then-print jobs and the print-while-RIP and streaming jobs is the following.RIP then print After the RIP completes, the job with all job information is available and visible on your system. You can move the job to memory, to edit the job and print the job again.Print while RIP Only the user name, job name and the number of printed sets are displayed, during the print job and after the print job. After the print job completes, the job is still available on your system. You cannot move the print while RIP jobs to memory.
Supported workflow Description
RIP then print When the system receives your job, the system first RIPs your whole job. After that, the job is available and visible on your system.
Print while RIP When the system receives your job, the job be-comes immediately available in the job queue. As soon as the RIP of the first page is ready, the system starts to print your job. After the RIP the job is still available on your system but with lim-ited information about the job like user name, job name and the number of prints.Note: The operator panel only gives limited feedback about the job.
Streaming (requires a li-cense on the Océ Vario-Print® 2100)
Streaming is mainly used for large jobs. When the system receives your job, the job becomes immediately available in the job queue. As soon as the RIP of the first page is ready, the system starts to print your job. Streaming jobs are a continuous flow of data to your system. To prevent an overflow of your sys-tem, printed data are already cleaned while the rest of your job is printed.Note: The operator panel only gives limited feedback about the job.

104 Océ VarioPrint® 2100/2110 User's Manual
Streaming Only the user name, job name and the number of printed pages are displayed during the print job. After the print job completes, the job is no longer available on your system. You cannot move the streaming jobs to memory because the system deletes the data to prevent an overflow.

The Print Function 105
About automatic printing
Introduction
Information for operators
The Océ VarioPrint® 2100/2110 allows you to print your jobs in two ways, the interactive way and the automatic way. When the box 'Mailbox' in the printer driver has a check mark for a job, this job is an interactive print job. The job goes to the mailbox. In order to print an interactive job, you must start the job at the operator panel.You can also create an automatic print job in the printer driver. For automatic print jobs, the box 'Mailbox' is left empty. Automatic print jobs go to the job queue.
The printing of automatic print jobs starts in the following situation.■ All the interactive jobs are finished.■ At least one automatic print job is present.[26] Automatic printing
[26] Automatic printing

106 Océ VarioPrint® 2100/2110 User's Manual
The order of automatic print jobs in the job queue
The automatic print jobs always come after the interactive print jobs in the job queue. The interactive print jobs have priority over the automatic print jobs. When you start an interactive job, all the automatic print jobs in the job queue wait until the interactive job is finished.
The Print Function 107
About Interactive Printing
Introduction
The Océ VarioPrint® 2100/2110 handles two types of print jobs, the interactive print jobs and the automatic print jobs. Both types, the interactive and the automatic print jobs, are created in the printer driver. The difference is that interactive print jobs have a check mark in the box 'Mailbox' in the printer driver. For the automatic print jobs, the box 'Mailbox' is empty.The interactive print jobs move into the mailbox, where these jobs wait. You must select an interactive job in the mailbox and press the Start key on the operator panel to print the job. Automatic print jobs move into the job queue. Automatic print jobs start automatically when there are no more interactive jobs in the job queue.
Definition
An interactive print job is a job that is started from the operator panel. This type of job needs operator intervention to be printed.
Attributes
■ Interactive print jobs have priority over automatic print jobs. When you start an interactive print job, this job moves to the end of the queue of interactive print jobs, before all automatic print jobs.
■ You can change the settings of an interactive print job before you start the job.
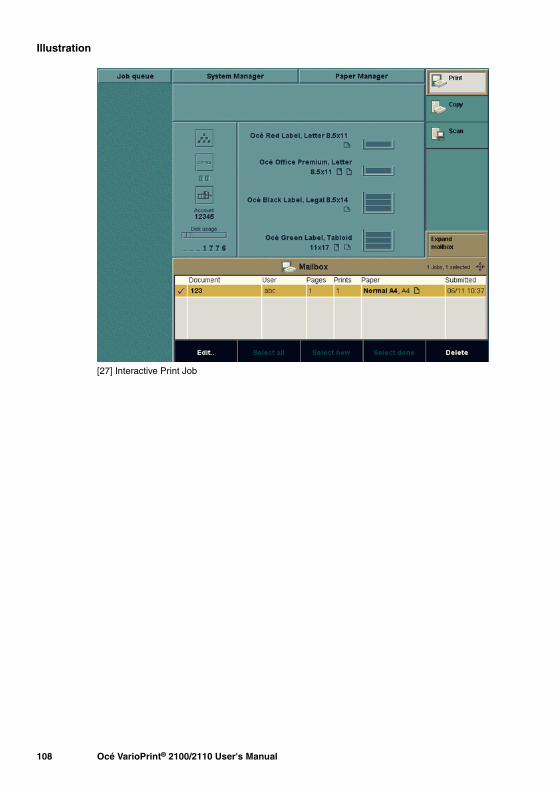
108 Océ VarioPrint® 2100/2110 User's Manual
Illustration[27] Interactive Print Job
[27] Interactive Print Job

The Print Function 109
The Printer Drivers
About the Océ VarioPrint® 2100/2110 Printer Drivers
Introduction
Information for operators
You need a printer driver to send your jobs from your work station to the Océ VarioPrint® 2100/2110. The printer driver allows you to define the print job settings on your work station. Click 'Properties' in your print window to access the specific Océ VarioPrint® 2100/2110 features in the printer driver. You can use the printer driver to define a large number of settings for layout, paper, finishing and image.
Note: The User's Manual only contains a short description of the printer drivers. Please refer to the on-line help of the printer driver for detailed information about the settings in the printer driver.

110 Océ VarioPrint® 2100/2110 User's Manual
Available printer drivers[35] Available printer drivers
[35] Available printer drivers
Operating system Available printer drivers■ Microsoft Windows
2000®■ Microsoft Windows XP®■ Microsoft Windows
Server 2003®
Océ provides the following Universal Printer Drivers (UPD).■ HP® PCL5e■ Adobe® PostScript® 3
Both drivers are based on Microsoft® driver core technology to guarantee an optimal in-tegration with the operating system of your work station.
Apple® Macintosh® Ma-cOS® 10.3 and higher
■ MacOS® printer driverThis driver allows you to do page programming and to use the Océ VarioPrint® 2100/2110 mailbox.
■ Microsoft Windows 95/98/ME
■ Microsoft Windows NT4,■ Older MacOS® versions■ Linux®
■ PPD fileThe PostScript Printer Description (PPD) file adds the Océ VarioPrint® 2100/2110 characteristics to a general Adobe PostScript® 3 printer driver, which translates the print jobs into PostScript® files.

The Print Function 111
Important features of the printer drivers
The following table describes some important features of the printer driver.
[36] Features of the printer driver
Feature Description
Templates A template is a set of default settings that describe a print job. A template is based on the characteristics of a spe-cific printer. Templates help you to define a print job in a quick and easy way. You must not define all the settings again when you print a job (see �About the templates� on page 118).
Bidirectional in-formation
The UPD printer driver for Microsoft Windows 2000®, Windows XP® and Windows Server 2003® provides you with feedback from the printer (see �About the Bidi-rectional Printer Driver� on page 113).
Preview window The preview window at the right-hand side of the printer driver provides graphical feedback about the result of the print job. When you change a setting that affects the pre-view, the setting and the preview are immediately changed.Below the graphical feedback, the preview window dis-plays a summary of the most used settings. These set-tings are links to the corresponding sections of the printer driver.Note: The preview window summary does not display all the settings.

112 Océ VarioPrint® 2100/2110 User's Manual
[36] Features of the printer driver
Contradiction handling
When you define settings that cannot be combined, a start contradiction occurs. The last setting you define, overrules all the other settings that have a conflict with the setting.When you define a setting that overrules other settings, the message area (at the bottom right-hand side) shows the changed settings.The message area also shows an 'Undo' option. You can use the 'Undo' option to undo the latest change that caused the start contradiction.All the settings that are overruled are marked as follows.■ The names of the settings become orange■ An orange dot is placed in front of the setting. The
orange dot shows the previous value of the setting.
After you correct or accept the settings, the messages in the message area and the orange indications disappear.
'Show settings before printing'
You can enable the option 'Show settings before printing' in the 'Printer' tab of your printer driver. You can also make this setting your default setting in the 'Printer pref-erences' of the Océ VarioPrint® 2100/2110 printer driver.When the setting is enabled, the printer driver appears when you click the print icon in the toolbar of your ap-plication. The standard template is automatically select-ed. You can change various settings, including the selection of another template. The settings that you can-not change, are disabled.Note: You can disable the 'Show settings before printing' option in the 'Printer' tab of the printer driver or in the 'Printer preferences' of the printer driver.
Feature Description

The Print Function 113
About the Bidirectional Printer Driver
Introduction
Information for operators
For the Océ VarioPrint® 2100/2110, a bidirectional UPD printer driver (PS and PCL) is available.
The printer driver is intended for the following operating systems:■ Microsoft Windows 2000®■ Microsoft Windows XP®■ Microsoft Windows Server 2003®.
The bidirectional printer driver provides feedback from the printer. The printer driver does not only send information to the printer (the print file), but can receive information from the printer as well.The communication between the printer and the printer driver has several advantages. For example, you can get information about the printer status or the available media.
The 'Printer' tab of the printer driver provides the following feedback:

114 Océ VarioPrint® 2100/2110 User's Manual
Types of feedback[37] The Feedback
[37] The Feedback
Type of infor-mation
Description
Status informa-tion
A dynamic icon and text show the status of the printer.■ Name and location of the printer■ Status of the connection
Media The media section contains three columns.■ Paper traysThe media levels are displayed for each paper tray. When a tray is almost empty, the color of the icon and the media information are changed to orange■ Media typesThe parameters of the media are displayed, for example the size and the name■ StockThe number of sheets in each paper tray is displayed
Consumables The toner level is displayed
Printer and Océ information
The name of the printer is displayed. The name is also displayed when the printer is not connected.Two links are added below the name of the printer.■ 'About'Information about the printer driver■ www.oce.comA link to the web site of Océ where you can find printer driver updates and other information
Picture A picture of your printer is displayed
Preferences ■ You can change the name of the mailbox■ You can click a link to your mailbox in Océ Intra
Logic®. You must enable this option in the 'Properties' of the printer driver
■ You can enable and disable the 'Show settings before printing' option
The Print Function 115
About the page programmer
Introduction
Information for operators
The page programmer is available in the Océ VarioPrint® 2100/2110 PostScript® printer driver. The page programmer enables you to define the required paper for your job page by page.The page programmer is only available when the setting 'Enable page programmer' in the 'Properties' of your printer driver is enabled.You can find the page programmer in the 'Paper' section of the printer driver.
General Information
The page programmer enables you to define different media types for your document. For example, you can create a document that contains covers, plain paper, tab sheets and inserts. You can also staple each subset separately.If you have a small document, you can use the page programmer without printing the document first.If you have a large document, printing the document first can give you a better overview of the document. When you have a printed document, it is easier to define the required media for each page.You can program a maximum of 100 subsets. If you define more than 100 subsets, the boxes for the page range are disabled. You can not add subsets.When you click 'OK', the system automatically stores the changed settings in a template. Then you can use these page program settings for other jobs.
Note: The on-line help of the Océ VarioPrint® 2100/2110 printer driver contains more information about the buttons, icons and settings of the page programmer.

116 Océ VarioPrint® 2100/2110 User's Manual
The tab caption editor
When you use tab sheets, you can define a text for the tabs. For each page that you defined as 'Print on tab' in the page programmer, you can define a text in the tab caption editor.Click the yellow icon for 'Open tab caption editor' in the toolbar of the page programmer to access the tab caption editor. The following screen appears.
[28] Tab Caption Editor
[28] Tab Caption Editor

The Print Function 117
The tab caption editor enables you to define the following:
[38] The Tab Caption Editor
[38] The Tab Caption Editor
Note: The on-line help of the Océ VarioPrint® 2100/2110 printer driver contains more information about the settings of the tab caption editor.
Option Description
'Set size' Enter the number of tab sheets of your set
Top / Bottom in-dent
Enter the distance of the tab from the top of the sheet
'Alignment' and 'Margin'
Click the desired icon to align the text to the top, center or bottom of the tab. The icons on the right-hand side al-low you to rotate the text on the tab.You can also define the distance of the text to the right-hand side and the left-hand side of the tab
'Font' and 'Font size'
Select a font and font size for the text on the tab
Text Click the '+' icon to add a caption. Then enter the text for the tab. Your text is immediately displayed in the graph-ical feedback of the tab

118 Océ VarioPrint® 2100/2110 User's Manual
About the templates
Introduction
Information for operators
The Océ VarioPrint® 2100/2110 printer driver contains templates. A template is a coherent set of default settings that describe a print job. A template is based on the characteristics of a specific printer. Templates can help you to define a print job in a quick and easy way.
[29] The templates
[29] The templates

The Print Function 119
The concept of templates
Templates help you to print jobs with recurring settings. If a job needs fixed settings, you can select the corresponding template. Then you must not define all the settings separately.You can create the templates as follows.
[39] Types of templates
[39] Types of templates
Note: After you press the 'Save' button, a dialog box appears. You can now enter a name for the new template. Then press 'OK'.
Rename a template
You can rename a template. Right-click the template and select 'Rename'.Then you can enter a new name.
Note: You can only rename locked templates in the 'Printer preferences'.
Delete a template
You can delete a template. Select the template and click the 'Delete' button. The template is removed.
Note: You can only delete locked templates in the 'Printer preferences'.
Where Description
In the 'Printer preferences' of the printer driver
You can create new templates in advance in the 'Printer preferences' of the printer driver. You can only edit, re-name or delete these templates in the 'Printer preferenc-es'.The templates icon in the printer driver displays a lock for this type of templates ( ).
In the printer driver itself when you print a job
When you print a job, you can select an existing template in the printer driver. If you change the settings of the template, you can save the template with the 'Save' but-ton.The templates icon in the printer driver does not display a lock for this type of templates.

120 Océ VarioPrint® 2100/2110 User's Manual
Set as default
If you use a certain template on a regular basis, you can set that template as default. In the 'Printer preferences', right-click the required template. Then click 'Set as default'. The template is now the default template each time you print a job.
The Print Function 121
Printing on the Océ VarioPrint® 2100/2110
Printing a Document
Introduction
Task for operators
Users need a printer driver to print jobs through the network to the Océ VarioPrint® 2100/2110. The printer driver allows users to define the print job settings on their workstation.
Note: The user's manual only contains a short description of the printer drivers. Please refer to the on-line help of the printer driver for detailed information about the settings in the printer driver.
How to print a document from the mailbox
1. Press the 'Print' function key.2. Use the arrow keys to select a job.
Note: You can press the 'Expand mailbox' function key to enlarge the view.3. Press the 'Edit...' function key to check or change the settings.4. Enter the number of prints.5. Press the Start key .
How to print a document from the memory
1. If necessary, press the 'Copy' function key to display the memory.2. Press the 'Memory' function key.3. Use the arrow keys to select a job.4. Press the 'Edit...' function key to check or change the settings.5. Enter the number of prints.6. Press the Start key .

122 Océ VarioPrint® 2100/2110 User's Manual
Printing a Job from the 'Mailbox' or 'Memory'
Introduction
Task for operators
You can start a job from the 'Mailbox' and the 'Memory'.
When you open the mailbox view or memory view ('Mailbox' or 'Memory'), you can see the following.■ The new jobs.■ The done jobs.
Note: The done jobs have a check mark and are below the new jobs.Star arrow keysWhen the list of jobs is longer than the screen, the number of jobs outside the view is displayed. Use the star arrow keys to scroll through the list of jobs.

The Print Function 123
OptionsYou can do the following actions on the jobs in the memory or mailbox.
[40] Job actions in the memory or mailbox
[40] Job actions in the memory or mailbox
Note: If you select more than one job, you can start and delete the selected jobs. You cannot edit the jobs.
Function Description Remark
'Select all' All jobs in the memory or mail-box are selected.
This key is disabled when the memory or mailbox is empty.
'Select new' All not yet started jobs are se-lected.
This key is disabled when there are no new jobs.
'Select done' All started jobs are selected. This key is disabled when there are no printed jobs.
'Select' Only one job is selected. Use the star arrow keys to select the job you prefer.
'Delete' All selected jobs are deleted.
'Edit...' A copy of the job is created in the queue. The job editor opens. You can edit the job settings.
'Start' All selected jobs are started.

124 Océ VarioPrint® 2100/2110 User's Manual
Illustration[30] Printing a Job
[30] Printing a Job
How to print a job from the 'Mailbox' or 'Memory'
1. Press the function key 'Mailbox' or 'Memory'.2. Select the job with the star arrow keys . 3. Press the round selection key to select the job.4. Press the Start key .
Note: When you select more than one job, you can define the order in which the jobs are printed. First select the job you want to print first. Number 1 appears in front of the job. Then select the job you want to print next. Number 2 appears in front of the job. When you press the Start key , all the selected jobs are printed as separate jobs. You can also bundle various jobs into one job (see �Bundle printing� on page 125).
Result
A copy of the job is created in the job queue. This job by default has the same settings as the job in the memory or mailbox. You can change the settings for this job (see �Editing a Job in the 'Mailbox' or 'Memory'� on page 86).
The Print Function 125
Bundle printing
Introduction
Task for operators
Bundle printing allows you to combine various jobs into one single job. You can select the required jobs from the 'Memory' or the 'Mailbox' and define the number of prints. The selected jobs are printed as one job called 'Bundle'.
You can also use bundle printing in combination with the feature 'Move to memory' to combine jobs from the 'Memory' and 'Mailbox'(see �Combining Print Jobs and Copy Jobs into One Bundle� on page 129).
How to create a bundle print job from the 'Memory'
1. Press the function key 'Copy' to select jobs from the 'Memory'.2. Press the function key 'Memory' to open the 'Memory'.3. Use the star arrow keys to navigate through the 'Memory'.4. Use the round selection key to select the first job for the bundle. The screen
displays the number 1 in front of the job.5. Repeat the steps 3 and 4 to select the second job, and all other consecutive jobs.
The screen displays the number 2 in front of the job, and so on.Note: You can always change the order of the jobs in the bundle. Use the selection key to select and deselect the jobs.
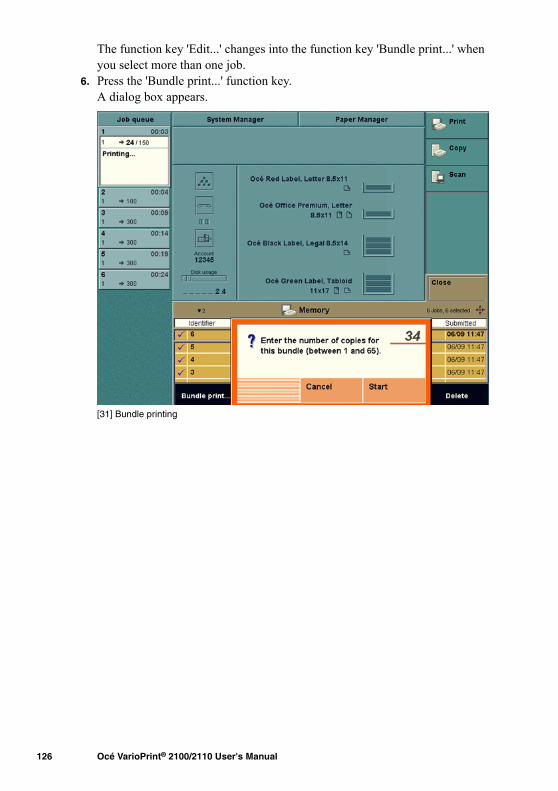
126 Océ VarioPrint® 2100/2110 User's Manual
The function key 'Edit...' changes into the function key 'Bundle print...' when you select more than one job.
6. Press the 'Bundle print...' function key.A dialog box appears.[31] Bundle printing
[31] Bundle printing

The Print Function 127
7. Use the numeric keys to enter the number of copies for the bundle.8. Press the 'Start' function key.
[32] A bundle print job in the job queue
[32] A bundle print job in the job queue
How to create a bundle print job from the 'Mailbox'
1. Press the function key 'Print' to select a job from the 'Mailbox'.2. Press the function key 'Mailbox' to open the 'Mailbox'.3. Use the star arrow keys to navigate through the 'Mailbox'.4. Use the round selection key to select the first job for the bundle. The screen
displays the number 1 in front of the job.5. Repeat the steps 3 and 4 to select the second job, and all other consecutive jobs.
The screen displays the number 2 in front of the job, and so on.Note: You can always change the order of the jobs in the bundle. Use the selection key to select and deselect the jobs.The function key 'Edit...' changes into the function key 'Bundle print...' when you select more than one job.
6. Press the 'Bundle print...' function key.A dialog box appears.
7. Use the numeric keys to enter the number of prints for the bundle.8. Press the 'Start' function key.

128 Océ VarioPrint® 2100/2110 User's Manual
Result
The bundle print jobs appear in the job queue as one job called 'Bundle'.All the jobs in the bundle are finished separately according to the original job settings.

The Print Function 129
Combining Print Jobs and Copy Jobs into One Bundle
Introduction
Task for operators
You can combine print jobs and copy jobs into 1 job. The following procedure describes how to create one job from a print job and a copy job.The procedure consists of the following steps.
1. Move your print job from the 'Mailbox' to the 'Memory'.2. Scan your copy job to the 'Memory'.3. Combine your print job and copy job into one job.
Move your print job from the 'Mailbox' to the 'Memory'
1. Send your print job to the 'Mailbox'.2. Use the star arrow keys to select your job in the 'Mailbox'.3. Press the function key 'Edit...'.4. Press the function key 'Target'.5. Press the 'Type' function key to select 'Memory'.6. Press the Start key .
The system creates a copy of your print job in the 'Memory'.
Scan your copy job to the 'Memory'
1. Put the originals in the automatic document feeder or on the glass plate.2. Press the 'Copy' function key.3. Select a copy template.4. Define the settings for 'Original' and 'Print'.5. In the 'Print' section, press the 'Target' function key.6. Press the 'Type' function key to select 'Memory'.7. Press the Start key .
The system creates a job in the 'Memory'.

130 Océ VarioPrint® 2100/2110 User's Manual
Combine your print job and copy job into one job
1. Press the 'Memory' function key.2. Press the 'Select all' function key or 'Select new' to select the jobs to combine.
The 'Edit...' function key changes into 'Bundle print...'.3. Press the 'Bundle print...' function key.4. Enter the number of copies.5. Press the 'Start' function key.
The job is sent to the job queue.

The Print Function 131
Printing a Job With an Account ID
Introduction
Task for operators
The Océ VarioPrint® 2100/2110 allows you to charge the costs for print jobs and copy jobs to the users or customers. You can define an 'Account ID' in the printer driver and on the operator panel.
When the 'Accounting mode' in the 'System manager' is set to 'Per job', you must enter the account ID for each job.When the 'Accounting mode' in the 'System manager' is set to 'Fixed', the account ID that you entered in the 'System manager' is used for all the jobs.
Make a copy when the 'Accounting mode' is set to 'Per job'
1. Press the 'Copy' function.2. Select a copy template.
A dialog box appears.3. Enter the 'Account ID'.4. Press the 'Confirm' function key.5. Define the settings for your job.6. Press the Start key .
Make a copy when the 'Accounting mode' is set to 'Fixed'
1. Press the 'Copy' function.2. Select a copy template.3. Define the settings for your job.4. Press the Start key .
Note: When the 'Accounting mode' is set to 'Fixed', the operator panel displays the current account ID in the warning section on the left-hand side.
132 Océ VarioPrint® 2100/2110 User's Manual
Print a job when the 'Accounting mode' is set to 'Per job'
1. Select a job from the 'Mailbox' or 'Memory'.2. Press the 'Edit...' function key to check or change the settings.
If no account ID was defined, a dialog box appears.3. Enter the 'Account ID'.4. Press the 'Confirm' function key.5. Press the Start key .
Print a job when the 'Accounting mode' is set to 'Fixed'
1. Select a job from the 'Mailbox' or 'Memory'.2. Press the 'Edit...' function key to check or change the settings.3. Press the Start key .
Note: When the 'Accounting mode' is set to 'Fixed', the operator panel displays the current account ID in the warning section on the left-hand side.
The Print Function 133
Stop printing
Introduction
You can stop a print job with the Stop key on the operator panel. If you press the stop key, the printing will stop.Press the Stop key 1 time to stop a print job at the end of a set.Press the Stop key 2 times to stop a print job at the end of a page.
How to stop a print job
1. Press the Stop key on the operator panel.The operator panel displays the message 'Print job stopped. Cancel this job?'.
2. Press the 'Yes' function key to stop the job.3. Press the 'No' function key to continue the job.

134 Océ VarioPrint® 2100/2110 User's Manual

135
Océ VarioPrint® 2100/2110
User's Manual
Chapter 6 The Copy Function

136 Océ VarioPrint® 2100/2110 User's Manual
The Copying Concepts
ID entry for copy jobs
Introduction
Task for operators, key operators
When you create a copy job on the Océ VarioPrint® 2100/2110, the system assigns a number to your job. Your job appears in the job queue with this number and the number of prints. There is no other information for copy jobs. If the job queue contains a large number of copy jobs, you may have problems finding your job. To prevent this problem, you can assign IDs to your copy jobs. An ID is a prefix (ID_), followed by a maximum of 20 digits. Copy jobs with job IDs that are moved to memory keep the job IDs in memory.
You can set the job ID entry in the 'System manager'. You have three options. ■ All jobs You can manually enter job IDs for all copy jobs and memory jobs■ Memory jobs You can manually enter job IDs for memory jobs only■ Automatic The system assigns IDs to memory jobs and copy jobs.
Note: All copy jobs get the prefix ID_.
Before you begin
Before you can enter the job IDs, you must turn on the option in the 'System manager'. Do the following:
1. Select 'System manager'.You now see the options of the 'Workflow' setting. If not, press the 'Workflow' function key.
2. Select 'ID entry for copy jobs'. Select one of the following:■ All jobs. You are asked to enter IDs for all copy jobs and memory jobs■ Memory jobs. You are asked to enter IDs for memory jobs only.
Note: If you select 'Automatic', the system assigns IDs to the memory jobs and copy jobs.

The Copy Function 137
3. Close the 'System manager'.[33] The Setting ID Entry for Copy Jobs in the System Manager
[33] The Setting ID Entry for Copy Jobs in the System Manager
Note: If you do not turn on the option in the 'System manager', you can still enter job IDs, but only per job. When you define a copy job, select 'Target' and then 'Job ID'. The system asks you to enter a job ID.
Enter an ID for a copy job
1. Put the originals face down and in readable form into the automatic document feeder or on the glass plate.
2. Press the 'Copy' function key.3. Select one of the copy templates (see �Making a Copy� on page 156).4. Define the settings.5. Enter the number of copies.6. Press the Start key .
The system now asks you to enter a job ID. This job ID is a sequence of digits.7. Enter the job ID.
Note: You can enter a maximum of 20 digits.

138 Océ VarioPrint® 2100/2110 User's Manual
Illustration[34] Entering an ID for a Copy Job
[34] Entering an ID for a Copy Job
Enter an ID for a memory job
1. Put the originals face down and in readable form into the automatic document feeder or on the glass plate.
2. Press the 'Copy' function key.3. Do one of the following:
■ Select one of the copy templates. Then press the key for 'Target'. Select 'Type' and then 'Memory'
■ Select the standard template 'Scan to memory'.
4. Define the other settings.5. Enter the number of copies.6. Press the Start key .
The system now asks you to enter a job ID. This job ID is a sequence of digits.7. Enter the job ID.
Note: You can enter a maximum of 20 digits.
Result
The job appears in the job queue with the job ID that you entered. The prefix 'ID_' comes before the job ID.

The Copy Function 139
Types of Job Settings
Introduction
When you select a template, you can change the following settings for your job in the job editor.■ The settings in the 'Basic settings' section. This section is a subset of the
most used settings in 'Original' and 'Print '. ■ The original document settings in the 'Original' section.■ The copy/print document settings in the 'Print ' section.
Settings for the original[35] The Settings in the Original Section
[35] The Settings in the Original Section
140 Océ VarioPrint® 2100/2110 User's Manual
The table below shows the settings for originals in the automatic document feeder or originals on the glass plate.
[41] Settings for the Original
Settings for 'Original'
Settings Definition
'Source' 'Type' This setting is read-only.'Paper'■ If you select a template this setting will be
set to 'Paper'.The originals are scanned from the glass plate or the automatic document feeder.'Memory'■ The document was scanned to memory or
moved from the job queue to the memory.
'Mailbox'■ You edit a mailbox job. This job comes
from the network and was created in the printer driver.
'Orientation' This setting is read-only for the originals to be scanned from the automatic document feeder. You can change this setting if you scan the original from the glass plate and the original is small enough to be scanned in two directions. (You can scan Tabloid in only one direction on the glass plate).
'Sheet' 'Size' This setting is read-only for the originals to be scanned from the automatic document feeder. Select one of the preferred paper sizes in the list if you copy from the glass plate.
'User-de-fined'
You can define the size of the 'Long edge' and the size of the 'Short edge' of the original.
'Layout' 'Original' You can indicate if the originals are 1-sided or 2-sided.

The Copy Function 141
[41] Settings for the Original
Margin eraseThe 'Margin erase' setting must be set to 'Off' when the 'Layout' setting of the resulting print is set to 'Booklet' or '2-up'.
'Document type'
The icons show the following:■ How the information is mapped on the
paper.■ The binding edge of a 2-sided document. A
2-sided document can turn on the long edge or the short edge.
'Margin erase'
This setting indicates the size of the margin part that is to be erased from the original, seen from the binding edge (see 'Document type').
'Image' 'Image type' This setting describes the original. The system takes this information into account. This func-tion enhances the quality of the copy job.You can indicate the type of information on the original.■ 'Photo'. The original contains mainly an
illustration or photo.■ 'Text'. The original contains only text.■ 'Mixed'. The original contains both text and
an illustration.
Settings for 'Original'
Settings Definition

142 Océ VarioPrint® 2100/2110 User's Manual
Settings for the print[36] The Settings in the Print Section
[36] The Settings in the Print Section

The Copy Function 143
The table below shows the settings that you can set for the print.
[42] Settings for the Print
Settings for 'Print '
Settings Definition
'Target' 'Type' 'Paper'. This setting indicates that you send the document directly into the job queue.'Memory'. This setting indicates that you have sent the document to memory.'File'. This setting is optional. It is only available if the Scan-to-file function is ac-tive. The setting indicates that you can gen-erate a digital file that is sent to the scan server.
'Output' 'Destination' This setting indicates the destination of the prints. The destination can be the output trays, the upper output tray or the external finisher (if configured).
'Sort' This setting indicates that the prints are sorted by set or by page.
'Staple' This setting indicates that the prints are sta-pled or not stapled. You can select 1 staple, 2 staples and no staples.The staple setting is only available when you select 'Output trays' as destination.Note: The position of 1 staple depends on the selected document type (landscape stapling possible).
'Offset stacked'
This setting indicates that sets go into the output trays in offset stacks or straight stacks.'Yes'. Each set has an offset.'No'. Only the first set has an offset (every new job has an offset)
'Paper' 'Paper' The setting 'Paper' displays the list of all media in the media catalog. This media cat-alog is a list of all the media types that your Océ VarioPrint® 2100/2110 can use. Use the star arrow keys to select a media type to use for your job.

144 Océ VarioPrint® 2100/2110 User's Manual
'Covers' 'Covers' You can select the following■ 'Front & back'. Your job has covers on
the front and on the back.■ 'Back'. Your job has a cover on the back
only.■ 'Front'. Your job has a cover on the front
only.■ 'No'. Your job has no covers.
'Paper' Here you can set a media type for your front covers and back covers.
'Layout' 'Print' This setting indicates that a print must be 1-sided or 2-sided.
'Layout' You can select the following■ 'Booklet'. The Océ VarioPrint®
2100/2110 prints the pages in booklet order. Pages 1 and 4 on one side of the sheet, pages 2 and 3 on the other side of the sheet.
■ 'Same-up'. The Océ VarioPrint® 2100/2110 prints the same image 2 times next to each other on each side of a sheet.
■ '2-up'. The Océ VarioPrint® 2100/2110 then prints 2 images on each side of a sheet.
■ 'Normal'. The Océ VarioPrint® 2100/2110 uses the standard way of printing. One image on one side of a sheet in the standard order.
'Document type'
The icons show the following:■ How the information is mapped on the
paper■ The binding edge of a 2-sided
document. A 2-sided document can turn on the long edge or the short edge.
'Image' 'Zoom' The zoom range is between 25% and 400%.
Settings for 'Print '
Settings Definition

The Copy Function 145
[42] Settings for the Print
Offset stackedThe prints are collated in the finisher and ejected in sets into one of the output trays. Select 'Offset stacked' to separate the different sets. If you set 'Offset stacked' to 'Yes', each printed set is moved approximately 1 cm to separate the set from the previous sets.
'Exposure' You can adjust the settings for light areas and dark areas on the print independently.If an area on the print is light gray and you want it to be white, move the cursor in the 'Light' bar to white.If an area on the print is dark gray and you want it to be black, move the cursor in the 'Dark' bar to black.
'Margin shift' This setting indicates the image shift on the front and the rear side of the print seen from the binding edge (see 'Document type').
'Shift to cen-ter'
This setting indicates that the image is put into the center of the sheet.
Settings for 'Print '
Settings Definition

146 Océ VarioPrint® 2100/2110 User's Manual
Sorted by pageYou can sort sheets 'By page' or 'By set'.If you copy single-page documents like forms, sort the documents 'By page'. Sort 'By set' slows down the print speed within this copy job.If you print one copy of a multi-page document, select sort 'By set'. Sort 'By page' slows down the print speed within this copy job.
[37] Sorted documents: 3 copies, sorted by page
[37] Sorted documents: 3 copies, sorted by page
Set 1,2,3: indicate the sorted sets 'By page'.
Sorted by sets
[38] Sorted documents: 3 copies, sorted by set
[38] Sorted documents: 3 copies, sorted by set
Set 1,2,3: indicate the sorted sets 'By set'.

The Copy Function 147
Concatenation and chapterization
Introduction
The set-build key ( ) of the Océ VarioPrint® 2100/2110 joins different originals, called subsets, into one digital document, for example a report or book. You can change 1-sided originals into 2-sided documents. If the originals result in an odd number of pages the Océ VarioPrint® 2100/2110 will detect this. An odd number of pages can result in an empty page between the subsets.
ConcatenationYou decide to print the next subset on this empty page (do not keep the empty page).
ChapterizationYou decide to keep the empty page and start the next subset on a new sheet (a new chapter starts on a new sheet).
When to do
When you use the set-build key to join subsets, you can do the following.■ Keep an empty page between the subsets, or not.■ Use this setting for the whole document, or not.
Before you begin
Divide your document into subsets. For example, put your first set of originals into the automatic document feeder or put the originals on the glass plate. Use the set-build key to start a new subset.
Note: You can use the glass plate for 1-sided scans only. Use the set-build key to join two or more 1-sided originals into a 2-sided document.

148 Océ VarioPrint® 2100/2110 User's Manual
Illustration[39] Chapterization: keep empty page
[39] Chapterization: keep empty page
[40] Concatenation: no empty page between subsets
[40] Concatenation: no empty page between subsets
Example: How to use concatenation and chapterization
1. Put a 1-sided subset that contains an odd number of pages, face down and in readable form into the automatic document feeder. You can put the subset on the glass plate also.
2. Press the key for a template, for example 'Standard job'.3. Press the key for 'Original'.4. Define the settings for the original. Make sure that the setting for the original
is 1-sided.5. Press the key for 'Print '.6. Define the settings for the document to print. Make sure that the print is set to
2-sided (so that you can use the function concatenation and chapterization).7. Press the set-build key ( ) to scan the 1-sided subset.
How to scan the second subset
1. Put the second subset into the automatic document feeder or put the first sheet on the glass plate.
2. Repeat the steps 3 to 6 from the above procedure.3. Press the set-build key ( ) to add the subset.

The Copy Function 149
Result
After you press the set-build key for the second time, a message appears. An empty page is detected.The last page of the first subset is printed on the front of a sheet. The back of the sheet is empty. You can select to print on the empty page, or not.
[41] Empty page detected dialog box
[41] Empty page detected dialog box
[43] Keep empty page settings
[43] Keep empty page settings
How to finish your document
1. Finish the settings of the subsets.2. Select 'Output' to define the settings for 'Destination', 'Sort', 'Staple' and 'Offset
stacked'.3. Set the number of copies with the numeric keys on the keyboard.4. Press the start key to print the whole document.
If you select Then
'Yes, start on new sheet' The first subset has an empty back side, which is not used. The next sub-set starts on a new sheet.
'No' The next subset starts on the back side of the last sheet of the previous subset. There is no empty page be-tween the two subsets.
'Whole document' The next subsets all have the same setting.
'This subset' The setting is used for this subset only.

150 Océ VarioPrint® 2100/2110 User's Manual
Create a custom template
Introduction
Task for operators, key operators
The Océ VarioPrint® 2100/2110 offers 2 types of copy templates.1. Standard templates2. Custom templates.
The standard templates contain a combination of frequently used settings for copy jobs. You can edit the settings for each copy job, but the system does not store the changed settings.However, the Océ VarioPrint® 2100/2110 enables you to use custom templates. You can create up to 5 templates with your own custom-made settings.This procedure describes how to create and remove a custom template.
How to create a custom template
1. Press the 'Copy' function key.2. Select one of the copy templates.3. Change the settings for 'Original' and 'Print'.4. In the 'Print' section, press the 'Target' function key.5. Press the function key 'Store as template'.6. Use the numeric keys 1-5 to enter a number for the template you want to store.7. Press the 'OK' function key.
The template is stored.Note: You can enter a number of a custom template that already exists. Then the system asks you to confirm that you really want to overwrite the existing template.
How to remove a custom template
1. Press the 'System manager' function key.2. Press the 'User interface' function key.3. Press the function key 'Delete template'.
The screen displays the available templates.4. Use the numeric keys 1-5 to enter the number of the template you want to
remove.5. Press the 'OK' function key.
The template is removed.

The Copy Function 151
Note: You can also press the function key 'Delete all' to delete all the custom templates.

152 Océ VarioPrint® 2100/2110 User's Manual
Use a custom template
Introduction
Task for operators
This procedure describes how to use the custom templates. You can use the custom templates in the same way that you use the standard copy templates.
How to use a custom template
1. Press the 'Copy' function key.2. Press the function key 'Custom templates'.
The screen displays the custom templates that you defined (see �Create a custom template� on page 150).Note: The function key 'Custom templates' is only available when you defined at least 1 custom template.
3. Use the numeric keys 1-5 to enter the number of the template you want to use.4. If required, edit the settings.5. Enter the number of copies.6. Press the Start key to start the job or press the Set-build key to scan the
subset.
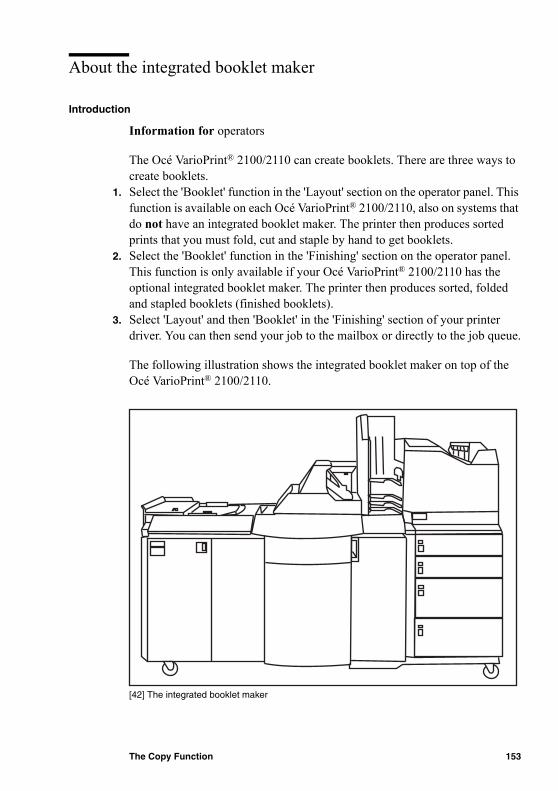
The Copy Function 153
About the integrated booklet maker
Introduction
Information for operators
The Océ VarioPrint® 2100/2110 can create booklets. There are three ways to create booklets.
1. Select the 'Booklet' function in the 'Layout' section on the operator panel. This function is available on each Océ VarioPrint® 2100/2110, also on systems that do not have an integrated booklet maker. The printer then produces sorted prints that you must fold, cut and staple by hand to get booklets.
2. Select the 'Booklet' function in the 'Finishing' section on the operator panel. This function is only available if your Océ VarioPrint® 2100/2110 has the optional integrated booklet maker. The printer then produces sorted, folded and stapled booklets (finished booklets).
3. Select 'Layout' and then 'Booklet' in the 'Finishing' section of your printer driver. You can then send your job to the mailbox or directly to the job queue.
The following illustration shows the integrated booklet maker on top of the Océ VarioPrint® 2100/2110.
[42] The integrated booklet maker
[42] The integrated booklet maker

154 Océ VarioPrint® 2100/2110 User's Manual
Illustration of the integrated booklet maker
The next illustration shows the output of the integrated booklet maker.
[43] The output side of the integrated booklet maker
[43] The output side of the integrated booklet maker

The Copy Function 155
Disabling Double-sheet Detection
Introduction
The automatic document feeder of the Océ VarioPrint® 2100/2110 contains a 'Double-sheet detection' function. This function makes sure that the originals in the automatic document feeder are well separated.If you want to copy or scan paste-up originals, disabling the 'Double-sheet detection' function can be convenient.
Note: By default, the double-sheet detection is enabled.
How to disable double-sheet detection
1. Press the 'System manager' function key.2. Press the 'Scanner' function key.3. Press the 'Double-sheet detection' function key. 4. Select 'Off'.5. Press the 'System manager' function key.6. The icon appears.
How to enable the double-sheet detection
1. Press the 'System manager' function key.2. Press the 'Scanner' function key.3. Press the 'Double-sheet detection' function key.4. Select 'On'.5. Press the 'System manager' function key.6. The icon disappears.

156 Océ VarioPrint® 2100/2110 User's Manual
Copying on the Océ VarioPrint® 2100/2110
Making a Copy
Introduction
The Océ VarioPrint® 2100/2110 contains five copy templates. The copy templates help you to improve your productivity. You can select the following copy templates.■ 'Standard job'■ 'Front&back cover'■ 'Front cover'■ 'Last used'■ 'Scan to memory'.
When you make a copy, you have 2 options. You can copy immediately, or scan now and print later (postponed copying). Select the copy template 'Scan to memory' to make a postponed copy.
The Copy Function 157
Note: If you select another copy template than 'Scan to memory', you can also scan your job to memory. You must define the destination in the 'Target' section of the job editor.[44] The Copy Templates
[44] The Copy Templates
Before you begin
■ Remove all staples from your originals.■ Remove the paper clips.■ Make sure that the originals in the automatic document feeder have the
same size.■ Make sure that the automatic document feeder does not contain more than
75 sheets (80 g/m2 or 20 lb bond).■ Make sure that the originals are not curled.
Copy template Description
'Standard job' All the settings are the system default set-tings. You can define all the required set-tings.
'Front&back cover' All the settings which are required for copy jobs that contain front and back covers are pre-defined. You can define the other set-tings for your job.
'Front cover' All the settings which are required for copy jobs that contain front covers are pre-de-fined. You can define the other settings for your job.
'Last used' The settings of the previous copy job will be used for your current copy job.Note: This copy template does not contain the settings of all the subsets of a set-build job.
'Scan to memory' All the settings which are required to scan a job now and print it later are pre-defined. You can define the other settings for your job.

158 Océ VarioPrint® 2100/2110 User's Manual
How to make a copy
1. Place the originals face down and in readable form into the automatic document feeder or on the glass plate.
2. Press the 'Copy' function key.3. Select a copy template.4. Define the settings for 'Original' and 'Print'.5. Enter the number of copies.6. Press the Start key .
Note: You can also make a basic 'Green button' copy. Place the originals in the automatic document feeder or on the glass plate and press the Start key .
How to scan to memory (scan now, print later)
1. Place the originals face down and in readable form into the automatic document feeder or on the glass plate.
2. Press the 'Copy' function key.3. Select the copy template 'Scan to memory'.4. Define the settings for 'Original' and 'Print'.5. Enter the number of copies.6. Press the Start key .
Your job is scanned to the 'Memory'. You can print your job later (see �How to print a document from the memory� on page 121).

The Copy Function 159
Change the settings for a copy job
Introduction
After you select a template, you can change all the settings for your copy job in the Job editor.
Note: If you edit a mailbox job you can only change output settings, document type settings and number of copies.
How to define the settings for a new job
1. Automatic document feeder: Put the originals face down and in readable form into the automatic document feeder. Adjust the original guides to the original paper size. Glass plate: Put the originals on the glass plate.
2. Select a template. 3. The Job editor opens with the 'Basic settings' menu. All settings are set to the
values defined for this template.Note: When you put your originals into the automatic document feeder, the original size, original sheet orientation and the original document type are selected automatically (Only for A4 and Letter Standard. Other formats can only be fed in one feed direction).The print size and document type are also automatically selected and adapted to the original settings.
4. To change the settings for the original document, press the key for 'Original' and go through the four menus on the right side of the screen ('Source', 'Sheet', 'Layout' and 'Image').
5. To change the settings for the print, press the key for 'Print ' and go from top to bottom through the six menus on the right side of the screen ('Target', 'Output', 'Paper', 'Covers', 'Layout' and 'Image').
6. Set the number of prints with the numeric keys. Note: You can set the number of prints at all times during the job definition. The print feedback area displays the number of prints.

160 Océ VarioPrint® 2100/2110 User's Manual
Combining Subsets into One Document
Introduction
The Océ VarioPrint® 2100/2110 allows you to create your documents and make a report, a manual or a brochure. Combined (build) documents can include several parts like a title page, the table of contents, the different chapters and the appendices. You can scan or print some parts of the document 1-sided and other parts 2-sided. You can print the different parts of a document on cover material and separation sheets or tab sheets. You can insert, for example, pre-printed paper and blank pages.
SubsetsA subset of a document is a number of pages to process in a defined method, for example print on red paper. When the required processing method (for scanning or printing) changes, a new subset begins. When you process parts of a document in a different way, you must divide the document into subsets.
The Set-build keyYou can scan different subsets with the Set-build key . You can find the set-build key on the operator panel. When you use the set-build key, the following settings do not apply to the subset, but to the whole job.
■ The number of copies■ The destination■ The sort order■ The staple setting■ The offset stack.
Remember that you can not use the Set-build key for documents in the mailbox or the memory. You can use the Set-build key for paper originals only. When you put different subsets together, the setting 'Source' for 'Original' is automatically set to 'Paper'. The original can come only from the glass plate or the automatic document feeder.
Note: When you use the automatic document feeder, the size of the originals must be one of the supported standard sizes.
The Copy Function 161
When to do
Use the procedure below for example to do the following:■ Print a document with many pages.■ Print the appendices of a document on colored paper.■ Insert blank pages into a document.
Before you begin
Divide your document into subsets. For example a subset on red paper or a scan with a specific dark exposure setting. When the processing method changes, a new subset begins. You must scan each subset separately, using the set-build key ( ).
Illustration[44] Define the document type
[44] Define the document type

162 Océ VarioPrint® 2100/2110 User's Manual
How to prepare your originals
1. Jog the subset of originals carefully to make a straight stack.2. Put the stack face down and in the readable form into the automatic document
feeder.3. If necessary, adjust the original guides.4. Press the key for a template, for example 'Standard job'.5. Press the key for 'Original'.6. Define the settings for the original.7. Press the key for 'Print '.8. Define the settings for the document to print.
How to scan the subset
1. Press the set-build key ( ).
Result
The originals in the automatic document feeder are scanned. The originals are added to the other subsets. You can see the number of scanned subsets on the screen in the feedback area. The screen also displays extra feedback for tabs and inserts.
Note: When you are building a set, the next subset starts with the settings of the previous subset. To process the new subset in a different method, you must define new settings.
How to finish your combined document
1. Wait for the scan job to finish.2. Define the settings for the next subset.3. Scan the next subset.4. Repeat the steps 1, 2 and 3 above to scan more subsets.5. Select 'Output' to define the settings for Destination, Sort order, Staples and the
Stacking method.6. Set the number of copies with the numeric keys on the keyboard.7. Press the start key ( ) to print the whole document (add the job to the job
queue) or to send the job to the local mailbox.Note: When you press the start key, the selected output settings and number of copies apply to the whole job.

The Copy Function 163
Deleting subsets
Introduction
You can delete subsets with the correction key ( ). If you press the correction key, you can remove the last scanned subset. You can delete as many subsets as needed, starting at the last subset.
Illustration[45] Three Subsets. The last subset can be deleted.
[45] Three Subsets. The last subset can be deleted.
164 Océ VarioPrint® 2100/2110 User's Manual
Deleting subsets
1. Press the correction key ( ). [45] Correction key behavior
[45] Correction key behavior
The following dialog box appears. 'Delete last subset?' Yes / No2. Select 'Yes' to delete the subset.3. Press the correction key ( ) again.
The following dialog box appears. 'Delete last subset?' Yes / No4. Repeat step 3 until all the incorrect subsets are deleted.
If you press the correction key Then
one time the number of copies setting is reset to one
two times all other settings are reset to the default values of the template
three times you delete the last subset after confir-mation

The Copy Function 165
Including Tab Sheets and Inserts
Introduction
An insert is a type of media that goes through the Océ VarioPrint® 2100/2110 but is not processed. This insert is only included in a media set, for example to indicate the start of a new chapter in a report. An insert can be a blank sheet but also a pre-printed sheet or a copied sheet.
There is no need to count the pages of the documents to use inserts and tab sheets. Use the 'Set-build' feature of the Océ VarioPrint® 2100/2110 to include tab sheets and inserts. You then divide your document into subsets. The first subset for example is a chapter. The next subset is an insert that indicates the start of the next chapter. Then follows the next subset, which is a chapter. If you use tab sheets, use the same method. Each subset is processed in a different way, for example printed on red paper or handled like a tab sheet or an insert. After you defined all the settings for all the subsets, the Océ VarioPrint® 2100/2110 joins all the subsets into one complete document.
Note: Remember that you can only use the set-build key for paper originals, not for documents from 'Memory' or the 'Mailbox'.
How to prepare your originals
1. Jog the subset of originals carefully to make a straight stack.2. Put the stack face down and in the readable form into the automatic document
feeder.3. If necessary, adjust the original guides.4. Press the key for a template, for example 'Standard job'.5. Press the key for 'Original'.6. Define the settings for the original.7. Press the key for 'Print '.8. Define the settings for the document to print.
How to scan the subset
1. Press the set-build key ( ).
Result
The originals in the automatic document feeder are scanned. The originals are added to the other subsets. You can see the number of scanned subsets on the

166 Océ VarioPrint® 2100/2110 User's Manual
screen in the feedback area. The screen also displays extra feedback for tabs and inserts.
Note: When you are building a set, the next subset starts with the settings of the previous subset. To process the new subset in a different method, you must define new settings.
How to finish your combined document
1. Wait for the scan job to finish.2. Define the settings for the next subset.3. Scan the next subset.4. Repeat the two procedures above to scan more subsets.5. Select 'Output' to define the settings for 'Destination', 'Sort', 'Staple' and 'Offset
stacked'.6. Set the number of copies with the numeric keys on the keyboard.7. Press the start key ( ) to print the whole document (add the job to the job
queue) or to send the job to the local mailbox.Note: When you press the start key, the selected output settings and number of copies apply to the whole job.

The Copy Function 167
Create a booklet
Introduction
Task for operators
If your Océ VarioPrint® 2100/2110 has the optional integrated booklet maker, you can use the 'Copy' function of the Océ VarioPrint® 2100/2110 to create a sorted, folded and stapled booklet. You can put the originals in the automatic document feeder or on the glass plate.You can also use the 'Set-build' function to create a booklet (see �Combining Subsets into One Document� on page 160).
Note: When you use A4 / Letter for the booklet maker, make sure that you use A4 SEF or Letter SEF. The booklet maker can only process paper that is fed over the short edge ( ).You can access the 'Booklet' function in the 'Finishing' section of the 'Basic settings'. If you put A4 paper into the automatic document feeder and one of the paper trays contains A3 paper, the following settings are set automatically. ■ The 'Print' setting in the 'Basic settings' section is set to '2-sided'■ The 'Layout' setting in the 'Print' section is set to 'Booklet'.
If your original is a booklet, you must set the 'Layout' setting in the 'Print' section to 'Normal'
Note: You can select A4 for the 'Paper' setting instead of A3. The 'Zoom' setting is then set to 71% if you loaded A4 paper over the short edge feed (SEF) into one of the paper trays.
Before you begin
■ Remove all staples from your originals.■ Remove the paper clips.■ Make sure that the originals in the automatic document feeder have the
same size.■ Make sure that the originals are not curled.
Note: If your Océ VarioPrint® 2100/2110 does not have the optional integrated booklet maker, you can still create a booklet layout for your document. The system then shuffles the originals. For example, the pages 1 and 4 are printed on one side of the sheet. The pages 2 and 3 are printed on the other side of the sheet. You must fold, cut and staple the prints by hand to get a booklet.

168 Océ VarioPrint® 2100/2110 User's Manual
How to create a booklet
1. Put the originals into the automatic document feeder.2. Press the 'Copy' function key.3. Select a template.
The operator panel displays the 'Basic settings' section4. Set 'Finishing' to 'Booklet'.
The graphical feedback displays the booklet icon ( ).[46] Create a booklet
[46] Create a booklet
Note: The Océ VarioPrint® 2100/2110 also allows you to copy originals that already have a booklet layout. When you copy originals with a booklet layout, you must set the setting 'Layout' in the procedure below to 'Normal' and not to 'Booklet'. There is no need to set the 'Layout' setting to 'Booklet' because your originals already are in booklet form.
5. Define the other settings.6. Enter the number of prints.7. Press the Start key .
The Copy Function 169
Stop Scanning
Introduction
Task for operators
You can stop a scan job with the Correction key on the operator panel. If you press the correction key, the scanning will stop after the scan station has processed the originals that are already separated in the automatic document feeder.
Illustration[47] Stop scanning
[47] Stop scanning
How to stop a scan job
1. Press the Correction key on the operator panel while the scanner scans the originals.The operator panel displays the message 'Scan job stopped. Cancel this job?'.
2. Press the function key 'Yes' to cancel the job.3. Press the function key 'No' to continue the job.

170 Océ VarioPrint® 2100/2110 User's Manual
Result
1. The job in the job queue is now displayed in orange.2. The scanning of documents stops.3. The message with the two options appears. You can cancel or resume the job.4. When you select 'Yes', the job is removed from the queue.
Note: If you use the set-build function, 'Yes' will only cancel the last subset, not the job in the job queue.Note: If you cancel a scan job, this also indicates that you cancel the corresponding print job.

The Copy Function 171
Stop printing
Introduction
You can stop a print job with the Stop key on the operator panel. If you press the stop key, the printing will stop.Press the Stop key 1 time to stop a print job at the end of a set.Press the Stop key 2 times to stop a print job at the end of a page.
How to stop a print job
1. Press the Stop key on the operator panel.The operator panel displays the message 'Print job stopped. Cancel this job?'.
2. Press the 'Yes' function key to stop the job.3. Press the 'No' function key to continue the job.

172 Océ VarioPrint® 2100/2110 User's Manual

173
Océ VarioPrint® 2100/2110
User's Manual
Chapter 7 The Scan Function (optional)

174 Océ VarioPrint® 2100/2110 User's Manual
Scanning Concepts
Introduction to the scan-to-file function
Introduction
Information for operators, system administrators
The scan-to-file function is optional for the Océ VarioPrint® 2100/2110.The scan-to-file function provides a way to convert the information of a physical document into a digital document. The Océ VarioPrint® 2100/2110 supports the Adobe® Portable Document Format (PDF) and the TIFF format for scan jobs. You can only use this scan-to-file function if you installed a valid license.
When you scan a document to file, the generated file is exported to a folder or digital storage area on a scan server. The export mechanism is normally FTP. You can get the file from this destination folder on the scan server.
Definition
When you scan a document to file, you must first select a scan profile. A scan profile is a combination of the following preset settings for scan jobs.■ The destination for the resulting file■ The resolution■ The file format.
Your company can use many scan profiles. For example, each department can have a scan profile to archive the files, a scan profile to display the files on screen and a scan profile to print the files. An example of a scan profile is 'Purchasing, 300 dpi, TIFF'.

The Scan Function (optional) 175
When you use a scan profile, your document is scanned with the resolution defined in the scan profile. The generated file has the format and the location indicated in the scan profile. The file name, scan resolution and file format are fixed. You cannot change these items on the operator panel.There are some settings that you can change, but only for the current scan job.
[46] Settings That You Can Change for the Current Scan Job
[46] Settings That You Can Change for the Current Scan Job
You can select a scan profile on the base of three items. These items were included when the scan profile was defined in the Océ Settings Editor. You cannot change these items on the operator panel.
[47] The contents of a scan profile
[47] The contents of a scan profile
Section 'Original'
Section 'Scan'
'Basic settings' 1-sided or 2-sid-ed
'Paper' 'Size'
'Document type' 'Image' 'Zoom'
'Size' 'Exposure'
'Zoom'
'Paper' 'Size'
'Image' 'Zoom'
'Exposure'
Item Definition
Name The name can indicate a departmental directory or a depart-ment.
Resolution The resolution indicates the number of dots per inch. You can select 300 dpi or 600 dpi.
File format Select the TIFF format, if you require a general format, compatible with a range of graphical applications. Remember that a TIFF file can be large in size.Select the PDF format, if you require a format that is com-patible with the Acrobat® applications. A PDF is a file with compressed graphics and text. This for-mat matches all print systems and is common in the Internet environment.

176 Océ VarioPrint® 2100/2110 User's Manual
Tasks for system administrators to maintain the scan-to-file function
The system administrator must do the following to enable and maintain the scan-to-file function:■ Configure the scan server.■ Configure the export function for the scan jobs.■ Create the scan profiles.■ Download the scan profiles from the Océ Settings Editor to change the
settings of the scan profile.■ Upload the scan profiles to the Océ Settings Editor after the settings are
changed.■ Install the scan server to which the files are sent.
Note: See the on-line help of the Océ Settings Editor for more information about the above tasks of the system administrator.

The Scan Function (optional) 177
Introduction to the scan-to-email function
Introduction
Information for operators, system administrators
The scan-to-email function is a part of the optional scan-to-file function on the Océ VarioPrint® 2100/2110. Scan to email runs on the GX270 platform and more recent platforms.
Definition
Scan to email allows you to scan a document and attach this scanned document to an email. The email is then automatically sent to the indicated email address. Like in the scan-to-file function, the format of the generated document is Adobe® Portable Document Format (PDF) or Tagged Image File Format (TIFF).The difference between scan to file and scan to email is the following. A document that was generated with the scan-to-file function, is stored on an image server. You can get the document from the image server. A document that was generated with the scan-to-email function, is attached to an email message. This email message is automatically sent to a mail server and, from that mail server, to an indicated email address. If the Océ VarioPrint® 2100/2110 cannot send the email message, the message with the attached document is not saved, but removed after an indicated time.
Scan-to-email profiles
When you start a scan-to-email job, you must first select a scan-to-email profile. A scan-to-email profile is similar to a scan profile (see �Introduction to the scan-to-file function� on page 174).Scan-to-email profiles are stored in a scan job ticket file (SJT), which is uploaded to the Océ Smart Imager. An SJT file can contain scan profiles and scan-to-email profiles at the same time.

178 Océ VarioPrint® 2100/2110 User's Manual
User codes
The scan-to-email function includes user codes. A user code is a unique number, for example a telephone number or a salary number, that is mapped to an email address. The combination of this user code and the matching email address is stored on an LDAP server or entered in an address list file.You need a user code to start a scan-to-email job. When you press the Start key
, you are asked to enter the code.
Attributes of the scan-to-email function
You must configure the following items to use scan to email.■ An SMTP server. This server is the mail server (see �Configure the mail
server� on page 182)■ An LDAP server (see �Configure the recipient search - LDAP server� on
page 183), an address list file (see �Configure the recipient search - Address list file� on page 184) or both items. The server or list contains the mapping to email addresses
■ The address mapping function on the Océ VarioPrint® 2100/2110 Settings Editor.
Note: Refer to the on-line help of the Océ VarioPrint® 2100/2110 Settings Editor for more information about the configuration of the scan-to-email function.

The Scan Function (optional) 179
About the scan profiles file
Introduction
Information for system administrators
The scan profiles are templates that you can access on the operator panel of the Océ VarioPrint® 2100/2110. The scan profiles are stored in a file on the Océ Smart Imager. The file has the name sjt.csv (Scan Job Ticket). You can download the file from the Océ Smart Imager and edit the contents.
After you update the file, you can upload the file to the Océ Smart Imager. The changed file overwrites the previous file.
You can define the file name in the sjt.csv file. The file name is a combination of the following elements: <prefix>_<number that the user entered>_<date>_<time>_<postfix>.<extension>.The following table describes the elements. The format for <date> is yyyymmdd. The format for <time> is hhmmss. The 24-hour notation is used.
About the .csv file
The system creates .csv files. The system administrator can define the field separator (comma or semicolon) in the Océ Settings Editor.The .csv file format is based on a text file format that consists of a sequence of lines of text. A line of text is an ordered sequence of characters. The last characters indicate the end of line.
The settings in the scan profiles file
The scan profiles contain the default job settings. The scan profiles file contains information about for example the format, resolution and identification of a job.For each job, you can change a number of scan profile settings on the operator panel. The changes on the operator panel are only valid for the current scan job. You can not change the template on the operator panel. You can only change the default settings of a scan profile after you download the sjt.csv file from the Océ Smart Imager. You can open the file with an application of your choice, for example Microsoft® Excel.

180 Océ VarioPrint® 2100/2110 User's Manual
The Configuration of the Scan-to-file Function
Introduction
Information for system administrators
The scan-to-file function is an optional function that enables you to scan analogue or physical documents and create digital files. You must configure the following items to make this scan-to-file function operational.
1. The scan server2. The scan settings in the Océ Settings Editor3. The settings for the Scan Job Ticket (SJT).
Scan-to-file function
The table below shows the actions that are necessary to configure the items in the list.
[48] Scan-to-file Function
[48] Scan-to-file Function
Step Action
1 ■ Define a scan server on the network to store the scan jobs■ Create an FTP account (a user name, a password and a destination
directory) on the scan server■ Share the destination directory under the FTP root on the scan
server.2 ■ Access the scan-to-file settings and the scan server settings in the
Océ Settings Editor.■ Define the settings for the scan server.
3 ■ Access the settings for the scan job ticket in the Océ Settings Editor.
■ Define the settings for the Scan Job Ticket (see �About the scan profiles file� on page 179).

The Scan Function (optional) 181
The configuration of the scan-to-email function
Introduction
Information for system administrators
The scan-to-email function is a part of the optional scan-to-file function. You must have a valid license for the scan-to-file function to use the scan-to-email function.
You must do the following:■ Configure the Océ VarioPrint® 2100/2110 Settings Editor
You must configure the mail server and the recipient search. For the recipient search, you can configure an LDAP server or use an address list file.
■ Upload a scan job type (SJT) file to the Océ Smart Imager (see �About the scan profiles file� on page 179).
The SJT file can contain both scan-to-file profiles and scan-to-email profiles. There is no difference in format between the two types of profile. The prefix selector string described in the table below and the application selector string in a profile render a job a scan-to-file job or a scan-to-email job. These two strings must be identical.
Note: You must enter values for all settings described in the tables. Otherwise, the scan-to-email function will not work correctly.

182 Océ VarioPrint® 2100/2110 User's Manual
Configure the mail server[49] Mail server settings
[49] Mail server settings
Mail server settings Description
Server address The address of the mail server. You must enter one server address. This address can be a host name of 32 characters or an IP-address.Default: Empty
Port number Default: 25
User name The user name gives you access to the server. This user name can be any name of up to 20 characters (a-z, A-Z , 0-9, _). Default: Empty
Email address of the sender
Enter the email address of the system that sends the email message, for example your controller. You can use the characters a-z, A-Z, 0-9, @, ., _Do not start an email address with a number.Default: Empty
Prefix selector string Identify the scan jobs that are sent to email. The pre-fix separates the scan-to-email jobs from the scan-to-file jobs. You can use up to 8 characters (a-z, A-Z , 0-9, _). The prefix selector string must be iden-tical to the application selector string in the scan-to-email profiles.Default: Email

The Scan Function (optional) 183
Configure the recipient search - LDAP server[50] Recipient search settings - LDAP server
Recipient search settings - LDAP server
Description
Address source The source that contains the list of user codes and email addresses. This source can be the LDAP server or an address list file. When you have no LDAP serv-er, you must upload an address list file.Default: LDAP
Server address Enter the address of one LDAP server. This address can be a host name of 32 characters or an IP address.Default: Empty
Port number Default: 389
User name The user name gives you access to the server. This user name can be any name of up to 20 characters (a-z, A-Z , 0-9, _). Default: Empty
Password The password can be any word of up to 20 characters (a-z, A-Z, 0-9, _). Each character that you enter is shown as an *.Default: Empty
Search base Define the path to the search base. The search base is the area in which an email address is searched. The search base can be any data file that contains at least unique identifiers for the users and email addresses. The search is from top to bottom only. You must en-ter the top node of the search base to enter the data in the file.Default: Empty

184 Océ VarioPrint® 2100/2110 User's Manual
[50] Recipient search settings - LDAP server
Configure the recipient search - Address list file[51] Recipient search settings - Address list file
[51] Recipient search settings - Address list file
User identifier This attribute is the field that is compared with the code that is entered on the operator panel.Default: Empty
Email address An email address is connected to a unique user iden-tifier. When a search is done on the server, the first email address that is connected to the entered user identifier, is returned. See 'Email address of the send-er' above for the format requirements.Default: Empty
Recipient search settings - Address list file
Description
When you have no LDAP server, you can use an ad-dress list file to search for recipients. When an ad-dress list file is available, this file is always used. You can upload and download the address list file to the Océ Smart Imager.The address list file is a comma-separated values (csv) file. The address list file must contain a user identifier column and an email address column. The user identifier must be a unique number of up to 20 digits (0-9). See 'Email address of the sender' above for the format requirements of the email address.Note: The name of the address list file must always be ral.csv. Other file names are not accepted. The header of the user identifier column must always be ruid. The header of the email address column must always be address.
Recipient search settings - LDAP server
Description

The Scan Function (optional) 185
Scanning on the Océ VarioPrint® 2100/2110
Original input on the glass plate or into the ADF
Definition
The procedures that describe the methods to scan documents from the glass plate or from the automatic document feeder (ADF) offer the following suggestions.■ Put the original face down and in readable form in the upper left-hand
corner on the glass plate.■ Put the originals face down and in readable form into the automatic
document feeder.
This paragraph explains how to position originals on the glass plate and how to feed originals into the automatic document feeder.
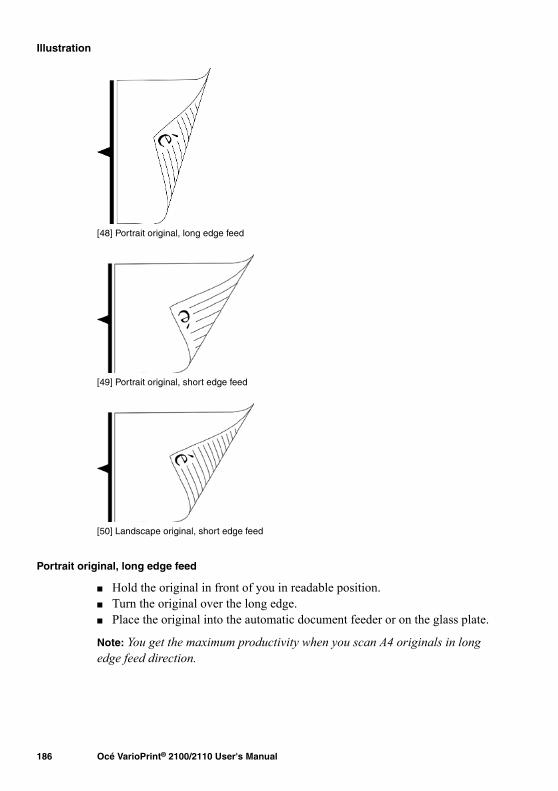
186 Océ VarioPrint® 2100/2110 User's Manual
Illustration[48] Portrait original, long edge feed
[48] Portrait original, long edge feed
[49] Portrait original, short edge feed
[49] Portrait original, short edge feed
[50] Landscape original, short edge feed
[50] Landscape original, short edge feed
Portrait original, long edge feed
■ Hold the original in front of you in readable position.■ Turn the original over the long edge. ■ Place the original into the automatic document feeder or on the glass plate.
Note: You get the maximum productivity when you scan A4 originals in long edge feed direction.

The Scan Function (optional) 187
Portrait original, short edge feed
■ Hold the original in front of you in readable position.■ Rotate the original 90 degrees counter-clockwise.■ Turn the original over the long edge. ■ Place it into the automatic document feeder or on the glass plate.
Landscape original, short edge feed
■ Hold the original in front of you in readable position.■ Turn the original over the short edge. ■ Place it into the automatic document feeder or on the glass plate.
Note: If you are scanning an original in which the long edge size is greater than the vertical glass plate size, you must always use a short edge feed. Long edge feed does not fit into the automatic document feeder.
Glass plate position[52] Glass plate position
[52] Glass plate position
Note: If you are scanning an original in which long edge size is greater than the vertical glass plate size, you must always scan the original in horizontal position.
Component Function[51] Glass plate scan
portrait
[51] Glass plate scan portrait
Scan a portrait document in vertical position on the glass plate.
[52] Glass plate scan
landscape
[52] Glass plate scan landscape
Scan a landscape document in horizontal position on the glass plate.

188 Océ VarioPrint® 2100/2110 User's Manual
Create a scan-to-file job
Introduction
You can scan an analogue document and turn the document into a digital file with the scan-to-file function on the Océ VarioPrint® 2100/2110. The procedure to create a scan-to-file job is almost the same as the method you use to create a copy job. In order to make the procedure quick and simple you can use the predefined scan profiles on the operator panel.
Note: When you have started a scan-to-file job, you must wait until the scan process is finished. After the scan process is completed, you can create a new scan-to-file job.
Purpose
You can turn analogue documents into digital files for archiving purposes and print on demand. You can use this method also to make the documents suited for digital processing.
Before you begin
The fastest way to scan a set of originals of the same, standard paper size is to place the set in the automatic document feeder. You can put a maximum of 75 sheets (80 g/m2 or 20 lb bond) in the automatic document feeder.
Note: You must scan originals of a non-standard size on the glass plate.

The Scan Function (optional) 189
Illustration[53] The scan profiles
[53] The scan profiles
Create a simple scan-to-file job
1. Put the originals face down in the automatic document feeder or on the glass platen.
2. Select 'Scan'.3. Select one of the scan profiles from the list.4. Select 'Edit...' to access the job settings for the scan-to-file job.
Note: You cannot edit all settings. The fixed settings are grayed out. If there is no need to change the scan-to-file settings, you can ignore this step and continue with the next step.
5. Press the Start key to start the scan-to-file job.Note: If you do not use the 'Edit...' function, you can use the Start key to start the scan-to-file job.

190 Océ VarioPrint® 2100/2110 User's Manual
Create a combined scan-to-file job with the Set-build function
1. Divide your document in different sets.The document is either too large to scan as 1 set or contains sheets of a different size or paper type.
2. Put the first set of originals face down in the automatic document feeder or on the glass plate.
3. Select 'Scan'.4. Select one of the profiles from the list with scan profiles.
Note: You can only select 1 scan profile for all the subsets to come.5. Select 'Edit...' to access the job settings for the scan-to-file job.6. You can also skip the 'Edit...' option and press the Set-build key . The first
subset is scanned.7. Repeat the steps for the next subsets and press the Set-build key again.8. When you have scanned the last subset, you can press the Start key .
Result
After you start the scan-to-file job, the job is scanned and the digitized result is sent to the scan server. The file is stored in a designated directory. The file is stored under the predefined name.There is no message on the operator panel to inform you that the file was stored successfully. You can access the status information on the Océ Smart Imager through the Océ VarioPrint® 2100/2110 Settings Editor.
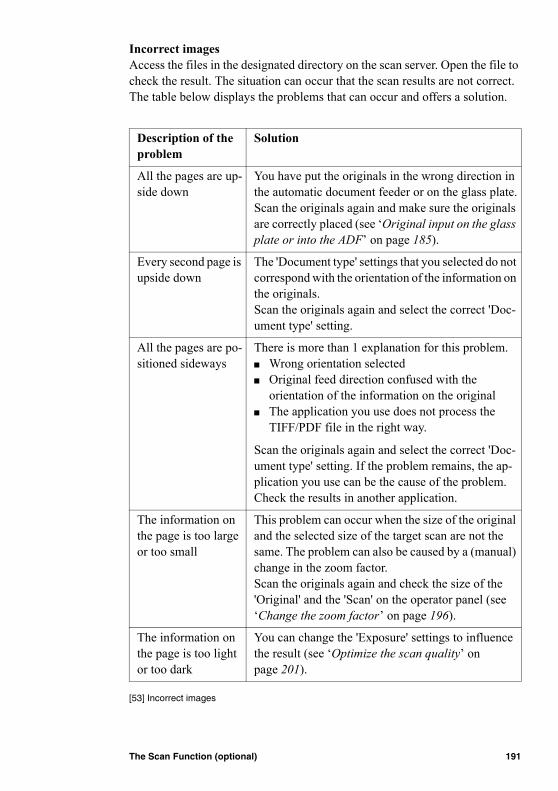
The Scan Function (optional) 191
Incorrect imagesAccess the files in the designated directory on the scan server. Open the file to check the result. The situation can occur that the scan results are not correct. The table below displays the problems that can occur and offers a solution.
[53] Incorrect images
[53] Incorrect images
Description of the problem
Solution
All the pages are up-side down
You have put the originals in the wrong direction in the automatic document feeder or on the glass plate.Scan the originals again and make sure the originals are correctly placed (see �Original input on the glass plate or into the ADF� on page 185).
Every second page is upside down
The 'Document type' settings that you selected do not correspond with the orientation of the information on the originals.Scan the originals again and select the correct 'Doc-ument type' setting.
All the pages are po-sitioned sideways
There is more than 1 explanation for this problem.■ Wrong orientation selected■ Original feed direction confused with the
orientation of the information on the original■ The application you use does not process the
TIFF/PDF file in the right way.
Scan the originals again and select the correct 'Doc-ument type' setting. If the problem remains, the ap-plication you use can be the cause of the problem. Check the results in another application.
The information on the page is too large or too small
This problem can occur when the size of the original and the selected size of the target scan are not the same. The problem can also be caused by a (manual) change in the zoom factor.Scan the originals again and check the size of the 'Original' and the 'Scan' on the operator panel (see �Change the zoom factor� on page 196).
The information on the page is too light or too dark
You can change the 'Exposure' settings to influence the result (see �Optimize the scan quality� on page 201).

192 Océ VarioPrint® 2100/2110 User's Manual
Create a scan-to-email job
Introduction
Task for operators
When you create a scan-to-email job, you must first select a scan-to-email profile. This profile contains a number of settings with preset values. You can use the values of the selected profile but you can also change certain setting values of this profile. Another option of scan to email is the set composition function. Set composition allows you to create one digital document of several different sets of originals. This document is then attached to an email message.
Before you begin
■ Remove all staples from your originals.■ Remove the paper clips.■ Make sure that the originals in the automatic document feeder have the
same size.■ Make sure that the automatic document feeder does not contain more than
75 sheets (80 g/m2 or 20 lb bond).■ Make sure that the originals are not curled.
How to prepare your originals for the scanning process
1. Glass plate Put the original face down and in readable form on the glass plate. Automatic document feeder Jog the set of originals carefully to make a straight stack. Put the set of originals face down and in readable form into the automatic document feeder.
2. Select 'Scan'.3. Select a scan-to-email profile from the list.4. If necessary, select 'Edit...' to change the scan settings.
Note: The settings that you cannot change, are dimmed.

The Scan Function (optional) 193
How to create a basic scan-to-email job
1. Prepare your originals for the scanning process, like described in the procedure above.
2. Press the Start key to start the scan-to-email job.3. Enter the user code.4. Confirm the user code.5. After the scanning process is completed, remove the originals from the original
output tray.
Result
The Océ VarioPrint® 2100/2110 creates a digital document from the scanned originals. This digital document is attached to an email message. The email message is then sent to the mail server.
How to create one digital document from different scanned sets of originals
1. Prepare the first set of originals for the scanning process, like described in the procedure above.Note: You can use only the automatic document feeder to combine different sets of originals.
2. Press the Set-build key to scan the first set of originals.3. Enter the user code. 4. Confirm the user code.5. After the scanning process is completed, prepare the next set of originals for
the scanning process.6. Press the Set-build key to scan the second set of originals.7. Repeat steps 5 and 6 until all sets are scanned.8. Press the Start key to create the digital document.9. Remove the originals from the output receiving tray.
Result
The Océ VarioPrint® 2100/2110 creates one digital document from the scanned sets of originals. This digital document is attached to an email message. The email message is then sent to the mail server.

194 Océ VarioPrint® 2100/2110 User's Manual
Combining subsets into one file
Introduction
Task for operators
The Océ VarioPrint® 2100/2110 allows you to create your documents and make a report, a manual or a brochure. Combined (built) documents can include different parts such as a title page, the table of contents, the various chapters and the appendices. You can combine different originals into one digital file.
SubsetsA subset of a document is a number of pages to process in a defined way. When the processing method changes, a new subset begins. When you process parts of a document in different ways, you must divide the document into subsets.
The Set-build keyUse the Set-build key to scan different subsets.
Remember that you can only combine hardcopy originals into a set-build job. You can not use the Set-build key for digital documents in the mailbox. You can only use originals from the glass plate or the automatic document feeder. Use the 'Scan' function on the operator panel to start a set-build job.
The automatic document feeder
Use the automatic document feeder to copy a set of originals. You can put a maximum of 75 originals into the automatic document feeder. This number refers to A4 originals of 80 g/m2 (20 lb bond). Remember the following:■ The originals must be the same size.■ Use originals that are larger than 140 x 203 mm.■ Use originals that are smaller than 297 x 432 mm.■ The weight of the originals can be between 15 and 45 lb. bond.
Note: Make sure that the size is one of the supported standard formats if you use the automatic document feeder.
Before you begin
1. Divide your documents into subsets.2. Arrange the different subsets in the required order.

The Scan Function (optional) 195
How to combine subsets into 1 file
1. Put your first subset into the automatic document feeder, or put the first original on the glass plate.
2. Press the 'Scan' function key.3. Select a scan profile.4. If necessary, press the key for 'Edit...' to change the settings for the subset.
You can change some settings for 'Original' and 'Scan'(see �Introduction to the scan-to-file function� on page 174).
5. Press the Set-build key .The first subset is scanned.
6. Prepare and scan the following subsets as described in the steps 2 -5 above.7. Press the Start key after you scanned the last subset.
The job is exported to a file.

196 Océ VarioPrint® 2100/2110 User's Manual
Change the zoom factor
Introduction
Originals in the automatic document feederThe automatic zoom function is active when you put standard size originals into the automatic document feeder. If the size of the image on the original is different from the size of the target scan value, the information is automatically resized (reduced or enlarged). By default, the zoom function is set to 'Automatic'. To change the zoom factor manually, use the 'Zoom' function in the 'Scan', 'Image' menu to change the zoom factor with the star arrow keys ( ).
Originals on the glass plateIf you use non-standard size originals, you must use the glass plate. The scanner can not automatically detect the size of the originals on the glass plate. Therefore, you must select the page size and the 'Zoom' factor manually.
The zoom function for the originals in the automatic document feeder is different from the zoom function for the originals on the glass plate.
[54] Zoom behavior
[54] Zoom behavior
Purpose
You use the 'Zoom' factor to fit the information of the original on the target scan without loss of information.
Before you begin
Check the result of a zoom action (enlarged or reduced image) on the operator panel. When the result is satisfactory, you can start the scan-to-file job.
Original Starting point of the zoom function
Automatic document feeder
center
Glass plate Upper left-hand corner
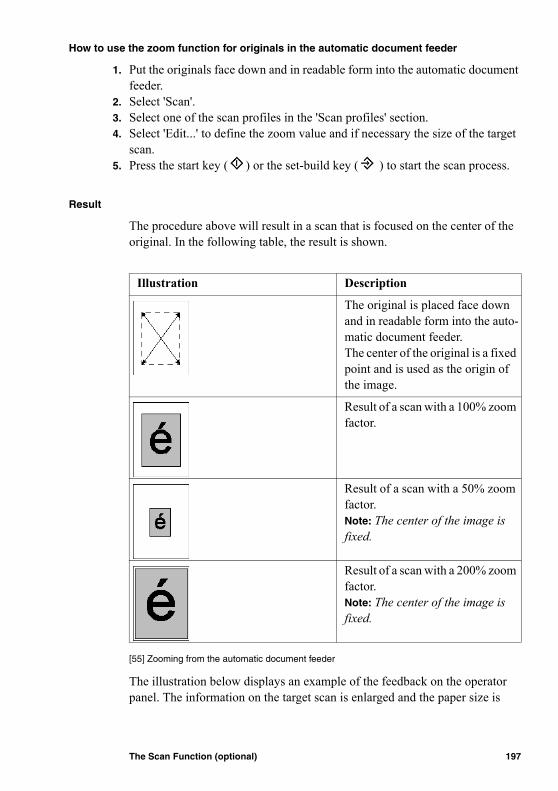
The Scan Function (optional) 197
How to use the zoom function for originals in the automatic document feeder
1. Put the originals face down and in readable form into the automatic document feeder.
2. Select 'Scan'.3. Select one of the scan profiles in the 'Scan profiles' section.4. Select 'Edit...' to define the zoom value and if necessary the size of the target
scan.5. Press the start key ( ) or the set-build key ( ) to start the scan process.
Result
The procedure above will result in a scan that is focused on the center of the original. In the following table, the result is shown.
[55] Zooming from the automatic document feeder
[55] Zooming from the automatic document feeder
The illustration below displays an example of the feedback on the operator panel. The information on the target scan is enlarged and the paper size is
Illustration Description
The original is placed face down and in readable form into the auto-matic document feeder.The center of the original is a fixed point and is used as the origin of the image.
Result of a scan with a 100% zoom factor.
Result of a scan with a 50% zoom factor.Note: The center of the image is fixed.
Result of a scan with a 200% zoom factor.Note: The center of the image is fixed.
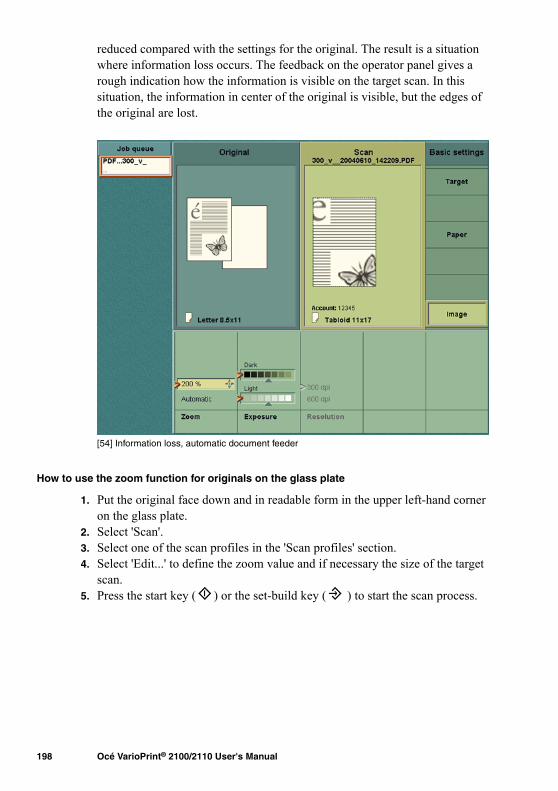
198 Océ VarioPrint® 2100/2110 User's Manual
reduced compared with the settings for the original. The result is a situation where information loss occurs. The feedback on the operator panel gives a rough indication how the information is visible on the target scan. In this situation, the information in center of the original is visible, but the edges of the original are lost.
[54] Information loss, automatic document feeder
[54] Information loss, automatic document feeder
How to use the zoom function for originals on the glass plate
1. Put the original face down and in readable form in the upper left-hand corner on the glass plate.
2. Select 'Scan'.3. Select one of the scan profiles in the 'Scan profiles' section.4. Select 'Edit...' to define the zoom value and if necessary the size of the target
scan.5. Press the start key ( ) or the set-build key ( ) to start the scan process.

The Scan Function (optional) 199
Result
The procedure above will result in a scan that is focused on the upper right-hand corner of the original (upper left-hand corner of the glass plate). In the following table, the result is shown.
[56] Zooming from the glass plate
[56] Zooming from the glass plate
The illustration below displays an example of the feedback on the operator panel. The information on the target scan is enlarged and the paper size is reduced compared with the settings for the original. The result is a situation where information loss occurs. The feedback on the operator panel gives a rough indication how the information is visible on the target scan. In this
Illustration Description
The original is placed face down and in readable form in the upper left-hand corner on the glass plate.The upper left-hand corner of the glass plate is a fixed point and is used as the origin of the image.
Result of a scan with a 100% zoom factor.
Result of a scan with a 50% zoom factor.Note: The upper right-hand corner of the image is fixed.
Result of a scan with a 200% zoom factor.Note: The upper right-hand corner of the image is fixed.

200 Océ VarioPrint® 2100/2110 User's Manual
situation, the information in the upper left-hand corner of the original is visible, the rest of the information of the original is lost.
[55] Information loss, glass plate
[55] Information loss, glass plate

The Scan Function (optional) 201
Optimize the scan quality
Introduction
The Océ VarioPrint® 2100/2110 is designed with Océ's patented Image logic® digital scan technology. The Océ VarioPrint® 2100/2110 can detect photos, rasters and fine lines on the original. This information is processed in such a way that the digital result has a high scan quality. This means that in most cases you do not need to adjust quality settings to get the best result.
To scan special originals, you can use the following settings to take the special characertistics into account.■ The 'Image type' settings to describe the special characteristics of the
'Original'.■ The 'Exposure' settings to describe the requirements for the 'Scan'.
Before you begin
Place the originals face down and in readable form on the glass plate or in the automatic document feeder.

202 Océ VarioPrint® 2100/2110 User's Manual
Illustration[56] Adjust the image quality settings
[56] Adjust the image quality settings
How to adjust the image quality settings
1. Select the 'Scan' section.2. Select one of the scan profiles from the list.3. Define the settings for the 'Original'4. Select 'Image', 'Image type' and the correct setting to describe the original
('Photo', 'Text' or 'Mixed')5. Define the settings for the 'Scan'6. Select 'Image' and 'Exposure'. Use the sliders to change the settings for the
'Light' and 'Dark' areas on the scan. To make the light areas on the scan darker, move the pointer for 'Light' to the left. To make the dark areas on the print darker, move the pointer for 'Dark' to the left.
7. When all the settings are OK, press the Start key or the Set-build key to start the scan process.
Result
The scan-to-file job is started. the document is sent to the designated scan directory on the scan server. You receive no feedback to confirm that the job was completed successfully.

The Scan Function (optional) 203
Stop Scanning
Introduction
Task for operators
You can stop a scan job with the Correction key on the operator panel. If you press the correction key, the scanning will stop after the scan station has processed the originals that are already separated in the automatic document feeder.
Illustration[57] Stop scanning
[57] Stop scanning
How to stop a scan job
1. Press the Correction key on the operator panel while the scanner scans the originals.The operator panel displays the message 'Scan job stopped. Cancel this job?'.
2. Press the function key 'Yes' to cancel the job.3. Press the function key 'No' to continue the job.

204 Océ VarioPrint® 2100/2110 User's Manual
Result
1. The job in the job queue is now displayed in orange.2. The scanning of documents stops.3. The message with the two options appears. You can cancel or resume the job.4. When you select 'Yes', the job is removed from the queue.
Note: If you use the set-build function, 'Yes' will only cancel the last subset, not the job in the job queue.Note: If you cancel a scan job, this also indicates that you cancel the corresponding print job.

The Scan Function (optional) 205
Error messages and possible solutions
Introduction
Information for operators
The operator panel of the Océ VarioPrint® 2100/2110 can display an error message when you try to scan a document. An error can occur when a combination of settings is a not possible combination or the limit of the system capacity is reached.
Handle the error messages
The following errors are OREs, Operator Recoverable Errors. The table describes the possible error messages for scan jobs. The table also describes which action is required.
[57] Messages and actions
[57] Messages and actions
Message Action
'Maximum number of images scanned. Start a new job to scan the rest of the document.'
The system memory is full. You can not scan more images for this job. Start the job. Scan the remaining originals as a new job.
'Maximum of 500 images imported' You can not scan more than 500 im-ages and combine them into a single TIFF or PDF file. Start the job. Scan the remaining originals as a new scan-to-file job.
'Please wait. Scanning will continue soon...'
The system needs time to process the information and send the informa-tion to the scan server. No user inter-action is required.
'Spool memory is almost full. No scan-to-file jobs can be started.''No scan-to-file jobs can be started.'
The maximum memory capacity on the Océ Smart Imager is reached. Use the Océ Settings Editor to empty the export buffer of the scan job.

206 Océ VarioPrint® 2100/2110 User's Manual
207
Océ VarioPrint® 2100/2110
User's Manual
Chapter 8 The Accounting Function

208 Océ VarioPrint® 2100/2110 User's Manual
General Information
About the accounting function
Introduction
Information for operators, system administrators
The Océ VarioPrint® 2100/2110 has two different options for billing for the costs for print and copy jobs.■ An accounting function■ A copy control device (see �Making a Copy or Print with the Copy Card�
on page 229).
The Océ VarioPrint® 2100/2110 has an accounting function that is available on the operator panel.The system administrator must enable the accounting function in the Océ Settings Editor first.
Note: The system administrator can refer to the on-line help of the Océ Settings Editor for more information about how to enable the accounting function.
The principles of accounting
Accounting is the allocation of costs for all types of jobs to an account. An account can for example represent a customer, a user, a department or a project. You can use the accounting function to charge the costs of the jobs. The accounting information of a job is registered in an accounting record. This record is saved in an accounting log file on the Océ Smart Imager.
Accounting log fileEvery processed job is logged in an accounting log file. An accounting log file provides detailed information per job, for example the user name or the number of copies and prints (see �About the accounting log file� on page 216). The system administrator can retrieve the accounting log file from the Océ Settings Editor and process the data in an application such as Microsoft® Excel. You can use the data to generate periodical cost reports.

The Accounting Function 209
Account ID fileThe account ID file is a database file that contains a list of predefined accounts. Each account in an account ID file consists of four data fields (record ID, account ID, account name and comment). You can edit the account ID file, for example to add, delete or change accounts (see �Edit the account ID file� on page 223).
The use of accounting
There are 2 accounting modes on the Océ VarioPrint® 2100/2110. On the operator panel, you can set the required accounting mode. You can select 'Fixed' or 'Per job'.
When 'Fixed' is selected, the account ID that was set in the 'System manager' is used for all jobs. The fixed account ID also overrules the account ID that was defined in the printer driver. The warning section on the operator panel displays the account ID that was set.
When 'Per job' is selected, a dialog box appears for each job. The dialog box does not appear when an account ID was indicated in the printer driver.
Note: Automatic print jobs that do not have a valid account ID are automatically sent to the mailbox. You must enter a valid account ID to print the job.

210 Océ VarioPrint® 2100/2110 User's Manual
The tasks of the system administrator for the accounting function
The system administrator can define a number of accounting settings in the Océ Settings Editor. The following table displays the main settings in relation to accounting.
[58] System Administrator Tasks for Accounting
[58] System Administrator Tasks for Accounting
Person respon-sible
Tasks
System adminis-trator
■ Enable the 'Account ID' setting.■ Enable the account ID check.When an account ID file is uploaded to the Océ Settings Editor and the account ID check is enabled, the system checks the validity of the account IDs that are entered on the operator panel.■ Upload the account ID file to the Océ Smart Imager.■ Download the account ID file from the Océ Smart
Imager to make changes in the file.■ Download the accounting log files.

The Accounting Function 211
Accounting Settings on the Operator Panel
Introduction
Information for operators
Access the 'Accounting' section in the 'System manager' on the operator panel of the Océ VarioPrint® 2100/2110 to define the accounting settings.

212 Océ VarioPrint® 2100/2110 User's Manual
The Accounting Settings[58] The Accounting Settings
[58] The Accounting Settings
[59] The Accounting Settings
[59] The Accounting Settings
Settings in the 'System manager'
Options in the 'Ac-counting' menu
Description
'Accounting' 'Accounting mode'
Define the accounting mode.■ 'Per job'. A dialog box appears for each
job. The dialog box does not appear when an account ID was indicated in the printer driver.
■ 'Fixed'. The account ID that was set in the 'System manager' is used for all jobs.
'Set account ID'
Enter the account ID.Note: The operator panel only displays this setting when the 'Accounting mode' is set to 'Fixed'.

The Accounting Function 213
Note: If you use the bundle print function or select multiple jobs in the mailbox, the operator must enter the account number only one time. The jobs in the bundle print job are recorded as separate jobs in the accounting log file.

214 Océ VarioPrint® 2100/2110 User's Manual
Configure the accounting settings
Introduction
The accounting function is an optional function that enables you to store copy and print information in a file. The information in the file is used to account jobs to relevant persons, projects, customers or departments.
Accounting settings
Select the 'Settings' tab in the Océ VarioPrint® 2100/2110 Settings Editor. Select the options 'Accounting' and 'Configure' to access the accounting settings.
Setting Description
'Identifica-tion'
■ Disabled. You can start the jobs that you create without the use of an account number.
■ Enabled. The Océ VarioPrint® 2100/2110 will ask you to enter an account number before the job is started. The number you enter is a sequence of 1 to 10 digits.
You can specify the account ID in the Océ job ticket (in the printer driver) when you create a job or you can enter the number on the operator panel of the Océ VarioPrint® 2100/2110.
'Verification' ■ Disabled. The Océ VarioPrint® 2100/2110 accepts any account number as a correct entry, even though the number is not listed in the account ID file on the Océ Smart Imager.
■ Enabled. The account number you enter is only accepted by the Océ VarioPrint® 2100/2110 if the number is listed in the account ID file on the Océ Smart Imager. If the number is not present in the account ID file, the job is not accepted.
Note: You can only use this setting if the 'Identification' setting is enabled.
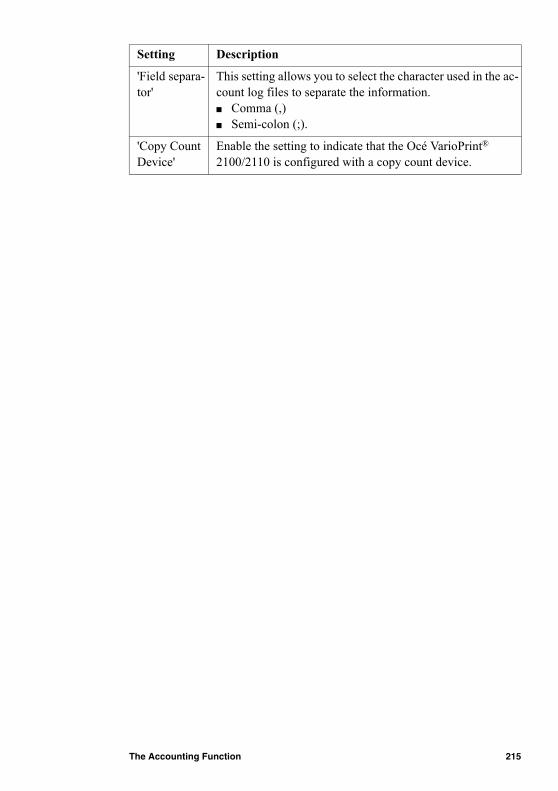
The Accounting Function 215
'Field separa-tor'
This setting allows you to select the character used in the ac-count log files to separate the information.■ Comma (,)■ Semi-colon (;).
'Copy Count Device'
Enable the setting to indicate that the Océ VarioPrint® 2100/2110 is configured with a copy count device.
Setting Description

216 Océ VarioPrint® 2100/2110 User's Manual
The Accounting Log File
About the accounting log file
Introduction
Information for system administrators
An accounting log file consists of data records. The data records contain information about the use of the Océ VarioPrint® 2100/2110. For each job on the Océ VarioPrint® 2100/2110, a new data record is added to the current accounting log file. Each data record in an accounting log file contains 53 fields.The first record of an accounting log file is the header record. This record acts as the heading of a table. The header record always starts with 4300. Every subsequent data field starts with 4301. Records of type 4301 hold the actual accounting information for each job.The Océ Smart Imager stores all the jobs into a temporary accounting log file (.acl file). Every night at midnight, the system converts this information into a permanent accounting log file (.csv file). At the same time, a new temporary accounting log file is created that remains active for 24 hours.You can download the .csv file. Then you can import the file into, for example, Microsoft® Excel or Microsoft® Access.The following table describes the fields of the data records in an accounting log file.
Note: The Océ Smart Imager can store a maximum of 99 accounting log files. The oldest file is removed when the limit is reached.

The Accounting Function 217
The fields of the accounting log file[60] The fields of the accounting log file
Field name Specification Description
<record-type>
4301 A number that identifies a data record
<jobid> A number with a maximum length of 9 digits
When a new job starts, the Océ Smart Imager creates a unique job identifica-tion number
<jobtype> Possible entries:■ COPY■ IP■ AP■ SCAN■ SCAN2MBX■ MBXCOPY■ SYSTEM
Describes the type of job.■ COPY: Direct copy job■ IP: Interactive print job (a job that
was printed from the mailbox)■ AP: Automatic print job (a job that
was directly printed from the network, not from the mailbox)
■ SCAN: A scan-to-file job■ SCAN2MBX: A job that was scanned
to the mailbox■ MBXCOPY: A copy job that was
printed from the mailbox■ SYSTEM: A test print that was
started in the service mode or service copy mode.
<date> <YYYY>-<MM>-<DD>
The date on which the job was finished or cancelledNote: When you open the file in Microsoft® Excel, the date format changes into the date format that is defined in Microsoft® Excel
<time> <hh>:<mm>:<ss> The time on which the job was finished or canceledNote: When you open the file in Microsoft® Excel, the time format changes into the time format that is defined in Microsoft® Excel

218 Océ VarioPrint® 2100/2110 User's Manual
<result> Possible entries:■ Done■ Abrt
Information about the status of the job.■ Done: The job was finished correctly.■ Abrt: The operator or the Océ Smart
Imager stopped or cancelled the job (for example in case of an error)
<user-name>
A text string with a maximum length of 255 characters
The user name that is defined for the job
<jobname> A text string with a maximum length of 255 characters
The name of the job (only for automatic or interactive print jobs). Otherwise, the field is empty
<depart-mentname>
This field is always empty
<costcen-tre>
A text string with maximum length of 40 characters
The name of a department or user as de-fined in the 'Cost center' field of the 'Ac-count' tab of the Océ VarioPrint® 2100/2110 printer driver.This field is empty when the attribute is not available
<custom> A text string with maximum length of 255 characters
Information as defined in the 'Custom' field of the 'Account' tab of the Océ Var-ioPrint® 2100/2110 printer driver. In the 'Custom' field, the user can add addition-al information about the account set-tings.This field is empty when the attribute is not available
<account-jobnum-ber>
This field is always empty
<accoun-tid>
A number with a maximum length of 10 digits
The account ID as defined in the 'ID' field of the 'Account' tab of the Océ Var-ioPrint® 2100/2110 printer driver, or on the operator panel.This field is empty when the attribute is not available
Field name Specification Description

The Accounting Function 219
<nofscana4>
Maximum 5 digits The number of scanned letter-like sheets, including custom sized sheets of which at least one dimension is equal to or less than 10 inches
<nofscana3>
Maximum 5 digits The number of scanned tabloid-like sheets, including custom sized sheets of which all dimensions are larger than 10 inches
<nofripa4> This field is always empty
<nofsripa3>
This field is always empty
<nofsingle-staples>
Maximum 5 digits The number of times that a single staple was used in a job. This number does not include the staples from the off-line sta-pler
<nofdou-blestaples>
Maximum 5 digits The number of times that two single sta-ples were used in a job. This number does not include the staples from the off-line stapler
<noffin-ishedsets>
Maximum 5 digits The number of finished sets. A set is fin-ished after the last sheet is sent to the output destination
<outputdes-tination>
Possible entries:■ FINISHER■ OEM■ SPECIAL
The output destination to which the job was sent.■ FINISHER: Output trays■ OEM: External finisher■ SPECIAL: Upper output tray
<nofprinteda4>
Maximum 5 digits The number of printed letter-standard sized sheets (copy jobs or print jobs)
<nofprinteda3>
Maximum 5 digits The number of printed tabloid sized sheets (copy jobs or print jobs)
<nofsim-plex(1-6)>*
Maximum 5 digits The number of 1-sided sheets of a certain paper type (1-6) used in a job
<nofdu-plex(1-6)>*
Maximum 5 digits The number of 2-sided sheets of a certain paper type (1-6) used in a job
Field name Specification Description

220 Océ VarioPrint® 2100/2110 User's Manual
[60] The fields of the accounting log file
Note: * (1-6) refers to the type of paper (1, 2, 3, 4, 5, 6) that is used. The paper characteristics of the first paper type in a job are logged in the fields ending on '1'. The characteristics of the next, different paper type are logged in the fields ending on '2', and so on. For example, <papertype2> and <paperweight2> both correspond to the second type of paper in a job. If you use less than 6 paper types, the remaining fields are empty. If you use more than 6 paper types, these paper types are logged as if they were paper type 6. The maximum number of paper types per job is 6.
<paperfor-mat(1-6)>*
A text string with a maximum length of 80 characters
The format of the paper type (1-6)
<paper-type(1-6)>*
Possible entries:■ PLAIN■ INSERT■ TAB■ COVER
Description of the type of paper (1-6).■ PLAIN: Standard paper ■ INSERT: Non-processed sheets ■ TAB: Tab sheets ■ COVER: A special front or back page
<paper-weight(1-6)>*
Maximum 3 digits The weight of the paper type (1-6) in grams
Field name Specification Description

The Accounting Function 221
Downloading the Accounting Log File
Introduction
Task for system administratorsThe accounting log file on the Océ Smart Imager contains the relevant job information. You can access the accounting log file through the Océ Settings Editor. You can download the file to a location of your choice. You can use for example Microsoft® Excel to open the file.
How to download the accounting log files
1. Select 'Settings' in the title bar of the Océ Settings Editor.2. Click 'Accounting'.3. Click 'Log files'.4. Click one of the links in the right-hand pane.
The file opens.
Note: The .acl file is the current accounting log file that the system uses to store the accounting information. The file remains active for 24 hours. The file is converted at 0.00 hours to a .csv file. The .csv file is added to the list of links. The Océ Smart Imager can store a maximum of 99 log files. The oldest file is removed when the limit is reached.

222 Océ VarioPrint® 2100/2110 User's Manual
The Account ID File
Download the account ID file
Introduction
The account ID file is a comma separated file (CSV) that contains the valid account IDs and (optional) the matching account names that you need to enter on the operator panel of the Océ VarioPrint® 2100/2110.
When to do
If you want to check and/or change the account numbers that are stored in the account ID file, you can download the file to a local destination on your PC.
Download the account ID file
1. Select the 'Settings' tab in the Océ VarioPrint® 2100/2110 Settings Editor.2. Select 'Accounting'.3. Select 'ID file'.4. Select 'Download'.5. Select the required file.
A dialog box appears.6. Click 'Save' to download the file.
You can browse to a destination of your choice.
Note: You can also right-click on the link and use the 'Save as...' option in the pop-up menu to save the file to a destination of your choice.
Result
After the download of the account ID file is completed, you can open and edit the file in an application of your choice, for example Microsoft® Excel (see �Edit the account ID file� on page 223). After you made the changes, you can upload the file again to the Océ Smart Imager (see �Uploading the Account ID File� on page 225).

The Accounting Function 223
Edit the account ID file
Introduction
Information for system administrators
The account ID file is a .csv file. The name of the default account ID file is account-id.csv. You must download the account ID file from the Océ Smart Imager to add, delete or edit records (see �Download the account ID file� on page 222).
Each record in the account ID file contains the following data fields:■ Record ID■ Account ID■ Account name■ Comment.
The setting 'Field separator' in the Océ Smart Imager determines the type of field separator. The field separator of the file can be a comma or a semicolon. Do not use both a comma and a semicolon as a field separator in one file.
When you use double quotes in a field, the system replaces the double quotes with two double quotes. Otherwise, the system cannot identify the field with certainty.
Note: An account ID file can contain a maximum of 2,000 records.
Save or open the account ID file
When you click on the link of your account ID file, for example account-id.csv, a dialogue box appears. You can now save or open the file.When you open the file, the screen shows the contents of the account ID file.

224 Océ VarioPrint® 2100/2110 User's Manual
The information in the account ID file[61] Account ID file information
[61] Account ID file information
After you change the account ID file, you must save the file. Then you can upload the account ID file to the Océ Smart Imager (see �Uploading the Account ID File� on page 225). The new file overwrites the file that is currently in use.
Column Data field Entry Description
A Record ID 4311 (man-datory for each new record)
Always start each new record with 4311.Note: The first record of the account ID file starts with 4310. This record contains general information. Do not change or delete the first record.
B Account ID 1234567890 (for example)
A sequence of 1 to 10 digits that is attached to a job that identifies a user, department, project or customer.
C Account name
Department X (for exam-ple)
After you enter the account ID on the operator panel, the sys-tem checks the account ID file for a matching account name. This name is displayed on the operator panel.If the account ID file does not contain a matching account name, the operator panel only displays the account number.The account name field can con-tain a maximum of 40 charac-ters.
D Comment Maximum monthly print volume: 20,000 (for example)
The system administrator can use the comment field for addi-tional information. A comment field can contain a maximum of 255 characters.
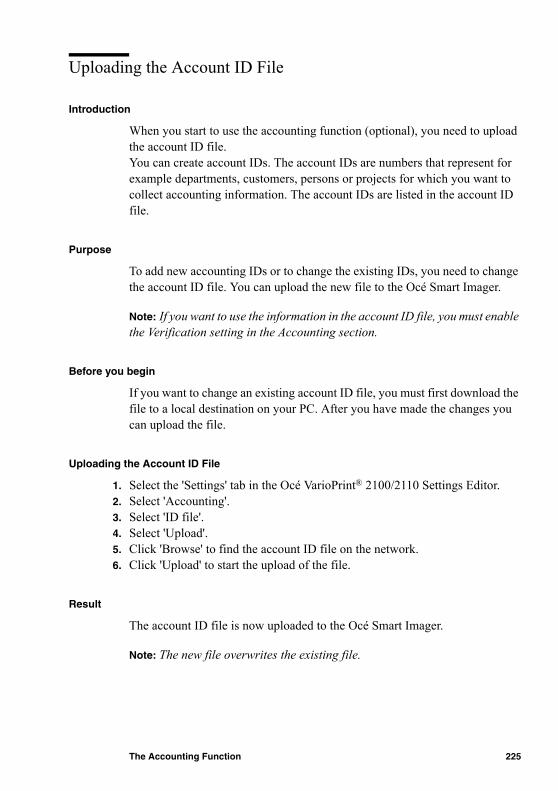
The Accounting Function 225
Uploading the Account ID File
Introduction
When you start to use the accounting function (optional), you need to upload the account ID file.You can create account IDs. The account IDs are numbers that represent for example departments, customers, persons or projects for which you want to collect accounting information. The account IDs are listed in the account ID file.
Purpose
To add new accounting IDs or to change the existing IDs, you need to change the account ID file. You can upload the new file to the Océ Smart Imager.
Note: If you want to use the information in the account ID file, you must enable the Verification setting in the Accounting section.
Before you begin
If you want to change an existing account ID file, you must first download the file to a local destination on your PC. After you have made the changes you can upload the file.
Uploading the Account ID File
1. Select the 'Settings' tab in the Océ VarioPrint® 2100/2110 Settings Editor.2. Select 'Accounting'.3. Select 'ID file'.4. Select 'Upload'.5. Click 'Browse' to find the account ID file on the network.6. Click 'Upload' to start the upload of the file.
Result
The account ID file is now uploaded to the Océ Smart Imager.
Note: The new file overwrites the existing file.

226 Océ VarioPrint® 2100/2110 User's Manual
Restoring the Default Account ID File
When to do
To return to the start situation, you can restore the factory default account ID file. This file is stored on the Océ Smart Imager and can not be edited.
Note: The information of the current account ID file is removed and cannot be recovered. It is recommended that you maintain a customized account ID file available on a location on your PC in the event you need a backup of the customized file. Note: You can only restore the default account ID file with this function. The factory defaults of the Key Operator and the System Administrator do not influence the account ID file.
Restore the factory default account ID file
1. Select the 'Settings' tab in the Océ VarioPrint® 2100/2110 Settings Editor.2. Select 'Accounting'.3. Select 'ID file'.4. Select 'Default'. 5. Click 'OK' to restore the factory default account ID file.
Result
The default account ID file overwrites the current account ID file.

The Accounting Function 227
Using the Accounting Function
Entering a Fixed Account ID
Introduction
Task for operators
When the 'Accounting mode' is set to 'Fixed', you must enter the account ID in the 'Accounting' section of the 'System manager' before you start to process your job. Each time a new account ID is required, you must enter that account ID.
Note: When the setting 'Verification' in the 'Account settings' section in the Océ Settings Editor is enabled, the system checks the validity of the ID.

228 Océ VarioPrint® 2100/2110 User's Manual
How to enter a fixed account ID
1. Press the 'System manager' function key.2. Press the 'Accounting' function key.3. Press the 'Set account ID' function key.
The following dialog box appears.[59] Entering the Account ID.
[59] Entering the Account ID.
4. Enter the account ID (1 - 10 digits).5. Press the 'Confirm' function key.6. Press the 'Close' function key.
You can start to process your jobs.

The Accounting Function 229
Making a Copy or Print with the Copy Card
Introduction
You can use the Océ VarioPrint® 2100/2110 in combination with a separate copy control device. You can use the copy control device as a prepaid credit system or a post-paid debit system. The prepaid system requires copy cards with credit units. The post-paid system uses an account number.
Prepaid system
The prepaid system uses a copy card that contains credit units. The print clicks are subtracted from the credit value on the card each time the system makes a print. When the card runs out of credits during a print job or copy job, the system stops printing and displays a message. The user must refill the credits or insert a new card.
Post-paid system
The post-paid system uses an account number that you must enter at the start of a job.
How to make a copy with the copy card
1. Insert the copy card into the copy control device or enter the account number.2. Select a job from the memory or the mailbox. You can also create a copy job
with the green start button (see �Making a Copy� on page 156).3. Start the job. The job is sent to the job queue.
Note: If you run out of credits during a job, the system stops the job and asks you to refill the credits on your card or insert a new card.

230 Océ VarioPrint® 2100/2110 User's Manual

231
Océ VarioPrint® 2100/2110
User's Manual
Chapter 9 Adding Supplies

232 Océ VarioPrint® 2100/2110 User's Manual
Adding Toner
Adding the Toner
Introduction
Task for operators, key operators
If the toner level of the Océ VarioPrint® 2100/2110 is low, the toner icon on the operator panel is highlighted in orange in order to inform the user about the status of the toner supply. The toner warning indication on the operator panel is highlighted when the toner level is low or if all of the toner is used.
Note: Only add the toner if the toner icon on the operator panel is highlighted. .
Attention: Only use Océ F11 toner.
Attention: Never add more than one bottle at a time.
Attention: The Océ VarioPrint® 2100/2110 must be switched on to add the toner.
Attention: If you spill toner, refer to the safety data sheets in the Océ VarioPrint® 2100/2110 Safety Manual for information about removal and cleaning.

Adding Supplies 233
How to access the toner reservoir
1. Open the left front door of the Océ VarioPrint® 2100/2110.[60] Open the Front Door
[60] Open the Front Door
2. To open the reservoir, turn the screw of the toner reservoir counter-clockwise with a screwdriver or coin.
3. Pull the cover of the toner reservoir towards you.4. Remove the cover of the toner reservoir.
How to add the toner
1. Shake the toner bottle well (see the instructions on the bottle).2. Remove the screw cap from the bottle.
Note: Do not remove the seal from the bottle.

234 Océ VarioPrint® 2100/2110 User's Manual
3. Check the ridge first in order to insert the bottle into the right position. Then push the toner bottle into the toner reservoir. Remember that you cannot rotate the bottle if the bottle is in the toner reservoir.[61] Push the bottle into the reservoir
[61] Push the bottle into the reservoir
4. Remove the bottle when the bottle is empty. Be careful, do not spill toner.5. Put the cap back on the empty toner bottle.6. Close the cover of the toner reservoir.7. Close the left front door.8. Press the 'System manager' key on the operator panel.9. Press the key for 'System'.
10. Press the key for 'Toner refill' to select 'Confirm refill'.11. Press the key for 'Close'.

Adding Supplies 235
Loading the Media
Load the standard media and media with special front
How to load the standard media in the paper tray
1. Press the button on the front side of the paper tray to open the paper tray.[62] Opening the Paper Tray
[62] Opening the Paper Tray

236 Océ VarioPrint® 2100/2110 User's Manual
The LED of the paper tray blinks rapidly while the plate inside moves down.2. Wait until the paper tray opens.3. Take the media from the pack.4. Hold each pack of media at the short sides.5. Bend the pack.6. Put the media face down and header up into the paper tray.
[63] Loading Standard Media
[63] Loading Standard Media
7. Adjust the paper guides.Based on the position of the paper guides, the Océ VarioPrint® 2100/2110 can identify the paper size.
8. Close the paper tray.
How to program the media in the 'Paper manager'
1. Press the 'Paper manager' function key.2. Press the function key for the paper tray in which you put the media.3. Use the star arrow keys to select the media from the list.4. Press the 'Close' function key.
The media is ready for use.
Note: The main actions when you change the media type are loading the media and programming the media. You can do these actions in random order.

Adding Supplies 237
Load oversize media
Introduction
Task for operators, key operators
All the paper trays of the Océ VarioPrint® 2100/2110 can process oversize media. Oversize media is a special type of custom size media. Oversize media is media that only fits in the paper trays if you remove the slide from the paper tray, for example A3+ or R-Ledger. This procedure describes the steps that are required to use oversize media.
1. Remove the slide inside the paper tray.2. Load the media.3. Program the oversize media in the 'Paper manager'.
Note: The order of the steps is not fixed. You can also begin with step 2 and do step 1 next.
Before you begin
1. Make sure that the oversize paper is defined in the 'Media catalog'. Refer to the on-line help of the Océ VarioPrint® 2100/2110 Settings Editor for more information about how to define the media.
2. Make sure that the paper tray is empty.3. Make sure that the job queue is empty to prevent that the oversize media is
used for the wrong jobs.
Note: If you have problems putting the media into the paper tray, you can switch the corner pieces at the right-hand side of the paper tray. There are two corner pieces, one at the lower right-hand side of the paper tray and one at the upper right-hand side. The lower right-hand corner piece has one higher side, which can cause problems when you load some media. Put the corner piece of the lower right-hand side at the upper right-hand side and vice versa.
How to remove the slide inside the paper tray
1. Open the paper tray.2. Loosen the screws of the slide.3. Pinch the green slide handle.4. Remove the slider with a sideward and upward move.
You can now put the oversize media into the paper tray.

238 Océ VarioPrint® 2100/2110 User's Manual
Note: You can store the slides inside the printer. When you open the front doors, you can see the storage location at the lower right-hand side of the printer. You can mount the slides to the back cover of the printer.
How to program the oversize media in the 'Paper manager'
1. Press the 'Paper manager' function key.2. Press the function key for the paper tray in which you put the oversize media.3. Use the star arrow keys to select the oversize media from the list.4. Press the 'Close' function key.
The oversize media is ready for use.

Adding Supplies 239
Load custom size media
Introduction
Task for operators, key operators
When you use custom size media and oversize media, you must pay attention to some things. The Océ VarioPrint® 2100/2110 has format detection, but only for standard sizes. These sizes are A4, A3, Letter, Legal, Tabloid and B4. The Océ VarioPrint® 2100/2110 detects the size of the media in the paper trays in ranges. The Océ VarioPrint® 2100/2110 is not able to detect the sizes of custom size media. You must enter the exact sizes of your custom size media in the 'Media catalog'.
Note: If you want to use custom size media on a VarioPrint® 2100, you need to upgrade your system with a license for custom size media.When you use custom size and oversize media, you must perform the following actions:
1. Put the paper into the paper trays.2. Configure the media in the 'Media catalog'. 3. Program the media in the 'Paper manager'. Here you link the media to a paper
tray.
Before you begin
Put the paper into the paper trays. If you use oversize paper, you must follow a special procedure (see �Load oversize media� on page 237).
Attention: Take care when you use custom size media and oversize media. You must indicate the exact sizes for your custom size media. Next, you must select the correct media in the 'Paper manager'. The Océ VarioPrint® 2100/2110 has no format detection for custom size media. If the media programmed for a paper tray in the 'Paper manager' does not match the detected size and orientation in the paper trays, the Océ VarioPrint® 2100/2110 cannot always detect the mismatch. A system failure can be the result.

240 Océ VarioPrint® 2100/2110 User's Manual
How to program a custom size media in the 'Media catalog'
1. Access the Océ Settings Editor on the Océ Smart Imager.2. Access the 'Media catalog' in the 'Media' section.3. Click 'Add'.4. Enter a name for your custom size media.5. Enter the size and orientation.
How to program the media in the 'Paper manager'
1. Press the 'Paper manager' function key.2. Press the function key for the paper tray in which you put the media.3. Use the star arrow keys to select the media from the list.4. Press the 'Close' function key.
The media is ready for use.
Note: The main actions when you change the media type are loading the media and programming the media. You can do these actions in random order.

Adding Supplies 241
Load the tab sheets
Introduction
Task for operators, key operators
When you print on tab sheets, the sheets can have the following destinations.■ The output trays■ The upper output tray■ The external finisher (if configured).
Note: You can not use tab sheets in combination with the optional booklet maker.Depending on the destination of the print job, you must load different sets of tab sheets.The following table shows the types of tab sheets that are required for the destinations.
[62] Types of tab sheets
[62] Types of tab sheets
How to load tab sheets when you print to the output trays and the upper output tray
1. Take a pack of reverse collated tab sheets. Note: The tab sheets, in reverse collated tab sheets, are counted down from the last number to 1.
Destination Type of tab sheet■ Output trays■ Upper output tray
Reverse collated tab sheetsIn reverse collated tab sheets, the highest number is on top of the set. The lowest number is at the bottom (for example 5, 4, 3, 2, 1)
External finisher Straight collated tab sheetsIn straight collated tab sheets, the lowest number is on top of the set. The highest number is at the bottom (for example 1, 2, 3, 4, 5)

242 Océ VarioPrint® 2100/2110 User's Manual
2. Complete steps 1 - 5 of the procedure for standard media.3. Put the tab sheets face down and header down into the paper tray.
[64] Loading Tab Sheets (destination: output trays and upper output tray)
[64] Loading Tab Sheets (destination: output trays and upper output tray)
4. Continue with steps 7 and 8 of the procedure for standard media.

Adding Supplies 243
How to load tab sheets when printing to the external finisher
1. Press the button on the front side of the paper tray to open the paper tray.[65] Opening the Paper Tray
[65] Opening the Paper Tray
The LED of the paper tray blinks rapidly while the plate inside moves down.2. Wait until the paper tray opens.3. Take a pack of straight collated tab sheets.4. Hold each pack of media at the short sides.5. Bend the pack.6. Put the tab sheets face down and header down into the paper tray.
[66] Loading Tab Sheets (destination: external finisher)
[66] Loading Tab Sheets (destination: external finisher)

244 Océ VarioPrint® 2100/2110 User's Manual
7. Adjust the paper guides.Based on the position of the paper guides, the Océ VarioPrint® 2100/2110 can identify the paper size.
8. Close the paper tray.
How to program the media in the 'Paper manager'
1. Press the 'Paper manager' function key.2. Press the function key for the paper tray in which you put the media.3. Use the star arrow keys to select the media from the list.4. Press the 'Close' function key.
The media is ready for use.
Note: The main actions when you change the media type are loading the media and programming the media. You can do these actions in random order.

Adding Supplies 245
Load a combination of tab sheets and media with special front
Introduction
Task for operators, key operators
You can use the Set-build function to create a complex document that contains tab sheets and media with a special front.Depending on the destination, you must load different sets of tab sheets.The following table shows the types of tab sheets that are required for the destinations.
[63] Types of tab sheets
[63] Types of tab sheets
How to load a combination of tab sheets and sheets with special front
1. Press the button on the front side of the paper tray to open the paper tray.[67] Opening the Paper Tray
[67] Opening the Paper Tray
The LED of the paper tray blinks rapidly while the plate inside moves down.2. Wait until the paper tray opens.3. Take the media from the pack.
Note: Hold each pack of media at the short sides.
Destination Type of tab sheet■ Output trays■ Upper output tray
Reverse collated tab sheetsIn reverse collated tab sheets, the highest number is on top of the set. The lowest number is at the bottom (for example 5, 4, 3, 2, 1)
External finisher Straight collated tab sheetsIn straight collated tab sheets, the lowest number is on top of the set. The highest number is at the bottom (for example 1, 2, 3, 4, 5)

246 Océ VarioPrint® 2100/2110 User's Manual
4. Bend the pack.5. Put the tab sheets face down and header down into the paper tray.
Note: Use the correct set for the destination of your print job. See the Introduction to this chapter.
6. Adjust the paper guides.Based on the position of the paper guides, the Océ VarioPrint® 2100/2110 can identify the paper size.
7. Close the paper tray.8. Open another paper tray.9. Put the media with a special front face down and header down into the paper
tray.[68] Loading Media with a Special Front
[68] Loading Media with a Special Front
10. Adjust the paper guides.11. Close the paper tray.
How to program the media in the 'Paper manager'
1. Press the 'Paper manager' function key.2. Press the function key for the paper tray in which you put the media.3. Use the star arrow keys to select the media from the list.4. Press the 'Close' function key.
The media is ready for use.

Adding Supplies 247
Note: The main actions when you change the media type are loading the media and programming the media. You can do these actions in random order.
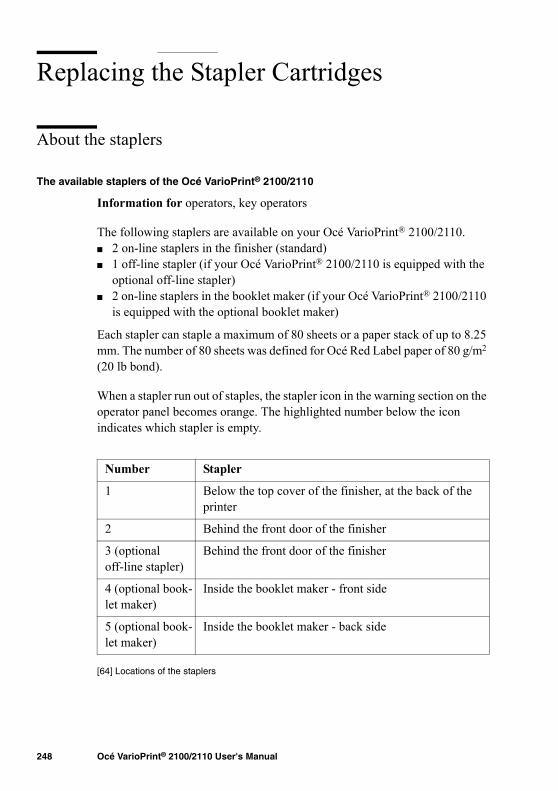
248 Océ VarioPrint® 2100/2110 User's Manual
Replacing the Stapler Cartridges
About the staplers
The available staplers of the Océ VarioPrint® 2100/2110
Information for operators, key operators
The following staplers are available on your Océ VarioPrint® 2100/2110.■ 2 on-line staplers in the finisher (standard)■ 1 off-line stapler (if your Océ VarioPrint® 2100/2110 is equipped with the
optional off-line stapler)■ 2 on-line staplers in the booklet maker (if your Océ VarioPrint® 2100/2110
is equipped with the optional booklet maker)
Each stapler can staple a maximum of 80 sheets or a paper stack of up to 8.25 mm. The number of 80 sheets was defined for Océ Red Label paper of 80 g/m2 (20 lb bond).
When a stapler run out of staples, the stapler icon in the warning section on the operator panel becomes orange. The highlighted number below the icon indicates which stapler is empty.
[64] Locations of the staplers
[64] Locations of the staplers
Number Stapler
1 Below the top cover of the finisher, at the back of the printer
2 Behind the front door of the finisher
3 (optional off-line stapler)
Behind the front door of the finisher
4 (optional book-let maker)
Inside the booklet maker - front side
5 (optional book-let maker)
Inside the booklet maker - back side

Adding Supplies 249
If a stapler runs empty when you start a job or during a job, a warning message appears. When a job stops because of a lack of staples, you can do the following.■ Refill the staplers.■ Cancel the job.■ Continue the job without staples (not possible for the optional booklet
maker).
The system automatically detects the refill of the staplers. The warning message disappears.
Note: Only use staples of type S3.

250 Océ VarioPrint® 2100/2110 User's Manual
Replacing Stapler Cartridges 1 and 2 (standard on-line staplers)
Attention: When you open the front door and the top cover of the finisher, check that the jaws of the staplers are open. If the jaws are not completely open, you must close the top cover and the front door of the finisher. Wait 15 seconds. The Océ VarioPrint® 2100/2110 opens the jaws of the staplers. Now you can remove the stapler cartridge.
Attention: Do not remove the stapler cartridge if the jaws are (partly) closed. If you did remove the stapler cartridge when the jaws were open, save the stapler cartridge. The service technician repairs the stapler cartridge at the next service visit.
Illustration[69] Location of the on-line staplers (only stapler 2 is visible - stapler 1 is located at the left-hand side of stapler 2)
[69] Location of the on-line staplers (only stapler 2 is visible - stapler 1 is located at the left-hand side of stapler 2)

Adding Supplies 251
How to replace the stapler cartridges of the staplers 1 and 2
1. Open the front door of the finisher.2. Open the top cover of the finisher.3. Check that the staplers are correctly aligned.
Note: The staplers must be extended to the maximum position. If the staplers are not in the correct position, you cannot access stapler 1. Follow the procedure below if the staplers are not correctly aligned (see �How to align the staplers correctly� on page 251).
4. Tilt the stapler cartridge forward.5. In the same movement, remove the stapler cartridge from the stapler.6. Remove the loose staples if necessary.
Note: Make sure that no staples fall into the finisher.7. Take a new cartridge, type S3.8. Remove the packing material.9. Slide the stapler cartridge into the stapler.
10. Press until the stapler cartridge clicks into place.Note: If the new stapler cartridge does not fit, put back the old stapler cartridge and call service.
11. Close the top cover of the finisher.12. Close the front door of the finisher.
How to align the staplers correctly
1. Close the top cover of the finisher if the staplers are not in the correct position.2. Pull stapler 2 toward you until the stapler cannot go any further.3. Open the top cover of the finisher again.
Note: You can access stapler 1 when the stapler cartridge is tilted upward.

252 Océ VarioPrint® 2100/2110 User's Manual
Replacing Stapler Cartridge 3 (optional off-line stapler)
Illustration[70] Location of the off-line stapler
[70] Location of the off-line stapler
How to replace the stapler cartridge of stapler 3
1. Open the front door of the finisher.The stapler cartridge is located in the left lower-hand corner of the finisher.
2. Tilt the stapler cartridge forward.3. In the same movement, remove the stapler cartridge from the stapler.4. Remove the stapler cartridge from the stapler.5. Remove the loose staples if necessary.
Note: Make sure that no staples fall into the finisher.6. Take a new cartridge, type S3.7. Remove the packing material.8. Slide the stapler cartridge into the stapler.
Note: The correct position of the off-line stapler cartridge is upside down.

Adding Supplies 253
9. Press until the stapler cartridge clicks into place.Note: If the new stapler cartridge does not fit, put back the old stapler cartridge and call service.
10. Close the front door of the finisher.

254 Océ VarioPrint® 2100/2110 User's Manual
Replacing Stapler Cartridges 4 and 5 (optional booklet maker)
How to replace the stapler cartridges of the staplers 4 and 5
1. Open the top right cover of the booklet maker.2. Use the handle of the top left cover to lift the top left cover.
Staplers 4 and 5 are located next to each other.3. Tilt the stapler cartridge forward.4. In the same movement, remove the stapler cartridge from the stapler.5. Take a new cartridge, type S3.6. Remove the packing material.7. Slide the stapler cartridge into the stapler.8. Press until the stapler cartridge clicks into place.9. Close the top left cover of the booklet maker.
10. Close the top right cover of the booklet maker.

255
Océ VarioPrint® 2100/2110
User's Manual
Chapter 10 Error Handling
256 Océ VarioPrint® 2100/2110 User's Manual
Handling Contradictions
Introduction
Task for operators, key operators
Three types of contradictions can occur on the Océ VarioPrint® 2100/2110.■ Specification contradictions
Specification contradictions refer to combinations of settings that are not possible combinations.For example, you cannot make a 2-sided scan from the glass plate. Change the original setting from 2-sided to 1-sided.
■ Start contradictionsStart contradictions refer to errors that occur when the required resources for a job are not available. Start contradictions only appear after you press the Start key . For example, a job needs staples, but the staplers are empty. An alarm bell is displayed. This alarm bell indicates that a certain supply is not available, for example staples or toner.
■ Run-time contradictionsRun-time contradictions occur when the system has not enough supplies, for example paper, while the system prints a job. The active or current job stops. The operator panel displays a message.

Error Handling 257
Illustration[71] Example of a Specification Contradiction
[71] Example of a Specification Contradiction
[72] Example of a Start Contradiction
[72] Example of a Start Contradiction

258 Océ VarioPrint® 2100/2110 User's Manual
[73] Example of a Run-time Contradiction
[73] Example of a Run-time Contradiction
How to correct a specification contradiction[65] Correcting a Specification Contradiction
[65] Correcting a Specification Contradiction
Step Action Remarks
1 Press the Start key or the Set-build
key .
The system checks the settings you select. If the settings do not match, the system cannot print your job. A pop-up message appears.
2 Change the settings according to the specifications of the Océ VarioPrint® 2100/2110.
For example, change the 'Original' settings from 2-sided to 1-sided, to make a copy from the glass plate. You can also press the Start key two times. This action corrects the incorrect setting.
3 Press the Start key or the Set-build
key .
If the job has the correct settings, the job is processed. If you do not correct the settings, the system corrects the specification contra-diction.

Error Handling 259
Correcting a start contradiction
1. Read the error message on the screen. 2. Add the needed resources. The job starts if there are no more contradictions.
Correcting a run-time contradiction
1. Add the required supplies.2. The job starts if there are no more contradictions.

260 Océ VarioPrint® 2100/2110 User's Manual
Handling Errors
Introduction
Task for operators, key operators
If an error occurs, the Océ VarioPrint® 2100/2110 stops.
There are three types of errors that can occur on the Océ VarioPrint® 2100/2110.■ ORE (operator recoverable error)
You must correct the error, for example a paper jam, before the scanning process or the printing process can continue. After you correct the error, the Océ VarioPrint® 2100/2110 checks that all activities to correct the error are done. If there are no more activities, the system continues with the active job. If you must do an additional activity, the system remains in the stand-by mode.
■ MRE (machine recoverable error)The operator panel displays a message that an MRE has occurred. After this message the system goes to sleep mode. You only need to turn on the system again. Follow the instructions on the screen.
■ PE (permanent error)If the system has a permanent error, the Océ VarioPrint® 2100/2110 stops. An error screen indicates that service is required. Only an Océ service technician can correct the error and remove the message.
Note: The scan process and the print process are separate processes. If one of the processes has an ORE, the other process continues.

Error Handling 261
The error screen
Screen messages or error screens A message shows you which areas you must inspect to find the error. A picture shows you how to correct the error. After you correct the error, the error screen disappears and the Océ VarioPrint® 2100/2110 starts to process.The error screen of an ORE is divided into two sections, a left-hand pane and a right-hand pane.The right-hand pane shows the part of the Océ VarioPrint® 2100/2110 where the error occurred. The screen gives you instructions for the area that you must inspect. If necessary, open doors or covers to access these areas.The left-hand pane shows all the actions to take. The Océ VarioPrint® 2100/2110 traces your actions and marks the steps on the screen. After you have checked all the indicated areas and after you have corrected the problems, the error screen disappears.
How to handle errors
1. Read the message on the operator panel.Wait for more instructions.The Océ VarioPrint® 2100/2110 stops the feeding of sheets from the input tray of the automatic document feeder when a scan error occurs.If possible, the sheets in the paper path are flushed. Error sheets go to the upper output tray.
2. Follow the instructions on the operator panel.Note: Follow the steps in the order that is displayed on the screen. The system keeps track of the actions and recovers from this error.

262 Océ VarioPrint® 2100/2110 User's Manual
About Paper Jams
Introduction
Information for operators, key operators
The media and originals normally move through the Océ VarioPrint® 2100/2110 without any problems. A sheet that gets stuck can cause a paper jam.If there is a paper jam, the operator panel displays an error message. The operator panel gives you instructions to clear the error. The graphics on the screen indicate which part of the Océ VarioPrint® 2100/2110 has a paper jam.
The operator panel guides you through a sequence of steps to correct the problem. If paper jams occur in more than one location, the operator panel continues to give the instructions until all the paper jams are corrected.When the error is cleared, follow the instructions on the display. The job continues. All the prints are moved correctly into the output trays or upper output tray.
If the print is still not correct, check the following:■ The originals must be aligned to the right in the automatic document feeder■ The original guides must not be too tight or too loose■ The originals must not be too heavy, too curled or too damaged. If
necessary, make the originals flat or make new originals on the glass plate.■ The originals must not be stapled. If necessary, remove any staples.
Separate the originals after you remove the staples.
The cause of the problem can be also in the paper compartment. Check the following:■ The paper is curled. Reload the paper upside down.■ The paper does not leave the paper tray because the guides are too tight.
Loosen the guides.■ The paper does not leave the paper tray because a sheet is folded or
damaged. Remove this sheet.
The green labels on several of the handles, covers and other parts of the Océ VarioPrint® 2100/2110 indicate the parts described in the instructions on the operator panel. Lift, press or open these parts to remove the paper jam.For example, the operator panel instructs you to open cover C1. A picture on the screen shows the exact location of cover C1 behind the open right-hand
Error Handling 263
door. If you open the door, you will find a cover with a green label 'C1' at the indicated position.
Follow the instructions on the operator panel in the correct order.
Possible locations of the paper jams
Paper jams can occur in various stages of the print process.
[66] Possible Locations of Paper Jams
[66] Possible Locations of Paper Jams
Location Description
Automatic docu-ment feeder
Open the top cover of the automatic document feeder to correct the paper jam.Note: Also check the glass plate for originals.
Paper trays Open the paper trays if the LED blinks rapidly. Check for paper jams.
Paper input mod-ule
■ Open the front doors of the Océ VarioPrint® 2100/2110.
■ Check the four paper path covers marked with the labels C1-C4.
Note: You can only open cover C2 when C1 is closed.Paper path Open the front doors of the Océ VarioPrint® 2100/2110
to access the areas marked with the labels A1 and B1-B3.Note: A small lamp illuminates when the paper path cover A1 opens.
Output trays There are three global areas in the output trays that you must check for paper jams.■ Open the top covers that are left of the copy receiving
unit and below the output trays.■ Open the front door to the output trays to access the
covers marked with the labels D1-D2. Also check the internal error tray.
■ Open the front door and the top cover to access the paper path covers marked with the labels E1-E3.
Note: Remove any paper from the upper output tray if you open the top cover of the output trays.
Upper output tray
Check the upper output tray for paper jams.

264 Océ VarioPrint® 2100/2110 User's Manual
About Staple Jams
Introduction
Information for operators, key operators
All the staplers can staple sets of 80 sheets of paper and sets of a maximum of 8.25 mm. The number of 80 sheets was defined with Océ Red Label paper of 80 g/m2 (20 lb bond). When a staple error occurs, the operator panel shows a message. Follow the instructions on the screen to correct the problem.
General information
When a stapler error occurs, replace the stapler cartridge (see �Replacing Stapler Cartridges 1 and 2 (standard on-line staplers)� on page 250).
Remove any loose staples. Make sure that no staples fall into the Océ VarioPrint® 2100/2110. Keep the stapler cartridge which caused the problems. Give the stapler cartridge to the Océ service technician.
Note: After you correct the problem, the situation can occur that the stapler does not staple the next two or three sets.

265
Océ VarioPrint® 2100/2110
User's Manual
Appendix AOverview and Tables
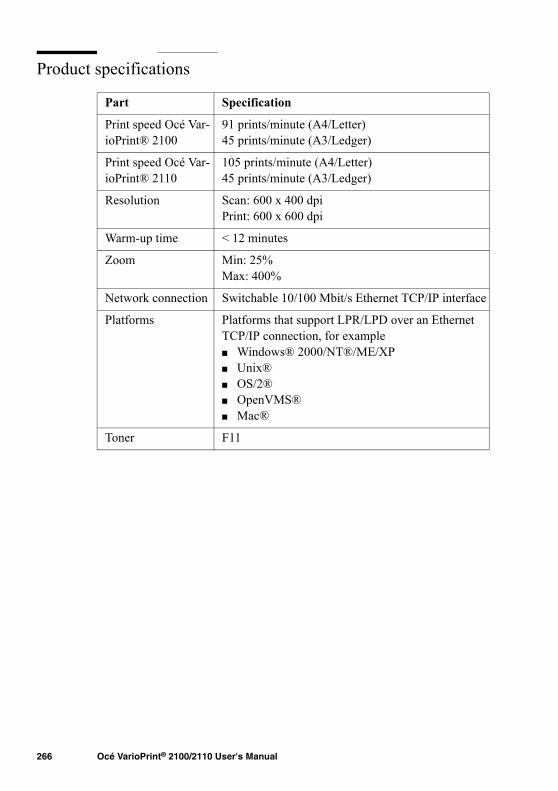
266 Océ VarioPrint® 2100/2110 User's Manual
Product specifications
Part Specification
Print speed Océ Var-ioPrint® 2100
91 prints/minute (A4/Letter)45 prints/minute (A3/Ledger)
Print speed Océ Var-ioPrint® 2110
105 prints/minute (A4/Letter)45 prints/minute (A3/Ledger)
Resolution Scan: 600 x 400 dpiPrint: 600 x 600 dpi
Warm-up time < 12 minutes
Zoom Min: 25%Max: 400%
Network connection Switchable 10/100 Mbit/s Ethernet TCP/IP interface
Platforms Platforms that support LPR/LPD over an Ethernet TCP/IP connection, for example■ Windows® 2000/NT®/ME/XP■ Unix®■ OS/2®■ OpenVMS®■ Mac®
Toner F11

Overview and Tables 267
Media and paper tray specifications
Introduction
The Océ VarioPrint® 2100/2110 has 3 or 4 paper trays that you can refill during a print job, one tray at a time. The paper trays have automatic size detection for the standard media (A4, A3, B4, Letter, Legal, Tabloid). You must define ranges for all the non-standard media in the Océ Settings Editor, and program the media in the 'Paper manager'. The optional dual paper trays almost double the capacity of the standard bulk trays.The following tables describe the capacities for the paper trays and the requirements for the paper in the paper trays. All trays can handle a variety of media.

268 Océ VarioPrint® 2100/2110 User's Manual
Media and paper tray specifications[67] The Four tray Configuration
[67] The Four tray Configuration
Paper trays Supported sizes Capacity
1 and 2 Standard sizes■ Letter■ Tabloid■ B4■ Letter 8.5 x 11■ Legal 8.5 x 14■ Tabloid 11 x 17
Non-standard sizes■ Custom size media with a
short edge of 203-305 mm (8"-12") and a long edge of 208-457 mm ((8.2"-18")
600 sheets of 80 g/m2 (20 lb bond)
3 and 4 Standard sizes■ Letter■ Tabloid■ B4■ Letter 8.5 x 11■ Legal 8.5 x 14■ Tabloid 11 x 17
Non-standard sizes■ Custom size media with a
short edge of 203-305 mm (8"-12") and a long edge of 208-457 mm ((8.2"-18")
1700 sheets of 80 g/m2 (20 lb bond)

Overview and Tables 269
[68] The Three Tray Configuration
[68] The Three Tray Configuration
[69] The Dual Paper Tray
[69] The Dual Paper Tray
Paper trays Supported sizes Capacity
1, 2 and 3 Standard sizes■ Letter■ Tabloid■ B4■ Letter 8.5 x 11■ Legal 8.5 x 14■ Tabloid 11 x 17
Non-standard sizes■ Custom size media with a
short edge of 203-305 mm (8"-12") and a long edge of 208-457 mm ((8.2"-18")
1700 sheets of 80 g/m2 (20 lb bond)
Supported sizes Capacity■ Letter■ Letter 8.5 x 11
Note: A dual paper tray is always configured for one of these paper sizes. You cannot switch between these paper sizes.
Left-hand stack: 1800 sheets of 80 g/m2 (20 lb bond)Right hand stack: 1600 sheets of 80 g/m2 (20 lb bond)

270 Océ VarioPrint® 2100/2110 User's Manual
The information in the table below refers to all paper trays.
[70] Requirements for the Media
[70] Requirements for the Media
All paper trays are best for the following media.■ Transparencies with back sheets.■ Punched paper.
Note: Use paper of more than 170 g/m2 only for covers.
Excellent Good Do not use
Materials:■ Océ brand paper■ Plain paper of
comparable, excellent quality
■ Thermo plotter
Materials:■ Océ Green or Gray
Label■ Plain paper of good,
but varying quality■ Light curling paper
(comparable to Océ Yellow, Blue Label)
Materials:■ Paper with extreme
properties (e.g. heavily contaminated paper with glue, dust, talc, wax-paper, with different properties front and backside (chromolux))
■ Machine coated paper
Weight:■ 70 g/m2 -170 g/m2
Weight:■ 60 g/m2 -70 g/m2
■ 170 g/m2 -200 g/m2
Weight:■ < 60 g/m2 and > 200
g/m2

Overview and Tables 271
Originals that can be used
Introduction
The table below describes the main requirements for the originals that are suitable for the Océ VarioPrint® 2100/2110.
Originals that can be used
Note: Do not put transparent originals into the automatic document feeder.
Originals Specifications
Original sizes Glass platen Max. 11 x 17 inches
Automatic document feeder
Min. 5.5 x 8 inchesMax. 11 x 17 inches
Original weight Glass platen Max. 22 lbs.
Automatic document feeder
75 sheets of 80 g/m2 (20 lb bond)
Original type Glass platen Any type of original
Automatic document feeder
Not damaged, 1-sided and 2-sided originals with a light curl

272 Océ VarioPrint® 2100/2110 User's Manual

273
Océ VarioPrint® 2100/2110
User's Manual
Appendix BMiscellaneous

274 Océ VarioPrint® 2100/2110 User's Manual
Reader's comment sheet
Questions
Have you found this manual to be accurate? O YesO No
Were you able to operate the product, after reading this manual? O YesO No
Does this manual provide sufficient background information? O YesO No
Is the format of this manual convenient in size, readability and arrangement (page layout, chapter order, etc.)?O YesO No
Could you find the information you were looking for? O AlwaysO Most of the timesO SometimesO Not at all
What did you use to find the required information? O Table of contentsO Index
Are you satisfied with this manual?O YesO No
Thank you for evaluating this manual.If you have other comments or concerns, please explain or suggest improvements overleaf or on a separate sheet.
Miscellaneous 275
Comments:------------------------------------------------------------------------------------------------------------------------------------------------------------------------------------------------------------------------------------------------------------------------------------------------------------------------------------------------------------------------------------------------------------------------------------------------------------------------------------------------------------------------------------------------------------------------Date:
This reader's comment sheet is completed by: (If you prefer to remain unknown, please do fill in your occupation)
Name:
Occupation:
Company:
Phone:
Address:
City:
Country:
Please return this sheet to:
Océ-Technologies B.V.For the attention of ITC User Documentation. P.O. Box 101,5900 MA VenloThe Netherlands
Send your comments by E-mail to: [email protected]
For the addresses of local Océ organisations see: http://www.oce.com

276 Océ VarioPrint® 2100/2110 User's Manual
Addresses of local Océ organisations
Océ-Australia Ltd. P.O. Box 363Ferntree Gully MDCVic 3165Australiahttp://www.oce.com.au/
Océ-Osterreich GmbH Postfach 951233 ViennaAustriahttp://www.oce.at/
Océ-Belgium N.V./S.A. J. Bordetlaan 321140 BrusselsBelgiumhttp://www.oce.be/
Océ-Brasil Comércio e Indústria Ltda.Av. das Nações Unidas, 11.857 Brooklin NovoSão Paulo-SP 04578-000Brasilhttp://www.oce-brasil.com.br/
Océ-Canada Inc. 4711 Yonge Street, Suite 1100 Toronto, Ontario M2N 6K8Canadahttp://www.oce.ca/
Océ Office Equipment (Beijing) Co., Ltd.Xu Mu ChengChaoyang DistrictBeijing 100028Chinahttp://www.oce.com.cn
Océ-Czech Republic ltd.Hanusova 18140 21 Praha 4Czech Republichttp://www.oce.cz/
Océ-Danmark a/s Vallensbækvej 452605 BrøndbyDenmarkhttp://www.oce.dk/
Océ Finland OYTallberginkatu 2 A, PL 16300180 HelsinkiFinlandhttp://www.oce.fi
Océ-France S.A. 32, Avenue du Pavé Neuf93161 Noisy-le-grand, Cedex Francehttp://www.oce.fr/
Océ-Deutschland GmbHSolinger Straße 5-745481 Mülheim/RuhrGermanyhttp://www.oce.de/
Océ-Hong Kong and China head of-fice12/F 1202 The Lee Gardens33 Hysan Avenue Causeway BayHong Konghttp://www.oce.com.hk/

Miscellaneous 277
Océ-Hungaria Kft.1241 BudapestPf.: 237Hungaryhttp://www.oce.hu/
Océ-Ireland Ltd.3006 Lake Drive Citywest Business CampusSaggartCo. DublinIreland
Océ-Italia S.p.A. Strada Padana Superiore 2/B 20063 Cernusco sul Naviglio (MI) Italiahttp://www.oce.it/
Océ Japan Corporation3-25-1, Nishi ShinbashiMinato-KuTokyo 105-0003Japanhttp://www.ocejapan.co.jp/
Océ-Belgium S.A.Rue Astrid 2/A1143 Luxembourg-Belairhttp://www.oce.lu/indexfr.htm
Océ Malaysia Sdn. Bhd.#3.01, Level 3, Wisma Academy Lot 4A, Jalan 19/1 46300 Petalig Jaya Selangor Darul EhsanMalaysiawww.ocemal.com.my
Océ-Mexico S.A. de C.V. Prolongación Reforma 1236, 4to Piso Col. Santa Fé, Del. Cuajimalpa C.P. 05348 México, D.F. Méxicowww.oceusa.com
Océ-Norge A.S. Postboks 4434 NydalenGjerdrums vei 80403 OsloNorwayhttp://www.oce.no
Océ-Poland Ltd. Sp.z o.o. ul. Bitwy Warszawskiej 1920 r. nr. 7 02-366 Warszawa Polandhttp://www.oce.com.pl
Océ-Lima Mayer, S.A.Av. José Gomes Ferreira, 11 Piso 2 - Miraflores 1497-139 AlgésPortugal
Océ Singapore Pte Ltd.190 MacPherson Road#03-00 Wisma Gulab Singapore 348548
Océ Printing Systems (PTY) Ltd.P.O.Box 629Rivonia 2128South Africa

278 Océ VarioPrint® 2100/2110 User's Manual
Note: The web site http://www.oce.com gives the current addresses of the local Océ organisations and distributors.Note: The addresses of local Océ organizations for information about the Wide Format Printing Systems and the Production Printing Systems can be different from the addresses above. Refer to the web site http://www.oce.com for the addresses you need.
Océ España SA Business Park Mas BlauOsona, 2 08820 El Prat de Llobre-gatBarcelonaSpainhttp://www.oce.es
Océ-Svenska ABP.O. Box 754S-191 27 SollentunaSwedenhttp://www.oce.se
Océ-Schweiz AG Sägereistrasse 10CH8152 GlattbruggSchweizhttp://www.oce.ch
Océ (Thailand) Ltd. B.B. Building 16/Floor54 Asoke RoadSukhumvit 21Bangkok 10110Thailand
Océ-Nederland B.V. P.O.Box 800 5201 AV 's-Hertogenbosch The Netherlandshttp://www.ocenl.nl/
Océ (UK) Limited Océ HouseChatham WayBrentwood, Essex CM14 4DZ United Kingdomhttp://www.oce.co.uk
Océ North America Inc.5450 North Cumberland AvenueChicago, IL 60656USAwww.oceusa.com
Index 279
Index
2-sided from glass plate 147
AAccess the toner reservoir 233Account ID
Enter 228Make a copy 131Print a job 131
Account ID file 208Download 222Upload 225
AccountingCopy count device 214Download log file 221Field separator 214Fields of the accounting log file 217Fixed 212Identification 214Per job 212Principles 208Printer driver 209Restore factory default account ID file 226Set account ID 212Upload account ID file 225Verification 214
Accounting log file 208Description of the fields 217General Information 216
Accounting settings 212, 214Add
Staples to stapler 3 252Staples to staplers 1 and 2 251Staples to staplers 4 and 5 254Toner 233
Add the media 235Add the paper 235Automatic printing 105Available documentation 11
BBacklight of the screen 94Booklet
Finishing 153Layout 153Printer driver 153
brightness 95Bundle printing
Combine Mailbox jobs 127Combine Memory jobs 125
CChapterization 147Clear
Paper jam 262Staple jam 264
Combine analog documents 194Combine Print Jobs and Copy Jobs 129Combine subsets
Create 1 document 160Create 1 file 194
Concatenation 147Concatenation and chapterization 147Concepts
Automatic printing 16Copy templates 17Interactive printing 16Mailbox 16Memory 16Next job 16Paper management 18Printing workflows 15Security 17Set-build 17
Configure scan to email 181Configure the accounting settings 214Configure the scan function 180Confirm refill of toner 233Contradiction
Run-time 259Specification 258Start 259
Control the backlight 94Copy

280 Océ VarioPrint® 2100/2110 User's Manual
Booklet 168Copy templates 156Green button copy 158Make 158Scan now, print later 158Scan to memory 158
Copy subsets 79Copy templates
Front cover 156Front&back cover 156Last used 156Scan to memory 156Standard job 156
CorrectRun-time contradiction 259Specification contradiction 258Start contradiction 259
Create a booklet 168Custom size media 62Custom sizes
Configure 240Program 240Use 239
Custom templatesCreate 150Remove 150Use 152
DData field
Account ID 224Account name 224Comment 224Record ID 224
Default Account ID File 226Define the required media type
dialog box 59Paper manager 60
Defining Job Settings 159Delete jobs from the job queue 78Deleting subsets 163Document type 142Documentation set 11Double-sheet detection
Disable 155Enable 155
Download the account ID file 222
EEdit a job
In the mailbox 86In the memory 86
Edit the account ID file 223empty page 147Empty page between subsets 147Error recovery 261Error screens 261
FFill the paper trays 235
GGlass plate position 187
HHandle errors 261Hold a job 76
IIcons
Dual paper trays 44Media information 43Message section 41Standard paper trays 44Warning section 42
ID entryCopy jobs 136Memory jobs 136
Information on the main screen 38Inspect a job in the job queue 75Install paper tray
Bulk tray 100Dual paper tray 100

Index 281
JJob
In the mailbox 122In the memory 122
Job Management 64Job queue 69
Delete a job 78Hold 71Inspect job 75Manage 75Move to memory 71Move to top 71Moving to Memory 85Release 71Select job 75Stop after this 71
Job queue manager 64, 69Hold 76Move to memory 76Move to top 76Stop after this 77
Job queue view area 66
KKeep empty page 147
LLanguage
Change 96Set 96
Layout of the main screen 38LEDs 24Load tab sheets 241Loading the Paper Trays 235Locations of the paper jams 263Long edge feed 186Low power mode 19
MMachine recoverable error 260
Mailbox jobEdit 86Print 122Remove 92
Main screen 38Main screen of the operator panel 38Make a copy or print
Copy card 229Manage print jobs 75Manual job ID
Copy jobs 136Memory jobs 136
Media catalog 57Media section information 45Media specifications 268Memory
Move jobs 84Memory job
Edit 86Print 122Remove 92
Move a job to the memory 85Move to the memory 76Move to top 76Moving to Memory 84
NNetwork connection 266
OOn/Off button 24On-line help
Arrow keys 50Help key 49Navigation 50Numeric keys 50Sections 49
Operator panel LEDs 24Operator recoverable error 260Optimize the scan quality 201Original face down 185Original sizes 271Original type 271

282 Océ VarioPrint® 2100/2110 User's Manual
Original weight 271Originals that can be used 271Oversize media 63
Adapt the paper tray 237Program in Paper manager 238
PPage programmer
Concept 115Tab caption editor 116
Paper jams 262Automatic document feeder 263Output trays 263Paper input module 263Paper path 263Paper trays 263Upper output tray 263
Paper traysCapacities 268Install bulk tray 100Install dual paper tray 100Oversize media 237Remove bulk tray 98Remove dual paper tray 98Supported sizes 268
Permanent error 260Platforms 266Power mode
Low power mode 19Off 19Sleep mode 20
Power state indicators 24Power switch 24Print
Account ID 131From the mailbox 122From the memory 122
Print jobFrom the mailbox 121From the memory 121Stop 133, 171
Print job types 102Print speed 266Print subsets 79Printer components
Finisher 30
Keys on the operator panel 32Operator panel 32Output trays 30Upper output tray 30
Printer driverBidirectional information 113booklet creation 153Delete a template 119Features 111Feedback 114Rename a template 119Set a default template 120Templates 118Versions 110
Product Specifications 266
RReadable form 185Refill
Off-line stapler 252Stapler 3 252Staplers 1 and 2 251Staplers 4 and 5 254Staplers in booklet maker 254Staplers in finisher 251Toner reservoir 233
Remove jobs from mailbox 92Remove jobs from memory 92Remove paper tray
Bulk tray 98Dual paper tray 98
Resolution 266Restart the system 27Restoring Factory Default Account ID File 226RIP then print 102RIP while print 102Run-time contradictions 256
SScan profiles file 179Scan speed 266Scan to email
Configuration 181

Index 283
Definition 177Job 192
Scan to fileCombined job 190Create job 188Set-build job 190Simple job 189
Scanner componentsAutomatic document feeder 32Cover handle 32Original receiving tray 32Scanner cover 32Scanner top left cover 32
Scan-to-fileEnlarge image 196Error messages 205Image quality settings 202Optimize scan quality 201Reduce image 196Resize image 196Zoom automatic document feeder 197Zoom behavior 196Zoom factor 196Zoom glass plate 198
Select a job in the job queue 75Set needed media type 58Set-build
Create 1 document 160Create 1 file 195
Settings Editor 53Short edge feed 187
landscape original 187Shut-down procedure 26Signal colors 52Signal lamp 51Sleep mode 20Sort
By page 142By set 142
Specification contradictions 256Specification of originals to be used 271Staple jam 264Staplers
Available staplers 248Booklet maker 254Numbers 248Off-line stapler 252On-line staplers 251
Replace stapler cartridge 3 252Replace stapler cartridges 1and 2 251Replace stapler cartridges 4 and 5 254
Start contradictions 256Stop
Print job 133, 171Scan job 169, 203
Stop after this 77Stream jobs 102Structure of the main screen 38Subsets
Copy job 79Print job 79
TTemporary media names 61Toner
Access the toner reservoir 233Add 233
Turn on the system 25Types of Job Settings 139
UUpload account ID file 225Users
Key operators 10Operators 10System Administrators 10
WWarm-up time 266
ZZoom 266