oasis insight user guide 0-12
TRANSCRIPT

User Guide

Client Intake
Case Management
My Agency Tab
Joining your Oasis Insight Network 01
Logging In 02
Oasis Insight Overview 03
Adding a New Case 06
Personal Info Tab 08
Assistance Tab 08
Relationships Tab 10
Notes Tab 11
Alerts Tab 11
Case Reporting 12
General Sub-Tab 13
Cases Sub-Tab 14
Assistance Sub-Tab 14
Categories Sub-Tab 14
Reports Sub-Tab 15
Table of Contents
04The Home Tab / Bulletins
Using the Search Feature 05
For Agency Administrators 19

01
Welcome to Oasis Insight
Welcome to the user guide for Oasis Insight! We hope this guide will help you get comfortable with the Oasis Insight service (Oasis). We encourage you to have Oasis open on your computer while you look through this guide, so you can “click around” and get familiar with everything. Let’s get started!
First off, let’s join the network. You should have received an email containing:
Tip: If you did not receive an email, check to see if it ended up in your spam folder.
When you click the link to create your password you are taken to the Enter New Password screen:
Just type your password in the fields and click the Set Password button.
When you click the Set Password button, you are taken to the login screen. You are now ready to log into Oasis.

02
Logging In
Now that you are ready to log in, use your email address and the password you just created.
Tip: Here are some things that will cause an unsuccessful login:
Click here if you ever forget your password.
The Request Membership button is for organi-zations that do not have access to your Oasis network. They can click this button and go through a process to ask the administrator of your Oasis for permission to join your network.
CAPS lock key is on. The login fields are case sensitive.
email address or password.
on your computer.
The first time you log in to Oasis you are required to initial the box that confirms your acceptance of the Terms of Service (TOS).
The TOS explains your responsibility as a user to maintain the legal and ethical integrity of your network.

03
Introduction to Oasis Insight
Once you’ve logged in and signed the terms of service, you are ready to start exploring the Oasis service. Oasis is designed to be extremely user friendly, and we hope you actually enjoy using the system. If you have questions or problems along the way please don’t hesitate to let us know and we will be glad to help in any way we can.
In the right-hand corner of the Header, you’ll see tabs. These tabs help you navi-gate through Oasis.
When you click a tab, the Main Content Area changes to reflect the tab you are viewing.
The Oasis screen is divided into three sections:
Note: The Header and Sidebar are static. The Main Content Area will change depending on which tab you are on.

04
The Home Tab
The Home Tab contains a message box so that the network administrator can put special announcements for all the users to see.
Bulletins are for sending network-wide messages and can be created by any user. Each bulletin can receive com-ments.
It’s easy to add a bulletin, you just click the Add Bulletin button (shown in the circle).
The Home Tab is the first thing you see when you log in to Oasis.
When you click the Add Bulletin button, a window will open so you can enter your information:
to all the agencies in our network (optional)
Tip: Any time you see a red asterisk (*) it means that the field is required, and must be filled in before proceeding.
Once you click the Add Bulletin button, the bulletin will appear on the Home Tab for everyone to see. If you checked the Send Email Notification To All Agen-cies button, the emails will be sent.
Agents in your community can then add comments and responses to your bulle-tins.

05
Client Intake (Using the Search Feature)
When a client comes to you for assistance, it’s always a good idea to check the system to see if they have already been entered. Start by clicking the Search button.
When the search page comes up, type the name of your client and press the Enter key.
Search matches will be highlighted in yellow.
Tip: If you don’t find your client on the first search, you can shorten the name by either entering their first initial and last name, or first name and last initial. This helps you find people if their name was previously entered with a different spelling.
If you can’t find the client in the system, you can click the link to begin adding a new case.

06
Client Intake (Adding a New Case)
The Add Case window has three sections: Identification, Income & Expenses, and Demographics. The Identification tab (shown in the circle) is first.
All clients must sign a Release of Infor-mation form (ROI) before they can be saved in the system. Clicking the link will open a copy of the ROI so you can print it, fill it out, and have your client sign.
Tip: If you type in your client’s information before you click the ROI link, the form will be automatically pre-filled.
Remember, red asterisks show the infor-mation required to add a new case.
Entering a Social Security Number is optional. To use a partial number, you simply leave the unused spaces blank.
Multiple phone numbers and multiple identification numbers can be recorded for your client.
These arrows allow you to switch to the next section of the Add Case window.
The next section is the Income & Expenses tab. Oasis will calculate and display the yearly income, as well as the monthly income, on the Personal Info tab. You will also notice that the House-hold income is displayed on that tab as well.

07
Client Intake (Adding a New Case)
The Demographics tab can be customized by the network administrator to allow for gathering an almost unlimited amount of information about your clients.
Any of the demographics can be marked “Required”, making it impossible to enter a client’s information unless the field is filled in.
When you click the Add Case button the case opens on the Personal Info tab.
Each case in Oasis has five sections: (1) Personal Info, (2) Assistance, (3) Relationships, (4) Notes, and (5) Alerts. On the next page, we’ll start by zooming in and taking a look at the Personal Info tab.

08
Case Management
The Personal Info tab keeps track of the basic information for your client.
It also keeps track of demographic information.
Below the client’s basic information is a record of modifications that have been made to your client’s case. Any time an agency changes or adds information for your client, Oasis makes a note of it.
At the bottom of the page, you’ll see a navigation bar. This bar will allow you scroll through all the modifications.
The Assistance tab keeps track of all the assistance given to your client and those living with your client.
Tip: You can see the assistance records for those related to your client by click-ing the Related checkbox.
Each assistance record keeps track of:
made
description-
tance, and the category the assis-tance was filed under
To add an Assistance record, click the Add Assistance button (circled) and a window will open where you can record the assistance. (See next page.)

09
Case Management
Once the Add Assistance window opens, you can start entering information.
-down menu
-tance, click this link.
only your agency by clicking this arrow and selecting “My Agency”.
Click the Add button when you are finished enter-ing information for the assistance record on this client. If you need to add another record, you can click the Save & Add Another button.

10
Case Management
The Relationships Tab shows you every one who is living with your client, and everyone who is related to your client.
To add a new relationship to your client’s records, you need to click the Add Relationship button (circled).
When you click the Add Relationship button, a window opens, giving you two options:
client already exists in the system
(Please note, it is always a good idea to do a search to see if the person is already in the system.)
Once you have added the relation-ship to Oasis, a window will open for you to define to the relation-ship.
You can mark whether or not the relationship is a dependant.
You can define whether or not the relationship lives with your client.
When you click the Add Relation-ship button the relationship is recorded.

11
Case Management
The Notes Tab keeps track of all the notes for your client and those living with your client.
When you click the Add Note button a window will open where you can record a note for your client.
To add a note to your client’s record, you just need to fill in the description field.
The note is private, so that only the agents in your agency can view it.
The Alerts Tab keeps track of all the alerts for your client and those living with your client.
When you click the Add Alert button a window will open where you can record an alert for your client.
To add an alert to your client’s record, you need to fill in the description field.
You have the option to send an email alert to all the agents in your agency.
When you click the Add Alert button, the alert is saved. If you checked the Send Email Alert To [your agency] box, an email will be sent to every agent in your agency.

12
Case Management (Reports)
There are three links below the Alerts Tab.
to allow you to change or add information.-
sage to the administrator of your network.
specific case. (See below.)
When you click on the Case Report link, a window opens where you can choose the format and filters for your report.
you need in this report.
options listed. (See note below.)
customize for this report.
Click the Next button for the next window.
Finally, select the fields you want to be included in your report and click the View Report button.
Note: If you selected the List export format, your report will open in a new window to be printed from your browser. If you selected the Table export format, your report will open in a new window in a table format. If you selected the CSV export format, you will receive an email when your report is ready (within 15 minutes). Your report will be in a file that you can open with any spreadsheet program like Open Office or Excel.

13
My Agency Tab
Now let’s take a look at the My Agency Tab. This tab has six sub-tabs, it’s where you keep track of all of your agency’s information. We’ll zoom in and go over each sub-tab. The General sub-tab is first.
The General sub-tab contains information about your agency, as well as a listing of all the agents within your agency.
Network and Agency Administrators can add agents and edit agent details here. Also, this is place to disable an agent’s login. An agent cannot be deleted from the system once they have entered infor-mation into Oasis.

14
My Agency Tab
The Cases sub-tab reveals a chronological list of cases that have been created by your agency. Each name is also a link that will open that case if you click it.
The Assistance sub-tab reveals a chronological list of assistance that has been given by your agency.
The Categories sub-tab shows all the categories of assistance listed under their appropriate section. Global Categories are categories that are available to all agencies, and are managed by the network administrator. Agency Categories are available to only your agency, and are managed by your agency’s administrator.

15
My Agency Tab (Reports)
Running a report is a simple process. Let’s go over the steps.
For this example, we are going to run an Assistance report. This report will give you a record of all the assistance your agency has provided during a time period that you specify. When you click the button for the Assistance report (shown above in the red box), the following window will open.
The Reports sub-tab is where you go to run all the reports that pertain to your agency. There are seven categories to report on (see the picture below).
Also on this sub-tab is a list of all your Custom Reports. You can tailor a report to your specifications and run it whenever you need to.
The last thing on this sub-tab is a list of Recent Reports. You just need to click the report and Oasis will generate a new report reflecting any recent additions to the network database.

16
My Agency Tab (Reports)
First, you need to select the format most appropriate for your needs. The List and Table formats will allow you to view the report prior to print-ing. The CSV format will take about 15 minutes, and when it is complete you will be notified by email. You can download your report and open it in a spreadsheet program like Excel.
Next, select the filters to customize your report. Click on each filter and check the appropriate box(es).
Note: If you do NOT modify a filter, the report will include all informa-tion represented by that filter.
Now click the Next button to go on to the final step.
Now you’re ready to fine tune your report to include only the information you need.
First, when you click the down arrow for “Order Assistance By”, you can order by Oldest to Newest, Newest to Oldest, Category Name, or Case Name.
Next, you simply check or uncheck the boxes beside each description to select the fields you need.
Once you have selected the information you need, click the View Report button. Oasis will open a page containing your report.

17
My Agency Tab (Reports)
To print your report, you can click the Print Report button in the upper right corner of the screen.
Tips for Reporting:
at what you have and work from there.
asking the system to show you individuals who have ALL those demographics you have selected.
Feedback button in the upper right corner of Oasis and let us know how we can help.
18
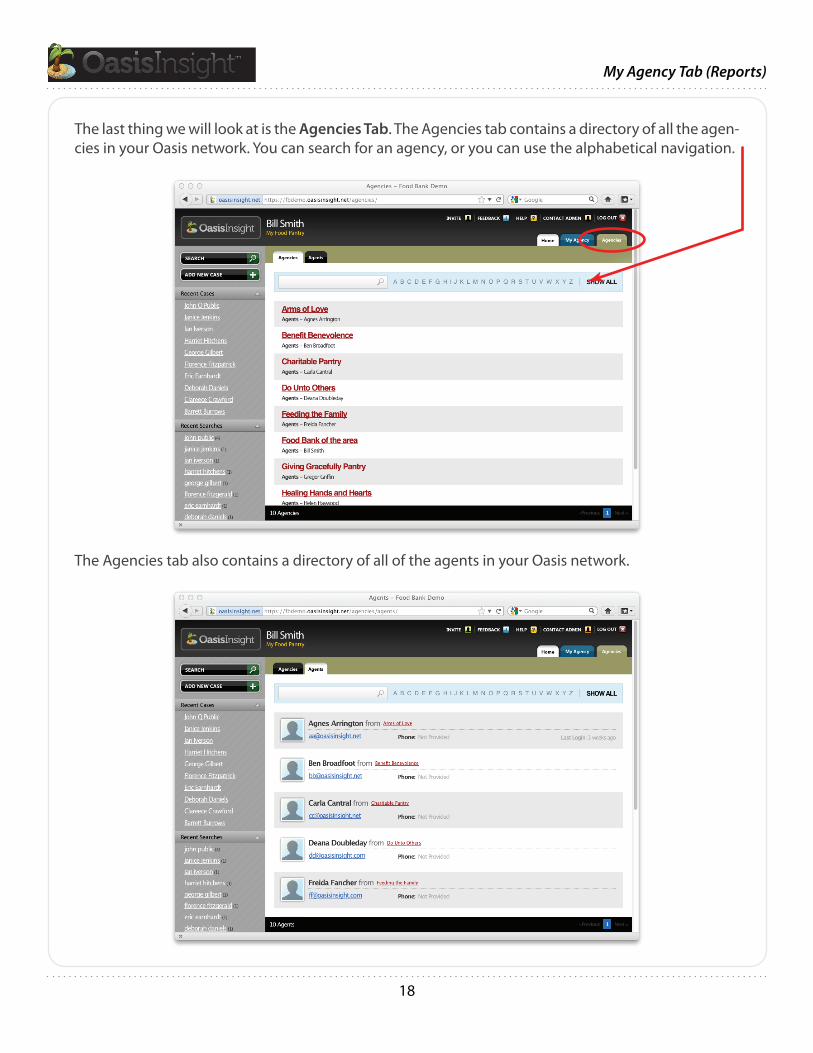
My Agency Tab (Reports)
The last thing we will look at is the Agencies Tab. The Agencies tab contains a directory of all the agen-cies in your Oasis network. You can search for an agency, or you can use the alphabetical navigation.
The Agencies tab also contains a directory of all of the agents in your Oasis network.

19
For Agency Administrators
This section of the user guide explains the role of an Agency Administrator (Agency Admin). The Agency Admin enters the information about their agency that appears on their My Agency tab. An Agency Admin can also change the password for an agent if they forget it. (An agent can reset their password themselves if they’d like, by clicking the “Forgot Password” link on the login screen.)
There are two functions an Agency Admin can perform, if those functions have been activated by the Network Administrator:
The Agency Admin will also see a Billing sub-tab on the My Agency tab. This sub-tab is where the Agency Admin can define the Administrative Contact information, and the Billing Contact informa-