notifier - eureka connection support | the most … of notifier control panels with eureka 5...
TRANSCRIPT

NOTIFIER
Supervision of Notifier control panels with Eureka
February 2011

Supervision of Notifier control panels with Eureka
2

Supervision of Notifier control panels with Eureka
3
INDEX
CONNECTION EUREKA‐NOTIFIER RS232
CONNECTION EUREKA‐NOTIFIER AI 4164 ETH
ADDING A NOTIFIER PERIPHERAL IN EUREKA
ACTIVATING THE NOTIFIER CONNECTION IN EUREKA
DOWNLOADING DATA FROM NOTIFIER
ANALOG VALUES
ENABLING THE PROTECTION KEY TO USE NOTIFIER CONNECTIONS
ATTACHMENTS

Supervision of Notifier control panels with Eureka
4
CONNECTION EUREKA-NOTIFIER
Eureka can supervise Notifier AM2000/AM4000/AM6000 control panels in two ways:
1) direct RS232 serial connection (19200, and 8.1) 2) connection to AI ETH 4164 which in turn is connected via serial RS232 (19200, and 8.1) 3) for Notifier programming see attachments
CONNECTION EUREKA-NOTIFIER RS232 Add an RS232 connection with E8‐Links32, and select Notifier.
Configure the communication port; it must be set to be less than 10.
Save.

Supervision of Notifier control panels with Eureka
5
CONNECTION EUREKA-NOTIFIER AI 4164 ETH Add an ETH 4164 connection with E8‐Links32, and select Notifier.
Set the connection according to the configuration performed on the AI 4164 ETH card connected to the Notifier control panel.
Save.

Supervision of Notifier control panels with Eureka
6
ADDING A NOTIFIER PERIPHERAL IN EUREKA Add a peripheral with the programm Eureka‐8.
Select the model of the control panel (AM2000,AM4000,AM6000).
It is now possible for you to manually enter sensors, modules, zones, and loops; or, you can automatically download the data from the control panel. If you want to load data from the control panel do not enter sensors or modules, and follow the steps hereinafter.

Supervision of Notifier control panels with Eureka
7
ACTIVATING THE NOTIFIER CONNECTION IN EUREKA
The empty peripheral list and the icon shown in the figure indicate that Notifier connection exists, but it has not been associated to a peripheral yet.
To activate the connection, click link from Setup.
Select the connection, the peripheral, and connect with the << button.
Save. The connection is now active; Eureka receives the status of the control panel and can send commands.

Supervision of Notifier control panels with Eureka
8
The initial alignment of the control panel takes a few minutes.

Supervision of Notifier control panels with Eureka
9
DOWLOADING DATA FROM NOTIFIER Now that the panel is connected you can download the peripheral settings (sensors, modules, zones, loops). To download the data, go back to peripheral settings and select the button for uploading.
The uploading will take a few minutes.
At the end of the uploading, complete data will appear as stored on the control panel.
Save.

Supervision of Notifier control panels with Eureka
10
ANALOG VALUES In addition to sending commands provided by Notifier (reset, acknowledge, silence, exclusion, inclusion, ...) it is possible to acquire the analog value of a single point, of the points of a loop or of all points. To acquire the analog value of a single point, select the sensor and send the command Analog value.
The following graph, showing the analog value, will be displayed.
The number in red indicates the analog value; the number in green indicates the sensor type.
Supervision of Notifier control panels with Eureka
11
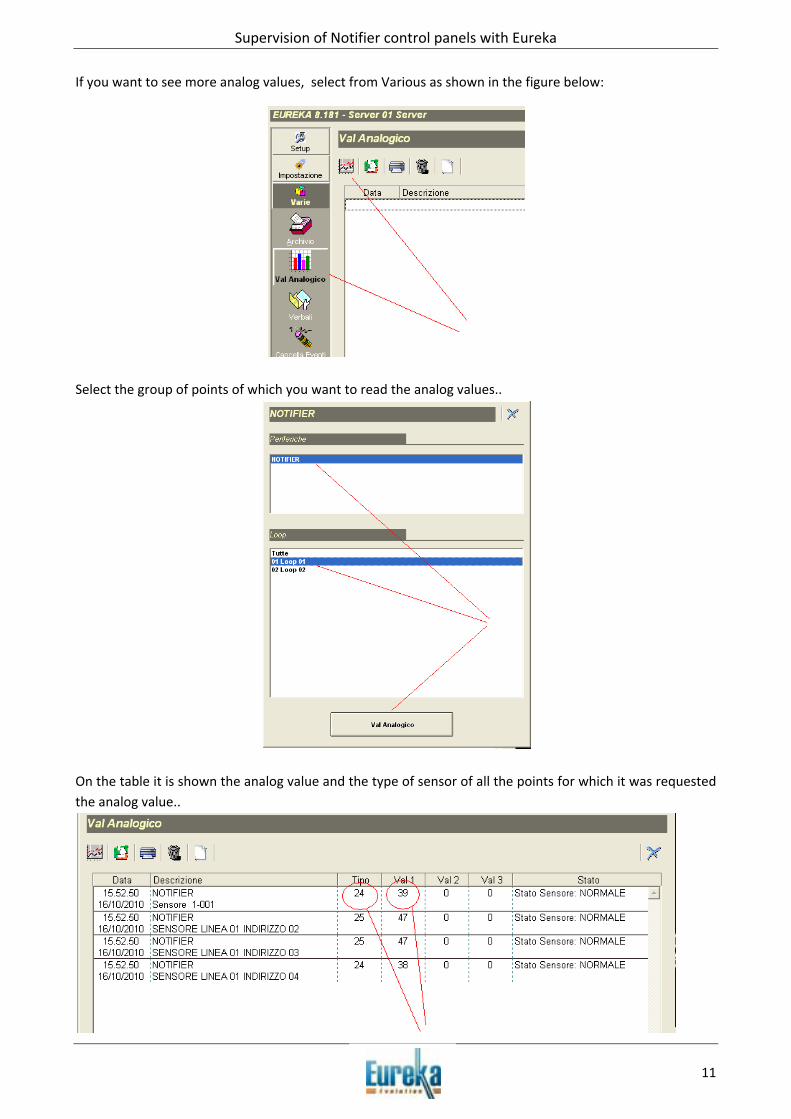
If you want to see more analog values, select from Various as shown in the figure below:
Select the group of points of which you want to read the analog values..
On the table it is shown the analog value and the type of sensor of all the points for which it was requested the analog value..

Supervision of Notifier control panels with Eureka
12
ENABLING THE PROTECTION KEY TO USE NOTIFIER CONNECTIONS In order to use the Notifier connections it is necessary to enable the hardware key. When trying to enter a new Notifier connection in the absence of enablement the following message appears:
To enable the key you have to request the enabling password; you’ll have to communicate the serial number that can be read in Eureka, as it is shown in the figure below:.

Supervision of Notifier control panels with Eureka
13
Once you have the password, you must activate the key from Eureka, by selecting Upgrade as shown in the figure below:
Select Notifier, enter the password and enable with UPGRADE.
If the password is correct, the following message will be displayed.
The key is now enabled for Notifier connections.

Supervision of Notifier control panels with Eureka
14
ATTACHMENTS ILITAZIONE DELLA CHIAVE HARDWARE
A‐ From the installation manual: connections of SIB‐600 card B‐ From operator's and programming manual: programming serial card SIB‐600 C‐ Serial card SIB‐600 OEM connections on new Notifier control panels D‐ Programming on new Notifier control panels to connect to PC

Supervision of Notifier control panels with Eureka
15
A) CONNECTIONS OF SIB‐600 SERIAL CARD

Supervision of Notifier control panels with Eureka
16
B) PROGRAMMING SIB‐600 SERIAL CARD
Supervision of Notifier control panels with Eureka
17
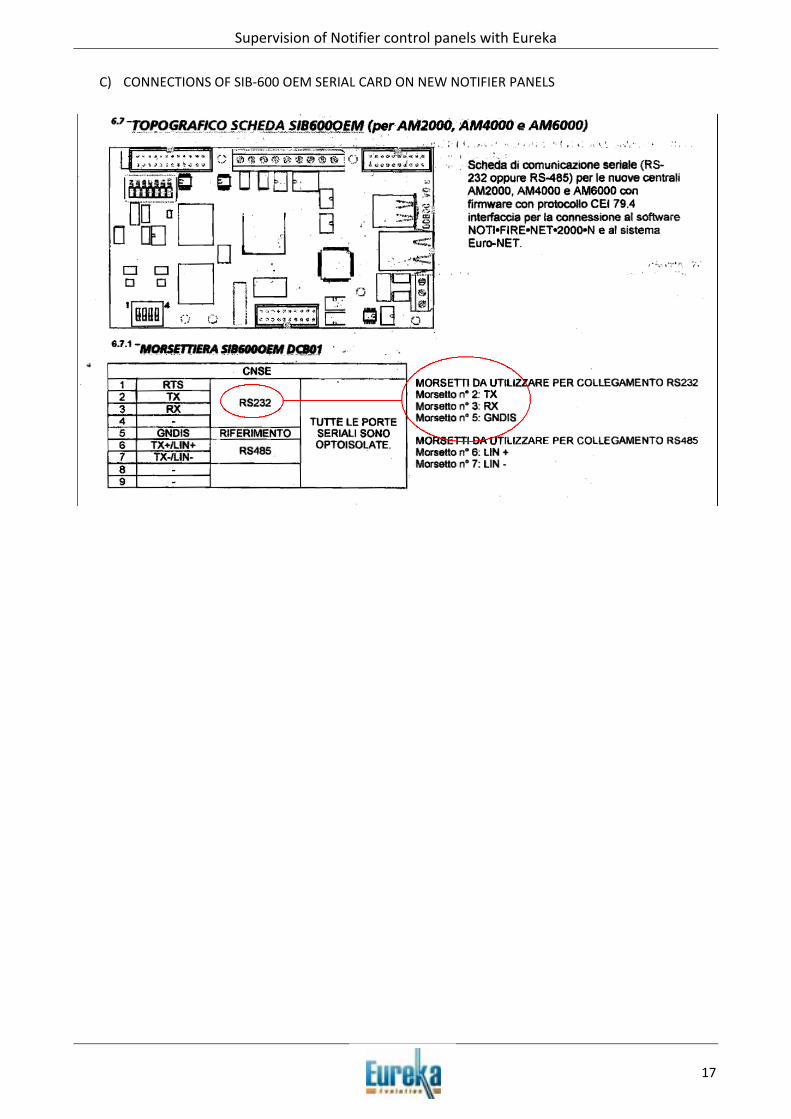
C) CONNECTIONS OF SIB‐600 OEM SERIAL CARD ON NEW NOTIFIER PANELS
Supervision of Notifier control panels with Eureka
18
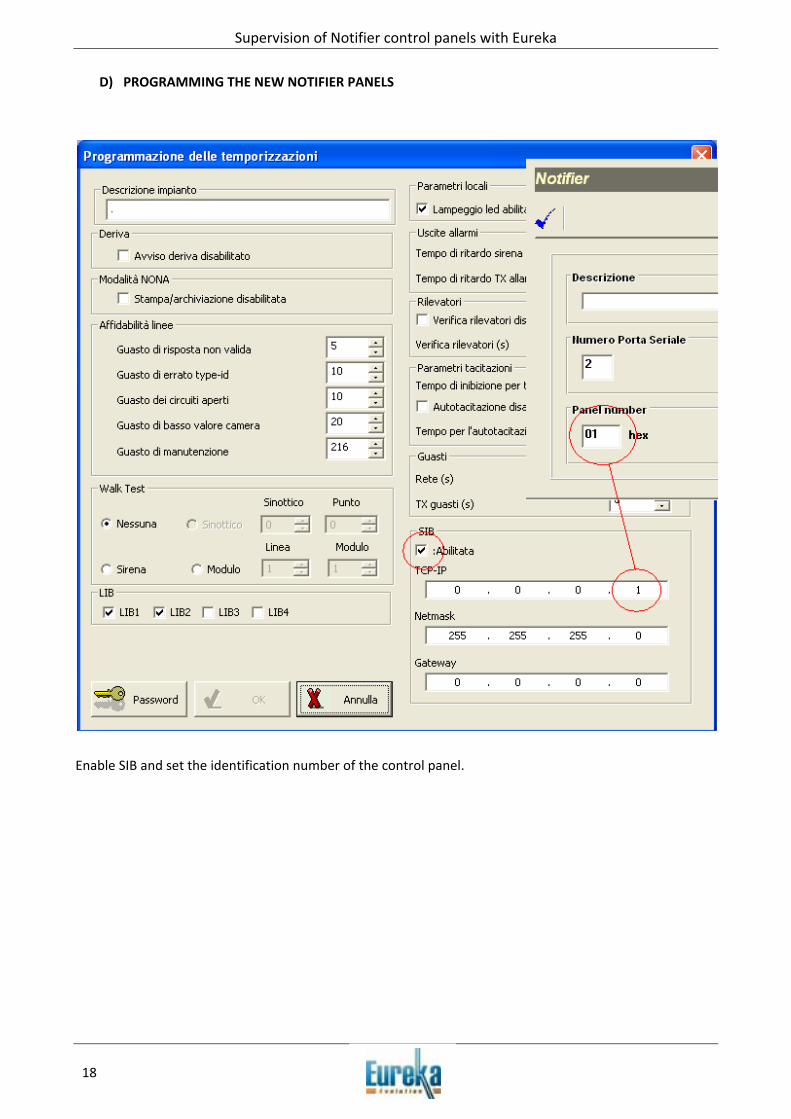
D) PROGRAMMING THE NEW NOTIFIER PANELS
Enable SIB and set the identification number of the control panel.
