norstar applications module installation and maintenance ... · p0885429 issue 01 norstar...
TRANSCRIPT

Norstar Applications Module
Installation and Maintenance Manual1-800-4 NORTELwww.nortel.com/norstar
Norstar is a trademark of Northern Telecom.P0885429 Issue 01 Printed in Canada
Norstar is a trademark of Northern Telecom.© Copyright Northern Telecom, 1998


Contents
Chapter 1 How to use this manual 1Introduction 1How this manual is organized 1Knowing the symbols 2
Norstar Applications Module (NAM) Components 3
Chapter 2 Components of the Norstar Applications Module (NAM) 5NAM upgrades 5Single Board Computer (SBC) 6Media Services Base Interface Card (BIC) 6Hard disk drive 6Floppy disk drive 6Connection Ports 7
Optional equipment 8About the System software 9
Installing the Norstar Applications Module (NAM) 11
Chapter 3 Installing the Norstar Applications Module (NAM) 13Introduction 13Before you start 13
Packaging Checklist 13Environment Checklist 14
Special parts and equipment 14Other documentation 14
Installation overview 15Changing the power supply voltage 15Mounting the NAM on the wall 15
Floor mount stand 17Assembling the floor mount stand 17Attaching the floor mount stand to the NAM 18Installing the end-caps 19
Connecting the NAM to the KSU 19Fiber cable precautions 20
P0885429 Issue 01 Norstar Applications Module Installation and Maintenance Manual
ii
Starting the NAM 21
Norstar Applications Module (NAM) Hardware Upgrades and Replacements 23
Chapter 4 Preparing for the upgrade 25Overview 25Special tools 26Shutting down the NAM 26Accessing the inside of the NAM 27
Removing the front cover 28Opening the cable trough 29Removing the plastic case 29
Chapter 5 Installing the clock/calendar battery 31Overview 31
Removing and replacing the battery 31
Chapter 6 Installing the Digital Fax Card (DFC) 33Overview 33
Precautions 34Installing the DFC 34
Installing the Media Services Bus Expansion Card (BEC) on the BIC 37Connecting the DFC to the BIC with the PEB Cable 39
Removing fax functionality from the System 41
Chapter 7 Installing and upgrading the Media Services Base Interface Card (BIC) 43
Overview 43Increasing the number of Voice Channels 43
Installing a PEC in the NAM 44Removing the BIC 46Re-installing the BIC 46
Chapter 8 Installing a new floppy disk drive 49Overview 49
Installing a new floppy disk drive 49
Chapter 9 Installing and upgrading the hard disk drive 51Overview 51
Backing up the NAM capabilities file 51Removing the hard disk drive 52
Norstar Applications Module Installation and Maintenance Manual P0885429 Issue 01
iii
Installing a new hard disk drive 54Restoring the NAM capabilities file 55
Adding a secondary hard disk drive 56
Chapter 10 Installing a new Internal modem 59Overview 59
Removing the internal modem 59Installing a new internal modem 60Connecting the internal modem to an Analog Terminal Adapter (ATA) 62
Chapter 11 Adding and replacing memory 63Overview 63Adding memory 63Removing memory 66
Chapter 12 Adding and removing a monitor, keyboard and mouse 69Overview 69
Installing the SVGA video card on the SBC 69Enabling the monitor, keyboard and mouse 72Removing the monitor, keyboard and mouse 73
Chapter 13 Changing the power supply voltage 75
Chapter 14 Installing and replacing the Single Board Computer (SBC) 77Overview 77Removing and replacing the SBC 78
ACCESS Server Administration 81
Chapter 15 ACCESS Server Administration software 83Overview 83Using the ACCESS Server Administration software 84
Changing the printer options 84Setting the DTMF digit duration length 84Viewing the Alarm and Message Log 85
Sharing Voice and Fax Channels between applications 86Installing applications 88Viewing the NAM serial number 89Shutting down the NAM 89Rebooting the NAM 90Allocating and restricting hard disk drive space 91
Line renumbering 93Resetting the Line Answer status 94
P0885429 Issue 01 Norstar Applications Module Installation and Maintenance Manual

iv
Troubleshooting 95
Chapter 16 Troubleshooting 97Overview 97Diagnosing problems 97
Hardware problems 97Checking the Channel Status 99Disabling and Re-enabling Norstar Voice Mail Channels 102
Preparing the NAM for travel 104
Glossary 105
Index 113
Norstar Applications Module Installation and Maintenance Manual P0885429 Issue 01
Regulatory information
v
.The Norstar Applications Server generates radio frequency energy, and if not installed and used in accordance with the instruction manual, may cause interference to radio communications. It has been tested and found to comply with the limits for a Class A computing device pursuant to Part 15 of the FCC rules and CSA specification C108.8, which are designed to provide reasonable protection against such interference when operated in a commercial environment. Operation of this equipment in a residential area is likely to cause interference, in which case users will be required, at their own expense, to take whatever measures necessary to correct the interference.
This apparatus does not exceed the Class A limits for radio noise emissions from digital apparatus set out in the Radio Interference Regulations for the Canadian Department of Communications.
This equipment has been verified to comply with the limits for Class A computing device, pursuant to FCC, Subpart B, and ICES-003 Canadian EMI requirements with the peripherals recommended by Nortel for use with this equipment.
To resolve problems with interference resulting from use of peripherals not specifically marketed by or recommended by Nortel, contact the manufacturer or dealer of that peripheral for assistance. Only peripherals (computer input/output devices, terminals, printers etc.) certified to comply with Class A limits may be attached to this computer. Operation with non-certified peripherals is likely to result in interference to radio and television reception.
Regulatory information
CAUTIONThe Norstar Applications Module contains fragile electronic parts. DO NOT DROP OR BUMP THE MODULE.
P0885429 Issue 01 Norstar Applications Module Installation and Maintenance Manual
vi
Regulatory information
Repair facilitiesIn the event of equipment malfunction, all repairs will be performed by Northern Telecom or by one of its authorized dealers.
Note: You will receive an RA# when you call the repair center in Nashville. This number should appear on the package of any and all parts sent to this location for repair.
In the USA In Canada
Northern Telecom Inc.Nashville Repair and Distribution Center640 Massman DriveNashville, TN 37210
Northern Telecom Canada Ltd. 30 Norelco DriveWeston, ONM9L 2X6
Attn: RA#Tel: (615) 883-9220
Tel: (416) 744-5201Fax: (416) 744-5227
Norstar Applications Module Installation and Maintenance Manual P0885429 Issue 01

IntroductionThe NAM Installation and Maintenance Manual provides technical information and procedures required by a technician to install the NAM and perform various replacement and upgrade tasks. This manual is useful during and after an initial installation.
To use this manual, you should be:
• an experienced Norstar installer
• familiar with basic Norstar terminology
How this manual is organizedThe NAM Installation and Maintenance Manual is organized in five sections that cover:
NAM Components — This section provides an overview and functional description of NAM hardware, a description of the hardware components, and shows where the components are located.
Installing the NAM — This section provides the steps necessary to install a NAM.
NAM Hardware Upgrades and Replacements — This section provides the steps necessary for upgrading or replacing various NAM components.
ACCESS Server administration — This section explains how to use the ACCESS Server administration software for a variety of maintenance functions.
Troubleshooting — This section provides procedures for diagnosing and solving problems concerning the NAM.
How to use this manual 1
P0885429 Issue 01 Norstar Applications Module Installation and Maintenance Manual
2
How to use this manual
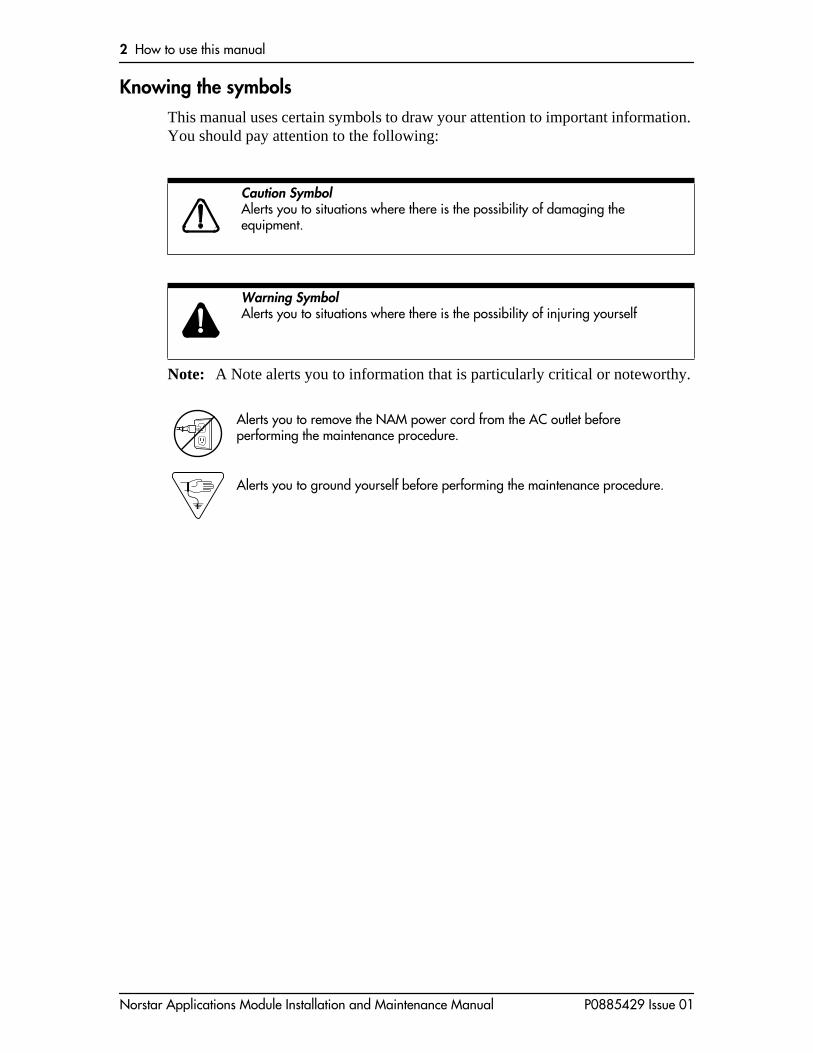
Knowing the symbolsThis manual uses certain symbols to draw your attention to important information. You should pay attention to the following:
Note: A Note alerts you to information that is particularly critical or noteworthy.
Caution SymbolAlerts you to situations where there is the possibility of damaging the equipment.
Warning SymbolAlerts you to situations where there is the possibility of injuring yourself
Alerts you to remove the NAM power cord from the AC outlet before performing the maintenance procedure.
Alerts you to ground yourself before performing the maintenance procedure.
Norstar Applications Module Installation and Maintenance Manual P0885429 Issue 01

Section I -Norstar Applications Module (NAM)
Components• Components of the NAM
• NAM System software
P0885429 Issue 01 Norstar Applications Module Installation and Maintenance Manual

4
Norstar Applications Module (NAM) Components
Norstar Applications Module Installation and Maintenance Manual P0885429 Issue 01
Components of the Norstar Applications Module (NAM)
The NAM consists of:
• 16 MB of EDO RAM
• 3.5 in., 1.44 MB floppy disk drive
• 3.5 in. 2.1 GB IDE hard disk drive*
• Internal modem
• Media Services Base Interface Card (BIC)
• OS/2 Warp™ operating system
• Norstar ACCESS Server software
* 2.1 GB is the minimum hard disk drive size offering over 100 hours of message storage time.
The NAM is physically connected to the Norstar KSU by a fiber cable. The fiber cable allows the NAM to send instructional messages to the KSU and vice versa.
NAM upgradesThe NAM can be upgraded to host a variety of hardware and software configurations. You can enhance functionality by adding more Voice Channels. Refer to "Norstar Applications Module (NAM) Hardware Upgrades and Replacements" on page 23 for more information about upgrading your NAM.
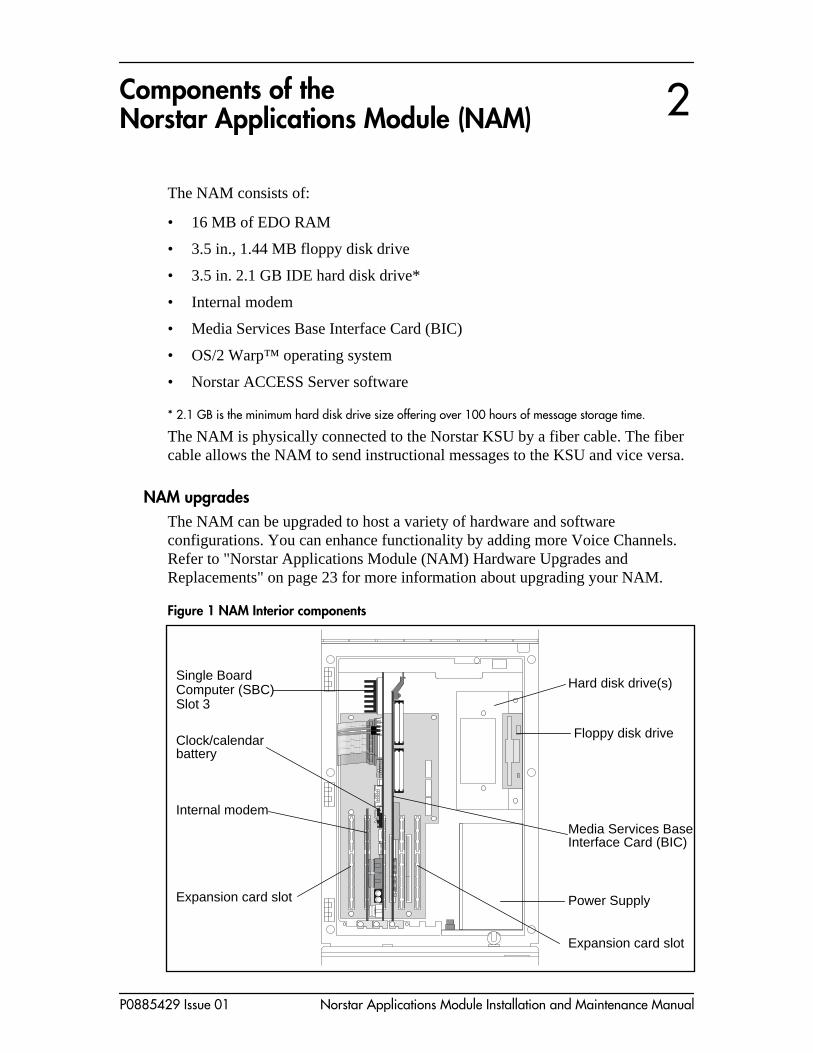
Figure 1 NAM Interior components
2
Floppy disk drive
Expansion card slot
Hard disk drive(s)
Clock/calendarbattery
Expansion card slot
Single Board Computer (SBC)Slot 3
Media Services BaseInterface Card (BIC)
Power Supply
Internal modem
P0885429 Issue 01 Norstar Applications Module Installation and Maintenance Manual
6
Components of the Norstar Applications Module (NAM)
Figure 1 shows the location of the hardware components in the NAM. We recommend you familiarize yourself with the location of the different components before working with the system. All connections located at the bottom of the NAM are accessed from the cable trough.
Single Board Computer (SBC)The Single Board Computer (SBC) is the main computing device of the NAM. All tasks such as answering incoming calls, playing recorded announcements and storing voice messages are controlled by the SBC.
The NAM is equipped with 16 MB of EDO Random Access Memory (RAM). This memory is located in Single In-line Memory Modules (SIMMs) on the SBC. The single 16 MB SIMM is located in memory slot 1. The microprocessor and the clock/calendar battery are also located on the SBC.
Media Services Base Interface Card (BIC)The Media Services Base Interface Card (BIC) is an expansion card installed in the NAM that converts and compresses analog voice signals to digital data for storage on the hard disk. A BIC can have up to 32 Voice Channels. NAM is physically connected to the Norstar KSU by a fiber cable. This allows the NAM to send instructional messages to the KSU and vice versa. Voice Channels on the BIC are enabled through a specific upgrade procedure.
Hard disk driveThe NAM comes equipped with an IDE 3.5 inch hard disk with a minimum capacity of 100 hours of message storage time. The hard disk drive stores all software, messages, greetings and voice prompts.
Note: To ensure your system programming is protected against a hardware failure, you must perform frequent backups of the hard disk drive. For more information about backing up your hard disk, refer to "Backing up the NAM capabilities file" on page 51.
Floppy disk driveThe floppy disk drive on the NAM is a 3.5 in., 1.44 MB drive. This drive is used to load programs and prompts from floppy disks onto the hard disk. It is also used for backup and restore procedures.
Norstar Applications Module Installation and Maintenance Manual P0885429 Issue 01

Components of the Norstar Applications Module (NAM)
7
Connection PortsExternal devices, such as a laptop computer or printer, are attached to the NAM through connection ports. The ports are located on the bottom of the NAM and are accessed through the cable trough. Figure 2 shows the location of the different connection ports.
Figure 2 Module external points of connection
Serial
The NAM is equipped with two serial ports that support asynchronous RS-232C communication. Each port features a male DB-9 connector and supports all standard baud rates (9600 default). The serial ports are used to connect:
• a laptop computer
• a modem
Parallel
The NAM is equipped with one parallel printer port that features a female DB-25 connector. This port is used to connect to an optional parallel printer or a CD-ROM drive for software upgrades or CD-ROM drive for software upgrades.
Parallelport
Serial portsExpansion card slots
AC powerplug
Fibre connectors
1 2 3 4 5 6
Power SupplyFan
Power supply
Internal modem
switch
P0885429 Issue 01 Norstar Applications Module Installation and Maintenance Manual

8
Components of the Norstar Applications Module (NAM)
Optional equipmentAdditional equipment can be added to the NAM to enhance its functionality. Additions can include a:
• Modem
• Monitor package
• Printer
• Network Interface Card
Modem
A modem can be attached to Serial Port A (COM1). The modem is necessary if you intend to perform Administration and Maintenance from a remote location.
Monitor package
The monitor package includes a monitor, SVGA card, keyboard and a mouse. This package is useful for on-site programming and maintenance.
Printer
A printer can be attached to the parallel port. This printer is used for printing reports and alarms. The NAM supports any EPSON compatible printer.
Network Interface Card (NIC)
If you do not want to use the on-board Ethernet NIC, a PCI or ISA card can be installed in expansion slot 5 of the NAM. For more information on Nortel recommended NIC cards, refer to the ITAS TIPS Number 108: NIC for NAM.
Norstar Applications Module Installation and Maintenance Manual P0885429 Issue 01
Components of the Norstar Applications Module (NAM)
9
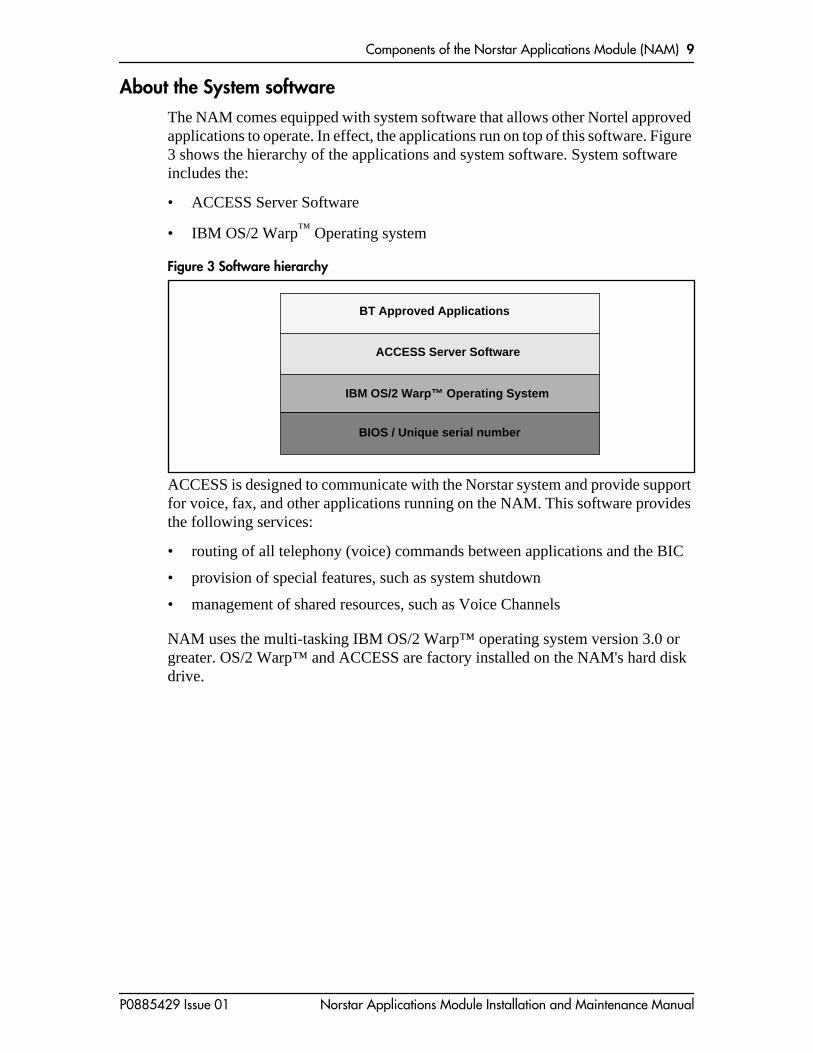
About the System softwareThe NAM comes equipped with system software that allows other Nortel approved applications to operate. In effect, the applications run on top of this software. Figure 3 shows the hierarchy of the applications and system software. System software includes the:
• ACCESS Server Software
• IBM OS/2 Warp™ Operating system
Figure 3 Software hierarchy
ACCESS is designed to communicate with the Norstar system and provide support for voice, fax, and other applications running on the NAM. This software provides the following services:
• routing of all telephony (voice) commands between applications and the BIC
• provision of special features, such as system shutdown
• management of shared resources, such as Voice Channels
NAM uses the multi-tasking IBM OS/2 Warp™ operating system version 3.0 or greater. OS/2 Warp™ and ACCESS are factory installed on the NAM's hard disk drive.
IBM OS/2 Warp™ Operating System
BIOS / Unique serial number
ACCESS Server Software
BT Approved Applications
P0885429 Issue 01 Norstar Applications Module Installation and Maintenance Manual

10 Components of the Norstar Applications Module (NAM)
Norstar Applications Module Installation and Maintenance Manual P0885429 Issue 01
Section II - Installing theNorstar Applications Module (NAM)
• Mounting the NAM on the wall• Mounting the NAM on a floor mount stand
• Connecting to the NAM to the KSU
P0885429 Issue 01 Norstar Applications Module Installation and Maintenance Manual

12 Installing the Norstar Applications Module (NAM)
Norstar Applications Module Installation and Maintenance Manual P0885429 Issue 01

Installing the Norstar Applications Module (NAM)
IntroductionThis section is intended for the installer of the NAM and describes how the system should be installed and prepared for operation.
Before you startBefore you start the installation, ensure that you:
• read this guide and understand the installation process
• verify that all conditions are met in the checklists
Packaging ChecklistMake sure the package you received contains the following items:
❐ NAM
❐ the NAM wall mounting bracket
❐ an AC power cord
❐ a fiber connector
3
P0885429 Issue 01 Norstar Applications Module Installation and Maintenance Manual

14 Installing the Norstar Applications Module (NAM)
Environment ChecklistThe installation area must be:
❐ at least 4 m (approximately 13 feet) from equipment such as copiers, electrical motors and other equipment that could produce electromagnetic, radio frequency and electrostatic interferences
❐ within 2 m (6.5 ft) of the KSU
❐ within 1.5 m (approximately 5 feet) of a three-wire grounded electrical outlet
❐ clean, free of traffic and excess dust, dry and well ventilated
❐ between 10° and 40° Celsius (approximately 50° to 104° Fahrenheit)
❐ between 8% and 80% non-condensing relative humidity
❐ a wall area approximately 1 m square (approximately 10 sq feet)
❐ a minimum of 16 cm (approximately 6 inches) from a corner wall or other component
❐ a minimum of 46 cm (approximately 18 inches) from the floor
Note: The distance from the floor to the installation area should be enough to prevent water damage.
The NAM does not require a dedicated circuit. Do not connect the NAM to an AC outlet on a circuit that is likely to be overloaded or used by large office equipment or power tools.
Special parts and equipmentFor the installation, you need the following equipment:
❐ Phillips #2 screwdriver
❐ power drill
❐ flat blade screwdriver
❐ antistatic grounding strap
❐ four #10 X 2.5 cm (#10 X 1 inch) round head wood screws
❐ plywood backboard 2 cm (3/4 inch) thick
❐ surge protector (recommended)
Other documentationIn addition to the documentation included in the package you received, the Norstar Installation Guide that came with your Norstar KSU may also be necessary.
Norstar Applications Module Installation and Maintenance Manual P0885429 Issue 01

Installing the Norstar Applications Module (NAM) 15
Installation overviewInstalling a NAM involves the following:
• power supply switch setting (if required)
• mounting the unit on the wall or floor mount stand
• connecting the NAM to the Norstar KSU
• connecting the power cord
Changing the power supply voltageThe power supply on the NAM is set at the factory to operate at 115 volts. If you plan to use 115 volts to power the NAM, do not change the voltage switch. If you plan to use 230 volts to power the NAM, you must change the power supply voltage setting before mounting the unit on the wall. Refer to "Changing the power supply voltage" on page 75.
For more information, refer to "Installing and replacing the Single Board Computer (SBC)" on page 77.
Mounting the NAM on the wall
1. Install the 2 cm inch plywood backboard on the wall.
2. Position NAM mounting bracket on the backboard. Place the smooth side flush against the backboard, with the screw holes near the top. Ensure the bracket is level.
3. Fasten the bracket to the backboard. Use two #10 X 2.5 cm (#10 X 1 inch) round head wood screws through the inner pair of holes.
CautionThe NAM contains fragile electronic components. Do not drop or bump the module. The NAM weighs 13.6 kg (30 lbs). You must fasten the back of the module to the backboard to fully support the weight of the NAM.
P0885429 Issue 01 Norstar Applications Module Installation and Maintenance Manual
16 Installing the Norstar Applications Module (NAM)
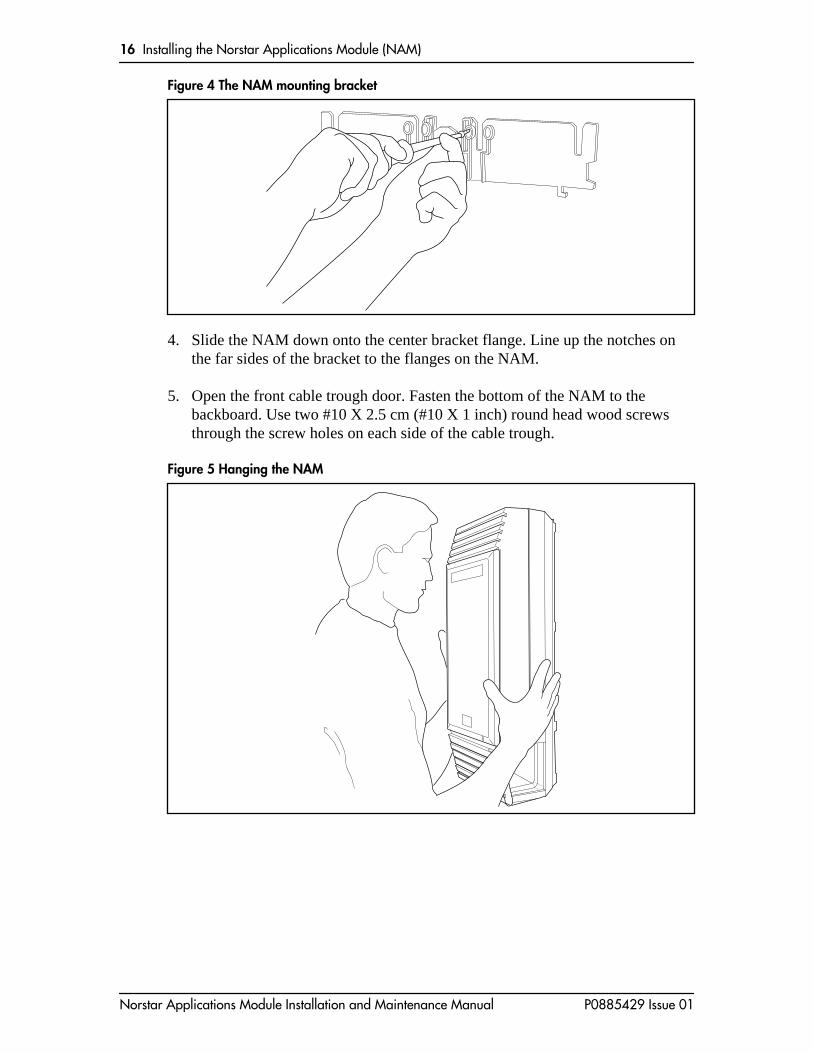
Figure 4 The NAM mounting bracket
4. Slide the NAM down onto the center bracket flange. Line up the notches on the far sides of the bracket to the flanges on the NAM.
5. Open the front cable trough door. Fasten the bottom of the NAM to the backboard. Use two #10 X 2.5 cm (#10 X 1 inch) round head wood screws through the screw holes on each side of the cable trough.
Figure 5 Hanging the NAM
Norstar Applications Module Installation and Maintenance Manual P0885429 Issue 01

Installing the Norstar Applications Module (NAM) 17
Figure 6 Installing the cable trough screws
Floor mount standThe floor mount stand is an alternative to wall-mounting the NAM. The stand allows the module to sit on any horizontal surface. The floor mount stand is useful when you are attaching a monitor and keyboard to the NAM and want it situated near a desk.
Assembling the floor mount standBefore you can attach the floor mount stand to the NAM, you must first assemble the stand.
To assemble the floor mount stand:
1. Align the two halves of the floor mount stand back to back.
2. Using the four screws provided, fasten the two sides together. Refer to Figure 7 for an illustration of an assembled floor mount stand. You must use all four screws.
CAUTIONRefer to “Environment Checklist“for acceptable environmental conditions before selecting a location for the NAM.
P0885429 Issue 01 Norstar Applications Module Installation and Maintenance Manual
18 Installing the Norstar Applications Module (NAM)
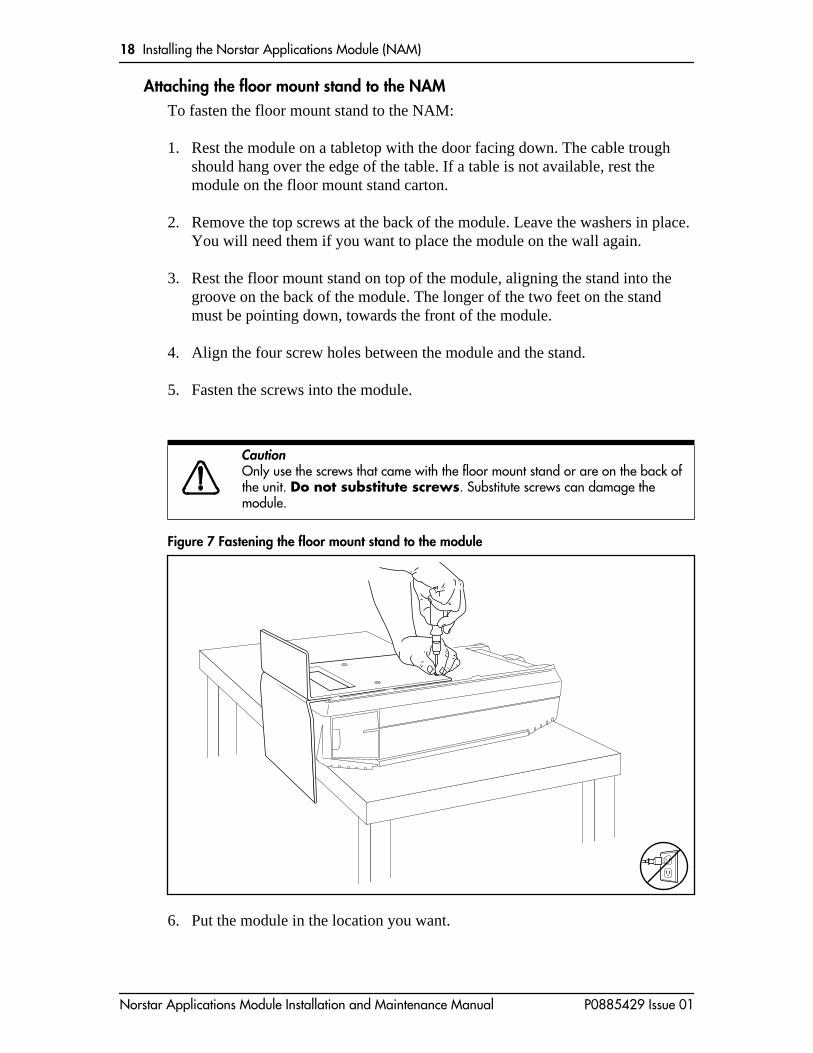
Attaching the floor mount stand to the NAMTo fasten the floor mount stand to the NAM:
1. Rest the module on a tabletop with the door facing down. The cable trough should hang over the edge of the table. If a table is not available, rest the module on the floor mount stand carton.
2. Remove the top screws at the back of the module. Leave the washers in place. You will need them if you want to place the module on the wall again.
3. Rest the floor mount stand on top of the module, aligning the stand into the groove on the back of the module. The longer of the two feet on the stand must be pointing down, towards the front of the module.
4. Align the four screw holes between the module and the stand.
5. Fasten the screws into the module.
Figure 7 Fastening the floor mount stand to the module
6. Put the module in the location you want.
CautionOnly use the screws that came with the floor mount stand or are on the back of the unit. Do not substitute screws. Substitute screws can damage the module.
Norstar Applications Module Installation and Maintenance Manual P0885429 Issue 01

Installing the Norstar Applications Module (NAM) 19
7. Reconnect the cables
Note: You can run the cables through the ends of the cable trough or through the back.
8. Plug the power cord into the AC outlet. If you are installing the monitor package, do not plug the NAM in until the installation is complete.
Installing the end-capsTo install the end-caps:
1. Make sure the front cable trough door is open.
2. Place the bottom of the end-cap into the slot in the bottom of the trough. There are two end-caps, one for the left side, and one for the right side of the cable trough.
3. Slide the end-cap straight back to the end of the slot.
Connecting the NAM to the KSUA NAM can only be connected to a Norstar KSU that supports fiber connections. To verify the compatibility of your KSU, refer to Table 1.
Table 1 KSU fiber connection compatibility
Note: If the Norstar KSU does not support fiber connections, a DS30/Station Port Adapter must be installed. For more information, talk to your service representative.
KSU Version SP Software Number
Modular ICS Release 1 - T1 All version numbers are compatible
Modular ICS Release 1 - Centrex All version numbers are compatible
USA-MICS-XL 1.0 All version numbers are compatible
USA-MICS-XC 1.0 All version numbers are compatible
CDA-MICS-XC 1.0 All version numbers are compatible
USA-MICS-XC 1.1 All version numbers are compatible
CDA-MICS-XC 1.1 All version numbers are compatible
NA-MICS-DR 1.1 All version numbers are compatible
NA-MICS-DR 2.0 All version numbers are compatible
P0885429 Issue 01 Norstar Applications Module Installation and Maintenance Manual
20 Installing the Norstar Applications Module (NAM)
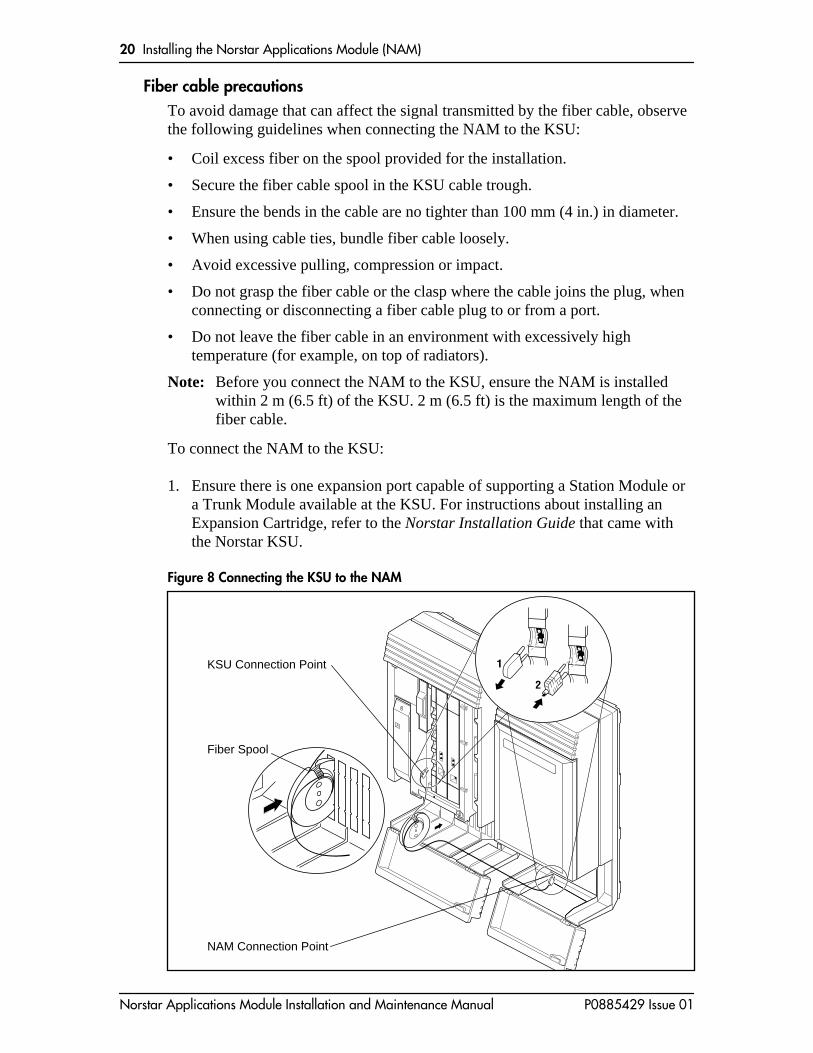
Fiber cable precautions To avoid damage that can affect the signal transmitted by the fiber cable, observe the following guidelines when connecting the NAM to the KSU:
• Coil excess fiber on the spool provided for the installation.
• Secure the fiber cable spool in the KSU cable trough.
• Ensure the bends in the cable are no tighter than 100 mm (4 in.) in diameter.
• When using cable ties, bundle fiber cable loosely.
• Avoid excessive pulling, compression or impact.
• Do not grasp the fiber cable or the clasp where the cable joins the plug, when connecting or disconnecting a fiber cable plug to or from a port.
• Do not leave the fiber cable in an environment with excessively high temperature (for example, on top of radiators).
Note: Before you connect the NAM to the KSU, ensure the NAM is installed within 2 m (6.5 ft) of the KSU. 2 m (6.5 ft) is the maximum length of the fiber cable.
To connect the NAM to the KSU:
1. Ensure there is one expansion port capable of supporting a Station Module or a Trunk Module available at the KSU. For instructions about installing an Expansion Cartridge, refer to the Norstar Installation Guide that came with the Norstar KSU.
Figure 8 Connecting the KSU to the NAM
KSU Connection Point
Fiber Spool
NAM Connection Point
Norstar Applications Module Installation and Maintenance Manual P0885429 Issue 01

Installing the Norstar Applications Module (NAM) 21
2. Connect one end of the fiber connector in an available expansion port on the KSU. The fiber connector is keyed and can only be inserted one way. Ensure the connector snaps into place.
3. Locate the BIC fiber connection point on the bottom of the NAM. The BIC will be located in slot 4. Remove the two rubber protectors from the fiber connection points on the BIC. For the location of the NAM connection points, refer to Figure 8 on page 20.
Figure 9 Fiber Connection Points - Bottom view
4. Connect the other end of the fiber connector into the BIC. The fiber connector is keyed and can only be inserted one way. Ensure the connector snaps into place.
5. Ensure all the excess fiber cable is on the spool provided and the spool is in the KSU cable trough. All the cabling should be run through the bottom or sides of the cable trough.
Starting the NAMRead the power supply warning label, covering the AC power plug, before starting NAM.
1. Plug in the NAM. Wait until the self-diagnostics are completed. This can take up to five minutes.
CAUTIONDo not place any other components, such as a power bar, into the NAM cable trough. Obstructions in the cable trough restrict a cooling air flow and may cause the unit to overheat.
CAUTIONThe power supply default setting is 115 volts. For more information about changing the power supply voltage setting, refer to "Installing and replacing the Single Board Computer (SBC)" on page 77.
BIC Fiber7 Connection Point
P0885429 Issue 01 Norstar Applications Module Installation and Maintenance Manual

22 Installing the Norstar Applications Module (NAM)
Norstar Applications Module Installation and Maintenance Manual P0885429 Issue 01
Section III - Norstar Applications Module(NAM) Hardware Upgrades
and Replacements• Preparing for the upgrade
• Installing the clock/calendar battery• Installing and upgrading the Digital Fax Card (DFC)
• Installing and upgrading the Media Services Base Interface Card (BIC)• Installing a new floppy disk drive
• Installing and upgrading the hard disk drive• Adding and replacing memory
• Adding or removing a monitor, keyboard and mouse• Adding the NAM to a network
• Changing the power supply voltage• Installing or replacing the Single Board Computer (SBC)
P0885429 Issue 01 Norstar Applications Module Installation and Maintenance Manual

24 Norstar Applications Module (NAM) Hardware Upgrades and Replacements
Norstar Applications Module Installation and Maintenance Manual P0885429 Issue 01

Preparing for the upgrade
OverviewHardware upgrades to the Norstar Applications Module (NAM) are required when additional capacity or functionality is needed. This section describes upgrade or replacement procedures for the following:
• clock/calendar battery
• Digital Fax Card (DFC)*
• Media Services Base Interface Card (BIC)
• floppy disk drive
• hard disk drive
• internal modem
• memory
• monitor, keyboard and mouse
• Single Board Computer (SBC)
*Only on systems with applications that support FAX functionality. For example, Norstar Voice Mail.
Refer to Figure 1 on page 5 for the location of the NAM interior components.
Note: The power supply is not a field replaceable part.
4
P0885429 Issue 01 Norstar Applications Module Installation and Maintenance Manual

26 Preparing for the upgrade
Special toolsBefore you begin replacing or upgrading the components, ensure you have the following equipment:
• #2 Phillips head screwdriver that has a blade 3.5 in. long
• 3/16 in. slot screwdriver
• an antistatic grounding strap
Shutting down the NAMThis option allows the installer to “gently” shutdown the NAM. OS/2 Warp™ requires a slow shutdown to guarantee the integrity of the file system.
Three shutdown options are available: Graceful, Quick and Immediate. The Graceful option allows an application to terminate all existing calls before shutting down. The Quick option only allows 45 seconds for an application to terminate before shutdown, and the Immediate option only allows 15 seconds.
When you are shutting down the NAM you will usually use the Graceful option. However, if the system is not responding to the command, you can speed up the process by changing the option to a Quick shutdown. After 45 seconds a Quick shutdown is performed.
To shutdown the NAM:
CAUTIONYou must wear an antistatic grounding strap at all times when handling electronic components. Failure to do so may result in damage to the equipment.
1. Press ƒ ·⁄fi .
2. Enter the ACCESS password.
Note: The default password is ACCESS2 (2223772).
3. Press NEXT .
4. Press SHOW .
5. Press GRACE .
Note: Press NEXT to change the shutdown option to QUICK (Quick) or IMMD (Immediate).
Password:∫∫∫∫∫∫∫∫∫∫∫∫∫∫∫∫ ∫∫RETRY
ACCESS∫ServerBACK∫∫ ∫ADMIN
System∫shutdownBACK∫∫NEXT∫∫
Shutdown∫typeQUIT∫∫NEXT∫
Norstar Applications Module Installation and Maintenance Manual P0885429 Issue 01
Preparing for the upgrade 27
The NAM issues a series of tones descending in pitch when the shutdown is complete. Wait for the tones before you unplug the NAM.
Accessing the inside of the NAMYou must unplug the NAM before you install or remove any components. The NAM components are accessed by removing the front cover or plastic case. Access to external connections is made through the cable trough. Figure 10 shows the different access points on the module.
Figure 10 Parts involved while accessing the inside of the module
The front cover must be removed when you need to access all internal components.
Note: You must remove both the front cover and plastic case when you need to replace the floppy disk drive.
6. Press YES .
Note: Press NO if you want to stop the shutdown.
WARNINGThe plastic door is part of the fire enclosure system. This door is required to meet safety requirements. It must be closed upon completion of each installation or repair.
Shutdown∫Graceful∫∫∫∫∫∫∫∫∫∫∫NO
Door
Front cover
Plastic case
Cable trough door
P0885429 Issue 01 Norstar Applications Module Installation and Maintenance Manual

28 Preparing for the upgrade
Removing the front coverFor most component upgrades or replacements you must remove the front cover. The front cover protects the components from dust and assists in evenly distributing air flow from the fans.
To remove the front cover:
1. Shutdown the NAM. For more information, refer to "Shutting down the NAM" on page 26.
2. Remove the NAM power cord from the AC outlet.
3. Ground yourself by attaching one end of the grounding strap to your wrist and the other end to a grounded metal surface.
4. Open the module door. The door may be locked. To unlock the door, use a screwdriver to turn the lock in the bottom-right corner of the door. Turn the lock 90° counterclockwise until the screwdriver slot is vertical.
5. Remove the two screws holding the front cover to the module. The screws are located along the top of the front cover.
6. Slide the front cover out from the module.
Figure 11 Removing the front cover
Norstar Applications Module Installation and Maintenance Manual P0885429 Issue 01

Preparing for the upgrade 29
To replace the front cover:
1. Insert the tongues on the bottom of the front cover into the module slots.
2. Fasten the two screws holding the front cover to the module.
3. Close the module door. To lock the door, turn the lock 90° clockwise until the screwdriver slot is horizontal.
4. Plug the power cord into the AC outlet.
Opening the cable troughThe cable trough provides access to the external connections. You must open the cable trough when you want to access the Network Interface Card (NIC) connector, serial ports, parallel port, video connector and the mouse and keyboard ports.
To open the cable trough door, grasp the slot in the upper right corner of the door and pull down. The door will swing down.
To close the front cable trough door, swing the door up until the two tongues on the door fit snugly into the case.
Removing the plastic caseBefore you remove the plastic case, you must ensure that the two screws in the cable trough that secure the case to the wall are in place.
To remove the plastic case:
1. Shutdown the NAM. For more information, refer to "Shutting down the NAM" on page 26.
2. Open the cable trough.
3. Remove the NAM power cord from the AC outlet.
4. Remove the front door by unclipping it from its three hinges.
5. Remove the six screws mounted around the front edge of the plastic case.
Note: The screws are deeply recessed in the plastic case.
6. Pull the plastic case towards you and away from the module.
P0885429 Issue 01 Norstar Applications Module Installation and Maintenance Manual

30 Preparing for the upgrade
To replace the plastic enclosure:
1. Place the plastic enclosure on the module and fasten its six screws to the module.
2. Replace the door by clipping it to its hinges.
3. Plug the power cord into the AC outlet.
4. Close the cable trough door.
Norstar Applications Module Installation and Maintenance Manual P0885429 Issue 01

OverviewThe clock/calendar battery is responsible for keeping BIOS information current if the power to the module goes down. The BIOS contains information such as the unique serial number of the Norstar Applications Module (NAM) system. The battery must be replaced with a 3 V, 170 mAh, lithium coin cell such as a Sony CR2032.
Removing and replacing the batteryTo remove the battery:
1. Shutdown the NAM. For more information, refer to "Shutting down the NAM" on page 26.
2. Remove the NAM power cord from the AC outlet.
3. Ground yourself by attaching one end of the grounding strap to your wrist and the other end to a grounded metal surface.
4. Remove the front cover. Refer to "Accessing the inside of the NAM" on page 27.
5. Using your finger, gently lift the metal clamp that is holding the battery in the socket. The socket is located on the SBC.
6. For the location of the battery, refer to "Removing the battery" on page 32.
7. If the battery doesn’t immediately fall out of the socket, gently wiggle the SBC. This will cause the battery to drop out of the socket into your hand.
Installing the clock/calendar battery 5
WARNINGIf you do not replace the battery with a 3 V, 170 mAh, lithium coin cell battery, there is a danger of explosion.
CAUTIONDo not use any type of tool to remove the battery.
P0885429 Issue 01 Norstar Applications Module Installation and Maintenance Manual
32 Installing the clock/calendar battery
Figure 12 Removing the battery
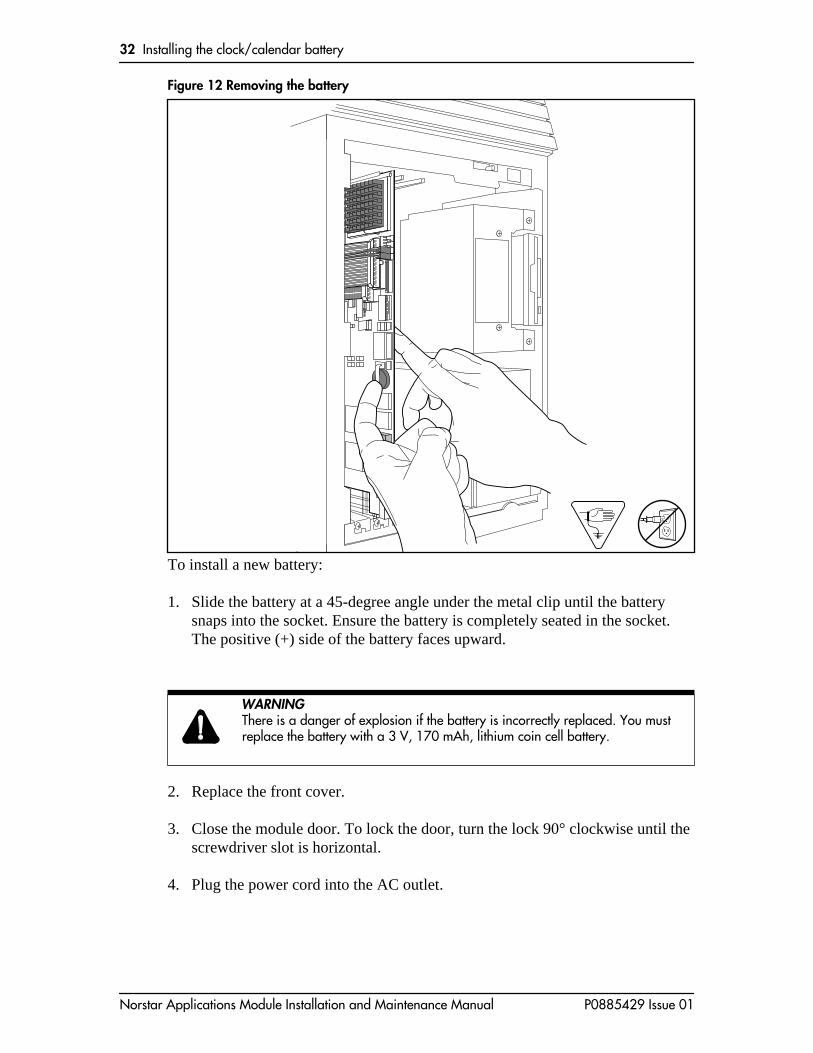
To install a new battery:
1. Slide the battery at a 45-degree angle under the metal clip until the battery snaps into the socket. Ensure the battery is completely seated in the socket. The positive (+) side of the battery faces upward.
2. Replace the front cover.
3. Close the module door. To lock the door, turn the lock 90° clockwise until the screwdriver slot is horizontal.
4. Plug the power cord into the AC outlet.
WARNINGThere is a danger of explosion if the battery is incorrectly replaced. You must replace the battery with a 3 V, 170 mAh, lithium coin cell battery.
Norstar Applications Module Installation and Maintenance Manual P0885429 Issue 01
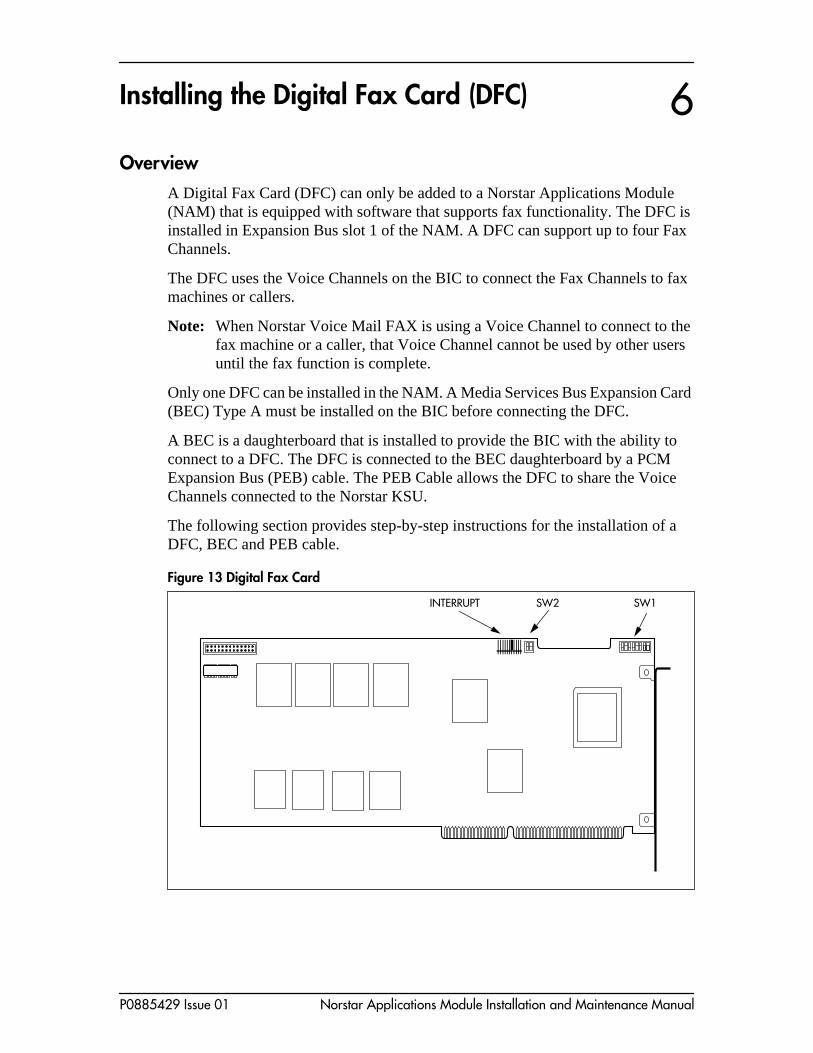
OverviewA Digital Fax Card (DFC) can only be added to a Norstar Applications Module (NAM) that is equipped with software that supports fax functionality. The DFC is installed in Expansion Bus slot 1 of the NAM. A DFC can support up to four Fax Channels.
The DFC uses the Voice Channels on the BIC to connect the Fax Channels to fax machines or callers.
Note: When Norstar Voice Mail FAX is using a Voice Channel to connect to the fax machine or a caller, that Voice Channel cannot be used by other users until the fax function is complete.
Only one DFC can be installed in the NAM. A Media Services Bus Expansion Card (BEC) Type A must be installed on the BIC before connecting the DFC.
A BEC is a daughterboard that is installed to provide the BIC with the ability to connect to a DFC. The DFC is connected to the BEC daughterboard by a PCM Expansion Bus (PEB) cable. The PEB Cable allows the DFC to share the Voice Channels connected to the Norstar KSU.
The following section provides step-by-step instructions for the installation of a DFC, BEC and PEB cable.
Figure 13 Digital Fax Card
Installing the Digital Fax Card (DFC) 6
INTERRUPT SW2 SW1
P0885429 Issue 01 Norstar Applications Module Installation and Maintenance Manual

34 Installing the Digital Fax Card (DFC)
PrecautionsBefore installing or upgrading a DFC, you MUST take the following precautions:
• Unplug the NAM power cord. The NAM power supply contains high voltage. If you do not unplug the power cord you may severely injure yourself. Also, if cards are installed or removed from the NAM before the power cord is unplugged, the cards and/or the NAM may be damaged.
• Wear a ground strap. Static electricity can damage the components on the cards and the NAM. Always wear a properly grounded antistatic strap while handling the DFC, BIC, BEC or any other component of the NAM.
Installing the DFC
1. Shutdown the NAM. For more information, refer to "Shutting down the NAM" on page 26.
2. Remove the NAM power cord from the AC outlet.
3. Open the front cover of the NAM. Refer to "Accessing the inside of the NAM" on page 27.
4. Ground yourself by attaching one end of the grounding strap to your wrist and the other end to a grounded metal surface.
5. Locate slot 1 on the expansion bus. Remove the slot cover screw and the metal slot cover from the slot.
Norstar Applications Module Installation and Maintenance Manual P0885429 Issue 01

Installing the Digital Fax Card (DFC) 35
Figure 14 Locating the expansion bus slots
6. Switch SW1 should be set according to the following table:
7. Switch SW2 should be set according to the following table:
8. Ensure there is a jumper on position 10 of the INTERRUPT.
Note: The settings are the default values and should be set properly when the board is received. Refer to Figure 13 on page 33 for the location of the jumper posts SW 1 and switch SW2.
9. Carefully hold the DFC along the top. Insert the card by aligning it between the groove on the top of theNAM and the slot opening at the bottom of the NAM.
Position 8 7 6 5 4 3 2 1
State off on off off on on on on
Position 2 1
State on on
DFC
P0885429 Issue 01 Norstar Applications Module Installation and Maintenance Manual

36 Installing the Digital Fax Card (DFC)
10. Push the DFC straight in until it is snugly in place. Ensure the edge connector is firmly inserted into the backplane socket.
Figure 15 Inserting the DFC
11. Fasten the slot cover screw in the DFC slot cover.
12. Proceed to step 1 of Installing the Media Services Bus Expansion Card (BEC) on the BIC.
Norstar Applications Module Installation and Maintenance Manual P0885429 Issue 01
Installing the Digital Fax Card (DFC) 37
Installing the Media Services Bus Expansion Card (BEC) on the BICA Media Services Bus Expansion Card (BEC) Type A is a daughterboard that is installed on the BIC provides the BIC with the ability to connect to a Digital Fax Card (DFC). The DFC allows the NAM fax capability. The DFC is connected to the BEC daughterboard by a PCM Expansion Bus (PEB) cable. The PEB Cable allows the DFC to share the Voice Channels connected to the Norstar KSU.
Before you begin the installation, you must have #2 Phillips screwdriver.
To install the BEC:
1. Shutdown the module. For more information, refer to "Shutting down the NAM" on page 26.
2. Remove the NAM power cord from the AC outlet.
3. Ground yourself by attaching one end of the grounding strap to your wrist and the other end to a grounded metal surface.
4. Remove the NAM front cover. Refer to "Removing the front cover" on page 28.
5. Remove the BIC from the NAM. Refer to "Removing the BIC" on page 46.
6. Place the BIC on a flat surface, with the components facing up. Refer to Figure 17 on page 38.
7. Unpack the BEC from the shipping container. Make sure you the BEC is not damaged.
8. Unpack the small plastic bag from the shipping container. Make sure you have two screws and two jumpers.
9. Locate JP1 and JP2 on the BEC. JP1 and JP2 are located next to the PEB connector.
10. Remove the two jumpers from the small plastic bag. Install the two jumpers in an “open” position on the bottom pin of JP1 and JP2. For the jumper to be in the “open” position, the outside half of each jumper does not cover a pin. Refer to Figure 16 for the jumper positions.
CautionFailure to place the BIC on a flat surface may result in serious damage to the BIC. While the BIC is out of the NAM, be careful not to slide or catch the back of the BIC, this may cause damage to the pins on the back of the board.
P0885429 Issue 01 Norstar Applications Module Installation and Maintenance Manual

38 Installing the Digital Fax Card (DFC)
Figure 16 BEC jumper position
11. Unpack the BEC daughterboard from the shipping container and antistatic bag. The BIC is equipped with two posts at the bottom of the board for connection of the BEC daughterboard. Handle the BEC daughterboard by its edges at all times. Do not touch any card components. Make sure you have the two screws that came with the BEC daughterboard
Figure 17 BIC connection points
12. Lightly press the BEC daughterboard down onto the female BEC daughterboard connectors on the BIC. The BIC connection screw hole posts should be flush with the BEC daughterboard screw holes. For the location of the BIC and BEC daughterboard connection points, refer to Figure 17.
13. Before pressing the BEC daughterboard completely down, ensure the male BEC daughterboard connectors line up with the female BEC daughterboard connection points on the BIC.
14. Fasten the BEC daughterboard to the BIC connection screw hole posts using the two screws provided. For the location of the BIC and BEC daughterboard connection points, refer to Figure 17 on page 38.
15. Insert the BIC back into the NAM. Refer to "Re-installing the BIC" on page 46.
16. Replace the front cover.
17. Plug the power cord into the AC outlet.
Jumper Jumper
JP1
JP2
Female BEC daughterboard connection points
Connection post screw hole posts PEC Slots (4)
Fibre connectors
Norstar Applications Module Installation and Maintenance Manual P0885429 Issue 01

Installing the Digital Fax Card (DFC) 39
Connecting the DFC to the BIC with the PEB CableThere are no fiber connections to the DFC. The DFC uses the Voice Channels on the BIC to connect the fax ports to fax machines or callers.
Only one DFC can be installed in the NAM. The DFC connects to the BEC daughterboard attached to the BIC through the PCM Expansion Bus (PEB) cable.The PEB cable connects the DFC to the BIC to share the Channels connected to the Norstar KSU.
Note: The BIC must have a BEC daughterboard installed before it can be connected to the DFC. For instructions on installing the BEC daughterboard, refer to "Installing the Media Services Bus Expansion Card (BEC) on the BIC" on page 37.
Figure 18 on page 39 shows an example of how the PEB cable is installed. The DFC is at the left end of the PEB “chain” in slot 1 and the BIC is at the other end of the chain in slot 4. The three extra connectors on the PEB cable remain empty.
You must use the PEB cable that is provided in the BEC shipping container. The PEB cable is pre-folded for correct installation.
Figure 18 Connecting the BIC to the DFC
PEB Cable
DFC connector
BIC connector locatedon the BEC daughterboard
P0885429 Issue 01 Norstar Applications Module Installation and Maintenance Manual
40 Installing the Digital Fax Card (DFC)
To connect the BIC to the DFC with the PEB cable:
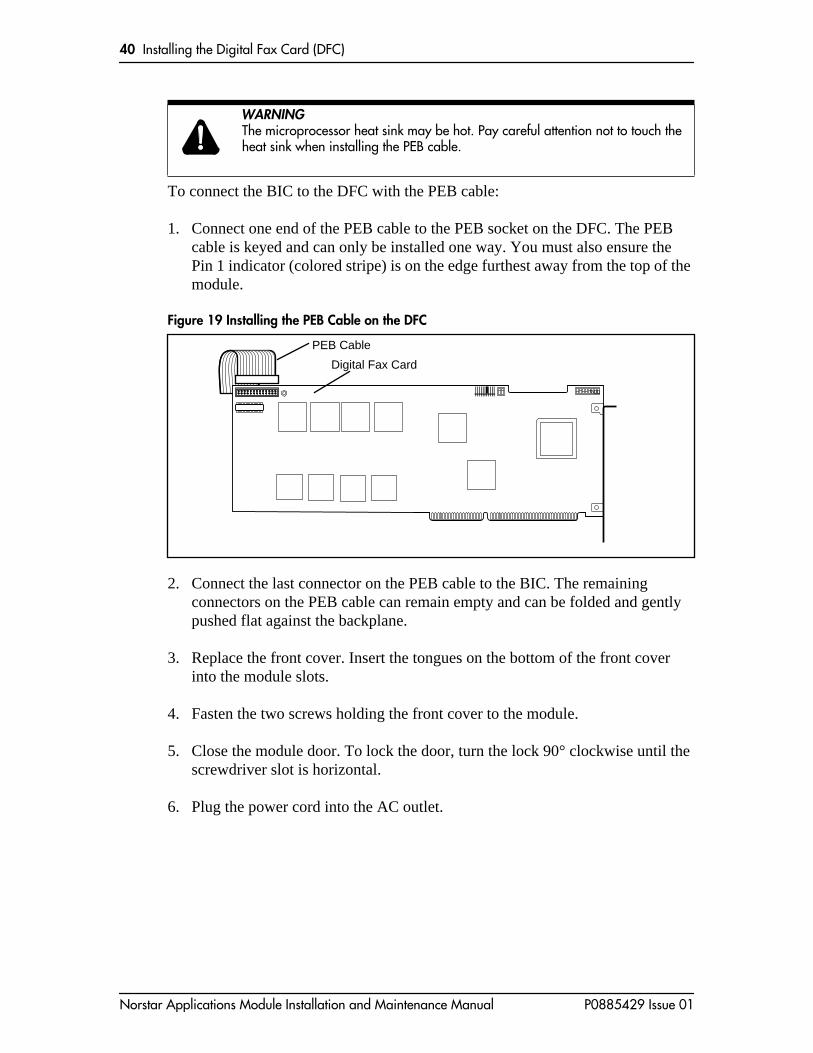
1. Connect one end of the PEB cable to the PEB socket on the DFC. The PEB cable is keyed and can only be installed one way. You must also ensure the Pin 1 indicator (colored stripe) is on the edge furthest away from the top of the module.
Figure 19 Installing the PEB Cable on the DFC
2. Connect the last connector on the PEB cable to the BIC. The remaining connectors on the PEB cable can remain empty and can be folded and gently pushed flat against the backplane.
3. Replace the front cover. Insert the tongues on the bottom of the front cover into the module slots.
4. Fasten the two screws holding the front cover to the module.
5. Close the module door. To lock the door, turn the lock 90° clockwise until the screwdriver slot is horizontal.
6. Plug the power cord into the AC outlet.
WARNINGThe microprocessor heat sink may be hot. Pay careful attention not to touch the heat sink when installing the PEB cable.
Digital Fax Card
PEB Cable
Norstar Applications Module Installation and Maintenance Manual P0885429 Issue 01
Installing the Digital Fax Card (DFC) 41
Removing fax functionality from the SystemThese steps are to be used only if you are removing the DFC and fax functionality from a NAM that is equipped with Norstar Voice Mail. If you are replacing the DFC, refer to "Installing the DFC" on page 34.
To remove fax functionality from the NAM:
1. Shutdown the module. For more information, refer to "Shutting down the NAM" on page 26.
2. Remove the NAM power cord from the AC outlet.
3. Ground yourself by attaching one end of the grounding strap to your wrist and the other end to a grounded metal surface.
4. Remove the NAM front cover. Refer to "Removing the front cover" on page 28.
5. Disconnect the PEB Cable from the BEC.
6. Remove the BIC from the NAM. Refer to "Removing the BIC" on page 46.
7. Place the BIC on a flat surface, with the components facing up. Refer to Figure 17 on page 38.
8. Remove the screws holding the BEC daughterboard to the BIC. For the location of the BIC and BEC daughterboard connection points, refer to Figure 17 on page 38.
9. Lightly pull the BEC daughterboard off of the female BEC daughterboard connectors located on the BIC.
10. Locate the DFC in slot 1.
11. Remove the slot cover screw.
12. Disconnect the PEB Cable from the DFC.
13. Carefully hold the DFC with both hands along the top. Lift the DFC straight up and out from the module. Sometimes the DFC is tightly seated and hard to remove. You may need to wiggle it out with a slight rocking motion.
CautionFailure to place the BIC on a flat surface may result in serious damage to the BIC. While the BIC is out of the NAM, be careful not to slide or catch the back of the BIC, this may cause damage to the pins on the back of the board.
P0885429 Issue 01 Norstar Applications Module Installation and Maintenance Manual

42 Installing the Digital Fax Card (DFC)
14. Close the module door. To lock the door, turn the lock 90° clockwise until the screwdriver slot is horizontal.
15. Plug the power cord into the AC outlet.
Norstar Applications Module Installation and Maintenance Manual P0885429 Issue 01
s
OverviewEach Norstar Applications Module (NAM) is equipped with a Media Services Base Interface Card (BIC) and a specific number of Voice Channels that can be expanded as needed.
Increasing the number of Voice ChannelsOn the BIC you can have a maximum 32 Voice Channels. If you want to add more than eight Voice Channels you must add a Media Services Processor Expansion Card (PEC) Type A to the BIC. The PEC allows the addition of more Voice Channels. For example, a BIC (without any PECs) can have a maximum of 8 Voice Channels, a BIC with one PEC can have a maximum of 16 Voice Channels, a BIC with two PECs can have a maximum of 24 Voice Channels and a BIC with 3 PECs can have a maximum of 32 Voice Channels.
Table 2 Maximum Voice Channels
This document does not provide instructions for enabling Voice Channels. Voice Channels are enabled by application-specific Security Key Codes. For more information about enabling Voice Channels, refer to the upgrade documentation that came with the application(s) installed on the NAM.
For information on adding a PEC card to the BIC, refer to "Installing a PEC in the NAM" on page 44.
Installing and upgrading the Media Services Base Interface Card (BIC)
7
BIC with no PECs BIC with 1 PEC BIC with 2 PECs BIC with 3 PECs
8 Voice Channels maximum
16 Voice Channels maximum
24 Voice Channels maximum
32 Voice Channels maximum
P0885429 Issue 01 Norstar Applications Module Installation and Maintenance Manual

44 Installing and upgrading the Media Services Base Interface Card (BIC)
Installing a PEC in the NAM
1. Shutdown the NAM. For more information, refer to "Shutting down the NAM" on page 26.
2. Remove the NAM power cord from the AC outlet.
3. Ground yourself by attaching one end of the grounding strap to your wrist and the other end to a grounded metal surface.
4. Remove theNAM front cover. Refer to "Removing the front cover" on page 28.
5. Locate the appropriate PEC slot on the BIC. The first PEC is installed in PEC slot 1. The second PEC is installed in PEC slot 2. The third PEC is installed in PEC slot 3. For PEC slot locations on the BIC, refer to Figure 20 on page 44.
Figure 20 PEC slot assignment
BIC
PEC slots 3 & 4
PEC slots1 & 2
Norstar Applications Module Installation and Maintenance Manual P0885429 Issue 01

Installing and upgrading the Media Services Base Interface Card (BIC) 45
6. Gently slide the PEC into the PEC slot on the BIC. Ensure the PEC snaps into place. The PEC is keyed and cannot be installed incorrectly. Do not force the PEC into place.
Figure 21 Installing a PEC on the BIC
7. Close the module door. To lock the door, turn the lock 90° clockwise until the screwdriver slot is horizontal.
8. Plug the power cord into the AC outlet.
BIC
PEC
PEC Slots (4)
P0885429 Issue 01 Norstar Applications Module Installation and Maintenance Manual
46 Installing and upgrading the Media Services Base Interface Card (BIC)
Removing the BICThe BIC is removed when a failure is suspected or when a Media Services Bus Expansion Card (BEC) is being added to the BIC. The BEC is installed along with a Digital Fax Card (DFC) to provide the NAM fax capability. For more information on the BEC, refer to "Installing the Media Services Bus Expansion Card (BEC) on the BIC" on page 37.
To remove the BIC:
1. Shutdown the NAM. For more information, refer to "Shutting down the NAM" on page 26.
2. Remove the NAM power cord from the AC outlet.
3. Ground yourself by attaching one end of the grounding strap to your wrist and the other end to a grounded metal surface.
4. Remove the front cover. Refer to "Removing the front cover" on page 28.
5. Locate the BIC in slot 4 and disconnect the fiber cable.
6. Remove the slot cover screw.
7. Use both hands to carefully hold the BIC along the top. Lift the BIC straight up and out from the module. Sometimes the BIC is tightly seated and difficult to remove. You may need to wiggle it out with a slight rocking motion.
Re-installing the BIC Before you begin to install the BIC, ensure you have an antistatic ground strap.
To re-install the BIC:
1. Ground yourself by attaching one end of the grounding strap to your wrist and the other end to a grounded metal surface.
2. Unpack the BIC from the shipping container and antistatic bag. Inspect for damage. Handle the board by its edges at all times. Do not touch any card components.
Norstar Applications Module Installation and Maintenance Manual P0885429 Issue 01

Installing and upgrading the Media Services Base Interface Card (BIC) 47
3. Locate expansion slot 4. For more information about the different card slots, refer to Figure 1 on page 5. Remove the slot cover screw and the metal slot cover.
Note: When replacing the BIC you must install any PECs or the BEC if it was installed on the original BIC. For instruction on installing a BEC, refer to "Installing the Media Services Bus Expansion Card (BEC) on the BIC" on page 37. For information on installing a PEC, refer to "Installing a PEC in the NAM" on page 44.
4. Carefully hold the BIC along the top. Insert the card by aligning it between the metal groove on one side and the slot opening on the other side.
Figure 22 Installing the BIC
5. Push the BIC straight back until it fits snugly in place. Ensure the edge connector is firmly inserted into the socket.
6. Fasten the slot cover screw in the BIC slot cover.
7. Replace the front cover.
8. Plug the power cord into the AC outlet.
Slot 3BIC
P0885429 Issue 01 Norstar Applications Module Installation and Maintenance Manual

48 Installing and upgrading the Media Services Base Interface Card (BIC)
Norstar Applications Module Installation and Maintenance Manual P0885429 Issue 01

OverviewWhen you are replacing the floppy disk drive, you must remove the front cover and the plastic case enclosing the Norstar Applications Module (NAM). The screws holding the floppy disk drive in place are only accessible from the outside edge of the module.
Installing a new floppy disk driveTo remove the floppy disk drive:
1. Shutdown the module. For more information, refer to "Shutting down the NAM" on page 26.
2. Remove the NAM power cord from the AC outlet.
3. Remove the hard disk drive mounting bracket. For more information refer to "Removing the hard disk drive" on page 52.
4. Remove the front cover and plastic case. For more information about removing the front cover and plastic case, refer to "Accessing the inside of the NAM" on page 27.
5. Ground yourself by attaching one end of the grounding strap to your wrist and the other end to a grounded metal surface.
6. Loosen, but do not remove the two screws that fasten the floppy disk drive to the module wall. Slowly lift the floppy drive up and away from the module wall.
7. Disconnect the power supply wiring and ribbon cable from the floppy disk drive.
Installing a new floppy disk drive 8
P0885429 Issue 01 Norstar Applications Module Installation and Maintenance Manual

50 Installing a new floppy disk drive
Figure 23 Removing the floppy disk drive
To install a new floppy disk drive:
1. Connect the power supply wiring and ribbon cable to the floppy disk drive.
2. Slide the floppy disk drive with its two screws still attached into the two mounting slots in the module wall.
3. Fasten the screws.
4. Replace the front cover and plastic case.
5. Plug the power cord into the AC outlet.
Norstar Applications Module Installation and Maintenance Manual P0885429 Issue 01

OverviewThe Norstar Applications Module (NAM) includes one factory installed hard disk drive. This hard disk drive can be replaced if a problem exists.
When you replace a hard disk, you must backup and restore the NAM capabilities file.
Table 3 Hard disk drive summary
*Approximate - the amount of message storage time depends on the applications installed on the NAM hard disk drive.
Backing up the NAM capabilities fileYou must back up the capabilities file SEKUR. The SEKUR file contains all upgrade and capability information about your system, including the number of voice channels and any upgrades to your system. The SEKUR file must be restored if a hard disk failure occurs.
If this file is lost and your hard disk drive fails, all upgrades made to your system will be lost.
Note: Before you begin, ensure you have a blank high density formatted 1.44 MB 3.5" floppy disk. Label the disk SEKUR/Capabilities File.
To back up the NAM capabilities file:
Installing and upgrading the hard disk drive
9
Hard Disk Drive Hours of message storage* (minimum)
Primary 100
Secondary 130
1. Press ƒ ·⁄fi .
2. Enter the ACCESS password.
Note: The default password is ACCESS2 (2223772).
3. Press ADMIN .
4. Press NEXT until the display shows E. Bckp/Rstr.
5. Press SHOW .
Password:∫∫∫∫∫∫∫∫ ∫∫RETRY
ACCESS∫ServerBACK∫∫NEXT∫
A.∫Prt∫queue∫mgrQUIT∫∫ ∫∫SHOW
E.∫Bckp/RstrQUIT∫∫NEXT∫∫
P0885429 Issue 01 Norstar Applications Module Installation and Maintenance Manual

52 Installing and upgrading the hard disk drive
Once you have backed up theNAM capabilities file, make sure you store the floppy disk in a safe place.
Removing the hard disk drive
1. Shutdown the NAM. For more information, refer to "Shutting down the NAM" on page 26.
2. Remove the NAM power cord from the AC outlet.
3. Ground yourself by attaching one end of the grounding strap to your wrist and the other end to a grounded metal surface.
4. Remove the front cover. Refer to "Accessing the inside of the NAM" on page 27.
5. The hard disk drive(s) are held by a bracket attached to the module wall. Remove the two screws located on the right hand side on the top and bottom of the bracket. Gently pull the bracket away the module wall.
6. Disconnect the power supply wiring and ribbon cable from the hard disk drive. If another hard disk drive is installed, its wiring and cabling must also be disconnected.
6. Press BCKP .
7. Insert a formatted floppy disk and press OK .
8. Wait until the backup is complete.
9. Press OK .Press ® to end this session.
CAUTIONDo not use an electric screwdriver near the hard disk drive. Information on the disk could be lost. Refer to Special tools earlier in this section for equipment recommendations.
CAUTIONEnsure the hard disk drive bracket does not fall onto the NAM components.
Backup∫&∫RestoreQUIT∫∫ ∫∫RSTR
Insert∫floppyQUIT∫∫∫∫∫∫∫∫∫∫
Backup∫complete∫∫∫∫∫∫∫∫∫∫∫∫∫∫
Norstar Applications Module Installation and Maintenance Manual P0885429 Issue 01

Installing and upgrading the hard disk drive 53
Figure 24 Removing the hard disk drive mounting bracket
7. Lift the bracket out of the module.
8. Remove the four screws that fasten the hard disk drive to the bracket. Two screws are located on each side of the hard disk drive.
9. Pull the hard disk drive out from the bracket.
Figure 25 Removing the hard disk drive from bracket
P0885429 Issue 01 Norstar Applications Module Installation and Maintenance Manual

54 Installing and upgrading the hard disk drive
If you are returning the hard disk drive to a Nortel repair facility, package it carefully in the box that the replacement disk drive came in. If you do not have the original box, package the drive in another box with plenty of shock-absorbing material.
Installing a new hard disk driveBefore you can install a new hard disk drive, you must remove the hard disk drive bracket from the NAM. When you are replacing the hard disk drive, you must also remove the existing hard disk from the disk drive bracket.
To install a new hard disk drive:
1. Fasten the hard disk drive to the bracket. The hard drive must be positioned with the bottom of the hard disk drive (the side with the exposed electronic connectors) facing into the module. Refer to Figure 1 on page 5 for the location of the hard disk drive.
2. Connect the hard disk drive power supply wiring and ribbon cable. The connector at the end of the ribbon cable is used for the primary hard disk drive.
Note: All connectors are keyed or shaped so they cannot be inserted backwards. If you cannot push a connector in easily, do not force it.
3. Insert the tongues on the bracket into the holes in the module wall.
4. Press the bracket firmly against the module wall so each of the two screw holes line up.
5. Fasten the bracket to the module.
6. Replace the front cover.
7. Plug the power cord into the AC outlet.
CAUTIONShock can damage the hard disk. Do not drop or bump the hard disk drive.
Norstar Applications Module Installation and Maintenance Manual P0885429 Issue 01
Installing and upgrading the hard disk drive 55
Restoring the NAM capabilities fileIf your system fails and a new hard disk drive is installed, the new drive is installed with all the necessary system software. The SEKUR file contains all upgrade and capability information about your system and must be restored if a hard disk failure occurs. If this file is lost and your hard disk drive fails, all upgrades made to your system will be lost.
When you restore the SEKUR file you must make sure you are restoring the most recent backup.
To restore the NAM capabilities file:
1. Press ƒ ·⁄fi .
2. Enter the ACCESS password.
Note: The default password is ACCESS2 (2223772).
3. Press ADMIN .
4. Press NEXT until the display showsE. Bckp/Rstr .
5. Press SHOW .
6. Press RSTR .
7. Insert the backup disk and press OK .
8. Wait until the restore completes.
9. Press OK .
10. Press to ® end this ACCESS programming session.
Password:∫∫∫∫∫∫∫∫ ∫∫RETRY
ACCESS∫ServerBACK∫∫NEXT∫
A.∫Prt∫queue∫mgrQUIT∫∫ ∫∫SHOW
E.∫Bckp/RstrQUIT∫∫NEXT∫∫
Backup∫&∫RestoreQUIT∫∫BCKP∫∫
Insert∫floppyQUIT∫∫∫∫∫∫∫∫∫∫OK
Restore∫complete∫∫∫∫∫∫∫∫∫∫∫∫∫∫
P0885429 Issue 01 Norstar Applications Module Installation and Maintenance Manual
56 Installing and upgrading the hard disk drive
Adding a secondary hard disk driveBefore you can install a secondary hard disk drive, you must remove the hard disk drive bracket from the NAM. When you are adding a secondary hard disk drive, installation is easier if you first loosen two screws on the first drive. You must make sure you tighten all screws on the first disk drive when installation is complete.
You must back up the capabilities file SEKUR. The SEKUR file contains all upgrade and capability information about your system, including the number of voice channels and any upgrades to your system. The SEKUR file must be restored if a hard disk failure occurs.
If this file is lost and your hard disk drive fails, all upgrades made to your system will be lost. Refer to ’Backing up the NAM capabilities file’ on page 51.
Adding a secondary hard disk drive:
1. Remove the hard disk drive and bracket from the NAM. Refer to the figure "Removing the hard disk drive" on page 52. Do not remove the primary hard disk drive from the bracket
2. Fasten the secondary hard disk drive to the bracket next to the primary hard disk drive. The secondary hard disk drive must be positioned with the bottom of the hard disk drive (the side with the exposed electronic connectors) facing into the module. Use the placement of the primary hard disk drive as an example.
Note: Refer to Figure 24 on page 53 for the location of the hard disk drives.
3. Set the jumper position for the secondary hard disk drive. Refer to the jumper position diagram located on the secondary hard disk drive.
Note: Master refers to the jumper settings for the primary hard disk drive and Slave refers to the jumper settings for the secondary hard disk drive.
4. Connect the hard disk drive power supply wiring and ribbon cable. The connector at the end of the ribbon cable is used for the primary hard disk drive.
Note: All connectors are keyed or shaped so they cannot be inserted backwards. If you cannot push a connector in easily, do not force it.
5. Insert the tongues on the bracket into the holes in the module wall.
6. Press the bracket firmly against the module wall so each of the two screw holes line up.
7. Fasten the bracket to the module.
Norstar Applications Module Installation and Maintenance Manual P0885429 Issue 01

Installing and upgrading the hard disk drive 57
8. Replace the front cover.
9. Plug in the module.
10. You must allocate hard disk drive space to the secondary hard disk drive. For more information on allocating disk space to the secondary hard disk drive, refer to ‘Allocating and restricting hard disk drive space’ on page 91.
CAUTIONAll connectors are keyed or shaped so they cannot be inserted backwards. If you cannot push a connector in easily, do not force it.
P0885429 Issue 01 Norstar Applications Module Installation and Maintenance Manual

58 Installing and upgrading the hard disk drive
Norstar Applications Module Installation and Maintenance Manual P0885429 Issue 01

OverviewThe internal modem is removed when a failure is suspected or confirmed. The internal modem is used for maintenance of the Norstar Applications Module (NAM) only. It cannot be accessed by users.
Removing the internal modemTo remove the internal modem:
1. Shutdown the module. Refer to "Shutting down the NAM" on page 26.
2. Remove the NAM power cord from the AC outlet.
3. Ground yourself by attaching one end of the grounding strap to your wrist and the other end to a grounded metal surface.
4. Remove the front cover. Refer to "Removing the front cover" on page 28 for more information on accessing the module.
5. Locate the internal modem card and disconnect the teladapt cord. The internal modem will be located in slot 2.
6. Remove the slot cover screw.
7. Use both hands to carefully hold the internal modem card along the top. Lift the card straight up and out from the module.
Note: Sometimes the internal modem card is tightly seated and hard to remove. You may need to wiggle it out with a slight rocking motion.
Installing a new Internal modem 10
P0885429 Issue 01 Norstar Applications Module Installation and Maintenance Manual
60 Installing a new Internal modem
Installing a new internal modemBefore you begin to install the new internal modem, make sure that you have an antistatic strap to ground yourself with.
To install the internal modem:
1. Unpack the internal modem from the shipping container and antistatic bag. Inspect for damage. Handle the board by its edges at all times. Do not touch any card components.
2. Locate the COM and IRQ jumpers on the internal modem. Hold the internal modem by the metal slot cover with the board facing up. The jumpers will be on the top, lefthand side, closest to the card edge connectors. The jumpers will be positioned across the pins.
3. Depending on the software loaded on your NAM, set the jumpers according to the settings in Table 4. The grey blocks signify where the jumpers are to be placed.
Table 4 Internal modem IRQ and COM settings
4. Locate slot 2.
5. Carefully hold the internal modem card along the top. Insert the card by aligning it between the metal groove on one side and the slot opening on the other side.
6. Gently push the internal modem straight down and back, with the two teladapt jacks facing forward, until it fits snugly in place.
Norstar Voice Mail and Interactive Voice Response
Settings
Automatic Call Distribution (ACD) Settings
COM
1 • •
COM
1 • •
2 • • 2
3 • • 3 • •
4 4 • •
IRQ
3 • •
IRQ
3
4 • • 4 • •
5 5 • •
7 • • 7 • •
Norstar Applications Module Installation and Maintenance Manual P0885429 Issue 01

Installing a new Internal modem 61
Figure 26 Inserting the internal modem
7. Fasten the slot cover screw in the modem slot cover.
8. Replace the front cover.
Slot 2
P0885429 Issue 01 Norstar Applications Module Installation and Maintenance Manual

62 Installing a new Internal modem
Connecting the internal modem to an Analog Terminal Adapter (ATA)Once the new internal modem is installed, you must connect it to the ATA or a Central Office (CO) line.
To connect the internal modem:
1. If you are not using an ATA, connect the CO line to the Line teladapt jack on the internal modem.
2. If you are using an ATA, connect the teladapt cord from the ATA Phone teladapt jack to the Line teladapt jack on the internal modem.
3. Close the cable trough door.
4. Plug the power cord into the AC outlet and wait for the system to boot before attempting to test the modem.
Figure 27 Connecting to the ATA
To KSU port
Modem Line teladapt jackATA Phone teladapt jack
PHO
NE
LINE
ATA Phone teladapt jack
To KSU port
Internal modem teladapt jack
Norstar Applications Module Installation and Maintenance Manual P0885429 Issue 01

OverviewThe Norstar Applications Module (NAM) is equipped with 16 MB of EDO Random Access Memory (RAM). This memory is located in Single In-line Memory Modules (SIMMs) on the SBC. The SIMM is located in memory slot 1. When the NAM is mounted on a wall, the SIMM is on the upper left corner of the SBC. For information about the location of the SIMM slots, refer to Figure 29 on page 65.
Adding memoryYou may want to increase the amount of RAM depending on the applications running on the NAM. You can expand the amount of RAM by adding one 16 MB SIMM to expand to 32 MB or by adding three 16 MB SIMMs to expand to 64 MB. Memory must be paired when using more than the original 16 MB of RAM. Ensure you use the Nortel recommended SIMMs.
Note: Before you begin installing additional memory SIMMs, make sure you ground yourself by attaching one end of the grounding strap to your wrist and the other end to a grounded metal surface.
To add memory:
1. Shutdown the NAM. For more information, refer to "Shutting down the NAM" on page 26.
2. Remove the NAM power cord from the AC outlet.
3. Ground yourself by attaching one end of the grounding strap to your wrist and the other end to a grounded metal surface.
4. Remove the front cover. Refer to "Accessing the inside of the NAM" on page 27.
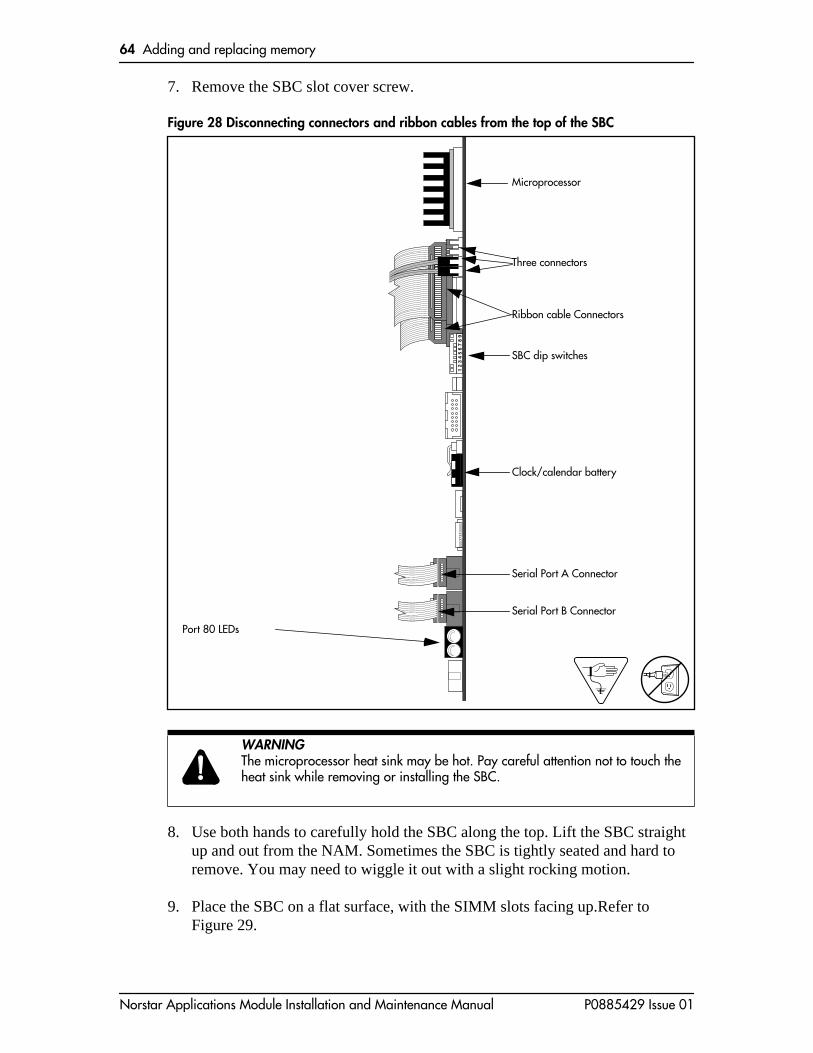
5. Disconnect the Serial Port A and Serial Port B connectors from the SBC. Refer to Figure 28 on page 64.
6. Disconnect the three connectors from the side of the SBC. Disconnect the three ribbon cable connectors near the top of the SBC. Refer to Figure 28.
Adding and replacing memory 11
CAUTIONDo not use an electric screwdriver or any other magnetized tools near the SIMMs. The SIMMs may be disrupted. Refer to "Special parts and equipment" on page 14 for equipment recommendations.
P0885429 Issue 01 Norstar Applications Module Installation and Maintenance Manual
64 Adding and replacing memory
7. Remove the SBC slot cover screw.
Figure 28 Disconnecting connectors and ribbon cables from the top of the SBC
8. Use both hands to carefully hold the SBC along the top. Lift the SBC straight up and out from the NAM. Sometimes the SBC is tightly seated and hard to remove. You may need to wiggle it out with a slight rocking motion.
9. Place the SBC on a flat surface, with the SIMM slots facing up.Refer to Figure 29.
WARNINGThe microprocessor heat sink may be hot. Pay careful attention not to touch the heat sink while removing or installing the SBC.
3) B
oard
Ele
vatio
n 1.
6
Serial Port A Connector
Microprocessor
Three connectors
Ribbon cable Connectors
SBC dip switches
Clock/calendar battery
Serial Port B Connector
Port 80 LEDs
Norstar Applications Module Installation and Maintenance Manual P0885429 Issue 01

Adding and replacing memory 65
10. Slide the SIMM at a 60 degree angle, edge connectors first, into the slot. Refer to Figure 29.
Note: The SIMM cannot be inserted upside-down. The SIMM has a notch which lines up with a post on the SBC SIMM slot. Do not force the SIMM into its slot.
Figure 29 Installing a SIMM on the SBC.
11. Gently push the SIMM up into the clips. The clips should snap onto the sides of the SIMM.
12. Carefully hold the SBC along the top. Insert the card by aligning it between the metal groove on one side and the slot opening on the other side.
13. Push the SBC straight back until it fits snugly in place. Ensure the edge connector is firmly inserted into the backplane socket.
14. Reconnect the Serial Port A and Serial Port B connectors to the SBC. Refer to Figure 28 on page 64 for the location of the connectors.
CautionFailure to place the SBC on a flat surface may result in serious damage to the SBC. While the SBC is out of the NAM, be careful not to slide or catch the back of the SBC, this may cause the modules to become damaged.
P0885429 Issue 01 Norstar Applications Module Installation and Maintenance Manual

66 Adding and replacing memory
15. Reconnect the three connectors from the side of the SBC. Reconnect the three ribbon cable connectors near the top of the SBC Refer to Figure 28 on page 64 for the proper alignment of the connectors.
16. Fasten the slot cover screw.
17. Replace the front cover.
18. Plug the power cord into the AC outlet.
The NAM will reboot and then automatically reboot a second time. The second reboot is necessary for the NAM to recognize the addition of memory.
Removing memorySIMMs are usually only removed when a failure is suspected.
Note: There must be at least one SIMM installed in the NAM in order for the NAM to be functional.
To remove a SIMM:
1. Shutdown the NAM. For more information, refer to "Shutting down the NAM" on page 26.
2. Remove the NAM power cord from the AC outlet.
3. Ground yourself by attaching one end of the grounding strap to your wrist and the other end to a grounded metal surface.
4. Remove module front cover. Refer to "Accessing the inside of the NAM" on page 27.
5. Disconnect the Serial Port A and Serial Port B connectors from the SBC. Refer to Figure 28 on page 64.
6. Disconnect the three connectors from the side of the SBC. Disconnect the three ribbon cable connectors near the top of the SBC. Refer to Figure 28 on page 64.
7. Remove the SBC slot cover screw.
WARNINGThe microprocessor heat sink may be hot. Pay careful attention not to touch the heat sink while removing or installing the SBC.
Norstar Applications Module Installation and Maintenance Manual P0885429 Issue 01

Adding and replacing memory 67
8. Use both hands to carefully hold the SBC along the top. Lift the SBC straight up and out from the module. Sometimes the SBC is tightly seated and hard to remove. You may need to wiggle it out with a slight rocking motion.
9. Place the SBC on a flat surface, with the SIMM slot facing up. Refer to the figure "Removing the SIMM" on page 67.
10. Each SIMM is connected to the SBC by two metal clips on each side of the SIMM's edge connector. Gently push each clip away from the SIMM until it unlatches from the SIMM. The SIMM should fall back slightly when released.
11. Pull the SIMM back from its connector.
12. Remove the SIMM from the slot.
Figure 30 Removing the SIMM
13. Carefully hold the SBC along the top. Insert the card by aligning it between the metal groove on one side and the slot opening on the other side.
CautionFailure to place the SBC on a flat surface may result in serious damage to the SBC. While the SBC is out of the NAM, be careful not to slide or catch the back of the SBC, this may cause the modules on the back of the SBC to become damaged.
P0885429 Issue 01 Norstar Applications Module Installation and Maintenance Manual
68 Adding and replacing memory
14. Push the SBC straight down until it fits snugly in place. Ensure the edge connector is firmly inserted into the backplane socket, refer to Figure 36 on page 79.
15. Reconnect the Serial Port A and Serial Port B connectors to the SBC. Refer to Figure 28 on page 64 for the location of the connectors.
16. Reconnect the three connectors to the side of the SBC. Reconnect the three ribbon cable connectors to the top of the SBC. Refer to Figure 28 on page 64 for the proper alignment of the connectors.
17. Fasten the slot cover screw.
18. Replace the front cover.
19. Plug the power cord into the AC outlet.
Norstar Applications Module Installation and Maintenance Manual P0885429 Issue 01
OverviewA 14 inch color monitor, a keyboard and a mouse can be added to the Norstar Applications Module (NAM) to allow the use of other Nortel approved software applications on the NAM. The monitor comes with a Super Video Graphic Array (SVGA) card.
Installing the SVGA video card on the SBCBefore you begin the installation, you must have a 1/8 in. slot screwdriver
To install the video card:
1. Shutdown the NAM. For more information, refer to "Shutting down the NAM" on page 26.
2. Remove the NAM power cord from the AC outlet.
3. Ground yourself by attaching one end of the grounding strap to your wrist and the other end to a grounded metal surface.
4. Remove the NAM front cover. Refer to "Removing the front cover" on page 28.
5. Remove the SBC from the NAM. Refer to "Removing and replacing the SBC" on page 78.
6. Place the SBC on a flat surface, with the microprocessor heat sink facing up. Refer to "SBC components" on page 70.
Adding and removing a monitor, keyboard and mouse
12
P0885429 Issue 01 Norstar Applications Module Installation and Maintenance Manual
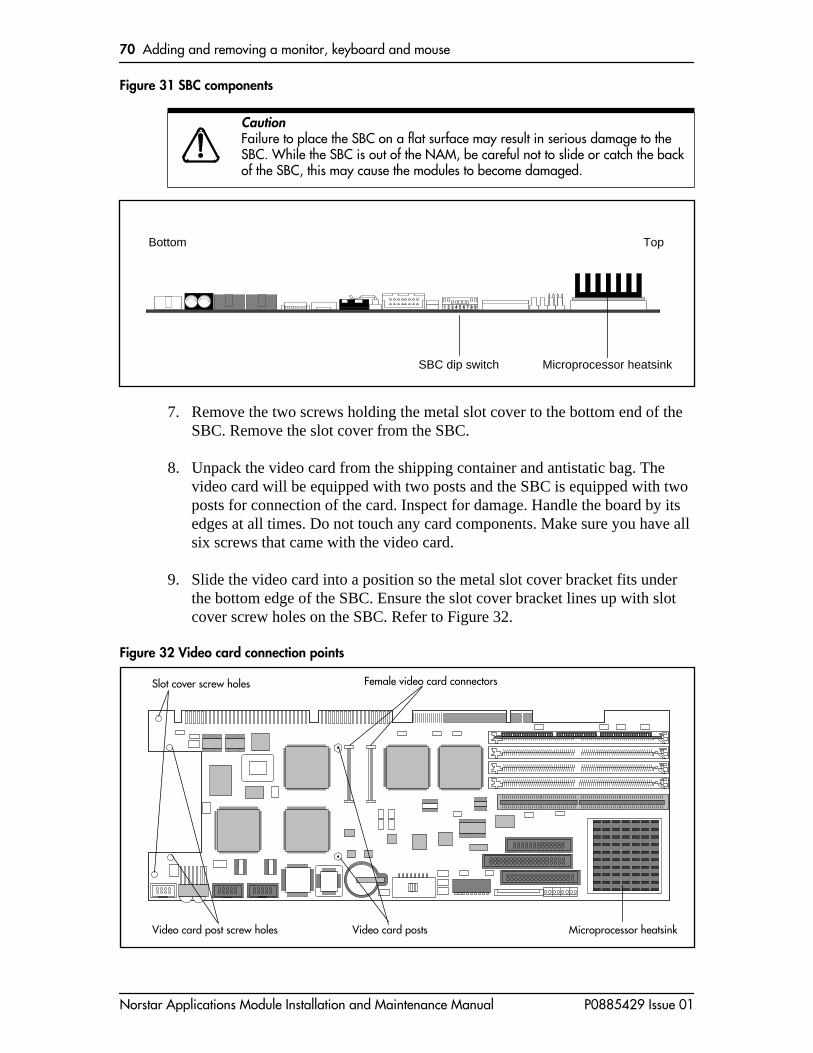
70 Adding and removing a monitor, keyboard and mouse
Figure 31 SBC components
7. Remove the two screws holding the metal slot cover to the bottom end of the SBC. Remove the slot cover from the SBC.
8. Unpack the video card from the shipping container and antistatic bag. The video card will be equipped with two posts and the SBC is equipped with two posts for connection of the card. Inspect for damage. Handle the board by its edges at all times. Do not touch any card components. Make sure you have all six screws that came with the video card.
9. Slide the video card into a position so the metal slot cover bracket fits under the bottom edge of the SBC. Ensure the slot cover bracket lines up with slot cover screw holes on the SBC. Refer to Figure 32.
Figure 32 Video card connection points
CautionFailure to place the SBC on a flat surface may result in serious damage to the SBC. While the SBC is out of the NAM, be careful not to slide or catch the back of the SBC, this may cause the modules to become damaged.
Microprocessor heatsink SBC dip switch
TopBottom
Female video card connectors Slot cover screw holes
Video card post screw holes Microprocessor heatsinkVideo card posts
Norstar Applications Module Installation and Maintenance Manual P0885429 Issue 01

Adding and removing a monitor, keyboard and mouse 71
10. Lightly press the video card down into the video card connectors on the SBC. The video card posts should be flush with the video card post screw holes on the SBC. Also, the SBC video card posts should line up with the screw holes on the video card.
11. Before pressing down on the video card, ensure the male video card connectors line up with the female video connectors on the SBC.
12. Fasten the metal slot cover to the SBC using the two larger screws provided.
13. Using two of the four remaining screws, fasten the video card to the two video card posts on the SBC.
14. Gently turn the SBC over and place it on a flat surface. The microprocessor heat sink should be facing down.
Note: Failure to place the SBC on a flat surface may result in serious damage to the SBC. While the SBC is out of the NAM, be careful not to slide or catch the front or back of the SBC, this may cause the modules on the SBC to become damaged.
15. Locate the remaining video card post screw holes on the back of the SBC. Using the remaining two screws, fasten the SBC to the video card.
16. Using a small screwdriver, you must set the SBC dip switch 8 to off in order to activate the video card. Refer to Table 5 for the SBC dip switch settings.
Table 5 Setting the SBC dip switches for SVGA activation
17. To set a dip switch to off, the switch must be up and point away from the SBC. To set a dip switch to on, the switch must be down towards the SBC.
18. Insert the SBC back into the NAM. Refer to "Removing and replacing the SBC" on page 78.
19. Replace the front cover.
To connect the monitor, keyboard and mouse to the NAM:
CAUTIONDo not apply downward pressure to the SBC while fastening the screws. Pressure on the SBC can cause severe damage to the SBC components
Position 1 2 3 4 5 6 7 8 9
State off off off on on on on off off
P0885429 Issue 01 Norstar Applications Module Installation and Maintenance Manual

72 Adding and removing a monitor, keyboard and mouse
20. Plug the monitor, keyboard and mouse cables into the appropriate ports located on the bottom of the SBC. Refer to Figure 33 for the location of each port.
Figure 33 Bottom view - external points of connection for SBC mounted video card
21. Plug the power cord into the AC outlet.
Enabling the monitor, keyboard and mouseAfter you have added the monitor, keyboard and mouse, you must enable them. This is necessary for the NAM software to recognize the addition of the components.
To enable the monitor, keyboard and mouse:
1. Press ƒ ·⁄fi .
2. Enter the ACCESS password.
Note: The default password is ACCESS2 (2223772).
3. Press ADMIN .
4. Press NEXT until the display shows G.∫Monitor∫Pkg.
5. Press SHOW .
6. Enter the default password ‡°›¤fl‹‹‹‹‹ (SVGANEEDED).
7. Press ADD .
Keyboard
SVGA connector
SBC
Mouse
Password:∫∫∫∫∫∫∫∫ ∫∫RETRY
ACCESS ServerBACK∫∫NEXT∫
A.∫Prt∫queue∫mgrQUIT∫∫ ∫∫SHOW
G.∫Monitor∫PkgQUIT∫∫NEXT∫∫
Password:QUIT∫∫∫∫ ∫∫RETRY
Monitor?QUIT∫ ∫ ∫∫∫REM
Norstar Applications Module Installation and Maintenance Manual P0885429 Issue 01

Adding and removing a monitor, keyboard and mouse 73
Removing the monitor, keyboard and mouseIf you remove the monitor, keyboard, mouse and SVGA card you must first disable the monitor package. This is necessary for the NAM software to recognize the removal of the components.
To remove the monitor, keyboard and mouse:
8. Reboot the system from a Norstar telephone. For more information, refer to "Rebooting the NAM" on page 90.
9. While the system is rebooting the monitor will go blank. Watch the screen during the reboot. When a small white OS/2 box appears in the top left corner, you must immediately press ∫Alt and åF1 at the same time. The flashing white box only appears on the screen for 2 seconds.
Note: If you were unable to press ∫Alt and
åF1 while the white OS/2 box appeared, cycle the power to the NAM and repeat step 9.
10. When the Recovery Choices screen appears on the monitor, press ◊ on the keyboard.
11. The monitor, keyboard and mouse have now been initialized and enabled.
Note: Steps 9 and 10 are part of a first time monitor initialization process. If the monitor, keyboard and mouse are removed from the NAM, only steps 1 through 8 need to be performed to re-enable the monitor package.
1. Press ƒ ·⁄fi .
2. Enter the ACCESS password.
Note: The default password is ACCESS2 (2223772).
3. Press ADMIN .
Reboot∫needed
Password:∫∫∫∫∫∫∫∫ ∫∫RETRY
ACCESS ServerBACK∫∫NEXT∫
P0885429 Issue 01 Norstar Applications Module Installation and Maintenance Manual
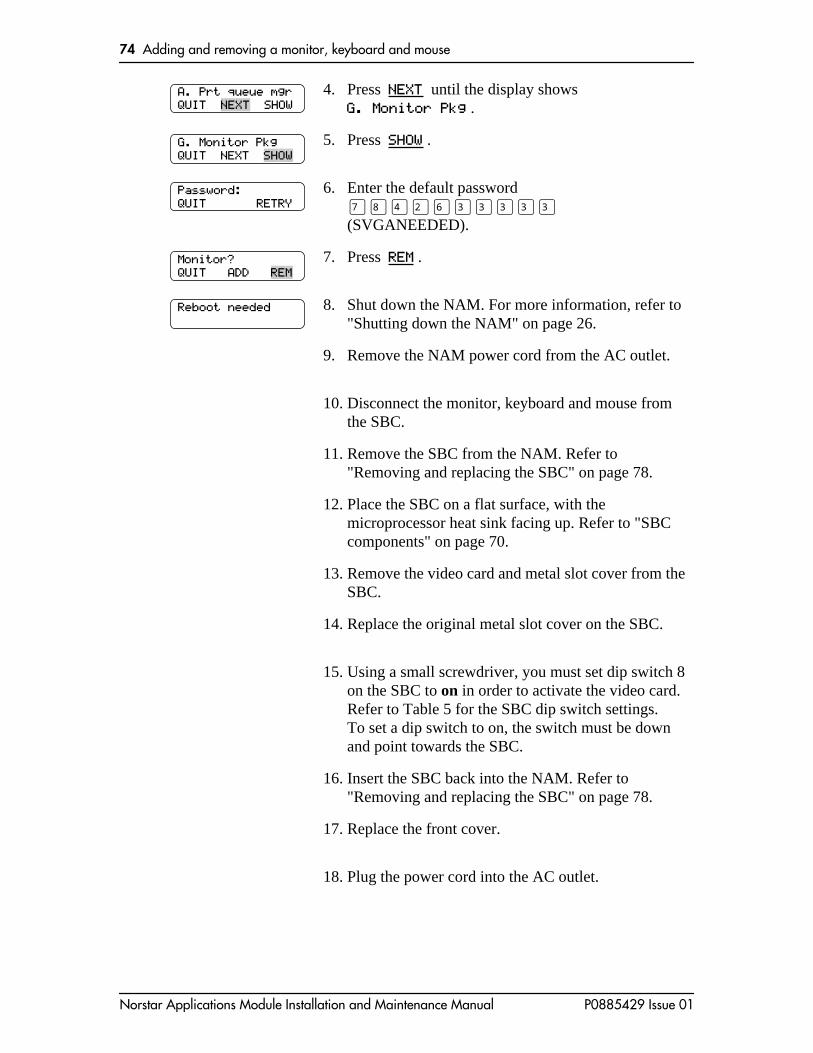
74 Adding and removing a monitor, keyboard and mouse
4. Press NEXT until the display shows G.∫Monitor∫Pkg .
5. Press SHOW .
6. Enter the default password ‡°›¤fl‹‹‹‹‹ (SVGANEEDED).
7. Press REM .
8. Shut down the NAM. For more information, refer to "Shutting down the NAM" on page 26.
9. Remove the NAM power cord from the AC outlet.
10. Disconnect the monitor, keyboard and mouse from the SBC.
11. Remove the SBC from the NAM. Refer to "Removing and replacing the SBC" on page 78.
12. Place the SBC on a flat surface, with the microprocessor heat sink facing up. Refer to "SBC components" on page 70.
13. Remove the video card and metal slot cover from the SBC.
14. Replace the original metal slot cover on the SBC.
15. Using a small screwdriver, you must set dip switch 8 on the SBC to on in order to activate the video card. Refer to Table 5 for the SBC dip switch settings.To set a dip switch to on, the switch must be down and point towards the SBC.
16. Insert the SBC back into the NAM. Refer to "Removing and replacing the SBC" on page 78.
17. Replace the front cover.
18. Plug the power cord into the AC outlet.
A.∫Prt∫queue∫mgrQUIT∫∫ ∫∫SHOW
G.∫Monitor∫PkgQUIT∫∫NEXT∫∫
Password:QUIT∫∫∫∫ ∫∫RETRY
Monitor?QUIT∫ ∫ADD∫∫∫
Reboot∫needed
Norstar Applications Module Installation and Maintenance Manual P0885429 Issue 01

The power supply is set at the factory to operate at 115 volts, but the power supply can be changed to operate at 230 volts for countries where this is the standard. If you are changing the power supply voltage setting to 230 volts, the Norstar Applications Module (NAM) must be unplugged.
To change the power supply setting:
1. Shutdown the NAM. For more information, refer to "Shutting down the NAM" on page 26.
2. Remove the NAM power cord from the AC outlet.
3. Slide the slider switch, mounted on the bottom of the power supply, so that the desired voltage label is shown (115 or 230).
4. Replace the module on its wall mount.
5. Plug the power cord into the AC outlet.
Figure 34 Changing the power supply voltage
Changing the power supply voltage 13
CAUTIONThis unit is set at the factory to use 115 volts AC. Failure to change the power supply voltage setting when using 230 volts AC will damage the unit beyond repair.
Power supply switch
P0885429 Issue 01 Norstar Applications Module Installation and Maintenance Manual

76 Changing the power supply voltage
Norstar Applications Module Installation and Maintenance Manual P0885429 Issue 01

OverviewThe Single Board Computer (SBC) is the main computing device of the Norstar Applications Module (NAM). It runs the operating system and all applications installed on the NAM. The microprocessor, clock/calendar battery and four Single In-Line Memory Modules (SIMM) slots are located on the SBC.
The SBC is removed when a failure is suspected or confirmed.
Figure 35 Components of the SBC
Installing and replacing the Single Board Computer (SBC)
14
3) B
oard
Ele
vatio
n 1.
6
Ribbon cable Connectors
Serial Port A Connector
Microprocessor
Three connectors
SBC dip switches
Clock/calendar battery
Serial Port B Connector
Port 80 LEDs
Keyboard and Mouse Connector
P0885429 Issue 01 Norstar Applications Module Installation and Maintenance Manual

78 Installing and replacing the Single Board Computer (SBC)
Removing and replacing the SBCTo remove and replace the SBC:
1. Shutdown the NAM. For more information, refer to "Shutting down the NAM" on page 26.
2. Remove the NAM power cord from the AC outlet.
3. Ground yourself by attaching one end of the grounding strap to your wrist and the other end to a grounded metal surface.
4. Remove the NAM front cover. Refer to "Accessing the inside of the NAM" on page 27.
5. Locate slot 3 and remove its slot cover screw and metal slot cover.
6. Disconnect the Serial Port A and Serial Port B connectors from the SBC. Refer to Figure 35 on page 77.
7. Disconnect the three connectors from the top of the SBC. Disconnect the three ribbon cable connectors from the side of the SBC. Refer to Refer to Figure 35 on page 77.
8. Use both hands to carefully hold the SBC along the top. Lift the SBC straight up and out from the module. Sometimes the SBC is tightly seated and hard to remove. You may need to wiggle it out with a slight rocking motion.
9. If you are returning the NAM for service, place the SBC in an antistatic bag. Package the SBC with plenty of shock-absorbing, insulating material.
10. Unpack the replacement SBC from the shipping container and antistatic bag. Inspect for damage. Handle the board by its edges at all times. Do not touch any card components.
11. Carefully hold the card along the top only and insert the card into the module by aligning it over the backplane connector.
Norstar Applications Module Installation and Maintenance Manual P0885429 Issue 01

Installing and replacing the Single Board Computer (SBC) 79
Figure 36 Installing the SBC
12. Push the card straight down until it fits snugly in place. Ensure the edge connector is firmly inserted into the backplane connector. Refer to Figure 36.
13. Fasten the slot cover screw.
14. Reconnect the Serial Port A and Serial Port B connectors to the SBC. Refer to Figure 35 on page 77 for the location of the connectors.
15. Reconnect the three connectors to the top side of the SBC. Reconnect the three ribbon cable connectors to the top of the SBC. Refer to Figure 35 on page 77 for the proper alignment of the connectors.
16. Check the dip switch settings to ensure they are in the proper position. Use a small screwdriver to adjust the dip switches. Refer to Table 6 on page 79 and Table 7 on page 80 for the SBC dip switch settings.
17. Table 6 contains the dip switch settings for systems that do not have an SVGA video card installed. Table 7 contains the dip switch settings for systems that have an SVGA video card installed.
Table 6 – SBC dip switch settings for systems without an SVGA video card installed.
Position 1 2 3 4 5 6 7 8 9
State off off off on on on on on off
P0885429 Issue 01 Norstar Applications Module Installation and Maintenance Manual

80 Installing and replacing the Single Board Computer (SBC)
Table 7 – SBC dip switch settings for systems with an SVGA video card installed
Note: To set a dip switch to off, the switch must be up and point away from the SBC. To set a dip switch to on, the switch must be down towards the SBC.
18. Replace the front cover.
19. Plug the power cord into the AC outlet.
Position 1 2 3 4 5 6 7 8 9
State off off off on on on on off off
Norstar Applications Module Installation and Maintenance Manual P0885429 Issue 01
Section IV - ACCESS ServerAdministration
• Using the ACCESS Server Administration software
P0885429 Issue 01 Norstar Applications Module Installation and Maintenance Manual

82 ACCESS Server Administration
Norstar Applications Module Installation and Maintenance Manual P0885429 Issue 01

ACCESS Server Administration software
OverviewThe ACCESS Server software resides on the Norstar Applications Module (NAM). The ACCESS Server Administration software is designed to communicate with the Norstar system and provide support for applications running on the NAM. The ACCESS Server provides services to a group of devices including:
• routing of all voice commands between applications and the Media Service Base Interface Card (BIC)
• provision of special features, such as supporting application installation and shutting down the system
• management of all shared resources of the platform, such as Voice and Fax Channels, that are not managed directly by the operating system
You can use access the ACCESS Server Administration software from any two-line display Norstar telephone connected to your NAM.
The Server Administration software allows you to:
• administer the printer queue
• set the DTMF digit duration length
• view the Alarm and Message log
• share Voice and Fax Channels between applications
• install applications
• view the NAM serial number
• shutdown or reboot the system
• schedule a reboot of the system
• set up hard disk drive restrictions
• renumber Norstar Voice Mail Lines (requires a diskette)
• view the Channel Status, refer to "Checking the Channel Status" on page 99.
15
P0885429 Issue 01 Norstar Applications Module Installation and Maintenance Manual
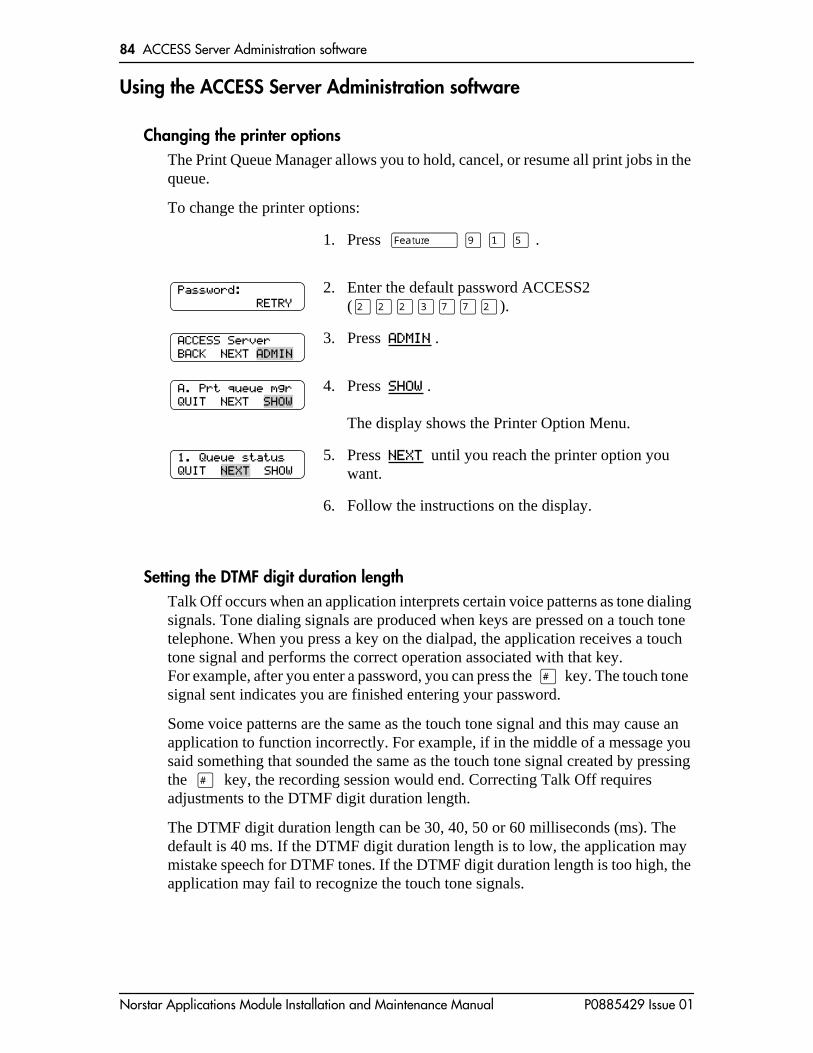
84 ACCESS Server Administration software
Using the ACCESS Server Administration software
Changing the printer optionsThe Print Queue Manager allows you to hold, cancel, or resume all print jobs in the queue.
To change the printer options:
Setting the DTMF digit duration lengthTalk Off occurs when an application interprets certain voice patterns as tone dialing signals. Tone dialing signals are produced when keys are pressed on a touch tone telephone. When you press a key on the dialpad, the application receives a touch tone signal and performs the correct operation associated with that key. For example, after you enter a password, you can press the £ key. The touch tone signal sent indicates you are finished entering your password.
Some voice patterns are the same as the touch tone signal and this may cause an application to function incorrectly. For example, if in the middle of a message you said something that sounded the same as the touch tone signal created by pressing the £ key, the recording session would end. Correcting Talk Off requires adjustments to the DTMF digit duration length.
The DTMF digit duration length can be 30, 40, 50 or 60 milliseconds (ms). The default is 40 ms. If the DTMF digit duration length is to low, the application may mistake speech for DTMF tones. If the DTMF digit duration length is too high, the application may fail to recognize the touch tone signals.
1. Press ƒ · ⁄ fi .
2. Enter the default password ACCESS2 (¤¤¤‹‡‡¤).
3. Press ADMIN .
4. Press SHOW .
The display shows the Printer Option Menu.
5. Press NEXT until you reach the printer option you want.
6. Follow the instructions on the display.
Password:∫∫∫∫∫∫∫∫∫∫∫RETRY
ACCESS∫ServerBACK∫∫NEXT∫
A.∫Prt∫queue∫mgrQUIT∫∫NEXT∫∫
1. Queue statusQUIT∫∫ ∫∫SHOW
Norstar Applications Module Installation and Maintenance Manual P0885429 Issue 01
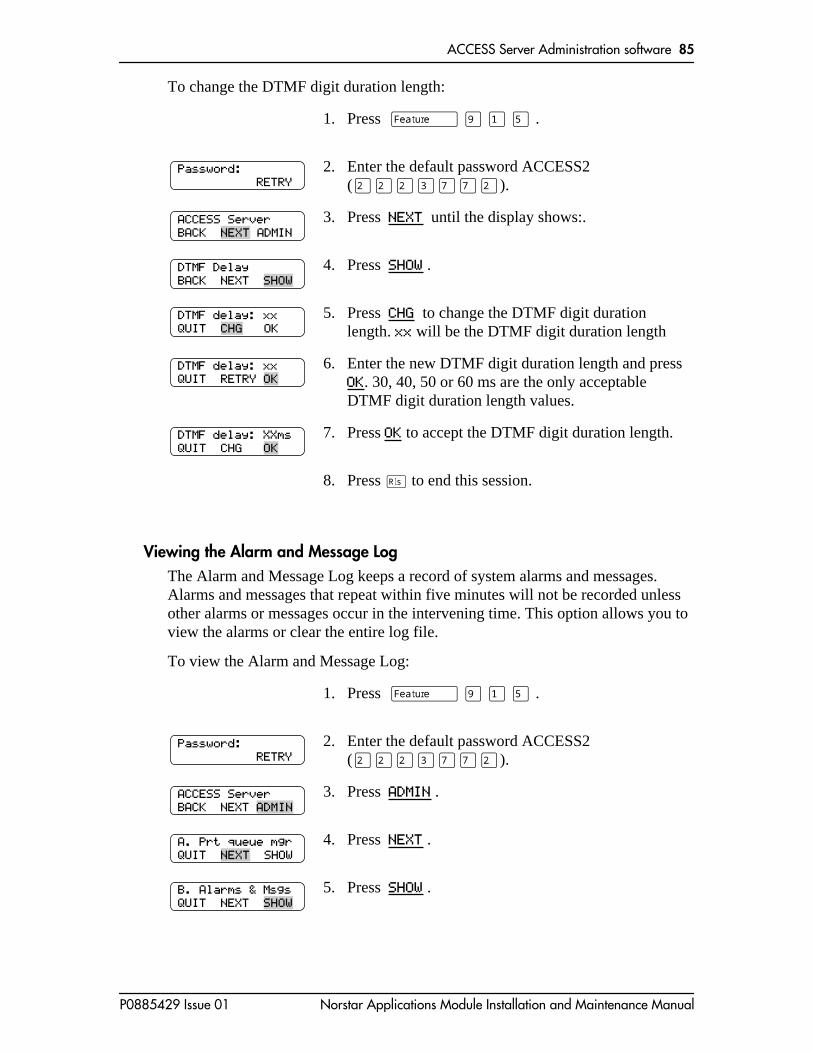
ACCESS Server Administration software 85
To change the DTMF digit duration length:
Viewing the Alarm and Message LogThe Alarm and Message Log keeps a record of system alarms and messages. Alarms and messages that repeat within five minutes will not be recorded unless other alarms or messages occur in the intervening time. This option allows you to view the alarms or clear the entire log file.
To view the Alarm and Message Log:
1. Press ƒ · ⁄ fi .
2. Enter the default password ACCESS2 (¤¤¤‹‡‡¤).
3. Press NEXT until the display shows:.
4. Press SHOW .
5. Press CHG to change the DTMF digit duration length. xx will be the DTMF digit duration length
6. Enter the new DTMF digit duration length and press OK. 30, 40, 50 or 60 ms are the only acceptable DTMF digit duration length values.
7. Press OK to accept the DTMF digit duration length.
8. Press ® to end this session.
1. Press ƒ · ⁄ fi .
2. Enter the default password ACCESS2 (¤¤¤‹‡‡¤).
3. Press ADMIN .
4. Press NEXT .
5. Press SHOW .
Password:∫∫∫∫∫∫∫∫∫∫∫RETRY
ACCESS∫ServerBACK∫∫ ∫ADMIN
DTMF DelayBACK∫∫NEXT∫∫
DTMF delay: xxQUIT∫∫ ∫∫ OK
DTMF delay: xxQUIT ∫RETRY∫
DTMF delay: XXmsQUIT ∫CHG∫
Password:∫∫∫∫∫∫∫∫∫∫∫RETRY
ACCESS∫ServerBACK∫∫NEXT∫
A.∫Prt∫queue∫mgrQUIT∫∫ ∫∫SHOW
B.∫Alarms∫&∫MsgsQUIT∫∫NEXT∫∫
P0885429 Issue 01 Norstar Applications Module Installation and Maintenance Manual
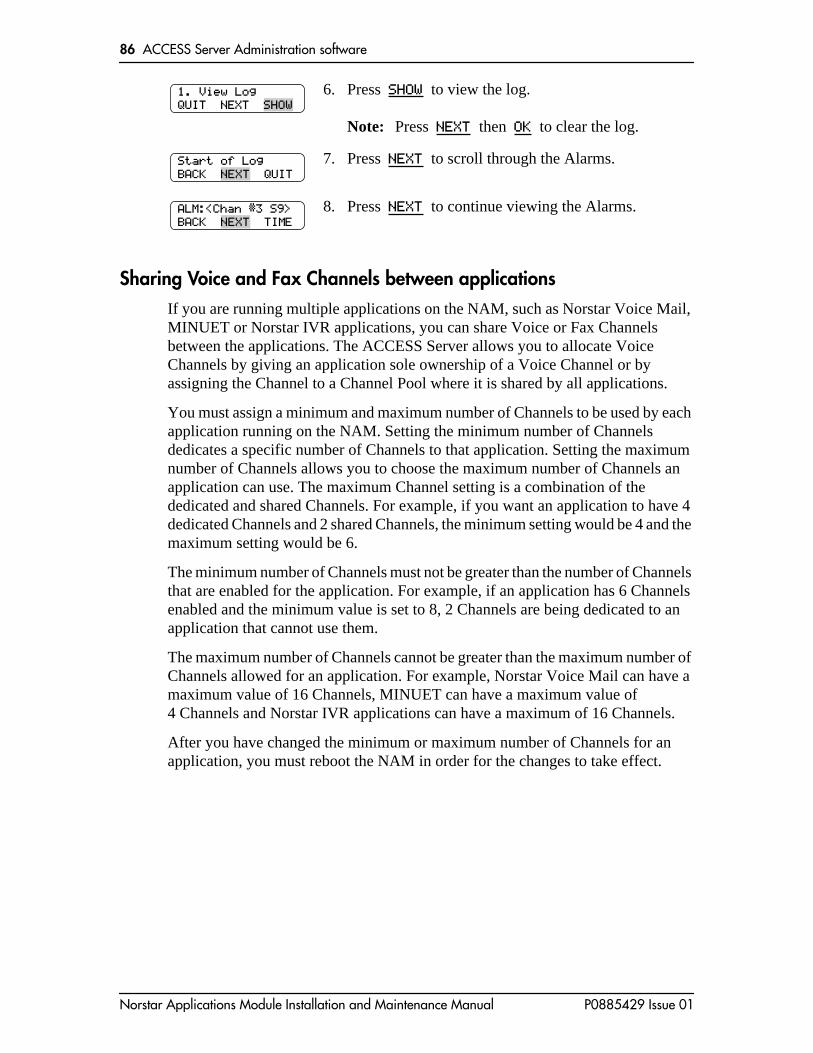
86 ACCESS Server Administration software
Sharing Voice and Fax Channels between applicationsIf you are running multiple applications on the NAM, such as Norstar Voice Mail, MINUET or Norstar IVR applications, you can share Voice or Fax Channels between the applications. The ACCESS Server allows you to allocate Voice Channels by giving an application sole ownership of a Voice Channel or by assigning the Channel to a Channel Pool where it is shared by all applications.
You must assign a minimum and maximum number of Channels to be used by each application running on the NAM. Setting the minimum number of Channels dedicates a specific number of Channels to that application. Setting the maximum number of Channels allows you to choose the maximum number of Channels an application can use. The maximum Channel setting is a combination of the dedicated and shared Channels. For example, if you want an application to have 4 dedicated Channels and 2 shared Channels, the minimum setting would be 4 and the maximum setting would be 6.
The minimum number of Channels must not be greater than the number of Channels that are enabled for the application. For example, if an application has 6 Channels enabled and the minimum value is set to 8, 2 Channels are being dedicated to an application that cannot use them.
The maximum number of Channels cannot be greater than the maximum number of Channels allowed for an application. For example, Norstar Voice Mail can have a maximum value of 16 Channels, MINUET can have a maximum value of 4 Channels and Norstar IVR applications can have a maximum of 16 Channels.
After you have changed the minimum or maximum number of Channels for an application, you must reboot the NAM in order for the changes to take effect.
6. Press SHOW to view the log.
Note: Press NEXT then OK to clear the log.
7. Press NEXT to scroll through the Alarms.
8. Press NEXT to continue viewing the Alarms.
1.∫View∫LogQUIT∫∫NEXT∫∫
Start∫of∫LogBACK∫∫ ∫∫QUIT
ALM:<Chan∫#3∫S9>BACK∫∫ ∫∫TIME
Norstar Applications Module Installation and Maintenance Manual P0885429 Issue 01

ACCESS Server Administration software 87
To set the minimum and maximum number of Channels for an application:
1. Press ƒ ·⁄fi .
2. Enter the default password ACCESS2 (¤¤¤‹‡‡¤).
3. Press ADMIN .
4. Press NEXT until the display shows the Voice and Fax heading.
5. Press SHOW .
6. Press SHOW until the display shows:
7. Press NEXT until the application you want appears.
8. Press SHOW when the application you want appears on the screen.
9. Press SHOW to change the minimum and maximum number of Voice Channels.
Note: Press NEXT and SHOW to change the minimum and maximum number of Fax Channels and follow steps 10 to 18.
10. Press MIN to change the minimum number of Voice Channels dedicated to the application.
Note: To change the maximum number of Voice Channels dedicated to the application, proceed to step 13.
11. Press INC to increase the minimum number of Voice Channels dedicated to the application. Continue pressing INC until you reach the desired number of Voice Channels.
Press DEC to decrease the minimum number of Voice Channels dedicated to the application. Continue pressing DEC until you reach the desired number of Voice Channels
Password:∫∫∫∫∫∫∫∫∫∫∫RETRY
ACCESS∫ServerBACK∫∫NEXT∫
A.∫Prt∫queue∫mgrQUIT∫∫ ∫∫SHOW
C.∫Voice∫&∫FaxQUIT∫∫NEXT∫∫
Choice∫of∫applQUIT∫∫∫∫∫∫∫∫
ACCESS ServerQUIT∫∫ ∫∫SHOW
<Application>QUIT∫∫NEXT∫∫
a. Voice channelQUIT∫∫NEXT∫∫
Voice channelsQUIT∫∫ ∫∫ MAX
Min chans:XDEC∫∫ INC∫∫ OK
P0885429 Issue 01 Norstar Applications Module Installation and Maintenance Manual

88 ACCESS Server Administration software
Installing applicationsThe Install applications option allows you to install other software packages that work in conjunction with the applications already running on the NAM.
To install an application:
12. Press OK when you have reached the desired number of Voice Channels.
13. To change the maximum number of Voice Channels used by the application, press SHOW .
14. Press SHOW .
15. Press MAX to change the maximum number of Voice Channels (dedicated and shared) allocated to the application.
16. Press INC to increase the maximum number of Voice Channels allocated to the application. Continue pressing INC until you reach the desired number of Voice Channels.
Press DEC to decrease the maximum number of Voice Channels allocated to the application. Continue pressing DEC until you reach the desired number of Voice Channels
17. Press OK when you have reached the desired number of Voice Channels.
1. Press ƒ · ⁄ fi .
2. Enter the default password ACCESS2 (¤¤¤‹‡‡¤).
3. Press ADMIN .
4. Press NEXT until the display shows:
5. Press SHOW .
6. Press INSTL .
Min chans:XDEC∫∫ INC∫∫
<Application>QUIT∫∫NEXT∫∫
a. Voice channelQUIT∫∫NEXT∫∫
Voice channelsQUIT∫∫ MIN∫∫
Max chans:XDEC∫∫ INC∫∫ OK
Max chans:XDEC∫∫ INC∫∫
Password:∫∫∫∫∫∫∫∫∫∫∫RETRY
ACCESS∫ServerBACK∫∫NEXT∫
A.∫Prt∫queue∫mgrQUIT∫∫ ∫∫SHOW
H.∫Appl∫InstallQUIT∫∫NEXT∫∫
Insert∫floppyQUIT∫∫∫∫∫∫∫
Norstar Applications Module Installation and Maintenance Manual P0885429 Issue 01

ACCESS Server Administration software 89
Viewing the NAM serial numberThe serial number option allows you to view the serial number of the unit. This number is useful for verification and purchasing software options.
To view the serial number:
Shutting down the NAMThis option allows you to “gently” shutdown the NAM. OS/2 Warp™ requires a controlled shutdown to guarantee the integrity of the file system.
Three shutdown options are available: Graceful, Quick and Immediate. The Graceful option allows an application to terminate all existing calls before shutting down. The Quick option only allows 45 seconds for an application to terminate before shutdown, and the Immediate option only allows 15 seconds.
When you are shutting down the NAM you will usually use the Graceful option. However, if the system is not responding to the command, you can speed up the process by changing the option to a Quick shutdown. After 45 seconds a Quick shutdown is performed.
To shutdown the NAM:
1. Press ƒ · ⁄ fi .
2. Enter the default password ACCESS2 (¤¤¤‹‡‡¤).
3. Press ADMIN .
4. Press NEXT until the display shows:
5. Press SHOW .
6. Press OK .
1. Press ƒ · ⁄ fi .
2. Enter the default password ACCESS2 (¤¤¤‹‡‡¤).
3. Press NEXT .
4. Press SHOW .
Password:∫∫∫∫∫∫∫∫∫∫∫RETRY
ACCESS∫ServerBACK∫∫NEXT∫
A.∫Prt∫queue∫mgrQUIT∫∫ ∫∫SHOW
I. Serial NumberQUIT∫∫NEXT∫∫
S#:∫XXXXXXXXXXX∫∫∫∫∫∫∫∫∫∫∫∫∫
Password:∫∫∫∫∫∫∫∫∫∫∫RETRY
ACCESS∫ServerBACK∫∫ ∫ADMIN
System∫shutdownBACK∫∫NEXT∫∫
P0885429 Issue 01 Norstar Applications Module Installation and Maintenance Manual

90 ACCESS Server Administration software
The NAM issues a series of tones descending in pitch when the shutdown is complete. Wait for the tones before you unplug the NAM.
Rebooting the NAMThis option allows the installer to reboot the system. The Reboot option ensures all applications are terminated before a reboot is performed.
Four reboot options are available: Graceful, Quick, Immediate and Scheduled. The Graceful option allows an application to terminate all existing calls before shutting down and restarting. The Quick option only allows 45 seconds for an application to terminate before the reboot, and the Immediate option allows 15 seconds. For information on setting up a scheduled reboot, refer to ’Scheduling a reboot of the NAM’ on page 91.
When you are rebooting NAM you will usually use the Graceful option. However, if the system is not responding to the command, you can speed up the process by changing the option to a Quick Reboot. After 45 seconds a Quick Reboot is performed.
To reboot the NAM:
5. Press GRACE .
Note: Press NEXT to change the shutdown option to QUICK (Quick) or IMMD (Immediate).
6. Press YES .
Note: Press NO if you want to stop the shutdown.
1. Press ƒ · ⁄ fi .
2. Enter the default password ACCESS2 (¤¤¤‹‡‡¤).
3. Press NEXT until the display shows:
4. Press SHOW .
5. Press GRACE .
Note: Press NEXT to change the shutdown option to QUICK (Quick), IMMED (Immediate) or SCHDL (Scheduled).
Shutdown∫typeQUIT∫∫NEXT∫
Shutdwn∫Graceful∫∫∫∫∫∫∫∫∫∫∫NO
Password:∫∫∫∫∫∫∫∫∫∫∫RETRY
ACCESS∫ServerBACK∫∫ ∫ADMIN
System∫rebootBACK∫∫NEXT∫∫
Reboot∫typeQUIT∫∫NEXT∫
Norstar Applications Module Installation and Maintenance Manual P0885429 Issue 01
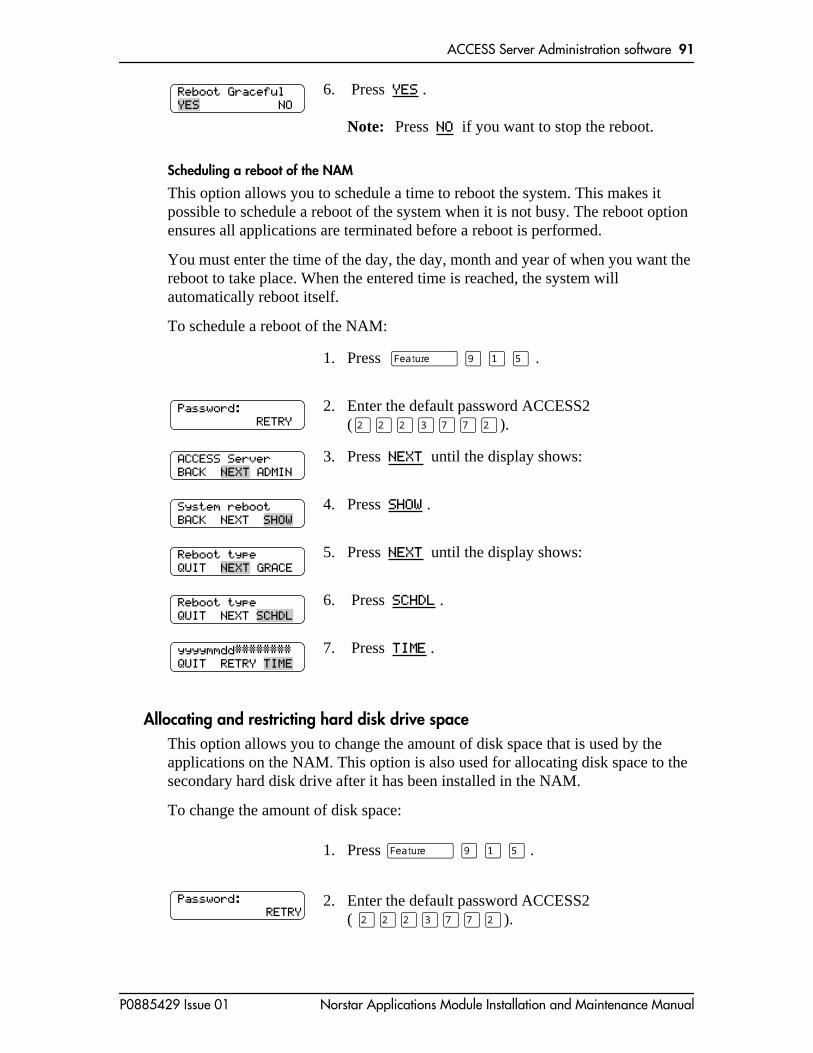
ACCESS Server Administration software 91
Scheduling a reboot of the NAM
This option allows you to schedule a time to reboot the system. This makes it possible to schedule a reboot of the system when it is not busy. The reboot option ensures all applications are terminated before a reboot is performed.
You must enter the time of the day, the day, month and year of when you want the reboot to take place. When the entered time is reached, the system will automatically reboot itself.
To schedule a reboot of the NAM:
Allocating and restricting hard disk drive space This option allows you to change the amount of disk space that is used by the applications on the NAM. This option is also used for allocating disk space to the secondary hard disk drive after it has been installed in the NAM.
To change the amount of disk space:
6. Press YES .
Note: Press NO if you want to stop the reboot.
1. Press ƒ · ⁄ fi .
2. Enter the default password ACCESS2 (¤¤¤‹‡‡¤).
3. Press NEXT until the display shows:
4. Press SHOW .
5. Press NEXT until the display shows:
6. Press SCHDL .
7. Press TIME .
1. Press ƒ · ⁄ fi .
2. Enter the default password ACCESS2 ( ¤¤¤‹‡‡¤).
Reboot∫Graceful∫∫∫∫∫∫∫∫∫∫∫NO
Password:∫∫∫∫∫∫∫∫∫∫∫RETRY
ACCESS∫ServerBACK∫∫ ∫ADMIN
System∫rebootBACK∫∫NEXT∫∫
Reboot∫typeQUIT∫∫ ∫GRACE
Reboot∫typeQUIT∫∫NEXT∫
yyyymmdd########QUIT∫∫RETRY∫
Password: RETRY
P0885429 Issue 01 Norstar Applications Module Installation and Maintenance Manual

92 ACCESS Server Administration software
To allocate disk space to the secondary hard disk drive:.
3. Press ADMIN .
4. Press NEXT until the display shows:
5. Press SHOW .
6. Press CHG .
7. Enter the new restriction size of the hard disk drive and press OK .
8. Press ® to end this programming session
1. Press ƒ · ⁄ fi .
2. Enter the default password ACCESS2 ( ¤¤¤‹‡‡¤).
3. Press ADMIN .
4. Press NEXT until the display shows:
5. Press SHOW .
6. Press NEXT .
7. Enter the new restriction size of 999999 and press OK.
8. Press ® to end this programming session
ACCESS∫ServerBACK∫∫NEXT∫
A. Prt queue mgrQUIT∫∫ ∫∫SHOW
F. DIsk RestictQUIT NEXT
C: Rest:xxxxxxkbNEXT SIZE
C: Rest: QUIT RETRY
C: Rest:xxxxxxkbNEXT SIZE CHG
Password: RETRY
ACCESS∫ServerBACK∫∫NEXT∫
A. Prt queue mgrQUIT∫∫ ∫∫SHOW
F. DIsk RestictQUIT NEXT
C: Rest:xxxxxxkb SIZE CHG
D: Rest: QUIT RETRY
D: Rest:xxxxxxkbNEXT SIZE CHG
Norstar Applications Module Installation and Maintenance Manual P0885429 Issue 01
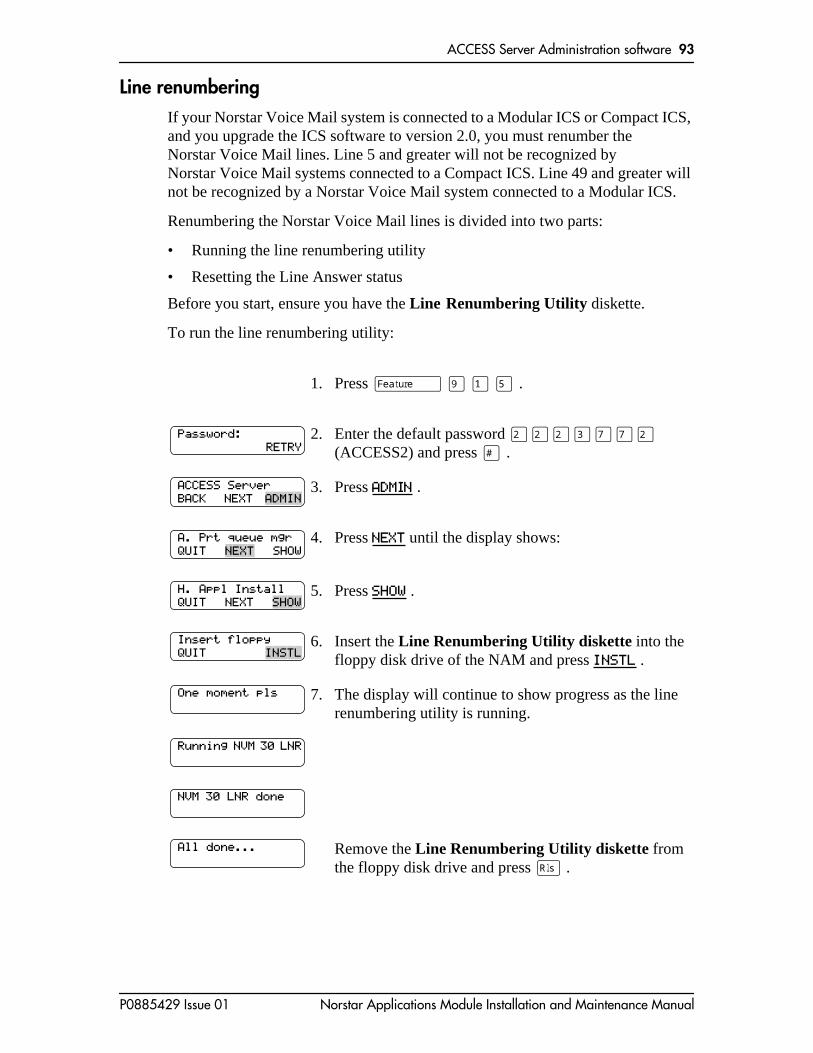
ACCESS Server Administration software 93
Line renumberingIf your Norstar Voice Mail system is connected to a Modular ICS or Compact ICS, and you upgrade the ICS software to version 2.0, you must renumber the Norstar Voice Mail lines. Line 5 and greater will not be recognized by Norstar Voice Mail systems connected to a Compact ICS. Line 49 and greater will not be recognized by a Norstar Voice Mail system connected to a Modular ICS.
Renumbering the Norstar Voice Mail lines is divided into two parts:
• Running the line renumbering utility
• Resetting the Line Answer status
Before you start, ensure you have the Line Renumbering Utility diskette.
To run the line renumbering utility:
1. Press ƒ · ⁄ fi .
2. Enter the default password ¤¤¤‹‡‡¤ (ACCESS2) and press £ .
3. Press ADMIN .
4. Press NEXT until the display shows:
5. Press SHOW .
6. Insert the Line Renumbering Utility diskette into the floppy disk drive of the NAM and press INSTL .
7. The display will continue to show progress as the line renumbering utility is running.
Remove the Line Renumbering Utility diskette from the floppy disk drive and press ® .
Password: RETRY
ACCESS ServerBACK NEXT
A. Prt queue mgrQUIT SHOW
H. Appl InstallQUIT NEXT
Insert floppyQUIT
One moment pls
Running NVM 30 LNR
NVM 30 LNR done
All done...
P0885429 Issue 01 Norstar Applications Module Installation and Maintenance Manual

94 ACCESS Server Administration software
Resetting the Line Answer statusAfter the Norstar Voice Mail lines have been renumbered, you must reset the Line Answer status.
To reset Line Answer status:
The Norstar Voice Mail lines are now renumbered and will be answered as they were programmed.
1. Press ƒ · ° ¤ .
2. Enter the Operator password and press OK .
3. Press NEXT .
4. Press NEXT .
5. Press CHNG .
When Answer Lines is set to N the display shows: Disabling...
6. Press CHNG .
When Answer Lines is set to Y the display shows: Enabling...
7. Press ® to end this programming session.
Pswd: RETRY
Atdt aval: NCHNG
Business open: YCHNG
Answer lines? Y NEXT
Answer lines? N NEXT
Answer lines? YCHNG NEXT
Norstar Applications Module Installation and Maintenance Manual P0885429 Issue 01
Section V - Troubleshooting• Troubleshooting
P0885429 Issue 01 Norstar Applications Module Installation and Maintenance Manual

96 Troubleshooting
Norstar Applications Module Installation and Maintenance Manual P0885429 Issue 01

Troubleshooting
OverviewTroubleshooting Norstar Applications Module (NAM) problems involves determining the symptoms and diagnosing the cause of the problem.
A problem can be the result of more than one component failure. Diagnosing a NAM problem involves isolating the cause, and determining whether or not the malfunction involves a failed hardware component.
After you have determined the cause of the problem, and corrected the problem by replacing a component, you must test the NAM to determine whether or not it is functioning properly.
Diagnosing problemsA malfunctioning NAM can be caused by a faulty component. This section describes the symptoms that occur when the NAM malfunctions. The section describes symptoms particular to hardware. The symptoms are described first, followed by procedures to confirm and correct the problem.
Hardware problemsHardware problems appear as any of the following:
• NAM does not function at all
• The Power-on tests fail
• The Power-on test run, but the download test do not
• Media Services Base Interface Card (BIC) is not functioning properly
Note: The procedures describe the components in the order of the most likely to cause the trouble.
CAUTIONBefore attempting any repair procedures that require replacing internal components, attach one end of your grounding strap to your wrist and the other end to the Norstar Applications Server.
16
P0885429 Issue 01 Norstar Applications Module Installation and Maintenance Manual
98 Troubleshooting
The NAM does not function at all
If there is no response from the NAM or the Feature Codes do not appear on the Norstar display:
1. Make sure the:
• AC power cord is plugged in
• NAM is getting power from the AC outlet
Note: When the power is connected, the fan works.
2. Unplug the NAM and remove the front cover. Reseat the BIC. Check to ensure all ribbon cables and power supply connectors are properly connected.
3. Reseat the SBC located in slot 3. Check to ensure all ribbon cables are connected to the SBC.
4. Replace the front cover and plug in the NAM.
The BIC is not functioning properly
1. Check the setting of Auto Relocation on the Norstar System. Set it to Off. Refer to the Norstar Installation Guide for instructions.
2. Unplug the NAM and open the module door. Remove the two screws holding the front cover to the module. The screws are located along the top of the front cover. Slide the front cover out from the module.
3. Ensure that the BIC is seated properly in the expansion bus slot.
4. Plug in the NAM and give it time to complete the diagnostics.
5. Establish a Norstar Maintenance session. From a Norstar telephone connected to the KSU, access: D. Maintenance and 2. Port/Extn Stat Refer to the Norstar Installation Guide for instructions.
6. Display the type and state of the Channel connected to the Norstar KSU.
7. If the NAM is attached to a Centrex KSU, make sure all Channels are defined as Norstar only.
Norstar Applications Module Installation and Maintenance Manual P0885429 Issue 01

Troubleshooting 99
Checking the Channel StatusChecking the Channel Status allows you to check each Channel for the following:
• If the Channel is installed
• If the Channel is idle
• If the Channel is currently receiving or dialling a call
• If the Channel is connected to a call
• If the Channel is connected to the KSU, but no application is using the Channel
• If the Channel is available, but has been not connected to the KSU
• Disable or re-enable a Channel
Note: Channel Status will show the status for all Channels. Channel Status will not identify the Channels as Voice or Fax.
To check the Channel Status:
1. Press ƒ · ⁄ fi .
2. Enter the default password ¤¤¤‹‡‡¤ (ACCESS2).
3. Press NEXT until the display shows:
4. Press SHOW .
5. Press SHOW to show the status of a range of Channels. The first range shows Channel 1 to 8. The second range shows Channel 9 to 16. The third range shows Channel 17 to 24. The fourth range shows Channel 25 to 32. Press ALL to view all 32 Channels at once.
Password:∫∫∫∫∫∫∫∫∫∫∫RETRY
ACCESS∫ServerBACK∫∫ ∫ADMIN
Channel StatusBACK∫∫NEXT∫∫
Chan Status Men QUIT ALL
P0885429 Issue 01 Norstar Applications Module Installation and Maintenance Manual
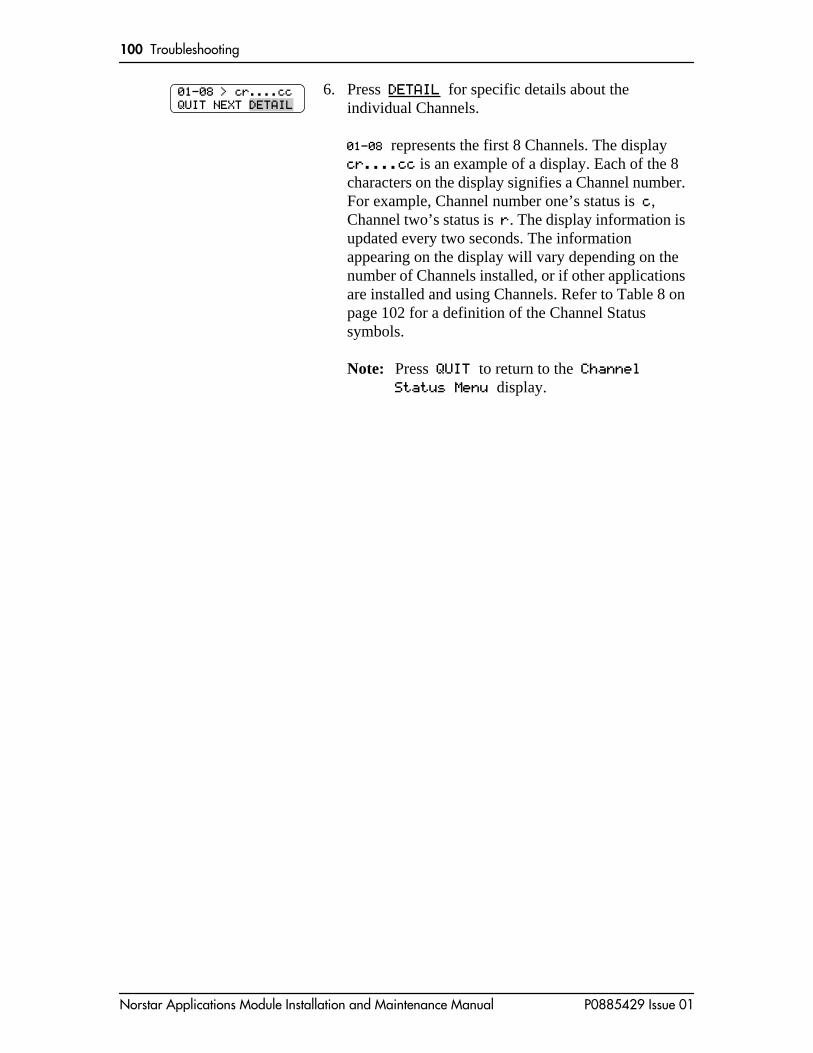
100 Troubleshooting
6. Press DETAIL for specific details about the individual Channels.
01-08 represents the first 8 Channels. The display cr....cc is an example of a display. Each of the 8 characters on the display signifies a Channel number. For example, Channel number one’s status is c, Channel two’s status is r. The display information is updated every two seconds. The information appearing on the display will vary depending on the number of Channels installed, or if other applications are installed and using Channels. Refer to Table 8 on page 102 for a definition of the Channel Status symbols.
Note: Press QUIT to return to the Channel Status Menu display.
01-08 > cr....ccQUIT∫NEXT∫
Norstar Applications Module Installation and Maintenance Manual P0885429 Issue 01

Troubleshooting 101
If a new Channel has been connected to the KSU, you will have to quit the Channel Status session and re-enter Channel Status in order to view the changes.
7. Continue pressing NEXT to view the specific details about the remaining Channels.
The display 1: 2235 2291 is an example of a display. 1 is the number of the Channel. 2235 is the DN assigned to the Channel. The DN can be up to seven digits in length. 2291 is the DN of the extension that is currently connected to the Channel. This number can either be the line number being used or a DN. The number can be up to seven digits in length.
If the display shows *** in the last three characters on the display, the Channel is idle and not in use. For example, the display might show: 11: 2245 ***
Note: Specific details will only be available for Channel that are assigned an a , . or r in the Channel Status display in step 5.
If the display shows: x: Not in sync this means that the Channel has not been connected to the KSU and there is no DN assigned to the Channel.
If the display shows: x: Not installed this means that there is no Channel installed to the corresponding Channel number.
Note: The x in the display will be the number of the Channel.
8. Press ® to end this programming session.
1:∫∫∫2235∫∫∫2291QUIT∫ NEXT∫ DSBL
xx: Not installed QUIT NEXT
P0885429 Issue 01 Norstar Applications Module Installation and Maintenance Manual

102 Troubleshooting
Table 8 Channel Status Symbols
Disabling and Re-enabling Norstar Voice Mail ChannelsIn the course of diagnosing a system problem you may find it necessary to disable a particular NAM Channel. After the problem has been solved, you will need to re-enable the Channel. If you attempt to disable all the Channels, the system will reboot itself.
To disable a Channel:
Channel Status Symbol Definition of symbol
. The Channel is installed and functioning, but is currently idle.
r The Channel is ringing. The Channel is either receiving a call or is attempting to make a call.
c The Channel is connected and is on an active call.
a The Channel is connected to the KSU, but is not activated for any applications
x A Channel is detected, but there is a connection problem.
* No Channel
1. Press ƒ · ⁄ fi .
2. Enter the default password ¤¤¤‹‡‡¤ (ACCESS2).
3. Press NEXT until the display shows.
4. Press SHOW .
5. Press SHOW .
6. Press DETAIL .
7. Press NEXT until the Channel you want to disable is displayed.
8. Press DSBL .
9. Press ® to end this programming session.
Password:∫∫∫∫∫∫∫∫∫∫∫RETRY
ACCESS∫ServerBACK∫∫ ∫ADMIN
Channel StatusBACK∫∫NEXT∫∫
Chan Status MenuQUIT∫∫ALL ∫∫
01-08 > ccc..crrQUIT NEXT
1: 2225 ***QUIT DSBL
3: 2227 ***QUIT NEXT
3: Not in syncQUIT NEXT ENBL
Norstar Applications Module Installation and Maintenance Manual P0885429 Issue 01
Troubleshooting 103
To re-enable the Channel:
1. Press ƒ · ⁄ fi .
2. Enter the default password ¤¤¤‹‡‡¤ (ACCESS2).
3. Press NEXT until the display shows.
4. Press SHOW .
5. Press SHOW .
6. Press DETAIL .
7. Press NEXT until the Channel you want to re-enable is displayed.
8. Press ENBL .
9. Press ® to end this programming session.
Password:∫∫∫∫∫∫∫∫∫∫∫RETRY
ACCESS∫ServerBACK∫∫ ∫ADMIN
Channel StatusBACK∫∫NEXT∫∫
Chan Status MenuQUIT∫∫ALL ∫∫
01-08 >ccxxxcrrQUIT NEXT
1: 2225 ***QUIT DSBL
3: Not in syncQUIT NEXT
3: 2227 ***QUIT NEXT DSBL
P0885429 Issue 01 Norstar Applications Module Installation and Maintenance Manual

104 Troubleshooting
Preparing the NAM for travelPerform the following if you are returning the NAM to the factory for service or are mounting it in a new location.
1. Shutdown the NAM. For more information, refer to "Shutting down the NAM" on page 26.
2. Remove the NAM power cord from the AC outlet.
3. Unplug the BIC and any other cabling or wiring to the module.
4. Remove the two screws in the cable trough.
5. Grasp the module on its sides and gently lift straight up until the module is clear of the wall-mounting bracket.
6. If you are returning the NAM for service, pack it in its original shipping container. If the container is not available, package the module well with plenty of shock-absorbing, insulating material.
Norstar Applications Module Installation and Maintenance Manual P0885429 Issue 01
Glossary
Application
A computer program that performs a wide range of tasks as specified by the user. Examples of application programs include word processing packages, spreadsheet packages and accounting packages.
Backplane
The backplane hosts the SBC and all other cards inserted in the NAM. The backplane connects the wiring between all circuits.
Back up
To make a duplicate copy of data files so that you can store the originals in a safe place. Backing up your original files protects them from damage if a hardware failure occurs.
Baud rate
A unit of measurement of data transmission speed. It is approximately equivalent to Bits Per Second (BPS). Typical baud rates are 300, 1200, 2400, 4800, and 9600.
Bit
An abbreviation for Binary Digit. A bit is the smallest unit of information recognized by the computer. A bit has one of two values (0 or 1) to indicate off or on.
BIOS (Basic Input Output System)
A program contained in Read Only Memory (ROM) that acts as the interface between software programs and the computer hardware.
BPS (Bits Per Second)
The speed of data transmission between two computers.
Bus
A collection of communication lines that carry electronic signals either between elements on the system board or between the circuitry on the system board and any cards plugged into the system board.
Byte
The amount of space required to store a single character. One byte equals eight bits.
CD-ROM (Compact Disc Read Only Memory)
The CD-ROM drive and the accompanying CD-ROM disk are used to upgrade the system software.
P0885429 Issue 01 Norstar Applications Module Installation and Maintenance Manual

106 Glossary
Conventions
The way certain information is described. For example, using underlined text to represent second-line display prompt information.
Default
The parameters that are preset within the NAM.
Disk drive
A mass storage device that seeks, reads and writes data on a disk.
Diskette
A removable magnetic disk used to store data.
Display
A one-line or two-line screen on a Norstar telephone that shows commands and options.
Display buttons
The three buttons that appear underneath a Norstar two-line LCD display.
Display options
The choices available to a user that appear on the Norstar two-line display. Options appearing on the display can be selected using the display or dialpad buttons.
Driver (Device)
A program that allows a hardware peripheral, such as a NIC, to communicate with the NAM.
Ethernet
A widely used Local Area Network (LAN) protocol that is the original Carrier Sense Multiple Access/Collision Detect (CSMA/CD) LAN that lets PCs and/or NAMs listen for pauses before they communicate.Ethernet LANs use coaxial cable or twisted pair wiring for connecting computers.
Extended Data-Out (EDO)
Extended Data-Out (EDO) is a form of Dynamic Random Access Memory (RAM) in which storing data to and reading data from the memory is performed at a faster rate.
FAX
FAX works with Norstar Voice Mail and Norstar, offering a caller the capability of sending a fax document to a mailbox as easily as sending a voice message.
Feature Code
A unique three-digit code used to access NAM Features and options.
Norstar Applications Module Installation and Maintenance Manual P0885429 Issue 01
Glossary 107
File
A collection of related information stored on a disk under a given name for later reference and used by an operating system or application program. Each application program that you use saves the data you create in files. Files are identified by a file name and optional extension.
File name
A name that identifies a file and consists of one to eight characters.
Fully Qualified Domain Name (FQDN)
The combination of host name and domain name. For example mycomputer.nortel.com is Fully Qualified Domain Name.
Hard disk drive
A data storage device that uses non-removable, rigid magnetic platters. Hard disk drives work faster and store more data than disk drives do for diskettes.
Hardware
The physical components of the NAM.
Host Name
In networking, the name of a computer that primarily provides services, such as database access, to other computers or NAMs in the domain. The host name is associated with a unique IP address. Since the NAM has a unique IP address, it qualifies as a host.
Hz (hertz)
A unit of measure for indicating frequency in cycles per second.
Initialization
The steps required to prepare hardware or software for operation.
Install
To set up for operation. For example, hardware is installed by attaching it to the appropriate connectors or sockets either inside or outside the NAM.
Interface
An information interchange path that allows communication between computer parts.
Internet
A global TCP/IP network linking millions of computers for communications purposes.
P0885429 Issue 01 Norstar Applications Module Installation and Maintenance Manual
108 Glossary
IRQ (Interrupt Request)
A signal sent by a hardware device to the microprocessor requesting its immediate attention. For example, each communications port has an interrupt request line for notifying the microprocessor when data has been received or transmitted.
IRQ Conflict
Two hardware devices are vying for same IRQ. On installation of a device where an IRQ conflict occurs, the user may have to manually configure the IRQ settings to resolve the conflict.
Industry Standard Architecture (ISA)
A 16-bit socket on the NAM’s backplane.
Kbyte
The abbreviation for kilobyte. A kilobyte is equal to 1024 bytes.
Local Area Network (LAN)
A group of computers or NAMs physically connected in a manner that lets them communicate and interact with each other.
Mailbox
A storage place for messages on the Norstar Voice Mail system.
MHz
The abbreviation for megahertz. This is a unit of measure indicating frequency in millions of cycles per second.
Microprocessor
A chip that is the centre of all activity inside the Applications Module. The microprocessor controls all logical and arithmetic operations for the computer and is responsible for executing program commands. It is also referred to as the Central Processing Unit (CPU).
Modem
A communications device that allows data to be exchanged between computers over telephone lines. The exchange is done by electronic processes called modulation and demodulation. The modem changes (modulates) the data into tones to send to another modem and also converts (demodulates) tones when receiving from another modem.
M7100 telephone
The Norstar model M7100 telephone that has a single-line display and one programmable button without an indicator.
M7208 telephone
The Norstar model M7208 telephone that has a single-line display and eight programmable button with indicators.
Norstar Applications Module Installation and Maintenance Manual P0885429 Issue 01

Glossary 109
M7310 telephone
The Norstar model M7310 telephone that has a two-line display with three display button, 10 programmable button with indicators and 12 dual programmable button without indicators.
M7324 telephone
The Norstar model M7324 telephone that has a two-line display with three display button and 24 programmable buttons with indicators.
Network
Two or more computers linked together electronically to share programs and exchange data. Joining computers over a network requires adding specialized hardware and software to each computer.
Network Interface Card (NIC)
An adapter card, inserted into a slot 5 of the NAM, containing the hardware necessary to connect a NAM to a network.
Operating system
The disk-based software that manages the operation of the Applications Module. An operating system controls the flow of information between the computer hardware such as the keyboard, video display, disk drives and printer. IBM OS/2 is the operating system that manages the Applications Module.
Option
A NAM choice that is given to a user through display prompts.
Parallel port
A port that transfers data through multiple wires so that eight bits are transmitted simultaneously. Parallel ports usually use a 25-pin interface that transmits and receives data one byte at a time using a separate data line for each bit.
Password
A four-digit to eight-digit number that is entered using the dialpad. A password is used to open mailboxes or perform configuration tasks.
PEB (PCM Expansion Bus)
A PEB cable is used to connect the BEC to the Digital Fax Card (DFC) when the FAX option is installed.
Peripheral
A device that is connected to and communicates with a computer. A printer and mouse are peripherals.
Peripheral Component Interconnect (PCI) Slot
A socket on the NAM’s backplane that allows for faster communication between theNAM’s CPU and peripheral components.
P0885429 Issue 01 Norstar Applications Module Installation and Maintenance Manual

110 Glossary
Pin-1
The first pin in a multiple-pin connector or chip designated as such to help you properly orient the component when attaching or installing it.
Port
A connector on the Applications Module that allows data exchange with other devices, such as a printer, mouse or external modem.
Protocol
A set of rules and procedures for exchanging data between computers or NAMs on a network or through the Internet.
Power cable
A cable that connects the NAM to a power source.
RAM (Random Access Memory)
Computer memory that stores data temporarily. RAM stores the data used by the microprocessor as it executes instructions. The contents of RAM are erased each time the Applications Module is turned off or restarted.
ROM (Read Only Memory)
Memory that stores data permanently. ROM contains instructions that the Applications Module needs to operate. The instructions stored in ROM cannot be changed and are used by the Applications Module each time it is turned on or restarted.
Routing
The path a message takes from its point of origin to its destination on a network or the Internet.
Serial port
A port that sends and receives data one bit at a time. This port can be used to connect the Applications Module to a printer, external modem or mouse. Serial port connectors usually have nine pins and are designated by software with the letters COM and a single digit, such as COM1.
Single Board Computer (SBC)
The Single Board Computer is the main computing device of the NAM. It runs the operating system and all applications installed on the NAM. The microprocessor, clock/calendar battery and four Single In-Line Memory Modules (SIMM) slots are located on the SBC.
SIMM
Single In-line Memory Module. The NAM is equipped with one SIMM that provides 16 MB of EDO RAM. The memory can be increased with the addition of more SIMMs.
Norstar Applications Module Installation and Maintenance Manual P0885429 Issue 01

Glossary 111
SVGA
Super Video Graphics Array. The video graphics standard that supports 800X600 graphic resolution and 1024X768 to 1280X960 text resolution displaying up to 256 colors.
Tone dial telephone
A push button telephone that emits DTMF tones.
Transmission Control Protocol/Internet Protocol (TCP/IP)
A language governing communication among all computers on the Internet.
TCP protocol checks packets of information for errors, submits requests for re-transmission in the event of errors and returns multiple packets of a message into the proper original sequence when the message reaches its destination.
IP dictates how packets are sent out over networks and has a packet addressing method that lets any computer on the Internet forward a packet to any other computer that is a step or more closer to the packet’s recipient.
Wide Area Network (WAN)
A collection of computers or NAMs connected or networked to each other over long distances, typically using common carrier facilities.
P0885429 Issue 01 Norstar Applications Module Installation and Maintenance Manual

112 Glossary
Norstar Applications Module Installation and Maintenance Manual P0885429 Issue 01

113
IndexAACCESS Server 9ACCESS Server admin 84, 89
Alarms 85From a telephone set 84Installing applications 88Printer options 84Rebooting the NAM 90Scheduled reboot 91Shutting down the NAM 89Voice Channel sharing 86Voice Channels 86
Alarms 85Viewing log 85
Applications, installing 88ATA, connecting to the internal modem 62
BBack up, capabilities file 51Battery
Installing 32Removing 31
CCable trough door 27Cable trough, opening 29Capabilities file
backing up 51Case 29Caution symbol 2Channel status 99Channels 43
Allocating 86disabling 102Re-enabling 103
Checking the Channel status 99Clock/calendar, removing 31Conventions and symbols 2
DDB 25-pin 7
Connector 7Diagnosing 97Digit duration length 84Digital Fax Card (DFC)
expansion bus slot 34Installation precautions 34Installing 34Installing PEB cable 39Number of ports 39Overview 33PEB cable 39
P0885429 Issue 01 Norstar Applicat
Removing Fax from the System 41Digital Voice Card (DVC) 46, 98
Installing the first DVC 46Not functioning 98Removing the fourth DVC 46
Dip switches, SBC 79Documents, required 14Door 27Drive
Secondary hard drive 56Drives
floppy disk 6Drive, floppy 49DTMF 84
EEnabling the monitor 72Enabling the monitor, keyboard and mouse 72End-caps 19Environment 14
FFax card
Overview 33Slot 34
Fax card, installing 34Fax Channel sharing 86Fax Channels
Allocating 86FAX ports, number of 39Fax, removing functionality 41FCC regulations vFloor mount stand
Assembling 17Attaching to the NAM 18Installing the end-caps 19
Floppy disk drive 6Installing 49Removing 49
Front cover 27, 28Removing 28
Front door 27
HHanging the NAM 15Hard disk drive
Adding a secondary 56Installing a new one 54Removing 52
ions Module Installation and Maintenance Manual

114
Hard drive, space 51Hardware 6, 8
Components 6Floppy disk drive 6Modem 8Network Interface Card 8Ports 7Printer 8
Hardware, problems 97
IIBM OS/2 Warp™ Operating system 9Installation overview 15Installation requirements 14Installation tools 14Installing
Digital Fax Card 34Installing an application 88Internal components
Hard disk drive 54Internal modem 59
Connecting to an ATA 62Installing 60Removing 60
KKeyboard
Enabling 72Removing 73
LLAN card 8
MManual, organization 1Manual, overview 1Memory
Adding 63Expansion capabilities 6, 63Removing 66
ModemConnecting to an ATA 62Installing 60Internal 59
Module partsDoor 27
MonitorEnabling 72Removing 73
Monitor packageEnabling 72Installing the SVGA 37, 69Removing 73
Monitor, keyboard and mouse
Enabling 72Mounting the NAM 15Mouse
Enabling 72Removing 73
NNAM
ACCESS Server 9Adding memory 63Attaching a stand 18Backing up the capabilities file 51Cable trough 29Connection points 7Digital Fax Card (DFC) slot 34Fax ports 39Floppy disk drive 6, 49Hard disk drive 51, 54Hardware components 6Installing a DFC 34Installing a PEB cable 39Installing clock/calendar battery 32Installing the SVGA 37, 69Interior components 6Internal modem 59Memory 6Monitor package 72, 73Mounting 15Operating system 9Optional equipment 8Packing 104Parallel Port 7Parallel port 7Parts 27PEB cable 39Plastic case
NAMCase 29
Ports 7Printer 7Rebooting 90Removing Fax 41Removing the front cover 28Removing the hard disk drive 52Restoring the capabilities file 55Secondary hard disk drive 56Serial number 89Serial Ports 7Shutting down 26, 89shutting down 26Single Board Computer (SBC) 6, 77, 78, 79Software hierarchy 9Stand 17System software 9
Norstar Applications Module Installation and Maintenance Manual P0885429 Issue 01

115
Tools 26Troubleshooting 97Voice Channels 43Voltage 15
NAM serial Number 89Network Interface Card 8
OOperating system 9Optional equipment 8
Modem 8Monitor package 8Network Interface Card 8Printer 8
OS/2 Warp™ 9
PParallel port 7PCM Expansion Bus (PEB) cable 39
Installing 39PEB cable 39
Installing 39Pin configuration 7Pin connector 7Plastic case 27
NAM 29Removing 29
Port sharing 86Ports 7
Fax 39Parallel 7Printer 7Serial 7
Power supplyChanging 15
Printer 7, 84Changing options 84
Printer connection 7Processor 6
RRebooting the NAM 90Regulatory information vRemoving Fax 41Repair equipment 26Repair facilities v, viRequirements
Environment 14Package 13
Requirements,Special parts 14
Restoring 55Capabilities file 55
Returning the NAM 104
SScheduled reboot 91Secondary hard disk drive 56Serial number, viewing 89Serial port 7
Pin configuration 7Setting the DTMF 84Sharing 86Sharing, Channels 86Shutting down NAM
Graceful 26Immediate 26Quick 26
Shutting down the NAM 89SIMMs 6, 63
Removing 66Single Board Computer (SBC) 6
Dip switch settings 79Installing 79Overview 77Removing 78Replacing 78
Software 9ACCESS 9hierarchy 9System 9
Stand, NAM 17SVGA video card 37SVGA video card on the SBC 69Symbols 2System Software 9
TTools, for repairs 26Troubleshooting
ChannelsVoice Channels
Troubleshooting 99, 102Diagnosing problems 97Digital Voice Card (DVC)
Voice cardTroubleshooting 98
Hardware 97Trough, cable 29
UUpgrades
Memory 63uses for 7
VVideo card
Enabling 72
P0885429 Issue 01 Norstar Applications Module Installation and Maintenance Manual

116
Installed on SBC 69Installing 69
Voice Channel sharing 86Voice Channels 43
Allocating 86Increasing number 43Re-enabling 103
Voltage of the NAM 15
WWarning symbol 2
Norstar Applications Module Installation and Maintenance Manual P0885429 Issue 01
Cab
letr
on N
etw
orki
ng B
asic
s ve
rsio
n 1.
2
Cabletron N
etworking B
asics version 1.2
Networking Basicsversion 1.2